Leaving the touch screen idle for extended periods may result in afterimages (screen burn-in) or ghosting. Turn off the touch screen, or turn on the screen saver or power saving mode when you are not using the computer.
• Features or options may differ depending on the model.
• The items marked as optional may not be provided or may be provided in different locations.
• Since some space on the storage device is reserved for system recovery and operations, the available space on the storage device may be less than the actual capacity
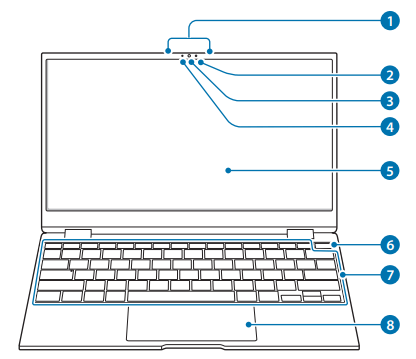
Front view
► For 13.3 inch models
Number/Name
Description
1 Microphone
•You can use the built-in microphone.
2 Ambient light sensor
•Recognizes the brightness of the environment where you use the computer.
•When the surroundings become dark, the keyboard backlight turns on.
•When the surroundings become
bright, the keyboard backlight
turns off.
Do not cover the ambient light sensor.
3 Camera
•Using this camera, you can take still pictures and record video.
4 Camera indicator light
•This indicates the camera operating status.
5 Display/Touch screen
•The screen’s images are displayed here.
•Recognizes touch interactions (Only for touch screen models).
6 Power button/ Fingerprint recognition sensor
•Turns the computer on and off.
•The fingerprint recognition sensor recognizes fingerprints. Scans a fingerprint to sign in to Windows, apps, and services.
7 Keyboard
•Enter text or control computer functions.
8 Touchpad
•Moves the cursor and selects options.
•Functions as a mouse.
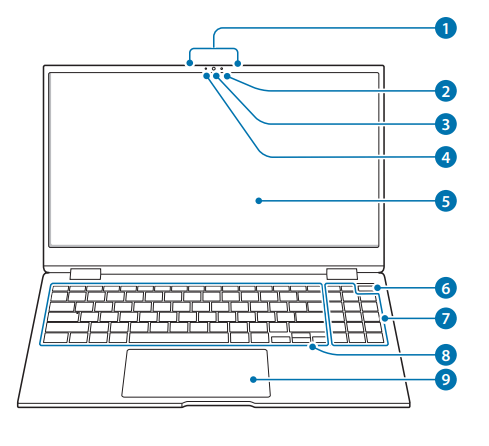
► For 15.6 inch models
Number/Name
Description
1 Microphone
•You can use the built-in microphone.
2 Ambient light sensor
•Recognizes the brightness of the environment where you use the computer.
•When the surroundings become dark, the keyboard backlight turns on.
•When the surroundings become bright, the keyboard backlight turns off.
Do not cover the ambient light sensor.
3 Camera
•Using this camera, you can take still pictures and record video.
4 Camera indicator light
•This indicates the camera operating status.
5 Display/Touch screen
•The screen’s images are displayed here.
•Recognizes touch interactions (Only for touch screen models).
6 Power button/ Fingerprint recognition sensor
•Turns the computer on and off.
•The fingerprint recognition sensor recognizes fingerprints. Scans a fingerprint to sign in to Windows, apps, and services.
7 Numeric keypad
•Enter numbers.
8 Keyboard
•Enter text or control computer functions.
9 Touchpad
•Moves the cursor and selects options.
•Functions as a mouse.
Right view
Number/Name
Description
1 Memory card slot
•Insert a memory card into the slot.
2 USB Type-C port
•This port allows the USB PD AC adapter to be used to supply power to the computer. It can also be used to charge USB Type-C devices or to connect external display devices.
3 Earpiece/ Headset jack
•Connect an earpiece or a headset to the computer to listen to audio.
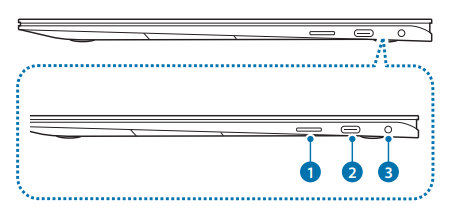
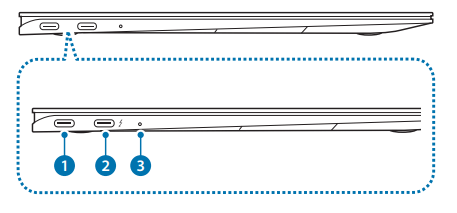
Left view
Number/Name
Description
1 USB Type-C port
•This port allows the USB PD AC adapter to be used to supply power to the computer. It can also be used to charge USB Type-C devices or to connect external display devices.
2 Thunderbolt™ 4 port
•Connect and charge a USB Type-C device and Thunderbolt™ device, or connect to an external display device.
Some features may not be supported depending on your device’s specifications.
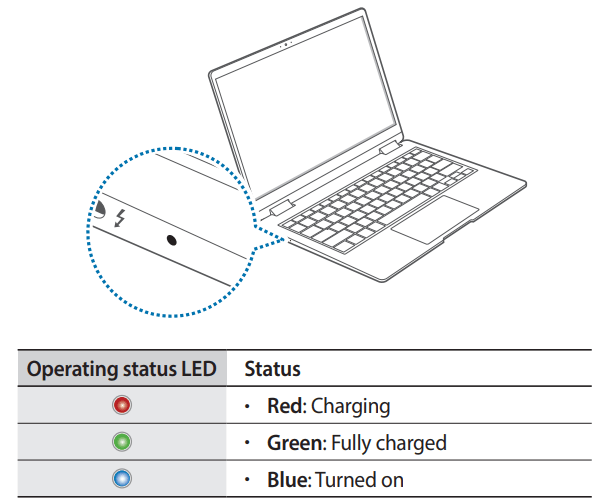
3 Operating status LED
•Shows the operating status of the computer.
The charging feature of the USB Type-C port or Thunderbolt™ 4 port
Charging the computer
Connect an external power supply (sold separately) to the USB Type-C port or Thunderbolt™ 4 port to use it as the auxiliary
power or charge the computer.
Use an external power supply (sold separately) with a rating level higher than 10 W (5 V, 2 A) that supports USB Type-C or USB BC 1.2.
Charging a USB Type-C device or Thunderbolt™ device Connect and charge your USB Type-C or Thunderbolt™ device by connecting it to the computer.
It may take longer to charge the battery when charging a connected device.
The battery power level may be reduced when charging a connected device while the computer is powered by the battery.
The charging status of the connected device is not displayed on the computer.
This charging feature may not be available on some devices.
To charge another device when the computer is in hibernation mode or is turned off, connect to the USB
Type-C port or Thunderbolt™ 4 port on the left side.
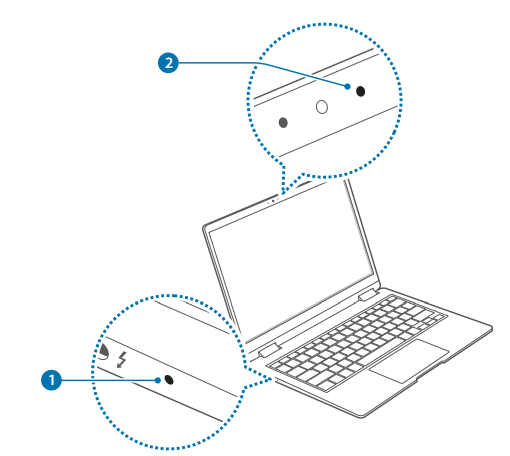
Operating status LED and Ambient light sensor
Number/Name
Description
1 Operating status LED
•Shows the operating status of the computer.
–Red: Charging
–Green: Fully charged
–Blue: Turned on
•Recognizes the brightness of the environment where you use the computer.
•When the surroundings become dark, the keyboard backlight turns on.
•When the surroundings become
bright, the keyboard backlight turns off.
Do not cover the ambient light sensor.
2 Ambient light sensor
Bottom view
Number/Name
Description
1 Fan vents
•Sucks in outside air and discharges heat generated inside the computer through these holes.
•If the vents are blocked the computer may overheat. Avoid blocking the vents as this may be dangerous.
2 Internal battery
•Provides power to the computer when not connected to an AC adapter.
•To remove or replace the internal battery, take it to a Samsung Service Center. You will be charged for this service.
3 Speaker
•Sound is emitted from the speakers.
If the case on the bottom of the device is replaced, the laser-carved model name, serial number, and various logos will not be displayed anymore.
For more information, contact a Samsung Service Center.
Basics
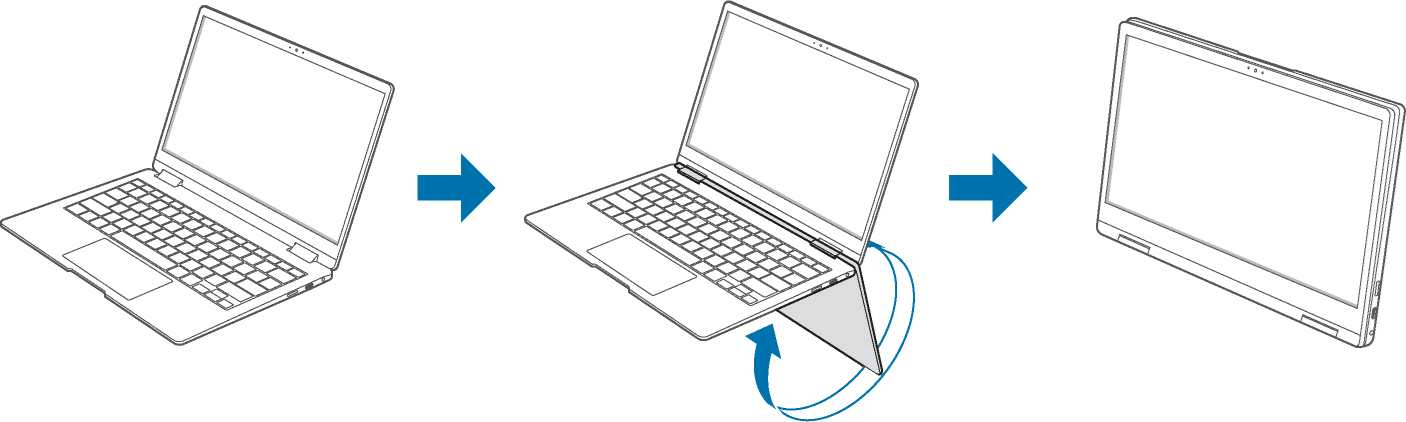
Using the computer as a tablet
You can use the computer as a tablet by folding the display panel behind the keyboard.
1. Open the display panel and rotate it away from the keyboard until it touches the bottom side of the computer.
When the display panel is tilted past the transition point
• The keyboard and touchpad will automatically be locked and will not function. But, during processes that start before Windows operation, such as the BIOS setup or DOS, the keyboard and touchpad will not be locked.
• The display will rotate automatically depending on the computer's orientation.
When storing the computer in a bag or carrying it, close the display panel to protect the computer.
2. The display will switch to tablet mode.
When the screen is turned off while using the computer as a tablet, touch the screen to unlock it. When the computer is in sleep mode, press the Power button to unlock the screen.
You can also switch the computer's display to tablet mode without rotating the display panel.
1. Select on the taskbar.
2 When the action center panel appears, select Tablet mode.
Using the S Pen
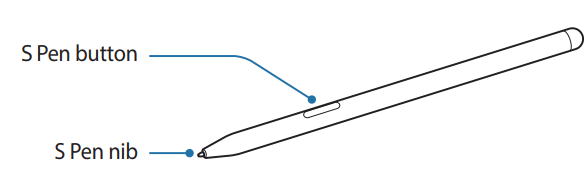
S Pen
Name
Functions
S Pen nib
• Use the S Pen to write, draw, or perform touch actions on the screen.
Hover the S Pen over items on the screen to access additional S Pen features, such as the Air view feature.
S Pen button
• Hover the S Pen over the screen and press the S Pen button to display the Air command features.
Do not bend or apply excessive pressure with the S Pen while using it. The S Pen may be damaged or the nib may be deformed.
• If you use the S Pen at sharp angles on the screen, the device may not recognize the S Pen actions.
• For more information about the S Pen, visit the Samsung website.
• If the S Pen is not working properly, take it to a Samsung Service Center.
Air command
Introduction
Air command is a menu that provides S Pen features quickly. To open the Air command panel, hover the S Pen over the screen and press the S Pen button.
Alternatively, select the Start button ( ) → Air Command.
Images and features may differ depending on the model and the application version.
Create note: Launch the Samsung Notes application and create a new note.
View all notes: Launch the Samsung Notes application and check all saved notes.
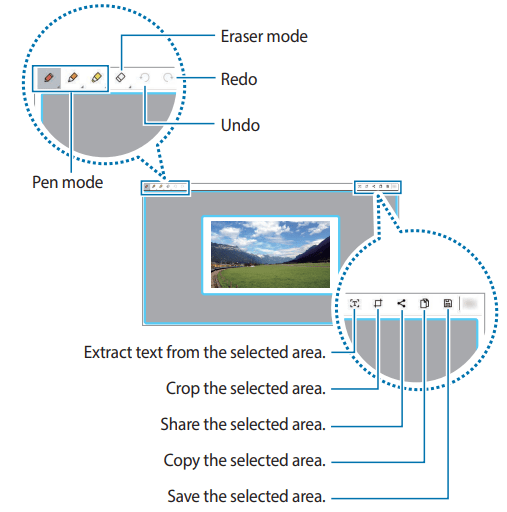
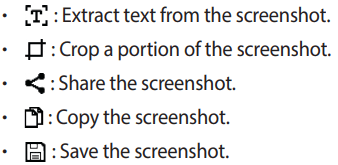
Smart select: Use the S Pen to select an area and perform actions, such as sharing or saving.
Screen write: Capture screenshots to write or draw on them or crop an area from the captured image. Also you can capture content that continues across multiple screens at once.
Live Message: Instead of a text message, create a unique message by recording your actions while handwriting or drawing a live message and saving it as an animated file.
PEN UP: Post your artwork, view others'artwork, and get useful drawing tips.
Show Window: Select an area on the screen and show it in full screen mode on an external display.
Add shortcuts: Add shortcuts to frequently used apps to the Air command panel.
Settings: Change the Air command settings.
Smart select
Use the S Pen to select an area and perform actions, such as sharing or saving. You can also select an area from a video and capture it as a GIF animation.
1. When there is content you want to capture, open the Air command panel and select Smart select.
2. Select a desired shape icon on the toolbar and drag the S Pen across the content you want to select.
3. Select an editing option and edit the selected area.
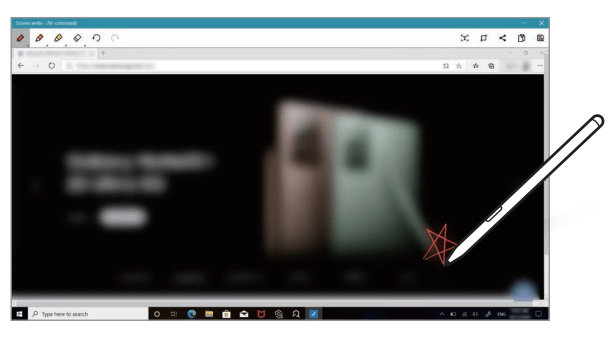
Screen write
Capture screenshots to write or draw on them or crop an area from the captured image.
1. When there is content you want to capture, open the Air command panel and select Screen write.
The current screen is automatically captured and the editing toolbar appears.
2. Write a memo on the screenshot.
3. Select an option to use with the screenshot.
It is not possible to capture a screenshot while using some application or some features.
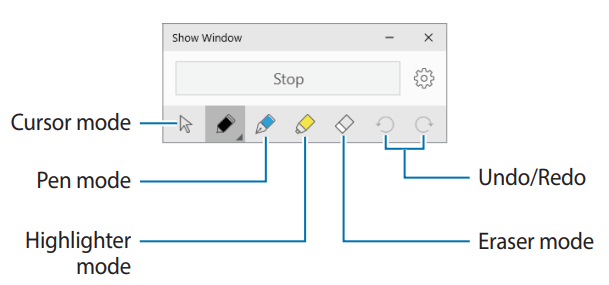
Show Window
Show Window allows you to select an area on the screen and show it in full screen mode on an external display. You can draw or highlight items on the screen using the S Pen.
Before using this feature, you must connect the computer to an external display.
Showing a selected area on an external display device
1. Connect the computer to an external display device.
2. Open the Air command panel and select Show Window.
3. Press and hold the Fn key and press the F4 key repeatedly, then select Extend for project mode.
4. Select Start. A frame for selecting area will appear.
Start is activated only when the project mode is set to Extend.
5. Drag to select an area to show in an external display and select Done.
The selected area will be shown on the external display.
To fix the ratio of the selected area to the ratio of the external display, select and select the Fixed ratio switch to activate it.
To stop displaying the screen, select Stop.
Using tools
While showing the screen on the connected display, you can write or draw on the screen using the following tools.
While using the pen or highlighter, select the desired icon again to change the color or line thickness.
Settings & Upgrade
Display brightness
Adjust the display brightness to reduce eye strain and save power.
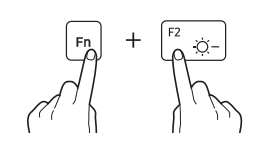
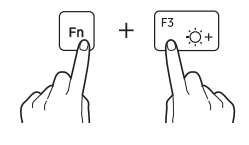
Controlling brightness using the keyboard
• To dim the display screen, press and hold the Fn key and press the F2 key.
• To brighten the display screen, press and hold the Fn key and press the F3 key.
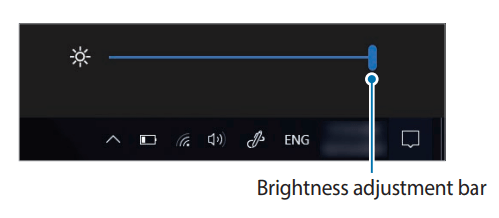
Controlling brightness using the taskbar
1 On the taskbar, select .
2 Drag the adjustment bar to the desired brightness.
The display screen is automatically set to the brightest level when the AC adapter is connected.The display screen automatically becomes dimmer when the AC adapter is disconnected.
The computer has an automatic screen brightness adjustment to extend the battery usage time. When necessary, the screen brightness is gradually adjusted.
Changing display mode
Select the optimal screen settings based on your activity.
Some options may not be available depending on the model.
1. Select the Start button () → Samsung Settings.
2. Select Display → Auto mode, and then select an option.
• Movie (DCI-P3): Optimizes for movies using DCI-P3 color space.
• Auto mode: Optimizes the screen automatically for the currently running program.
• Vivid (AMOLED native): Makes scenes more vivid and clear using AMOLED color space.
• Natural (sRGB): Make videos natural using sRGB color space.
• PhotoEdit (Adobe RGB): Optimizes photo editing using Adobe RGB color space.
• Movie (DCI-P3): Optimizes for movies using DCI-P3 color space.
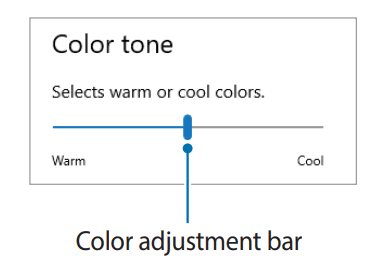
Optimizing the full screen color balance
Optimize the screen color by adjusting the color tones to your preference.
1. Select the Start button () → Samsung Settings.
2. Select Display → Advanced color settings.
3. Drag the color adjustment bar to the desired color tone.
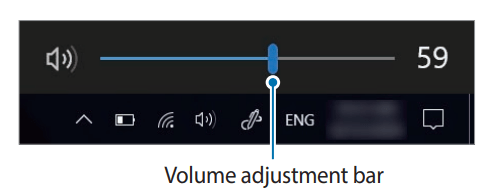
Volume
Adjust the system volume or sound volume when playing music or video.
Controlling volume using the keyboard
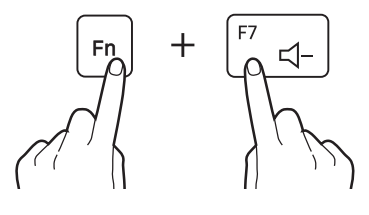
• To turn down the volume, press and hold the Fn key and press the F7 key.
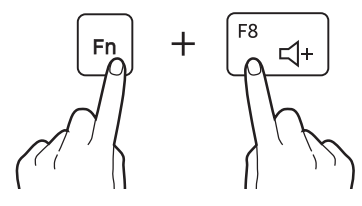
• To turn up the volume, press and hold the Fn key and press the F8 key.
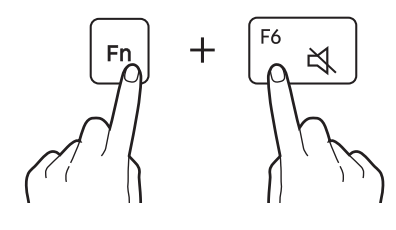
• To mute or unmute the volume, press and hold the Fn key and press the F6 key.
Controlling volume using the taskbar
1. Select on the taskbar.
2. Drag the adjustment bar to the desired volume.
BIOS (Setup utility)
Define a boot password, change the boot priority, or configure the installed chipsets.
Incorrect settings may cause the system to malfunction or crash.
• The BIOS setup screens, menus, and items may appear differently depending on the model and BIOS version.
• BIOS setup functions are subject to upgrades.
Entering the BIOS screen
1. Turn on the computer.
2. Before the Samsung logo appears, press the F2 key several times.
• If the computer is password-protected, press the F2 key several times before the password screen appears.
• If the password screen or the Windows start screen appears, restart the computer and try again.
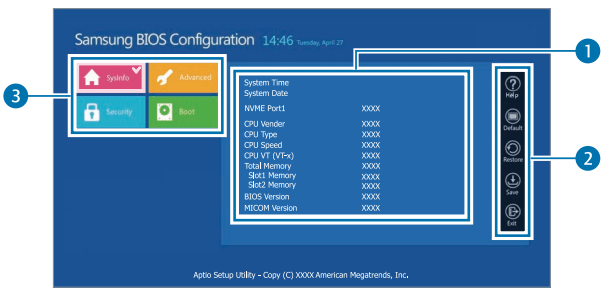
The BIOS screen
The BIOS setup screen appears as shown below.
You can change BIOS settings using the keyboard or mouse.
Number
Name
1
• Setup items
2
• Setup tools
- Help: View the help for BIOS set up.
- Default: Return to the default settings.
- Restore: Cancel changes.
- Save: Save settings.
- Exit: Exit BIOS setup.
3
• Setup menu
- Syslnfo: View the basic specifications of the computer.
- Advanced: Configure the chipsets and additional functions.
- Security: Configure security functions.
- Boot: Configure peripherals and boot-related settings.
Boot password
Setting a password with the BIOS enhances protection against viruses and hacking attacks.
Do not forget your password or expose it to others.
If you forget the Supervisor Password or HDD Password, request assistance from the Samsung Service Center. In this case, a service fee will be charged.
If you forget the User Password, disable the Supervisor Password, and the User Password will also be automatically disabled.
Setting passwords
There are three password settings available: Supervisor Password, User Password, and HDD Password.
• Supervisor Password (low security level):This password is required when turning on the computer or entering the BIOS setup.
• User Password (low security level):This password is required to enter the BIOS setup.This password will be deactivated automatically if the Supervisor Password is disabled.
• HDD Password (high security level):This password is required to access the hard disk drive (HDD) from another computer. This password may not be supported, depending on the model or storage device.
Setting a boot password
Turn on the computer.
Before the Samsung logo appears, press the F2 key several times.
Access the Security menu.
Select a password type (Supervisor Password, User Password, or HDD Password). If you cannot select an item or the HDD Password Frozen message appears, turn off the computer and turn it on again. Then, press the F2 key several times before the Samsung logo appears to enter the BIOS setup screen.
Enter a password and select Ok. The password can be up to 20 characters.
Enter the password again to confirm it and select Ok.
Select Save → Ok to save and restart.
To enable the Password On Boot option, set a Supervisor Password and enter the password when starting up the computer.
For some models, if the password entered message appears in the Setup Notice window, select Ok to complete the setup.
Removing a password
Turn on the computer.
Before the Samsung logo appears, press the F2 key several times.
Access the Security menu.
Select a password type (Supervisor Password, User Password, or HDD Password).
Enter the current password and select Ok.
Without entering any characters, select Ok → Ok.
Select Save → Ok to save and restart.
For some models, to cancel the password, select Cancel in the Setup Notice window
Boot priority
Change the boot priority from the BIOS setup.
Turn on the computer.
Before the Samsung logo appears, press the F2 key several times.
Access the Boot menu.
Select Boot Device Priority.
Select an option menu to open the list.
Select an option.
Select Save —> Ok to save and restart.
Select Exit —> Ok to restart without saving the changes.
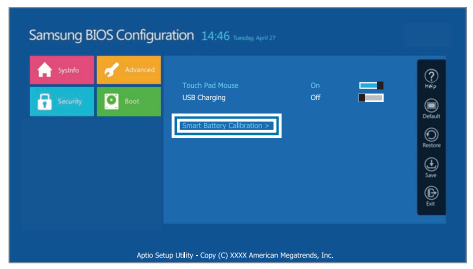
Using the Battery Calibration Function
When charging/discharging the battery repeatedly for a short time only, the battery usage time may be reduced by the difference between the actual battery charge and the remaining charge display.
You can make the actual battery charge and the remaining charge display the same by discharging the battery completely using the Battery Calibration function, and then recharging it again.
The screen images and terms may differ from the actual product depending on the computer model and driver version.
Turn off the computer and then disconnect the AC power adapter.
Turn the computer back on, and press the F2 key to enter the Setup screen
Select Advanced → Smart Battery Calibration.
The Battery Calibration function is activated and the battery is forcefully discharged. To stop the operation, press the Esc key. This operation requires 3–5 hours depending on the battery capacity and the remaining battery charge.
Battery
Fully charge the battery using the AC adapter before using the computer for the first time.
Use only Samsung-approved AC adapters, batteries, and cables. Unapproved adapters or cables can cause the battery to explode or damage the computer.
Incorrectly connecting the charger may cause serious damage to the computer.
This computer is equipped with an internal battery.
The battery is not user-serviceable or user-replaceable.
To safely remove or replace the battery, take the device to a Samsung Service Center. You will be charged for this service.
You can use the computer while it is charging, but the battery charging time may increase. If the battery temperature rises too much, the charging may stop as a safety measure.
To restore the battery power after cutting it, connect the AC adapter.
Charging the battery
Connect the AC adapter to the Thunderbolt™ 4 or the USB Type-C port of the computer.
Plug the AC adapter into an electric socket.
When the battery is fully charged, the operating status LED turns green. Disconnect the AC adapter from the computer.
Unplug the AC adapter from the electric socket.
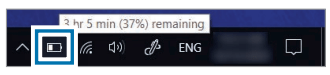
Battery status
When the AC adapter is removed, move the cursor over the battery icon on the taskbar to view the current battery charge
Viewing the current battery charge when the computer is turned off
Connect or disconnect the AC adapter from the computer to view the current battery charge when the computer is turned off.
Saving battery power
On the taskbar, select → Battery saver.
Battery saver mode is activated.
Battery saver mode is disabled when the AC adapter is connected.
Battery usage time
Batteries are replaceable items and over time the battery’s capacity to hold a charge and its power level is reduced. If a battery can only hold its charge for half of the time that it could when new, it is recommended to purchase a new, replacement battery.
Checking battery life instruction messages
When the battery has expired, an instruction message may appear on the screen. To prevent the computer from losing data and to use the computer safely, follow the on-screen instructions.
When battery expiration is imminent
Batteries are consumable parts and the remaining battery life is currently low. Continued use may result in charge or discharge failures. Whether or not batteries can be used is determined based on safety evaluations. Please replace it with a new battery (genuine) to prevent data loss and ensure safe usage.
When the battery has expired
Batteries are consumable parts and the current battery cannot be used as the battery life has expired. Please replace it with a new battery (genuine) to prevent data loss and ensure safe usage. Whether or not batteries can be used is determined based on safety evaluations. To prevent data loss while replacing batteries, please be sure to save your work first.
Instruction messages related to battery life are displayed properly when the Samsung Settings application is installed on your computer. The messages may vary depending on the model and software version.
Troubleshooting
Samsung Recovery
When a problem occurs with the computer, it is easy to restore the computer back to the factory default settings by using the Samsung Recovery application (Recovery/Backup). It is also possible to restore the computer to a previously backed up point. Back up important data regularly before a problem occurs with the computer.
The Samsung Recovery application may not be provided in models with less than 64 GB of storage. If you cannot access the Samsung Recovery application, refer to Windows recovery function.
Some functions may differ or may be unavailable depending on the version. Refer to the application's help information.
The Samsung Recovery application (Recovery/Backup) is not available when using CD/DVD drives.
Recovering the computer erases the data or applications saved after a backup point.Therefore, back up important data regularly before a problem occurs with the computer.
When you launch the application for the first time, read and accept the Terms and Conditions when they display on the screen.
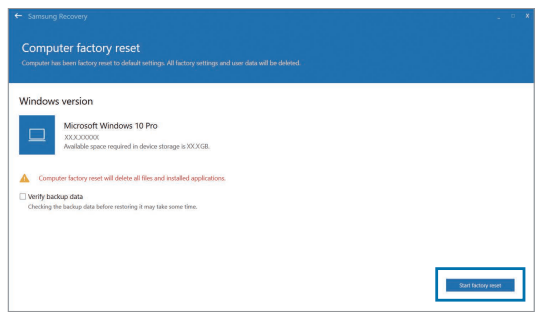
Recovering to factory defau
lt You can restore the computer to its factory default settings. If necessary, back up important data to an external storage device before restoring the system. See Backing up data.
1. When the computer starts Windows: Select the Start button ( ) → Samsung Recovery.
When the computer does not start Windows: Turn on the computer and press the F4 key several times before the Samsung logo appears.
2. Select PC factory reset → Start factory reset. Follow the on-screen instructions to complete the recovery to its initial status.
Backing up data
Back up important data to an alternate internal drive or an external storage device regularly to prevent data loss.
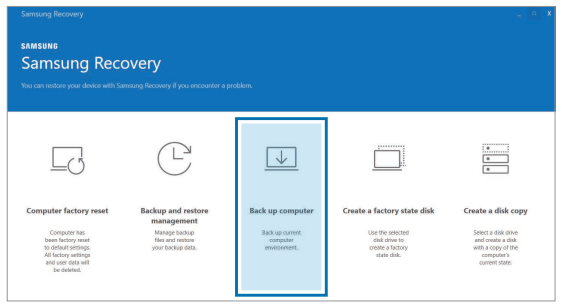
Backing up the current system
You can back up the factory default system or current system to an alternate internal drive or an external storage device.
Select the Start button ( ) → Samsung Recovery → Back up computer.
Select a drive to save the backed up data → Start backup.
When backing up to an external storage device, connect the device to the computer and then select the external drive.
Follow the on-screen instructions to complete the backup.
Backing up user data
You can back up data files and folders.
Turn on the computer and press the F4 key several times.
Select Back up user data.
Select the files or folders to back up and choose a storage device to save the data to and then select Start backup.
The backed up folders or files can be saved only on an external storage device. Connect an external storage device to your computer first and then select the external drive.
Follow the on-screen instructions to complete the backup.
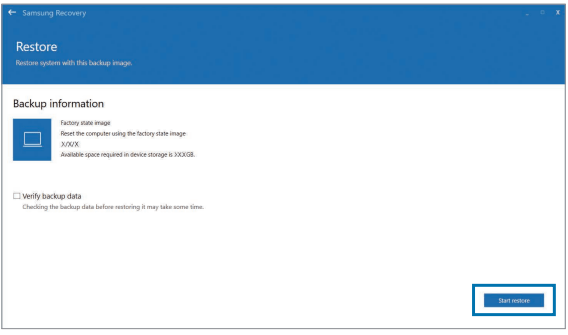
Recovering after a backup
Select a backup point saved on an alternate internal drive or an external storage device to recover the computer to that point.
When backing up to an external storage device, connect the device to the computer.
Select the Start button ( ) → Samsung Recovery.
Select Backup and restore management.
Select Restore of the data you want to recover → Start restore.
Follow the on-screen instructions to complete data recovery.
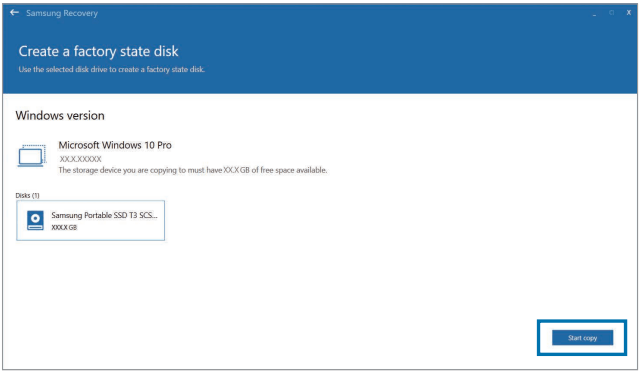
Copying the drive (making a disk image)
To replace the drive, move the data to the new drive by making a disk image. The new drive must be large enough to hold the data from the current drive. Purchase an external hard drive connector separately to connect the new drive to the computer.
When Windows is installed on a non-user replaceable disk, such as an eMMC, you cannot copy the drive.
Connect the new drive to the computer with an external hard drive connector.
Select the Start button ( ) → Samsung Recovery.
Select Create a factory state disk or Create a disk copy
Select a disk to be copied → Start copy.
The data on the disk is copied to the new disk.
Windows recovery function
If the Samsung Recovery application is not supported by the computer, reinstall Windows using the recovery function of Windows.
Reinstalling Windows will erase all data saved on the computer. Back up applications and personal data to an external storage device before reinstalling Windows.
On the list, select an app to delete, and then select Uninstall.
Samsung Recovery
What is a Recovery Area?
The computer has an additional partition for restoring data or saving backup files (only for models with the Samsung Recovery application).This partition is called a Recovery Area and it includes a recovery image comprised of the operating system and applications.
Why is the capacity representation of the hard disk drive (HDD) in Windows different from the product specifications?
The capacity of the storage device (HDD or SSD) of the manufacturer is calculated assuming that 1 KB = 1,000 Bytes. However, the operating system (Windows) calculates the storage device capacity assuming that 1 KB = 1,024 Bytes, and therefore the capacity representation of the HDD in Windows is smaller than the actual capacity.The capacity representation in Windows may be smaller than the actual capacity because some applications occupy a certain area of the HDD outside of Windows.
For models with the Samsung Recovery application, the HDD capacity representation in Windows may be smaller than the actual capacity because the Samsung Recovery application uses a hidden area of 5-20 GBof the HDD to save the recovery image, and that hidden area is not counted towards the total size available to Windows. The size of the Samsung Recovery application varies by model.
What is a recovery image?
This refers to the operating system, drivers, and software that are converted to a data image. It is required to recover the computer and is embedded in the computer's HDD. However, this is not provided for storage devices where the capacity is less than 64 GB.
How can I restore a computer that does not have the Samsung Recovery application?
Restore the computer with the recovery function provided by Windows. Refer to the Recover Functionality item in the help for more details.
Miscellaneous
The camera and the microphone are not working. How do I turn them on again?
When recording protect mode is activated, the camera and microphone will not work.
Select the Start button () → Samsung Security → Block Recording and tap the switch to turn the features off.
The computer does not turn on automatically when the display panel is opened.
To turn on the computer, the display panel should be opened greater than a certain angle.
The angle may differ depending on the model.
If the computer LED does not turn on automatically, press the Power button.
#1 No usb type A, How about USB type C etc? Only thing listed in specs under connectivity is Bluetooth. Is there no other way than Bluetooth to connect peripherals to this laptop?
There are two USB-C ports and one Thunderbolt 4 port. Also a 3.5" headphone jack and SD card slot.


 When the screen is turned off while using the computer as a tablet, touch the screen to unlock it. When the computer is in sleep mode, press the Power button to unlock the screen.
 on the taskbar.
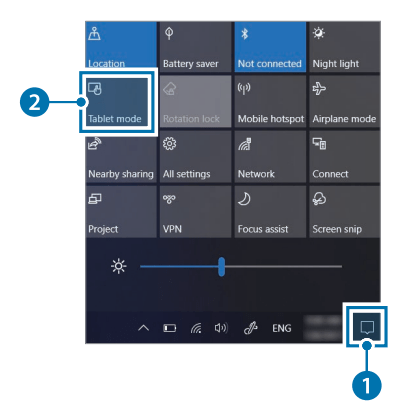
 ) → Air Command.
 Images and features may differ depending on the model and the application version.
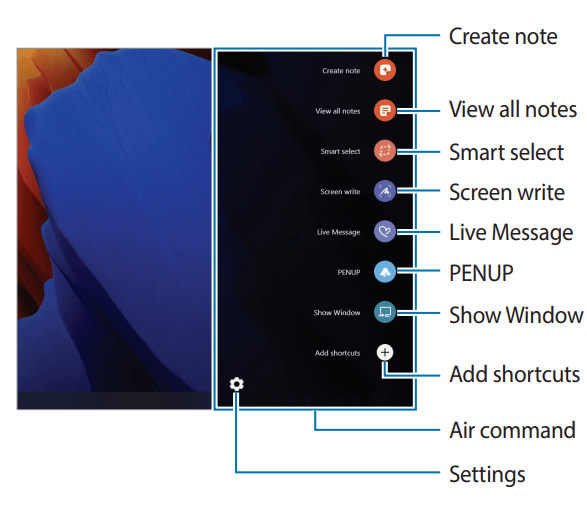
 Create note: Launch the Samsung Notes application and create a new note.
 View all notes: Launch the Samsung Notes application and check all saved notes.
 Smart select: Use the S Pen to select an area and perform actions, such as sharing or saving.
 Screen write: Capture screenshots to write or draw on them or crop an area from the captured image. Also you can capture content that continues across multiple screens at once.
 Live Message: Instead of a text message, create a unique message by recording your actions while handwriting or drawing a live message and saving it as an animated file.
 PEN UP: Post your artwork, view others'artwork, and get useful drawing tips.
 Show Window: Select an area on the screen and show it in full screen mode on an external display.
 Add shortcuts: Add shortcuts to frequently used apps to the Air command panel.
 Settings: Change the Air command settings.
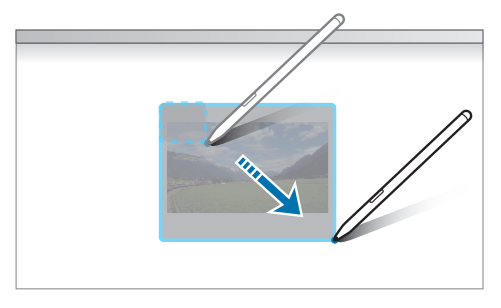
 to select an area to show in an external display and select Done.
 the Fixed ratio switch to activate it.
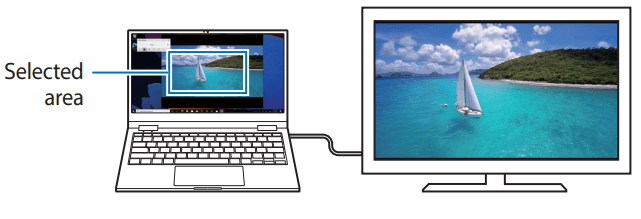
 on the taskbar.