www.dreo.com
Looking for help? Send us an email to get
expert support.
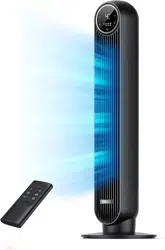
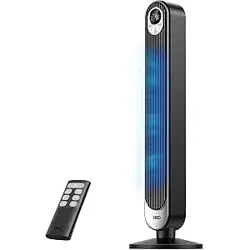
Tower Fan
USER MANUAL
MODEL: DR-HTF001
for Choosing Dreo
Your support means the world to us
Thank You
!
We hope you enjoy our tower fan as much as we did creating it
.
.
Scan or visit dreo.com/warranty
to extend your warranty by registering your product. If you need
any help, don't hesitate to email us to get expert support!
Email: [email protected]

1
CONTENTS
IMPORTANT SAFETY INSTRUCTIONS -------------------------01
ASSEMBLING YOUR TOWER FAN ---------------------------------04
Package Contents ------------------------------------------------------ 05
Assembly Instructions ------------------------------------------------06
KNOWING YOUR TOWER FAN ---------------------------------------08
Control Panel/ LED Display ------------------------------------------- 09
Specifications ------------------------------------------------------------11
USING YOUR TOWER FAN -------------------------------------------- 12
Operating Instructions -----------------------------------------------13
Getting the Most out of Your Tower Fan ------------------------15
Additional Features ----------------------------------------------------15
Remote Control ---------------------------------------------------------- 16
Battery Replacement -------------------------------------------------- 16
WARNING ------------------------------------------------------------------16
CLEANING AND MAINTENANCE -----------------------------------19
TROUBLESHOOTING ----------------------------------------------------22
DREO CUSTOMER CARE ----------------------------------------------24
IMPORTANT
SAFETY
INSTRUCTIONS
01

2
3
IMPORTANT SAFETY
INSTRUCTIONS
READ ALL CAUTIONARY MARKINGS
ON THE APPLIANCE AND SAFETY IN-
STRUCTIONS IN THE USER MANUAL
BEFORE USE.
Do not cover the air inlet
and outlet while in operation.
FOR HOUSEHOLD USE ONLY
READ AND SAVE THESE INSTRUCTIONS
Just a friendly reminder:
Do not use the fan near
flammables and combustibles.
Children shall not play with the appliance. Cleaning and
maintenance shall not be performed by children without
supervision.
Use the appliance as described in the user manual only.
Any other use not recommended in the user manual may
cause fire, electrical shock, or personal injury.
This appliance can be used by children aged above 8
years and persons with reduced physical, sensory or
mental capabilities or lack of experience and knowledge
if they have been given supervision or instruction
concerning use of this appliance in a safe way and
understand the hazards involved.
Place the appliance on a flat, dry surface before use.
Do not immerse in water and any other liquids.
Do not use the appliance until the base is installed.
Do not insert your fingers, pencil and any other objects
into the grilles while in operation.
Do not dismantle, repair, or modify. All servicing should be
performed by qualified personnel.
Make sure that the voltage of your electricity supply is
the same as that indicated on the appliance.
Always unplug before cleaning or leaving the appliance
unused for a long period of time. Keep your hands dry
when plugging/unplugging.
Do not operate the appliance with a damaged cord
or plug or after the appliance malfunctions, has been
dropped or damaged in any manner.
Do not run the cord under carpeting, furniture or
electrical devices. Do not cover the cord with throw
rugs, runner rugs and other similar rugs. Keep the cord
away from traffic areas to avoid tripping hazards.
This appliance has a polarized plug (one blade is wider
than the other). To reduce the risk of electric shock, this
plug is intended to fit in a polarized outlet only one way,
If the plug does not fit fully in the outlet, reverse the
plug. If it still does not fit, contact a qualified electrician.
Do not attempt to defeat this safety feature.
1.
2.
3.
4.
5.
6.
7
8.
9.
10.
11.
12.
13.
In the event of an abnormality or malfunction, stop using
the appliance immediately and contact Customer Support.
GENERAL SAFETY
OPERATION SAFETY
ELECTRICITY SAFETY

4
5
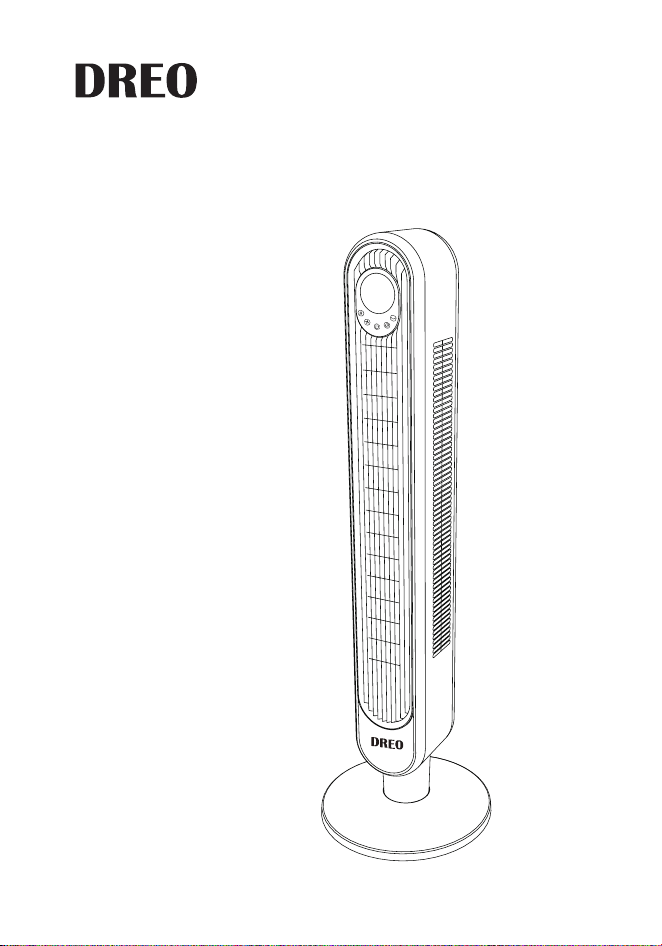
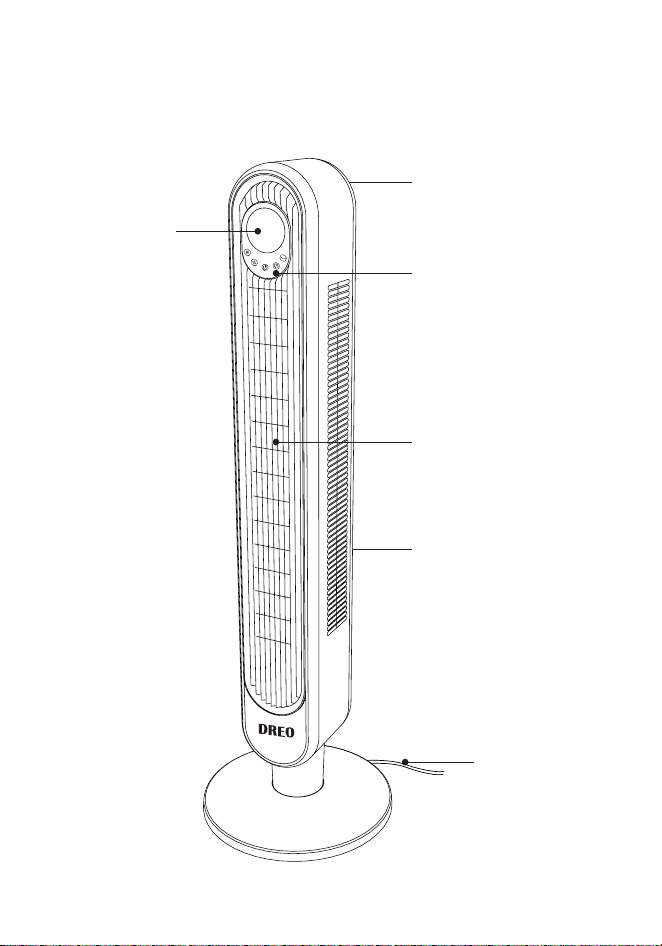
Package Contents
Handle
LED Display
Control Panel
Air Outlet
Air Inlet
Power & Plug
ASSEMBLING
YOUR TOWER FAN
02
4
5
Package Contents
Handle
LED Display
Control Panel
Air Outlet
Air Inlet
Power & Plug
ASSEMBLING
YOUR TOWER FAN
02

6
7
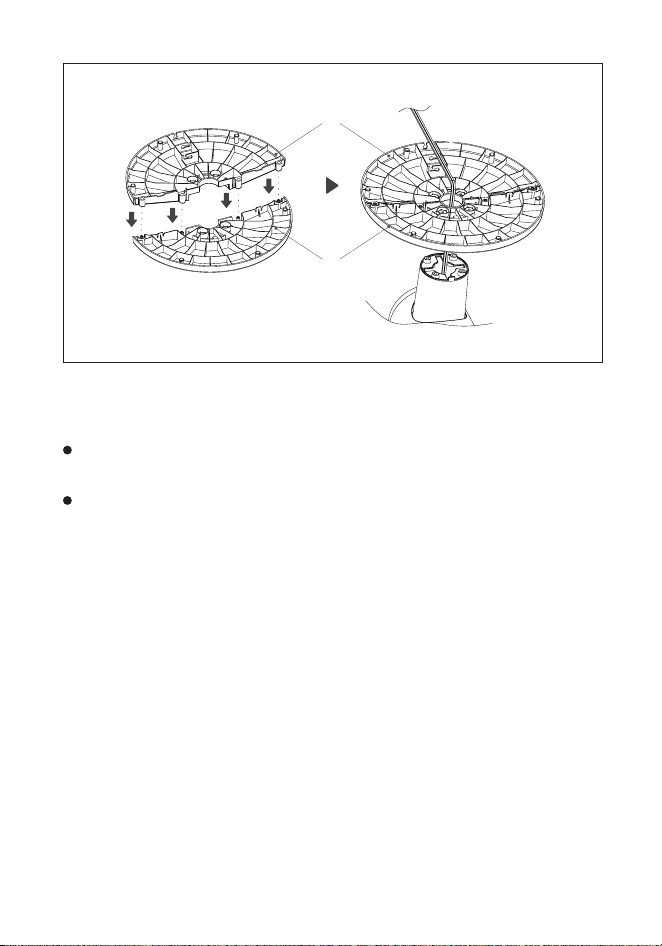
Assembly Instructions
REAR
FRONT
Align the pegs and the holes, then snap two base
halves together.
Run the cord through the center hole, and fit the
base into the bottom.
Align four screws with the holes and drive them
clockwise until tight.
Thread the cord through the cord keepers before
putting the fan upright.
1.
2.
3.
4.
When using the appliance for the first time, remove the
wraps and attach the parts by following the steps below.
Do not operate the tower fan if the base has not
been installed.
Make sure to thread the cord through all
three cord keepers.
CAUTION:
Accessories
Front Base Half
Rear Base Half
Thumb Screws x4
Remote Control (battery included)
Guides
User Manual
Quick Start Guide
6
7
Assembly Instructions
REAR
FRONT
Align the pegs and the holes, then snap two base
halves together.
Run the cord through the center hole, and fit the
base into the bottom.
Align four screws with the holes and drive them
clockwise until tight.
Thread the cord through the cord keepers before
putting the fan upright.
1.
2.
3.
4.
When using the appliance for the first time, remove the
wraps and attach the parts by following the steps below.
Do not operate the tower fan if the base has not
been installed.
Make sure to thread the cord through all
three cord keepers.
CAUTION:
Accessories
Front Base Half
Rear Base Half
Thumb Screws x4
Remote Control (battery included)
Guides
User Manual
Quick Start Guide

8
9
KNOWING YOUR
TOWER FAN
03
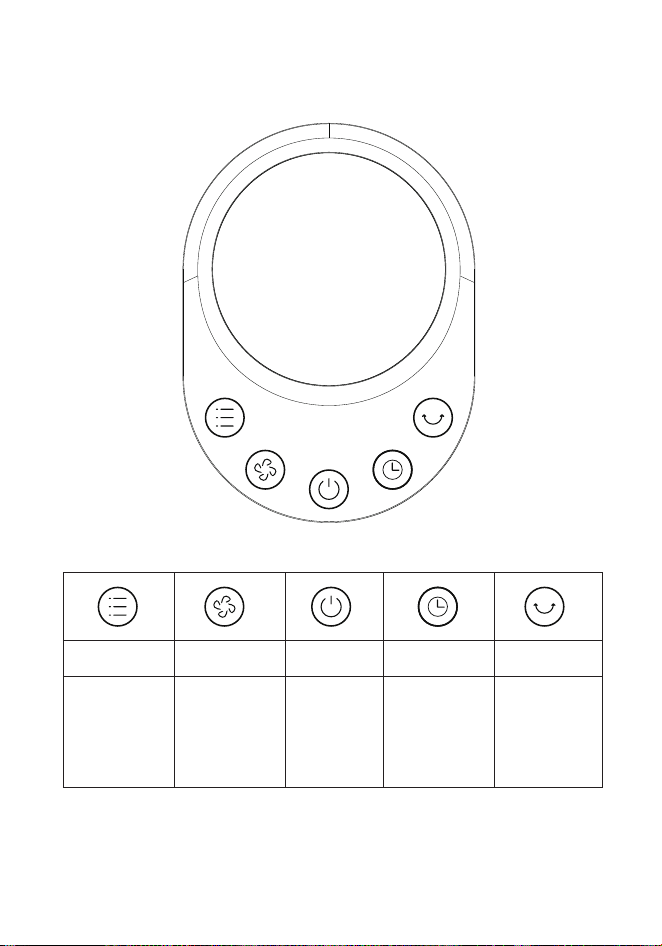
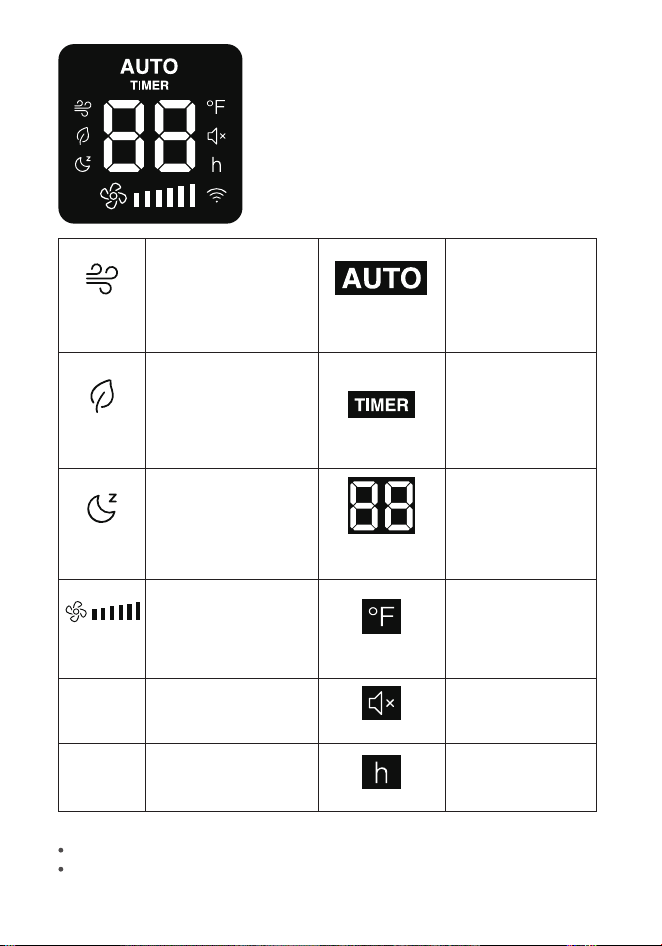
Control Panel/ LED Display
Mode Fan Speed Power Timer Oscillation
Switch
between
Normal/
Natural/
Sleep/Auto
Adjust
airflow
volume (1-6
levels)
Turn
power on/
off
Select time
to turn off
(0-12h)
Adjust
airflow
direction
8
9
KNOWING YOUR
TOWER FAN
03
Control Panel/ LED Display
Mode Fan Speed Power Timer Oscillation
Switch
between
Normal/
Natural/
Sleep/Auto
Adjust
airflow
volume (1-6
levels)
Turn
power on/
off
Select time
to turn off
(0-12h)
Adjust
airflow
direction
10
11
Specifications
Normal
Mode
·6 speed levels
·Constant airflow
AUTO Mode
·6 speed levels
·Adaptable
airflow
Natural
Mode
·6 speed levels
·Changing airflow
Timer
·Off timer (0-12 h)
Sleep
Mode
·6 speed levels
·Decreasing airflow
·Display off in 20s Temperature/
Timer
·Ambient
temperature /
Timer hour (0-
12h)
Fan
Speed
·6 speed levels
Fahrenheit
-
- -
Mute
·Mute is on
- -
Hour
-
Note:
Mute function is only available on the remote control.
The display will turn off automatically after 1 minute.
Model DR-HTF001
Input AC 120V 60Hz
Rated Power 45W
Battery Type CR2025 3V

12
13
USING YOUR
TOWER FAN
04
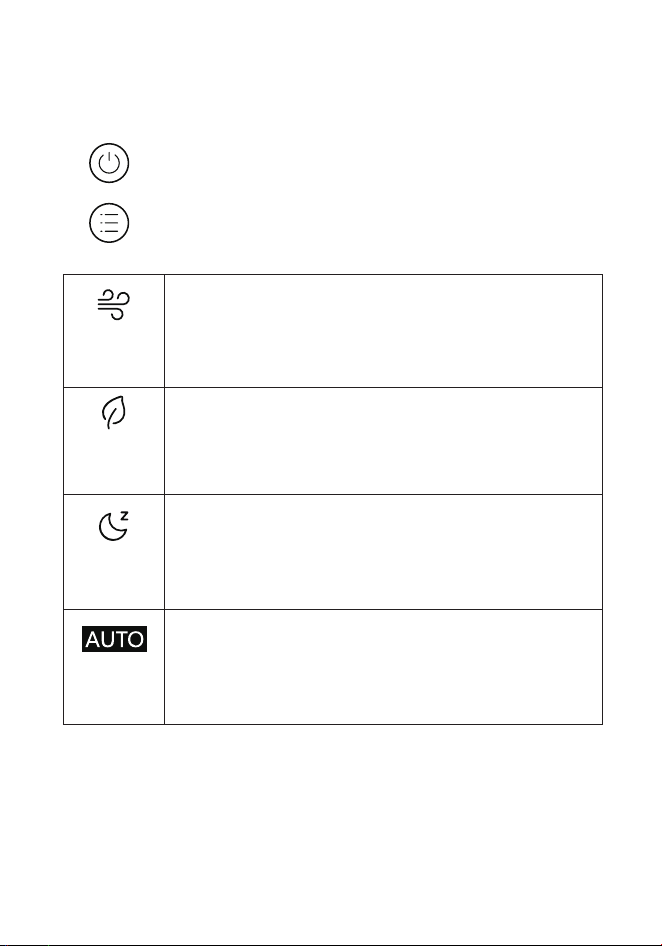
Operating Instructions
Press the power button to turn
the power on/off.
Press the mode button to
choose a working mode.
1.
2.
Normal
Mode
·Standard performance with constant airflow.
Natural
Mode
·Simulates a natural breeze with changing airflow.
Sleep
Mode
·Display turns off automatically after 5 seconds.
Wake it up with any non-power button.
·Mute turns on automatically.
·Airflow volume decreases from the current speed
every 30 minutes until it reaches level 1.
Auto
Mode
·Fan speed will adapt to the ambient temperature.
12
13
USING YOUR
TOWER FAN
04
Operating Instructions
Press the power button to turn
the power on/off.
Press the mode button to
choose a working mode.
1.
2.
Normal
Mode
·Standard performance with constant airflow.
Natural
Mode
·Simulates a natural breeze with changing airflow.
Sleep
Mode
·Display turns off automatically after 5 seconds.
Wake it up with any non-power button.
·Mute turns on automatically.
·Airflow volume decreases from the current speed
every 30 minutes until it reaches level 1.
Auto
Mode
·Fan speed will adapt to the ambient temperature.

14
15
Press the fan speed button to
adjust the airflow volume.
Press the oscillation button to
change the airflow direction.
90° 90°
3.
4.
Getting the Most out of
Your Tower Fan
Not an air conditioner
Off timer
Mute
Additional Features
This tower fan helps improve the circulation of the cool
air coming from your air conditioner. Find an ideal position
and strategically use your fan to maximize the cooling
effect in the room.
Remove any tall obstacles that might block
the airflow from the fan.
Combine with your AC unit to get cooler air
throughout the room.
1.
2.
Press to set a timer (1-12h).
Press to turn on mute.
To cancel, set the timer to 0h.
Press again to turn off mute.
Note:
Display will return to temperature after 10 seconds.
16
17
Memory
Auto Display Off
If you turn off the fan, it will return to the previous mode
(except sleep mode) and speed once you press the power
button again.
Display will turn off automatically after 1 minute.
Note:
Note:
If the fan is unplugged or loses power, all settings will not
be remembered.
If the indicator on the remote control doesn’t turn on any more,
please consider replacing the battery.
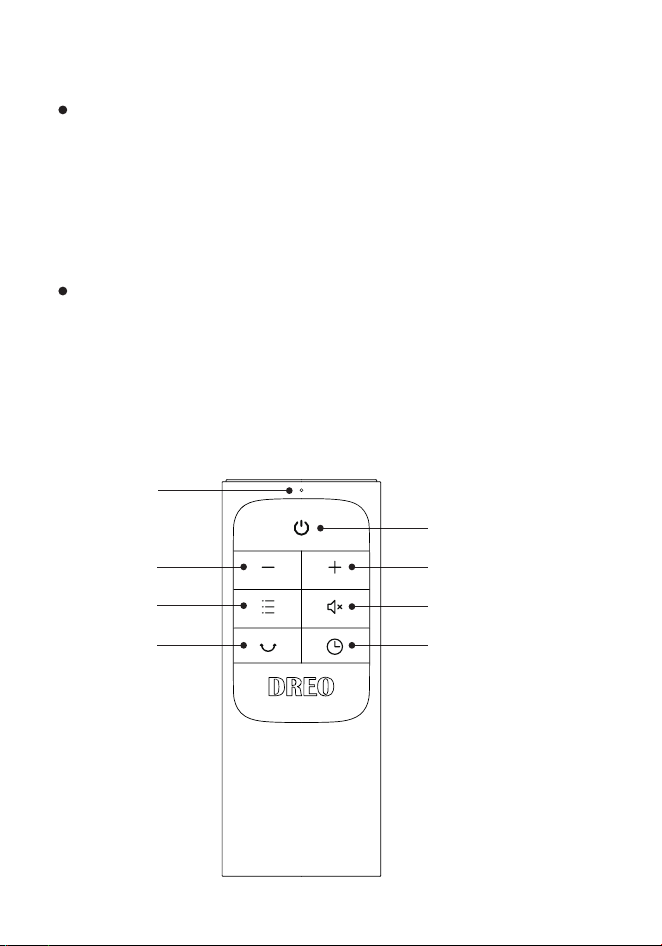
Increase Fan Speed
Mute
Timer
Power
Decrease
Fan Speed
Power
Indicator
Mode
Oscillation
Remote Control
Battery Replacement
Press the locking button
to pop out the battery
holder.
Push in the holder until
securely locked into place.
Replace with the same
battery type with the (+)
side facing up.
CR2025 3V
3
1
2

16
17
Memory
Auto Display Off
If you turn off the fan, it will return to the previous mode
(except sleep mode) and speed once you press the power
button again.
Display will turn off automatically after 1 minute.
Note:
Note:
If the fan is unplugged or loses power, all settings will not
be remembered.
If the indicator on the remote control doesn’t turn on any more,
please consider replacing the battery.
Increase Fan Speed
Mute
Timer
Power
Decrease
Fan Speed
Power
Indicator
Mode
Oscillation
Remote Control
Battery Replacement
Press the locking button
to pop out the battery
holder.
Push in the holder until
securely locked into place.
Replace with the same
battery type with the (+)
side facing up.
CR2025 3V
3
1
2

18
19
This product contains a lithium button/coin cell battery. If
a new or used lithium button/coin cell battery is swallowed
or enters the body, it can cause severe internal burns
and can lead to death in as little as 2 hours. Always
completely secure the battery compartment. If the
battery compartment does not close securely, stop using
the product, remove the battery, and keep it away from
children. If you think batteries might have been swallowed
or placed inside any part of the body, seek immediate
medical attention.
Chemical Burn Hazard
Keep batteries away from children.
The batteries must be disposed of properly,
including keeping them away from children. Even
used cells may cause injury.
WARNING
CLEANING AND
MAINTENANCE
04

20
21
Outer Surface
Grilles & Blades
Fuse Replacement
CAUTION
WARNING
Gently wipe off the dust with a soft, dry cloth.
This appliance features a fused safety plug that protects
against overload or short-circuit situations. If the fuse
blows, please follow the below instructions or consult a
qualified electrician.
Remove the dust using a vacuum or air duster.
Always unplug the fan before any cleaning or maintenance.
Never replace a blown fuse with a higher-amp fuse.
Risk of fire.
Do not immerse in water or get water inside
the motor housing.
Do not pull by the cord or operate the fan with
a damaged cord or plug.
Do not use any chemical agents when cleaning the fan.
Contact Costumer Support if you need assistance or any
other servicing.
Store in a cool, dry place and cover it to protect from dust.
Grasp the plug and unplug from the outlet.
Slide the fuse cover towards the blades.
Lever out the fuse and replace with a 2.5 amp, 125V fuse.
Close the fuse cover by sliding it back into place.
1.
2.
3.
4.

22
23
TROUBLESHOOTING
05
Q1: My fan won’t turn on.
Q2: My fan is shaky and wobbling.
Q3: My fan is making vibration and noise.
A1: Make sure that the cord is connected to a powered outlet
and the mains voltage corresponds with the voltage indicated
on the fan. Check if the fuse has blown. If the fuse has blown,
please refer to page.
If your problem is not listed or still persists, please contact our
Customer Support at
.
A1: Place the fan on a flat, level surface. Incorrect installation
might also cause shakiness. Please refer to the assembly
instructions in page.
A3: Place the fan on a flat, level surface. Be sure not to insert
anything into the air inlet and outlet.
Note:
that the power cord must be run through all three keepers.
CAUTION
Always unplug the fan before any cleaning or maintenance.
Do not immerse in water or get water inside
the motor housing.
Do not use any chemical agents when cleaning the fan.
Store in a cool, dry place and cover it to protect from dust.

24
25
DREO CUSTOMER
CARE
06
We’re Here to Help!
Default 12-Month Warranty
Extend Your Warranty
If you have any questions or encounter any issues regarding
your Dreo appliance, feel free to contact our Customer
Support anytime. Your satisfaction is our first priority!
This appliance is covered by Dreo warranty for 12 months from
the date of its original purchase. During this period, in the
unlikely event that this appliance is defective or malfunctions
due to faulty workmanship or manufacturing, you will get
exchange at no cost.
Extend your warranty by registering your new appliance on
our website https://dreo.com/warranty. This will confirm
ownership of your Dreo appliance in the event of expiry of the
warranty period, and enable us to contact you if necessary.
* Please have your order ID ready before contacting
Customer Support.
Email: [email protected]
The warranty will not apply in cases of:
Accident, misuse, or repairs performed by
unauthorized personnel.
Any unit that has been tampered with or used
for commercial purposes.
Normal wear and tear of wearable parts.
Use of force, damage caused by external influences.
26
Email: [email protected]
Shenzhen Hesung Innovation Technology
Co., LTD
26F, Bldg A7, Creative City, Shenzhen, China
Intertek
5020677
www.dreo.com
MADE IN CHINA
Damage caused by non-observance of the User Manual, e.g.
connection to an unsuitable mains supply or noncompliance
with the instructions.
Defects caused by or resulting from damages from shipping
or from repairs, service, or alteration to the product or any
of its parts that have been performed by a repair person
not authorized by Dreo.
We can only provide after-sales service for products that are
sold by Dreo or Dreo authorized retailers and distributors.
If you have purchased the appliance from a different place,
please contact your seller for return and warranty issues.

www.dreo.com
Looking for help? Send us an email to get
expert support.
Tower Fan
USER MANUAL
MODEL: DR-HTF001