User Manual
USING THE AIR CONDITIONER
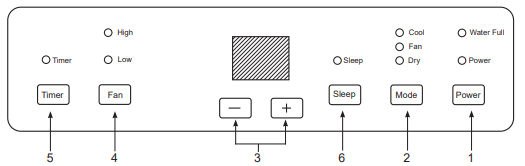
Controls
Features and appearance will vary.
Lights next to the touch pads on the air conditioner control panel indicate the selected settings.
NOTE: When the machine is powered on for the first time, the buzzer will play power-on music and then the machine will go into standby status.
1. Power Button
Turns ON/OFF power to the air conditioner.
NOTE: Turning off power by pressing the Power button does NOT disconnect the appliance from power supply. Press the Power button. The Power indicator will illuminate.
2. Mode Button
Press the Mode button to toggle among the operating options. The corresponding indicator will illuminate:
Cool – Cools the room to the set temperature
DRY – Reduces the humidity in the room
Fan – Circulates the air in the room without cooling
3. + and – Buttons
Sets the Temperature when in Cooling Mode or sets the Time when Timer is selected.
To Set the Temperature: Press the + or – button to select the required temperature.
NOTE: The temperature cannot be set when the air conditioner is in either Fan or DRY mode.
To Set the Time: Press the + or – button to select the required time.
4. Fan Speed Button
The fan speed can be adjusted from Low to High speed when the air conditioner is in operation.
NOTE: The fan speed cannot be adjusted when the unit is in DRY mode.
5. Timer Button
Program a time from (1 hour to 24 hours) for the air conditioner to turn Off or On.
6. Sleep Mode
Press the Sleep button to turn on Sleep Mode.
NOTE: You cannot turn on the Sleep mode in the Dry or Fan Mode.
NOTE: When the inner unit chassis is full of water, the Water Full light will turn on. A buzzer will sound for several seconds and the compressor will stop.
Refer to the instructions on page 5 for draining the water from the unit.
The display will always default to show room temperature. When the air conditioner is turned on, it will automatically start in the last mode and fan settings selected.
Frost Protection Function:
In cooling or dry mode, if the temperature of the exhaust hose is too low, the AC will automatically go into a unit protection state. When the temperature rises to a normal temperature, the unit will automatically resume normal operation.
Overflow Protection Function:
When water in the water pan exceeds the warning level, the machine will automatically sound an alarm, the FULL indicator light will flash and the unit will shut down. At this point, you need to drain the water from the lower drain (See Drainage instructions for details)
After the water is emptied, the machine the machine will automatically resume normal operation.
Automatic Defrosting (on some models)
The machine has an automatic defrosting function.
Protection Function of the Compressor
To increase the service life of the compressor, the AC has a 3-minute delay after the compressor has shut off to protect the compressor.
Drainage Instructions
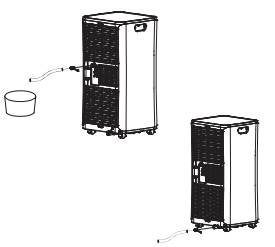
Draining the unit manually:
Note: Please move the AC carefully, do not spill the water in the water pan at the bottom of the unit.
1. When the AC stops after the water is full, turn off the AC power and unplug the power plug.
2. Place a water container larger than the sump capacity (at least 1-1/2 quart) below the lower rear water outlet on the back side of unit.
3. Remove the plug, the water will automatically flow into the container.
Note: During drainage, the body can be tilted slightly backwards. If the water container cannot hold all the water, before the water container is full, replace the water plug as soon as possible to prevent water from flowing to the floor or the carpet.
4. After water has been drained from the unit, re-install the water plug securely.
Note: Restart the AC after the water plug is installed, otherwise condensate water from the AC will drain onto the floor or carpet.
Continuous drainage (optional, and only in dry mode)
1. Remove the upper drain plug.
2. Connect a drain hose with an inside diameter of 5/8” to the water outlet.
3. Route drain hose to a bucket or floor drain.
4. Be sure to use a large container (3 gallons or larger is recommended) and monitor the water level in the container continuously. The unit will not shut off when the container is full. An overflowing container can cause flooding and damage to the floor.
Features and appearance may vary.
Icons on the remote control indicate the selected settings
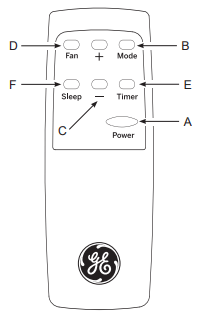
REMOTE CONTROL
- Insert the two AAA batteries (provided).
- Aim the remote control at the signal receiver on the control panel to operate the air conditioner.
A. Power Button
Turns ON/OFF power to the air conditioner.
B. Mode Button
Press the Mode button to toggle among the operating options, cooling, fan and dry mode.
C. + and – Button
Adjusts the Temperature or Timing set value.
D. Fan Button
Press the Fan button to adjust fan speed from Low to High speed.
E. Timer
Press Timer button to activate the ON/OFF timer. Use the + and – buttons to adjust the timer.
F. Sleep Button
Press the Sleep button to turn on the sleep mode.
CARE AND CLEANING
CLEANING
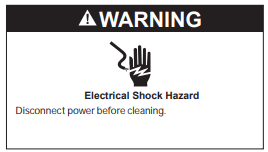
1. Unplug or disconnect power.
2. Use only a soft cloth dampened with water to clean the cabinet.
NOTE:
- Do not use a liquid or spray cleaner to clean the air conditioner.
- DO NOT use chemicals, abrasives, ammonia, chlorine bleach, concentrated detergents, solvents or scouring pads. Some of these chemicals/items may damage and/or discolor your air conditioner.
3. Dry thoroughly with a soft cloth.
4. Plug in or reconnect power.
Cleaning the surface
Clean surface of machine with a wet soft cloth. Do not use chemicals, such as benzene, alcohol, gasoline, etc.; otherwise, the surface of the air conditioner will be damaged or the entire unit will be damaged.
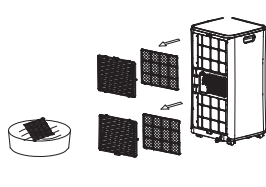
Air Filter
The air filters should be cleaned at least every two weeks for your unit to operate at optimum efficiency.
CAUTION DO NOT operate the air conditioner without a filter because dirt and lint will clog it and reduce performance.
To clean the upper filter screen frame:
- Remove the upper and lower filter screens. On the top filter, place finger in recess at top of filter and pull down and outward to remove. On the lower filter, place finger in recess at bottom of filter, pull upward and outward to remove filter.
- Remove the filter from the filter frame. It is held in place by 4 tabs. After removal, wash or vacuum the filter to remove the dirt and lint. Make sure filter is dry before reinstalling on the unit.
Storage
If the unit is not being used for a long period of time:
To Empty the Internal Water Tank:
- Unplug or disconnect power.
- Drain the water from the water tank. (See “Internal Water Tank section” above.)
- Use the original packaging to repack the unit to avoid a buildup of dust or dirt.
- Store the air conditioner in a cool, dry location.
INSTALLATION INSTRUCTIONS
PARTS INCLUDED (Appearance may vary)
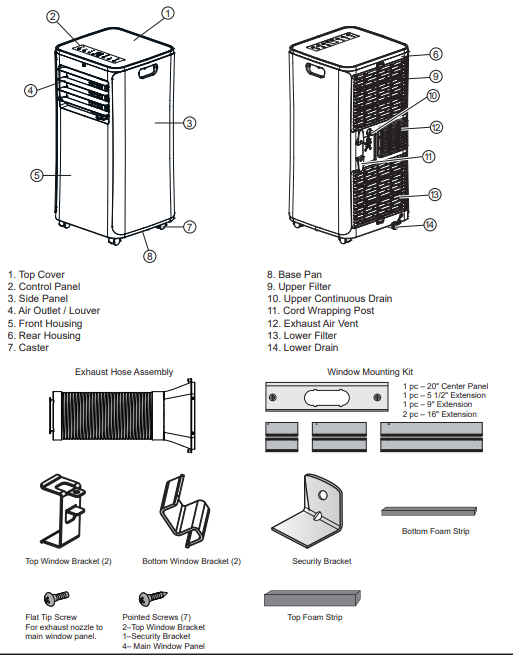
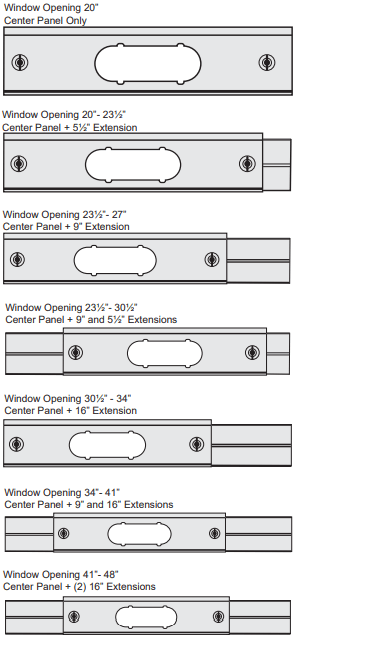
Window Panel Combinations to fit window openings (Appearance may vary)
1. UNPACK AIR CONDITIONER
WARNING Excessive Weight Hazard
- Use two or more people to move and install air conditioner.
- Failure to do so can result in back or other injury
NOTE: Before using the air conditioner, keep it upright for at least 2 hours.
- Remove packaging materials. Save the carton and the foam packaging for storing the air conditioner when not in use.
NOTE: There are NO packing materials inside the air conditioner to remove—Do Not open the cabinet.
- Properly dispose of/recycle all packing material.
- Handle the air conditioner gently.
- Keep the air conditioner upright and level. Do not set the air conditioner on its side, front, back or upside down.
2. Install Exhaust Nozzle to Main Window Panel
1. Hold the main window panel so that the L-shaped edges of the panel are facing you.
2. Align the exhaust nozzle with the slots in the opening, and then insert and slide the nozzle to access the hole from the back of the main window panel.
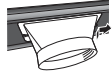
3. Turn the main window panel over, so that the nozzle is away from you. Insert a flat tip screw through the hole to fasten the window panel to the adapter.
3. Install Main Window Panel and Extension Panels
NOTE: Measure the window opening and use the extension panels as referenced on page 10 to fit your window.
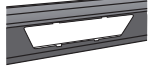
1. Open the window and place the window kit assembly into the window.
NOTE: The window assembly is designed to accommodate either a double hung or sliding window
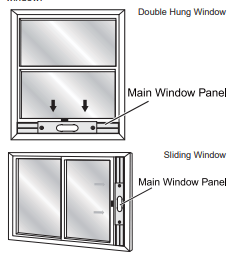
2. Adjust the extension panel(s) to the width or height of the window as shown.
3. Depending on the number of extension panels used, turn the knobs to secure the extension panel(s) to the main panel. Install from the back.
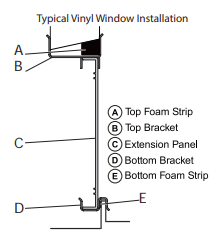
4. For vinyl windows only. Skip to step 6 for wood windows.
Place the two top window brackets and two bottom window brackets where they will best support the extension panels. Use painted screws to attach top bracket to the support panels.
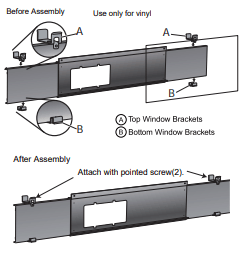
5. Apply the top foam strip (provided) across the top of the window panel assembly, and then apply the bottom foam strip (provided) across the bottom front edge of the window panel assembly, as shown
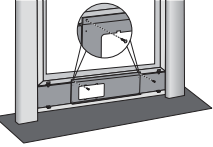
6. Place the window panel assembly in the window, and using the screws provided, fasten the assembly to the window sill and window frame
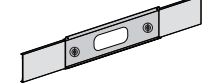
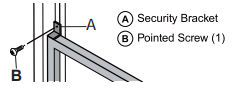
7. Using one pointed screw, install the Security bracket to the window.
NOTE: The security bracket prevents the window from being opened from the outside.
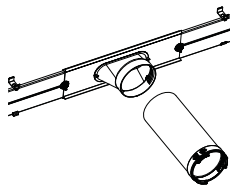
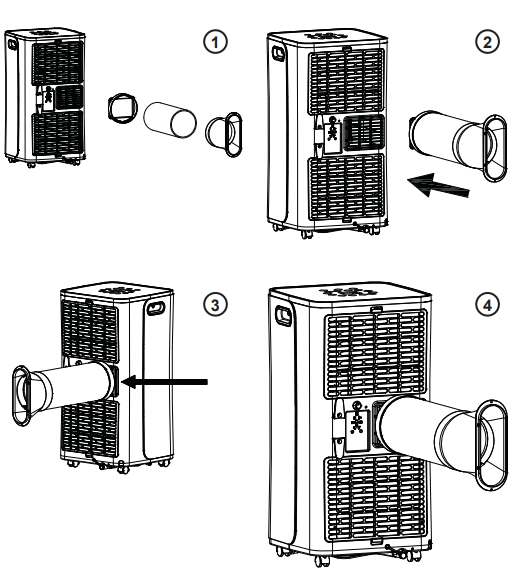
4. Attach Exhaust Hose to the Exhaust Nozzle
1. Grasp both ends of the exhaust hose and gently pull to expand the hose.
NOTE: Do not attach additional hoses to extend the length. This would decrease cooling efficiency and may damage the air conditioner.
2. Using a clockwise motion, attach the open end of the exhaust hose to the exhaust nozzle.
5. Connect Exhaust Hose to the Air Conditioner
NOTE: When connecting the hose, the air conditioner must be close enough to the window that you will not dislodge the window seal plate. Once the hose is connected, move the air conditioner 20” (51 cm) from the wall.
1. Extend the flexible exhaust hose to reach out to the unit.
2. Aim the opening of the hose to the air exhaust outlet and push it hard straight into the outlet until it clicks.
TROUBLESHOOTING TIPS
Unit does not start or operate
- Power supply cord is not plugged into an outlet.
- Plug the power cord into a grounded 3 prong outlet.
- Power supply cord has tripped.
- Press and release the RESET button on the power supply cord.
- The Power button has not been pressed.
- Press the Power button on the Control Panel or Remote Control to turn ON the air conditioner.
- There is no power to the electrical outlet.
- Plug a working lamp into the outlet to check for power.
- A household fuse has blown or a circuit breaker has tripped.
- Replace the fuse or reset the circuit breaker.
- The control was programmed for a Time Delay.
- Cancel the Time Delay. See “Control Panel.”
- The batteries in the remote control are dead.
- The internal water tank is full. NOTE: The air conditioner automatically turns off, and the Water Full indicator illuminates to alert you of this condition.
- Empty the water tank. See “Air Conditioner Care.”
Remote control is not working
- Batteries are dead.
- Batteries are installed incorrectly.
- Make sure the batteries are inserted in the correct position.
Air conditioner is working but the room is not cooling.
- The room temperature is hot. NOTE: On extremely hot and humid days,the air conditioner will take longer to cool the room.
- Allow time for the room to cool when you first turn on the unit. Make sure the air conditioner has an adequate BTU rating for the size of the room being cooled.
- The control is set incorrectly to Fan or Dehum mode.
- Set the Mode to Cool and the Fan Speed to High.
- Airflow is restricted.
- Remove any obstacles to the airflow and redirect airflow for uniform cooling.
- Temperature set too high.
- Lower the set temperature.
- Air filters are dirty or restricted.
- Clean the air filter. See “Air Conditioner Care.”
- Air conditioner installed incorrectly
- Check the exhaust hose and window panel for proper installation.
- Doors and windows are open.
- Close the doors and windows to the room being cooled to prevent cooled air from escaping.