Documents: Go to download!
- Owner's manual - (English)
- CONTROLS
- PARTS AND FEATURES
- INSTALLATION REQUIREMENTS
- INSTALLATION INSTRUCTIONS
- AIR CONDITIONER USE
- AIR CONDITIONER CARE
- TROUBLESHOOTING
Table of contents
Owner's Manual Air Conditioner
CONTROLS
Features and appearance will vary.
Lights next to the touch pads on the air conditioner control panel indicate the selected settings.

Controls
A. Timer Button
Program a time from (1-hour to 24-hours) for the air conditioner to turn Off or On. When a Time Delay is programmed, the Timer indicator light will illuminate.
While the air conditioner is operating:
- Press the Timer button.
- Press the Up/Down arrow buttons to select the number of hours you want the air conditioner to continue to operate before turning it Off.
NOTE: Wait approximately 5 seconds for the Turn-Off time to be saved.
While the air conditioner is off:
- Press the Timer button.
- Press the Up/Down arrow buttons to select the number of hours you want the air conditioner to remain off before turning it On.
NOTE: Wait approximately 5 seconds for the Turn-On time to be saved.
To cancel the timer:
- Press the Timer button once, the hours remaining will flash, press the timer button again and the timer will be canceled.
B. Fan Speed Button
The fan speed can be adjusted from Low speed to High speed when the air conditioner is either in Cool or Fan mode.
NOTE: The fan speed cannot be adjusted when the unit is in DEHUM mode.
- Press the Fan Speed button to toggle between the two speeds. The corresponding fan speed indicator will illuminate.
C. Remote Control Signal Receiving Window
See other models: PFSS5NJXASS PSC23SGRASS GSS25JEMCWW CTX16CABHLAA RGB526DET3WW
Aim the Remote Control at this window so the Control will receive the signal.
D. CONTROL PANEL DISPLAY
Displays the Set Temperature in degrees Fahrenheit or degrees Celsius, or the hours remaining in a Time Delay. The corresponding indicator light will illuminate.
E. Up and Down Arrow Buttons
Adjusts the Temperature or Hours in Time Delay.
To Set the Temperature:
The temperature can be set between 62oF and 86oF(17oC and 30o C) when the air conditioner is in Cool mode.
- Press the Mode button until the Cool mode is selected.
- Press the Up Arrow or Down Arrow buttons to select the Temperature.
NOTE: The temperature cannot be set when the air conditioner is in either Fan or Dry mode.
F. Mode Button
Press the Mode button to toggle among the operating options. The corresponding indicator will illuminate:
Cool – Cools the room to the set temperature
ECO – Cycles fan to cool economically
Deum – Reduces the humidity in the room
Fan – Circulates the air in the room without cooling
G. Power Button
Turns ON/OFF power to the air conditioner.
NOTE: Turning o power by pressing the Power button does NOT disconnect the appliance from the power supply.
- Press the Power button. The Power indicator will illuminate.
REMOTE CONTROL
- Insert the two batteries (provided).
- Aim the remote control at the signal receiver on the control panel to operate the air conditioner.
H. Sleep Button
Increases the set temperature by 2oF (1oC) after 2 hours, and then increases the temperature by an additional 2oF (1oC) after another 2 hours.
NOTE: The fan will operate at Low speed and cannot be adjusted while in Sleep mode. Press the Sleep button to enter Sleep mode. The Sleep indicator will illuminate.
To Cancel Sleep Mode:
- Press the Sleep button or the Mode button (Cool, Fan, or Dry) on the remote control.
I. oC/oF Button
- Press the oC/oF button to toggle between displaying the temperature in degrees Fahrenheit or degrees Celsius. The corresponding indicator will illuminate.
Cool Mode
Use the COOL mode for cooling.
To set the COOL mode:
1. Press the MODE pad until the COOL indicator light is lit.
2. Press the FAN pad to set the HIGH or LOW fan speed.
3. Press + or - to set the desired temperature between 61°F and 89°F in 1°F increments.
After settings have been made, the display will change back to show the room temperature.
Temperature control is used to maintain the room temperature. The compressor will cycle on and off to keep the room at a set level of comfort. Set the temperature control at a lower number and the indoor air will become cooler. Set the temperature control at a higher number and the indoor air will become warmer.
NOTE: If the air conditioner is off and is then turned on while set to COOL, it will take approximately 3 minutes for the compressor to start and cooling to begin.
Cooling Descriptions
For Normal Cooling—Select the COOL mode and HIGH or LOW fan speed with a middle set temperature.
For Maximum Cooling—Select the COOL mode and HIGH fan speed with a lower set temperature.
For Quieter & Nighttime Cooling—Select the COOL mode and LOW fan speed with a middle set temperature.
NOTE: If you switch from COOL or DEHUM mode setting to OFF, wait 3 minutes before restarting.
ECO Mode
Use ECO mode for economy cooling.
To set ECO Mode:
- Press the MODE pad until the ECO indicator light is lit.
- Press the FAN pad to set high or low fan speed.
- Press + or - to set the desired temperature between 61°F and 89°F in 1°F increments.
In ECO mode, the fan will cycle off with the compressor when the room temperature is reached. Then the fan will cycle 10 minutes off / 2 minutes on to sample the room temperature.
DEHUM Mode—Dehumidification
Use the DEHUM mode to provide dehumidification only. The fan will run at a fixed speed at this setting, so a fan speed cannot be set. Keep windows and doors closed for the best dehumidifying effects.
To set the DEHUM mode:
- Press the MODE pad until the DEHUM indicator light is lit.
In the DEHUM mode, a set temperature will not be displayed. After DEHUM mode is set, the display will change to show the room temperature.
NOTE: If you switch from a DEHUM setting to OFF or to a fan setting, wait at least 3 minutes before switching back to a DEHUM set.
If using the unit in the DEHUM mode as a dehumidifier for an extended time.
- Unplug the power cord.
- Connect a drain hose (not included) to the bottom drain port (see page 10, lower drain #8) and lead hose to the floor drain.
- Reconnect the power cord and press the MODE pad until the DEHUM indicator light is lit.
FAN Mode
Use the FAN mode to provide air circulation and filtering without cooling.
To set the FAN mode:
- Press the FAN pad until the desired indicator light for HIGH or LOW fan speed is lit.
Since fan-only settings do not provide cooling, a set temperature will not be displayed. After the FAN speed is set, the display will change to show the room temperature.
Power Outage Recovery Feature
In the case of a power outage or interruption, the unit will automatically restart in the settings last used after the power is restored.
NOTE: If the TIMER was set before the power outage, it would need to be reset after power is restored.
PARTS AND FEATURES
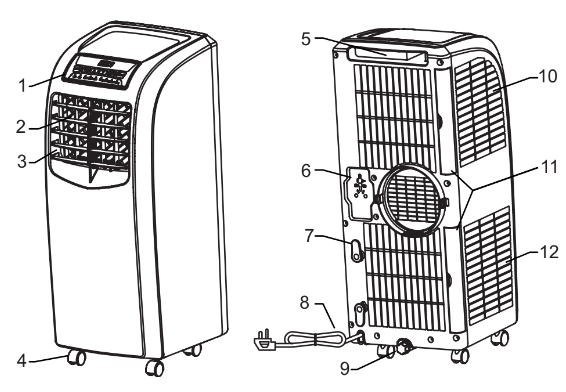
- Control Panel
- Vertical Louvers
- Horizontal Louvers
- Casters
- Handle (right side for remote control storage)
- Plug Storage
- Power Cord Storage
- Power Cord
- Drain the Hole and Cover
- Filter
- Filters
- Filter
NOTE: Remove filters (number 11) first, in order to access filters 10 and 12.
INSTALLATION REQUIREMENTS
TOOLS AND PARTS
Gather the required tools and parts before starting installation.
TOOLS NEEDED
- Flat-blade Screwdriver
- Phillips Screwdriver
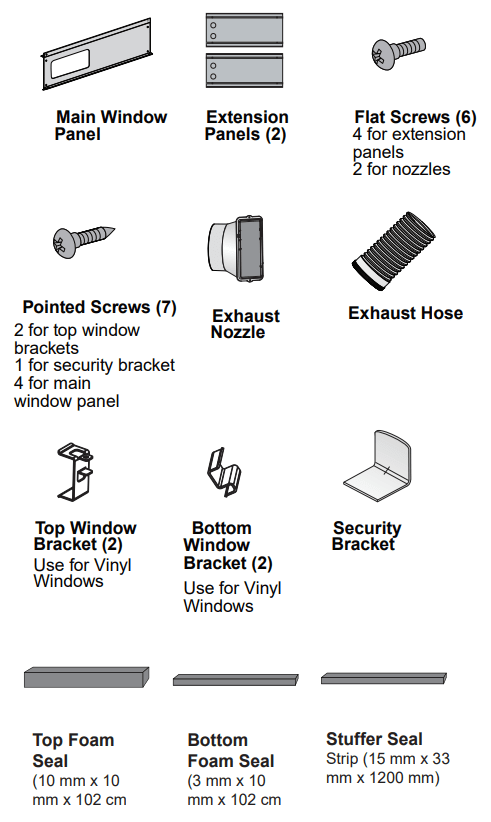
PARTS SUPPLIED
INSTALLATION INSTRUCTIONS
BEFORE YOU BEGIN
Read these instructions completely and carefully.
- IMPORTANT — Save these instructions for the local inspector’s use.
- IMPORTANT — Observe all governing codes and ordinances.
- Note to Installer – Be sure to leave these instructions with the Consumer.
- Note to Consumer – Keep these instructions for future reference.
- Skill level – Installation of this appliance requires basic mechanical skills.
- Completion time – Approximately 1 hour
- We recommend that two people install this product.
- Proper installation is the responsibility of the installer.
- Product failure due to improper installation is not covered under the Warranty.
- You MUST use all supplied parts and use proper installation procedures as described in these instructions when installing this air conditioner.
ELECTRICAL REQUIREMENTS
Some models require a 115/120-volt AC, 60-Hz grounded outlet protected with a 15-amp time-delay fuse or circuit breaker. The 3-prong grounding plug minimizes the possibility of electric shock hazards. If the wall outlet you plan to use is only a 2-prong outlet, it is your responsibility to have it replaced with a properly grounded 3-prong wall outlet.
CAUTION
Do not, under any circumstances, cut or remove the third (ground) prong from the power cord. Do not change the plug on the power cord of this air conditioner. Aluminum house wiring may present special problems—consult a qualified electrician.
The power cord includes a current interrupter device. A test and reset button are provided on the plug case. The device should be tested on a periodic basis by first pressing the TEST button and then the RESET button while plugged into the outlet. If the TEST button does not trip or if the RESET button will not stay engaged, discontinue the use of the air conditioner and contact a qualified service technician.
Location Requirements
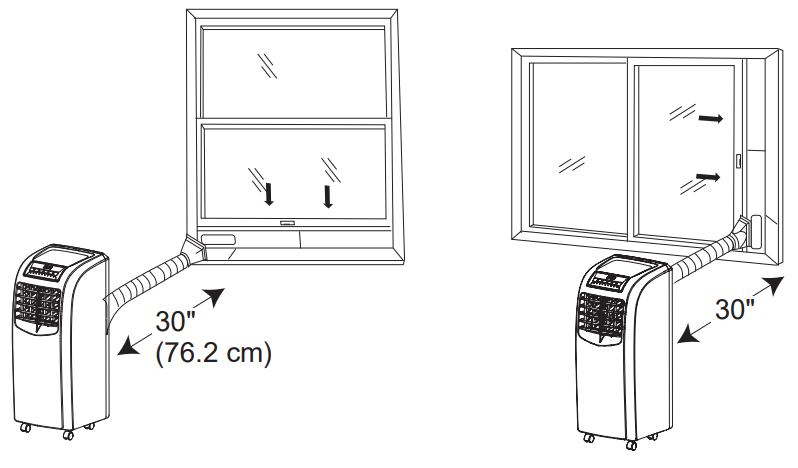
- Place the air conditioner on a flat, level surface in a location that is at least 30” (76.2 cm) from any wall.
NOTE: A minimum clearance of 30” (76.2 cm) from the air conditioner to the wall must be maintained to ensure proper airflow.
- Maintain a minimum 30” (76.2 cm) clearance around the air conditioner to not block airflow.
- Keep the air conditioner free of any obstructions such as drapes, curtains, blinds, etc.
- The exhaust hose should be free of any obstructions.
- Do not place the air conditioner on an unstable or raised surface because it could fall and cause damage or injury.
- Do not place the air conditioner in direct sunlight or near a heat source such as baseboard heaters, stoves, etc.
- The window panel can be installed in a window with a minimum 30” (76.2 cm) to a maximum 40” (101.6 cm) opening.
1. Unpack the Air Conditioner
WARNING
Excessive Weight Hazard
- Use two or more people to move and install an air conditioner.
- Failure to do so can result in back or other injuries.
- Remove packaging materials. Save the carton and the foam packaging for storing the air conditioner when not in use.
NOTE: There are NO packing materials inside the air conditioner to remove—Do Not open the cabinet.
- Properly dispose of/recycle all packing material.
- Handle the air conditioner gently.
- Keep the air conditioner upright and level. Do not set the air conditioner on its side, front, back, or upside down.
2. Install Exhaust Nozzle to Main Window Panel
1. Hold the main window panel so that the L-shaped edges of the panel are facing you.

2. Align the exhaust nozzle with the slots in the opening, and then insert and slide the nozzle to access the hole from the back of the main window panel.
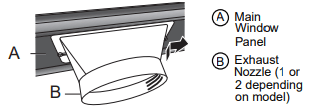
3. Turn the main window panel over, so that the nozzle is away from you. Insert a flat screw through the hole to fasten the window panel to the adapter.
NOTE: On a dual hose unit, install the smaller hose nozzle to the left-hand hole in the panel.
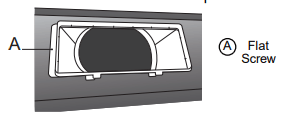
3. Install Main Window Panel and Extension Panels
NOTE: Depending on the size of your window opening, use the main panel and one or both of the extension panels.
1. Open the window and place the main window panel into the window.
NOTE: The window assembly is designed to accommodate either a vertical slide or a horizontal slider window.
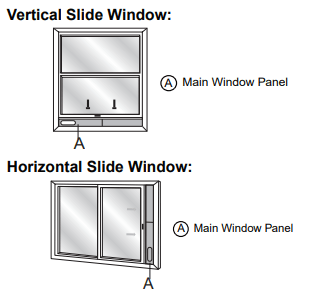
2. Adjust the extension panel(s) to the width or height of the window as shown.
NOTE: Some window installations may require the extension panels to be trimmed.
3. Depending on the number of extension panels used, use two or four flat screws to secure the extension panel(s) to the main panel. Install from the back.

NOTE: There are many window types on the market today. Use the foam strips and brackets (provided) to secure the extension panels that will fit the window opening.
4. For vinyl windows only. Skip stepping 6 for wood windows. Place the two top window brackets and two bottom window brackets where they will best support the extension panels.
Before assembly: USE ONLY FOR VINYL
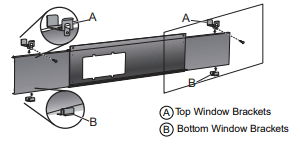
After assembly:
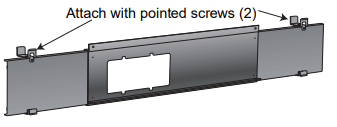
5. Apply the top foam strip (provided) across the top of the window panel assembly, and then apply the bottom foam strip (provided) across the bottom front edge of the window panel assembly, as shown.
Typical Vinyl Window Installation:
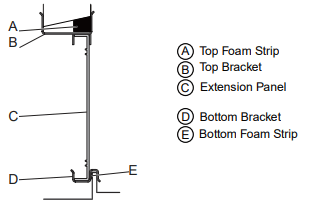
6. Place the window panel assembly in the window, and using the screws provided, fasten the assembly to the window sill and window frame.
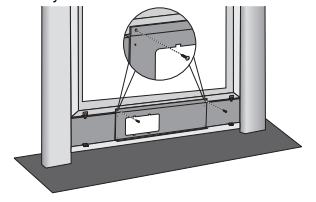
7. Using one pointed screw, install the Security bracket to the window.
NOTE: The security bracket prevents the window from being opened from the outside.
4. Attach Exhaust Hose to the Exhaust Nozzle
1. Grasp both ends of the exhaust hose and gently pull to expand the hose.
NOTE: Do not attach additional hoses to extend the length. This would decrease cooling efficiency and may damage the air conditioner.
2. Using a counterclockwise motion, attach the open end of the exhaust hose to the exhaust nozzle.

5. Connect Exhaust Hose to the Air Conditioner
IMPORTANT: When connecting the hose, the air conditioner must be close enough to the window that you will not dislodge the window seal plate. Once the hose is connected, move the air conditioner 20” (51 cm) from the wall.
1. Extend the flexible exhaust hose to reach out to the unit.
2. Aim the opening of the hose to the air exhaust outlet and push it hard straight into the outlet until it clicks.
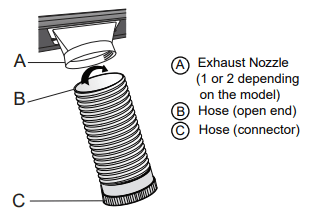
6. Complete Installation
WARNING
Electrical Shock Hazard:
- Plug into a grounded 3-prong outlet.
- Do not remove the ground prong from the power cord plug.
- Do not use an adapter.
- Do not use an extension cord.
- Failure to do so can result in death, fire, or electrical shock.
- Plug the power cord into a grounded 3-prong outlet.
- Press the Reset button on the power cord to ensure the safety plug is providing power to the air conditioner.
AIR CONDITIONER USE
IMPORTANT: If the air conditioner has been tilted on its side, wait 24 hours before turning on the air conditioner to allow the oil to return to the compressor. This will prevent the air conditioner from failing prematurely.
- Allow 30” (76.2 cm) of space around the unit for proper air circulation.
- Do Not operate the air conditioner without air filters in place.
- Do not spill liquid on the control panel; it may cause an electrical short to the interior electronic parts that would either disable them or cause them to function improperly.
- When turning on the air conditioner for the first time after plugging it into an electrical outlet, the unit will start in Cooling mode set at 75ºF (24°C), and at High fan speed. The control panel will display the current room temperature.
- When turning on the unit after previous use, it will remember the last settings used.
- After a normal shutdown, please wait for 3 minutes before restarting the unit.
- In Cooling mode, this unit should not require water to be removed. This model has a unique design that continuously evaporates the water.
- When the unit is operated in high humidity conditions, you may need to empty the water tank periodically.
- The unit will shut down automatically when the water tank is full. The Water Full indicator illuminates to alert you of this condition.
AIR CONDITIONER CARE
WARNING Electrical Shock Hazard:
- • Disconnect power before cleaning.
- Failure to do so can result in death or electrical shock.
Cleaning
- Unplug or disconnect the power.
- Use only a soft cloth dampened with water to clean the cabinet.
- NOTE: Do not use a liquid or spray cleaner to clean the air conditioner.
- NOTE: DO NOT use chemicals, abrasives, ammonia, chlorine bleach, concentrated detergents, solvents, or scouring pads. Some of these chemicals/items may damage and/or discolor your air conditioner.
- Dry thoroughly with a soft cloth.
- Plug in or reconnect power.
Air Filters
The air filters should be cleaned at least once a week for your unit to operate at optimum efficiency.
IMPORTANT: Do Not operate the air conditioner without the air filters in place.
- Unplug or disconnect the power.
- Pull on the tabs to slide out the filters from the back of the air conditioner.
- NOTE: The secondary filters are accessible once the main filters are removed.
- Wash or vacuum the dust from the air filters.
- NOTE: If washed, gently shake the filter to remove the excess water and dust particles trapped in the filter.
- Reinstall the filters.
- Plug in or reconnect power.
Internal Water Tank
The Water Full indicator illuminates when the internal water tank has filled with condensed water.
To Empty the Internal Water Tank:
- Unplug or disconnect the power.
- Place a shallow 1 quart or larger pan (not included) below the lower drain located on the back (near the bottom) of the air conditioner.
- Remove the cap and the rubber plug and drain the water tank.
- Re-insert the drain plug and screw the cap snugly into place.
- Plug in or reconnect power.
Storage
If the unit is not being used for a long period of time:
- Unplug or disconnect the power.
- Drain the water from the water tank. See “Air Conditioner Care.”
- Use the original packaging to repack the unit to avoid a buildup of dust or dirt.
- Store the air conditioner in a cool, dry location.
TROUBLESHOOTING
The unit does not start or operate.
- The power supply cord is not plugged into an outlet.
- Plug the power cord into a grounded 3-prong outlet.
- The power supply cord has tripped.
- Press and release the RESET button on the power supply cord.
- The Power button has not been pressed.
- Press the Power button on the Control Panel or Remote Control to turn ON the air conditioner.
- There is no power to the electrical outlet.
- Plug a working lamp into the outlet to check for power.
- A household fuse has blown or a circuit breaker has tripped.
- Replace the fuse or reset the circuit breaker.
- The control was programmed for a Time Delay.
- Cancel the Time Delay. See “Control Panel.”
- The batteries in the remote control are dead.
- Replace the batteries.
- The internal water tank is full. NOTE: The air conditioner automatically turns off, and the Water Full indicator illuminates to alert you of this condition.
- Empty the water tank. See “Air Conditioner Care.”
The remote control is not working.
- Batteries are dead.
- Replace the batteries.
- Batteries are installed incorrectly.
- Make sure the batteries are inserted in the correct position.
The air conditioner is working but the room is not cooling.
- The room temperature is hot. NOTE: On extremely hot and humid days, the air conditioner will take longer to cool the room.
- Allow time for the room to cool when you first turn on the unit. Make sure the air conditioner has an adequate BTU rating for the size of the room being cooled.
- The control is set incorrectly to Fan or Dehum mode.
- Set the Mode to Cool and the Fan Speed to High.
- Airflow is restricted.
- Remove any obstacles to the airflow and redirect airflow for uniform cooling.
- Temperature set too high.
- Lower the set temperature.
- Air filters are dirty or restricted.
- Clean the air filter. See “Air Conditioner Care.”
- The air conditioner is installed incorrectly
- Check the exhaust hose and window panel for proper installation.
- Doors and windows are open.
- Close the doors and windows to the room being cooled to prevent cooled air from escaping.
