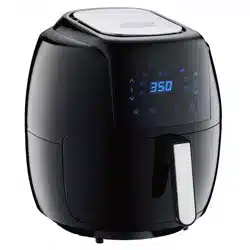
USER MANUAL Air Fryer
PARTS AND ACCESSORIES
PARTS
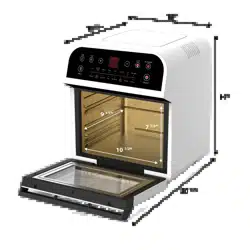
1. Unit Housing
2. Control Display
3. Side Air Intake Vents
4. Power Cord + Plug
5. Internal Heating Compartment
6. Oven Door
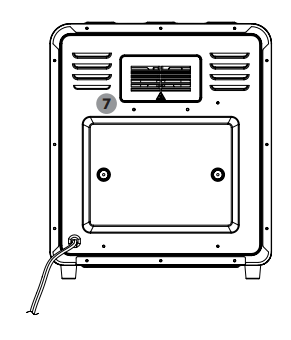
7. Air Outlet Vent
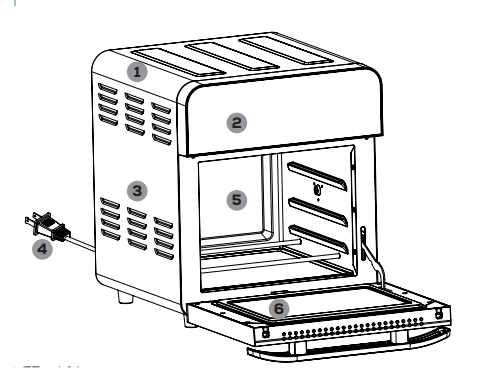
- Unit Dimensions:
- Outside: 13 x 12.75 x 14 in
- Inside: 10.25 x 9.75 x 8 in
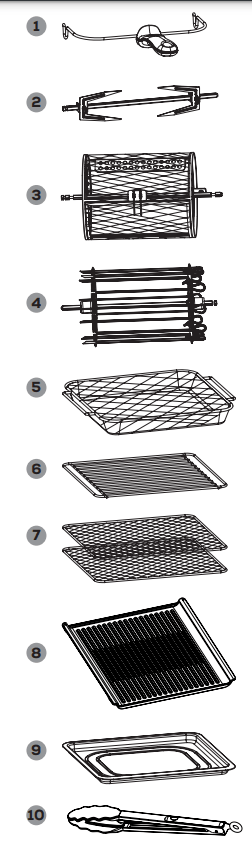
ACCESSORIES
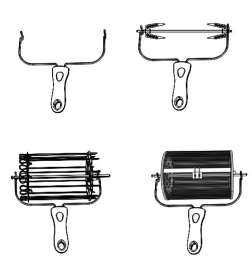
1. Rotisserie Tong
2. Rotisserie Rod & Forks
3. Rotisserie Cage
4. Rotisserie Skewers
5. Shallow Mesh Basket
6. Wire Rack
7. Mesh Tray X2
8. Grill Tray
9. Drip Pan
10. Tongs
NOTE: Rotisserie Forks, Rotisserie Cage, and Skewers share one (1) rod.
CONTROL DISPLAY
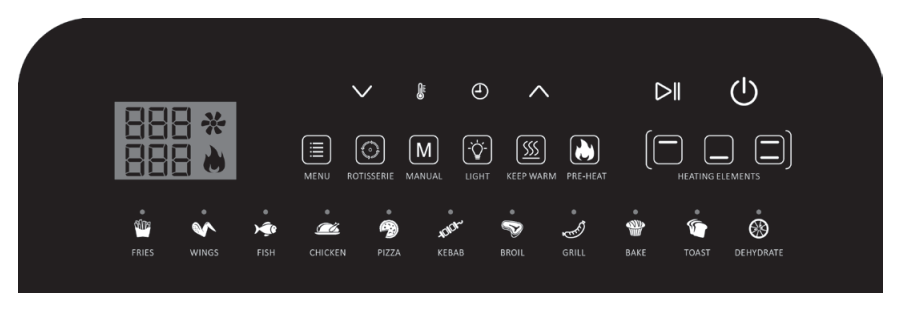
BUTTONS
- MENU: Cycle through preset options
- ROTISSERIE: Activate the Rotisserie function
- MANUAL: Manually select the time and temp of your choosing
- LIGHT: Turn the internal cooking light on or off
- KEEP WARM: Keep food warm for up to 1 hour
- PRE-HEAT: Pre-heat the oven before cooking
- HEATING ELEMENTS: Manually select top-only, bottom-only, or both heating elements
- TEMP: Adjust the temperature of cooking presets or manual function
- TIME: Adjust the time of cooking presets, manual function
- UP & DOWN arrows: Increase or decrease
- TEMP & TIME and KEEP WARM
- START/PAUSE: Start and stop the cooking process
- POWER: Power the unit on and off
USING THE DIGITAL CONTROLS
- Once the unit is plugged in, the display lights will flash once with a single chime/beep.
- Press the POWER button, and the digital display will light up displaying zero and the unit will be in standby mode. NOTE: The unit will automatically shut down after 60 seconds in standby mode.
- In standby mode, press MENU or MANUAL to begin.
Using Manual Mode
Completely customize your cooking experience with the MANUAL mode.
- Press the MANUAL button to begin.
- Set the time and temperature by pressing the TIME or TEMP button and use the UP & DOWN arrows to adjust. The temperature can be adjusted in increments of 10° between 120°F – 450°F for all presets except Dehydrate. The time can be adjusted in 1 minute increments between 1-60 minutes (except Dehydrate). Press and hold the UP or DOWN arrows to adjust time in 10 minute increments.
- Press one of three HEATING ELEMENTS options: Top-only, Bottom-only, or both heating elements. NOTE: The Air Fryer Oven Grill Ultimate uses 1700 watts, divided between the two heating elements. The top heating element reaches 1200 watts, while the bottom heating element only reaches 500 watts. Keep this in mind when using ONLY the bottom heating element. Food may take longer to cook.
- If using a rotisserie accessory, press the ROTISSERIE button to activate the rotisserie.
- If you would like to pre-heat your oven, press the PRE-HEAT button. NOTE: When PRE-HEAT is selected, the unit will first heat to your selected temperature, then beep to alert you that it is time to insert your food. Once you insert your food and close the oven door, the time will begin to count down.
- Press START/PAUSE to begin cooking. The
 icon and
  icon will light up on the digital display meaning both the fan and heating element are running.
Using the Presets
Your Air Fryer Oven Grill Ultimate includes 11 preset cooking programs to take the guesswork out of cooking times and temps.
- To select a preset, press the MENU button repeatedly until the indicator light reaches your desired preset. NOTE: Refer to the PRESET CHART of this manual (pg. 16) for detailed TEMP & TIME for each preset.
- To adjust the preset settings, press the TEMP or TIME button and use the UP & DOWN arrows to change. The temperature can be adjusted in increments of 10° between 120°F – 450°F for all presets except Dehydrate. The time can be adjusted in 1 minute increments between 1-60 minutes (except Dehydrate). Press and hold the UP or DOWN arrows to adjust time in 10 minute increments.
- Press START/PAUSE to begin cooking. The icon and icon will light up on the digital display meaning both the fan and heating element are running. NOTE: Use the heating element buttons to select single heating (top or bottom) or dual heating before starting the cooking cycle.
Using the Pre-heat Function
Pre-heating your oven gives you the best results.
- Select a preset by using the MENU button or set a time and temp in MANUAL mode.
- Press the PRE-HEAT button and the button will illuminate.
- Press the START/PAUSE button to begin the pre-heating process.
- When the oven is pre-heated, it will beep to indicate it’s ready to cook, and the PRE-HEAT button light will turn off.
- Open the door and put the food inside. Close the door and the unit will automatically enter your selected preset or manual cooking mode selection, and the time will begin to count down.
NOTE: Press the POWER button to turn off the pre-heat process at any point. The unit will enter standby mode.
Using the Keep Warm Function
Keep your food warm until you are ready to eat. You can select the Keep Warm function by itself (150°F for 30 minutes), or in conjunction with another cooking setting. To use KEEP WARM with another cooking setting, follow the instructions below.
- Select a preset by using the MENU button or set a time and temp in MANUAL mode.
- Press the KEEP WARM button and the button will illuminate.
- Press the START/PAUSE button to begin the cooking process.
- When your cooking cycle is done, the unit will beep 3 times and switch to Keep Warm mode (150°F for 30 minutes). The unit will beep twice every five minutes to alert you that Keep Warm mode is running
CAUTION! Contents and cooking accessories will be extremely hot after every use. To prevent personal injury, always use oven mitts to remove contents and always wait until the Unit has cooled sufficiently before touching or cleaning any area of the Internal Heating Compartment of the Air Fryer Oven Grill.
SET UP AND USING AIR FRYER OVEN GRILL
BEFORE FIRST USE
- Unbox the Unit and place on a countertop or flat surface away from any water source and near a polarized outlet. Before plugging in the Unit, remove accessories from the Internal Heating Compartment. Unwrap accessories.
- Rinse the accessories with warm water and dry thoroughly. Place the Drip Pan at the bottom of the Internal Heating Compartment and close the oven door.
- Plug in the Unit. Press the POWER button and use MANUAL mode to follow the steps below:
- Press TEMP icon and using the
 and
and  arrows set to 350°F
- Press TIME icon and using the and arrows set to 5 minutes
- Wait for the Unit to begin heating
- This process will burn off any remaining residue left from the manufacturer. There may be a slight burning smell but, will dissipate after a few minutes.
- Your new GoWISE USA Air Fryer Oven Grill Ultimate is now ready for use!
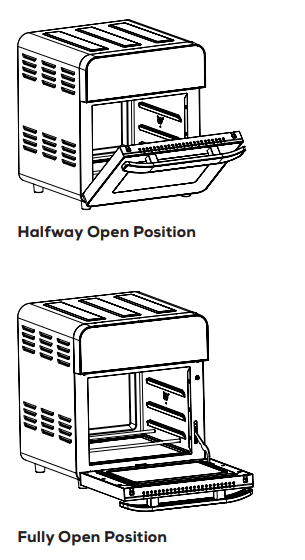
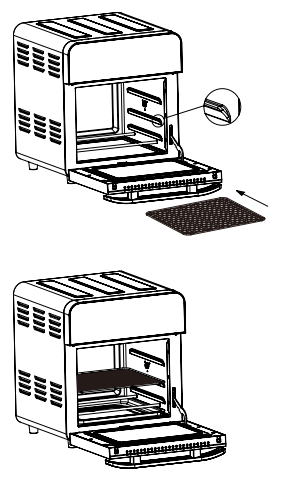
NOTE: The oven door has two different open positions – halfway and fully open. This is to prevent you from accidentally slamming the glass and stainless-steel door down onto your countertop. When you open the door, it will intentionally stop at the halfway position. Pull towards you again to lower the door into the fully open position.
USING YOUR ACCESSORIES
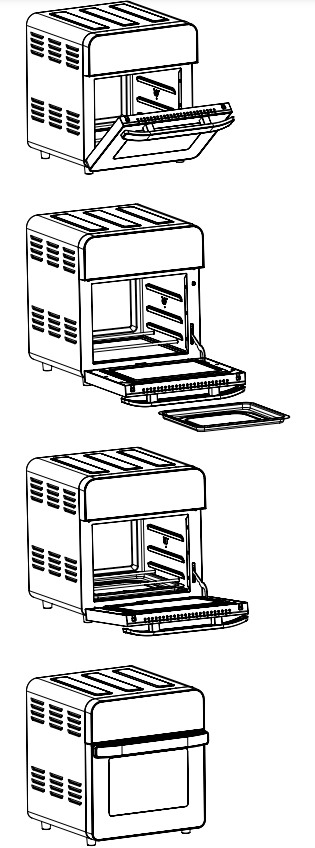
Inserting the Drip Pan
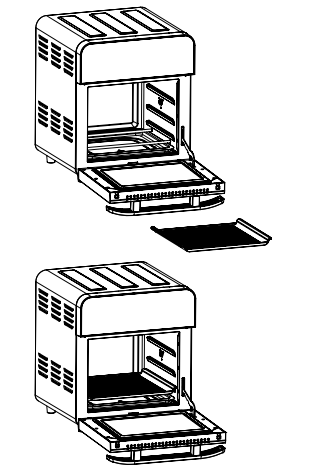
Inserting the Grill Tray
- The Grill Tray is designed to fit directly onto the bottom heating element. Insert the tray on top of the heating element and align the heating element with the grooves on the bottom of the Grill Tray so it lays flat. Ensure that the Drip Pan is inserted below the bottom heating element to catch oils and juices as you grill.
NOTES:
- Only use silicone-tipped tongs (included with your oven) when using the Grill Tray to avoid scratching the nonstick surface.
- When removing the Grill Tray, be sure to use oven mitts to avoid personal injury
Inserting the Mesh Rack
Inserting the Wire Rack

NOTE: Choose the correct cooking rack per cooking application. The mesh rack is perfect for dehydration, but is also great for cooking crispy snacks and reheating pizza. The wire rack is best used for holding baking trays at the correct cooking distance from the internal heating element.
Rotisserie Skewers: Use for cooking Kebabs.
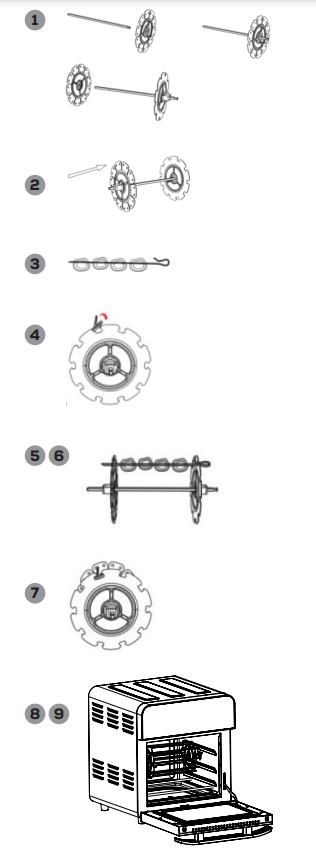
Attaching Rotisserie Rod and Skewer Racks
1. Place the two Skewer Racks at each end of the Rotisserie Rod. Make sure thumb bolts are on the outer side of the Rotisserie Rod.
2. Slightly tighten the thumb bolts. Do not over tighten as you may need to adjust the tightness after inserting skewers.
3. Carefully poke skewers through food.
Rotisserie Skewer Assembly
4. Slide a skewer into an open slot on the edge of the Skewer Rack with the clip facing toward the Rotisserie Rod.
5. Guide the sharp end of the skewer through the hole on the opposite Skewer Rack and push the clip through the hole near the slot until the skewer is secure.
6. Repeat steps 3-5 in a uniform manner around the Skewer Rack. Make sure skewers are evenly spaced.
7. Tighten thumb bolts to make sure they are securely in place.
8. Use caution when inserting Rotisserie Skewers into the Unit to avoid being poked by the skewer tips.
9. Open the oven door. Insert the long end of the Rotisserie Rod into the Rotisserie Socket first then, set the opposite end into the Rotisserie slot. Do not force the rod into the socket; rotate until the rod slips in easily
Removing Rotisserie Rod, Rotisserie Skewers, and Rotisserie Cage from Unit
- Open the oven door.
- While wearing oven mitts on both hands and using the Rotisserie Tong, hook the bottom left and right sides of the Rotisserie Rod, in the gaps of the rod and carefully lift the rod out of the resting slot on the left side of the oven – carefully pull the rod out of the Rotisserie socket and remove from the oven.
NOTE: Contents will be hot and can easily burn – use caution not to let scalding meat juices or oils from falling on the skin by holding a catch tray or plate under the Rotisserie contents.
NOTES:
- The GoWISE USA Air Fryer Oven Grill Ultimate will only begin heating once the oven door is completely closed. If the oven door isn’t completely shut, an alarm will sound when the START/PAUSE button is pushed.
- The oven door can be opened during the cooking process – the Unit will stop heating automatically until the door is closed again. The fan will also stop while the door remains open. If the oven door remains open for 6 minutes, the Unit will shut down.
CAUTION! Contents and cooking accessories will be extremely hot after every use. To prevent personal injury, always use oven mitts to remove contents and always wait until the Unit has cooled sufficiently before touching or cleaning any area of the Internal Heating Compartment of the Air Fryer Oven Grill.
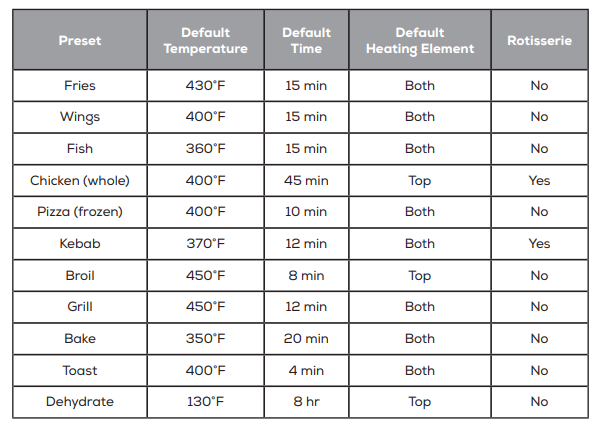
COOKING PRESET CHART
Cooking time of a whole roasted chicken may vary depending on weight. Use a meat thermometer to check the internal temperature as per the chart..
CLEANING YOUR AIR FRYER OVEN GRILL
- Clean the unit after every use.
- Unplug the unit. ALWAYS WAIT UNTIL THE OVEN HAS COOLED TO A SAFE TEMPERATURE BEFORE HANDLING.
- Wipe the outside of the unit with a damp cloth.
- Wash the accessories with hot water, soap and a non-abrasive sponge. You can remove any stuck-on food by using a degreasing liquid soap. For any hard-to-remove food, soak the accessories in hot water.
- Clean the inside of the appliance with a lightly dampened nonabrasive sponge or cloth. NEVER submerge in water.
- Scrub the heating element with a cleaning brush to remove any food debris.
TROUBLESHOOTING & ERROR CODES
| Problem |
Solution |
| Why won’t my air fryer oven turn on? |
First, make sure the air fryer oven is plugged in and the oven door is closed. You can also try using different outlets if it’s still not turning on. If none of these solve the problem, please contact our Customer Care Team. |
| My food is not cooked all the way / My food doesn’t seem crispy enough |
Your oven may be overfilled with ingredients. Cook in smaller batches for more even cooking. |
| You may have the temperature set too low. Increase the temp. and continue cooking |
| For a crispier effect, brush w |
| Try flipping or rotating your food over midway through the cooking cycle. This will ensure even cooking |
| White smoke is coming out of my air fryer oven. Should I be worried? |
It’s normal for white smoke to appear when prepping greasy ingredients. When frying greasy ingredients, a large amount of oil will leak into the pan. The oil produces white smoke and the oven may heat up more than usual. This does not affect the appliance or end food result. Be sure to clean your oven properly after each use to prevent it from smoking during the next use. It helps to wipe down the heating element as well. |
| How do I stop the cooking cycle on my air fryer oven? |
Press the POWER button to completely stop your cooking cycle. To pause the cooking cycle, press the START/PAUSE button. The heat and fan icons will turn off, but your cooking cycle time and temp will hold until you press the START/PAUSE button again. |
| ERROR CODE |
ISSUE |
| E1 |
Sensor open circuit |
| E2 |
Touch sensors short circuit |
| E3 |
Circuit board connection error |