
ASSEMBLY MANUAL / OWNER’S MANUAL
Manual en Español Latino Americano:
http://www.nautilus.com
R514c

2
This icon means a potentially hazardous situation which, if not avoided, could result in death or serious injury.
Obey the following warnings:
Read and understand all warnings on this machine.
Carefully read and understand the Assembly instructions.
• Keepbystandersandchildrenawayfromtheproductyouareassemblingatalltimes.
• Donotconnectpowersupplytothemachineuntilinstructedtodoso.
• Donotassemblethismachineoutdoorsorinawetormoistlocation.
• Makesureassemblyisdoneinanappropriateworkspaceawayfromfoottrafficandexposuretobystanders.
• Somecomponentsofthemachinecanbeheavyorawkward.Useasecondpersonwhendoingtheassemblysteps
involvingtheseparts.Donotdostepsthatinvolveheavyliftingorawkwardmovementsonyourown.
• Setupthismachineonasolid,level,horizontalsurface.
• Donottrytochangethedesignorfunctionalityofthismachine.Thiscouldcompromisethesafetyofthismachineandwill
void the warranty.
• Ifreplacementpartsarenecessary,useonlygenuineNautilus
®
replacement parts and hardware. Failure to use genuine
replacementpartscancausearisktousers,keepthemachinefromoperatingcorrectlyandvoidthewarranty.
• Donotuseuntilthemachinehasbeenfullyassembledandinspectedforcorrectperformanceinaccordancewiththe
Manual.
• DonotoperatethismachineuntilyoureadandunderstandthecompleteOwner’sManualprovidedonline.Keepthe
Owner’sManualforfuturereference.
• Doallassemblystepsinthesequencegiven.Incorrectassemblycanleadtoinjuryorincorrectfunction.
• Thisproductcontainsmagnets.Magneticfieldscaninterferewiththenormaluseofcertainmedicaldevicesataclose
range.Usersmaycomeintoproximityofthemagnetsintheassembly,maintenance,and/oruseoftheproduct.Giventhe
obviousimportanceofthesedevices,suchasapacemaker,itisimportantthatyouconsultwithyourmedicalprovider
inconnectionwiththeuseofthisequipment.Pleaseconsultthe“SafetyWarningLabelsandSerialNumber”sectionto
determine the location of the magnets on this product.
ImportantSafetyInstructions-Assembly 2
SafetyWarningLabels/SerialNumber 3
Specifications 3
Parts 4
Tools 4
Hardware 5
Before Assembly 5
Assembly 6
MovingtheMachine 20
LevelingtheMachine 20
ImportantSafetyInstructions 21
Features 22
Operations 26
InitialSetup 27
QuickStartProgram 27
ResultsMode 31
PausingorStopping 32
Maintenance 34
Troubleshooting 36
Warranty 39
TABLE Of CONTENTS
IMpORTANT SAfETY INSTRUCTIONS
-ASSEMBLY
Nautilus,Inc.,(800)NAUTILUS/(800)628-8458,www.NautilusInc.com-CustomerService:NorthAmerica(800)605-3369,
[email protected]|outsideU.S.+01-360-859-5180,[email protected]|PrintedinChina|©2012Nautilus,Inc.
Tovalidatewarrantysupport,keeptheoriginalproofofpurchaseandrecordthefollowing
information:
Serial Number __________________________
Date of Purchase ____________________
To register your product warranty, go to: www.nautilus.com/register
Orcall1(800)605–3369.
Ifyouhavequestionsorproblemswithyourproduct,pleasecall1(800)NAUTILUS(628–8458).
3
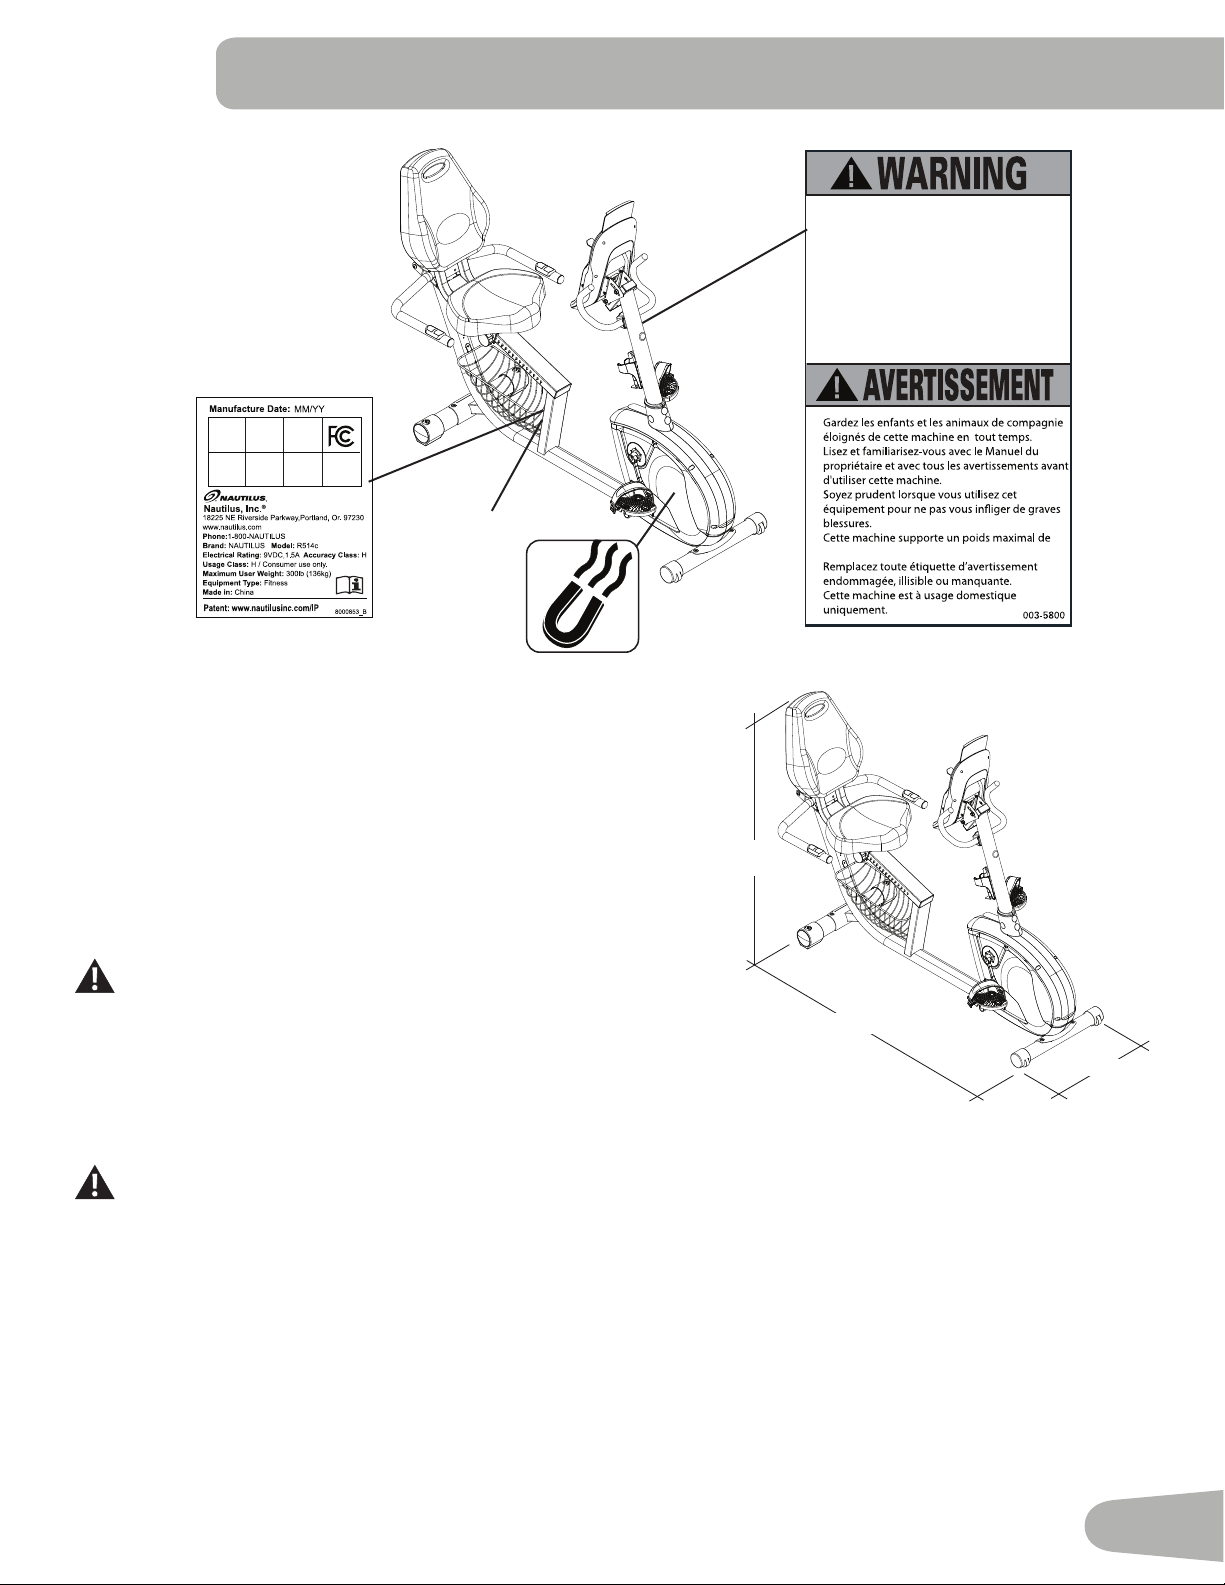
SAfETY WARNINg LABELS ANd SERIAL NUMBER
/ SpECIfICATIONS
Maximum User Weight: 300lbs.(136kg)
Power Requirements:
OperationalVoltage: 9VDC
OperatingCurrent: 1500mA
Regulatory Approvals:
ACPowerAdapter: ULlisted,CSAcertified(orequivalent),Rated
120V60HzInput,9VDC,1500mAOutput.
Class2orLPS.
Thisproduct,itspackaging,andcomponentscontainchemicals
knowntotheStateofCaliforniatocausecancer,birthdefects,or
reproductiveharm.ThisNoticeisprovidedinaccordancewith
California’sProposition65.Ifyouwouldlikeadditionalinformation,
please refer to our website at
www.nautilus.com/prop65.
52”
(132 cm)
25” (63.5 cm)
67” (170 cm)
•
•
•
•
•
•
300lbs. (136kg).
Keep children away.
Prior to use, read and understand the
Owners Manual.
Injury or death is possible if Caution is not
used while using this machine.
The maximum user weight for this
machine is 300 lbs (136 Kg).
Replace any “Caution” “Warning” or
“Danger” label that is illegible, damaged,
or removed.
This machine is for home use only.
•
•
•
•
•
•
SerialNumber
This document is the property of Nautilus, Inc. It may not be reproduced in whole or part, provided to third parties, or used for any purposes other than the performance of work for Nautilus, Inc. without written authorization. © Nautilus, Inc. This document is provided in condence and your acceptance of this document is your agreement to maintain the document in condence.
FCC Compliance
Changesormodificationstothisunitnotexpresslyapprovedbythepartyresponsibleforcompliancecouldvoidthe
user’sauthoritytooperatetheequipment.
Thepowersupplycomplieswithpart15oftheFCCrules.Operationissubjecttothefollowingtwoconditions:(1)Thisdevicemaynot
causeharmfulinterference,and(2)thisdevicemustacceptanyinterferencereceived,includinginterferencethatmaycauseundesired
operation.
Note:ThispowersupplyhasbeentestedandfoundtocomplywiththelimitsforaClassBdigitaldevice,pursuanttoPart15ofthe
FCC Rules. These limits are designed to provide reasonable protection against harmful interference in a residential installation. This
equipmentgenerates,usesandcanradiateradiofrequencyenergyand,ifnotinstalledandusedinaccordancewiththeinstructions,
may cause harmful interference to radio communications.
However,thereisnoguaranteethatinterferencewillnotoccurinaparticularinstallation.Ifthisequipmentdoescauseharmfulinterference
toradioortelevisionreception,whichcanbedeterminedbyturningtheequipmentoffandon,theuserisencouragedtotrytocorrectthe
interference by one or more of the following measures:
•Reorientorrelocatethereceivingantenna.
•Increasetheseparationbetweentheequipmentandreceiver.
•Connecttheequipmentintoanoutletonacircuitdifferentfromthattowhichthereceiverisconnected.
•Consultthedealeroranexperiencedradio/TVtechnicianforhelp.

4
Item Qty Description Item Qty Description
1 1
Main Frame
12 1 RearStabilizer
2
1 SeatRail
13 1 SeatFrame
3 1
UprightHandlebar
14 1 AC Adapter
4 1
ConsoleBracket
15 1 SideHandlebar
5 1
Console
16 1 SeatBack
6 1
WaterBottleHolder
17 1 SeatBottom
7 2
Console Mast
18 1 SeatBackCover
8 1
HandlebarBracket
19 1 SeatBackFrame
9 1 LeftPedal 20 1 SeatRailBracket
10 1
RightPedal
21 1 MP3Cord(notshown)
11 1 Front stabilizer
Tools
Included Not Included
5 mm
(recommended)
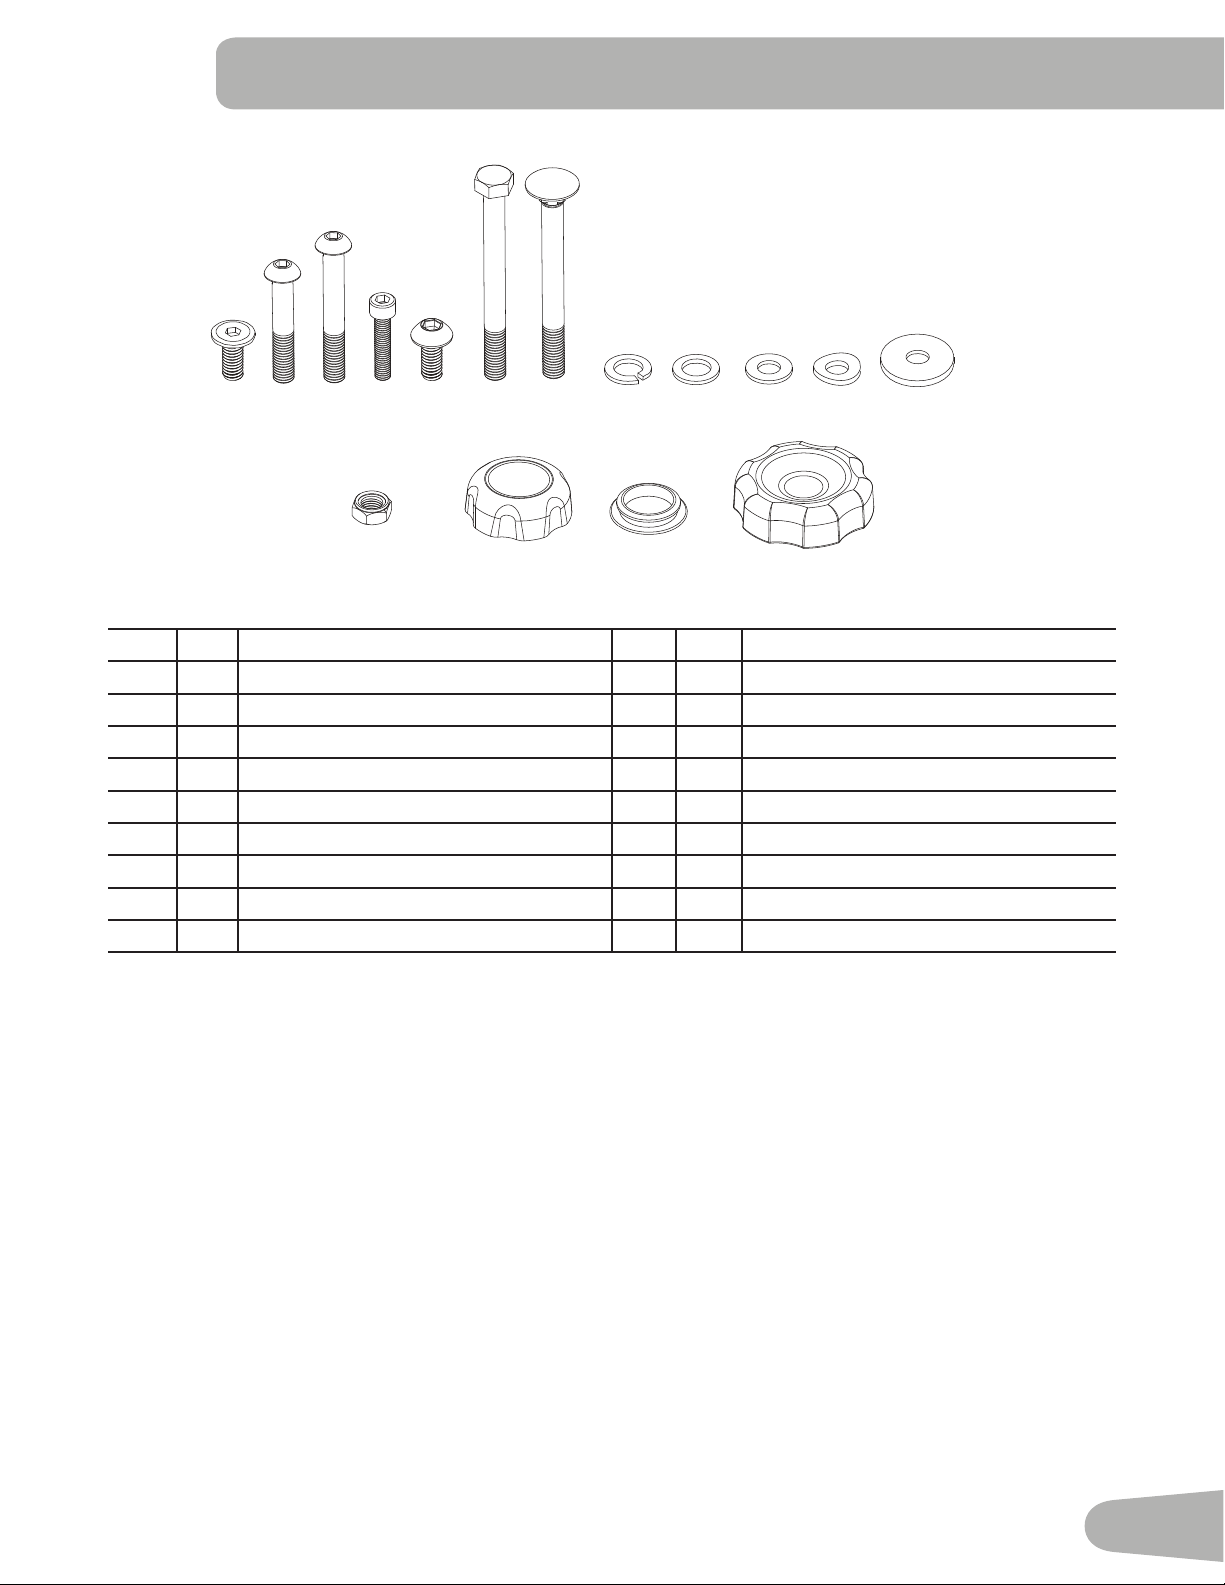
pARTS / TOOLS
1
2
3
4
6
7
8
9
10
11
12
13
14
15
16
17
18
19
20
5
5
Item Qty Description Item Qty Description
A 4
HexScrewM8x16
J
28
RegularWasher(9pre-installed)
B
5
ButtonHeadHexScrewM8x35
K
4
ArcWasher
C
4
ButtonHeadHexScrewM8x45
L
1
WideWasher
D
1
HexBoltM7x30
M
1
LockNutM8
E
21
ButtonHeadHexScrewM8x16(9pre-installed)
N
-
not used
F
1
HexBoltM8x85
O
1
ConsoleAdjustmentKnob
G
1
CarriageBoltM8x85
P
4
Cap
H
1
LockWasher
Q
1
SeatBackAdjustmentKnob
I
1
NarrowWasher
HARdWARE / BEfORE ASSEMBLY
Before Assembly
Selecttheareawhereyouaregoingtosetupandoperateyourmachine.Forsafeoperation,thelocationmustbeonahard,
levelsurface.Allowaworkoutareaofaminimum73”x115”(185.4cmx292.1cm).
Basic Assembly Tips
Follow these basic points when you assemble your machine:
• Readandunderstandthe“ImportantSafetyInstructions”beforeassembly.
• Collect all the pieces necessary for each assembly step.
• Usingtherecommendedwrenches,turntheboltsandnutstotheright(clockwise)totighten,andtheleft(counterclock-
wise)toloosen,unlessinstructedotherwise.
• Whenattaching2pieces,lightlyliftandlookthroughtheboltholestohelpinserttheboltthroughtheholes.
• Theassemblyrequires2people.
A B C D E F G H I J K L
M O P Q
6
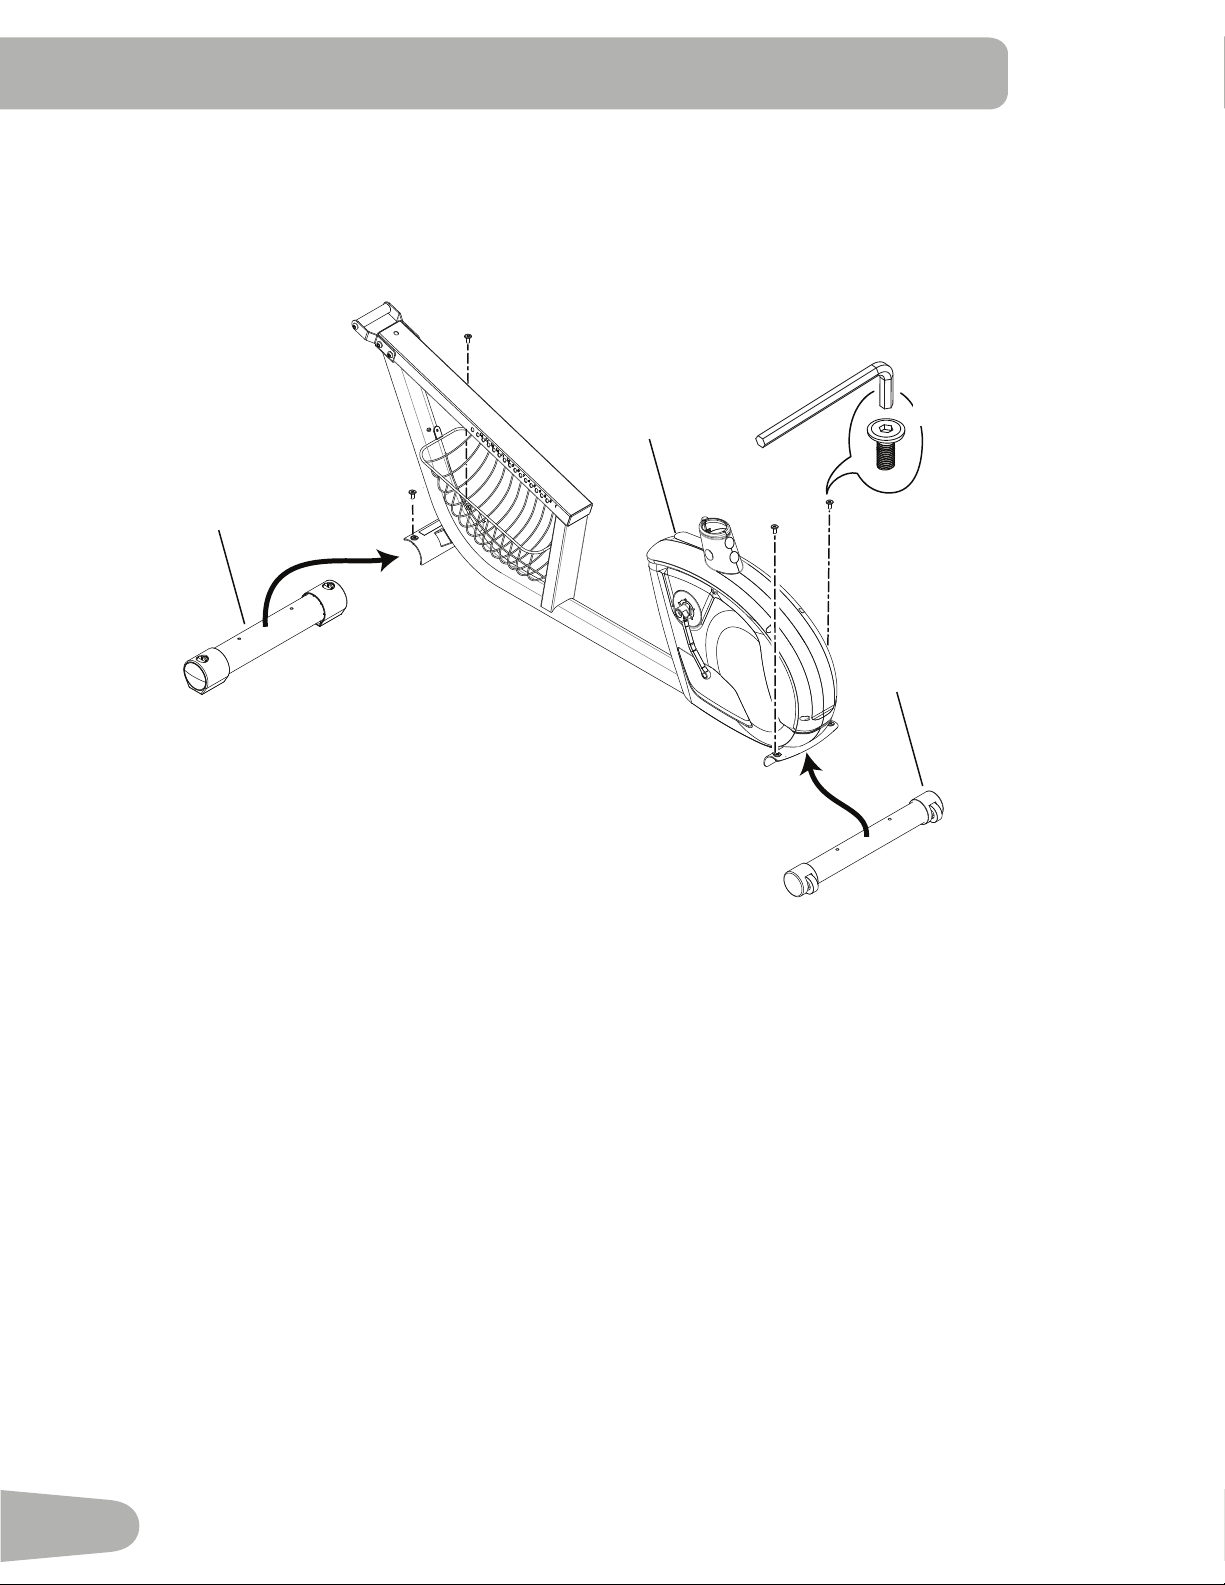
1. Install Front and Rear Stabilizers
ASSEMBLY
1
12
11
A
X4
7
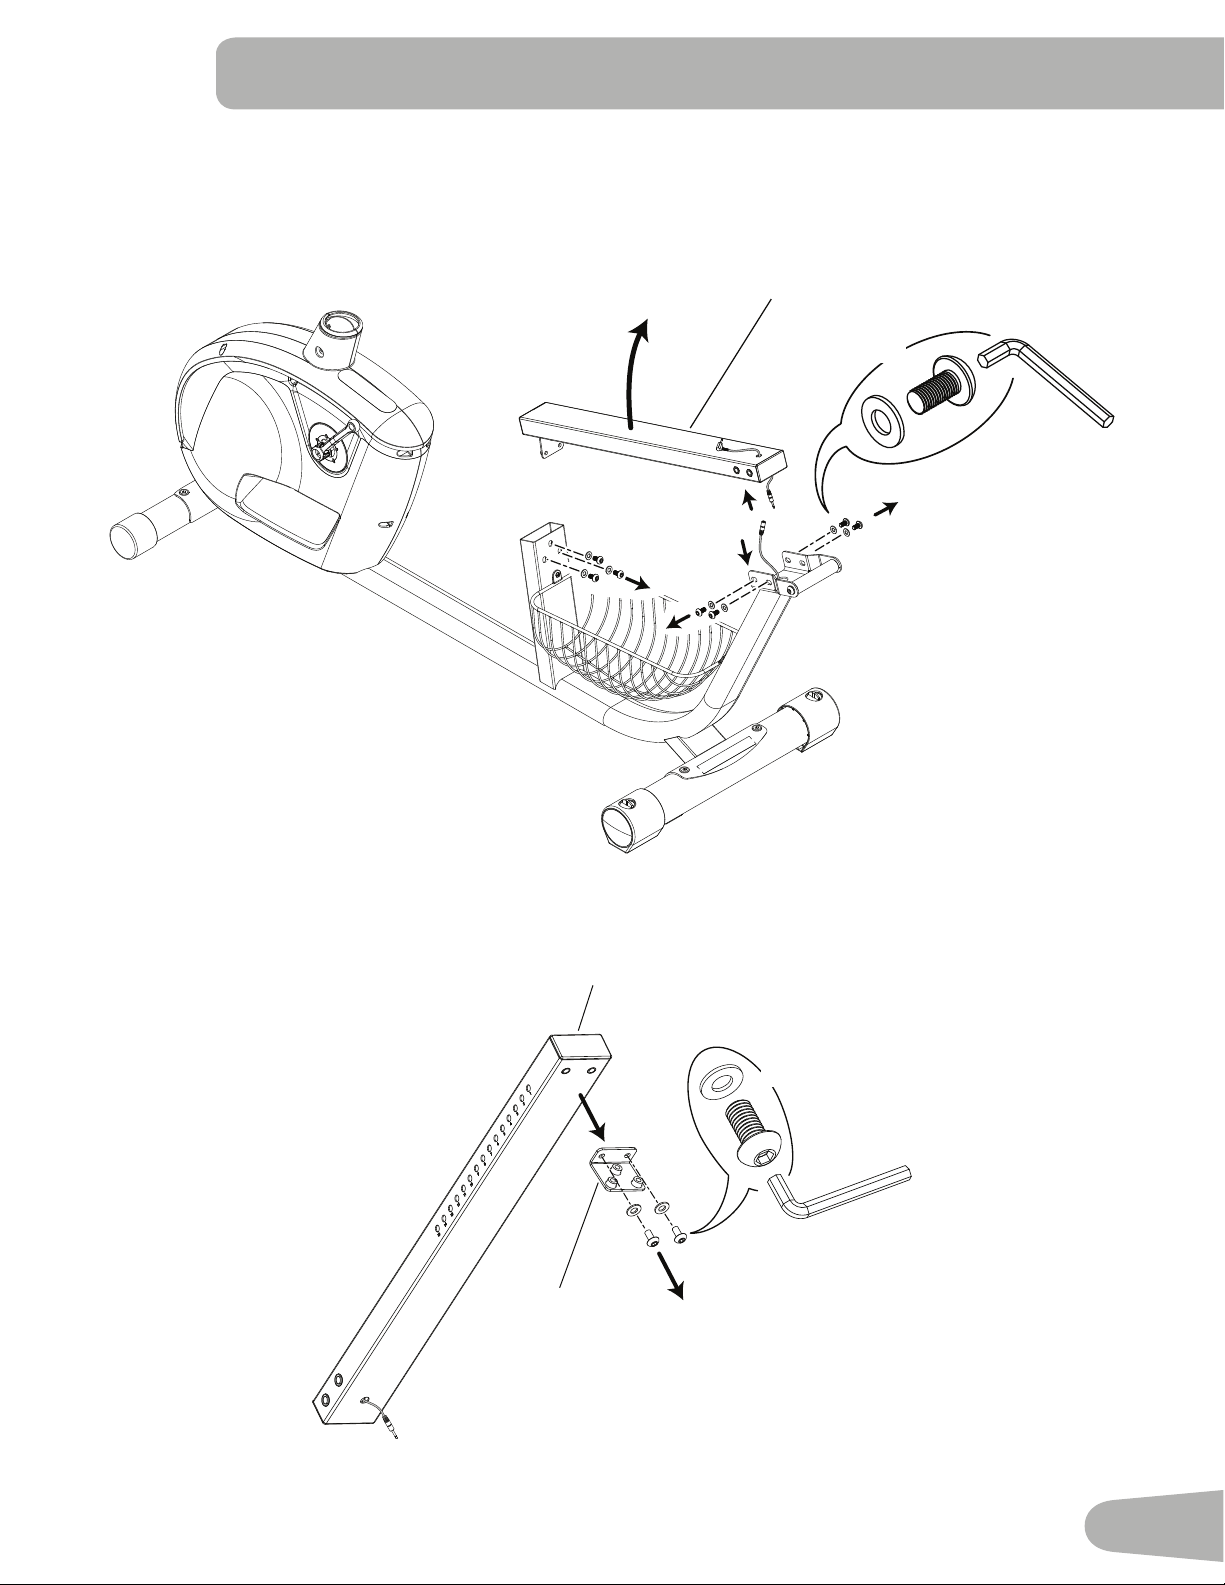
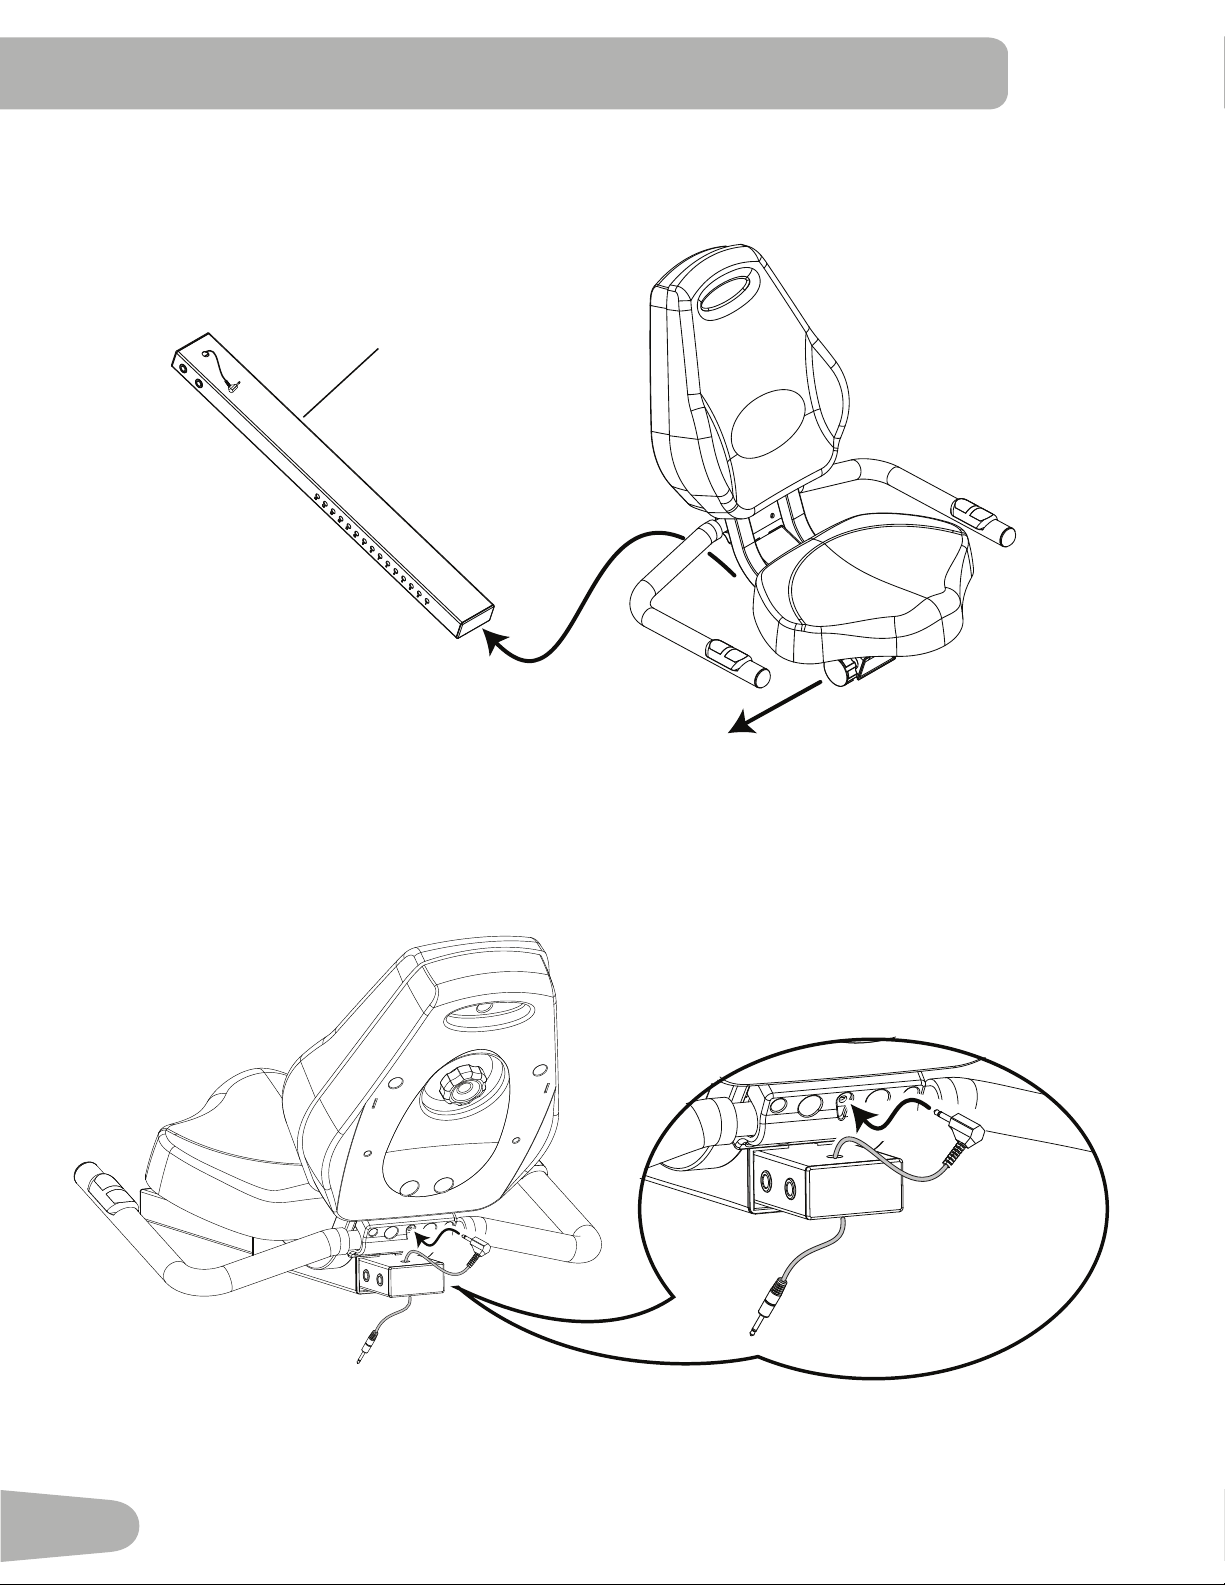
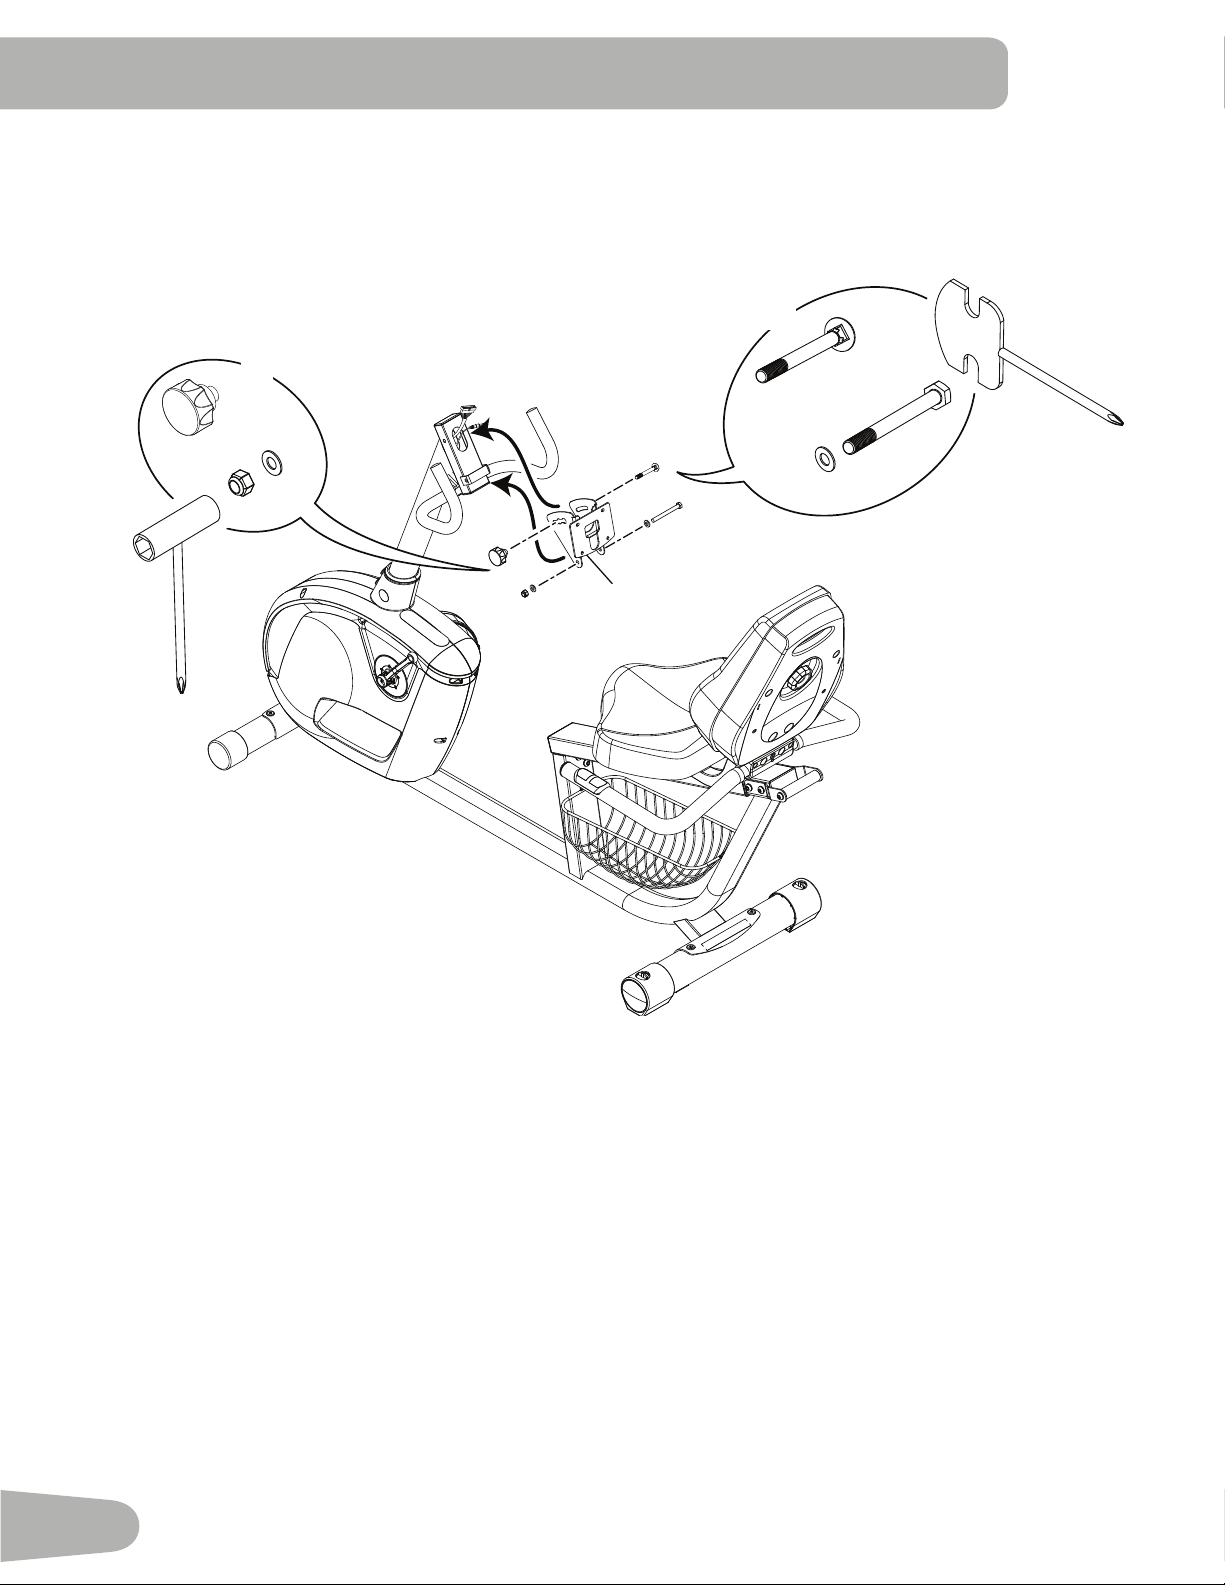
2. Remove Seat Rail
NOTICE:DisconnecttheHeartRateCable.MakesurethattheHeartRateCabledoesnotfallintotheframetube.
X2
E
J
2
20
X7
J
E
2
8
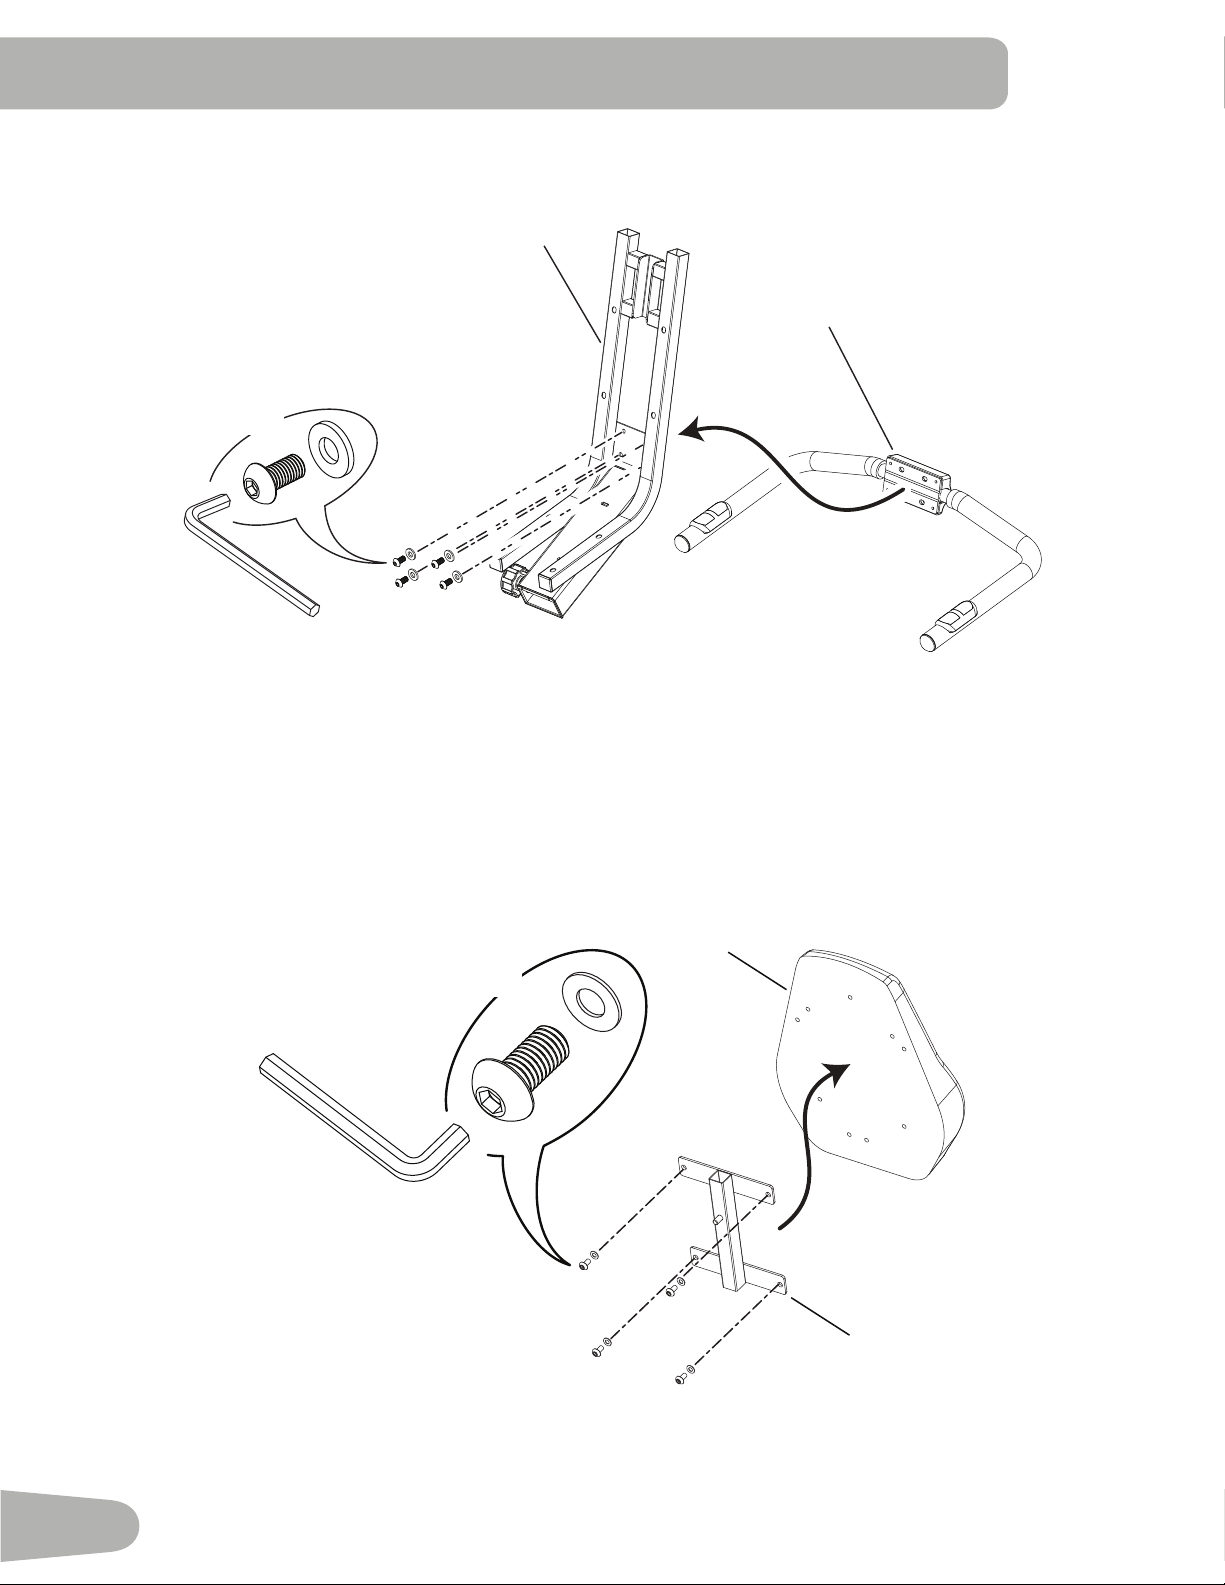
4. Attach Seat Back Frame to Seat Back
3. Attach Side Handlebar to Seat Frame
13
15
E
J
X4
19
E
J
16
X4
9
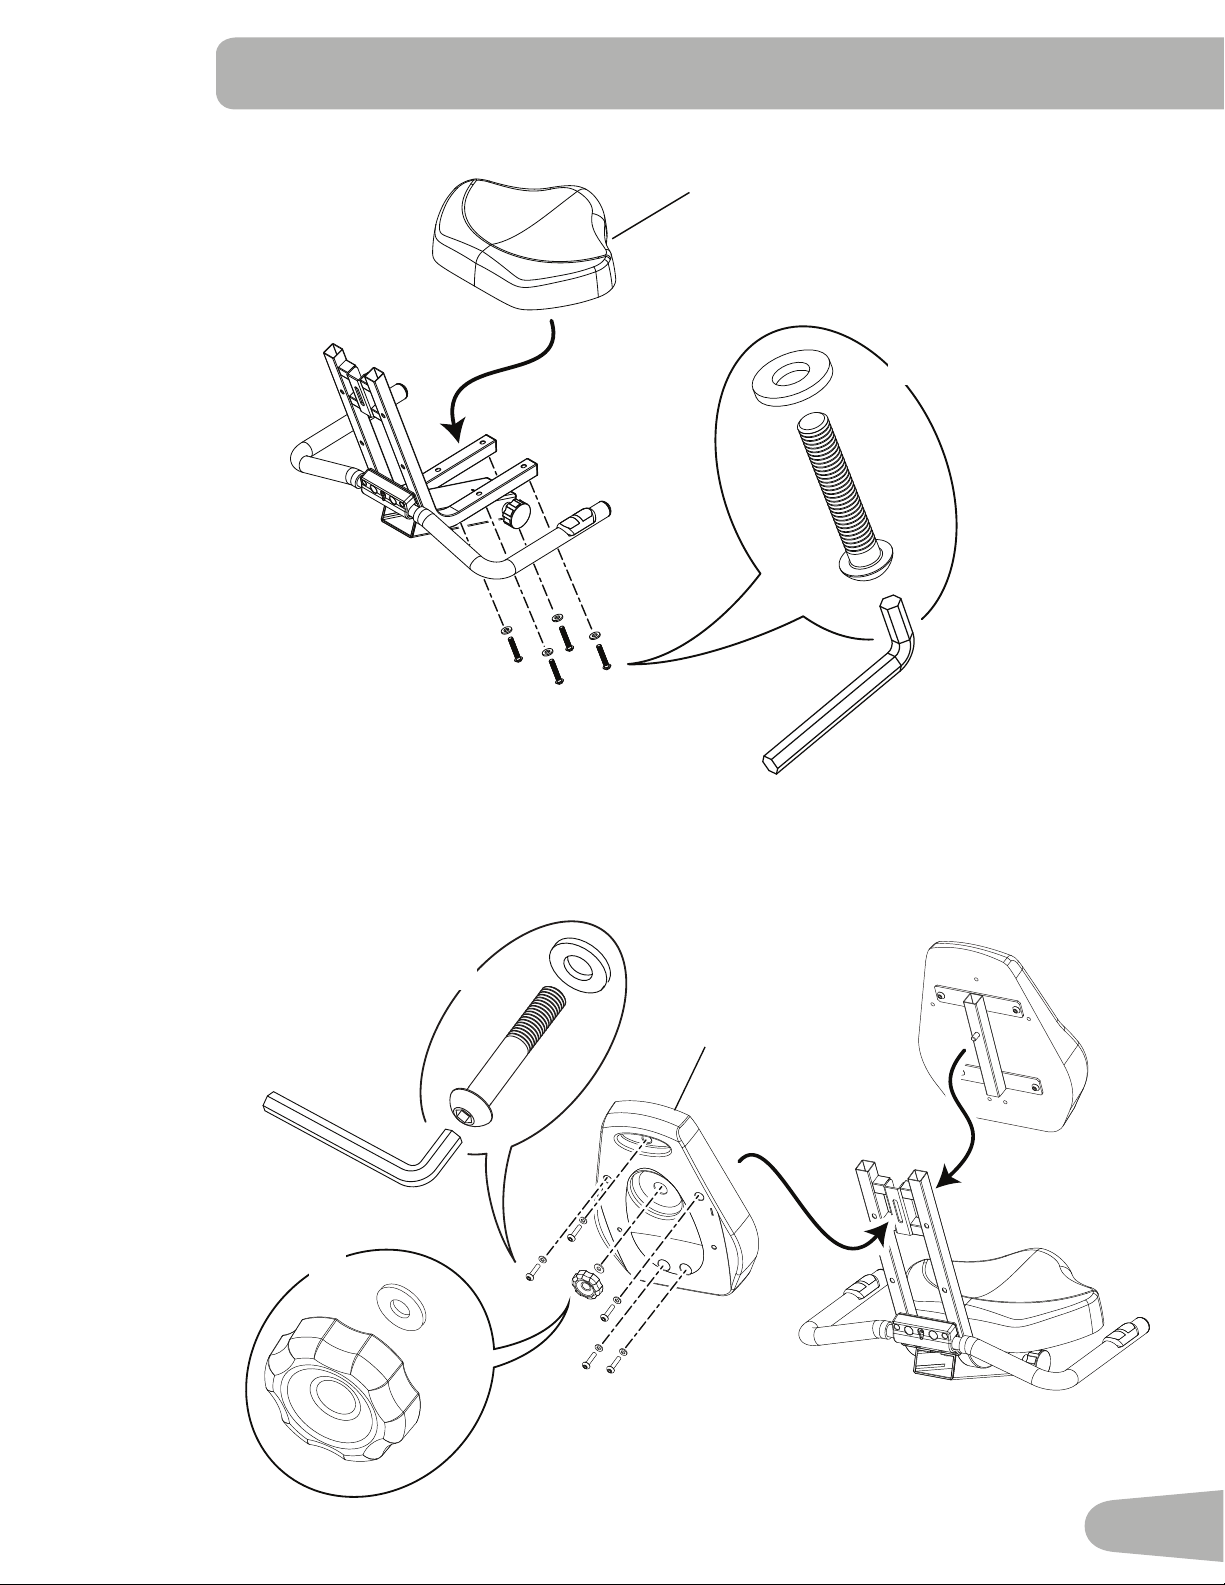
5. Install Seat Bottom
17
C
J
X4
6. Install Seat Back Assembly and Seat Back Cover
B
J
L
18
Q
X5
X1
10
7. Slide Seat Assembly onto Seat Rail
NOTICE:Donotcrimpthecables.
8. Connect Heart Rate Cable to Seat Assembly
2
11
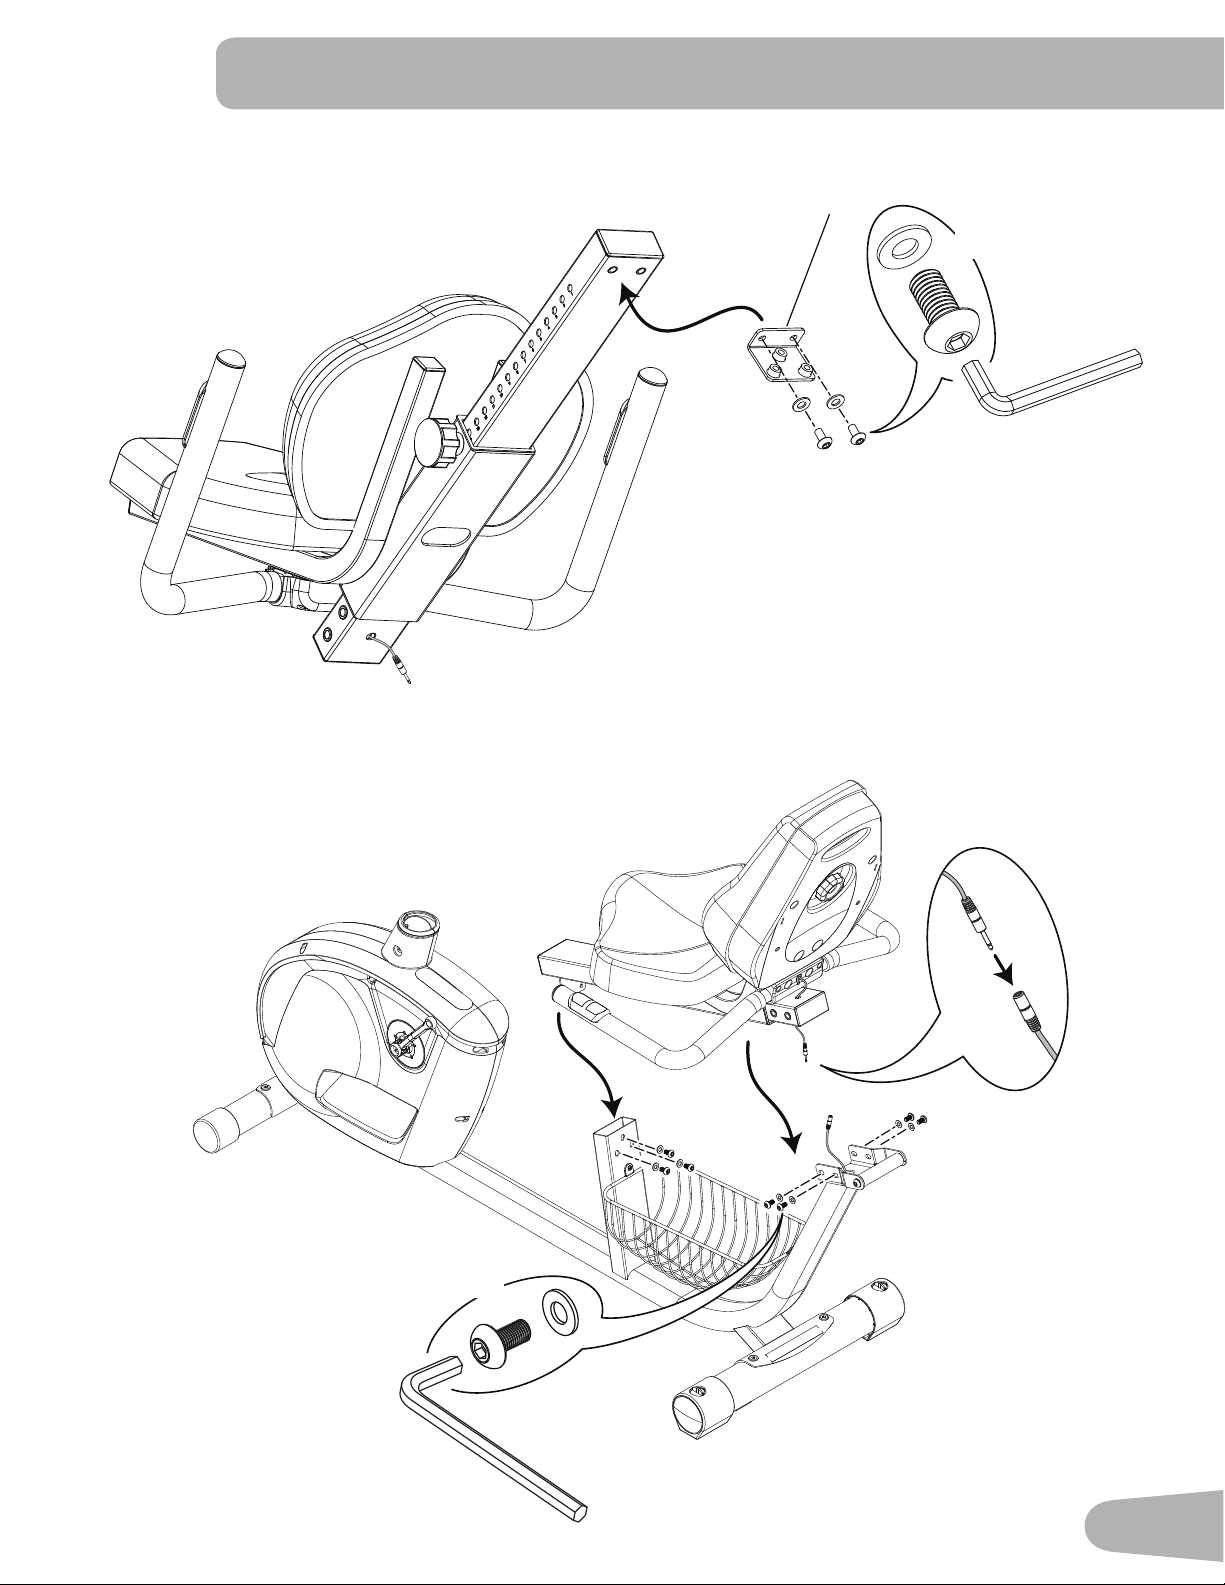
9. Attach Seat Rail Bracket to Seat Rail Assembly
10. Attach Seat Assembly to Frame Assembly
NOTICE:DonotcrimpHeartRateCable.
20
E
X2
J
E
J
X7
12
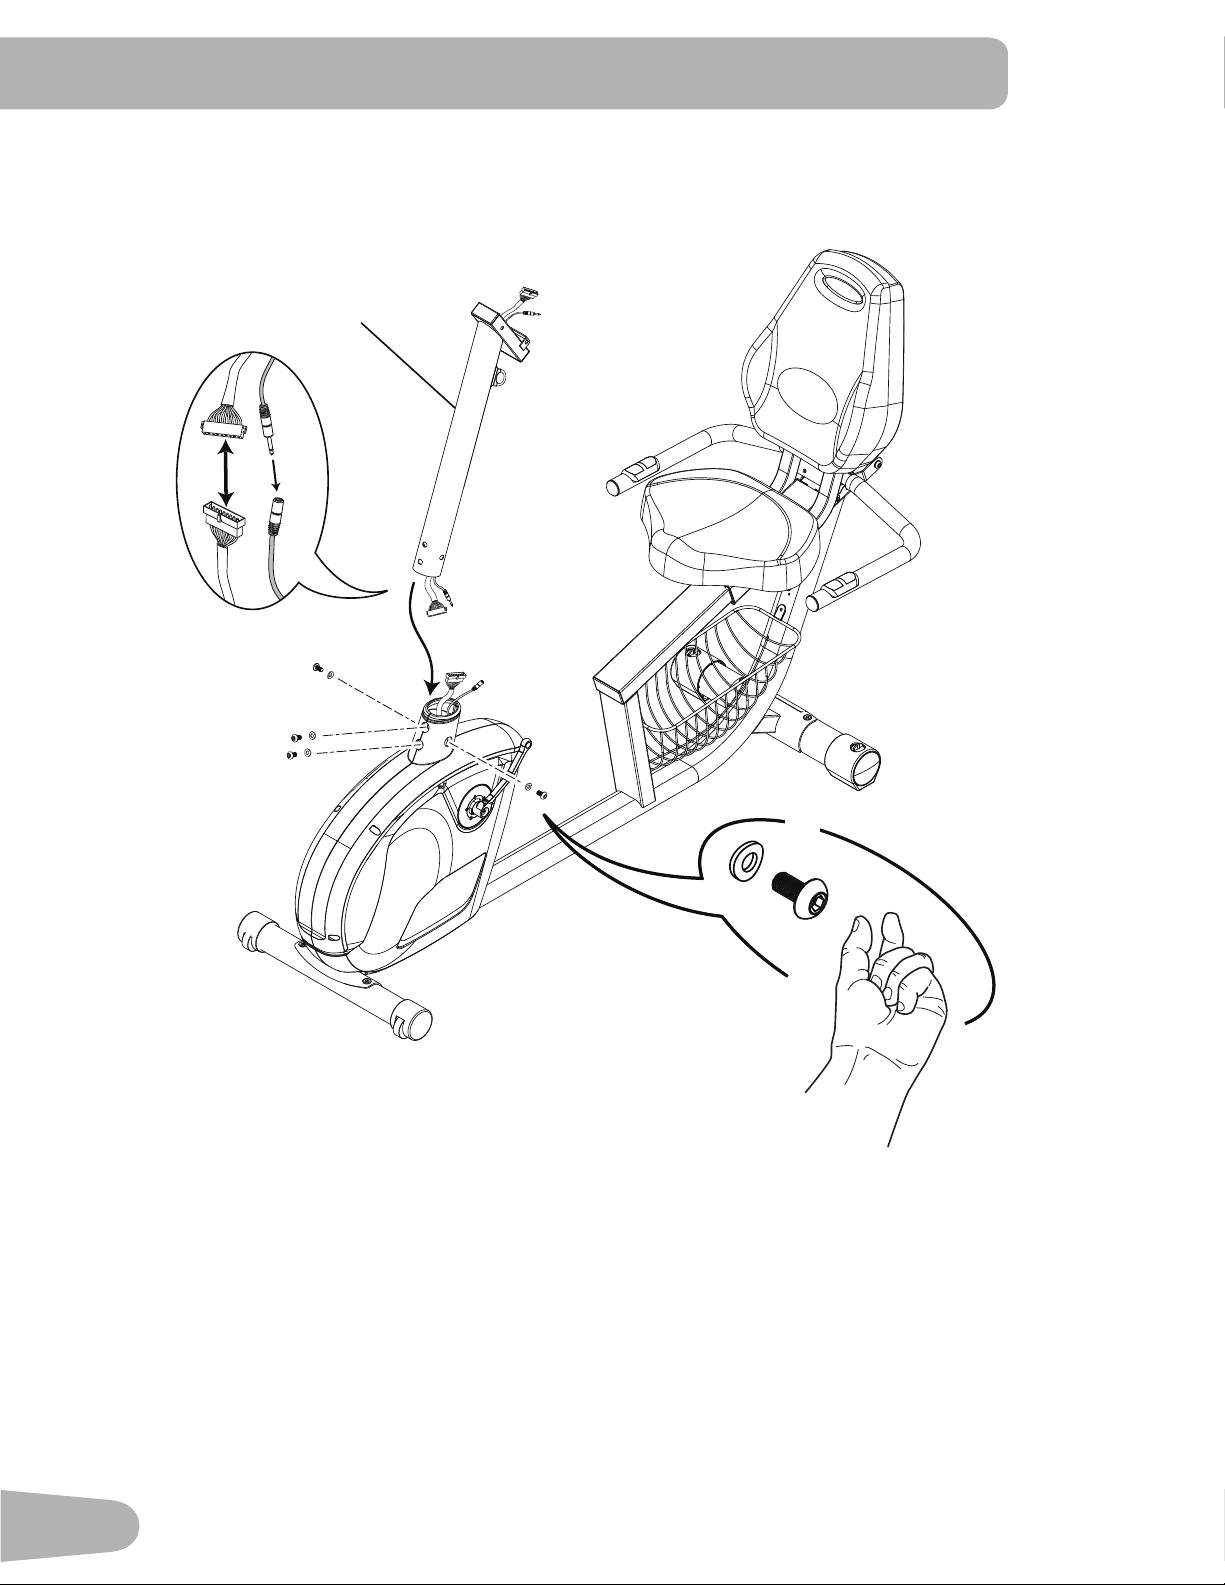
11. Attach Console Mast to Frame Assembly
NOTICE:Aligntheclipsonthecableconnectorsandmakesuretheconnectorslock.DonotcrimpConsoleCable.
X4
K
E
7
13
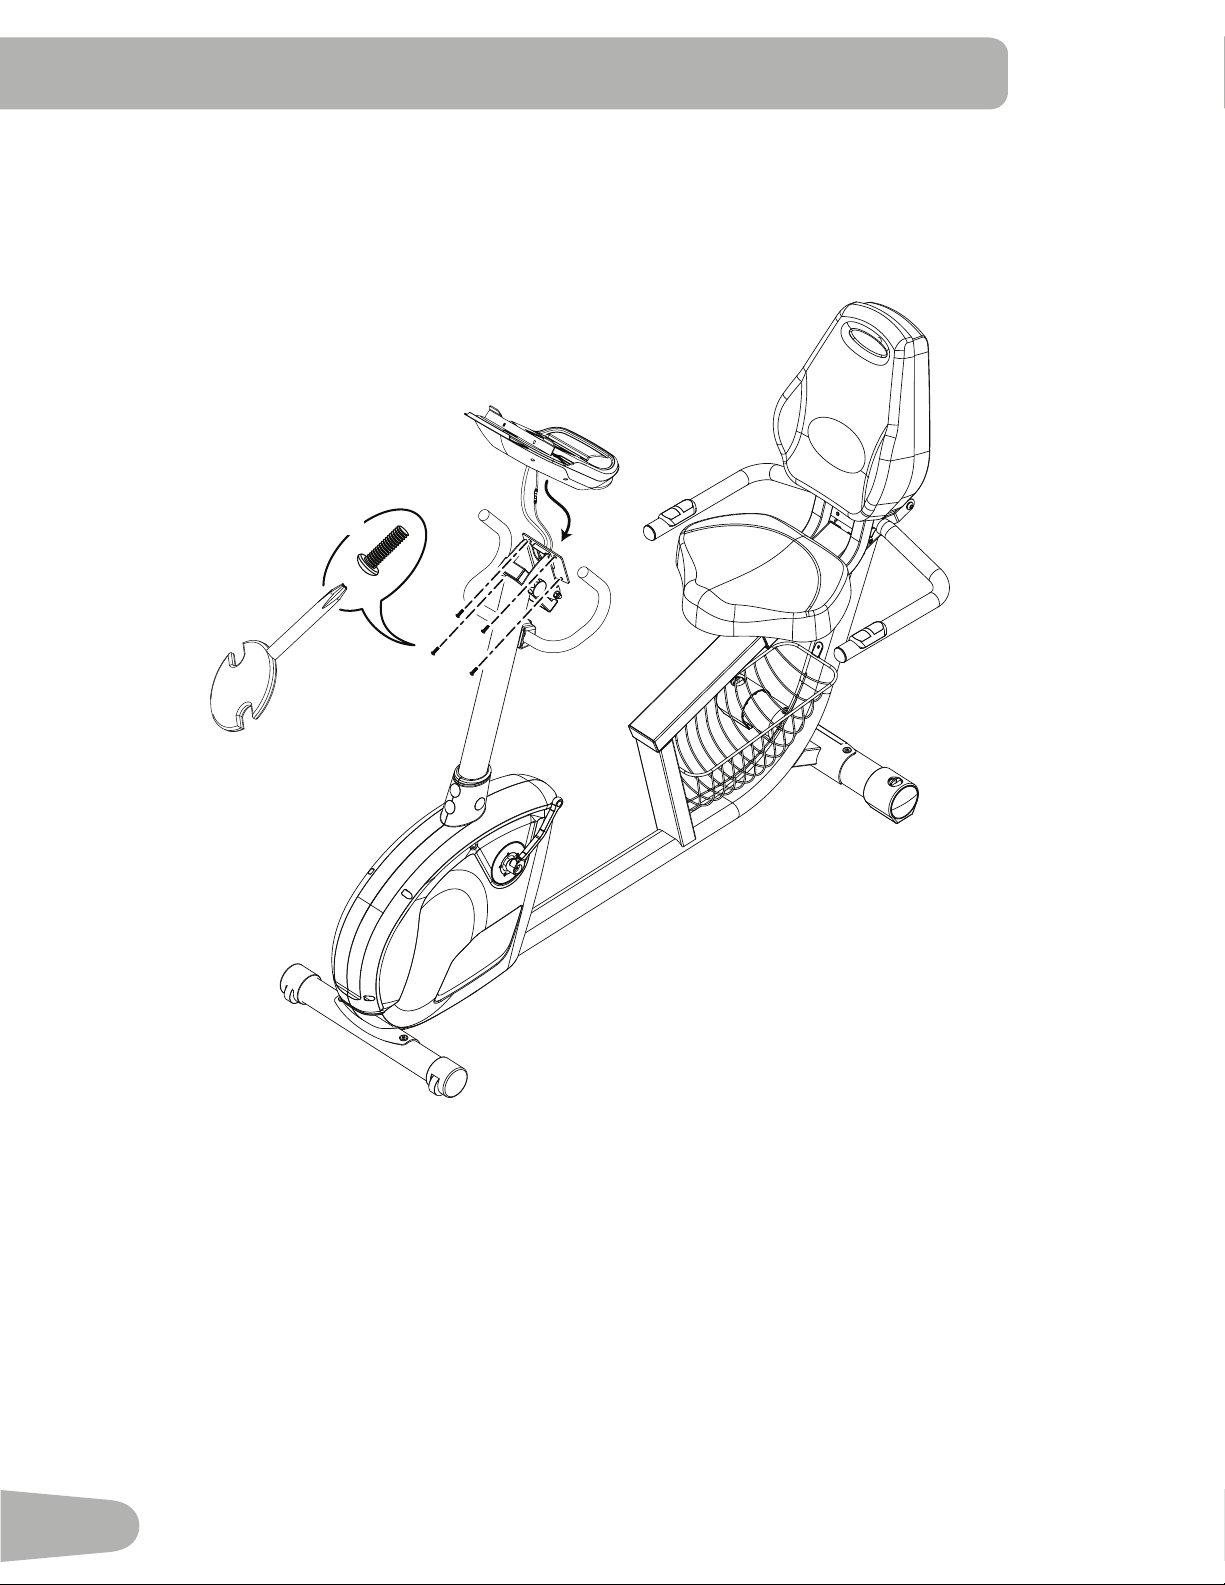
12. Attach Upright Handlebar to Console Mast
3
8
I
H
D
14
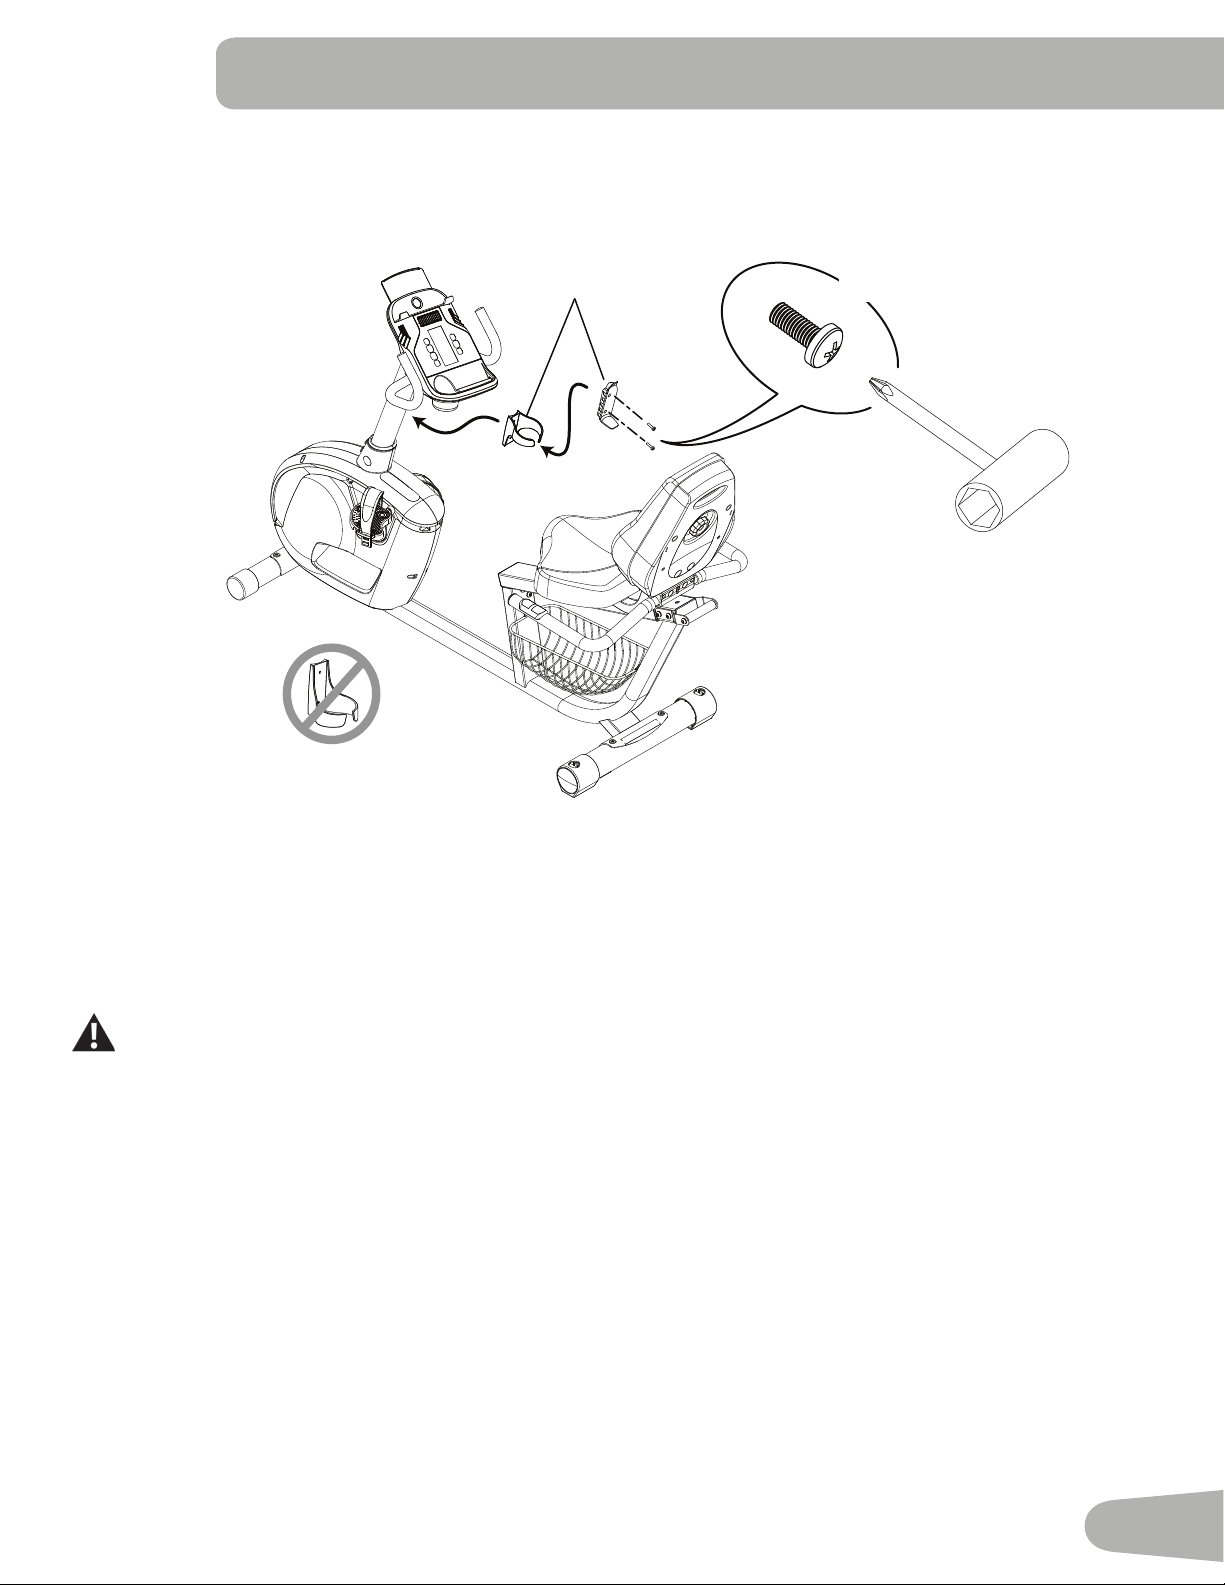
13. Attach Console Bracket to Console Mast
NOTICE: DonotcrimpConsoleCables.
G
F
J
4
X1
O
M
J
X1
15
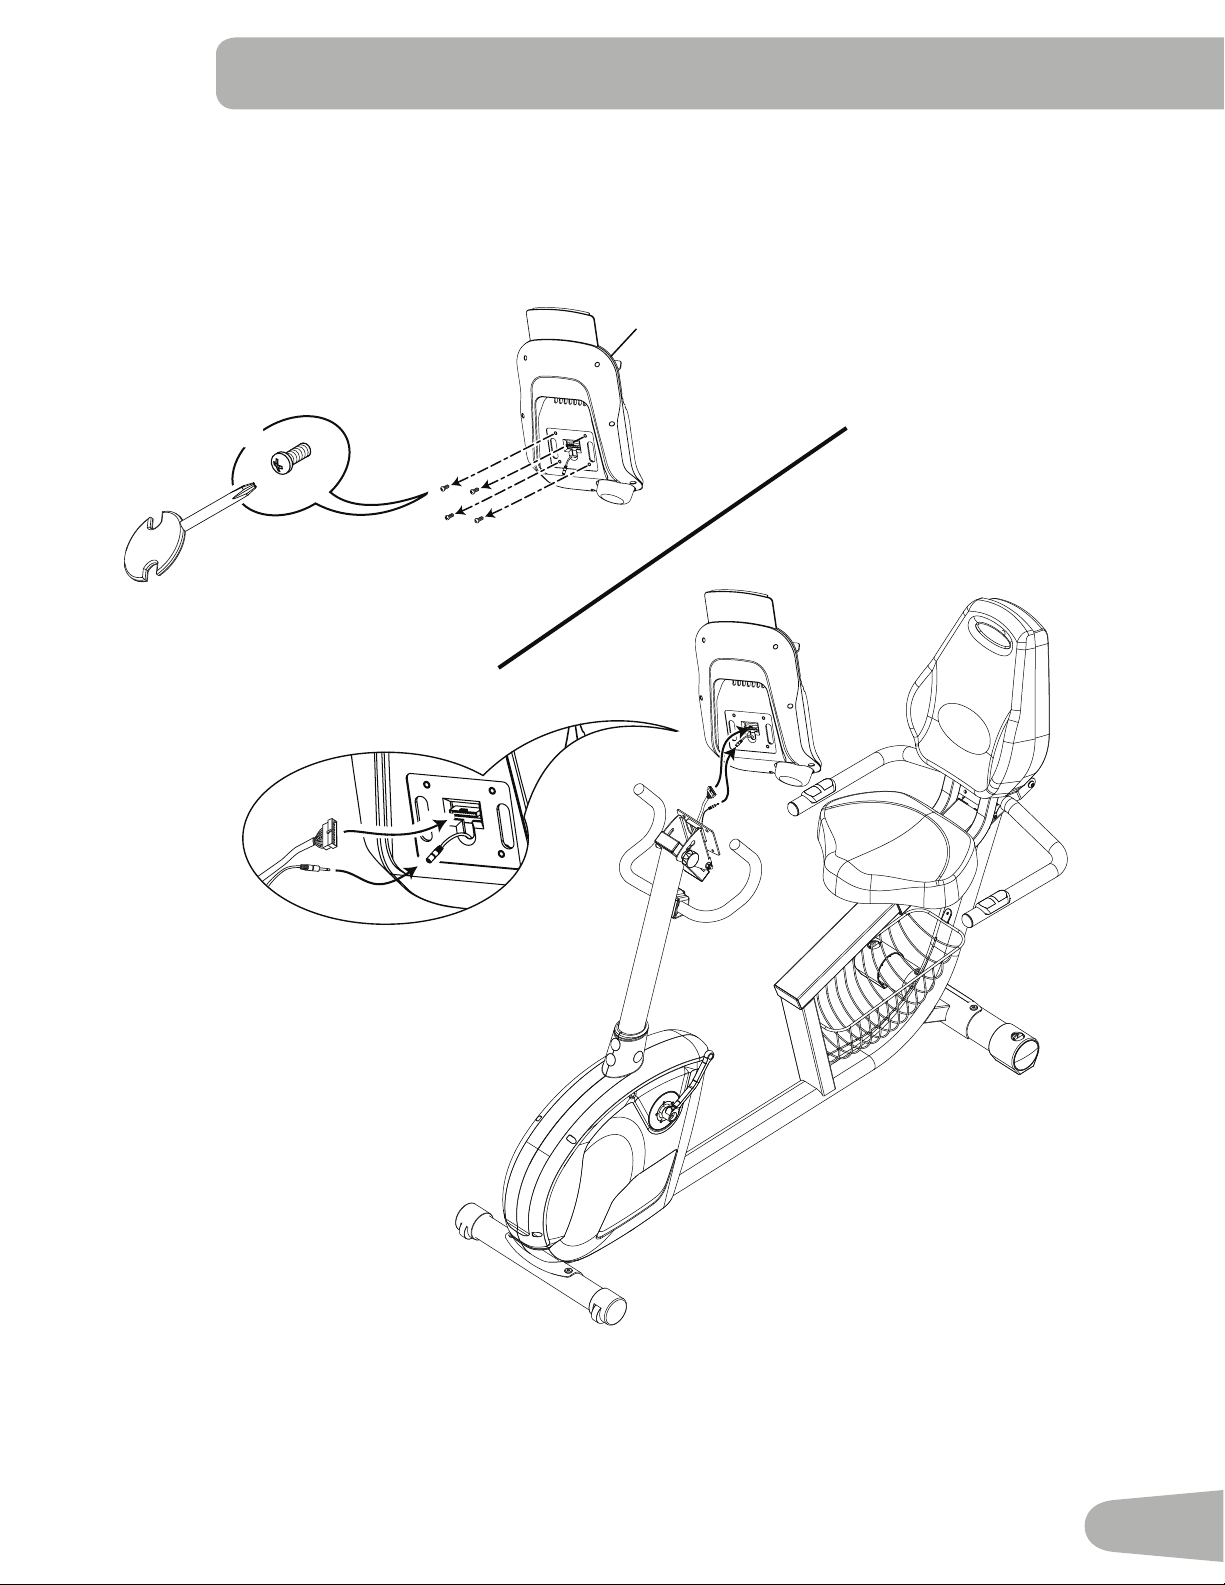
14. Remove Hardware from the Console and Connect the Cables
NOTICE: Aligntheclipsonthecableconnectorsandmakesuretheconnectorslock.DonotcrimpConsoleCable
Note: Hardwareispre-installedonConsoleandnotonHardwareCard.
*
X4
5
16
15. Attach Console to Frame Assembly
NOTICE: DonotcrimpConsoleCable.
X4
*
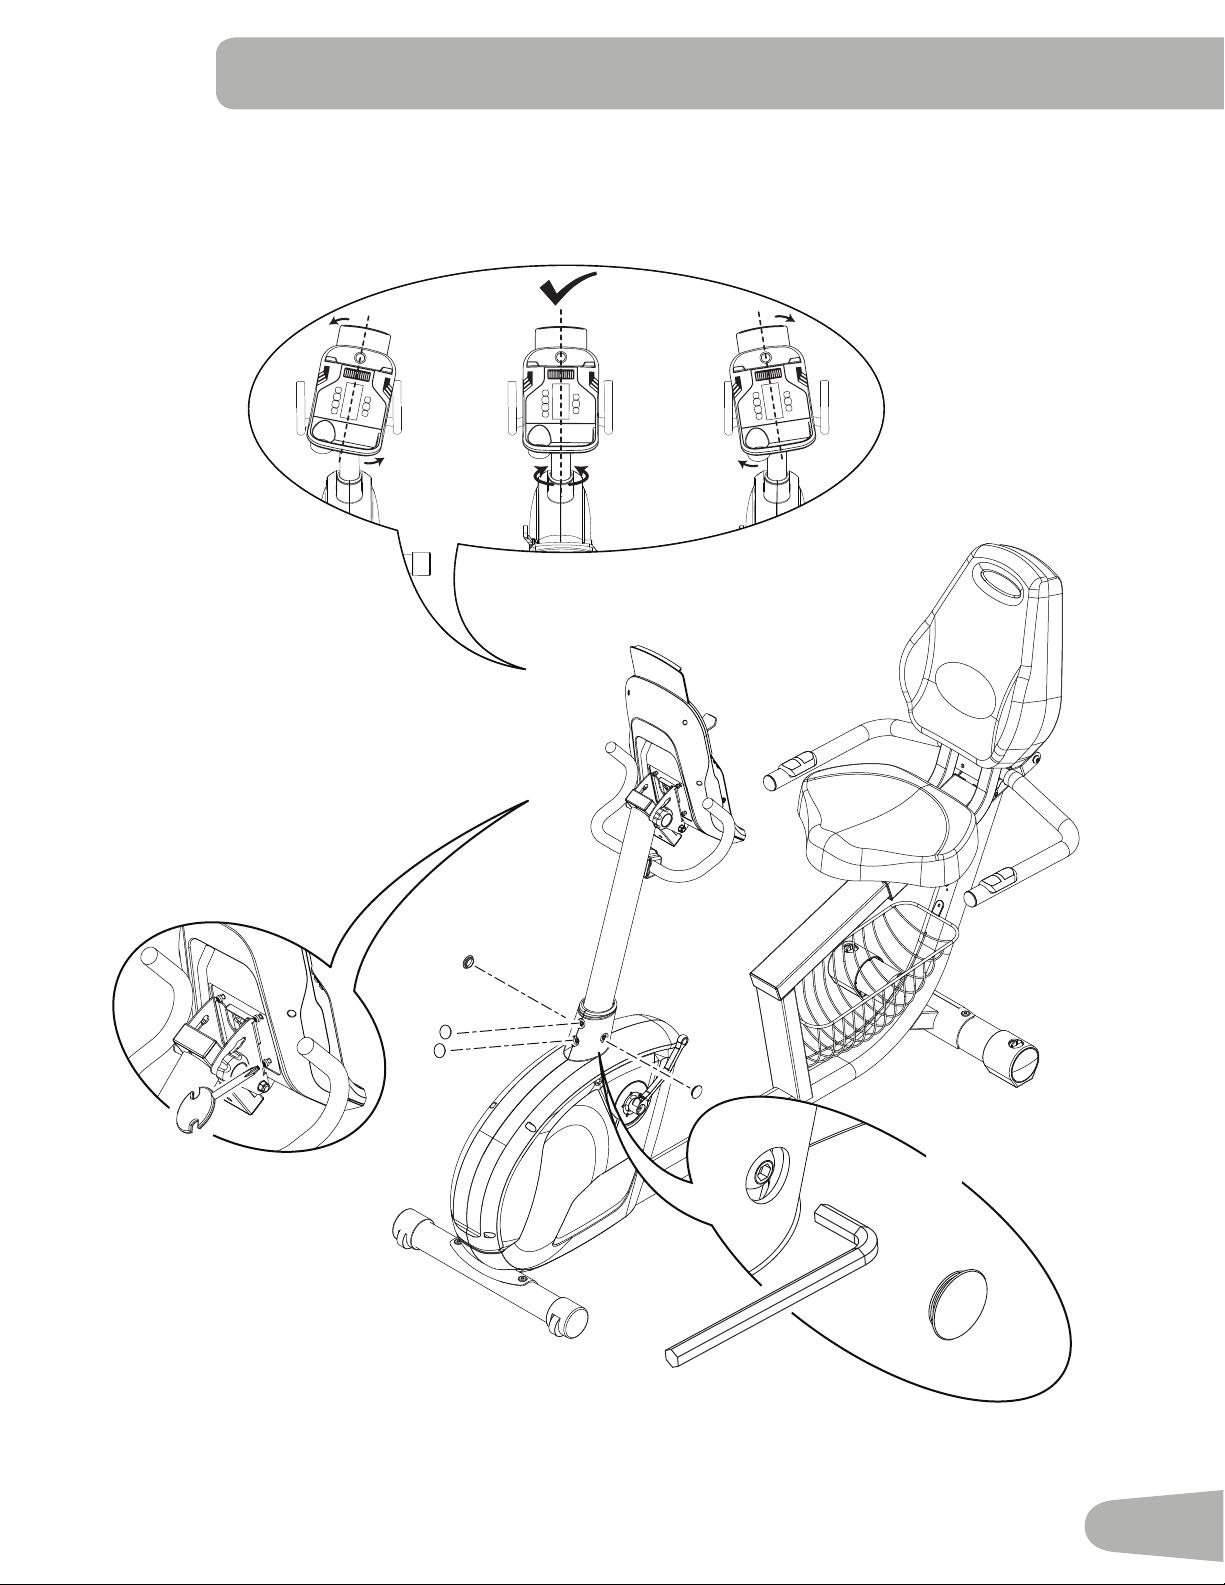
17
16. Adjust and Tighten the Console Mast
NOTICE: Tighten hardware and install Caps.
P
6mm
X4
#2
18
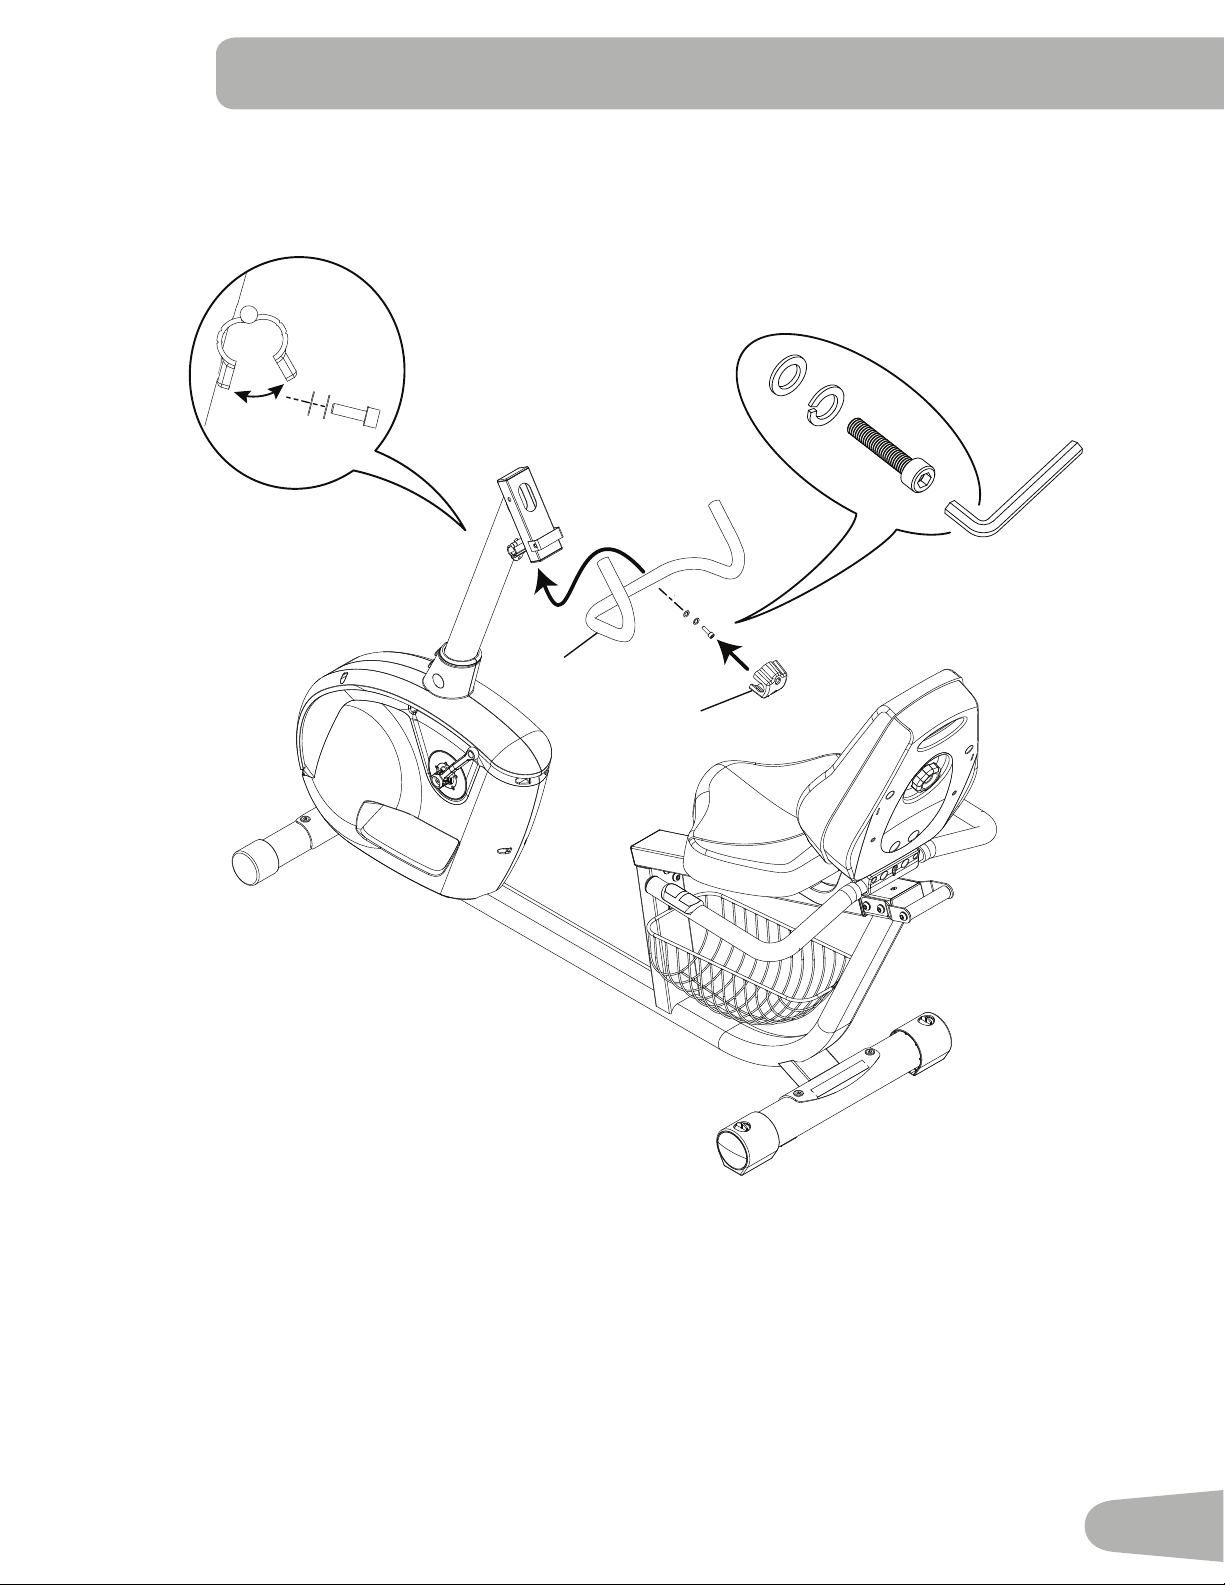
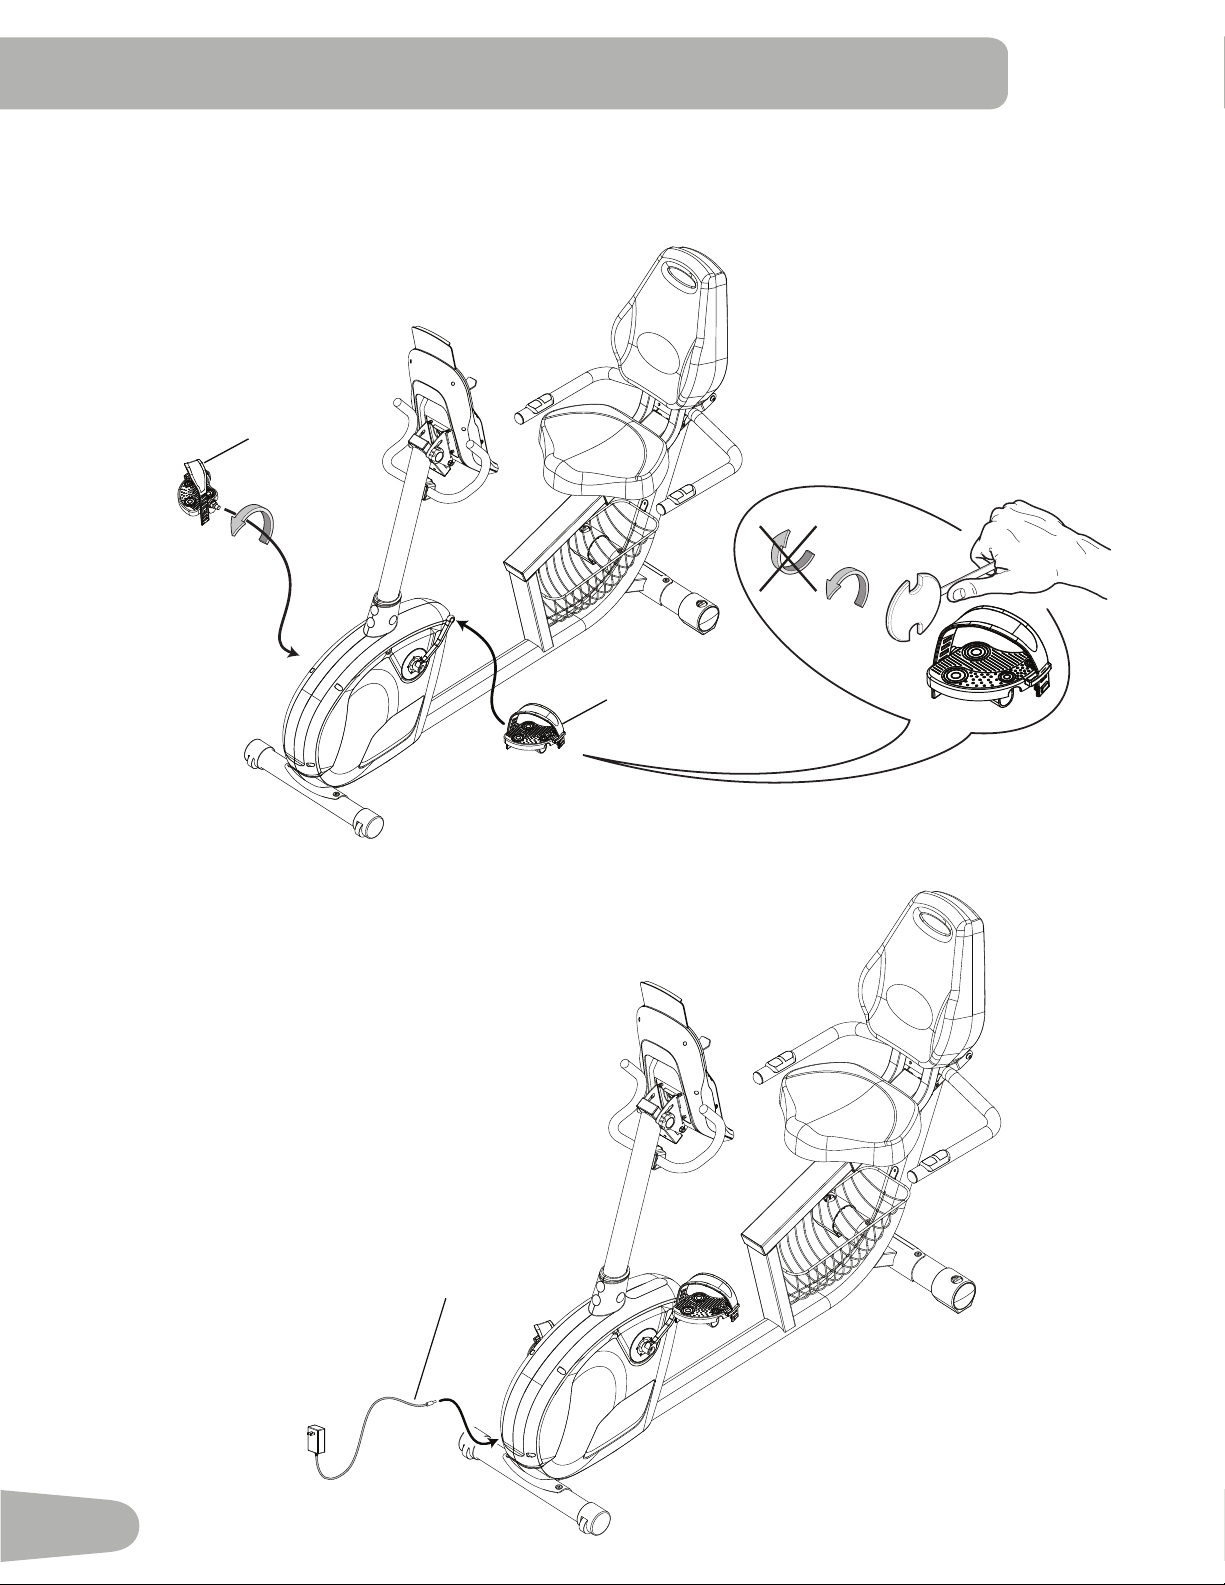
17. Attach Pedals to Frame Assembly
Note: TheLeftPedalisreverse-threaded.BesuretoattachPedalsonthepropersideoftheBike.Orientationis
basedfromaseatedpositiononthebike.TheLeftPedalhasan“L”,theRightPedalan“R”.
10
9
18. Connect AC Adapter to Frame Assembly
14
19
20. Final Inspection
Inspectyourmachinetoensurethatallhardwareistightandcomponentsareproperlyassembled.
Be sure to record the serial number in the field provided at the front of this manual.
Donotuseuntilthemachinehasbeenfullyassembledandinspectedforcorrectperformanceinaccordancewith
theOwner’sManual.
19. Install Water Bottle Holder
Note: Hardwareispre-installedonMastandnotonHardwareCard.
6
X2
*
20
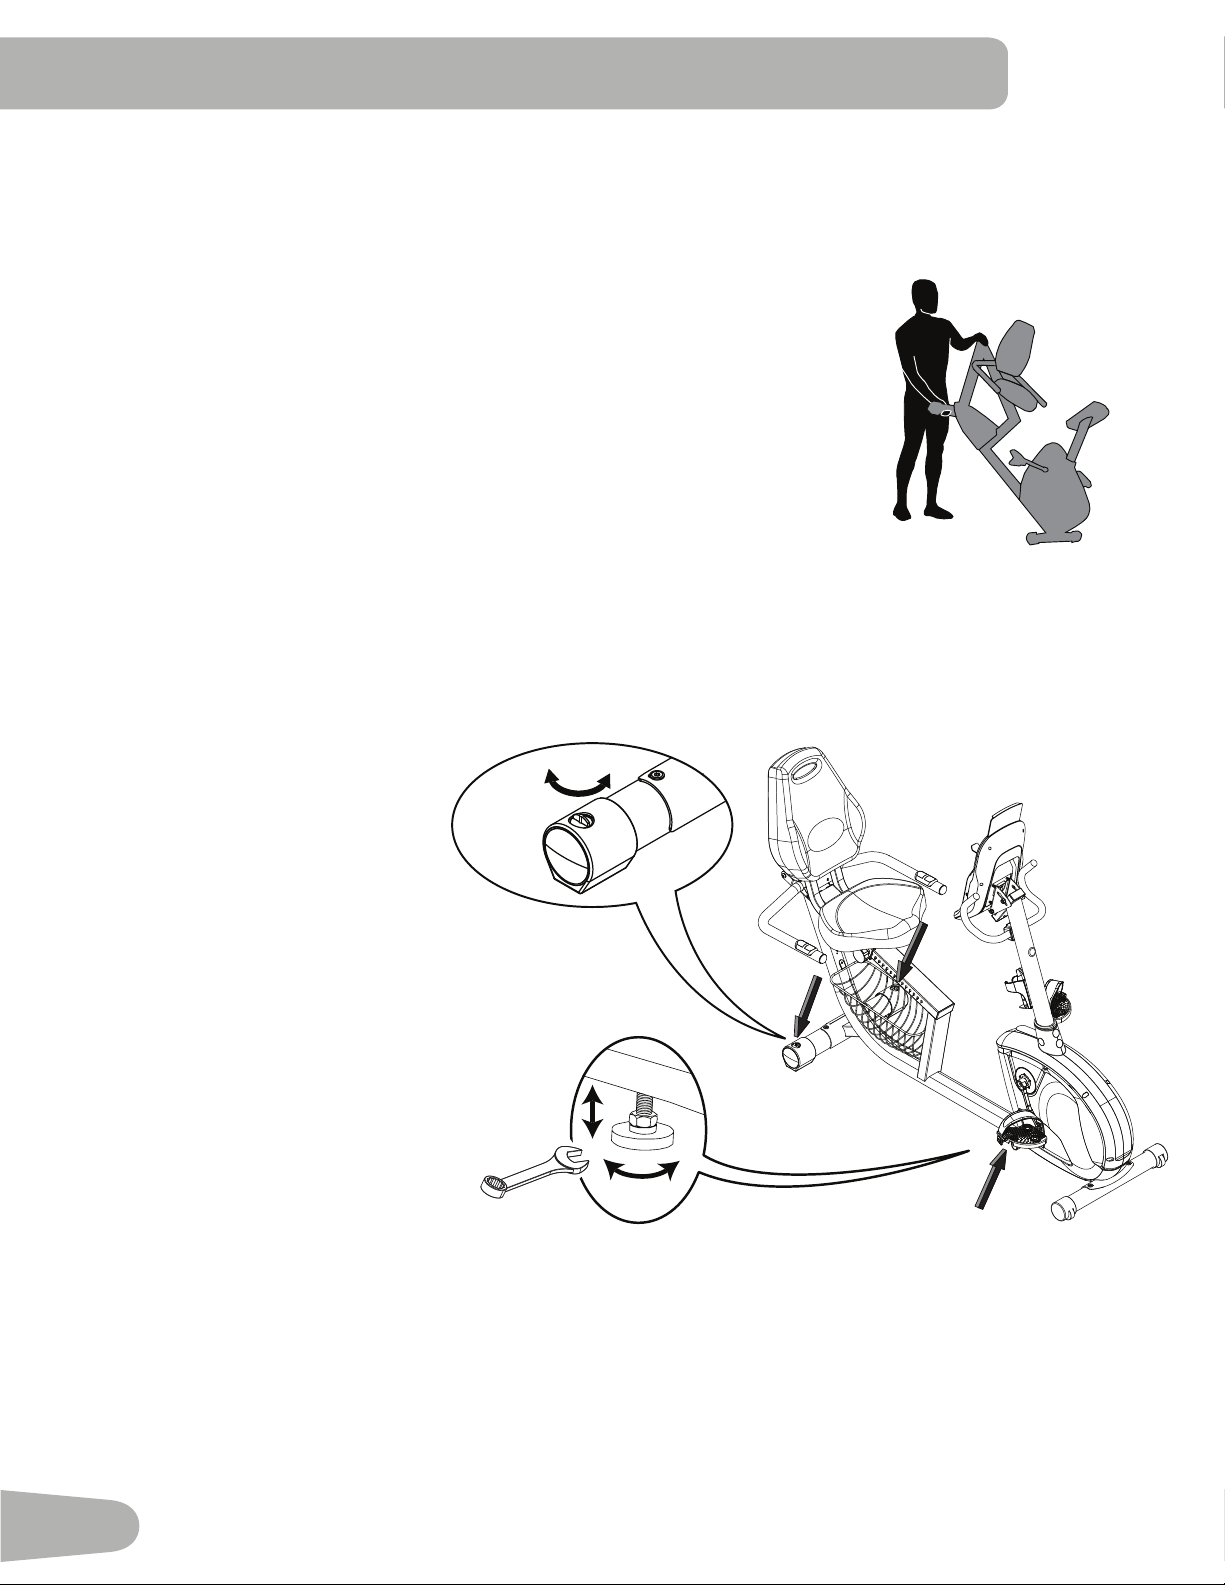
Moving the Bike
Tomovetherecumbentbike,carefullylifttherearendofthebikeandslowlypushittothedesiredlocation.
NOTICE:Becarefulwhenyoumovethebike.Abruptmotionscanaffectthecomputeroperation.
13 mm
BEfORE YOU START
Leveling the Machine
LevelersarefoundoneachsideoftheRearStabilizerandontheFrameRail.OntheRearStabilizer,turntheknobto
adjust the stabilizer foot.
To adjust the leveler on the Frame Rail:
1.Loosentheupperlockingnut.
2.Turnthelevelertoadjusttheheight.
3.Tightentheupperlockingnuttolock
the leveler.
Makesurethemachineisleveland
stablebeforeyouexercise.

21
IMpORTANT SAfETY INSTRUCTIONS
This icon means a potentially hazardous situation which, if not avoided, could result in death or serious injury.
Before using this equipment, obey the following warnings:
ReadandunderstandthecompleteManual.KeeptheManualforfuturereference.
Readandunderstandallwarningsonthismachine.IfatanytimetheWarningstickersbecomeloose,unreadable
ordislodged,contactNautilus
®
CustomerServiceforreplacementstickers.
• Childrenmustnotbeletonorneartothismachine.Movingpartsandotherfeaturesofthemachinecanbe
dangerous to children.
• Notintendedforusebyanyoneunder14yearsofage.
• Consultaphysicianbeforeyoustartanexerciseprogram.Stopexercisingifyoufeelpainortightnessinyour
chest,becomeshortofbreath,orfeelfaint.Contactyourdoctorbeforeyouusethemachineagain.Usethevalues
calculatedormeasuredbythemachine’scomputerforreferencepurposesonly.
• Beforeeachuse,examinethismachineforloosepartsorsignsofwear.Donotuseiffoundinthiscondition.Monitor
theSeat,Pedals,andCrankArmsclosely.ContactNautilus®CustomerServiceforrepairinformation.
• Maximumuserweightlimit:300lbs.(136kg).Donotuseifyouareoverthisweight.
• Thismachineisforhomeuseonly.
• Donotwearlooseclothingorjewelry.Thismachinecontainsmovingparts.Donotputfingersorotherobjectsinto
movingpartsoftheexerciseequipment.
• Setupandoperatethismachineonasolid,level,horizontalsurface.
• MakethePedalsstablebeforeyousteponthem.Usecautionwhenyousteponandoffthemachine.
• Disconnectallpowerbeforeservicingthismachine.
• Donotoperatethismachineoutdoorsorinmoistorwetlocations.Keepthefootpedalscleananddry.
• Keepatleast24”(0.6m)oneachsideofthemachineclear.Thisistherecommendedsafedistanceforaccessand
passagearoundandemergencydismountsfromthemachine.Keepthirdpartiesoutofthisspacewhenmachineis
in use.
• Donotoverexertyourselfduringexercise.Operatethemachineinthemannerdescribedinthismanual.
• CorrectlyadjustandsafelyengageallPositionalAdjustmentDevices.MakesurethattheAdjustmentDevicesdonot
hit the user.
• Exerciseonthismachinerequirescoordinationandbalance.Besuretoanticipatethatchangesinspeedand
resistancelevelcanoccurduringworkouts,andbeattentiveinordertoavoidlossofbalanceandpossibleinjury.
22
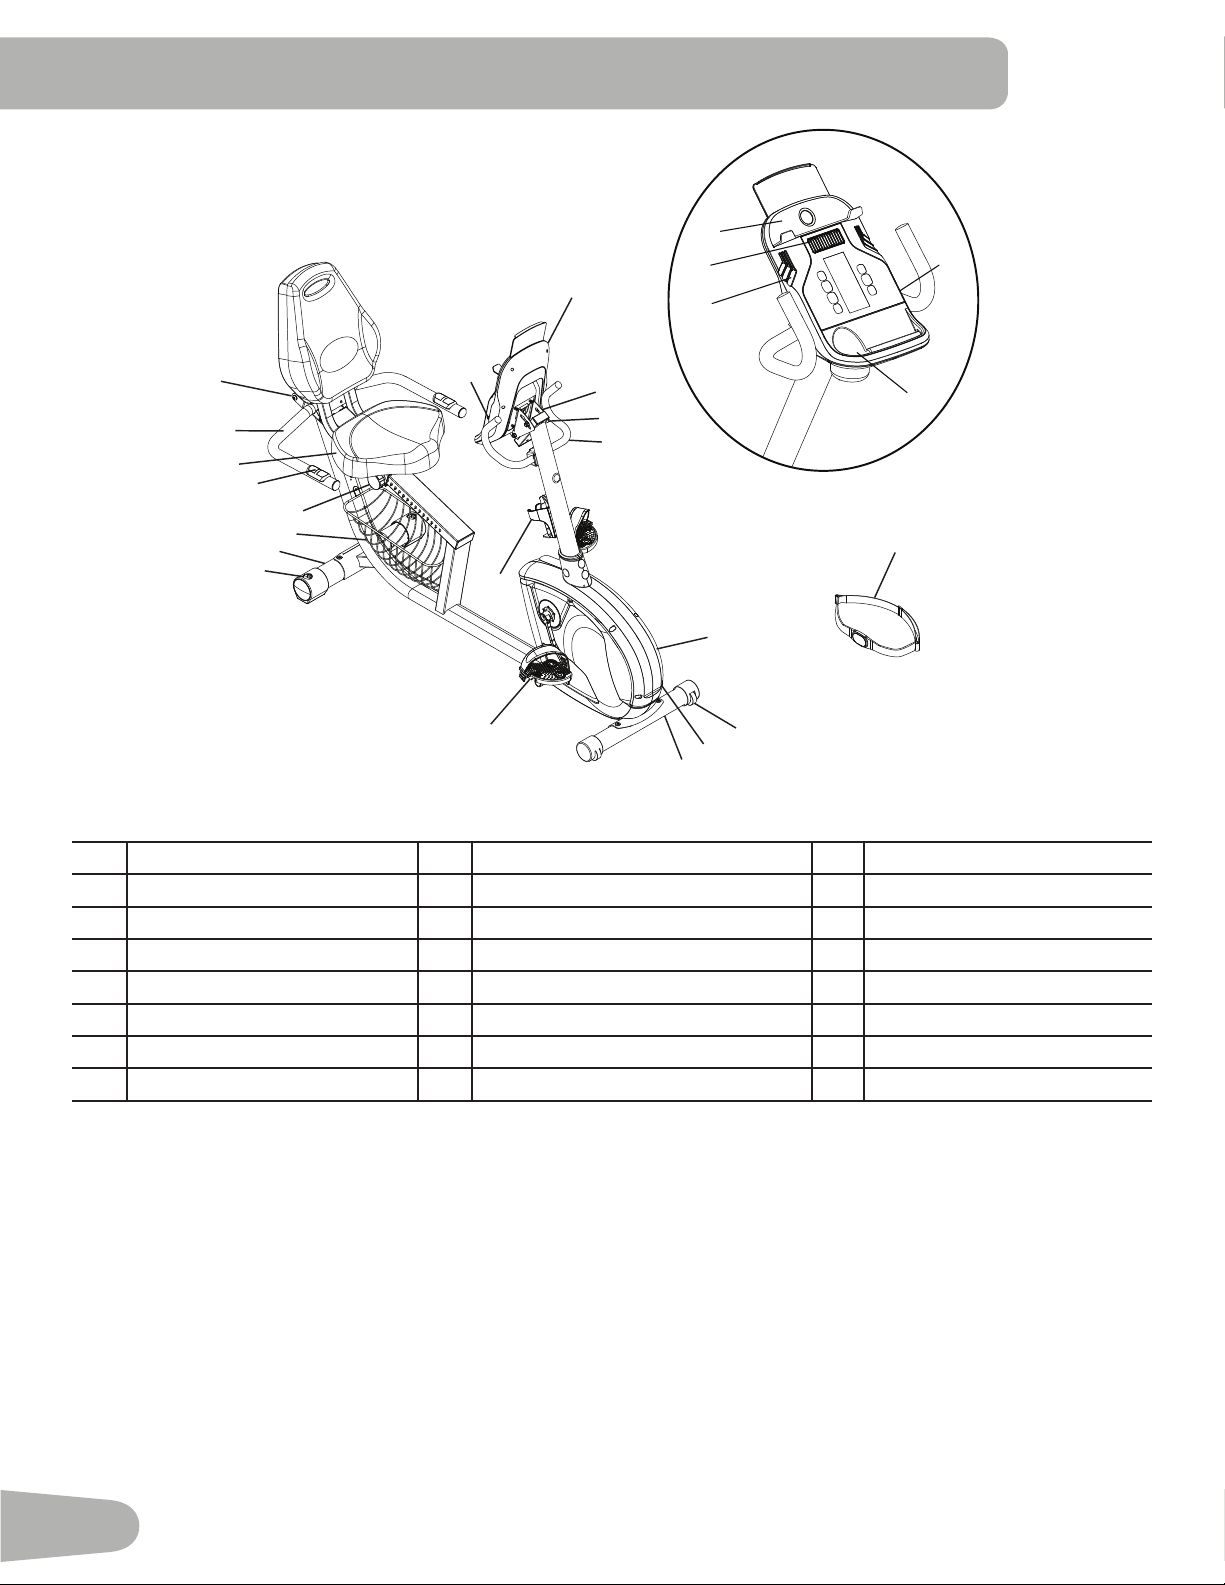
A Console I Pedals Q MP3Input
B ConsoleBracket J Leveler R WaterBottleHolder
C ConsoleAdjustmentKnob K EntertainmentRack S Speakers
D Handlebar,Upright L SeatAdjustmentKnob T Fan
E FullyShroudedFlywheel M ContactHeartRate(CHR)Sensors U Media Tray
F TransportWheel N AdjustableSeat V WaterBolttleHolder
G
ACAdapterPlug O Handlebar,Side W HeartRateChestStrap
H
Stabilizer P Transport Handle
fEATURES
A
B
E
F
J
I
L
M
N
H
V
Q
U
R
S
T
W
C
P
O
K
D
Q
G
H
23
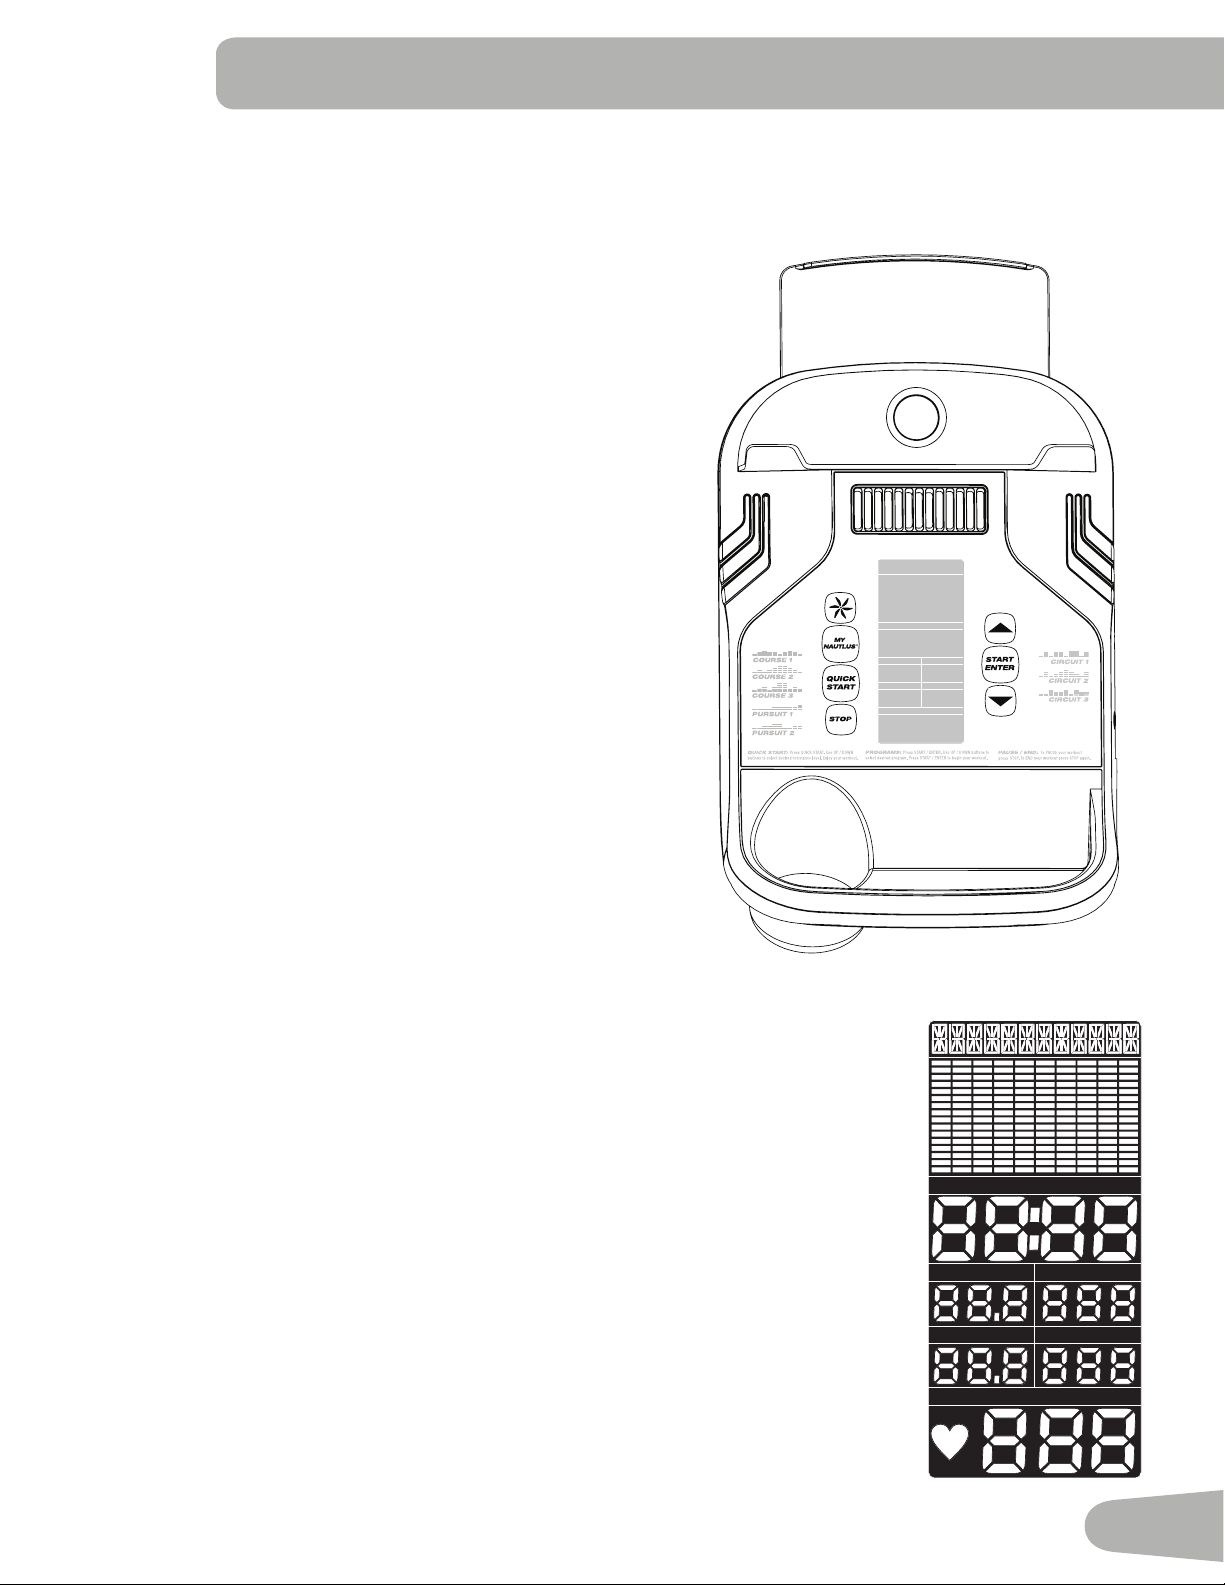
Console Features
TheConsoleprovidesimportantinformationaboutyourworkoutandletsyoucontroltheresistancelevelswhileyouexercise.
TheConsolehasagriddisplaywithtouchcontrolbuttonstonavigateyouthroughtheexerciseprograms.
Keypad Functions
FANbutton-Controls3-speedfan
MyNautilus
™
button-Controlsthetwoprogrammedusers
QUICKSTARTbutton-BeginsaQuickStartworkout
STOPbutton-Pausesanactiveworkout,endsapausedworkout,or
goesbacktothepreviousscreen.
Increase()button-Increasesavalue(age,time,distance,calories,or
workoutresistancelevel)ormovesthroughoptions
START/ENTERbutton-StartsaProgramworkout,confirmsinformation,
orresumesapausedworkout.Pushandholdfor3secondstobegina
GuestUser/ProfileProgramworkout.
Decrease()button-Decreasesavalue(age,time,distance,calories,
orworkoutresistancelevel)ormovesthroughoptions
MP3 Input
TheMP3Inputallowsyoutoconnectyourplayerandusethespeakers
built into the Console.
LCD Display Data
Program Display
TheProgramDisplayshowsthenameoftheprogramselectionandthegriddisplayareashows
thecourseprofilefortheprogram.Eachcolumnintheprofileshowsoneinterval(workout
segment).Thehigherthecolumn,thehighertheresistancelevel.Theflashingcolumnshows
your current interval.
Time / Interval
TheTIMEdisplayfieldshowsthetimecountoftheworkoutfor6seconds,andthenthecurrent
INTERVALsegmentoftheworkoutfor6seconds.
Iftheworkouthasapresettime,thetimedisplaystartsatthepresetvalueandcountsdown
tozero.Ifnopresettimeissetupforthecurrentworkoutprogram,thedisplayvaluestartsat
zeroandcountsforwarduntiltheendoftheworkout.Maximumtimeis99:59.Thetimedisplay
showsthetotaltimecountfortheworkout.
Speed / RPM
TheSPEEDdisplayfieldshowsthemachinespeedinmilesperhour(mph)orkilometersper
hour(km/h)for6seconds,andthenthemachinerevolutionsperminute(RPM)for6seconds.
SPEED
DISTANCE
INTERVA LTIME
CALORIES
PULSE
LEVELM
SPEED
DISTANCE
INTERVA LTIME
RPM K WA T T
CALORIES
PULSE
LEVELM
SPEED
DISTANCE
INTERVA LTIME
CALORIES
PULSE
LEVELMSPEED
DISTANCE
INTERVA LTIME
RPM K W AT T
CALORIES
PULSE
LEVELM

24
Distance
TheDistancedisplayshowsthedistancecount(milesorkm)intheworkout.
Note:TochangethemeasurementunitstoEnglishImperialormetric,refertothe“ConsoleSetupMode”sectioninthis
manual.
Watt / Level
TheWATTdisplayfieldshowsthepowerthatyouareproducingatthecurrentresistancelevel(1horsepower=746watts)for
6seconds,andthenthecurrentresistanceLEVEL(1–16)for6seconds.
Calories
TheCaloriesdisplayfieldshowstheestimatedcaloriesthatyouhaveburnedduringtheexercise.
Pulse (Heart Rate)
ThePulsedisplayshowstheheartrateinbeatsperminute(BPM)fromtheheartratemonitor.
Consultaphysicianbeforeyoustartanexerciseprogram.Stopexercisingifyoufeelpainortightnessinyourchest,
becomeshortofbreath,orfeelfaint.Contactyourdoctorbeforeyouusethemachineagain.Usethevaluescalculated
ormeasuredbythemachine’scomputerforreferencepurposesonly.
Remote Heart Rate Monitor
MonitoringyourHeartRateisoneofthebestprocedurestocontroltheintensityofyourexercise.ContactHeartRate(CHR)
sensors are installed to send your heart rate signals to the Console. The Console can also read telemetry HR signals from a
HeartRateChestStrapTransmitterthatoperatesinthe4.5kHz-5.5kHzrange.
Note:TheheartratecheststrapmustbeanuncodedheartratestrapfromPolarElectrooranuncodedPOLAR
®
compat-
iblemodel.(CodedPOLAR
®
heartratestrapssuchasPOLAR
®
OwnCode
®
cheststrapswillnotworkwiththisequip-
ment.)
Ifyouhaveapacemakerorotherimplantedelectronicdevice,consultyourdoctorbeforeusingawirelesscheststrapor
other telemetric heart rate monitor.
Contact Heart Rate Sensors
ContactHeartRate(CHR)sensorssendyourheartratesignalstotheConsole.TheCHRsensorsarethestainlesssteelparts
of the Handlebars. To use, put your hands comfortably around the sensors. Be sure that your hands touch both the top and
thebottomofthesensors.Holdfirm,butnottootightorloose.BothhandsmustmakecontactwiththesensorsfortheCon-
sole to detect a pulse. After the Console detects four stable pulse signals, your initial pulse rate will be shown.
OncetheConsolehasyourinitialheartrate,donotmoveorshiftyourhandsfor10to15seconds.TheConsolewillnow
validate the heart rate. Many factors influence the ability of the sensors to detect your heart rate signal:
• Movementoftheupperbodymuscles(includingarms)producesanelectricalsignal(muscleartifact)thatcaninterferewith
pulsedetection.Slighthandmovementwhileincontactwiththesensorscanalsoproduceinterference.
• Calluses and hand lotion may act as an insulating layer to reduce the signal strength.
• SomeElectrocardiogram(EKG)signalsgeneratedbyindividualsarenotstrongenoughtobedetectedbythesensors.
• Theproximityofotherelectronicmachinescangenerateinterference.
CHRdetectionmaybelimitedtowalkingorslowjoggingduetotheextrememuscleartifactsandhandmotiongeneratedby
acomfortablerunningstyle.Ifyourheartratesignaleverseemserraticaftervalidation,wipeoffyourhandsandthesensors
and try again.

25
Heart Rate Calculations
Yourmaximumheartrateusuallydecreasesfrom220BeatsPerMinute(BPM)inchildhoodtoapproximately160BPMby
age60.Thisfallinheartrateisusuallylinear,decreasingbyapproximatelyoneBPMforeachyear.Thereisnoindicationthat
traininginfluencesthedecreaseinmaximumheartrate.Individualsofthesameagecouldhavedifferentmaximumheartrates.
Itismoreaccuratetofindthisvaluebycompletingastresstestthanbyusinganagerelatedformula.
Yourat-restheartrateisinfluencedbyendurancetraining.Thetypicaladulthasanatrestheartrateofapproximately72
BPM,whereashighlytrainedrunnersmayhavereadingsof40BPMorlower.
TheHeartRatetableisanestimateofwhatHeartRateZone(HRZ)iseffectivetoburnfatandimproveyourcardiovascular
system.Physicalconditionsvary,thereforeyourindividualHRZcouldbeseveralbeatshigherorlowerthanwhatisshown.
Themostefficientproceduretoburnfatduringexerciseistostartataslowpaceandgraduallyincreaseyourintensityuntil
yourheartratereachesbetween60–85%ofyourmaximumheartrate.Continueatthatpace,keepingyourheartrateinthat
targetzoneforover20minutes.Thelongeryoumaintainyourtargetheartrate,themorefatyourbodywillburn.
The graph is a brief guideline, describing the generally suggested target heart rates based on age. As noted above, your opti-
mal target rate may be higher or lower. Consult your physician for your individual target heart rate zone.
Note:Aswithallexercisesandfitnessregimens,alwaysuseyourbestjudgmentwhenyouincreaseyourexercisetimeor
intensity.
20-24
FAT-BURNING TARGET HEART RATE
Heart Rate BPM (beats per minute)
Age
25-29
0
50
100
150
200
250
30-34 35-39 40-44 45-49 50-54 55-59 60-64 65-69 70+
196
191
186
181
176
171
166
161
156
151
146
167
162
158
154
150
145
141
137
133
128
126
Maximum Heart Rate
Target Heart Rate Zone
(keep within this range
for optimum fat-burning)
11 8
11 5
11 2
109
106
103
100
97
94
91
88
26
What to Wear
Wearrubber-soledathleticshoes.Youwillneedtheappropriateclothesforexercisethatallowyoutomovefreely.
How Often Should You Exercise
Consultaphysicianbeforeyoustartanexerciseprogram.Stopexercisingifyoufeelpainortightnessinyourchest,
becomeshortofbreath,orfeelfaint.Contactyourdoctorbeforeyouusethemachineagain.Usethevaluescalculated
ormeasuredbythemachine’scomputerforreferencepurposesonly.
• 3timesaweekfor30minuteseachday.
• Scheduleworkoutsinadvanceandtrytofollowtheschedule.
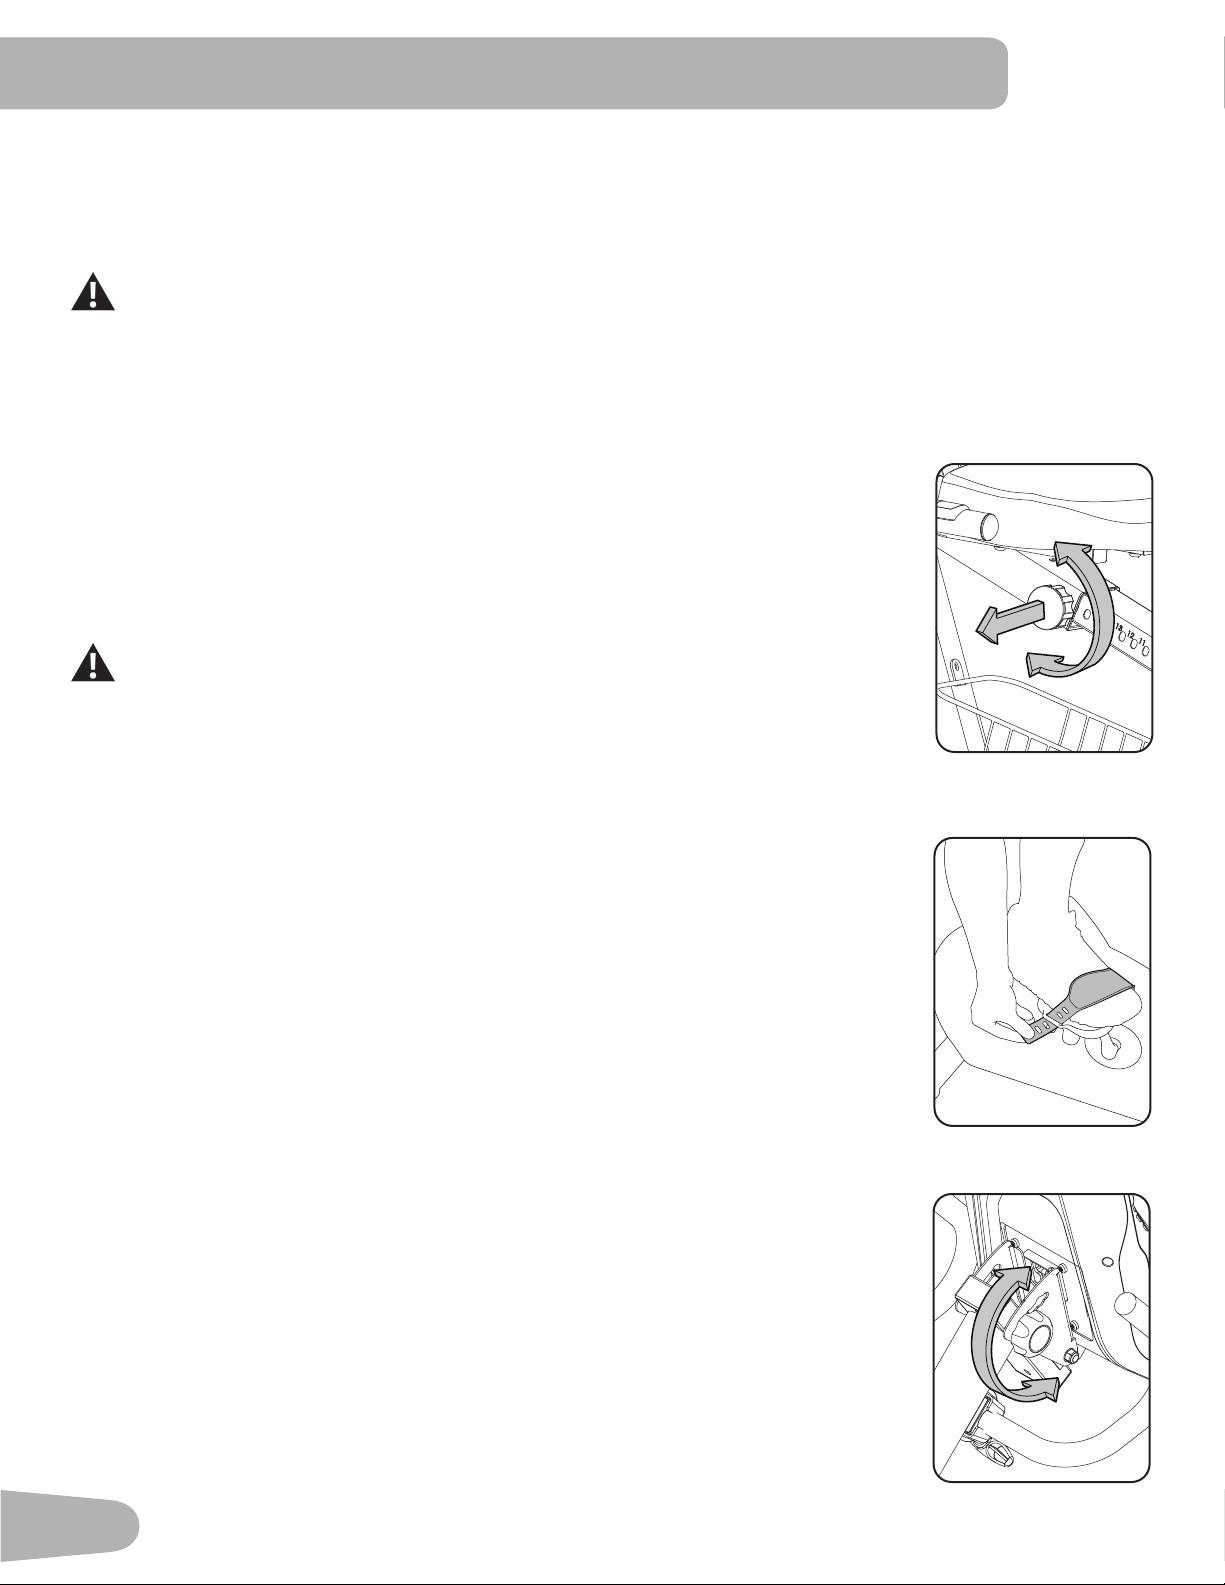
Seat Adjustment
Correctseatplacementencouragesexerciseefficiencyandcomfort,whilereducingtheriskof
injury.
1. WithaPedalintheforwardposition,placetheballofyourfootoverthecenterofit.Yourleg
shouldbebentslightlyattheknee.
2. IfyourlegistoostraightoryourfootcannottouchthePedal,movetheseatforward.Ifyour
legisbenttoomuch,movetheseattowardtheback.
Stepoffthebikebeforeyouadjusttheseat.
3. Loosenandpulltheadjustmentknobontheseattube.Adjustthe seat to the desired
position.
4. Releasetheadjustmentknobtoengagethelockingpin.Besurethatthepinisfullyengaged
andfullytightentheknob.
Foot Position / Pedal Strap Adjustment
Footpedalswithstrapsprovidesecurefootingtotheexercisebike.
1. RotatethePedalsuntilonecanbereached.
2. PuttheballofeachfootonthePedals.
3. Fastenthestrapovertheshoe.
4. Repeatfortheotherfoot.
BesuretoesandkneespointdirectlyforwardtoensuremaximumPedalefficiency.Pedalstraps
canbeleftinpositionforsubsequentworkouts.
Console Adjustment
To adjust the Console tilt position:
1. LoosentheknobbehindtheConsole.
2. CarefullymovetheConsoletilttooneoftheavailablepositions.
3. Tightentheknob.
OpERATIONS

27
Power-Up / Idle Mode
The Console will enter Power-Up/IdleModeifitispluggedintoapowersource,anybuttonispushed,orifitreceivesasignal
fromtheRPMsensorasaresultofpedalingthemachine.
Auto Shut-Off (Sleep Mode)
IftheConsoledoesnotreceiveanyinputinapproximately5minutes,itwillautomaticallyshutoff.TheLCDdisplayisoffwhile
inSleepMode.
Note: TheConsoledoesnothaveanOn/Offswitch.
Initial Setup
Duringthefirstpower-up,theConsolemustbesetupforyourpreferredmeasurementunits,themachinetype,andbrightness
of the screen.
1. UnitsofMeasurement:PushtheIncrease/Decreasebuttonstochangebetween“Miles-Lb”(ImperialEnglish)or“Km-Kg”
(metric).
2. PushSTART/ENTERtoset.
3. MachineType:PushtheIncrease/Decreasebuttonstochangebetween“BIKE”and“ELLIPTICAL”.
4. PushSTART/ENTERtoset.
5. Backlight:PushtheIncrease/Decreasebuttonstochangethescreencontrast,with“1”thelowestand“5”thehighest.
6. PushSTART/ENTERtoset.TheConsolegoesbacktothePower-Up/IdleModescreen.
Note: Tochangethesechoices,consultthe“ConsoleSet-UpMode”section.
Quick Start Program
TheQuickStartprogramletsyoustartaworkoutwithoutenteringanyinformation.
1. Standonthemachine.
2. PushtheQUICKSTARTbuttontostarttheQUICKSTARTprogram.
3. Tochangetheresistancelevel,pushtheIncrease/Decreasebuttons.Thecurrentintervalandfutureintervalsaresetto
thenewlevel.ThedefaultQuickStartresistancelevelis3.Thetimewillcountupfrom00:00.
Note: Themaximumtimevalueis99:59.
4. Whendonewithyourworkout,stoppedalingandpushSTOPtopausetheworkout.PushSTOPagaintoendthework-
out.
Guest User / Profile Program
TheGuestUser/Profileprogramletsyouselectaprofileworkoutwithoutenteringanyinformation.
1. Standonthemachine.
2. PushtheSTART/ENTERbutton.
3. UsetheIncrease()orDecrease()buttonstoselectoneoftheprofileprograms.PushSTART/ENTERtoselectthe
profile program.
4. UsetheIncrease()andDecrease()buttonstoadjusttheworkouttime.PushSTART/ENTER.
Note:TherangeofvaluesforTIMEis5-99minutes;thedefaultvalueis30:00.
5. UsetheIncrease()andDecrease()buttonstoadjusttheresistancelevel.
Note:TherangeofvaluesforLEVELis1-16;thedefaultresistancelevelis3.
6. PushtheSTART/ENTERbuttontostarttheprofileworkout.Thetimewillcountdownfromthesettime.

28
My Nautilus
™
User Setup Mode
TheConsoleletsyoustoreanduse2Userprofiles.TheUserprofilesautomaticallyrecordtheworkoutresultsforeachUser
profile,andletsyouviewyourworkoutdata.
TheUserprofilestoresthefollowingdata:
• Name—upto19characters
• Age
• W e i g h t
• Gender
• aCustomWorkout(programprofile)
• Totaltime(lastworkout,average,andtotal)
• Averagespeed(lastworkout,average,andtotal)
• Totaldistance(lastworkout,average,andtotal)
• Totalcalories(lastworkout,average,andtotal)
• Totalworkouts
Note:PushtheSTOPbuttontogobacktothepreviousscreen.
Add User Profile
1. FromthePower-UpModescreen,pushtheMyNautilus
™
buttonandholdfor3secondstogotoUserSetupMode.
Note:IfnoUserProfileissetup,theConsolewillshowtheNamepromptforUser1.IfaUserProfiledoesexist,usethe
Increase/DecreasebuttonstoselectCreateUser2andpushSTART/ENTER.
2. TheConsoledisplayshowsthe“ENTERNAME”prompt.PushSTART/ENTER.
3 Enteranamefortheuser.UsetheIncrease/Decreasebuttonstomovethroughthealphabetandblankspace(foundbe-
tweenAandZ).Toseteachletter,pushtheSTART/ENTERbutton.PushtheSTOPbuttontogobacktothepreviousletter.
PushandholdtheSTART/ENTERbuttonfor3secondstocompletetheentryandgotothenextdataprompt.
4. TheConsoledisplayshowsthe“AGE30”prompt.UsetheIncrease/Decreasebuttonstoadjustthedefaultvalue,andpush
START/ENTERtocompletetheentryandgotothenextprompt.
5. TheConsoledisplayshowsthe“WEIGHT150”prompt.UsetheIncrease/Decreasebuttonstoadjustthedefaultvalue,and
pushSTART/ENTERtocompletetheentryandgotothenextprompt.
6. TheConsoledisplayshowsthe“GENDERMALE”prompt.UsetheIncrease/Decreasebuttonstoadjustthedefaultvalue,
andpushSTART/ENTERtocompletetheentryandgotothenextprompt.
Note:Duetoscreenlimitations,“FEMLE”istheabbreviationforfemale.
7. TheConsoledisplayshowsthe“CREATECUSTOMYES”prompt.UsetheIncrease/DecreasebuttonstomovetotheYES
orNOoption.TostartsetupofyourCustomWorkout,gotoYESandpushSTART/ENTER.
TocompleteUserSetupwithoutaCustomWorkout,gototheNOoptionandpushSTART/ENTER.TheConsolegoes
backtothePower-UpModescreen.
Note:TheCustomworkoutcanbecreatedatalatertimebyeditingtheUser.
8. IfyoustarttheCustomWorkoutsetup,theProgramDisplaywillshowtheleftcolumn(workoutinterval)isactivebyflashing,
withadefaultresistancelevelof3.UsetheIncrease/Decreasebuttonstoadjusttheresistanceleveloftheactiveinterval.
PushSTART/ENTERtorecordtheresistancelevel.Thenextcolumntotherightbecomesactive.
Note:TheConsoledisplayshowsthemessage“Nof20”duringsetup(Nisthecurrentinterval).Themaximumnumberof
intervalsis20.
PushandholdSTART/ENTERtocompletetheCustomWorkoutsetup.
9. TheConsolegoesbacktothePower-UpModescreen

29
User Profile Workout Program
1. FromthePower-UpModescreen,pushtheMyNautilus
™
buttontogotoUserSelectionMode.
2. UsetheIncrease/DecreasebuttonstoselectaUserProfileandpushSTART/ENTER.
Note:IfnoUserProfileissetup,theConsolewillgototheUserSetupMode.
3. VIEWSTATSandWORKOUT.UsetheIncrease/Decreasebuttonstochooseanoption,andpushSTART/ENTERto
makeyourselection.TheUserStatisticsoptionletsyouseeasummaryofyourworkoutdata(seetheUserStatistics
section).TheWorkoutoptionletsyouselectaworkoutprofileprogramandbeginaworkout.
4. Toworkout,usetheIncrease()orDecrease()buttonstoselectoneoftheprofileprograms.PushSTART/ENTERto
select the profile program.
Note:TheCustomworkoutwillbeoneoftheprofileprogramsifsetup.
5. UsetheIncrease()andDecrease()buttonstoadjusttheworkouttime.PushSTART/ENTER.
Note:TherangeofvaluesforTIMEis5-99minutes;thedefaultvalueis30:00.
6. UsetheIncrease()andDecrease()buttonstoadjusttheworkoutLEVEL.
Note:TherangeofvaluesforLEVELis1-16;thedefaultstartvalueis3.
7. PushtheSTART/ENTERbuttontostarttheprofileworkout.Thetimewillcountdownfromthesettime.
Edit User Profile
1. FromthePower-UpModescreen,pushtheMyNautilus
™
buttonandholdfor3secondstogotoUserSetupMode.
ToexittheUserSelectionoption,pushSTOPandtheconsolewillgobacktothePower-UpModescreen.
2. TheConsolewillshowaprompttoedittheuser(EDIT<Name>)ordeletetheuser(DELETE<Name>).UsetheIncrease/
DecreasebuttonstomovethroughtheEditmenuoptions,andpushSTART/ENTERtomakeyourselection.
ToexittheEditUseroption,pushSTOPandtheconsolewillgobacktotheUserSelection option.
3. AfteryoustarttheEditfunction,theConsolewillshowtheEditNameprompt.Toeditthename,pushSTART/ENTER.
Note:UsetheIncrease/Decreasebuttonstomovethroughthealphabetandblankspace(foundbetweenAandZ).Toset
eachletter,pushtheSTART/ENTERbutton.PushtheSTOPbuttontogobacktothepreviousletter.
PushandholdSTART/ENTERtocompletetheentryandgotothenextdataprompt.OryoucantaptheSTART/ENTER
buttontoaddspacesuntilthenextdatascreenappears.
4. ToedittheotherUserdata(EDITAGE,EDITWEIGHT,EDITGENDER),usetheIncrease/Decreasebuttonstoselectan
optionandpushSTART/ENTER.UsetheIncrease/Decreasebuttonstoadjust,andpushSTART/ENTERtoseteachentry.
5. TheConsoledisplayshowstheCUSTOMprompt.ToedityourCustomWorkout,pushSTART/ENTER.
6. TheProgramDisplaywillshowtheleftcolumn(workoutinterval)isactivebyflashing.UsetheIncrease/Decreasebuttonsto
adjusttheresistanceleveloftheactiveinterval.PushSTART/ENTERtorecordtheresistancelevel.Thenextcolumntothe
right becomes active.
Note:TheConsoledisplayshowsthemessage“Nof20”duringsetup(Nisthecurrentinterval).Themaximumnumberof
intervalsis20.
PushandholdSTART/ENTERtoaccepttheCustomWorkout.
7. Whendone,pushSTOPandtheConsolewillgobacktotheUserSelection option.
Delete a User Profile
1. FromthePower-UpModescreen,pushtheMyNautilus
™
buttonandholdfor3secondstogotoUserSetupMode.
ToexittheMyNautilus
™
option,pushSTOPandtheConsolewillgobacktothePower-UpModescreen.
2. TheConsolewillshowaprompttoedittheuser(EDIT<Name>)ordeletetheuser(DELETE<Name>).UsetheIncrease/
DecreasebuttonstogototheDeleteoption,andpushSTART/ENTERtomakeyourselection.
ToexittheDeleteoption,pushSTOPandtheconsolewillgobacktotheEditandDeleteoptions.
3. AfteryoustarttheDeletefunction,theConsolewillshowaprompttodeletetheUserprofile,ornotdeletetheuserandgo
backtotheEditandDeleteoptions.PushSTART/ENTERtomakeyourselection.
30
4. Afteryoudeletetheuser,theConsolewillgotothePower-UpModescreen.
Custom Workout
AfteryourCustomWorkoutissetupinyourUserProfile,youcanstarttheprogramfromtheCUSTOMworkoutoptioninthe
ProgramMenu.TheConsoledisplaywillpromptyoutosettheTimefortheworkout(defaultis30:00).UsetheIncrease/De-
creasebuttonstoadjusttheTimevalue,andpushSTART/ENTERtobegintheworkout.
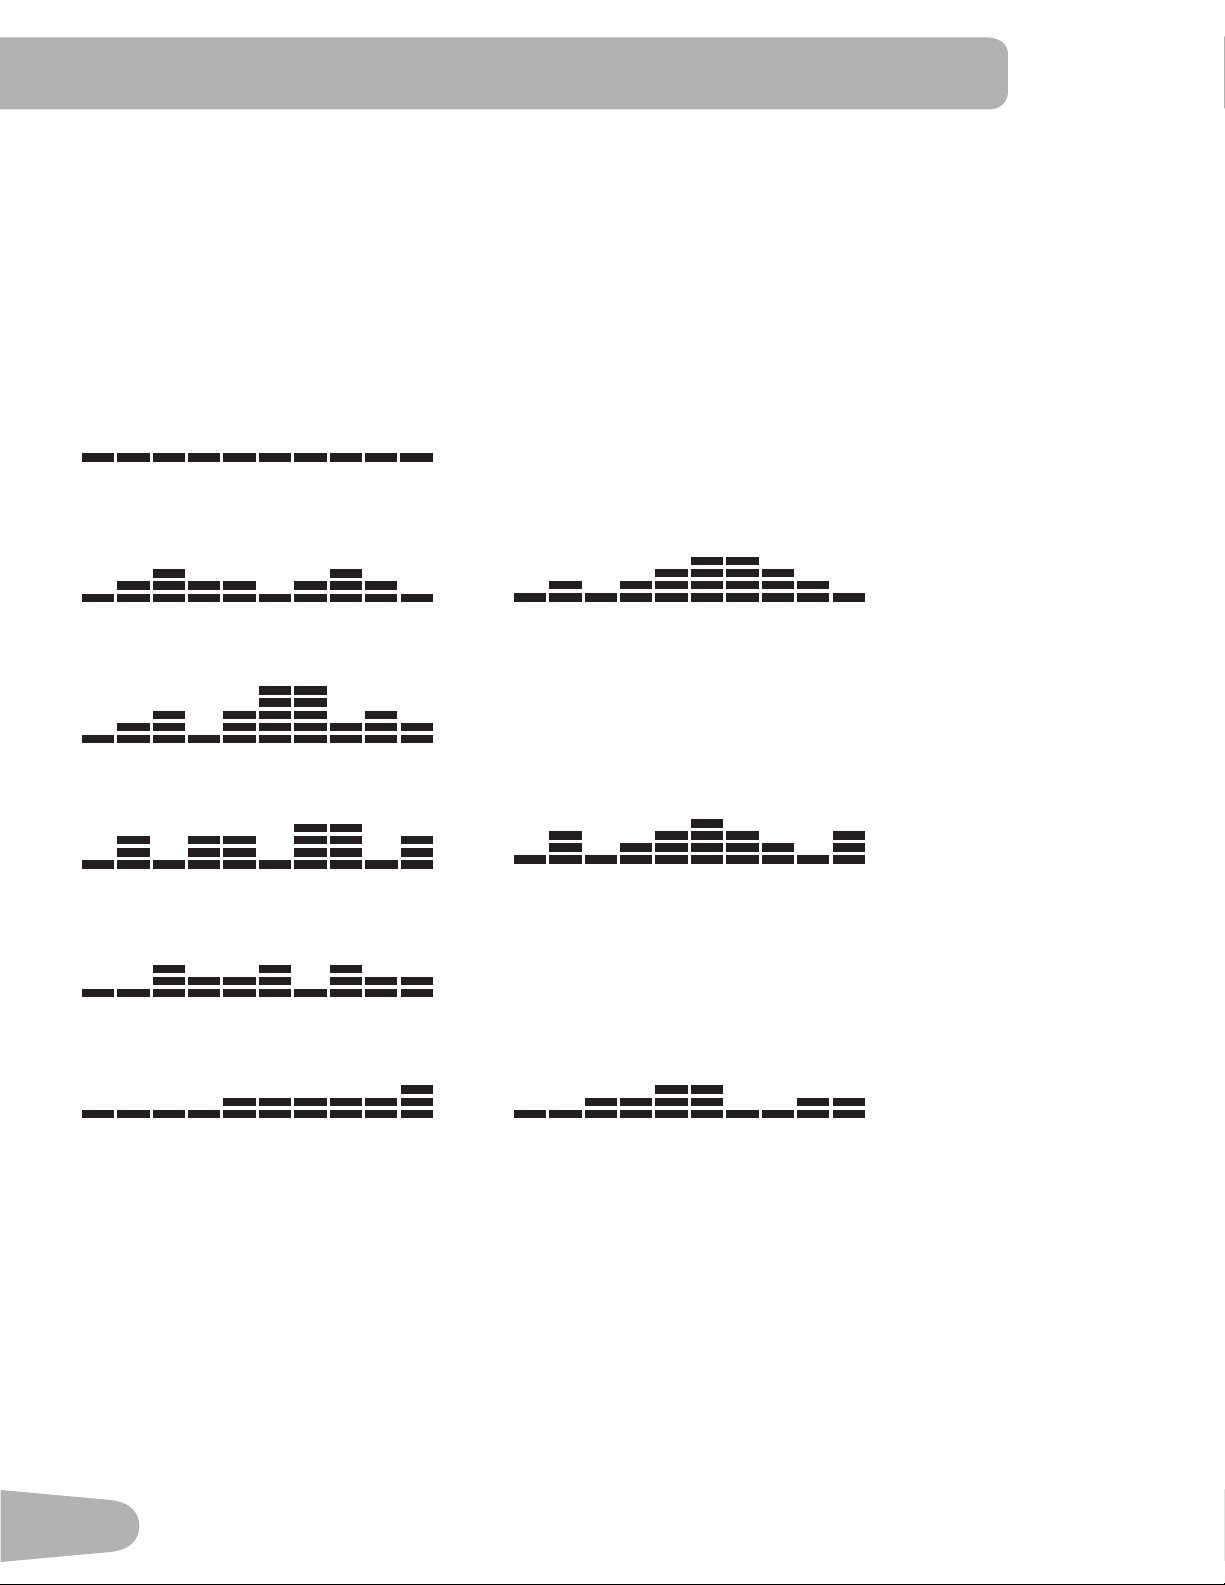
Profile Programs
Theseprogramsautomatedifferentresistancesandworkoutlevels.
Manual
Course 1 Course 2
Course 3
Circuit 1 Circuit 2
Circuit 3
Pursuit 1 Pursuit 2
Changing Resistance Levels
PushtheIncrease()orDecrease()buttonstochangetheresistancelevelatanytimeinaworkoutprogram.
Fitness Test
TheFitnessTestmeasurestheimprovementsofyourphysicalfitnesslevel.Thetestcomparesyourpoweroutput(inWatts)to
your heart rate. As your fitness level improves, your power output will increase at a given heart rate.
YoucanstarttheFitnessTestfromtheFITNESSTESToptionintheProgramMenu.TheFitnessTestprogramfirstprompts
youtoselectyourfitnesslevel—BeginnerorAdvanced.TheprogramwillusetheAgeandWeightvaluesinyourUserprofile
tocalculateyourFitnessScore.IfyouareaGuestUser,theprogramwillusethedefaultvaluesforyourworkout.
StarttopedalandholdtheHeartRateSensors.Whentheteststarts,thepower(Watts)slowlyincreases.Thismeansyou
willworkharder,andasaresult,yourheartrateincreases.TheWattscontinuestoincreaseautomaticallyuntilyourheartrate
reachesthe“TestZone.”Thiszoneisindividuallycomputedtobenear75percentofyourmaximumheartrate.Whenyou

31
reachtheTestZoneyourmachineholdstheWattssteadyfor3minutes.Thisletsyoureachastablecondition(whereyour
heartratebecomessteady).Attheendofthe3minutes,theConsolemeasuresyourheartrateandthepoweroutput(Watts).
Thesenumbers,alongwithinformationaboutyourageandweight,arecomputedtoproducea“FitnessScore”.
Note: Fitness Test scores should only be compared to your previous scores and not other users.
CompareyourFitnessScorestoseeyourimprovement.
Heart Rate Control (HRC) Workout
TheHeartRateControl(HRC)programletsyousetaheartrategoalforyourworkout.Theprogrammonitorsyourheartrate
inbeatsperminute(BPM)fromtheContactHeartRate(CHR)sensorsonthemachineorfromaHeartRateMonitor(HRM)
chest strap.
Note: The console must be able to read the heart rate information from the CHR sensors or HRM for the HRC program to
workcorrectly.
IfyougototheHRCprogramfromyourUserprofile,theTargetHeartRateprogramusesyourageandotherusersetup
informationtosettheHeartRateZonevaluesforyourworkout.IfyouareaGuestUser,theprogramwillusethedefaultvalues
foryourworkout.Theconsoledisplaythengivespromptsforyoutosetupyourworkout:
1. Settheworkoutlevel:BEGINNERorADVANCED.
2. Setthepercentageofmaximumheartrate:60–70%,70–80%,80–90%.
Consultaphysicianbeforeyoustarttoexerciseinthe80–90%heartratezone.
3. SettheTimefortheworkout.(Thedefaultvalueis10:00.)
Distance Goal Program
TheDistanceGoalProgramletsyousetthetotalDistanceandPacerSpeedforyourworkout.
IfyougototheDistanceGoalprogramfromyourUserprofile,theprogramwillusetheAgeandWeightvaluesinyourUser
profile. IfyouareaGuestUser,theprogramwillusethedefaultvaluesforyourworkout. The console display then gives
promptsforyoutosetupyourworkout:
1. EnterthedistancewiththeIncrease()andDecrease()buttons(defaultis20mi/20km).PushSTART/ENTER
2. EnterthepacerspeedwiththeIncrease()andDecrease()buttons(defaultis25mph/25km/h).PushSTART/ENTER.
3. Theworkoutstartsatlevel1.Toadjusttheresistance,usetheIncrease/Decreasebuttons.
4. TheTIMEdisplaystartstocountupfrom00:00.
Results / Cool Down Mode
AfteraworkouttheTIMEdisplayshows00:00andthenstartstocountup.DuringthisCoolDownperiod,theConsoleshows
theWorkoutResultsandyourcurrentHeartRate.AllworkoutsexceptQuickStarthavea3-minuteCoolDownperiod.
TheLCDdisplayshowseachworkoutdatavaluefor4seconds:TIME,DISTANCE,CALORIE,AVG/MPH(KMH),AVG/PWR,
AVG/HR,MAX/HR.YoucanusetheIncrease/Decreasebuttonstomovethroughtheresultsmanually.TheHRdisplayshows
thecurrentBPMvalue.
TheLevelduringCoolDownisbasedontheLevelattheendoftheworkout:
End Level Cool Down Level
Level ≤3 1
3<Level≤10 3
10<Level 5
YoucanpushSTOPtostoptheResultsdisplayandgobacktoPower-UpMode.IfthereisnoRPMorHRsignal,theConsole
automaticallygoesintoSleepMode.

32
Pausing or Stopping
TheConsolewillgointoPauseModeiftheuserstopspedalingandpushesSTOPduringaworkout,orthereisnoRPM
signalfor5seconds(usernotpedaling).TheConsoledisplayshowsWORKOUTPAUSED,andafter4secondsthecurrent
workoutdatastartstoscrollautomatically(thesameformatasResultsMode).YoucanusetheIncrease/Decreasebuttonsto
move through the results manually.
1. StoppedalingandpushtheSTOPbuttontopauseyourworkout.
2. Tocontinueyourworkout,pushSTART/ENTERorstartpedaling.
Tostoptheworkout,pushtheSTOPbutton.TheConsolewillgointoResults/CoolDownmode.
User Statistics
EachUserProfilestoresthestatisticsfromallworkoutdatarecordedforthatuserinthreecapacities-LastWorkout,Aver-
ages, and Totals.
WhentheTOTALSdisplayedforastatisticexceedsthemaximumvalue,thecountwillstartagainatzero.
• Totalnumberofworkouts—maximumis9999.
• Total hours—maximumis999:59(999hours,59minutes).
• Average speed—mphorkm(perunitsinsetup)
• Total distance—maximumis9999.9.
• Total calories—maximumis999999.
TheStatisticsoptionintheUserprofilemenuletsyoulookattherecordeddataordeleteit.
1. PushtheMyNautilus
™
buttonatthePower-UpModescreen.TheConsoledisplayshowstheUserProfiles.
2. UsetheIncrease()andDecrease()buttonstoselectaUserprofile,andpushSTART/ENTERtomakeyourselection.
3. AfteryouselecttheUserprofileoption,youhavetwooptions:VIEWSTATSandWORKOUT.UsetheIncrease()and
Decrease()buttonstogototheStatisticsoption,andpushSTART/ENTERtomakeyourselection.
4. TheConsoledisplayshowstheUserStatisticsmenuoptions—LASTWORKOUT,AVERAGES,TOTALSandRESET
STATS.UsetheIncrease/Decreasebuttonstomovebetweenthemenuoptions,andpushSTART/ENTERtomakeyour
selection.
5. UsetheIncrease/Decreasebuttonstomovebetweenthevalues,orafterafewsecondstheworkoutstatisticsstartto
scrollautomatically.YoucanusetheIncrease/Decreasebuttonstomovethroughtheresultsmanually.PushSTOPtoexit
totheUserStatisticsmenu.
TheRESETSTATSoptionwillcleartheaccumulatedworkoutvalues.UsetheIncrease/Decreasebuttonstochangeyour
selectionbetweenYESandNO,andpushSTART/ENTER.PushSTOPtoexittheRESETSTATSoption.
6. PushSTOPtogobacktotheUserprofilemenu—ViewStatsorWorkoutoption.

33
CONSOLE SETUp MOdE
TheConsoleSetupModeletsyousettheunitsofmeasurementtoeitherEnglishorMetric,changethemachinetype,orsee
maintenancestatistics(ErrorLogandRunHours–forservicetechnicianuseonly).
1. HolddowntheIncreasebuttonandDecreasebuttontogetherfor3secondswhileinthePower-UpModetogointothe
ConsoleSetupMode.
Note:PushSTOPtogobacktothepreviousscreenorthePower-UpModescreen.
2. TheConsoledisplayshowstheUnitsprompt.PushSTART/ENTERtostartUnitsoption.PushtheIncrease/Decrease
buttonstochangebetween“Miles-Lb”(ImperialEnglishunits)and“Km-Kg”(metricunits).
Note:IftheunitschangewhenthereisdatainUserStatistics,thestatisticsconverttothenewunits.
3. PushSTART/ENTERtoset.Forthenextoption,pushtheIncreasebutton.
4. TheConsoledisplayshowstheMachineTypeprompt.PushSTART/ENTERtostartMachineTypeoption.Pushthe
Increase/DecreasebuttonstochangebetweenELLIPTICALandBIKE.
5. PushSTART/ENTERtoset.Forthenextoption,pushtheIncreasebutton.
6. TheConsoledisplayshowstheBrightnessprompt.PushSTART/ENTERtostartthebrightnessoption.Pushthe
Increase/Decreasebuttonstochangethebacklightlevelsfrom1(lowest)to5(highest).
7. PushSTART/ENTERtoset.Forthenextoption,pushtheIncreasebutton.
8. TheConsoledisplayshowstheErrorLogprompt.PushSTART/ENTERtostartErrorLogoption.TheErrorLogstoresthe
last10errors(errortypeandsystemtimeoferror),listednewesttooldest.PushtheIncrease/Decreasebuttonstomove
throughtheErrorLog.Iftherearenoerrors,theConsoledisplayshows“Index=0”.
9. PushSTOPtoexit.Forthenextoption,pushtheIncreasebutton.
10. TheConsoleshowstheRUNHOURSprompt.PushSTART/ENTERtoseetotalhoursandminutesforthemachine.
11. PushSTOPtoexit.Forthenextoption,pushtheIncreasebutton.
12. TheConsoledisplayshowstheUnitspromptagain.PushSTOPtogobacktothePower-UpModescreen.

34
Readallmaintenanceinstructionsfullybeforeyoustartanyrepairwork.Insomeconditions,anassistantisrequiredtodothe
necessarytasks.
Equipmentmustberegularlyexaminedfordamageandrepairs.Theownerisresponsibletomakesurethatregular
maintenanceisdone.Wornordamagedcomponentsmustberepairedorreplacedimmediately.Onlymanufacturer
suppliedcomponentscanbeusedtomaintainandrepairtheequipment.
To reduce the risk of electrical shock or unsupervised usage of the equipment, always
unplug the power cord from the wall outlet and the machine and wait 5 minutes before
cleaning, maintaining or repairing the machine. Place the power cord in a secure
location.
Daily:
Beforeeachuse,examinetheexercisemachineforloose,broken,damaged,orwornparts.Donot
use if found in this condition. Repair or replace all parts at the first sign of wear or damage. After each
workout,useadampclothtowipeyourmachineandConsolefreeofsweat.
Note:AvoidexcessivemoistureontheConsole.
Weekly:
Cleanthemachinetoremoveanydust,dirt,orgrimefromthesurfaces.Checkforsmoothseatslider
andconsoletiltoperation.Ifneeded,applyaverythincoatingofsiliconelubetoeaseoperation.
Note:Donotusepetroleumbasedproducts.
Monthly
or after 20 hours:
Checkpedalsandcrankarmsandtightenasnecessary.Makesureallboltsandscrewsaretight.
Tighten as necessary.
NOTICE:Donotcleanwithapetroleumbasedsolventoranautomotivecleaner.BesuretokeeptheConsolefreeof
moisture.
MAINTENANCE
35
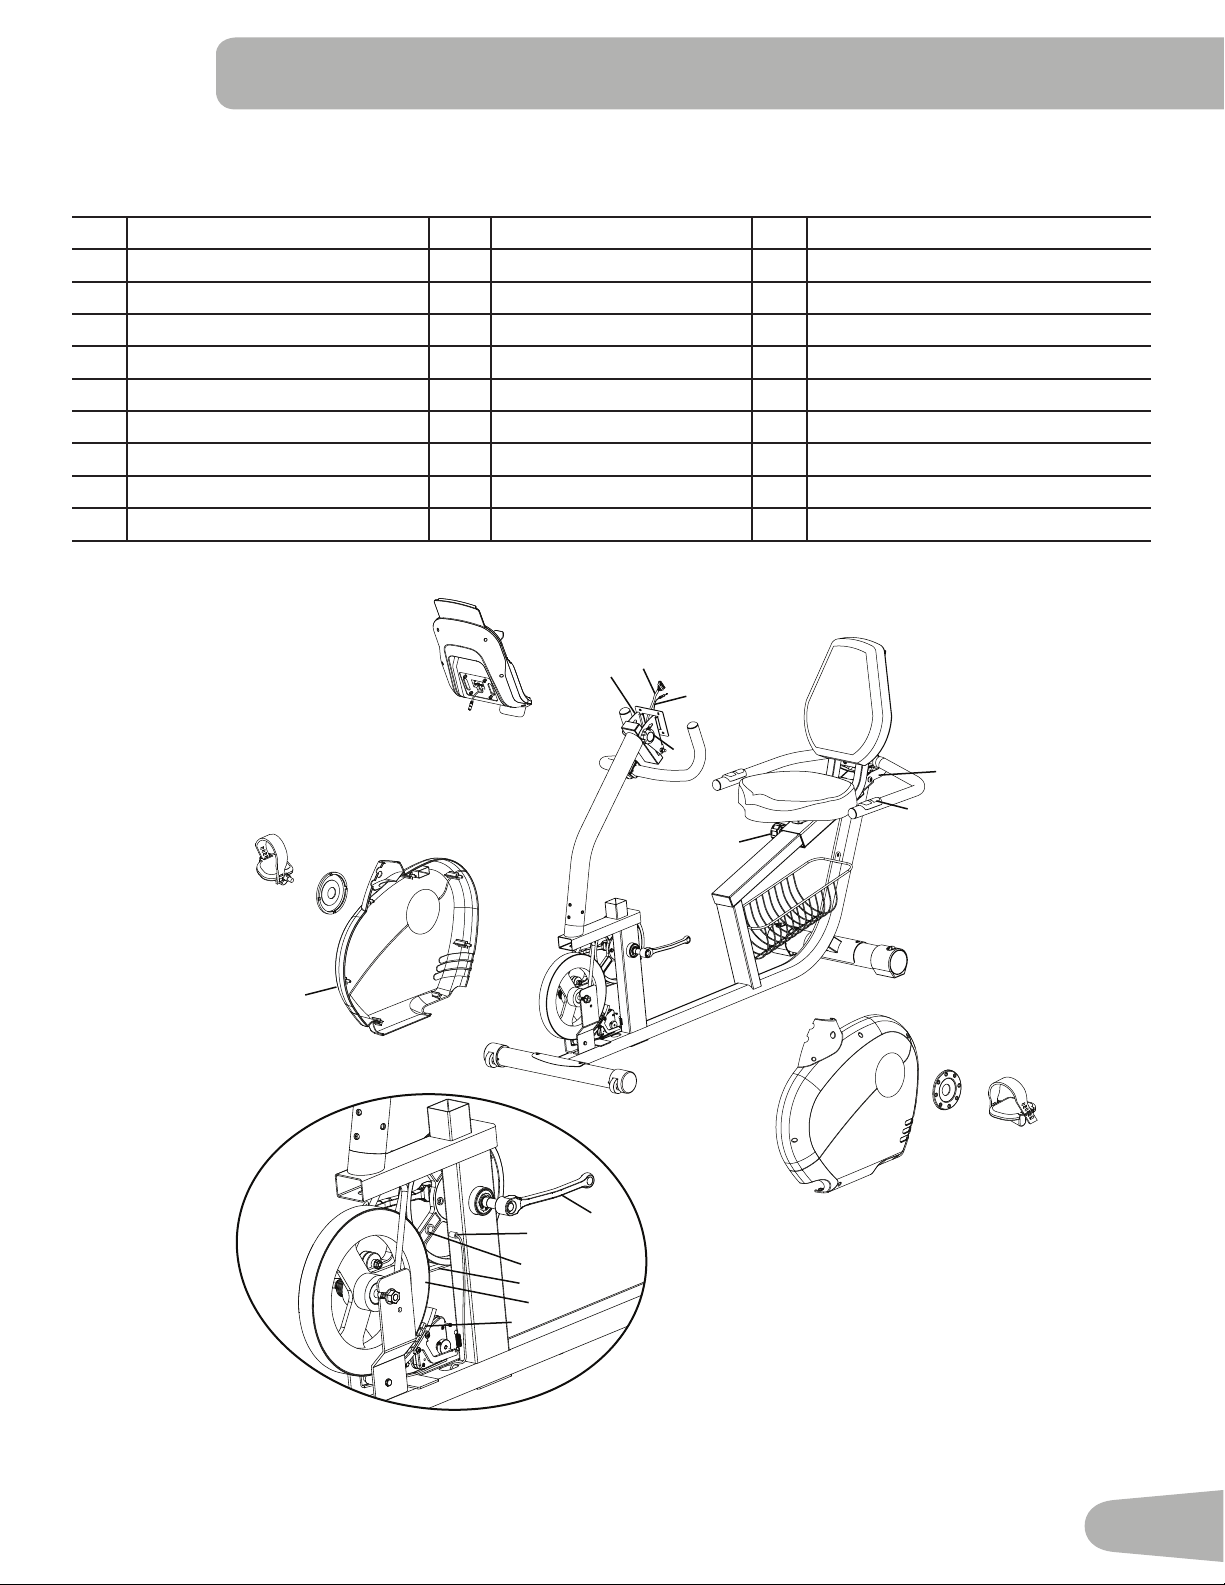
Maintenance Parts
A Console K SeatBack U SpeedSensorMagnet
B ConsoleBracket L Transport Handle V DriveBelt
C Console Cable M HRSensors W Flywheel
D HeartRateSensorCable,Upper N Leveler X BrakeAssembly
E ConsoleAdjustmentKnob O RearStabilizer Y FrontStabilizer
F Handlebar,Upper P Pedal,Left Z TransportWheel
G Console Mast Q CrankCap AA Shroud,Right
H SeatAdjustmentKnob R Shroud,Left BB ACAdapterPlug
I SeatBottom S CrankArm CC Pedal,Right
J Handlebar,Side T SpeedSensor
T
U
W
S
X
CC
Q
AA
A
C
D
B
F
G
Z
R
Q
P
N
H
M
J
K
I
E
BB
L
V
O
Y

36
Problem Check Solution
Nodisplay/partialdiplay/unit
will not turn on
Checkelectrical(wall)outlet Makesureunitispluggedintoafunctioningwall
outlet.
Checkconnectionatfront(recumbent)
orrear(upright)ofunit
Connection should be secure and undamaged.
Replace adapter or connection at unit if either
are damaged.
Checkdatacableintegrity Allwiresincableshouldbeintact.Ifanyare
visibly crimped or cut, replace cable.
Checkdatacableconnections/
orientation
Be sure cable is connected securely and
orientedproperly.Smalllatchonconnector
should line up and snap into place.
Checkconsoledisplayfordamage Checkforvisualsignthatconsoledisplay
iscrackedorotherwisedamaged.Replace
Console if damaged.
ConsoleDisplay IfConsoleonlyhaspartialdisplayandall
connections are fine, replace the Console.
Iftheabovestepsdonotresolvetheproblem,
contact Customer Care for further assistance.
UnitoperatesbutContactHR
not displayed
HR cable connection at Console Makesurecableisconnectedsecurelyto
Console.
HRcableboxconnection Makesurecablesfromhandlebarsandcable
toConsolearesecureandundamaged.Some
modelsmayrequiretheseatbackberaisedto
accesscablebox.
Sensorgrip MakesurehandsarecenteredonHRsensors.
Handsmustbekeptstillwithrelativelyequal
pressure applied to each side.
Dryorcallousedhands Sensorsmayhavedifficultywithdriedoutor
calloused hands. A conductive electrode cream
suchas“SignaCrème”or“Buh-Bump”canhelp
makebetterconduct.Theseareavailableonthe
web or at medical or some larger fitness stores.
Handlebars Iftestsrevealnootherissues,Handlebars
should be replaced.
UnitoperatesbutTelemetric
HR not displayed
ChestStrap Strapshouldbe“Polar”compatible.Makesure
strapisdirectlyagainstskinandcontactareais
moist.
Interference Try moving unit away from sources of
interference(TV,Microwave,etc).Ifinterference
is eliminated and HR still does not function,
replace strap and Console.
Consoledisplays“E2”error
code
Checkdatacableintegrity Allwiresincableshouldbeintact.Ifanyarecut
or crimped, replace cable.
Checkdatacableconnections/
orientation
Makesurecableisconnectedsecurelyand
orientedproperly.Smalllatchonconnector
should line up and snap into place.
Console Electronics Iftestsrevealnootherissues,Consoleshould
be replaced.
TROUBLESHOOTINg

37
Nospeed/RPMreading,
Consoledisplays“E3”error
code
Checkdatacableintegrity Allwiresincableshouldbeintact.Ifanyarecut
or crimped, replace cable.
Checkdatacableconnections/
orientation
Makesurecableisconnectedsecurelyand
orientedproperly.Smalllatchonconnector
should line up and snap into place.
Checkmagnetposition(requiresshroud
removal)
Magnetshouldbeinplaceonflywheel.Ifno
magnet is present, replace the flywheel or the
entirebaseunit(ifunabletoreplaceflywheel).
CheckRPMSensor(requiresshroud
removal)
RPMsensorshouldbealignedwithmagnet
and connected to data cable. Realign sensor if
necessary. Replace if there is any damage to the
sensor or the connecting wire.
Consoleshutsoff(enters
sleepmode)whileinuse
Checkdatacableintegrity Allwiresinthecableshouldbeintact.Ifanyare
cut or crimped, replace cable.
Checkdatacableconnections/
orientation
Makesurecableisconnectedsecurelyand
orientedproperly.Smalllatchonconnector
should line up and snap into place.
ResetMachine(ifequippedwithreset
button)
Unplugunitfromelectricaloutletfor3minutes.
Reconnect to outlet. After the Console powers
up,press“reset”.
Checkmagnetposition(Technician
onlyrequiresshroudremoval)
Magnetshouldbeinplaceonflywheel.Ifno
magnet is present, replace flywheel or entire
base unit.
CheckRPMSensor Contact Customer Care for further assistance.
Fan(ifequipped)willnotturn
on or will not turn off
Checkdatacableintegrity Allwiresincableshouldbeintact.Ifanyarecut
or crimped, replace cable.
Checkdatacableconnections/
orientation
Be sure cable is connected securely and
orientedproperly.Smalllatchonconnector
should line up and snap into place.
ResetMachine(ifequippedwithreset
button)
Unplugunitfromelectricaloutletfor3minutes.
Reconnect to outlet. After Console powers up,
press“reset”.
Unitrocks/doesnotsitlevel Checkleveleradjustment Leveling feet may be turned in or out to level
bike.
Checksurfaceunderunit Adjustment may not be able to compensate for
extremelyunevensurfaces.Movebiketolevel
area.
Pedalsloose/unitdifficultto
pedal
Checkpedaltocrankconnection Pedalshouldbetightenedsecurelytocrank.Be
sureconnectionisnotcross-threaded.
Checkcranktoaxleconnection Crankshouldbetightenedsecurelytoaxle.Be
surecranksareconnectedat180degreesfrom
each other.
Seatpostmovement Checklockingpin Besureadjustmentpinislockedintooneofthe
seat post adjustment holes
Checkadjustmentknob Besureknobissecurelytightened.

38

39
WARRANTY
Who Is Covered
This warranty is valid only to the original purchaser and is not transferable or applicable to any other person(s).
What Is Covered
Nautilus, Inc. warrants that this product is free from defects in materials and workmanship, when used for the purpose intended, under normal conditions, and provided it receives
proper care and maintenance as described in the Product’s Assembly and Owner’s manual. This warranty is good only for authentic, original, legitimate machines manufactured by
Nautilus, Inc. and sold through an authorized agent and used in the United States or Canada.
Terms
• Frame 10 years
• Mechanical parts 2 years
• Electronics 1 year
• Wear items 6 months
• Labor 6 months
(Labor support does not include the installation of replacement parts involved in the initial product assembly and preventative maintenance services.)
How Nautilus Will Support the Warranty
Throughout the terms of the warranty coverage, Nautilus, Inc. will repair any machine that proves to be defective in materials or workmanship. Nautilus reserves the right to replace
the product in the event a repair is not possible. When Nautilus determines replacement is the correct remedy, Nautilus may apply a limited credit reimbursement toward another
Nautilus, Inc. brand Product, at our discretion. This reimbursement may be prorated based on length of ownership. Nautilus, Inc. provides repair service within major metropolitan
areas. Nautilus, Inc. reserves the right to charge the consumer for travel outside these areas. Nautilus, Inc. is not responsible for dealer labor or maintenance charges beyond the
applicable warranty period(s) stated herein. Nautilus, Inc. reserves the right to substitute material, parts or products of equal or better quality if identical materials or products are
not available at the time of service under this warranty. Any replacement of the product under the terms of the Warranty in no way extends the original Warranty period. Any limited
credit reimbursement may be prorated based on length of ownership. THESE REMEDIES ARE THE EXCLUSIVE AND SOLE REMEDIES FOR ANY BREACH OF WARRANTY.
What You Must Do
• Retain appropriate and acceptable Proof of Purchase.
• Operate, maintain, and inspect the Product as specified in the Product Documentation (Manuals, (Assembly, Owner’s Manuals, etc.).
• Product must be used exclusively for the purpose intended.
• Notify Nautilus within 30 days after detecting an issue with the Product.
• Install replacement parts or components in accordance with any Nautilus instructions.
• Perform diagnostic procedures with a trained Nautilus, Inc representative if requested.
What Is Not Covered
• Damage due to abuse, tampering or modification of the Product, failure to properly follow assembly instructions, maintenance instructions, or safety warnings as stated in the
Product Documentation (Assembly, Owner’s Manuals, etc), damage due to improper storage or the effect of environmental conditions such as moisture or weather, misuse,
mishandling, accident, natural disasters, power surges.
• A machine placed or used in a commercial or institutional setting. This includes gyms, corporations, work places, clubs, fitness centers and any public or private entity that
has a machine for use by its members, customers, employees or affiliates.
• Damage caused by exceeding maximum user weights as defined in the Product’s Owner’s manual or warning label.
• Damage due to normal usage and wear and tear.
• This warranty does not extend to any territories or countries outside the United States and Canada.
How to Obtain Service
For Products purchased directly from Nautilus, Inc. contact the Nautilus office listed on the Contacts page of the products Owner’s manual. You may be required to return the
defective component to a specified address for repair or inspection, at your expense. Standard ground shipping of any warranty replacement parts will be paid by Nautilus, Inc. For
products purchased from a retailer, you may be asked to contact your retailer for warranty support.
Exclusions
The preceding warranties are the sole and exclusive express warranties made by Nautilus, Inc. They supersede any prior, contrary or additional representations, whether oral or
written. No agent, representative, dealer, person or employee has the authority to alter or increase the obligations or limitations of this warranty. Any implied warranties, including
the WARRANTY OF MERCHANTABILITY and any WARRANTY OF FITNESS FOR A PARTICULAR PURPOSE, are limited in duration to the term of the applicable express warranty
provided above, whichever is longer. Some states do not allow limitations on how long an implied warranty lasts, so the above limitation may not apply to you.
Limitation of Remedies
EXCEPT AS OTHERWISE REQUIRED BY APPLICABLE LAW, THE PURCHASER’S EXCLUSIVE REMEDY IS LIMITED TO REPAIR OR REPLACEMENT OF ANY COMPONENT DEEMED BY
NAUTILUS, INC. TO BE DEFECTIVE UNDER THE TERMS AND CONDITIONS STATED HEREIN. IN NO EVENT WILL NAUTILUS, INC. BE LIABLE FOR ANY SPECIAL, CONSEQUENTIAL,
INCIDENTAL, INDIRECT OR ECONOMIC DAMAGES, REGARDLESS OF THE THEORY OF LIABILITY (INCLUDING, WITHOUT LIMITATION, PRODUCT LIABILITY, NEGLIGENCE OR OTHER
TORT) OR FOR ANY LOST REVENUE, PROFIT, DATA, PRIVACY OR FOR ANY PUNITIVE DAMAGES ARISING OUT OF OR RELATED TO THE USE OF THE FITNESS MACHINE EVEN IF
NAUTILUS, INC. HAS BEEN ADVISED OF THE POSSIBILITY OF SUCH DAMAGES. THIS EXCLUSION AND LIMITATION SHALL APPLY EVEN IF ANY REMEDY FAILS OF ITS ESSENTIAL
PURPOSE. SOME STATES DO NOT ALLOW THE EXCLUSION OR LIMITATION OF CONSEQUENTIAL OR INCIDENTAL TYPE DAMAGES SO THE ABOVE LIMITATION MAY NOT APPLY TO
YOU.
State Laws
This warranty gives you specific legal rights. You may also have other rights, which vary from state to state.
Expirations
If the warranty has expired, Nautilus, Inc. may assist with replacements or repairs to parts and labor, but there will be a charge for these services. Contact a Nautilus® office for
information on post-warranty parts and services. Nautilus® does not guarantee availability of spare parts after expiration of warranty period.
International Purchases
If you purchased your machine outside of the United States consult your local distributor or dealer for warranty coverage.

Nautilus® Bowflex® Schwinn® fitness Universal®
8001471.111512.B
EN