Note: Your machine comes with oil in the engine crankcase. Before starting the engine, check the oil level and add oil if necessary.
Refer to Checking the Engine-Oil Level (page 19).
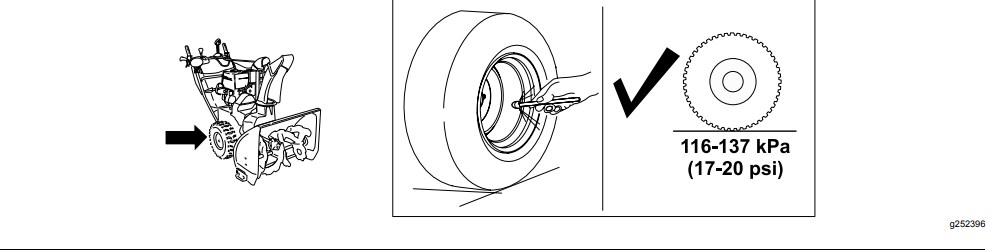
7. Checking the Tire Pressure
No Parts Required
Procedure
8. Checking the Skids and Scraper
No Parts Required
Procedure
Refer to Checking and Adjusting the Skids and Scraper (page 19).
9. Checking the Operation of the Traction Drive
No Parts Required
Procedure
If the traction drive is not properly adjusted, the machine may move in the direction opposite of what you intended, causing injury and/or property damage.
Carefully check the traction drive and adjust it properly, if necessary.
1. Start the engine; refer to Starting the Engine (page 13).
2. Move the speed selector to Position R1; refer to Operating the Speed Selector (page 15).
3. Squeeze the left (traction) lever to the handgrip (Figure 10).
The machine should move rearward. If the machine does not move or moves forward, complete the following:
A. Release the traction lever and shut off the engine.
B. Disconnect the trunnion from the speed-selector lever.
C. Turn the trunnion downward (clockwise) on the speed-control rod.
D. Connect the trunnion to the speed-selector lever.
4. Release the traction lever.
5. Move the speed selector to Position 1; refer to Operating the Speed Selector (page 15).
6. Squeeze the left (traction) lever to the handgrip (Figure 10).
The machine should move forward. If the machine does not move or moves rearward, complete the following:
A. Release the traction lever and shut off the engine.
B. Disconnect the trunnion from the speed-selector lever.
C. Turn the trunnion upward (counterclockwise) on the speed-control rod.
D. Connect the trunnion to the speed-selector lever.
7. If you made any adjustments, repeat this procedure until no adjustments are required.
Important: If the machine moves when the traction lever is in the released position, check the traction cable; refer to Checking and Adjusting the Traction Cable (page 20) or take the machine to an Authorized Service Dealer for service.
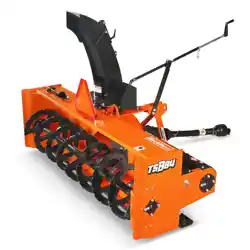
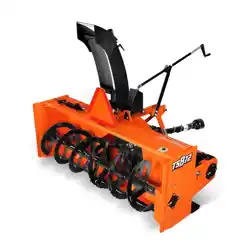
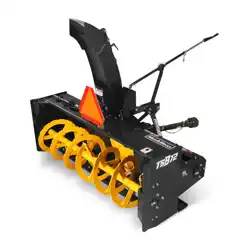
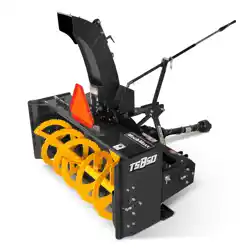
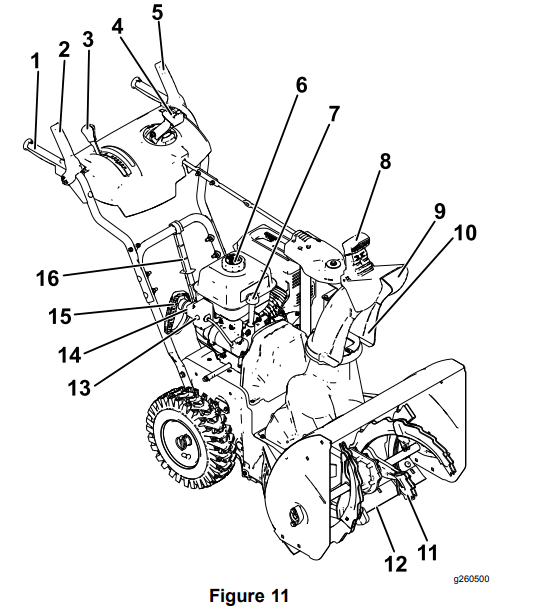
Product Overview
1. Handgrip (2)
2. Auger/impeller lever
3. Speed-selector lever
4. Quick Stick® discharge-chute control
5. Traction lever
6. Fuel-tank cap
7. Oil-fill tube/dipstick
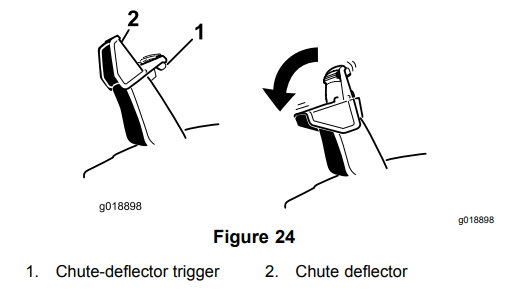
8. Chute-deflector control
9. Chute deflector
10. Discharge chute
11. Auger
12. Scraper
13. Electric-start button
14. Electric-start plug-in
15. Recoil-start handle
16. Snow-cleanout tool
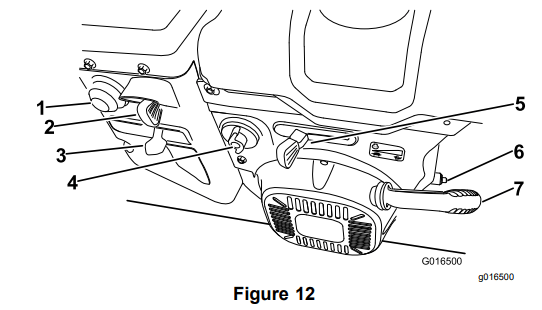
1. Primer
2. Ignition switch
3. Choke
4. Fuel-shutoff valve
5. Throttle
6. Oil-drain plug
7. Recoil-start handle
1. Snow-cleanout tool (attached to the handle)
Specifications
Attachments/Accessories
A selection of Lawn-Boy approved attachments and accessories is available for use with the machine to enhance and expand its capabilities. Contact your Authorized Service Dealer or authorized Lawn-Boy distributor or go to www.Lawn-Boy.com for a list of all approved attachments and accessories.
To ensure optimum performance and continued safety certification of the machine, use only genuine Lawn-Boy replacement parts and accessories. Replacement parts and accessories made by other manufacturers could be dangerous, and such use could void the product warranty
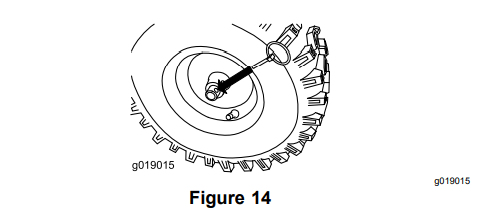
Freewheeling or Using the Self-Propel Drive
You can operate the snowthrower with the self-propel feature engaged or disengaged (freewheeling).
To freewheel, insert the axle pins through the axle holes, but not through the wheel hubs (Figure 14).
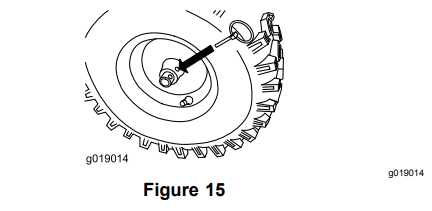
To self-propel, insert the axle pins through the holes in the wheel hubs and the inner-axle holes (Figure 15).
Operation
Filling the Fuel Tank
• For best results, use only clean, fresh (less than 30 days old), unleaded gasoline with an octane rating of 87 or higher ((R+M)/2 rating method).
• Oxygenated fuel with up to 10% ethanol or 15% MTBE by volume is acceptable.
• Do not use ethanol blends of gasoline (such as E15 or E85) with more than 10% ethanol by volume. Performance problems and/or engine damage may result which may not be covered under warranty.
• Do not use gasoline containing methanol.
• Do not store fuel either in the fuel tank or fuel containers over the winter unless you use a fuel stabilizer.
• Do not add oil to gasoline.
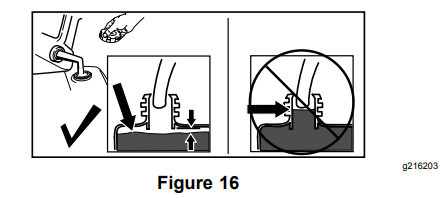
Do not fill above the bottom of the fuel tank neck (Figure 16).
Important: For best results, purchase only the quantity of fuel that you expect to use in 30 days. Otherwise, you may use fuel stabilizer/conditioner in the machine at all times to keep the fuel fresh longer when used as directed by the fuel-stabilizer manufacturer.
Starting the Engine
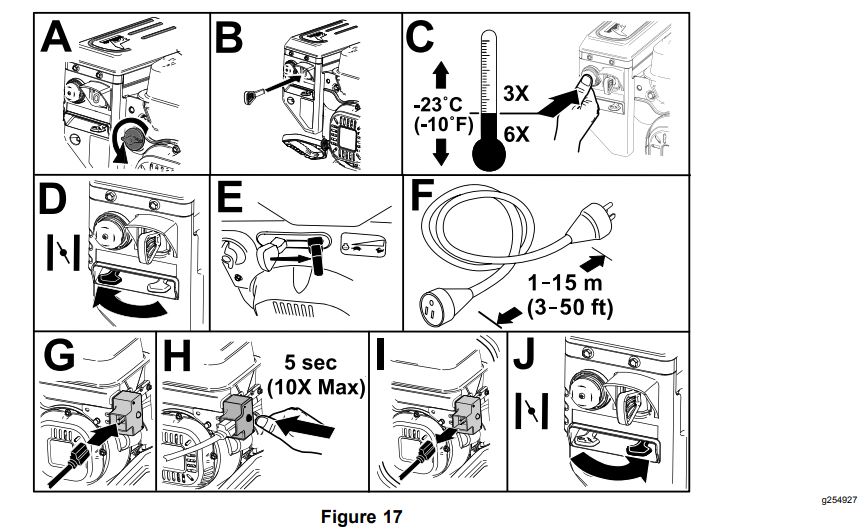
Using Electric Start
Note: To use the electric starter (electric-start models only), connect a power cord to the plug-in first and then to a power outlet. Use only a UL-listed, 16-gauge extension cord recommended for outdoor use that is not longer than 50 ft (15 m).
The electrical cord can become damaged, causing a shock or fire.
Thoroughly inspect the electrical cord before using the machine. If the cord is damaged, do not use it. Replace or repair the damaged cord immediately. Contact an Authorized Service Dealer for assistance.
If you leave the machine plugged into a power outlet, someone can inadvertently start the machine and injure people or damage property.
Unplug the power cord whenever you are not starting the machine.
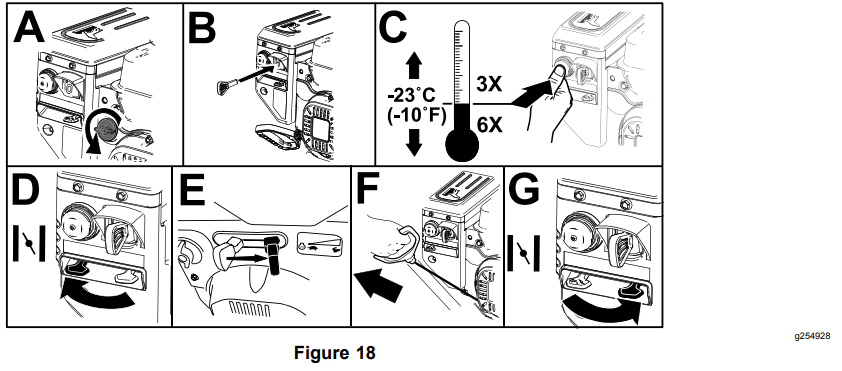
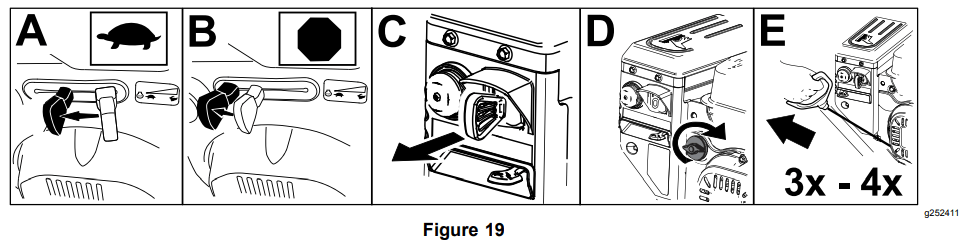
Using Recoil Start
Shutting Off the Engine
Operating the Traction Drive
1. To engage the traction drive, squeeze the left (traction) lever to the handgrip (Figure 20).
2. To stop the traction drive, release the traction lever.
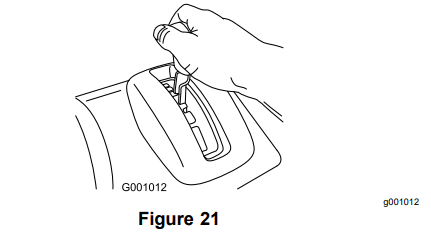
Operating the Speed Selector
The speed selector has 6 forward and 2 reverse gears. To change speeds, release the traction lever and shift the speed-selector lever to the desired position (Figure 21). The lever locks in a notch at each speed selection.
Operating the Auger/Impeller Drive
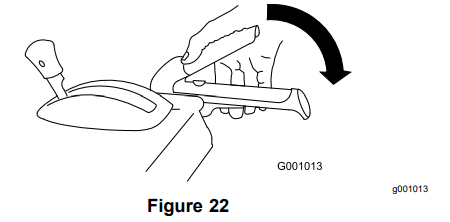
1. To engage the auger/impeller drive, squeeze the right (auger/impeller) lever to the handgrip (Figure 22).
2. To stop the auger and impeller, release the right lever.
Important: When you engage both the auger/impeller lever and the traction lever, the traction lever locks the auger/impeller lever down, freeing your right hand. To release both levers, simply release the left (traction) lever.
3. If the auger and impeller continue to rotate when you release the auger/impeller lever, do not operate the machine. Check the auger/impeller cable; refer to Checking and Adjusting the Auger/Impeller Cable (page 21) and adjust it if necessary. Otherwise, take the machine to an Authorized Service Dealer for service.
Operating the Quick Lever
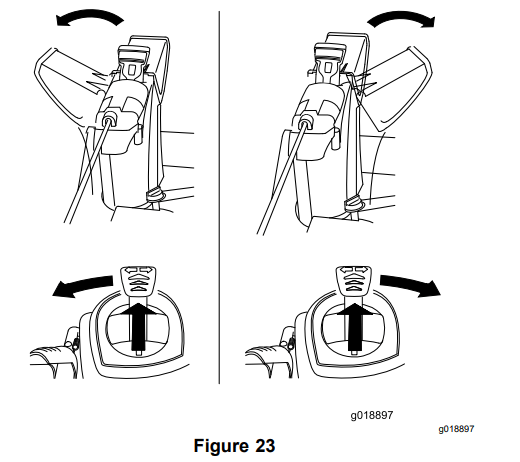
Moving the Discharge Chute
Push the Quick Lever forward; move the Quick Lever to the left to move the discharge chute to the left; move the Quick Lever to the right to move the discharge chute to the right. Release the lever to lock the discharge chute in place (Figure 23).
Moving the Chute Deflector
To raise or lower the angle of the chute deflector, press the trigger on the chute deflector and move the chute deflector up or down (Figure 24).
Clearing a Clogged Discharge Chute
If the auger/impeller is running but there is no snow coming out of the discharge chute, the discharge chute may be clogged.
Never use your hands to clear a clogged discharge chute. This could result in personal injury.
• To unclog the discharge chute, stay in the operating position and release the left (traction) lever. While running the auger/impeller, push down on the handles to raise the front of the machine a few centimeters (inches) off the pavement. Then lift the handles quickly to bump the front of the machine on the pavement. Repeat if necessary until a stream of snow comes out the discharge chute.
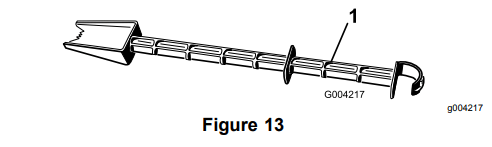
• If you cannot unclog the discharge chute by bumping the front of the machine, shut off the engine, wait for all moving parts to stop, and use the snow-cleanout tool (Figure 13).
Important: Unclogging the discharge chute by bumping the front of the machine on the pavement may cause the skids to move. Adjust the skids and tighten the skid bolts securely; refer to Checking and Adjusting the Skids and Scraper (page 19).
Maintenance
Recommended Maintenance Schedule(s)
Maintenance Service Interval
Maintenance Procedure
After the first 2 hours
• Inspect the traction cable and adjust it if necessary.
• Inspect the auger/impeller cable and adjust it if necessary.
After the first 5 hours
• Change the engine oil.
Before each use or daily
• Check the engine-oil level and add oil if necessary.
Every 100 hours
• Replace the spark plug.
Yearly
• Check the skids and the scraper and adjust them if necessary.
• Inspect the traction cable and adjust or replace it if necessary.
• Inspect the auger/impeller cable and adjust or replace it if necessary.
• Check the auger-gearbox oil and add oil if necessary.
• Change the engine oil.
• Lubricate the hex shaft.
Yearly or before storage
• Check the air pressure in the tires and inflate them to 116 to 137 kPa (17 to 20 psi).
• Drain the fuel and run the engine to dry out the fuel tank and the carburetor at the end of the season.
• Have an Authorized Service Dealer inspect and replace the traction drive belt and/or the auger/impeller drive belt, if necessary.
Maintenance Safety
Read the following safety precautions before performing any maintenance on the machine:
• Before servicing, adjusting, or cleaning the machine, shut off the engine and remove the key. If major repairs are ever needed, contact an Authorized Service Dealer.
• Always wear eye protection while performing an adjustment or repair to protect your eyes from foreign objects that the machine may throw.
• Check all fasteners at frequent intervals for proper tightness to ensure that the machine is in safe working condition.
• Do not change the governor settings on the engine. Purchase only genuine Lawn-Boy replacement parts and accessories.
Preparing for Maintenance
Move the machine to a level surface.
Shut off the engine and wait for all moving parts to stop. 3.
Disconnect the spark-plug wire. Refer to Replacing the Spark Plug (page 23).
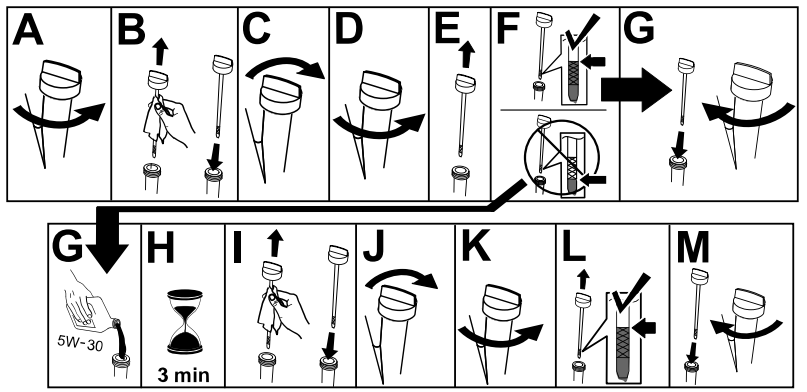
Checking the Engine-Oil Level
Service Interval: Before each use or daily—Check the engine-oil level and add oil if necessary.
Checking and Adjusting the Skids and Scraper
Service Interval: Yearly—Check the skids and the scraper and adjust them if necessary.
Check the skids and the scraper to ensure that the auger does not contact the paved or gravel surface. Adjust the skids and the scraper as needed to compensate for wear.
1. Check the tire pressure; refer to 7 Checking the Tire Pressure (page 7).
2. Loosen the nuts that secure both skids to the auger sides until the skids slide up and down easily.
Important: The auger blades must be supported above the ground by the skids.
3. Ensure that the scraper is 3 mm (1/8 inch) above and parallel to a level surface.
Note: If the pavement is cracked, rough, or uneven, adjust the skids to raise the scraper. For gravel surfaces, adjust the skids further down to prevent the machine from picking up rocks.
4. Move the skids down until they are even with the ground.
5. Firmly tighten the nuts that secure both skids to the auger sides.
Note: To quickly adjust the skids if they loosen, support the scraper 3 mm (1/8 inch) off the pavement, then adjust the skids down to the pavement.
Note: If the skids become excessively worn, you can turn them over and set the unused side toward the pavement.
Checking and Adjusting the Traction Cable
Service Interval: After the first 2 hours—Inspect the traction cable and adjust it if necessary.
Yearly—Inspect the traction cable and adjust or replace it if necessary.
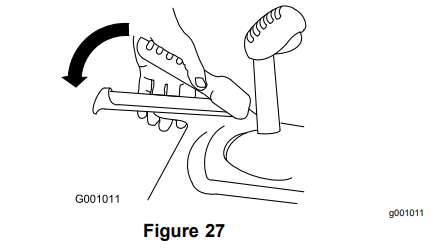
If the machine does not drive in the forward or reverse speeds or it drives when you release the traction lever, adjust the traction cable. If the left (traction) cable is not properly adjusted, do the following steps:
1. Loosen the jam nut.
2. Engage the traction lever and hold it in place (Figure 27).
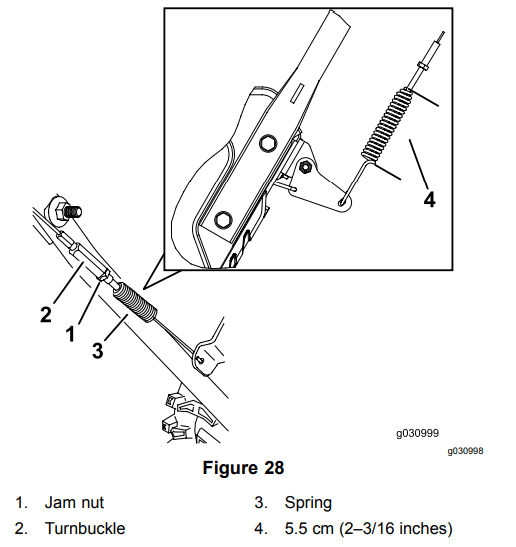
3. Loosen or tighten the turnbuckle to adjust the spring length to 5.5 cm (2–3/16 inches) as shown in Figure 28.
4. Tighten the jam nut (Figure 28), ensuring that there is slight tension on the cable.
5. If the traction cable is properly adjusted but a problem remains, contact an Authorized Service Dealer.
Checking and Adjusting the Auger/Impeller Cable
Service Interval: After the first 2 hours—Inspect the auger/impeller cable and adjust it if necessary.
Yearly—Inspect the auger/impeller cable and adjust or replace it if necessary.
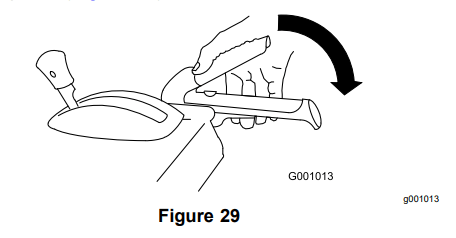
1. Loosen the jam nut.
2. Engage the auger/impeller lever and hold it in place (Figure 29).
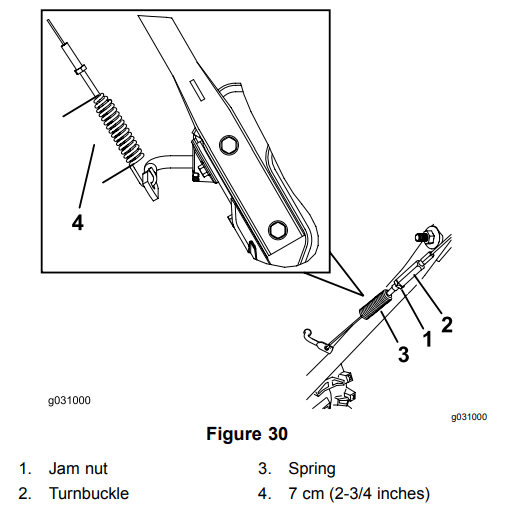
3. Loosen or tighten the turnbuckle to adjust the spring length to 7 cm (2-3/4 inches) as shown in Figure 30.
4. Tighten the jam nut (Figure 30), ensuring that there is slight tension on the cable.
5. If the auger/impeller cable is properly adjusted but a problem remains, contact an Authorized Service Dealer.
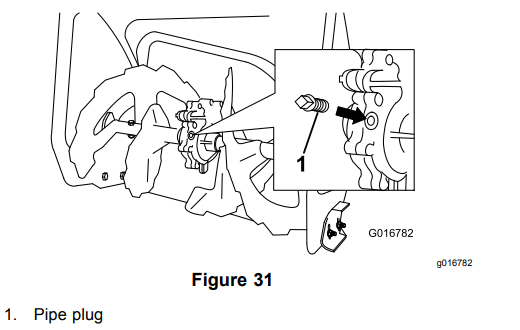
Checking the Auger-Gearbox-Oil Level
Service Interval: Yearly—Check the auger-gearbox oil and add oil if necessary
1. Move the machine to a level surface.
2. Clean the area around the pipe plug (Figure 31).
3. Remove the pipe plug from the gearbox.
4. Check the oil level in the gearbox. The oil should be 9.5 mm (3/8 inch) below the filler opening.
5. If the oil level is low, add GL-5 or GL-6, SAE 80-90 EP gear oil lubricant to the gearbox until the oil level is 9.5 mm (3/8 inch) below the filler opening.
Note: Do not use synthetic oil.
6. Install the pipe plug in the gearbox
Changing the Engine Oil
Service Interval: After the first 5 hours—Change the engine oil.
Yearly—Change the engine oil.
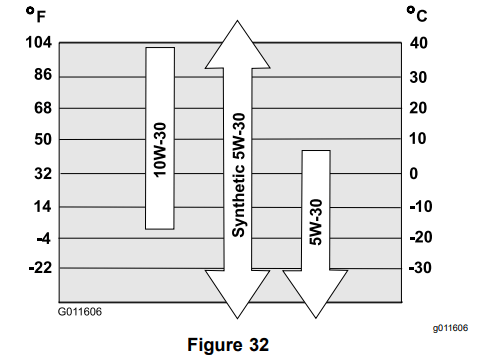
If possible, run the engine for a few minutes before changing the oil because warm oil flows better and carries more contaminants.
Use Figure 32 below to select the best oil viscosity for the outdoor temperature range expected:
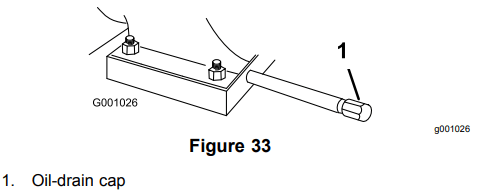
1. Clean the area around the oil-drain cap (Figure 33).
2. Slide an oil-drain pan under the drain extension and remove the oil-drain cap.
3. Drain the oil.
Note: Dispose of the used oil properly at a local recycling center.
4. Install the oil-drain cap.
5. Fill the crankcase with oil.
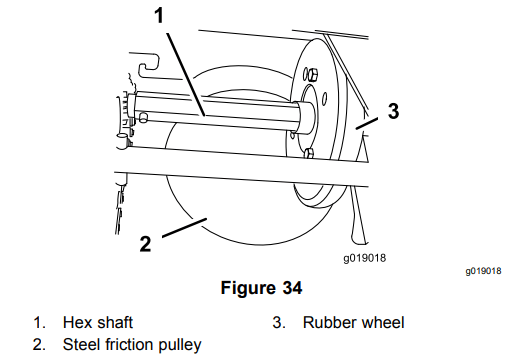
Lubricating the Hex Shaft
Service Interval: Yearly—Lubricate the hex shaft.
Lightly lubricate the hex shaft yearly with automotive engine oil (Figure 34).
Important: Do not get oil on the rubber wheel or the steel friction pulley because the traction drive will slip (Figure 34).
1. Drain the fuel from the fuel tank.
2. Tip the machine forward onto its auger housing and block it so that it cannot fall.
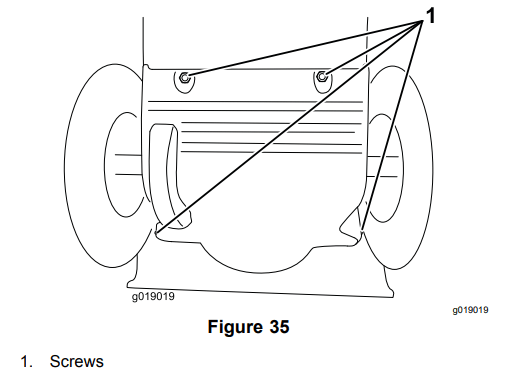
3. Remove the back cover (Figure 35).
4. Move the speed-selector lever to Position R2.
5. Dip your finger in automotive engine oil and lightly lubricate the hex shaft.
6. Move the speed-selector lever to Position 6.
7. Lubricate the other end of the hex shaft.
8. Move the speed-selector lever forward and rearward a few times.
9. Install the back cover and return the machine to the operating position.
Replacing the Spark Plug
Service Interval: Every 100 hours—Replace the spark plug.
Use a Lawn-Boy spark plug or equivalent (Champion® RN9YC or NGK BPR6ES).
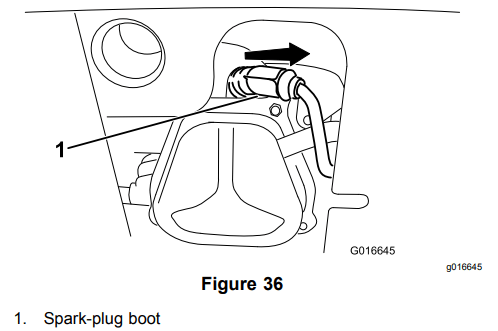
1. Remove the boot (Figure 36).
2. Clean around the base of the spark plug.
3. Remove and discard the old spark plug.
Note: You will need a ratchet wrench extension to remove the spark plug.
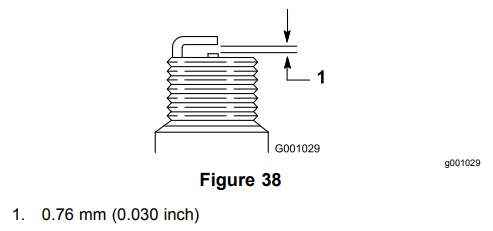
4. Set the gap between the electrodes on a new spark plug at 0.76 mm (0.030 inch) as shown in Figure 38.
5. Install the new spark plug, tighten it firmly, and attach the ignition wire to the spark plug.
Note: Ensure that the ignition wire snaps completely into place on the spark plug.
Adjusting the Discharge-Chute Latch
If the discharge chute does not lock into the desired position or does not unlock so that you can move it to another position, adjust the discharge-chute latch.
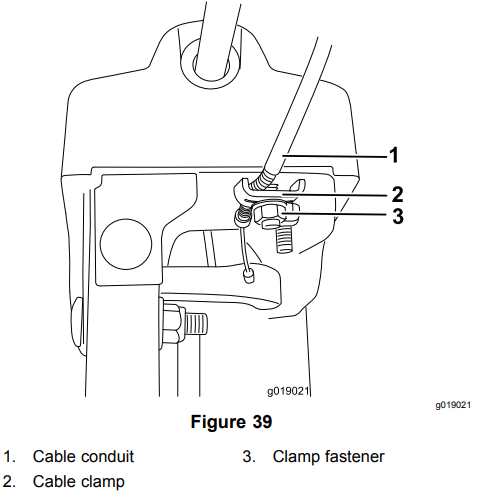
1. Loosen the clamp fastener on the chute-support plate until the cable is free.
2. Remove any slack in the cable by pulling the cable conduit rearward.
3. Tighten the clamp fastener while holding the cable in place.
Replacing the Drive Belts
If the auger/impeller drive belt or the traction-drive belt becomes worn, oil-soaked, or otherwise damaged, have an Authorized Service Dealer replace the belt.
Troubleshooting
Problem
Possible Cause
Corrective Action
The electric starter does not turn (electric-start models only).
1. The power cord is disconnected at the outlet or the machine.
1. Connect the power cord to the outlet and/or the machine.
2. The power cord is worn, corroded, or damaged.
2. Replace the power cord.
3. The power outlet is not energized.
3. Have a qualified electrician energize the outlet.
The engine does not start or starts hard.
1. The key is not in the ignition or is in the STOP position.
1. Insert the key into the ignition and turn it to the ON position.
2. The choke is in the OFF position and the primer has not been pressed.
2. Move the choke to the ON position and press the primer 3 times.
3. The fuel-shutoff valve is not open.
3. Open the fuel-shutoff valve.
4. The throttle is not in the FAST position.
4. Move the throttle to the FAST position.
5. The fuel tank is empty or the fuel system contains stale fuel.
5. Drain and/or fill the fuel tank with fresh fuel (not more than 30 days old). If the problem persists, contact an Authorized Service Dealer
6. The spark-plug wire is loose or disconnected.
6. Connect the wire to the spark plug.
7. The spark plug is pitted, fouled, or the gap is incorrect.
7. Check the spark plug and adjust the gap if necessary. Replace the spark plug if it is pitted, fouled, or cracked.
8. The fuel-vent cap is restricted.
8. Remove the vent restriction or replace the fuel cap.
9. The engine-oil level in the engine crankcase is too low or too high.
9. Add or drain oil to adjust the oil level in the engine crankcase to the Full mark on the dipstick.
The engine runs rough.
1. The choke is in the ON position.
1. Move the choke to the OFF position.
2. The fuel-shutoff valve is not completely open.
2. Open the fuel-shutoff valve.
3. The fuel tank is nearly empty or contains stale fuel.
3. Drain and fill the fuel tank with fresh fuel (not more than 30 days old). If the problem persists, contact an Authorized Service Dealer.
4. The spark-plug wire is loose.
4. Connect the wire to the spark plug.
The engine runs, but the machine discharges snow poorly or not at all.
1. The throttle is not in the FAST position when throwing snow.
1. Move the throttle to the FAST position.
2. The machine is moving too fast to clear the snow. .
2. Shift the machine into a lower gear
3. You are trying to remove too much snow per swath.
3. Reduce the amount of snow removed per swath.
4. You are trying to remove extremely heavy or wet snow.
4. Do not overload the machine with extremely heavy or wet snow.
5. The discharge chute is plugged.
5. Unclog the discharge chute.
6. The auger/impeller drive belt is loose or is off the pulley.
6. Install and/or adjust the auger/impeller drive belt; refer to Lawn-Boy website for servicing information or take the machine to an Authorized Service Dealer.
7. The auger/impeller drive belt is worn or broken.
7. Replace the auger/impeller drive belt; refer to Lawn-Boy website for servicing information or take the machine to an Authorized Service Dealer.
The discharge chute either does not lock into place or does not move.
1. The discharge-chute latch is not properly adjusted.
1. Adjust the discharge-chute latch.
The machine does not properly clear the snow off the surface.
1. The skids and/or scraper are not properly adjusted.
1. Adjust the skids and/or the scraper.
2. The pressure in the tires is not equal.
2. Check and adjust the pressure in 1 or both tires.
 If the traction drive is not properly adjusted, the machine may move in the direction opposite of what you intended, causing injury and/or property damage.
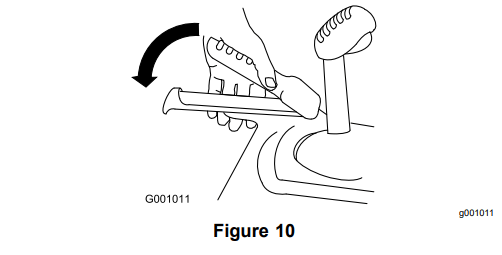

 The electrical cord can become damaged, causing a shock or fire.
  If you leave the machine plugged into a power outlet, someone can inadvertently start the machine and injure people or damage property.