
Model:
RF210N6ASE
For questions about features, operation/performance, parts or service,
call: 1-855-344-7367
Refrigerator Use & Care Guide

1
Copyright Statement
© 2019 Hisense Company Ltd. All Rights Reserved.
All material in this User Manual is the property of Hisense Company Ltd. and its subsidiaries, and is
protected under US, CANADA, MEXICO and International copyright and/or other intellectual property
laws. Reproduction or transmission of the materials, in whole or in part, in any manner, electronic, print, or
otherwise, without the prior written consent of Hisense Company Ltd. is a violation of Hisense Company
Ltd. rights under the aforementioned laws.
No part of this publication may be stored, reproduced, transmitted or distributed, in whole or in part, in
any manner, electronic or otherwise, whether or not for a charge or other or no consideration, without
the prior written permission of Hisense Company Ltd.
Requests for permission to store, reproduce, transmit or distribute materials may be made to one of the
following addresses:
USA: Hisense USA Corporation
7310 McGinnis Ferry Road
Suwanee, GA 30024
CANADA: Hisense Canada Co., Ltd
2283 Argentia Road, Unit 16
Mississauga, ON, Canada
LSN 5Z2
MEXICO: Hisense Mexico S. de R.L. de C.V.
Blvd. Miguel de Cervantes Saavedra No 301
Torre Norte Piso 2, Col. Ampliación Granada
Miguel Hidalgo, Ciudad de México, C.P. 11520
Hisense, and any and all other Hisense product names, logo’s, slogans or marks are registered trademarks
of Hisense Company Ltd. and its subsidiaries. All other trademarks are the property of their respective
holders.
©2019. All rights reserved. Hisense and the Hisense logo are registered trademarks of Hisense. Other
brand and product names are registered trademarks of their respective owners.
Disclaimer:
Images throughout this document are for illustrative purposes only and may differ from the actual
product.

2
Thank you for choosing Hisense. We are sure you will find your new refrigerator a
pleasure to use. However, before you use the appliance, we recommend that you
carefully read the instructions, which provide details about installing and using the
product. Please keep this manual for future reference.
Table of Contents
REFRIGERATOR SAFETY ........................................................................................................................................3
PARTS AND FEATURES ..........................................................................................................................................4
INSTALLATION REQUIREMENTS ...........................................................................................................................5
Location Requirements ............................................................................................................................................................... 5
Electrical Requirements .............................................................................................................................................................. 5
INSTALLATION INSTRUCTIONS ............................................................................................................................6
Unpack the Refrigerator .............................................................................................................................................................6
Door Removal ................................................................................................................................................................................. 7
Level Refrigerator ......................................................................................................................................................................... 9
Align Doors ..................................................................................................................................................................................... 9
REFRIGERATOR USE .............................................................................................................................................. 9
Opening and Closing Doors ..................................................................................................................................................... 9
Using the Controls .......................................................................................................................................................................10
Features ........................................................................................................................................................................................... 12
General Use Information .......................................................................................................................................................... 13
REFRIGERATOR CARE .......................................................................................................................................... 13
Cleaning .......................................................................................................................................................................................... 13
Lights ................................................................................................................................................................................................ 14
Vacation and Moving Care ........................................................................................................................................................14
Reinstalling/Using Refrigerator Again .................................................................................................................................14
TROUBLESHOOTING ............................................................................................................................................ 15
3
Refrigerator Safety
Your safety and the safety of others are very important.
We have provided many important safety messages in this manual and on your appliance. Always
read and obey all safety messages.
DANGER
WARNING
CAUTION
This is the safety alert symbol.
This symbol alerts you to potential hazards that can kill or hurt you and others.
All safety messages will follow the safety alert symbol and either the word
“DANGER,” “WARNING” or “CAUTION.”
These words mean:
An imminently hazardous situation. You could be killed or seriously
injured if you don’t immediately follow instructions.
A potentially hazardous situation which, if not avoided, could result
in death or serious bodily injury.
A potentially hazardous situation which, if not avoided, may result in
moderate or minor injury.
All safety messages will tell you what the potential hazard is, tell you how to reduce the chance of
injury, and tell you what can happen if the instructions are not followed.
Important Safety Instructions
WARNING: To reduce the risk of fire, electrical shock, injury to persons, or damage when using the
refrigerator, follow basic precautions, including the following:
• Ensure everyone using this appliance is familiar
with its operations and safety features.
• This appliance is not intended for use by
persons (including children) with reduced
physical, sensory or mental capabilities, unless
supervised or properly instructed.
• Plug into a grounded 3 prong outlet.
• Do not remove ground prong.
• Do not use an adapter.
• Do not use an extension cord.
• If the power supply cord is damaged, it must
be replaced by the manufacturer, its service
agent or a similarly qualified person to avoid a
hazard.
• Disconnect power before servicing.
• Do not use electrical appliances inside the food
storage compartments of the refrigerator,
unless they are of the type recommended by
the manufacturer.
• Replace all parts and panels before operating.
• Flammable refrigerant used. To be repaired
only by trained service personnel. Do not
puncture refrigerant tubing.
• Flammable refrigerant used. Dispose of
properly in accordance with federal or local
regulations.
•
Flammable refrigerant used. Follow
handling instructions carefully. Risk of fire
or explosion due to puncture of refrigerant
tubing.
•
Use nonflammable cleaner.
•
Do not use mechanical devices or other
means to accelerate the defrosting process,
other than those recommended by the
manufacturer.
•
Keep flammable materials and vapors, such
as gasoline, away from refrigerator.
•
CAUTION: Do not store explosive
substances such as aerosol cans with a
flammable propellant in this appliance.
•
Keep ventilation openings in the appliance
enclosure or in the built-in structure clear of
obstruction.
•
Connect to potable water supply only.
•
Use two or more people to move and install
refrigerator.
•
Children should be supervised to ensure
that they do not play with the appliance.
Read and Save These Instructions
4
a
b
d
c
e
f
i
h
j
k
g
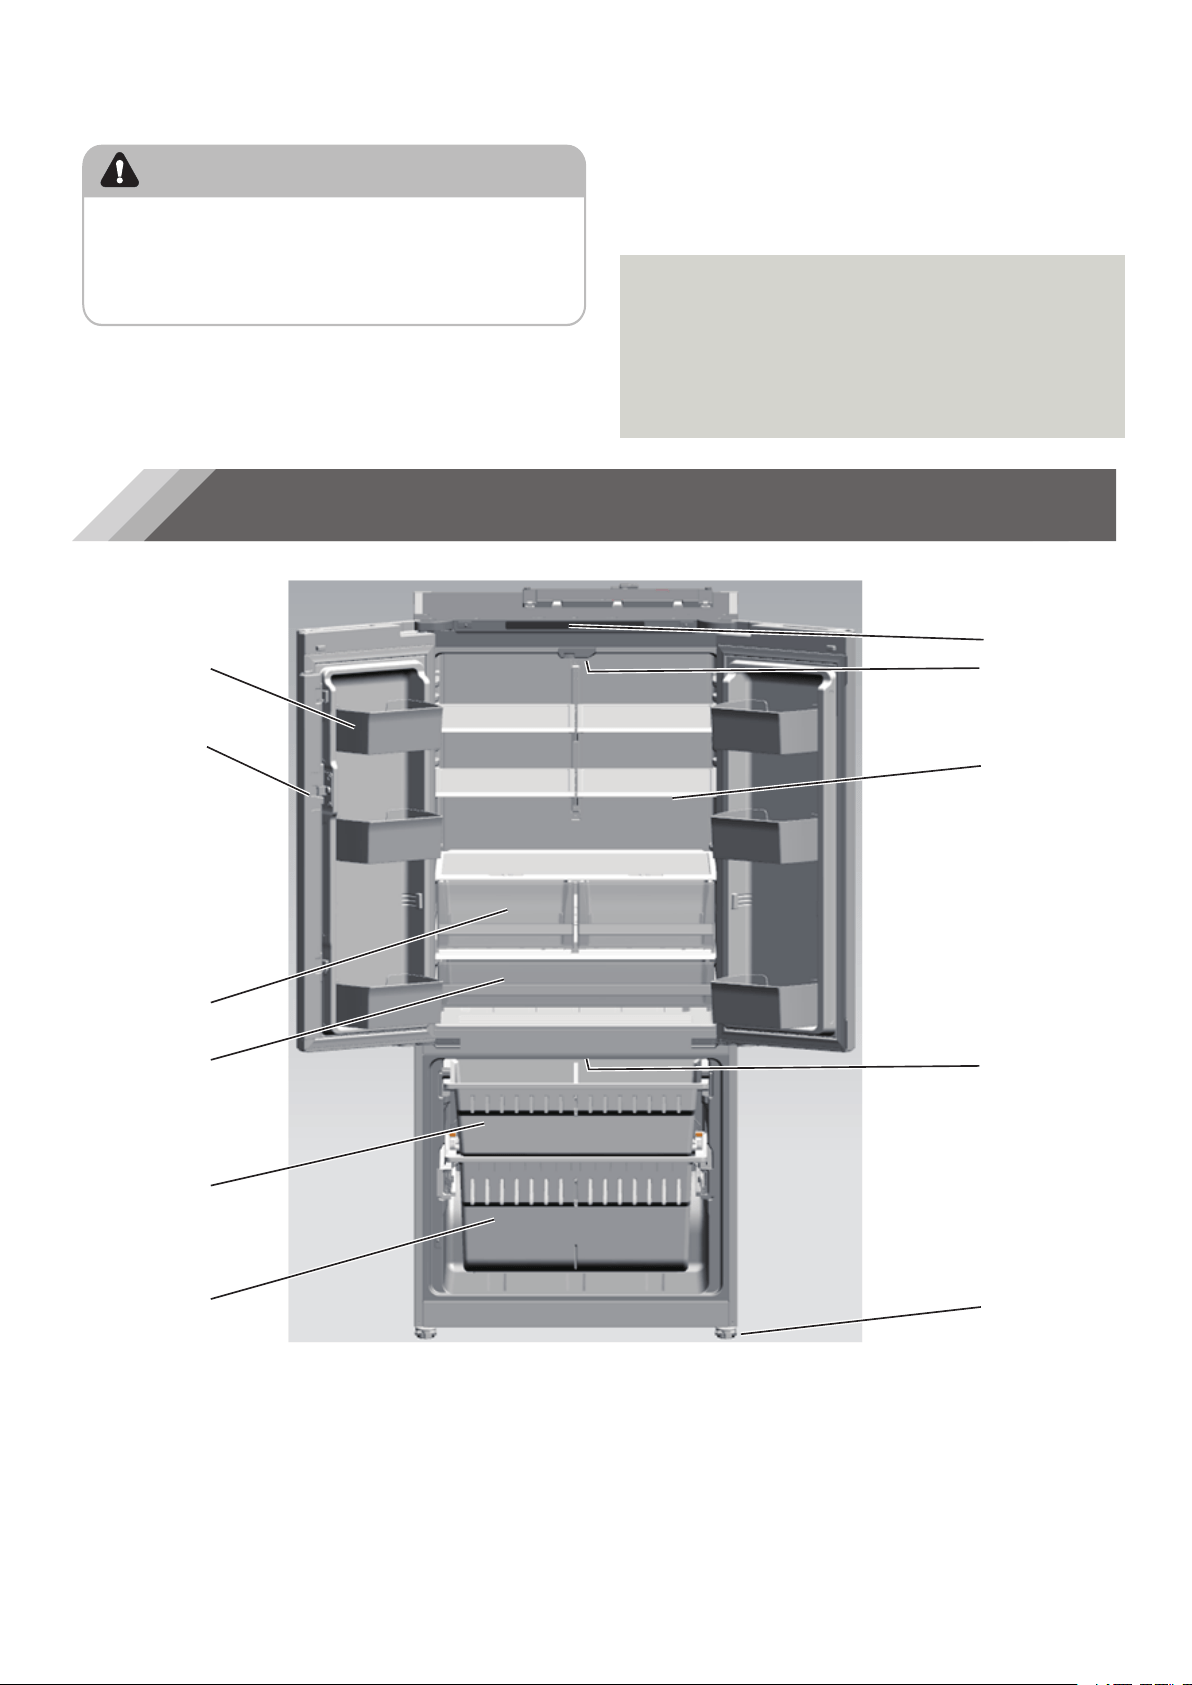
a Door Bin
b Mullion
c Storage Drawer
d Full-width Drawer
e Freezer Storage Drawer
f Freezer Storage Compartment
g Control Panel
h Refrigerator LED Light
i Glass Shelves
j Freezer LED Light
k Leveling Leg
Proper Disposal of Your Old Refrigerator
WARNING
Suffocation Hazard
Remove doors from your old refrigerator.
Failure to do so can result in death or brain
damage.
IMPORTANT: Child entrapment and suffocation are
not problems of the past. Junked or abandoned
refrigerators are still dangerous– even if they will sit
for “just a few days.” If you are getting rid of your old
refrigerator, please follow these instructions to help
prevent accidents.
DANGER: Risk of child entrapment.
Before You Throw Away Your Old Refrigerator
or Freezer:
•
Take off the doors.
•
Leave the shelves in place so that children may
not easily climb inside.
Important information to know about disposal
of refrigerants:
Dispose of refrigerator in accordance with
Federal and Local regulations. Refrigerants
must be evacuated by a licensed, EPA certified
refrigerant technician in accordance with
established procedures.
NOTE: Your model may look different from this and other images in this manual, depending on your
model’s features.
Parts and Features
5
a
b c
c
Location Requirements
WARNING
Explosion and Fire Hazard
Keep flammable materials and vapors,
such as gasoline, away from appliance.
Failure to do so can result in death, explosion
or fire.
IMPORTANT: This refrigerator is designed for
indoor, household use only.
Temperature
This refrigerator is intended for use in a location
where the temperature ranges from a minimum
of 55°F (13°C) to a maximum of 110°F (43°C). The
preferred room temperature range for optimum
performance, which reduces electricity usage and
provides superior cooling, is between 60°F (15°C)
and 90°F (32°C). It is recommended that you do
not install the refrigerator near a heat source, such
as an oven or radiator.
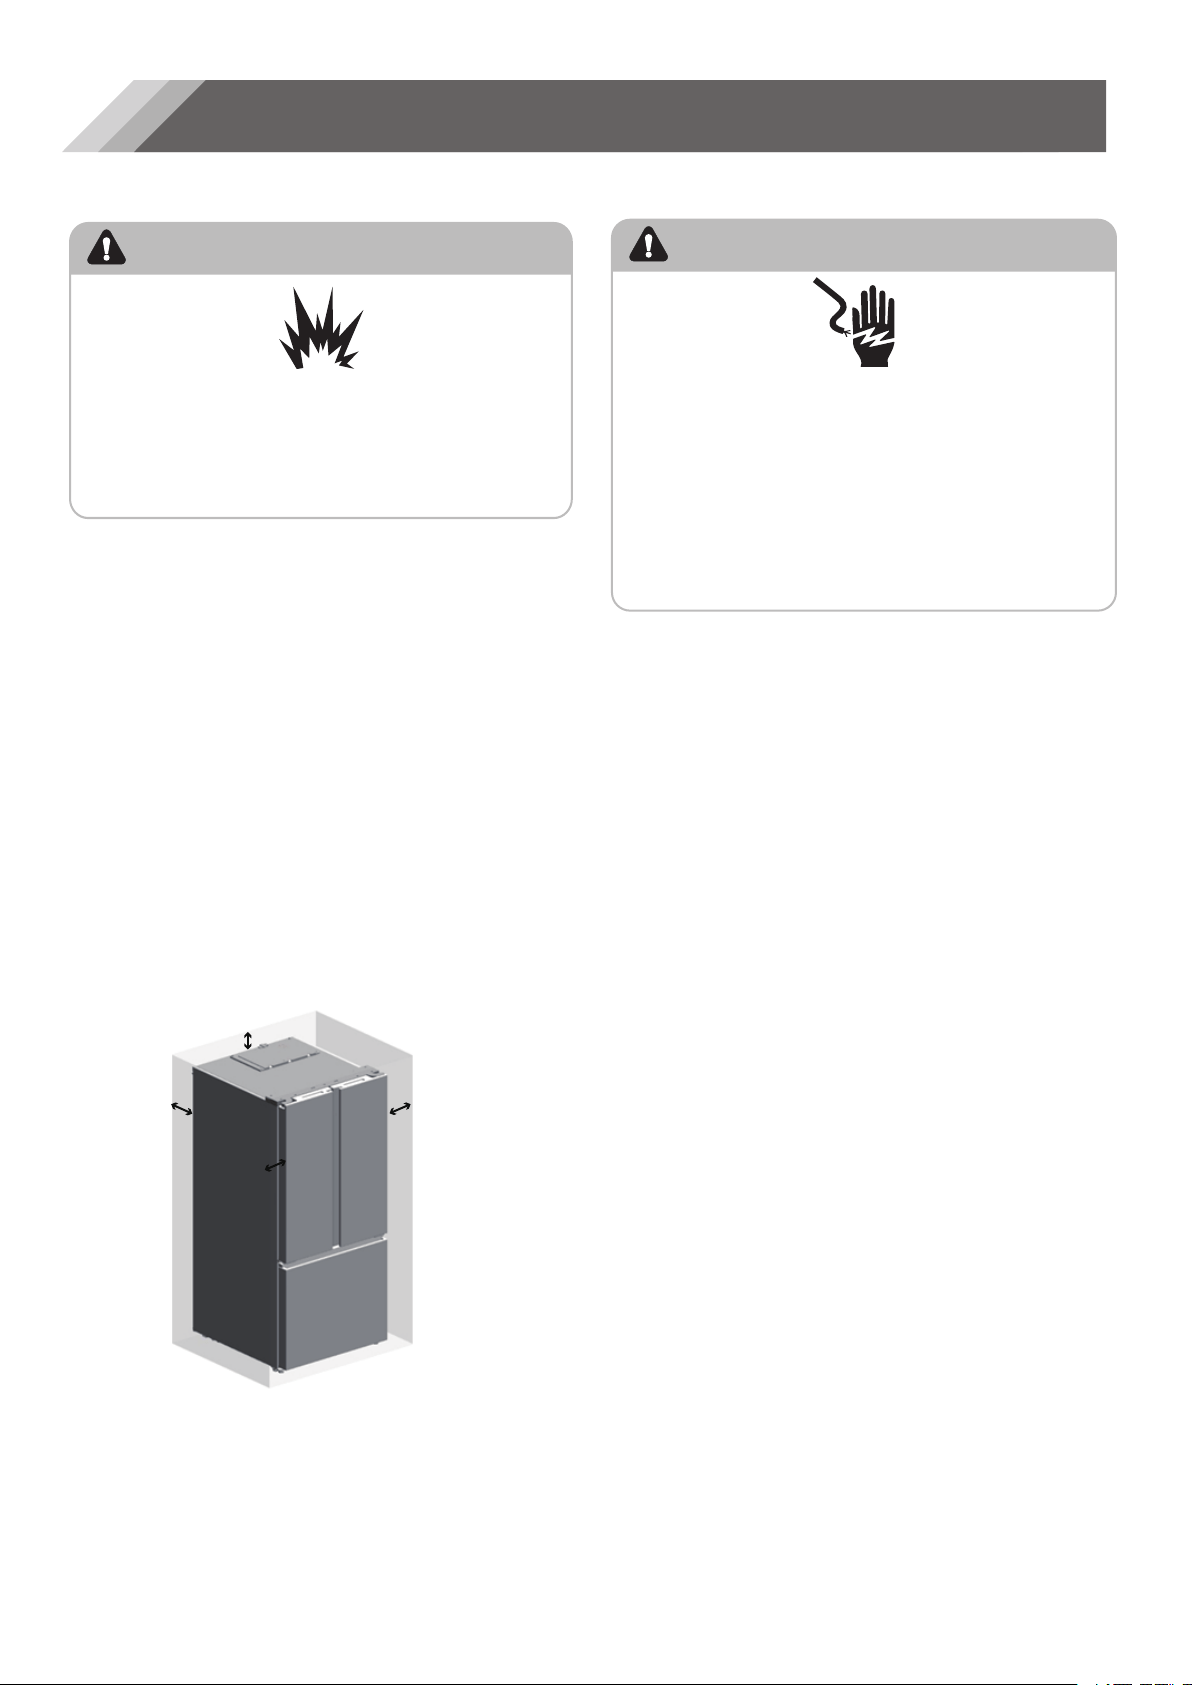
Ventilation
Adequate air circulation around the refrigerator is
required for efficient operation.
To ensure proper ventilation, maintain the
recommended clearances.
Recommended Clearances
Electrical Requirements
WARNING
Electrical Shock Hazard
Do not remove the ground prong from the
power cord plug.
Do not use an adapter.
Do not use an extension cord.
Failure to do so can result in death, fire or
electrical shock.
Before you move your refrigerator into its final
location, it is important to make sure you have the
proper electrical connection.
Recommended Grounding Method
A 115 volt, 60 Hz, AC only 15- or 20-amp fused,
grounded electrical supply is required. It is
recommended that a separate circuit serving only
your refrigerator be provided. Use an outlet that
cannot be turned off by a switch. Do not use an
extension cord.
NOTE: Before performing any type of installation
or cleaning, disconnect the refrigerator from the
electrical source. When you are finished, reconnect
the refrigerator to the electrical source and reset
the temperature controls to the desired setting.
Installation Requirements
a 4" Above(From top of the door)
b 2" Behind
c 1" Each Side
NOTE: If you place the refrigerator next to a fixed
wall, leave 10" minimum space to allow the door
to swing open.
Plug into a grounded 3 prong outlet.
6
Installation Instructions
Unpack the Refrigerator
WARNING
Do not puncture refrigerant tubing.
Follow handling instructions carefully.
Flammable refrigerant used.
Failure to do so can result in death, explosion
or fire.
IMPORTANT: Handle with care when moving
refrigerator to avoid either damaging the
refrigerant tubing or increasing the risk of a leak.
WARNING
Use two or more people to move and install
refrigerator.
Failure to do so can result in back or other injury.
Remove the Packaging
•
Remove tape and glue residue from surfaces
before turning on the refrigerator. Rub a small
amount of liquid dish soap over the adhesive
with your fingers. Wipe with warm water and
dry.
NOTE: Do not use sharp instruments, rubbing
alcohol, flammable fluids, or abrasive cleaners
to remove tape or glue. These products can
damage the surface of your refrigerator. For
more information, see “Refrigerator Safety.”
•
Dispose of/recycle all packaging materials.
•
If the refrigerator has been in a horizontal
or tilted position for any period of time wait
4 hours before plugging it in to allow the oil to
settle into the compressor.
When Moving Your Refrigerator:
Your refrigerator is heavy. When moving
the refrigerator for cleaning or service, be
sure to cover the floor with cardboard or
hardboard to avoid floor damage. Always pull
the refrigerator straight out when moving it.
Do not wiggle or “walk” the refrigerator when
trying to move it, as floor damage could occur.
Clean Before Using
After you remove all of the packaging materials,
clean the inside of the refrigerator before using
it. See the cleaning instructions in “Refrigerator
Care.”
Important information to know about glass
shelves and covers:
Do not clean glass shelves or covers with
warm water when they are cold. Shelves
and covers may break if exposed to sudden
temperature changes or impact, such as
bumping. Tempered glass is designed to
shatter into many small, pebble-size pieces.
This is normal. Glass shelves and covers are
heavy. Use both hands when removing them to
avoid dropping.
Fire or Explosion Hazard
Excessive Weight Hazard
7
a
b
a Screws
b Hinge Cover
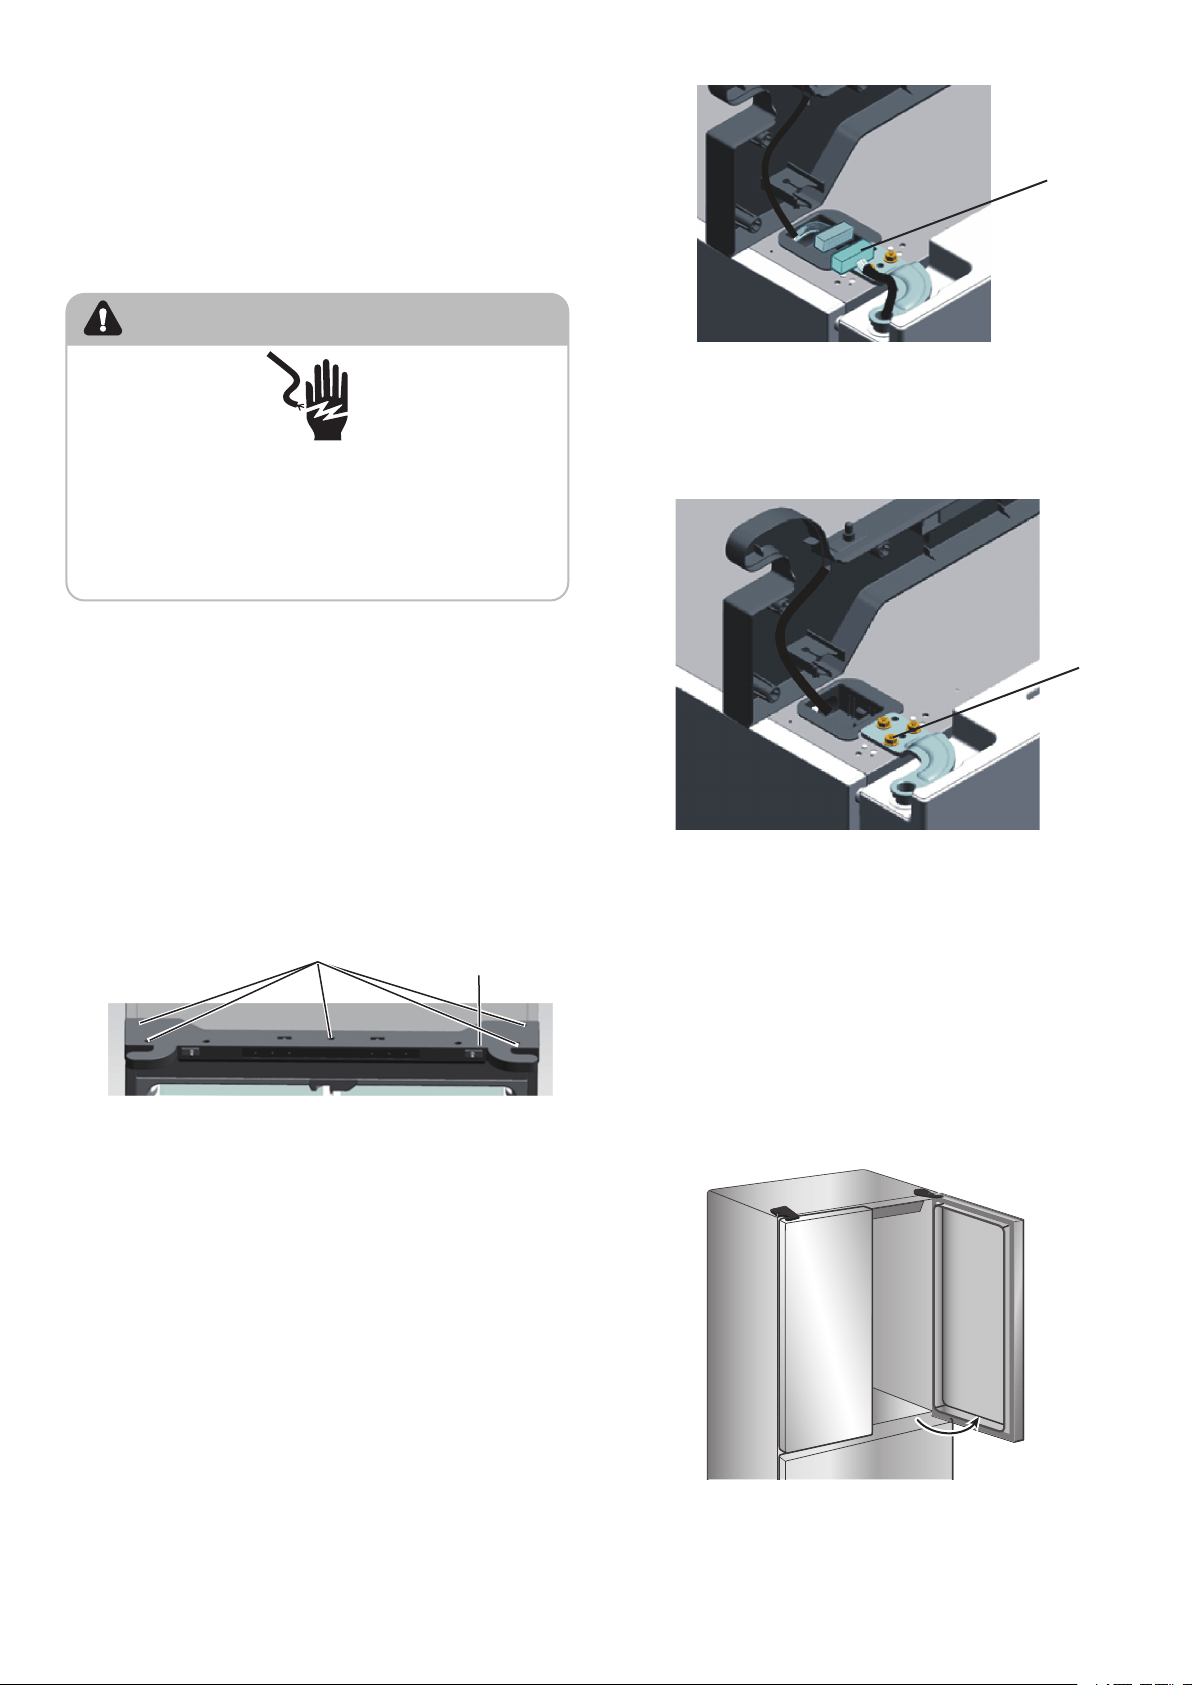
a
a
Wiring Harness
5.
Using an 8 mm socket wrench, remove
the three screws fastening the top
hinge to the cabinet.
a Screws
90°
a
Door Removal
(only if needed)
Measure the refrigerator to make sure it will fi t
through the doorway. If the refrigerator cannot
pass easily through the doorway, follow the
instructions to remove the two refrigerator
compartment doors and the front panel of the
freezer drawer.
WARNING
Electrical Shock Hazard
Disconnect power before removing doors.
Reconnect ground wire before operating.
Failure to do so could result in death or electric
shock.
Tools needed
•
Phillips Screwdriver
•
4 mm Hex-key Wrench
•
8 mm Socket Wrench
Remove the Doors
IMPORTANT: Keep the refrigerator doors closed
until you are ready to lift them from the cabinet.
1. Unplug refrigerator or disconnect power.
2.
Using a Phillips screwdriver, remove the
three
screws
attaching the hinge cover and
control
panel to the top of the cabinet.
3.
Gently lift the hinge cover, keeping the wire
harness attached, and move the cover/wire
harness assembly behind the door hinges on
the cabinet top.
4.
Disconnect the harness from the door by
using a release clip on the harness
connector, then separate the two ends(only
the left side).
8. Using both hands, lift the door off the bottom
hinge and set it onto a soft surface to protect
the fi nish.
NOTE: Provide additional support for the
door while the hinge is being removed. Do not
depend on the door gasket magnets to hold
the door in place while you are working.
6. Remove the top door hinge.
IMPORTANT: For the door to close properly
in the future, DO NOT lift the door from the
bottom hinge if it is open to an angle narrower
than a 90° angle.
7. Open the door to a 90° or wider angle.
8
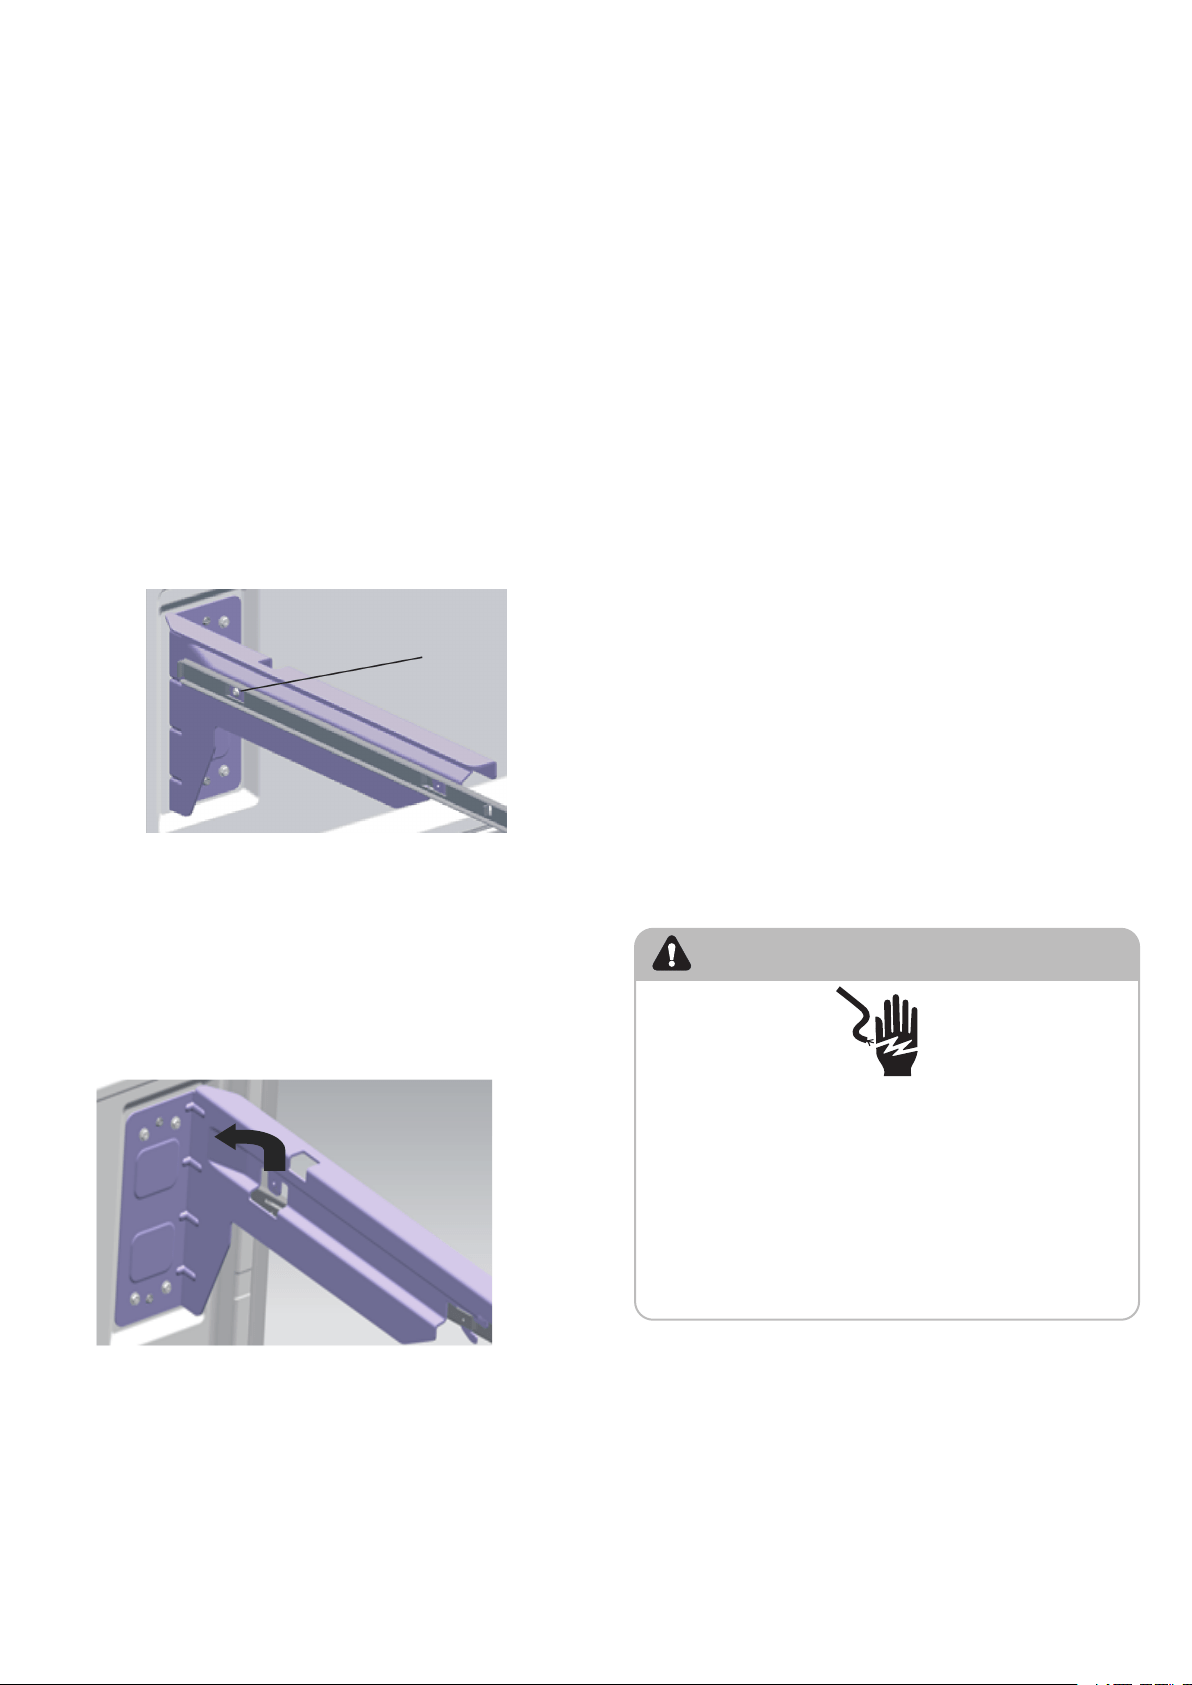
a
Screws
Grab the drawer door by using both
hands and pull it up to make sure
the door detaches from the front of the
slide rail and then move forward to
remove the freezer drawer door.
a
9. If necessary, use a hex-key wrench to remove
the two bolts fastening the bottom hinge to
the front of the cabinet, and then remove the
hinge.
10. Repeat this procedure to remove the other
door.
Remove the Front of the Freezer Drawer
1. Slide open the freezer drawer to its full
extension.
2. Slide open the upper storage drawer to its full
extension.
3.
4.
5.
Remove the upper storage drawer from the
glide rails by lifting up and pulling out at an
angle.
Remove the lower storage compartment by
lifting upward at an angle.
Remove one fixing screw (left and right
each) from the side of the slide rail.
6.
7.
8.
9.
Set the drawer front on a soft surface to
protect the fi nish.
Slide the drawer glide rails into the cabinet.
Move the refrigerator through the doorway
and into the room near the water and electrical
connections.
Complete the Installation
WARNING
Plug into a grounded 3 prong outlet.
Do not remove the ground prong from the
power cord plug.
Do not use an adapter.
Do not use an extension cord.
Failure to do so can result in death,
fire or electrical shock.
1. Plug into a grounded 3 prong outlet.
NOTE: This refrigerator begins operating as
soon as it is connected to the power supply.
2. Move the refrigerator into its final location,
making sure to maintain the recommended
clearance.
Replace the Doors
1. If removed, reinstall the bottom hinge.
2. Using two or more people, set the refrigerator
door onto the bottom hinge.
3. Insert the top hinge into the top of the door.
4. Using the three screws removed earlier, fasten
the top hinge to the top of the cabinet.
NOTE: Left-hand door only, replace the ground
screw into the top hinge.
5. Repeat steps 1 through 4 to replace the
opposite door.
6. Using the three screws removed earlier, reinstall
the top hinge cover and control panel to the
top of the cabinet.
IMPORTANT: The refrigerator must be located
on a solid, level surface that is strong enough to
support the refrigerator fully loaded.
•
Before moving, retract the leveling legs to
avoid scraping the floor.
•
The refrigerator has wheels, which should
be used for only forward and backward
movement.
NOTE: Trying to move the refrigerator sideways
may damage your floor.
Electrical Shock Hazard
9
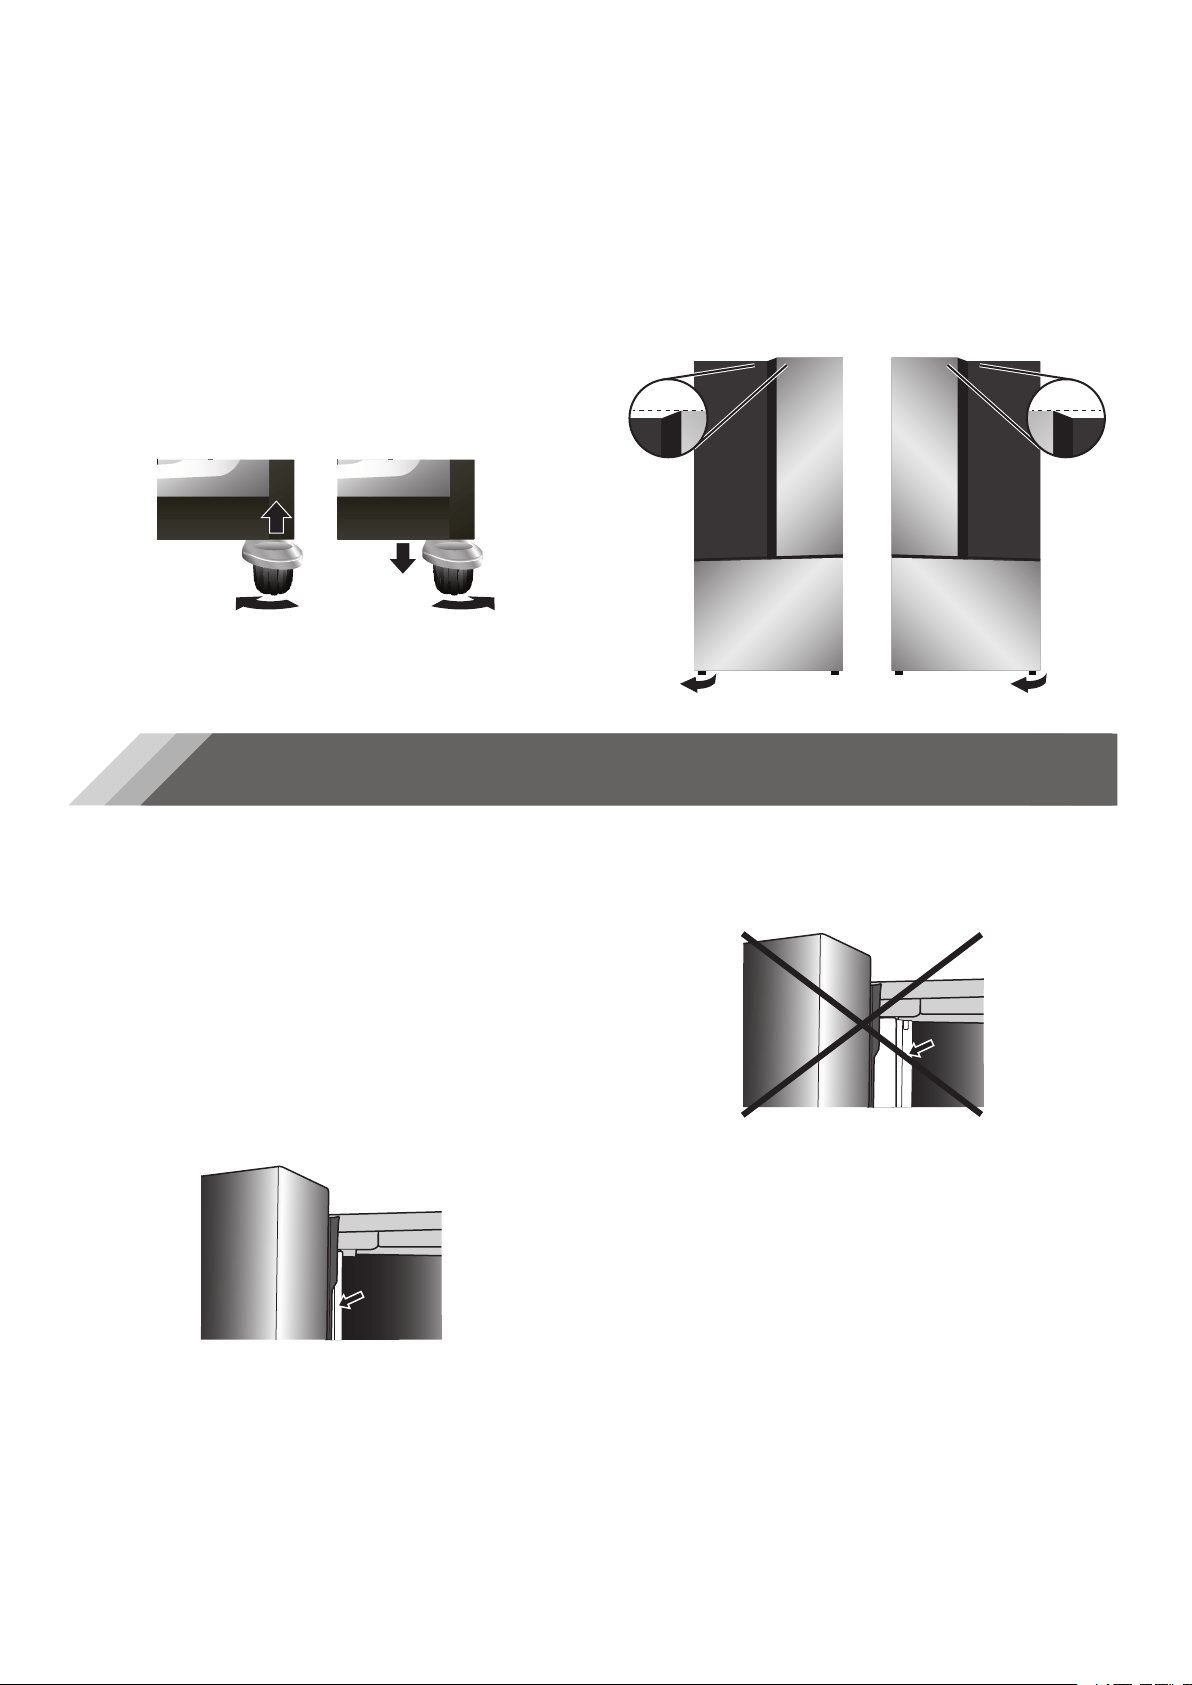
Level Refrigerator
(if needed)
The refrigerator must be level to maintain optimal
performance and appearance.
1. Turn the leveling feet on the bottom, front of
the cabinet to raise or lower that side of the
refrigerator until the refrigerator is level side-
to-side.
2. Turn both feet, by the same amount, to slightly
raise the front of the refrigerator. This will make
it easier for the doors to close.
NOTE: Having someone push against the top
of the refrigerator takes some weight off the
leveling feet. This makes it easier to turn the
feet.
Align Doors
(if needed)
If the edges of the refrigerator doors do not align
with each other, you can make adjustments.
Using Adjustable Foot
•
Turn the adjustable foot to raise or lower that
side of the refrigerator.
•
Clockwise - to raise
•
Counterclockwise - to lower
Refrigerator Use
Opening and Closing Doors
The refrigerator doors can be opened and closed
either separately or together.
•
There is a mullion on the left-hand side
refrigerator compartment door.
•
When closing the left-hand door, the mullion
folds behind the right-hand door joining the
two doors.
•
The temperature of the door frame is controlled
to help prevent moisture from developing on
the mullion. The temperature of the surface
may be warm, which is normal, and will not
affect the performance of the refrigerator.
NOTE: Before closing the left-hand door, make
sure the mullion is folded inward. If the mullion
is pulled outward it may become damaged
when you try to close the door.
10
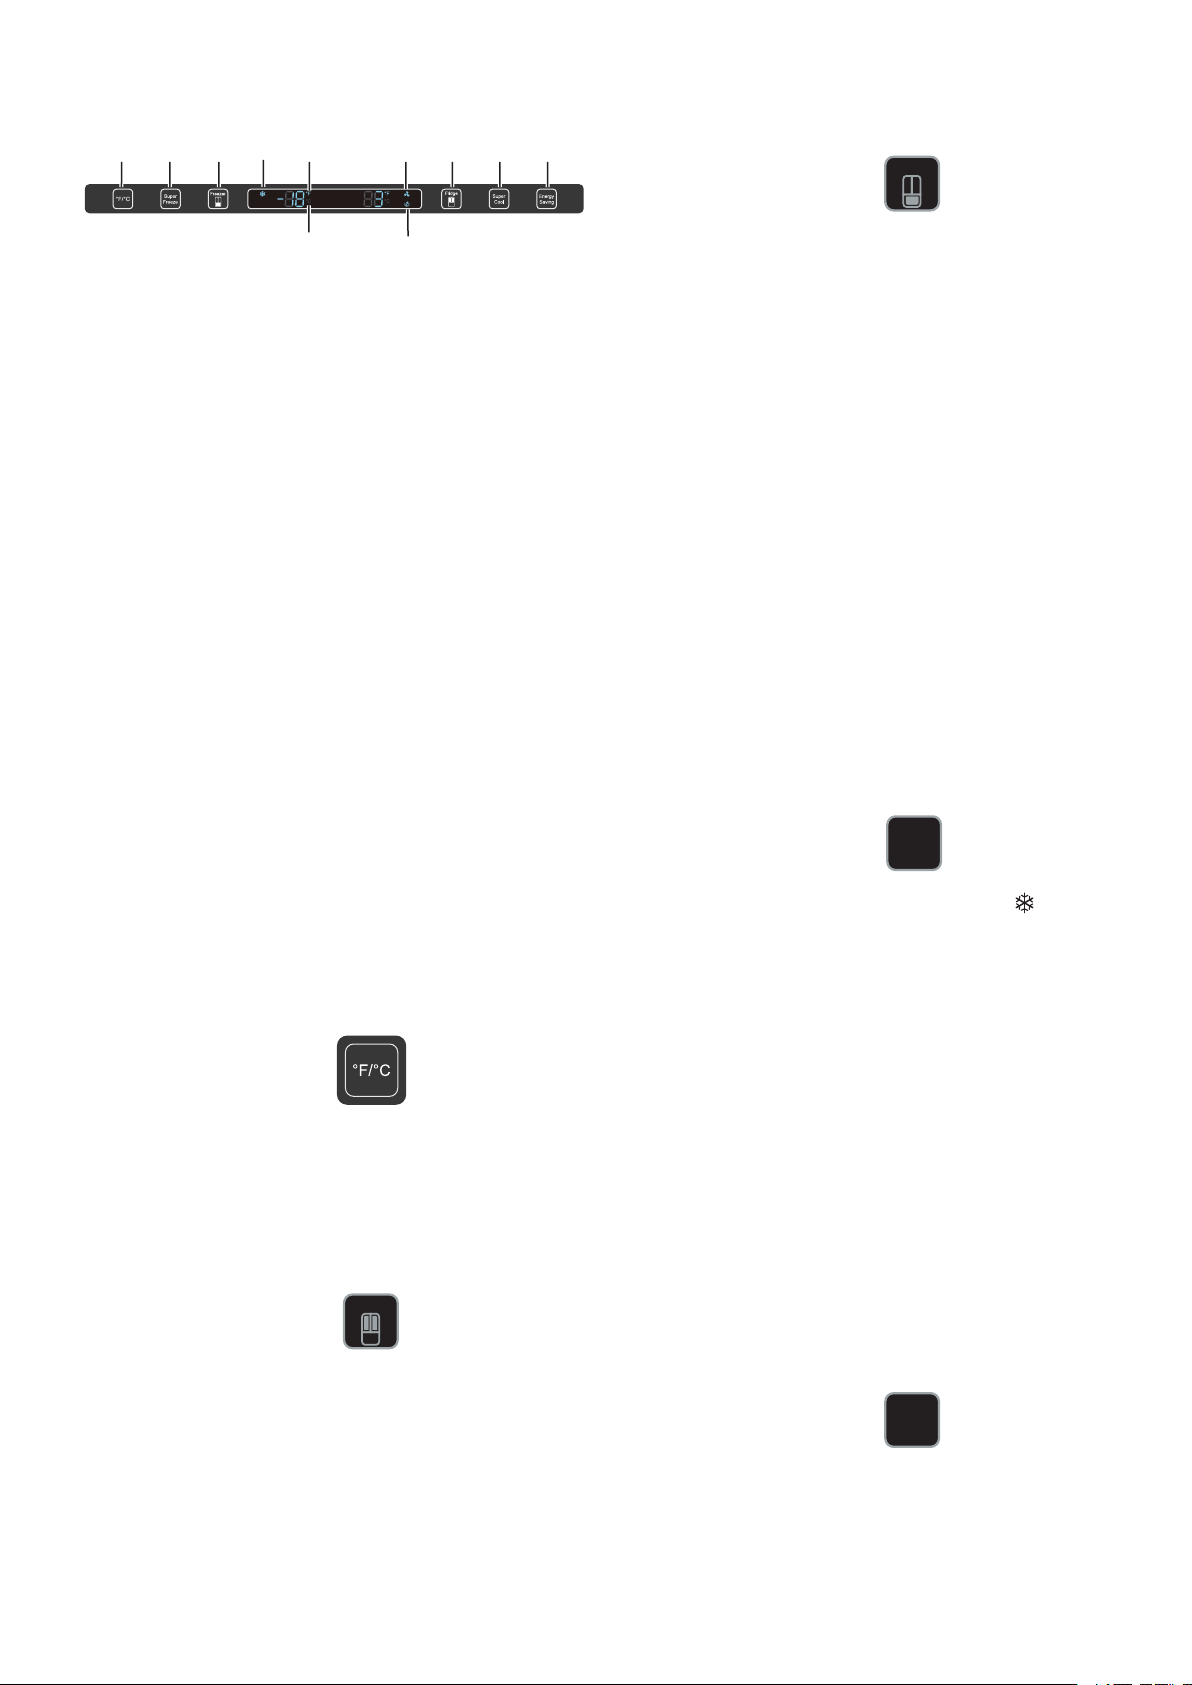
Using the Controls
a b c ge
d
j k
f h i
The display will illuminate when the
refrigerator is first plugged in,Singing, light
show 3s display content, without any
operation, after 20s screen.
When you set a temperature, you are setting
an average temperature for the entire
compartment. The actual compartment
temperatures may vary from the
temperatures displayed depending on the
amount and placement of stored food, and
the surrounding room temperature.
•
Refrigerator Compartment: 39°F (4°C)
•
Freezer Compartment: 0°F (-18°C)
•
Press °F / °C to switch
Fridge
2.
Press FRIDGE repeatedly to cycle through the
available temperature settings, from 46°F to 35°F
or from 8°C to 2°C.
NOTE:Such as °C. scenario,each press advances
the setting by one
degree(4→3→2→8→7→6→5→4);Such as °F
scenario,temperature control range
(39→37→35→46→44→42→41→39)
Freezer
2.
Press FREEZER repeatedly to cycle through
the available temperature settings,from 5°F to
-10°F or from -15°C to -23°C.
NOTE:Such as °C scenario,each press
advances the setting by one
degree(-18→-19→-20→-21→-22→-23→-15→-16
→-17→-18).
Such as °F scenario,temperature control
range (0→-2→-4→-6→-8→-10→5→4→2→0).
Super
Freeze
Super
Cool
a °F / °C
Super Freeze Control
Freezer Compartment Temp Control
b
Control Panel
Setting Compartment Temperatures
Recommended Temperature Settings
Display Temperatures in Degrees Fahrenheit
or Celsius
Freezer Compartment Temperature
1. Press FREEZER once to turn on the
temperature control.
3. Release FREEZER to select the desired
temperature setting.
Additional Features
Super Freeze
The Super Freeze feature rapidly lowers the
freezer compartment temperature to freeze
fresh food faster and maintain the temperature
of the frozen food during periods of high usage,
full grocery loads, or temporarily warm room
temperatures.
The Super Freeze feature lowers the temperature
in the freezer compartment to -10°F (-23°C).
•
Press SUPER FREEZE once to turn On/Off the
Super Freeze feature.
NOTE: When Super Freeze is on, is
illuminated and -10°F or -23°C appears in
the temperature display.
•
Press FREEZER to manually turn off Super
Freeze and return to the previously set
temperature.
NOTE: Super Freeze will automatically turn off
after several hours, and the freezer will revert
to its previous temperature setting.
Super Cool
The Super Cool feature rapidly lowers the
refrigerator compartment temperature to
maintain the temperature of the chilled food
during periods of high usage, full grocery loads, or
temporarily warm room temperatures.
The Super Cool feature lowers the temperature in
the refrigerator compartment to 35°F (2°C).
•
Press SUPER COOL once to turn On/Off the
Super Cool feature.
NOTE: Either the °F or °C icon will illuminate
to indicate in which scale (Fahrenheit or
Celsius) the temperature is being displayed.
Refrigerator (Fridge) Compartment Temperature
1. Press FRIDGE once to turn on the temperature
control.
3. Release FRIDGE when the desired temperature
setting appears.
Super Freeze Icon
Fahrenheit Indicator
Super Cool Icon
Refrigerator Compartment Temp Control
Super Cool Control
Energy Saving Control
Celsius Indicator
Energy Saving Icon
c
d
e
f
g
h
i
j
k
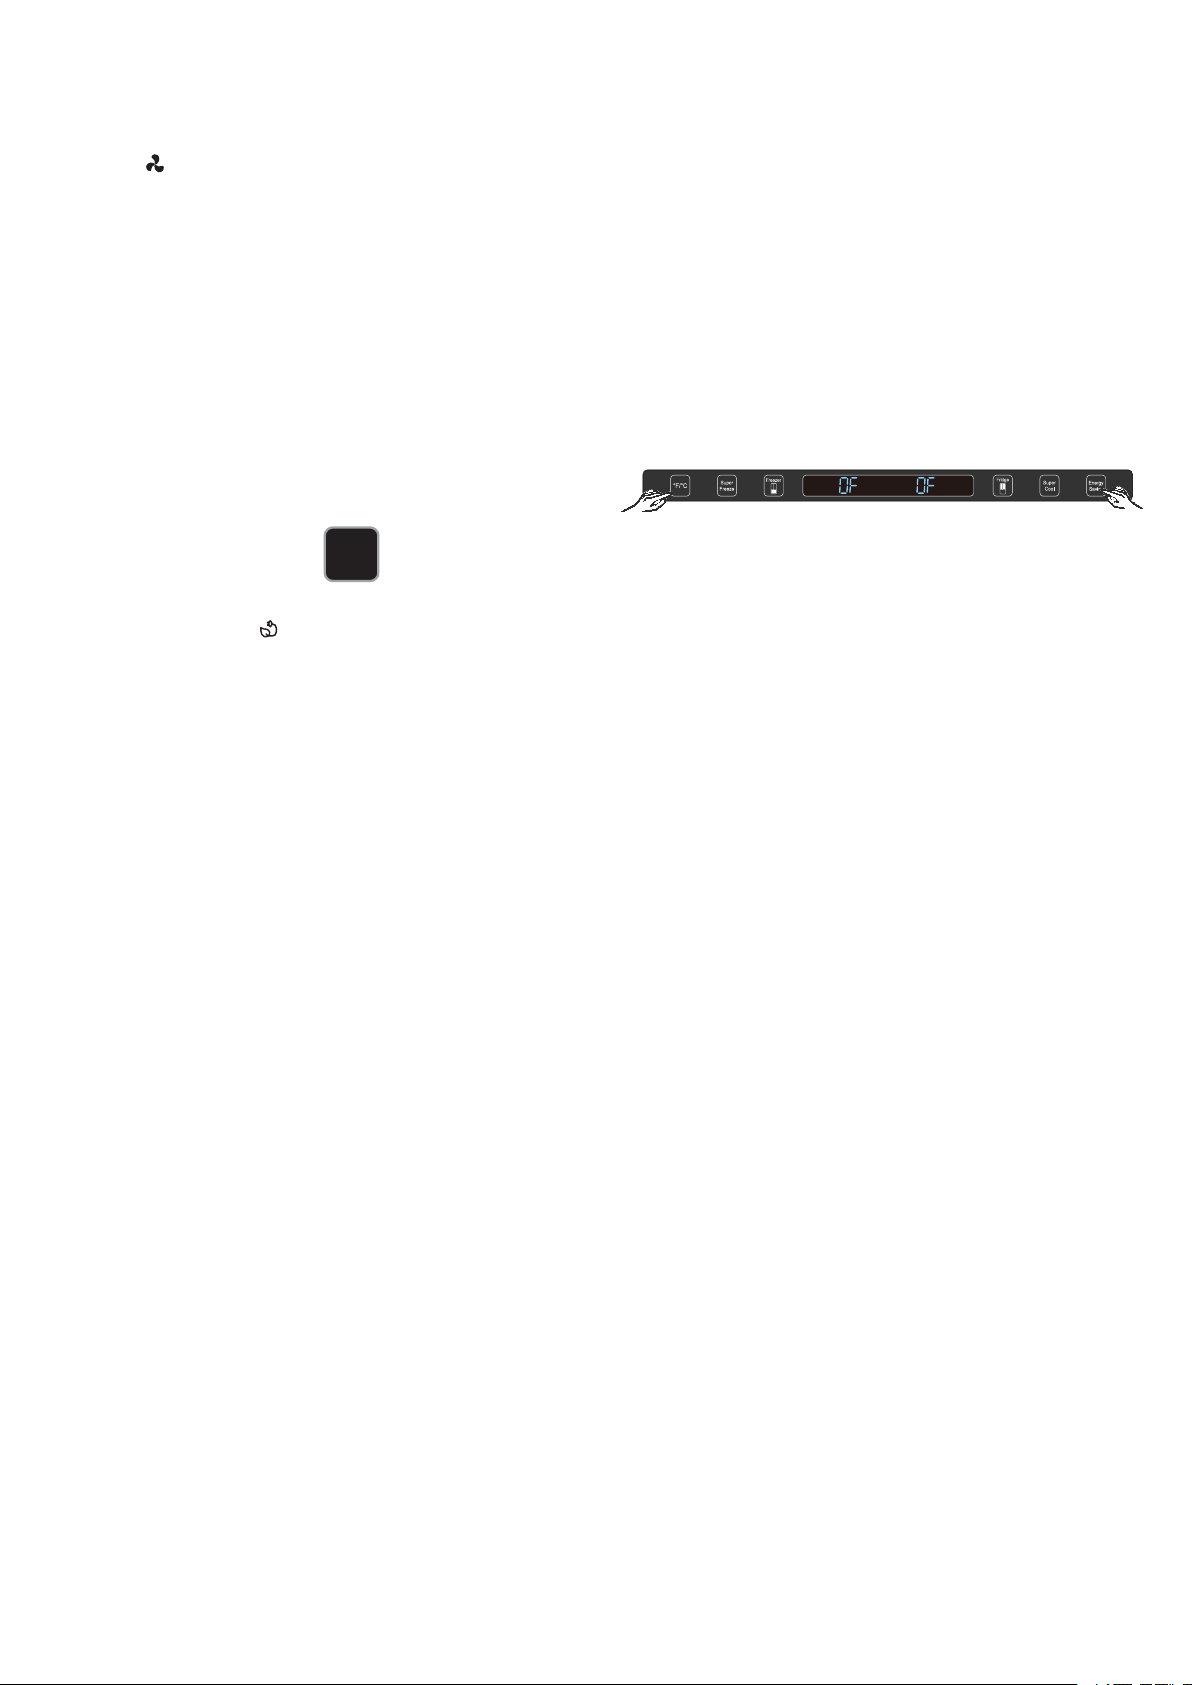
Demo mode is for store display, and it makes the
refrigerator not to generate cool air.
In case of Cooling off Mode, refrigerator may
seem like working but it does not make cool air.
The indicators on control panel is showing double
“OF”. To cancel this mode, press the “°F/°C” and
“Energy Saving ” at same time for 3 seconds until
“Ding” sounds.
11
Demo mode (Freezer/ Fridge
Temperature Indicator moving)
Energy
Saving
NOTE: When the refrigerator is in Energy
Saving mode, is illuminated.
NOTES:
•
When the refrigerator is in Super Cool mode,
appears in the display.
•
If not manually turned off, the Super Cool
feature will automatically turn off after
150 miniutes.
Energy Saving
The Energy Saving feature reduces energy use by
raising the Refrigerator Compartment temperature
to 46°F (8°C) and the Freezer Compartment
temperature to 5°F (-15°C).
IMPORTANT: The compartment temperatures
in Energy Saving mode are not suitable for the
storage of certain food items.
•
Press ENERGY SAVING once to turn On/Off
this feature.
12
Features
Important information to know about glass
shelves and covers:
Do not clean glass shelves or covers with
warm water when they are cold. Shelves
and covers may break if exposed to sudden
temperature changes or impact, such as
bumping. Tempered glass is designed to
shatter into many small, pebble-size pieces.
This is normal. Glass shelves and covers are
heavy. Use both hands when removing them to
avoid dropping.
Refrigerator
Adjustable Shelves
The height of the shelves can be adjusted to fi
t your storage needs.
1.
To remove a shelf, gently lift upward and then
pull the shelf forward until the end of the shelf
is past the shelf guides.
2.
To reinstall a shelf, gently slide the shelf back
into the refrigerator compartment, and then
lower the shelf onto the shelf guides so that the
hooks fi t behind the rear guides.
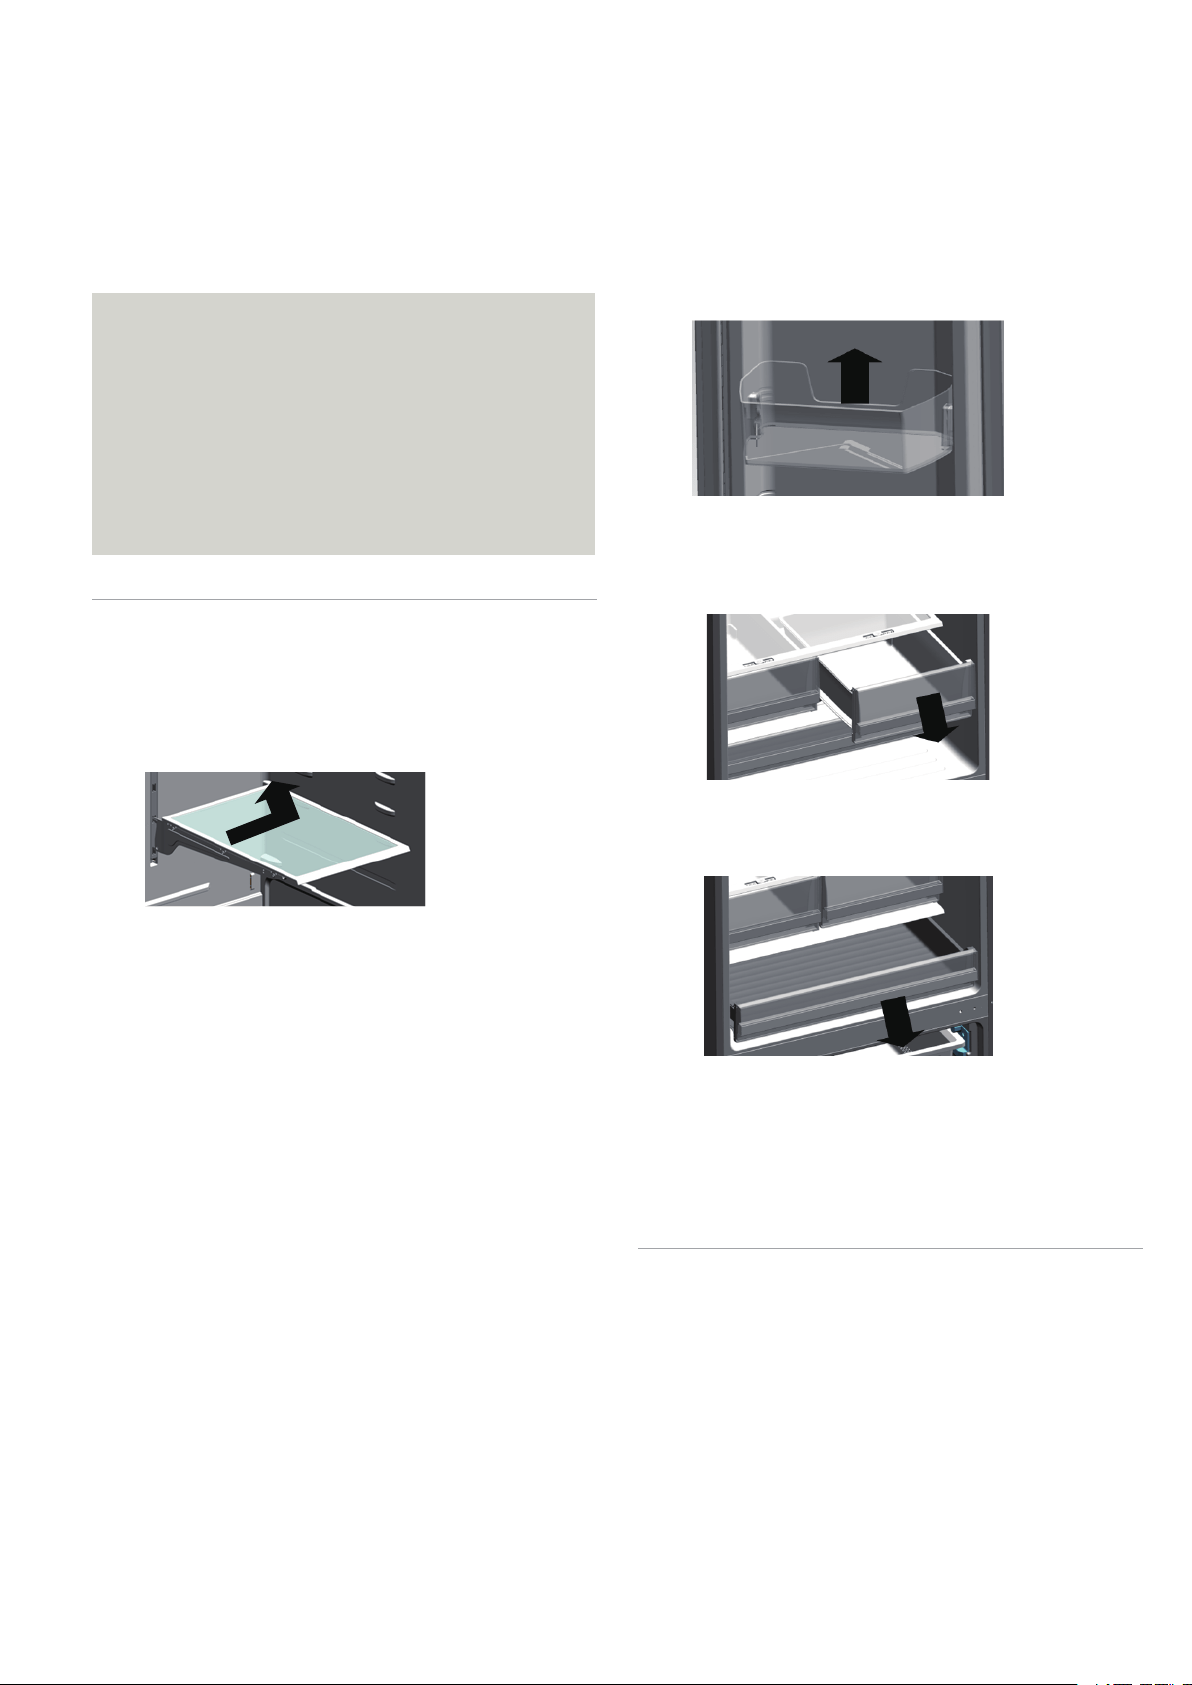
Freezer Drawers
To Remove/Replace Freezer Storage Drawer:
1. Pull out drawer to maximum extension.
2.
Slide open the upper storage drawer to its full
extension.
Freezer
Full-width Drawer
The full-width drawer is an ideal space to store
large deli platters.
•
Open - The cover automatically opens as the
drawer is pulled out from the cabinet.
•
Close - The cover automatically closes as the
drawer is pushed into the cabinet.
Storage Drawers
The two refrigerator storage drawers, mounted on
telescopic extension slides, can be used to store
fruits and vegetables.
Removable Door Bins
The bins located in the middle of the door are
adjustable.
To Remove and Replace a Door Bin:
1. Place hands on both sides of the bin and lift
upward.
2. Pull the door bin out.
3. Replace the door bin by inserting it above the
support and pressing down to snap into place.
Door Open Alarm
If a door is open for longer than 1 minute,
an alarm will sound to alert you. The alarm
will sound 3 times every 30s forever.
•
To turn off the alarm, close all doors and
drawer completely.
13
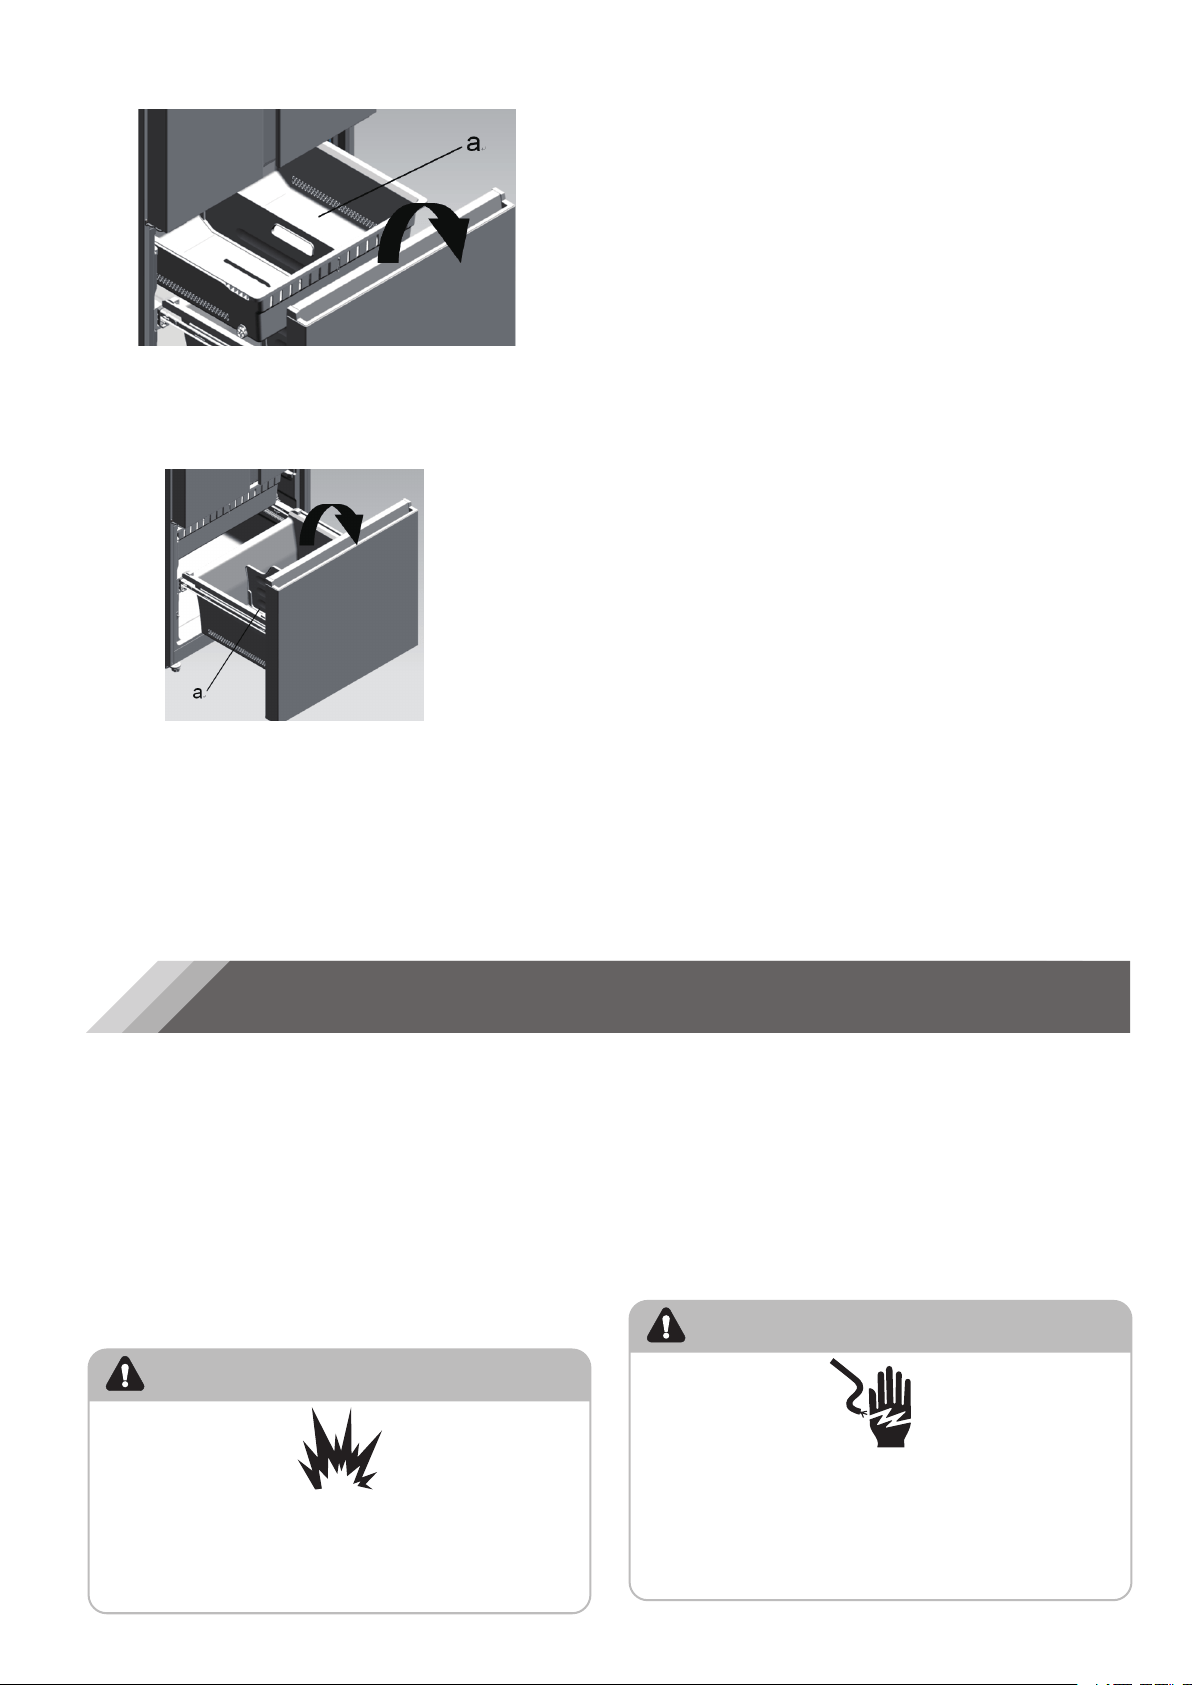
3.
Lift up on the front of the drawer, and then
pull it out at an angle.
a Upper Storage Drawer
4.
Remove the lower freezer storage
compartment by lifting up on the front,
and then pulling out at an angle.
a Lower Storage Compartment
5.
Replace each storage compartment by
using the opposite motion, tilt the
back side downward and push inward.
Refrigerator Care
Cleaning
Both the refrigerator and freezer sections defrost
automatically. However, clean both sections about
once a month to avoid buildup of odors. Wipe up
spills immediately.
Because air circulates between both
compartments, any odors formed in one
compartment will transfer to the other. You must
thoroughly clean both sections to eliminate odors.
To avoid odor transfer and drying out of food,
wrap or cover foods tightly.
WARNING
Explosion Hazard
IMPORTANT:
•
Do not use harsh chemicals, ammonia, chlorine
bleach, concentrated detergent, solvents,
abrasives or metal scouring pads to clean your
refrigerator inside or out. They can damage
and/or discolor the refrigerator finish.
•
Do not use warm water to clean glass shelves
while they are still cold. Glass may break when
exposed to sudden temperature changes or
impact.
WARNING
Electrical Shock Hazard
Unplug your appliance or disconnect power
before cleaning.
Failure to do so can result in death, electric
shock or personal injury.
General Use Information
•
When first turning on refrigerator after a period
of non-use, allow the refrigerator to cool at
least 2 hours before adding food.
•
Do not block air circulation vents with stored
items.
•
Store items so that the air can circulate freely
around them.
•
Cover or wrap stored food well to avoid
transfer of odors.
•
Once defrosted, food quality will deteriorate
rapidly and should not be refrozen.
•
Neither bottled nor canned drinks should be
stored in the freezer compartment. Bottles and
cans may explode.
Use nonflammable cleaner.
Failure to do so can result in death, explosion
or fire.
14
1. Unplug refrigerator or disconnect power.
2. Clean the interior.
Hand wash, rinse, and dry removable parts
and interior surfaces thoroughly. Use a clean
sponge or soft cloth and a mild detergent in
warm water.
3. Clean the door and drawer seals (gaskets). A
dirty or sticky seal may adhere to the cabinet
and tear when you open the door.
Using a soft cloth and a solution of mild
detergent and warm water, hand wash the
door seals. Rinse with clear water and dry
thoroughly.
4. Clean the exterior surfaces.
Wash exterior surfaces with a clean, soft cloth
or sponge and a mild detergent in warm water.
Rinse surfaces with clean, warm water and dry
immediately to avoid water spots.
5. Plug in refrigerator or reconnect power.
Lights
IMPORTANT: Your refrigerator is equipped with
LED lighting. These lights are designed to last
for the life of your refrigerator. However, if the
lights stop operating, please contact a qualified
technician for replacement.
Vacation and Moving Care
Vacation
If You Choose to Leave the Refrigerator On While
You’re Away:
1. Use up any perishables and freeze other items.
If You Choose to Turn Off the Refrigerator Before
You Leave:
1. Remove all food from the refrigerator and
freezer.
2. Unplug refrigerator or disconnect power.
3. Clean refrigerator, wipe it, and dry well.
4. Tape rubber or wood blocks to the tops of both
doors to prop them open far enough for air to
get in. This stops odor and mold from building
up.
Moving
WARNING
Do not puncture refrigerant tubing.
Follow handling instructions carefully.
Flammable refrigerant used.
Failure to do so can result in death, explosion
or fire.
IMPORTANT: Handle with care when moving
refrigerator to avoid either damaging the
refrigerant tubing or increasing the risk of a leak.
WARNING
Excessive Weight Hazard
Use two or more people to move and
install refrigerator.
Failure to do so can result in back or other injury.
When you are moving your refrigerator to a new
home, follow these steps to prepare it for the
move.
1. Remove all food from the refrigerator and pack
all frozen food in dry ice.
2. Unplug refrigerator.
3. Clean, wipe, and dry thoroughly.
4. Take out all removable parts, wrap them well,
and tape them together so they don’t shift and
rattle during the move.
5. Raise the leveling legs so they don’t scrape the
floor. See “Level Refrigerator.”
6. Tape the doors closed and tape the power cord
to the back of the refrigerator. When you get to
your new home, put everything back and refer
to the “Installation Instructions” section for
preparation instructions.
Reinstalling/Using Refrigerator
Again
If the refrigerator has been placed in a horizontal
or tilted position for any period of time wait
4 hours before plugging it in to allow the oil to
settle into the compressor.
1. Clean refrigerator. See “Cleaning.”
2. Place refrigerator in desired location and level.
See “Installation Instructions.”
WARNING
Plug into a grounded 3 prong outlet.
Do not remove the ground prong from the
power cord plug.
Do not use an adapter.
Do not use an extension cord.
Failure to do so can result in death,
fire or electrical shock.
3. Plug into grounded 3 prong outlet.
Fire or Explosion Hazard
Electrical Shock Hazard
15
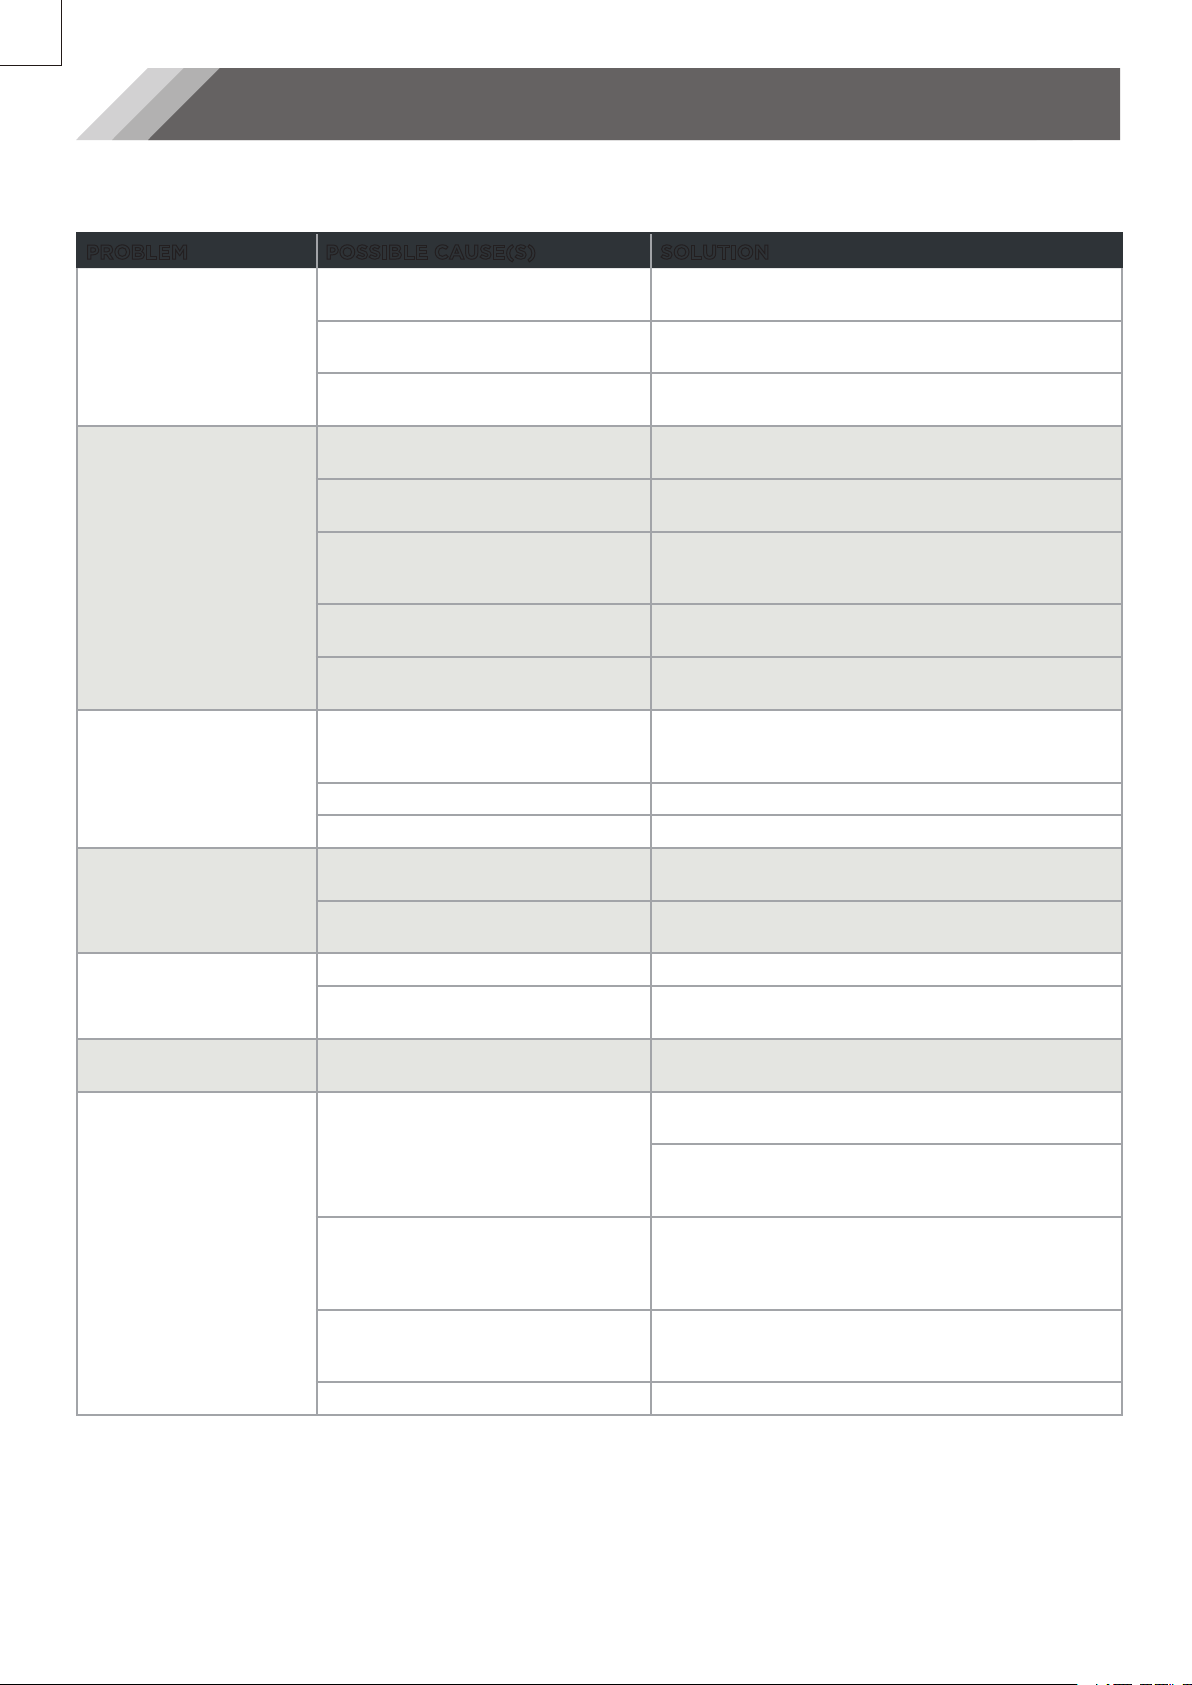
Troubleshooting
Try the solutions suggested here fir t in order to avoid the cost of an unnecessary service call.
Refrigerator is Not Operating
PROBLEM
Refrigerator does not
run
POSSIBLE CAUSE(S)
Refrigerator is unplugged.
SOLUTION
Plug refrigerator into a grounded 3 prong
outlet.
Breaker is tripped or turned off,
or fuse is blown.
Reset/Turn on breaker or replace fuse.
Refrigerator is in defrost mode. Wait for defrost cycle to end and cooling
system to restart.
Refrigerator
compressor runs
frequently or for long
periods of time
NOTE: This
refrigerator is
designed to run for
longer periods of time
at a lower energy
usage.
Refrigerator is first plugged in. This is normal. Allow 24 hours for the
refrigerator to cool down.
Warm or large amounts of food
added.
This is normal.
Door is left open, or refrigerator
is not level.
Check that an item is not preventing door
from closing. Level the refrigerator. See
“Level Refrigerator.”
Hot weather or frequent
openings
This is normal.
Temperature control set to
coldest setting.
Adjust temperature to a warmer setting.
Refrigerator has an
odor
Food is not sealed or packaged
properly.
Reseal packaging. Place an opened box of
baking soda in the refrigerator, replace every
3 months.
Interior needs to be cleaned. Clean the interior. See “Cleaning.”
Food stored too long. Dispose of spoiled food.
Light does not come
on
Refrigerator is unplugged. Plug refrigerator into a grounded 3 prong
outlet.
LED light is burned out. Contact a qualified technician to replace the
burned out LED.
Doors do not close
properly
Refrigerator is not level. See “Level Refrigerator.”
Something is obstructing door
closure.
Check for and remove obstructions.
Vibration or rattling Refrigerator is not resting firmly
on floor.
See “Level Refrigerator.”
Normal Sounds It sounds like water is flowing
from the refrigerator.
Refrigerant flowing in the lines will make this
sound when the compressor starts and stops.
The refrigerator has an automatic defrosting
system. The defrosted water will make this
sound.
Humming or buzzing sounds The compressor and fans used for cold
air circulation can make this sound. If the
refrigerator is not level, the sound will be
louder.
Cracking or clicking sounds The interior parts will make this sound as
they contract and expand in response to
temperature changes.
Popping noise May occur during automatic defrosting.
16
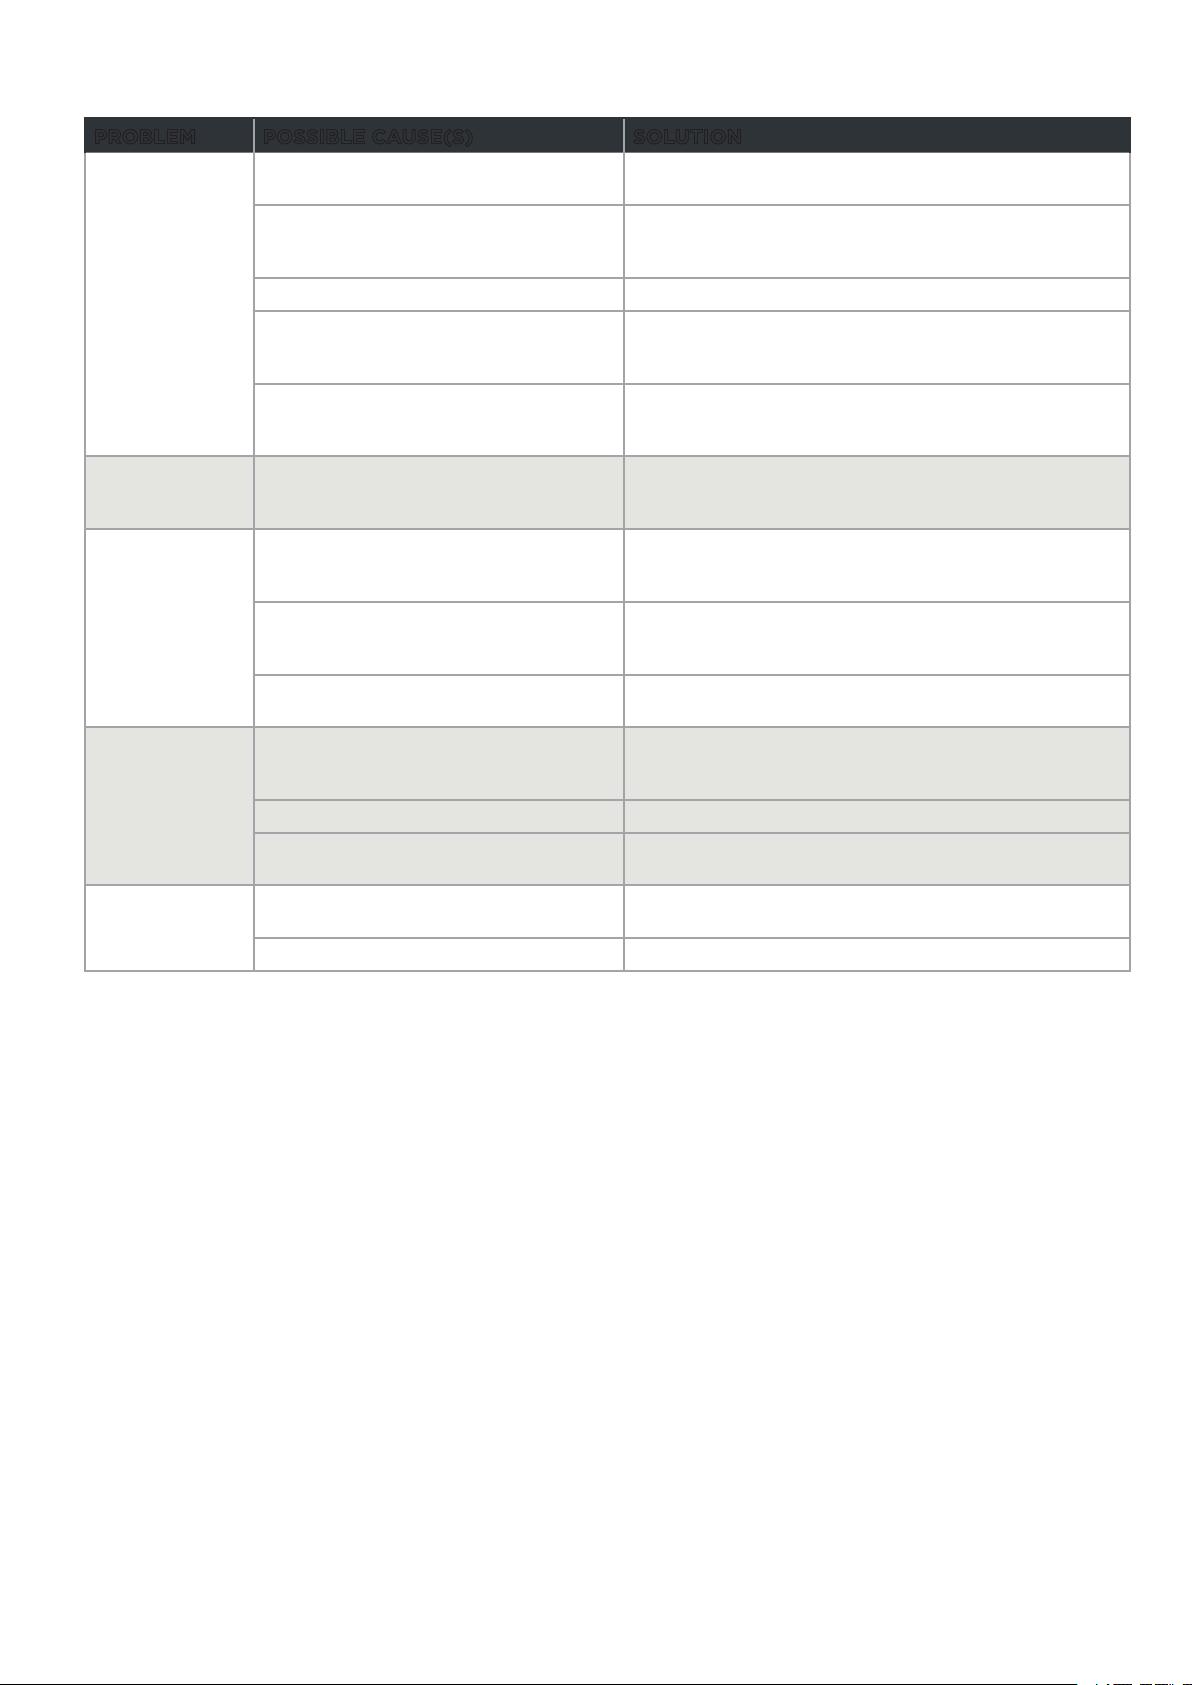
Temperature and Moisture
PROBLEM
Refrigerator or
freezer is too
warm
POSSIBLE CAUSE(S)
Temperature control is not set cold
enough.
SOLUTION
Adjust the compartment to a colder setting;
allow 24 hours for the temperature to adjust.
Doors opened frequently or left
open.
Limit door openings to maintain the internal
temperature. Check that an item is not
preventing door from closing.
Warm food added recently. Allow time for food and refrigerator to cool.
The space between the back of
the refrigerator and the wall is too
close.
Allow 2" (5 cm) space between the back of the
refrigerator and the wall.
Items against back of
compartments are blocking proper
airflow.
Store items only inside the trim of the glass
shelves; don’t place items against sides of the
compartments or directly in front of any vents.
Refrigerator or
freezer is too
cold
Temperature control is set too cold. Adjust temperature in the compartment to
the next warmer setting; allow 24 hours for
temperature to adjust.
Moisture on
exterior/
interior of
refrigerator
High humidity This is normal during times of high humidity.
Dry surface and adjust temperature to a slightly
colder setting.
Doors opened frequently or left
open.
Keep door closed. Check that an item is not
preventing the door from closing. Level the
refrigerator. See “Level Refrigerator.”
Open container of water in
refrigerator
Cover or seal container
Frost or ice
crystals on
frozen food
Freezer door left open or opened
frequently.
Limit door openings to maintain the internal
temperature. Check that an item is not
preventing door from closing.
Refrigerator is not level. Level the refrigerator. See “Level Refrigerator.”
Items blocking freezer air vents and
preventing proper air flow.
Move items away from rear wall.
Food freezing
in refrigerator
Food placed too close to the air
vent.
Move items away from back and top of the
refrigerator.
Temperature control set too cold. Adjust the temperature to a less cold setting.
For more help, visit www.hisense-canada.com or call the consumer help
line at 1-855-344-7367.