User guide.


3
GENERAL SAFETY
INFORMATION
• This juicer system has sharp
blades and moving parts,
and is NOT intended for use
by children or persons with
reduced physical, sensory,
or mental capabilities,
or who lack experience
and knowledge of its safe
operation. Such persons
require close supervision
and thorough instruction
on its proper use and safe
operation. Close supervision is
necessary when any appliance
is used by or near children.
Children should be supervised
to ensure that they do not play
with the appliance.
• To protect against fire, electrical
shock and injury to persons, do
not immerse the juicer, Motor
Base, cord or plug in water or
any other liquid.
• Turn the juicer OFF, then unplug
from the outlet when not in
use, before assembling or
Important safeguards.
Warning! To avoid the risk of serious injury, carefully read all
instructions before operating your NutriBullet Juicer Pro™. When
using any electrical appliance, basic safety precautions should
always be observed, including the following important information.
Save these instructions!
FOR HOUSEHOLD USE ONLY
disassembling parts and before
cleaning. To unplug, grasp the
plug and pull from the outlet.
Never pull from the power cord.
AVOID CONTACT WITH
MOVING PARTS
• Regularly inspect the power
supply cord, plug, and actual
juicer for any damage
• Do not operate this or any
appliance with a damaged
cord or plug or after the
appliance malfunctions, or is
dropped or damaged in any
manner. Contact Customer
Service for assistance at
1 (800) 523-5993.
• The use of attachments not
recommended or sold by
NutriBullet
®
may cause fire,
electric shock, or injury.
• This juicer is for household
use only. Do not use this juicer
for anything other than its
intended use. Do not use in
moving vehicles or boats. Do
not use outdoors. Misuse may
cause injury.
!

4
• Do not let the power cord
hang over the edge of a table
or counter top.
• Do not let the power cord
touch hot surfaces, such as a
stove or let it become tangled
or knotted.
• Always make sure the pulp
basin cover is securely in
place (with locking handle
in its upright and locked
position) before the motor is
turned on. Do not unlock the
locking handle while the juicer
is in operation.
Always ensure the
juicer is turned OFF
after each use. Before
disassembling, make sure
the sieve has stopped
rotating and the motor
has completely stopped.
• Do not push food into the feed
chute with your fingers or
utensils. Always use the food
pusher provided. Do not place
your hand or fingers into the
feed chute when it is attached
to the juicer. If food becomes
lodged in the feed chute, use
the food pusher provided
or another piece of fruit or
vegetable to push it down.
Turn the motor o and ensure
that all moving parts have
stopped before disassembling
the juicer to remove the
remaining pulp.
• Do not use the juicer if the
rotating sieve is damaged.
• Do not use the juicer
without the pulp basin and
basin cover attached to
the motor base. Please see
assembly instructions for
proper placement.
• Do not modify the plug in any
way. This juicer has a polarized
plug. To reduce the risk of
electric shock, this plug will fit
in a polarized outlet only one
way. If the plug does not fit fully
in the outlet, reverse the plug.
If it still does not fit, contact a
qualified electrician.
ADDITIONAL
SAFEGUARDS
Remove and safely
discard any packaging
material or promotional
labels before using the
juicer for the first time.
• To eliminate a choking
hazard for young children,
remove and safely discard the
protective cover fitted to the
power plug of this juicer.
• Do not touch the small
cutting blades/teeth on the
bottom/base of the sieve.
BLADES ARE SHARP! HANDLE
WITH EXTREME CARE!
• Keep fingers away from the
sharp blade in the feed chute.

5
Always make sure the
Juicer is properly and
completely assembled
before connecting to power
outlet and operating.
Ensure that the surface
where the appliance
operates is stable, level,
clean and dry.
• Vibration can occur during
normal operation.
• If extreme vibration occurs,
discontinue use and call
Customer Service.
• If the juicer leaks or there
is a spill under or around
the juicer, or onto the juicer
itself, clean and dry before
continuing use.
• When using this juicer, make
sure there is adequate air
space around and under it for
proper air circulation.
This juicer is only
designed to juice fruits
and vegetables. Please
refer to the juicing guide
to determine the correct
speed for the fruits and
vegetables selected for
juicing. Do not use any
frozen fruits or vegetables.
• Hard fruits and vegetables
will put excess strain onto
the motor if a low speed
is selected.
• Remove rind from all citrus
fruits before juicing.
• Do not juice stone fruit
unless pits or seed stone has
been removed.
Do not leave the appliance
unattended while in use.
Keep hands, fingers, hair,
clothing as well as spatulas
and other utensils away
from the appliance during
operation.
Keep the juicer clean. Refer to
care and cleaning section for
further information.
Any maintenance other
than cleaning should be
performed by an authorized
electrician. Do not attempt
to repair or service this juicer,
contact Customer Service for
assistance at 1 (800) 523-5993.
If any of the instructions or
warnings are not understood
please contact Customer
Service for assistance at
1 (800) 523-5993.
!
WARNING!
6

7
Contents.
Thank you for purchasing the NutriBullet
Juicer Pro™.
03 Important safeguards
08 What’s included
09 Assembly guide
10 Assembly & use
12 Usage instructions
17 ontrol panel
18 Juicing tips
22 Disassembly
24 Care and maintenance
25 Juice and unit storage
26 Troubleshooting guide
26 Replacement parts
27 NutriBullet Juicer Pro™
one-year limited warranty
30 Warranty registration

8
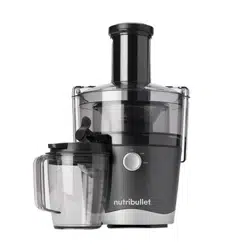
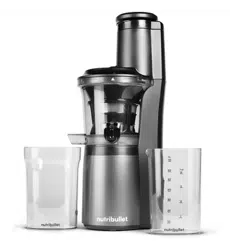
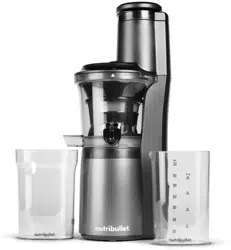
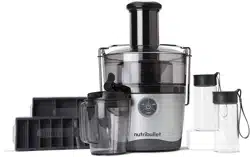
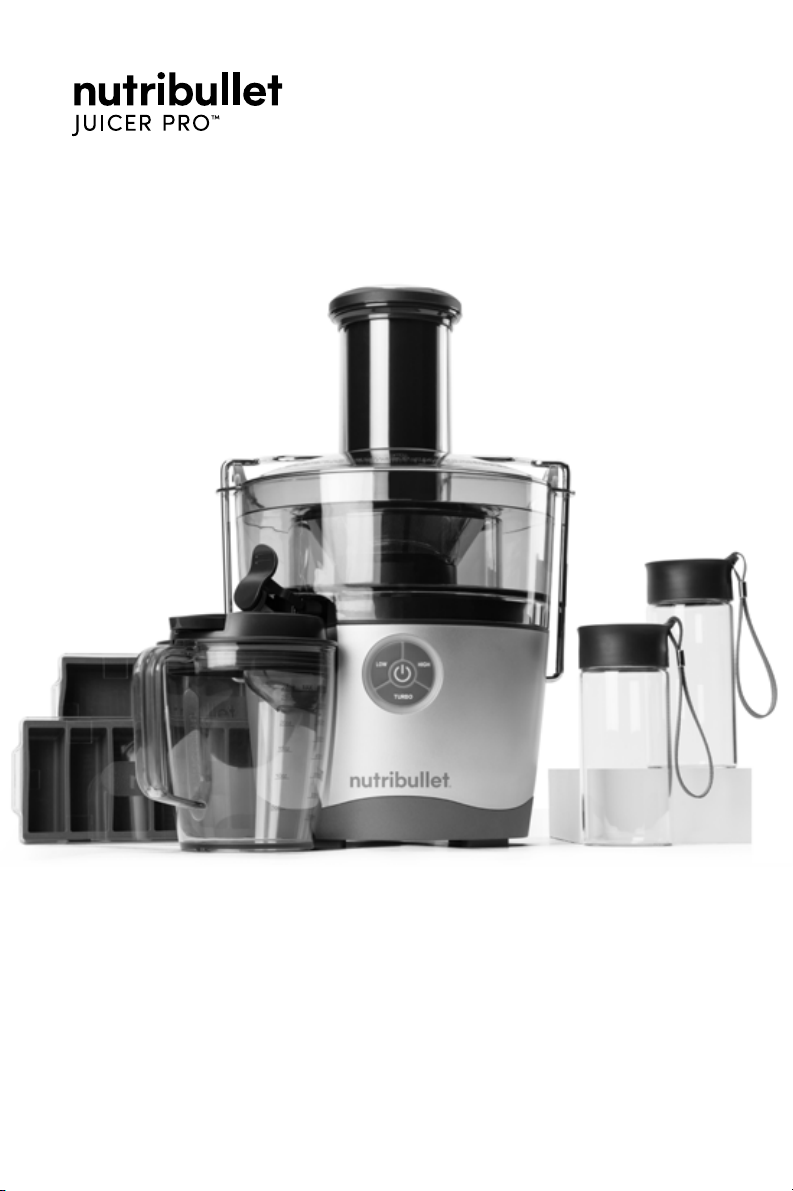
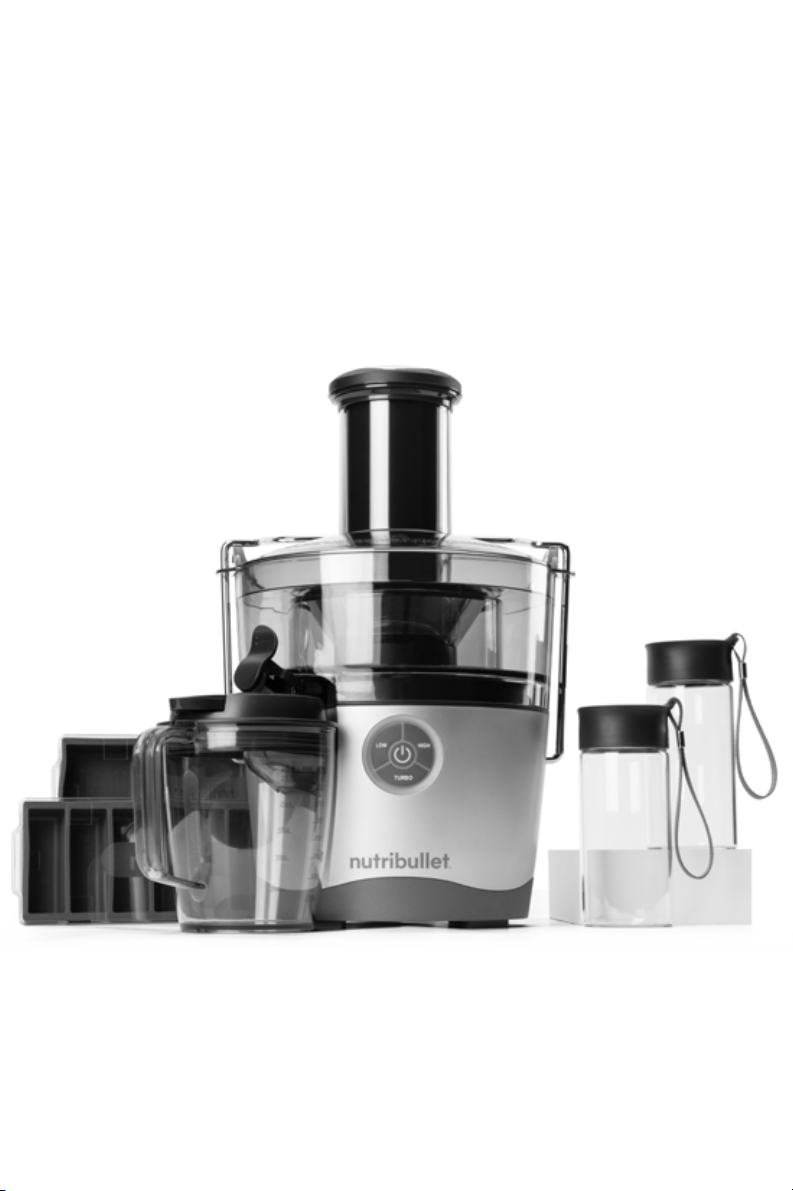
What’s included.
1000 WATT MOTOR
BASE WITH
LOCKING HANDLE
PULP BASIN COVER
WITH 3" FEED CHUTE
DUALSIZE
FOOD PUSHER
2L PULP BASIN
WITH NODRIP SPOUT
STAINLESS STEEL SIEVE 27 OZ JUICE PITCHER
JUICE PITCHER LID
WITH FROTH SEPARATOR
CLEANING BRUSH TWO 12 OZ GLASS
STORAGE BOTTLES
4 OZ FREEZER TRAY2 OZ FREEZER TRAY
9
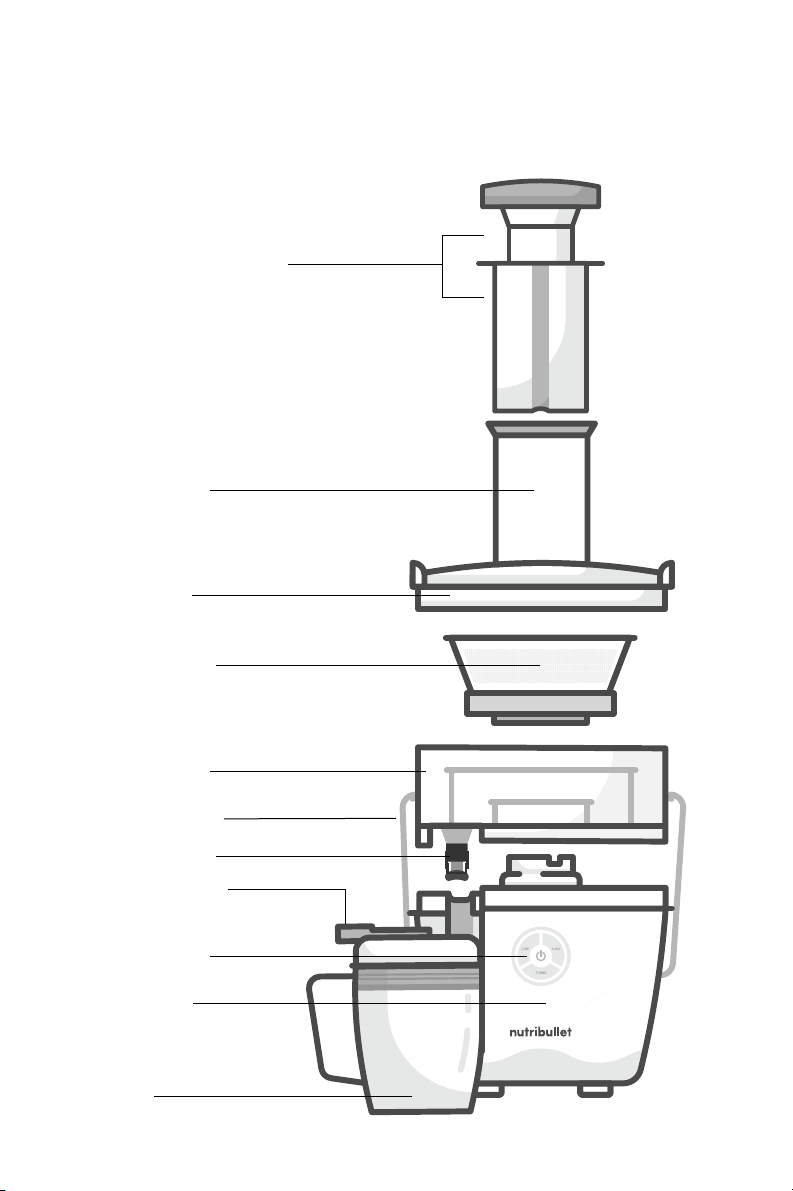
Assembly guide.
dual-size food pusher
3” feed chute
locking handle
basin cover
2L pulp basin
stainless steel
sieve (inside basin)
no-drip spout
27 oz juice
pitcher
multi-speed
control panel
motor base
juice pitcher lid
10
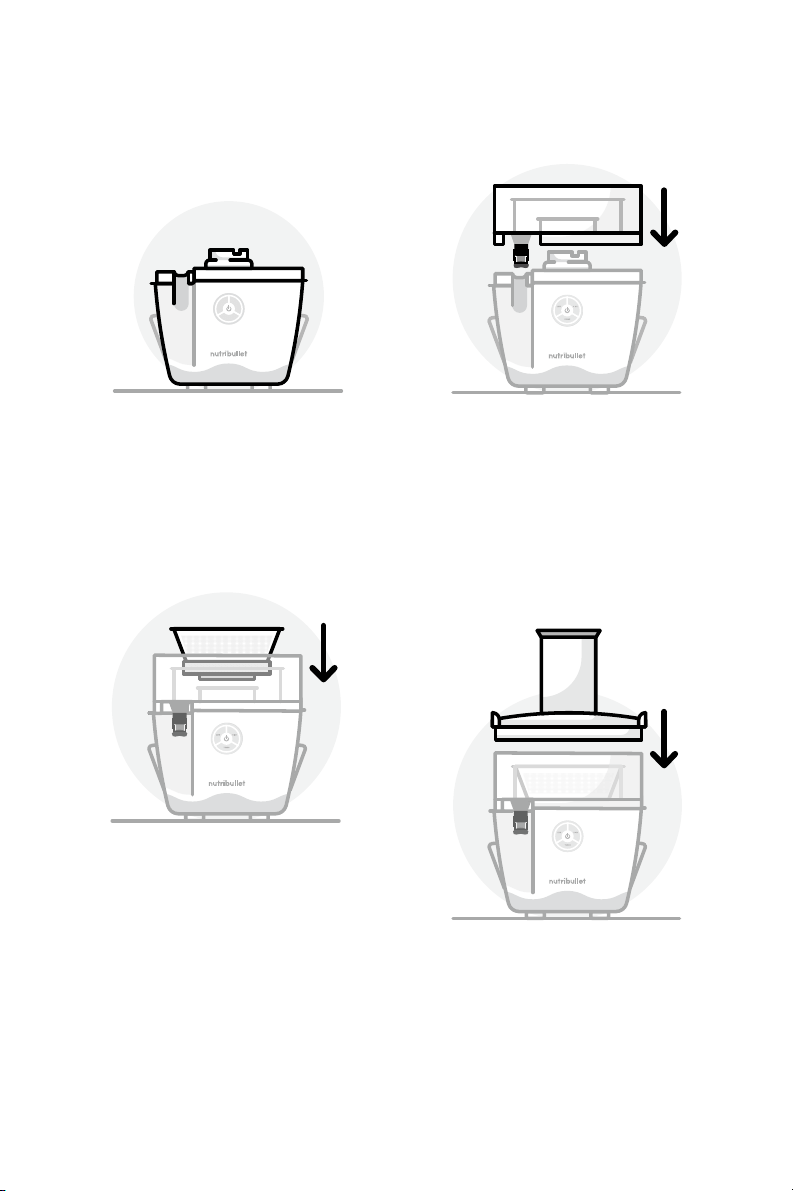
Assembly & use.
1 Place the Motor Base on
a dry, level counter top.
Ensure the dial is set to the
“OFF” position and the unit
is unplugged.
2 Place the Pulp Basin on top
of the Motor Base. Align the
Pulp Basin with the Motor
Base so that the spout is
aligned with the dimpled
side of the Motor Base.
3 Align the Sieve with the
motor drive coupling and
push down until it clicks into
place. Handle the Sieve
by gripping the top edges
being careful not touch the
sharp teeth on the base of
the Sieve. Ensure the Sieve
is properly seated in place
and securely inside of the
Pulp Basin.
4 Place the Basin Cover
over the Sieve and Pulp
Basin. The side “ears” on the
Basin Cover should align
with the “ears” on the sides
of the Pulp Basin.

11
5 Raise the Locking Handle
and move it into the “ears” on
each side of the Basin Cover.
The Locking Handle should
be in a vertical position and
locked into place.
NOTE: if the Locking Handle is not
securely in place, the juicer will
not power on.
6 Swing the No-Drip Spout
cover up vertically so that
it is no longer covering the
juice spout.
7 Place the Juice Pitcher Lid on
top of the Juice Pitcher, and
open the locking lid latch.
8 Slightly angle the Juice
Pitcher and place it under
the juice spout. Align the
spout with the hole in the
Juice Pitcher Lid and level
out the Juice Pitcher. It will
fit snuggly into the spout to
hold it in place.
12
Usage instructions.
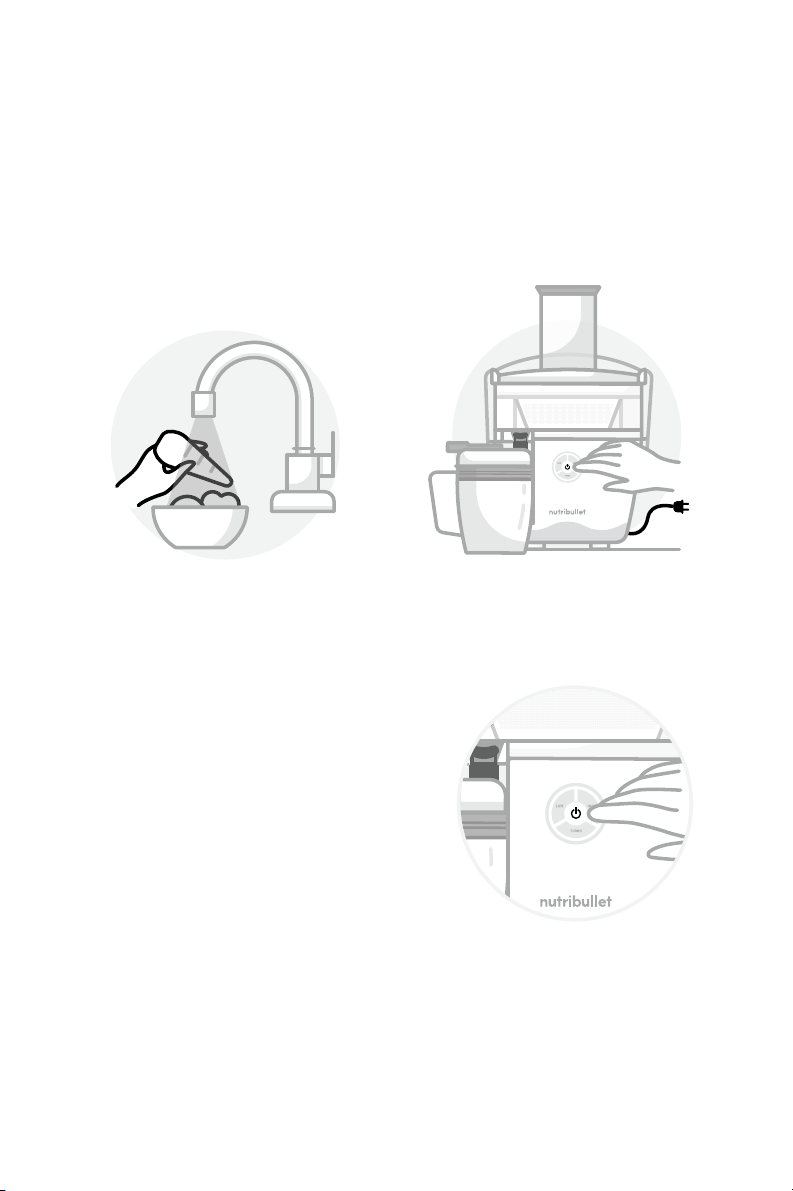
1 Gather all of your desired
ingredients. Wash and
prepare them for juicing.
2 After the juicer is fully
assembled, plug the power
cord into an outlet.
NOTE: If no speed is selected after
10 minutes, the unit will power o.
13
3 Select a speed to begin
juicing. The speed selected
will illuminate on the
control panel. You may
start at any speed and can
toggle between speeds as
desired depending on the
type of produce (refer to
the chart on page 18 for
recommended speeds for
each type of produce).
NOTE: always start the juicer before
putting food in the feed chute.
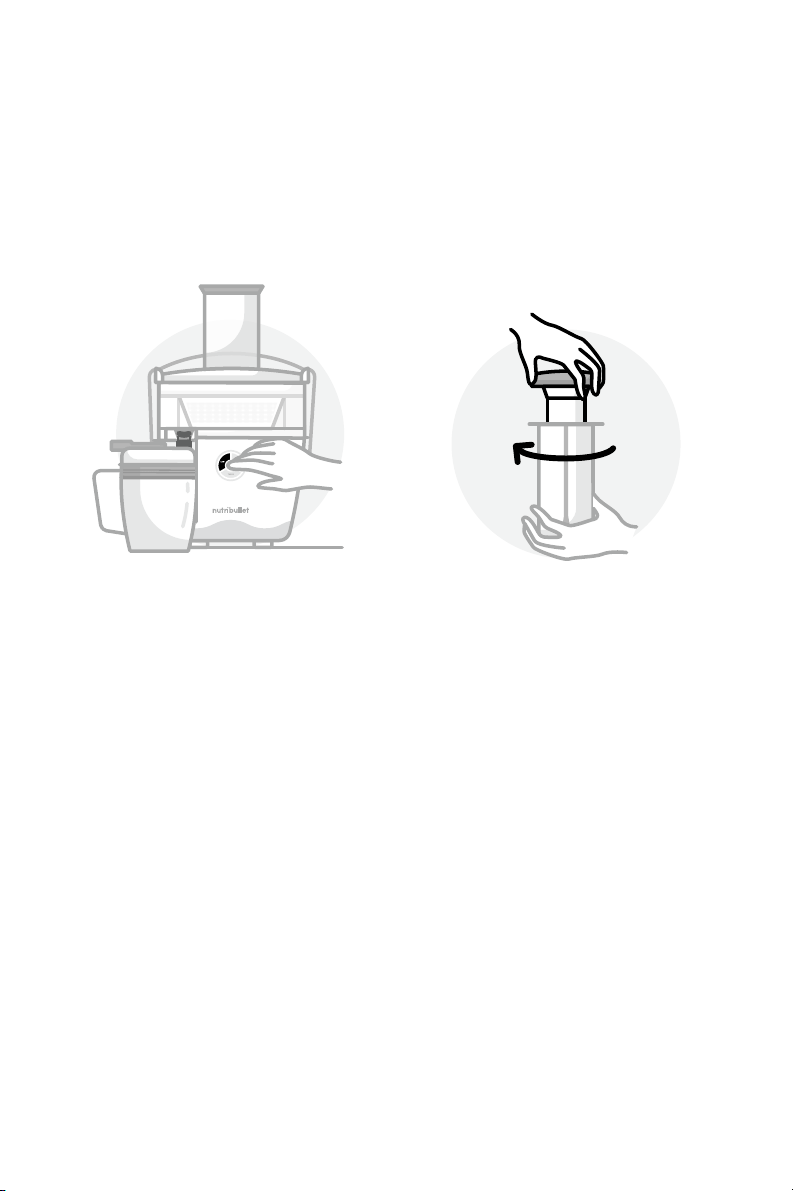
4 To operate the Dual-Size
Food Pusher, grip the
outer edge of the top of
the pusher with one hand
and the bottom of the
pusher with the other hand.
Twist the top of the pusher
clockwise to unlock the
inner pusher. (The inner
pusher is thinner than the
full pusher.)
14
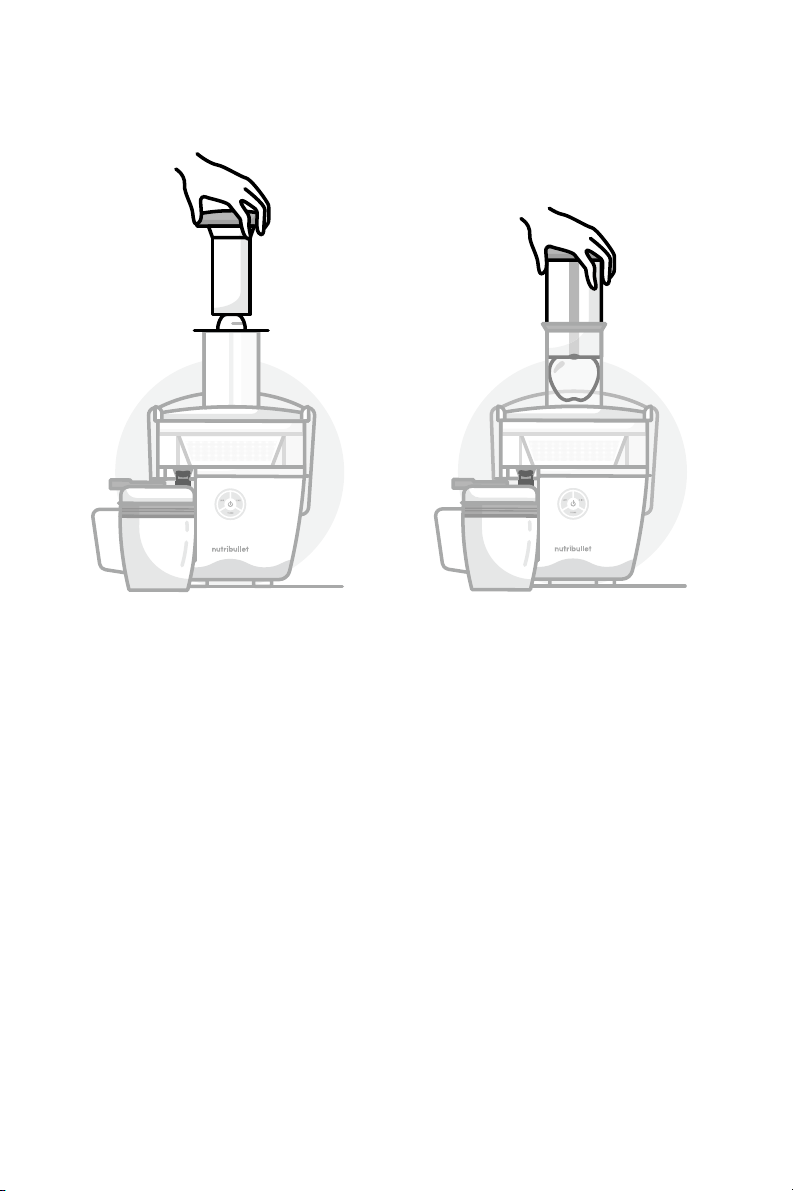
5 If you are using smaller
ingredients (smaller
fruits, leafy greens, stalk
vegetables like celery or
carrots), place the outer part
of the pusher into the chute,
making the chute more
narrow. While the motor
is running, begin gently
guiding ingredients into
the internal chute using the
inner pusher.
TIP: When using the narrow chute
for juicing leafy greens, take
a small handful of greens and
squeeze them into a tighter bunch.
Place the bunch into the chute
and slowly push down into the
Sieve. Using the narrow chute will
help to prevent any pieces from
flying up out of the chute.
6 If you are using larger
ingredients, keep the feed
chute empty (creating a
wider chute) and lock the
inner pusher back inside
the outer pusher. While
the motor is running,
begin gently guiding your
ingredients into the feed
chute using the full Dual-
Size Food Pusher.

15
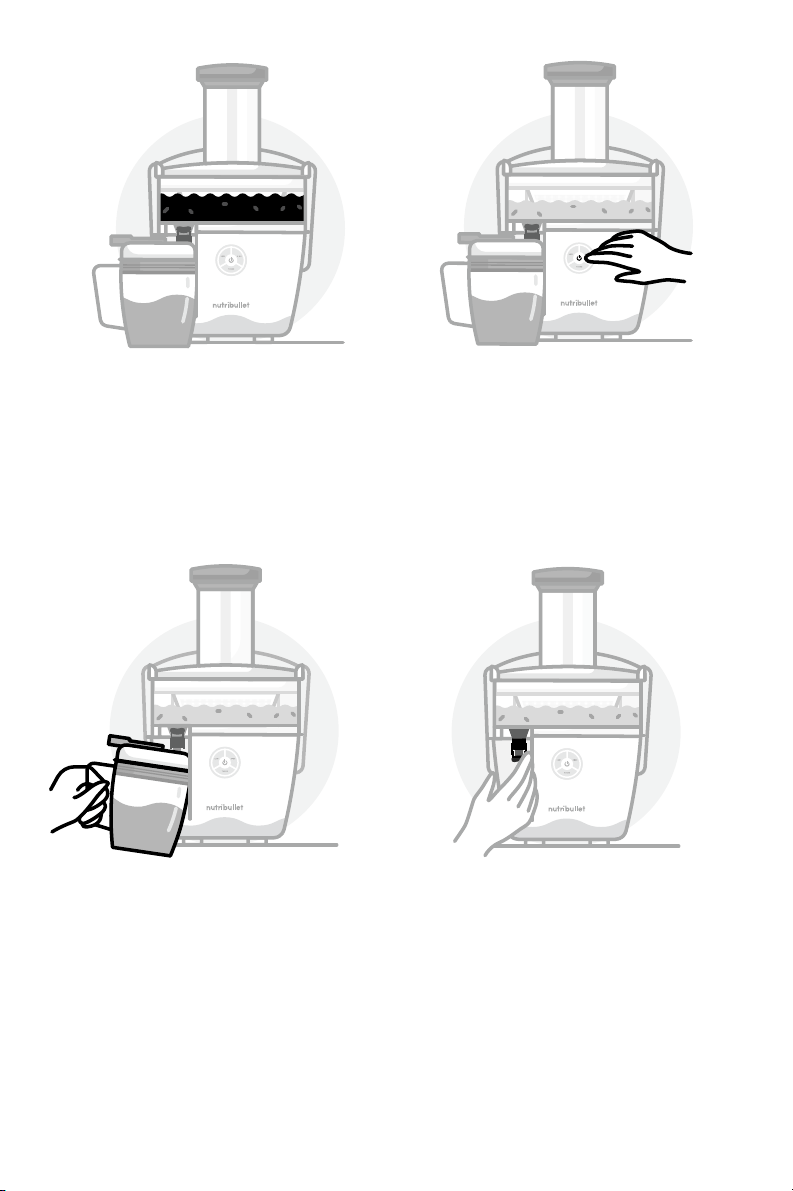
7 Juice will begin to flow out
of the spout and into the
Juice Pitcher, while the
pulp will be separated and
stored in the Pulp Basin.
NOTE: You may alternate
between the two chute sizes
(narrow and wide) as you
are juicing.
WARNING: Do not use
excess force when pushing
food down with the Food
Pusher, as it will not allow
for maximum juice yield.
WARNING: Never use
hands/fingers or other tools
to push ingredients down
the feed chute into the
Sieve. Only the Food Pusher
should be used to push
down ingredients.
16
10 Remove the Juice Pitcher
from under the spout. You
may close the Juice Pitcher
Lid and store juice in the
Juice Pitcher if desired.
NOTE: To do this, you’ll first need
to tip the Juice Pitcher forward
at a slight angle, so that the lid’s
large hole has some separation
from the spout, then you can slide
out the pitcher. This is the reverse
of what you did during assembly.
9 To stop juicing, press the speed
at which you are currently
juicing. To completely power
o the juicer, press the center
power button and wait for the
Sieve to stop spinning. Unplug
the unit after each use.
8 When the Pulp Basin is
completely full, it must be
emptied before continuing
juicing. See disassembly
instructions.
11 Immediately move the
No-Drip Spout cover
downward over the spout
to avoid any residual drips
onto the unit or onto the
surface below the juicer.
TIP: We recommend using your
left hand to pull the Juice Pitcher
away, while using your right hand
to swing the No-Drip Spout cover
down and over the spout opening.

17
Control panel.
OFF:
Power is OFF. If the unit is ON,
the center power button will be
illuminated. Pressing the center
button will turn the unit OFF.
LOW:
Best for juicing softer fruits
and vegetables.
HIGH:
Best for harder produce
like pineapples.
TURBO:
Best for juicing the toughest
vegetables like beets or carrots.
MULTISPEED CONTROL PANEL
& JUICING SETTINGS

18
Juicing tips.
JUICING SPEED SELECTION GUIDE
Apple Turbo All Year
Beets Turbo Summer / Fall / Winter
Blueberry Turbo Summer
Broccoli Turbo Fall / Spring
Brussels Sprouts Turbo Fall / Winter
Cabbage Low Fall / Winter / Spring
Carrots Turbo All Year
Cauliflower Turbo Fall
Celery Turbo All Year
Cucumber High Summer
Fennel Turbo All Year
Ginger Turbo Fall
Grapes Low Fall
Grapefruit Low Winter
Kale High Fall / Winter / Spring
Kiwi Low Fall / Winter / Spring
Lemon Low All Year
Lime Low All Year
Melons (all) Low Summer
Orange Turbo Winter
Peaches High Summer
Pears High Fall / Winter
Pineapple High Fall / Winter / Spring
Plums High Summer
Raspberries Low Summer / Fall
Spinach Low Fall / Spring
Sweet Potato (raw) Turbo Fall / Winter
Tomatoes Low Summer
INGREDIENTS SPEEDS SEASONS

19
source of quercetin
excellent source of folate
good source of vitamin C
high in vitamin C, high in folate, good source of potassium
high in vitamin C, good source of folate
high in vitamin C
excellent source of vitamin A, good source of vitamin C
high in vitamin C, good source of folate
good source of vitamin C, good source of vitamin A
good source of vitamin C
good source of vitamin C and potassium
contains vitamin C, magnesium, and potassium
good source of vitamin K
high in vitamin A, high in vitamin C
excellent source of vitamin A and vitamin C, good source of calcium and potassium
high in vitamin C, good source of potassium and vitamin E
high in vitamin C
high in vitamin C
high in vitamin A, high in vitamin C
high in vitamin C
good source of vitamin C
good source of vitamin C
high in vitamin C
good source of vitamin C
high in vitamin C
high in vitamin A, vitamin C, iron, and folate, good source of magnesium
good source of potassium, high in vitamin A and vitamin C
high in vitamin A, high in vitamin C, good source of potassium
VITAMINS / NUTRIENTS

20
PROPER PRODUCE PREP
Prepare fruit and veggies before
inserting them into the juicer:
• Properly clean produce
(rinse with produce wash, or
lukewarm water and apple
cider vinegar).
• Peel or remove skin as
needed, and chop food items
down to the right size – just
small enough to fit easily into
the feed chute, without having
to force the pieces down with
the Food Pusher.
• Remove rind from all citrus
fruits before juicing.
• Remove large pits and
seeds from stone fruits
before juicing.
FEED CHUTE
Selecting which Food Pusher
to use (narrow or wide) aects
feed chute thickness. If you
pull out the thinner inner food
pusher from within the full
pusher, you’ll place the outer
part into the chute, making the
chute narrow. If you use the full
(wide) pusher, the feed chute
will be wider.
• Never place your hand or
fingers into the feed chute
when it is attached to the juicer.
• Always start the juicer before
adding food to the feed chute.
The unit must be running
when items enter it.
• Do not overload the feed
chute. Items must be added
gradually, at a pace the juicer
can keep up with.
• Use only the provided Food
Pusher to push food into the
feed chute. Never use fingers,
utensils, or any other apparatus.
• Never use excessive force to
push items into the feed chute.
• When juicing, ensure all
produce has moved through
the feed chute and into the
Sieve before adding more.
• If any food gets stuck in the
feed chute, use the Food
Pusher to move it down the
chute and into the Sieve.

21
CONSUMING JUICE AND PULP
Instead of composting or
throwing away the pulp left
over after juicing, you can
choose to consume it. See our
Recipe Guide for some fun tips
on what to do with the leftover
pulp. By using these creative
ideas, you can enjoy pulp in
a variety of delicious (and
healthy) ways.
• Whether you prefer sweet or
savory, you can use pulp to
create some tasty treats!
• For best taste, consume fresh
juice and pulp within 48 hours
of juicing.
NOGO FOODS
Foods that should NEVER be
used in this juicer:
• Thicker foods that do not
contain juice to extract
(for example, bananas
or avocados).
• Frozen fruits or vegetables.
• Stone fruits that have large
pits or seeds that have not
been removed. Stone fruits
may be used only if the seed
or pit has been removed.
OVERHEATING, SPEED
SELECTION, & AUTO SHUTOFF
• If the motor overheats, the
juicer will turn o.
• If the juicer stops working,
unplug it and allow it to cool
down for at least fifteen
minutes before attempting to
use again.
• Refer to the Troubleshooting
Guide for instructions on
what to do if the unit turns o
or is not working.
22
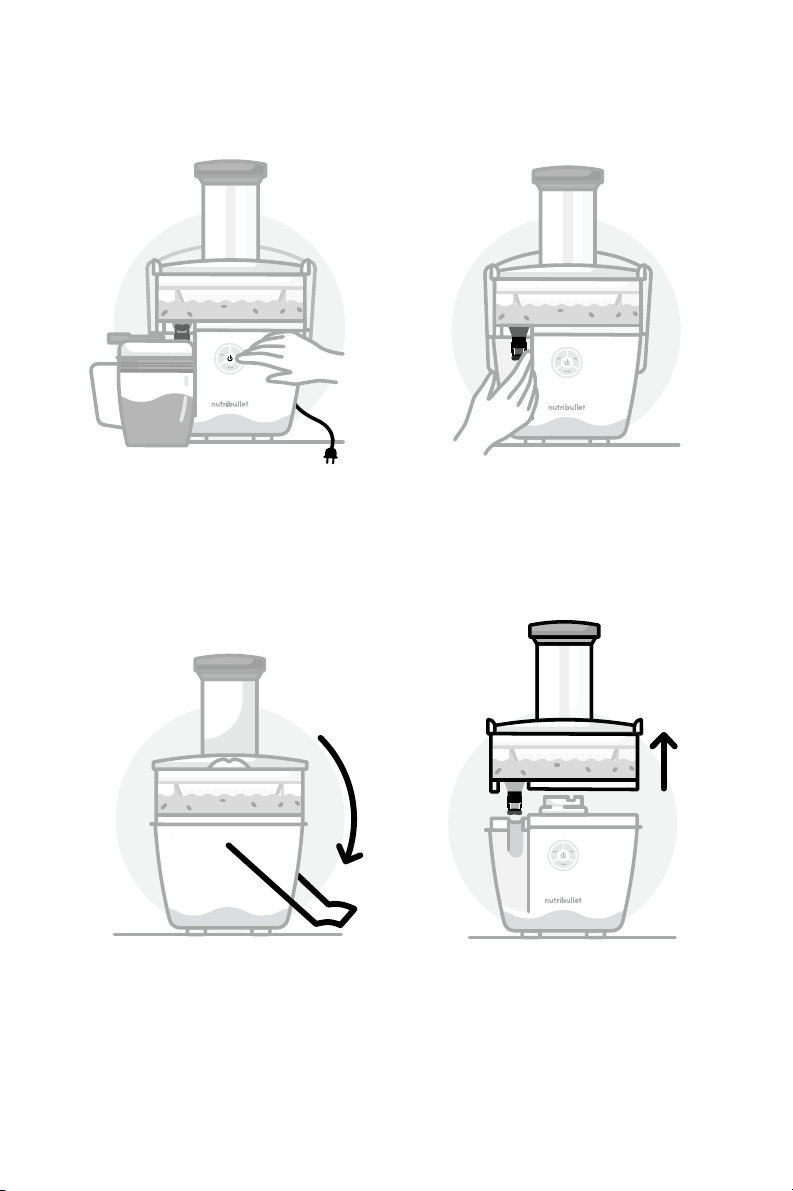
Disassembly.
1 Ensure the unit is powered
“OFF” and unplugged.
2 Remove the pitcher from
under the spout. To prevent
drips use the No-Drip Spout
cover to close the juice spout.
3 Unlock the Locking Handle
from the Basin Cover by
pulling the handle backward
out of the “ears” on either
side of the Basin Cover.
Move the handle down.
4 Remove the Pulp Basin
from the Motor Base by
pulling upwards with the
Basin Cover and Sieve still
in place, and take it directly
to your sink.

23
5 Remove the Food Pusher by
lifting it out of the feed chute.
6 Lift the Basin Cover
vertically o of the Pulp
Basin and remove any pulp
from the inside of the cover.
You may use the flat end
of the Cleaning Brush to
scrape pulp o of the cover.
7 Gently lift the Sieve
vertically out of the center
of the Pulp Basin. Clean
the Sieve right away (see
care instructions).
8 Empty the Pulp Basin. Use
the flat end of the Cleaning
Brush to easily scrape out the
pulp and set it aside for use in
other recipes or composting.
Or empty the pulp into your
waste bin or compost.

24
Cleaning the NutriBullet Juicer
Pro™ is quick and easy. All
components except for the
Food Pusher and Motor Base
are dishwasher safe. Read on
for some cleaning tips and
best practices.
1 Always ensure the Motor
Base is unplugged before
you begin assembly,
disassembly, cleaning or
storage of the unit.
2 Once the Pulp Basin is
emptied, rinse all parts
under running water.
3 Use the Cleaning Brush
to scrub the Sieve under
running water. Be sure to
properly clean the Sieve
every time you juice, as
minerals from fruits and
vegetables can cause
build-up in the Sieve which
may prohibit maximum
juice extraction.
WARNING: Always use precaution
when cleaning the Sieve, as it
contains sharp blade teeth on the
flat disc part.
TIP
: Always clean the Sieve as
soon as possible after juicing using
the Cleaning Brush. If allowed to
sit, pulp will dry on the Sieve and it
will become more dicult to scrub
blocked holes. If this happens, be
sure to allow the Sieve to soak in
hot water for 30 minutes.
4 All Juicer Pro components
except the Food Pusher
and Motor Base are
dishwasher safe. You may
also hand wash with warm
soapy water.
TIP: Do not use the Sterilize cycle on
your dishwasher to clean your juicer
as it may cause parts to deform.
5 Wipe down Motor Base
with a clean, damp cloth.
WARNING: Never submerge Motor
Base into water or other liquid.
Cleaning instructions for
your NutriBullet Juicer Pro™
storage accessories:
• Glass Storage Bottles and
lids are dishwasher safe.
• Freezer Trays and lids
are dishwasher safe.
Care & maintenance.

25
Included with your Juicer Pro are some great storage accessories:
a Juice Pitcher, two Juice Storage Bottles, and two Freezer Trays.
Juice & unit storage.
The storage accessories give you
three options for storing juice:
1 IN THE PITCHER:
The Juice Pitcher stores up
to 27 ounces. Make sure to
store the pitcher upright in
your refrigerator, with lid
tightly sealed, latch closed,
and nothing atop the lid.
2 IN THE BOTTLES:
Use each Storage Bottle to
save up to 12 ounces of juice,
so you can enjoy it later —
either at home or on the go.
Fill up the bottles leaving
about a quarter of an inch of
room at the top, leaving just
enough air in the bottle.
3 IN THE TRAYS:
Each Freezer Tray holds a
total of 16 ounces: one tray
has eight 2-ounce wells,
and the other tray has four
4-ounce wells. These are a
great way to preserve juice
longer-term, then defrost it
anytime for a full drinkable
portion. Or, use the trays
to make frozen juice shots.
(See our Recipe Guide for
some inspiring recipes for
frozen juice shots to add to
your favorite beverages, or
to drink on their own.)
For best taste, consume
fresh juice and pulp within
48 hours of juicing.
Do not place anything on top
of the Pitcher Lid when storing
in the refrigerator.
Store remaining pieces of the
unit in a safe place where they
will not be damaged and won’t
cause harm as some pieces
are sharp!

26
Replacement parts.
To order additional parts and accessories, please visit our website
at nutribullet.com/shop/accessories or contact Customer Service
at 1 (800) 523-5993.
1 PROBLEM: The power
button flashes three
times and then remains
illuminated when I select
a speed.
SOLUTION: This means
that the unit is not properly
assembled. Ensure the Pulp
Basin is properly seated
on top of the Motor Base,
and the Locking Handle is
locked into place.
2 PROBLEM: The juicer
stopped in the middle of
juicing, and the power
button flashed.
SOLUTION: Ensure the
Locking Handle is securely
locked into place.
Troubleshooting guide.
3 PROBLEM: The juicer
stopped in the middle of
juicing, and the power
button remains illuminated.
SOLUTION: You have
exceeded 10 minutes of
continuous running time.
Unplug the juicer and keep
the unit o for 15 minutes
before continuing use.
4 PROBLEM: The juicer has
stopped running, and all
lights flashed three times.
SOLUTION: The juicer has
overheated. Unplug the
unit and allow it to cool
down for 15 minutes before
continuing use.

27
NutriBullet
Juicer Pro
™
one-year
limited warranty.
LIMITED WARRANTY
FOR NUTRIBULLET
®
NutriBullet's limited warranty
obligations are confined to the
terms set forth below:
NutriBullet, LLC and Capital
Brands Distribution, LLC
(together, “NutriBullet”)
warrants this NutriBullet
®
against defects in materials
and workmanship for a period
of one year from the date of
original retail purchase. This
limited warranty is valid only
in the country in which the
product is purchased and
comes with the product at no
extra charge, however shipping
and processing fees will be
incurred by you for returns,
replacements and/or refunds.
If a defect exists and subject
to this limited warranty, at its
option NutriBullet will (1) repair
the product at no charge,
using new or refurbished
replacement parts, (2)
exchange the product with a
product that is new or that has
been manufactured from new
or serviceable used parts and is
at least functionally equivalent
to the original product, or (3)
refund the purchase price of
the product. A replacement
product assumes the remaining
warranty of the original
product. A repaired product
has a one-year warranty from
the date of repair. When a
product or part is exchanged,
any replacement item becomes
your property and the replaced
item becomes NutriBullet’s
property. When a refund is
given, your product becomes
NutriBullet’s property.
OBTAINING WARRANTY SERVICE
For limited warranty service,
simply call our Customer Service
Department at 1 (800) 523-5993
or contact us via email from our
website at nutribullet.com, simply
click the contact us link, fill out
and submit the customer contact
form and we will be glad to
help you. When you contact our
Customer Service Department
you will be asked for your name,
address, telephone number
and to provide proof of the
original purchase (receipt)

28
containing a description of the
product(s), purchase date, and
the appropriate NutriBullet
®
serial number(s). Before you
send your product for limited
warranty service please make
sure to keep a copy of all
relevant documents for your
files (receipt, etc.). It is always
recommended to purchase
product insurance and tracking
services when sending your
product for service. Remember,
shipping and processing fees
will be incurred by you and are
not covered by the one-year
limited warranty.
EXCLUSIONS & LIMITATIONS
This NutriBullet
®
One-Year
Limited Warranty applies only to
NutriBullet
®
products distributed
by or for NutriBullet that can be
identified by the “NutriBullet”
trademark, trade name, logo
and bar code. This NutriBullet
®
Juicer Pro™ One-Year Limited
Warranty does not apply to
any unauthentic product
or accessory that were not
distributed/sold by NutriBullet.
Normal wear and tear is not
covered by this limited warranty.
This limited warranty applies
to household use only, and is
void when the product is
used in a commercial or
institutional setting.
This limited warranty
extends only to the original
consumer purchaser and is
not transferable. In addition,
proof of purchase must
be demonstrated.
Repair or replacement of
the product (or, if repair or
replacement is not feasible, a
refund of the purchase price)
is the exclusive remedy of the
consumer under this limited
warranty. NutriBullet shall not
be liable for any incidental or
consequential damages for
breach of this limited warranty
or any implied warranty on
this product.
This limited warranty gives
you specific legal rights, and
you may also have other
rights which vary from state to
state. NutriBullet is not liable
for any damage to products
not covered by this warranty
(e.g., cups, book, User Guide).
This limited warranty does not
apply: (a) to damage caused
by accident, abuse, misuse,
or misapplication; (b) to
damage caused by improper
maintenance (including
unauthorized parts service); (c)
to a product or a part that has
been modified in any way; (d) if
any NutriBullet
®
serial number
or trademark has been removed
or defaced; (e) if the product
has been used with an adapter/
converter; and/or (f) if the
product is used for commercial
or industrial purposes.

29
THIS LIMITED WARRANTY
AND THE REMEDIES SET
FORTH ABOVE ARE EXCLUSIVE
AND IN LIEU OF ALL OTHER
WARRANTIES, REMEDIES
AND CONDITIONS, WHETHER
ORAL OR WRITTEN, EXPRESS
OR IMPLIED. NUTRIBULLET
SPECIFICALLY DISCLAIMS ANY
AND ALL IMPLIED WARRANTIES,
INCLUDING, WITHOUT
LIMITATION, WARRANTIES
OF MERCHANTABILITY AND
FITNESS FOR A PARTICULAR
PURPOSE. IF NUTRIBULLET
CANNOT LAWFULLY DISCLAIM
IMPLIED WARRANTIES UNDER
THIS LIMITED WARRANTY,
ALL SUCH WARRANTIES,
INCLUDING WARRANTIES
OF MERCHANTABILITY AND
FITNESS FOR A PARTICULAR
PURPOSE ARE LIMITED IN
DURATION TO THE DURATION
OF THIS LIMITED WARRANTY.
No NutriBullet
®
reseller, agent, or
employee is authorized to make
any modification to this warranty.
NUTRIBULLET IS NOT
RESPONSIBLE FOR DIRECT,
SPECIAL, INCIDENTAL OR
CONSEQUENTIAL DAMAGES
RESULTING FROM ANY
BREACH OF WARRANTY
OR CONDITION, OR UNDER
ANY OTHER LEGAL THEORY,
INCLUDING BUT NOT LIMITED
TO LOST PROFITS, DOWNTIME,
GOODWILL, DAMAGE TO
OR REPLACEMENT OF
EQUIPMENT AND PROPERTY.
NUTRIBULLET SPECIFICALLY
DOES NOT REPRESENT THAT
IT WILL BE ABLE TO REPAIR
ANY PRODUCT UNDER THIS
LIMITED WARRANTY.
Some states and provinces
do not allow the exclusion
or limitation of incidental or
consequential damages or
exclusions or limitations on the
duration of implied warranties
or conditions, so the above
limitations or exclusions may not
apply to you. This warranty gives
you specific legal rights, and you
may also have other rights that
vary by state or province.
30
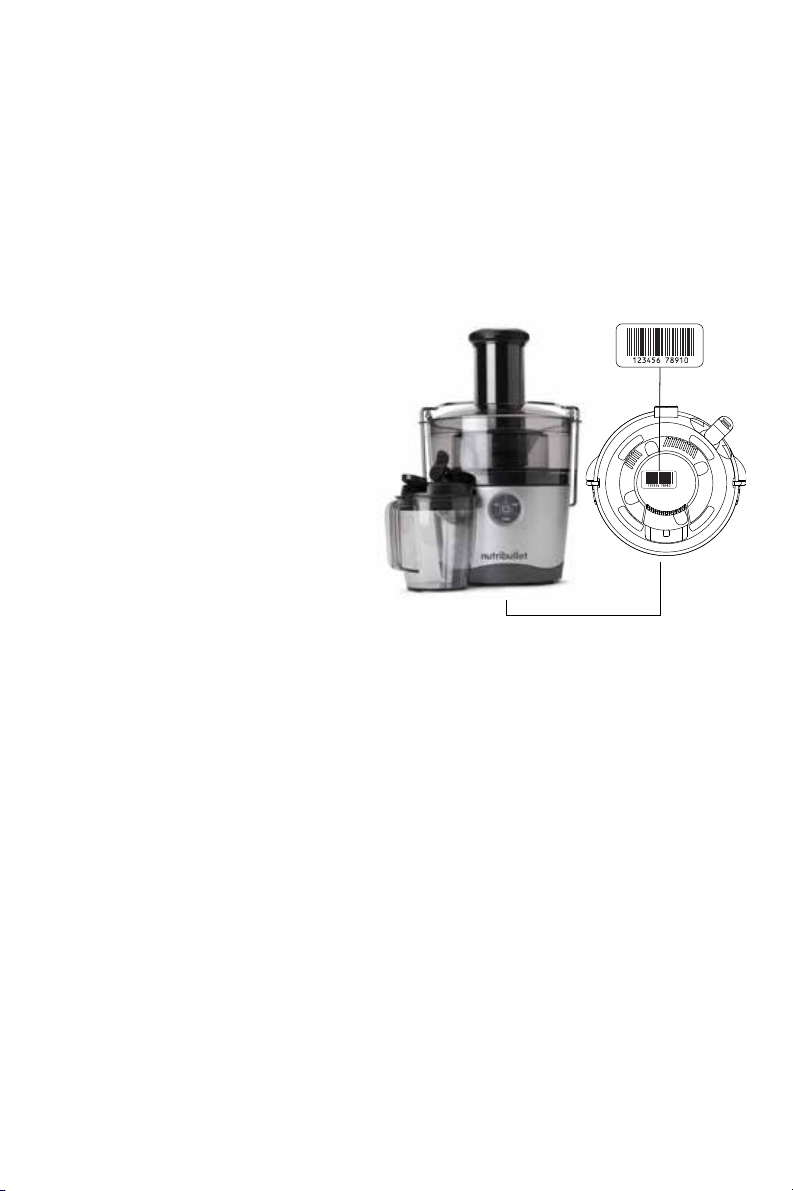
Warranty registration.
How to find serial number
under the Motor Base.
Please visit nutribullet.com/
warranty-registration or call
1 (800) 523-5993 to register your
new NutriBullet Juicer Pro™.
You will be asked to enter the
Serial Number* of your product,
along with the purchase date
and place of purchase.
The registration will enable us
to contact you in the unlikely
event of product safety
notification. By registering
your product you acknowledge
to have read and understood
the instructions for use, and
the warnings set forth in the
accompanying instructions.
To find the serial number,
check under the Motor Base.
If you cannot find the serial number,
call Customer Service for assistance.

How to find serial number
under the Motor Base.

1 (800) 523-5993 | nutribullet.com
NUTRIBULLET
®
is the registered trademark of CAPBRAN HOLDINGS, LLC
Copyright © 2020 CAPBRAN HOLDINGS, LLC. Distributed by CAPITAL BRANDS
DISTRIBUTION, LLC. LOS ANGELES, CA 90025 USA
All Rights Reserved. MADE IN CHINA
Illustrations may dier from the actual product. We are constantly striving
to improve our products, therefore the specifications contained herein
are subject to change without notice.
200603_NBJ50200