Loading ...
Loading ...
Loading ...
12 13
ninjakitchen.com
ninjakitchen.com
USING YOUR FOODI™ COMPACT
TENDERCRISP™ PRESSURE COOKER – CONT.
NATURAL PRESSURE RELEASE
VS. QUICK PRESSURE RELEASE
Natural Pressure Release: Once pressure
cooking is complete, the pressure will start
to naturally decrease as the unit cools
down. This can take up to 20 minutes or
more, depending on the amount of liquid
and food in the pot. During this time, the
unit will switch to Keep Warm mode. Press
the KEEP WARM button if you would like
to turn Keep Warm mode o. When natural
pressure release is complete, the float valve
will drop down.
Quick Pressure Release: Use ONLY if your
recipe calls for it. Whe pressure cooking
is complete and the KEEP WARM light is
on, turn the pressure release valve to the
VENT position to instantly release pressure
through the valve.
Even after releasing pressure naturally or
using the pressure release valve, some
steam will remain in the unit and will
escape when the lid is opened. Lift and
tilt it away from you, making sure no
condensation drips into the cooker base.
NOTE: At any time during the natural
release process, you can switch to quick
release by turning the pressure release
valve to the VENT position.
PRESSURIZING
As pressure builds in the unit, the
control panel will display rotating lights.
Pressurizing time varies, depending on the
amount of ingredients and liquid in the
pot. As the unit pressurizes, the lid will lock
as a safety measure, and it will not unlock
until pressure is released. Once the unit has
reached full pressure. The pressure cooking
cycle will begin and the timer will start
counting down.
FAMILIARIZING YOURSELF
WITH PRESSURE COOKING
In order to familiarize yourself with the
Pressure Cook function and start cooking,
it is highly recommended for first-time users
to do an initial run.
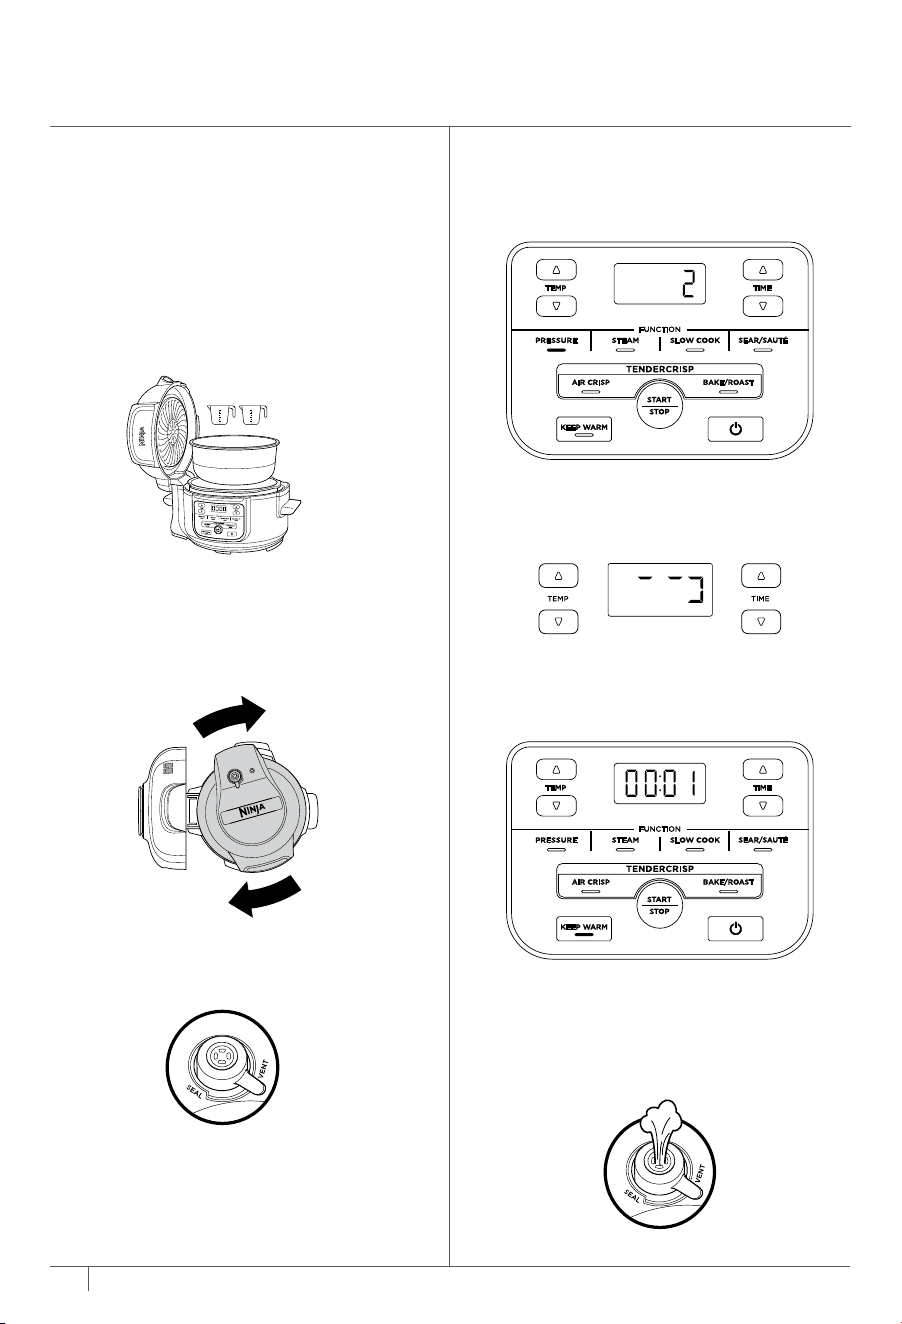
1 Place the pot in the cooker base and
add 2 cups room-temperature water
to the pot.
2 Assemble the pressure lid by aligning
the arrow on the front of the lid with
the arrow on the front of the cooker
base. Then turn the lid clockwise until
it locks into place.
3 Make sure the pressure release valve
on the lid is in the SEAL position.
4 Press the PRESSURE button, the unit
will default to high (HI) pressure. Set
the time to 2 minutes and press the
START/STOP button to begin.
5 The unit will begin building pressure,
indicated by the rotating lights. The
unit will begin counting down when it
is fully pressurized
6 When the countdown is finished, the
unit will beep, automatically switch
to Keep Warm mode, and begin
counting up.
7 Turn the pressure release valve to the
VENT position to quick release the
pressurized steam. A quick burst of
steam will spurt out of the pressure
release valve. When steam is completely
released, the unit will be ready to open.
Loading ...
Loading ...
Loading ...