Loading ...
Loading ...
Loading ...
8 9
ninjakitchen.com
ninjakitchen.com
USING THE CONTROL PANEL BEFORE FIRST USE
1 Remove and discard any packaging
material, promotional labels, and tape
from the unit.
2 Please pay particular attention to
operational instructions, warnings,
and important safeguards to avoid
any injury or property damage.
3 Wash the pressure lid, silicone ring,
removable cooking pot, Cook & Crisp
TM
Basket, and condensation collector in
hot, soapy water, then rinse and dry
thoroughly. NEVER clean the cooker
base in the dishwasher. Inspect the
pressure lid to ensure there is no
debris blocking the valves.
4 The silicone ring is reversible and can
be inserted in either direction. Insert the
silicone ring around the outer edge of
the silicone ring rack on the underside
of the lid. Ensure it is fully inserted
behind the silicone ring rack.
FUNCTION BUTTONS
PRESSURE: Cook food quickly while
maintaining tenderness.
STEAM: Gently cook delicate foods at a
high temperature.
SLOW COOK: Slow cook food at lower
temperatures.
SEAR/SAUTÉ: Use the unit as a stovetop
for browning meats, sautéing veggies,
simmering sauces, and more.
AIR CRISP: Give foods crispiness and
crunch with little to no oil.
BAKE/ROAST: Use the unit as an oven
for tender meats, baked treats, and more.
OPERATING BUTTONS
TEMP arrows: Use the up and down TEMP
arrows to adjust the cook temperature
and/or pressure level.
TIME arrows: Use the up and down TIME
arrows to adjust the cook time.
START/STOP button: Press the
START/STOP button after selecting your
temperature (or pressure) and time to start
cooking. Pressing this button while the unit
is cooking will stop the current function.
KEEP WARM button: After pressure
cooking, steaming, or slow cooking, the
unit will automatically switch to Keep
Warm mode and start counting up. Keep
Warm will stay on for 12 hours, or you may
press KEEP WARM to turn it o. Keep
Warm mode is not intended to warm food
from a cold state but to keep it warm at a
food-safe temperature.
POWER button: The Power button turns
the unit on and o and stops all cooking
modes.
NOTE: Control panel may dier per model.
INSTALLING THE
CONDENSATION COLLECTOR
To install the condensation collector, slide it
into the slot on the cooker base. Slide it out
to remove it for hand-washing after each use.
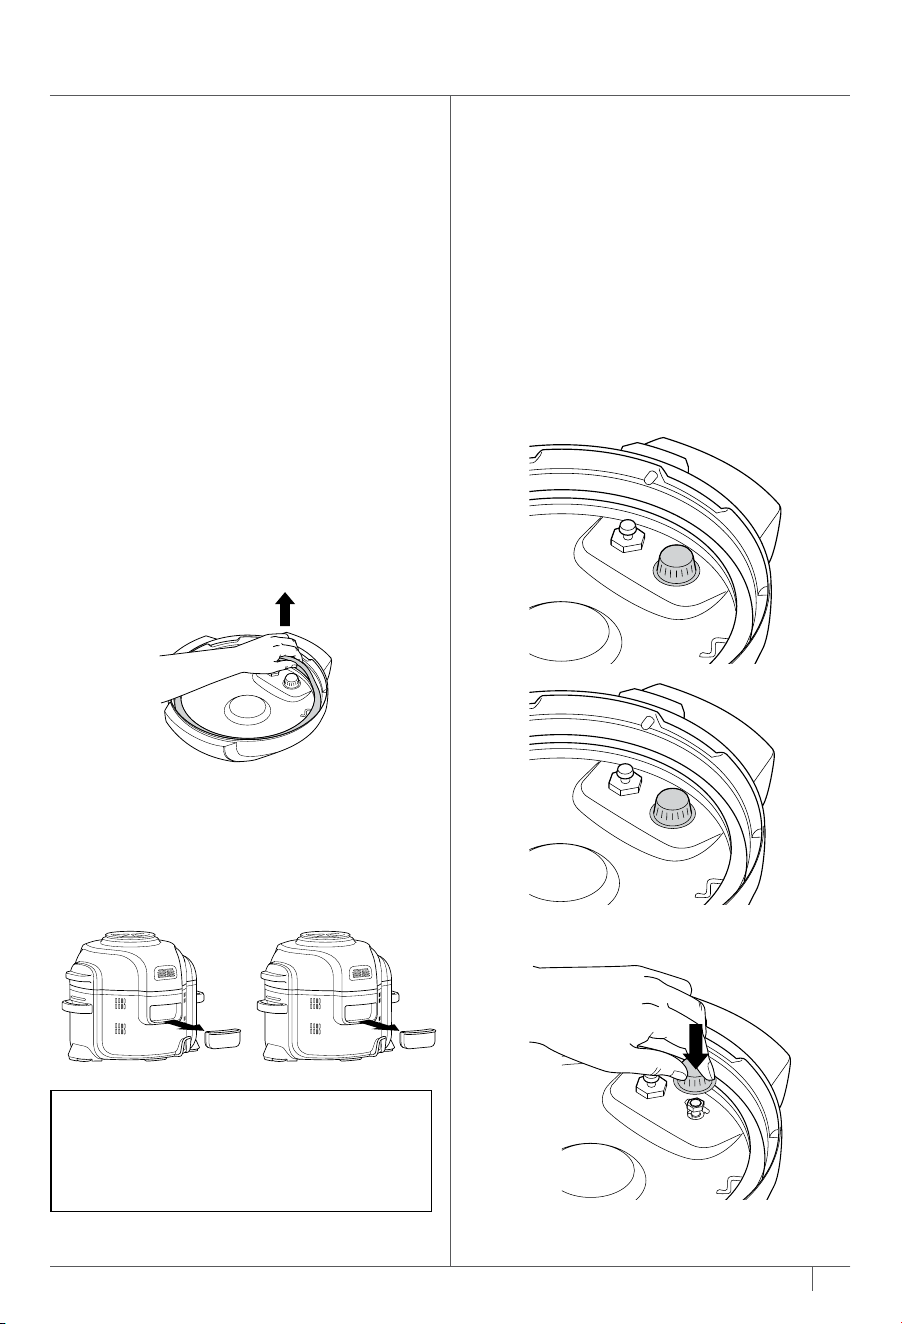
REMOVING & REINSTALLING
THE ANTI-CLOG CAP
Make sure that the anti-clog cap is in the
correct position before using the pressure
lid. The anti-clog cap protects the inner
valve of the pressure lid from clogging
and protects users from potential
food splatters. It should be cleaned
after every use with a cleaning brush.
To remove, squeeze tightly and pull
upwards. To reinstall, position it in place
and press down.
NOTE: While cooking, to adjust temp or
time, use the up and down arrows. The
unit will then resume at those settings.
NOTE: Prior to each use, make sure
the silicone ring is well seated in the
silicone ring rack and the anti-clog cap
is mounted properly on the pressure
release valve.
HH:MM
Loading ...
Loading ...
Loading ...