%$
4
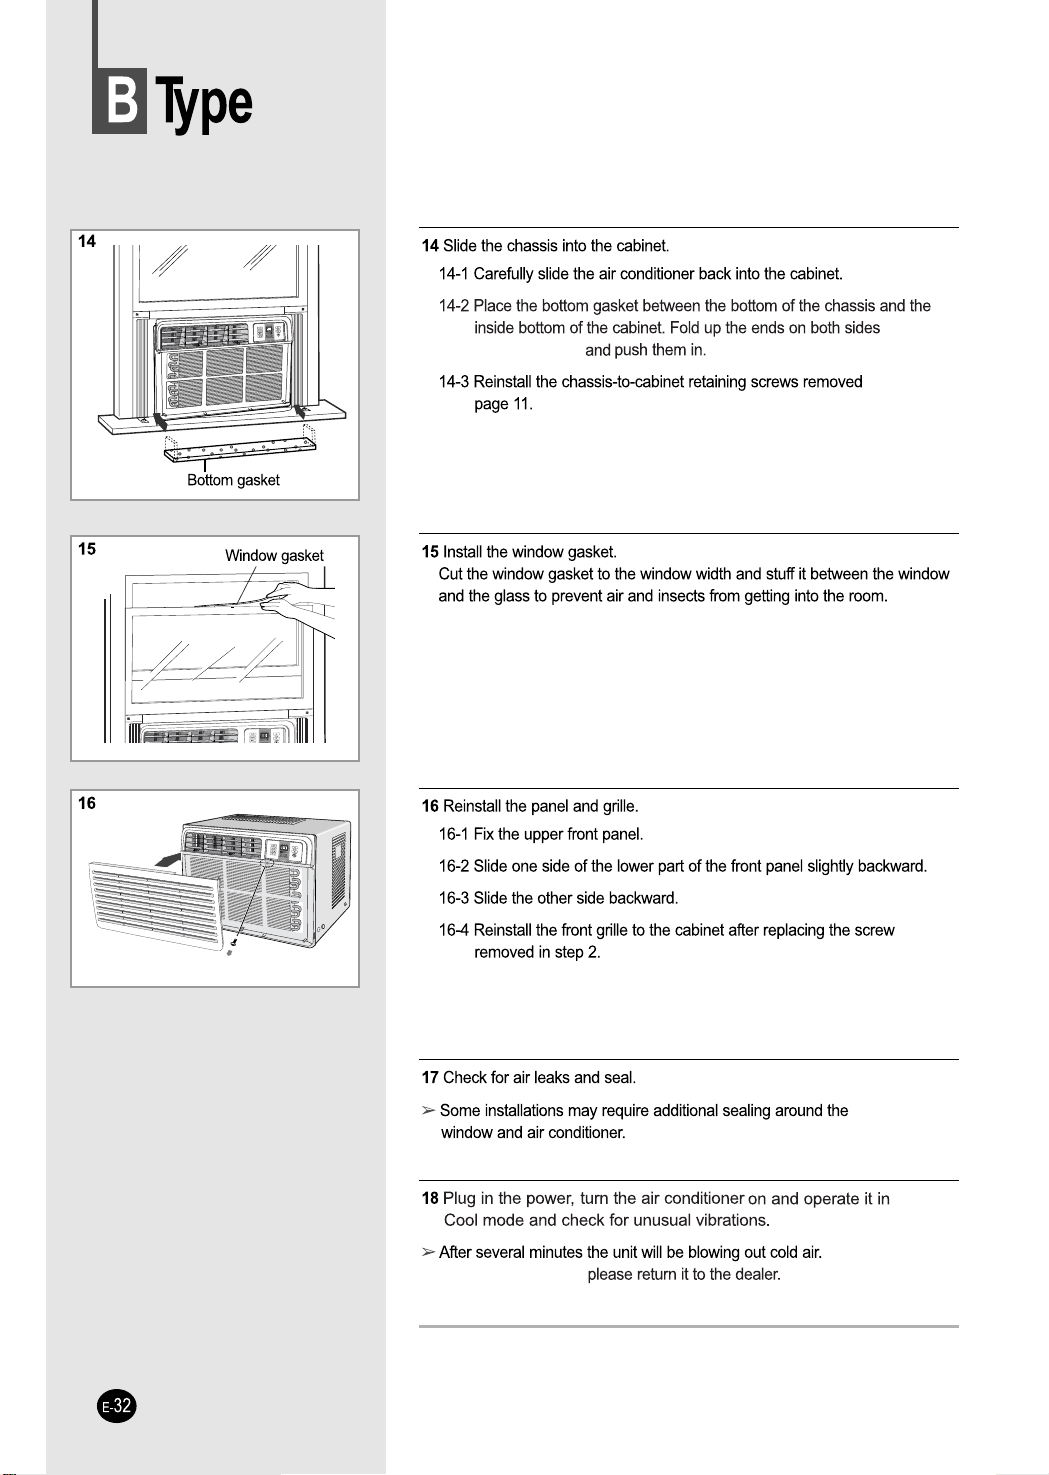
4
4EJ@KSPULA /KKI EN KJ@EPEKJAN
Ġ KKHEJC
,4+"/0
&+01/2 1&,+0
4
4
4
4
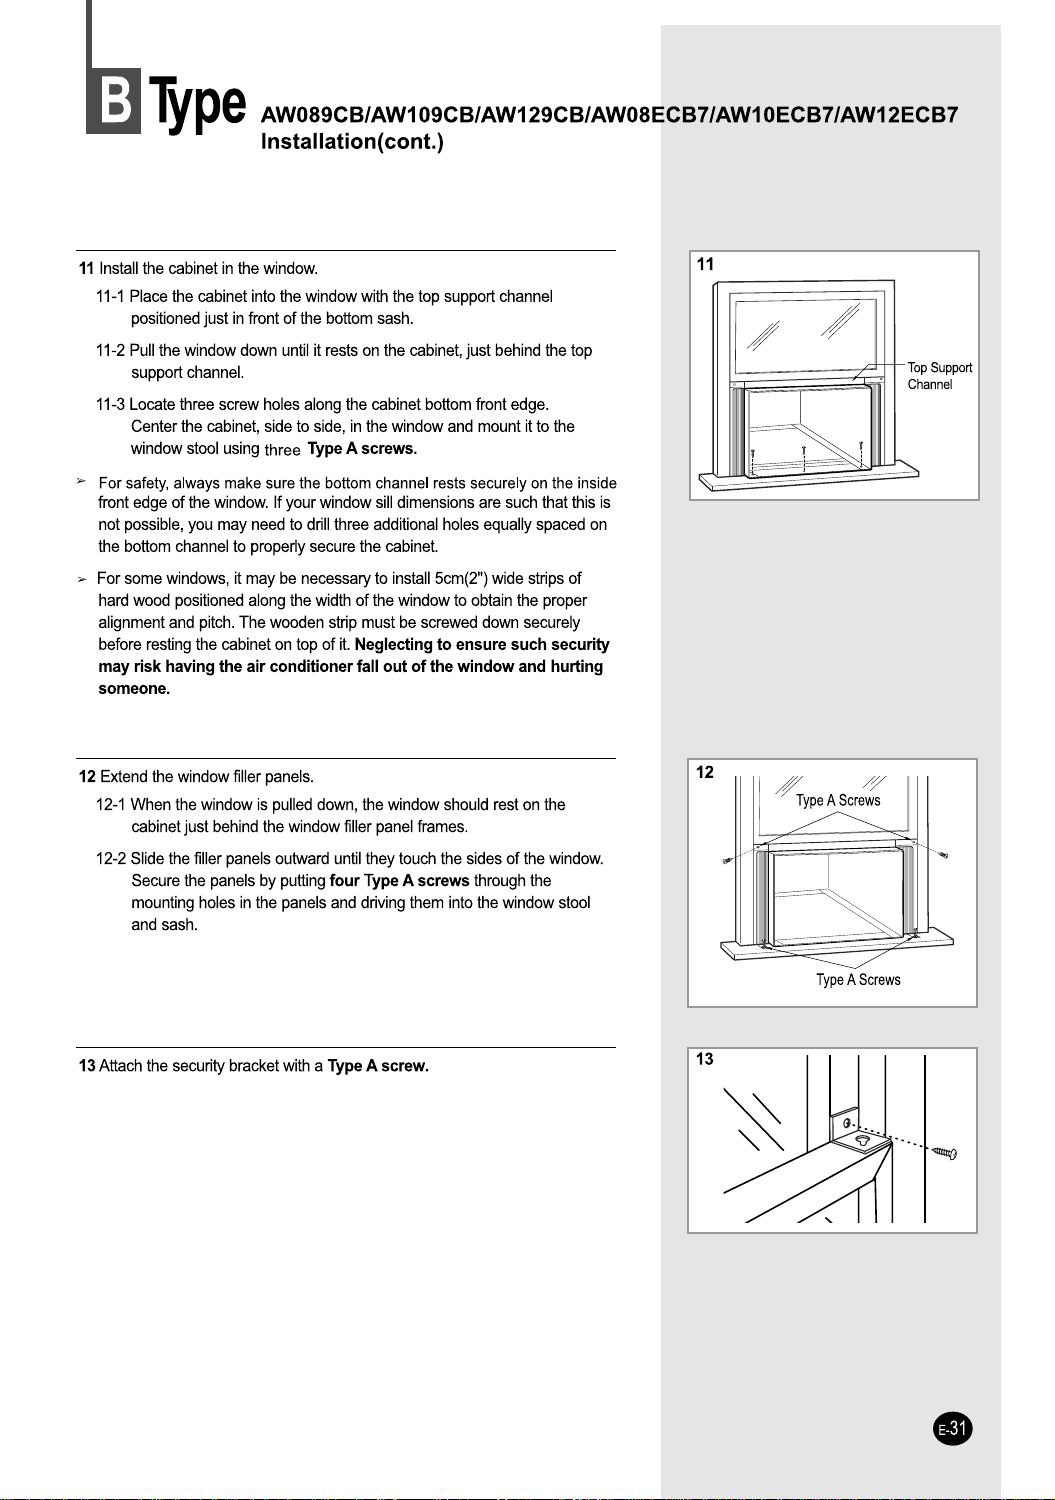
4"
4"
4"
4"
4"
4"
4"
E-
3
Contents
X PREPARING YOUR AIR CONDITIONER
Q Safety Precautions ......................................................................................... 2
Q Description of Each Component .................................................................... 4
Q Remote Control - Buttons .............................................................................. 5
Q Getting Started ............................................................................................... 6
Q Inserting the Remote Control Batteries .......................................................... 7
X OPERATING YOUR AIR CONDITIONER
Q Cooling Your Room ........................................................................................ 8
Q Airing Your Room ........................................................................................... 9
Q Removing Excess Humidity ............................................................................ 10
Q Adjusting the Air Flow Direction Horizontally .................................................. 11
Q Adjusting the Air Flow Direction Vertically ...................................................... 11
X PROGRAMMING YOUR AIR CONDITIONER
Q Setting the On Timer ...................................................................................... 12
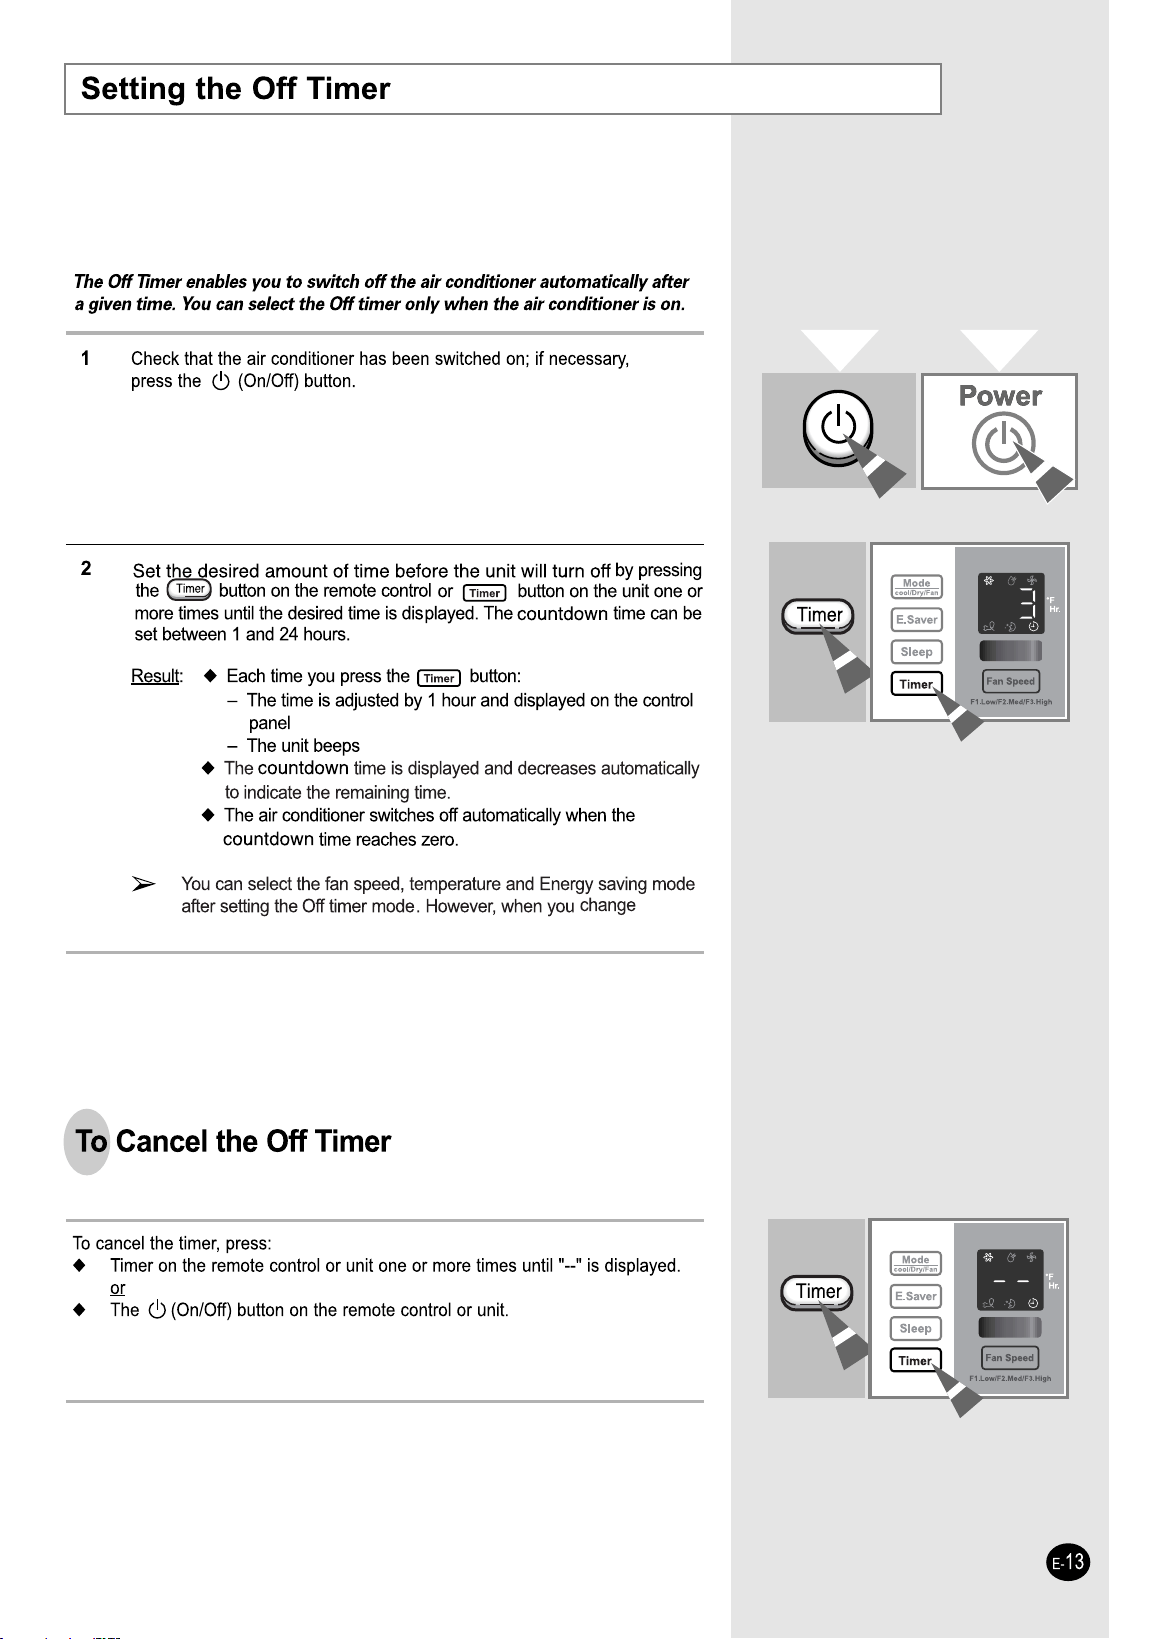
Q Setting the Off Timer ...................................................................................... 13
Q Setting the Sleep Timer .................................................................................. 14
Q Selecting Energy Saving mode ...................................................................... 15
X R
ECOMMENDATIONS FOR USE
Q Temperature and Humidity Ranges ................................................................ 16
Q Cleaning Your Air Conditioner ........................................................................ 17
Q Solving Common Problems ............................................................................ 18
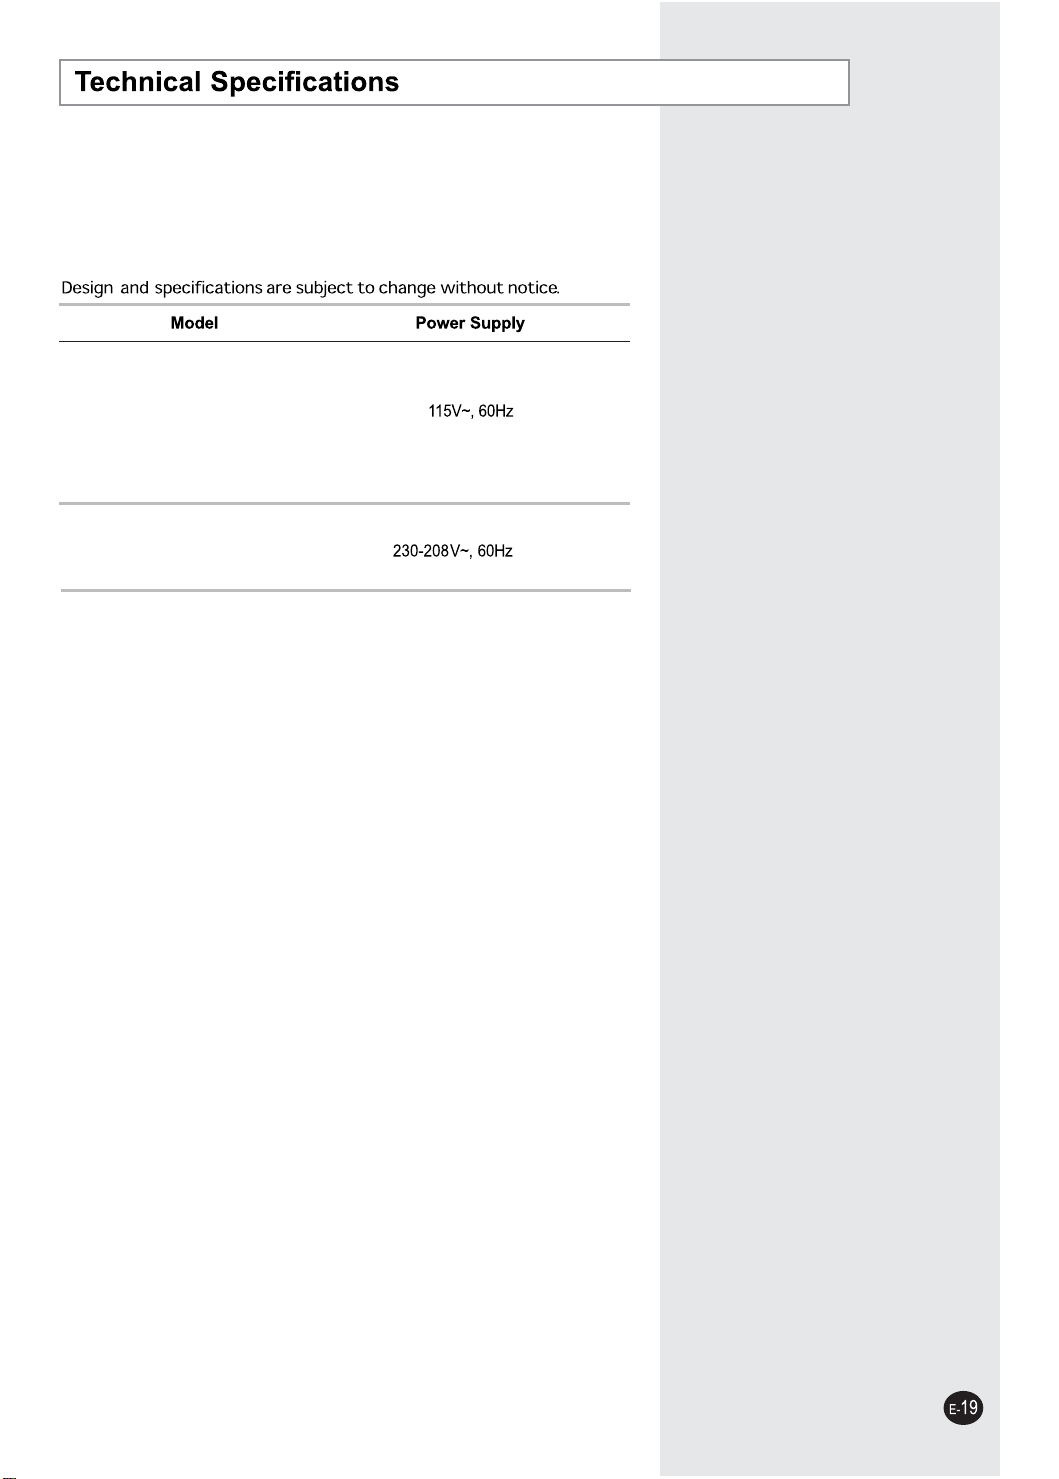
Q Technical Specifications ................................................................................. 19
......................................................................................................... 20
(
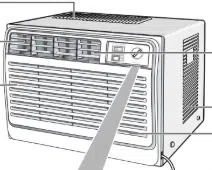
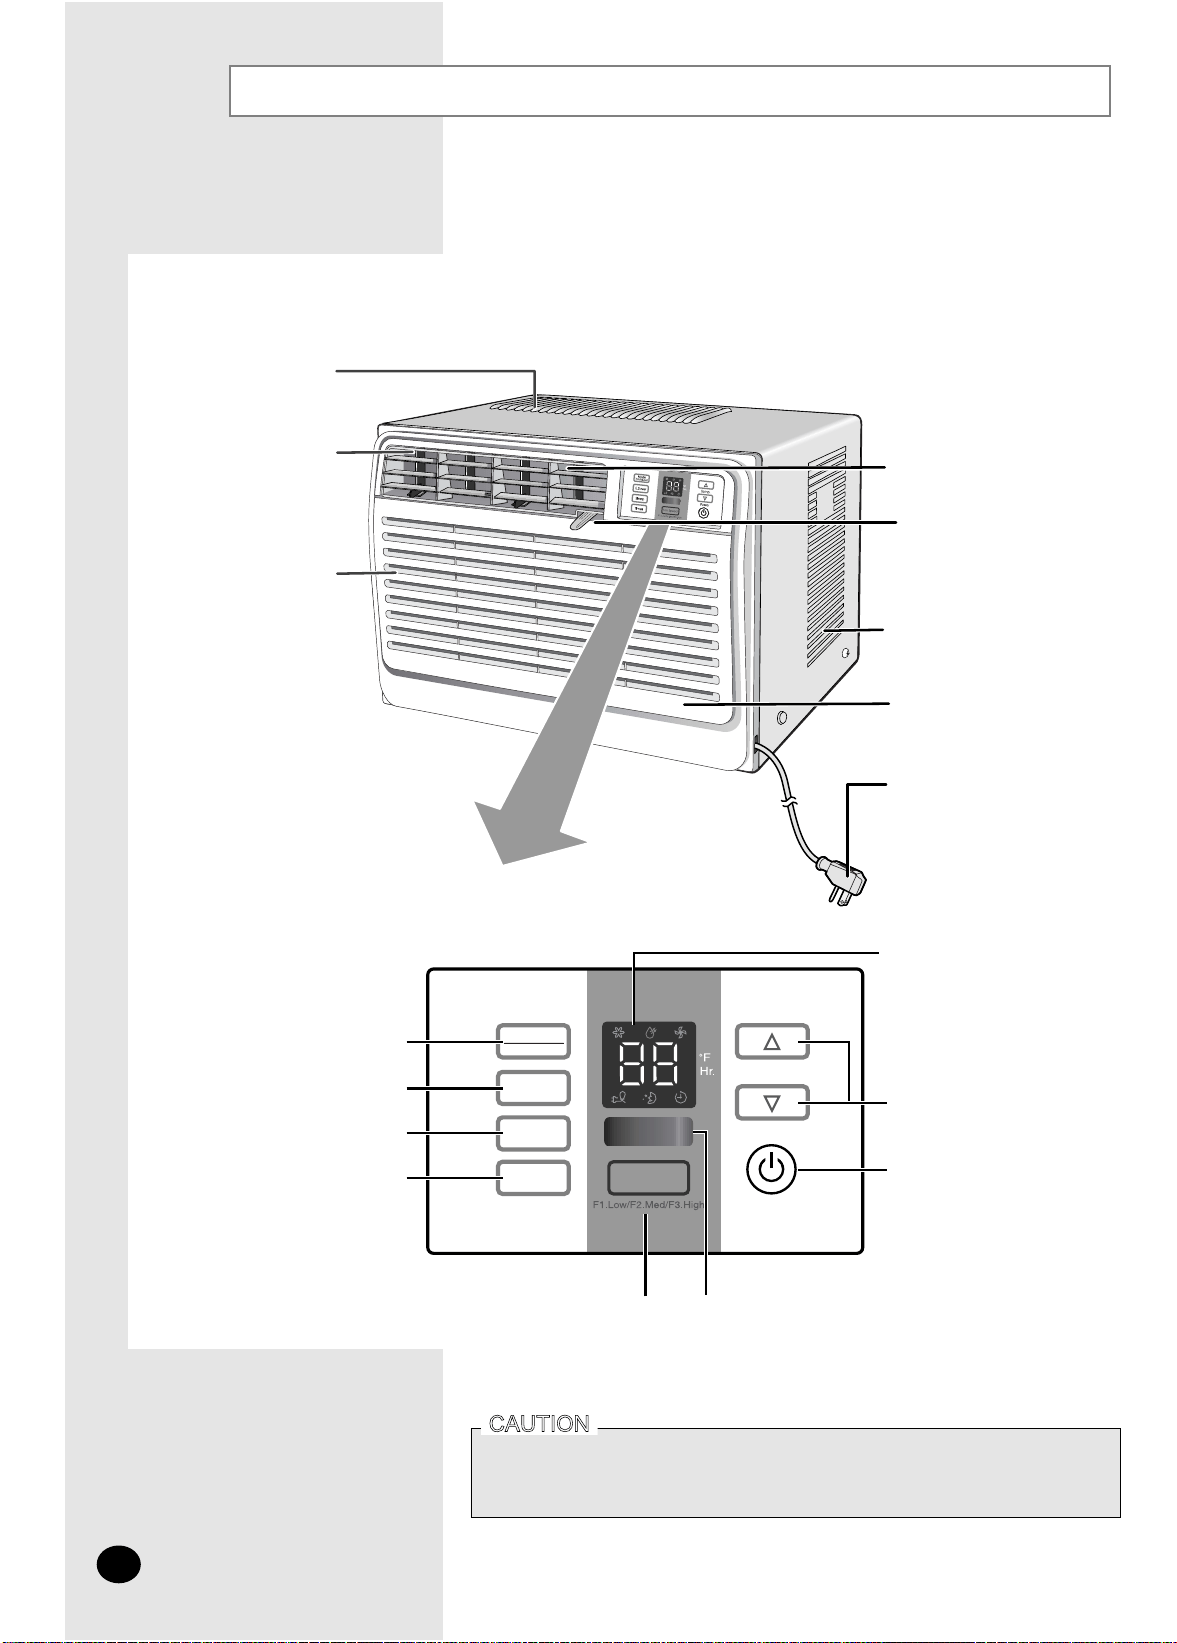
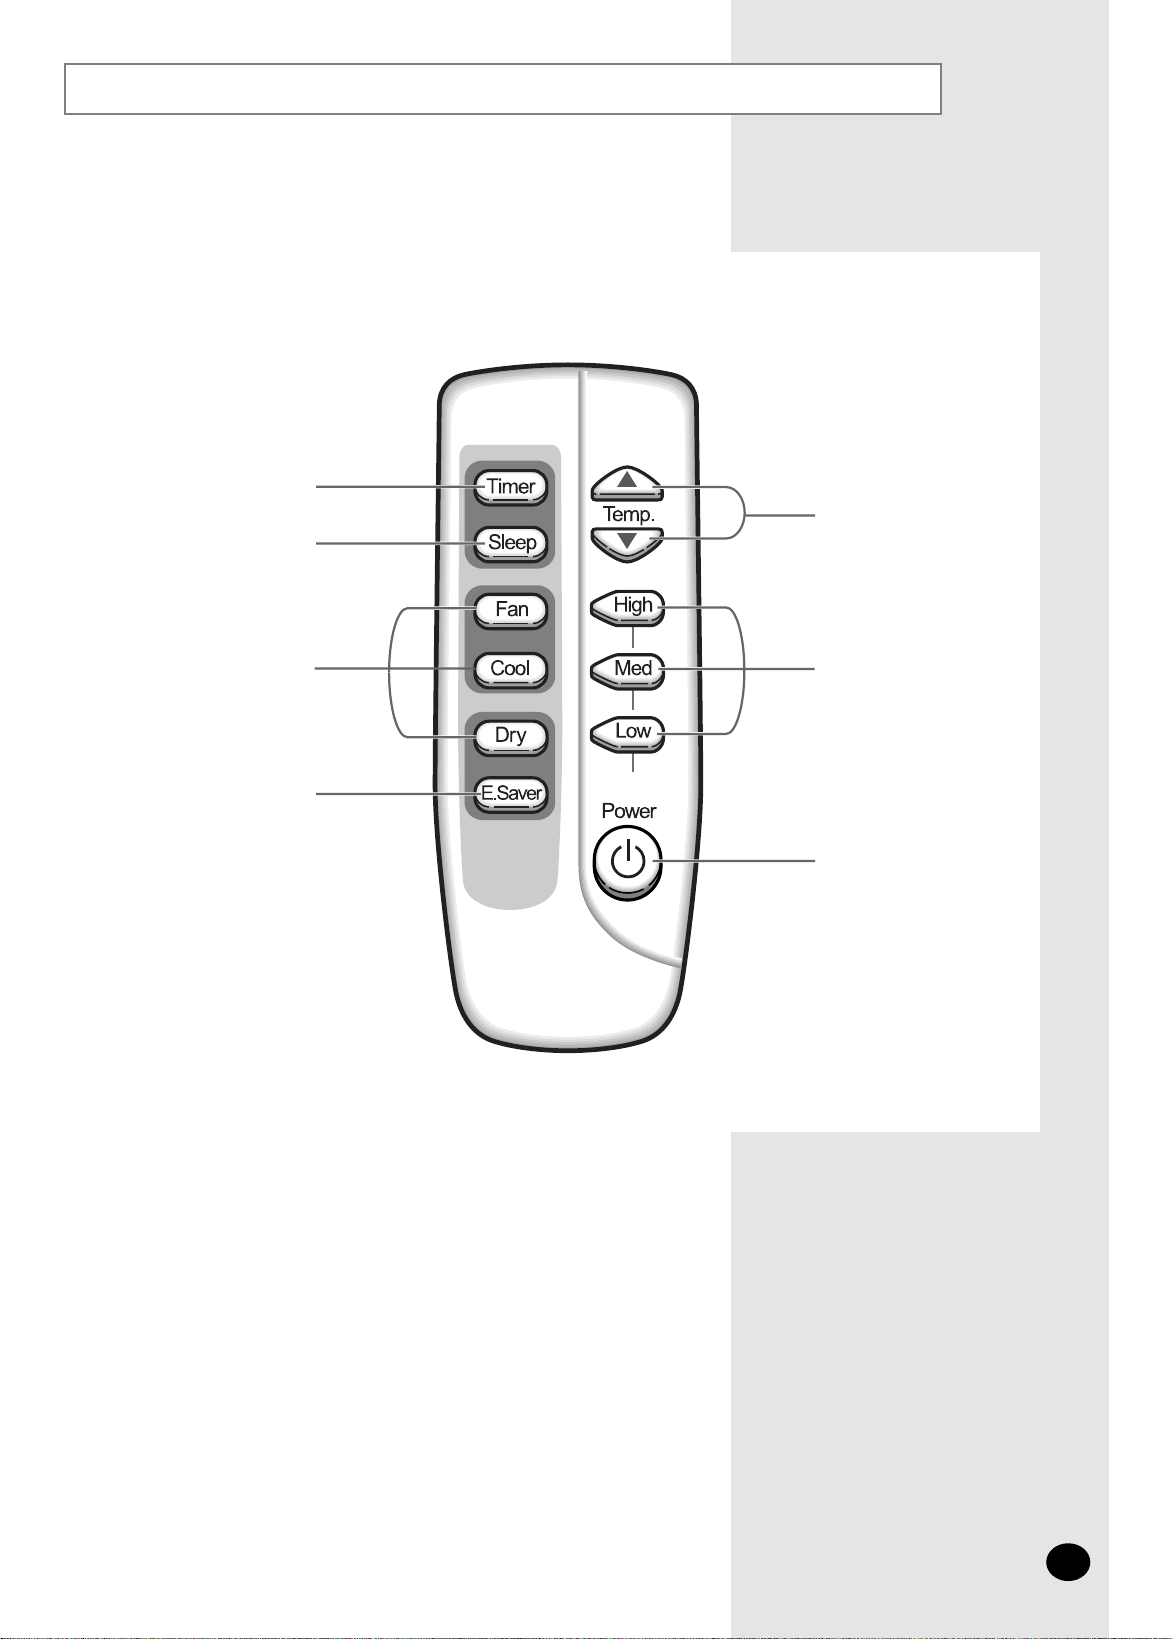
'HVFULSWLRQRI(DFK&RPSRQHQW
D 7KHGHVLJQDQGVKDSHDUHVXEMHFWWR
FKDQJH
7HPSHUDWXUH7LPHU
VHWWLQJV
7HPSHUDWXUHDGMXVWPHQW
EXWWRQV
2Q2IIEXWWRQ
0RGHVHOHFWLRQEXWWRQ
&RRO )DQ'U\
6OHHSWLPHUVHWWLQJEXWWRQ
7LPHUVHWWLQJEXWWRQ
)DQVSHHGDGMXVWPHQWEXWWRQ 5HPRWHFRQWURO
(QHUJ\6DYHUEXWWRQ
)DQ6SHHG
0RGH
&RRO'U\)DQ
(6DYHU
6OHHS
7LPHU
7HPS
3RZHU
$LURXWOHW
$LULQOHW2XWVLGH
$LUILOWHU,QVLGH
,QQHUDLUIORZ
EODGHVULJKWOHIW
RULHQWDWLRQ
Front Grille
3RZHUSOXJ
7KHW\SHRISRZHUSOXJ
PD\GLIIHUGHSHQGLQJRQ
WKHORFDOSRZHUVXSSO\.
The power plug contains a Reset button that will automatically shut down
the air conditioner in the event of a power surge. To restart the unit, press
the Reset button and the unit will return to normal operation in 2-3 minutes.
$LULQOHW2XWVLGH
9HQWLODWLRQOHYHU
E-
5
Remote Control - Buttons
Timer setting button
Temperature
adjustment buttons
Fan speed
adjustment buttons
On/Off button
Sleep timer setting
button
Mode selection
buttons
Energy Saver button
(
*HWWLQJ6WDUWHG
&*-,/1+1 +,1"
-/"00-20%
6KQ D=RA FQOP LQN?D=OA@ = 0=IOQJC SEJ@KSPULA/KKIEN KJ@EPEKJAN SDE?D ODKQH@ >A EJOP=HHA@
>UBKHHKSEJC UKQN EJOP=HH=PEKJ I=JQ=H
6KQN ,SJANO &JOPNQ?PEKJO ?KJP=EJ R=HQ=>HA EJBKNI=PEKJ KJ QOEJC UKQN =EN ?KJ@EPEKJAN
-HA=OA P=GA PDA PEIA PK NA=@ PDAI =O PDAU SEHH DAHL UKQ P=GA BQHH =@R=JP=CA KB PDA QJEPO BA=PQNAO
1DA >KKGHAP EO KNC=JEVA@ =O BKHHKSO
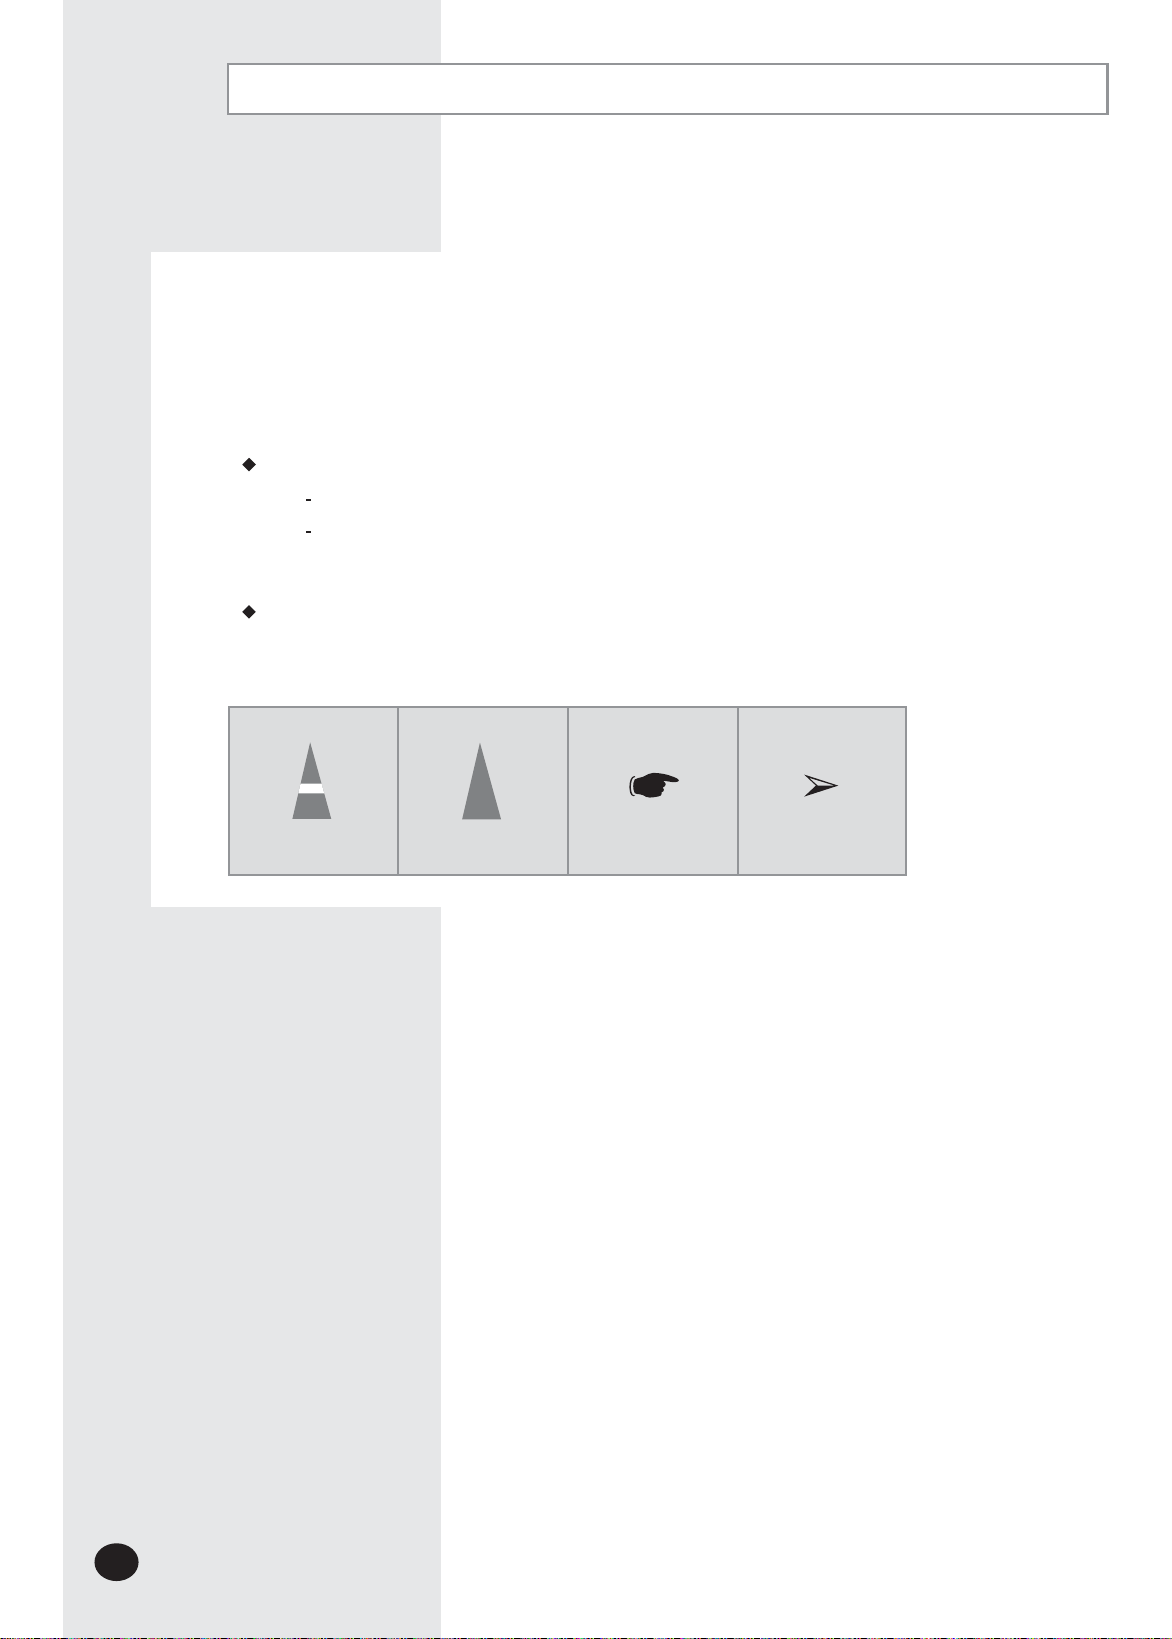
1DA BKHHKSEJC BECQNAO =NA ODKSJ KJ L=CAO =J@ ġ
!AO?NELPEKJ KB "=?D KILKJAJP
/AIKPA ?KJPNKH Ġ>QPPKJO
1DAU SEHH DAHL UKQ BEJ@ PDA >QPPKJO =J@ QJ@ANOP=J@ PDA OUI>KHO @EOLH=UA@
&J PDA I=JQ=H UKQ SEHH BEJ@ = OANEAO KB OPAL>UOPAL LNK?A@QNAO BKN A=?D BQJ?PEKJ
=R=EH=>HA
1DA EHHQOPN=PEKJO EJ PDA OPAL>UOPAL LNK?A@QNAO QOA BKQN @EBBANAJP OUI>KHOġ
E-
7
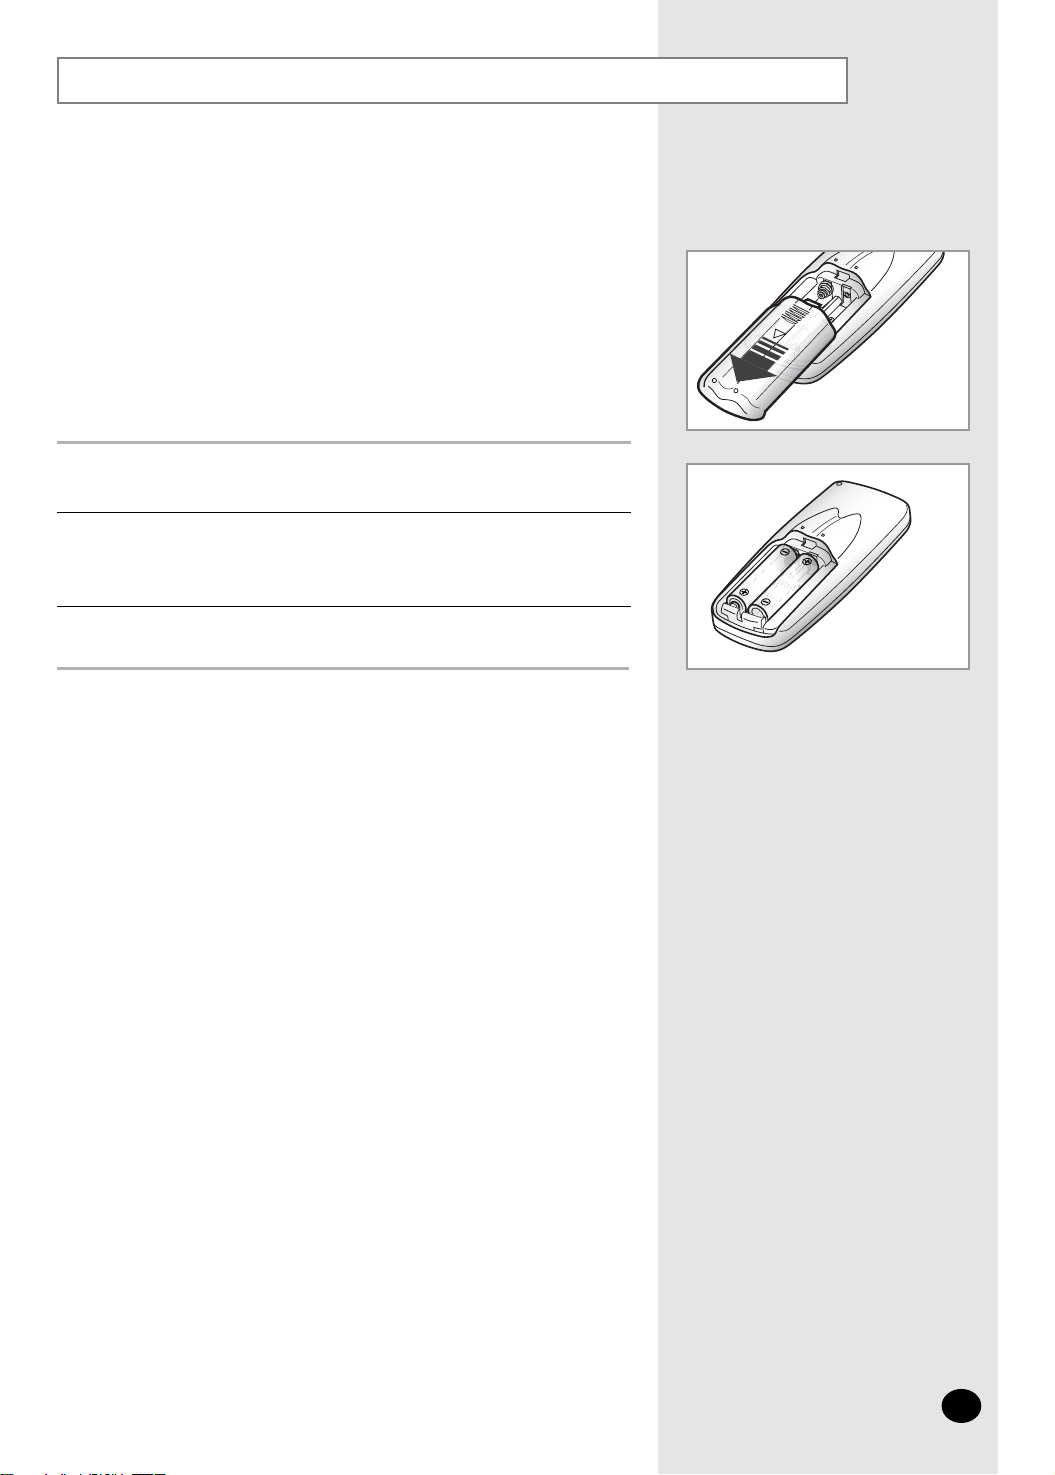
Inserting the Remote Control Batteries
Push the battery cover on the rear of the remote control with your thumb
in the direction of the arrow and remove it.
Insert the two batteries, taking care to respect the polarities :
X + on the battery with + on the remote control.
X - on the battery with - on the remote control.
1
2
Close the cover by sliding it back until it clicks into place.
3
X Use two AAA, LR03 1.5V batteries.
X Do not use old batteries or different kinds of batteries together.
X Batteries may be completely discharged after 12 months, even
if they have not been used.
You must insert or replace the remote control batteries when :
X You purchase the air conditioner
X The remote control does not work correctly
±
(
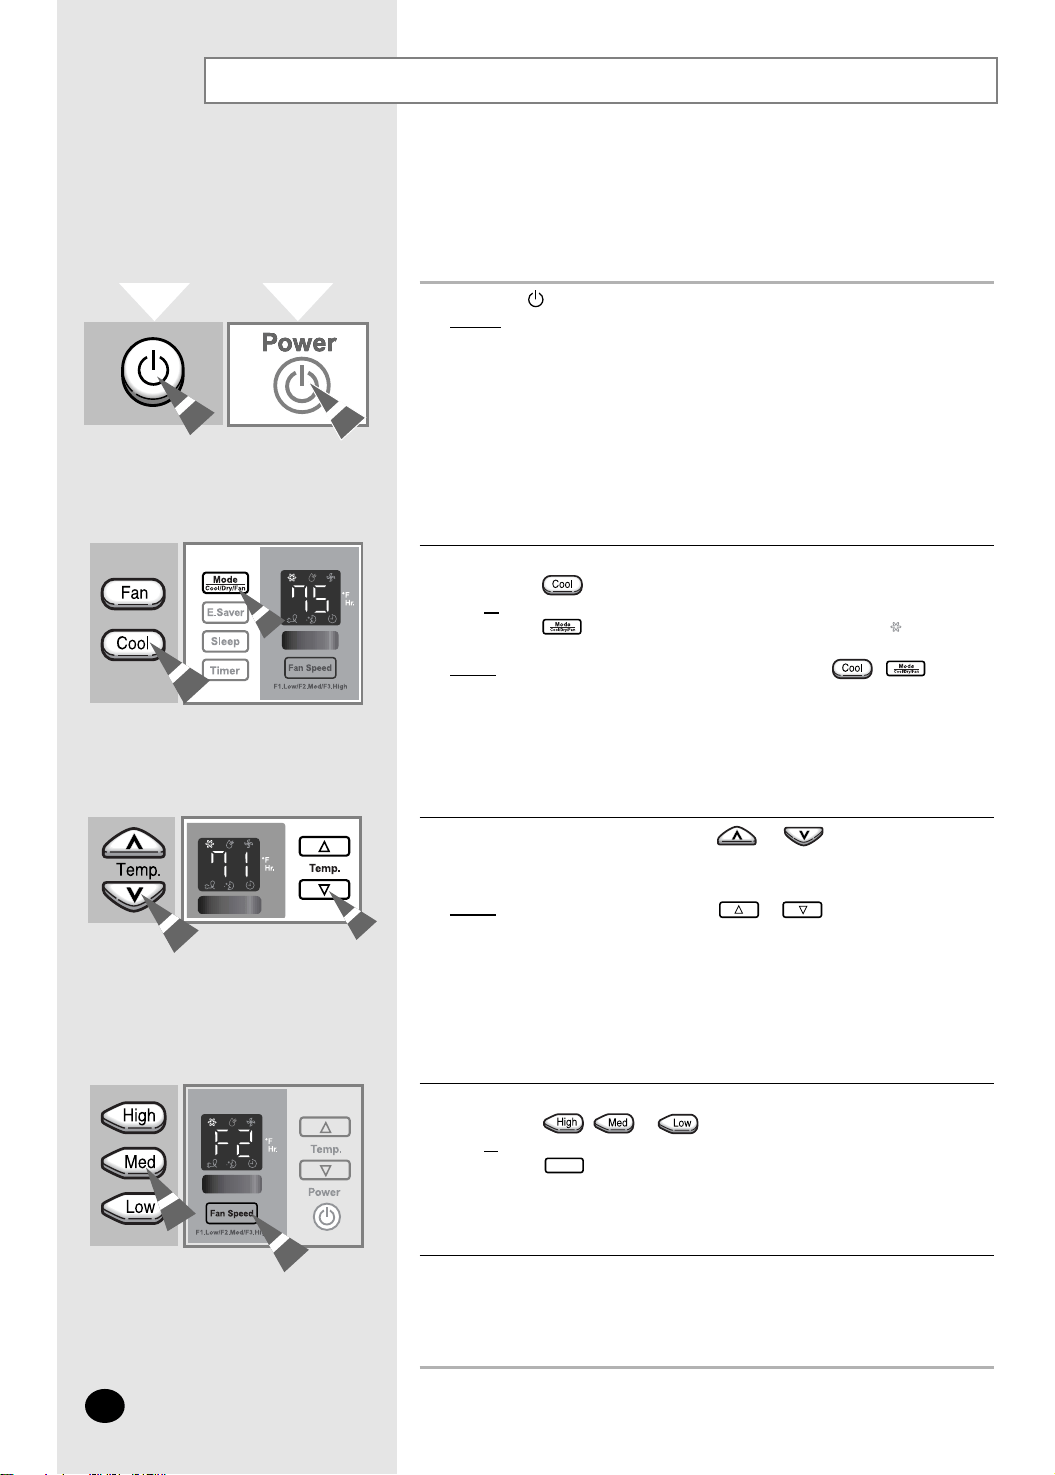
&RROLQJ<RXU5RRP
7RDGMXVWWKHWHPSHUDWXUHSUHVVWKHRUEXWWRQVRQWKHUHPRWH
FRQWURORUXQLWRQHRUPRUHWLPHVXQWLOWKHGHVLUHGWHPSHUDWXUHLVGLVSOD\HG
7KHWHPSHUDWXUHFDQEHVHWEHWZHHQ)DQG)
5HVXOW
U
(DFKWLPH\RXSUHVVWKHRUEXWWRQV
±7KHWHPSHUDWXUHLVDGMXVWHGE\)DQGGLVSOD\HGRQ
WKHFRQWUROSDQHO
±7KHXQLWEHHSV
U
IIWKHURRPWHPSHUDWXUHLV higher than the selected temperature,
the air conditioner starts cooling
U
,IWKHURRPWHPSHUDWXUHUHDFKHVWKHVHWWHPSHUDWXUHWKHDLU
FRQGLWLRQHUVWRSVFRROLQJEXWWKHIDQVWLOORSHUDWHV
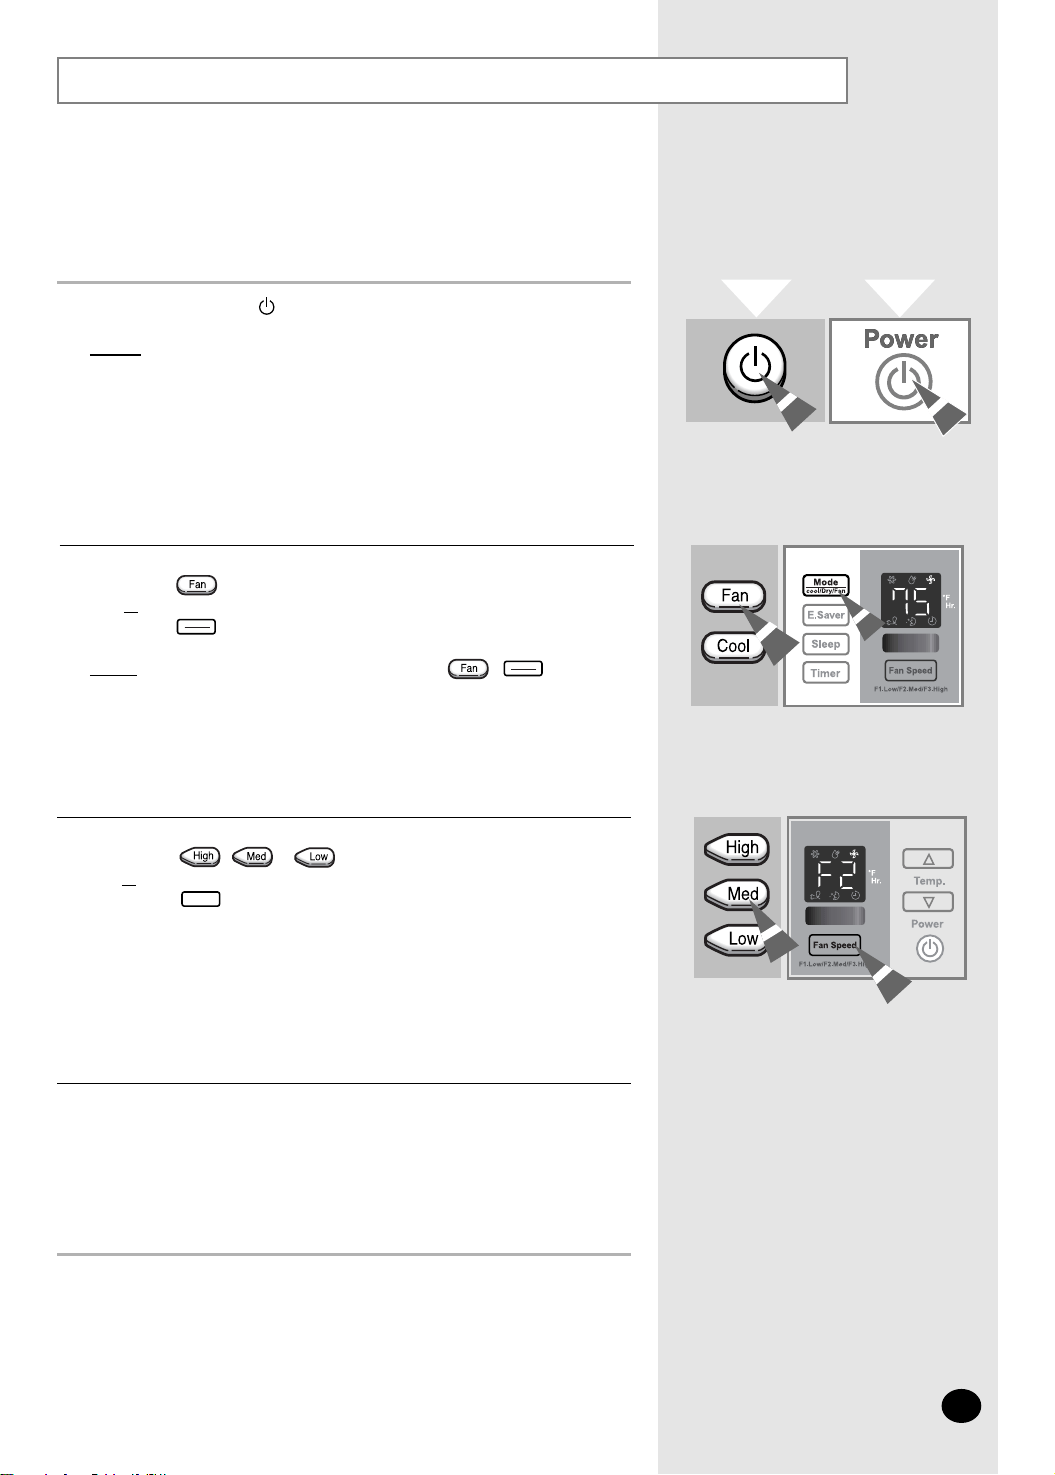
3UHVVWKH2Q2IIEXWWRQ
5HVXOW
U7KHDLUFRQGLWLRQHUVWDUWVXSLQWKH&RROPRGH
U7KHXQLWEHHSVWZLFH
7KHDLUFRQGLWLRQHULVILWWHGZLWKDSURWHFWLRQPHFKDQLVPWRSUHYHQW
WKHXQLWIURPEHLQJGDPDJHGZKHQLWLVVWDUWHGLPPHGLDWHO\DIWHU
EHLQJ
U3OXJJHGLQ
U6WRSSHG
It will begin to cool after three minutes
,IWKHWHPSHUDWXUHLVQRWGLVSOD\HGRQWKHFRQWUROSDQHO
U
3UHVVWKHEXWWRQRQWKHUHPRWHFRQWURO
RU
U
3UHVVWKHEXWWRQRQWKHXQLWRQHRUPRUHWLPHVXQWLO is displayed.
5HVXOW
U
7KHXQLWEHHSVHDFKWLPH\RXSUHVVWKHEXWWRQ
U
7KHDLUFRQGLWLRQHUVWDUWVXSLQWKH&RROPRGH
®
<RXFDQFKDQJHPRGHVDWDQ\WLPH
You must select the Cool mode if you wish to lower the temperature
in your room. You can also set the Fan speed.
7RVHWWKHIDQVSHHG
U
3UHVVWKHRUEXWWRQRQWKHUHPRWHFRQWURODVGHVLUHG
RU
U
3UHVVWKHEXWWRQRQWKHXQLWRQHRUPRUHWLPHVXQWLOWKH
GHVLUHG)DQVSHHG))RU)LVGLVSOD\HG
7RFRQWUROWKHGLUHFWLRQRIWKHDLUIORZUHIHUWRSDJH
)DQ6SHHG
Remote Control
Control Panel
E-
9
Airing Your Room
If you want to provide air circulation without cooling, you can use
the Fan mode.
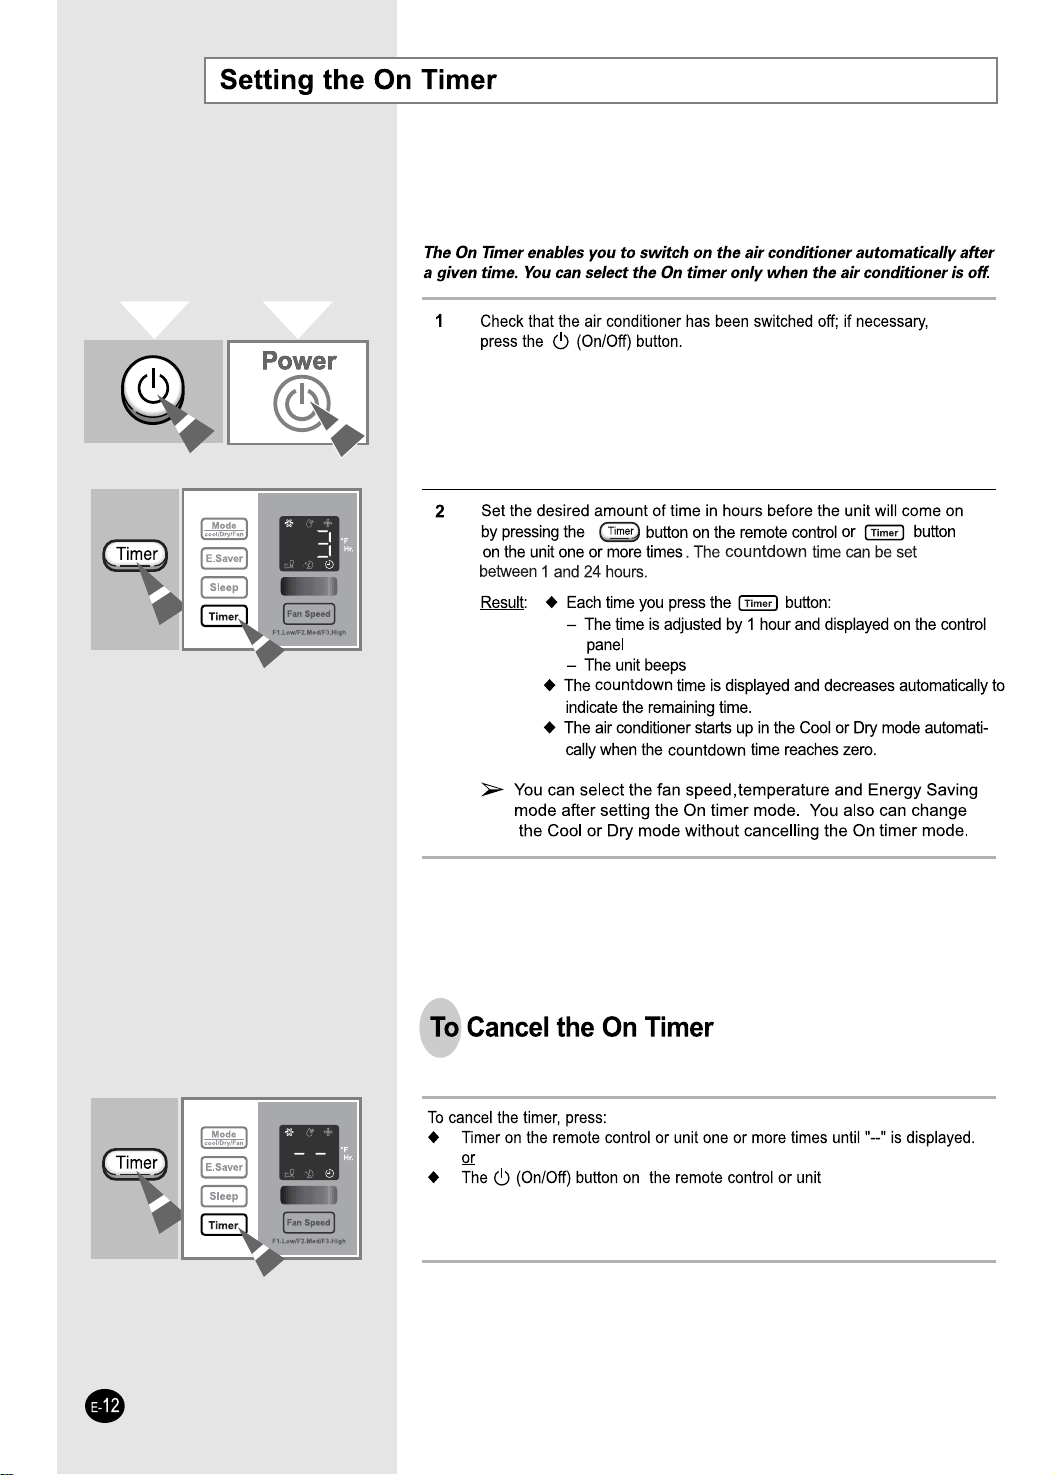
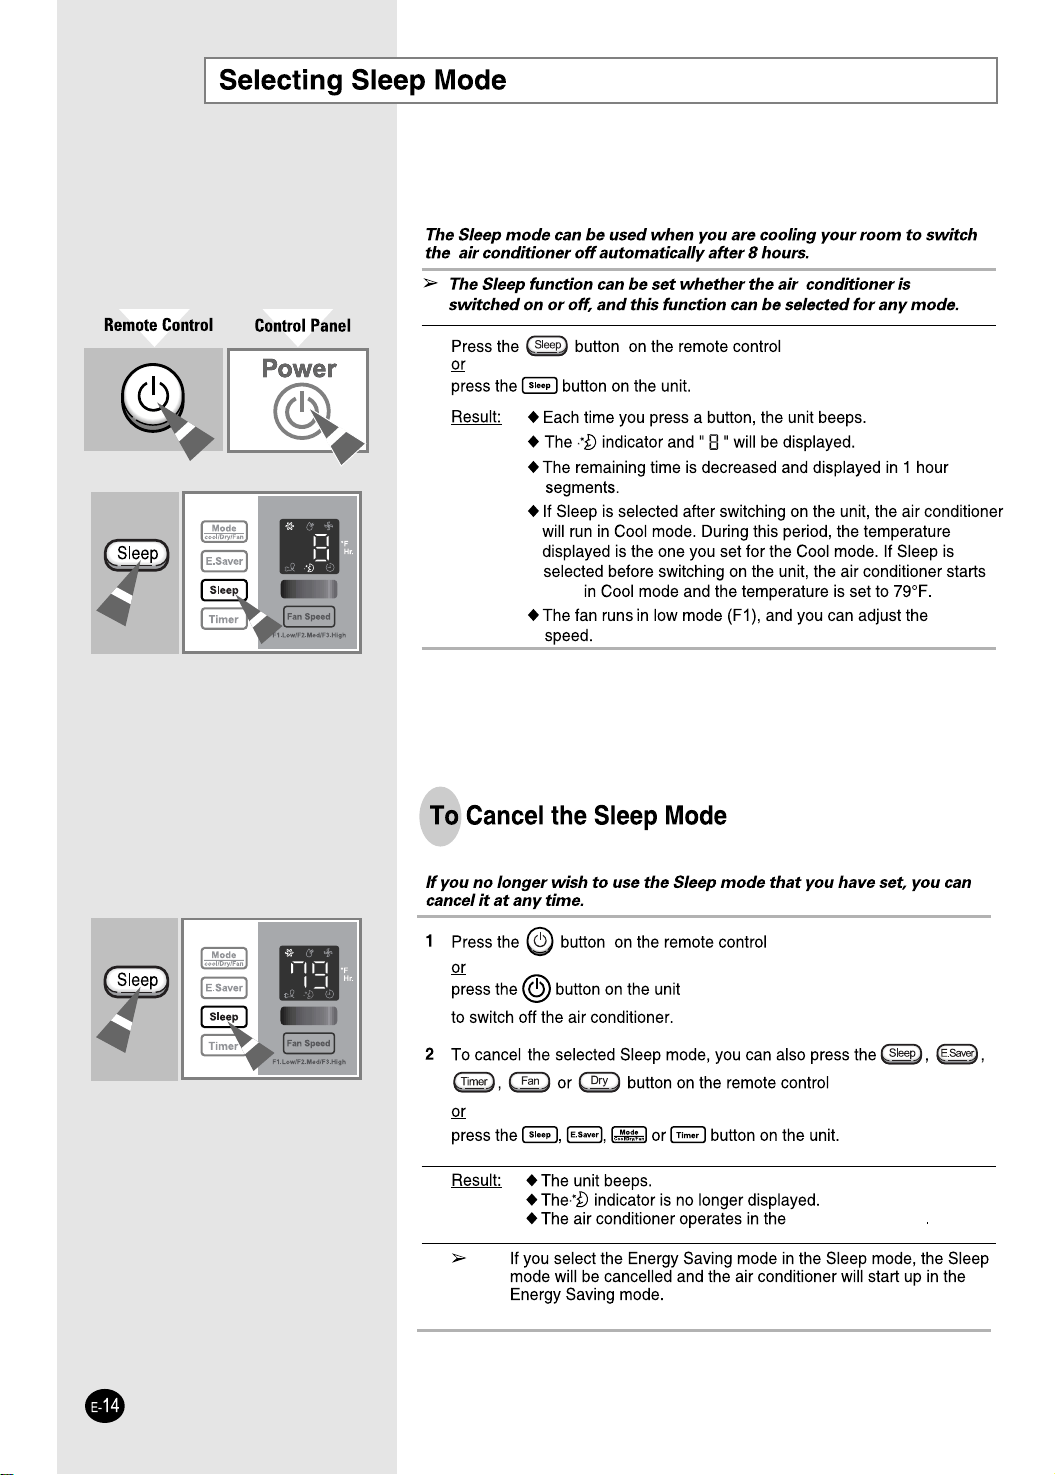
If necessary, press the (On/Off) button.
Result: X The air conditioner starts up in the Cool mode
.
X The unit beeps twice.
1
To set the fan speed:
X
Press the , or button on the remote control as desired.
or
X
Press the button on the unit one or more times until the
desired fan speed(F1, F2 or F3) is displayed.
3
To control the direction of the air flow, refer to page 11.
4
If the fan speed(F1, F2 or F3) is not displayed on the control panel:
XPress the button on the remote control
or
XPress the button on the unit one or more times until the fan speed
(F1, F2 or F3) is displayed.
Result:
XThe unit beeps each time you press the / button.
X The air conditioner starts up in Fan mode.
±
You can change modes at any time.
When the air conditioner is in the Fan mode, the temperature
cannot be set or displayed.
2
Mode
Cool/Dry/Fan
Fan Speed
Mode
Cool/Dry/Fan
Remote Control
Control Panel
E-
10
Removing Excess Humidity
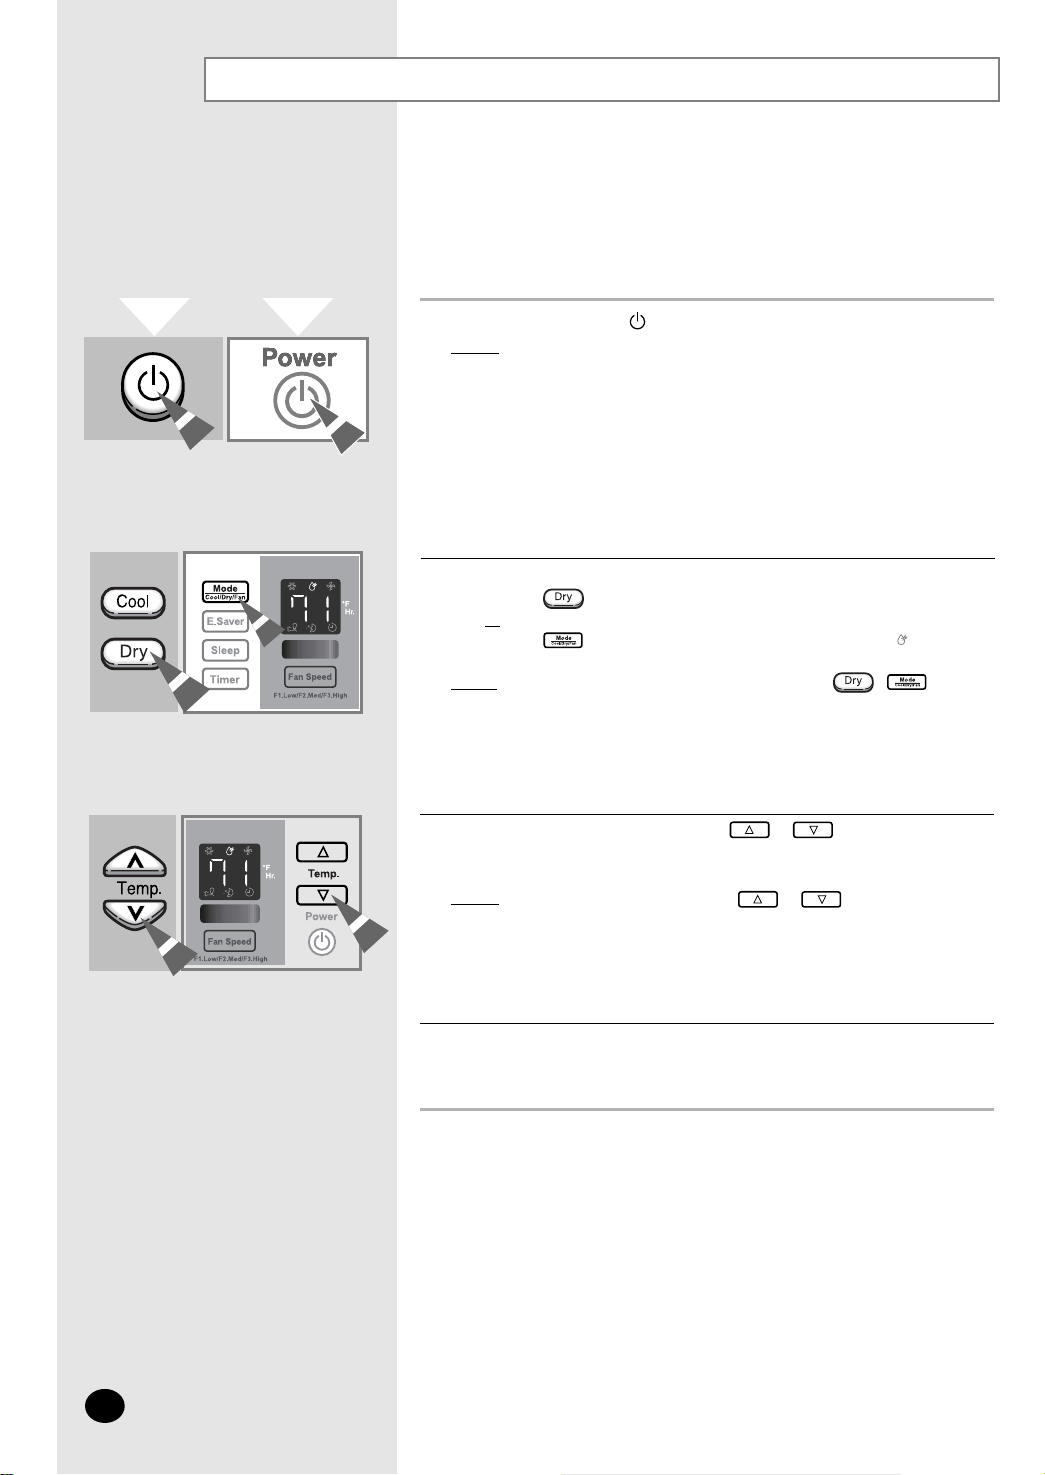
Remote Control
Control Panel
If the temperature is not displayed on the control panel:
X
Press the button on the remote control
or
X
Press the button on the unit one or more times until is displayed.
Result
:
X
The unit beeps each time you press the / button.
X
The air conditioner starts up in the Cool mode.
±
You can change modes at any time.
2
If the atmosphere in your room is very humid or damp, you can remove
excess humidity without lowering the room temperature too much.
1 If necessary, press the (On/Off) button.
Result
: X The air conditioner starts up in the Cool mode.
X The unit beeps.
The air conditioner is fitted with a protection mechanism to pre-
vent the unit from being damaged when it is started immediately
after being:
X Plugged in
X Stopped
It will begin to cool after three minutes.
3 To adjust the temperature, press the
or
buttons one or
more times until the required temperature is displayed.
The temperature can be set between
64°F and 86°F
.
Result
: X Each time you press the
or
buttons:
- The temperature is adjusted by 1°F
- The unit beeps
X The air conditioner starts removing the excess humidity;
the quality of air is adjusted automatically.
4 To control the direction of the air flow, refer to page 11.
E-
11
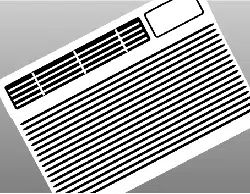
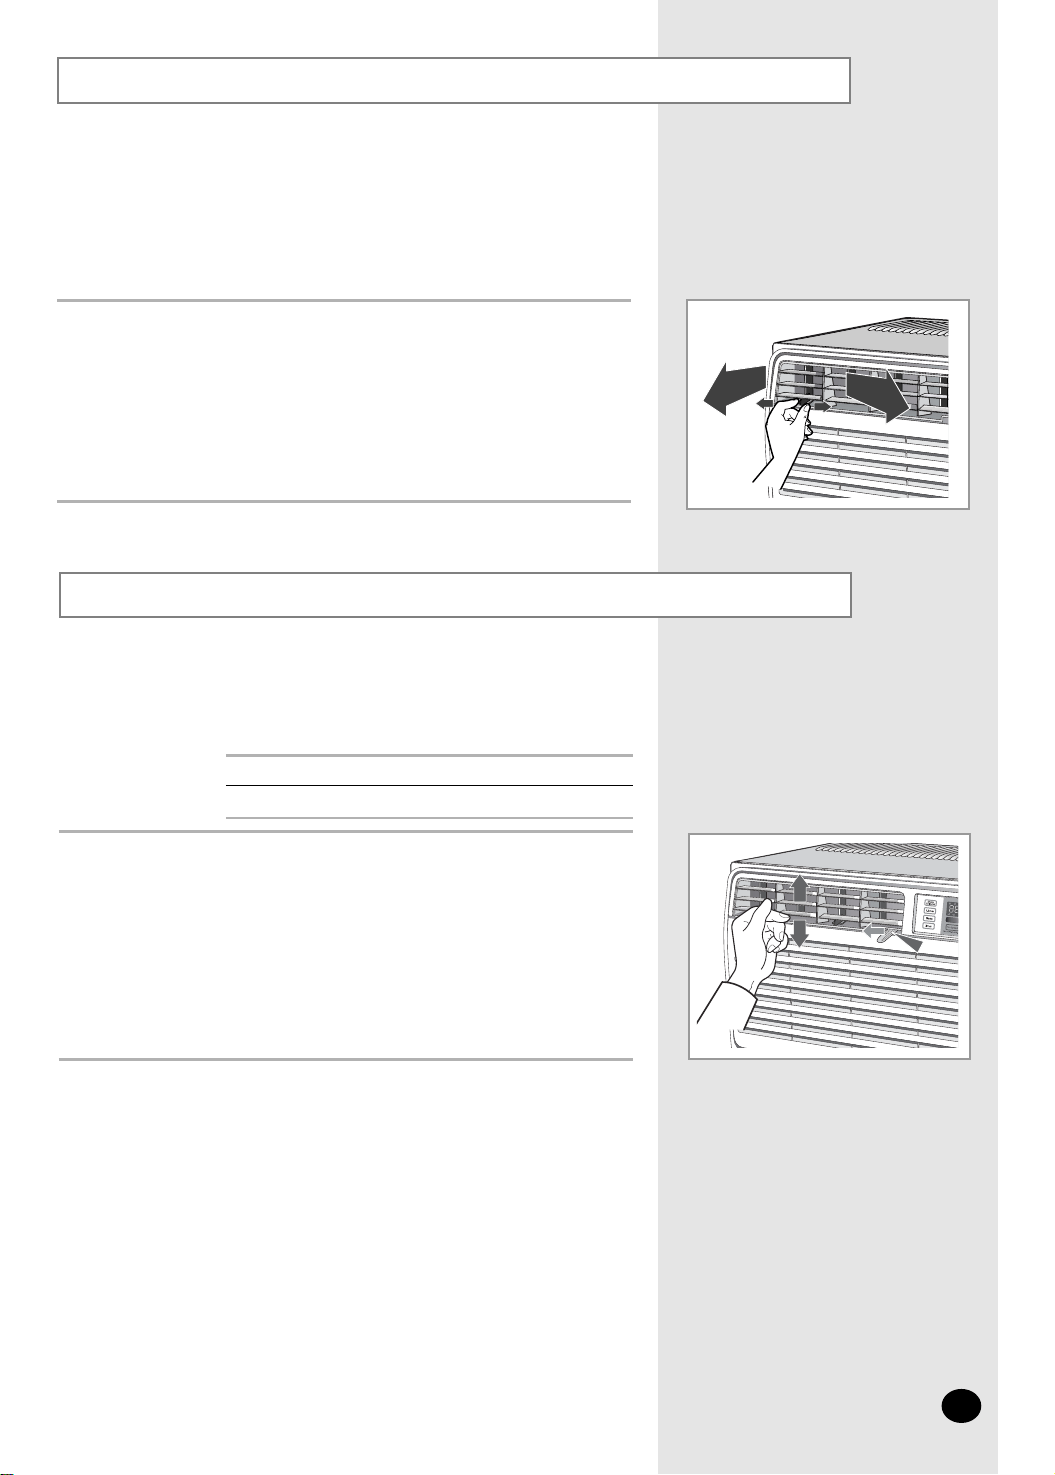
Adjusting the Air Flow Direction Horizontally
Depending on the position of the unit in your room, you can adjust
the orientation of the inner air flow blades on the unit.
Adjust the inner air flow blades to the desired position by sliding them side to side.
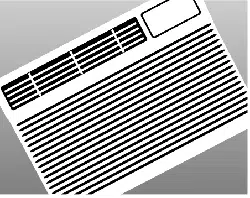
$GMXVWLQJWKH$LU)ORZ'LUHFWLRQ9HUWLFDOO\
The outer air flow blades can be adjusted to control the vertical air
flow direction.
RECOMMENDATION
:KHQ
&RROLQJ
$GMXVWWKHEODGHVWRIDFH
8SZDUGV
$GMXVWWKHouter DLUIORZEODGHVWRWKHGHVLUHGSRVLWLRQE\SXVKLQJWKHP
XSZDUGVRUGRZQZDUGV
,I\RXpositionWKHouter DLUIORZEODGHVGRZQZDUGwhile theXQLW
operates LQ&RROPRGHIRUORQJSHULRGVRIWLPHGHZPD\
)RUPRQWKHVXUIDFHRIWKHEODGHV
'ULSIURPWKHEODGHV
®
/AIKPA KJPNKH
KJPNKH -=JAH
7KH$LU&RQGLWLRQHUUHWXUQVWRWKHSUHYLRXVO\VHOHFWHGRSHUDWLRQPRGH
/AIKPA KJPNKH
KJPNKH -=JAH
WRWKHIDQVSHHGPRGHWKH2IIWLPHUPRGHLVFDQFHOHG
ODVWVHOHFWHGPRGH
UXQV
E-
15
Selecting Energy Saving Mode
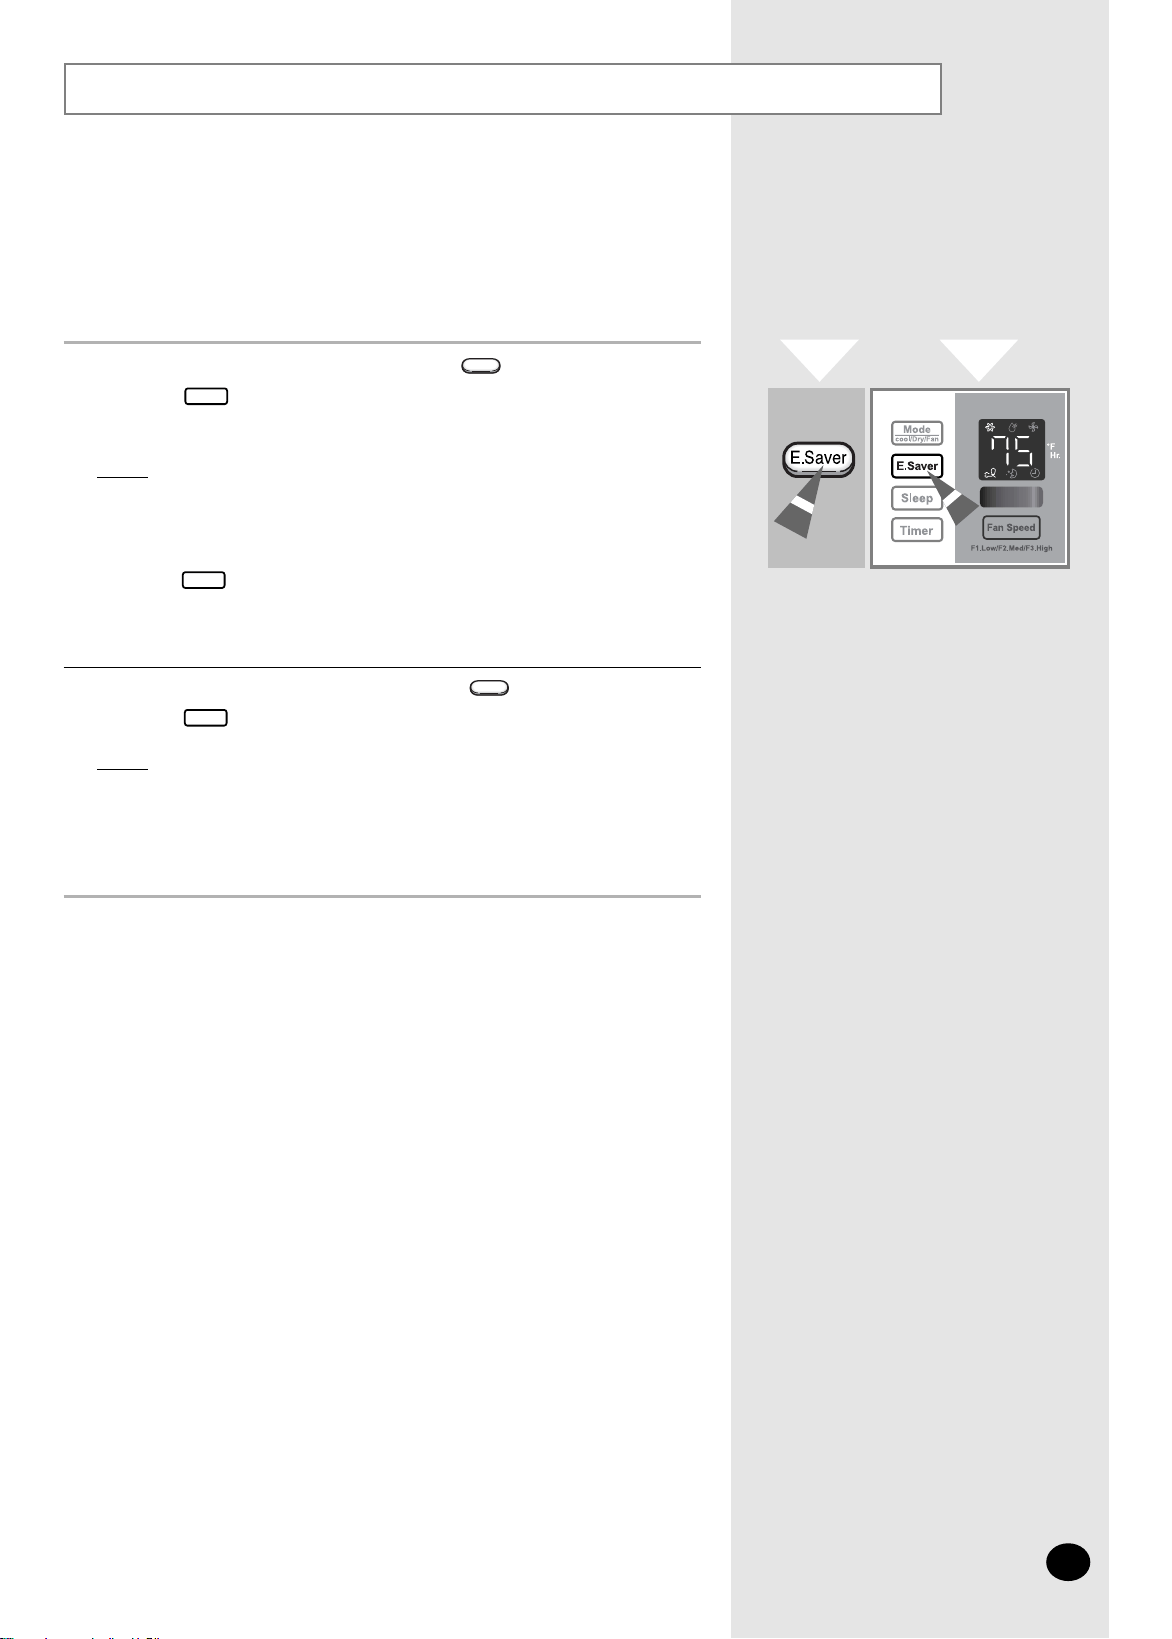
To select the energy saving mode, press the button on the remote
control or button on the unit one or more times until the Energy
Saver indicator lights up.
Result
:
X
The fan and compressor cycle on and off together.
X
The fan will continue to run for a short time after the
compressor cycles off.
±
If you would like the air conditioner to run in Dry mode, do not press
the button. You cannot use the Dry mode in the energy saving
mode.
To stop the energy saving mode, press the button on the remote
control or button on the unit again.
Result: The fan runs at all times, while the compressor cycles on and off.
±
If you select the Sleep Timer in the Energy Saving mode, the Energy
Saving will be cancelled and the air conditioner will start up in the
Sleep Timer mode.
If you wish to save energy when using your air conditioner,
select the energy saving mode.
1
2
E.Saver
E.Saver
E.Saver
E.Saver
E.Saver
Remote Control
Control Panel
(
7HPSHUDWXUHDQG+XPLGLW\5DQJHV
,IWKHDLUFRQGLWLRQHULVXVHGDW 7KHQ
+LJKHUWHPSHUDWXUHs 7KHDXWRPDWLFSURWHFWLRQIHDWXUHPD\EHWULJJHUHGDQGWKHDLU
FRQGLWLRQHUZLOO VWRS
/RZHUWHPSHUDWXUHs $ ZDWHUOHDNDJHRUVRPHRWKHUPDOIXQFWLRQPD\KDSSHQLIWKH
KHDWH[FKDQJHUIUHH]HV
+LJKHUKXPLGLW\OHYHOV :DWHUPD\FRQGHQVHRQDQGGULSIURPWKHVXUIDFHRIWKHXQLW
LILWLVXVHGIRUORQJSHULRGV
7KHIROORZLQJWDEOHLQGLFDWHVWKH DLU FRQGLWLRQHUV WHPSHUDWXUHDQGKXPLGLW\ RSHUD WL R Q UDQJH
0RGH ,QGRRU7HPSHUDWXUH 2XWGRRU7HPSHUDWXUH ,QGRRU+XPLGLW\
&RROLQJ )WR)DSSUR[ )WR)DSSUR[ RUOHVV

(
%NGCPKPI;QWT#KT%QPFKVKQPGT
IURQWJULOOH IURQWJULOOH
IURQWJULOOH
DLU
ZLWFK RQ
ZLWFK RQ
(
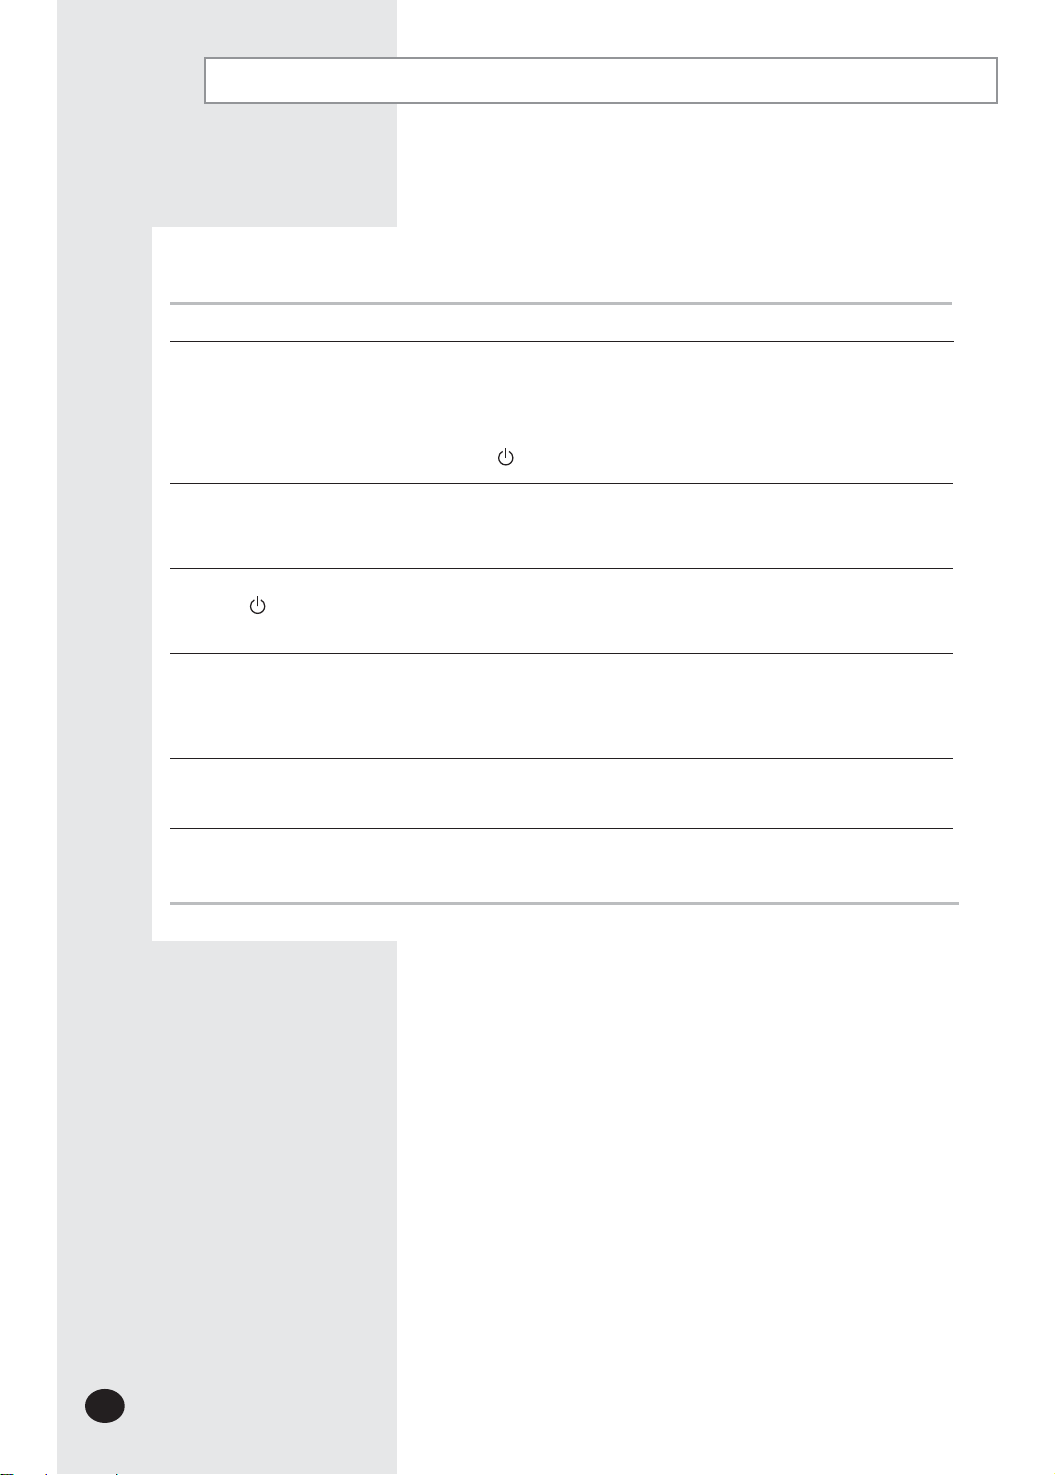
6ROYLQJ&RPPRQ3UREOHPV
([SODQDWLRQ6ROXWLRQ
U &KHFNWKDWWKHFLUFXLWEUHDNHUXVHGIRUWKHDLUFRQGLWLRQHUKDVQRWEHHQ
WULJJHUHG
U&KHFNWKDWWKHSRZHUFDEOHLVSOXJJHGLQWRDZDOOVRFNHWDQGWKHVRFNHWLV
VZLWFKHGRQLIQHFHVVDU\
U&KHFNWKDWWKHWHPSHUDWXUHLQGLFDWRURQWKHXQLWLVOLWLIQHFHVVDU\
SUHVVWKH 2Q2IIEXWWRQRQWKHUHPRWHFRQWURORUXQLW
U &KHFNWKDWWKHUHDUHQRREVWDFOHVEHWZHHQ\RXDQGWKHXQLW
U5HSODFHWKHUHPRWHFRQWUROEDWWHULHVLIQHFHVVDU\
U&KHFNWKDW\RXDUHFORVHHQRXJKWRWKHXQLWVHYHQPHWHUV\DUGVRUOHVV
U
9HQWLODWHWKHURRP
3UREOHP
7KHDLUFRQGLWLRQHUGRHV
QRW
RSHUDWHDWDOO
7KHDLUFRQGLWLRQHUGRHVQRW
RSHUDWHZLWKWKHUHPRWH
FRQWURO
2GRUVDUHSHUPHDWLQJWKH
URRPGXULQJDLUFRQGLWLRQLQJ
U &KHFNWKDW\RXDUHSRLQWLQJWKHUHPRWHFRQWURODWWKHUHPRWHFRQWUROVHQVRU
RQWKHXQLW
U5HSODFHWKHUHPRWHFRQWUROEDWWHULHVLIQHFHVVDU\
1REHHSLVKHDUGZKHQ\RX
SUHVVWKH 2Q2IIEXWWRQ
RQWKHUHPRWHFRQWURO
U &KHFNWKDWWKHFRUUHFWRSHUDWLQJPRGHKDVEHHQVHOHFWHG&RRO
U7KHURRPWHPSHUDWXUHPD\EHWRRORZ
U 'XVWPD\EHEORFNLQJWKHDLUILOWHUUHIHUWRSDJHIRUFOHDQLQJLQVWUXFWLRQV
U &KHFNWKDWWKHUHLVQRREVWDFOHEORFNLQJWKHDLUIORZLQWRRURXWRIWKHXQLW
7KHDLUFRQGLWLRQHUGRHVQRW
FRRO
U &KHFNWKDWWKHWLPHUKDVEHHQSURJUDPPHGFRUUHFWO\UHIHUWRSDJHVa
7KHWLPHULVQRWFRUUHFWO\WULJ
JHUHG
ABKNA ?KJP=?PEJC = 0=IOQJC=QPDKNEVA@ OANRE?A ?AJPAN LANBKNI PDA BKHHKSEJC OEILHA ?DA?GO
1DAU I=U O=RA UKQ PDA PEIA =J@ ATLAJOA KB =J QJJA?AOO=NU ?=HH
$:&%
$:&%
$:&%
$:&%
$:&%
$:(&%
$:(&%
$:(&%
$:(&%
$:(&%
$:&%
$:(&%
$:(&%

INSTALLATION MANUAL
Window-Type room air conditioner
7KLVEULHISURFHGXUHJXLGHZDVSUHSDUHGWRVXSSOHPHQWWKHXVHUPDQXDOLQKHOSLQJto FRUUHFWO\LQVWDOO
\RXUURRPDLUFRQGLWLRQHU
7KLVDLUFRQGLWLRQHUVKRXOGEHLQVWDOOHGLQDZLQGRZ7RHQVXUHSURGXFWTXDOLW\DQGVDIHW\
GRQRWLQVWDOOWKHDLUFRQGLWLRQHULQDZDOO
X Always have an assistant to help you. Never attempt to install
any air conditioner alone.
X You risk the possibility of hurting yourself or injuring others by
attempting to install it alone.
Preparation for Installation
&DUHIXOO\UHPRYHWKHXQLWIURPWKHSDFNLQJFDVHOD\LWRQ
WKHIORRUDQGFKHFNWKDWDOODFFHVVRULHVDVLQGLFDWHGDUHHQFORVHG
&KHFNWKHFDELQHWDQG front grilleRIWKHXQLWIRUDQ\GHIHFWVVXFKDV
VFUDWFKHV
%HVXUHWRFKHFNWKHSRZHUVXSSO\
5HIHUWRWKHVSHFLILFDWLRQVRQWKHODEHODWWDFKHGWRWKHXQLW
Checkpoints Prior to Installation
Installation Conditions
G ETTING STARTED
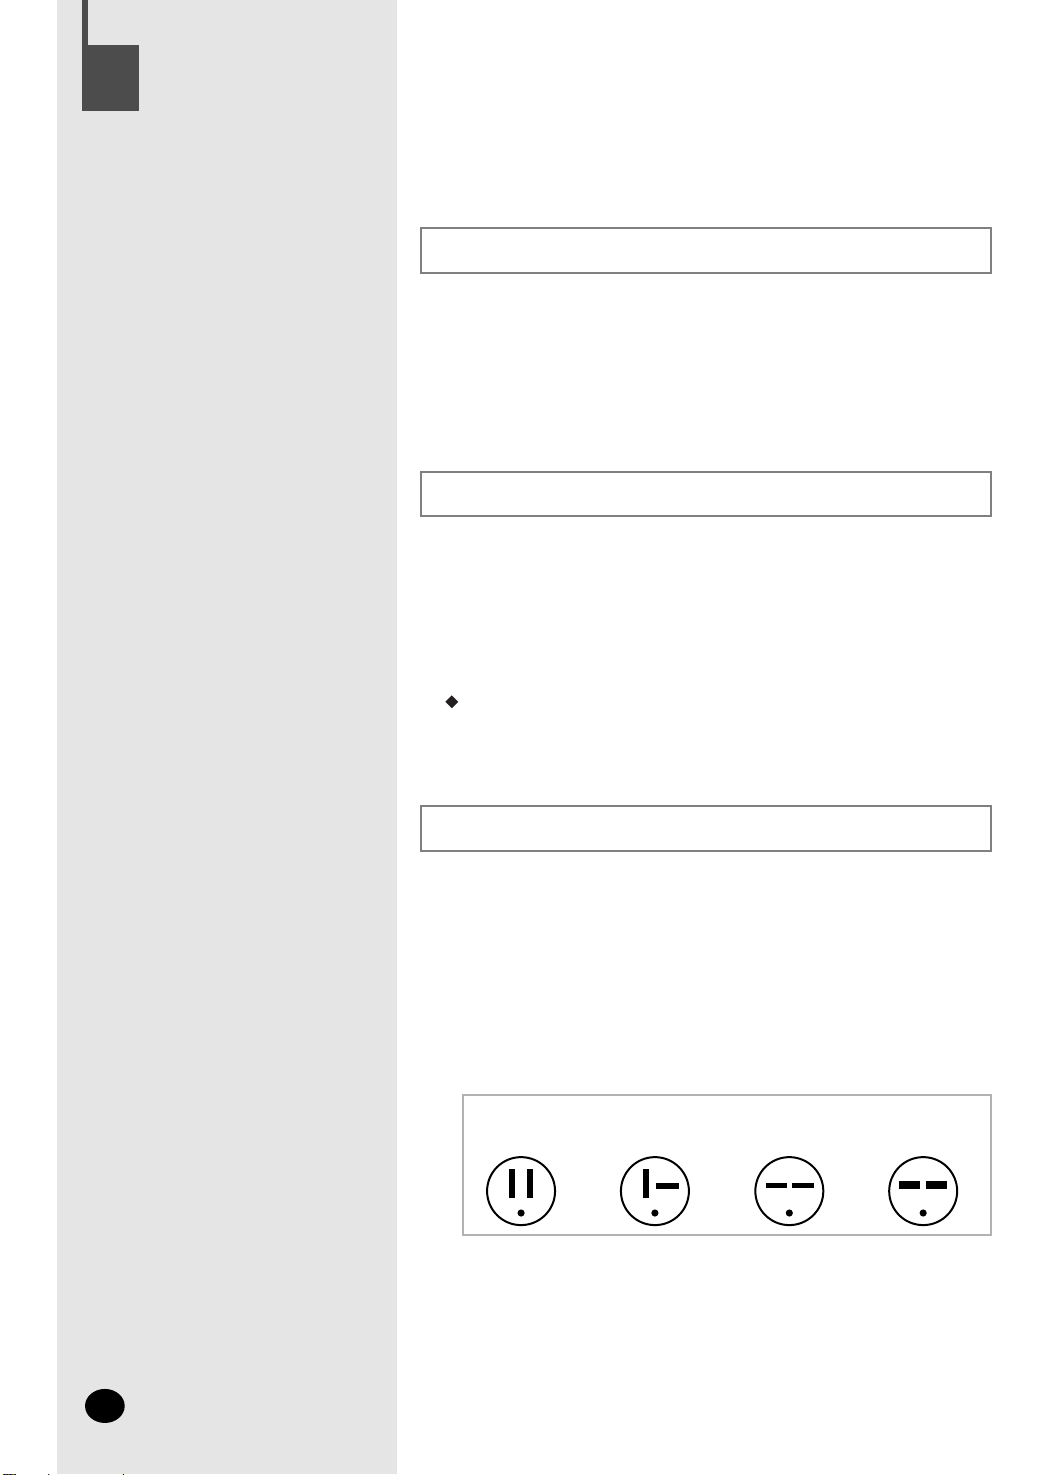
Electrical Requirements
For personal safety:
X This appliance must be properly grounded.
X Do not, under any circumstances, cut or remove the third grounding
prong from the power cord.
X We recommend that you do not use an extension cord or an
adapter plug with this appliance.
X Do not change the plug on the power cord of this appliance.
XFollow national electrical codes or local codes and ordinances.
1
X If the electric supply provided does not meet the above
specifications, call a licensed electrician.
X Aluminum house wiring may pose special problems -
consult a qualified electrician.
X This unit requires a separate circuit, serving only this appliance.
115V
15 AMP circuit
"parallel" type
230-208V
20 AMP circuit
"perpendicular" type
230-208V
15 AMP circuit
"tandem" type
230-208V
30 AMP circuit
"tandem" type
E-22

FPWRFP
FP
$:&%$:(&%,QVWDOODWLRQ
IURQWIODQJH
CONNECTEDTO
#
TOMAKESURETHEREARENO
DOES
$
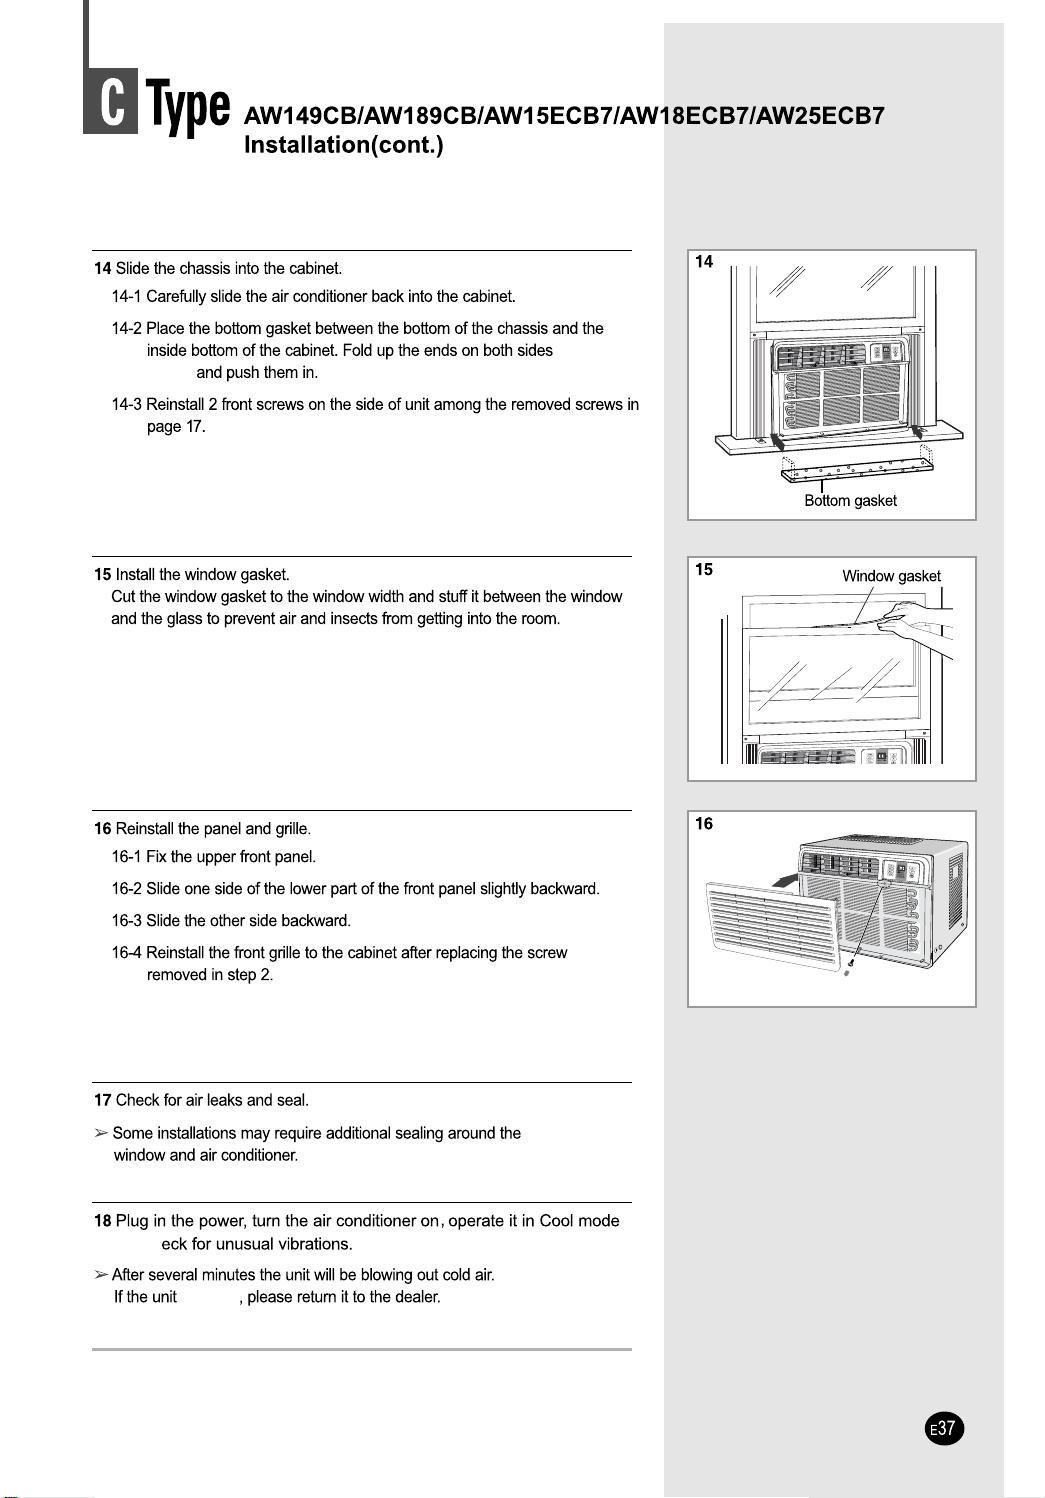
$:&%$:(&%,QVWDOODWLRQFRQW
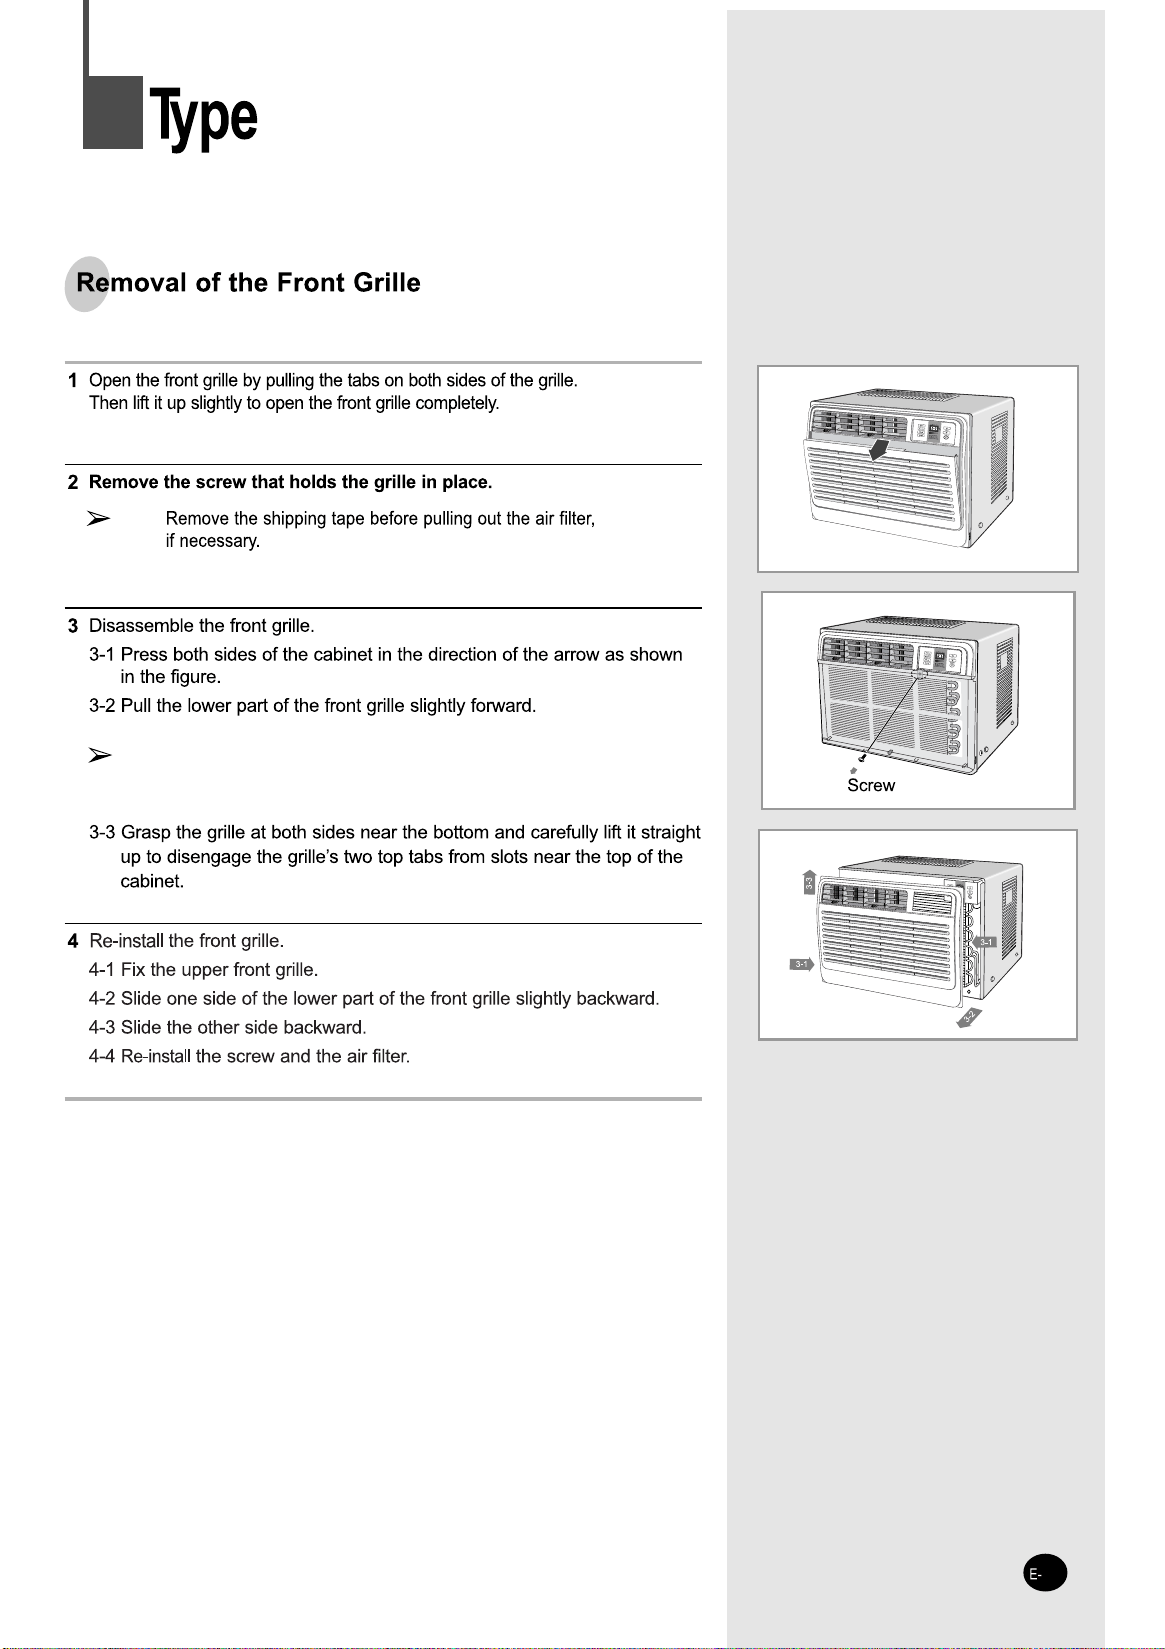
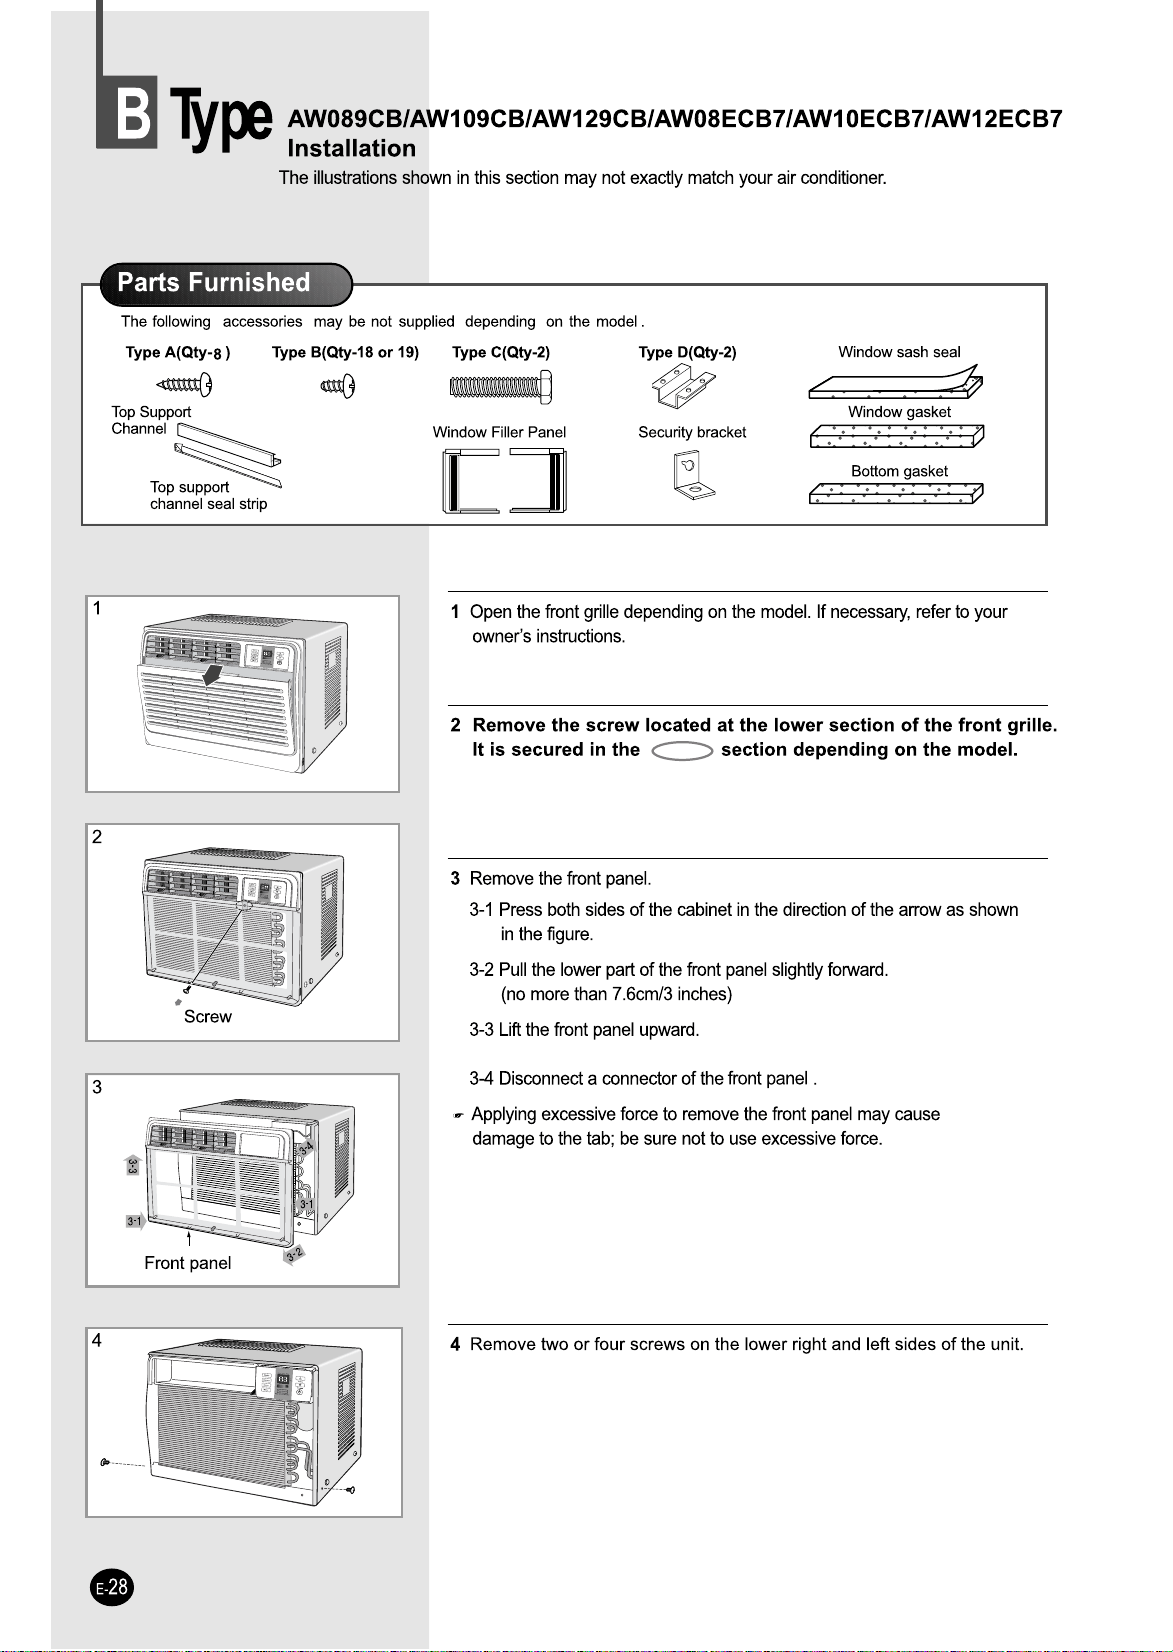
&B UKQ JAA@ PK NAIKRA PDA BNKJP CNEHHA BKN NALH=?AIAJP BKHHKS PDA OPALO >AHKS
'RQRWSXOOWKHERWWRPHGJHRIWKHJULOOHWRZDUGV\RXPRUH
WKDQFP
'RLQJVRPD\FDXVHGDPDJHWRWKHJULOOHVWZRWRSWDEV
$
$:&%/$:(&%,QVWDOODWLRQFRQW
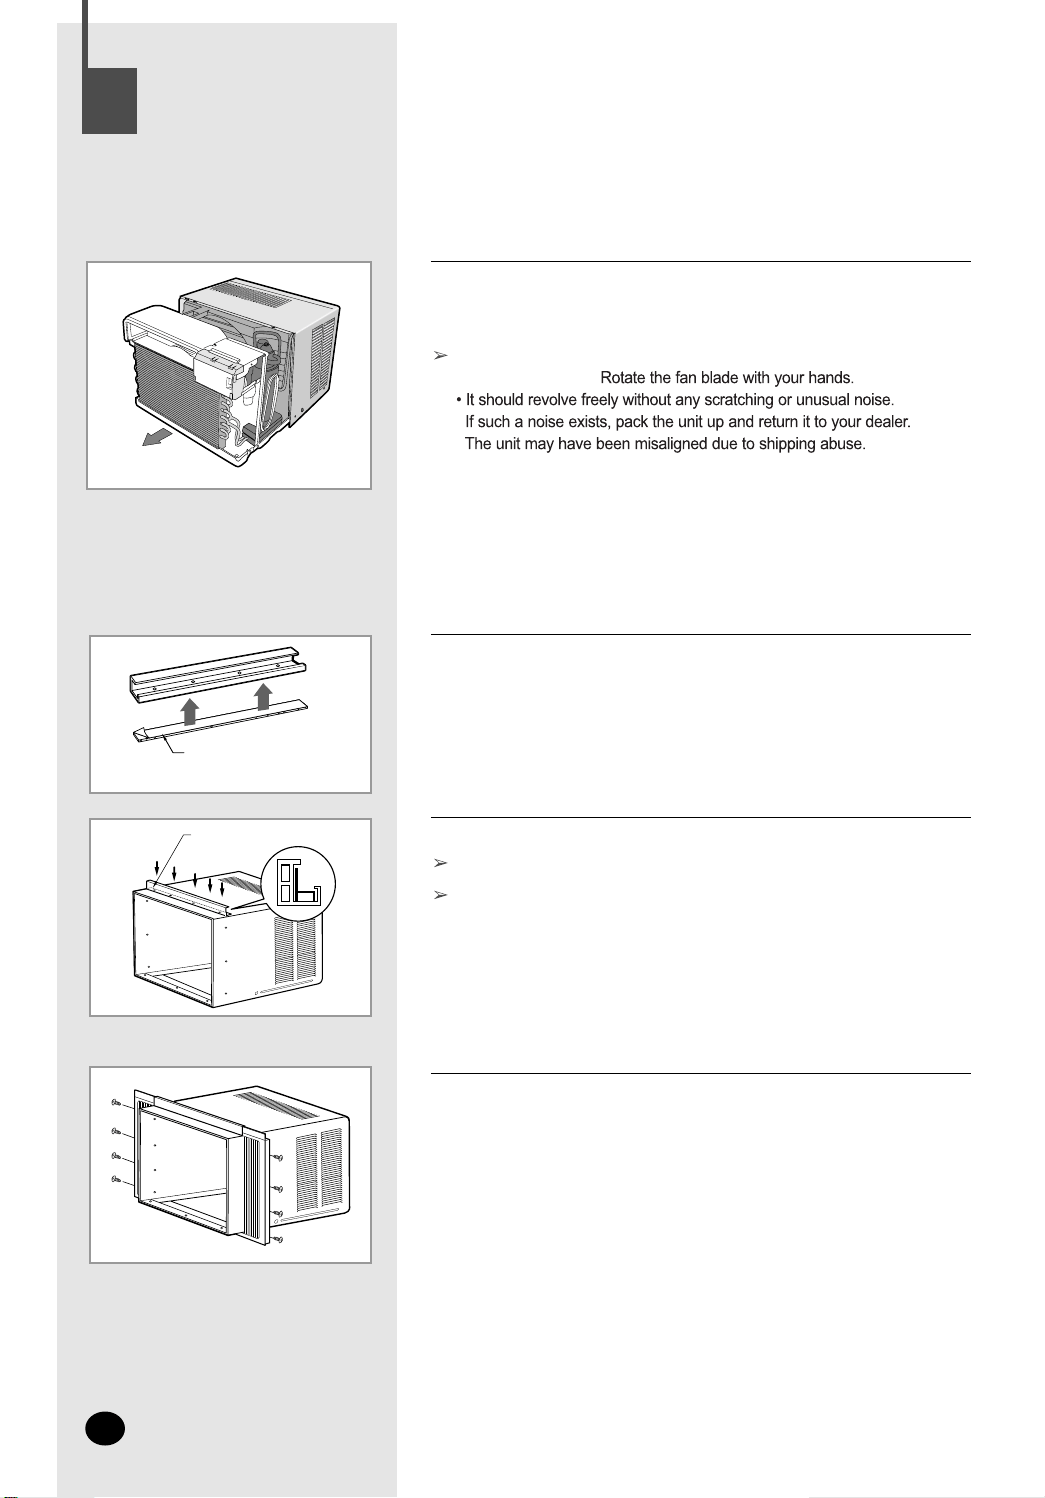
1RZZRXOGEHDQJRRGWLPHWRLQVSHFWWKHIDQIRUGDPDJH
FDXVHGE\VKLSPHQW
1ULA
$:&%$:&%$:&%$:(&%$:(&%$:(&%
,QVWDOODWLRQFRQW
LQRUGHUWRDGMXVWWKHSLWFK
A OUTSIDE
@KSJS=N@OH=JP
PKPDAKQPOE@A
$:&%$:&%$:&%$:(&%$:(&%$:(&%
,QVWDOODWLRQ
RIWKH
ERWWRPJDVNHW
RQ
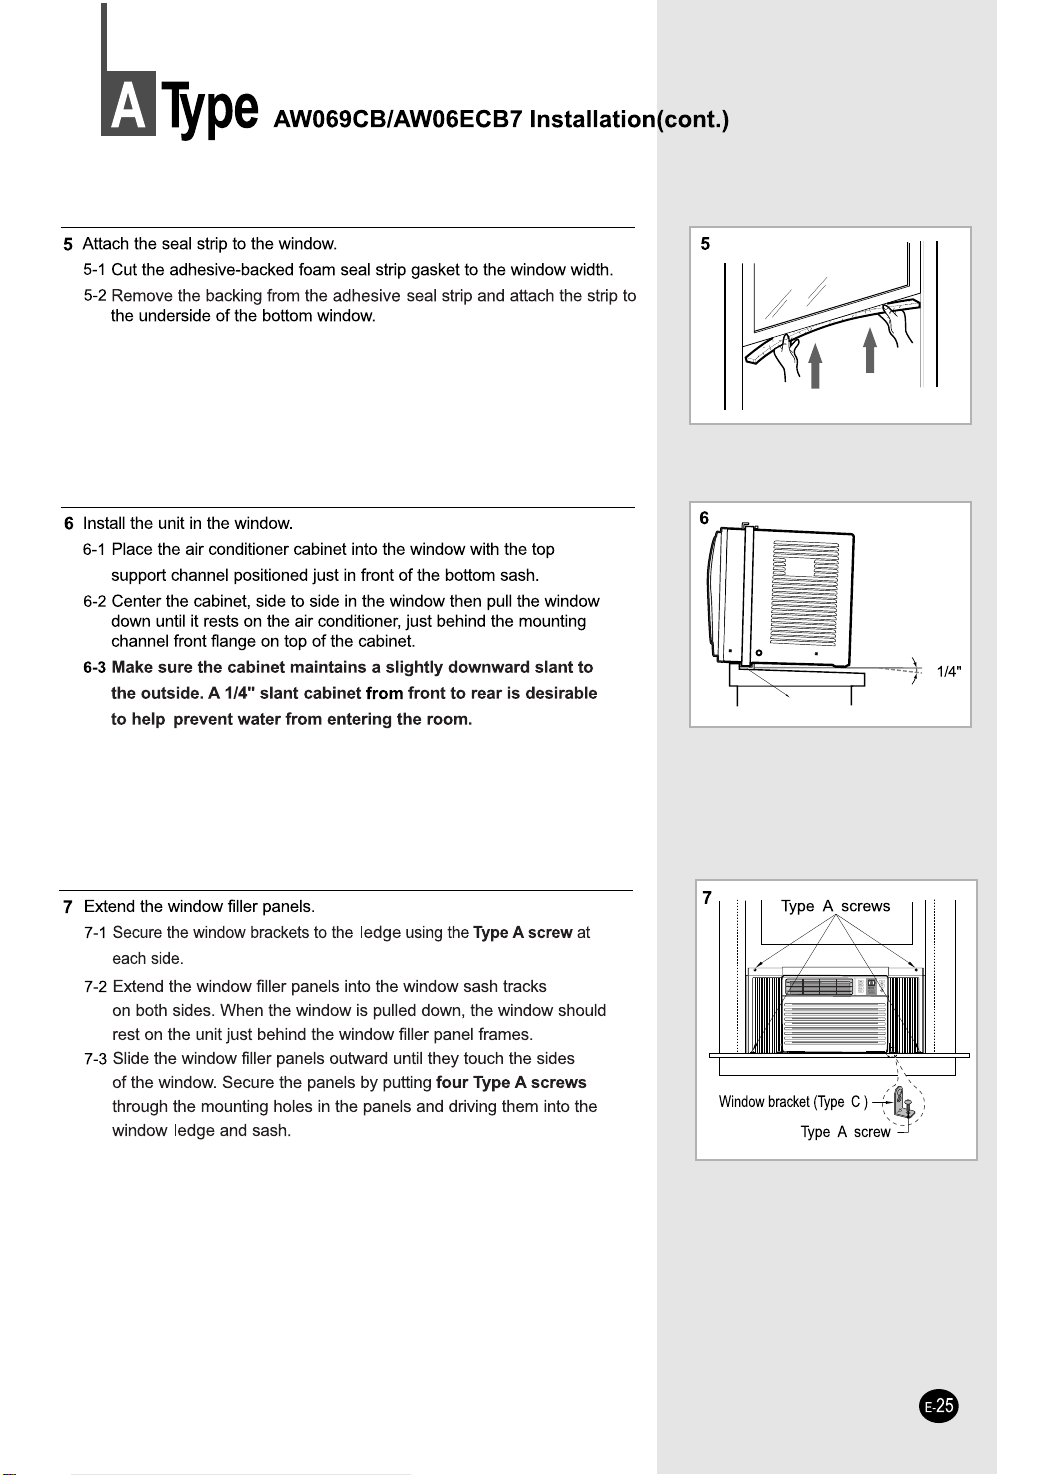
,IWKHXQLWGRHVQRW
$:&%$:&%$:&%$:(&%$:(&%$:(&%
,QVWDOODWLRQFRQW

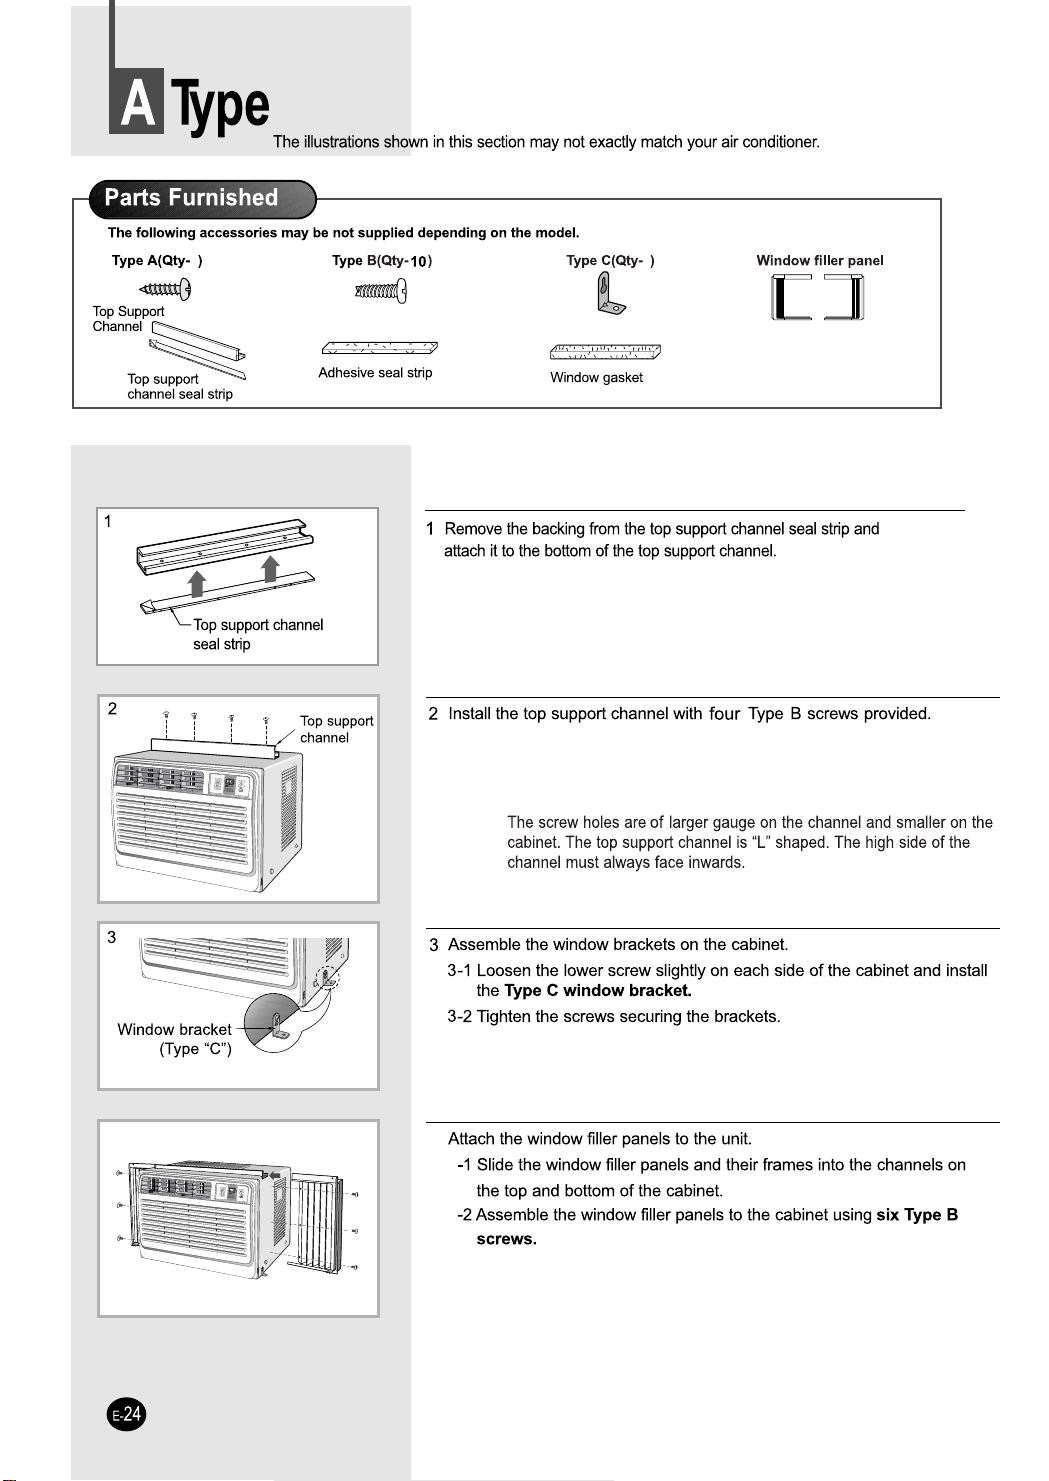
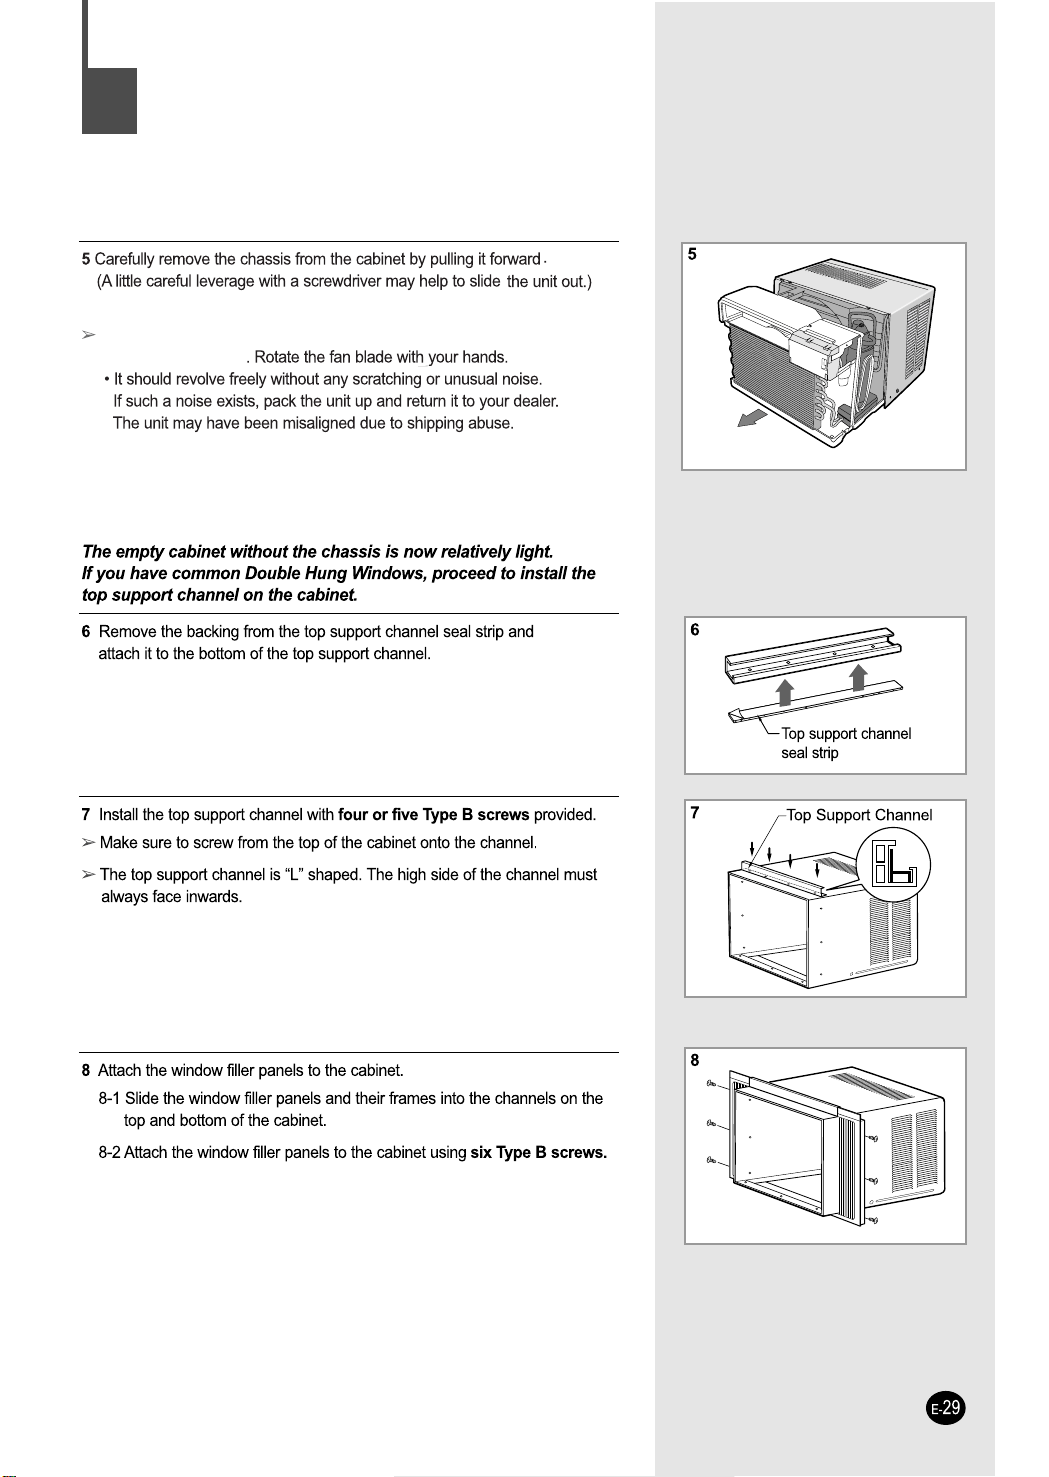
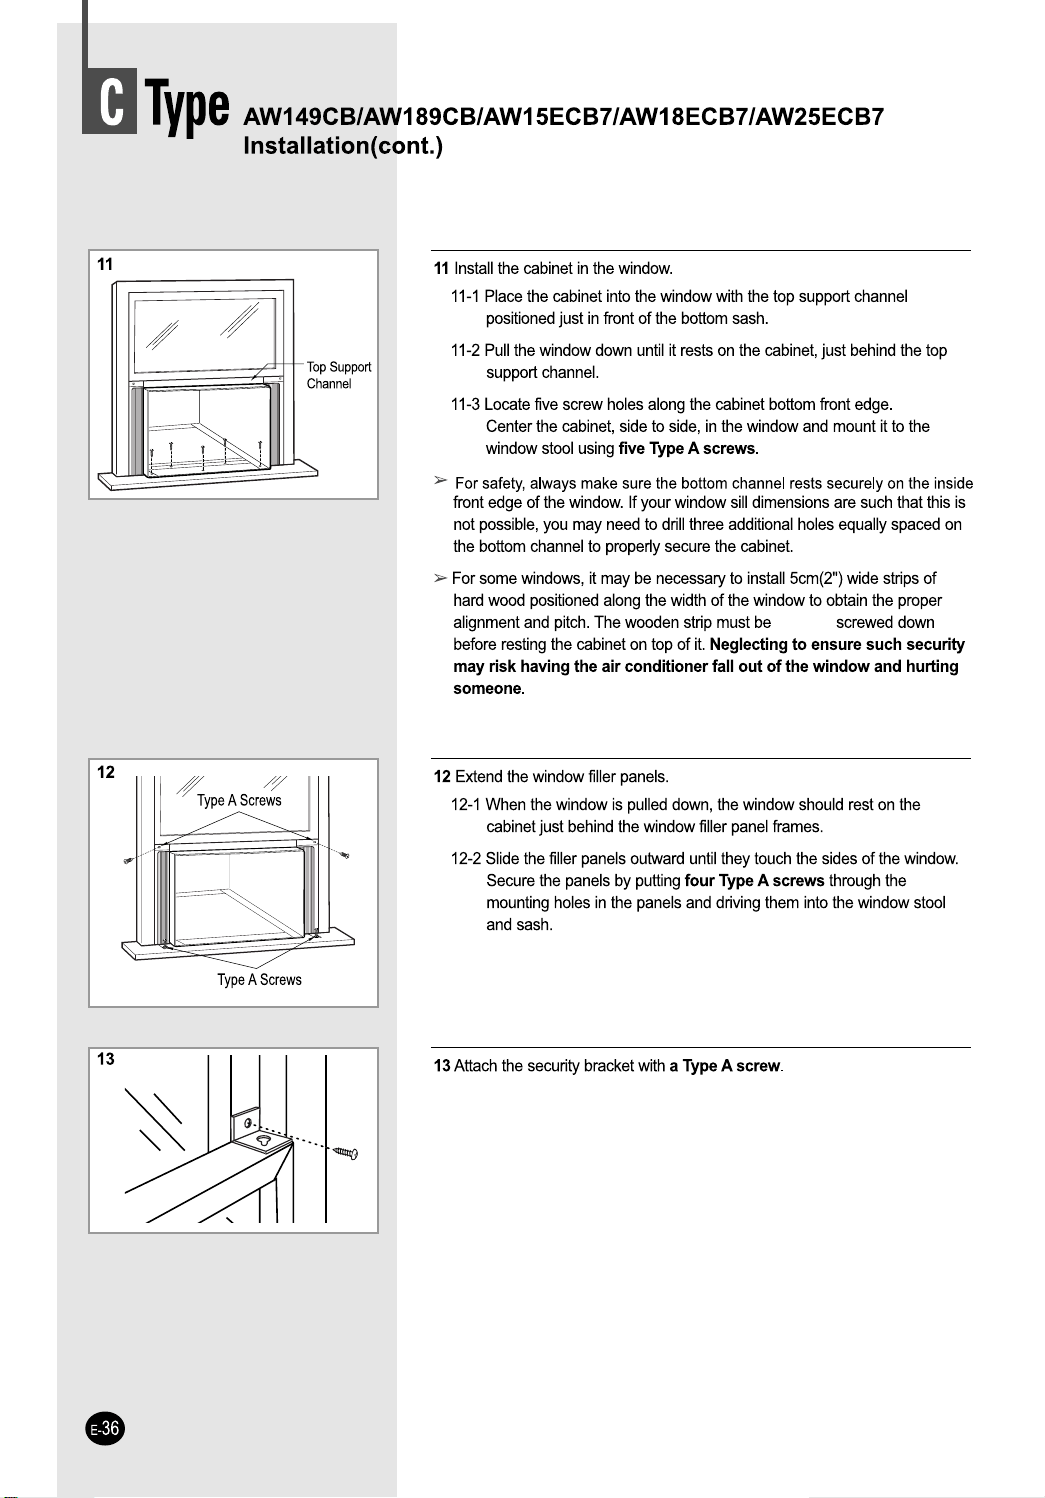
,QVWDOOWKHWRSVXSSRUWFKDQQHOZLWKILYH7\SH%VFUHZV SURYLGHG
0DNHVXUHWRVFUHZIURPWKHWRSRIWKHFDELQHWRQWRWKHFKDQQHO
7KHWRSVXSSRUWFKDQQHOLV³/´VKDSHG7KHKLJKVLGHRIWKHFKDQQHOPXVW
DOZD\VIDFHLQZDUGV
7KHHPSW\FDELQHWZLWKRXWWKHFKDVVLVLVQRZUHODWLYHO\OLJKW
,I\RXKDYHFRPPRQ'RXEOH+XQJ:LQGRZVSURFHHGWRLQVWDOOWKH
WRSVXSSRUWFKDQQHORQWKHFDELQHW
$WWDFKWKHZLQGRZILOOHUSDQHOVWRWKHFDELQHW
6OLGHWKHZLQGRZILOOHUSDQHOVDQGWKHLUIUDPHVLQWRWKHFKDQQHOVRQWKH
WRSDQGERWWRPRIWKHFDELQHW
$WWDFKWKHZLQGRZILOOHUSDQHOVWRWKHFDELQHWXVLQJHLJKW7\SH%VFUHZV
&DUHIXOO\UHPRYHWKHFKDVVLVIURPWKHFDELQHWE\SXOOLQJLWIRUZDUG
WRZDUGV\RX$ OLWWOHFDUHIXOOHYHUDJHZLWKDVFUHZGULYHUPD\KHOSWRVOLGH
WKHXQLWRXW
1RZZRXOGEHDJRRGWLPHWRLQVSHFWWKHIDQIRUGDPDJH
FDXVHGE\VKLSPHQW
7RS6XSSRUW&KDQQHO
5HPRYHWKHEDFNLQJIURPWKHWRSVXSSRUWFKDQQHOVHDOVWULSDQG
DWWDFKLWWRWKHERWWRPRIWKHWRSVXSSRUWFKDQQHO
7RSVXSSRUWFKDQQHO
VHDOVWULS
1ULA
(
$:&%$:&%$:(&%$:(&%$:(&%
,QVWDOODWLRQFRQW
(
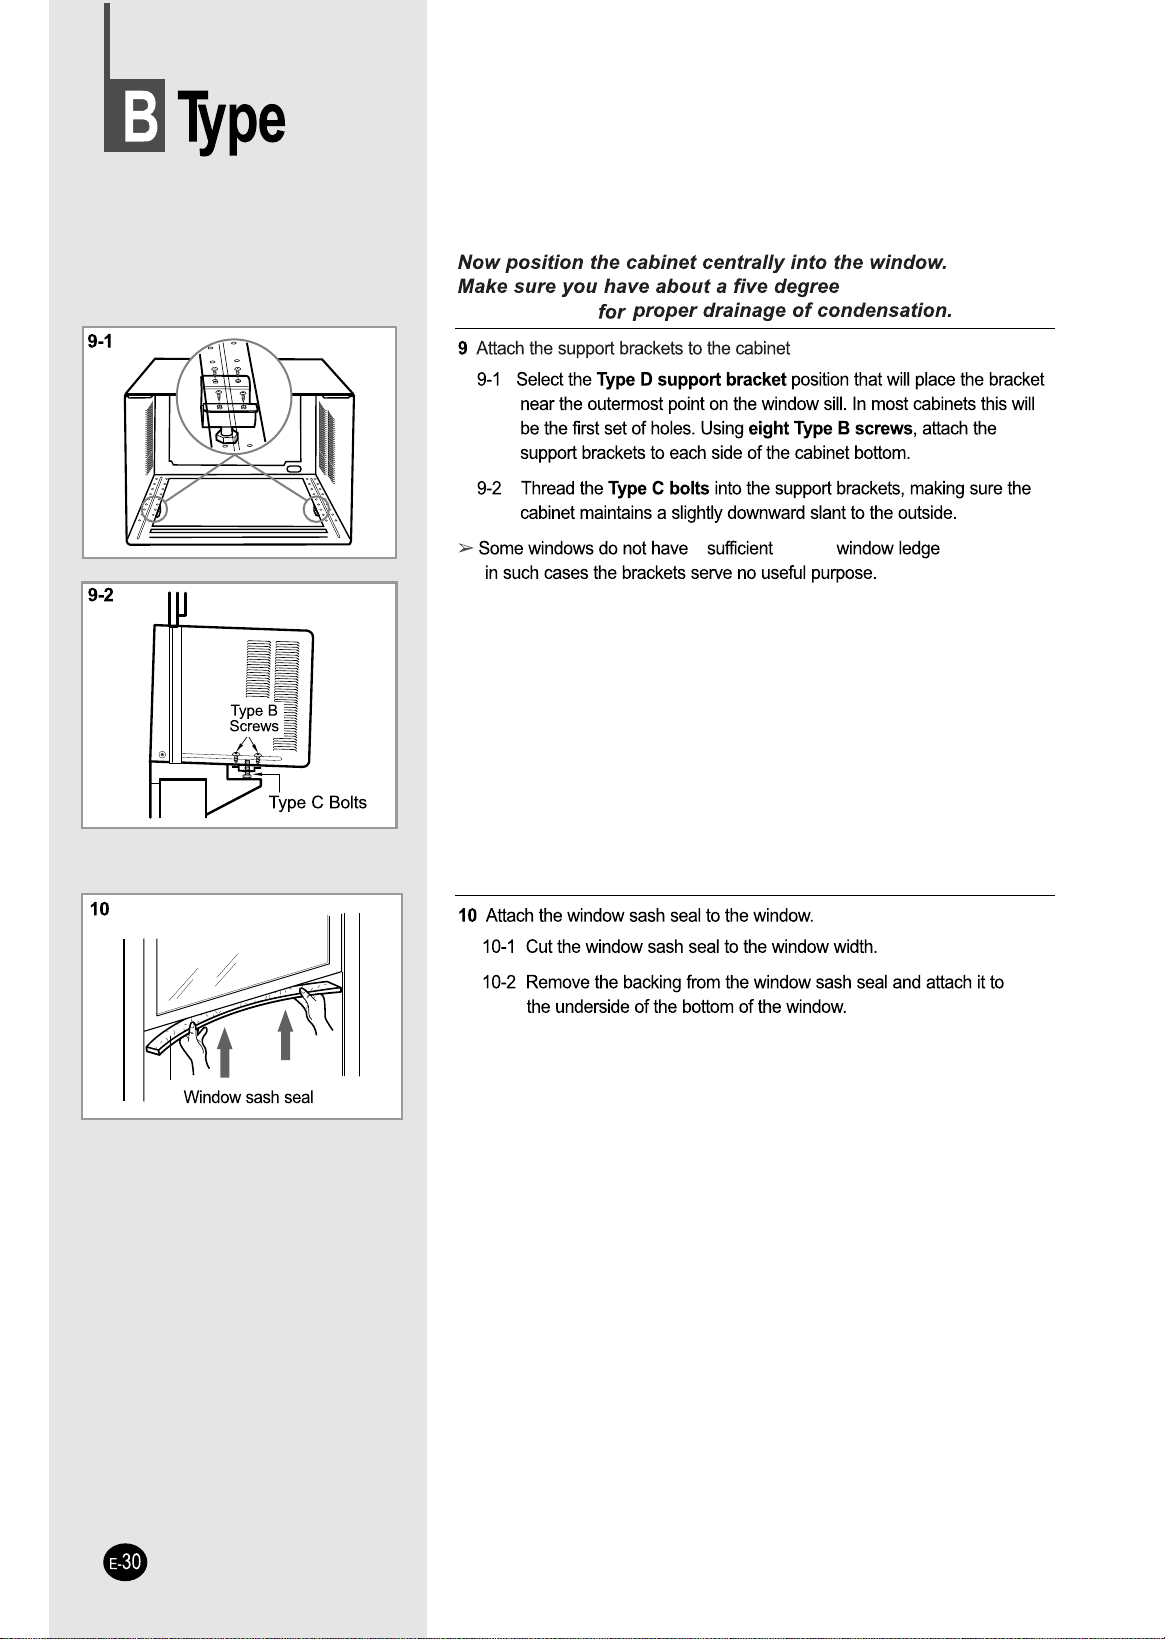
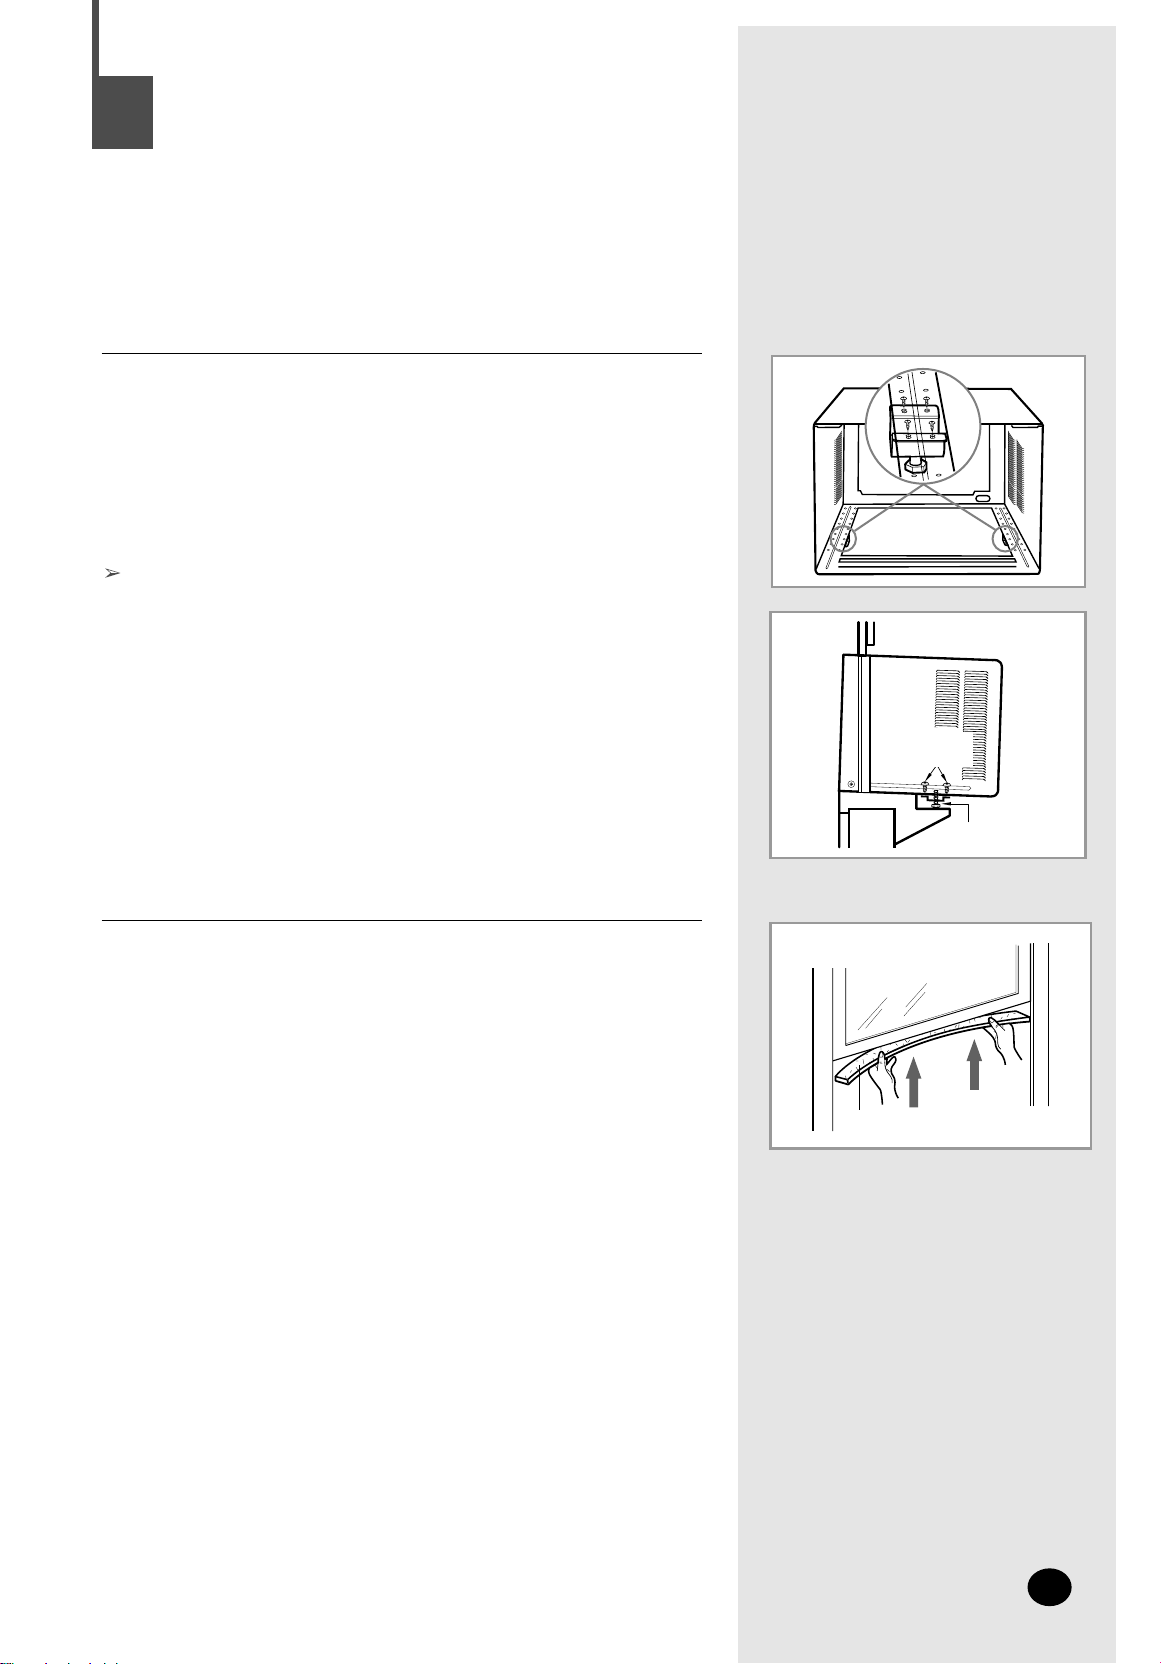
$WWDFKWKHVXSSRUWEUDFNHWVWRWKHFDELQHWIRUDGMXVWLQJWKHSLWFK
6HOHFWWKH7\SH'VXSSRUWEUDFNHW SRVLWLRQWKDWZLOOSODFHWKHEUDFNHW
QHDUWKHRXWHUPRVWSRLQWRQWKHZLQGRZVLOO,QPRVWFDELQHWVWKLVZLOO
EHWKHILUVWVHWRIKROHV8VLQJHLJKW 7\SH%VFUHZVDWWDFKWKH
VXSSRUWEUDFNHWVWRHDFKVLGHRIWKHFDELQHWERWWRP
7KUHDGWKH7\SH&EROWV LQWRWKHVXSSRUWEUDFNHWVPDNLQJVXUHWKH
FDELQHWPDLQWDLQVDVOLJKWO\GRZQZDUGVODQWWRWKHRXWVLGH
6RPHZLQGRZVGRQRWKDYHVXIILFLHQWZLQGRZOHGJHRQWKHRXWVLGHHGJHRI
WKHZLQGRZLQVXFKFDVHVWKHEUDFNHWVVHUYHQRXVHIXOSXUSRVH
1RZSRVLWLRQWKHFDELQHWFHQWUDOO\LQWRWKHZLQGRZ
0DNHVXUH\RXKDYHDERXWDILYHdownward slant towards
the outside backwards for SURSHUGUDLQDJHRIFRQGHQVDWLRQ
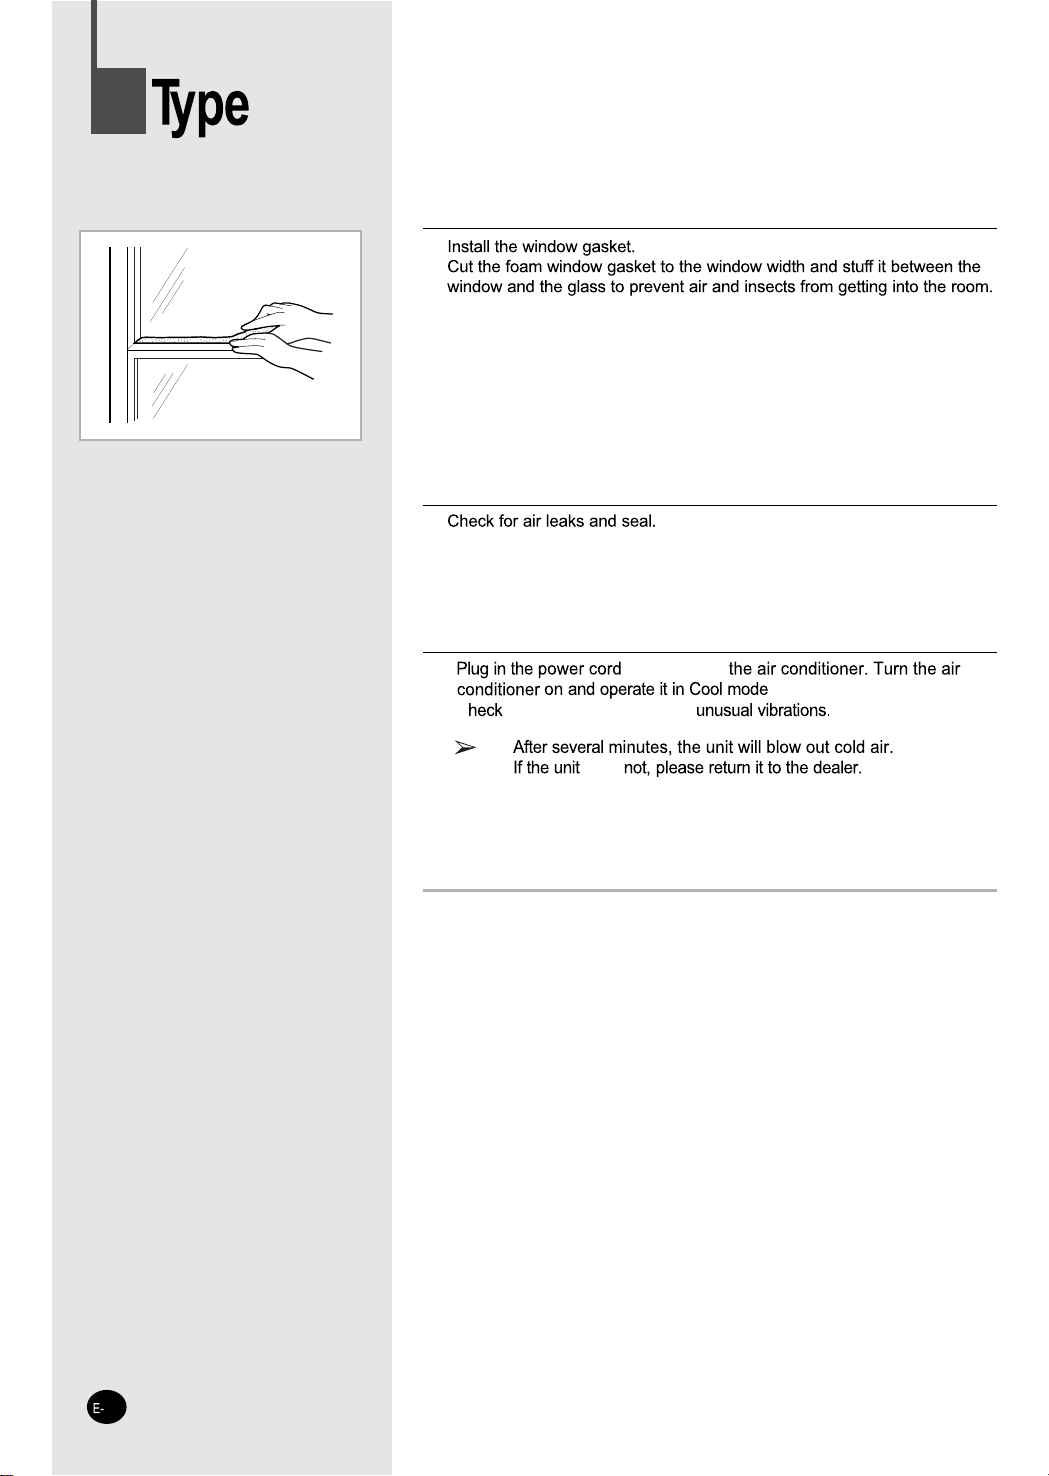
$WWDFKWKHZLQGRZVDVKVHDOWRWKHZLQGRZ
&XWWKHZLQGRZVDVKVHDOWRWKHZLQGRZZLGWK
5HPRYHWKHEDFNLQJIURPWKHZLQGRZVDVKVHDODQGDWWDFKLWWR
WKHXQGHUVLGHRIWKHERWWRPRIWKHZLQGRZ
7\SH&%ROWV
7\SH%
6FUHZV
:LQGRZVDVKVHDO
1ULA
$:&%$:&%$:(&%$:(&%$:(&%
,QVWDOODWLRQFRQW
VHFXUHO\
RIWKHERWWRP
JDVNHW
DQGFK
GRHVQRW

7KLVOLPLWHGZDUUDQW\EHJLQVRQWKHRULJLQDOGDWHRISXUFKDVHDQGLVYDOLGRQO\RQSURGXFWVSXUFKDVHGDQGXVHGLQWKH8QLWHG
6WDWHV:DUUDQW\UHSDLUVPXVWEHSHUIRUPHGE\6$0681*VDXWKRUL]HGVHUYLFHFHQWHU7RUHFHLYHZDUUDQW\VHUYLFHWKHRULJLQDO
GDWHGELOORIVDOHPXVWEHSUHVHQWHGXSRQUHTXHVWDVSURRIRISXUFKDVHWR6$0681*RU6$0681*VDXWKRUL]HGVHUYLFHFHQWHU
6$0681*ZLOOUHSDLURUUHSODFHDQ\SDUWIRXQGWREHGHIHFWLYHDWQRFKDUJHDVVWLSXODWHGKHUHLQZLWKQHZRUUHFRQGLWLRQHGSDUW V
GXULQJWKHOLPLWHGZDUUDQW\SHULRGVSHFLILHGDERYH7RUHTXHVWZDUUDQW\VHUYLFHWKHSXUFKDVHUPXVWFRQWDFW6$0681*IRU
SUREOHPGHWHUPLQDWLRQDQGVHUYLFHSURFHGXUHV6$0681*GRHVQRWZDUUDQWXQLQWHUUXSWHGRUHUURUIUHHRSHUDWLRQRIWKHSURGXFW
$OOUHSODFHGSDUWVDQGSURGXFWVEHFRPHWKHSURSHUW\RI6$0681*DQGPXVWEHUHWXUQHGWR6$0681*5HSODFHPHQWSDUWVDQG
SURGXFWVDVVXPHWKHUHPDLQLQJRULJLQDOZDUUDQW\RUQLQHW\GD\VZKLFKHYHULVORQJHU
,Q+RPH6HUYLFH
'XULQJWKHZDUUDQW\ODERUSHULRGLQKRPHVHUYLFHZLOOEHSURYLGHGVXEMHFWWRDYDLODELOLW\ZLWKLQWKHFRQWLJXRXV8QLWHG6WDWHV
,QKRPHVHUYLFHLVQRWDYDLODEOHLQDOODUHDV,IGXULQJLQKRPHVHUYLFHUHSDLUFDQQRWEHFRPSOHWHGLWPD\EHQHFHVVDU\WRUHPRYH
UHSDLUDQGUHWXUQWKHSURGXFW,ILQKRPHVHUYLFHLVXQDYDLODEOH6$0681*PD\HOHFWDWRXURSWLRQWRSURYLGHIRUWUDQVSRUWDWLRQRI
RXUFKRLFHWRDQGIURPD6$0681*DXWKRUL]HGVHUYLFHFHQWHU2WKHUZLVHWUDQVSRUWDWLRQWRDQGIURPWKH6$0681*DXWKRUL]HG
VHUYLFHFHQWHULVWKHUHVSRQVLELOLW\RIWKHSXUFKDVHU
7KLVOLPLWHGZDUUDQW\FRYHUVPDQXIDFWXULQJGHIHFWVLQPDWHULDOVDQGZRUNPDQVKLSHQFRXQWHUHGLQQRUPDOQRQFRPPHUFLDOXVHRI
WKLVSURGXFWDQGVKDOOQRWDSSO\WRWKHIROORZLQJLQFOXGLQJEXWQRWOLPLWHGWRGHOLYHU\DQGLQVWDOODWLRQGDPDJHZKLFKRFFXUV L Q
VKLSPHQWDSSOLFDWLRQVDQGXVHVIRUZKLFKWKLVSURGXFWZDVQRWLQWHQGHGIDLOXUHVRUSUREOHPVZKLFKDUHFDXVHGE\SURGXFWVRU
HTXLSPHQWQRWVXSSOLHGE\6$0681*DFFLGHQWVPLVXVHDEXVHQHJOHFWPLVDSSOLFDWLRQILUHZDWHUOLJKWQLQJRURWKHUDFWVRI
QDWXUHLQFRUUHFWHOHFWULFDOOLQHYROWDJHIOXFWXDWLRQVRUVXUJHVGDPDJHFDXVHGE\LPSURSHURUIDXOW\LQVWDOODWLRQSURGXFWDOWHUDWLRQRU
PRGLILFDWLRQLPSURSHURUXQDXWKRUL]HGUHSDLUFRVPHWLFGDPDJHRUH[WHULRUILQLVKSURGXFWZLWKDOWHUHGVHULDOQXPEHUVIDLOXUHWR
IROORZRSHUDWLQJDQGHQYLURQPHQWDOLQVWUXFWLRQVWKDWDUHFRYHUHGDQGSUHVFULEHGLQWKHLQVWUXFWLRQERRNFXVWRPHUDGMXVWPHQWV
URXWLQHPDLQWHQDQFHDQGFOHDQLQJFRQVXPDEOHLWHPVVXFKDVILOWHUVXVHRIQRQ6$0681*RUXQDXWKRUL]HGSDUWVVXSSOLHV
DFFHVVRULHVRUHTXLSPHQWZKLFKGDPDJHWKLVSURGXFWRUUHVXOWLQVHUYLFHSUREOHPV
7+(5($5(12(;35(66:$55$17,(627+(57+$17+26(/,67('$1''(6&5,%('$%29($1'12:$55$17,(6
:+(7+(5(;35(6625,03/,(',1&/8',1*%87 127 /,0,7('72$1< ,03/,(':$55$17,(62)0(5&+$17$%,/,
7< 25),71(66)25$ 3$57,&8/$5385326(6+$// $33/< $)7(57+((;35(66:$55$17< 3(5,2'667$7('
$%29($1'1227+(5(;35(66:$55$17< 25*8$5$17< *,9(1%< $1< 3(5621),5025&25325$7,21
:,7+5(63(&7 727+,6352'8&7 6+$// %(%,1',1*216$0681*6$0681*6+$// 127 %(/,$%/()25/266
2)5(9(18(25352),76)$,/85(725($/,=(6$9,1*62527+(5%(1(),7625$1< 27+(563(&,$/
,1&,'(17$/ 25&216(48(17,$/ '$0$*(6&$86('%< 7+(86(0,686(25,1$%,/,7< 7286(7+,6352'8&7
5(*$5'/(662)7+(/(*$/ 7+(25< 21:+,&+7+(&/$,0,6%$6('$1'(9(1,)6$0681*+$6%((1$'9,6('
2)7+(3266,%,/,7< 2)68&+'$0$*(61256+$// 5(&29(5< 2)$1< .,1'$*$,167 6$0681*%(*5($7(5,1
$02817 7+$17+(385&+$6(35,&(2)7+(352'8&7 62/'%< 6$0681*$1'&$86,1*7+($//(*('
'$0$*(:,7+287 /,0,7,1*7+()25(*2,1*385&+$6(5$6680(6$// 5,6.$1'/,$%,/,7< )25/266'$0$*(
25,1-85< 72385&+$6(5$1'385&+$6(563523(57< $1'7227+(56$1'7+(,53523(57< $5,6,1*287 2)
7+(86(0,686(25,1$%,/,7< 7286(7+,6352'8&7 62/'%< 6$0681*127 &$86('',5(&7/< %< 7+(
1(*/,*(1&(2)6$0681*7+,6/,0,7(':$55$17< 6+$// 127 (;7(1'72$1<21(27+(57+$17+(25,*,1$/
385&+$6(52)7+,6352'8&7,7,612175$16)(5$%/($1'67$7(6<285(;&/86,9(5(0('<
6RPHVWDWHVGRQRWDOORZOLPLWDWLRQVRQKRZORQJDQLPSOLHGZDUUDQW\ODVWVRUWKHH[FOXVLRQRUOLPLWDWLRQRILQFLGHQWDORU
FRQVHTXHQWLDOGDPDJHVVRWKHDERYHOLPLWDWLRQVRUH[FOXVLRQVPD\QRWDSSO\WR\RX7KLVZDUUDQW\JLYHV\RXVSHFLILFOHJDOULJKWV
DQG\RXPD\DOVRKDYHRWKHUULJKWVZKLFKYDU\IURPVWDWHWRVWDWH
7RREWDLQZDUUDQW\VHUYLFHSOHDVHFRQWDFW6$0681*DW
)LYH<HDUV3DUWV/DERU DQG&RPSUHVVRU:DUUDQW\
6$0681*(/(&7521,&6$0(5,&$,1&&21680(5(/(&7521,&6&86720(56(59,&(
&KDOOHQJHU5RDG5LGJHILHOG3DUN1-
6$0681*
ZZZVDPVXQJFRP
6$0681*5220$,5&21',7,21(5
7KLV6$0681*EUDQGSURGXFWDVVXSSOLHGDQGGLVWULEXWHGE\6$0681*(/(&7521,&6$0(5,&$,1&
6$0681*DQGGHOLYHUHGQHZLQWKHRULJLQDOFDUWRQWRWKHRULJLQDOFRQVXPHUSXUFKDVHULVZDUUDQWHGE\6$0681*
DJDLQVWPDQXIDFWXULQJGHIHFWVLQPDWHULDOVDQGZRUNPDQVKLSIRUDOLPLWHGZDUUDQW\SHULRGRI
/,0,7(':$55$17< 7225,*,1$/ 385&+$6(5