DB98-27303A(1)
E-3
Contents
PREPARING YOUR AIR CONDITIONER
Safety Precautions ......................................................................................... 2
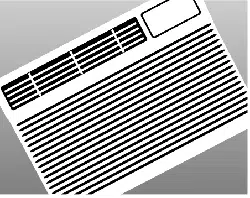
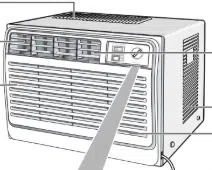
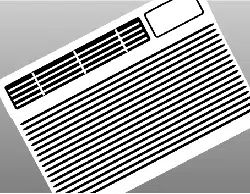
Description of Each Component .................................................................... 4
Remote Control - Buttons .............................................................................. 5
Getting Started ............................................................................................... 6
Inserting the Remote Control Batteries .......................................................... 7
OPERATING YOUR AIR CONDITIONER
Cooling Your Room ........................................................................................ 8
Airing Your Room ........................................................................................... 9
Removing Excess Humidity ............................................................................ 10
Adjusting the Air Flow Direction Horizontally .................................................. 11
Adjusting the Air Flow Direction Vertically ...................................................... 11
PROGRAMMING YOUR AIR CONDITIONER
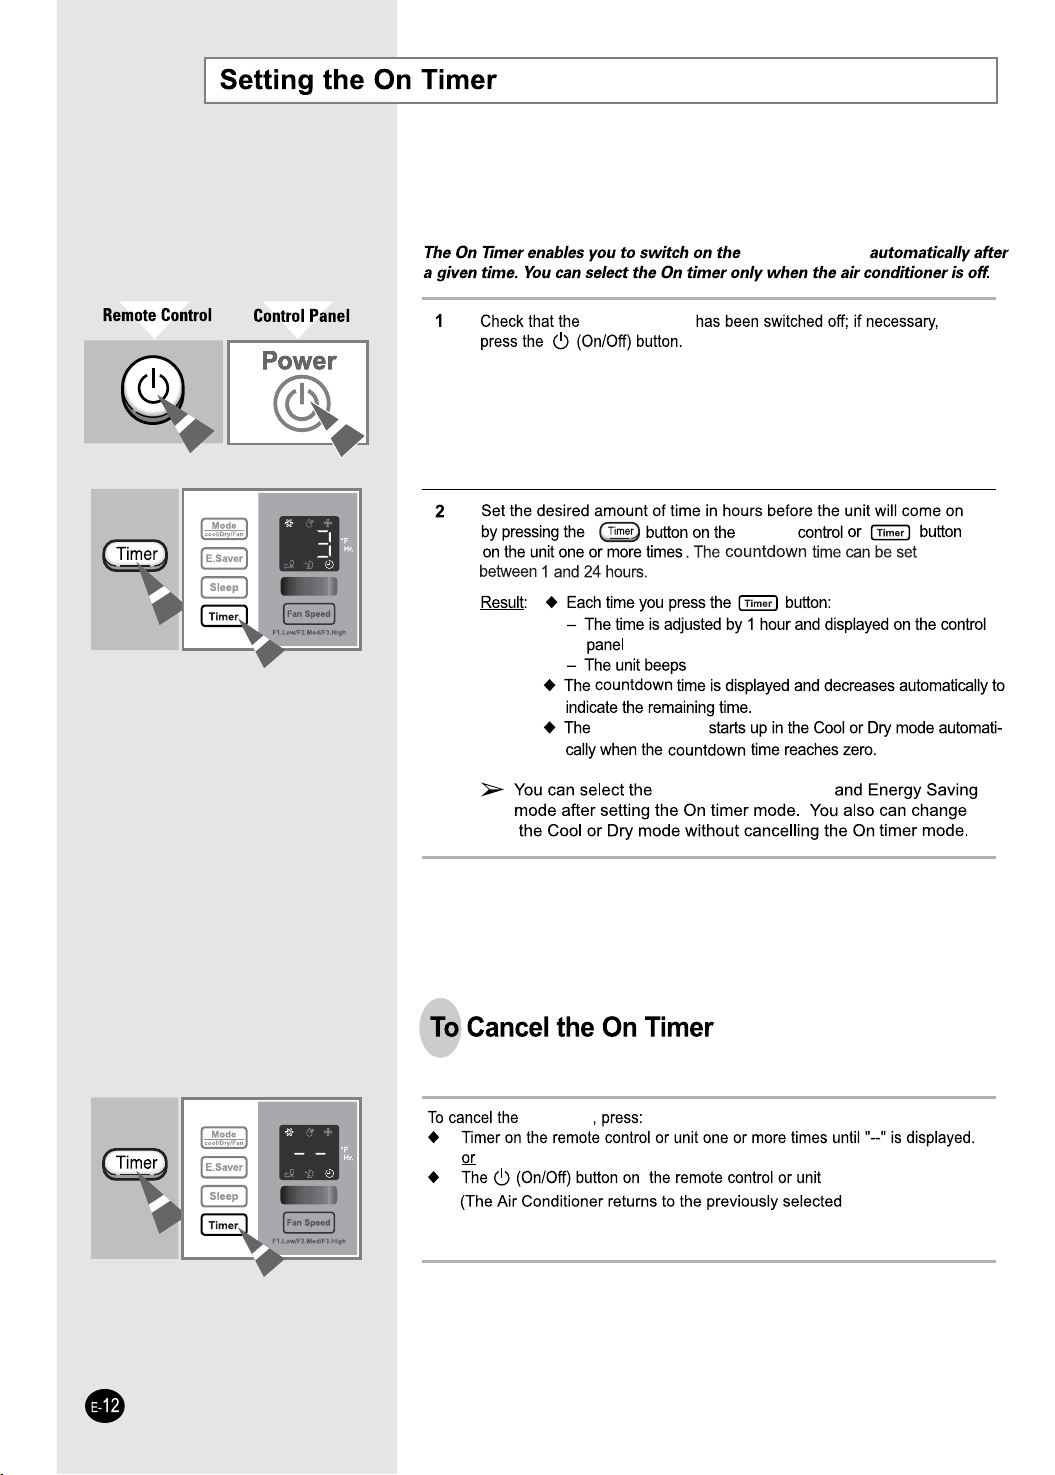
Setting the On Timer ...................................................................................... 12
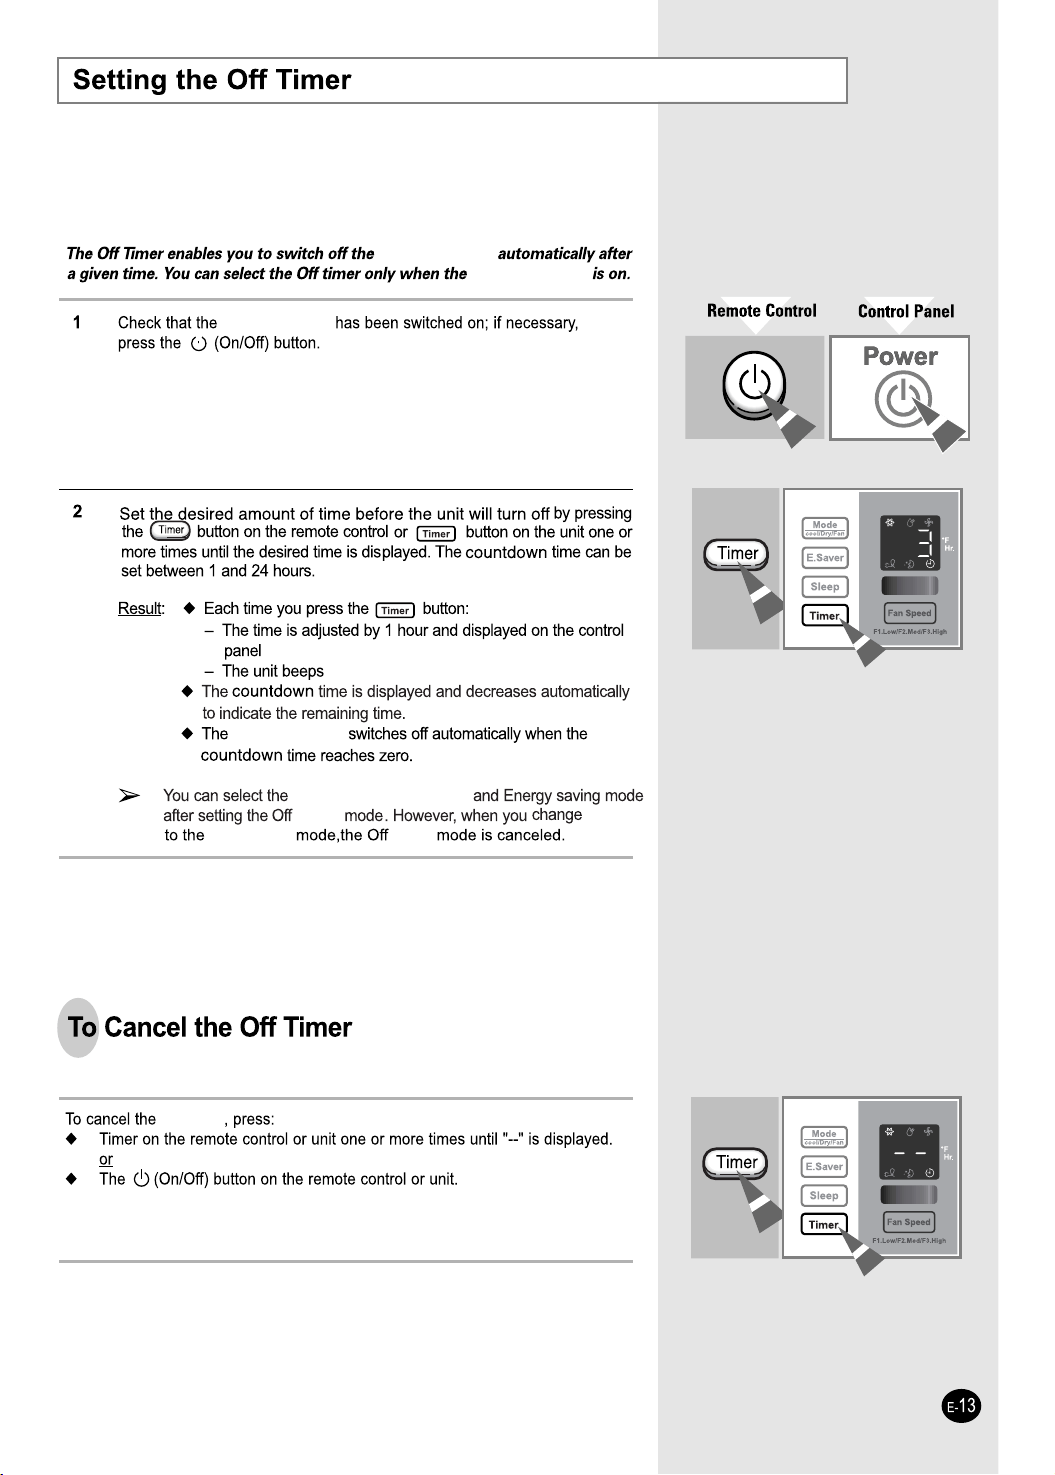
Setting the Off Timer ...................................................................................... 13
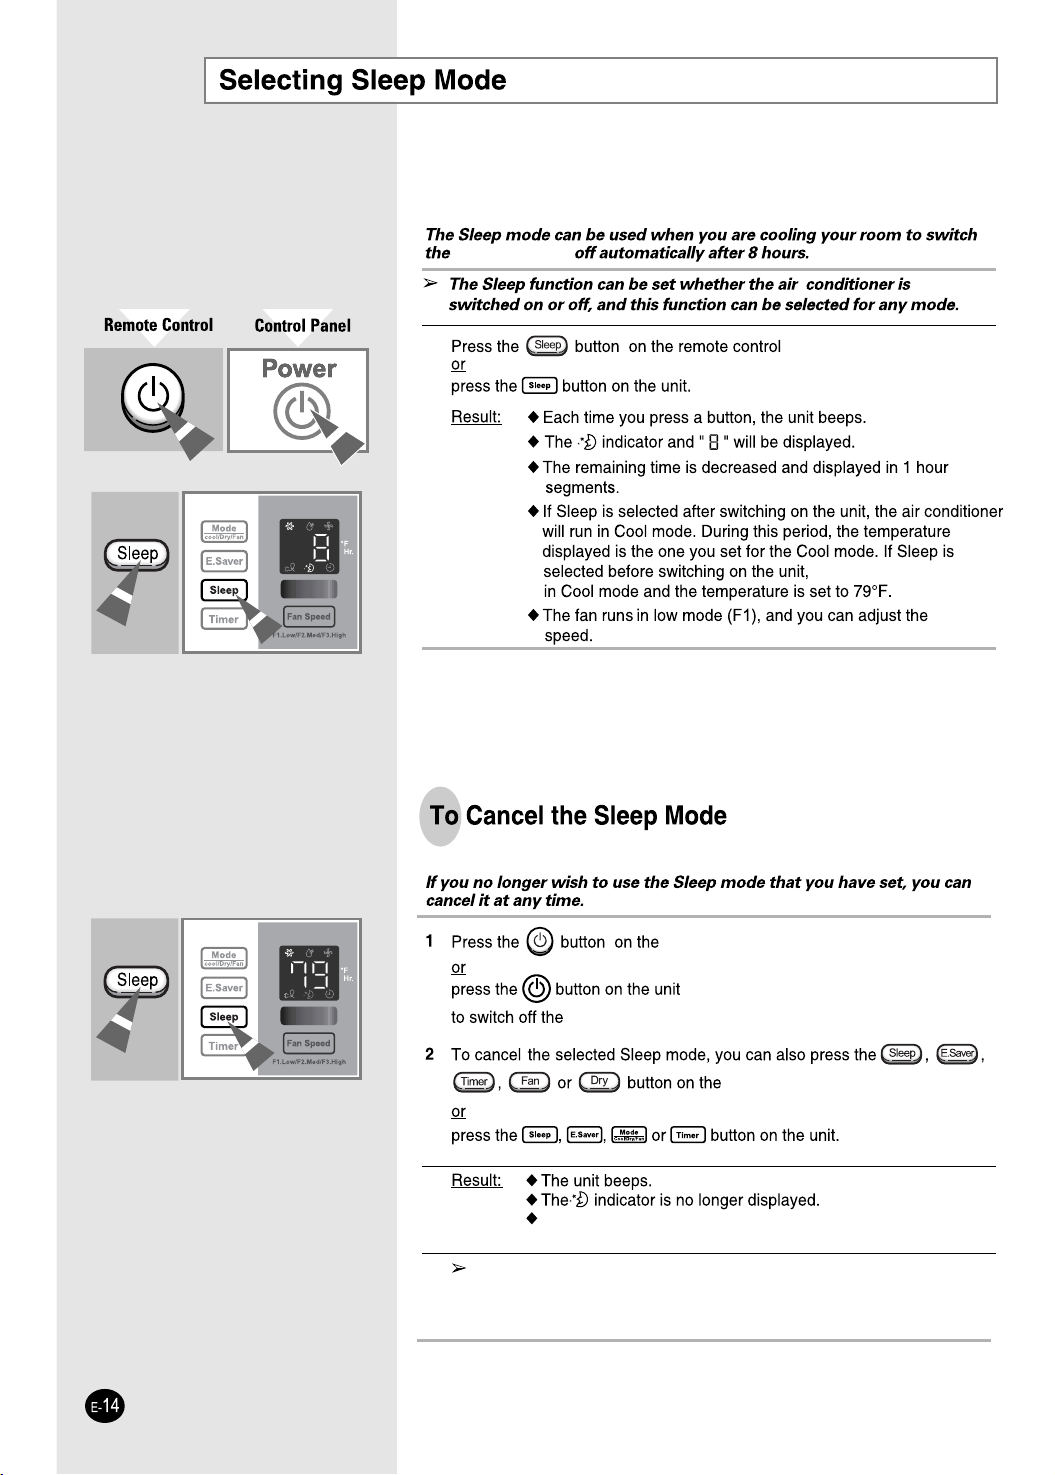
Setting the Sleep Timer .................................................................................. 14
Selecting Energy Saving mode ...................................................................... 15
R
ECOMMENDATIONS FOR USE
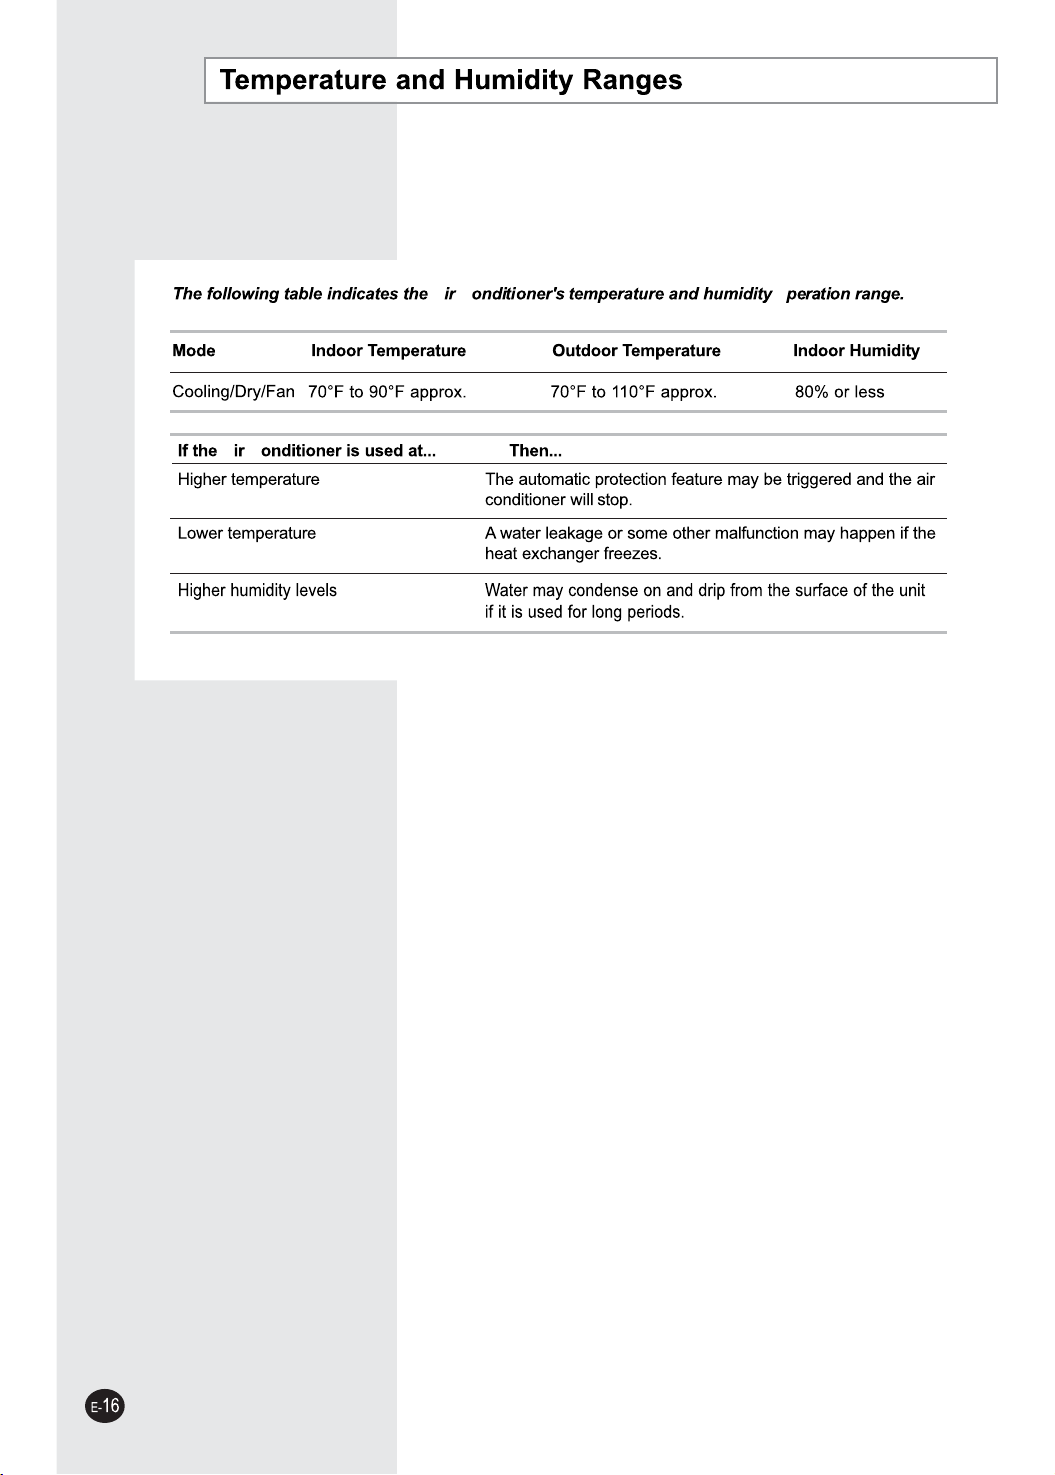
Temperature and Humidity Ranges ................................................................ 16
Cleaning Your Air Conditioner ........................................................................ 17
Troubleshooting .............................................................................................. 18
Technical Specifications ................................................................................. 19
......................................................................................................... 20
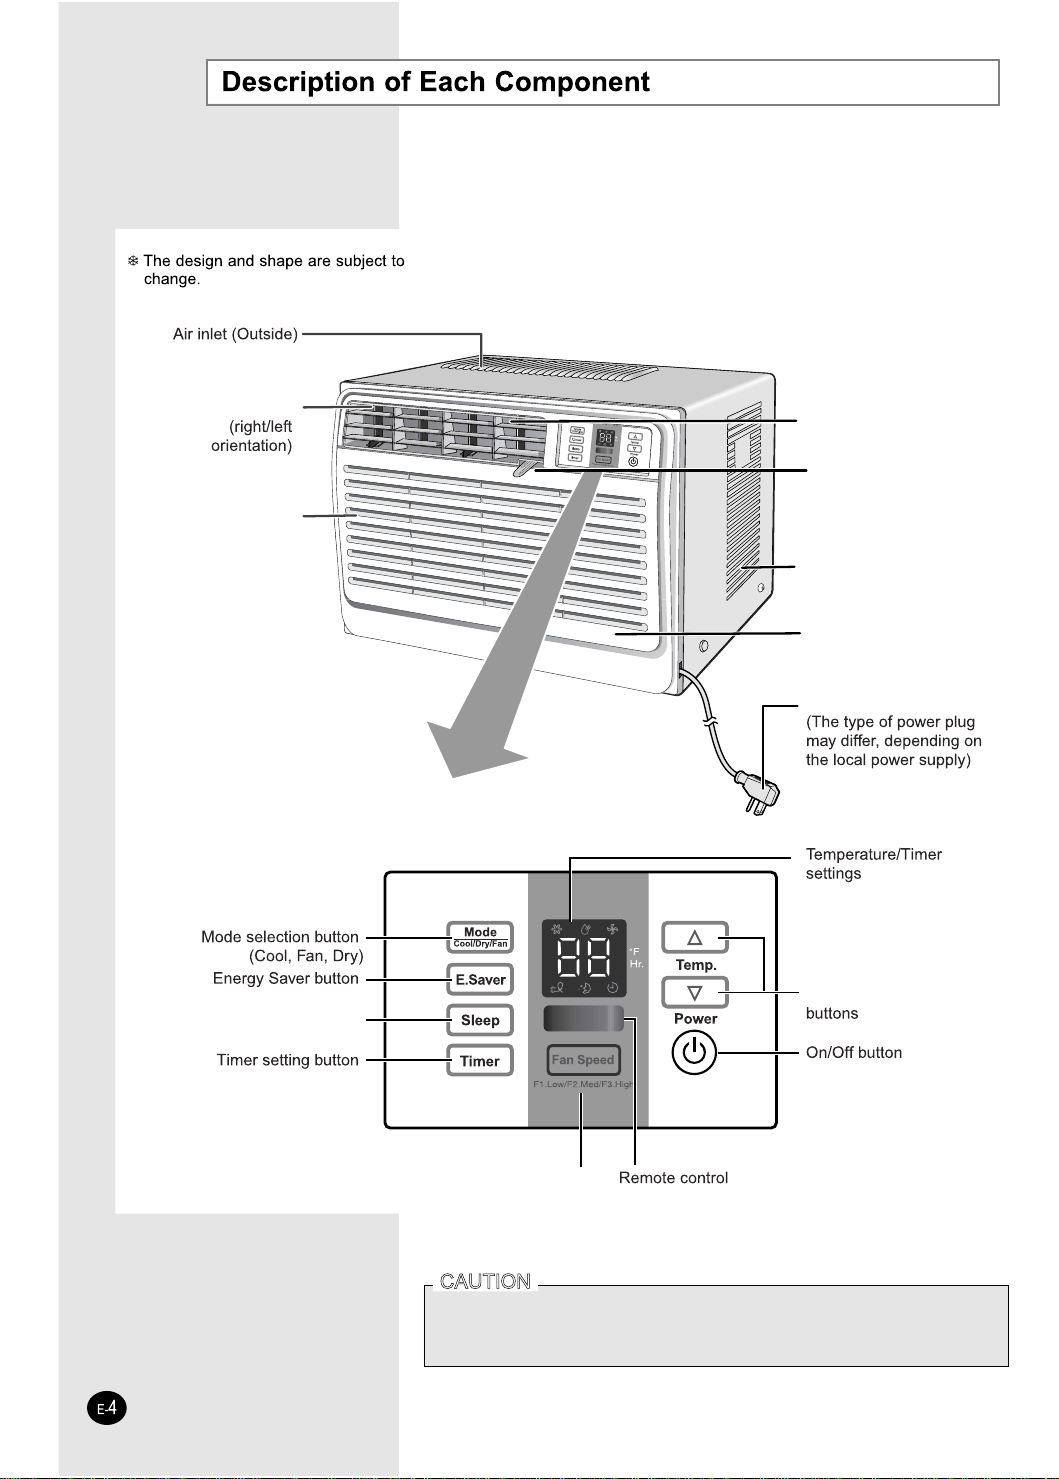
Front Grille
.
The Power Plug contains a Reset button that will automatically shut down
the air conditioner in the event of a power surge. To restart the unit, press
the Reset button and the unit will return to normal operation in 2-3 minutes.
Inner Air Flow
Blades
Air Outlet
Ventilation Lever
Air Inlet (Outside)
Air Filter (Inside)
Power Plug
Sleep Timer setting button
Temperature Adjustment
Fan Speed Adjustment button
E-5
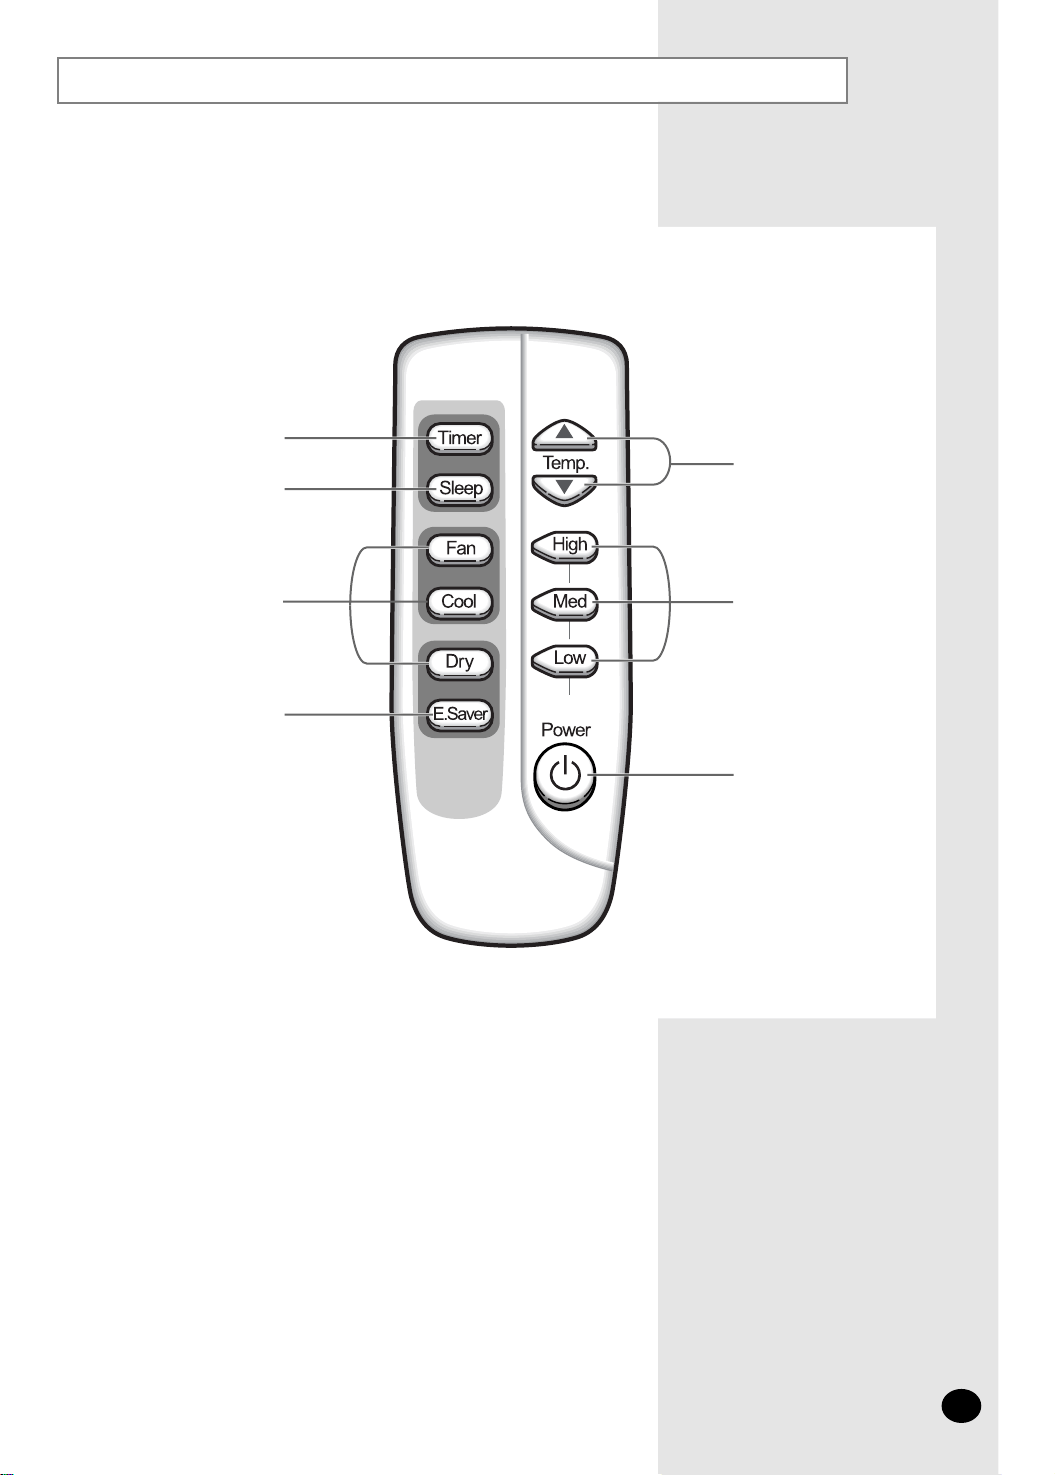
Remote Control - Buttons
Timer setting button
Temperature
Adjustment
buttons
Fan Speed
Adjustment
buttons
On/O
ff button
Sleep Timer setting
button
Mode selection
buttons
Energy S
aver button


E-
7
Inserting the Remote Control Batteries
Push the battery cover on the rear of the remote control with your thumb
in the direction of the arrow and remove it.
Insert the two batteries, taking care to respect the polarities :
X + on the battery with + on the remote control.
X - on the battery with - on the remote control.
1
2
Close the cover by sliding it back until it clicks into place.
3
X Use two AAA, LR03 1.5V batteries.
X Do not use old batteries or different kinds of batteries together.
X Batteries may be completely discharged after 12 months, even
if they have not been used.
You must insert or replace the remote control batteries when :
X You purchase the air conditioner
X The remote control does not work correctly
±
R
I higher than the selected temperature,
the Air Conditioner
starts cooling
A
C
A C
It will begin to cool after three minutes
R
is displayed.
You must select the Cool mode if you wish to lower the temperature
in your room. You can also set the Fan Speed.
F S
R
S
Remote Control
Contr
o
l Panel
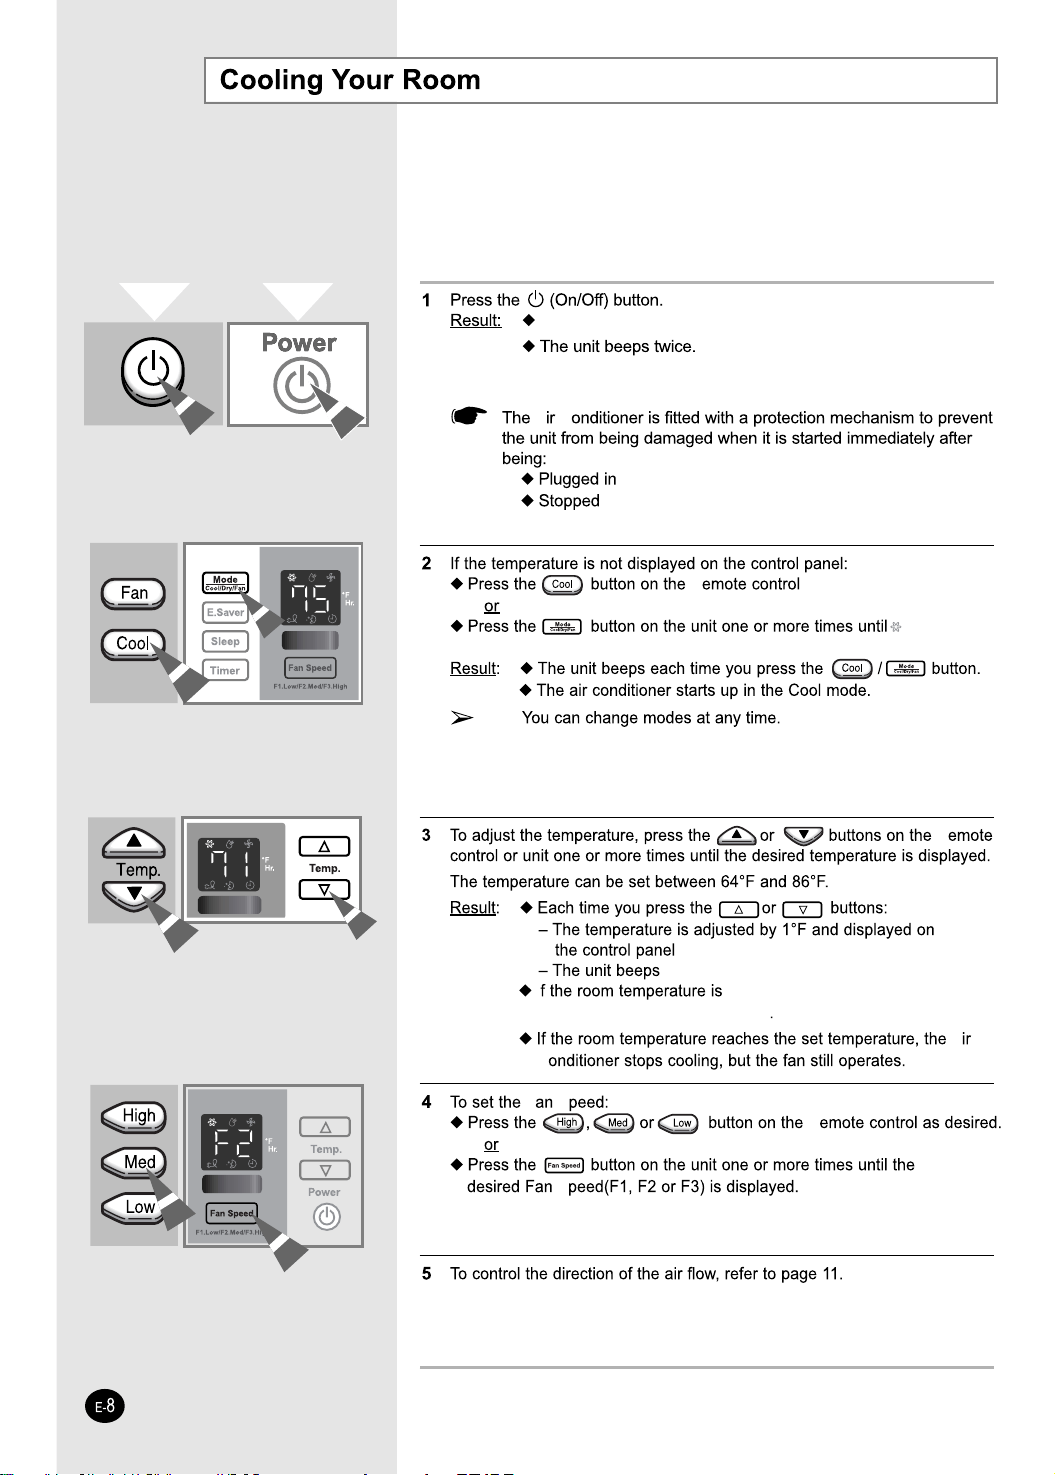
The Air Conditioner starts up in Cool mode.

E-9
Airing Your Room
If you want to provide air circulation without cooling, you can use
the
Fan mode.
If necessary, press the (On/Off) button.
Result: The Air Conditioner starts up in Cool mode
.
The unit beeps twice.
2
To set the Fan Speed:
Press the , or button on the Remote control as desired.
or
Press the button on the unit one or more times until the
desired
Fan Speed(F1, F2 or F3) is displayed.
4
To control the direction of the air flow, refer to page 11.
5
If the Fan Speed(F1, F2 or F3) is not displayed on the control panel:
Press the button on the remote control
or
Press the button on the unit one or more times until the Fan Speed
(F1,
F2 or F3) is displayed.
Result
:
The unit beeps each time you press the / button.
The Air Conditioner starts up in Fan mode.
You can change modes at any time.
When
the Air Conditioner is in Fan mode, the temperature
cannot
be set or displayed.
3
Mode
Cool/Dry/Fan
Fan Speed
Mode
Cool/Dry/Fan
Remote Control
Control Panel
1
If you wish to evacuate stale air outside, push the ventilation lever on the
front of the unit to the right and the open position (
).
Result: The air inside the room circulates and stale air is evacuated
outside
.
Otherwise, push the ventilation lever to the left and the closed
position (
).
Result: The air simply circulates inside the room.
E-
10
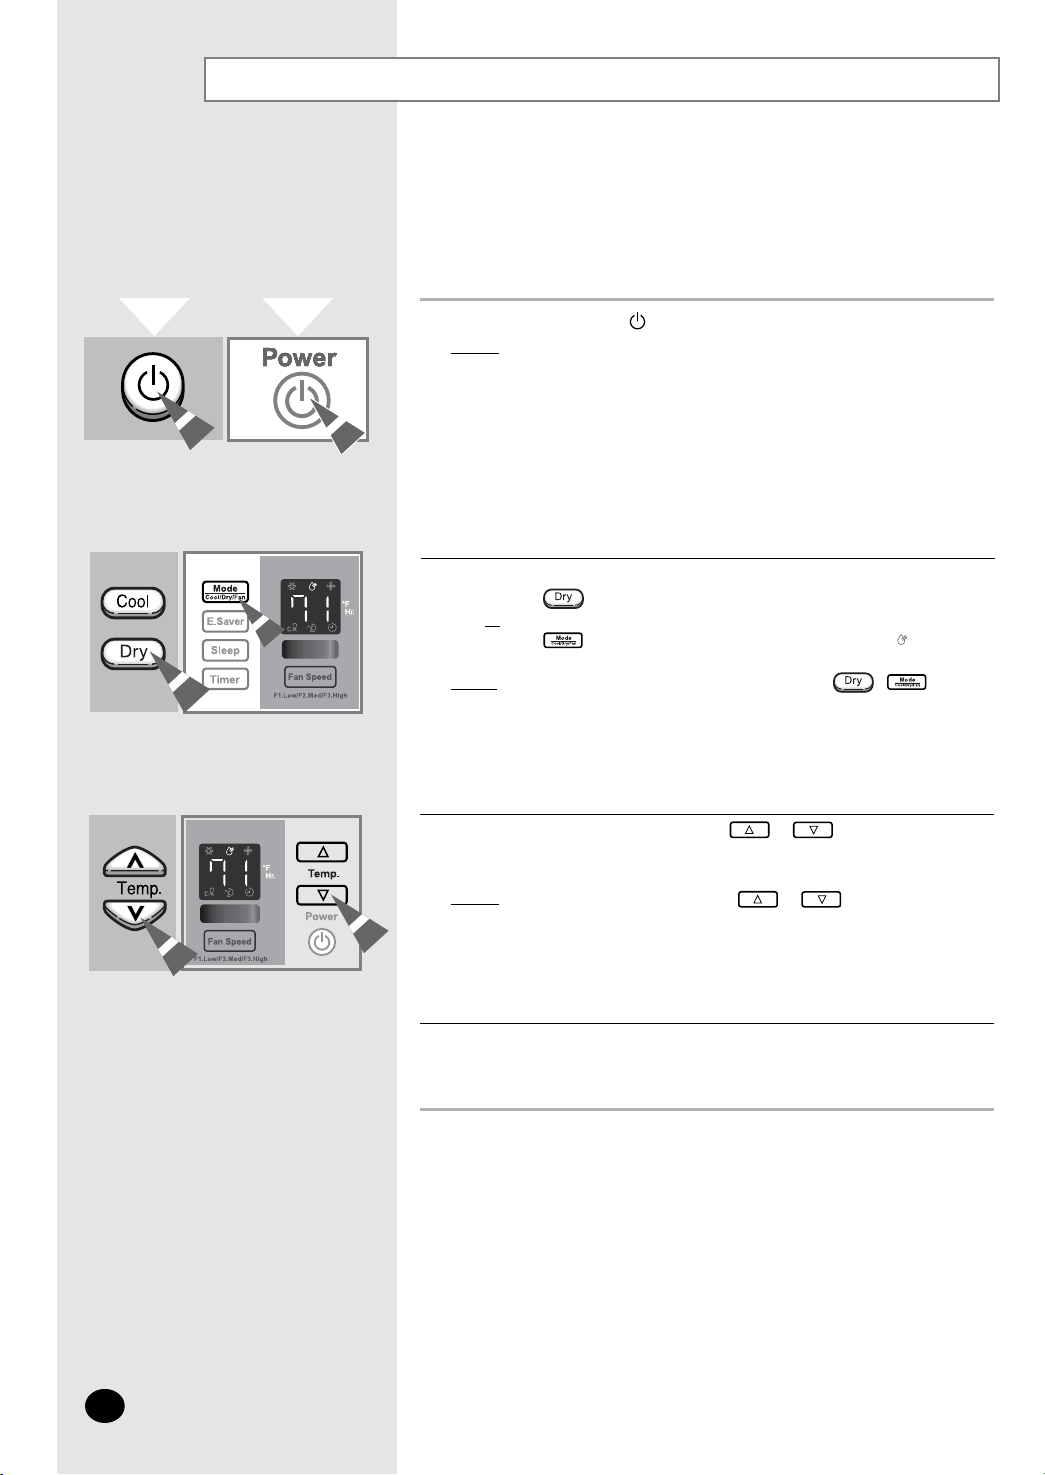
Removing Excess Humidity
Remote Control
Control Panel
If the temperature is not displayed on the control panel:
X
Press the button on the Remote control
or
X
Press the button on the unit one or more times until is displayed.
Result
:
X
The unit beeps each time you press the / button.
X
The Air Conditioner starts up in Cool mode.
±
You can change modes at any time.
2
If the atmosphere in your room is very humid or damp, you can remove
excess humidity without lowering the room temperature too much.
1 If necessary, press the (On/Off) button.
Result
: X The Air Conditioner starts up in Cool mode.
X The unit beeps.
The Air Conditioner is fitted with a protection mechanism to pre-
vent the unit from being damaged when it is started immediately
after being:
X Plugged in
X Stopped
It will begin to cool after three minutes.
3 To adjust the temperature, press the
or
buttons one or
more times until the desired temperature is displayed.
The temperature can be set between
64°F and 86°F
.
Result
: X Each time you press the
or
buttons:
- The temperature is adjusted by 1°F
- The unit beeps
X The Air Conditioner starts removing the excess humidity;
the quality of air is adjusted automatically.
4 To control the direction of the air flow, refer to page 11.
E-11
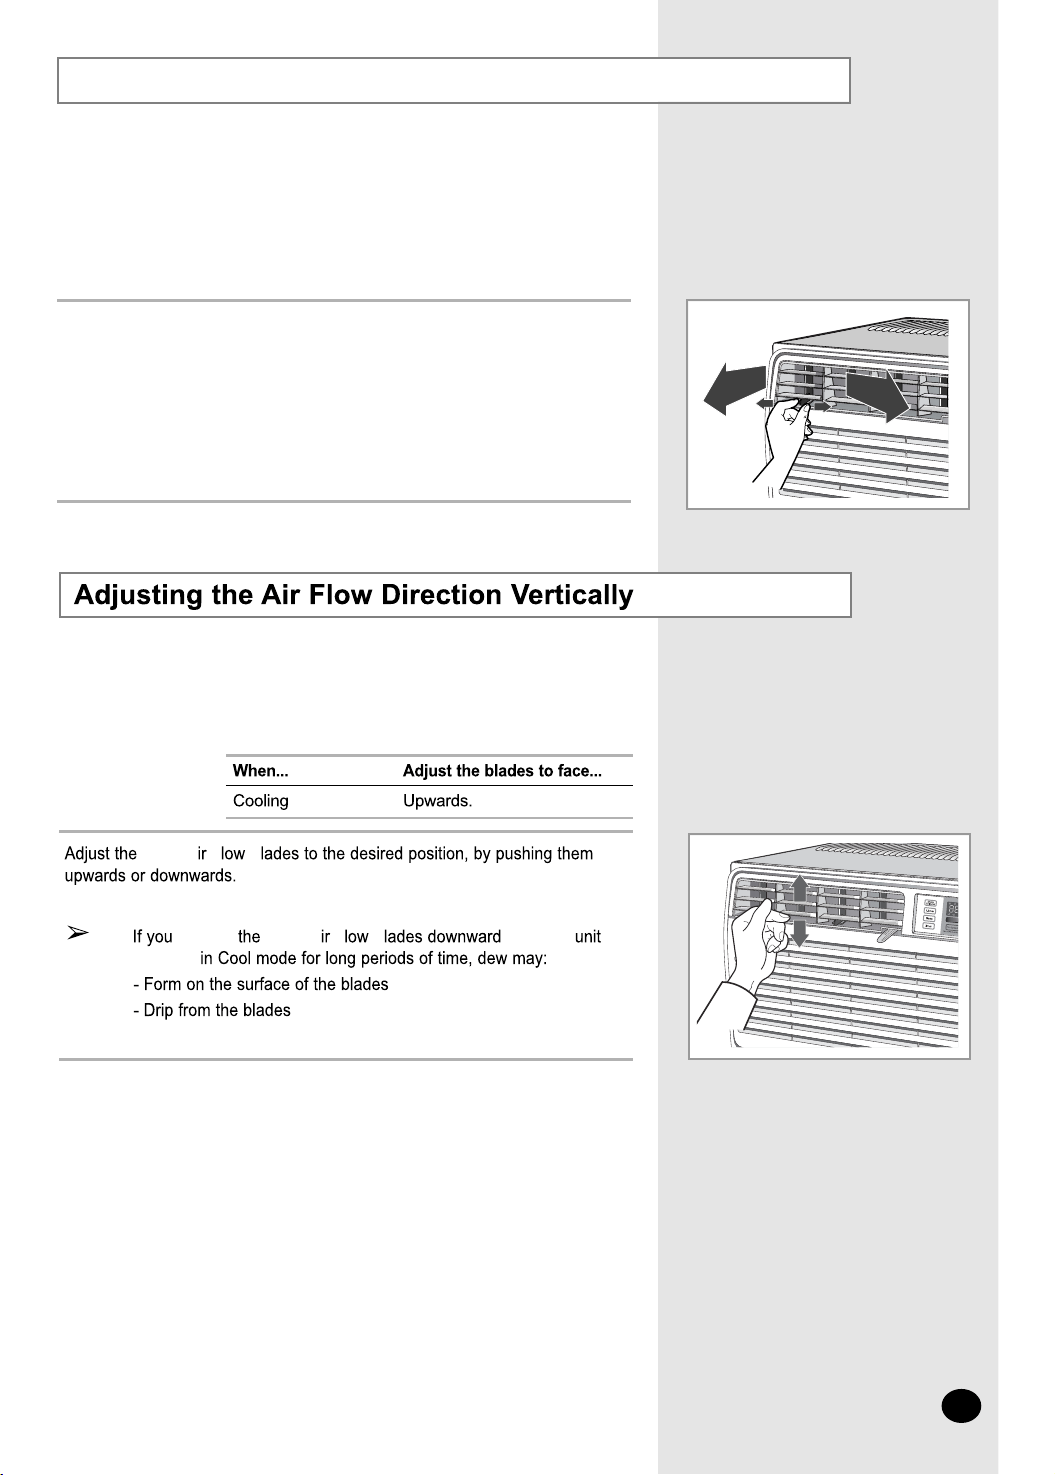
Adjusting the Air Flow Direction Horizontally
Depending on the position of the unit in your room, you can adjust
the
orientation of the
I
nner
A
ir
F
low
B
lades on the unit.
Adjust the Inner Air Flow Blades to the desired position by sliding them side to side.
The
O
uter
A
ir
F
low
B
lades can be adjusted to control the vertical air
flo
w direction.
RECOMMENDATION
Outer A F B
position Outer A F B while the
operates
Air Conditioner
Air Conditioner
Remote
Air Conditioner
Fan Speed,Temperature
On
Timer
settings.)
Air Conditioner
Air Conditioner
Air Conditioner
Air Conditioner
Fan Speed,Temperature
Fan Speed
Timer
Timer
Off Timer
Air Conditioner
Remote control
Air Conditioner.
Remote control
The Air Conditioner will operate with the previously selected
settings.
If you select the Energy Saving mode while in Sleep mode, the Sleep
mode will be cancelled and the air conditioner will start in the
Energy Saving mode.
the Air Conditioner starts
E-
15
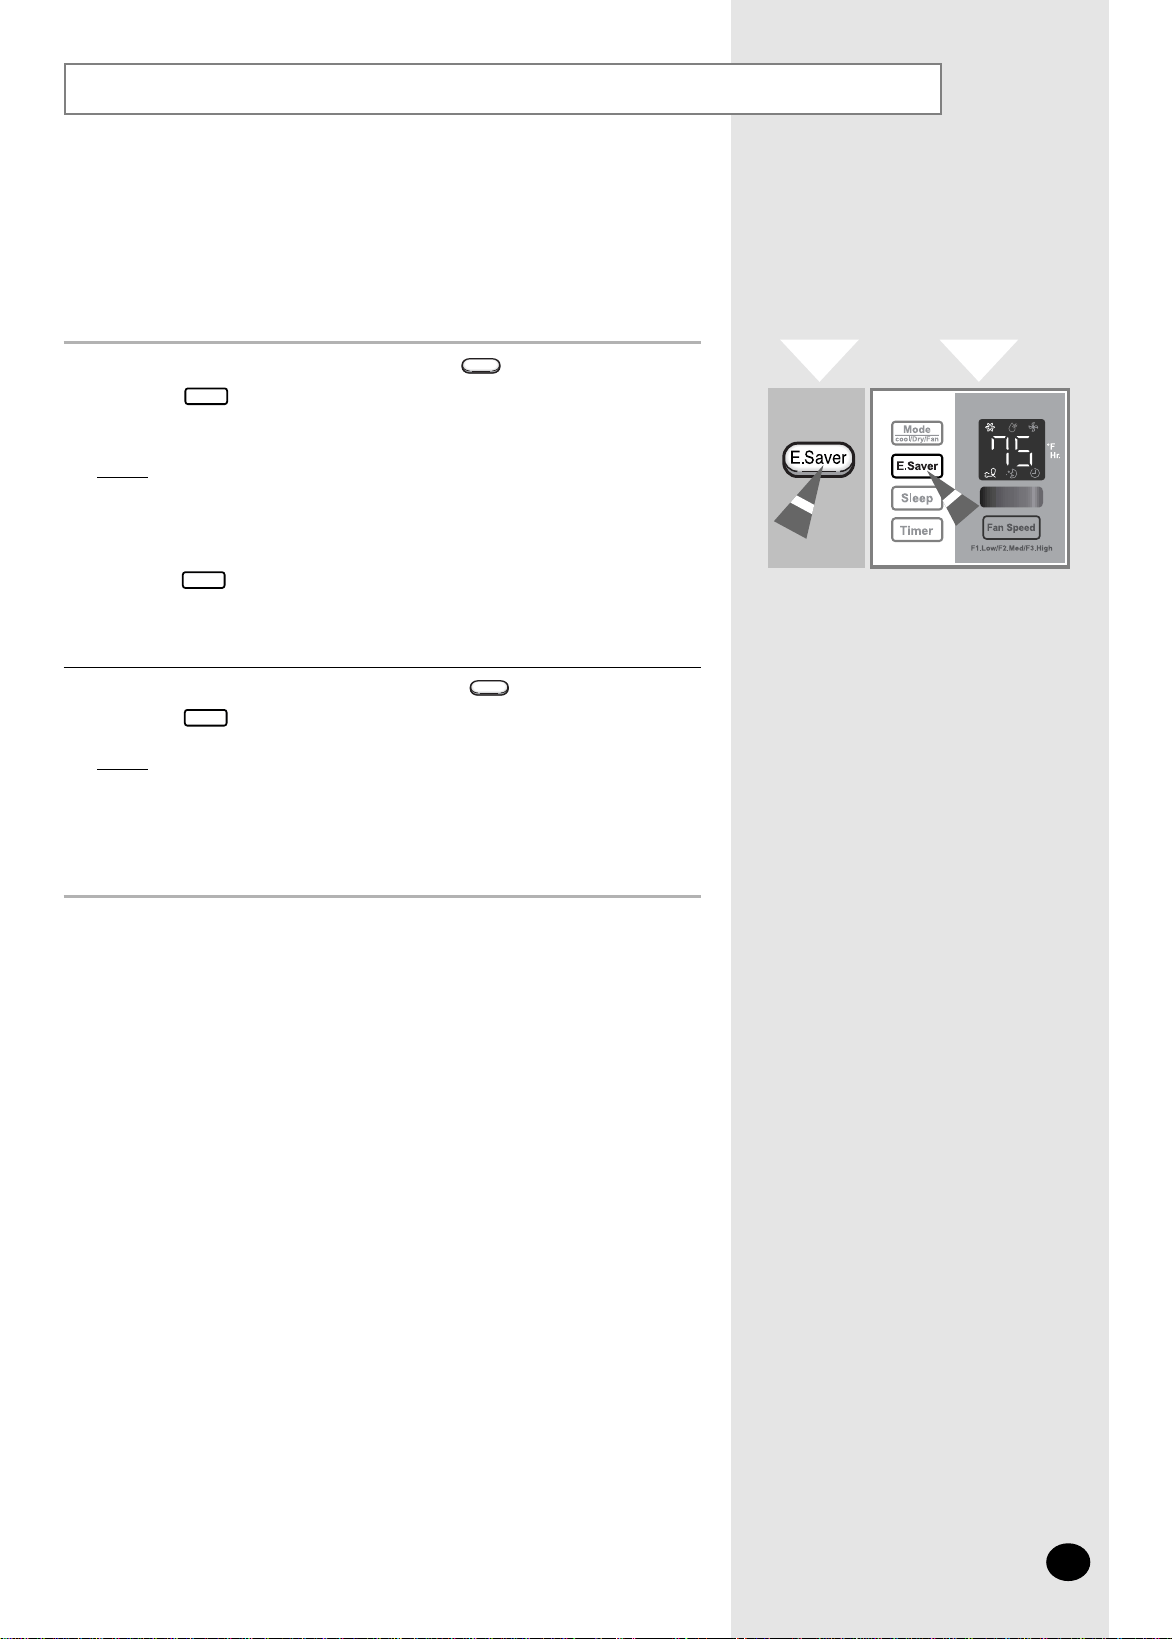
Selecting Energy Saving Mode
To select the Energy Saving mode, press the button on the Remote
control or button on the unit one or more times until the Energy
Saver indicator lights up.
Result
:
X
The fan and compressor cycle on and off together.
X
The fan will continue to run for a short time after the
compressor cycles off.
±
If you would like the Air Conditioner to run in Dry mode, do not press
the button. You cannot use the Dry mode
while in the Energy
Saving mode.
To stop the Energy Saving mode, press the button on the remote
control or button on the unit again.
Result: The fan runs at all times, while the compressor cycles on and off.
±
If you select the Sleep Timer while in the Energy Saving mode, the
Energy Saving mode will be cancelled and the Air Conditioner will
start in the Sleep Timer mode.
If you wish to save energy when using your Air Conditioner,
select the Energy Saving mode.
1
2
E.Saver
E.Saver
E.Saver
E.Saver
E.Saver
Remote Control
Control Panel
A C
s
s
A C o
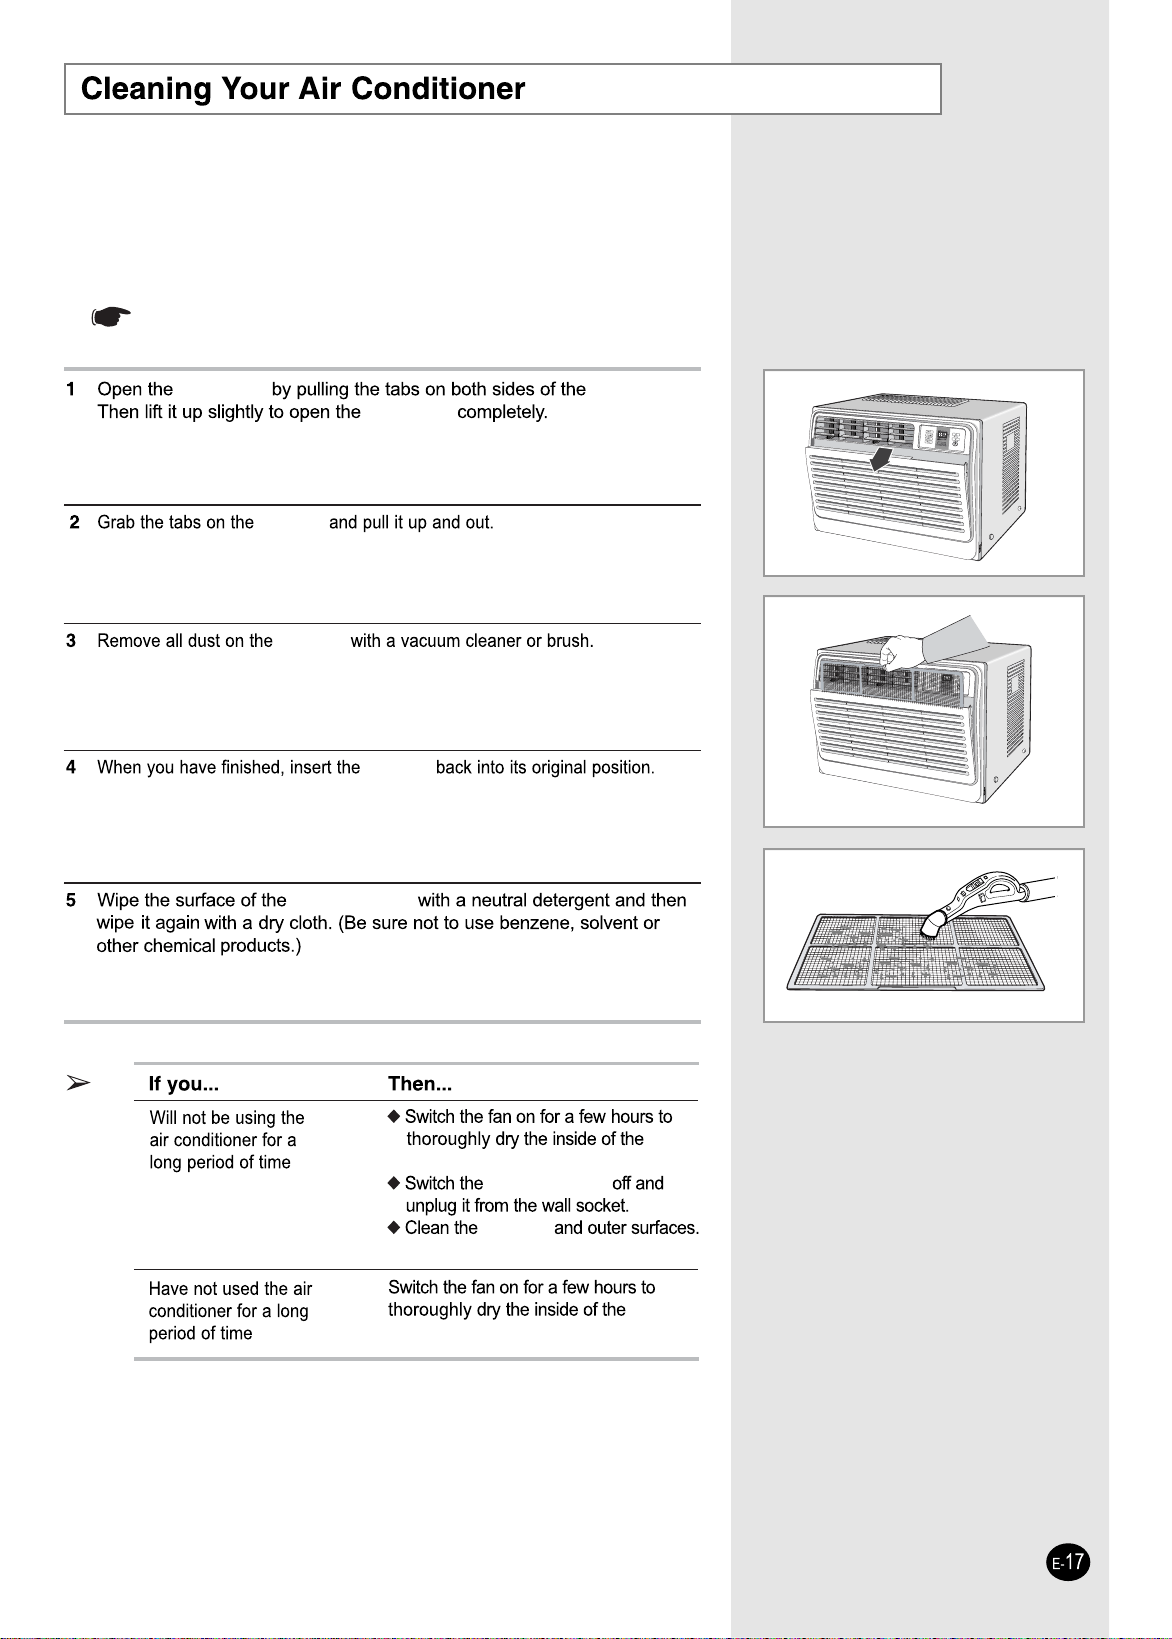
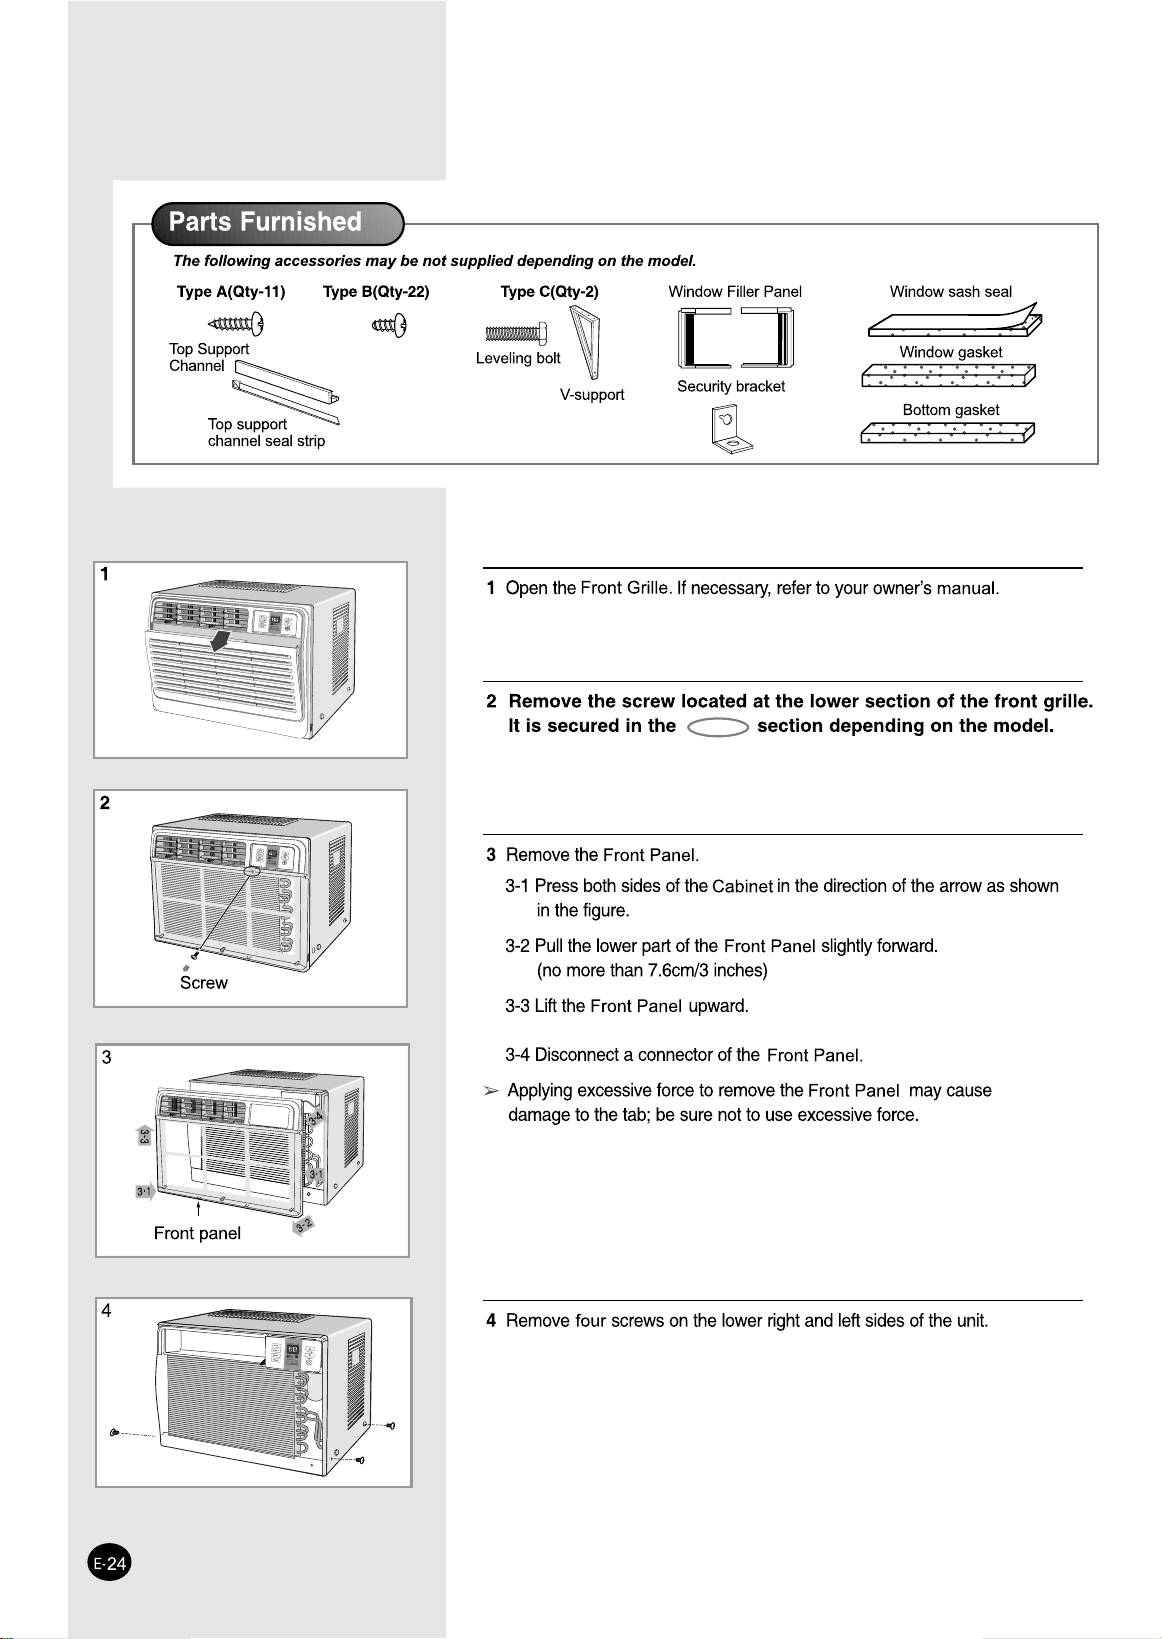
Front Grille
Front Grille
Front Grille
Air Filter
Air Filter
Air Filter
Air Conditioner
Air
Conditioner.
Air Conditioner
Air Filter
Air
Conditioner.
When cleaning the Air Conditioner,turn it off and pull out the
power plug.
Be sure to clean the Air Filter periodically to keep the Air Conditioner
operating at optimum level.
Troubleshooting
within 23 feet (7 meters) of the air conditioner.
A C
A C
R R
R
R
A F
A C
Air Conditoner
The On or Off not working
correctly
while using the
Air Conditioner
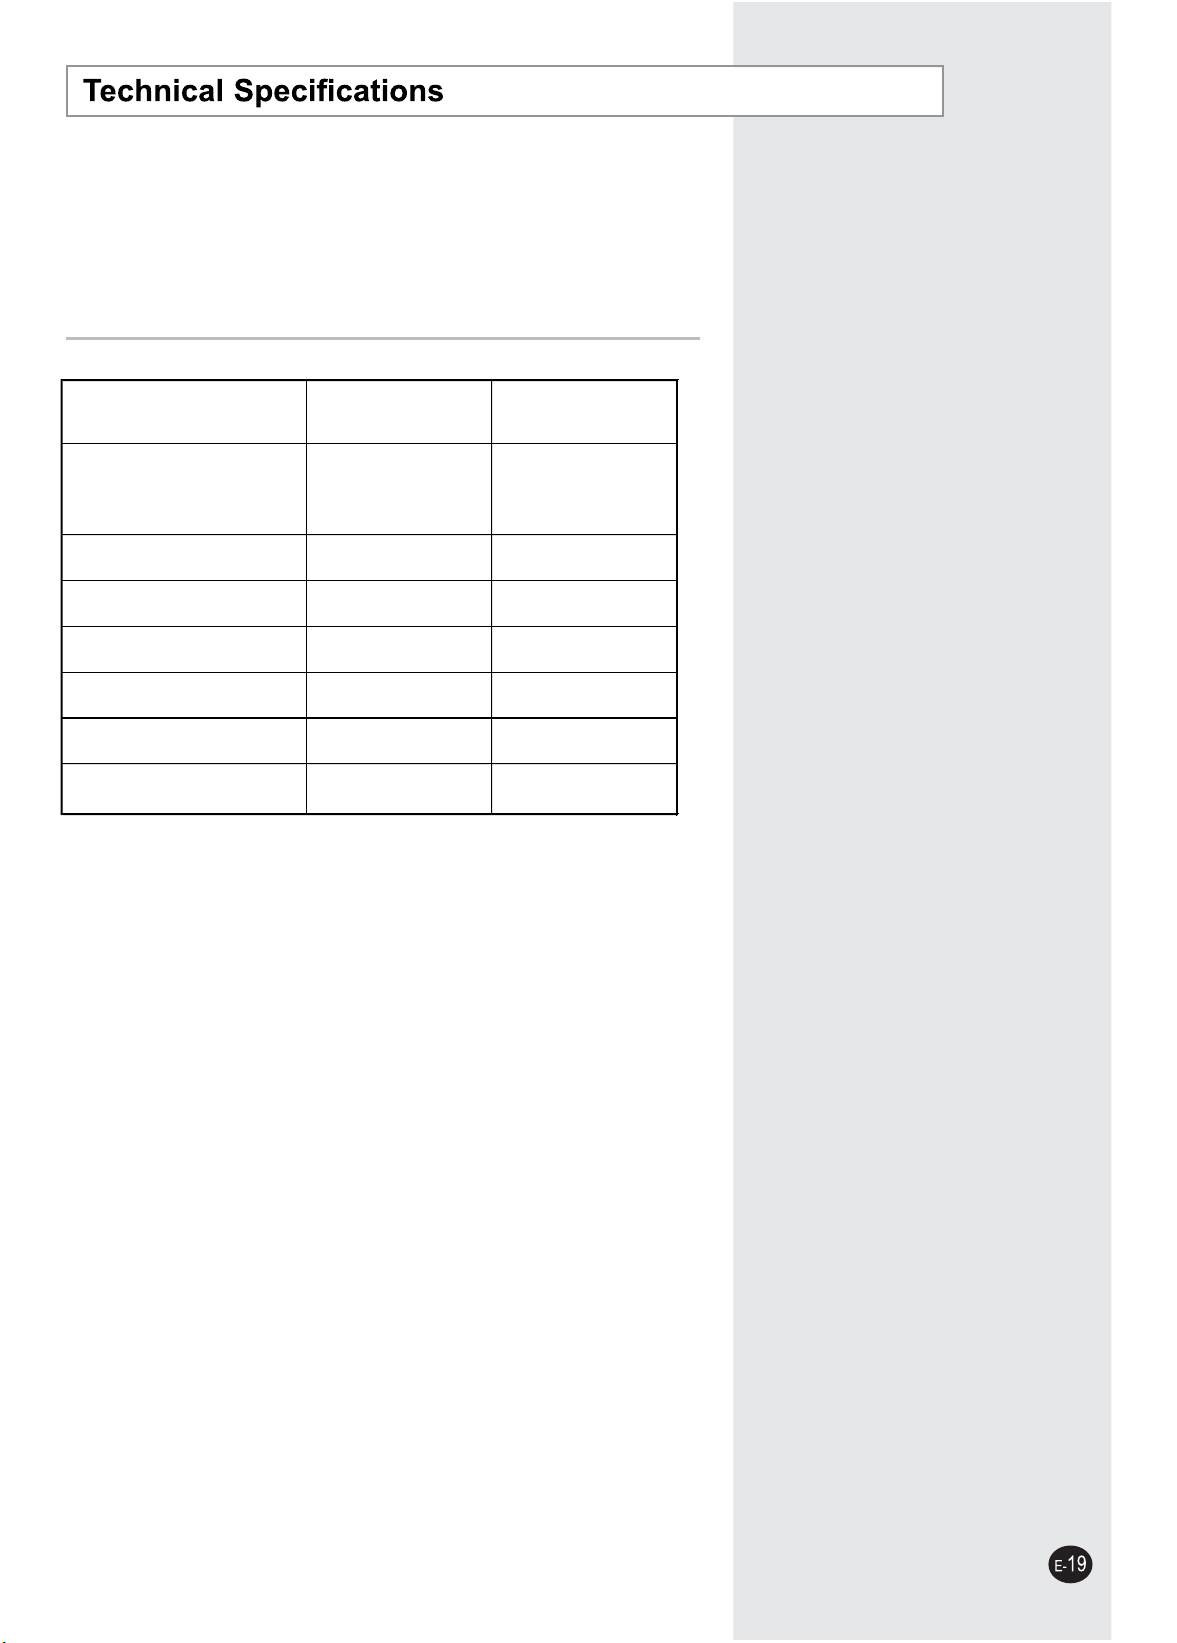
MODEL
Unit of Measure AW25ECB7
Net Dimensions:
(Width x Height x Depth)
(660 X 450 X 715)
Voltage
Volt 208-230
Hertz
Hz 60
Rated Amps
A 12.8/12.0
Power Consumption
W 2600/2660
Capacity
BTU/h 24500/25000
EER
BTU/h.W 9.4/9.4
Inch (mm)
26 X 17.72 X 28.15
Design and specifications are subject to change without notice.

INSTALLATION MANUAL
Window-Type Room Air Conditioner
Installation manual Owner's to
Installation manual
Air Conditioner
Air Conditioner
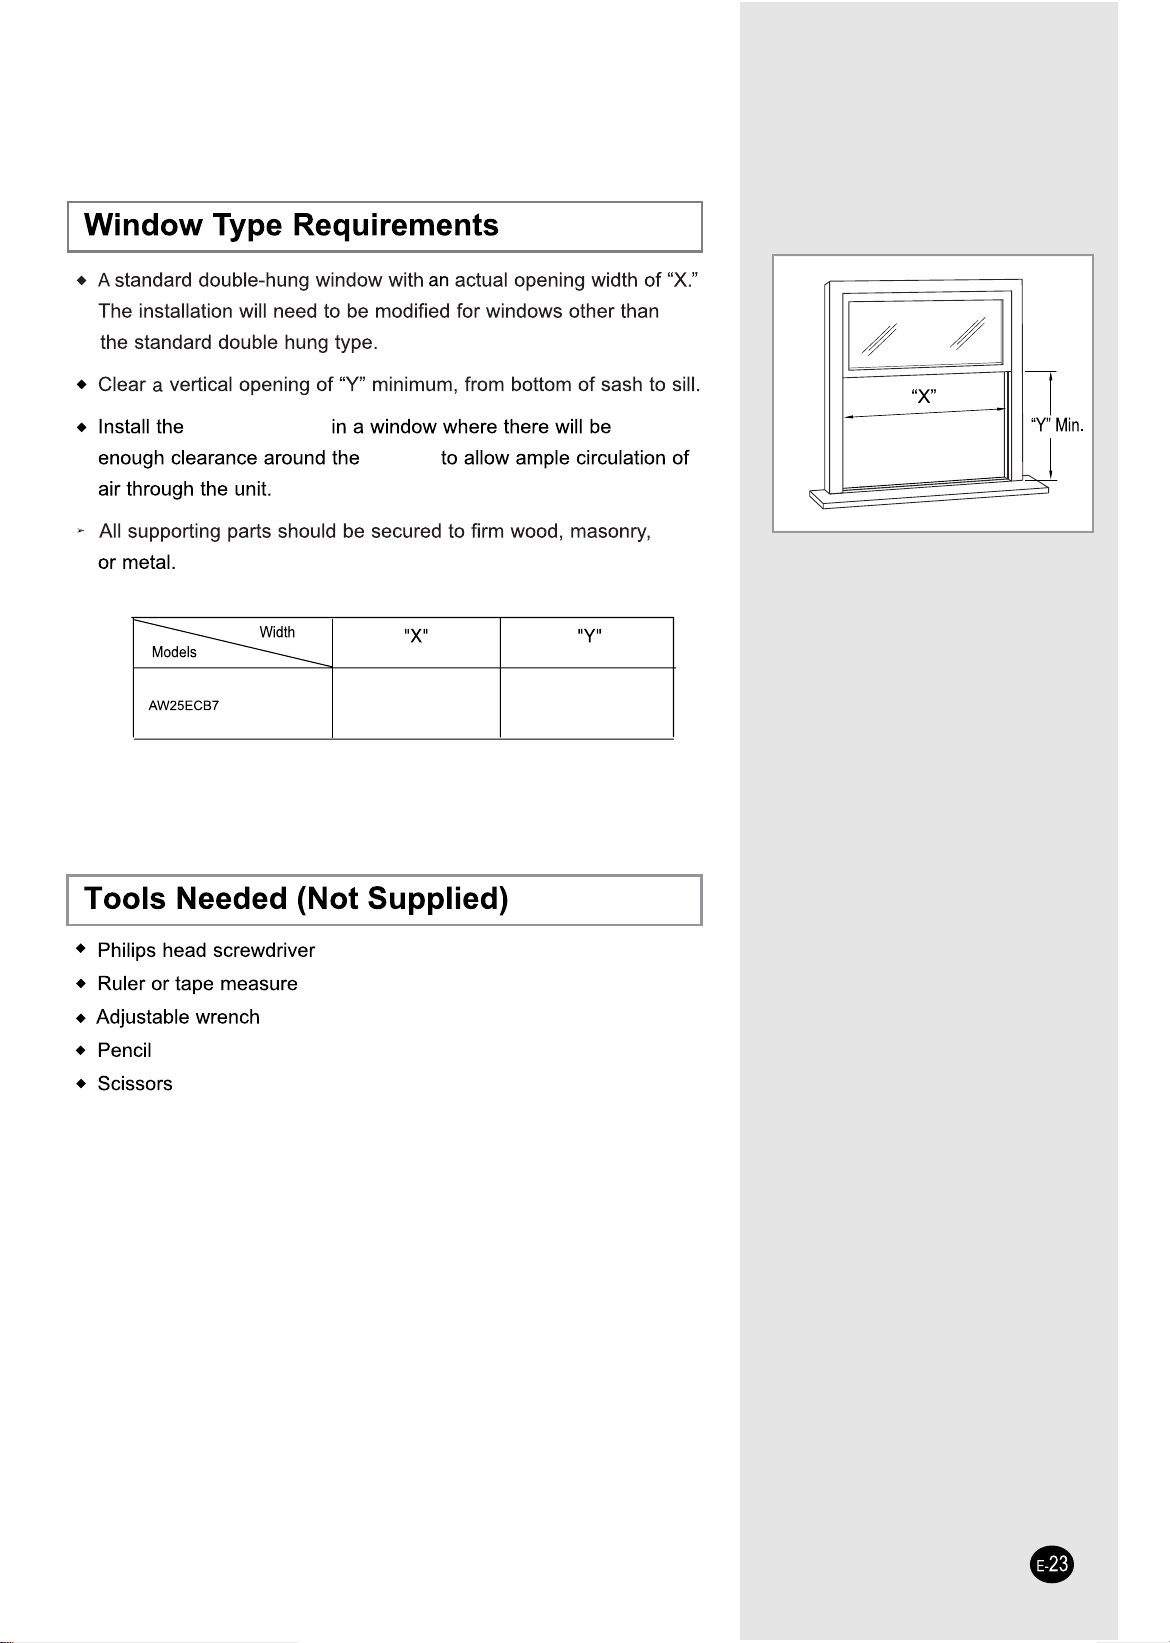
X Always have an assistant to help you. Never attempt to install
any Air Conditioner alone.
X You risk the possibility of hurting yourself or injuring others by
attempting to install it this Air Conditioner alone.
Preparation for Installation
&DUHIXOO\UHPRYHWKHAir ConditionerIURPWKHSDFNLQJFDVHOD\LWRQ
WKHIORRUDQGFKHFNWKDWDOODFFHVVRULHVDVLQGLFDWHGDUHHQFORVHG
&KHFNWKHCDELQHWDQG Front GrilleRIWKHXQLWIRUDQ\GHIHFWVVXFKDV
VFUDWFKHV
%HVXUHWRFKHFNWKHSRZHUVXSSO\
5HIHUWRWKHVSHFLILFDWLRQVRQWKHODEHODWWDFKHGWRWKHXQLW
Checkpoints Prior to Installation
Installation Conditions
G ETTING STARTED
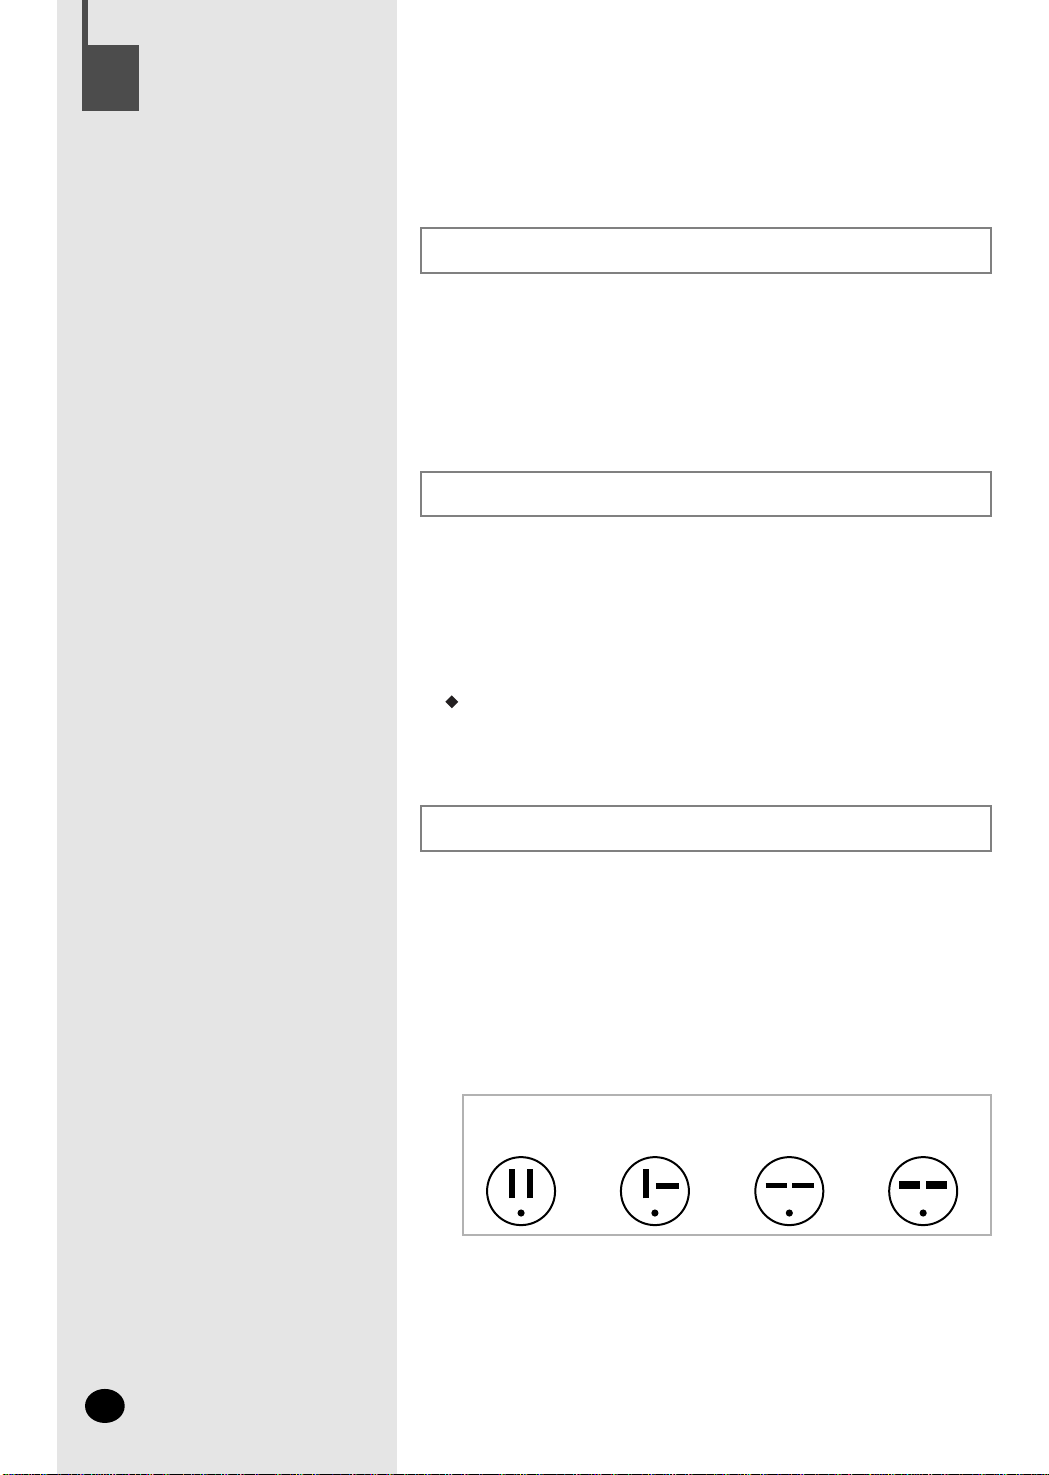
Electrical Requirements
For personal safety:
X This appliance must be properly grounded.
X Do not, under any circumstances, cut or remove the third grounding
prong from the power cord.
X We recommend that you do not use an extension cord or an
adapter plug with this appliance.
X Do not change the plug on the power cord of this appliance.
XFollow national electrical codes or local codes and ordinances.
1
X If the electric supply provided does not meet the above
specifications, call a licensed electrician.
X Aluminum house wiring may pose special problems -
consult a qualified electrician.
X This unit requires a separate circuit, serving only this appliance.
115V
15 AMP circuit
"parallel" type
230-208V
20 AMP circuit
"perpendicular" type
230-208V
15 AMP circuit
"tandem" type
230-208V
30 AMP circuit
"tandem" type
E-22
(76.2cm to 101.6cm) (47cm)
Air Conditioner
Cabinet
30 in. to 40 in. 18.5 in.

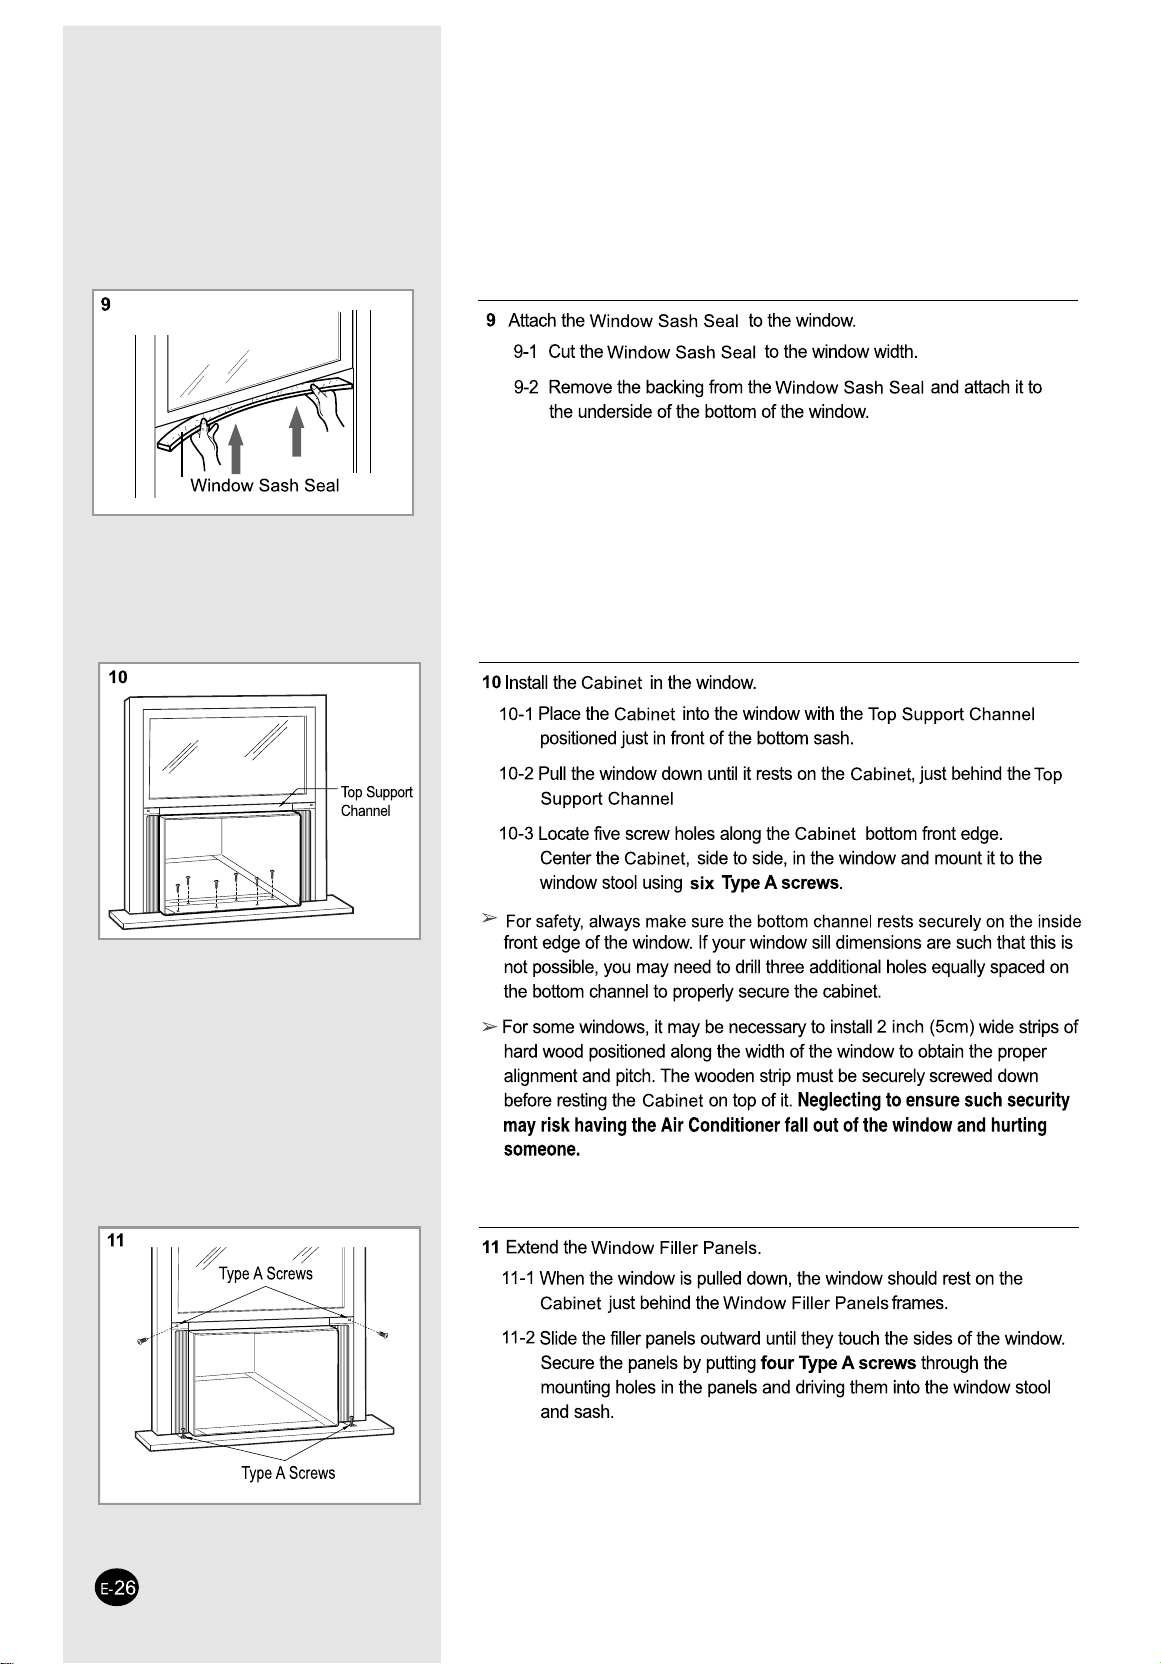
E-27
12-1
12-2
12-3
12 Install the V-supports.
12-1 Thread a Type C leveling bolt about 1/2 of the way into the outer face
of
the shortest angle of each Type C V-support.
12-2
Install each V-support to the Cabinet with four Type B screws.
Make
sure the V-support is just past the window sill.
12-3
Adjust the leveling bolts until the Cabinet tilts slightly downward towards
out
side. Make sure you have about a 6.4mm(1/4") tilt backwards.
Use a wood block between the leveling bolts and the wall if the wall is
weak or if the weight of the Air Conditioner falls between the studs in the
wall
.
V-support
Leveling
bolt
13 Attach the Security Bracket with a Type A screw.
13
Not Supplied
7KLVOLPLWHGZDUUDQW\EHJLQVRQWKHRULJLQDOGDWHRISXUFKDVHDQGLVYDOLGRQO\RQSURGXFWVSXUFKDVHGDQGXVHGLQWKH8QLWHG
6WDWHV:DUUDQW\UHSDLUVPXVWEHSHUIRUPHGE\6$0681*VDXWKRUL]HGVHUYLFHFHQWHU7RUHFHLYHZDUUDQW\VHUYLFHWKHRULJLQDO
GDWHGELOORIVDOHPXVWEHSUHVHQWHGXSRQUHTXHVWDVSURRIRISXUFKDVHWR6$0681*RU6$0681*VDXWKRUL]HGVHUYLFHFHQWHU
6$0681*ZLOOUHSDLURUUHSODFHDQ\SDUWIRXQGWREHGHIHFWLYHDWQRFKDUJHDVVWLSXODWHGKHUHLQZLWKQHZRUUHFRQGLWLRQHGSDUW V
GXULQJWKHOLPLWHGZDUUDQW\SHULRGVSHFLILHGDERYH7RUHTXHVWZDUUDQW\VHUYLFHWKHSXUFKDVHUPXVWFRQWDFW6$0681*IRU
SUREOHPGHWHUPLQDWLRQDQGVHUYLFHSURFHGXUHV6$0681*GRHVQRWZDUUDQWXQLQWHUUXSWHGRUHUURUIUHHRSHUDWLRQRIWKHSURGXFW
$OOUHSODFHGSDUWVDQGSURGXFWVEHFRPHWKHSURSHUW\RI6$0681*DQGPXVWEHUHWXUQHGWR6$0681*5HSODFHPHQWSDUWVDQG
SURGXFWVDVVXPHWKHUHPDLQLQJRULJLQDOZDUUDQW\RUQLQHW\GD\VZKLFKHYHULVORQJHU
,Q+RPH6HUYLFH
'XULQJWKHZDUUDQW\ODERUSHULRGLQKRPHVHUYLFHZLOOEHSURYLGHGVXEMHFWWRDYDLODELOLW\ZLWKLQWKHFRQWLJXRXV8QLWHG6WDWHV
,QKRPHVHUYLFHLVQRWDYDLODEOHLQDOODUHDV,IGXULQJLQKRPHVHUYLFHUHSDLUFDQQRWEHFRPSOHWHGLWPD\EHQHFHVVDU\WRUHPRYH
UHSDLUDQGUHWXUQWKHSURGXFW,ILQKRPHVHUYLFHLVXQDYDLODEOH6$0681*PD\HOHFWDWRXURSWLRQWRSURYLGHIRUWUDQVSRUWDWLRQRI
RXUFKRLFHWRDQGIURPD6$0681*DXWKRUL]HGVHUYLFHFHQWHU2WKHUZLVHWUDQVSRUWDWLRQWRDQGIURPWKH6$0681*DXWKRUL]HG
VHUYLFHFHQWHULVWKHUHVSRQVLELOLW\RIWKHSXUFKDVHU
7KLVOLPLWHGZDUUDQW\FRYHUVPDQXIDFWXULQJGHIHFWVLQPDWHULDOVDQGZRUNPDQVKLSHQFRXQWHUHGLQQRUPDOQRQFRPPHUFLDOXVHRI
WKLVSURGXFWDQGVKDOOQRWDSSO\WRWKHIROORZLQJLQFOXGLQJEXWQRWOLPLWHGWRGHOLYHU\DQGLQVWDOODWLRQGDPDJHZKLFKRFFXUV L Q
VKLSPHQWDSSOLFDWLRQVDQGXVHVIRUZKLFKWKLVSURGXFWZDVQRWLQWHQGHGIDLOXUHVRUSUREOHPVZKLFKDUHFDXVHGE\SURGXFWVRU
HTXLSPHQWQRWVXSSOLHGE\6$0681*DFFLGHQWVPLVXVHDEXVHQHJOHFWPLVDSSOLFDWLRQILUHZDWHUOLJKWQLQJRURWKHUDFWVRI
QDWXUHLQFRUUHFWHOHFWULFDOOLQHYROWDJHIOXFWXDWLRQVRUVXUJHVGDPDJHFDXVHGE\LPSURSHURUIDXOW\LQVWDOODWLRQSURGXFWDOWHUDWLRQRU
PRGLILFDWLRQLPSURSHURUXQDXWKRUL]HGUHSDLUFRVPHWLFGDPDJHRUH[WHULRUILQLVKSURGXFWZLWKDOWHUHGVHULDOQXPEHUVIDLOXUHWR
IROORZRSHUDWLQJDQGHQYLURQPHQWDOLQVWUXFWLRQVWKDWDUHFRYHUHGDQGSUHVFULEHGLQWKHLQVWUXFWLRQERRNFXVWRPHUDGMXVWPHQWV
URXWLQHPDLQWHQDQFHDQGFOHDQLQJFRQVXPDEOHLWHPVVXFKDVILOWHUVXVHRIQRQ6$0681*RUXQDXWKRUL]HGSDUWVVXSSOLHV
DFFHVVRULHVRUHTXLSPHQWZKLFKGDPDJHWKLVSURGXFWRUUHVXOWLQVHUYLFHSUREOHPV
7+(5($5(12(;35(66:$55$17,(627+(57+$17+26(/,67('$1''(6&5,%('$%29($1'12:$55$17,(6
:+(7+(5(;35(6625,03/,(',1&/8',1*%87 127 /,0,7('72$1< ,03/,(':$55$17,(62)0(5&+$17$%,/,
7< 25),71(66)25$ 3$57,&8/$5385326(6+$// $33/< $)7(57+((;35(66:$55$17< 3(5,2'667$7('
$%29($1'1227+(5(;35(66:$55$17< 25*8$5$17< *,9(1%< $1< 3(5621),5025&25325$7,21
:,7+5(63(&7 727+,6352'8&7 6+$// %(%,1',1*216$0681*6$0681*6+$// 127 %(/,$%/()25/266
2)5(9(18(25352),76)$,/85(725($/,=(6$9,1*62527+(5%(1(),7625$1< 27+(563(&,$/
,1&,'(17$/ 25&216(48(17,$/ '$0$*(6&$86('%< 7+(86(0,686(25,1$%,/,7< 7286(7+,6352'8&7
5(*$5'/(662)7+(/(*$/ 7+(25< 21:+,&+7+(&/$,0,6%$6('$1'(9(1,)6$0681*+$6%((1$'9,6('
2)7+(3266,%,/,7< 2)68&+'$0$*(61256+$// 5(&29(5< 2)$1< .,1'$*$,167 6$0681*%(*5($7(5,1
$02817 7+$17+(385&+$6(35,&(2)7+(352'8&7 62/'%< 6$0681*$1'&$86,1*7+($//(*('
'$0$*(:,7+287 /,0,7,1*7+()25(*2,1*385&+$6(5$6680(6$// 5,6.$1'/,$%,/,7< )25/266'$0$*(
25,1-85< 72385&+$6(5$1'385&+$6(563523(57< $1'7227+(56$1'7+(,53523(57< $5,6,1*287 2)
7+(86(0,686(25,1$%,/,7< 7286(7+,6352'8&7 62/'%< 6$0681*127 &$86('',5(&7/< %< 7+(
1(*/,*(1&(2)6$0681*7+,6/,0,7(':$55$17< 6+$// 127 (;7(1'72$1<21(27+(57+$17+(25,*,1$/
385&+$6(52)7+,6352'8&7,7,612175$16)(5$%/($1'67$7(6<285(;&/86,9(5(0('<
6RPHVWDWHVGRQRWDOORZOLPLWDWLRQVRQKRZORQJDQLPSOLHGZDUUDQW\ODVWVRUWKHH[FOXVLRQRUOLPLWDWLRQRILQFLGHQWDORU
FRQVHTXHQWLDOGDPDJHVVRWKHDERYHOLPLWDWLRQVRUH[FOXVLRQVPD\QRWDSSO\WR\RX7KLVZDUUDQW\JLYHV\RXVSHFLILFOHJDOULJKWV
DQG\RXPD\DOVRKDYHRWKHUULJKWVZKLFKYDU\IURPVWDWHWRVWDWH
7RREWDLQZDUUDQW\VHUYLFHSOHDVHFRQWDFW6$0681*DW
)LYH<HDUV3DUWV/DERU DQG&RPSUHVVRU:DUUDQW\
6$0681*(/(&7521,&6$0(5,&$,1&&21680(5(/(&7521,&6&86720(56(59,&(
&KDOOHQJHU5RDG5LGJHILHOG3DUN1-
6$0681*
ZZZVDPVXQJFRP
6$0681*5220$,5&21',7,21(5
7KLV6$0681*EUDQGSURGXFWDVVXSSOLHGDQGGLVWULEXWHGE\6$0681*(/(&7521,&6$0(5,&$,1&
6$0681*DQGGHOLYHUHGQHZLQWKHRULJLQDOFDUWRQWRWKHRULJLQDOFRQVXPHUSXUFKDVHULVZDUUDQWHGE\6$0681*
DJDLQVWPDQXIDFWXULQJGHIHFWVLQPDWHULDOVDQGZRUNPDQVKLSIRUDOLPLWHGZDUUDQW\SHULRGRI
/,0,7(':$55$17< 7225,*,1$/ 385&+$6(5