Locate the screw in the base of the head and remove the screw. Attach the safety guard to the trimmer head. Align the guard so it slides into the slots located on the trimmer head. Turn the tool over and secure the safety guard onto the trimmer head with the screw provided.
FITTING THE AUXILIARY HANDLE (See Fig. C1)
Disconnect the trimmer from the power supply.
Unscrew the auxiliary handle’s tightening knob (counterclockwise) and remove from handle.
Position auxiliary handle onto handle bracket assembly located on trimmer’s topshaft (See Fig. C1).
Position the knob and screw through the auxiliary handle and bracket, and tighten knob (turn clockwise). (See Fig. C1) Do not tighten completely until you have adjusted the auxiliary handle to your desired working position.
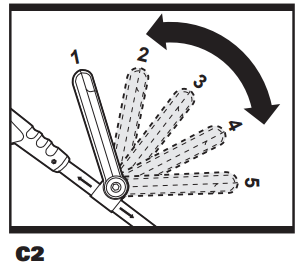
ADJUSTING AUXILIARY HANDLE (See Fig. C2)
The auxiliary handle’s bracket can be moved up or down on the shaft and the auxiliary handle itself can be moved forward or backward into 5 different locked positions (See Fig.C2).
When the handle is in desired position, turn knob and tighten securely.
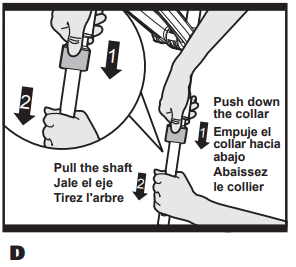
ADJUST THE HEIGHT (See Fig. D)
Disconnect the trimmer from the power supply.
To adjust the shaft height, hold the upper shaft as shown in Fig D, push the bottom collar with your thumb, then pull the lower shaft with your other hand to the desired height . Release your hands to lock the shaft into place.
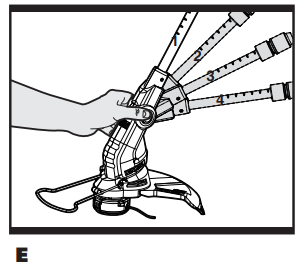
ADJUST THE CUTTING ANGLE (See Fig. E)
Your trimmer has a 4-position tilting head that easily adjusts to the desired working angle for optimum operator control and comfort. To adjust the trimmer head angle:
Disconnect the trimmer from the power supply.
Press the trimmer head adjustment button on the motor housing (See Fig. E).
Move the trimmer head to one of four different angles and release the button.
Head will click into position. Easily readjust the angle to a more comfortable or efficient position as needed
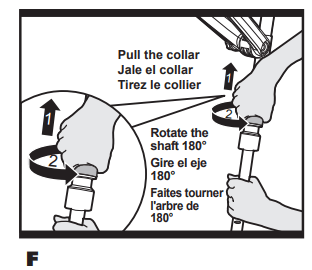
ROTATE REAR HANDLE AND UPPER SHAFT 180° (See Fig. F)
Disconnect the trimmer from the power supply.
To rotate the upper shaft 1800 , hold the lower shaft as shown in Fig F, pull the top collar with your other hand, then rotate the upper shaft 1800 . Release your hands to lock the shaft into place.
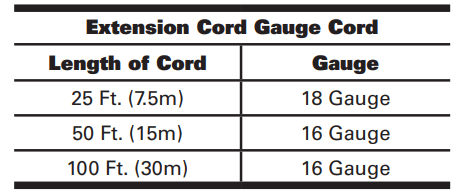
SELECT AN EXTENSION CORD
WARNING! Use only a voltage supply as specified on your unit.
Extension cords are available for this unit.
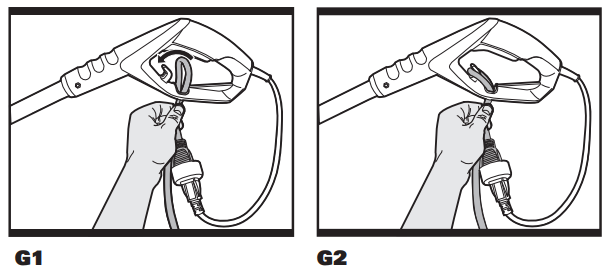
PIGTAIL POWER CORD (See Fig. G1, G2)
Your trimmer/edger has a 12-inch pigtail power cord. This cord must be attached to a proper extension cord. Make a loop in the extension cord. Push loop through hole in the handle (See Fig. G1). Fasten loop around cord retention hook. Plug trimmer’s power cord into extension cord plug (See Fig. G2).
OPERATION INSTRUCTIONS
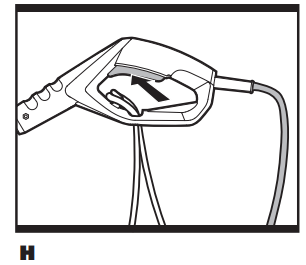
ON/OFF TRIGGER (See Fig. H)
Press and hold the trigger to operate the trimmer. Release to stop
OPERATION
WARNING: Always wear eye protection and heavy clothing to prevent rocks and debris from hitting you and causing an eye injury or other serious injuries. Use two hands to operate the trimmer and hold the unit below waist level. To best ensure that debris is thrown away from your body, work only from the right to left. For optimal trimming and edging results while maintaining comfort, keep the trimmer head parallel to the ground when trimming (perpendicular, when edging). When trimming be sure to keep sufficient distance between the cutting line and the ground.
WARNING: Before operating, make sure both trimmer lines are extended. When trimming, make sure motor is running at full speed.
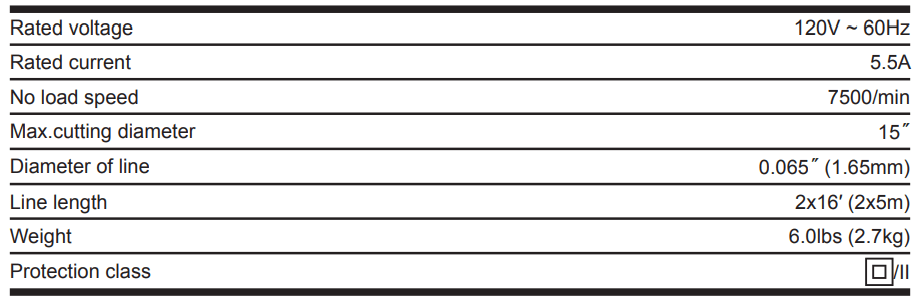
WARNING: Use only 0.065”(1.65 mm) diameter cutting line. Other line sizes will not properly feed in the trimmer head and could cause serious injury. Never use other materials such as wires, string or rope, as this may break off during cutting and cause serious injury
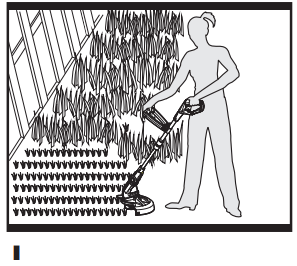
TRIMMING (See Fig. I)
Hold the bottom of the trimmer head about 8 cm above the ground and at an angle. Allow only the tip of line to make contact. Do not force trimmer line into work area.
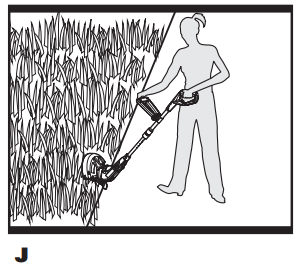
EDGING (See Fig. J)
To edge,rotate the shaft 180˚. Place trimmer head above the surface you are going to edge, as shown in Fig. J.
While edging, allow the tip of the line to make contact. Do not force the line. Take extra caution while edging as objects can be thrown from the trimmer line.
AUTOMATIC LINE FEED SYSTEM
When initially switching on the trimmer, a small length of line is fed out.
A ‘clattering’ noise will be heard for a short time. This is normal and is caused by the line being cut by the line cutter. Once the line is cut to the correct length, the ‘clattering’ noise will stop and the trimmer motor will run at full speed.
To feed more line, stop the trimmer completely, then restart, allowing the motor to reach full speed. Repeat this until you hear the ‘clattering’ noise of the line cutting. (Do not repeat this procedure more than 6 times)
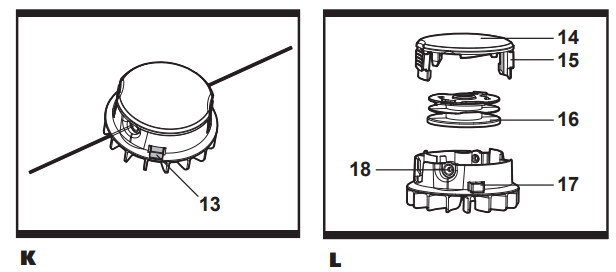
MANUALLY FEEDING THE LINE (See Fig. K, L)
Press and release manual line feed button (13), whilst gently pull out the lines until the lines reaches the line cutter.
When the required amount of line is fed out, gently pull on the second line (there is no need to press the manual line feed button again). If the line extends past the line cutter, too much line has been fed out.
If too much line is fed out, remove the spool cap and click the spool anti-clockwise until the line is at the desired length.
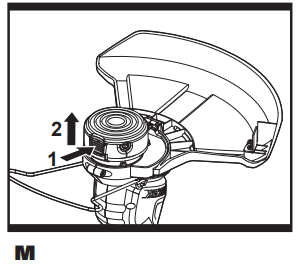
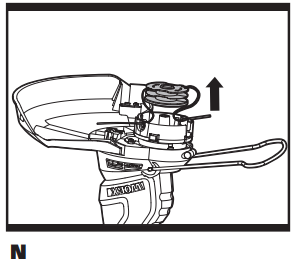
Removing the Cap (See Fig. M, N)
Press and hold in the two latches (15). Pull cap away from the spool holder. Keep the cap and spool holder clean from debris. To replace the cap, press it firmly towards the spool holder. Ensure that it is correctly connected by trying to remove it without depressing the two latches
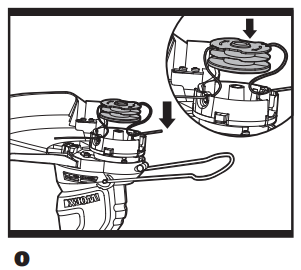
Changing the Line Spool:
First take off the cap and remove the old spool. Place new spool into cutting head. Feed one line through the eyelet, then repeat for second line. (See Fig. O) Release line from cleat on the Spool. Reattach the cap.
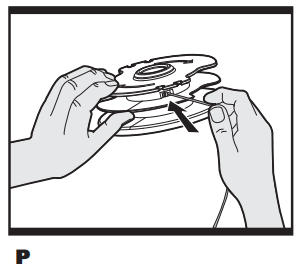
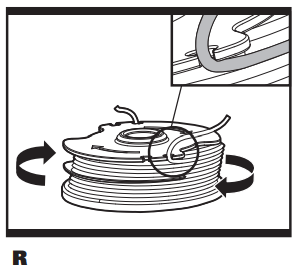
TO MANUALLY WIND LINE (See Fig. P, Q, R, S)
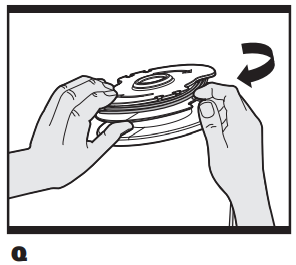
Take approximately 16ft (5m) line and insert 5/8” (15mm) of line into one of the holes in the upper section of the spool. (See Fig. P) Wind the line in the direction of the arrows on the top of the spool. (See Fig. Q, R)
Leave approximately 4” (100mm) of line unwound and place it into the cleat. Repeat on the lower section of spool.
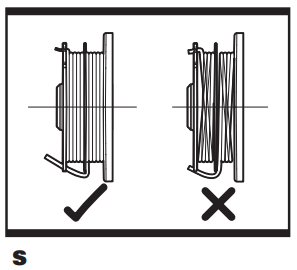
Care should be taken to ensure that the line is neatly coiled on the spool. (See Fig. S) Failure to do so will impair the efficiency of the automatic line feed.
Then fit the spool as described above in “Changing the Line Spool”.
MAINTENANCE
After use, disconnect the machine from the mains and check for damage. Your power tool requires no additional lubrication or maintenance. There are no user serviceable parts in your power tool. Mains powered trimmers should only be repaired by an authorised repairer use only manufacturers recommended replacement parts and accessories.
Never use water or chemical cleaners to clean your power tool. Wipe clean with a dry cloth. Always store your power tool in a dry place out of the reach of children. Keep the motor ventilation slots clean. Keep all working controls free of dust. If you see some sparks flashing in the ventilation slots, this is normal and will not damage your power tool.


 WARNING: Always wear eye protection and heavy clothing to prevent rocks and debris from hitting you and causing an eye injury or other serious injuries. Use two hands to operate the trimmer and hold the unit below waist level. To best ensure that debris is thrown away from your body, work only from the right to left. For optimal trimming and edging results while maintaining comfort, keep the trimmer head parallel to the ground when trimming (perpendicular, when edging). When trimming be sure to keep sufficient distance between the cutting line and the ground.