Before you can install your TV set, you need to fit the stand. Alternatively, you can mount it on the wall. A Phillips screwdriver is needed to perform the installation. Please check stand installation guide in accessory bag.
Setting up the TV set
Place your TV set on a flat, stable surface (e.g. a table or a specially designed TV stand). Make sure that all cables are laid simply and safely and do not represent a trip hazard. The device must be connected to a mains socket using the mains cable. This mains socket must be easily accessible so that the mains plug can be removed immediately in the event of an emergency.
Fitting the batteries into the remote control
1. Turn the remote control over with the back facing upwards, put thumb on the top of the battery cover where it has a triangle sign. Push down gently and pull down the cover out of the position.
2. Insert the batteries supplied into the remote control. Make sure that you insert the batteries correctly with the polarity as shown inside the battery compartment.
3. Replace the battery compartment cover and push in the opposite direction to the arrow until it clicks into place.
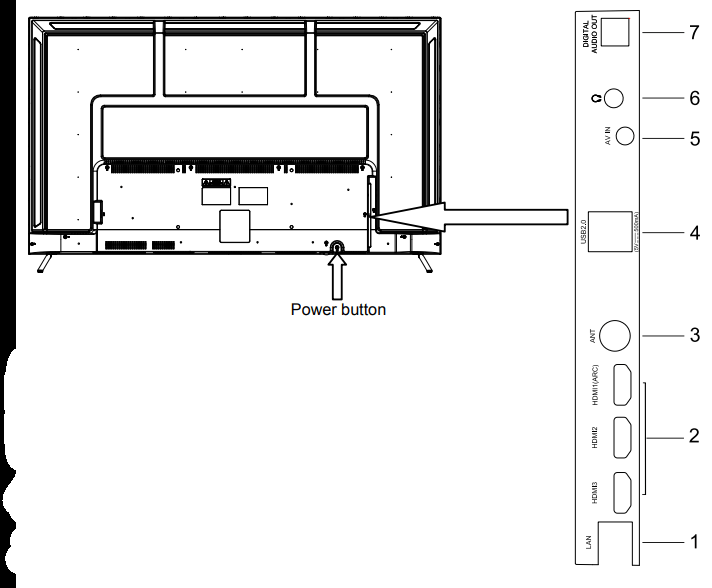
Controls and connections
1.LAN: Network port
2.HDMI ports
3.Antenna socket
4.USB 2.0 port
5. AV IN( require a mini AV cable which is in accessory bag)
6.Headphone out
7.Digital audio out
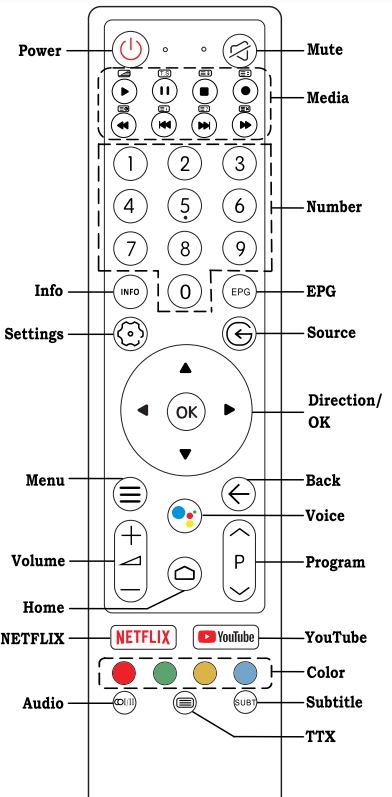
Remote control
Definition of the buttons on remote control
Buttons
Description
Power
Turn on/off
Mute
Mute or restore sound
Media
Control media playback in Media mode
Number
Number buttons
Info
Display program information
EPG
Launch Electronic Program Guide
Settings
Display System Settings Menu
Source
Select signal source
Direction/
OK
Press the direction buttons to select menu options or settings. Press OK to select or confirm menu item.
Menu
Display main menu
Back
Return to previous menu or setting
Voice
Activate Voice command function
Volume
Adjust the volume
Program
Select programs in ascending or descending order
Home
Open Android TV Homepage
NETFLIX
Goes to NETFLIX
YouTube
Open YouTube App
Color
Use in accordance with the Operation interface instructions
Audio
Select audio languages and Audio channels
Subtitle
Select subtitle
TTX
Show or hide Teletext
Initial Setup
The first time you switch on the TV, the Welcome screen appears, which guides you through the initial setup process. Follow the on-screen instructions to finish the initial setup process such as selecting the language, connecting to the network, scanning channels, and more. During each step, either make a choice or skip the step. If you skip a step, you can perform the setup later from the settings menu.
Note:
The country setting need to be Australia, otherwise TV can’t receive digital channels. If you miss the step, please go to menu→setting→device preferences→ reset the TV.
When scan the channels, please set up scan mode to “Antenna”.
If the channel search retrieved no channel or only some channels it could be caused by poor broadcasting or antenna reception isn’t strong enough. Manufacturers cannot be held responsible for poor broadcasting in some areas or antenna reception issue.
Please contact your local antenna technician if it is a reception issue.
Network Connection
Your TV will require an internet connection to operate all functions. Data usage charges may apply. Please refer to your Internet Service Provider (ISP) for additional information. To access the internet, you must subscribe to high speed broadband internet service from your internet service provider.
Your TV can be connected to your home network in two ways:
• Wired, using the RJ45 (LAN) connector on the back panel.
• Wireless, using the internal wireless or external wireless USB adapter and your home wireless network. Please get WIFI password ready if it has one. Please contact ISP or technician who set up the router.
Watching Connected Devices
Press on the remote control to display the source list. Press to select TV or other input sources and press OK to confirm.
You can also press home page button on the remote control to display the homepage, press to move to the Sources symbol on the top right hand side, then press and OK to select the input source.
Accessing Channels
Using the numeric buttons: press the corresponding numeric buttons on the remote control to access the channels.
Using the P buttons: press the P buttons on the remote control to change channels.
Press OK button in TV mode to bring up channel LIST, use V and OK to select channels.
Adjusting Volume
Volume control: press +/- buttons on the remote control to increase or decrease the volume.
Sound mute: press the button to temporarily mute the sound. Press this button again or the + button to restore the sound.
Basic TV instructions
Installing Channels
This section describes how to search and store channels automatically. This may be done in any of the cases below:
- you have skipped the channel installation step in the initial setup;
- you are prompted that there are no channels in TV mode;
- you want to update channels list.
1. In TV mode, press Menu button on the remote control and select Settings >Channel.
2. Make sure Channel Installation Mode is set to Antenna.
3. Go into Channels and select Channel Scan, press OK button to start.
4. The channel scan may take a few minutes. After the automatic search, channels are arranged in a preset order. You can also skip, move or edit channels in the Channels menu.
Using BPG (Electronic Program Guide)
EPG is an on-screen guide that displays scheduled digital TV program. You can navigate, select and view programs.
Note: The DTV EPG does not require an internet connection.
-To use the DTV EPG, Press EPG button on the remote control, the Program Guide menu will appear, which allows you to get information about the current or future program playing on each channel. Navigate through the different programs using the arrow button son the remote control.
-Use the related color buttons shown at the bottom of the screen to view EPG.
-It might have no information to be displayed. Please change channel first and TV can get proper EPG information from TV signal when the channel is on.
Using Subtitles
You can enable subtitles for each TV channel. Subtitles are broadcast via DVB-T digital broadcasts. With digital broadcast, you have the additional option of selecting a preferred subtitle language.
Turning on/off subtitles
In TV mode, press Menu button then select Advance options, select Subtitle and press OK to enter. You can set up subtitle language,2ndsubtitle language and subtitle type via the menu.
Access subtitle via remote
In TV mode, press SUBT button on the bottom of remote control, then the English will display on the screen to indicate subtitle function is on. Press the button again to close subtitle function and English will disappear on the screen.
Please note the remote subtitle button can turn on and off subtitle function temporary, change channels will active original setting in menu.
Please go to main menu to turn it on and off completely.
Trouble-shooting
You can solve most common problems yourself using the solutions below. If the problem persists after checking the suggested solutions, please contact CHIQ customer care 1300796688.
General problems
The TV set will not switch on or stop responding.
• Plug the power cable of the TV set into a working mains socket.
• Replace the batteries in the remote control.
• Unplug the plug of the power cable from the mains socket, wait approx. 30 seconds and plug the power cable back in. The device should then work normally.
The remote control does not work
• Is there an obstruction between the remote control and the sensor on the TV?
• Replace the batteries.
• Make sure that the remote control sensor is not exposed to direct sunlight.
TV reception problems
No picture
• Is the antenna plugged in properly? Is the antenna cable damaged?
• Is the antenna cable plug firmly connected?
• Have you selected the correct signal source on the TV set?
• Have you already executed a channel search at your present location?
• Are all the connection cables to external signal sources properly connected?
• Is the connection cable to the external signal source damaged?
• Have you selected the correct signal source on the TV set?
Poor picture
• Is the antenna plugged in? Adjust the antenna.
• Check that the channel is tuned properly.
• Adjust the picture settings, such as brightness, colour, sharpness.
No sound
• Is the sound muted? Press the button .
• Is the volume turned down? Press the +button .
No colour
• Adjust the colour setting.
• Check the programme is broadcast in colour.
• Check that the channel is tuned properly.
Multimedia playback problems
File is not played back
• Check that the USB mass storage device contains compatible files.
Problems with playback from external devices
No sound
• Check that the audio cable is properly connected or damaged.
• Make sure that you have selected the correct signal source on your TV set.
Sound is distorted or humming
• Clean the connector plugs.
• Replace the connection cable to the external device.
Problems with online services (Smart TV)
If you are using a cable network connection (LAN)
• Check that the network cable is properly connected.
• Check whether the network cable is damaged.
• Check whether you can access the internet from another device on the network .
• It is possible that the server for the selected service is temporarily down.
• Check the network settings on the TV set.
If you are using a wireless network
• Check whether you can access the internet from another device on the wireless network.
• It is possible that the server for the selected service is temporarily down.

 on the remote control to display the source list. Press
  to select TV or other input sources and press OK to confirm.
 home page button on the remote control to display the homepage, press
  on the top right hand side, then press
  buttons: press the P
  +/- buttons on the remote control to increase or decrease the volume.
 button to temporarily mute the sound. Press this button again or the
  Menu button on the remote control and select Settings >Channel.