When using the remote control, aim it at remote sensor on the television. If there is an object between the remote control and the remote sensor on the unit, the unit may not operate.
Point the remote control at the REMOTE SENSOR located on the television.
When using this television in a very brightly lit area, the infrared REMOTE CONTROL SENSOR may not work properly.
The recommended effective distance for using the remote control is about 7 meters.
Installing Batteries in the Remote Control
Open the cover at the back of the remote control.
Install two AAA size batteries. Make sure to match the “+” and “-” ends of the batteries with the diagram inside the compartment.
Replace the cover.
Battery Replacement
You will need to install the batteries into the remote control to make it operate following the instruction below.
When the batteries become weak, the operating distance of the remote control will be greatly reduced and you will need to replace the batteries.
Notes on Using Batteries:
The use of the wrong type of batteries may cause chemical leakage and/or explosion. Please note the following:
Always ensure that the batteries are inserted with the + and - terminals in the correct direction as shown in the battery compartment.
Different types of batteries have different characteristics. Do not mix different types.
Do not mix old and new batteries. Mixing old and new batteries will shorten battery life and/or cause chemical leakage.
Replace batteries as soon as they do not work.
Chemicals which leak from batteries may cause skin irritation. If any chemical matter seeps out of the batteries, wipe it up immediately with a dry cloth.
The batteries may have a shorter life expectancy due to storage conditions. Remove the batteries whenever you anticipate that the remote control will not be used for an extended period.
The batteries (battery pack or batteries installed) shall not be exposed to excessive heat such as sunshine, fire or the like.
Remote Control
Definition of the buttons on remote control:
Basic Operation
Turning on and off the TV
Turn on the TV
Connect the TV to your mains socket.
If TV has a power switch, turn it on firstly. In standby mode, press Power button on the remote to turn on the TV.
Turn off the TV
Press the button on the remote control to enter standby mode.
Do not leave your TV in standby mode for long periods of time. It is best to unplug the power cord.
NOTE:
If there is an accident power off, the TV will be in standby mode automatically after re-supply the power. To ensure the normal use of the TV, the frequent turning on and off is forbidden, when there is an accident power off, it is recommended to unplug the power cable from the power socket.
First Time Setup
If this is the first time you run the TV, the Initial Setup Menu will appear in the picture, and the items of this menu also exist in other menus, so you are able to change the values after you set them up.
Tips: Make sure that the antenna connection is made.
Set you desired language
Press ▲/▼buttons to select the language to be used for menus and message.
Select your country
Press the ▲/▼ buttons to select the country you are living in, and then press the button.
Select your time zone.
Press the ▲/▼ buttons to select a time zone, and then press the ► button
Select your TV environment.
Press the ▲/▼ buttons to select the Home Mode or Store Mode and then press the ►button.
Home is the recommended setting to produce the best energy efficiency. If you want to set Store Mode, a message appears asking you to confirm your choice.
Auto Tuning
Press the ► button to start the auto searching
First tuning DTV, press Menu and left arrow button to skip DTV tuning.
NOTE:
If the TV doesn't receive any channels, please check your aerial connection or the country you selected, and then try an auto search again.
If the TV just receives some of the channels, it means the aerial's reception isn't good enough and an antenna service is recommended
Choosing a TV channel
Using the CHon the remote control.
Press CH to increase channel number.
Press CH to decrease channel number.
Using 0-9 digital buttons.
You can select the channel number by pressing 0 to 9.
Additionally, when TV is in some mode, the TV will work in TV mode and play the corresponding channel if any number button is pressed.
Example
To select - channel (e.g. Channel 5): Press 5.
To select -- channel (e.g. Channel 20): Press 2 and 0 in a short time.
Volume Adjustment
Press the on the remote control to adjust the volume.
If you want to switch the sound OFF, press the
You can release mute by pressing the or increase the volume.
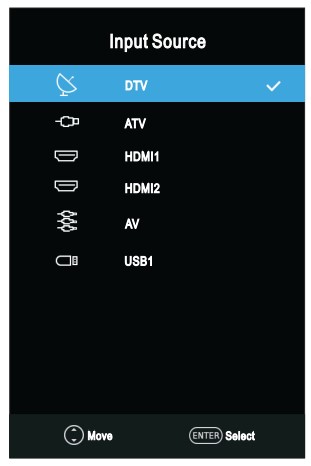
Changing the Input Source
You can select the input source by pressing the SOURCE button on the remote control.
Press the▲/▼buttons to cycle through the input source, and press the ENTER button to confirm your choice.
Menu Operation
Channel Menu
■ Auto tuning: Select the ENTER button to start Auto Tuning.
1. Select the country and tune type for channels.
2. The TV will begin memorizing all of the available channels
Once the progress bar is full, the found channels will be stored and the unit will proceed to the search for TV, DTV and Radio.
If you press the MENU button in TV searching, the Channel Tuning will skip to DTV searching as the suggestive picture shows.
■ DTV Manual Tuning: Press the ENTER button.
Press the ◄/►button to select channel, then press the ENTER button to search.
When a channel is found, the searching process will stop, the channel will be saved with current channel number.
If the program is not your expected one, please press the ◄/►button to continue the searching. Press the EXIT button to exit.
■ ATV Manual Tuning: Manual store for ATV channels.
Storage To 1: Store the searched channel to 1 (you can adjust the channel number by◄/►).
Sound_Standard: Select the sound Standard.
Video_Standard : Select the Video Standard.
Current CH 1: Select the current channel.
Search: Press the ◄ button to search down from the current frequency, and press the ► button to search up.
Fine-Tune: Adjust the frequency of the channel finely. Press the red button to save it. Press the EXIT to exit.
■ LCN Enable
Press the ENTER button to select On or Off.
■ Dynamic Rescan (In DTV mode)
Switch the Dynamic Rescan function On or Off.
■ Programme Edit
Press the▲/▼ buttons select the Programme Edit, then press the ENTER button to enter sub-menu. First press the▲/▼buttons to highlight the channel you want to delete, skip, or Move, then:
Delete: Press the RED button to delete the channel.
Move: Press the YELLOW button to set the channel to moving state, and then press the ▲/▼buttons to move it to the position you want to put
Skip: Press the BLUE button to skip the channel.(Your TV set will skip the channel automatically when using CH to view the channels.)
Favorite: Press the button to set the favorite channel. (One or more groups can be select.)
■ Signal Information(Only available when there is signal under DTV)
Press the▲/▼buttons to select the Signal Information, then press the ENTER button to see the detail information.
Lock Menu
■ Lock System: The feature can prevent unauthorized operating the TV set, unless entering 4-digit password.The default password is 0000.
NOTE: If you forget your password, the super password of 1225 still is valid.
■ Set Password: Press the ENTER button to access the submenu. You can set your private password. Press the number buttons on the remote control to set the new password. When the new password has been input twice, the setting is finished successfully.
■ Block Program (In ATV/DTV mode): Press the YELLOW button to lock the available channel you want. Press the YELLOW button again to unlock it. To watch a locked channel, enter your 4 digit password number when input screen displays.
■ Parent Lock (In DTV mode): This feature can prevent children watching adult’s TV programmes, according to the rating limit set. This function appears according to information from broadcasting station. Therefore if the signal has incorrect information, this function does not operate.
Important Unique Buttons
PROGRAMME GUIDE (In DTV mode)
Press EPG button to display the Programme Guide menu. This function let you know the detailed information of the channel, indicating the time of the program playing. From the Programme Guide it is possible to check the program information for the next eight days (If the information is available from the broadcaster).
• Press the▲/▼buttons to select a different channel in the list and press ENTER to active the channel.
• Recorder: Press the red/ button to set the parameters for recording. You can choose the time of the appointment to record you want, different schedules should not overlap. The unit is able to do schedule recording when TV is turning on or in standby mode. When recording starts in standby mode, there will be no picture or sound from the unit.
• Info: Press green button to see the detailed information of the current channel.
• Schedule: Press the yellow button to display the Schedule list.
• Reminder: If you find the desired program which will be shown in the future. Press the blue button to book program.
• Time/Channel: Press Index button to select the top of items, and press the ◄/► button to change the list by Time or Channel.
• Press the EPG or EXIT button to exit
Channel List
Press LIST button to display the Channel List.
Press the ▲/▼ buttons to select the channel and press ENTER to watch it.
Press CH button to page up or down the Channel list.
Press EXIT button to exit the channel list.
Favorite List
Press button to display the Favorite List.
Press red, green, yellow, blue button to select the desired favorite group.
Press the ▲/▼ buttons to select the channel and press ENTER to watch it.
Press CH button to page up or down the Favorite list.
Press EXIT button to exit the Favorite List.
Troubleshooting Guide
Troubleshooting
When you meet the following common problems, you might diagnose and get the solutions without contacting with the technicians.
Symptoms
Possible Reason
Solutions
No picture, no sound, and no indicator light on
The power cord is not plugged in
The power is off
Plug the power cord in
Turn the power on
Picture and sound with abnormity
Contrast, sharpness, and color are set improperly
Color system is set improperly
Sound system is set improperly
Adjust the value of Contrast, sharpness, and colour
Set the Color system to the country broadcasting standard
Set the Sound system to the country broadcasting standard
Picture is spotted or with snow
Signal source is low-grade or the signal cord is in a lower quality
Use the qualified signal cord
No picture, no sound and indicator light is green/blue
Volume is in the minimum value or TV is in mute mode.
Adjust the value of volume
The signal cable is not correctly connected.
Connect the signal cable correctly
Blue screen, AV is displayed
There is no signal input or the video cable is not connected or incorrectly connected
Connect the video cable correctly
No sound
There is no audio signal input or audio cable is not connected correctly
Connect the audio cable correctly
HDMI source, with snow pixel of full screen
The source generate is not standard
Plug the HDMI cable again
The remote control does not work
Batteries are improperly installed or exhausted
Make sure the positive and the negative polarities are correct.
Check if there is a loose contact between the batteries and the springs
Replace the batteries
Maintenance
Early malfunctions can be prevented. Careful and regular cleaning can extend the life of your new TV. Be sure to turn the power off and unplug the power cord before you begin any cleaning.
Cleaning the screen
Here’s a great way to keep the dust off your screen for a while. Wet a soft cloth in a mixture of lukewarm water and a little fabric softener or dish washing detergent. Wring the cloth until it’s almost dry, and then used it to wipe the screen.
Make sure the excess water is off the screen, and then let it air-dry before you turn on your TV.
Cleaning the cabinet
To remove dirt or dust, wipe the cabinet with a soft, dry, lint-free cloth. Please be sure not to use a wet cloth.
Extended Absence
If you expect to leave your TV dormant for a long time (such as a vacation), it’s a good idea to unplug the power cord to protect against possible damage from lightning or power surges.


 Power button on the remote to turn on the TV.
 on the remote control.
 to increase channel number.
 to decrease channel number.


 button to page up or down the Channel list.
 button to display the Favorite List.