Loading ...
Loading ...
Loading ...
12
(Cable not supplied)
Set up network
1 Connect the home theater to a broadband
modem or router (see ‘Connect to a
computer network and the Internet’ on
page 12 ).
2 Turn on your TV and switch to the correct
source for the home theater.
3 Press ( Home).
4 Select [Setup], then press OK.
5 Select [Network] > [Network Installation],
then press OK.
6 Select [Wired (Ethernet)], then press OK.
7 Select [Auto (recommended)] or
[Manual (advanced)], then press OK.
8 Follow the instructions on the TV to
complete the setup.
» The home theater connects to the
internet. If connection fails, select [Retry],
then press OK.
9 Select [Finish], then press OK to exit.
Caution
• Familiarize yourself with the network router,
media server software and networking
principles before attempting to connect the
home theater to a computer network. If
necessary, read documentation accompanying
network components. Philips is not responsible
for lost, damaged or corrupt data.
LAN
www
Option 2: Connect audio through coaxial
cable
Note
• The digital coaxial cable or connector might be
labeled COAXIAL/DIGITAL OUT or SPDIF
OUT.
(Cable not supplied)
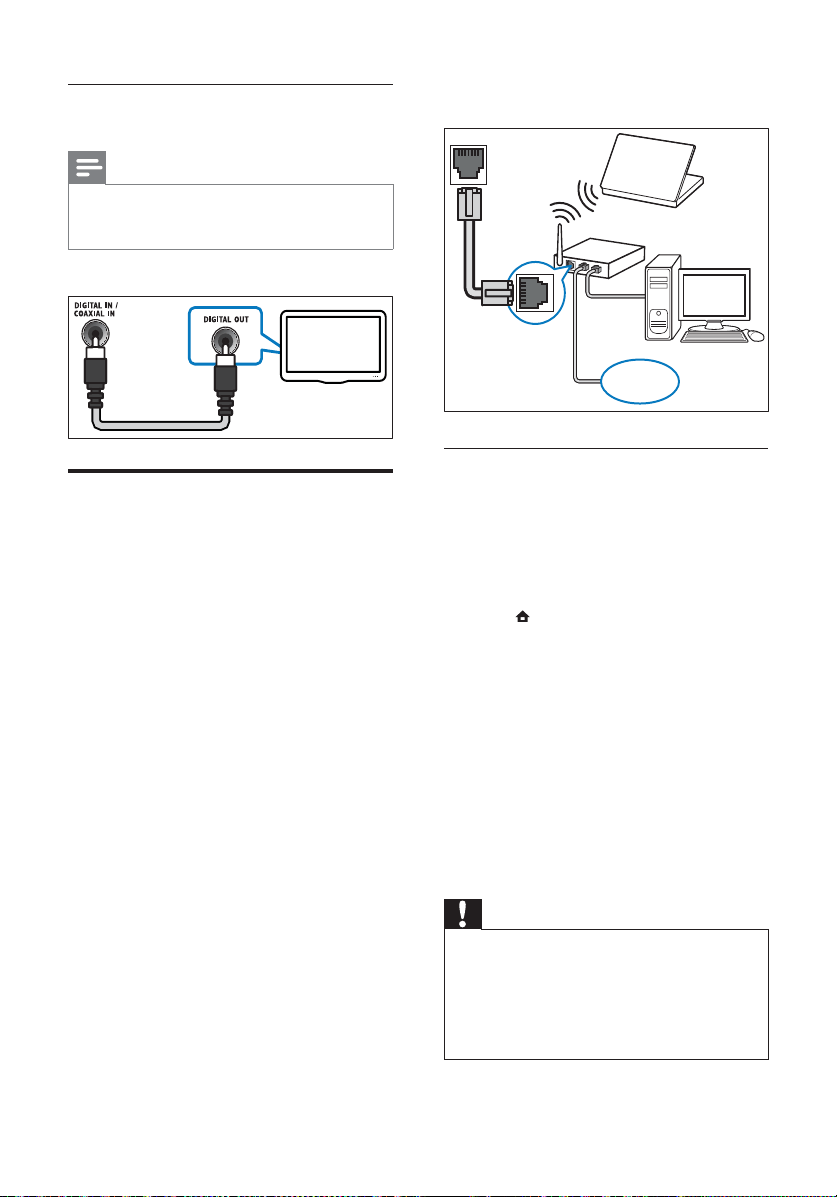
Connect to a computer
network and the Internet
Connect the home theater to a computer
network and enjoy:
• Multimedia content streamed from
your computer : view photos, play
music and watch video fi les streamed
from your computer (see ‘Play from PC
(DLNA)’ on page 18 ).
• BD-Live applications : access to some
exclusive services from the BD-Live
enabled Blu-ray discs (see ‘Access
BD-Live on Blu-ray’ on page 16 ).
• Software update : update the software
of the home theater through the
network (see ‘Update software from
the network’ on page 24 ).
What you need:
• A network router (with DHCP
enabled).
• A network cable (RJ45 straight cable).
• A computer with media server
software installed (see ‘Set up media
server software’ on page 18 ).
• For BD-Live application and software
update, make sure that the network
router has access to the Internet and
the fi rewall is disabled.
TV
EN
Loading ...
Loading ...
Loading ...