EN
ZH
KO
MS
TH
S.A.S. SEB SELONGEY CEDEX • RC. DIJON B 302 412 226
Réf. NC00125943 • 07/2014
JPM & Associés • marketing-design-communication
1
2
3
4
8
12
14
5
www.tefal.com
DeliRice induction rice cooker
50HC2
6
7
9
10
11
13
描述
설명
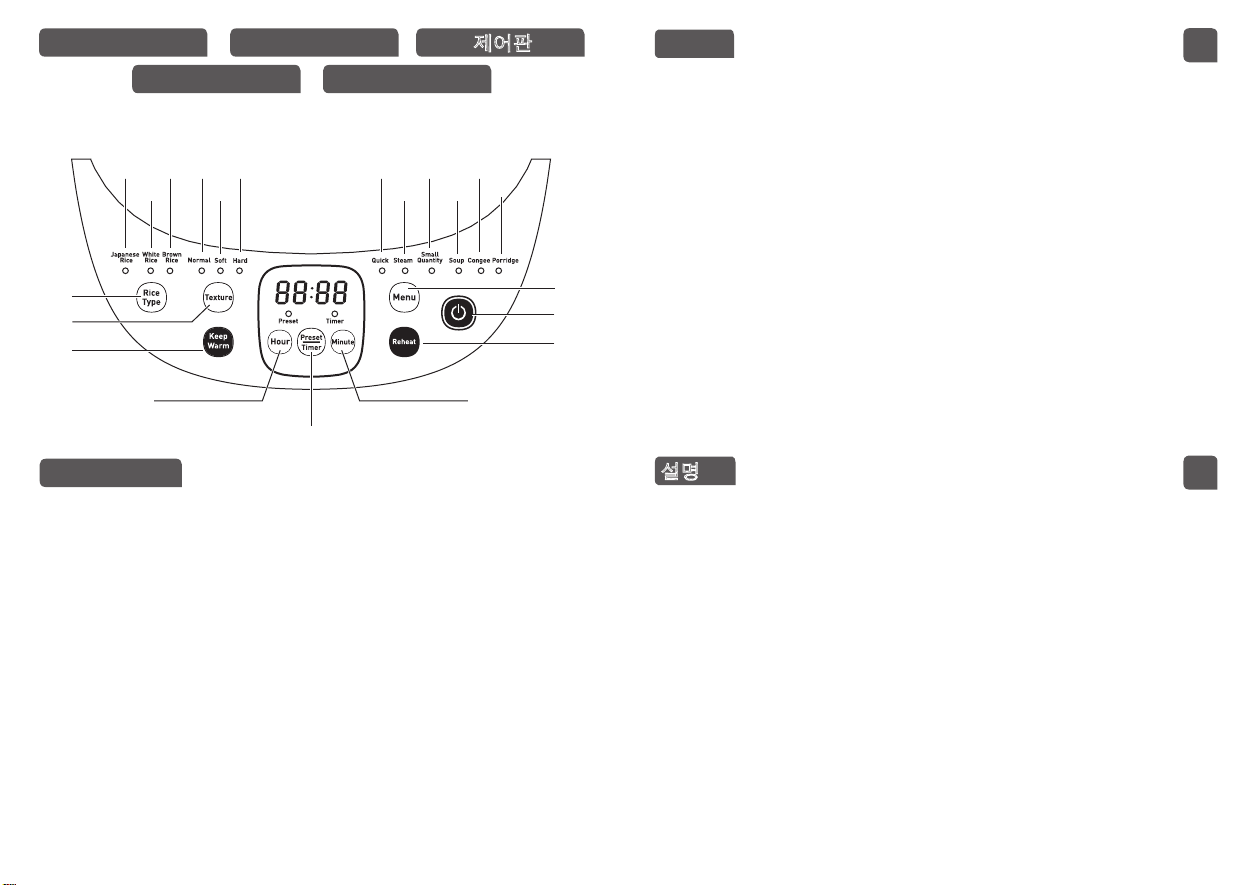
DESCRIPTION
1. Steam basket
2. Graduation for water and rice
3.
Removable stainless steel bowl
4. Measuring cup
5. Rice spoon
6. Soup spoon
7. Lid
8. Removable inner steam shield
9. Micro pressure valve
10. Lid opening button
11.
Handle
12. Control panel
a. Rice Type Key
a1. Japanese Rice
a2. White Rice
a3. Brown Rice
b. Texture Key
b1. Normal
b2. Soft
b3. Hard
c. Menu Key
c1. Quick
c2. Steam
c3. Small quantity
c4. Soup
c5. Congee
c6. Porridge
d. «Keep warm» key
e. Hour
f. Preset/Timer
g. Minute
h. Reheat key
i. «Start/Cancel» key
13. Housing
14. Power cord
1.
蒸盤
2. 水和米量刻度
3. 可拆式不銹鋼內鍋 (內為塗層)
4. 量杯
5. 飯勺
6. 湯勺
7. 蓋子
8. 可拆式內蓋
9. 微壓閥
10.
開蓋按鈕
11. 把手
12. 控制面板
a. 米類鍵
a1. 日本米
a2. 白米
a3. 糙米
b. 口感鍵
b1. 正常
b2. 軟
b3. 硬
c. 選單鍵
c1. 快煮
c2. 蒸煮
c3. 少量
c4. 湯
c5. 粥
c6. 稀飯
d. «保溫»鍵
e. 小時
f. 預設/計時器
g. 分鐘
h. 翻熱鍵
i. «開始/取消»鍵
13. 外殼
14. 電源線
1. 찜바구니
2. 물과
쌀눈금
3. 탈착식스테인레스강용기
4. 계량컵
5. 주걱
6. 국자
7. 뚜껑
8. 탈착식내부증기차폐기
9. 마이크로압력밸브
10. 뚜껑열림버튼
11. 손잡이
12.
제어판
a.쌀종류키
a1.일본쌀
a2.백미
a3.현미
b.질감키
b1.보통
b2.부드러움
b3.단단함
c.
메뉴키
c1.쾌속
c2.찜
c3.
소량
c4.스프
c5.죽
c6.포리지
d.«보온»키
e.시간
f.예약/타이머
g.
분
h.재가열키
i.«시작/취소»키
13.외관
14.전원코드
a1
a
c
b
e
i
d
h
g
a2 c2 c4
c6
a3
b2
b1 b3
f
c1 c3 c5
PANEL KAWALAN
แผงควบคุม
CONTROL PANEL
控制台
제어판
ZH
KO

PENERANGAN
รายละเอียด
1. Dulang stim
2. Tanda untuk ketinggian air dan beras
3. Mangkuk keluli tahan karat boleh
ditanggalkan
4. Cawan penyukat
5. Senduk nasi
6. Senduk sup
7. Penutup
8. Pelindung stim boleh tanggal
9. Injap tekanan mikro
10. Butang membuka penutup
11. Pemegang
12. Panel kawalan
a. Kunci Jenis Beras
a1. Beras Jepun
a2. Beras Putih
a3. Beras Perang
b. Kunci Tekstur
b1. Biasa
b2. Lembut
b3. Keras
c. Kunci Menu
c1. Cepat
c2. Stim
c3. Kuantiti kecil
c4. Sup
c5. Bubur nasi
c6. Bubur
d. Kunci «kekal panas»
e. Jam
f. Pratetap/Perakam waktu
g. Minit
h. Kunci panas semula
i. Kunci «Mula/Batal»
13. Badan perkakas
14. Kabel kuasa
1. ตะกร้านึ่ง
2. ตัวบอกระดับน้ำาและข้าว
3. หม้อสแตนเลสแบบถอดได้้
4. ถ้วยตวง
5. ทัพพี
6. ช้อนตักแกง
7. ฝาปิด
8. ฝากั้นไอน้ำาภายในแบบถอดได้
9. วาล์วปล่อยแรงดันขนาดเล็ก
10. ปุ่มเปิดฝา
11. ที่จับ
12. แผงควบคุม
a. ปุ่มเลือกชนิดของข้าว
a1 ข้าวญี่ปุ่น
a2 ข้าวขาว
a3. ข้าวกล้อง
b. ปุ่มเลือกลักษณะ
b1. ปกติ
b2. นุ่ม
b3. แข็ง
c. ปุ่มเมนู
c1. หุงด่วน
c2. นึ่ง
c3. ปริมาณน้อย
c4. ซุป
c5. ข้าวต้ม
c6. โจ๊ก
d. ปุ่มรักษาอุณหภูมิ
e. ชั่วโมง
f. ตั้งเวลาล่วงหน้า/จับเวลา
g. นาที
h. ปุ่มอุ่นร้อน
i. ปุ่ม «เริ่ม/ยกเลิก»
13. ตัวเครื่อง
14. สายไฟ
MS
TH

EN
3
BEFORE THE FIRST USE
Unpack the appliance
• Remove the appliance from the packaging and unpack all the accessories and printed
documents.
• Open the lid by pushing the opening button located on the housing - g.1.
Read the instructions and carefully follow the operating method.
Clean the appliance
• Remove the stainless steel bowl – g.2, the steam shield and the pressure valve – g.3a
and 3b.
• Clean the bowl, the valve and the steam shield with a sponge and washingup liquid.
• Wipe the outside of the appliance and the lid with a damp cloth.
• Dry off carefully.
• Put all the elements back in their original position. Install the steam shield in the right
positions on the top lid of machine. Then, put the steam shield behind the 2 ribs and push
it on the top until it’s fixed. Install the detachable cord into the socket on the cooker base.
THE APPLIANCE
• This rice cooker is equipped with 16 functions: Japanese rice, White rice, Brown rice, Normal,
Soft, Hard, Quick, Steam, Small quantity, Soup, Congee, Porridge, Reheat, Keep Warm, Preset
and Adjustable Timer.
• When the power cord is installed into the power outlet and into the socket on the cooker
base, all the indicators on the control box will light up for an instant.
• At the end of the cooking period, the appliance will automatically switch over to keep warm
which will last up to 24h.
• Do not touch the inner surface of the appliance when the product is connected or after
cooking.
• Do not carry the product in use or just after cooking.
PREPARATION BEFORE COOKING
Measuring the ingredients - Max capacity of the bowl
• The graduated markings on the inside of the bowl are given in liters and cups, these are used
for measuring the amount of water when cooking rice.
• The plastic measuring cup provided with your appliance is for measuring rice and not water.
1 level measuring cup of rice weighs about 150 g.
• Users may reduce or increase water according to types of rice and their preference of taste.
• As the voltage varies in different areas, slight spillover of rice and water is a normal
phenomenon.
• The maximum quantity of water + rice should not exceed the highest mark inside the bowl.
Fig.1 Fig.2 Fig.3a Fig.3b
Fig.4 Fig.5 Fig.6 Fig.7
Fig.12 Fig.13 Fig.14 Fig.15
a
b
a
b
Fig.16 Fig.17 Fig.18
Fig.8 Fig.9 Fig.10 Fig.11
10
cups
MAX.
MAX.
10cups
EN
54
Never add ingredients or water higher than the highest level mark.
When cooking rice
• Before cooking, measuring the rice with measuring cup and rinse it.
• Put the rinsed rice into the bowl and fill it with water to the corresponding water level (The
graduations in cups).
• The water quantity can be adjusted depending on your taste.
When steam cooking
• The quantity of water must be appropriate and always be lower than the steam basket
bottom.
• Exceeding this level may cause overflows during use.
• Place the steam basket onto the bowl – g.4.
• Add the ingredients in the basket.
FOR ALL FONCTIONS
• Carefully wipe the outside of the bowl (especially the bottom). Make sure that there are no
foreign residues or liquid underneath the bowl– g.5.
• Place the bowl into the appliance, making sure that it is correctly positioned – g.6.
• Make sure that the steam shield is correctly in position.
• Close the lid in place with a sound of “click”.
• Plug the power cord into the socket on the base and then plug another end of power cord
into power outlet.
• Do not switch on the appliance until all the above stages have been completed.
Never place your hand on the steam vent during cooking, as there is a danger of
burns – g.10.
If you wish to change the selected cooking menu because of an error, press «Start/
Cancel» key and re-choose the menu you want.
Only use the inner pot provided with the appliance.
Do not pour water or put ingredients in the appliance without the bowl inside.
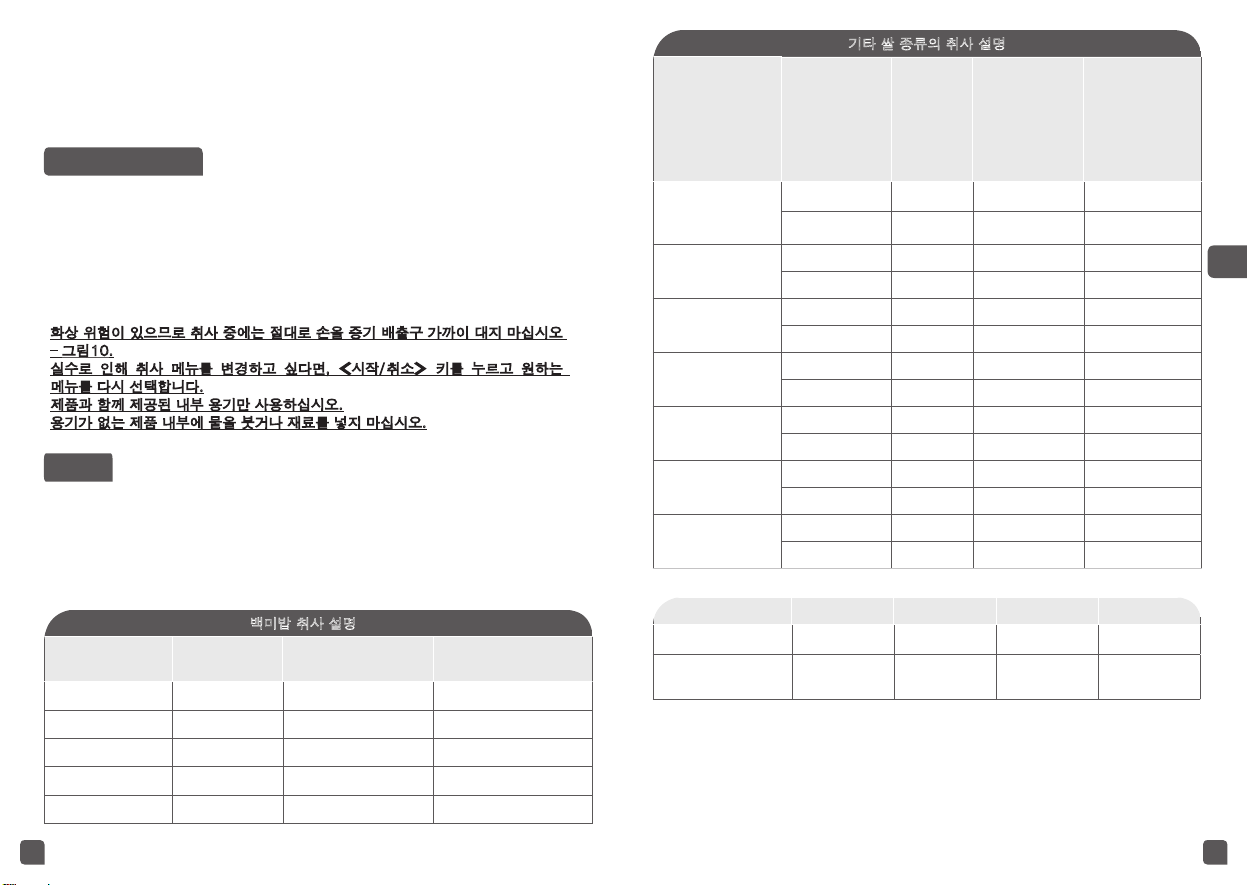
COOKING RICE TABLES
• The table below gives a guide to cook different types of rice. For best results, we recommend
using ordinary rice rather than ‘easy cook’ type of rice which tends to give a stickier rice and
may adhere to the base. With other types of rice, such as brown or wild rice, the quantities of
water need adjustment, check the tables below.
• The maximum quantity of water + rice should not exceed the highest mark inside the
bowl – g.7. Depending on the type of rice, quantities of water may need adjustment. See
the table below.
COOKING GUIDE FOR WHITE RICE - 10 cups
Measuring cups Weight of rice
Water level in the bowl
(+ rice)
Serves
2 300 g 2 cup mark 3 per. - 4 per.
4 600 g 4 cup mark 5 per. - 6 per.
6 900 g 6 cup mark 8 per. - 10 per.
8 1200 g 8 cup mark 13 per. - 14 per.
10 1500 g 10 cup mark 16 per. - 18 per.
COOKING GUIDE FOR OTHER TYPES OF RICE
Type of rice
Measuring
cup of rice
Weight
of rice
Water level in the
bowl (+ rice)
Serves
Round white rice
(Italian rice -
often a stickier rice)
6 870 g 6 cup mark 7 per. - 8 per.
10 1450 g 10 cup mark 10 per. - 12 per.
Whole grain
Brown rice
6 887 g 6 cup mark 7 per. - 8 per.
9 1332 g 9 cup mark 10per.- 11per.
Risotto rice
(Arborio type)
6 870 g 6 cup mark 7 per. - 8 per.
10 1450 g 10 cup mark 10 per. - 12 per.
Glutinous rice
6 736 g 5 cup mark 7 per. - 8 per.
10 1227 g 9 cup mark 10 per. - 12 per.
Brown rice
6 840 g 6 cup mark 7 per. - 8 per.
9 1260 g 9 cup mark 10 per. - 11 per.
Japanese rice
6 900 g 6 cup mark 7 per. - 8 per.
10 1500 g 10 cup mark 10 per. - 12 per.
Fragrant rice
6 870 g 6 cup mark 7 per. - 8 per.
10 1450 g 10 cup mark 10 per. - 12 per.
Cooking function Steam Soup Congee Porridge
Default time 40 min 1 h 30 min 45 min 1 h
Time range which
can be set
30 min -
1 h 30 min
1 h - 2 h 35 min - 1 h
50 min -
1 h 30 min

EN
76
SOME RECOMMENDATIONS
FOR BEST RESULTS WHEN COOKING RICE
• Measure the rice and rinse it thoroughly under running water in a sieve for a long time
(except for risotto rice which should not be rinsed). Then place the rice in the bowl together
with the corresponding quantity of water.
• Make sure that the rice is well distributed around the whole surface of the bowl, in order to
allow even cooking.
• Water may be substituted to stock. If using stock, there is the risks of rice browning a bit in
the bottom.
• Do not open the lid during cooking as steam will escape and this will affect the cooking time
and the taste.
• When the rice is ready, when the «KEEP WARM» indicator light is on, stir the rice and then
leave it in the rice cooker for a few minutes longer in order to get perfect rice with separate
grains.
RICE FUNCTION
• The rice function is set as the default function when the appliance is plugged.
• Place the appliance on a flat, stable, heat-resistant work surface away from water splashes
and any other sources of heat.
• Pour the required quantity of rice into the bowl using the measuring cup provided - g.8.
Then fill with cold water up to the corresponding «CUP» mark printed in the bowl
(See cooking guide above) - g.9.
• Close the lid.
Note : Always add the rice rst otherwise you will have too much water.
• Press «Rice type» key and select «Japanese rice», «White rice» or «Brown rice».
• Press «Texture» key to select the taste you prefer, e.g. «Normal», «Soft», «Hard».
• Press «Start/Cancel» key to enter into cooking status.
• When the dish is ready, the appliance will make a sound with several «bip» and will enter keep
warm status with the lamp on and the screen will display «b».
QUICK FUNCTION
• Press «Menu» key to select function «Quick». This function is dedicated to rice cooking. You
may select 3 types of rice and 3 different textures. Then press «Start/Cancel» key, the rice
cooker enter into cooking status.
• When the dish is ready, the appliance will make a sound with several «bip» and will enter into
keep warm status with the lamp on and the screen will display «b».
SMALL QUANTITY FUNCTION
• Press «Menu» key to select function «Small Quantity». This function is dedicated to rice
cooking. You may select 3 types of rice and 3 different textures. Then press «Start/Cancel»
key, the rice cooker enter into cooking status.
• When the dish is ready, the appliance will make a sound with several «bip» and will enter into
keep warm status with the lamp on and the screen will display «b».
• To cook 1 cup of white rice (serves 2 small or 1 large portion), use 1 measuring cup of white
rice and then add one and a half measuring cup of water. With some types of rice it is normal
to have some rice stuck on the bowl base when cooking 1 cup of rice.
PORRIDGE FUNCTION
• Press «Menu» key to select function «Porridge», the screen displays the default cooking time,
the light of «Start/Cancel» flicker. Then press «Start/Cancel» key, the rice cooker enter into
«Porridge» cooking status. The button of «Start/Cancel» lights up and the LED screen displays
the count down remaining time.
• The default cooking time is one hour adjustable from minimum 50 minutes to 90 minutes.
Press on «Hour» and «Minute» key to adjust the cooking time, before to press «Start/Cancel».
• When the dish is ready, the appliance will make a sound with several «bip» and will enter into
keep warm status with the lamp on and the screen will display «b».
STEAM FUNCTION
• Press «Menu» key to select function «Steam», the screen displays the default cooking time,
the light of «Start/Cancel» flicker. Then press «Start/Cancel» key, the rice cooker enter into
«Steam» cooking status. The button of «Start/Cancel» lights up and the LED screen displays
the count down remaining time.
• The default cooking time is 40 minutes adjustable from minimum 30 minutes to 90 minutes.
Press on «Hour» and «Minute» key to adjust the cooking time, before to press «Start/Cancel».
• When the dish is ready, the appliance will make a sound with several «bip» and will enter into
keep warm status with the lamp on and the screen will display «b».
SOUP FUNCTION
• Press «Menu» key to select function «Soup», the screen displays the default cooking time,
the light of «Start/Cancel» flicker. Then press «Start/Cancel» key, the rice cooker enter into
«Soup» cooking status. The button of «Start/Cancel» lights up and the LED screen the count
down remaining time.
• The default cooking time is 90 minutes adjustable from minimum 1 hour to 2 hours. Press on
«Hour» and «Minute» key to adjust the cooking time, before to press «Start/Cancel».
• When the dish is ready, the appliance will make a sound with several «bip» and will enter into
keep warm status with the lamp on and the screen will display «b».
CONGEE FUNCTION
• Press «Menu» key to select function «Congee», the screen displays the default cooking time,
the light of «Start/Cancel» flicker. Then press «Start/Cancel» key, the rice cooker enter into
«Congee» cooking status. The button of «Start/Cancel» lights up and the LED screen displays
the count down remaining time.

EN
98
• The default cooking time is 45 minutes adjustable from minimum 35 minutes to 1 hour.
Press on «Hour» and «Minute» key to adjust the cooking time, before to press «Start/Cancel».
• When the dish is ready, the appliance will make a sound with several «bip» and will enter into
keep warm status with the lamp on and the screen will display «b».
Recommendation : 0.5 cups of rice needs 7 cups of water.
REHEAT FUNCTION
• Press «Reheat» key, reheat light is on, then press «Start/Cancel» key, the rice cooker enter into
«Reheat» cooking status. The button of «Start/Cancel» lights up and the LED screen displays
dynamic rotated wireframe.
• At the end of reheating process, please stop the machine manually by pressing «Start/
Cancel» key.
• It is recommended to stir the food during Reheat function in order to have better temperature
homogeneity.
Recommendation : To add some water in the bowl before reheating to avoid the rice
gets burned. It is recommended to not reheat more than 4 cups of rice.
KEEP WARM FUNCTION
• Press «Keep Warm» key, the appliance will enter into «Keep Warm» status. The «Start/Cancel»
key lights up and the LED screen displays «b».
• At the end of keeping warm process, please stop the machine manually by pressing «Start/
Cancel» key.
• Do not use this function to reheat the cold food.
Recommendation : In order to keep the rice fresh in taste, please limit the holding
time within 6 hours.
PRESET FUNCTION
• Press the «Preset/Timer» key, the screen will display «00:00». Then press the «Hour» and
«Minute» to enact the preset time. The preset time can be set from the minimum cooking
time up to 24 hours. When you have chosen the preset time, press the «Start/Cancel» key
to enter into cooking status. The «Start/Cancel» indicator will remain on and LED screen will
display the count down remaining time.
• If the selected preset time is shorter than the cooking time, the product will enter into
cooking status immediately.
ON COMPLETION OF COOKING
• At the end of all cooking process for all functions, the appliance enters into keep warm mode.
• Open the lid – g.1.
• Glove must be used when manipulating the cooking bowl and steam tray – g.11.
• Serve the food using the spoon provided with your appliance and reclose the lid.
• The food remaining in the container will be kept warm up to 24 hours.
• Press «Start/Cancel» to stop the keep warm status.
• Unplug the appliance.
MISCELLANEOUS INFORMATION
• The appliance has memory function. In case of power failure, the rice cooker will memorize
the cooking state right before the failure, and it will continue the cooking process if the
power is resumed within 2 secondes. If the power failure lasts for more than 2 secondes, the
appliance will cancel previous cooking and return to standby status.
• Please do not open the lid during cooking in order to ensure the cooking efficiency.
CLEANING AND MAINTENANCE
• To ensure the rice cooker is unplugged and completely cooled down before cleaning and
maintenance.
• It is strongly advised to clean the appliance after each use with a sponge – g.12.
• Do not immerse the appliance in water nor pour water into it.
Bowl, steam basket (fig.13)
• It is possible to clean the bowl and steam basket in the dishwasher machine.
• If food has stuck to the bottom, you may put water in the bowl to soak for a while before
washing.
• Dry the bowl carefully.
Taking care of the bowl
For the bowl, carefully follow the instructions below:
• To ensure the maintenance of bowl quality, it is recommended not to cut food in it.
• Make sure you put the bowl back into the rice cooker.
• Use the plastic spoon provided or a wooden spoon and not a metal type so as to avoid
damaging the bowl surface – g.14.
• To avoid any risk of corrosion, do not pour vinegar into the bowl.
• The color of the bowl surface may change after using for the first time or after longer use.
This change in color is due to the action of steam and water and does not have any effect on
the use of the rice cooker, nor is it dangerous for your health. It is perfectly safe to continue
using it.
Cleaning the micro pressure valve
• When clean the micro-pressure valve, please remove it from the lid – g.16 and open it by
rotating in the direction of “open” – g.16a and 16b. After cleaning it, please wipe dry it and
meet the two triangle in the two parts together and rotate it in the direction of “close”, then
put it back to the lid of the rice cooker – g.17a and 17b.

ZH
1110
Cleaning and care of the other parts of the appliance
• Unplug the appliance before cleaning.
• Clean the outside of the Rice Cooker – g.18, the inside of the lid – g.13 and the cord with
a damp cloth and wipe dry. Do not use abrasive products.
• Do not use water to clean the interior of the appliance body as it could damage the heat
sensor.
TECHNICAL TROUBLESHOOTING GUIDE
Remark: if inner bowl is deformed, do not use it anymore and get a replacement from
the authorized service center for repai
Malfunction
description
Causes Solutions
Any indicator lamp
off and no heating.
Rice cooker not plugged.
Verify the main plug is well engaged in the
product body.
Any indicator lamp
off and heating.
Problem of the connection of
the indicator lamp or indicator
lamp is damaged.
Send to the authorized service center for
repair.
Steam leakage
during using.
Lid is badly closed. Open and close again the lid.
Micro pressure valve not well
positioned or uncomplete.
Stop the cooking (unplug the product) and
check the valve is complete (2 parts locked
together) and well positioned.
Lid or micro pressure valve
gasket is damaged.
Send to the authorized service center for
repair.
Rice half cooked or
overtime cooking.
Too much or not enough water
compared to rice quantity.
Refer to table for water quantity.
Automatic warm-
keeping fails
(product stay in
cooking position, or
no heating).
Send to authorized service center for repair.
E0
The sensor on the top open
circuit or short circuit.
Send to the authorized service center for
repair.
E1
The sensor on the bottom open
or short circuit.
E2
The sensor of inductor open or
short cirucuit.
E3 High temperature detected.
Stop the appliance and restart the program.
If the problem repeats, please send to the
authorized service center for repair.
E5 Missing bowl.
Put the inner pot inside the appliance, then
unplug and re-plug the appliance and finally
restart the program.
第一次使用前
取出設備
• 將設備從包裝中取出並拆開所有配件和文件。
• 按位於外殼上的開蓋按鈕,打開蓋子 - 圖1.
閱讀說明書並仔細遵循操作方法。
清潔設備
• 取出內鍋 – 圖 2、內蓋以及微壓閥– 圖 3a 和 3b.
• 用海綿和洗潔精將內鍋、微壓閥以及內蓋洗淨。
• 用濕布擦拭設備外部以及蓋子。
• 仔細擦乾。
• 將所有的部件放回初始位置。將內蓋安裝到機器頂蓋的正確位置上。然後,將內蓋
放到兩個勾位後並在頂部推動它,直至固定。將可拆式電源線安裝到電飯煲底的電源
接口上。
設備
• 該電飯煲具備16種功能。日本米、白米、糙米、正常、軟、硬、快煮、蒸煮、少
量、湯、粥、稀飯、翻熱、保溫、預設以及可調校計時器。
• 當電源線接通插座和電飯煲的電源接口時,控制面板上的所有指示燈都將亮起片
刻。
• 在烹調時間結束時,設備將自動切換至保溫模式,持續24小時。
• 接通電源或烹調後,切勿碰觸設備內部的表面。
• 切勿在使用中或剛烹調完後搬動產品。
烹調前準備
量度材料——鍋的最大容量
• 鍋內側的刻度標記單位為升和杯,用於測量煮飯時的用水量。
• 隨設備一起提供的塑膠量杯用於量米,而不是量水。1 量杯的米重量約為150g。
• 使用者可以根據米的類型以及他們的口味偏好減少或增加水。
• 由於不同地區的電壓不同,水和米少量外溢屬正常現象。
• 水+米的最大量不應超過鍋內的最高刻度。
添加的材料或水不得超過最高刻度。
煮飯時
• 在煮飯前,用量杯量米,並將米沖洗。
• 將沖洗後的米放入鍋內,並加水至相應的水位(杯內的刻度)。
• 加水量可根據個人口味進行調整。
ZH
1312
煮飯時以達到最佳效果的
一些建議
• 量米,並將量好的米放在篩子中,在自來水下長時間徹底沖洗(無需沖洗的意大利
米除外)。然後將米放入鍋內,並加入相應量的水。
• 確保米均勻地分佈在整個鍋底面上,以便能均衡烹調。
• 水可用高湯代替。如果使用高湯,底部可能會有些許米焦掉。
• 在烹調過程中切勿打開蓋子,否則蒸汽將會流失,影響烹調時間以及口感。
• 當米飯熟後,且«保溫»指示燈亮起,攪拌米飯並繼續把它放在電飯煲中幾分鐘,
以便能煮出粒粒分明的完美米飯。
蒸煮時
• 水量必須適宜並總是低於蒸盤底部。
• 水量超過該水準可能會導致使用時水溢出。
• 將蒸盤放入鍋中 - 圖 4.
• 將材料放入蒸盤。
所有功能
• 仔細擦拭鍋的外部(尤其是底部)。確保鍋底沒有任何殘留物質或液體。 – 圖 5 .
• 將鍋放入設備中,確保其位置正確。 – 圖 6.
• 確保擋汽圈位於正確位置。
• 將蓋子蓋上,如果位置恰當,則會發出一聲“咔嚓”。
• 將電源線插入底部的接口,然後將電源線的另一端插入插座。
• 在以上所有步驟完成後方能開啟設備。
蒸煮時,切勿將手放到汽孔上,否則會引致燒傷 - 圖 10。
如果你想更改烹調選單,按下«開始/取消»鍵,並重新選擇你所想要的選單。
只能使用設備配置的內鍋。
鍋不在設備中時,切勿往設備中添加水或材料。
煮飯表
• 以下表格為煮不同類型的米提供指導。為達最佳效果,我們推薦使用一般稻米,而
不是‘易煮’類的米,後者煮出來的飯更具粘性,可能會粘附在鍋底。煮其他類型
的米時,如糙米或野生稻米,水量需要進行調整,請查看以下表格。
• 水+米的最大量不應超過鍋內的最高刻度。 – 圖 7.根據不同類型的米,水量可能
需要進行調整。詳見下表。
白米烹調指南
量杯 米的重量 鍋內水位(+米) 可供食用人數
2 300 g 2杯標記 3-4人.
4 600 g 4杯標記 5-6人.
6 900 g 6杯標記 8-10人.
8 1200 g 8杯標記 13-14人.
10 1500 g 10杯標記 16-18人.
其他米類烹調指南
米的種類 量杯 米的重量 鍋內水位(+米) 可供食用人數
精白米(意大利米—
通常更具粘性)
6 870 g 6杯標記 7-8人
10 1450 g 10杯標記 10-12人
全麥糙米
6 887 g 6杯標記 7-8人
9 1332 g 9杯標記 10-11人
意大利米
(Arborio類)
6 870 g 6杯標記
7-8人
.
10 1450 g 10杯標記 10-12人
糯米
6 736 g 5杯標記 7-8人
10 1227 g 9杯標記 10-12人
糙米
6 840 g 6杯標記 7-8人
9 1260 g 9杯標記 10-11人
日本米
6 900 g 6杯標記 7-8人
10 1500 g 10杯標記
10-12人
.
香米
6 870 g 6杯標記 7-8人
10 1450 g 10杯標記 10-12人
烹調功能 蒸煮 湯 粥 稀飯
默認時間 40 分鐘 1小時30分鐘 45 分鐘 1小時
可設置的時間範圍
30分鐘—1小
時30分鐘
1小時 - 2
小時
35 分鐘 -1小時
50 分鐘 -
1小時30分鐘

ZH
1514
示燈將閃爍。然後按下 «開始/取消» 鍵,電飯煲進入 «蒸煮» 烹調狀態。«開始/
取消»按鈕亮起,LED 螢幕上顯示倒數剩餘時間。
• 默認烹調時間為40分鐘,可在30至90分鐘之間調整。在按下«開始/取消»鍵前,按
«小時» 和 «分鐘» 鍵調整烹調時間。
• 當飯煮熟時,設備會發出由幾個 «嗶» 組成的聲音,並進入保溫狀態,保溫指示燈
將亮起,螢幕會顯示 «b»。
«湯» 功能
• 按下 «選單» 鍵,選擇 «湯»功能,螢幕將顯示預設烹調時間, «開始/取消» 指示
燈將閃爍。然後按下 «開始/取消» 鍵,電飯煲進入 «湯» 烹調狀態。«開始/取消»
按鈕亮起,LED 螢幕上顯示倒數剩餘時間。
• 默認烹調時間為90分鐘,可在1個小時至2個小時之間調整。在按下«開始/取消»鍵
前,按 «小時» 和 «分鐘» 鍵調整烹調時間。
• 當飯煮熟時,設備會發出由幾個 «嗶» 組成的聲音,並進入保溫狀態,保溫指示燈
將亮起,螢幕會顯示 «b»。
«稀飯» 功能
• 按下 «選單» 鍵,選擇 «稀飯»功能,螢幕將顯示預設烹調時間, «開始/取消» 指
示燈將閃爍。然後按下 «開始/取消» 鍵,電飯煲進入 «稀飯» 烹調狀態。«開始/
取消»按鈕亮起,LED 螢幕上顯示倒數剩餘時間。
• 默認烹調時間為45分鐘,可在35分鐘至1個小時之間調整。在按下«開始/取消»鍵
前,按 «小時» 和 «分鐘» 鍵調整烹調時間。
• 當飯煮熟時,設備會發出由幾個 «嗶» 組成的聲音,並進入保溫狀態,保溫指示燈
將亮起,螢幕會顯示 «b»。
建議:0.5杯的米需要7杯的水。
«翻熱» 功能
• 按下 «翻熱» 鍵,翻熱指示燈將亮起,然後按下«開始/取消» 鍵,電飯煲進入
«翻熱» 烹調狀態。«開始/取消»按鈕亮起,LED 螢幕上顯示動態旋轉線框。
• 請勿用該功能來翻熱涼掉的食物。
• 使用翻熱功能時,建議攪拌食物,使食物均勻受熱。
建議:重新加熱前,往鍋中加入少許水,以免米飯焦掉。建議不要重新加熱超過4杯
的米飯。
«保溫» 功能
• 按下 «保溫» 鍵,設備將進入«保溫» 狀態。.«開始/取消»鍵亮起,LED 螢幕上顯
示«b»。
• 在保溫過程結束時,請按下«開始/取消»鍵手動停止機器。
• 請勿用該功能來重新加熱涼掉的食物。
«米飯» 功能
• 當設備接通電源時,米飯功能被設置為默認功能。
• 將設備放置在平坦、穩固、耐熱的工作臺面上,遠離水濺以及任何其它熱源。
• 用配備的量杯往鍋中倒入所需數量的米 - 圖 8.然後往鍋中倒入冷水,直至水位達
到鍋內相應的 «杯»標記(見前蒸煮指南)- 圖 9.
• 蓋上蓋子。
注意:先加米後放水,不然會導致水過多。
• 按下 «米類»鍵並選擇 «日本米»、 «白米» 或 «糙米»。
• 按下 «口感» 鍵,選擇你所喜歡的口味,例如«正常»、«軟»、 «硬»。
• 按下 «開始/取消» 鍵,進入烹調狀態。
• 當飯煮熟時,設備會發出由幾個 «嗶» 組成的聲音,並進入保溫狀態,保溫指示燈
將亮起,螢幕會顯示 «b»。
«快煮» 功能
• 按下 «選單» 鍵,選擇 «快煮»功能。該功能專用於煮米飯。你可以選擇3種不同類
型的米和3種不同口感。然後按下 «開始/取消» 鍵,電飯煲進入烹調狀態。
• 當飯煮熟時,設備會發出由幾個 «嗶» 組成的聲音,並進入保溫狀態,保溫指示燈
將亮起,螢幕會顯示 «b»。
«少量»功能
• 按下 «選單» 鍵,選擇 «少量»功能。該功能專用於煮米飯。你可以選擇3種不同類
型的米和3種不同口感。然後按下 «開始/取消» 鍵,電飯煲進入烹調狀態。
• 當飯煮熟時,設備會發出由幾個 «嗶» 組成的聲音,並進入保溫狀態,保溫指示燈
將亮起,螢幕會顯示 «b»。
• 如果你想煮1杯的白米(供2小份或1大份),用1量杯的白米,然後加入1.5量杯的
水。某些米類煮1杯的量時會有些許米飯黏在鍋底,這是正常現象。
«粥» 功能
• 按下 «選單» 鍵,選擇 «粥»功能,螢幕將顯示預設烹調時間, «開始/取消» 指示
燈將閃爍。然後按下 «開始/取消» 鍵,電飯煲進入 «粥» 烹調狀態。«開始/取消»
按鈕亮起,LED 螢幕上顯示倒數剩餘時間。
• 默認烹調時間為1個小時,可在50至90分鐘之間調整。在按下«開始/取消»鍵前,按
«小時» 和 «分鐘» 鍵調整烹調時間。
• 當飯煮熟時,設備會發出由幾個 «嗶» 組成的聲音,並進入保溫狀態,保溫指示燈
將亮起,螢幕會顯示 «b»。
«蒸煮»功能
• 按下 «選單» 鍵,選擇 «蒸煮»功能,螢幕將顯示預設烹調時間, «開始/取消» 指
«CONGEE»
FUNCTION
«REHEAT»
FUNCTION

ZH
1716
• 第一次使用或長期使用後,鍋表面的顏色可能會發生改變。這種顏色變化是在蒸汽
和水的作用下形成的,並不影響電飯煲的使用,也不會對你的健康造成任何危害。
繼續使用本產品是絕對安全的。
清洗微壓閥
• 清洗微壓閥時,請將其從蓋子上卸下 – 圖 16 並通過往“開”方向旋轉來將其
打開。– 圖 16a 和 16b.清洗完後,請將其擦乾,並將兩個部分上的三角對準,
往“關”方向旋轉,然後將其放回電飯煲蓋子上。 – 圖 17a 和 17b.
設備其他部分清潔和護理
• 清洗前請先拔掉電源。
• 用濕布清洗電飯煲外部 – 圖 18、蓋子內部– 圖 13 以及電線,並擦乾。切勿使
用硬身清潔用品。
• 切勿用水清洗電飯煲鍋身內部,否則將損壞熱感器。
建議:為保持米飯新鮮口感,請將時間設置在6個小時以內。
«預設 » 功能
• 一旦你選定了想要的程式和時間,你就可以使用該功能。
• 按下 «預設/計時器» 鍵,螢幕將顯示 «00:00»。然後按下«小時» 和 «分鐘» ,
設定預設時間。預設時間的設置範圍為最小烹調時間至24個小時。當你選好了預設
時間,按下«開始/取消»鍵,進入烹調狀態。«開始/取消»指示燈將保持亮著,同時
LED螢幕上將顯示倒數剩餘時間。
• 如果所選定的預設時間比烹調時間要短,電飯煲將立即進入烹調狀態。
烹調結束時
• 在所有功能的烹調過程結束時,設備將進入保溫模式。
• 打開蓋子。– 圖 1.
• 在調整內鍋和蒸盤時必須穿戴手套。– 圖 11.
• 用配置的勺子舀取食物,然後重新蓋上蓋子。
• 容器內剩餘的食物將保溫最高達24個小時。
• 按下 «開始/取消» 停止保溫狀態。
• 拔掉設備電源插頭。
其他資訊
• 設備具有記憶功能。在電源出現故障時,電飯煲將記住故障前的烹調狀態,如果電
力在2秒內恢復,電飯煲將繼續該烹調過程。如果電源故障持續時間超過2秒,設備
將取消先前的烹調並返回待命狀態。
• 為確保烹調效率,請勿在烹調過程中打開蓋子。
清潔和保養
• 確保電飯煲在清潔和保養前已經斷開電源並徹底冷卻。
• 強烈建議每次使用完都用海綿清潔設備 – 圖12。
• 請勿將設備浸入水中或將水倒入設備中。
內鍋、蒸盤(圖 13)
• 鍋和蒸盤可放入洗碗機內清洗。
• 如果有食物黏在底部,你可以在清洗前往鍋中加水浸泡一會兒。
• 仔細將鍋擦乾。
保養內鍋
在使用鍋時,請仔細遵循以下說明:
• 為確保鍋品質的保養,建議不要在鍋中切割食物。
• 確保將鍋放回電飯煲中。
• 用配備的膠勺或木勺,切勿使用金屬勺,以免破壞鍋表面。 – 圖 14。
• 為避免腐蝕,切勿將醋倒入鍋中。
EN
KO
1918
처음사용하기전에
제품포장을풉니다.
•포장에서제품을꺼내고모든부속품과설명서포장을풉니다.
•외관에위치한열림버튼을눌러뚜껑을엽니다-그림1.
설명서를읽고주의해서사용방법을준수하십시오.
제품을청소합니다.
• 스테인레스강 용기 – 그림 2, 증기 차폐기 및 압력 밸브 – 그림 3a 및 3b를
분리합니다.
• 용기,밸브,증기차폐기를스펀지와주방용세제로청소합니다.
• 제품의외부와뚜껑을젖은천으로닦습니다.
• 주의해서건조시킵니다.
• 모든 구성품을 원래 위치에 돌려 놓습니다. 증기 차폐기를 기기 상단 뚜껑의
정위치에 설치합니다. 그 다음, 증기 차폐기를 2개의 가로대 뒤에 넣고 고정될
때까지위를누릅니다.탈착식코드를밥솥바닥의소켓에끼웁니다.
제품
• 이전기밥솥에는다음16가지기능이있습니다.일본쌀,백미,현미,보통,부드러움,
단단함,쾌속,찜,소량,스프,죽,포리지,재가열,보온,예약및조절식타이머.
• 전원코드를전원콘센트와밥솥바닥의소켓에연결하면제어판의모든표시등이
잠시동안켜집니다.
• 취사시간이완료되면제품이자동으로보온상태로전환되고보온은최대24시간
지속됩니다.
• 제품이연결되어있는경우또는취사후에제품내면을만지지마십시오.
• 사용중또는취사후에바로제품을옮기지마십시오.
취사전준비
재료계량-최대용기용량
• 용기내부의눈금표시는리터와컵으로제공되며,쌀밥취사시물의양을측정하는
데사용됩니다.
• 제품과함께제공된플라스틱계량컵은물이아닌쌀을측정하는데사용됩니다.
계량컵하나의쌀무게는약150g입니다.
• 사용자는쌀의종류와취향에따라물을가감할수있습니다.
• 전압이지역마다다르기때문에밥물이약간넘치는것은정상적인현상입니다.
• 쌀과물의최대양이용기의가장높은표시를초과해서는안됩니다.
절대로가장높은수준표시보다더높게재료또는물을추가하지마십시오.
쌀밥취사시
• 취사전에계량컵으로쌀을측정하고씻습니다.
• 씻은쌀을용기에담고물을해당되는물수준(컵의눈금표시)까지채웁니다.
• 취향에따라물의양을조정할수있습니다.
技術故障檢修指南
注意:如果 內鍋變形,切勿再使用,並從授權的維修服務中心購買一個新的內鍋。
故障描述 原因 解決方案
任何指示燈熄滅且
不加熱。
電飯煲尚未接通電源。 主插頭是否在產品上插好。
任何指示燈熄滅,
但仍在加熱。
指示燈連結問題或者指示燈已
損壞。
送至授權的維修服務中心。
使用時漏汽
。
蓋子沒蓋好。 打開並再次關閉蓋子。
微壓閥位置沒放對,或者不
完整。
停止烹調(拔掉電源)並檢查微壓閥是否完
整(2個部件鎖在一起)並擺放正確。
送至授權的維修服務中心。
蓋子或微壓閥墊圈損壞。 送至授權的維修服務中心。
米飯半生不熟或烹
調超時。
與所用的米量相比,水量過多
或不足
參考表格中的水量。
自動保溫失效
(產品停留在烹調
狀態,或者不加
熱)。
送至授權的維修服務中心。
E0
頂部感應器短路。
送至授權的維修服務中心。
E1
底部感應器短路。
E2
磁應器的感應器短路。
E3
檢測到高溫度。
關閉設備並重啟程式。如果問題重複出現,
請送至授權的維修服務中心。
E5
內鍋不在正確位置。
將內鍋放入設備中,然後斷開並重新接通電
源,最後重啟程式。
EN
KO
2120
기타쌀종류의취사설명
쌀종류 계량컵 쌀무게
용기내물
수준(+쌀)
용량
둥근백미
(이탈리아쌀-
흔히찰진쌀)
6 870 g
6컵표시 7-8인분
10 1450 g
10컵표시 10-12인분
전곡현미
6 887 g
6컵표시 7-8인분
9 1332 g
9컵표시 10-11인분
리조또쌀
(아보리오종)
6 870 g
6컵표시 7-8인분
10 1450 g
10컵표시 10-12인분
찹쌀
6 736 g
5컵표시 7-8인분
10 1227 g
9컵표시 10-12인분
현미
6 840 g
6컵표시 7-8인분
9 1260 g
9컵표시 10-11인분
일본쌀
6 900 g
6컵표시 7-8인분
10 1500 g
10컵표시 10-12인분
향미
6 870 g
6컵표시 7-8인분
10 1450 g
10컵표시 10-12인분
취사기능 찜 스프 죽 포리지
기본시간 40분
1시간30분 45분 1시간
설정가능한시간
범위
30분
-1시간30분
1시간-
2시간
35분
-1시간
50분
-1시간30분
찜조리시
• 물의양은적절하게항상찜바구니바닥보다낮아야합니다.
• 이수준을초과하면사용중에넘칠수가있습니다.
• 찜바구니를용기에걸칩니다–그림4.
• 바구니에재료를담습니다.
모든기능에해당
• 용기의외부(특히바닥)를조심스럽게닦습니다.용기아래에이물질이나물기가
없는지확인합니다–그림5.
• 용기를제품에넣고올바르게배치되었는지확인합니다–그림6.
• 스팀차폐기가올바르게배치되었는지확인합니다.
• «딸칵»소리가나도록뚜껑을제자리에닫습니다.
• 전원코드를밥솥바닥의소켓에끼우고다른쪽끝을전원콘센트에끼웁니다.
• 위의과정을모두완료한후에제품전원을켜십시오.
•
화상위험이있으므로취사중에는절대로손을증기배출구가까이대지마십시오
–그림10.
•
실수로 인해 취사 메뉴를 변경하고 싶다면, «시작/취소» 키를 누르고 원하는
메뉴를다시선택합니다.
•
제품과함께제공된내부용기만사용하십시오.
•
용기가없는제품내부에물을붓거나재료를넣지마십시오.
쌀밥표
• 아래 표는 여러 종류의 쌀을 취사하는 방법에 대한 설명입니다. 찰진 밥이 되어
바닥에 달라붙을 수 있는 «간편 취사»형 쌀보다는 보통 쌀을 사용하는 것이
최상의 결과를 얻기에 바람직합니다. 현미 또는 야생쌀 등 기타 쌀 종류의 경우
물의양을조절해야하므로아래표를확인하십시오.
• 쌀과물의최대양이용기의가장높은표시를초과해서는안됩니다–그림7.쌀의
종류에따라물의양조절이필요할수도있습니다.아래표를참조하십시오.
백미밥취사설명
계량컵 쌀무게
용기내물수준
(+쌀)
용량
2 300 g
2컵표시 3-4인분
4 600 g
4컵표시 5-6인분
6 900 g
6컵표시 8-10인분
8 1200 g
8컵표시 13-14인분
10 1500 g
10컵표시 16-18인분
EN
KO
2322
• 백미1컵을취사하려면(작은2인분또는큰1인분),계량컵으로백미1컵을넣고
그다음계량컵으로물을1컵반을추가합니다.쌀1컵을취사하면쌀종류에따라
밥이용기바닥에눌러붙을수있는데이것은정상입니다.
«포리지»기능
• «메뉴» 키를 누르고 «포리지» 기능을 선택하면, 화면에 기본 취사 시간이
표시되고«시작/취소»불빛이깜박입니다.그다음,«시작/취소»키를누르면
밥솥이 «포리지» 취사 상태로 들어갑니다. «시작/취소» 버튼에불이 켜지고
LED화면에역동적인회전와이어프레임이표시됩니다.
• 기본 취사 시간은 1시간이고 최소 50분에서 90분까지 조정할 수 있습니다. «
시간» 및 «분» 키를 눌러 취사 사긴을 조정한 다음 «시작/취소» 버튼을
누릅니다.
• 밥이 다되면 제품이 «삐» 소리를 여러 번 내고 보온 상태로 들어가며 램프가
켜지고화면에는«b»가표시됩니다.
«찜»기능
• «메뉴»키를누르고«찜»기능을선택하면,화면에기본취사시간이표시되고
«시작/취소» 불빛이 깜박입니다. 그 다음, «시작/취소» 키를 누르면 밥솥이
«찜»취사상태로들어갑니다.«시작/취소»버튼에불이켜지고LED화면에
역동적인회전와이어프레임이표시됩니다.
• 기본 취사 시간은 40분이고 최소 30분에서 90분까지 조정할 수 있습니다. «
시간» 및 «분» 키를 눌러 취사 사긴을 조정한 다음 «시작/취소» 버튼을
누릅니다.
• 밥이 다되면 제품이 «삐» 소리를 여러 번 내고 보온 상태로 들어가며 램프가
켜지고화면에는«b»가표시됩니다.
«스프»기능
• «메뉴»키를누르고«스프»기능을선택하면,화면에기본취사시간이표시되고
«시작/취소»불빛이깜박입니다.그다음,«시작/취소»키를누르면밥솥이«
스프»취사상태로들어갑니다.«시작/취소»버튼에불이켜지고LED화면에
역동적인회전와이어프레임이표시됩니다.
• 기본 취사 시간은 90분이고 최소 1시간에서 2시간까지 조정할 수 있습니다.
«시간» 및 «분» 키를 눌러 취사 사긴을 조정한 다음 «시작/취소» 버튼을
누릅니다.
• 밥이 다되면 제품이 «삐» 소리를 여러 번 내고 보온 상태로 들어가며 램프가
켜지고화면에는«b»가표시됩니다.
«죽»기능
• «메뉴»키를누르고«죽»기능을선택하면,화면에기본취사시간이표시되고
«시작/취소» 불빛이 깜박입니다. 그 다음, «시작/취소» 키를 누르면 밥솥이
«죽»취사상태로들어갑니다.«시작/취소»버튼에불이켜지고LED화면에
쌀밥취사시최상의결과를위한
일부권장사항
• 쌀을계량한후체에담아흐르는물에오랫동안깨끗하게씻습니다(씻지말아야
하는리조또쌀제외).그다음,적당한양의물과쌀을함께용기에담습니다.
• 균일한취사를위해쌀이용기전면에적절하게분산되어있는지확인합니다.
• 물은 우려낸 물로 대체할 수 있습니다. 우려낸 물을 사용하는 경우 바닥에 밥이
눌러붙을수있습니다.
• 취사도중에뚜껑을열면증기가빠져나가취사시간과맛에영향을줄수있으니
주의하십시오.
• 밥이다되어«보온»표시등이켜지면밥알이뭉치지않도록밥을저어준다음몇
분동안밥솥에두고뜸이들때까지기다립니다.
«쌀밥»기능
• 쌀밥기능은제품에전원을꽂을때설정되는기본기능입니다.
• 물이 튀지 않고 기타 열원에서 떨어져 있는 평평하고 안정된 내열 작업 표면에
제품을놓으십시오.
• 제공된계량컵을사용하여필요한양의쌀을용기내에붓습니다-그림8.그다음,
용기에 표시된 «컵» 마크에서 해당되는 표시까지 냉수로 채웁니다(위의 취사
설명참조)-그림9.
• 뚜껑을닫습니다.
참고:항상쌀을먼저넣으십시오.그렇지않으면물이너무많아집니다.
• «쌀종류»키를누르고«일본쌀»,«백미»또는«현미»를선택합니다.
• «질감»키를누르고«보통»,«부드러움»,«단단함»중에서선호하는맛을
선택합니다.
• «시작/취소»키를눌러취사상태로들어갑니다.
• 밥이 다되면 제품이 «삐» 소리를 여러 번 내고 보온 상태로 들어가며 램프가
켜지고화면에는«b»가표시됩니다.
«쾌속»기능
• «메뉴»키를눌러«쾌속»기능을선택합니다.이기능은쌀밥전용입니다.3
종류의쌀과3가지질감중에서선택할수있습니다.그다음,«시작/취소»키를
누르면밥솥이취사상태로들어갑니다.
• 밥이 다되면 제품이 «삐» 소리를 여러 번 내고 보온 상태로 들어가며 램프가
켜지고화면에는«b»가표시됩니다.
«소량기능»
• «메뉴»키를눌러«소량»기능을선택합니다.이기능은쌀밥전용입니다.3
종류의쌀과3가지질감중에서선택할수있습니다.그다음,«시작/취소»키를
누르면밥솥이취사상태로들어갑니다.
• 밥이 다되면 제품이 «삐» 소리를 여러 번 내고 보온 상태로 들어가며 램프가
켜지고화면에는«b»가표시됩니다.

EN
KO
2524
기타정보
• 이제품에는메모리기능이있습니다.정전이발생한경우밥솥은정전전의취사
상태를바로기억하고2초내에전원이다시돌아오면취사과정을계속진행합니다.
정전이2초이상지속되면제품은이전취사를취소하고대기상태로돌아갑니다.
• 취사능률을보장하기위해취사중에는뚜껑을열지마십시오.
청소및유지보수
• 청소및유지보수전에밥솥의플러그를뽑고완전히식히십시오.
• 각사용후제품을스펀지로청소하는것이바람직합니다–그림12.
• 제품을물에담그거나물을제품에붓지마십시오.
용기,찜바구니(그림13)
• 용기와찜바구니는식기세척기로세척할수있습니다.
• 음식이바닥에눌러붙은경우용기에물을부어잠시동안불린후에세척합니다.
• 용기를조심스럽게건조시킵니다.
용기관리
• 용기와관련된아래설명을주의해서따르십시오.
• 용기품질을유지하려면음식을용기안에서자르지마십시오.
• 용기를밥솥에다시끼워넣으십시오.
• 용기 표면의 손상을 방지하려면 금속 스푼을 사용하지 말고 제공된 플라스틱
주걱이나나무스푼을사용하십시오–그림14.
• 부식을방지하려면용기에식초를붓지마십시오.
• 처음사용후또는장기간사용후에는용기표면의색깔이변할수있습니다.이런
색깔의 변화는 물과증기의 작용으로인한 것이고 밥솥 사용에는 아무런영향을
주지않으며인체건강에유해하지않습니다.계속사용해도완전하게안전합니다.
마이크로압력밸브청소
• 마이크로 압력 밸브를 청소할 때 뚜껑에서 밸브를 분리하고 – 그림16, “열림”
방향으로회전시켜 밸브를 엽니다 –그림16a 및16b.밸브를청소한 후 닦아서
건조시키고 두 부분의 삼각형이 만나도록 맞춘 다음, «닫힘» 방향으로 돌려
결합시키고밥솥뚜껑에밸브를다시끼웁니다–그림17a및17b.
제품의기타부품청소및관리
• 청소전에제품플러그를뽑아주십시오.
• 밥솥의외부–그림18,뚜껑의내부–그림13및전원코드를젖은천으로청소하고
마른천으로닦아건조시킵니다.연마재를사용하지마십시오.
• 열센서를손상시킬수있으므로제품본체내부를물로청소하지마십시오.
역동적인회전와이어프레임이표시됩니다.
• 기본 취사 시간은 45분이고 최소 35분에서 1시간까지 조정할 수 있습니다.
«시간» 및 «분» 키를 눌러 취사 사긴을 조정한 다음 «시작/취소» 버튼을
누릅니다.
• 밥이 다되면 제품이 «삐» 소리를 여러 번 내고 보온 상태로 들어가며 램프가
켜지고화면에는«b»가표시됩니다.
권장사항:쌀반컵에7컵의물이필요합니다.
«재가열»기능
• «재가열»키를누르면재가열불이켜지고그다음,«시작/취소»키를누르면
밥솥이 «재가열» 조리 상태로 들어갑니다. «시작/취소» 버튼에불이 켜지고
LED화면에역동적인회전와이어프레임이표시됩니다.
• 재가열과정종료시«시작/취소»키를눌러기기작동을수동으로중단시키십시오.
권장사항: 밥이 타는 것을방지하려면 재가열 전에물을 조금 추가하십시오.4컵
이상의쌀을재가열하는것은바람직하지않습니다.
«보온»기능
• «보온» 키를 누르면제품이 «보온» 상태로 들어갑니다. «시작/취소» 키에
불이켜지고LED화면에«b»가표시됩니다.
• 보온과정종료시«시작/취소»키를눌러기기작동을수동으로중단시키십시오.
• 찬음식을재가열하기위해이기능을사용하지마십시오.
권장사항:밥맛을신선하게유지하려면유지시간을6시간내로제한하십시오.
«예약»기능
• 원하는프로그램과시간을선택한다음이기능을사용할수있습니다.
• «예약/타이머»키를누르면화면에«00:00»이표시됩니다.그다음,«시간»
및«분»을눌러예약시간을지정합니다.예약시간은최소취사시간에서최대
24시간까지 설정할 수있습니다. 예약 시간을선택한 다음, «시작/취소» 키를
누르면 취사 상태로 들어갑니다. «시작/취소» 표시등이 켜진상태로 유지되고
LED화면에카운트다운되는잔여시간이표시됩니다.
• 선택한예약시간이취사시간보다짧은경우,제품은즉시취사상태로들어갑니다.
취사완료시
• 모든기능의모든취사과정이완료되면제품은보온모드로들어갑니다.
• 뚜껑을엽니다–그림1.
• 취사용기와증기트레이를취급할때장갑을사용해야합니다–그림11.
• 제품과함께제공된주걱을사용하여음식을담고뚜껑을다시닫습니다.
• 용기에남아있는음식은최대24시간까지보온이유지됩니다.
• 보온상태를중단하려면«시작/취소»를누릅니다.
• 제품의플러그를뺍니다.
EN
KO
MS
2726
SEBELUM PENGGUNAAN KALI PERTAMA
Membuka perkakas
• Keluarkan perkakas dari kotak dan keluarkan semua aksesori dan dokumen yang dicetak.
• Buka penutup dengan menekan butang pembuka pada badan perkakas - gambarajah 1.
Baca arahan dan ikuti cara operasi dengan teliti.
Bersihkan perkakas
• Keluarkan mangkuk keluli tahan karat – gambarajah 2, pelindung stim dan injap tekanan –
gambarajah 3a dan 3b.
• Bersihkan mangkuk, injap dan pelindung stim dengan span dan sabun cecair.
• Lapkan bahagian luar perkakas dan penutup dengan kain basah, Keringkan dengan berhati-
hati.
• Letakkan semua bahagian-bahagian dalam kedudukan asal. Pasangkan pelindung stim pada
kedudukan betul di bahagian atas perkakas. Kemudian, letakkan pelindung stim di belakang
2 pemegang dan kemudian tekan pada bahagian atas sehingga dipasangkan. Pasangkan
kabel boleh tanggal pada soket di bahagian dasar periuk nasi.
PERKAKAS
• Periuk nasi ini dilengkapi dengan 16 fungsi: Beras Jepun, Beras putih, Beras perang, Beras
biasa, Lembut, Keras, Cepat, Stim, Kuantiti kecil, Sup, Bubur nasi, Bubur, panas semula, Kekal
Panas, Pratetap dan Pemasa boleh laras.
• Apabila kabel kuasa dipasangkan pada salur kuasa dan pada soket di dasar periuk nasi, semua
penunjuk pada kotak kawalan akan menyala seketika.
• Pada akhir masa pemasakan, perkakas akan hidupkan fungsi kekal panas secara otomatis
selama 24 jam.
• Jangan sentuh bahagian dalam perkakas ketika sedang dipasang atau semasa memasak.
• Jangan mengangkat perkakas semasa memasak atau sebaik selepas memasak.
PERSEDIAAN SEBELUM MEMASAK
Menyukat bahan-bahan - Muatan maksima untuk
mangkuk
• Tanda-tanda pada bahagian dalam mangkuk adalah dalam unit liter dan cawan, ini adalah
untuk menyukat kuantiti air dan beras untuk dimasak.
• Cawan sukatan plastik yang terdapat bersama perkakas adalah untuk menyukat beras dan
bukan untuk menyukat air. 1 cawan beras adalah kira-kira 150 g.
• Pengguna boleh mengurangkan atau menambahkan jumlah air berdasarkan jenis beras dan
juga ikut rasa.
• Disebabkan nilai voltan berbeza di tempat berlainan, sedikit nasi dan air yang melimpah
기술적문제해결설명
주의:내부용기가변형된경우용기를더이상사용하지말고공식서비스센터에서
교체품을구하십시오.
고장설명 원인 해결방법
표시등이꺼져있고
가열되지않습니다
밥솥의플러그가빠져있습니다
.
전원플러그가제품본체에확실하게끼워졌는지
확인합니다.
표시등이꺼져있고
가열이됩니다
표시등연결에문제가있거나
표시등이손상되었습니다.
공식서비스센터에수리를맡깁니다.
사용중에증기가
샙니다
뚜껑이잘못닫혔습니다. 뚜껑을열었다가다시닫습니다.
마이크로압력밸브가잘못
끼워졌거나불완전합니다.
취사를중단하고(제품플러그를뽑음),밸브가
완전하고(2부품이결합고정)올바르게부착되어
있는지확인합니다.
뚜껑또는마이크로압력밸브
개스킷이손상되었습니다.
공식서비스센터에수리를맡깁니다.
밥이설익거나과도하게
취사됩니다
쌀의양에비해너무많거나적은
물을사용했습니다.
물의양은표를참조합니다.
자동보온기능고장
(제품이취사상태를
유지하거나가열되지
않음)
공식서비스센터에수리를맡깁니다.
E0
상단센서회로가개방되었거나
단락되었습니다.
공식서비스센터에수리를맡깁니다.
E1
하단센서회로가개방되었거나
단락되었습니다.
E2
유도기센서회로가개방되었거나
단락되었습니다.
E3
고온이감지되었습니다.
제품작동을중단하고프로그램을재시작합니다.
문제가반복되면공식서비스센터에수리를
맡깁니다.
E5
용기가없습니다.
제품안에내부용기를넣고제품의플러그를
뽑았다가다시꽂은후마지막으로프로그램을다시
시작합니다.
EN
KO
MS
2928
sila rujuk jadual di bawah.
• Kuantit air yang maksimum + beras sepatutnya tidak melebihi had tertinggi pada bahagian
dalam mangkuk – gambarajah 7. Bergantung kepada jenis beras, jumlah air mungkin perlu
diubah. Sila rujuk kepada jadual di bawah.
PANDUAN MEMASAK UNTUK BERAS PUTIH
Cawan sukatan Berat beras
Paras air di dalam
mangkuk (+ beras)
Mencukupi untuk
2 300 g Tanda 2 cawan 3 - 4 orang
4 600 g Tanda 4 cawan 5 - 6 orang
6 900 g Tanda 6 cawan 8 - 10 orang
8 1200 g Tanda 8 cawan 13 - 14 orang
10 1500 g Tanda 10 cawan 16 - 18 orang
PANDUAN MEMASAK UNTUK JENISJENIS BERAS YANG LAIN
Jenis beras
Cawan
sukatan
Berat beras
Paras air di dalam
mangkuk (+ beras)
Mencukupi untuk
Beras putih bulat
(beras Itali - biasa-
nya lebih melekit)
6 870 g Tanda 6 cawan 7 - 8 orang
10 1450 g Tanda 10 cawan 10 - 12 orang
Beras Perang
bergandum penuh
6 887 g Tanda 6 cawan 7 - 8 orang
9 1332 g Tanda 9 cawan 10 - 11 orang
Beras risotto
(jenis Arborio)
6 870 g Tanda 6 cawan 7 - 8 orang
10 1450 g Tanda 10 cawan 10 - 12 orang
Beras pulut
6 736 g Tanda 5 cawan 7 - 8 orang
10 1227 g Tanda 9 cawan 10 - 12 orang
Beras perang
6 840 g Tanda 6 cawan 7 - 8 orang
9 1260 g Tanda 9 cawan 10 - 11 orang
Beras Jepun
6 900 g Tanda 6 cawan 7 - 8 orang
10 1500 g Tanda 10 cawan 10 - 12 orang
Beras wangi
6 870 g Tanda 6 cawan 7 - 8 orang
10 1450 g Tanda 10 cawan 10 - 12 orang
keluar adalah perkara biasa.
• Kuantiti maksima air + beras sepatutnya tidak melebihi had tertinggi yang ditandakan di
dalam mangkuk.
Jangan sekali-kali menambahkan bahan-bahan atau air supaya melebihi had tanda
tertinggi.
Semasa memasak nasi
• Sebelum memasak, sukat beras dengan menggunakan cawan sukatan dan basuh dengan air.
• Letakkan nasi yang sudah dibasuh ke dalam mangkuk dan isikan dengan air ke had yang
diingini (Tanda-tanda pada permukaan dalam cawan).
• Kuantiti air boleh diubah ikut rasa.
Semasa memasak dengan stim
• Kuantiti air mesti bersesuaian dan mesti sentiasa lebih rendah daripada bahagian dasar
dulang stim.
• Melebihi had ini boleh menyebabkan limpahan semasa digunakan.
• Letakkan dulang stim di atas mangkuk – gambarajah 4.
• Tambahkan bahan-bahan ke dalam dulang.
UNTUK SEMUA FUNGSI
• Lapkan bahagian luar mangkuk secara berhati-hati (khasnya bahagian dasar). Pastikan
bahawa tiada bahan asing atau cecair di bawah mangkuk – gambarajah 5.
• Letakkan mangkuk di dalam pekakas, pastikan kedudukannya adalah betul – gambarajah 6.
• Pastikan pelindung stim berada di kedudukan betul.
• Tutupkan penutup sehingga bunyi “klik» kedengaran.
• Pasangkan kabel kuasa ke dalam soket di dasar dan pasangkan hujung lain ke dalam salur
kuasa.
• Jangan pasangkan perkakas sehingga kesemua langkah di atas telah diikuti.
Jangan sekali-kali letakkan tangan anda di atas bolong stim, disebabkan bahaya
melecur – gambarajah 10.
Jika anda ingin mengubah menu pemasakan pilihan akibat kesilapan, tekan kunci
«Mula/Batal» dan pilih jenis menu yang dikehendaki.
Gunakan periuk dalaman yang dibekalkan bersama perkakas.
Jangan masukkan air atau bahan-bahan ke dalam perkakas jika mangkuk telah
dikeluarkan.
JADUAL MEMASAK NASI
• Jadual di bawah merupakan panduan untuk memasak pelbagai jenis nasi. Untuk hasil terbaik,
kami mencadangkan bahawa beras biasa digunakan dan bukan beras «mudah masak» yang
menghasilkan nasi yang lebih melekit dan yang boleh melekat pada dasar periuk. Untuk
jenis-jenis beras yang lain, seperti beras perang atau beras liar, jumlah air mesti disesuaikan,

EN
KO
MS
3130
CEPAT FUNCTION
• Tekan kunci «Menu» untuk memilih fungsi «Cepat». Fungsi ini khas untuk memasak nasi. Anda
boleh memilih 3 jenis nasi dan 3 jenis tekstur. Kemudian tekan kunci «Mula/Batal», periuk nasi
akan masuk status memasak.
• Bila masakan sudah siap, perkakas akan mengeluarkan beberapa bunyi «bip» dan akan
memasuki status kekal panas dengan lampu yang menyala dan skrin memaparkan huruf «b».
FUNGSI KUANTITI KECIL
• Tekan kunci «Menu» untuk memilih fungsi «Kuantiti Kecil». Fungsi ini khas untuk memasak
nasi. Anda boleh memilih 3 jenis nasi dan 3 jenis tekstur. Kemudian tekan kunci «Mula/Batal»,
periuk nasi akan masuk status memasak.
• Bila masakan sudah siap, perkakas akan mengeluarkan beberapa bunyi «bip» dan akan
memasuki status kekal panas dengan lampu yang menyala dan skrin memaparkan huruf «b».
• Untuk memasak 1 cawan beras putih (cukup untuk 2 hidangan kecil atau 1 hidangan besar),
gunakan 1 cawan sukatan beras putih dan kemudian tambahkan satu setengah cawan air.
Semasa memasak sesetengah jenis beras, adalah biasa bahawa nasi akan terlekat pada dasar
mangkuk semasam memasak secawan beras.
FUNGSI BUBUR
• Tekan kunci «Menu» untuk memilih fungsi «Bubur», skrin akan memaparkan masa pemasakan
default dan lampu «Mula/Batal» akan berkelip-kelip. Kemudian tekan kunci «Mula/Batal»,
periuk nasi akan masuk status memasak «Bubur». Butang «Mula/Batal» akan menyala dan
skrin LED akan memaparkan bingkai kawat berputar yang dinamik menunjukkan masa yang
berbaki.
• Masa memasak default adalah satu jam dan ini boleh diselaraskan kepada masa minimum
selama 50 minit hingga ke masa maksimum 90 minit. Tekan kunci «Jam» dan «Minit» key
untuk menyelaraskan masa memasak sebelum menekan butang «Mula/Batal».
• Bila masakan sudah siap, perkakas akan mengeluarkan beberapa bunyi «bip» dan akan
memasuki status kekal panas dengan lampu yang menyala dan skrin memaparkan huruf «b».
STEAM FUNCTION
• Tekan kunci «Menu» untuk memilih fungsi «Stim», skrin memaparkan masa pemasakan
default dan lampu«Mula/Batal» akan berkelip-kelip. Kemudian tekan kunci «Mula/Batal»
periuk nasi akan memasuki status memasak «Steam». Butang «Mula/Batal» akan menyala dan
skrin LED akan memaparkan bingkai kawat berputar yang dinamik menunjukkan masa yang
berbaki.
• Masa memasak default adalah 40 minit dan ini boleh diselaraskan kepada masa minimum
selama 30 minit hingga ke masa maksimum 90 minit. Tekan kunci «Jam» dan «Minit» key
untuk menyelaraskan masa memasak sebelum menekan butang «Mula/Batal».
• Bila masakan sudah siap, perkakas akan mengeluarkan beberapa bunyi «bip» dan akan
memasuki status kekal panas dengan lampu yang menyala dan skrin memaparkan huruf «b».
Fungsi memasak Stim Sup Bubur nasi Bubur
Masa default 40 min 1 jam 30 mi 45 min 1 jam
Jangka masa yang
dapat ditetapkan
30 min -
1 jam 30 mi
1 jam -2 jam 35 min - 1 jam
50 min -
1 jam 30 mi
CADANGANCADANGAN
UNTUK HASIK TERBAIK SEMASA MEMASAK NASI
• Sukat beras dan bilas dengan baik dengan menggunakan air yang mengalir dan penapis
untuk masa yang panjang (kecuali beras risotto yang sepatutnya tidak boleh dibilas).
Kemudian letakkan beras di dalam mangkuk bersama-sama kuantiti air yang sesuai.Kemudian
letakkan beras di dalam mangkuk bersama-sama kuantiti air yang sesuai.
• Pastikan beras diagihkan di sekitar permukaan dalam mangkuk, untuk memastikan
pemasakan sekata.
• Air boleh digantikan dengan stok. Jika menggunakan stok, ada kemungkinan terdapat sedikit
nasi hangus pada dasar periuk.
• Jangan buka penutup semasa memasak kerana wap air akan terkeluar dan masa memasak
dan rasa nasi akan berubah.
• Apabila nasi sudah sedia dimasak, semasa penunjuk «KEKAL PANAS» menyala, kacau nasi dan
biarkan di dalam periuk nasi untuk beberapa minit lebih lama supaya nasi dapat dimasak
dengan sempurna.
FUNGSI NASI
• Fungsi nasi disetkan sebagai fungsi default bila perkakas diplagkan.
• Letakkan perkakas pada permukaan yang mendatar, stabil dan tahan panas jauh daripada
terkena air dan juga sumber-sumber tenaga haba yang lain.
• Tuangkan kuantiti nasi yang diperlukan ke dalam mangkuk dengan menggunakan cawan
sukatan - gambarajah 8. Kemudian isikan dengan air sejuk sehingge ke tanda «CAWAN» sesuai
yang dicetak pada mangkuk (Sila rujuk kepada panduan memasak di atas) - gambarajah 9.
• Tutup penutup.
Perhatian : Sentiasa tambahkan nasi terlebih dahulu, jika tidak jumah air yang
ditambah mungkin terlalu banyak.
• Tekan kunci «Jenis beras» dan pilih «beras Jepun», «Beras putih» atau«Beras perang».
• Tekan kunci «Tekstur» untuk memilih rasa yang diiingini contohnya,«Biasa», «Lembut», «Keras».
• Tekan kunci «Mula/Batal» untuk masukkan status pemasakan.
• Apabila masakan sudah sedia, perkakas akan mengeluarkan bunyi «bip» dan akan
memaparkan status kekal panas dengan lampu yang menyala dan skrin akan memaparkan
huruf «b».

EN
KO
MS
3332
secara manual.
• Jangan gunakan fungsi ini untuk memanaskan makanan sejuk
.Cadangan : Untuk memastikan nasi berasa segar, sila simpan nasi selama 6 jam sahaja.
FUNGSI PRESET
• Anda boleh menggunakan fungsi ini setelah anda telah memilih program dan masa yang
diingini.
• Tekan kunci «Pratetap/Pemasa» key, skrin akan memaparkan «00:00». Kemudian tekan kunci
«Jam» dan «Minit» untuk menghidupkan masa pratetap. Masa pratetap boleh disetkan
daripada masa pemasakan minimum sehinnga 24 jam. Apabila anda telah memilih masa
pratetap, tekan kunci «Start/Cancel» untuk memasuki status pemasakan. Penunjuk «Mula/
Batal» akan kekal dibuka dan skrin LED akan memaparkan masa kiraan detik yang tertinggal.
• JIka masa pratetap adalah lebih singkat daripada masa pemasakan, perkakas akan memasuki
status memasak serta-merta.
SEMASA HABIS MEMASAK
• Pada akhir semua proses memasak untuk semua fungsi, perkakas akan memasuki mod kekal
panas.
• Buka penutup - gambarajah 1.
• Sarung tangan mesti digunakan semasa mengendalikan mangkuk pemasakan dan dulang
stim – gambarajah 11.
• Hidangkan makanan dengan menggunakan senduk yang dibekalkan bersama perkakas
anda dan tutupkan senduk semula.
• Makanan yang tertinggal di dalam bekas akan kekal dalam keadaan panas selama 24 jam.
• Tekan kunci «Mula/Batal» untuk mematikan status kekal panas.
• Cabutkan perkakas daripada soket.
BERBAGAIBAGAI MAKLUMAT LAIN
• Perkakas mempunyai fungsi memori. Jika ada gangguan kuasa elektrik, periuk nasi akan
mengingati keadaan memasak sebelum gangguan, dan akan sambung memasak jika kuasa
bersambung dalam masa 2 saat. Jika gangguan kekal lebih daripada 2 saat, perkakas akan
membatalkan pemasakan dan akan balik ke status siap sedia.
• Jangan membuka tudung semasa memasak untuk memastikan pemasakan berjalan dengan
efisien.
PERMBERSIHAN DAN PENYELENGGARAAN
• Pastikan periuk nasi dicabut daripada soket dan dibiar menyejuk dengan sepenuhnya
sebelum pembersihan dan penyelenggaraan.
• Adalah digalakkan bahawa perkakas dibersihkan dengan span selepas setiap penggunaan
– gambarajah 12.
• Jangan masukkan perkakas ke dalam air atau tuangkan air ke dalamnya.
FUNGSI SUP FUNCTION
• Tekan kunci «Menu» untuk memilih fungsi «Sup», skrin memaparkan masa pemasakan default
dan lampu «Mula/Batal» akan berkelip-kelip. Kemudian tekan kunci «Mula/Batal», periuk nasi
akan memasuki status memasak «Sup». Butang «Mula/Batal» akan menyala dan skrin LED
akan memaparkan bingkai kawat berputar yang dinamik menunjukkan masa yang berbaki.
• > Masa memasak default adalah 90 minit dan ini boleh diselaraskan kepada masa minimum
selama 1 jam hingga ke masa maksimum 2 jam. Tekan kunci «Jam» dan «Minit» key untuk
menyelaraskan masa memasak sebelum menekan butang «Mula/Batal».
• Bila masakan sudah siap, perkakas akan mengeluarkan beberapa bunyi «bip» dan akan
memasuki status kekal panas dengan lampu yang menyala dan skrin memaparkan huruf «b».
FUNGSI BUBUR NASI
• Tekan kunci «Menu» untuk memilih fungsi «Bubur nasi», skrin memaparkan masa pemasakan
default dan lampu «Mula/Batal» akan berkelip-kelip. Kemudian tekan kunci «Mula/Batal»
periuk nasi akan memasuki status memasak «Bubur nasi». Butang «Mula/Batal» akan menyala
dan skrin LED akan memaparkan bingkai kawat berputar yang dinamik menunjukkan masa
yang berbaki.
• Masa memasak default adalah 45 minit dan ini boleh diselaraskan kepada masa minimum
selama 35 minit hingga ke masa maksimum satu jam. Tekan kunci «Jam» dan «Minit» key
untuk menyelaraskan masa memasak sebelum menekan butang «Mula/Batal».
• Bila masakan sudah siap, perkakas akan mengeluarkan beberapa bunyi «bip» dan akan
memasuki status kekal panas dengan lampu yang menyala dan skrin memaparkan huruf «b».
Cadangan : 0.5 cawan beras memerlukan 7 cawan air.
FUNGSI PANASKAN SEMULA
• Kemudian tekan kunci «Mula/Batal» periuk nasi akan memasuki status memasak «Panaskan
semula». Butang «Mula/Batal» akan menyala dan skrin LED akan memaparkan bingkai kawat
berputar yang dinamik.
• Pada akhir proses memanaskan semula, sila hentikan perkakas dengan menekan kunci «Mula
batal» secara manual.
• Adalah dinasihatkan untuk mengacau makanan apabila menggunakan fungsi ‘panaskan
semula’ untuk menghasilkan kehomogenan suhu yang lebih baik
Cadangan : Tambahkan sedikit air ke dalam nasi untuk mengelakkan nasi terbakar.
Anda tidak digalakkan memanaskan lebih daripada 4 cawan nasi.
FUNGSI KEKAL PANAS
• Tekan kunci «Kekal Panas», periuk nasi akan masuk status «Kekal Panas». Kunci «Mula/Batal»
akan menyala dan skrin LED akan memaparkan huruf «b».
• >Pada akhir proses kekal panas, sila hentikan perkakas dengan menekan kunci «Mula/Batal»

EN
KO
MS
3534
PANDUAN PENYELESAIAN MASALAH TEKNIK
Penerangan
kerosakan
Punca Penyelesaian
Lampu penunjuk
tertutup dan tiada
pemanasan
Periuk nasi tidak dipasangan
kepada sumber tenaga.
Pastikan plag utama dipasangkan dengan
betul pada badan perkakas.
Lampu penunjuk
tertutup dan tiada
pemanasan
Masalah hubungan lampu
penunjuk atau lampu penunjuk
sudah rosak.
Hantarkan ke pusat perkhidmatan yang
diluluskan untuk dibaiki.
Kebocoran stim
semasa digunakan
Penutup tidak ditutup dengan
sempurna.
Buka dan tutup penutup semula.
Injap tekanan mikro tidak
berada pada kedudukan yang
baik atau tidak lengkap.
Hentikan pemasakan (cabutkan perkakas
daripada soket) dan pastikan injap adalah
lengkap (2 bahagian dipasangkan
bersama-sama) dan dipasangkan dengan baik.
Tudung atau gasket injap
tekanan mikro rosak.
Hantarkan ke pusat perkhidmatan yang
diluluskan untuk dibaiki.Hantarkan ke pusat
perkhidmatan yang diluluskan untuk dibaiki.
Nasi setengah
masak atau masa
memasak lebih
panjang dari masa
dijangkakan
Kuantiti air terlalu banyak atau
tidak mencukupi berbanding
dengan kuantiti nasi.
Rujukkan kepada jadual untuk kuantiti air.
Fungsi kekal panas
automatik tidak
berfungsi (perkakas
kekal pada kedudu-
kan memasak atau
tiada pemanasan)
Hantarkan ke pusat perkhidmatan yang
diluluskan untuk dibaiki.
E0
Pengesan pada bahagian atas
mengalami litar terbuka atau
litar pintas.
Hantarkan ke pusat perkhidmatan yang
diluluskan untuk dibaiki.E1
Pengesan pada bahagian
bawah mengalami litar terbuka
atau litar pintas.
E2
Pengesan induktor mengalami
litar terbuka atau litar pintas.
E3 Suhu tinggi dikesan.
Matikan perkakas dan hidupkan semula
programnya. Jika masalah berterusan, sila
hantarkan perkakas ke pusat perkhidmatan
yang diluluskan untk dibaiki.
E5 Mangkuk hilang.
Masukkan bahagian dalam periuk ke dalam
perkakas, kemudian cabutkan plag daripada
soket, pasangkan plag semula dan hidupkan
semula programnya.
Catatan: Jika bahagian dalam mangkuk rosak, jangan gunakan lagi dan dapatkan
gantian daripada pusat perkhidmatan yang diluluskan.
Mangkuk, dulang stim (Gambarajah 13)
• Mangkuk dan dulang stim boleh dicuci dengan menggunakan mesin pencuci pingggan.
• Jika makanan telah terlekat pada dasarnya, anda boleh menuangkan sedikit air ke dalam
mangkuk untuk merendam seketika sebelum pencucian.
• Keringkan mangkuk dengan berhati-hati.
Menjaga mangkuk
Untuk mangkuk, ikuti arahan bawah dengan teliti:
• Untuk memastikan kualiti mangkuk dikekalkan, adalah dicadangkan bahawa makanan tidak
boleh dipotong di dalamnya.
• Pastikan mangkuk dipasangkan semula pada periuk nasi.
• Gunakan senduk plastik yang dibekalkan atau senduk kayu dan bukan senduk logam untuk
mengelakkan daripada merosakkan permukaan mangkuk– gambarajah 14.
• Untuk mengelakkan risiko kakisan, jangan memasukkan cuka ke dalam mangkuk.
• Warna permukaan mangkuk mungkin akan berubah selepas digunakan untuk kali pertama
atau lebih lama selepas digunakan. Perubahan ini adalah disebabkan oleh wap air dan air dan
tidak ada kesan terhadap periuk nasi, selain tidak mengakibatkan masalah kesihatan. Anda
boleh sambung menggunakan mangkuk dengan selamat.
Membersihkan injap tekanan mikro
• Semasa mencuci injap tekanan mikro, sila tanggalkan injap daripada tudung – gambarajah 16
dan buka dengan memutarkan ke arah “buka” – gambarajah 16a dan 16b. Selepas dibersihkan,
sila lapkan sehingga kering dan pasangkan kedua-dua segitiga dalam kedua-dua bahagian
bersama dan kemudian putarkan dalam arah «tutup», kemudian letakkan semula pada tudung
periuk nasi – gambarajah 17a dan 17b.
Membersihkan dan menjaga bahagian-bahagian
lain perkakas
• Cabutkan perkakas daripada soket sebelum dibersihkan.
• Bersihkan bahagian luar Periuk Nasi - gambarajah 18, bahagian dalam penutup -gambarajah
13 and kabel dengan kain basah dan lapkan sehingga kering. Jangan gunakan produk abrasif.
• Jangan gunakan air untuk membersihkan bahagian dalaman badan perkakas kerana
pengesan haba mungkin terosak.

EN
KO
MS
TH
3736
ก่อนใช้งานครั้งแรก
การถอดตัวเครื่อง
• เอาเครื่องและอุปกรณ์เสริมทั้งหมดพร้อมเอกสารออกจากบรรจุภัณฑ์
• เปิดฝาโดยกดปุ่มเปิดที่ตัวเครื่อง - g.1
อ่านคำาแนะนำาและวิธีการใช้งานอย่างละเอียด
การทำาความสะอาด
• เอาโถสแตนเลสออก – g.2 ฝากั้นไอน้ำาและวาล์วปล่อยแรงดัน – g.3a และ 3b
• ทำาความสะอาดโถ วาล์ว และฝากั้นไอน้ำา ด้วยฟองน้ำาชุบน้ำายาทำาความสะอาด
• เช็ดด้านนอกของเครื่องและฝาด้วยผ้าชุบน้ำาหมาดๆ แล้วเช็ดให้แห้ง
• วางส่วนประกอบทั้งหมดกลับไปยังตำาแหน่งเดิม ติดตั้งฝากั้นไอน้ำาด้านขวาของฝาเครื่อง จาก
นั้น ดึงฝากั้นไอน้ำาไปข้างหลัง 2 ร่อง แล้วกดด้านบนจนลงล็อก ติดตั้งสายที่สามารถถอดออก
ได้เข้ากับเต้ารับบนฐานเครื่อง
หม้อหุงข้าว
• หม้อหุงข้าวนี้ประกอบไปด้วยฟังก์ชันการปรุงอาหารทั้งหมด 16 ฟังก์ชันคือ: ข้าวญี่ปุ่น ข้าว
ขาว ข้าวกล้อง ปกติ นุ่ม แข็ง รวดเร็ว นึ่ง ปริมาณน้อย ซุป โจ๊ก ข้าวต้ม อุ่นร้อน อุ่น ตั้งค่า
ล่วงหน้า และปรับเวลา
• เมื่อเสียบสายไฟในเต้ารับแล้วเต้าเสียบบนฐานเครื่องแล้ว สัญญาณไฟบนกล่องควบคุมจะติด
ขึ้นทันที
• เมื่อเสร็จสิ้นการหุงหรือปรุงอาหาร หม้อหุงข้าวจะเปลี่ยนไปยังโหมดการรักษาความร้อนโดย
อัตโนมัติซึ่งจะรักษาความร้อนได้นานสูงสุด 24 ชั่วโมง
• อย่าสัมผัสพื้นผิวเครื่องเมื่อกำาลังเสียบปลักอยู่หรือหลังประกอบอาหารเสร็จ
• อย่ายกเครื่องที่กำาลังใช้งานอยู่หรือหลังจากประกอบอาหารเสร็จทันที
การเตรียมก่อนเริ่มใใช้งาน
การตวง - ความจุสูงสุดของหม้อชั่นใน
• เครื่องหมายบอกระดับภายในโถแสดงเป็นหน่วยลิตรและถ้วย ใช้สำาหรับวัดปริมาณน้ำาเมื่อหุง
ข้าว
• ถ้วยตวงที่ให้มาพร้อมกับเครื่องใช้สำาหรับวัดข้าว แต่ไม่ใช้สำาหรับน้ำา ข้าว 1 ถ้วย มีน้ำาหนัก
ประมาณ 150 กรัม
• ผู้ใช้งานอาจจะลดหรือเพิ่มน้ำาตามประเภทของข้าวและตามรสชาติของข้าวที่ต้องการ
• ตามที่แรงดันไฟฟ้ามีความแตกต่างตามพื้นที่ต่างๆ, การล้นของข้าวและน้ำาเล็กน้อยเป็น
เหตุการณ์ที่เกิดขึ้นตามปกติ
• ปริมาณสูงสุดของน้ำา + ข้าว ไม่ควรเกินขีดสูงสุดในโถ
อย่าเติมส่วนผสมหรือน้ำาให้สูงกว่าขีดระดับสูงสุด
เมื่อต้องการหุงข้าว
• ก่อนหุง วัดปริมาณข้าวโดยใช้ถ้วยตวงแล้วล้างให้สะอาด
• ใส่ข้าวที่ล้างแล้วลงในโถแล้วเติมน้ำาตามขีดบอกระดับ (ขีดบอกระดับในถ้วย)
• สามารถปรับปริมาณของน้ำาได้ตามต้องการ
เมื่อต้องการหุงนึ่งอาหาร
• ปริมาณของน้ำาต้องเหมาะสมและต่ำากว่าส่วนล่างของตะกร้านึ่งเสมอ
• หากเกินระดับนี้ อาจทำาให้น้ำาล้นระหว่างประกอบอาหารได้ วางตะกร้านึ่งบนโถ – g.4
• ใส่ส่วนผสมลงในตะกร้า
สำาหรับทุกฟังก์ชัน
• เช็ดด้านนอกของโถอย่างระมัดระวัง (โดยเฉพาะอย่างยิ่งด้านล่าง) ให้แน่ใจว่าไม่มีสิ่งตกค้าง
หรือของเหลวอยู่ใต้โถ– g.5
• วางโถในเครื่อง ให้แน่ใจว่าอยู่ในตำาแหน่งที่ถูกต้อง – g.6
• ให้แน่ใจว่าฝากั้นไอน้ำาอยู่ในตำาแหน่งที่ถูกต้อง
• ปิดฝาครอบจนได้ยินเสียง «กริ๊ก»
• เสียบสายไฟเข้าที่ฐานของช่องเสียบที่ตัวหม้อหุงข้าวและปลั๊กเสียบเข้าที่เต้าเสียบไฟฟ้า
• อย่ากดสวิตช์เครื่องจนกว่าจะดำาเนินการขั้นก่อนหน้าเสร็จ
อย่าวางมือไว้ตรงบริเวณที่ระบายไอร้อนในระหว่างการปรุงอาหาร เนื่องจากอาจได้รับ
อันตรายเนื่องจากถูกความร้อนลวก - g.10
หากต้องการเปลี่ยนเมนูการประกอบอาหารตามที่เลือกเนื่องจากเกิดความผิดพลาด
กดปุ่ม «เริ่ม/บกเลิก» แล้วเลือกเมนูที่ต้องการใหม่
ใช้เฉพาะหม้อภายในที่ให้มาพร้อมกับเครื่อง
อย่าใส่น้ำาหรือส่วนผสมในเครื่องหากไม่มีโถอยู่
ตารางหุงข้าว
• ตารางต่อไปนี้แสดงแนวทางในการหุงข้าวประเภทต่างๆ เพื่อให้ได้ผลดีที่สุด แนะนำาให้ใช้
ข้าวปกติแทนข้าวประเภทที่ «หุงง่าย» ซึ่งมีแนวโน้มที่จะให้ข้าวที่เหนียวกว่าและอาจติดที่
ฐาน สำาหรับข้าวประเภทอื่น เช่น ข้าวกล้องหรือข้าวป่า ต้องปรับปริมาณน้ำา ตามตารางด้าน
ล่าง
• ปริมาณสูงสุดของน้ำา + ข้าว ไม่ควรเกินขีดสูงสุดในโถ– g.7 อาจต้องปรับปริมาณน้ำา ขึ้นอยู่
กับประเภทของข้าว ดูตารางด้านล่าง
EN
KO
MS
TH
3938
แนวทางการหุงข้าวขาว
ถ้วยตวง นำาหนักของข้าว ระดับน้ำาในโถ (+ ข้าว) ปริมาณที่ได้
2
300 กรัม 2 ถ้วย 3 - 4 คน
4
600 กรัม 4 ถ้วย 5 - 6 คน
6
900 กรัม 6 ถ้วย 8 - 10 คน
8
1200 กรัม 8 ถ้วย 13 - 14 คน
10
1500 กรัม 10 ถ้วย 16 - 18 คน
แนวทางการหุงข้าวประเภทอื่น
ประเภทของข้าว
ถ้วยตวง น้ำาหนักของข้าว
ระดับน้ำาในโถ
(+ ข้าว)
ปริมาณที่ได้
ข้าวขาวเม็ดกลม
(ข้าวอิตาเลียน - มัก
เป็นข้าวมีความ
เหนียว)
6
870 กรัม 6 ถ้วย 7 - 8 คน
10
1450 กรัม 10 ถ้วย 10 - 12 คน
ข้าวกล้องไม่ขัดสี
6
887 กรัม 6 ถ้วย 7 - 8 คน
9
1332 กรัม 9 ถ้วย 10 - 11 คน
ข้าวรีซอตโต
6
870 กรัม 6 ถ้วย 7 - 8 คน
10
1450 กรัม 10 ถ้วย 10 - 12 คน
ข้าวเหนียว
6
736 กรัม 5 ถ้วย 7 - 8 คน
10
1227 กรัม 9 ถ้วย 10 - 12 คน
ข้าวกล้อง
6
840 กรัม 6 ถ้วย 7 - 8 คน
9
1260 กรัม 9 ถ้วย 10 - 11 คน
ข้าวญี่ปุ่น
6
900 กรัม 6 ถ้วย 7 - 8 คน
10
1500 กรัม 10 ถ้วย 10 - 12 คน
ข้าวหอม
6
870 กรัม 6 ถ้วย 7 - 8 คน
10
1450 กรัม 10 ถ้วย 10 - 12 คน
คำาแนะนำาเพิ่มเติมเพื่อผลลัพธ์การหุงข้าวที่ดี
• วัดข้าวและล้างด้วยน้ำาก๊อกโดยใช้กระชอนหลายครั้ง (ยกเว้นข้าวริซอตโตซึ่งไม่ควรล้าง)
จากนั้นใส่ข้าวในโถโดยใส่น้ำาตามเหมาะสม
• ใช้แน่ใจว่าข้าวกระจายตัวทั่วโถ เพื่อให้หุงได้ทั่ว
• อาจใช้น้ำาสต็อกแทนน้ำา หากใช้น้ำาสต็อก ข้าวอาจไหม้ติดด้านล่าง
• อย่าเปิดฝาระหว่างประกกอบอาหารเนื่องจากไอน้ำาจะออกมาและจะมีผลต่อเวลาการหุงและ
รสชาติ
• เมื่อข้าวสุก สัญญาณไฟติดที่ «KEEP WARM» คนข้าว แล้วทิ้งไว้สองสามนาทีเพื่อให้ข้าว
เรียงเม็ด
ฟังก์ชั่น «ข้าว»
• ฟังก์ชั่นข้าวตั้งเป็นฟังก์ชั่นของเครื่องเมื่อเสียบปลั๊กครั้ง
• วางเครื่องบนผิวราบ มั่นคง ทนความร้อน ให้ห่างจากน้ำาที่กระเซ็นและแหล่งความร้อนอื่นๆ
• ใส่ข้าวตามปริมาณที่ต้องการลงในโโดยใช้ถ้วยตวงที่ให้มา - g.8 จากนั้นเติมน้ำาเย็นจนถึง
ขีด «ถ้วย» ในโถ (ดูแนวทางการหุงข้างต้น) g.9
• ปิดฝา
หมายเหตุ : ใส่้ข้าวก่อนเสมอ มิฉธนั้นจะมีน้ำามากเกินไป
• กดปุ่ม «ประเภทของข้าว» แล้วเลือก «ข้าวญี่ปุ่น» «ข้าวขาว» หรือ «ข้าวกล้อง»
• กดปุ่ม «ลักษณะ» เพื่อเลือกรสชาติที่ชอบ เช่น «ปกติ» «นุ่ม» «แข็ง»
• กดปุ่ม «เริ่ม/ยกเลิก» เพื่อเข้าสู่สถานะการหุง
• จัดจาน จะได้ยินเสียง «ปี๊บ» จะเข้าสถานะการอุ่นเมื่อไฟติด หน้าจอจะปรากฏ «b»
ฟังก์ชั่น «รวดเร็ว»
• กดปุ่ม «เมนู» เพื่อเลือกฟังก์ชั่น «รวดเร็ว» ฟังก์ชั้นนี้ใช้สำาหรับหุงข้าว เลือกข้าวได้ 3 ประเภท
และ 3 ลักษณะ จากนั้น กดปุ่ม «เริ่ม/ยกเลิก» หม้อหุงข้าวเข้าสู่โหมดหุง
• จัดจาน จะได้ยินเสียง «ปี๊บ» จะเข้าสถานะการอุ่นเมื่อไฟติด หน้าจอจะปรากฏ «b»
«ฟังก์ชั่น ปริมาณน้อย»
• กดปุ่ม «เมนู» เพื่อเลือกฟังก์ชั่น «ปริมาณน้อย» ฟังก์ชั้นนี้ใช้สำาหรับหุงข้าว เลือกข้าวได้ 3
ประเภท และ 3 ลักษณะ จากนั้น กดปุ่ม «เริ่ม/ยกเลิก» หม้อหุงข้าวเข้าสู่โหมดหุง
• จัดจาน จะได้ยินเสียง «ปี๊บ» จะเข้าสถานะการอุ่นเมื่อไฟติด หน้าจอจะปรากฏ «b»
• หุงข้าวขาว 1 ถ้วย (รับประทานได้ 2 คน หรือ 1 จานใหญ่) ใช้ข้าวขาว 1 ถ้วย เติมน้ำาหนึ่งถ้วย
ครึ่ง สำาหรับข้าวบางประเภท เมื่อหุงข้าว 1 ถ้วย อาจติดด้านล่าง
ฟังก์ชั่น «ข้าวต้ม»
• กดปุ่ม «เมนู» เพื่อเลือกฟังก์ชั่น «ข้าวต้ม» หน้าจอแสดงเวลาของเครื่องไฟ «เริ่ม/ยกเลิก»
ติด จากนั้น กดปุ่ม «เริ่ม/ยกเลิก» หม้อหุงข้าวเข้าสู่โหมด «ข้าวต้ม» ปุ่มบนไฟ «เริ่ม/ยกเลิก»
จิด หน้าจอแอลซีดีแสดลวดไดนามิกส์หมุน หน้าจอแอลอีดีจะนับเวลาถอยหลัง
• เวลาของเครื่องตั้งไว้ที่หนึ่งชั่วโมงซึ่งสามารถปรับได้ตั้งแต่ 50 นาที ถึง 90 นาที กดปุ่ม
ฟังก์ชันการหุงข้าว นึ่ง ซุป โจ๊ก ข้าวต้ม
เวลาเดิม 40 นาที
1 ชั่วโมง 30
นาที
45 นาที 1 ชั่วโมง
ช่วงเวลาที่สามารถ
ปรับได้
30 นาที -
1 ชั่วโมง 30
นาที
1 ชั่วโมง -
2 ชั่วโมง
35 นาที - 1 ชั่วโมง
50 นาที -
1 ชั่วโมง 30 นาที

EN
KO
MS
TH
4140
«ชั่วโมง» และ «นาที» เพื่อปรับเวลาประกอบอาหาร จากนั้นกดปุ่ม «เริ่ม/ยกเลิก»
• จัดจาน จะได้ยินเสียง «ปี๊บ» จะเข้าสถานะการอุ่นเมื่อไฟติด หน้าจอจะปรากฏ «b»
ฟังก์ชั่น «นึ่ง»
• กดปุ่ม «เมนู» เพื่อเลือกฟังก์ชั่น «นึ่ง» หน้าจอแสดงเวลาของเครื่องไฟ «เริ่ม/ยกเลิก» ติด
จากนั้น กดปุ่ม «เริ่ม/ยกเลิก» หม้อหุงข้าวเข้าสู่โหมด «นึ่ง» ปุ่มบนไฟ «เริ่ม/ยกเลิก» จิด
หน้าจอแอลซีดีแสดลวดไดนามิกส์หมุน หน้าจอแอลอีดีจะนับเวลาถอยหลัง
• เวลาของเครื่องตั้งไว้ที่ 40 นาที ซึ่งสามารถปรับได้ตั้งแต่ 30 นาที ถึง 90 นาที กดปุ่ม
«ชั่วโมง» และ «นาที» เพื่อปรับเวลาประกอบอาหาร จากนั้นกดปุ่ม «เริ่ม/ยกเลิก»
• จัดจาน จะได้ยินเสียง «ปี๊บ» จะเข้าสถานะการอุ่นเมื่อไฟติด หน้าจอจะปรากฏ «b»
ฟังก์ชั่น «ซุป»
• กดปุ่ม «เมนู» เพื่อเลือกฟังก์ชั่น «ซุป» หน้าจอแสดงเวลาของเครื่องไฟ «เริ่ม/ยกเลิก» ติด
จากนั้น กดปุ่ม «เริ่ม/ยกเลิก» หม้อหุงข้าวเข้าสู่โหมด «ซุป» ปุ่มบนไฟ «เริ่ม/ยกเลิก» จิด
หน้าจอแอลซีดีแสดลวดไดนามิกส์หมุน หน้าจอแอลอีดีจะนับเวลาถอยหลัง
• เวลาของเครื่องตั้งไว้ที่ 90 นาที ซึ่งสามารถปรับได้ตั้งแต่ 1 ชั่วโมง ถึง 2 ชั่วโมง กดปุ่ม
«ชั่วโมง» และ «นาที» เพื่อปรับเวลาประกอบอาหาร จากนั้นกดปุ่ม «เริ่ม/ยกเลิก»
• จัดจาน จะได้ยินเสียง «ปี๊บ» จะเข้าสถานะการอุ่นเมื่อไฟติด หน้าจอจะปรากฏ «b»
ฟังก์ชั่น «โจ๊ก»
• กดปุ่ม «เมนู» เพื่อเลือกฟังก์ชั่น «โจ๊ก» หน้าจอแสดงเวลาของเครื่องไฟ «เริ่ม/ยกเลิก» ติด
จากนั้น กดปุ่ม «เริ่ม/ยกเลิก» หม้อหุงข้าวเข้าสู่โหมด «โจ๊ก» ปุ่มบนไฟ «เริ่ม/ยกเลิก» จิด
หน้าจอแอลซีดีแสดลวดไดนามิกส์หมุน หน้าจอแอลอีดีจะนับเวลาถอยหลัง
• เวลาของเครื่องตั้งไว้ที่ 45 นาที ซึ่งสามารถปรับได้ตั้งแต่ 35 นาที ถึง 1 ชั่วโมง กดปุ่ม
«ชั่วโมง» และ «นาที» เพื่อปรับเวลาประกอบอาหาร จากนั้นกดปุ่ม «เริ่ม/ยกเลิก»
• จัดจาน จะได้ยินเสียง «ปี๊บ» จะเข้าสถานะการอุ่นเมื่อไฟติด หน้าจอจะปรากฏ «b»
คำาแนะนำา : ข้าว 0.5 ถ้วย ใช้น้ำา 7 ถ้วย
ฟังก์ชั่น «อุ่นร้อน»
• กดปุ่ม «อุ่นร้อน» ไฟอุ่นอาหารจะติด จากนั้นกดปุ่ม «เริ่ม/ยกเลิก» หม้อหุงข้าวจะเข้าสู่สถานะ
«อุ่นร้อน» ปุ่มบนไฟ «เริ่ม/ยกเลิก» จิด หน้าจอแอลซีดีแสดลวดไดนามิกส์หมุน
• เมื่อสิ้นสุดการอุ่นร้อน หยุดการทำางานของเครื่องโดยกดปุ่ม «เริ่ม/ยกเลิก»
• คำาแนะนำา ควรคนอาหารในขณะที่อุ่นร้อน เพื่อให้อาหารโดนความร้อนได้อย่างทั่วถึง
คำาแนะนำา : เติมน้ำาลงในโถก่อนอุ่นร้อนเพื่อไม่ให้ข้าวไหม้ ไม่ควรอุ่นร้อนข้าวเกิน
4 ถ้วย
ฟังก์ชั่น «รักษาอุณหภูมิ»
• กดปุ่ม «อุ่น» เครื่องจะเข้าสู่สถานะ «อุ่น» ไฟติดที่ปุ่ม «เริ่ม/ยกเลิก» หน้าจอแอลซีดีแสดง «b»
• เมื่อสิ้นสุดการอุ่น หยุดการทำางานของเครื่องโดยกดปุ่ม «เริ่ม/ยกเลิก»
• อย่าใช้ฟังก์ชั่นนี้เพื่ออุ่นร้อนอาหารเย็น
คำาแนะนำา : เพื่อรักษาให้ข้าวยังมีรสชาติสดใหม่ รักษาความร้อนไว้ภายใน 6 ชั่วโมง
ฟังก์ชั่น «ตั้งเวลาล่วงหน้า»
• สามารถใช้ฟังก์ชั่นนี้เพื่อเลือกโปรแกรมและเวลาที่ต้องการ
• กดปุ่ม «ตั้งเวลาล่วงหน้า/จับเวลา หน้าจอจะปรากฏ «00:00» จากนั้น กดปุ่ม «เวลา» และ
«นาที» เพื่อตั้งเวลาล่วงหน้า สามารถตั้งเวลาล่วงหน้าได้ตั้งแต่เวลาต่ำาสุดถึง 24 ชั่วโมง เมื่อ
เลือกเวลาที่ตั้งไว้ล่วงหน้า กดปุ่ม «เริ่ม/ยกเลิก» เพื่อเข้าสู่สถานะการประกอบอาหาร ไฟ
สัญญาณ «เริ่ม/ยกเลิก» จะติดอยู่ หน้าจอแอลอีดีจะนับเวลาถอยหลัง
• หากเวลาที่ตั้งล่วงหน้าน้อยกว่าเวลาประกอบอาหาร เครื่องจะเข้าสู่สถานะประกอบอาหารใน
ทันที
เมื่อประกอบอาหารเสร็จ
• เมื่อเสร็จสิ้นขั้นตอนการประกอบอาหารสำาหรับทุกฟังก์ชั่น เครื่องจะเข้าสู่โหมดอุ่น
• เปิดฝา – g.1
• ควรสวมถุงมือกันความร้อนเมื่อต้องหยิบจับหม้อหุงหรือถาดนึ่ง – g.11
• การเสิร์ฟอาหารให้ใช้ช้อนพลาสติกที่มาพร้อมกับหม้อหุงข้าวและทำาการปิดฝาอีกครั้ง
• อาาหารที่เหลือในภาชนะจะอุ่นได้ถึง 24 ชั่วโมง
• กดปุ่ม «เริ่ม/ยกเลิก» เพื่อหยุดสถานะอุ่น
• ถอดปลั๊กเครื่องใช้ไฟฟ้า
ข้อมูลเบ็ดเตล็ด
• เครื่องมีฟังก์ชั่นความจำา ในกรณีที่เกิดไฟฟ้าขัดข้อง หม้อหุงข้าวจะจดจำาสถานะการหุงล่าสุด
ก่อนที่จะเกิดไฟฟ้าขัดข้องและจะดำาเนินการหุงต่อเมื่อไฟฟ้ากลับมาตามปกติภายใน 2 วินาที
ถ้าหากไฟฟ้าขัดข้องนานเกิน 2 วินาที หม้อหุงข้าวจะยกเลิกการหุงล่าสุดและจะกลับไปยัง
โหมดแสตนบาย
• อย่าเปิดฝาระหว่่างการประกอบอาหารเพื่อให้มั่นใจว่าเครื่องทำางานได้ดี
การทำาความสะอาดและการบำารุงรักษา
• ถอดปลั๊กเครื่องแล้วปล่อยให้เย็นก่อนทำาความสะอาดและบำารุงรักษา
• ควรทำาความสะอาดเครื่องหลังใช้งานทุกครั้งโดยใช้ฟองน้ำา – g.12
• อย่านำาเครื่องจุ่มลงในน้ำาหรือเทน้ำาลงบนเครื่อง
EN
KO
MS
TH
4342
หม้อชั้นใน (Fig.13)
• สามารถทำาความสะอาดโถและตะกร้านึ่งได้โดยใส่ในเครื่องล้างจาน
• หากอาหารติดด้านล่าง อาจนำาโถไปแช่น้ำาก่อนล้าง
• เช็ดโถให้แห้ง
การดูแลรักษาหม้อชั่นใน
• สำาหรับโถ ปฏิบัติตามคำาแนะนำาด้านล่างนี้ :
• เพื่อบำารุงรักษาให้โถอยู่ในสภาพดี ไม่ควรหั่่นอาหารในโถ
• ใส่โถกลับไปยังหม้อหุงข้าว
• ใช้ช้อนพลาสติกที่ให้มาหรือช้อนไม้ อย่าใช้ช้อนโลหะ เพื่อหลีกเลี่ยงการทำาให้ผิวของโถเสีย
หาย – g.14
• กัดกร่อน โดยไม่ใส่น้ำาส้มสายชูลงในโถ
• สีของโถอาจเปลี่ยนหลังจากใช้งานครั้งแรกหรือใช้งานเป็นเวลานาน สีอาจเปลี่ยนเนื่องจาก
การนึ่งและน้ำา ซึ่งไม่มีผลต่อการหุงข้าว และไม่เป็นอันตรายต่อสุขภาพ สามารถใช้ได้อย่าง
ปลอดภัย
การทำาความสะอาดฝาระบายไอน้ำา ไมโคร-เพรสเชอร์ วาลว์
• เมื่อทำาความสะอาดวาล์วปล่อยความดัน ถอดออกจากฝา – g.16 แล้วเปิดโดยหมุนตาม
ทิศทาง «เปิด» – g.16a และ 16b หลังทำาความสะอาด เช็ดให้แห้ง แล้วนำาสามเหลี่ยม
สองชิ้นมาประกอบเข้าด้วยกัน แล้วหมุนตามทิศทาง «ปิด» จากนั้นใส่กลับที่ฝาหม้อหุงข้าว
– g.17a และ 17b
การทำาความสะอาดและดูแลรักษาชิ้นส่วนอื่นของเครื่อง
• ถอดปลั๊กเครื่องใช้ไฟฟ้าก่อนที่จะทำาความสะอาด
• ทำาความสะอาดภายนอกของหม้อหุงข้าว – g.18 ภายในฝา – g.13 และสายไฟโดยใช้ผ้า
ชุบน้ำาหมาดๆ แล้วเช็ดให้แห้ง อย่าใช้ผลิตภัณฑ์สำาหรับขัด
• อย่าใช้น้ำาทำาความสะอาดภายในเครื่องเนื่องจากอาจทำาให้เซนเซอร์ความร้อนเสียได้
วิธีแก้ปัญหาทางเทคนิค
คำาอธิบายการ
ทำางานผิดปกติ
สาเหตุ วิธีแก้ไข
ไฟสัญญาณดับ
เครื่องไม่ร้อน
ไม่ได้เสียบปลั๊กหม้อหุงข้าว
เสียบปลั๊กเครื่องเข้ากับเต้ารับให้เรียบร้อย
ไฟสัญญาณดับ
เครื่องร้อน
เกิดปัญหาเนื่องจากไฟสัญญาณ
หรือไฟสัญญาณชำารุด
ส่งซ่อมที่ศูนย์บริการที่ได้รับการรับรอง
ไอน้ำารั่วระหว่าง
เครื่องทำางาน
ปิดฝาไม่สนิท เปิดและปิดฝาอีกครั้ง
วาล์วปล่อยแรง หยุดการทำางาน (ถอดปลั๊กเครื่อง) แล้วตรวจ
สอบวาล์ว (ล็อก 2 ส่วนเข้าด้วยัน) แล้ววาง
ให้ถูกต้อง
ส่งซ่อมที่ศูนย์บริการที่ได้รับการรับรอง
ฝาหรือตะกร้าใส่วาล์วปล่อย
ความดันขนาดเล็กชำารุด
ข้าวกึ่งดิบกึ่่งสุก
น้ำามากหรือน้อยเกินไปเมื่อเทียบ
กับปริมาณข้าว
ดูตารางปริมาณน้ำาด้านล่าง
ฟังก์ชั่นอุ่นอาหารไม่
ทำางานโดยอัตโนมัติ
(เครื่องอยู่ในโหมด
ประกอบอาหารหรือ
ไม่ร้อน).
ส่งซ่อมที่ศูนย์บริการที่ได้รับการรับรอง
E0
เซนเซอร์ด้านบนของวงจรเปิด
หรือลัดวงจร
ส่งซ่อมที่ศูนย์บริการที่ได้รับการรับรองE1
เซนเซอร์ด้านล่างเปิดหรือ
ลัดวงจร
E2
เซนเซอร์ตัวเหนี่ยวนำาเปิดหรือ
ลัดวงจร
E3 ความร้อนสูง
หยุดการทำางานของเครื่องแล้วเริ่มโปรแกรม
ใหม่ หากยังคงเกิดปัญหา ส่งซ่อมที่ศูนย์
บริการที่ได้รับการรับรอง
E5 ไม่มีโถ
ใส่หม้อลงในเครื่อง จากนั้นถอดปลั๊ก แล้ว
เสียบปลั๊กใหม่ เริ่มโปรแกรมใหม่
หมายเหตุ: หากหม้อชั้นในผิดรูป อย่าใช้อีกต่อไป ส่งให้ศูนย์บริการที่ได้รับการรับรอง
เปลี่ยนให้