Loading ...
Loading ...
Loading ...

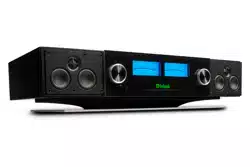
6
Qualcomm® aptX™ Audio
AptX™ is a codec that can provide CD quality
music over Bluetooth connections. The RS200 will
automatically utilize aptX when connected to a source
that supports aptX. Simply connect with Bluetooth as
described in the previous section.
The RS200 also supports the higher resolution aptX
HD (24-bit/48kHz). If your device utilizes aptX™ HD
then that resolution will be utilized automatically.
The RS200 also features aptX Low Latency which
automatically ensures Bluetooth can deliver sound in
sync with visual media. It reduces delay and improves
end-to-end speed of the audio transmission, resulting in
a high quality, synchronized user experience.
Buons and the Switches on the Back
Master Power Switch
Looking at the rear of the RS200, the Master Power
Switch will be directly to the left of the AC Power Inlet
(Figure 1 on page 4). This switch will toggle power
to the RS200 ON (I) and OFF (O). With this switch in
the ON position, the RS200 can be put in Power Save
mode by pushing and holding the Front Right Knob for
2 seconds.
When the Master Power Switch is in the OFF position,
the RS200 will consume no power. Power Save/
Standby and the remote control will only function
when the Master Power Switch is in the ON position.
EQ- The WFT Switch
Placement of a speaker can greatly affect the sound
equalization (EQ). The EQ switch provides a quick
and easy way to compensate for three typical RS200
placements with three EQ enviromental settings named
“WALL”, “FREE” and “TABLE.”
The WALL setting is for placement near a wall. The
TABLE setting is to compensate for reective surfaces
that may be present if the unit is pushed back eight
or more inches (20cm) from the edge of a at surface
(like a table). And the FREE setting is for placement
without large obstructions. Ultimately, EQ is a matter
of taste so feel free to experiment with these settings to
determine your preference.
CEC Buon
Consumer Electronics Control (CEC) is a feature of
HDMI that theoretically allows users to control multiple
connected devices through one remote control. This
can work ne in some cases when you want to turn on
the television and also power on other related devices,
but there may be times when you do not want this or
other connected events to happen. You can use the CEC
Button to defeat this HDMI feature. Push in the button
to defeat. Push again to enable. If you have a control
system for your devices, you will want CEC defeated.
With CEC enabled, the RS200 can control a television’s
volume, mute and unmute as well as power functions
with compatible televisions. CEC will also ensure
correct decoding and lip syncing automatically.
To determine the current setting of CEC, press and hold
the CEC button for 2 seconds. The red LED above the
Right Knob will blink for 3 seconds if CEC is active
or remain solid for 3 seconds if not active. Holding
the CEC button for 4 seconds will toggle the setting as
indicated by the red LED.
Wi-Fi Reset
If you need to reset the Wi-Fi module of the RS200,
press the Wi-Fi reset button and hold it for 4 seconds.
The NET LED will ash quickly at rst and then
more slowly. The unit is now in Play-Fi set-up mode
and can be set up using the Play-Fi App as described
previously in “The Wi-Fi Connection.” All previous
setup information for Play-Fi and AirPlay is erased
when reset.
Inputs and Outputs on the Back
Opcal
The Optical input allows a digital source to be
connected using a TOSLINK cable also known as an
“optical audio cable.” The internal digital-to-analog
converter (DAC) of the RS200 is able to process hi-
res digital audio up to 192kHz/24-bit. The RS200 DAC
will process standard format SPDIF PCM signals as
well as Dolby Digital and DTS encoded multi-channel
bit streams. Unsupported formats can result in strange
and/or unpleasant sounds.
This input can be chosen by turning the Left Knob to
the OPT position.(Figure 8 on page 8.)
WALL FREE TABLE
Figure 3– Rear Panel
Loading ...
Loading ...
Loading ...