Documents: Go to download!
User Manual
- User Manual - (English)
- EVEP616DSD - - Product Catalogue - (English)
- EVEP616DSD - - Specifications Sheet - (English)
- INSTALLING THE OVEN ACCESSORIES
- EVE614
- EVEP614
- EVE616
- EVE626, EVE636
- EVEP616, EVEP618
- EVEP626
- EVEP616, EVEP618, EVEP626
- STEAM ASSISTED COOKING
- USING THE FOOD PROBE
- COOKING GUIDE
- DEALING WITH COOKING PROBLEMS
- CLEANING THE APPLIANCE
- TIPS AND TROUBLESHOOTING
- TROUBLESHOOTING
- INSTALLATION OF THE APPLIANCE
- TECHNICAL SPECIFICATIONS
Table of contents
User manual
INSTALLING THE OVEN ACCESSORIES
Slides (Telescopic runners)
| 1. Obtain left hand side rack and left hand slide – see image to identify. | 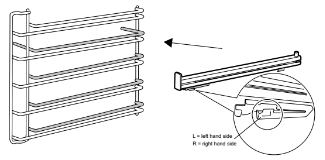 |
| 2. The shaded wires indicate the wire the slide can be mounted on. Fit slide rear clips to the rear of wire at an angle as shown below. | 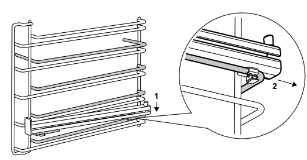 |
| Push slide front clip over wire until secured | 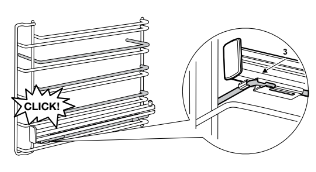 |
Side racks
|
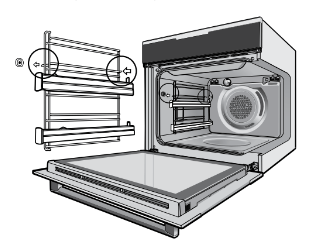 |
Shelves
The shelves are designed so that they have maximum extension but cannot be accidentally pulled right out.
To fit a shelf to side racks:
- Rest the rear edge of the shelf on the lower guide rail of the side rack - see diagram. Ensure the same rail positions on both sides of the oven are being engaged.
- With the front edge raised, begin to slide the shelf in between the guide rails of the side rack.
- Once the detents have passed the front edge of the side rack, the shelf can be pushed fully in.
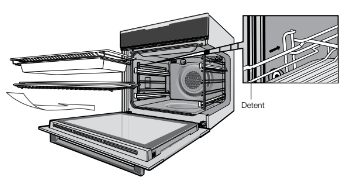
4. When fully inserted the shelf should not interfere with the closed oven door.
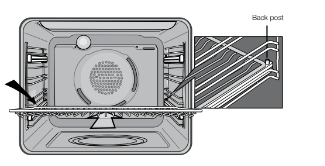
To fit a shelf or tray to telescopic slides:
1. Push the shelf or tray along the top of the slide until it hits the back post.
2. Drop the front of the shelf or tray onto the slide ensuring it sits behind the front post of the slide.
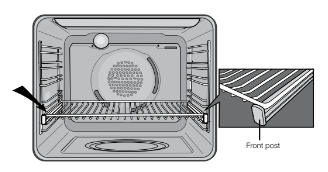
3. When fully inserted the shelf/tray should not interfere with the closed oven door.
The appliance is supplied with two types of shelves
- Standard shelf
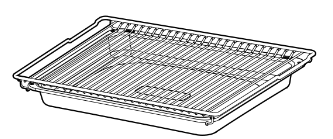
- Grill shelf -The tray can be suspended under the grill shelf to catch dripping fat. Rest the tray on two side rails of the grill shelf and push all the way in. Once the tray is pushed in fully it should sit inside the side rails.
Trays
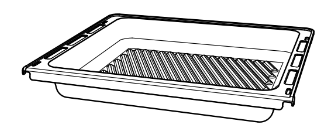
The appliance is supplied with Baking tray, Roasting tray and on selected models Cast roasting tray.
The baking tray and roasting tray can be placed on top of the shelves or can be suspended under the grill shelf.
Grill shelf and Roasting tray
Baking tray
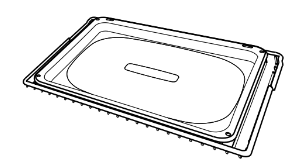
Cast roasting tray
The Cast roasting tray can be inserted between rack wires or can be fitted on telescopic slides.
USING THE APPLIANCE
Pre-heating
For best cooking results pre-heat the oven.
Pre-heating allows the oven to reach the required temperature quickly and efficiently as well as cook food at the correct temperature for the entire cook time.
1. With ‘Rapid Heat’ function
This function allows the oven to reach preset temperature quicker than any other cooking function.
Turn the function selector to ‘Rapid Heat’, then set the desired temperature, by rotating the oven temperature selector.
When the heating light goes out, the oven has reached the desired temperature. Select the oven function required and place the food in the oven.
2. With other oven functions
Set the desired temperature. Once the oven has reached the desired preset temperature, place your food in the oven, close the door and set the timer if you desire.
3. With ‘Grill’ function
Pre-heat the grill for at least 3 minutes to obtain best results. This will help to seal the natural juices of steak, chops and other meats for a better flavour.
Cooling / Ventilation fan
The built-in appliance is fitted with a cooling fan.
This prevents the kitchen cabinet from overheating and reduces the condensation inside the oven. It will operate whenever the oven is in use and blow warm air across the top of the oven door.
Condensation
Excess condensation may fog the oven door. This may happen when cooking large quantities of food from a cold start. Minimise condensation by:
- Keeping the amount of water used whilst cooking to a minimum.
- Making sure the oven door is firmly closed.
- Baking custard in a baking dish that is slightly smaller than the water container.
- Cooking casseroles with the lid on.
EVE614
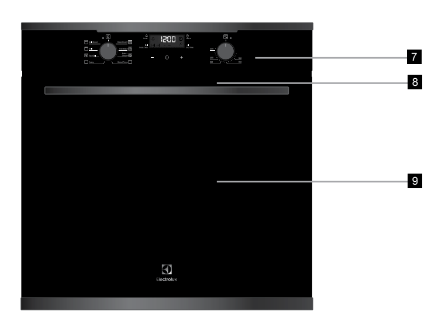
COMPONENTS
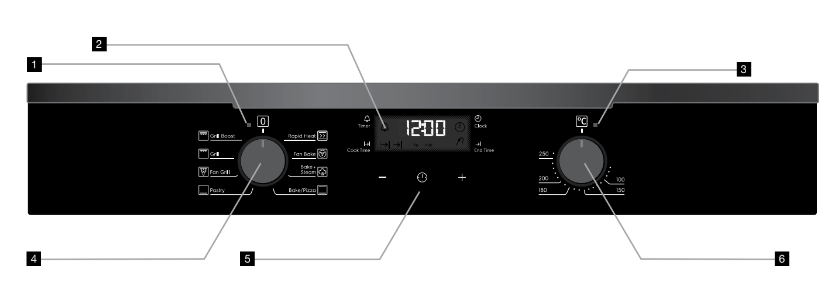
- Oven ‘ON’ light
- Timer display
- Heating’ light
- Function selector knob
- Touch pad
- Temperature selector knob
- Control panel
- Warm air exhaust
- Triple glazed door
BEFORE USING THE APPLIANCE
Setting the time
Before the appliance can be used, the time must be set
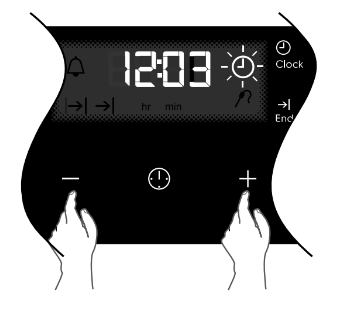
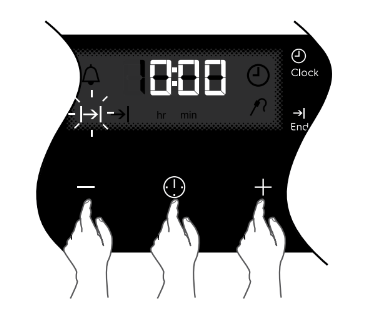
After the appliance has been electrically connected will be displayed and the  clock icon will flash.
To set the time of day in hours and minutes touch the + or - symbols. Refer to the diagram above. seconds after the last change, the clock symbol will disappear, confirming the time has been set. Once the time has been entered, the clock advances minute by minute
COOKING FUNCTIONS
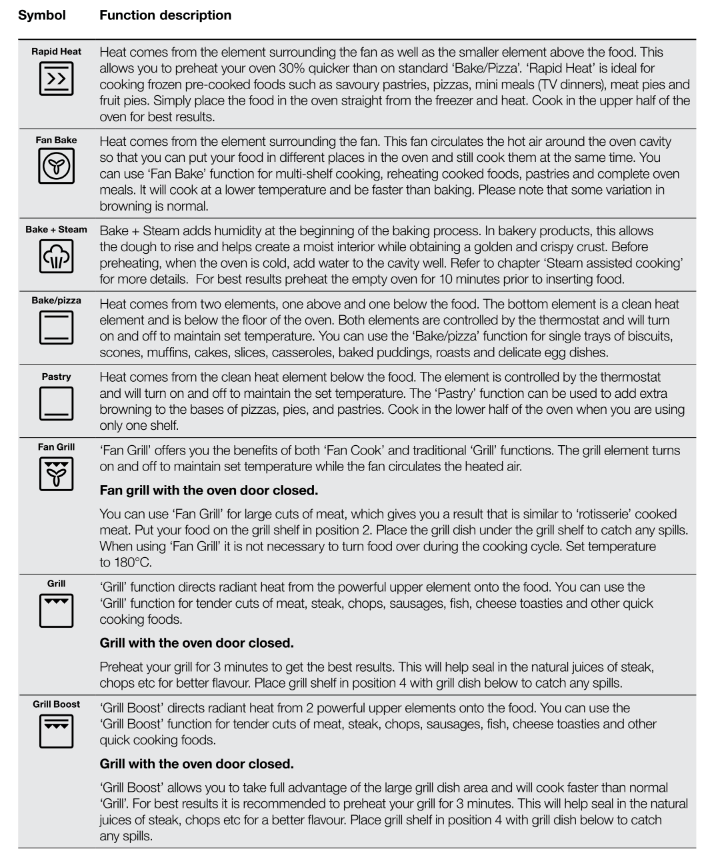
OPERATING SEQUENCE
Select the cooking function
Turn the function selector in any direction to the desired cooking function. The oven cavity light will come on.
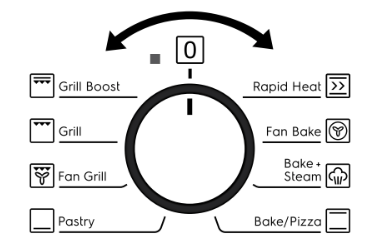
Select the temperature
To set the temperature, turn the temperature selector in a clockwise direction to the desired setting. An indicator light in the display will come on.
A thermostat controls the temperature in your oven. When the temperature is reached, the heating source switches itself off and the indicator light goes out. When the oven temperature falls below the desired setting, the heating source switches on and the indicator light comes on again.
Once the food is cooked, turn the temperature selector back in an anti-clockwise direction. Do not force it right round in a clockwise direction as this will result in damage to the thermostat.
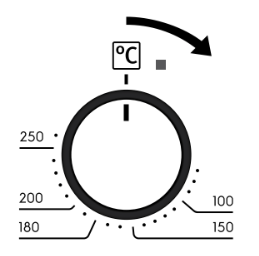
USING THE APPLIANCE
Cooking with the timer
The appliance is equipped with a timer that has the following features:
- Timer - sets a countdown time that will beep when the set time has elapsed.
- Cook time - sets cooking duration. A timer will count down the preset cooking time, beep when the time has elapsed and turn the appliance off.
- End time - instead of setting a cooking duration, a cooking finish time can be set. When the finish time has been reached the timer will beep and turn the appliance off.
- Delayed start cooking time - combines the cooking time and end cooking time to switch oven on and off at a specific time during the day.
Selecting the timer
- Touch the MODE symbol until the timer
 icon begins flashing.
 - Set the countdown time you want by using the + and – symbols. 5 seconds after the last change the timer icon will stop flashing and the countdown will start in minutes.
- To stop the beeper, touch any symbol.
- Maximum countdown time is 2hrs 30mins.
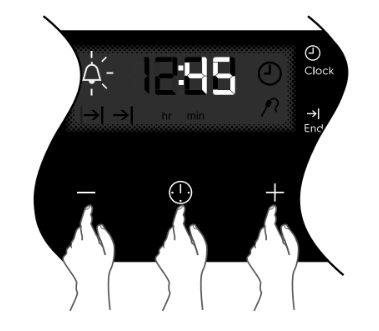
Setting the cooking duration
- Select the desired oven function and temperature.
- The oven indicator light will glow and the heating source will come on.
- Touch the MODE symbol until the cook time icon
 begins flashing.
 - Set the cooking duration you want by using the + and – symbols. Five seconds after the last change the cook time icon will stop flashing, and the time of day will be displayed. The oven will automatically shut off once the set duration is reached. To check how much time remains, press MODE until the cook time icon is lit. The remaining time will be displayed.
- When the oven shuts off an alarm will beep. To stop the beeper, touch any symbol.
Setting the cooking end time
Check that the clock displays the correct time of day.
Select the desired oven function and temperature.
The oven indicator light will glow and the heating source will come on.
Touch the MODE symbol until the end time  icon begins flashing.
Enter the time of day you want the cooking to finish by using the + and – symbols. Five seconds after the last change, the end time icon will stop flashing and the current time will be displayed.
Setting the delayed start cooking time
- Set the cook time and end time as described in the previous sections.
- Once both the cook time and end time have been set, both icons will stop flashing and the current time will be displayed.
To check or cancel settings:
- To check settings, touch the MODE symbol until the desired setting is displayed. The relevant icon will flash.
To cancel ‘delayed start’ touch the MODE symbol until the end time  icon flashes. Touch and hold the _ symbol until the clock no longer reverses (a beep will be heard). If temperature and function knobs are still at a setting, the oven will start once the end time
  icon stops flashing.
- To cancel ‘auto shut off’ touch the MODE symbol until the cook time
 icon flashes. Touch and hold the – button until the clock no longer reverses (at a beep will be heard). This automatically cancels auto shut off’. If the temperature and function knobs are still at a setting, the oven will start once the cook time
  icon stops flashing. Because ‘auto off’ is cancelled the oven will continue to heat until it is manually turned off.
On completion of cooking
The heat source will turn off, the timer will beep and the end time and/or cook time icons will flash.
Even though the heating element turns off the oven will still retain substantial heat. This will continue to cook the food until it is removed or the oven cools down. If you do not plan on being present when the oven turns off, you should take this extra heating time into account.
Turn the function and temperature controls to the off position.
Touch any button to stop the timer beeping.
Adjusting the clock
Touch the MODE symbol until the  clock icon begins flashing.
Touch the + and – symbols to change the time of day. seconds after the last change, the clock icon will disappear, confirming the time has been adjusted.
EVEP614
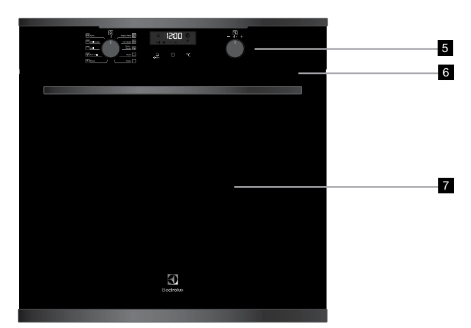
COMPONENTS

- Function selector knob
- Timer display
- Temperature selector knob
- Touch pad
- Control panel
- Warm air exhaust
- Quad glazed door
BEFORE USING THE APPLIANCE
Setting the time
Before the appliance, can be used, the time must be set
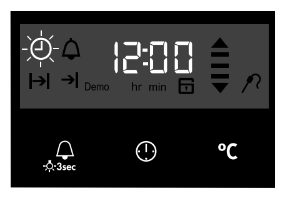
When power is supplied to the oven the  clock icon will be displayed. Along with the clock symbol the ‘12’ will be flashing. This indicates that ‘hour’ portion of the time is ready to be changed.
Toggle the temp selector + or – , then touch  when you have the right hour.
The minutes will flash and can be set in the same manner. seconds after the last change, the clock display will stop flashing, confirming that the time has been set.
COOKING FUNCTIONS
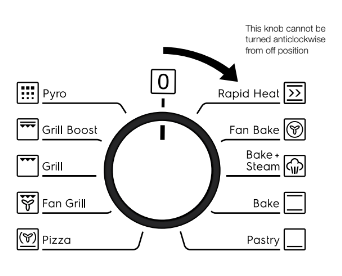
OPERATING SEQUENCE
Select the oven function
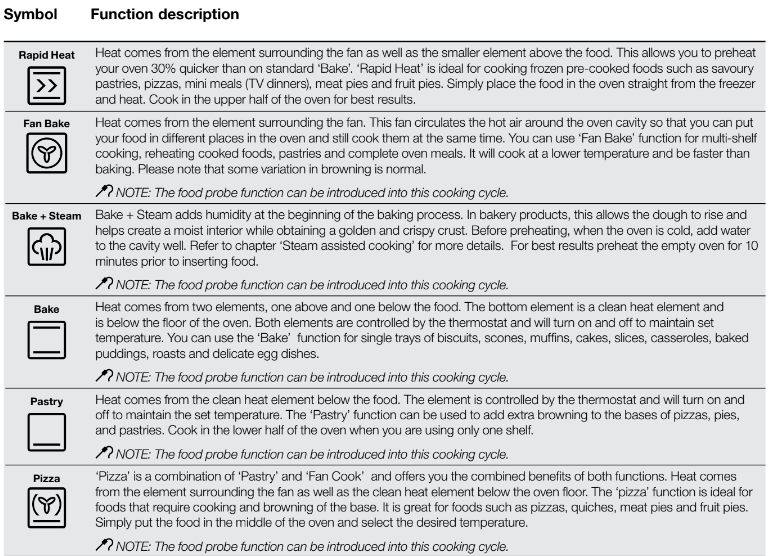
Turn the oven function selector clockwise to select the desired oven function.
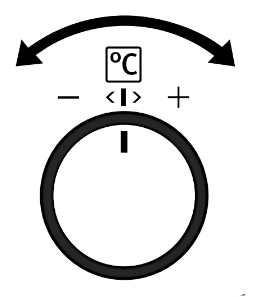
Selecting the oven temperature
Toggle the temperature selector (left – or right +) as required to set the desired cooking temperature in °C.
USING THE APPLIANCE
Cooking with the timer
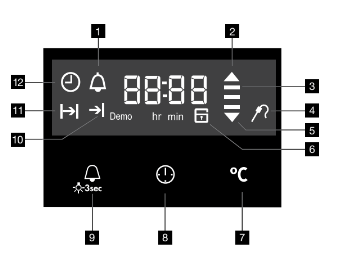
- On when the timer is set
- On when oven warming up
- 3 bars displayed when oven reaches set temperature
- Food Probe icon
- On when oven cooling down
- Oven door locked
- Touch to toggle through cooking time & oven set temp
- Touch to toggle through the timer modes
- Touch to start timer mode. Hold to turn oven light on/off
- End time icon
- Cook time icon
- Time of day icon
Adjusting the clock
To change the time, touch and hold the  button until the clock symbol begins to flash. The hour display will be ready to change.
Toggle the temp selector + or – , then touch  when you have the right hour.
The minutes will flash and can be set in the same manner. seconds after the last change, the clock display will stop flashing, confirming that the time has been set.
NOTE: The clock has a 24 hour display.
Setting the cook time
- Use the knobs to select the desired oven function and cooking temperature.
- Touch the
 button as often as necessary, until the cook time’
  symbol appears.
 - Set the desired cooking time commencing with minutes by using + or –, whilst the
 symbol is flashing, then touch the
  button again and set the hours by using + or –. After 5 seconds from the last time adjustment
  the symbol will stop flashing. The appliance is now programmed and the display will countdown to zero.
 - When the set time has elapsed, a signal will sound and the appliance will turn off. To stop the signal, touch any button on the clock and then turn the oven function selector to OFF.
The feature can be cancelled at any time by returning the function selector to OFF.
Setting the end time
- Use the knobs to select the desired oven function and cooking temperature.
- Touch the
 button as often as necessary, until the end time’ symbol appears.
 - Set the desired end time commencing with hours using + or – whilst the
 symbol is flashing, then touch the
  button again and set the minutes by using + or –. After 5 seconds from the last time adjustment the symbol
  will stop flashing and the appliance is now programmed.
 - When the set time has elapsed, a signal will sound and the appliance will turn off. To stop the signal, touch any button on the clock and then turn the oven function selector to OFF.
Setting the delayed start cooking time
The ‘cook time’ and ‘end time’ functions can be combined to switch the oven on and off at a specific time during the day.
- Use the knobs to select the desired oven function and cooking temperature.
- Touch the
 button as often as necessary, until the cook time’
  symbol appears.
 - Set the desired cooking time by using + or –, whilst the
 symbol is flashing.
 - Touch the
 button as often as necessary, until the end time’
  symbol appears flashing.
 - Set the desired switch-off time using + or – whilst the ‘end time’
 symbol is flashing.
 - 5 seconds after the last change the ‘cook time’ and end time’ arrows are lit to confirm that the oven has been programmed.
- When the delayed start cooking time has elapsed, a signal will sound and the appliance will turn off. To stop the signal, press any button on the clock and then turn the oven function selector to OFF.
The feature can be cancelled at any time by returning the function selector to OFF
Additional Functionality
Setting the countdown timer
Use this for timing any activity. For example boiling eggs.
- Touch the
 button, the display will flash.
 - Set the countdown time you want by using + and Commence with setting the number of seconds first. The minutes and hours can then be set by subsequently pressing the
 button again and adjusting using + or –. 5 seconds after the last change the timer will stop flashing, confirming the timer has been set.
 - To cancel the timer touch the
 button, the display will flash. Then touch and hold
  and °C buttons until the timer is cleared.
 - To stop the beeper, touch any button.
NOTE: The clock display cannot be selected when the timer is operating.
Elapsed Time
When an oven function is selected (other than pyrolytic clean) an elapsed timer commences on the display.
To reset this timer touch and hold both  the and °C buttons until the timer is reset.
Displaying the oven temperature
During operation of the oven the current oven temperature during pre-heating of the oven can be displayed by touching °C the button. During normal operation the set temperature can be reviewed by touching the °C button.
NOTE: this temperature will only be displayed for approximately 5 seconds.
Light operation
During operation of the oven the light can be switched off by touching and holding the button until the light turns off. Also the light can be turned on from the standby state by touching and holding the
  button until the light comes on.
Activating the child-proof lock
When the child lock is engaged, the oven cannot be operated and the door cannot be opened.
- Switch off the appliance using the function selector switch.
- Touch and hold the
 and°C buttons at the same time until the word ‘SAFE’ is displayed and a double beep is sounded. The word SAFE will be replaced by a padlock symbol on the display after 5 seconds.
Releasing the child-proof lock
Touch and hold the  and °Cbuttons at the same time until a double beep is sounded. This will commence to unlock the door and after 5 seconds the oven is ready for use.
Activating the function lock
The active function can be locked so it is not changed unintentionally.
- The active function can be locked, to activate touch
 and°C together until ‘Loc’ is displayed.
 - If the oven is switched-off while in ‘Loc’ it will switch into Child lock mode and the display will show ‘SAFE’.
- Oven can be released the same way as ‘Releasing the child proof lock’
Safety Cut-out feature
The oven automatically switches itself off if the temperature is not adjusted or the appliance is left operating after a period of time. The oven switches itself off after:
- 12.5 hours when the temperature is set less than 120°C.
- 8.5 hours when the temperature is set to 120°C or above, and below 200°C.
- 5.5 hours when the temperature is set to 200°C or above, and below 250°C.
- 3.0 hours when the temperature is set at 250°C.
DEMO Mode
The oven can be set to operate in a demo mode (e.g. in a retail store). In this mode the display works and functions can be set but the oven does not actually heat. When in this mode the text ‘DEMO’ will be lit. The following instructions show how to enter and exit ‘Demo’ mode.
- Ensure the oven is in the off state. Toggle and hold the selector to + until a beep sounds. The ‘DEMO’ text will begin to flash.
- Toggle the temperature selector to set the first digit of display to 2. Touch clock to set.
- Repeat step 2 until display shows 24:68. 3 beeps sound and DEMO will be shown.
- To disable DEMO mode repeat steps 1 - 3.
PYROLYTIC CLEANING THE OVEN
Pyrolytic cleaning of the oven cavity
The oven has the Pyrolytic self-cleaning function. It cleans by burning off the spatters and accumulated dirt and grease from the oven liner, at high temperature. This process produces ash which can then be wiped out of the oven cavity.
Pyrolytic cleaning will not remove salt and mineral residue left in the cavity well when water evaporates.
It is recommended that the residue is cleaned prior to conducting pyrolytic cleaning cycles. See section Cleaning the cavity well’.
Before carrying out the Pyrolytic function
- All accessories must be removed from the oven, including shelves, trays and side racks.
- Clean large deposits, spills or grease from the oven cavity.
- Ensure the cavity well is free of limestone scaling refer to cleaning the cavity well chapter)
- Choose the Pyrolytic cleaning cycle from the following:

Light clean
This is an energy saving cycle that can be used on a regular basis if the oven is lightly soiled. Possibly after every nd or 3rd roast.
Normal clean
Use this as the regular cycle about once every months.
Pyrolytic Cleaning Operation
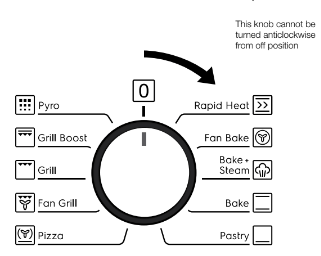
The pyrolytic cleaning function can be selected by turning the function selector switch clockwise to the pyrolytic position. Use + or – to toggle between a pyrolytic cleaning time of 1:30 hours or 2:30 hours. The pyrolytic function can be stopped at any time by turning the function selector counterclockwise to the OFF position.
When the pyrolytic cleaning function is on, it is advisable not to use a cooktop if it is fitted above the oven. This could cause overheating and damage to both appliances.
The door will only unlock when the oven has cooled to a safe temperature. Turning the function off will not unlock the door. This will only happen when safe temperature is reached.
After Pyrolytic cleaning
After cool-down, wipe the ash out of the oven with a soft damp cloth and warm water.
To restore the enamel shine to more difficult areas, use a damp cloth with vinegar and detergent.
EVE616
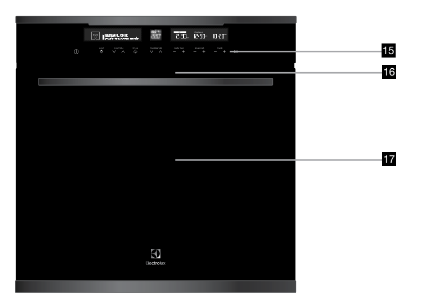
COMPONENTS

- ON/OFF
- Light on/off
- Cooking function selector
- Steam on/off
- Temperature control
- Cook time control
- Delay end control
- Set clock and timer control
- Instant confirm
- Cooking function icon
- Cooking function display
- Temperature display
- Cook time display
- Delay end display
- Clock/Timer display
15.Control panel
16.Warm air exhaust
17.Triple glazed door
EVE626, EVE636
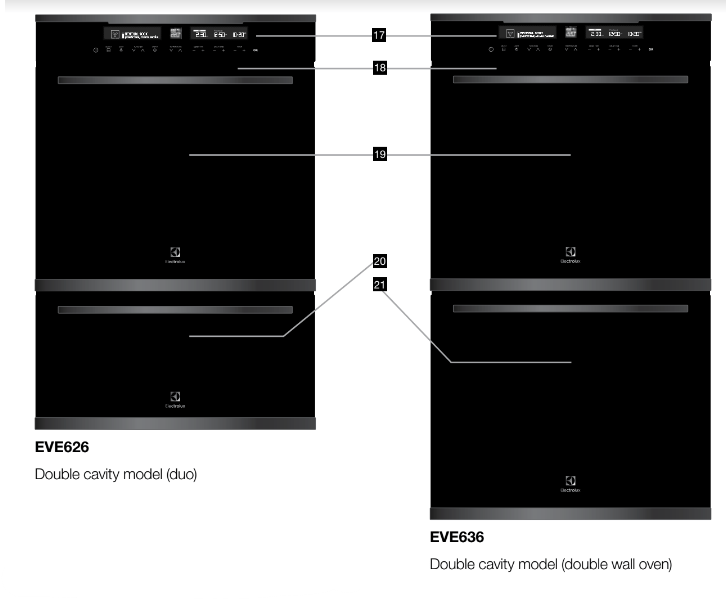
COMPONENTS

- ON/OFF
- Upper/Lower level selector
- Light on/off
- Cooking function selector
- Steam on/off
- Temperature control
- Cook time control
- Delay end control
- Set clock and timer control
- Instant confirm
- Cooking function icon
- Cooking function display
- Temperature display
- Cook time display
- Delay end display
- Clock/Timer display
- Control panel
- Warm air exhaust
- Upper main oven with triple glazed door
- Lower (half sized) oven with triple glazed door
- Lower (full sized) oven with triple glazed door
BEFORE USING THE APPLIANCE
Setting the time
The time of day must be set before the appliance can operate.
After the appliance has been electrically connected the display will cycle through the welcome screen, then ‘Set Clock’ will illuminate under the clock display and the Hour digits will flash.
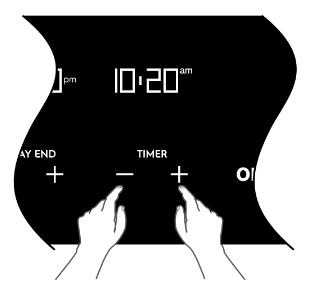
- Use the timer + and – to set the hour portion of the current time (including AM/PM).
- Press OK when the hours are set correctly. The Minute digits will flash.
- Use the timer + and – to set the minutes portion of the current time.
- Press OK when the minutes are set correctly. You can turn the oven off or it will do so after 8 seconds. Once the time has been entered, the clock advances minute by minute.
COOKING FUNCTIONS
Functions listed may not apply to all models
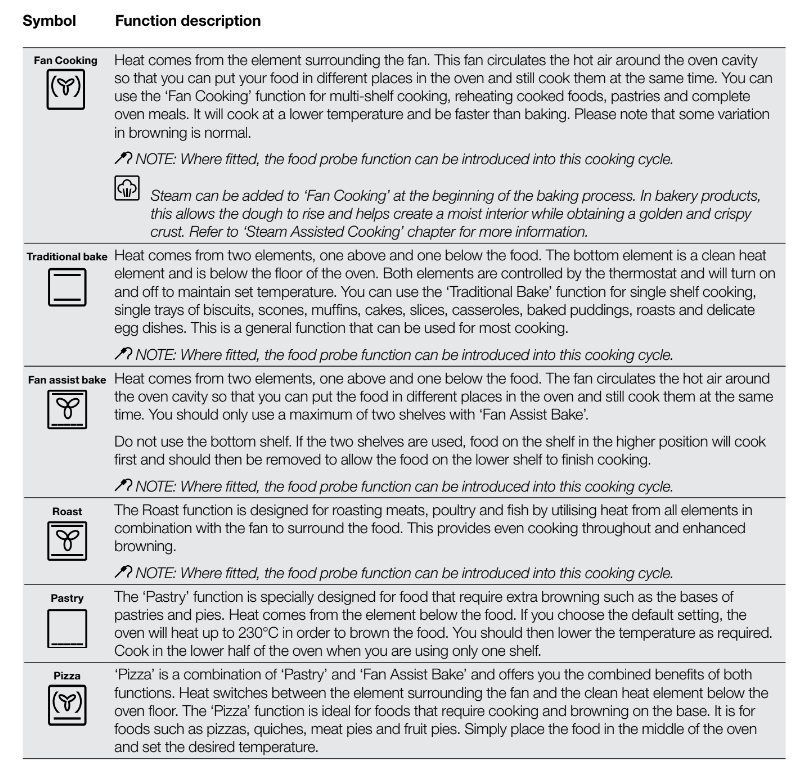
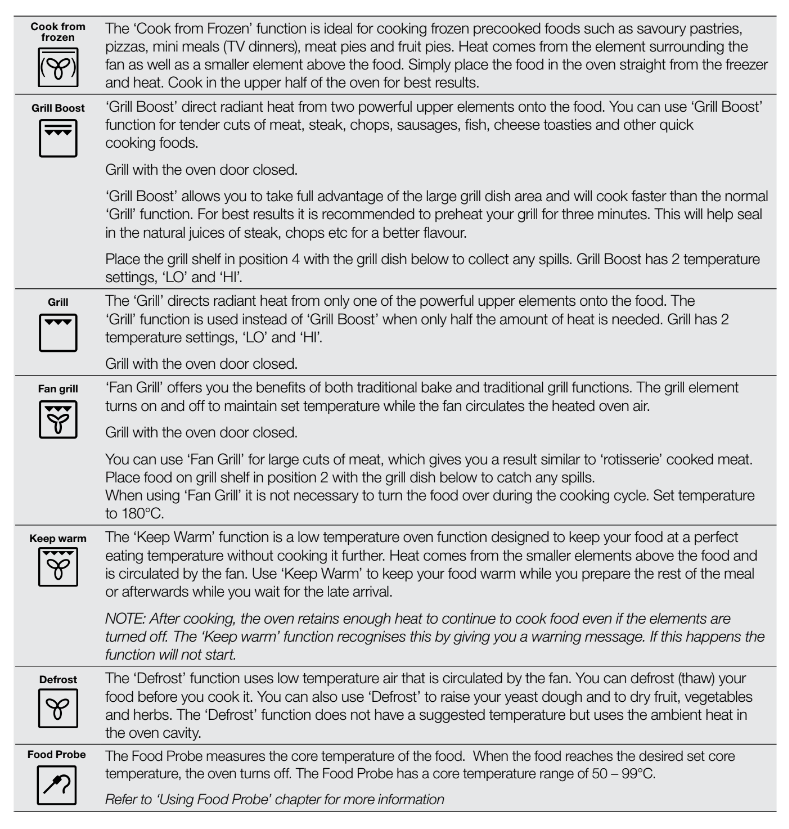
OPERATING SEQUENCE
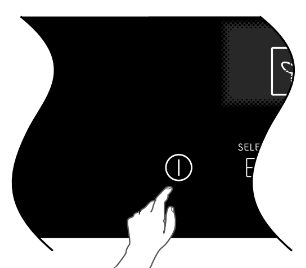
Turning the oven on
- Switch on the oven by touching the ON/OFF symbol. The control panel will come on and inform you that you need to select a cooking function.
- If you do not select a function within 20 seconds the oven will turn off.
Selecting the Upper or Lower oven
(EVE626, EVE636)
These models are equipped with two ovens. Use the oven selector symbol to toggle between the upper and lower ovens.
The oven cavity icon on the control panel will show which oven is currently active.
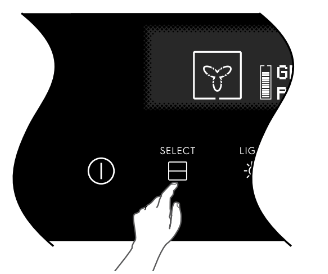
Select a cooking function
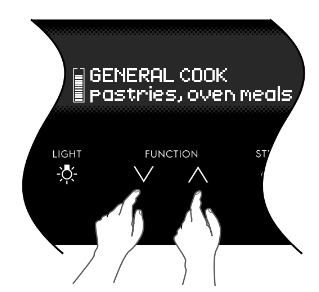
The oven will have a selection of functions. Press the function ^ or v function symbols as many times as necessary until the desired function appears.
Cooking suggestions will appear under the function name and suggested cooking temperatures will appear above the temperature selector.
If no other symbol is touched within 8 seconds the oven will switch on and begin to heat up to the displayed temperature.
Selecting a temperature
The temperature is electronically controlled.
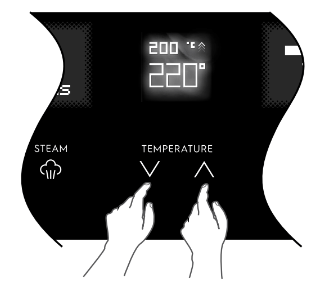
The temperature can be selected within the range of 30°C to 250°C and can be adjusted at any time. To set the temperature, press the temperature ^ and v temperature symbols to reach the desired setting.
Touch OK, or if no further changes are made within seconds the oven begins to heat up to the set temperature. The current oven temperature will appear above set temperature. This will change as the oven heats up and the heat up bar will change from grey to red.
When the temperature is reached, ‘Set temperature reached’ will appear and only the target temperature will be displayed.
USING THE APPLIANCE
Turning the oven off
Single cavity models:
Touch the  ON/OFF symbol to switch off the oven. As the appliance cools down, ‘cooling’ will be displayed until the oven is below 100°C
Double cavity models:
- Touch the upper/lower oven selector symbol to toggle to the desired oven.
- Touch the
 ON/OFF symbol to switch off the desired oven. The control panel will turn off to confirm that the oven is now switched off.
 - If the other oven is still active, after 1 second, the control panel will automatically revert to show the setting of that oven.
- To turn off both ovens at once, touch and hold the
 ON/OFF symbol for 5 seconds. All elements, cavity light and the control panel will then switch off at the same time.
 - If both ovens are off as the appliance cools down, cooling’ will be displayed until both ovens are below approximately 100°C.
Cooking with the timer
The oven is equipped with a programmable controller that can be used to turn the oven on and off automatically. The cook time’ controls are used to automatically turn the oven off after a set amount of time. The ‘Delay End’ controls are used to set the time of day you want the cooking cycle to finish.
Setting the cook time
- Select the desired oven function and cooking temperature.
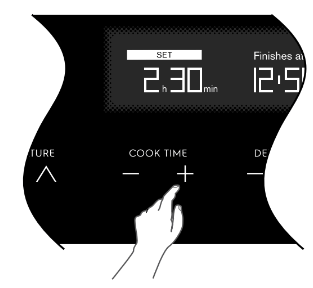
- Touch the ‘cook time’ symbol as often as necessary (or hold), until the desired cook time has been set.
- Touch ‘OK’ or after 8 seconds from the last time adjustment the oven will start cooking and the ‘cook time’ display will countdown to zero.
- The oven will turn off and beep when the ‘cook time’ display reaches zero.
Setting the delay end time
The delay end function can be used to switch the oven on and off at a specific time during the day.
- Check the clock displays the correct time of day.
- Select the desired oven function and cooking temperature.
- Set the required cook time.
- Touch the ‘delay end’ symbol to move the end time.
- Touch ‘OK’ or after 8 seconds from the last time adjustment the SET icon will light and the oven is now programmed. The oven will start its cooking cycle to finish at the set ‘end time’.
- When the oven has finished cooking, cook time can be extended or the beeper turned off just as in ‘cook time’ mode.
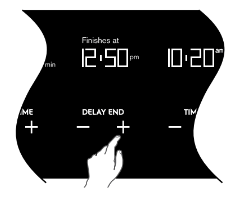
7. Touch the ‘delay end’ symbol to move the end time forward.
8. Touch ‘OK’ or after 8 seconds from the last time adjustment the SET icon will light and the oven is now programmed.
The oven will commence its cooking cycle to finish at the set ‘end time’.
Even though the heating element turns off the oven will still retain substantial heat. This will continue to cook the food until it is removed or the oven cools down. If you do not plan on being present when the oven turns off, you should take this extra heating time into account.
Timers
The appliance has two timers which can be used one at a time. The count up timer can be used to measure a period of time. The count down timer beeps at the end of a preset time.
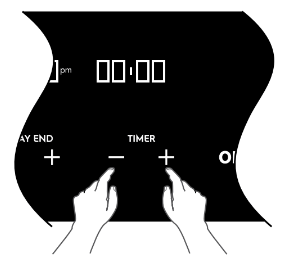
Setting the count up timer
The timer can be used independently of the oven for measuring a count up period. There is no alert provided with this timer.
- Touch either ‘timer’ + or –.
- 00min will be displayed along with a bell and the up arrow will flash.
- To begin the count up timer press OK.
- To reset the count up timer, press ‘timer’ – once to show 00min. Press OK to restart.
- To cancel the count up timer press ‘timer’ – twice.
Setting the count down timer
The timer can be used independently of the oven for setting a count down period. When the period of time has elapsed, an audible signal sounds.
- Touch either ‘timer’ + or –.
- 00min will be displayed along with a bell and the up arrow will flash.
- Touch the ‘timer’ + to set the countdown period.
- The timer bell icon
 will flash.
 - To begin the count down timer press OK or wait 8 seconds. When the timer starts, the bell will stop flashing and the timer will begin to count down.
- When the set time has elapsed, an audible signal will sound for 2 minutes. The time indication ‘00min’ and the timer bell will flash on the display.
- To stop the signal, touch either of the ‘timer’ or – symbols.
- To cancel the count down timer touch ‘timer’ – until the normal time of day is displayed.
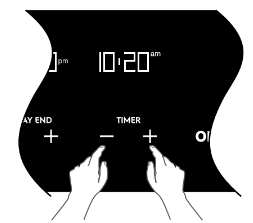
Adjusting the clock
- Switch on the oven by touching ‘ON/OFF’ symbol.
- Select ‘SETTINGS’ from the function list and touch OK.
- Select ‘SET CLOCK’ from the list and touch OK.
- Set Clock’ will illuminate under the clock display.
- Use the timer + and – to set the hour portion of the current time (including AM/PM).
- Touch ‘OK’ when the hours are set correctly.
- Use the timer + and – to set the minutes portion of the current time.
- Touch ‘OK’ when the minutes are set correctly. TIME SAVED will be displayed and then the function display will revert to the ‘set clock’ menu. Turn the oven off or it will do so after 8 seconds.
ADDITIONAL FUNCTIONALITY
Light on/off
Turn the oven light off and on in any cooking mode by simply touching the 
DEMO Mode
This mode is intended to be used in retail shops to demonstrate the oven functionality without any power consumption except to the oven lights.
The following instructions show how to enter and exit DEMO’ mode.
- Ensure the oven is off by touching the ON/OFF symbol.
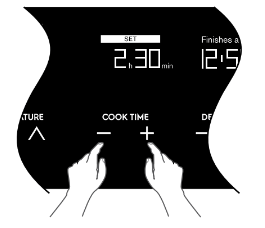
- Touch and hold the ON/OFF symbol until the display turns ON then OFF. Immediately after, touch both the cooktime symbols simultaneously. Hold until a triple beep sounds.
Activating the child-proof lock
When the child lock is engaged, the oven cannot be switched on.
- Switch on the oven by touching the ‘ON/OFF’ symbol.
- Select ‘SETTINGS’ from the function list and touch ‘OK’.
- Select ‘ACTIVATE LOCK’ from the list and touch ‘OK’.
- The word ‘LOCKED’ will momentarily appear and a single beep will sound to confirm the operation. The child lock is now engaged.
De-activating the child lock
- Touch any symbol on the control panel (including the on/off symbol). ‘Locked’ will appear on the display.
- Touch any symbol again. The display will instruct you to touch both ‘cook time’ symbols for 2 seconds.
- Hold until a beep sounds. The child lock is now released and the oven is ready to use.
Other settings.
The ‘Settings’ function gives the opportunity to change oven functionality. Scroll through the list by using function up ^ or v function down .
- Switch on the oven by touching the ON/OFF’ symbol.
- Select ‘SETTINGS’ from the function list and touch OK.
- Select ‘SET CLOCK’ to change the time of day.
- Select ‘TIME INDICATION’ to have the time permanently displayed or not.
- Select ‘BUZZER VOLUME’ to adjust the ‘beep on touch’ and alarm loudness.
- Select ‘KEY TONE’ to turn the ‘beep on touch’ on or off.
- Select ‘SCREEN BRIGHTNESS’ to adjust the brightness of the display.
- Select ‘SCREEN CONTRAST’ to adjust the contrast of the display.
- Select ‘TEMPERATURE UNITS’ to change between Celsius and Fahrenheit units.
- Select “FAST HEAT UP” to enable or disable automatic fast heat up function.
- Select “SERVICE INFO” to show the service information.
- Select “FACTORY SETTINGS” to reset to original factory settings.
- Select ‘ACTIVATE LOCK’ to turn child lock on.
- Touch ‘OK’ to go into each selection to change its settings by using function up or function down .
Safety Cut-out feature
The oven automatically switches itself off if the temperature is not adjusted or the appliance is left operating after a period of time. The oven switches itself off after:
- 12.5 hours when the temperature is set between 30° C and 120°C.
- 8.5 hours when the temperature is set between 120° C and 200°C.
- 5.5 hours when the temperature is set between 200°C and 250°C.
EVEP616, EVEP618
COMPONENTS
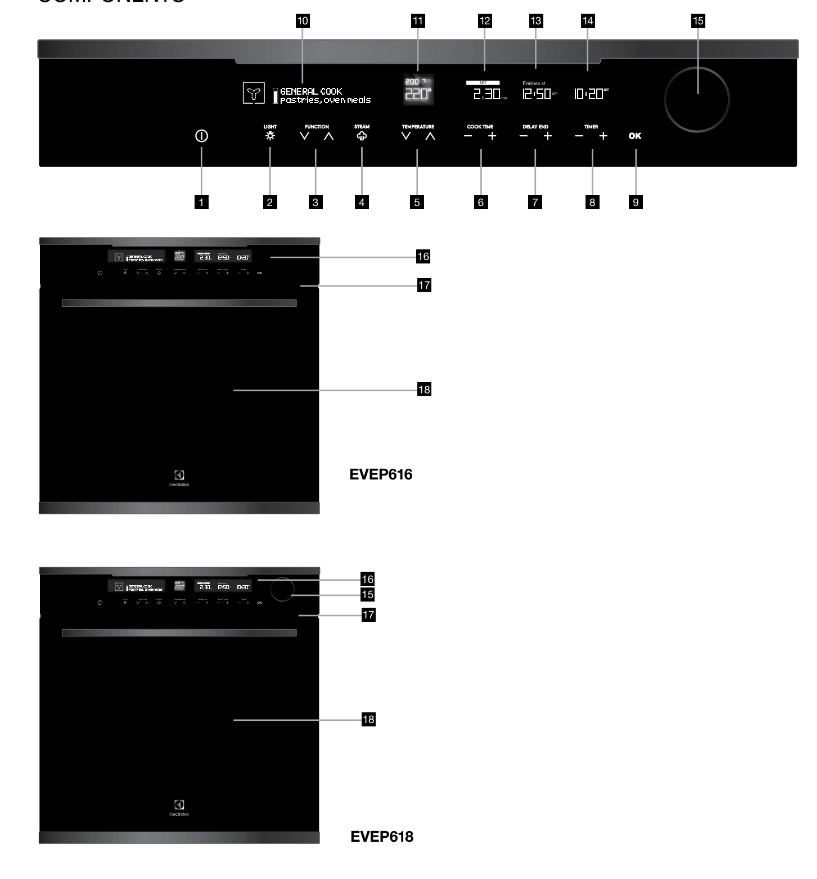
- ON/OFF
- Light on/off
- Cooking function selector
- Steam on/off
- Temperature control
- Cook time control
- Delay end control
- Set clock and timer control
- Instant confirm
- Cooking function display
- Temperature display
- Cook time display
- Delay end display
- Clock/timer display
- Water Drawer (EVEP618 only)
- Control panel
- Warm air exhaust
- Quad glazed door
EVEP626
COMPONENTS
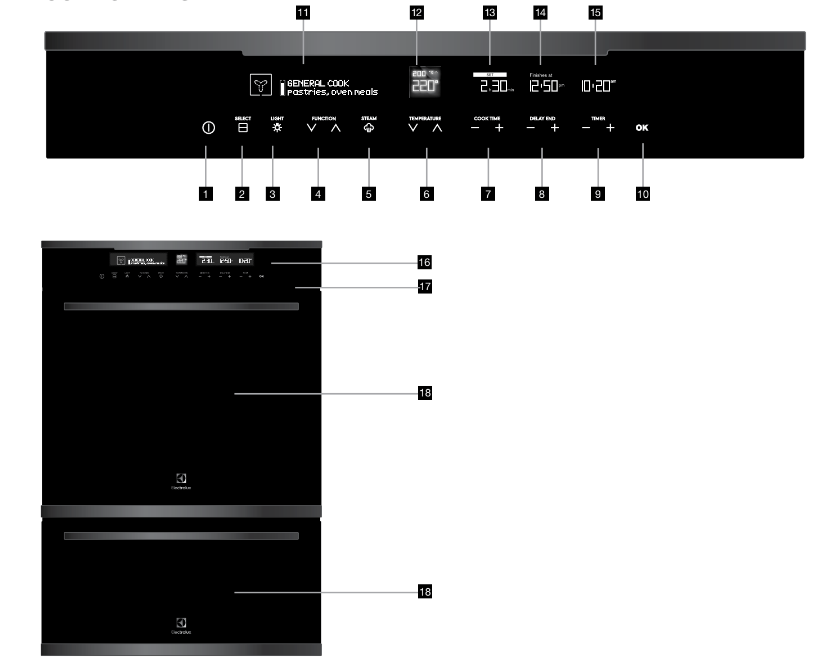
- ON/OFF
- Upper/Lower oven selector
- Light on/off
- Cooking function selector
- Steam function
- Temperature control
- Cook time control
- Delay end control
- Set clock and timer control
- Instant confirm
- Cooking function display
- Temperature display
- Cook time display
- Delay end display
- Clock/timer display
- Control panel
- Warm air exhaust
- Quad glazed door
EVEP616, EVEP618, EVEP626
BEFORE USING THE APPLIANCE
Setting the time
The time of day must be set before the appliance can operate.
After the appliance has been electrically connected the display will cycle through the welcome screen, then ‘Set Clock’ will illuminate under the clock display and the Hour digits will flash.
- Use the timer and to set the hour portion of the current time (including AM/PM).
- Press OK when the hours are set correctly. The Minute digits will flash.
- Use the timer and to set the minutes portion of the current time.
- Press OK when the minutes are set correctly. You can turn off the oven or it will do so automatically after 8 seconds.
Once the time has been entered, the clock advances minute by minute.
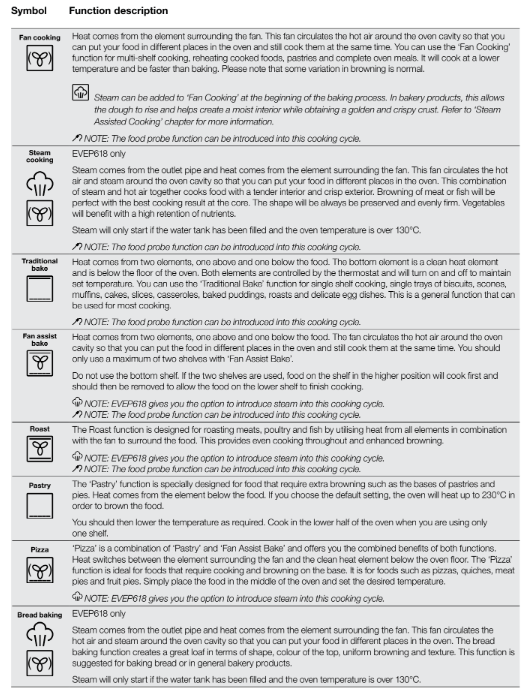
COOKING FUNCTIONS (Functions listed may not apply to all models.)
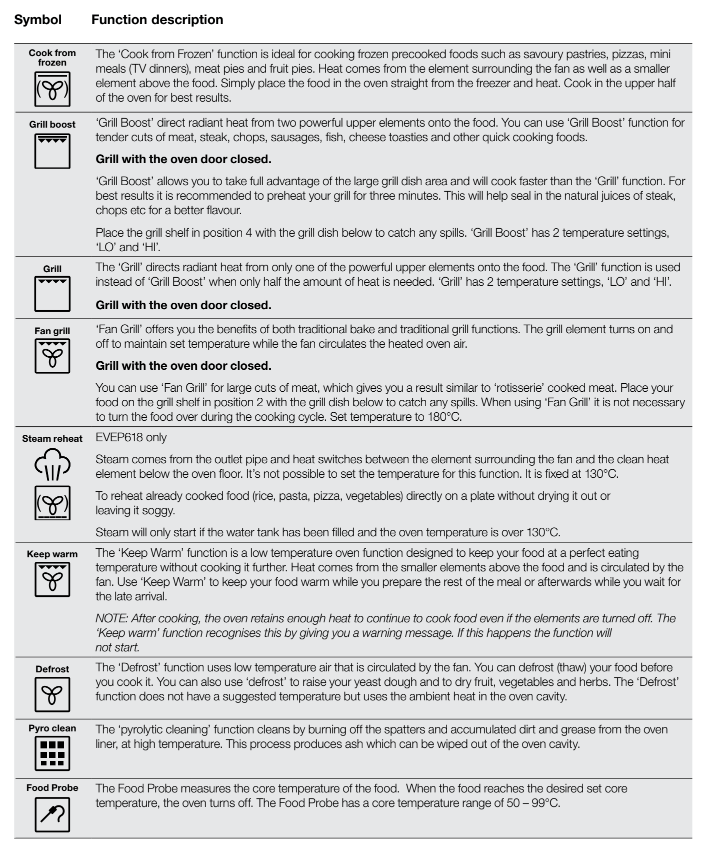
OPERATING SEQUENCE
Turning the oven on
- Switch on the oven by touching the ON/OFF symbol. The LCD control panel will come on and inform you that you need to select a cooking function.
- If you do not select a function within 20 seconds the oven will turn off
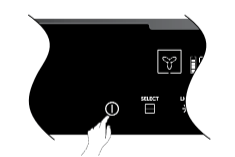
Selecting the upper and lower oven
(EVEP626)
This model is equipped with two ovens. Use the oven selector symbol to toggle between the upper and lower ovens.
The oven cavity icon on the control panel will show which oven is currently active.
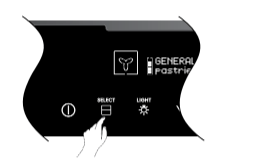
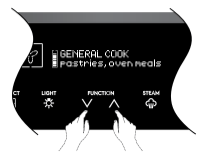
Select a cooking function
The oven will have a selection of functions. Press the function ^ or v function symbols as many times as necessary until the desired function appears.
Cooking suggestions will appear under the function name and suggested cooking temperatures will appear above the temperature selector.
If no other symbol is touched within 8 seconds the oven will switch on and begin to heat up to the displayed temperature.
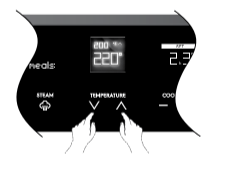
Selecting a temperature
The temperature is electronically controlled.
The temperature can be selected within the range of 30°C to 250°C and can be adjusted at any time. To set the temperature, press the temperature ^ and v temperature symbols to reach the desired setting.
Touch OK, or if no further changes are made within seconds the oven begins to heat up to the set temperature. The current oven temperature will appear above set temperature. This will change as the oven heats up and the heat up bar will change from grey to red.
When the temperature is reached, ‘Set temperature reached’ will appear and only the target temperature will be displayed.
Turning the oven off
Single cavity models:
Touch the  ON/OFF symbol to switch off the oven. As the appliance cools down ‘cooling’ will be displayed until the oven reaches approximately 100°C.
Double cavity models:
- Touch the upper/lower oven selector symbol to toggle to the desired oven.
- Touch the
 ON/OFF symbol to switch off the desired oven. The control panel will turn off to confirm that the oven is now switched off.
 - If the other oven is still active, after 1 second, the control panel will automatically revert to show the setting of that oven.
- To turn off both ovens at once, touch and hold the
 ON/OFF symbol for 5 seconds. All elements, cavity light and the control panel will then switch off at the same time.
 - If both ovens are off as the appliance cools down, cooling’ will be displayed until both ovens are below approximately 100°C.
USING THE APPLIANCE
Cooking with the timer
The oven is equipped with a programmable controller that can be used to turn the oven on and off automatically. The cook time’ controls are used to automatically turn the oven off after a set amount of time. The ‘Delay End’ controls are used to set the time of day you want the cooking cycle to finish.
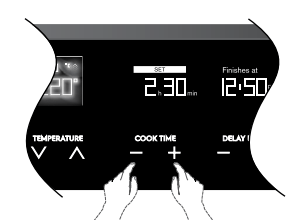
Setting the cook time
- Select the desired oven function and cooking temperature.
- Touch the ‘cook time’ symbol as often as necessary (or hold), until the desired cook time has been set.
- Touch ‘OK’ or after 8 seconds from the last time adjustment the oven will start cooking and the ‘cook time’ display will countdown to zero.
- The oven will turn off and beep when the ‘cook time’ display reaches zero
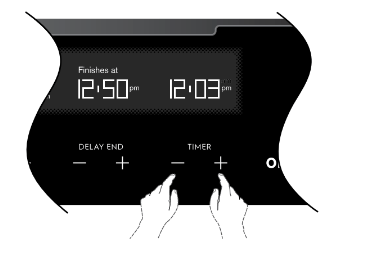
Setting the delay end time
The delay end function can be used to switch the oven on and off at a specific time during the day.
- Check the clock displays the correct time of day.
- Select the desired oven function and cooking temperature.
- Set the required cook time.
- Touch the ‘delay end’ symbol to move the end time.
- Touch ‘OK’ or after 8 seconds from the last time adjustment the SET icon will light and the oven is now programmed. The oven will start its cooking cycle to finish at the set ‘end time’.
- When the oven has finished cooking, cook time can be extended or the beeper turned off just as in ‘cook time’ mode.
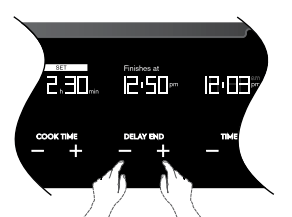
7. Touch the ‘delay end’ symbol to move the end time forward.
8. Touch ‘OK’ or after 8 seconds from the last time adjustment the SET icon will light and the oven is now programmed.
The oven will commence its cooking cycle to finish at the set ‘end time’.
Timers
The appliance has two timers which can be used one at a time. The count up timer can be used to measure a period of time. The count down timer beeps at the end of a preset time.
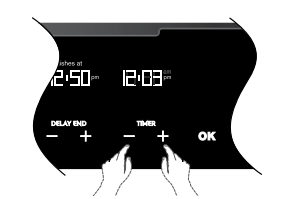
Setting the count up timer
The timer can be used independently of the oven for measuring a count up period. There is no alert provided with this timer.
- Touch either ‘timer’ + or –.
- 00min will be displayed along with a bell and the up arrow will flash.
- To begin the count up timer press OK.
- To reset the count up timer, press ‘timer’ – once to show 00min. Press OK to restart.
- To cancel the count up timer press ‘timer’ – twice.
Setting the count down timer
The timer can be used independently of the oven for setting a count down period. When the period of time has elapsed, an audible signal sounds.
- Touch either ‘timer’ + or –.
- 00min will be displayed along with a bell and the up arrow will flash.
- Touch the ‘timer’ + to set the countdown period.
- The timer bell icon
 will flash.
 - To begin the count down timer press OK or wait 8 seconds. When the timer starts, the bell will stop flashing and the timer will begin to count down.
- When the set time has elapsed, an audible signal will sound for 2 minutes. The time indication ‘00min’ and the timer bell will flash on the display.
- To stop the signal, touch either of the ‘timer’ or – symbols.
- To cancel the count down timer touch ‘timer’ – until the normal time of day is displayed.
Adjusting the clock
- Switch on the oven by touching ‘ON/OFF’ symbol.
- Select ‘SETTINGS’ from the function list and touch OK.
- Select ‘SET CLOCK’ from the list and touch OK.
- Set Clock’ will illuminate under the clock display.
- Use the timer + and – to set the hour portion of the current time (including AM/PM).
- Touch ‘OK’ when the hours are set correctly.
- Use the timer + and – to set the minutes portion of the current time.
- Touch ‘OK’ when the minutes are set correctly. TIME SAVED will be displayed and then the function display will revert to the ‘set clock’ menu. Turn the oven off or it will do so after 8 seconds.
ADDITIONAL FUNCTIONALITY
Light on/off
Turn the oven light off and on in any cooking mode by simply touching the 
DEMO Mode
This mode is intended to be used in retail shops to demonstrate the oven functionality without any power consumption except to the oven lights.
The following instructions show how to enter and exit DEMO’ mode.
- Ensure the oven is off by touching the ON/OFF symbol.
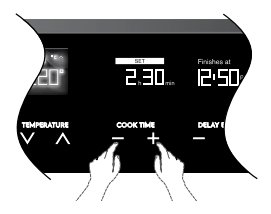
- Touch and hold the ON/OFF symbol until the display turns ON then OFF. Immediately after, touch both the cooktime symbols simultaneously. Hold until a triple beep sounds.
Activating the child-proof lock
When the child lock is engaged, the oven cannot be switched on.
- Switch on the oven by touching the ON/OFF’ symbol.
- Select ‘SETTINGS’ from the function list and touch ‘OK’.
- Select ‘ACTIVATE LOCK’ from the list and touch ‘OK’.
- The word ‘LOCKED’ will momentarily appear and a single beep will sound to confirm the operation. The child lock is now engaged.
De-activating the child lock
- Touch any symbol on the control panel (including the on/off symbol). ‘Locked’ will appear on the display.
- Touch any symbol again. The display will instruct you to touch both ‘cook time’ symbols for 2 seconds.
- Hold until a beep sounds. The child lock is now released and the oven is ready to use.
Other settings.
The ‘Settings’ function gives the opportunity to change oven functionality. Scroll through the list by using function up ^ or v function down .
- Switch on the oven by touching the ON/OFF’ symbol.
- Select ‘SETTINGS’ from the function list and touch OK.
- Select ‘SET CLOCK’ to change the time of day.
- Select ‘TIME INDICATION’ to have the time permanently displayed or not.
- Select ‘BUZZER VOLUME’ to adjust the ‘beep on touch’ and alarm loudness.
- Select ‘KEY TONE’ to turn the ‘beep on touch’ on or off.
- Select ‘SCREEN BRIGHTNESS’ to adjust the brightness of the display.
- Select ‘SCREEN CONTRAST’ to adjust the contrast of the display.
- Select ‘TEMPERATURE UNITS’ to change between Celsius and Fahrenheit units.
- Select “FAST HEAT UP” to enable or disable automatic fast heat up function.
- Select “CLEANING REMINDER” to enable or disable the cleaning reminder function.
- Select “SERVICE INFO” to show the service information.
- Select “FACTORY SETTINGS” to reset to original factory settings.
- Select ‘ACTIVATE LOCK’ to turn child lock on.
- Touch ‘OK’ to go into each selection to change its settings by using function up and function down .
Safety Cut-out feature
The oven automatically switches itself off if the temperature is not adjusted or the appliance is left operating after a period of time. The oven switches itself off after:
- 12.5 hours when the temperature is set between 30° C and 120°C.
- 8.5 hours when the temperature is set between 120° C and 200°C.
- 5.5 hours when the temperature is set between 200°C and 250°C.
CLEANING THE OVEN
Cleaning steam parts
EVEP618
After some time, the water tank can accumulate mineral deposits. To prevent this from occurring, empty the water tank after each steam cooking session and clean the water tank every two to three months using the following process.
Cleaning procedure
- With oven turned off, fill the water tank with a cleaning solution of 850mL of water and 50mL of citric acid. Let sit for approximately minutes.
- Turn on the oven and set to ‘steam cooking’. Set the temperature to 230°C. After 25 minutes, turn off the oven and let it cool for 15 minutes.
- Turn on the oven again and set to ‘steam cooking’. Set the temperature to 180°C. After minutes, turn off the oven and let it cool for minutes. Insert the supplied drain pipe and empty the tank of remaining water. When tank is empty, remove the drain pipe.
- To flush cleaning solution from water tank, refill the water tank with 850mL fresh water and empty via the drain pipe.
- Remove the drain pipe again and clean by hand in warm water with soap.
- To prevent build up of calcium deposits it is recommended to use this procedure every 2-3 months.
Pyrolytic cleaning of the oven cavity
The oven has the Pyrolytic self-cleaning function, it cleans by burning off the spatters and accumulated dirt and grease from the oven liner, at high temperature. This process produces ash which can then be wiped out of the oven cavity.
Before carrying out the Pyrolytic function
- All accessories must be removed from the oven, including shelves, trays and side racks.
- Clean large deposits, spills or grease from the oven cavity.
- If you have a steam oven ensure the water tank is empty.
- Pyrolitic cleaning can release fumes that are not harmful to humans, including infants or persons with medical conditions, however you are strongly advised to provide good ventilation during and after each pyrolytic cleaning process.
- Unlike humans, some birds and reptiles can be extremely sensitive to the potential fumes emitted during the pyrolytic cleaning process. It is strongly advised to remove any pets (especially birds) from the vicinity of the appliance during and after each pyrolytic cleaning process.
- Small pets can also be highly sensitive to the localized temperature changes in the vicinity of all pyrolytic ovens when the pyrolytic self cleaning program is in operation.
- Pyrolytic cleaning will not remove salt and mineral residue left in the cavity well when water evaporates. It is recommended that the residue is cleaned prior to conducting pyrolytic cleaning cycles. See section ‘Cleaning the cavity well’.
- Choose your Pyrolytic cleaning cycle from the following:

Light clean
This is an energy saving cycle that can be used on a regular basis if the oven is lightly soiled. Possibly after every 2nd or 3rd roast.
Medium clean
Use this as the regular cycle about once every 2-3 months.
Heavy clean
When the oven is very dirty it may need a longer cycle to clean it thoroughly. This cycle will clean the dirtiest of ovens.
Turning the oven on
Switch on the oven by touching the  ON/OFF symbol. The control panel will come on and inform you that you need to select a cooking function.
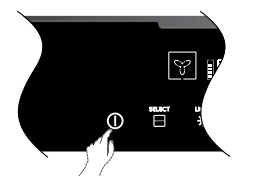
Selecting the upper or lower oven
(EVEP626)
This model is equipped with two ovens. Use the oven selector symbol to toggle between the upper and lower ovens.
The oven cavity icon on the control panel will show which oven is currently active.
Only one cavity can be cleaned at a time.
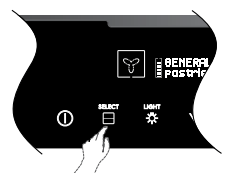
Select the pyrolytic clean function.
Use cooking function selector to slect the pyro clean’ function.
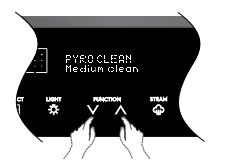
Selecting the required cleaning cycle
Use the ‘cook time’ control to select Light, Medium or Heavy depending on the soiling of the oven.
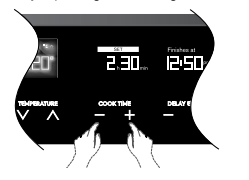
Start Pyrolytic
Unlike other cooking functions, you MUST touch ‘OK’ for the pyrolytic cycle to start. The display will prompt you to remove all shelves and trays. You must touch ‘OK’ again to start. The oven light will then go out and the Pyrolytic function will start.
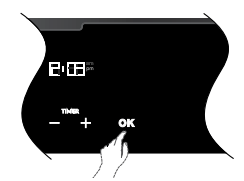
(EVEP626)
For these models with two ovens, both doors will lock automatically at the beginning of the pyrolytic cleaning.
Cooking is not permitted in either oven during the pyrolytic clean function.
The door(s) will only unlock when the oven has cooled to a safe temperature. Turning the function off will not unlock the door(s). This will only happen when safe temperatures are reached.
When the pyrolytic cleaning function is on, it is advisable not to use a cooktop if it is fitted above the oven. This could cause overheating and damage to both appliances'
After Pyrolytic cleaning
After cool-down wipe the ash out of the oven with a soft damp cloth and warm water.
To restore the enamel shine to more difficult areas, use a damp cloth with vinegar and detergent.
Cleaning Reminder
After a recommended period of time the oven will remind you to clean the oven. Once this period of time has elapsed, when turning the oven off you will get a message “TIME TO CLEAN YOUR OVEN”. Press the on/off button to clear the message and run the pyrolytic cycle. After the pyrolytic cycle has finished, the cleaning reminder will reset. The “Cleaning Reminder” setting can be enabled/disabled in the settings menu.
Alternatively while the “TIME TO CLEAN YOUR OVEN” message is displayed, you can press the “OK” button and you will get the option to “REMIND ME AGAIN”
GETTING TO KNOW THE OVEN
Get to know your new oven with this ‘Simple Test Cake’
Although we strive for a perfect performing oven, it’s possible that there will be some variation in colour when baking. Therefore, we suggest to make this simple, easy and delicious Simple Test Cake to help you understand your new oven. All ovens do sometimes have hot or cold spots, therefore it is important to judge with your eye as you may require to rotate during baking.
Simple Test Cake’
125 g butter, softened to room temperature
1 cup caster sugar
1 teaspoon pure vanilla essence
1 large eggs
2 cups self-raising flour
pinch of salt
4 tablespoons (80mL) full-cream milk
Method:
- Butter base and sides of two, 20cm straight-sided round or square cake pans. Then line the base with grease proof or baking paper.
- Preheat oven to moderate ‘180ºC’ (170ºC fan forced) and ensure oven shelf is in the centre position of oven.
- Cream softened butter and sugar until light in colour.
- Add vanilla essence.
- Then eggs one at a time, beating well after each addition.
- Sift flour and salt into the mixture and beat until well combined.
- Add milk and beat or stir to combine.
- Spoon mixture equally between prepared cake pans.
- Bake in preheated oven, middle shelf for about 25 to 35 minutes or until when tested with a fine cake skewer it comes out clean or the edges of the cakes have come away slightly from the sides of the cake pans.
- Remove from oven to wire cake rack and rest for 5 minutes before removing from cake pans.
- Cool completely.
To Serve:
Sandwich together with your favourite jam or conserve, and dust top with pure icing sugar.
Using the bread baking function
(EVEP618 model only)
To aid you in baking bread here is a basic recipe to understand and experiment with the bread baking function.
"Test loaf from base ingredients’
500g wheat flour
10g salt
10 g butter at room temperature
280+/- 20 g water at 37 °C +/- 2 °C
3g sugar
20g fresh yeast
Method
- Weigh wheat flour, salt and butter in mixing bowl of the food processor.
- Dissolve sugar and yeast in the warm water and add to the flour.
- If using a mixing machine, mix on slow speed for minutes. Then mix on medium for 8 minutes or until dough is smooth.
- Shape round ball of 750g of the dough, put in a bowl, cover with cling film and let it rise for 45 minutes in the oven at 30°C (or in defrost mode).
- Shape a longish loaf, cover with a towel and let it rise for 45 minutes in the oven at 30°C (or in defrost mode).
- Carve the surface of the bread with a serrated knife, depth of the cuts around 5mm.
- Choose ‘bread baking’ function, ensure water is in the tank and pre-heat the oven to 180°C for minutes.
- Place the dough in shelf level 2 (second from bottom) and cook for 40-45 minutes.
- Refill the water tank if it becomes empty before the end of the cycle.
- Remove loaf and allow to cool.
- Drain any left over water from the tank once the appliance is cool.
Cooking guide
- Select the correct shelf location for food being cooked.
- Make sure dishes will fit into the oven before it is switched on.
- Keep edges of non Electrolux baking dishes at least mm from the side of the oven. This allows free circulation of heat and ensures even cooking.
- Do not open the oven door more than necessary.
- Do not place foods with a lot of liquid into the oven with other foods. This will cause food to steam and not brown.
- After the oven is turned off it retains the heat for some time. Use this heat to finish custards or to dry bread.
- Do not use a lot of cooking oil when roasting. This will prevent splattering oil on the sides of the oven and the oven door.
- When cooking items that require a high heat (e.g. tarts), place the cooking dish on a scone tray in the desired shelf position.
- For sponges and cakes use aluminium, bright finished or non-stick cookware.
Condensation
Excess condensation may fog the oven door. This may happen when you are cooking large quantities of food from a cold start. Minimise condensation by:
- Keeping the amount of water used whilst cooking to a minimum.
- Making sure the oven door is firmly closed.
- Baking custard in a baking dish that is slightly smaller than the water container.
- Cooking casseroles with the lid on.
If water is being used in cooking, it will turn to steam and may condense outside your appliance. This is not a problem or fault with the appliance.
Oven shelf location
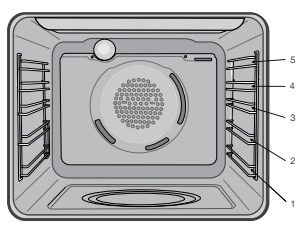
The oven has 5 positions for shelves (as shown in the diagram below). To give maximum space above and below the shelves, load them in this way:
When cooking with 1 shelf, position at 1 or 2.
When cooking with 2 shelves, position them at 2 and 4.
For more detailed shelf locations. Refer to cooking tables for individual cooking functions.
STEAM ASSISTED COOKING
All Electrolux range of ovens have the ability to add steam while baking, additionally EVEP618 has dedicated steam drawer and functions.
Cooking with steam is a great addition to ‘hot air’ cooking. Steam brings out all the natural flavours and goodness in the food, cooks evenly from surface to centre and retains more nutrients and vitamins. Steam assisted cooking consistently produces juicy, succulent interiors with crisp, golden exteriors.
EVE614, EVEP614
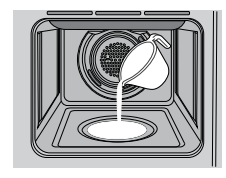
- Open the oven door
- Add 150ml of tap water to the cavity well. Fill the cavity well with water only when the oven is cold.
3. Set the ‘Bake + steam’ function.
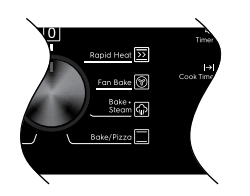
4. Turn the knob for the temperature to select a temperature.
5. Preheat the oven for 10 minutes or according to the recipe suggestions.
6. Place food in the appliance and close the oven door.
7. To deactivate the appliance, turn the knob for the oven functions to off position.
8. Remove water from the cavity well.
EVE626, EVE636, EVEP616, EVEP626
- Open the oven door
- Add 150ml of tap water to the cavity well. Fill the cavity well with water only when the oven is cold.
- Set the ‘Fan cooking’ function.
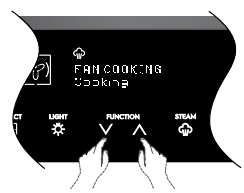
4. Activate the Steam button by touching  . The steam control works only with the ‘Fan cooking’ function.
The indicator turns on  .
.
5. Set the temperature using ^ v .
6. Preheat the oven for 10 minutes or according to the recipe suggestions.
7. Place food in the appliance and close the oven door
EVEP618
Steam product description
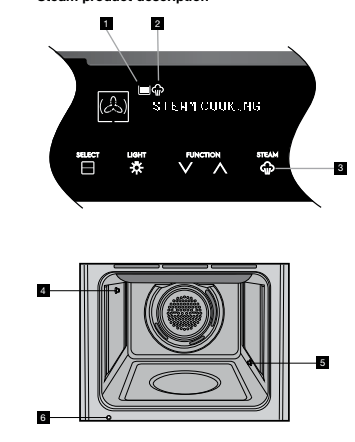
1. Water tank Level Indicator
 Tank empty.
 Water present.
 Tank full. Overfill alarm will sound. Press ‘OK’ to continue.
2. Steam function in progress.
3. Steam On Demand. Available for certain functions only.
4. Steam outlet. This is where steam is injected into the oven.
5. Water overflow pipe. If the water tank is over filled, water will be dispensed into the oven from here. This is not a fault with the appliance. It prevents water spilling out of the water drawer which could create a hazard. If this occurs mop up the overflow with a clean cloth and continue with the cooking function.
6. Water outlet valve. To be used with the draining pipe (supplied). Any water left in the tank is to be drained after the appliance has cooled down.
Steam operating sequence
- Open the water drawer in the control panel by pressing it.
- Pour approximately 850mL of water into the drawer. The water level indicator on the display will show one to two bars. Close the water drawer.
Take care when filling the water drawer. Spillage could create a slipping hazard. Immediately clean up any spills on the product, cabinet or floor. If the overfill alarm sounds immediately stop pouring water into the water drawer. If the tank is overfilled the excess will flow into the oven. This prevents leakage onto cabinets and is not a fault. Sponge up overflows if they occur.
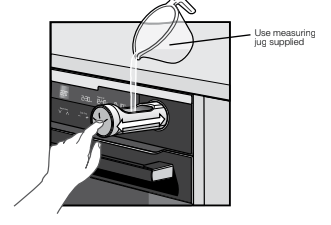
Do not use any liquid other than normal tap water.
Do not use demineralised or distilled water. Doing so could affect the normal operation of the steam generator. Do not put solid matter into the water drawer.
- Turn on the oven and select the steam cooking function and temperature as per normal operation. Set timer functions if desired.
- Once the oven has reached the desired temperature put the food in and cook as planned. A full water tank will last approximately 30 minutes. It may have to be refilled during a long cooking cycle, for example, a roast.
- Once cooking is complete remove the food and turn off the oven. Leave the oven door ajar to aid drying of the oven.
- Drain water tank once the appliance is cool.
Emptying the water tank
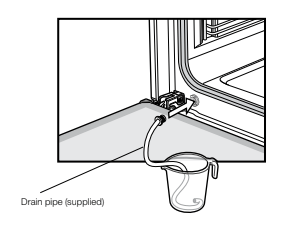
The water tank must be emptied after every steam assisted cooking cycle. This is done by:
- Open the oven door to reveal the water outlet valve.
- Insert the valve end of the supplied drain pipe into the water outlet valve. Ensure the other end is in a container that can take up to 1 litre.
- Remove the drain pipe only when the water stops flowing.
- Soak up any leakages with a sponge or cloth.
Water in the tank can still be hot. Wait until the appliance is cool before the water tank is drained.
Do not use the drained water to fill the water tank again.
This model has three dedicated steam functions that have been individually tuned to produce the best result with a combination of steam and heat application.
They are:
Steam cooking
Perfect for all kinds meat, poultry and fish dishes.
The hot air ensures the outside is sealed whilst the steam keeps the inside tender.
Steam reheat
Rejuvenates food like it was just cooked. Great for reheating dishes like rice, pasta and pizza that can suffer from dryness in normal ovens or sogginess in microwave ovens.
Bread baking
Specially programmed for buns and loaves of bread.
This function gives perfect, fluffy insides with crisp golden crusts. See ‘getting to know your oven’ on page 40 for directions of use.
Steam on demand
During the cooking process some functions will allow the user to switch between standard cooking and steam assisted cooking. This is useful if the food is drying out or the meal requires a higher retention of moisture. Steam can be introduced by pressing the  symbol. This option is available for the following functions:
- Fan cooking
- Fan assist bake
- Roast
- Pizza
- Cook from frozen
It will always be possible to switch back to standard cooking by again pressing the  symbol.
USING THE FOOD PROBE
The Food Probe measures the core temperature of the food. When the food reaches the desired set core temperature, the oven turns off. The Food Probe has a core temperature range of 50-99°C.
There are two temperatures to set:
- The oven temperature
- The core temperature of the food
ALL FOOD PROBE MODELS EXCEPT EVEP614
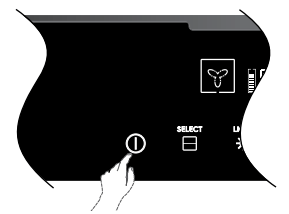
1. Switch on the oven by touching the  symbol
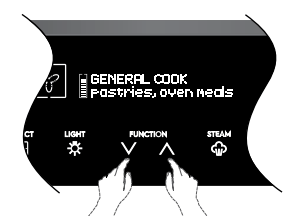
2. Select a cooking function by pressing the function ^ or v function as many times as necessary until the desired function appears.
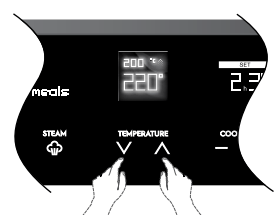
3. Select the oven temperature by pressing the temperature ^ or v temperature to reach the desired setting. Allow oven to preheat.
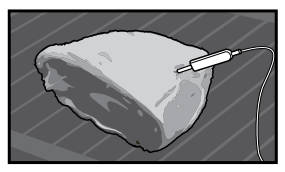
4. Put the tip of the Food Probe into the centre of the food, with at least 75% of the probe inserted into the food.
Meat
For large pieces of meat, insert the tip of the Food Probe into the centre of the meat, with at least 75% of the probe inserted into the meat.
Fish
For best results, place the whole fish onto the wire rack and prop it up in the swimming position (i.e. using half a potato or onion). Alternatively the fish can be laid flat. Insert the Food Probe behind the head with at least 75% of the probe inserted into the fish towards the bones in the middle of the fish.
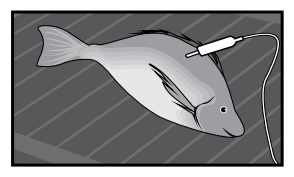
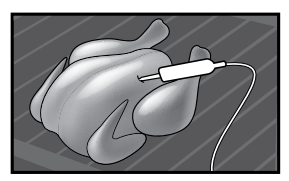
Poultry
Place the whole poultry on the wire rack breast side up. Insert the Food Probe with at least 75% of the probe into the breast of the poultry. Place the probe in a direction toward the neck end of the poultry.
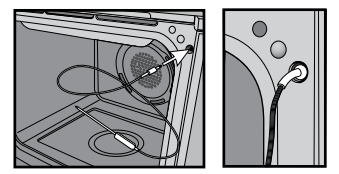
5. Put the plug of the Food Probe into the socket on the top right hand corner of the front frame. Ensure plug is fully inserted into the socket.
6. Set the desired food core temperature by pressing the temperature ^ or v temperature to reach the desired setting.
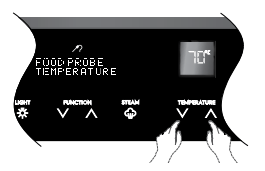
Core temperatures of different foods
The temperatures in the table are given as a guide and may vary depending on the composition of the food.
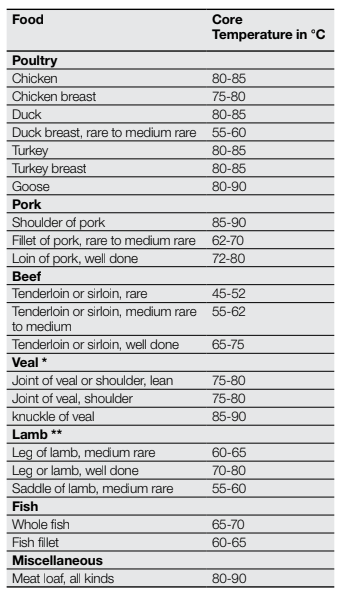
7. The appliance will calculate the approximate end time. The end time is different for different quantities of food, set oven temperatures and function modes.
NOTE: The estimated end time will be displayed after approximately 30 minutes.
NOTE: The Food Probe temperature will not be displayed until the oven is at the desired temperature. Once the oven is at the desired temperature, the Food Probe temperature will cycle between the desired food core temperature and the actual food core temperature.
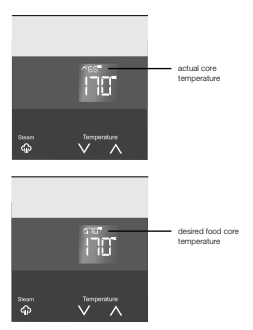
8. When the food is at the desired food core temperature, an audible signal will sound for 2 minutes. To stop the signal, press the symbol on the control panel.
9. Remove the Food Probe plug from the socket and remove the food from the oven.
To change the desired food core temperature during cooking, press and hold the and at the same time.
To cancel the Food Probe operation, simply unplug the probe from the socket.
USING THE FOOD PROBE:
MODEL EVEP614
1. Turn function knob to the desired function
NOTE: The food probe will only work with the following functions.
- Fan Bake
- Bake + Steam
- Bake
- Pastry
- Pizza
- Fan grill
2. Set the temperature using the temperature selector knob.
3. Put the tip of food probe into the centre of the food, with at least 75% of the probe inserted into the food, and then place food into the oven.
4. Put the plug of the Food Probe into the socket on the top right hand corner of the front frame. Ensure plug is fully inserted into the socket. The food probe icon and set temperature begin flashing. While the display is flashing, the food probe set temperature can be set using the temperature selector knob.
5. Touch the °C symbol to toggle through oven temperature – oven set temperature – Food Probe temperature – Food Probe set temperature. The oven set temperature and the Food Probe set temperature can be adjusted this way. The display will default to the Food Probe temperature.
6. Once the food has reached the set temperature, the oven will beep to notify. Touch any of the symbols to stop beep.
7. Remove the Food Probe plug from the socket and remove the food from the oven.
COOKING GUIDE
Use the oven efficiently by cooking many trays of food at the same time. For example:
- Cook 2 trays of scones, small cakes or sausage rolls.
- Cook a roast dinner at the same time as you cook chips or vegetables.
Roasting meat (use roasting tray & insert)
- Place the meat in the oven and set the temperature between 180°C and 200°C. (It is recommended to wrap your meats in an oven roasting bag or foil to prevent fats and oils from splattering. This will make it easier to clean the oven.)
- Use the grill/oven dish.
- Do not pierce the meat.
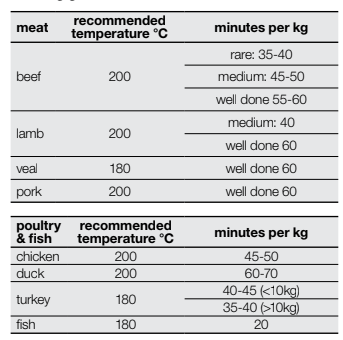
- When the meat is cooked, take the roast out of the oven, wrap in aluminium foil and leave to stand for about 10 minutes. This will help retain the juices when the meat is carved. The table below shows temperatures and cooking times for different kinds of meat. These may vary depending on the thickness and bone content of the meat.
Roasting poultry and fish
- Place the poultry or fish in an oven set at a moderate temperature of 180°C-200°C.
- Place a layer of foil over the fish for about three quarters of the cooking time The table shows the temperatures and the cooking times for different kinds of fish and poultry. These may vary depending on the thickness and bone content of the meat.
Cooking guide
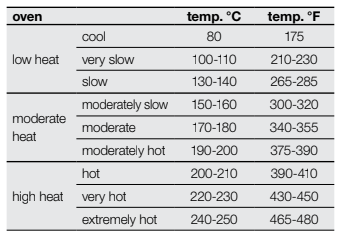
Temperature estimations
If a recipe calls for Fahrenheit (°F) or no actual temperatures, use the following table to determine the temperature (°C).
TRADITIONAL BAKING
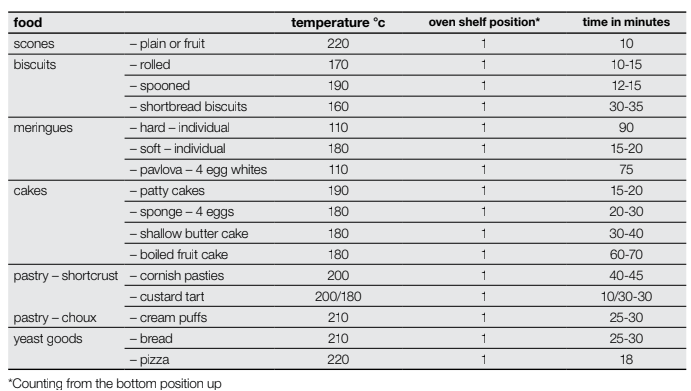
FAN COOKING
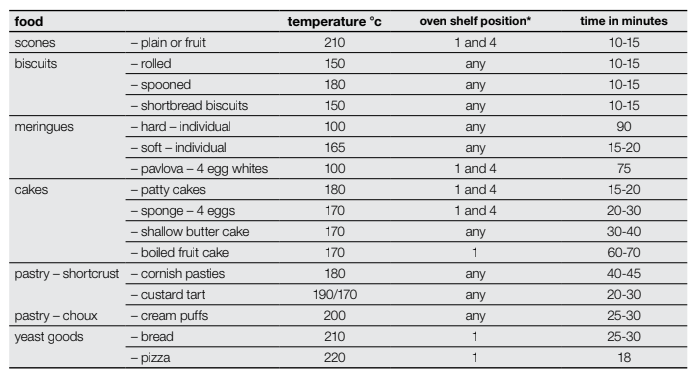
STEAM COOKING
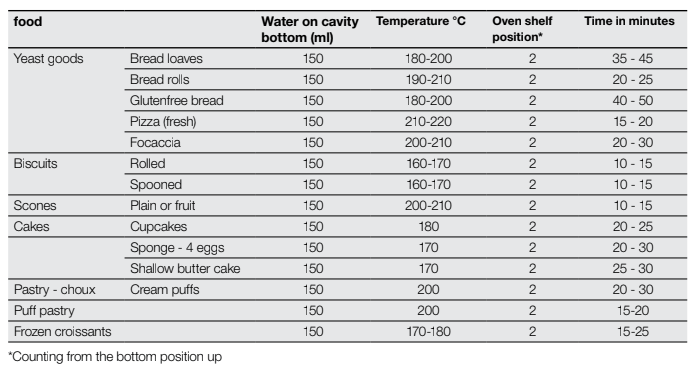
Bake + Steam function
(EVE614, EVE616, EVEP614, EVEP616, EVE626, EVEP626, EVE636)
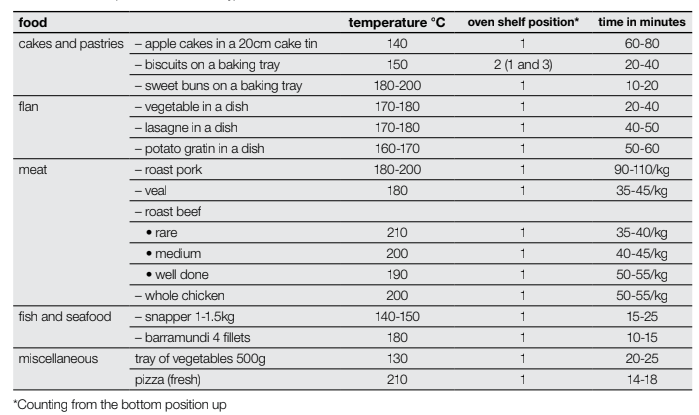
Steam function (EVEP618 model only)
BREAD BAKING

GRILLING
Grilling hints
As a method of cooking, grilling can be used to:
- Enhance the flavours of vegetables, fish, poultry and meat.
- Seal the surface of the food and retain natural juices.
- Grill with the door closed.
This table shows how to grill different types of meat:
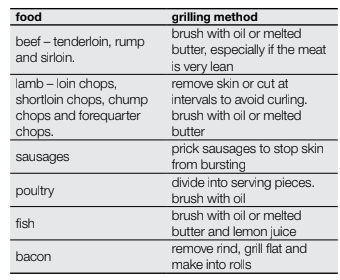
Guide to better grilling
No definite times can be given for grilling because this depends on your own tastes and the size of the food. These times should only be used as a guide and remember to turn the food over half way through the cooking process.

For better grilling results, follow these easy instructions:
- Remove oven/grill dish and grill shelf and preheat grill for about 5 minutes.
- Choose only prime cuts of meat or fish. If the cut is less than 5mm thick it will dry out. If the cut is more than 40mm thick, the outside may burn whilst the inside remains raw.
Fan grill
The ‘fan grill’ function will assist the grilling process by circulating the heat evenly around the food. The recommended temperature setting is 180°C for all fan grilling functions.
Use the grill shelf with dish below for all fan grilling. Position the shelf in the lower half of the oven for the best results.
Wipe off any oil or fat which splatters while the oven is still warm.
There is no need to turn meat as both sides are cooked at the same time which means the food is succulent.
DEALING WITH COOKING PROBLEMS
| problem | possible causes | remedies |
| Uneven cooking |
|
|
| Baked products too brown on top |
|
|
| Baked products too brown on bottom |
|
|
| Cakes have a cracked thin crust |
|
|
| Baked products are pale, flat and See other models: ERI842DSD TRMKTSS2LV84 ECVI4262AS E30DF74TPS ECVW3062AS undercooked |
|
|
| Cakes fallen in the centre |
|
|
| Roast meat, potatoes not browning in fan oven |
|
|
| Grilled meats outside is overcooked and centre is raw |
|
|
| Grilled chops and steaks curling |
|
|
| The steam cooking does not operate |
|
|
| It takes more than three minutes to empty the water tank or the water tank leaks from the steam outlet |
|
|
| Steam and condensation settle on the food and in the appliance |
|
|
| Food Probe function will not display when plugged in |
|
CLEANING THE APPLIANCE
Stainless steel
All grades of stainless steel can stain, discolour or become greasy. You must clean these areas regularly by following the procedures below, if you want your appliance to look its best, perform well and have a long life.
Care must be taken when wiping exposed stainless steel edges, they can be sharp!
A suitable cleaner can be purchased from Electrolux
Customer Care Centres.
Glass
- Glass surfaces on doors and control panels are best cleaned immediately after soiling.
- A damp cloth may help remove baked on food deposits.
- Oven cleaners can be used to remove stubborn marks and stains.
Oven
- Always keep the appliance clean. Ensure fats and oils do not accumulate around elements, burners or fans.
- Always keep oven dish, bake trays and grill dish inserts clean, as any fat deposits may catch fire.
- It is recommended to wrap meats in foil or an oven roasting bag to minimise cleaning.
- Any polyunsaturated fats can leave a varnish-like residue which is very difficult to remove.
Grill
- Always keep grill dish clean, as any fat deposits may catch fire.
Food Probe (selected models only)
- Clean the Food Probe after each use and let it dry. Use a soft cloth with warm water and a cleaning agent. Only clean the probe end and not the plug.
Cleaning the cavity well
The cleaning procedure removes limestone residue from the cavity well after cooking with steam.
CLEANING THE ACCESSORIES
Removing the trays and shelves from the appliance
- Slide the tray and shelves towards you until they reach the front stop.
- Tilt them up at the front to clear the side supports, taking care not to spill the contents.
- Lift them clear.
- Wash the tray and shelves in hot soapy water.
- Reverse the above steps to put the tray and shelves back again.
- Ensure that they are placed between two support wires.
- To remove a shelf from slides:
- Pull shelf towards you until it stops.
- Lift the shelf clear.
Removing the side racks
- Grasp the middle wire at the front.
- Pull firmly inwards while pushing back.
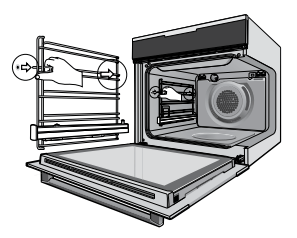
Slides (Telescopic runners)
- Do not subject slides to temperatures greater than 300°C.
- Do not place slides in a dishwasher
- Do not use a knife or sharp object to clean slides.
- Do not add oil or any other lubricant to slides.
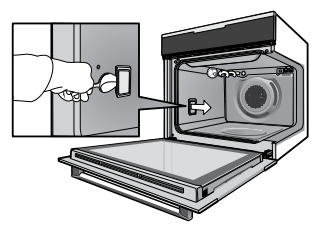
Removing and replacing the oven back light and side light (if fitted)
- Turn oven light glass anti-clockwise to remove it for globe replacement.
- To remove side light, place a spoon under the light glass and lever off. Replace globe and snap glass cover back into position.
- A special high temperature resistant globe should be used. This can be purchased from Electrolux Customer Care Centres.
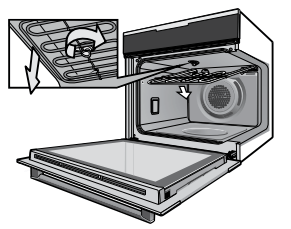
Releasing the grill element
To clean the oven roof, rotate latch until the element drops down freely
CLEANING THE TRIPLE GLAZED DOOR (NON PYROLYTIC MODELS)
Removing the oven door
The oven is equipped with a door that can be disassembled in order to clean all the panes of glass.
Remove the door before cleaning.
1. Open the door fully to access the hinges then rotate the ‘stirrups’ (highlighted in the diagram) on both hinges fully towards the oven.
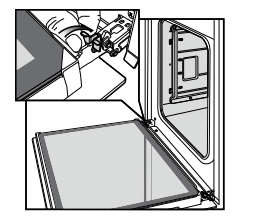
2. Slowly close the oven door until it is stops against the stirrups’ (about 45°).
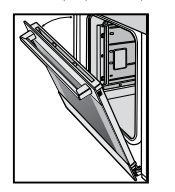
3. Grasp the oven door with a hand each side of the door and remove it from the oven by pulling it towards you.
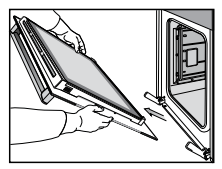
4. Lay the oven door with the outer side facing downwards on something soft and flat (for example a cloth/towel on a kitchen bench/table) to prevent scratches.
Removing the oven door top trim
- Take hold of the grid embossed sections of the door trim at each end and press inwards to release the clips. Remove the door trim by pulling it towards you.
Removing door glass panels
- Lift the black bordered glass panel out of the guide.
- Repeat this for the smaller clear glass panel.
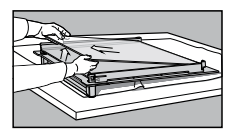
Cleaning the door glass panels
Replacing the door glass panels
1. Insert the smaller clear glass panel first from above and at an angle to the profile of the door.
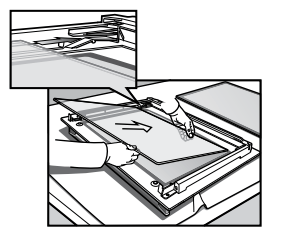
2. Repeat for the black bordered glass panel ensuring the painted surface is facing to the downside.
Replacing the top door trim
- Take hold of the top door trim at each side and position it to the inside edge of the glass.
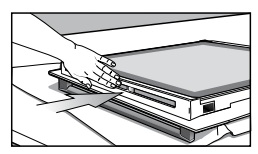
- Push the trim down with its top edge over glass panel until the clip snaps in on each side of the trim.
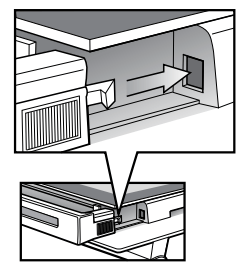
3. Push the middle of the trim down to ensure it is straight and firm against the glass panel.
Fitting the oven door
1. Take hold of the oven door with a hand on each side and with the door at an angle of 45º, position the recesses at the bottom of the door onto the hinge arms of the oven. Let the door slide down the hinge arms as far as it will go.
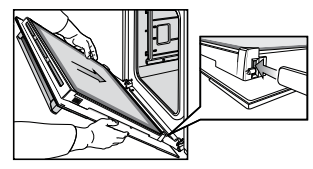
2. Open the door fully to access the hinges.
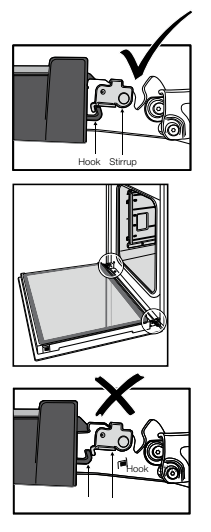
3. Rotate the ‘stirrups’ (see the diagram below) until they lock into the hook. The oven door may now be closed
CLEANING THE QUAD GLAZED DOOR (PYROLYTIC MODELS)
Removing the oven door
The oven is equipped with a door that can be disassembled in order to clean all the panes of glass.
Remove the door before cleaning.
1. Open the door fully to access the hinges then rotate the ‘stirrups’ (highlighted in the diagram) on both hinges fully to open position.
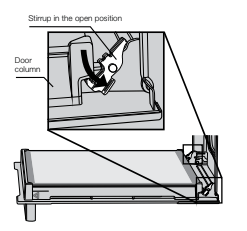
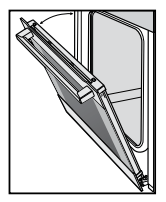
2. Slowly close the oven door until it is stops against the stirrups’ (about 30°)
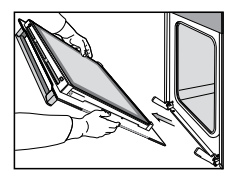
3. Hold the oven door with a hand each side and remove it from the oven by pulling it towards you.
4. Lay the oven door with the outer side facing downwards on something soft and flat (for example a cloth/towel on a kitchen bench/table) to prevent scratches.
Removing the oven door top trim
- Hold the embossed sections of the door columns at each end and press inwards to release the clips. Remove the upper door trim by pulling it towards you.
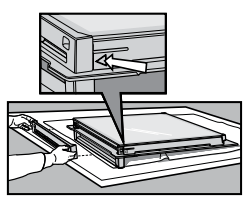
Removing door glass panels
Rough handling, especially around the edges can cause the glass to break.
- Lift the black bordered glass panel out of the guide.
- Repeat this for the smaller clear glass panels.
- When removing panel 3, ensure that the two rubber spacers are removed before cleaning.
Replacing door glass panels
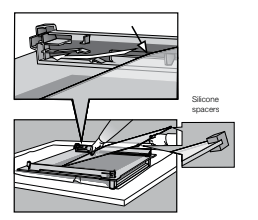
1. Assemble the silicone spacers to the upper corners of one of the clear glass panels. Position the panel into the lower position of the door, ensuring the chamfered corner of the panel is placed in the correct location as shown in the image below.
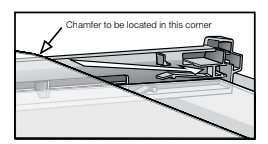
2. Insert the remaining smaller clear glass panel into the middle position, ensuring the chamfered corner of the panel is placed in the correct location as shown in the image below.
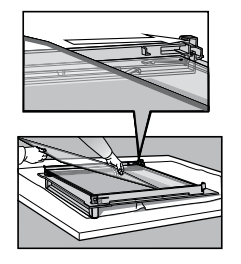
3. Insert the black bordered glass panel into the upper position, ensuring the painted surface is facing the downside as per the image below.
Replacing the top door trim
- Hold the top door trim at each side and position it to the inside edge of the glass with trim vent opening closest to glass.
- Push the trim down with its top edge over the glass panel until the clip snap in on each side of the trim.
- Push the middle of the trim down to ensure it is straight and firm against the glass panel.
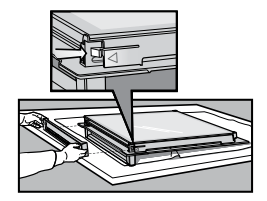
Fitting the oven door
1. Take hold of the oven door with a hand on each side and with the door at an angle of 30˚, position the recesses at the bottom of the door onto the hinge arms of the oven. Let the door slide down the hinge arms as far as it will go.
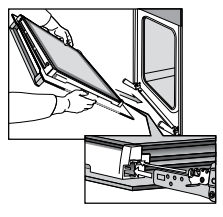
2. Open the door fully to access the hinges.
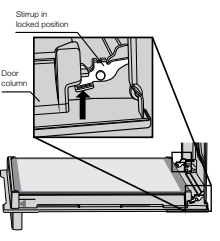
3. Rotate the ‘stirrups’ (see the diagram below) until they lock into the hook. The oven door may now be closed.
TIPS AND TROUBLESHOOTING
Condensation and steam
This appliance is supplied with an exclusive system which produces a natural circulation of air and the constant recycling of steam.
This steam makes it possible to cook in a steamy environment ensuring that dishes are soft inside and crusty on the outside. This process also reduces cooking time and energy consumption. During cooking steam may be produced and released when the door is opened. This is absolutely normal.
When food is heated it produces steam in the same way a boiling kettle does. When steam comes into contact with the oven door glass it will condense and produce water droplets. To reduce condensation, ensure that the oven is well heated before placing food in the oven cavity.
Oven pre-heating is necessary before any cooking.
It is recommended that condensation is wiped away after each use of the oven
The effects of dishes on cooking results
Dishes and tins vary in their thickness, heat conductivity, colour etc. which affects the way they transfer heat to the food inside them.
- Aluminium, earthenware, oven glassware and bright shiny utensils reduce cooking and base browning.
- Enamelled cast iron, anodized aluminium, aluminium with non-stick interior and coloured exterior and dark, heavy utensils increase cooking and base browning.
- To increase base browning simply lower the shelf position. To increase top browning, raise the shelf position.
- Always place dishes centrally on the shelf to ensure even browning.
- Single level cooking gives best results in conventional modes that do not use the oven fan. If cooking on more than one level, use the fan cooking function.
Faults
If there is a problem with the oven or grill, please check the points listed below before calling for service. It may be possible to avoid a call by fixing the problem yourself - and so continue cooking.
TROUBLESHOOTING
| problem | possible cause |
| Oven or grill not working |
|
| Oven light not working |
|
| Oven not heating enough |
|
| Clock flashing on display |
|
| Unit smoking when first used |
|
| Condensation build up |
|
| Door cannot be replaced after removal |
|
| Functions and temperature appear on display but oven does not work |
|
| When the door is open the fan stops (underbench only) |
|
| When a non fan mode is selected the fan starts |
|
| The light stays on when the door is closed |
|
| The light does not turn *ON* when the door is opened |
|
| Error message “REMOVE FOOD PROBE” after connecting Food Probe to appliance |
|
| Food Probe temperature setting not displayed |
|
| When using the Food Probe, centre of the food is undercooked |
|
| Shelf or telescopic runner slides out when door is opened |
|
| Door locked (switching off Pyro function quickly) |
|
| Lime scale residue on base of oven |
|
| Oven seal loose |
|
INSTALLATION OF THE APPLIANCE
Use an authorised person
As stated in the local municipal building codes and other relevant statutory regulations:
- Wiring connections must be in accordance with AS/ NZS 3000 Wiring Rules and any particular conditions of the local authority.
- Refer to data plate for rating information. The data plate is positioned behind the bottom of the oven door.
- For appliances with open cooking surfaces, a disconnect functional switch should be provided near the appliance in an accessible position. Refer to AS/NZS 3000 clause 4.7.1
- Wiring should be protected against mechanical failure. Refer to AS/NZS3000 clauses 3.3.2.6, 3.9, 3.10
- A means of disconnection with a contact separation of at least 3mm must be supplied in the fixed wiring.
- This appliance must be connected with cable of 75°C rating minimum.
- This product has passed the insulation resistance test after manufacture. If the resistance reading is low at installation, it is probably caused by moisture from the atmosphere being absorbed by the elements after the appliance has been produced. (pass at MΩ AS/NZS 3000 Wiring Rules Clause 8.3.6.2).
This appliance must be properly earthed.
- Do not lift the appliance by the door handles.
- Prepare the cupboard opening to match your appliance measurements. (See diagrams)
- Slide appliance into the cupboard, ensuring that the supply cable (where fitted) does not kink.
- To prevent tipping, use the screws supplied to secure your appliance into the cupboard by fastening through the 4 holes to the front panel.
- Where the appliance is built into a cabinet, the cabinet must be capable of withstanding 70°C.
- Installation into low temperature tolerant cabinetry (e.g. Vinyl coated) may result in deterioration of the low temperature coating by discolouring or bubbling.
- If the appliance is to be installed adjacent to vinyl wrapped surfaces, use an installation kit available from the vinyl-wrap supplier.
- Electrolux Home Products cannot accept responsibility for damage caused by installation into low temperature tolerant cabinets.
- After installation, test and ensure that the appliance operates correctly before handing it over to the customer
Cabinet construction for your appliance
For the best integration within a kitchen, install this appliance in a standard 600mm wide cupboard that gives a flush fit (Figure A) with the surrounding cupboard fronts. Non-pyrolytic appliances can also be installed using a proud fit (Figure B).
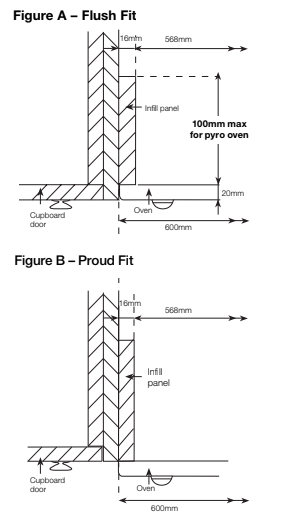
Levelling oven
Place a level in the oven as below making sure the level sits on the front and rear forms. The level needs to be correct to prevent slides from moving in or out with gravity.
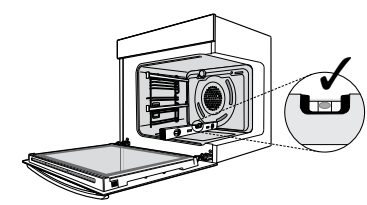
Underbench oven
Your underbench oven looks best when the control panel is directly under the benchtop. An upper infill panel may be added if the cooktop placed above the benchtop is too deep. Refer to cooktop installation instructions for required clearance between cooktop and oven.
Power point connection for the EVEP618 must be accessible with the appliance fully installed. If the supply cord is damaged it must be replaced by the manufacturer, its service agent or similarly qualified persons in order to avoid a hazard.
Cut-out dimensions
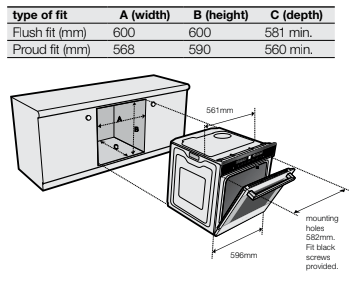
Double oven Cut-out dimensions
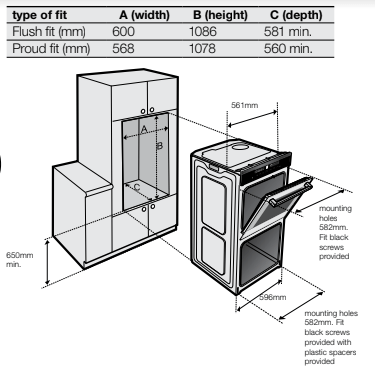
Pyrolytic underbench Cut-out dimensions
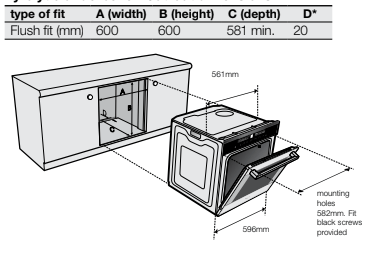
Duo oven Cut-out dimensions
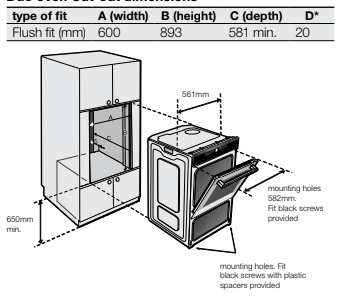
TECHNICAL SPECIFICATIONS

Hard wiring details
- Remove terminal cover plate from rear panel of appliance.
- Fit wires through hole in cover plate and make connections to terminals.
- Engage wires into plastic clip. Secure plastic clip with two long silver screws (supplied in separate bag).
- Replace cover plate onto rear panel.
