The time of day must be set before the appliance can operate.
After the appliance has been electrically connected the display will cycle through the welcome screen, then ‘Set Clock’ will illuminate under the clock display and the Hour digits will flash.
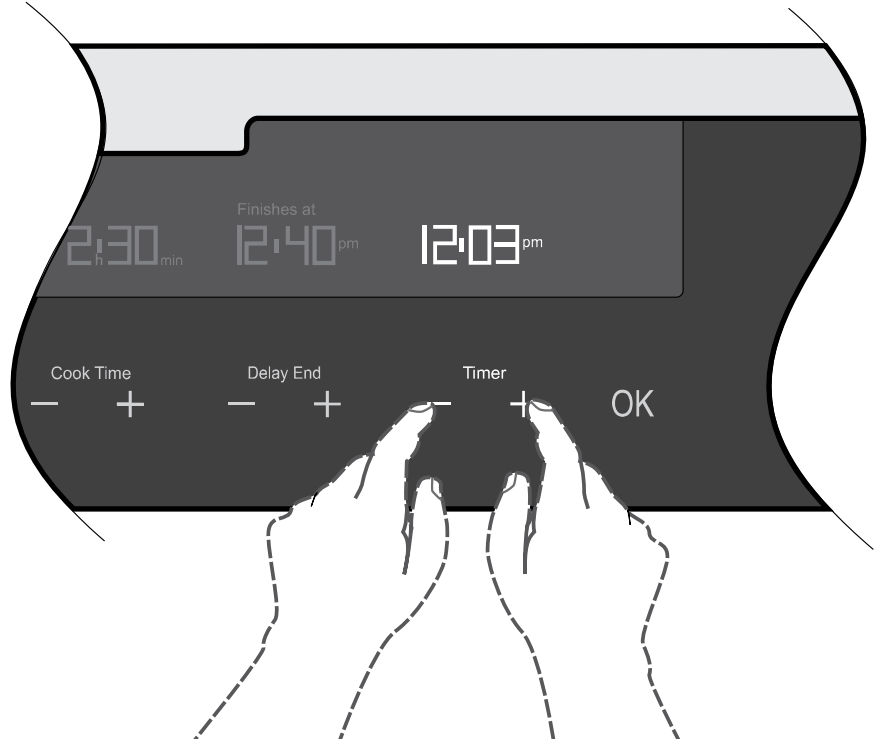
Use the timer + and - to set the hour portion of the current time (including AM/PM).
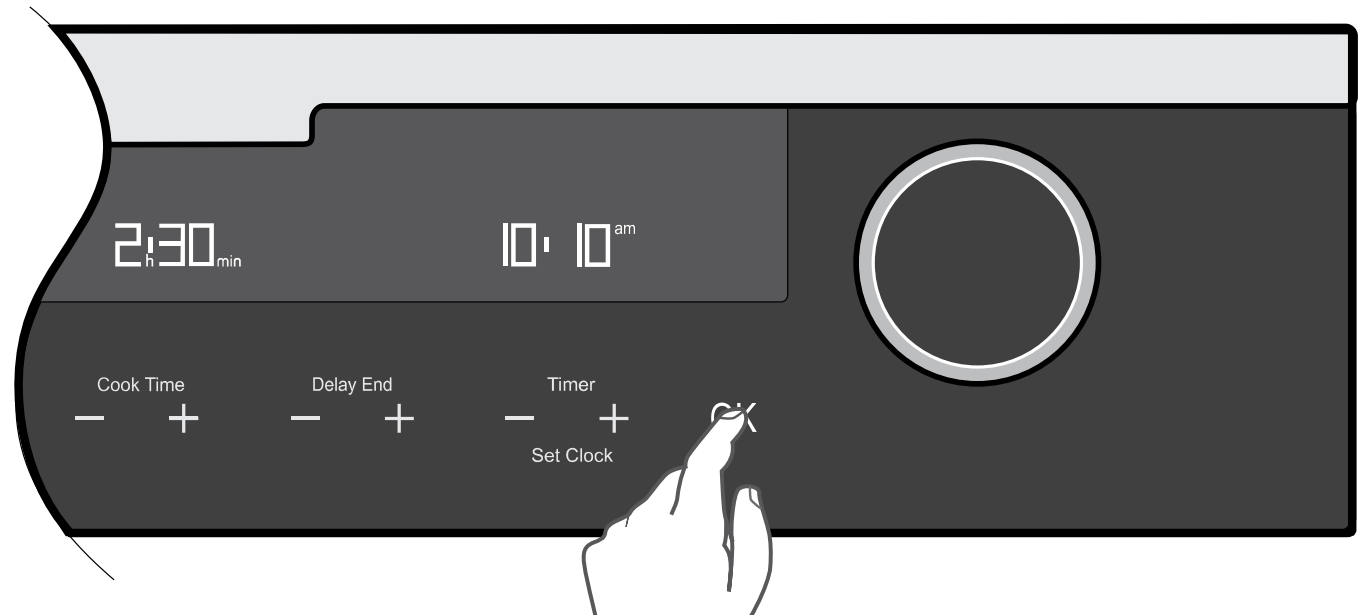
Press OK when the hours are set correctly. The Minute digits will flash.
Use the timer + and - to set the minutes portion of the current time.
Press OK when the minutes are set correctly.
You can turn off the oven or it will do so automatically after 8 seconds.
Once the time has been entered, the clock advances minute by minute.
NOTE: The clock has a 12 hour display and will remember the time for 3 days without power
IMPORTANT
New appliances can have a smell during first use.
It is recommended to ‘run in’ the oven before cooking for the first time. Operate the oven, empty, at a temperature of 180°C for approximately minutes.
Please ensure the room is well ventilated during this process.
INSTALLATION
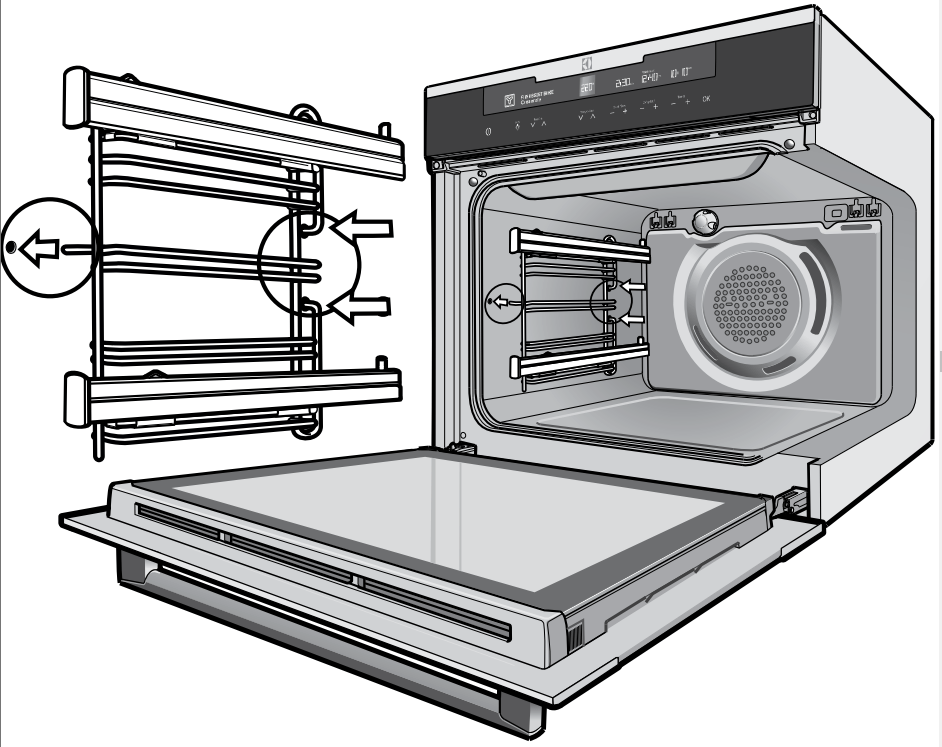
Side racks
Insert the twin pegged end into the rear access holes provided, ensuring pegs are fully inserted.
Then locate the front peg into the front access hole and push in firmly.
NOTE: If you have purchased a EVEP626 you will have additional side racks for the lower oven/grill. These are fitted in a similar manner, however the left hand side rack must be fitted to the lower two holes of the half cavity.
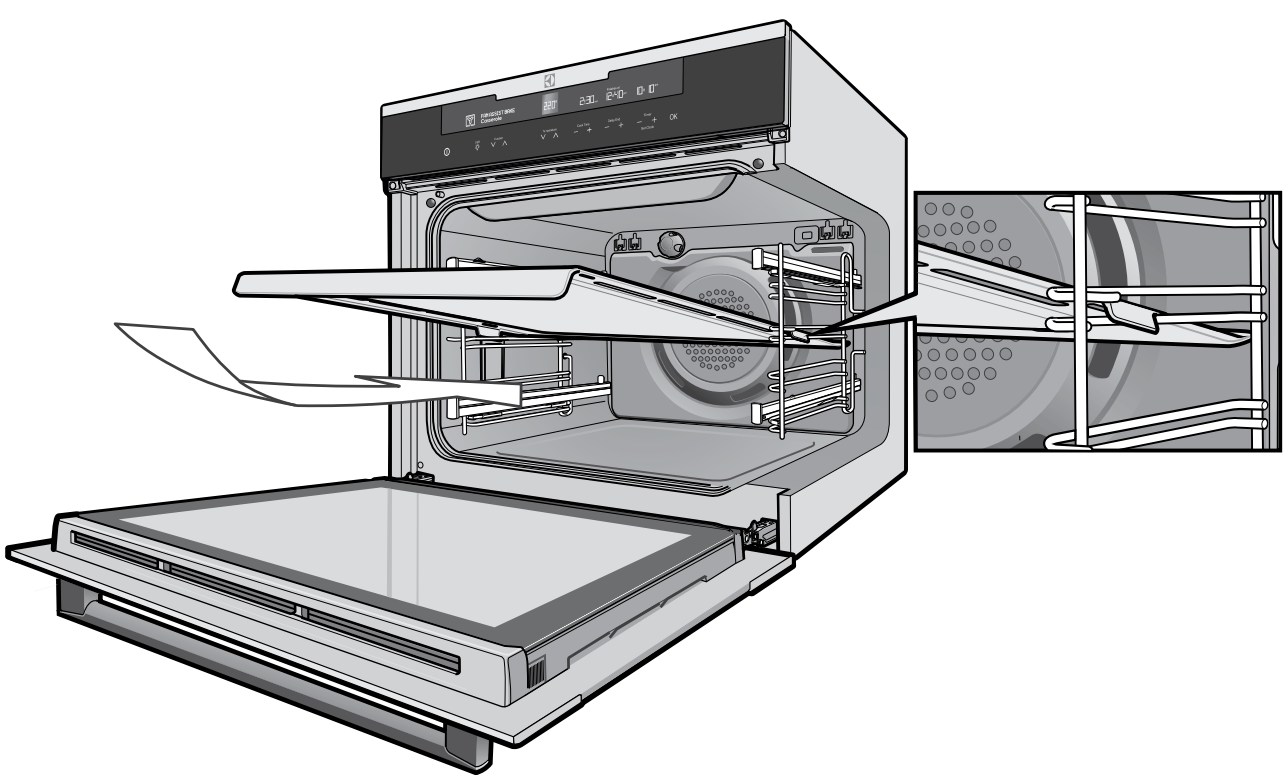
Shelves and trays
The shelves are designed so that they have maximum extension but cannot be accidentally pulled right out. The trays are designed the same way and slot straight into the side racks.
To fit a shelf or tray to side racks:
Locate the rear edge of the shelf/tray in between the guide rails of the side rack – see diagram. Ensure the same rail positions on both sides of the oven are being engaged.
With the front edge raised, begin to slide the shelf into the oven.
Once the detents have passed the front edge of the side rack, the shelf can be pushed fully in.
When fully inserted the shelf/tray should not interfere with the closed oven door.
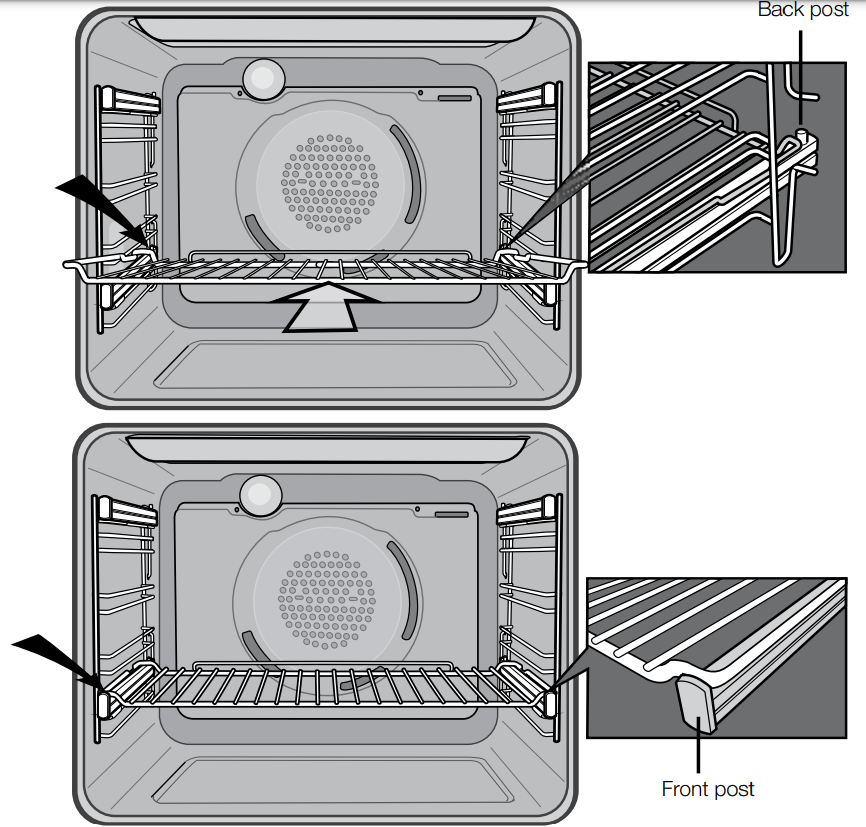
To fit a shelf or tray to telescopic slides:
With the slides fully pushed in, push the shelf or tray along the top of the slide until it hits the back post.
Drop the front of the shelf or tray onto the slide ensuring it sits behind the front post of the slide.
When fully inserted the shelf/tray should not interfere with the closed oven door
COOKING FUNCTIONS
Fan cooking
Heat comes from the element surrounding the fan. This fan circulates the hot air around the oven cavity so that you can put your food in different places in the oven and still cook them at the same time. You can use the ‘Fan
Cooking’ function for multi-shelf cooking, reheating cooked foods, pastries and complete oven meals. It will cook at a lower temperature and be faster than baking. Please note that some variation in browning is normal.
NOTE: Where fitted, the food probe function can be introduced into this cooking cycle.
Traditional bake
Heat comes from two elements, one above and one below the food. The bottom element is a clean heat element and is below the floor of the oven. Both elements are controlled by the thermostat and will turn on and off to maintain set temperature. You can use the ‘Traditional Bake’ function for single shelf cooking, single trays of biscuits, scones, muffins, cakes, slices, casseroles, baked puddings, roasts and delicate egg dishes. This is a general function that can be used for most cooking.
NOTE: Where fitted, the food probe function can be introduced into this cooking cycle.
Fan assist bake
Heat comes from two elements, one above and one below the food. The fan circulates the hot air around the oven cavity so that you can put the food in different places in the oven and still cook them at the same time. You should only use a maximum of two shelves with ‘Fan Assist Bake’.
Do not use the bottom shelf. If the two shelves are used, food on the shelf in the higher position will cook first and should then be removed to allow the food on the lower shelf to finish cooking.
NOTE: Where fitted, the food probe function can be introduced into this cooking cycle.
Roast
The Roast function is designed for roasting meats, poultry and fish by utilising heat from all elements in combination with the fan to surround the food. This provides even cooking throughout and enhanced browning.
NOTE: Where fitted, the food probe function can be introduced into this cooking cycle.
Pastry
The ‘Pastry’ function is specially designed for food that require extra browning such as the bases of pastries and pies. Heat comes from the element below the food. If you choose the default setting, the oven will heat up to 230°C in order to brown the food.
You should then lower the temperature as required. Cook in the lower half of the oven when you are using only one shelf.
Pizza
‘Pizza’ is a combination of ‘Pastry’ and ‘Fan Assist Bake’ and offers you the combined benefits of both functions. Heat switches between the element surrounding the fan and the clean heat element below the oven floor. The ‘Pizza’ function is ideal for foods that require cooking and browning on the base. It is for foods such as pizzas, quiches, meat pies and fruit pies. Simply place the food in the middle of the oven and set the desired temperature.
Cook from Frozen
The ‘Cook from Frozen’ function is ideal for cooking frozen precooked foods such as savoury pastries, pizzas, mini meals (TV dinners), meat pies and fruit pies. Heat comes from the element surrounding the fan as well as a smaller element above the food. Simply place the food in the oven straight from the freezer and heat. Cook in the upper half of the oven for best results.
Grill boost
‘Full Grill’ direct radiant heat from two powerful upper elements onto the food. You can use ‘Full Grill’ function for tender cuts of meat, steak, chops, sausages, fish, cheese toasties and other quick cooking foods.
Grill with the oven door closed.
Full Grill’ allows you to take full advantage of the large grill dish area and will cook faster than the ‘Half Grill’ function. For best results it is recommended to preheat your grill for three minutes. This will help seal in the natural juices of steak, chops etc for a better flavour.
You can slide your grill dish into either of the two spaces within the upper pairs of support rails. Full Grill has 2 temperature settings, ‘LO’ and ‘HI’.
Grill
The ‘Half Grill’ directs radiant heat from only one of the powerful upper elements onto the food. The ‘Half Grill’ function is used instead of ‘Full Grill’ when only half the amount of heat is needed. Half Grill has 2 temperature settings, ‘LO’ and ‘HI’.
Grill with the oven door closed.
Fan grill
‘Fan Grill’ offers you the benefits of both traditional bake and traditional grill functions. The grill element turns on and off to maintain set temperature while the fan circulates the heated oven air.
Grill with the oven door closed.
You can use ‘Fan Grill’ for large cuts of meat, which gives you a result similar to ‘rotisserie’ cooked meat.
Put your food on a shelf in the second lowest shelf position. Put the grill dish on the lowest shelf position to catch any spills. When using ‘Fan Grill’ it is not necessary to turn the food over during the cooking cycle. Set temperature to 180°C.
Keep warm
The ‘Keep Warm’ function is a low temperature oven function designed to keep your food at a perfect eating temperature without cooking it further. Heat comes from the smaller elements above the food and is circulated by the fan. Use ‘Keep Warm’ to keep your food warm while you prepare the rest of the meal or afterwards while you wait for the late arrival.
NOTE: After cooking, the oven retains enough heat to continue to cook food even if the elements are turned off.
The ‘Keep warm’ function recognises this by giving you a warning message. If this happens the function will not start.
Defrost
The ‘Defrost’ function uses low temperature air that is circulated by the fan. You can defrost (thaw) your food before you cook it. You can also use ‘defrost’ to raise your yeast dough and to dry fruit, vegetables and herbs.
The ‘Defrost’ function does not have a suggested temperature but uses the ambient heat in the oven cavity.
Pyro clean
The ‘pyrolytic cleaning’ function cleans by burning off the spatters and accumulated dirt and grease from the oven liner, at high temperature. This process produces ash which can be wiped out of the oven cavity.
Food Probe
The Food Probe measures the core temperature of the food. When the food reaches the desired set core temperature, the oven turns off. The Food Probe has a core temperature range of 50 – 99°C.
OPERATING SEQUENCE
Turning the oven on
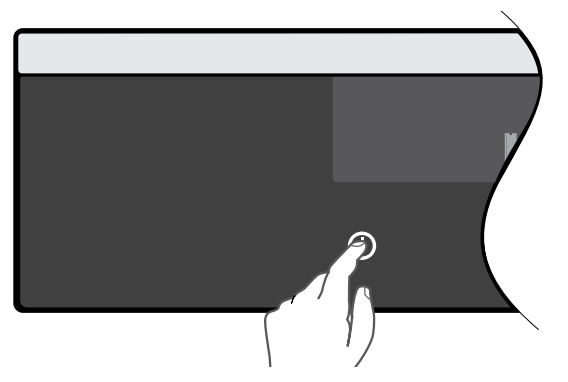
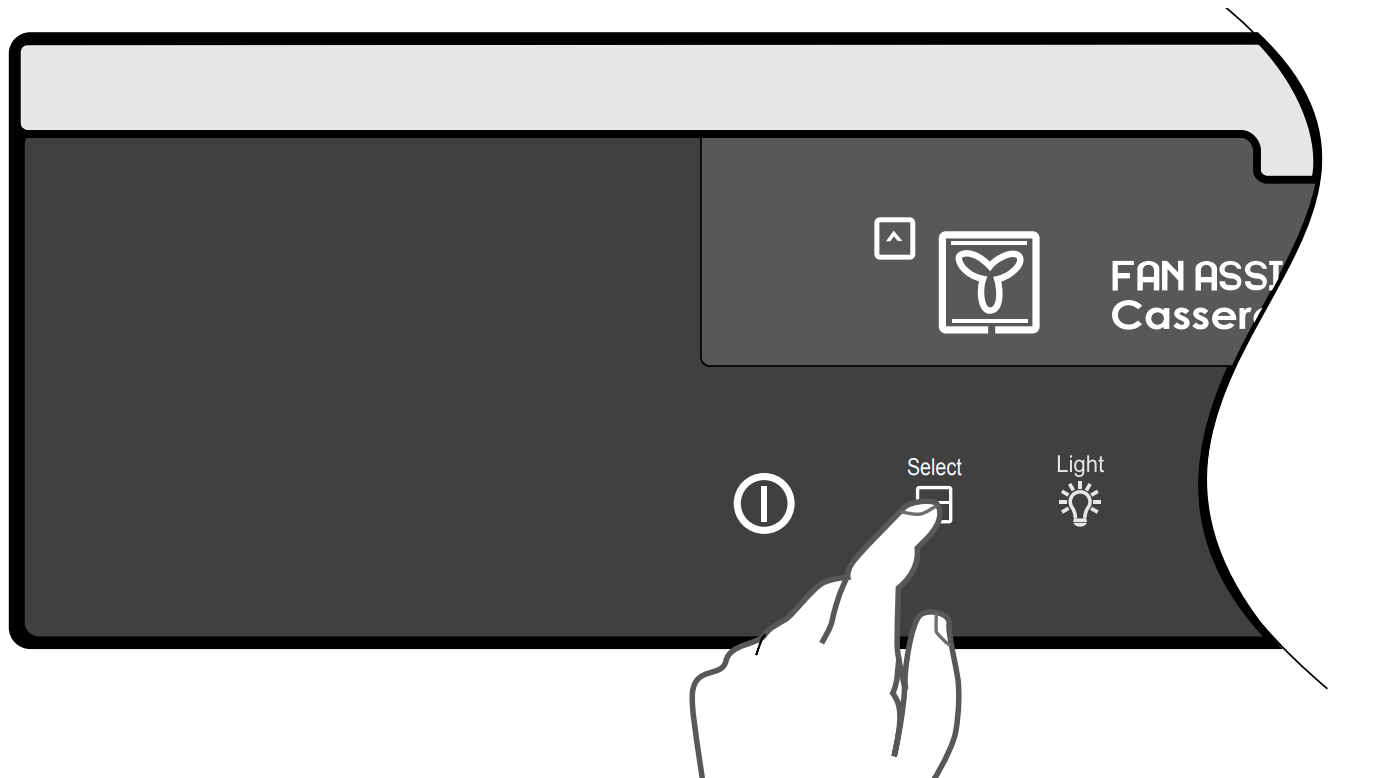
Switch on the oven by touching the ON/OF F symbol. The LCD control panel will come on and inform you that you need to select a cooking function.
If you do not select a function within 20 seconds the oven will turn off.
Selecting the upper and lower oven (EVEP626)
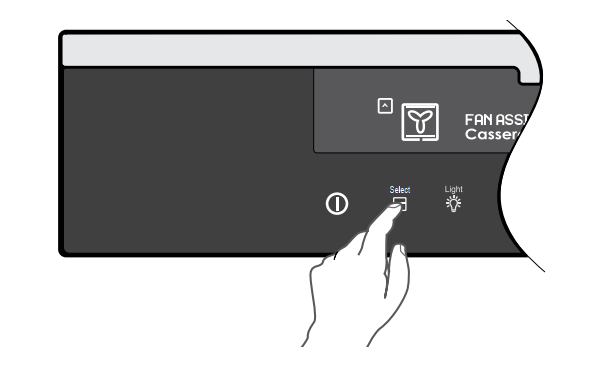
This model is equipped with two ovens. Use the oven selector symbol to toggle between the upper and lower ovens.
The oven cavity icon on the control panel will show which oven is currently active.
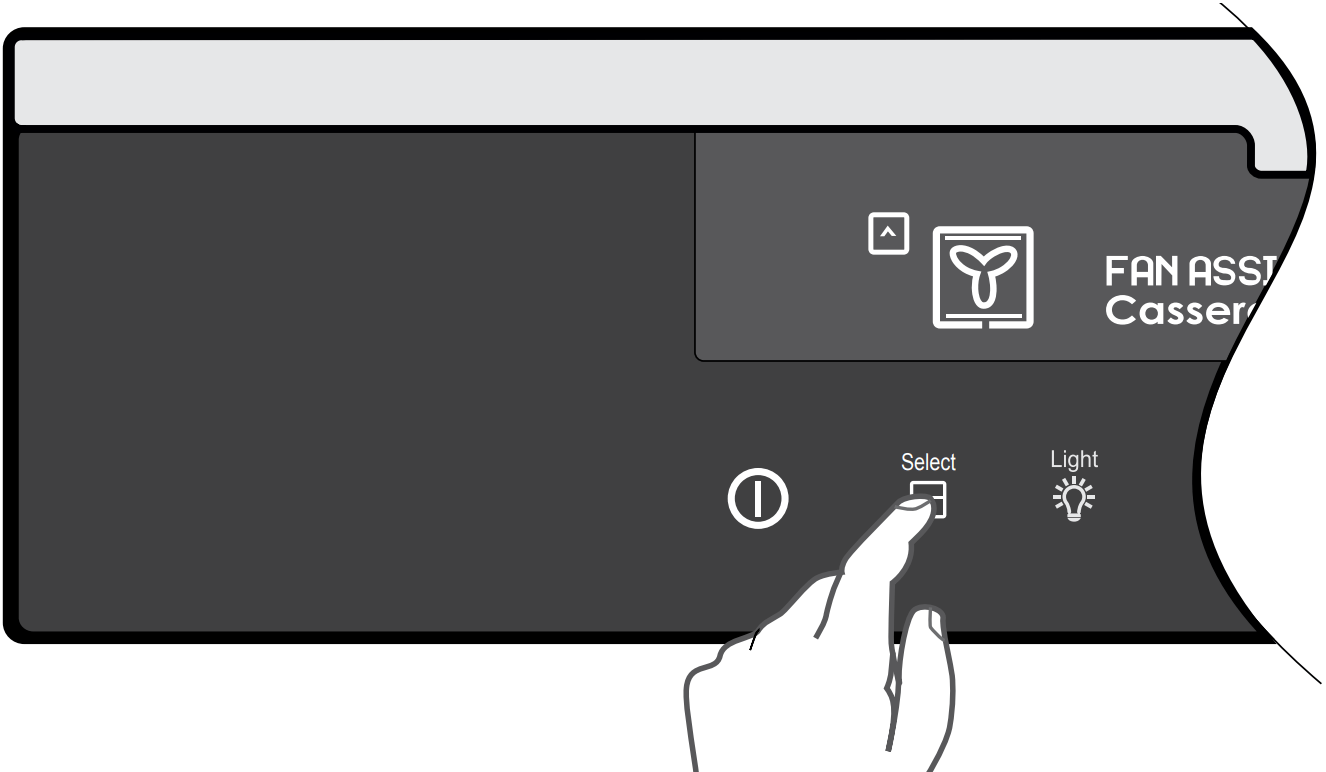
Select a cooking function
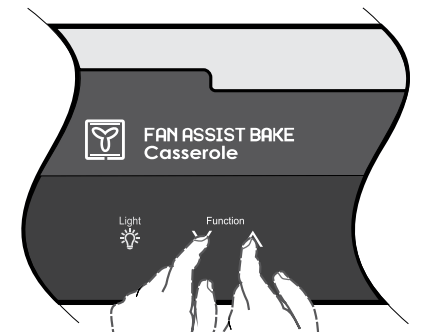
The oven will have a selection of functions. Press the function or function symbols as many times as necessary until the desired function appears.
Cooking suggestions will appear under the function name and suggested cooking temperatures will appear above the temperature selector.
If no other symbol is touched within 8 seconds the oven will switch on and begin to heat up to the displayed temperature.
Selecting a temperature
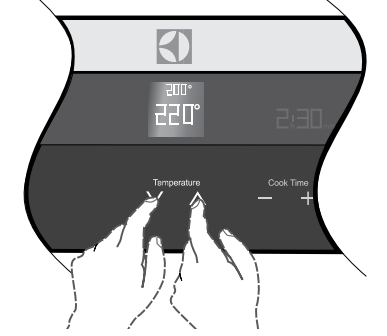
The temperature is electronically controlled.
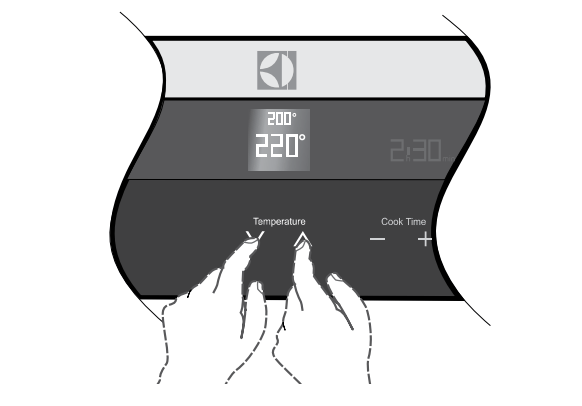
The temperature can be selected within the range of 30°C to 250°C and can be adjusted at any time. To set the temperature, press the temperature and temperature symbols to reach the desired setting.
Touch OK, or if no further changes are made within seconds the oven begins to heat up to the set temperature. The current oven temperature will appear above set temperature. This will change as the oven heats up and the background colour will change from grey to red.
When the temperature is reached, ‘Set temperature reached’ will appear and only the target temperature will be displayed.
Turning the oven off
Single cavity models:
Touch the ON/OFF symbol to switch off the oven. As the appliance cools down ‘cooling’ will be displayed until the oven reaches approximately 100°C.
Double cavity models:
Touch the upper/lower oven selector symbol to toggle to the desired oven.
Touch the ON/OFF symbol to switch off the desired oven. The control panel will turn off to confirm that the oven is now switched off.
If the other oven is still active, after 1 second, the control panel will automatically revert to show the setting of that oven.
To turn off both ovens at once, touch and hold the ON/OFF symbol for 5 seconds. All elements, cavity light and the control panel will then switch off at the same time.
If both ovens are off as the appliance cools down, cooling’ will be displayed until both ovens are below approximately 100°C.
USING THE APPLIANCE
Pre-heating
Pre-heating the oven is recommended in several cooking and grilling functions. Pre-heating the oven allows it to reach the required temperature quickly and efficiently as well as cook food at the correct temperature for the entire cook time.
These models are equipped with a built-in rapid heat up mode that activates each time you start an oven function.
During the rapid heat-up mode the heat comes from the element surrounding the fan as well as the smaller element above the food. This combination will heat up the oven quicker than it would on standard ‘Bake’ function.
The oven will automatically revert to the set cooking function once the preset temperature is reached.
Cooling / Vent fan
The appliance is fitted with a cooling fan. This prevents the kitchen cabinet from overheating and reduces the condensation inside the oven. It will operate whenever the oven is in use and blow warm air across the top of the oven door.
NOTE: If the oven is still hot from cooking, the cooling fan will keep running to cool the oven down and will switch off by itself once cool.
Condensation
Excess condensation may fog the oven door. This may happen when cooking large quantities of food from a cold start. Minimise condensation by:
Keeping the amount of water used whilst cooking to a minimum.
Making sure the oven door is firmly closed.
Baking custard in a baking dish that is slightly smaller than the water container.
Cooking casseroles with the lid on.
NOTE: If using water in cooking, this will turn to steam and may condense outside your appliance. This is not a problem or fault with your oven.
Cooking with the timer
The oven is equipped with a programmable controller that can be used to turn the oven on and off automatically. The cook time’ controls are used to automatically turn the oven off after a set amount of time. The ‘Delay End’ controls are used to set the time of day you want the cooking cycle to finish.
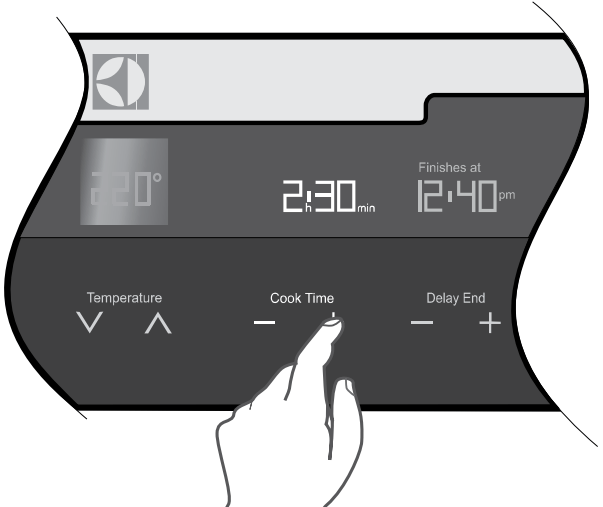
Setting the cook time
Select the desired oven function and cooking temperature.
Touch the ‘cook time’ + symbol as often as necessary (or hold), until the desired cook time has been set.
Touch ‘OK’ or after 8 seconds from the last time adjustment the oven will start cooking and the ‘cook time’ display will countdown to zero.
The oven will turn off and beep when the ‘cook time’ display reaches zero.
IMPORTANT
When you use the ‘cook time’ function, the Finishes at’ display activates and tells you what time of day the oven will turn off (based on the set cook time).
During cooking, you can adjust the cook time with the ‘cook time’ - or + symbols for better cooking performance.
When the cook time has elapsed, an audible signal will sound for 2 minutes, the oven will switch off and COOKING FINISHED will be displayed.
To stop the audible signal, press any of the symbols on the control panel.
If you wish to cook a bit longer, press the cook time’ + symbol for each additional minute you require. The oven automatically reverts to the function and temperature previously programmed. This feature is available for 10 minutes after cooking has finished. After that, the oven automatically switches off.
When using the Food Probe (where applicable), the duration and end time functions do not operate.
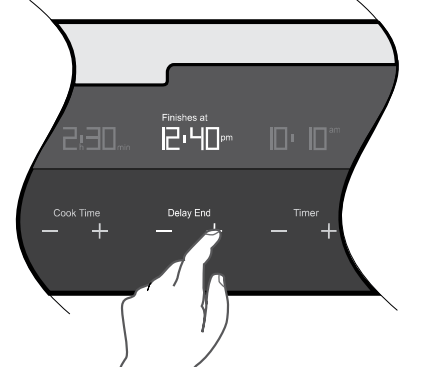
Setting the delay end time
The delay end function can be used to switch the oven on and off at a specific time during the day.
Check the clock displays the correct time of day.
Select the desired oven function and cooking temperature.
Set the required cook time.
Touch the ‘delay end’ + symbol to move the end time.
Touch ‘OK’ or after 8 seconds from the last time adjustment the SET icon will light and the oven is now programmed. The oven will start its cooking cycle to finish at the set ‘end time’.
When the oven has finished cooking, cook time can be extended or the beeper turned off just as in ‘cook time’ mode.
7. Touch the ‘delay end’ + symbol to move the end time forward.
8. Touch ‘OK’ or after 8 seconds from the last time adjustment the SET icon will light and the oven is now programmed.
The oven will commence its cooking cycle to finish at the set ‘end time’.
IMPORTANT
30 seconds after a cooking function has started, it is no longer possible to delay the end time.
In order to delay a cooking function that has already started, the oven needs to be switched off then switched on again and re-programmed.
Even though the heating element turns off the oven will still retain substantial heat. This will continue to cook the food until it is removed or the oven cools down. If you do not plan on being present when the oven turns off, you should take this extra heating time into account.
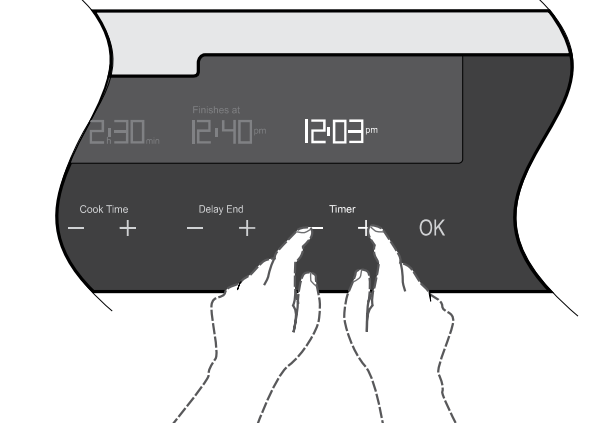
Timers
The appliance has two timers which can be used one at a time. The count up timer can be used to measure a period of time. The count down timer beeps at the end of a preset time.
Setting the count up timer
The timer can be used independently of the oven for measuring a count up period. There is no alert provided with this timer.
Touch either ‘timer’ + or -
00min will be displayed along with a bell and the up arrow will flash.
To begin the count up timer press OK.
To reset the count up timer, press ‘timer’ - once to show 00min. Press OK to restart.
To cancel the count up timer press ‘timer’ - twice.
Setting the count down timer
The timer can be used independently of the oven for setting a count down period. When the period of time has elapsed, an audible signal sounds.
Touch either ‘timer’ + or - .
00min will be displayed along with a bell and the up arrow will flash.
Touch the ‘timer’ + to set the countdown period.
The timer bell icon will flash.
To begin the count down timer press OK or wait 8 seconds. When the timer starts, the bell will stop flashing and the timer will begin to count down.
When the set time has elapsed, an audible signal will sound for 2 minutes. The time indication ‘00min’ and the timer bell will flash on the display.
To stop the signal, touch either of the ‘timer’ + or - symbols.
To cancel the count down timer touch ‘timer’ - until the normal time of day is displayed.
Adjusting the clock
Switch on the oven by touching ‘ON/OFF’ symbol.
Select ‘SETTINGS’ from the function list and touch OK.
Select ‘SET CLOCK’ from the list and touch OK.
Set Clock’ will illuminate under the clock display.
Use the timer + and - to set the hour portion of the current time (including AM/PM).
Touch ‘OK’ when the hours are set correctly.
Use the timer + and - to set the minutes portion of the current time.
Touch ‘OK’ when the minutes are set correctly. TIME SAVED will be displayed and then the function display will revert to the ‘set clock’ menu. Turn the oven off or it will do so after 8 seconds.
Steam on demand
During the cooking process some functions will allow the user to switch between standard cooking and steam assisted cooking. This is useful if the food is drying out or the meal requires a higher retention of moisture. Steam can be introduced by pressing the symbol. This option is available for the following functions:
Fan cooking
Fan assist bake
Roast
Pizza
Cook from frozen
It will always be possible to switch back to standard cooking by again pressing the symbol.
NOTE: the ability to switch between steam and standard cooking is only available on the above functions. Pressing the symbol on any other function will have no effect.
Steam can only be generated if there is water in the tank and the oven temperature is over 130°C.
Steam product description
Water tank Level Indicator
Tank empty.
Water present.
Tank full. Overfill alarm will sound. Press ‘OK’ to continue.
Steam function in progress.
Steam On Demand. Available for certain functions only.
Steam outlet. This is where steam is injected into the oven.
Water overflow pipe. If the water tank is over filled, water will be dispensed into the oven from here. This is not a fault with the appliance. It prevents water spilling out of the water drawer which could create a hazard. If this occurs mop up the overflow with a clean cloth and continue with the cooking function.
Water outlet valve. To be used with the draining pipe supplied). Any water left in the tank is to be drained after the appliance has cooled down.
Steam operating sequence
Open the water drawer in the control panel by pressing it.
Pour approximately 850mL of water into the drawer. The water level indicator on the display will show one to two bars. Close the water drawer.
WARNING
Take care when filling the water drawer. Spillage could create a slipping hazard. Immediately clean up any spills on the product, cabinet or floor. If the overfill alarm sounds immediately stop pouring water into the water drawer. If the tank is overfilled the excess will flow into the oven. This prevents leakage onto cabinets and is not a fault. Sponge up overflows if they occur.
CAUTION Do not use any liquid other than normal tap water. Do not use demineralised or distilled water. Doing so could affect the normal operation of the steam generator. Do not put solid matter into the water drawer.
Turn on the oven and select the steam cooking function and temperature as per normal operation. Set timer functions if desired.
Once the oven has reached the desired temperature put the food in and cook as planned. A full water tank will last approximately 30 minutes. It may have to be refilled during a long cooking cycle, for example, a roast.
Once cooking is complete remove the food and turn off the oven. Leave the oven door ajar to aid drying of the oven.
Drain water tank once the appliance is cool.
WARNING The steam is not visible inside the oven but it is there. Opening the oven door to place, remove or inspect food will release it. Stand back when opening the door to avoid the risk of burns.
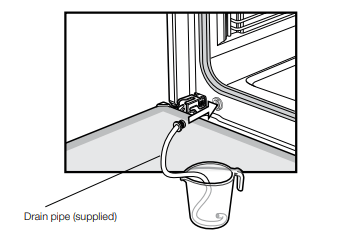
Emptying the water tank.
The water tank must be emptied after every steam assisted cooking cycle. This is done by:
Open the oven door to reveal the water outlet valve.
Insert the valve end of the supplied drain pipe into the water outlet valve. Ensure the other end is in a container that can take up to 1 litre.
Remove the drain pipe only when the water stops flowing.
Soak up any leakages with a sponge or cloth.
WARNING Water in the tank can still be hot. Wait until the appliance is cool before the water tank is drained. Do not use the drained water to fill the water tank again.
ADDITIONAL FUNCTIONALITY
Light on/off
Turn the oven light off and on in any cooking mode by simply touching the light symbol.
DEMO Mode
This mode is intended to be used in retail shops to demonstrate the oven functionality without any power consumption except to the oven lights.
The following instructions show how to enter and exit DEMO’ mode.
Ensure the oven is off by touching the ON/OFF’ symbol.
Touch and hold the ‘ON/OFF’ symbol until the display turns ON then OFF. Immediately after, touch both the cooktime symbols simultaneously. Hold until a triple beep sounds.
Activating the child-proof lock
When the child lock is engaged, the oven cannot be switched on.
Switch on the oven by touching the ON/OFF’ symbol.
Select ‘SETTINGS’ from the function list and touch ‘OK’.
Select ‘ACTIVATE LOCK’ from the list and touch ‘OK’.
The word ‘LOCKED’ will momentarily appear and a single beep will sound to confirm the operation. The child lock is now engaged.
De-activating the child lock
Touch any symbol on the control panel (including the on/off symbol). ‘Locked’ will appear on the display.
Touch any symbol again. The display will instruct you to touch both ‘cook time’ symbols for 2 seconds.
Hold until a beep sounds. The child lock is now released and the oven is ready to use.
Other settings.
The ‘Settings’ function gives the opportunity to change oven functionality. Scroll through the list by using function up or function down .
Switch on the oven by touching the ON/OFF’ symbol.
Select ‘SETTINGS’ from the function list and touch OK.
Select ‘SET CLOCK’ to change the time of day.
Select ‘TIME INDICATION’ to have the time permanently displayed or not.
Select ‘BUZZER VOLUME’ to adjust the ‘beep on touch’ and alarm loudness.
Select ‘KEY TONE’ to turn the ‘beep on touch’ on or off.
Select ‘SCREEN BRIGHTNESS’ to adjust the brightness of the display.
Select ‘SCREEN CONTRAST’ to adjust the contrast of the display.
Select ‘TEMPERATURE UNITS’ to change between Celsius and Fahrenheit units.
Select “FAST HEAT UP” to enable or disable automatic fast heat up function.
Select “CLEANING REMINDER” to enable or disable the cleaning reminder function (not on EVE607)
Select “SERVICE INFO” to show the service information.
Select “FACTORY SETTINGS” to reset to original factory settings.
Select ‘ACTIVATE LOCK’ to turn child lock on.
Touch ‘OK’ to go into each selection to change its settings by using function up and function down .
Safety Cut-out feature
The oven automatically switches itself off if the temperature is not adjusted or the appliance is left operating after a period of time. The oven switches itself off after:
12.5 hours when the temperature is set between 30°C and 120°C.
8.5 hours when the temperature is set between 120°C and 200°C.
5.5 hours when the temperature is set between 200°C and 250°C.
USING THE FOOD PROBE
The Food Probe measures the core temperature of the food. When the food reaches the desired set core temperature, the oven turns off. The Food Probe has a core temperature range of 50 – 99°C.
There are two temperatures to set:
The oven temperature
The core temperature of the food
WARNING Only use the Food Probe supplied or the correct replacement parts.
NOTE: Food must be completely defrosted when inserting the Food Probe. If the food is too cold, the Food Probe function will not work.
Using the Food Probe:
1. Switch on the oven by touching the symbol .
2. Select a cooking function by pressing the function or function as many times as necessary until the desired function appears.
NOTE: When using the Food Probe, the duration and end time functions do not operate.
3. Select the oven temperature by pressing the temperature or temperature to reach the desired setting. Allow oven to preheat
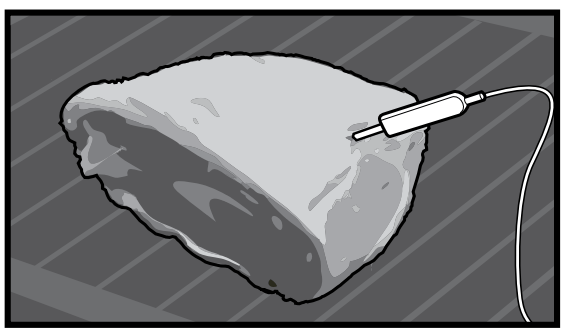
4. Put the tip of the Food Probe into the centre of the food, with at least 75% of the probe inserted into the food.
Meat For large pieces of meat, insert the tip of the Food Probe into the centre of the meat, with at least 75% of the probe inserted into the meat.
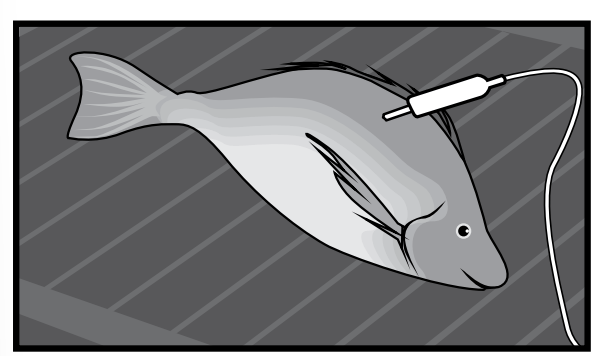
Fish For best results, place the whole fish onto the wire rack and prop it up in the swimming position (i.e. using half a potato or onion). Alternatively the fish can be laid flat. Insert the Food Probe behind the head with at least 75% of the probe inserted into the fish towards the bones in the middle of the fish.
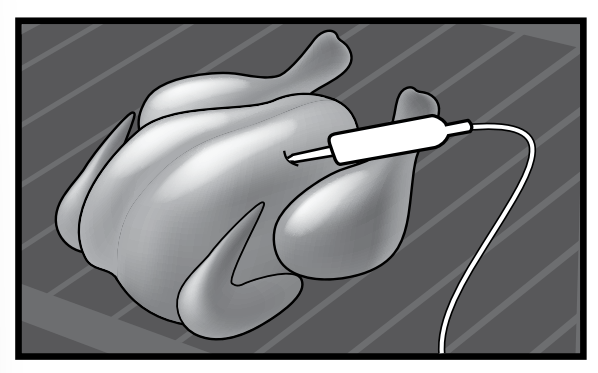
Poultry Place the whole poultry on the wire rack breast side up. Insert the Food Probe with at least 75% of the probe into the breast of the poultry. Place the probe in a direction toward the neck end of the poultry.
CAUTION To prevent the Food Probe from being damaged by excessive heat, there must be a gap of a few centimetres between the grill element and the Food Probe. The meat may expand during the cooking process.
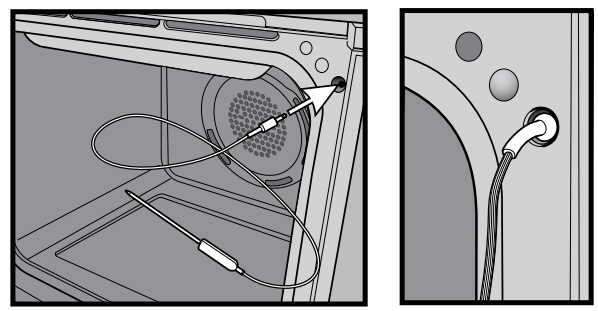
5. Put the plug of the Food Probe into the socket on the top right hand corner of the front frame. Ensure plug is fully inserted into the socket.
CAUTION After pre-heating, the front of the oven will be hot. Care should be taken when inserting the food probe plug.
NOTE: The Food Probe will only work for the following functions
NOTE: The Food Probe will only work for the following functions
Fan cooking
Steam cooking (EVE607 and EVEP618 only)
Traditional bake
Fan assist bake (except EVE607)
Roast
If you have selected a function that is not compatible with the Food Probe, you will see the message “REMOVE FOOD PROBE”.
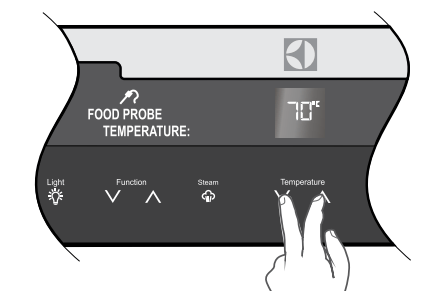
6. Set the desired food core temperature by pressing the temperature or temperature to reach the desired setting.
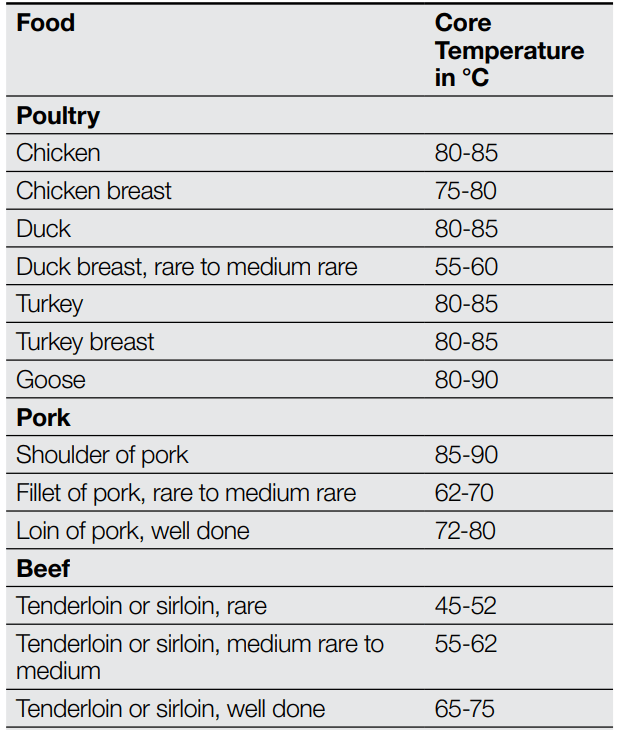
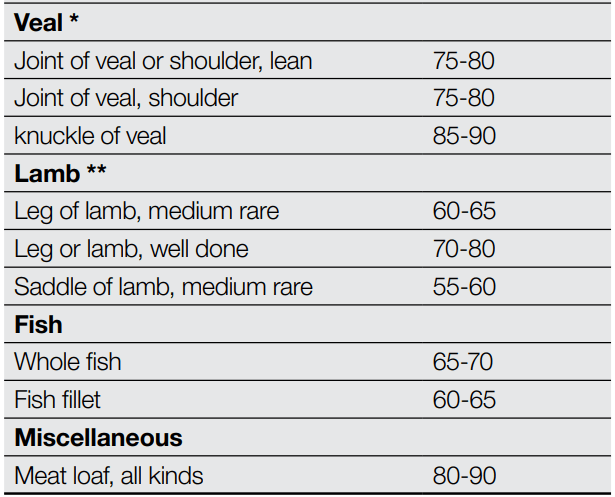
Core temperatures of different foods
The temperatures in the table are given as a guide and may vary depending on the composition of the food.
* Veal core temperatures are for well done.
* Lamb temperatures are for cuts of Lamb with the bone still in. For boneless, cooking times will be slightly less.
NOTE: The oven temperature needs to be set at least 10° higher than the desired food core temperature.
7. The appliance will calculate the approximate end time. The end time is different for different quantities of food, set oven temperatures and function modes.
NOTE: The estimated end time will be displayed after approximately 30 minutes.
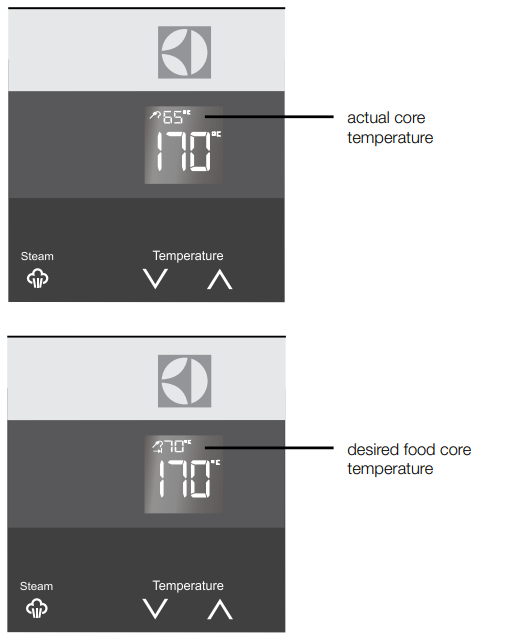
NOTE: The Food Probe temperature will not be displayed until the oven is at the desired temperature. Once the oven is at the desired temperature, the Food Probe temperature will cycle between the desired food core temperature and the actual food core temperature.
NOTE: The end time/cook time function cannot be set whilst using the Food Probe function.
8. When the food is at the desired food core temperature, an audible signal will sound for 2 minutes. To stop the signal, press the symbol on the control panel.
9. Remove the Food Probe plug from the socket and remove the food from the oven.
NOTE: All meat/fish/poultry should be rested, covered for at least 10 minutes.
CAUTION Always check if food is cooked throughout before eating.
WARNING After use, always remove the Food Probe from the oven cavity.
WARNING The Food Probe is hot. There is a risk of burns. Be careful when you remove the tip and plug of the Food Probe.
To change the desired food core temperature during cooking, press and hold the and at the same time.
To cancel the Food Probe operation, simply unplug the probe from the socket.
COOKING GUIDE
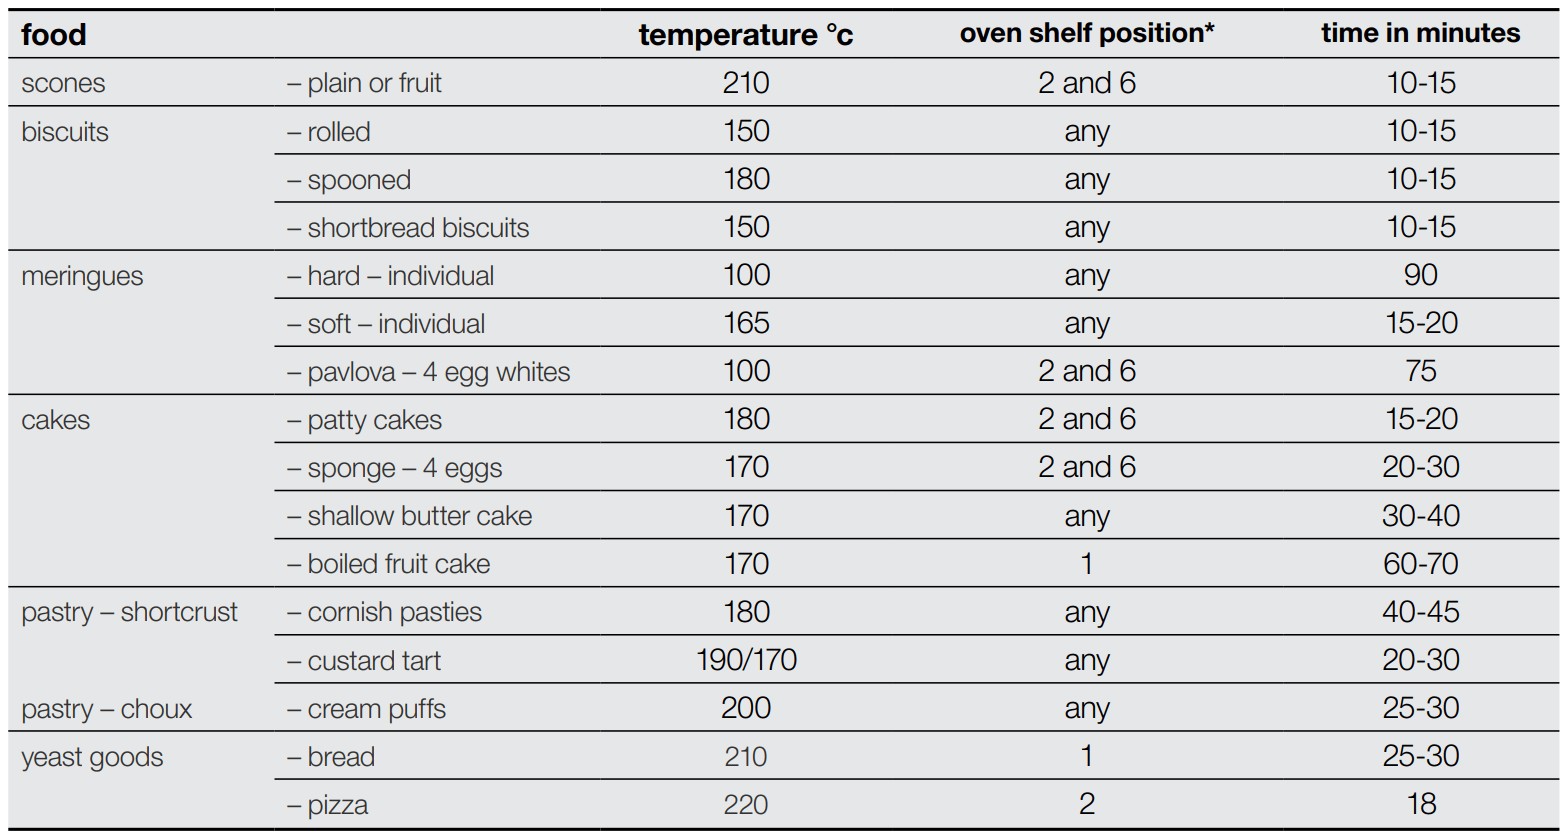
TRADITIONAL BAKING
FAN COOKING
BREAD BAKING
GRILLING
Grilling hints
As a method of cooking, grilling can be used to:
Enhance the flavours of vegetables, fish, poultry and meat.
Seal the surface of the food and retain natural juices.
Grill with the door closed.
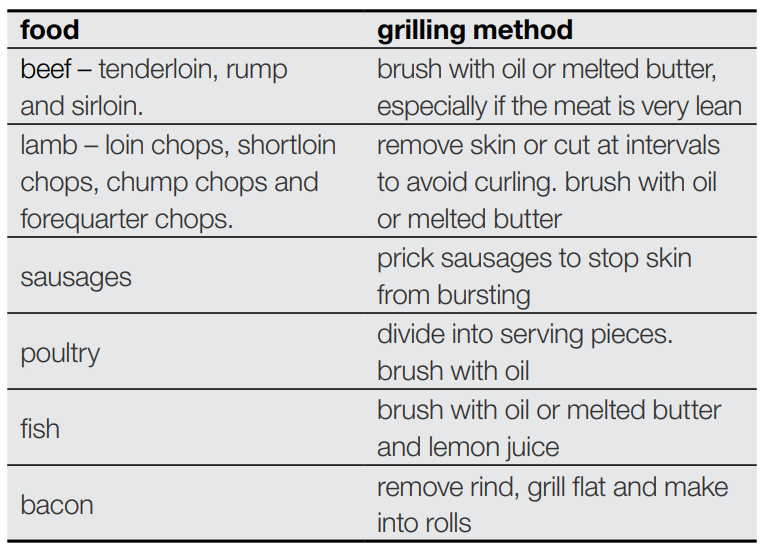
This table shows how to grill different types of meat:
WARNING
Always clean the grill/oven dish after every use. Excessive fat build up may cause a fire.
Guide to better grilling
No definite times can be given for grilling because this depends on your own tastes and the size of the food. These times should only be used as a guide and remember to turn the food over half way through the cooking process.
For better grilling results, follow these easy instructions:
Remove oven/grill dish and grill insert and preheat grill for about 5 minutes.
Choose only prime cuts of meat or fish. If the cut is less than 5mm thick it will dry out. If the cut is more than 40mm thick, the outside may burn whilst the inside remains raw.
WARNING
Do not place aluminium foil under food as this prevents fats and oils from draining away, which could result in a fire.
Baste the food during grilling with butter, olive oil or marinade. Grilled food is better if marinated before cooking.
Use tongs to turn food as a fork pierces the surface and will let juices escape.
Fan grill
The ‘fan grill’ function will assist the grilling process by circulating the heat evenly around the food. The recommended temperature setting is 180°C for all fan grilling functions.
Use the anti spatter grill dish insert and grill dish for all fan grilling. Position the dish in the lower half of the oven for best results.
Wipe off any oil or fat which splatters while the oven is still warm.
There is no need to turn meat as both sides are cooked at the same time which means the food is succulent.
CLEANING
CAUTION A steam cleaner is not to be used to clean the product.
Cleaning procedure
With oven turned off, fill the water tank with a cleaning solution of 850mL of water and 50mL of citric acid.
Let sit for approximately 60 minutes.
Turn on the oven and set to ‘steam cooking’. Set the temperature to 230°C. After 25 minutes, turn off the oven and let it cool for 15 minutes. Turn on the oven again and set to ‘steam cooking’. Set the temperature to 180°C. After 10 minutes, turn off the oven and let it cool for 15 minutes. Insert the supplied drain pipe and empty the tank of remaining water. When tank is empty, remove the drain pipe.
To flush cleaning solution from water tank, refill the water tank with 850mL fresh water and empty via the drain pipe.
Remove the drain pipe again and clean by hand in warm water with soap.
To prevent build up of calcium deposits it is recommended to use this procedure every months.
Pyrolytic cleaning of the oven cavity (not applicable to EVE607)
The oven has the Pyrolytic self-cleaning function, it cleans by burning off the spatters and accumulated dirt and grease from the oven liner, at high temperature. This process produces ash which can then be wiped out of the oven cavity.
WARNING During the pyrolytic cleaning process the oven becomes extremely hot.
Please keep small children at a safe distance.
Never clean non-stick baking trays and tins in the oven during the pyrolytic cycle. High temperatures damage the non-stick coating and poisonous gas is released.
Do not put water into the water tank during the cleaning procedure.
To prevent damage, do not use acids, sprays or similar cleaning agents.
CAUTION
During pyrolytic cleaning the air outlet exhaust above the door must be kept clear of any obstruction (e.g. bulky tea towels).
Do not use your oven to clean miscellaneous items e.g. cookware).
If you have a steam oven, do not cause the water tank to overflow during the cleaning cycle. This could damage the enamel
Before carrying out the Pyrolytic function
All accessories must be removed from the oven, including shelves, trays and side racks.
Clean large deposits, spills or grease from the oven cavity.
If you have a steam oven ensure the water tank is empty.
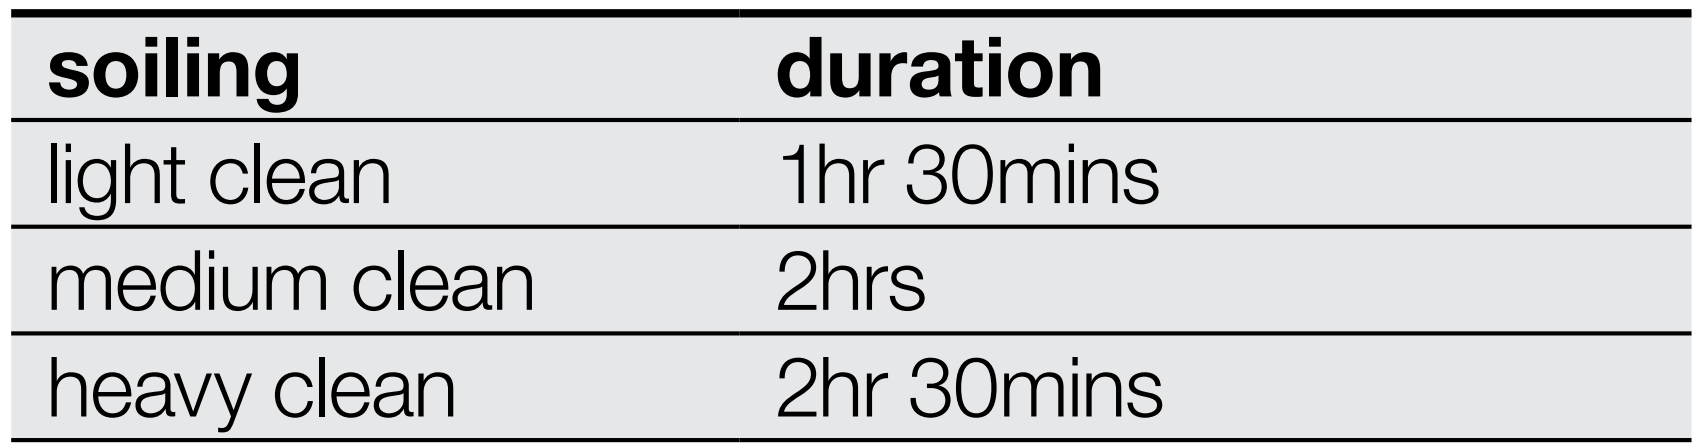
Choose your Pyrolytic cleaning cycle from the following:
NOTE: Duration includes heat-up time, excluding cool-down time.
Light clean
This is an energy saving cycle that can be used on a regular basis if the oven is lightly soiled. Possibly after every nd or 3rd roast.
Medium clean
Use this as the regular cycle about once every months.
Heavy clean
When the oven is very dirty it may need a longer cycle to clean it thoroughly. This cycle will clean the dirtiest of ovens.
Turning the oven on
Switch on the oven by touching the ON/OFF symbol.
The control panel will come on and inform you that you need to select a cooking function.
Selecting the upper or lower oven
(EVEP626)
This model is equipped with two ovens. Use the oven selector symbol to toggle between the upper and lower ovens.
The oven cavity icon on the control panel will show which oven is currently active.
Only one cavity can be cleaned at a time.
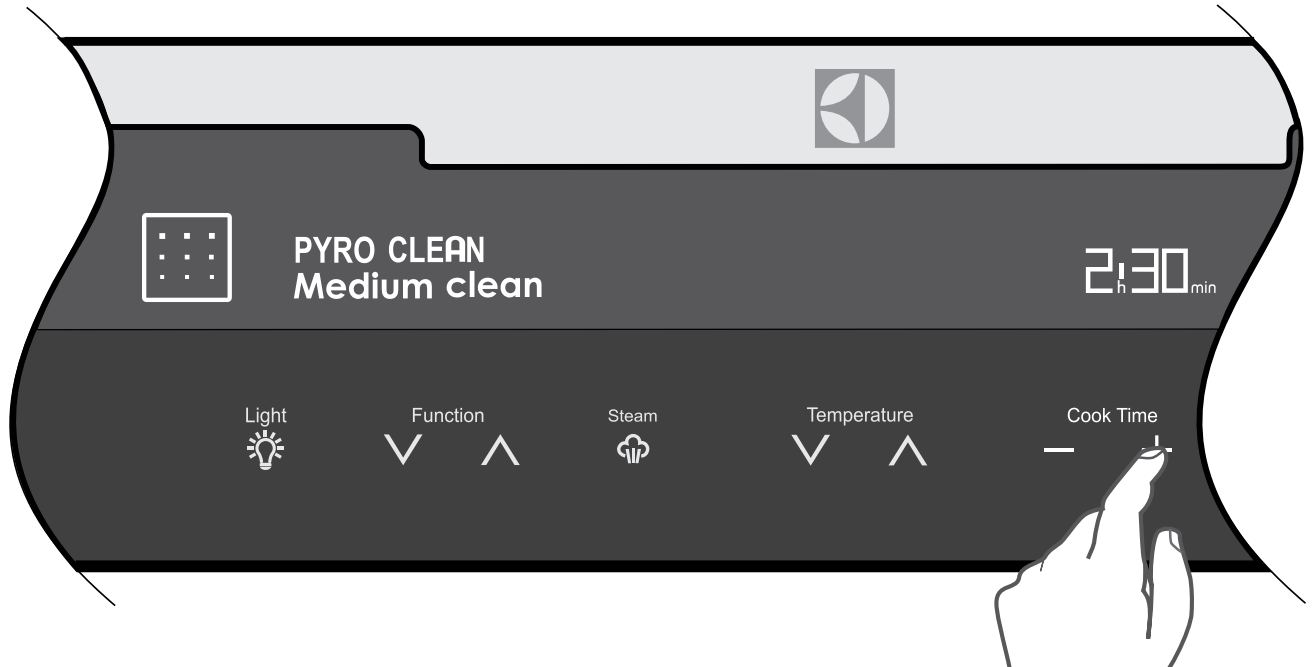
Select the pyrolytic clean function.
Use cooking function selector to slect the 'pyro clean’ function.
Selecting the required cleaning cycle
Use the ‘cook time’ control to select Light, Medium or Heavy depending on the soiling of the oven.
Start Pyrolytic
Unlike other cooking functions, you MUST touch ‘OK’ for the pyrolytic cycle to start. The display will prompt you to remove all shelves and trays. You must touch ‘OK’ again to start. The oven light will then go out and the Pyrolytic function will start.
IMPORTANT
At the beginning of pyrolytic cleaning the door will automatically lock will appear on the display.
During the pyrolytic cleaning cycle there may be some burn off odours. It is advised to keep the room well ventilated during this cycle.
(EVEP626)
For this model with two ovens, both doors will lock automatically at the beginning of the pyrolytic cleaning.
Cooking is not permitted in either oven during the pyrolytic clean function.
The door(s) will only unlock when the oven has cooled to a safe temperature. Turning the function off will not unlock the door(s). This will only happen when safe temperatures are reached.
When the pyrolytic cleaning function is on, it is advisable not to use a cooktop if it is fitted above the oven. This could cause overheating and damage to both appliances.
NOTE: The cooling fan will operate at an increased speed for Pyrolytic cleaning and will continue to run until the oven has cooled down. This is normal.
It is recommended to clean the oven regularly to keep it in its best condition.
After Pyrolytic cleaning
After cool-down wipe the ash out of the oven with a soft damp cloth and warm water.
To restore the enamel shine to more difficult areas, use a damp cloth with vinegar and detergent.
CAUTION Do not turn off the mains power supply to the oven during the pyrolytic cycle. This could damage the appliance.
Cleaning Reminder
After a recommended period of time the oven will remind you to clean the oven. Once this period of time has elapsed, when turning the oven off you will get a message “TIME TO CLEAN YOUR OVEN”. Press the on/off button to clear the message and run the pyrolytic cycle. After the pyrolytic cycle has finished, the cleaning reminder will reset. The “Cleaning Reminder” setting can be enabled/disabled in the settings menu.
Alternatively while the “TIME TO CLEAN YOUR OVEN” message is displayed, you can press the “OK” button and you will get the option to “REMIND ME AGAIN”.
TROUBLESHOOTING
IMPORTANT
Cooling/vent fan
This appliance is fitted with a cooling fan. This prevents your kitchen cabinet from overheating and reduces the condensation inside the oven. It will operate whenever you are using the oven and blow warm air across the top of the oven door.
NOTE: If the oven is still hot from cooking, the cooling fan will keep running to cool the oven down and will switch off by itself once cool.
CAUTION
Using the oven
Always cook with the oven door closed.
Stand clear when opening the drop down oven door.
Do not allow it to fall open. Always support the door using the door handle until it is fully open.
Do not lean on an open oven door, or place heavy items on it. This could damage the appliance. Take care in the region of the hinges.
IMPORTANT
Condensation and steam
This appliance is supplied with an exclusive system which produces a natural circulation of air and the constant recycling of steam.
This steam makes it possible to cook in a steamy environment ensuring that dishes are soft inside and crusty on the outside. This process also reduces cooking time and energy consumption. During cooking steam may be produced and released when the door is opened. This is absolutely normal.
When food is heated it produces steam in the same way a boiling kettle does. When steam comes into contact with the oven door glass it will condense and produce water droplets. To reduce condensation, ensure that the oven is well heated before placing food in the oven cavity.
Oven pre-heating is necessary before any cooking.
It is recommended that condensation is wiped away after each use of the oven.
The effects of dishes on cooking results
Dishes and tins vary in their thickness, heat conductivity, colour etc. which affects the way they transfer heat to the food inside them.
Aluminium, earthenware, oven glassware and bright shiny utensils reduce cooking and base browning.
Enamelled cast iron, anodized aluminium, aluminium with non-stick interior and coloured exterior and dark, heavy utensils increase cooking and base browning.
To increase base browning simply lower the shelf position. To increase top browning, raise the shelf position.
Always place dishes centrally on the shelf to ensure even browning.
Single level cooking gives best results in conventional modes that do not use the oven fan. If cooking on more than one level, use the fan cooking function.
Faults
If there is a problem with the oven or grill, please check the points listed below before calling for service. It may be possible to avoid a call by fixing the problem yourself - and so continue cooking.
Problem
Possible causes
Oven or grill not working
Time of day is not set.
Power is not turned on.
Controls are incorrectly set.
Oven is in ‘Demo’ mode, refer to Additional Functionality.
Household fuse has blown or power supply is off. (If the household fuse continues to blow, call the Service Centre).
Child-proof oven lock is activated. ‘LOCKED’ is displayed when control is touched. (Refer to operating instructions)
Oven light not working
Light may be turned off at control panel.
Lamp blown or loose socket.
Household fuse has blown. (If the household fuse continues to blow, call the Service Centre).
Oven not heating enough
Foil trays on bottom of oven.
Timer is in ‘AUTO’ mode. (Refer to operating instructions).
Household fuse has blown or power supply is off. (If the household fuse continues to blow, call the Service Centre).
Clock flashing on display
Reset time of day and any cooking functions you were using.
Unit smoking when first used
Protective oils being removed.
Condensation build up
Reduce the amount of water used in cooking. (Sometimes condensation is normal).
Door cannot be replaced after remova
Stirrup not engaged properly.
Pyrolytic cycle not working
All accessories must be removed from the ovens
Functions and temperature appear on display but oven does not work
Oven is in ‘Demo’ mode, refer to Additional Functionality.
When the door is open the fan stops (underbench only)
This is a function of the power board to help reduce the blast of air when opening the door.
When a non fan mode is selected the fan starts
Most oven modes have a fast heat up function that uses the fan, fan element and top (boost) elements. Auto fast heat up can be overridden by selecting a temperature of 120°C or less, allowing the function to start, then increasing the temperature to the desired level.
The light stays on when the door is closed
An oven function has been selected.
The light has been turned on at the control panel
The light does not turn *ON* when the door is opened
Oven light may need replacing.
Error message “REMOVE FOOD PROBE” after connecting Food Probe to appliance
The cooking function selected is not compatible with the food probe. Refer Food Probe instructions page.
Food Probe temperature setting not displayed
Ensure Food Probe plug is fully inserted into the socket on the front panel.
Incorrect Food Probe used. Only use the Food Probe recommended for this appliance.
Ensure food is fully defrosted
When using the Food Probe, centre of the food is undercooked
Ensure the Food Probe is inserted at least 75% into the food.
Ensure that food has been adequately rested after cooking.


 ON/OF F symbol. The LCD control panel will come on and inform you that you need to select a cooking function.
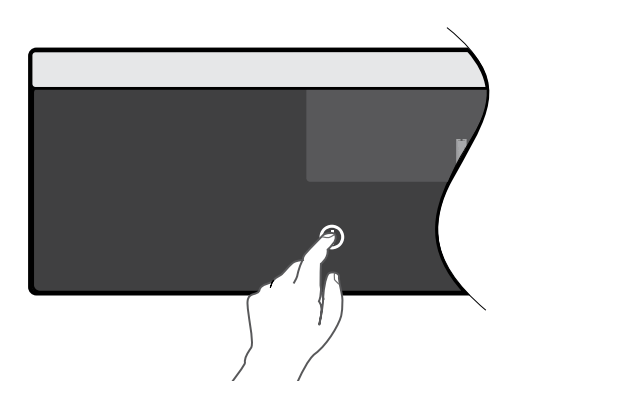
 or function
  symbols as many times as necessary until the desired function appears.
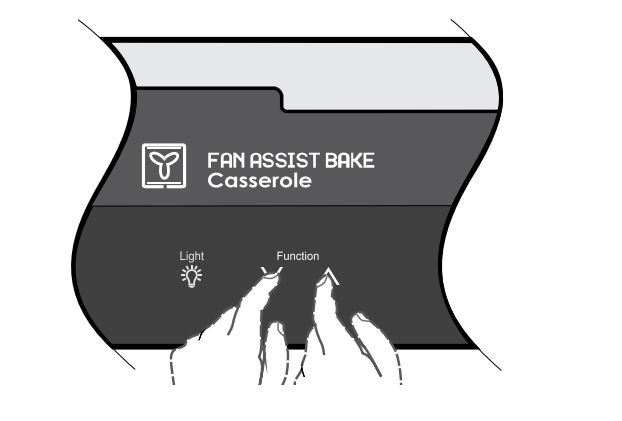
 will flash.
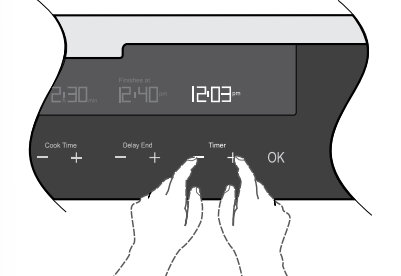
 symbol. This option is available for the following functions:
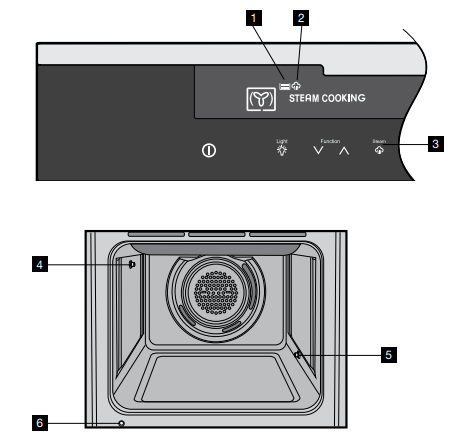
 Tank empty.
 Water present.
 Tank full. Overfill alarm will sound. Press ‘OK’ to continue.
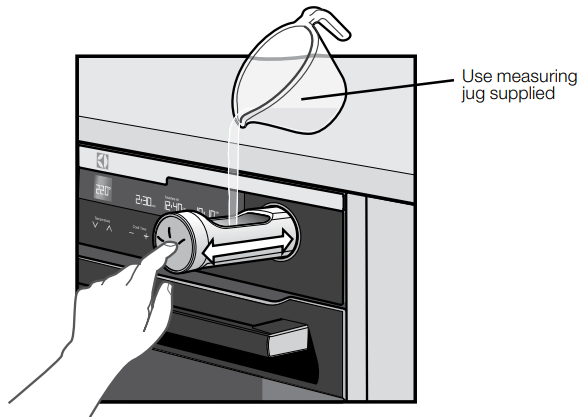
 symbol.
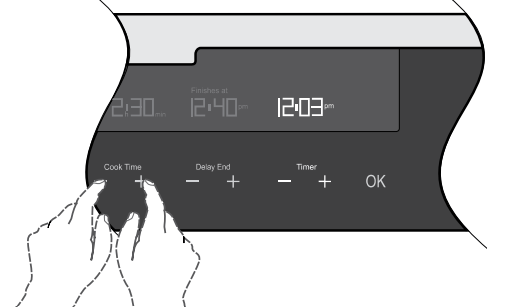
 or function down
  .
.


 ON/OFF symbol.
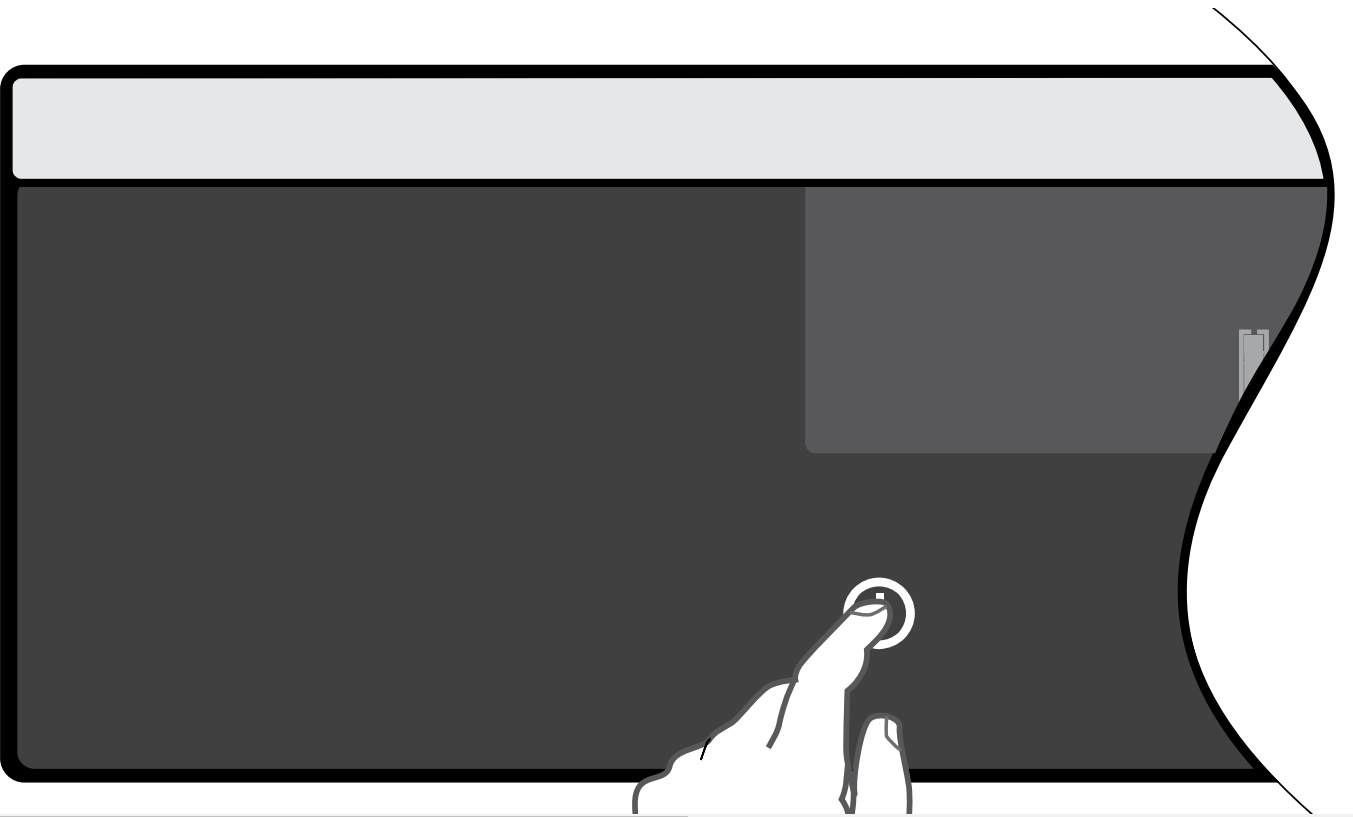
 will appear on the display.