Thank you for purchasing the V90-DAC
digital to analog converter. We sincerely
hope that it will bring you many years of
outstanding listening pleasure.
Your new V90-DAC is designed and built to
provide trouble-free performance, but as with
all electronic devices, it is necessary to
observe a few precautions:
Do not use the V90-DAC near water. The
unit must not be exposed to dripping or
splashing and no objects filled with liquids,
such as vases, must be placed on the unit.
Keep the V90-DAC away from heat such as
radiators. No naked flame sources, such as
lighted candles, should be placed on the
unit.
Only use approved
Musical Fidelity
DC
power supply. The use of other adaptors or
supplies could seriously damage the V90-
DAC.
This Hi-fi product has been tested to ensure
that its operation is not adversely affected by
normal background levels of Radio
Frequency Interference (R.F.I.), and that it
does not itself generate excessive amounts
of interference. However, if a problem
persists, please contact your Musical Fidelity
agent.
Never open the case of the V90-DAC
yourself, as this will invalidate the guarantee.
Place all connecting cables where they are
not likely to be walked on or trapped by
items placed on them.
The V90-DAC will operate in accordance
with its specifications within the following
environmental range:
Temperature 5 to 45 degrees Celsius
Humidity 10 to 90% non condensing
There are no user adjustments inside.
Please refer all service work to an
authorised Musical Fidelity agent.
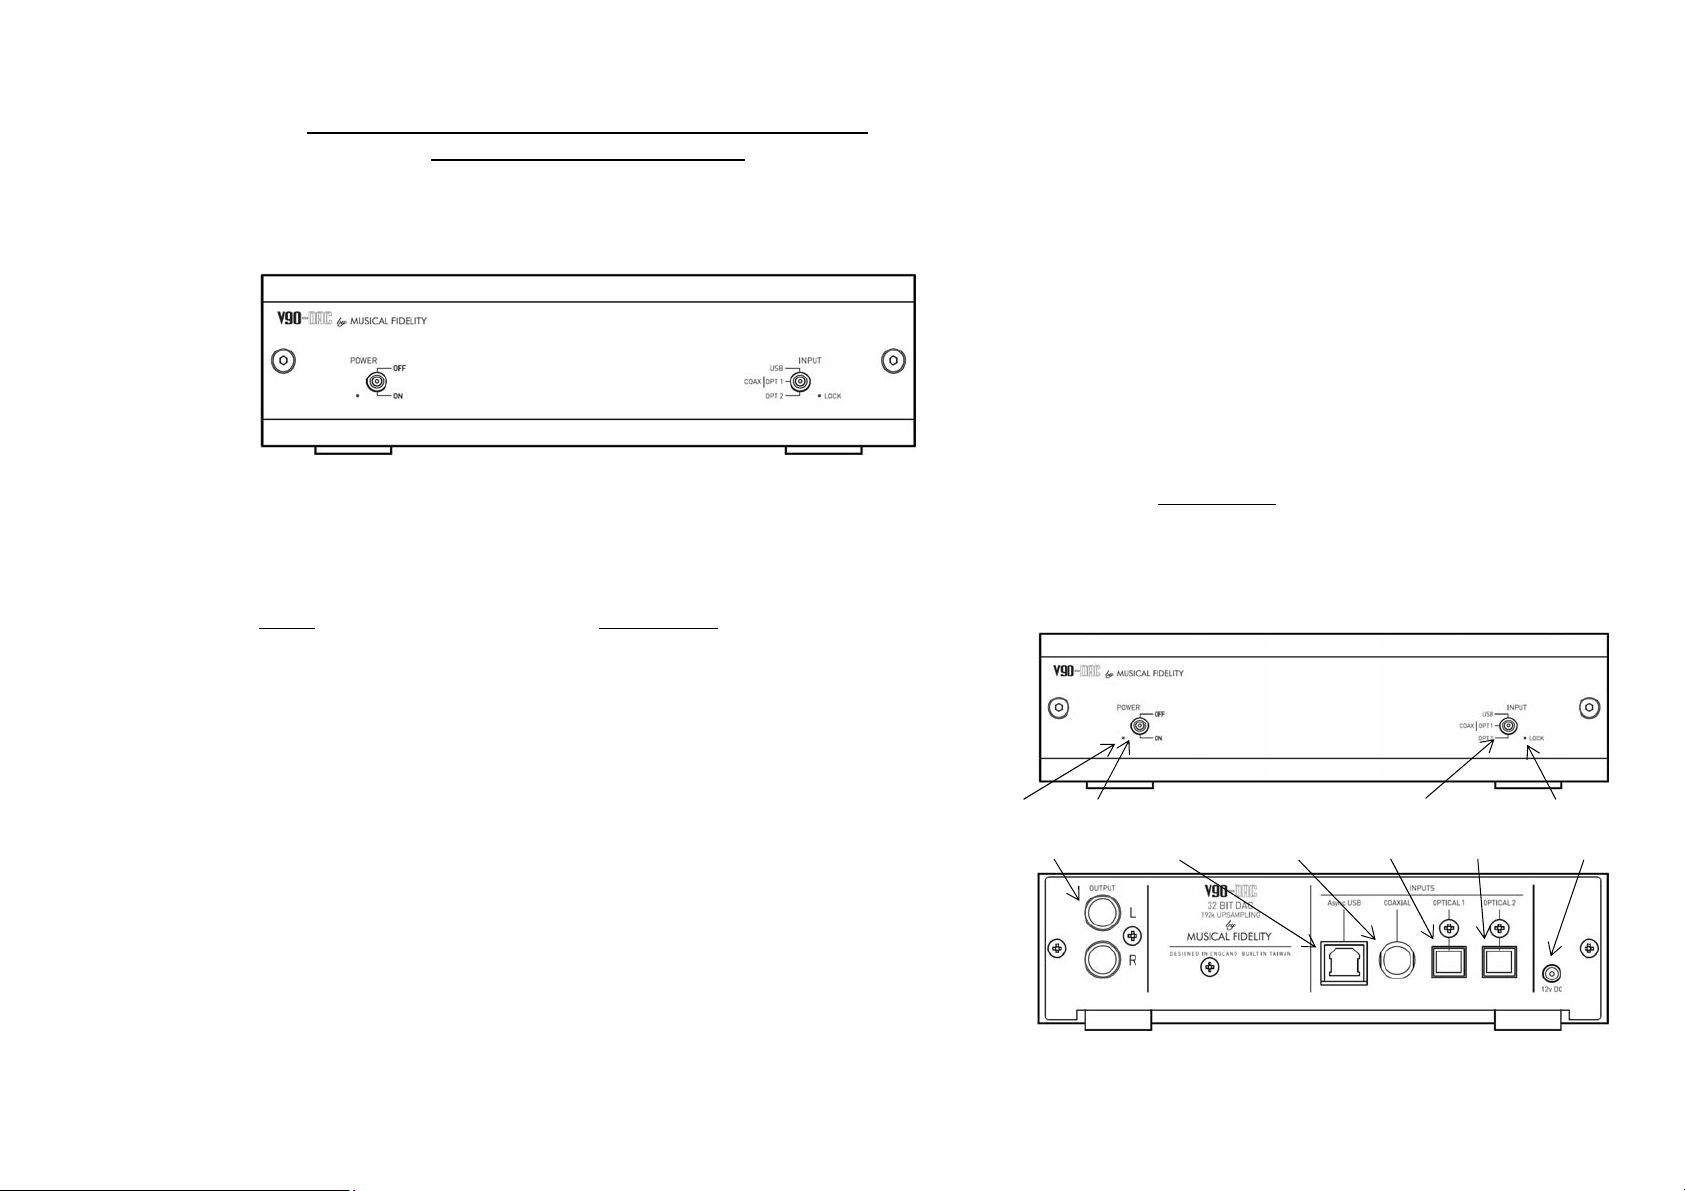
All connections must be made before the mains adaptor is plugged in,
and before any amplifier connected is switched on. Always switch off
the equipment attached to the V90-DAC before
connecting/disconnecting power, changing leads or inputs.
Using good quality digital RCA (SPDIF) leads (not supplied), connect
the digital coaxial output from a digital audio source (e.g. CD player) to
the V90-DAC socket.
Using good quality optical (TOSLINK) leads (not supplied), connect the
digital optical output from a digital audio source (e.g. CD player) to the
V90-DAC socket (or if input is not already
used).
Note the COAXIAL and OPTICAL 1 inputs are a
shared
input. The unit
will only respond to the first of these inputs to present a valid digital
stream if both are used.
A quality USB A-B cable is required to connect the unit to a computer.
Plug the B (square) end into the socket in the back of the V90-DAC and
the A (rectangle) end into a free USB socket on your computer. Set the
input select switch to “USB”.
Once the unit is plugged in and powered, the computer should detect
the new hardware and install a generic driver automatically (No setup or
driver disk required). The V90-DAC is then ready to play V90-DAC, CD
or any other form of music file recognised by the
computer.
Make sure following the amplifier is turned off. Connect the V90-DAC
left and right outputs to the line level inputs of the amplifier system.
Plug the DC connector lead from the power supply unit into the V90-
DAC’s power inlet socket, and plug the adaptor itself into a convenient
wall mains outlet. The blue LED will light to confirm the unit is ready for
use, and the green LED should also be lit indicating presence of digital
signal.
Turn the volume on amplifier to normal listening levels, set the
input selector switch to desired input, sit back and enjoy the music!
On the host computer, a new mixer will be available, which is the default
mixer whenever the DAC is plugged in. Use this mixer to select the
source or adjust levels if required. CD, MP3, WAV files played on any
software should now play through the DAC. This device has been
designed to work with Windows 98, ME, 2000, XP, Vista, 7 and 8, Linux
and Apple OS
The computer drivers for the USB input of the V90-DAC should install
automatically. To check correct installation follow these steps:
Check the computer has picked up the device and is currently using it
by clicking: (most Windows versions)
- Start
- Settings
- Control panel
- Sounds and Multimedia
- Audio
Check “V90-DAC 24/96” appears under PREFERRED AUDIO DEVICE
tab.
Check the computer has picked up the device and is currently using it
by clicking: (MAC OS X)
- System preferences
- Hardware
- Sound
Check that “V90-DAC 24/96” is selected under the OUTPUT tab.
If the computer’s warning sounds/chimes are to played through the
DAC, make sure it is selected under the SOUND EFFECTS tab too.
This device is a high speed serial data processor, and by its nature,
requires a very high volume of USB bandwidth. It will benefit greatly
from being the only device connected on its USB ‘port’. Sharing the
same port with other devices may cause unwanted artefacts such as
dropouts or temporary loss of signal. This especially includes the use of
the DAC on a USB hub/splitter alongside other USB components.
Thank you for purchasing the V90-DAC
digital to analog converter. We sincerely
hope that it will bring you many years of
outstanding listening pleasure.
Your new V90-DAC is designed and built to
provide trouble-free performance, but as with
all electronic devices, it is necessary to
observe a few precautions:
Do not use the V90-DAC near water. The
unit must not be exposed to dripping or
splashing and no objects filled with liquids,
such as vases, must be placed on the unit.
Keep the V90-DAC away from heat such as
radiators. No naked flame sources, such as
lighted candles, should be placed on the
unit.
Only use approved
Musical Fidelity
DC
power supply. The use of other adaptors or
supplies could seriously damage the V90-
DAC.
This Hi-fi product has been tested to ensure
that its operation is not adversely affected by
normal background levels of Radio
Frequency Interference (R.F.I.), and that it
does not itself generate excessive amounts
of interference. However, if a problem
persists, please contact your Musical Fidelity
agent.
Never open the case of the V90-DAC
yourself, as this will invalidate the guarantee.
Place all connecting cables where they are
not likely to be walked on or trapped by
items placed on them.
The V90-DAC will operate in accordance
with its specifications within the following
environmental range:
Temperature 5 to 45 degrees Celsius
Humidity 10 to 90% non condensing
There are no user adjustments inside.
Please refer all service work to an
authorised Musical Fidelity agent.
All connections must be made before the mains adaptor is plugged in,
and before any amplifier connected is switched on. Always switch off
the equipment attached to the V90-DAC before
connecting/disconnecting power, changing leads or inputs.
Using good quality digital RCA (SPDIF) leads (not supplied), connect
the digital coaxial output from a digital audio source (e.g. CD player) to
the V90-DAC socket.
Using good quality optical (TOSLINK) leads (not supplied), connect the
digital optical output from a digital audio source (e.g. CD player) to the
V90-DAC socket (or if input is not already
used).
Note the COAXIAL and OPTICAL 1 inputs are a
shared
input. The unit
will only respond to the first of these inputs to present a valid digital
stream if both are used.
A quality USB A-B cable is required to connect the unit to a computer.
Plug the B (square) end into the socket in the back of the V90-DAC and
the A (rectangle) end into a free USB socket on your computer. Set the
input select switch to “USB”.
Once the unit is plugged in and powered, the computer should detect
the new hardware and install a generic driver automatically (No setup or
driver disk required). The V90-DAC is then ready to play V90-DAC, CD
or any other form of music file recognised by the
computer.
Make sure following the amplifier is turned off. Connect the V90-DAC
left and right outputs to the line level inputs of the amplifier system.
Plug the DC connector lead from the power supply unit into the V90-
DAC’s power inlet socket, and plug the adaptor itself into a convenient
wall mains outlet. The blue LED will light to confirm the unit is ready for
use, and the green LED should also be lit indicating presence of digital
signal.
Turn the volume on amplifier to normal listening levels, set the
input selector switch to desired input, sit back and enjoy the music!
On the host computer, a new mixer will be available, which is the default
mixer whenever the DAC is plugged in. Use this mixer to select the
source or adjust levels if required. CD, MP3, WAV files played on any
software should now play through the DAC. This device has been
designed to work with Windows 98, ME, 2000, XP, Vista, 7 and 8, Linux
and Apple OS
The computer drivers for the USB input of the V90-DAC should install
automatically. To check correct installation follow these steps:
Check the computer has picked up the device and is currently using it
by clicking: (most Windows versions)
- Start
- Settings
- Control panel
- Sounds and Multimedia
- Audio
Check “V90-DAC 24/96” appears under PREFERRED AUDIO DEVICE
tab.
Check the computer has picked up the device and is currently using it
by clicking: (MAC OS X)
- System preferences
- Hardware
- Sound
Check that “V90-DAC 24/96” is selected under the OUTPUT tab.
If the computer’s warning sounds/chimes are to played through the
DAC, make sure it is selected under the SOUND EFFECTS tab too.
This device is a high speed serial data processor, and by its nature,
requires a very high volume of USB bandwidth. It will benefit greatly
from being the only device connected on its USB ‘port’. Sharing the
same port with other devices may cause unwanted artefacts such as
dropouts or temporary loss of signal. This especially includes the use of
the DAC on a USB hub/splitter alongside other USB components.
DISPOSAL
The crossed out wheeled bin label that appears on the back panel of
the product indicates that the product must not be disposed of as normal household
waste. To prevent possible harm to the environment please separate the product from
other waste to ensure that it can be recycled in an environmentally safe manner.
Please contact your local government office or your retailer for available collectio
acilities.
n
f
DISPOSITION
La poubelle sur roulettes barrées X, qui apparaît en logo sur le panneau
arrière du produit, indique que celui-ci ne doit pas être traité comme un déchet
domestique commun. Afin de protéger l'environnement, ce produit électronique devra
être géré séparément et donc recyclé selon les nouvelles normes Européennes Rohs
concernant les déchets d'appareils électroniques. Prière de contacter les services
concernés gouvernementaux ou votre point de vente pour l'élimination et l'enlèvement
de déchets électroniques équipés de composants électroniques.
DISPOSAL
La etiqueta cruzada hacia fuera del compartimiento que aparece en el
panel trasero del producto indica que el producto no se debe reciclarse como basura
normal de la casa. Para prevenir daños posible al ambiente separe por favor el
producto de otras basura para asegurarse de que puede ser reciclada de una manera
ambientalmente segura. Entre en contacto por favor a su oficina gu
o a su min rista para las instalaciones disponibles de la colección.
bernamental local
o
RIFIUTI
L'etichetta del cassonetto barrato riportato sul retro dell'apparecchio
indica che il prodotto non deve essere smaltito tramite la procedura normale di
smaltimento dei rifiuti domestici. Per evitare eventuali danni all'ambiente, separare
questo prodotto da altri rifiuti domestici in modo che possa venire riciclato in base alle
procedure di rispetto ambientale. Per maggiori d
isponibili, contattate l'ufficio govenativo locale od il riv
ettagli sulle aree di raccolta
enditore del prodotto. d
FACHGERECHTE ENTSORGUNG:
Das auf der Geräterückseite angebrachte Label deutet darauf hin, dass
das Produkt nicht mit konventionellem Hauskehricht entsorgt werden darf. Um
Schäden und Verschmutzungen an Umwelt und Mensch zu vermeiden, muss das
Produkt fachgerecht entsorgt und von anderem Abfall getrennt werden. Wenden Sie
sich bei Fragen hierzu an Ihren Fachhändler oder an eine öffentliche
Informationsstelle.
AFVAL
Het label op de achterzijde van dit apparaat, een afvalbak op wielen met
een kruis doorgehaald, geeft aan dat dit apparaat niet samen met gewoon
huishoudafval mag worden weggegooid. Om mogelijke schade aan onze
leefomgeving te voorkomen dient dit apparaat, gescheiden van gewoon huishoudelijk
afval, te worden afgevoerd zodat het op een milieuvriendelijke manier kan worden
gerecycled. Neem voor beschikbare inzamelplaatsen contact op met uw gemeentelijke
reinigingsdienst of met uw elektronica leverancier.
HÄVITTÄMINEN
Yliruksattua jäteastiaa kuvaava tarra tuotteen takalevyssä kertoo, että
tuotetta ei saa käsitellä normaalina talousjätteenä. Ympäristön suojelemiseksi on tuote
pidettävä erillään muusta jätteestä ja se on kierrätettävä ekologisesti kestävällä
tavalla. Ota yhteyttä laitteen myyjään tai Pirkanmaan Ympäristökeskukseen lähimmän
kierrätyskeskuksen löytämiseksi.
AFSKAFNING
Logoet med en skraldespand med kryds over på bagsiden af apparatet
indikerer at dette produkt ikke må kasseres som normal husholdningsaffald. For at
forebygge mulig skade på miljøet, bedes De separere dette produkt fra andet affald, og
sikre at det bliver genbrugt på en miljørigtig måde. Kontakt venligst de lokale
myndigheder eller din forhandler for oplysning om nærmeste tilgængelige
opsamlingssted for elektronikaffald.
ΔΙΑΔΙΚΑΣΙΑ ΑΠΟΡΡΙΨΗΣ
ΤΟ ΣΗΜΑ ΜΕ ΤΟΝ ΔΙΑΓΕΓΡΑΜΜΕΝΟ ΤΡΟΧΗΛΑΤΟ ΚΑΔΟ
ΑΠΟΡΡΙΜΑΤΩΝ ΣΤΗΝ ΠΙΣΩ ΟΨΗ ΤΟΥ ΜΗΧΑΝΗΜΑΤΟΣ ΔΗΛΩΝΕΙ ΟΤΙ ΤΟ
ΠΡΟΙΟΝ ΑΥΤΟ ΔΕΝ ΠΡΕΠΕΙ ΝΑ ΔΙΑΧΕΙΡΙΣΘΕΙ ΣΑΝ ΣΥΝΗΘΙΣΜΕΝΟ ΟΙΚΙΑΚΟ
ΑΠΟΒΛΗΤΟ. ΠΡΟΣ ΑΠΟΦΥΓΗ ΕΝΔΕΧΟΜΕΝΗΣ ΕΠΙΒΑΡΥΝΣΗΣ ΤΟΥ
ΠΕΡΙΒΑΛΛΟΝΤΟΣ, ΞΕΧΩΡΙΣΤΕ ΤΟ ΠΡΟΙΟΝ ΑΠΟ ΤΑ ΑΛΛΑ ΑΠΟΡΡΙΜΑΤΑ ΩΣΤΕ
ΝΑ ΕΞΑΣΦΑΛΙΣΘΕΙ Η ΑΝΑΚΥΚΛΩΣΗ ΤΟΥ ΜΕ ΤΟΝ ΠΡΕΠΟΝΤΑ ΤΡΟΠΟ.
ΠΑΡΑΚΑΛΟΥΜΕ ΝΑ ΕΠΙΚΟΙΝΩΝΗΣΕΤΕ ΜΕ ΤΗΝ ΤΟΠΙΚΗ ΥΠΗΡΕΣΙΑ
ΑΝΑΚΥΚΛΩΣΗΣ Η ΜΕ ΤΟ ΚΑΤΑΣΤΗΜΑ ΑΓΟΡΑΣ ΓΙΑ ΠΕΡΙΣΣΟΤΕΡΕΣ
ΛΕΠΤΟΜΕΡΕΙΕΣ.
Manual issue 01
Basic problem-solving with an amplifier is similar to troubleshooting other electrical or electronic equipment.
Always check the most obvious possible causes first, such as the following examples:
Problem Probable Cause Remedy
No power
Unit or power supply not switched on.
Power plug is not fully inserted into rear
socket
Check power supply is plugged in and switched on, as
well as ON/OFF POWER toggle switch
Plug in securely.
Wrong connections between input source
and the V90-DAC
Wrong source selected
Multichannel stream being set to V90-
DAC from DVD or Blue-Ray player
Check digital/USB input leads are securely connected.
Check INPUT SELECT switch is correctly set and
green LOCK LED is lit.
Check digital source output is set to give 16 bit Stereo
PCM digital stream (refer to source product’s manual)
No sound
Wrong connections between the V90-
DAC output and the following component
Check audio input lead connections
Hum
Audio connector plug not fully pushed in Insert plug securely
Dropouts in sound (Digital inputs) Digital input lead not properly connected
Faulty digital input lead
Check input lead is fully secured
Change or replace lead. Please use a good quality
straight-through signal-and-ground phono to phono lead
for coaxial connection.
No Sound (USB input)
Computer USB port not working or
incorrectly setup
Check USB port with another USB device.
See “additional USB information” section
Dropouts in sound (USB input)
Shared USB port with another device
Computer busy with another application
Computer low on resources
Avoid sharing the USB port with other devices, if
possible. At times an application (program) may
intervene, sometimes invisibly e.g. a virus scanner.
When this happens, computer resources are
temporarily used up, and playback may suffer. This is
not a fault. Try running fewer applications if possible.
If none of these actions affect a cure, please contact the dealer, or an authorised Musical Fidelity service agent. Remember; never open the
case of the V90-DAC, as this will invalidate the guarantee.
Specifications: DAC 32 Bit upsampled to 192kHz on all inputs
Output impedance 47Ω
Maximum output 2.2V
Total harmonic distortion 0.0004% 20Hz-20kHz
Frequency response +0, -0.1dB 20Hz-20kHz
Crosstalk -104dB 20Hz-20kHz
Signal / noise ratio -117dB
“A”-
weighted
Total Jitter 12ps
Power requirement 12V DC 500mA
USB input Asynchronous data stream at up to 24-bit/96kHz
Connections Digital inputs 1 RCA (coaxial), 2 TOSLINK (optical), 1 USB (type B)
Line level outputs 1 pair RCA sockets
Power input 1.3mm DC power socket
Dimensions Length 102mm 4” including terminals and switches
Width 170mm
6⅔”
Height 47mm
1⅔” including feet
Weight Unit alone 600g 1½ lbs
Unit packed in carton 1.1Kg 2½ lbs
Accessories DC power supply 12V 500mA 1 off
(supplied) Leaflet V90-DAC instructions 1 off
Musical Fidelity reserves the right to make improvements which may
result in specification or feature changes without notice. E&OE.
Musical Fidelity Limited,
Units 24-26
Fulton Road
Wembley
HA9 0TF
England
(+) 44 208 8900 2866
http://www.musicalfidelity.com/
DISPOSAL
The crossed out wheeled bin label that appears on the back panel of
the product indicates that the product must not be disposed of as normal household
waste. To prevent possible harm to the environment please separate the product from
other waste to ensure that it can be recycled in an environmentally safe manner.
Please contact your local government office or your retailer for available collectio
acilities.
n
f
DISPOSITION
La poubelle sur roulettes barrées X, qui apparaît en logo sur le panneau
arrière du produit, indique que celui-ci ne doit pas être traité comme un déchet
domestique commun. Afin de protéger l'environnement, ce produit électronique devra
être géré séparément et donc recyclé selon les nouvelles normes Européennes Rohs
concernant les déchets d'appareils électroniques. Prière de contacter les services
concernés gouvernementaux ou votre point de vente pour l'élimination et l'enlèvement
de déchets électroniques équipés de composants électroniques.
DISPOSAL
La etiqueta cruzada hacia fuera del compartimiento que aparece en el
panel trasero del producto indica que el producto no se debe reciclarse como basura
normal de la casa. Para prevenir daños posible al ambiente separe por favor el
producto de otras basura para asegurarse de que puede ser reciclada de una manera
ambientalmente segura. Entre en contacto por favor a su oficina gu
o a su min rista para las instalaciones disponibles de la colección.
bernamental local
o
RIFIUTI
L'etichetta del cassonetto barrato riportato sul retro dell'apparecchio
indica che il prodotto non deve essere smaltito tramite la procedura normale di
smaltimento dei rifiuti domestici. Per evitare eventuali danni all'ambiente, separare
questo prodotto da altri rifiuti domestici in modo che possa venire riciclato in base alle
procedure di rispetto ambientale. Per maggiori d
isponibili, contattate l'ufficio govenativo locale od il riv
ettagli sulle aree di raccolta
enditore del prodotto. d
FACHGERECHTE ENTSORGUNG:
Das auf der Geräterückseite angebrachte Label deutet darauf hin, dass
das Produkt nicht mit konventionellem Hauskehricht entsorgt werden darf. Um
Schäden und Verschmutzungen an Umwelt und Mensch zu vermeiden, muss das
Produkt fachgerecht entsorgt und von anderem Abfall getrennt werden. Wenden Sie
sich bei Fragen hierzu an Ihren Fachhändler oder an eine öffentliche
Informationsstelle.
AFVAL
Het label op de achterzijde van dit apparaat, een afvalbak op wielen met
een kruis doorgehaald, geeft aan dat dit apparaat niet samen met gewoon
huishoudafval mag worden weggegooid. Om mogelijke schade aan onze
leefomgeving te voorkomen dient dit apparaat, gescheiden van gewoon huishoudelijk
afval, te worden afgevoerd zodat het op een milieuvriendelijke manier kan worden
gerecycled. Neem voor beschikbare inzamelplaatsen contact op met uw gemeentelijke
reinigingsdienst of met uw elektronica leverancier.
HÄVITTÄMINEN
Yliruksattua jäteastiaa kuvaava tarra tuotteen takalevyssä kertoo, että
tuotetta ei saa käsitellä normaalina talousjätteenä. Ympäristön suojelemiseksi on tuote
pidettävä erillään muusta jätteestä ja se on kierrätettävä ekologisesti kestävällä
tavalla. Ota yhteyttä laitteen myyjään tai Pirkanmaan Ympäristökeskukseen lähimmän
kierrätyskeskuksen löytämiseksi.
AFSKAFNING
Logoet med en skraldespand med kryds over på bagsiden af apparatet
indikerer at dette produkt ikke må kasseres som normal husholdningsaffald. For at
forebygge mulig skade på miljøet, bedes De separere dette produkt fra andet affald, og
sikre at det bliver genbrugt på en miljørigtig måde. Kontakt venligst de lokale
myndigheder eller din forhandler for oplysning om nærmeste tilgængelige
opsamlingssted for elektronikaffald.
ΔΙΑΔΙΚΑΣΙΑ ΑΠΟΡΡΙΨΗΣ
ΤΟ ΣΗΜΑ ΜΕ ΤΟΝ ΔΙΑΓΕΓΡΑΜΜΕΝΟ ΤΡΟΧΗΛΑΤΟ ΚΑΔΟ
ΑΠΟΡΡΙΜΑΤΩΝ ΣΤΗΝ ΠΙΣΩ ΟΨΗ ΤΟΥ ΜΗΧΑΝΗΜΑΤΟΣ ΔΗΛΩΝΕΙ ΟΤΙ ΤΟ
ΠΡΟΙΟΝ ΑΥΤΟ ΔΕΝ ΠΡΕΠΕΙ ΝΑ ΔΙΑΧΕΙΡΙΣΘΕΙ ΣΑΝ ΣΥΝΗΘΙΣΜΕΝΟ ΟΙΚΙΑΚΟ
ΑΠΟΒΛΗΤΟ. ΠΡΟΣ ΑΠΟΦΥΓΗ ΕΝΔΕΧΟΜΕΝΗΣ ΕΠΙΒΑΡΥΝΣΗΣ ΤΟΥ
ΠΕΡΙΒΑΛΛΟΝΤΟΣ, ΞΕΧΩΡΙΣΤΕ ΤΟ ΠΡΟΙΟΝ ΑΠΟ ΤΑ ΑΛΛΑ ΑΠΟΡΡΙΜΑΤΑ ΩΣΤΕ
ΝΑ ΕΞΑΣΦΑΛΙΣΘΕΙ Η ΑΝΑΚΥΚΛΩΣΗ ΤΟΥ ΜΕ ΤΟΝ ΠΡΕΠΟΝΤΑ ΤΡΟΠΟ.
ΠΑΡΑΚΑΛΟΥΜΕ ΝΑ ΕΠΙΚΟΙΝΩΝΗΣΕΤΕ ΜΕ ΤΗΝ ΤΟΠΙΚΗ ΥΠΗΡΕΣΙΑ
ΑΝΑΚΥΚΛΩΣΗΣ Η ΜΕ ΤΟ ΚΑΤΑΣΤΗΜΑ ΑΓΟΡΑΣ ΓΙΑ ΠΕΡΙΣΣΟΤΕΡΕΣ
ΛΕΠΤΟΜΕΡΕΙΕΣ.
Manual issue 01
Basic problem-solving with an amplifier is similar to troubleshooting other electrical or electronic equipment.
Always check the most obvious possible causes first, such as the following examples:
Problem Probable Cause Remedy
No power
Unit or power supply not switched on.
Power plug is not fully inserted into rear
socket
Check power supply is plugged in and switched on, as
well as ON/OFF POWER toggle switch
Plug in securely.
Wrong connections between input source
and the V90-DAC
Wrong source selected
Multichannel stream being set to V90-
DAC from DVD or Blue-Ray player
Check digital/USB input leads are securely connected.
Check INPUT SELECT switch is correctly set and
green LOCK LED is lit.
Check digital source output is set to give 16 bit Stereo
PCM digital stream (refer to source product’s manual)
No sound
Wrong connections between the V90-
DAC output and the following component
Check audio input lead connections
Hum
Audio connector plug not fully pushed in Insert plug securely
Dropouts in sound (Digital inputs) Digital input lead not properly connected
Faulty digital input lead
Check input lead is fully secured
Change or replace lead. Please use a good quality
straight-through signal-and-ground phono to phono lead
for coaxial connection.
No Sound (USB input)
Computer USB port not working or
incorrectly setup
Check USB port with another USB device.
See “additional USB information” section
Dropouts in sound (USB input)
Shared USB port with another device
Computer busy with another application
Computer low on resources
Avoid sharing the USB port with other devices, if
possible. At times an application (program) may
intervene, sometimes invisibly e.g. a virus scanner.
When this happens, computer resources are
temporarily used up, and playback may suffer. This is
not a fault. Try running fewer applications if possible.
If none of these actions affect a cure, please contact the dealer, or an authorised Musical Fidelity service agent. Remember; never open the
case of the V90-DAC, as this will invalidate the guarantee.
Specifications: DAC 32 Bit upsampled to 192kHz on all inputs
Output impedance 47Ω
Maximum output 2.2V
Total harmonic distortion 0.0004% 20Hz-20kHz
Frequency response +0, -0.1dB 20Hz-20kHz
Crosstalk -104dB 20Hz-20kHz
Signal / noise ratio -117dB
“A”-
weighted
Total Jitter 12ps
Power requirement 12V DC 500mA
USB input Asynchronous data stream at up to 24-bit/96kHz
Connections Digital inputs 1 RCA (coaxial), 2 TOSLINK (optical), 1 USB (type B)
Line level outputs 1 pair RCA sockets
Power input 1.3mm DC power socket
Dimensions Length 102mm 4” including terminals and switches
Width 170mm
6⅔”
Height 47mm
1⅔” including feet
Weight Unit alone 600g 1½ lbs
Unit packed in carton 1.1Kg 2½ lbs
Accessories DC power supply 12V 500mA 1 off
(supplied) Leaflet V90-DAC instructions 1 off
Musical Fidelity reserves the right to make improvements which may
result in specification or feature changes without notice. E&OE.
Musical Fidelity Limited,
Units 24-26
Fulton Road
Wembley
HA9 0TF
England
(+) 44 208 8900 2866
http://www.musicalfidelity.com/