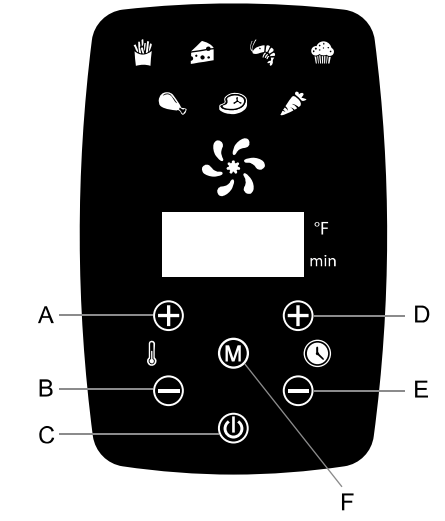
Press to increase the temperature setting by 5-degree increments.
B) TEMPERATURE DECREASE BUTTON:
Press to decrease the temperature setting by 5-degree increments.
C) POWER/START BUTTON:
Tap this button once to START or CANCEL cooking.
D) TIMER INCREASE BUTTON:
Each press increases cooking time by one minute.
E) TIMER DECREASE BUTTON:
Each press decreases cooking time by one minute.
F) MENU FUNCTION BUTTON:
Use this button to toggle through the different menu functions.
PREPARING YOUR AIR FRYER FOR USE
1. Before using your Digital Air Fryer for the first time, carefully remove all packaging materials and recycle appropriately.
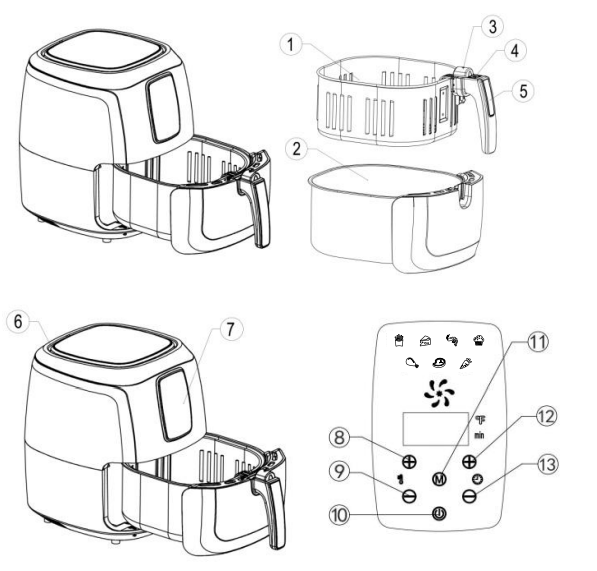
2. Remove the parts from the box and wash the Drawer Pan (2) and Basket (1) with warm, soapy water and a non-abrasive sponge.
IMPORTANT: DO NOT IMMERSE THE MAIN HOUSING IN WATER. Wipe the interior and exterior of appliance clean with a damp cloth.
IMPORTANT: THIS IS NOT A DEEP FRYER. DO NOT FILL THE APPLIANCE OR ITS DRAWER (2) WITH OIL OR FRYING FAT.
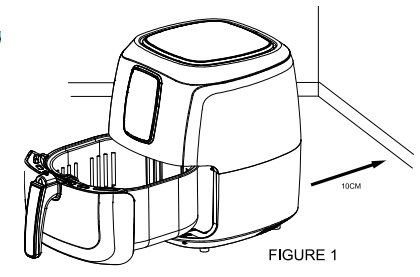
3. Place the appliance on a flat, horizontal and stable surface (make sure surface is heatresistant). Place away from walls and other appliances. Leave approximately 4 inches of space from nearby objects (see Figure 1).
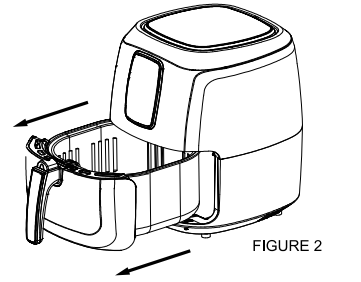
4. Pull the Drawer Pan (2) out by the Handle (5). Push the Protective Cover (3) and press down on the Basket Release Button (4) to lift out the Basket (1) (see Figure 2).
TIP: Never place food directly into the Drawer Pan (2).
HOW TO USE YOUR AIR FRYER
1. Carefully pull out the Drawer Pan (2) from the Main Fryer Base by pulling forward on the basket handle (3).
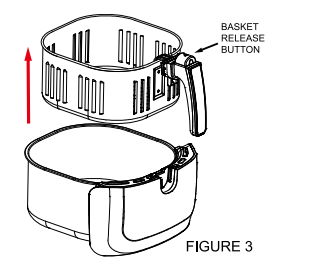
2. Remove the Basket (1) from the Drawer Pan (2), push the Protective Cover (3), and press down on the Basket Release Button (9) and lift up on the basket. (see Figure 3).
3. Place ingredients into Basket (1).
TIP:
- Do not fill the Basket (1) over the MAX fill position.
- If cooking food that expands, make sure the cooked capacity will not exceed the MAX fill position.
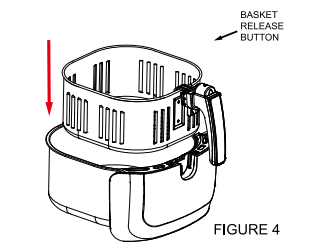
4. Insert Basket (1) back into the Drawer Pan (2) by inserting into the basket slot. (see Figure 4).
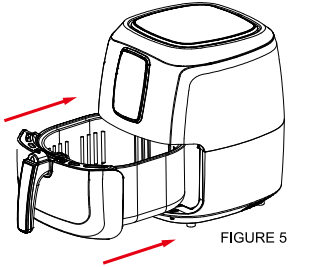
5. Slide Drawer Pan (2) back into the Main Fryer Base (see Figure 5). Once in place, the Air Fryer will beep to let you know it is in position.
HOW TO MANUALLY PROGRAM FRYING TIME AND TEMPERATURE:
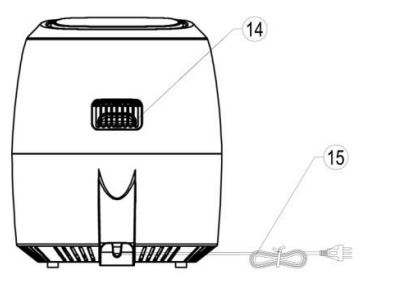
1. Plug Power Cord (15) into an electrical outlet.
2. Gently tap the POWER button, you will hear a beep and the LED screen will illuminate. The Digital Display will default to 360 F and 15-minute setting.
TIP: It is recommended to preheat the air fryer on empty at 360 F for 3 min. if the appliance is cold. The initial 15 minutes of use may result in minimal smell and smoke. This is normal and harmless and comes from the protective substance applied to the heating elements during manufacturing.
3. Press the +/- button for the Temperature setting to adjust to the desired temperature. Temperature will increase or decrease in 5-degree increments.
4. Press the +/- button for the Timer setting to adjust to the desired cooking time. Timer will increase or decrease in 1-minute increments.
5. Tap the START Button once to begin cooking.
HOW TO SELECT A QUICK MENU FUNCTION:
1. Plug Power Cord (15) into an electrical outlet.
2. Gently tap the POWER button, you will hear a beep and the LED screen will illuminate. The Digital Display will default to 360 F and 15-minute setting.
TIP: It is recommended to preheat the air fryer on empty at 360 F for 3 min. if the appliance is cold. The initial 15 minutes of use may result in minimal smell and smoke. This is normal and harmless and comes from the protective substance applied to the heating elements during manufacturing
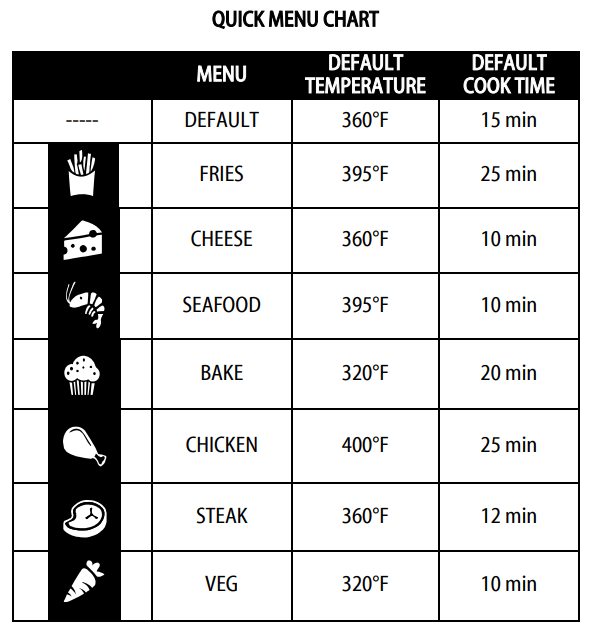
3. Press the (M) button to cycle through the different Menu functions. Default Menu Temperatures and Times will appear.
4. To select desired Menu function, tap the START Button to begin cooking.
5. Use the +/- buttons to adjust Menu function temperatures or times if you wish to change the programmed settings. Note: The initial 15 minutes of use may result in minimal smell and smoke. This is normal and harmless and comes from the protective substance applied to the heating elements during manufacturing
CANCELING A SELECTION:
1. To Cancel any programmed selection, simply tap the POWER button to cancel the selection.
2. To change a selection, simply press the M button to cycle through the other Menu functions.
NOTE: There is no need to press POWER button again when changing a setting during the cooking process.
DURING THE COOKING/FRYING PROCESS:
1. Once you tap the START Button, the Timer will begin counting down and begin the cooking process.
NOTE: Any excess oil from food will collect at the bottom of the Pan (2).
2. Some recipes require stirring/mixing/flipping the contents mid-way through cooking (see Cooking Time Chart on page 10). You can do this in the middle of the cooking process by simply pulling out the basket by grasping the Handle (5) and pull forward the entire Drawer Pan (2). The built-in auto sensors will automatically pause the heating system to allow you to attend to the food.
3. Shake, stir or flip the contents of the basket using a non-metallic utensil and then slide Drawer Pan (2) back into the Main Fryer Base.
CAUTION: During cooking, the Drawer Pan (2) and Basket (1) will be very hot, only use the cool-touch handles or oven mitts.
WHEN COOKING/FRYING IS COMPLETE:
1. When the timer completes its countdown, the air fryer will beep and stop heating - this signals it is time to remove your food. (Please note that the fan motor will continue to operate in order to cool down the Drawer Pan (2) and the Basket (1), this will stop within approximately 30 seconds).
NOTE: You can also switch off the appliance manually by pressing POWER at any time during the cooking process.
2. Carefully pull out the Drawer Pan (2) from the Main Fryer Base by pulling forward on the basket handle (5).
3. Remove the Basket (5) from the Drawer Pan (2) by pressing down on the Basket Release Button (4) and lifting up on the basket.
CAUTION: When sliding out the Drawer Pan (2), be careful of hot air and steam. Keep hands and face away from the opening.
CAUTION: After cooking, the Drawer Pan (2) and Basket (1) will be extremely hot to the touch. Do not touch surfaces of the Drawer Pan (2) or Basket (1) directly.
4. Check that your foods are ready. If not, then place the Basket (1) back into the Drawer Pan (2) and set the timer for a few more minutes.
5. Empty the contents of the Basket (1) into a bowl or onto a plate. If necessary, you can also use Tongs to remove foods from the Basket (1).
TIP: If food contents within Basket (1) are too heavy to lift using the Basket Handle (5), use oven mitts to carefully pull out the whole Drawer Pan (2) and Basket (1) together. Place on a flat, heat-resistant surface and use Tongs to remove contents from the Basket (1).
TIP: Do not turn the Basket (1) and Drawer Pan (2) upside down together, as any excess oil that has collected in the bottom of the Drawer Pan (2) will be poured onto the foods.
6. When the next batch of ingredients is ready, the air fryer is instantly ready to use again.
7. When cooking is complete, the display will show "OFF." Remove the Power cord (15) from the electrical outlet.
CLEANING & MAINTENANCE
The Digital Air Fryer should be cleaned thoroughly after every use.
1. Make sure the Power cord (15) is disconnected from the electrical outlet and that the appliance has cooled down before attempting to clean.
2. The Drawer Pan (2), Basket (1) and the inside of the appliance have a nonstick coating. Do not use metal utensils or abrasive cleaning materials on them, as this can damage the nonstick coating.
3. Wipe the outside of the appliance with a damp cloth.
CAUTION: Do not allow water to seep into the LED control panel as that may damage the appliance.
4. Clean the Drawer Pan (2) and Basket (1) with hot water, dishwashing soap and a non-abrasive sponge.
5. You can use a degreaser to remove any stuck-on residue.
NOTE: The Drawer Pan (2) and Basket (1) are dishwasher-safe (top rack only).
TIP: If food residue is stuck to the Basket (1) or the bottom of the Drawer Pan (2), place the Basket (1) into the Drawer Pan (2) and fill with dishwashing soap and water and let soak for 10 minutes.
6. Clean the inside of the appliance with hot water and a non-abrasive sponge.
7. Never immerse the power cord, plug or the appliance body in water or any other liquids. 8. Dry all parts after each use, re-assemble and store in a cool, dry location.
HINTS & TIPS
TIPS
- Smaller cuts of foods usually require a slightly shorter cooking time than larger foods.
- A larger amount of foods only requires a slightly longer cooking time and a smaller amount of foods only requires a slightly shorter cooking time.
- Stirring or shaking smaller foods mid-way through the cooking process will improve the end result and can help cook more evenly.
- Adding a small amount of oil to fresh potatoes can result in a crispier result. Cook your ingredients in the air fryer within a few minutes after adding the oil.
- Do not air fry extremely greasy foods such as sausages in the air fryer.
- Snacks that can be prepared in an oven can also be prepared in the air fryer.
- The optimum amount for air frying crispy fries is 17.5 ounces or a little over 1 lb.
- Use pre-made dough to prepare foods with fillings quickly and easily. Pre-made dough also requires a shorter cooking time than home-made dough.
- The air fryer can also reheat foods. To reheat foods, set the temperature to 300°F for up to 10 minutes.
- To cook frozen foods, add an additional 3-5 minutes to your cook time.
Note: When cooking/baking foods that rise (i.e. cakes, quiches or muffins) the Basket (1) should not be filled more than halfway.
Note: Add 3 minutes to the cooking time if you begin cooking while the air fryer is still cold
BAKING CAKES/QUICHES
- Place an oven-safe dish (not included) into the air fryer Basket (1) if you want to bake a cake/quiche, steam foods or if you want to air fry delicate foods or foods with fillings.
HOME-MADE FRENCH FRIES
When making your own French fries, follow these steps:
1. Peel potatoes and slice them into strips.
2. Wash and dry them thoroughly.
3. Mix potato strips in a bowl with ½ tablespoon of olive oil, make sure they are evenly coated.
4. Using your hands or tongs, place the potato strips into the frying Basket (1).
5. NOTE: Do not pour the potato sticks from the bowl into the Basket (1) because we don't want to transfer any excess oil into the Basket (1)
TROUBLESHOOTING GUIDE
Problem
Possible cause
Solution
The airfryer does not work.
The appliance is not plugged in.
Plug the power cord (15) into an electrical outlet.
You did not press the POWER button.
The appliance is defective.
Contact customer service
Air fryer keeps powering off while you are trying to program time/temperature.
During time/temperature selection process, if START button is not pressed within 10-minutes, the unit will automatically turn off.
Do not wait more than 10-minutes after making your selections to press START button.
Food not completely cooked/fried.
There is too much food in the Basket (1).
Use smaller batches of food in the Basket (1). Small batches of food will cook more evenly
The cooking temperature is set too low.
Increase the temperature setting. Check "Cooking Time Chart" found in this manual.
The cooking time is too short.
Increase the time setting. Check "Cooking Time Chart" found in this manual.
Food cooked is uneven
Certain foods need to be stirred/mixed mid-way through the cooking process.
Foods that overlap inside the Basket (1) need to be stirred mid-way through cooking. Go to section: 'During the Cooking/Frying Process' in this manual.
Fried snacks are not crispy.
You used a type of snack meant to be prepared in a traditional deep fryer.
Use oven snacks or lightly brush some oil onto the snacks for a crispier result.
I cannot close the Drawer Pan (2) properly.
The Basket (1) is too full.
Do not fill the Basket (1) above the MAX level.
The Basket (1) is not aligned correctly.
Make sure the Basket (1) is flush with the Drawer Pan (2).
The Drawer Pan (2) is not properly placed into air fryer.
Make sure there is no obstruction for the Drawer Pan (2) to close properly.
White smoke is emitted out of the appliance during use.
You are preparing food with a high oil content.
When cooking with oily foods, oil will drain into the Drawer Pan (2). When the air fryer heats up, the pan heats up the oil and produces white smoke. This does not adversely affect the air fryer or your cooking process.
The pan has built-up oil residue from previous uses.
White smoke is caused by oil leftover in the Drawer Pan (2). Make sure to thoroughly clean the Drawer Pan (2) after every use.
Home-made French fries are coming out unevenly cooked.
Your potatoes are not fresh or are frozen.
Make sure to use fresh and firm potatoes. Not frozen potatoes for home-made French fries.
Potato strips were not thoroughly rinsed prior to frying.
Thoroughly rinse sliced potato to remove all starch prior to frying.
Your home-made French fries are not crispy after air frying.
Crispy results are directly linked to the amount of oil and water content of the fresh potato strips.
Potato strips need to be thoroughly dried before adding oil.
Slice potato strips thinner if you want them crispier.
Use a bit more oil on the potato strips prior to frying if you want crispier results.
RETURN INSTRUCTIONS
A. Any return of defective merchandise to the manufacturer must be processed accordingly by first contacting customer service ([email protected]) to obtain an RA # (Return Authorization Number). We will not accept any returns of merchandise without an applicable RA #.
B. IMPORTANT RETURN INSTRUCTIONS. Your Warranty depends on your following these instructions if you are returning the unit to Maxi-Matic, USA:
1. Carefully pack the item in its original carton or other suitable box with sufficient cushioning to avoid damage in shipping.
2. Before packing your unit for return, be sure to enclose:
a) Your name, full address with zip code, daytime telephone number, and RA#,
b) A dated sales receipt or PROOF OF PURCHASE,
c) The model number of the unit and the problem you are having (Enclose in an envelope and tape directly to the unit before the box is sealed,) and
d) Any parts or accessories related to the problem.
3. Maxi-Matic, USA recommends that you ship the package via UPS ground service for tracking purposes. We cannot assume responsibility for lost or damaged products returned to us during incoming shipment. For your protection, always carefully package the product for shipment and insure it with the carrier. C.O.D shipments cannot be accepted.
4. All return shipping charges must be prepaid by you.
5. Once your return has been received by our warehouse, Maxi-Matic, USA will repair or replace the product if it is defective in material or workmanship, subject to the conditions in paragraph B.
6. Maxi-Matic will pay the shipping charges to ship the repaired or replacement product back to you.