
IMPORTANT SAFEGUARDS
The Elite Brand takes consumer safety very seriously. Products are designed and
manufactured with our valued consumers' safety in mind. Additionally, we ask that you
exercise a level of caution when using any electrical appliance by following all
instructions and important safeguards.
READ ALL INSTRUCTIONS BEFORE USE AND SAVE FOR FUTURE REFERENCE
When using an electrical appliance, basic safety precautions should always be followed,
especially when children are present, including the following:
1. Do not touch hot surfaces. Use handles or knobs and oven mitts.
2. To protect against risk of electrical shock, do not immerse cord, plug, or any non-
removable parts of this oven in water or other liquid.
3. Close supervision is necessary when any appliance is used by or near children.
4. Unplug from outlet when not in use and before cleaning. Allow to cool before
putting on or taking off parts.
5. Do not use outdoors.
6. Do not let cord hang over edge of table or counter, or touch hot surfaces.
7. Extreme caution must be used when moving an appliance containing hot oil or
other hot liquid.
8. Do not place on or near a hot gas or electrical burner, or in a heated oven.
9. Turn all controls to "OFF" before inserting or removing plug from wall outlet.
10. Do not place any flammable materials in the oven: paper, cardboard, plastic,
etc.
11. To disconnect, grasp plug and remove from outlet. Do not pull by the cord.
12. Do not use oven for other than intended use.
13. Oversized foods or utensils must not be inserted in this appliance, as they
may create a fire or risk of electric shock.
14. A fire may occur if this appliance is covered by or touches flammable material
including curtains, draperies, walls, etc. when in operation. Do not store any item
on top of the appliance.
15. Do not store any material, other than manufacturer's recommended accessories, in
this oven when not in use.
16. Do not clean with metal scouring pads. Pieces can break off the pad and touch
electrical parts resulting in a risk of electric shock.
17. Extreme caution should be used when using containers constructed of other than
metal or oven safe glass.
18. Do not cover crumb tray or any parts of the oven with metal foil. This will cause
overheating of the oven.
19. To reduce the risk of fire, do not place any heating or cooking appliance beneath the
appliance.
- To reduce the risk of fire, do not mount unit over or near any portion of a heating
or cooking appliance.
- To reduce the risk of electric shock, do not mount over a sink.
20. Do not operate the appliance if the power cord or plug is damaged, it must be
replaced by the manufacturer or its service agent before use.
21. Some countertop and table surfaces, such as Corian®, wood and/or laminates, are
not designed to withstand prolonged heat generated by certain appliances. It is
recommended by countertop manufacturers that a hot pad or trivet be placed
under your appliance to prevent possible damage to the surface.
Questions? We're here to help! Visit: www.maxi-matic.com for support on this product.
1

SHORT CORD PURPOSE
NOTE: A short power cord is provided to reduce the risk of personal injury resulting from
becoming entangled in or tripping over a longer cord.
Longer power-supply cords or extension cords are available and may be used if care is
exercised in their use.
If an extension cord is used: (1) the marked electrical rating of the extension cord should
be at least as great as the electrical rating of the product; (2) the extension cord should
be arranged so that it will not drape over the countertop or tabletop where it can
unintentionally be pulled on or tripped over by
children or pets.
POLARIZED PLUG
If this appliance is equipped with a
polarized plug
(one blade is wider than the other),
please follow the below instructions:
To reduce the risk of electrical shock, this plug is intended to fit into a polarized outlet
only one way. If you are unable to fit the plug into the electrical outlet, try reversing the
plug. If the plug still does not fit, contact a qualified electrician. Never use the plug with
an extension cord unless the plug can be fully inserted into the extension cord. Do not
alter the plug of the product or any extension cord being used with this product. Do not
attempt to defeat the safety purpose of the polarized plug.
PLASTICIZER WARNING
CAUTION: To prevent Plasticizers from migrating from the finish of the counter top or
table top or other furniture, place NON-PLASTIC coaster or place mats between the
appliance and the finish of the counter top or table top.
Failure to do so may cause the finish to darken. Permanent blemishes may occur or
stains can appear.
SAVE THESE INSTRUCTIONS
THIS PRODUCT IS FOR
HOUSEHOLD USE ONLY
Questions? We're here to help! Visit: www.maxi-matic.com for support on this product.
2
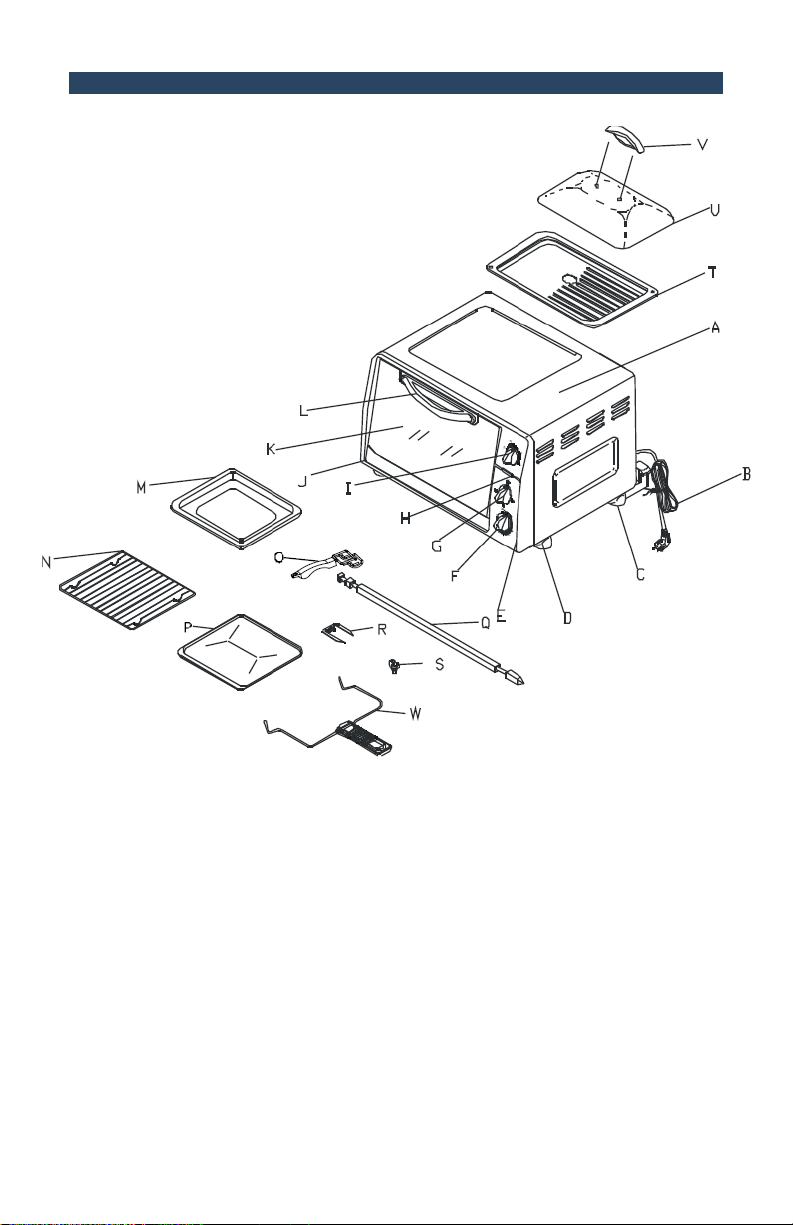
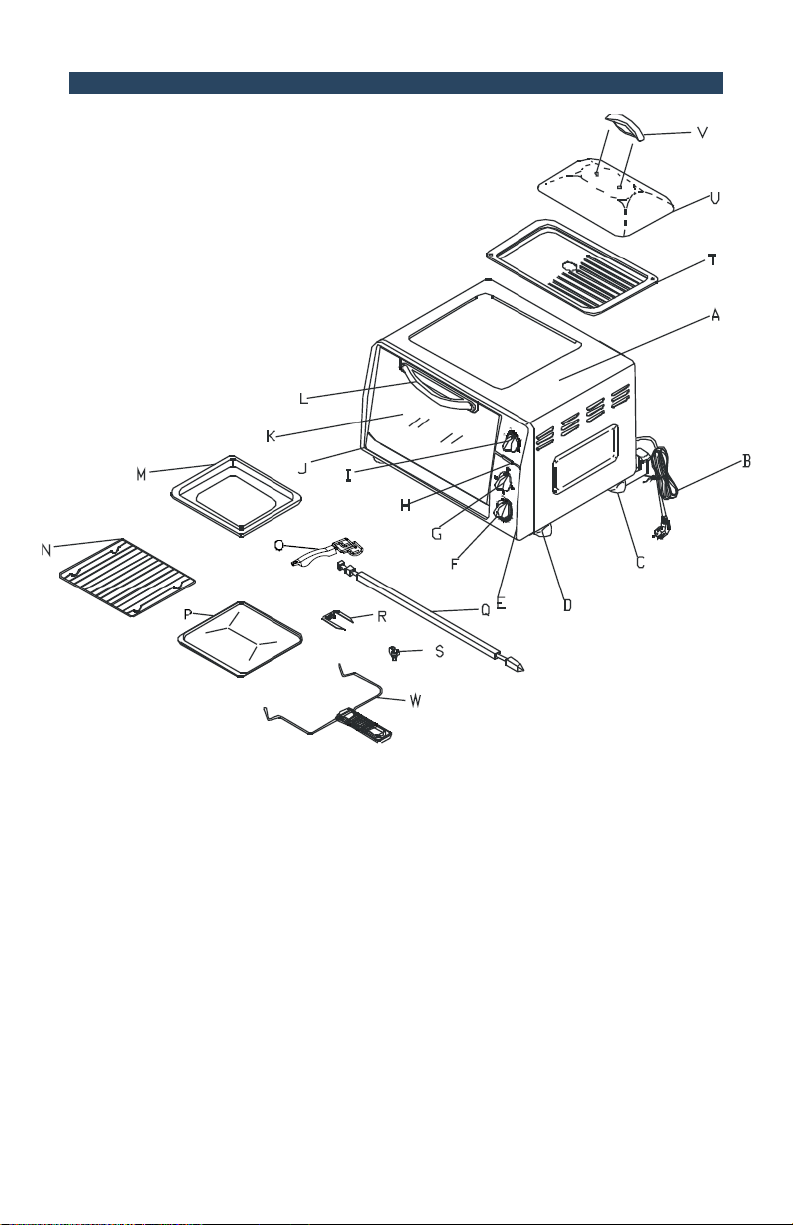
PARTS IDENTIFICATION
A) Housing
B) Power Cord
C) Back Feet
D) Front Feet
E) Face Plate
F) Timer Knob
G) Function Control Knob
H) ON-Light Indicator
I) Temperature Control Knob
J) Lower Door Frame
K) Glass Door
L) Door Handle
M) Bake/Roasting Pan
N) Wire Rack
O) Tray Handle
P) Crumb Tray
Q) Rotisserie Skewer
R) Skewer Clamps (2pcs)
S) Thumbscrew (2pcs)
T) Griddle
U) Griddle Cover
V) Griddle Cover Handle
W) Rotisserie Removal Handle
Questions? We're here to help! Visit: www.maxi-matic.com for support on this product.
3

BEFORE FIRST USE
Before using your appliance for the first time, be sure to:
1) Read all the instructions included in this manual.
2) Remove all packaging materials from the appliance.
3) Make sure that the oven is unplugged and the Timer Knob (F) is in the “OFF” position.
4) Wash the accessories (N, M, O, P, T, V) in hot, soapy water or in the dishwasher. Also
remove the rotisserie skewer (Q), and the skewer clamps (R) from the packaging and
wash these in hot, soapy water.
5) Thoroughly dry all accessories and re-assemble inside the oven. Plug the oven into the
wall outlet and you are ready to use your new Toaster Oven with Rotisserie & Griddle.
6) After re-assembling your oven, we recommend that you run it at the highest
temperature (450°F) on the Toast Function for approximately 15-minutes to eliminate
any packing residue that may remain after shipping. This will remove all traces of odor
or smoke that is initially present.
PLEASE NOTE: The initial 15 minutes of use may result in minimal smell and smoke. This is
normal and harmless and comes from the protective substance applied to the heating
elements during manufacturing.
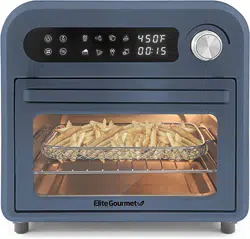
HOW TO USE YOUR TOASTER OVEN
Please familiarize yourself with the following oven functions and accessories prior to first
use:
- Temperature Control Knob (I): Choose the desired temperature from Keep Warm to
450°F for baking or rotisserie.
- Function Control Knob (G): This oven is equipped with five positions for a variety of
cooking needs.
Bake/Roast – Cakes, pies, cookies, poultry, beef, pork etc.
Toast – Bread, Bagels, muffins, frozen waffles, etc.
Rotisserie – Can cook up to a 5lb. roast or chicken
Griddle/Broil – For broiling fish, steak, poultry, pork chops, etc and for making
grilled cheese sandwiches, eggs, bacon, etc on the oven-top.
Keep Warm – To keep cooked food warm for up to 30-minutes.
- Timer Knob (F): When you turn the Timer Knob to the left (counter-clockwise), the
oven will stay “ON” until it is manually shut “OFF”. To activate the timer segment of
the control, turn to the right (clockwise) to toast or use as a timer. This function also
has a bell that rings at the end of the programmed time.
- ON-Light Indicator (H): Illuminated whenever the oven is turned on.
- Wire Rack (N): For toasting, baking and general cooking for casserole dishes and
standard pans.
- Bake/Roasting Pan (M): For use in broiling and roasting.
- Tray/Rack Handle (O): Allows you to pick up the wire rack (N), bake tray (M) when
they are hot and remove from the oven.
- Rotisserie Skewer (Q): Roasts a variety of meats and poultry that are very tender and
juicy inside, and browned to perfection outside. (Used with Rotisserie Clamps &
Thumbscrews (R & S) to secure food to the Skewer.)
Questions? We're here to help! Visit: www.maxi-matic.com for support on this product.
4

HOW TO USE YOUR TOASTER OVEN (cont.)
- Rotisserie Handle (W): Used for removing the rotisserie skewer from the oven after
your food is done.
WARNING: TO AVOID RISK OF INJURY OR BURNS, DO NOT TOUCH HOT SURFACES WHEN
THE OEVEN IS IN USE. ALWAYS USE OVEN MITTS.
CAUTION: ALWAYS USE EXTREME CARE WHEN REMOVING ROTISSERIE, BAKE TRAY, WIRE
RACK, CRUMB TRAY OR ANY HOT CONTAINER FROM THE HOT OVEN. ALWAYS USE THE
TRAY/RACK HANDLE, ROTISSERIE REMOVAL HANDLE OR AN OVEN MITT WHEN REMOVING
THESE ITEMS.
ROTISSERIE COOKING
We recommend that you do not cook a roast/chicken weighing more than 4-5lbs. on the
skewer (Q). Chicken should be bound in food ties/string to prevent chicken legs or wings
from unraveling during cooking; and to keep the rotisserie assembly rotating smoothly. For
best results, we recommend that you preheat the oven for 15-minutes on 450°F.
OPERATION:
- Set the temperature control knob ( I ) to 450°F.
- Turn the function control knob (G) to Rotisserie. Insert the pointed end of the skewer
clamp (R) through the rotisserie skewer (Q), making sure the points of the skewer clamp
(R) face the same direction as the pointed end of the rotisserie skewer. Slide the skewer
clamp (R) towards the square end of the skewer (Q) and secure with a thumbscrew (S).
- Place food to be cooked onto the rotisserie skewer (Q) by inserted the skewer directly
through the center of the food. Push food all the way to the end until the skewer clamp
(R) pierces the food to secure.
- Thread the second skewer clamp (R) through the skewer and pierce the food to secure
and tighten with second thumbscrew (S).
- Check that the food is centered on the rotisserie skewer.
- Insert the pointed end of the rotisserie skewer (Q) into the drive socket located on the
right-hand side of the inside of the oven wall. Make sure the square end of the rotisserie
skewer (Q) rests on the skewer support located on the left-hand side of the oven wall.
- Slide the Crumb Tray (P) into the lowest position slot right above the bottom heating
element rods to catch food drippings.
- Turn the Timer Control Knob (F) to the “STAY ON” position.
- Use the Rotisserie Guide below for suggested roasting times. Check the doneness with a
reliable meat thermometer. Use an independent timer to remind you to check the meat
temperature periodically.
- When complete, turn the Timer Control Knob (F) to the “OFF” position.
- Remove the skewer by placing the hooks of the Rotisserie Removal Handle (W) under
the grooves on either side of the skewer (Q). Lift the left side of the rotisserie skewer first
by lifting it up and out. Then pull the rotisserie skewer out of the drive socket and
carefully remove the roast from the oven. Take the meat off of the rotisserie skewer (Q)
and place on cutting board or platter.
Questions? We're here to help! Visit: www.maxi-matic.com for support on this product.
5

ROTISSERIE COOKING (cont.)
ROTISSERIE GUIDE
Cooking results may vary, adjust these times to your individual requirements.
MEAT
OVEN TEMP
TIME PER LB.
Beef Roast
325 – 450°
30 – 35 min.
Pork Roast
325 – 450°
45 – 50 min.
Ham
325 – 450°
45 – 50 min.
Chicken
350 – 450°
25 – 30 min.
Turkey
350 – 450°
25 – 30 min.
NOTE: All rotisserie times are based on meats at refrigerator temperature. Frozen meats
may take considerably longer and difficult to secure onto skewer. Using a meat
thermometer is
highly recommended.
ROASTING IN YOUR OVEN
Roast your favorite cut of meat to perfection. The oven can cook up to a 6lb. chicken, turkey
and up to a 6lb. roast. A guide has been provided to assist you with roasting times. However,
we suggest that you periodically check the cooking progress with a meat thermometer. For
best results we recommend that you preheat the oven for 15-minutes on 450°. We do not
recommend the use of oven roasting bags or glass containers inside the oven unless they are
heat resistant glass. Never use plastic, cardboard, paper or anything flammable inside the
oven.
OPERATION:
- Place food to be cooked into the Bake/Roasting Pan (M).
- Slide the Grill Rack (N) into the lowest position slot inside the oven.
- Place the Bake/Roasting Pan (M) on top of the grill rack (N).
- Set the Temperature Control Knob ( I ) to the desired temperature.
- Turn the Function Control Knob (G) to Bake/Roast.
- Turn the Timer Control Knob (F) to the “STAY ON” potion.
- To check or remove the roast, use the tray/rack handle (O) provided to help you slide the
pan in and out.
- When cooking is complete, turn the Timer Control Knob (F) to “OFF” position.
ROASTING GUIDE
Cooking results may vary; adjust these times to your individual requirements.
MEAT
OVEN TEMP
TIME PER LB.
Beef Roast
325 – 450°
25 – 30 min.
Pork Roast
325 – 450°
40 – 45 min.
Ham
325 – 450°
35 – 40 min.
Chicken
350 – 450°
20 – 25 min.
Turkey
350 – 450°
20 – 25 min.
NOTE: All roasting times are based on meats at refrigerator temperature. Frozen meats may
take considerably longer. Using a meat thermometer is highly recommended.
Questions? We're here to help! Visit: www.maxi-matic.com for support on this product.
6

BROILING IN YOUR OVEN
For best results, we recommend that you preheat the oven for 15-minutes on 450°F.
OPERATION:
- Set Temperature Control Knob ( I ) to 450°F.
- Turn the Function Control Knob (G) to Broil.
- Preheat the oven.
- Place the Wire Rack (N) into the oven in one of the higher top slots.
- Place the Crumb Tray (P) in a slot right under the Wire Rack.
- Place the food onto the Wire Rack (N).
- Food should be placed as close as possible to the Top Heating Elements without
touching it.
- Now adjust the Temperature Control Knob ( I ) to the appropriate temperature.
- Brush food with any sauces or oil, as desired.
- Turn the Timer Control Knob (F) to “STAY ON”.
- It is advisable to leave the door slightly ajar to ventilate any smoking caused by the
food.
- Turn food over midway through the prescribed cooking time.
- When broiling is complete, turn the Timer Control Knob (F) to “OFF”.
BROILING GUIDE
Cooking results may vary, adjust these times to your individual requirements.
MEAT
OVEN TEMP
TIME PER LB.
Rib Eye Steak
400°
25 – 30 min.
T-Bone Steak
400°
25 – 30 min.
Hamburger Patty
400°
25 – 28 min.
Pork Chops
400°
40 – 45 min.
Lamb Chops
400°
30 – 40 min.
Chicken Legs
400°
30 – 35 min.
Fish Filets
350°
20 – 25 min.
Salmon Steaks
350°
20 – 25 min.
NOTE: All broiling times are based on meats at refrigerator temperature. Frozen meats
may take considerably longer. Using a meat thermometer is highly recommended.
Questions? We're here to help! Visit: www.maxi-matic.com for support on this product.
7

USING THE OVEN-TOP GRIDDLE
The Griddle (T), located on the top of the oven, is a convenient way to cook a large variety
of foods without having to use additional pots and pans. It is also perfect for cooking
your dinner side dishes while using the Rotisserie or broiling meat, fish or poultry. Food
can be kept warm while cooking items within the oven itself or while cooking elsewhere.
The Griddle (T) is ideal for making grilled cheese sandwiches, bacon, eggs, French Toast,
pancakes, hamburgers, hot dogs and much more.
PLEASE NOTE: The initial 15 minutes of use may result in minimal smell and smoke. This
is normal and harmless and comes from the protective substance applied to the heating
elements during manufacturing.
OPERATION:
- Set the Temperature Control Knob ( I ) to the Maximum temperature setting.
- Turn the Function Control Knob (G) to Broil; this will turn on the top heating
element rods to heat up the Griddle (T).
- Turn the Timer Control Knob (F) to “STAY ON”, preheat for 5-minutes and begin
cooking.
- When finished, turn the Timer Control Knob (F) to the “OFF” position.
- Remove food and serve.
- Always allow the griddle to cool down completely before removing it off the oven
for cleaning. The Griddle (T) is dishwasher safe.
- To remove the Griddle (T), open the Glass Door (K). Grip the front edge of the
Griddle and lift upwards carefully. The back will lift up easily.
- To place the Griddle (T) back onto the oven after cleaning, simply set it back on top
making sure the front edge is facing the front.
USING THE LID/COVER & STEAMING
The Lid/Cover (U) can be used to flash steam vegetables, to warm rolls and to keep other
foods warm before serving.
STEAMING: (Use Steam Rack if applicable)
- Prepare and cut foods into uniform size.
- Place Steam Rack onto the Oven Top Griddle (T).
- Pour ¼ cup of water into the Griddle. Replenish as needed.
- Position food onto the Steam Rack.
- Cover food with the Lid/Cover (U).
- Set the Temperature Control Knob ( I ) to the Maximum temperature setting.
- Turn the Function Control Knob (G) to Broil, this will turn on the top heating
element rods to heat up the Griddle (T).
- Turn the Timer Control Knob (F) to “STAY ON”, preheat for 5-minutes and begin
cooking.
- When finished, turn the Timer Control Knob (F) to the “OFF” position. Remove food
and serve.
Questions? We're here to help! Visit: www.maxi-matic.com for support on this product.
8

BAKING IN YOUR OVEN
Bake your favorite cookies, cakes, pies, brownies, etc. The bakeware that will fit in your
oven are up to 9-inches in length. We do not recommend the use of oven roasting bags
or glass containers inside the oven that are not heat resistant.
NEVER use plastic, cardboard, paper or anything flammable in the oven.
NOTE: When using a single wire rack (N), position the Wire Rack (N) in the lowest
support guide.
POSITIONING OF THE RACK WHEN BAKING:
Cookies – Use bottom or middle support guides.
Layer Cakes – Use bottom support guide only. (Bake one at a time).
Pies – Use bottom or middle support guides.
TOASTING IN YOUR OVEN
Large capacity oven allows for toasting 4 to 6 slices of bread, 6 muffins, frozen waffles or
frozen pancakes. When toasting only 1 or 2 items, place food on the wire rack (N) in the
center of the oven.
OPERATION:
- Set the Temperature Control Knob ( I ) to 450°.
- Turn the Function Control Knob (G) to Toast.
- Place food to be toasted on the Wire Rack (N).
- Ensure Crumb Tray (P) is positioned at bottom of oven below the heating rods.
- Turn the Timer Control Knob (F) to desired darkness. (Light to Dark).
- Bell will ring to signal the end of the Toast cycle.
NOTE: Wire Rack (N) should be positioned in the middle of the oven with the
indentations pointing down.
KEEP WARM
Keep cooked food warm for up to 30-minutes. Longer periods of time are not
recommended as food will become dry or spoiled.
OPERATION:
- Set the Temperature Control Knob ( I ) to Keep Warm.
- Turn the Function Control Knob (G) to Keep Warm.
- Turn the Timer Control Knob (F) to ON.
- Turn the Timer Control Knob (F) to OFF when finished using Keep Warm function.
CAUTION: When using the Wire Rack (N) and pulling it out of the oven, always support
the rack. Do not let go until you are sure the rack is securely supported by the rack
handle.
Questions? We're here to help! Visit: www.maxi-matic.com for support on this product.
9

CLEANING AND MAINTENANCE
WARNING: Be sure to unplug the oven and allow it to cool before cleaning.
If desired, wipe the walls with a damp sponge, cloth or nylon scouring pad and mild
detergent. DO NOT USE STEEL WOOL SCOURING PADS, ABRASIVE CLEANERS OR SCRAPE
THE WALLS WITH A METAL UTENSIL, AS ALL OF THESE METHODS MAY DAMAGE THE
INTERIOR COATING.
All accessories should be washed in hot soapy water or can be cleaned in a dishwasher.
The door can be wiped with a damp sponge and wiped dry with a paper or cloth towel.
Clean the outside with a damp sponge. DO NOT USE AN ABRASIVE CLEANER AS IT MAY
DAMAGE THE EXTERIOR FINISH.
DO NOT USE AN ABRASIVE CLEANER OR STEEL WOOL SCOURING PAD ON THE DRIP PAN
AS IT MAY DAMAGE THE PORCELAIN ENAMEL FINISH.
LET ALL PARTS AND SURFACES DRY THOROUGHLY PRIOR TO PLUGGING THE OVEN IN AND
USING
Questions? We're here to help! Visit: www.maxi-matic.com for support on this product.
10

RECIPES – ROASTS / For Oven Roast or Rotisserie
These recipes can all be used by cooking the roasting rack OR by using the Rotisserie Spit &
Fork.
CHERRY-GLAZED PORK ROAST
(Can substitute with Beef Roasts)
14 oz. Jar of cherry preserves 3 lb. Boneless pork roast
¼ C Red wine vinegar ½ Tsp. Salt
¼ Tsp. Salt ¼ Tsp. Black pepper
3 Tbsp. Light corn syrup
¼ Tsp. Ground cinnamon
¼ Tsp. Ground cloves
3 Tbsp. Almonds, slivered toasted
- Combine first 7 ingredients in a small saucepan. Bring to a boil; reduce heat, and simmer
for 2 minutes. Add the almonds and simmer for 1 minute.
- Sprinkle roast with salt and pepper. Place roast into the oven.
- Set Timer for 45min. – 1 hour.
- Set heat selection according to Roasting or Rotisserie.
- After every 15 minutes of roasting, occasionally brush on the Cherry Mixture.
- When cooking cycle is complete, turn oven off, remove roast carefully and serve hot.
ROYAL PORK ROAST
1 Boneless pork top loin roast (3 lbs.)
2 cloves garlic, thinly sliced
2 Tbsp. Dijon mustard
1 Tsp. Red wine vinegar
¾ Tsp. Ground thyme
½ Tsp. Ground sage
1 Cup Reduced-fat beef broth
¾ Cup unsweetened apple juice
½ Cup apricot jam
1 Tbsp. Cornstarch
1 Tbsp. Sour cream
- Cut 8 deep slits in the top of roast, insert garlic into slits.
- Mix mustard, vinegar, thyme, and sage in a bowl. Brush on the mixture onto the roast
entirely.
- Place roast into the oven.
- Set Timer for 1 hour and begin cooking.
- Set heat selection according to Roasting or Rotisserie.
- Warm ¾ cup of broth, apple juice and jam in a small saucepan over medium-high heat
or until jam melts. Brush jam mixture onto roast once. (Save the ¼ cup of broth for later
use.)
- Add sour cream and cornstarch to jam mixture and mix until smooth. Add the rest of
beef broth into mixture in a saucepan and cook over medium heat until bubbly and
thickened.
- Serve sauce over thin slices of the pork roast.
CAJUN PORK ROAST
(Can substitute with Beef Roasts)
2 lbs. Boneless Single Loin Pork Roast
2 Tbsp. Paprika
½ Tsp. Cayenne Pepper
½ Tsp. Garlic Powder
2 Tsp. Oregano
1 Tsp. Thyme
½ Tsp. Salt
½ Tsp. White pepper
1 Tsp. Cumin
¼ Tsp. Nutmeg
Questions? We're here to help! Visit: www.maxi-matic.com for support on this product.
11

RECIPES – ROASTS / For Oven Roast or Rotisserie (cont.)
- Combine all seasonings and rub mixture all over the surface of roast. Place roast
into oven. Set heat selection according to Roasting or Rotisserie.
- Roast for 1- 1 ½ hour. When done, cool down for 10 minutes before serving.
SWEET CHILE CHUTNEY ROAST BEEF
2 ½ lb. Boneless Rib of beef.
Glaze:
3 Tbsp. Honey 1 Tbsp. Dried chilies
Chutney:
1 large thinly sliced apples
2 Tomatoes, chopped
2 Tbsp. Brown Sugar
½ Cup Red Wine
½ Cup Water
Pinch of Cayenne pepper
- Place ingredients for Chutney into saucepan. Bring to a boil and simmer for 10
minutes until nice and thick.
- Place roast beef into oven.
- Set heat selection according to Roasting or Rotisserie.
- Cook for ½ hour – 45 minutes.
- Brush Honey onto Roast. Let roast for another 10 minutes and brush some of
Chutney mixture onto Roast.
- Serve with remaining Chutney mixture.
RECIPES – CHICKEN / For Oven Roast or Rotisserie
These recipes can all be used by cooking the roasting rack OR by using the Rotisserie Spit
& Fork.
JAMAICAN CHICKEN
½ Cup Water
5-6 thin slices fresh ginger
2 dried chili peppers, crumbled
½ onion chopped.
¼ cup white-wine vinegar
1 Tbsp. Pepper sauce
1 Tsp. Dried thyme
½ Tsp. Ground allspice
½ Tsp. Ground Black pepper
1 Whole chicken (4 lbs.)
- In blender, combine water, ginger, chili peppers, onions, vinegar, pepper sauce,
thyme, allspice and black pepper. Puree until fairly smooth.
- Truss chicken or tie drumsticks together. Spread mixture onto chicken thoroughly.
Reserve leftover mixture for later use. Cover and refrigerate overnight.
- Place chicken into oven and set heat selection according to Roasting or Rotisserie.
Roast for 1- 1½ hour.
- Take reserved mixture and place in a saucepan. Bring to a boil and keep warm over
low heat.
- Serve mixture as the sauce with the chicken.
Questions? We're here to help! Visit: www.maxi-matic.com for support on this product.
12

RECIPES – CHICKEN / For Oven Roast or Rotisserie (cont.)
BALSAMIC CHICKEN
1/3 Cup Olive Oil
1/3 Cup Balsamic Vinegar
1 Tbsp. Dried rosemary
½ Tsp. Red pepper flakes
1 clove garlic, minced
1 Whole chicken (4 lbs.)
1 Green bell pepper, sliced
1 Red bell pepper, sliced.
1 Small red onion, quartered
3 Carrots cut into 1” pieces.
1 Small eggplant cut into 1” pieces
- In small bowl, combine olive oil, balsamic vinegar, rosemary, red pepper flakes and
garlic.
- Truss chicken or tie drumsticks together. Marinate chicken in mixture for a half
hour.
- Reserve the mixture.
- Place chicken into oven.
- Set heat selection according to Roasting or Rotisserie.
- Roast for 1-1½ hour.
- Add the vegetables into reserved mixture and toss to coat evenly. Place vegetables
in roasting basket and roast in Oven when chicken is done and removed. Cook for
15-20 minutes or until edges brown.
- Serve together hot with chicken.
SPICY CUBAN ROTISSERIE CHICKEN _______
1 large whole chicken (4 lbs.)
2 Tsp. Dried oregano
1 Tsp. Salt & pepper
¼ Cup fresh lime juice
1 Tsp. Ground cumin
3 Tbsp. Olive Oil
1 Shallot, minced
¼ Tsp. Pepper lime slices
2 Large garlic cloves
Minced Cilantro sprigs
1 Tsp. Grated Lime peel
- Truss chicken or tie drumsticks together. In large bowl, mix lime juice, olive oil,
shallot, garlic, lime peel, oregano, salt, cumin and pepper together.
- Cover chicken with this mixture, make sure to coat evenly. Cover chicken and
refrigerate overnight.
- At cooking time, take chicken and insert into the oven.
- Set heat selection according to Roasting or Rotisserie.
- Cook about 1- 1½ hours.
- Once Timer is done, let chicken sit for 5-10 minutes. Remove chicken when it has
cooled down.
- Serve with lime slices and cilantro sprigs.
Questions? We're here to help! Visit: www.maxi-matic.com for support on this product.
13

RECIPES – CHICKEN / For Oven Roast or Rotisserie (cont.)
STICKY ROASTED CHICKEN _______
4 Tsp. Salt
2 Tsp. Paprika
1 Tsp. Cayenne pepper
1 Tsp. Onion Powder
1 Tsp. Thyme
1 Tsp. White Pepper
½ Tsp. Garlic Powder
½ Tsp. Black Pepper
1 Large Whole chicken (4 lbs.)
1 Cup Chopped Onion
- Combine all the spices in a bowl. Remove giblets from chicken. Truss chicken or tie
drumsticks in place. Rub spice mixture into chicken both inside and out. Place in
refrigerator overnight.
- When ready to roast, stuff cavity of chicken with onions. Place chicken into the oven
Set heat selection according to Roasting or Rotisserie.
- Cook for 1-1½ hours.
- Once Timer is done, let chicken sit for 5-10 minutes. Remove chicken when it has
cooled down. Carve and serve.
RECIPES – HAMS / For Oven Roast or Rotisserie
These recipes can all be used by cooking the roasting rack OR by using the Rotisserie Spit
& Fork.
APPLE CIDER GLAZED HAM
1 (3 lb - 5 lb) Boneless shank of Ham
1 Cup Apple Cider
4 Tsp. Cornstarch
2 Tsp. Spicy Mustard
1/8 Tsp. Cloves, ground
- Combine 2 Tbsp. Of apple cider and cornstarch together in small bowl. In a
saucepan, bring cornstarch mixture and rest of apple cider, mustard and cloves to a
boil. Stir until thickened.
- Coat Ham in mixture and refrigerate overnight.
- When ready to cook, place ham into oven.
- Set heat selection according to Roasting or Rotisserie.
- Set Timer to 1 – 1 ½ hour. Occasionally glazing Ham with remaining apple cider
mixture. Serve mixture over slices of Ham.
HONEY-APRICOT GLAZED HAM
1 (8-10 lb) Smoked Ham
1 Cup Honey
1 (6oz) Can of Frozen Orange Juice
thawed
1/3 Cup Soy Sauce
1/3 Cup Apricot Jam
½ Tsp. Nutmeg
¼ Tsp. Cloves
- Mix all ingredients together except for the Ham. Coat mixture over Ham.
- Place ham into oven.
- Set heat selection according to Roasting or Rotisserie.
- Set Timer for 1 ½ - 2 hours.
- Occasionally brush remaining mixture onto Ham during cooking.
- Once Timer reaches zero, set switch to No Heat Rotation and let cool for 5 minutes.
- Slice and serve with mixture.
Questions? We're here to help! Visit: www.maxi-matic.com for support on this product.
14

RECIPES – HAMS / For Oven Roast or Rotisserie (cont.)
SUGARED HAM
1 (8 lbs) half shank of smoked ham
2 Tbsp. Whole cloves
¾ Cup Port Wine
2 Tbsp. Port Wine
1 Cup Packed Brown sugar
3 Tbsp. Dijon Mustard
- Score Ham in diamond pattern and stud with cloves. Marinate Ham in ¾ Cup of Port
over night. Make sure to turn occasionally to coat thoroughly.
- Place Ham into oven
- Set heat selection according to Roasting or Rotisserie..
- Set Timer for 45 – 60 minutes.
- In small bowl, combine sugar, mustard and 2 Tbsp. of port. Mix until smooth and
glazy.
- Once Ham been cooking for 30 – 45 minutes, brush sugar glaze onto Ham and cook
for 15 more minutes. Let stand for 15 minutes before carving and serve.
HONEY BAKED HAM
1 (5 lb) boneless Ham
2 Cups Honey
2 Cups Brown Sugar
5 1/3 Tbsp. Cider Vinegar
2 Tsp. Nutmeg
2 Tsp. Ground cinnamon
2 Tsp. Ground cloves
- Combine all ingredients except for the Ham and the string into a saucepan. Stir over
medium heat until warm. Coat Ham with mixture evenly. Cover and refrigerate
overnight.
- Place ham into oven.
- Set heat selection according to Roasting or Rotisserie.
- Set Timer for 45 – 60 minutes or until heated through.
- Let stand for 10 minutes before carving and serve.
RECIPES – CHICKEN / For Oven Top Grill & Griddle
Note: Most recipes to be used on the Oven Top GRILL can be incorporated to be used
with grilling INSIDE the oven as well by using the Grilling Rack.
CITRUS GRILLED CHICKEN BREASTS
6 Boneless chicken breasts
½ Cup Frozen orange juice concentrate,
thawed
¼ Cup Vegetable oil
¼ Cup Lemon Juice
2 Tbsp Grate orange peel
1 Clove garlic, chopped
½ Tsp Salt
- Mix all the ingredients except the chicken in a bowl. Using a fork, pierce chicken
breasts a few times on both sides. Coat chicken with orange marinade and store
with the marinade in refrigerator for 2-5 hours. Do not exceed 24 hours.
- Heat up your Oven Top Grill to desired temperature.
- Remove chicken from the marinade. Reserve the remaining marinade for later use.
- Cover and grill for 15-20 minutes, brushing occasionally with reserved marinade.
- Heat remaining marinade in saucepan to boiling or until thick. Serve with chicken.
Questions? We're here to help! Visit: www.maxi-matic.com for support on this product.
15

RECIPES – CHICKEN / For Oven Top Grill & Griddle (cont.)
HONEY MUSTARD GRILLED CHICKEN SANDWICHES
4 Chicken breast breasts
¼ Cup Dijon mustard
2 Tbsp Honey
¼ Tbsp Garlic powder
1 Tablespoon Chopped oregano leaves
(Fresh or dried)
1/8 Tsp Red cayenne pepper
1 Tsp Water
2 Tbsp Mayonnaise
Thin slices of tomatoes
Lettuce
Whole grain sandwich buns
- Mix mustard, honey, oregano, garlic powder, red pepper and water; brush onto
chicken breasts.
- Heat up your Oven Top Grill to desired temperature.
- Cover and grill chicken 8 to 10 minutes, brushing with mustard mixture and turning
occasionally. Discard any remaining mustard mixture. Serve chicken on buns with
tomato, mayonnaise and lettuce.
CHEDDAR STUFFED GRILLD CHICKEN BREASTS
4 Boneless, skinless chicken breasts
3 oz. Shredded cheddar cheese
¼ Tsp Salt
¼ Tsp Pepper
1 Tbsp Melted butter
- Heat your Oven Top Grill to desired temperature
- Take chicken breasts and flatten to ¼” thick between sheets of plastic wrap.
Sprinkle with salt and pepper.
- Spread shredded cheddar cheese over chicken breasts and roll chicken tightly,
wrapping in the cheese. Brush chicken with melted butter.
- Cover and grill chicken for 15 minutes.
- Serve with salsa, rice and beans.
MAPLE WHISKEY GLAZED CHICKEN BREAST
1 Tbsp Dried Thyme
2 Boneless, skinless chicken breasts
½ Cup Pure maple syrup
3 Tbsp Jack Daniel’s Whiskey
1 Tbsp Vegetable Oil
- Rub chicken breasts with dried thyme.
- Mix the remaining ingredients in a bowl. Using a fork, pierce chicken breasts a few
times on both sides. Coat chicken with marinade and store with the marinade in
refrigerator for 2-5 hours. Do not exceed 24 hours.
- Heat up your Oven Top Grill to desired temperature.
- Remove chicken from the marinade. Reserve the remaining marinade for later use.
- Cover and grill for 15-20 minutes, brushing occasionally with reserved marinade.
Questions? We're here to help! Visit: www.maxi-matic.com for support on this product.
16

RECIPES – CHICKEN / For Oven Top Grill & Griddle (cont.)
APPLE HONEY GRILLED CHICKEN
4 Boneless, skinless chicken breasts
1/3 Cup Apple jelly
1 Tbsp Honey
1 Tbsp Dijon Mustard
½ Tsp Cinnamon
½ Tsp Salt
- Heat up your Oven Top Grill to desired temperature.
- Mix all ingredients except chicken in a small bowl. Brush chicken with sauce mixture
- Reserve the remaining glaze for later use.
- Cover and grill for 15-20 minutes, brushing occasionally with reserved glaze.
- Serve chicken drizzled with remaining apply honey glaze.
RECIPES – BEEF / For Oven Top Grill & Griddle
Note: Most recipes to be used on the Oven Top GRILL can be incorporated to be used
with grilling INSIDE the oven as well by using the Grilling Rack.
HERB STEAKS
4 Beef boneless top loin steaks, 1” thick
(1 pound)
¼ Cup Dijon Mustard
2 Cloves garlic, chopped finely
2 Tsp Chopped rosemary leaves
(Fresh or dried)
1 Tsp Ground pepper
- Heat up your Oven Top Grill to desired temperature. Mix the mustard, rosemary,
pepper and garlic. Spread mixture onto both sides of the steaks.
- Grill steaks uncovered for 5-10 minutes depending on desired doneness.
COWBOY T-BONE STEAKS
4 Beef T-Bone steaks, ¾” thick
¼ Cup Softened butter
½ Tsp Worcestershire sauce
1 Tbsp Dijon Mustard
2 Cloves garlic, cut in halves
4 Tsp Crushed black peppercorn
¼ Tsp Lime juice
Salt & pepper for taste
- Heat up your Oven Top Grill to desired temperature. Rub garlic onto steaks. Press
crushed peppercorn into the steaks.
- Mix the remaining ingredients except the salt and pepper. Brush thinly onto steaks.
Set aside remaining mixture.
- Cover and grill steaks for 5-10 minutes depending on desired doneness. Serve with
remaining butter mixture and sprinkle with salt and pepper.
Questions? We're here to help! Visit: www.maxi-matic.com for support on this product.
17

RECIPES – BEEF / For Oven Top Grill & Griddle (cont.)
TEQUILA LIME STEAKS _______
2 lb. Beef boneless steak
2 Tbsp Tequila
2 Tbsp Vegetable oil
½ Cup Lime juice
½ Tsp Salt
½ Tsp Ground cumin
½ Tsp Cayenne pepper
2 Cloves chopped garlic
- Mix all the ingredients except the steak in a bowl. Using a fork, pierce steak a few
times on both sides. Coat steak with tequila marinade and store with the marinade
in refrigerator for 6 hours. Do not exceed 24 hours.
- Heat up your Oven Top Grill to desired temperature. Remove steak from the
marinade. Reserve the remaining marinade for later use.
- Cover and grill steak for 3-7 minutes depending on desired doneness. Occasionally
brush the remaining marinade onto steak while grilling.
BALSAMIC HERB STEAKS
4 Beef boneless top loin steaks, 1” thick
(1 pound)
½ Cup Balsamic vinegar
8 Sprigs of thyme
8 Sprigs of rosemary
¼ Cup Olive oil
- Combine rosemary and thyme sprigs in a bowl. Stir in the balsamic vinegar and oil.
Add steaks to marinade. Coat well on both sides. Cover steaks and marinade with
plastic wrap and refrigerate up to 6 hours. Do not exceed 24 hours.
- Heat up your Oven Top Grill to desired temperature. Remove steaks from the
marinade. Reserve the remaining marinade for later use.
- Cover and grill steak for 5-10 minutes depending on desired doneness. Occasionally
brush the remaining marinade onto steak while grilling.
PEPPER STEAK WITH CABERNET
6 Sirloin Steaks
4 Tbsp. Cracked Peppercorn
(black, green and pink)
½ Tsp. Salt
1 Tbsp. Olive Oil
3 Shallots, sliced
1 Cup Cabernet wine
1 ½ Cups beef broth
1 Cup Cream
2 Tbsp. Butter
- Heat up your Oven Top Grill to desired temperature. Season steaks with peppercorn
and salt.
- Over medium heat, in a saucepan, combine olive oil and 1 Tbsp. Butter, shallots and
cabernet. Stir and cook until the mixture thickens slightly to a glaze. Add cream
and reduce mixture. Mix well and keep warm. Season with salt.
- Grill steaks uncovered for 5-10 minutes depending on desired doneness.
Occasionally brush the mixture onto steaks while grilling. Reserve remaining
mixture and serve the steaks.
Questions? We're here to help! Visit: www.maxi-matic.com for support on this product.
18

RECIPES – SEAFOOD / For Oven Top Grill & Griddle
Note: Most recipes to be used on the Oven Top GRILL can be incorporated to be used
with grilling INSIDE the oven as well by using the Grilling Rack.
GRILLED HALIBUT WITH CAILANTRO & LIME
2 Halibut steaks
1 Tbsp Freshly chopped cilantro
2 Tbsp Lime juice
1 Clove garlic, chopped
1 Tsp Olive oil
Pepper to taste
- Mix all the ingredients except the halibut in a bowl. Using a fork, pierce the fish a
few times on both sides. Coat halibut steaks with lime juice marinade and store
with the marinade in refrigerator for 6 hours. Do not exceed 24 hours.
- Heat up your Oven Top Grill to desired temperature. Remove steaks from the
marinade. Reserve the remaining marinade for later use.
- Cover and grill halibut for 10-15 minutes or until fish flakes easily with a fork.
Occasionally brush remaining marinade onto fish while grilling.
- Sprinkle with pepper and serve.
GRILLED SHRIMP
2 pounds Jumbo shrimp
¼ cup Vegetable oil
2 Tbsp Fresh lemon juice
¼ cup Freshly chopped parsley
3 Cloves garlic, minced
1 tsp Dried basil
1 tsp Dry mustard
1 tsp Salt
- Place shrimp in a glass bowl. Stir remaining ingredients together; pour over shrimp.
Cover and refrigerate for 3 to 4 hours.
- Heat up your Oven Top Grill to desired temperature. Remove shrimp from the
refrigerator.
- Grill shrimp for 5-10 minutes or until skin turns pink and opacity disappears.
Occasionally brush shrimp with remaining marinade while grilling.
CUCUMBER SAUCE WITH SWORDFISH
2 fresh or frozen Swordfish steaks (or Halibut)
1/4 Cup Finely chopped Cucumber, seeds removed.
1/3 Cup Plain Yogurt
2 Cloves crushed Garlic
1 Tsp. Dill weed
- Heat up your Oven Top Grill to desired temperature. Cover and grill fish for 5-10
minutes or until fish flakes easily.
- For sauce, combine remaining ingredients into a bowl, mix well and let chill for an
hour.
- Remove fish and serve hot with chilled sauce.
Questions? We're here to help! Visit: www.maxi-matic.com for support on this product.
19

RECIPES – SEAFOOD / For Oven Top Grill & Griddle (cont.)
LEMON SAGE RED SNAPPER
4 Red Snapper fillets (½ inch thick)
½ Tsp. Salt
¼ Tsp. Scallion (minced)
1 Tsp. Sage (crumbled)
3 Tbsp. Butter
½ Cup Chicken Broth
- Marinade fish in chicken broth for 4-5 hours or over night.
- Season fish on both sides with salt and pepper. Arrange lemon slices over fillets,
sprinkled with scallion then top with sage. Dot with butter.
- Heat up your Oven Top Grill to desired temperature. Cover and grill for 5-10
minutes or until fish flakes easily. Transfer fish into serving plates, spoon some of
the chicken broth over the fish and serve right away.
GRILLED FISH WITH MUSHROOMS
4 Fish Fillets (Any)
3 Tbsp. Butter slices
1 Tbsp. Lemon juice
1½ Cups Chopped mushrooms
1 Tsp. Salt
¼ Tsp. Lemon pepper
2 Tbsp. Chopped parsley
Parsley sprigs and lemon wedges for
garnish
- Heat up your Oven Top Grill to desired temperature. Place fish fillets onto grill.
Sprinkle with lemon juice, salt, and lemon pepper. Grill for 5-10 minutes or until fish
flakes easily.
- Meanwhile, combine remaining ingredients in a saucepan and sauté over low heat
for 5 to 7 minutes.
- To serve, spoon mushroom mixture over fish. Garnish with parsley springs and
lemon wedges.
BUTTERED CITRUS LOBSTER TAILS
6 (6oz) Fresh Lobster Tails
¼ Cup Water
2 Tbsp. Butter
1 ½ Tsp. Lemon Juice
¼ Tsp. Finely shredded Orange peel
Dash of Salt
Dash of Ground Ginger
Dash of Paprika
- Heat up your Oven Top Grill to desired temperature.
- Make sure the tops of each lobster tail has a slit through the center to allow the
meat to break through. Spread the tail open in a butterfly fashion. Position tails
onto grill.
- Meanwhile, combine lemon juice, salt, ginger, butter, orange peel and paprika
together in small saucepan over low heat until mixture is melted and mixed well.
Drizzle mixture over lobster tails.
- Grill covered for 20-25 minutes or until lobster shell turns bright red and the meat
turns white.
Questions? We're here to help! Visit: www.maxi-matic.com for support on this product.
20

RECIPES – MISCELLANEOUS / For Oven Top Grill & Griddle
Note: Most recipes to be used on the Oven Top GRILL can be incorporated to be used
with grilling INSIDE the oven as well by using the Grilling Rack.
GRILLED PEACHES
6 Peaches
½ cup Balsamic vinegar
¼ cup Brown sugar juice of 1 lemon
¼ tsp Freshly ground black pepper
- Half the peaches, remove pits. Drizzle with about 2 tsp of the lemon juice. Cover
with plastic wrap and set aside.
- In a small saucepan, combine vinegar, brown sugar, remaining lemon juice and
black pepper. Boil until reduced by about 1/2.
- Heat up your Oven Top Grill & Griddle to desired temperature. Lightly oil the grill.
- Place peaches cut-side down on. Cover and cook for about 2 minutes, or until there
are grill marks. Turn over and baste the cut sides with the vinegar mixture. Cover the
grill and cook for about 3 more minutes, or until softened.
- Serve with fish or chicken.
APPLE CINNAMON PANKCAKES (Use with Griddle)
1 1/2 Cups milk
2 eggs
1/3 Cup solid shortening
1 1/2 Cups all-purpose flour
2 1/2 Tsp. Baking powder
1 Tsp. Salt
1 Tsp. Ground cinnamon
2 medium apples, quartered, pared and
cored
- Heat up your Oven Top Grill & Griddle to desired temperature.
- Put all ingredients into blender container. Blend until apples are finely chopped.
- For each pancake, pour 1/4 cups of batter onto heated griddle.
- Cook until bubbly, turn and cook on other side until golden brown.
BACON & EGGS 3 CHEESE WRAP (Use with Griddle)
4 Corn or Flour tortillas
4 Strips of bacon
4 Eggs, well beaten
¼ Cup Shredded Cheddar Cheese
¼ Cup Shredded Mozzarella Cheese
¼ Cup Shredded Romano Cheese
- Heat up your Oven Top Grill & Griddle to desired temperature.
- Cook bacon on griddle 3-5 minutes or until crisp. Remove and keep warm.
- Cook eggs on griddle for 5-7 minutes or until light and fluffy.
- Place tortillas onto griddle, fill with cooked eggs. Lay strips of bacon onto each
tortilla.
- Spread cheeses on top. Cook covered for 4-5 minutes or until cheese is melted.
- Serve with tortilla wrapped tightly around the bacon, eggs and cheese.
Questions? We're here to help! Visit: www.maxi-matic.com for support on this product.
21

RECIPES – MISCELLANEOUS / For Oven Top Grill & Griddle (cont.)
GRILLED MIXED VEGETABLES___________________________________________
2 Zucchini, sliced length wise
½ Cup Sliced mushrooms
½ Cup Sliced red bell peppers
½ Cup Sliced yellow bell peppers
1 Tablespoon Olive oil
Salt and pepper
- Combine all ingredients into bowl. Toss to coat well.
- Heat up your indoor/outdoor grill to desired temperature. Grill vegetables until
tender. Serve with steaks, chicken or wish.
HAM AND CHEESE GRIDDLE CAKES
3/4 cup Yellow cornmeal
3/4 cup Unbleached all purpose flour
1 tsp Baking powder
1/4 tsp Baking soda
1/4 tsp Salt
1 1/2 cup Buttermilk
3 Large eggs, separated
4 tbsp Butter, melted
1/3 cup Crumbled blue cheese
1/3 cup Finely chopped ham
Maple syrup
- Mix first 5 ingredients in large bowl to blend. Whisk buttermilk, egg yolks and 1 1/2
tablespoons melted butter in medium bowl to blend. Whisk into dry ingredients.
Mix in cheese and ham. Beat egg whites in another bowl to stiff peaks. Fold whites
into batter in 2 additions. Heat up your indoor/outdoor griddle to desired
temperature.
- Heat 1 tablespoon melted butter on griddle over medium heat. Working in batches,
pour batter into skillet by 1/4 cupfuls. Cook until cakes are puffed and golden,
adding more butter skillet for each batch if necessary, about 3 minutes per side.
Transfer to plates. Serve with maple syrup.
GRILLED NEW POTATOES WITH PARMESAN AND HERBS
3 pounds Small red-skinned potatoes
4 tbsp Olive oil
1 cup Thinly sliced green onions
3 tbsp Chopped Italian parsley
3 tbsp Grated Parmesan
3 Cloves of garlic, chopped
2 tsp Freshly chopped oregano
- Cook potatoes in large pot of boiling salted water until tender, about 15 minutes.
Drain potatoes; cool.
- Heat up your Oven Top Grill & Griddle to desired temperature.
- Cut potatoes in half; transfer to large bowl. Add 2 tablespoons oil; toss to coat.
- Grill potatoes until golden, turning occasionally, about 7 minutes. Transfer to bowl.
Add remaining ingredients; toss to coat. Season with salt and pepper. Serve warm.
Questions? We're here to help! Visit: www.maxi-matic.com for support on this product.
22

RECIPES – BAKING COOKIES / For Oven Baking Feature
APPLE SAUCE COOKIES
Makes 36
________________________________________
1 lb. Cooking apples, peeled, cored and
diced.
3 Tbsp Water
½ Cup Sugar
½ Cup Butter or Margarine
1 Cup All-purpose flour
½ Tsp Baking Powder
¼ Tsp Baking Soda
Pinch Salt
½ Tsp Ground Cinnamon
½ Cup Chopped Walnuts
- Cook apples with the water in a covered saucepan over low heat until the apples are
tender. Set aside and let cool slightly. Then purée in a food processor or blender, or
mash with a fork. Measure out ¾ of a cup and set aside.
- Preheat the oven to 375F. Grease a baking sheet. (Make sure the baking sheet is
the right size to fit into the oven.)
- Cream together the sugar, butter or margarine in a medium sized bowl until
thoroughly mixed. Beat in the reserved applesauce. Sift the flour, baking powder,
baking soda, salt and cinnamon into the mixture and stir to blend. Fold in the
walnuts.
- Drop small spoonfuls about the size of jawbreaker onto the prepared baking sheet.
Place each about 2 inches apart to avoid sticking.
- Bake the cookies for 8-10 minutes or until they are golden brown. Transfer to a wire
rack and allow to cook before serving.
(You may need to repeat the baking process for the remaining dough.)
BUTTERMILK COOKIE BISCUITS
Makes 15
1 ½ Cups All-Purpose flour
Pinch Salt
1 Tsp Baking powder
½ Tsp Baking soda
4 Tbsp Cold butter or margarine
¼ Cup Buttermilk
- Preheat oven to 425F. Grease a baking sheet. Sift the dry ingredients first into a
bowl. Rub the butter or margarine in until the dough becomes crumbly.
- Gradually pour in the buttermilk, stirring with a fork until the mixture forms a soft
dough. Roll dough out to about ½ inch thick. Stamp out 2 inch cookies with a
cookie cutter. Place onto baking sheet and bake for 12-15 minutes until golden.
Serve warm or at room temperature.
(You may need to repeat the baking process for the remaining dough.)
Questions? We're here to help! Visit: www.maxi-matic.com for support on this product.
23

RECIPES – BAKING COOKIES / For Oven Baking Feature (cont.)
GRANNY’S GINGER COOKIES
Makes 60
2 ½ Cups All-purpose flour
1 Tsp Baking Soda
1 ½ Tsp Ground Ginger
¼ Tsp Ground Cinnamon
¼ Tsp Ground Cloves
½ Cup Butter or Margarine
1 ½ Cups Sugar
1 Egg, well beaten
4 Tbsp Black molasses
1 Tsp Fresh lemon juice
- Preheat the oven to 325F. Grease baking sheet. (Make sure the baking sheet is the
right size to fit into the oven.)
- Sift the flour, baking soda and all the spices into a bowl. Set aside.
- Cream together the butter or margarine and 2/3 of the sugar with an electric mixer.
- Stir in the egg, molasses and lemon juice. Add the flour mixture and mix in
thoroughly with a wooden spoon to make a soft dough.
- Shape the dough into 1/4 “ balls. Roll the balls in the left over sugar and place them
on the baking sheets about 2 inches apart.
- Bake for about 12 minutes or until the cookies are firm to the touch. Transfer to a
wire rack and let cool before serving.
(You may need to repeat the baking process for the remaining dough.)
ALMOND CINNAMON COOKIE BALLS
Makes 15
1 ½ Cups Ground almonds
1/3 Cup Granulated sugar
1 Tablespoon Ground Cinnamon
2 Egg Whites
Oil For greasing
Confectioners’ Sugar or Powder Sugar
for coating
- Preheat the oven to 350F. Grease a baking sheet. (Make sure the baking sheet is
the right size to fit into the oven.)
- Mix together the ground almonds, sugar and cinnamon. Beat the egg whites until
they begin to stiffen and fold enough into the almond mixture to make a fairly firm
dough. Wet hands with cold water and roll small spoonfuls of the dough into round
balls. Place onto baking sheet.
- Bake for 15 minutes making sure that they remain soft on the inside. Too much
baking time will result in hard and tough cookies. Remove the cookie balls from the
baking sheet and set aside to cool.
- Sift the confections’ sugar or powder sugar onto a plate. Roll the cookie balls into
the sugar, shaking off any excess.
(You may need to repeat the baking process for the remaining dough.)
Questions? We're here to help! Visit: www.maxi-matic.com for support on this product.
24

RECIPES – BAKING BISCUITS/BREAD STICKS / For Oven Baking Feature
BACON BREAD TWISTS
Makes 12
4 Cups All-purpose flour
1 envelope Active dry yeast
Pinch Salt
1 2/3 cups Hot water
12 Bacon strips
1 Egg, well beaten
- Mix the flour, yeast and salt in a bowl and blend together. Add a little water to the
mixture and mix with a knife. Add the remaining water and use hands to pull the
mixture together to make a sticky dough.
- Turn the dough into a slightly floured surface and knead for 5 minutes until the
dough is smooth and elastic.
- Divide the dough into 12 even sections and roll into sausage shapes. Lightly grease
a baking sheet. (Make sure the baking sheet is the right size to fit into the oven.)
Wind each bacon strip around each “sausage” dough. Brush the dough with beaten
egg and arrange them onto baking sheet.
- Preheat the oven to 400F. Set the aside for about 30 minutes until the dough has
risen to twice its size. Bake for 20-25 minutes until cooked and gold brown.
(You may need to repeat the baking process for the remaining dough.)
DILL AND POTATO BISCUIT CAKES
Makes 10
2 Cups Self-rising flour
3 Tbsp Butter
Pinch Salt
1 Tablespoon Finely chopped fresh dill
1 Cup Freshly made mashed potatoes
2-3 Tbsp Milk
- Preheat oven to 450F. Sift flour into a bowl and add the butter, salt and dill. Mix in
the mashed potatoes and enough milk to make a soft dough.
- Roll out the dough until fairly thin. Cut into neat rounds. Place cakes onto greased
baking sheet. (Make sure the baking sheet is the right size to fit into the oven.)
- Bake fore 20-25 minutes until golden brown. Serve warm.
(You may need to repeat the baking process for the remaining dough.)
ITSY BITSY CHEESIE PUFFS
Makes 45
1 Cup All-purpose flour
Pinch Salt
1 Tsp Dry mustard
Pinch Cayenne pepper
1 Cup Water
½ Cup Chopped butter
4 Eggs
1 Tbsp Finely chopped chives
3 oz. Gruyére or Swiss cheese, finely
diced
- Preheat the oven to 400F. Lightly grease a baking sheet. (Make sure the baking
sheet is the right size to fit into the oven.) Sift together the flour, salt, dry mustard
and cayenne pepper.
- In a saucepan, bring water and butter to a boil. Remove from heat and add flour
mixture all at once, beating until the dough forms a ball. Return to the heat and
beat constantly for 1-2 minutes to dry out. Remove from heat and let cool for 5
minutes.
- Beat three of the eggs into the dough. Beat the fourth egg in a bowl and add a
teaspoon at a time to the dough until it is smooth and shiny and drops slowly from
the spoon.
Questions? We're here to help! Visit: www.maxi-matic.com for support on this product.
25

RECIPES – BAKING BISCUITS/BREAD STICKS / For Oven Baking Feature (cont.)
- The fourth egg does not need to be used entirely. It can be reserved for later use as
a glaze.
- Using two small spoons, drop small mounds of dough 2 inches apart onto the
baking sheet. Beat the reserved egg with 1 teaspoon water and brush the tops of
the dough balls.
- Bake for 8 minutes, then reduce the oven temperature to 350F and bake for 7
minutes more, until puffy and golden. Transfer to a wire rack and let cool slightly.
Serve warm.
(You may need to repeat the baking process for the remaining dough.)
FETA CHEESE & CHIVES BISCUITS
Makes 9
1 Cup self-rising flour
1 Cup self-rising whole wheat flour
Pinch salt
3 oz. Feta cheese
1 Tablespoon chopped fresh chives
2/3 Cups skim milk, plus extra for
glazing
¼ Tsp cayenne pepper
- Preheat the oven to 400F. Sift the flours and salt into a bowl. Crumble the feta
cheese and rub into the dry ingredients. Stir in the chives, then add the milk and
mix to a soft dough.
- Turn the dough onto a floured surface and lightly knead until smooth. Roll out into
¼ inch thick and stamp out nine biscuits with a floured cookie cutter.
- Transfer to a greased baking sheet. (Make sure the baking sheet is the right size to
fit into the oven.) Brush with skim milk and sprinkle with cayenne pepper. Bake for
15 minutes until golden brown. Serve warm.
(You may need to repeat the baking process for the remaining dough.)
Questions? We're here to help! Visit: www.maxi-matic.com for support on this product.
26

LIMITED WARRANTY* ONE (1) YEAR
WARRANTY IS ONLY VALID WITH A DATED PROOF OF PURCHASE
PLEASE DO NOT RETURN TO STORE OF PURCHASE.
If you have any problems with this unit, contact Customer Service for support.
1. Your small kitchen appliance is warranted to the original purchaser to be free from any
manufacturing defects under normal use and conditions for one (1) year, cord excluded. This
Warranty applies only to the original purchaser of this product.
2. Retail stores/merchants selling this product do not have the right to alter, modify, or in any
way revise the terms and conditions of the warranty.
3. If you use your appliance for household use and according to instructions, it should give you
years of satisfactory service.
4. At its sole discretion, Maxi-Matic USA will either repair or replace the product found to be
defective during the warranty period.
5. The repaired or replacement product will be in warranty for the remaining balance of the
one-year warranty period and an additional one-month period.
6. Consumer’s remorse is not an acceptable reason to return a product to our Service Center.
7. This limited warranty covers appliances purchased and used within the 50 U.S. states plus the
District of Columbia and does NOT cover normal wear of parts or:
- Damages caused by unreasonable use, neglect, normal wear and tear, commercial use,
improper assembly or installation of product.
- Damages caused in shipping.
- Damages caused by replacement or resetting of house fuses or circuit breakers.
- Defects other than manufacturing defects.
- Breakage caused by misuse, abuse, accident, alteration, lack of proper care and maintenance,
or incorrect current or voltage.
- Lost or missing parts of the product. Parts will need to be purchased separately.
- Damages of parts that are not electrical; i.e. cracked or broken plastic/glass, scratched/dented
inner pots.
- Damage from service or repair by unauthorized personnel.
- Extended warranties purchased via a separate company or reseller.
- Acts of God such as fire, floods, hurricanes, tornadoes, etc.
8. This warranty does not apply to re-manufactured merchandise.
Maxi-Matic, USA shall not be liable for any incidental or consequential damages caused by the
breach of any express or implied warranty. Apart from the extent prohibited by applicable law, any
implied warranty of merchantability or fitness for a particular purpose is limited in time to the
duration of the warranty.
*One Year Limited Warranty valid only in the 50 U.S. states plus the District of Columbia, excluding
Puerto Rico and the Virgin Islands.
This warranty is effective only if the product is purchased and operated in the USA; product usage
which is in violation of the written instructions provided with the unit will void this warranty.
For international warranty, please contact the local distributor.
This warranty gives you special legal rights and you may also have other rights to which you are
entitled which may vary by state, province, and/or jurisdiction.
**Any instruction or policy included in this manual may be subject to change at any time.
MAXI-MATIC, USA
18401 E. Arenth Ave. City of Industry, CA 91748
Customer Support Hours of Operation MON-FRI 8:30 AM - 5:00 PM PST
(800) 365-6133 Ext: 120/107/105; (626) 912-9877 Ext: 120/107/105
Visit: www.maxi-matic.com for Live Chat Support and Contact Us Form
Questions? We're here to help! Visit: www.maxi-matic.com for support on this product.
27

RETURN INSTRUCTIONS
RETURNS:
A. Any return of defective merchandise to the manufacturer must be processed accordingly by
first contacting customer service ([email protected]) to obtain an RA # (Return
Authorization Number). We will not accept any returns of merchandise without an
applicable RA #.
B. IMPORTANT RETURN INSTRUCTIONS. Your Warranty depends on your following these
instructions if you are returning the unit to Maxi-Matic, USA:
1. Carefully pack the item in its original carton or other suitable box with sufficient
cushioning to avoid damage in shipping.
2. Before packing your unit for return, be sure to enclose:
a) Your name, full address with zip code, daytime telephone number,
and RA#,
b) A dated sales receipt or PROOF OF PURCHASE,
c) The model number of the unit and the problem you are having
(Enclose in an envelope and tape directly to the unit before the box is
sealed,) and
d) Any parts or accessories related to the problem.
3. Maxi-Matic, USA recommends that you ship the package via UPS ground service
for tracking purposes. We cannot assume responsibility for lost or damaged
products returned to us during incoming shipment. For your protection, always
carefully package the product for shipment and insure it with the carrier. C.O.D
shipments cannot be accepted.
4. All return shipping charges must be prepaid by you.
5. Once your return has been received by our warehouse, Maxi-Matic, USA will
repair or replace the product if it is defective in material or workmanship, subject
to the conditions in paragraph B.
6. Maxi-Matic will pay the shipping charges to ship the repaired or replacement
product back to you.
Questions? We're here to help! Visit: www.maxi-matic.com for support on this product.
28

EL USO DE UN CORDÓN CORTO
1. Para reducir el riesgo de daños personales, como un tropezón o enredarse con el
cordón eléctrico, un cordón eléctrico corto es suministrado con la unidad.
2. Una extensión eléctrica más larga podrá ser utilizada, siempre y cuando tome
extremas precauciones durante su uso.
3. Si una extensión eléctrica más larga va a ser utilizada, tenga muy en cuenta las
siguientes recomendaciones:
Las especificaciones eléctricas especialmente el (amperaje) del cordón eléctrico
a utilizar deberá de ser igual o de más amperaje que el especificado en el
aparato a utilizar.
La extensión eléctrica deberá de ser colocada de una manera que no
cuelgue de la mesa, donde una mascota, los niños o cualquier otra persona lo
pueda jalar o tropezar sobre ella, accidentalmente.
ENCHÚFE POLARIZADO
Si este aparato es suministrado con un cordón eléctrico de enchufe polarizado (un lado
del enchufe es más ancho que el otro) favor de seguir las siguientes recomendaciones.
Para reducir el riesgo de una descarga eléctrica, este enchufe está diseñado para entrar
en el receptáculo eléctrico de una sola manera. Si el enchufe eléctrico no entra
completamente, de un giro al mismo y trate de nuevo; si no entra de ninguna manera,
póngase en contacto con un electricista para solucionar el problema.
NO TRATE DE MODIFICAR EL ENCHÚFE DE NINGUNA MANERA.
GUARDE ESTAS INSTRUCCIONES
ESTE PRODUCTO ES PARA USO DOMĚSTICO UNICAMENTE
Questions? We're here to help! Visit: www.maxi-matic.com for support on this product.
29
DESCRIPCION DE PARTES
A) Horno Tostador
B) Cable Eléctrico
C) Soporte trasero
D) Soporte delantero
E) Panel de control
F) Temporizador de 60 Min. – Controla el tiempo para cocinar con alarma de campana
G) Selector de calor– Dirige la posición del calor en los alimentos, arriba abajo o los dos al
mismo tiempo.
H) Luz de indicador
I) Termostato – controla la temperatura sobre el ciclo de cocinado.
J) Marco de puerta
K) Puerta de cristal
L) Agarradera
M) Charola asadora– Perfecto para asar o dorar una gran variedad de carnes.
N) Parrilla para tostar – Para tostar o dorar una gran variedad de alimentos, como son
panecillos, pan tostado y bollos de pan.
O) Mango Removible
P) Bandeja
Questions? We're here to help! Visit: www.maxi-matic.com for support on this product.
30

DESCRIPCION DE PARTES (cont.)
ROSTIZADOR:
Q, R, S) Varilla para rostizar con ganchos – Para incertar y rostizar pollos y carnes
T) Parrilla y plancha asadora
U, V) Tapadera exterior
Tapadera profunda para asar y cocinar al vapor en el exterior del horno.Para asar
o freir una gran variedad de alimentos mientras cocina en el horn
W) Soporte para remover y mango removible – Para remover del horno caliente
la charola asadora facil y rapidamente.
Nota: Todos los accesorios se pueden lavar en el lavaplatos sin dañarse
COMO USAR
COMO COCINAR
Cocina trozos de carne a la perfección como pollos, pavos,carne de res, cerdo,
borrego y tambien vegetales. Su nuevo horno podra cocinar hasta 3 y 4 kilos de
su alimento favorito. Favor de segir las instrucciones recomendadas abajo en
como cocinar usando su nuevo horno tostador.
OPERACIÓN:
1. Ponga el alimento a cocinar en la charola asadora.
2. Introduzca la charola asadora, en la parte mas baja del horno asegurandose
de que los alimentos a cocinar no toquen y esten separados del elemento
termico superior 5cm. Aproximadamente.
3. Ajuste el control de termostato a la temperatura deceada.
4. Coloque el selector de calor en la posicion (ALL).
5. Seleccione el tiempo a cocinar con el control temporizador maximo 1 hora.
Alimentos que neseciten mas de una hora para cocinar, vuelva a seleccionar
el tiempo otro vez.
6. Para remover la charola asadora del horno Primero asegurese de que el
horno este apagado (OFF) Y desconectado del toma corriente.
7. Use el mango removible, coloquelo entre la parte inferior y orilla superior de
la charola asadora ( vease la figura 1).
8. Lentamente saque la bandeja del horno y pongalo en una Superficie
resistente al calor. Remueva los alimentos ya cocinados y sirva.
PARA ASAR Y DORAR
Antes de usar esta caracteristica del horno, precaliente el horno por 5 minutos en
la posición de maxima temperatura 250 F° para mejores resultados. Corte el exeso
de grasa y húmedad de la carne, siga las instrucciones abajo en como usar su
horno.
OPERACIÓN:
1. Con el control termostatico seleccione la temperatura al maximo.
2. Use el selector de calor para seleccionar el elemento termico superior.
3. Precaliente el horno por 15 minutos aproximadamente.
4. Introduzca los alimentos en la parrilla o charola para dorar.
5. Aplique salsas, condimentos y sabores a su gusto, sobre los alimentos.
6. Deslice la parrilla o charola en la parte mas alta del horno, asegurandose de
que los alimentos a cocinar no toquen y esten separados del elemento
Questions? We're here to help! Visit: www.maxi-matic.com for support on this product.
31

COMO USAR (cont.)
termico superior 5cm. aproximadamente.(puede usar la parte media del
horno si usted asi lo prefiere).
7. Seleccione el tiempo de cocinado.Para alimentos que necesitan mas de 60
min. de cocinar, vuelva a poner el tiempo otra vez.
8. Cuando el ciclo de cocinar a terminado, asegurese de apagar y desconectar
el horno.
9. Remueva la parrilla o charolla del horno.Coloquelo en una superficie
resistente al calor.
10. Remueva los alimentos de la parrilla o charola y sirva.
COMO ROSTIZAR
Cocina alimentos de la manera mas saludable, reduce la cantidad de gordura,
grasas y aceites. Es muy recomendable,cuando use el horno rostizador no exceda
la capacidad de 6 Lbs. (3 Kg.). sazone los alimentos con su condimento favorito.
Para obtener y saborear una excelente comida baja en grasas y muy rico en sabor.
OPERACIÓN:
1. Prepare, unte con su salsa favorita y condimentos, los alimentos a cocinar en
el rostizador, es recomendable que si va a rostizar pollos o godorniz se
asegure de amarrar las alitas y patas para evitar se golpeen o atoren ,
mientras este rostizando.
2. Tome la varilla de metal, inserte un gancho y asegurelo apretando el tornillo
de mariposa para evitar que el gancho se mueva y con las puntas hacia el
interior opuesto a la terminal de la varilla .
3. Para apretar los ganchos simplemente apriete los tornillos de mariposa
contra la varilla. Para soltar simplemente afloje los tornillos de mariposa.
Asegurese de mantener limpios estas partes despues de cada uso.
4. Introduzca los alimentos en la varilla por la punta y empujelo contra las
puntas del primer gancho
5. Tome el segundo gancho introduzca en la varilla
6. Meta el gancho en los alimentos y apriete con el tornillo de mariposa.
7. Tome la varilla ya ensamblado con los alimentos y coloque dentro del horno
y asegurese de que la base final acanalada de la varilla este de el lado
derecho del horno.
8. Introduzca la punta de la varilla en el orificio dentado del lado izquierdo del
horno y deje descansar el lado derecho de la varilla en la oreja de metal del
horno.
9. Seleccione la maxima temperatura del horno (MAX.)
10. Coloque el control de calor en la posición (ALL) seleccione el tiempo a
cocinar con el control temporizador
11. Cuando el ciclo de cocinar haya terminado asegurese de que el horno este
apagado y desconectado del toma corriente.
12. Saque la varilla ,con los alimentos ya cocinados usando el soporte rostizador
y deslizandolo debajo de la varilla rostizadora, levante y saque del orificio
dentado y de la oreja de metal y ponga los alimentos en una tabla de cortar
13. Afloje y remueva el gancho de la punta de la varilla primeramente, deslice
los alimentos de la varilla.
14. Remueva los alimentos completamente de la varilla rostizadora y sirva.
Questions? We're here to help! Visit: www.maxi-matic.com for support on this product.
32

COMO USAR (cont.)
COCINANDO EN SU HORNO
Cocinando en su nuevo horno tostador MAXI-MATIC Podra cocinar usted una amplia gama
de alimentos como panecillos,galletas,empaderados,pasteles y mucho mas. Ademas
cualquier tipo de moldes para panecillos podran ser usados dentro del horno, segun sus
necesidades. Cualquiera de estos moldes con medidas menos de 12” x8”1/2 pueden ser
husados en el horno y colocarlos encima de la parrilla para mejor estabilidad. No es
recomendable usar contenedores de plastico o vidrio dentro del horno.
OPERACIÓN:
1. Precaliente el horno tostador como sugiere la receta de cocina.
2. Introduzca la parrilla para tostar / asar.
3. Coloque los alimentos a cocinar sobre la parrilla.
4. Seleccione con el control de calor a la posicion (UP).
5. Seleccione el tiempo a cocinar (temporizador).
6. Cuando el tiempo de cocinar a terminado, apague y desconecte el horno.
7. Remueva los alimentos del horno y sirva.
Siempre deverá seguir las instrucciones que vienen en el paquete y receta de cocina.
COMO USAR SU PARRILLA Y PLANCHA PARA ASAR
La parrilla y plancha para asar, localizada en la parte superior del horno es muy
conveniente y una manera exelente para cocinar una amplia variedad de platillos sin tener
que usar muchas ollas y sartenes. Tambien es una manera muy practica de cocinar
pequeños platillos de entremes mientras usa el interior del horno para cocinar su platillo
principal. Alimentos pueden ser mantenidos calientes hasta por 30 min. mientras el horno
esta encendido y en uso , esto es ideal para cocinar huevos con jamon,tortas
hamburguesas,perros calientes,bistec,pescado pechuga de pollo y empaderados de queso.
CUIDADO: Nunca use la parrilla y plancha superior, debajo de un gabinete, esto podría
causar un incendio, esto tambien podría salpicar de aceites y grasas los gabinetes, No
olvide de remover cualquier cosa que este serca del horno que no quiera usted que se
salpique de aceite, como las cortinas, manteles y otras cosas que estén alrrededor del
horno.
OPERACIÓN:
1. Asegurese de que cuando use la parrilla y plancha para asar tambien este el horno en
funcionamiento y esté cocinando dentro al mismo tiempo. Nunca encienda el horno
sin nada dentro.
2. Mientras use el horno deje que la parrilla y la palncha asadora se calienten por 5 min.
aproximadamente antes de cocinar en el.
3. La tapadera de la parrilla y plancha asadora puede ser usado para cocinar más
rapidamente y tambien para evitar salpicaduras.
4. Cuando los alimentos estén ya cocinados remueva cuidadosamente y sirva.
5. El horno podra estar encendido para terminar de cocinar los alimentos dentro.
6. Siempre deberá esperar hasta que el horno este apagado (OFF) y esté
completamente frío antes de remover la parrilla y plancha asadora para lavarse.
COMO MANTENER LOS ALIMENTOS CALIENTES
Existen dos maneras de mantener los alimentos calientes en el horno,mientras termina
otros platillos que requieran mucho tiempo para cocinar. Primero usando el interior del
horno para mantener los alimentos calientes hasta por 30 min.. y segundo, usando la parte
de arriba del horno, mientras este cocinando dentro del horno al mismo tiempo.
Questions? We're here to help! Visit: www.maxi-matic.com for support on this product.
33

COMO USAR (cont.)
OPERACIÓN:
CUANDO COCINE DENTRO DEL HORNO –
1. Espere hasta que, el ciclo de cocinar haya terminado.
2. Coloque el control de temperatura al nivel mas vajo.
3. El horno se mantendra caliente y los alimentos tambien por aprox. 30 minutos
NOTA: Los alimentos se resecaran, si los deja por periodos largos de tiempo.
CUANDO COCINE EN LA PARTE EXTERIOR DEL HORNO –
1. Mientras el horno este cocinando y otros platillos necesiten de estar calientes.
2. Simplemente coloque la parrilla y bandeja vaporera sobre la charola para asar.
3. No adhiera agua.
4. Ponga los alimentos en la parrilla y cubralo con la tapadera.
5. Los alimentos se podran mantener calientes de 30 a 45 minutos.
NOTA: Los alimentos se resecarán, si los deja por periodos largos de tiempo.
MANTENIMIENTO Y LIMPIEZA
SIEMPRE ASEGURESE DE QUE EL HORNO ESTE FRÍO Y DESCONECTADO DEL TOMA
CORRIENTE ANTES DE LIMPIAR.
Su nuevo horno, tiene una caracteristica unica. Tiene una capa de material
antiadherente en el interior del horno, que se limpia automatico y continuamente
por si solo mientras lo esta usando. Cualquier salpicadura de alimento en las
paredes del horno se oxidarán por el calor generado dentro del horno mientras
esté en uso.
Si lo prefiere,usted puede tambien usar un trapo o esponja con un poco de
detergente para limpiar los residuos que hayan quedado.
No use limpiadores abrasivos como, estropajos de metal ,espatulas o ningún tipo
de utencilos de metal, podrían causarsevero daño permanente a la superficie
antiadherente en el interior del horno
Lave todos los otros accesorios en agua caliente con jabón o en el lava vajillas.
Limpie la puerta de cristal del horno con un esponja o trapo húmedo seque con
un trapo seco o papel absorbente. Tambien limpie el exterior del horno con una
esponja o trapo húmedo y despues seque. No use limpiadores abrasivos como,
estropajos de metal, espatulas o ningún tipo de utencilios de metal. Podrían
causar severo daño permanente a la superficie antiadherente en el interior del
horno
No use ningún tipo de limpiadores abrasivos como, estropajos de
metal ,espatulas para limpiar podría resultar con daños a la parrilla y plancha para
asar. Seque todas las partes incluyendo el horno antes de conectarlo al toma
corriente y volverlo a utilizar.
Questions? We're here to help! Visit: www.maxi-matic.com for support on this product.
34

GARANTÍA LIMITADA * UN (1) AÑO
GARANTIA ES VALIDA CON UNA PRUEBA DE COMPRA FECHADA
1. Se garantiza, al comprador original, de estar libres de defectos de fabricación en
condiciones de uso normales y las condiciones para un (1) año, cordones excluidos.
Esta garantía se aplica sólo al comprador original de este producto.
2. Si necesita cambiar la unidad, devuélvala en su caja original, con el recibo de compra, a
la tienda donde lo compró. Si usted está más allá del plazo concedido para el retorno
por la política de la tienda, por favor consulte la garantía incluida.
3. Si utiliza el aparato para uso doméstico y de acuerdo con las instrucciones, debería
ofrecerle años de servicio satisfactorio.
4. Durante el período de garantía de un año, un producto con un defecto será reparado o
reemplazado por un modelo nuevo o reacondicionado (a nuestro criterio) cuando el
producto sea devuelto a nuestro Centro de Servicio. (Consulte la sección
"Devoluciones" a continuación).
5. El producto reparado o reemplazado estará garantizado por el saldo restante del
período de garantía de un año y un plazo adicional de un mes.
6. Esta garantía limitada cubre los aparatos comprados y usados en los 50 estados
contiguos y el Distrito de Columbia, y no cubre:
- Los daños causados por el uso excesivo, negligencia, uso y desgaste normal, uso
comercial, montaje o instalación incorrecta del producto.
- Los daños causados durante el envío.
- Los daños causados por la sustitución o reposición de fusibles o disyuntores.
- Defectos que no sean defectos de fabricación.
- Rotura causada por mal uso, abuso, accidente, alteración, falta de cuidado y
mantenimiento, o incorrecta de corriente o voltaje.
- Pérdida o falta alguna pieza del producto. Las piezas se deben comprar por separado.
- Daños de piezas que no sean eléctricos; por ejemplo: agrietado o roto de plástico o de
vidrio.
- Daños por servicio o reparación por personal no autorizado.
- Las garantías extendidas compradas a través de una empresa independiente o
revendedor.
- Remordimiento del consumidor no es una razón aceptable para devolver un producto
a nuestro Centro de Servicio.
* Un año de garantía limitada válida solamente en los 50 estados contiguos y el Distrito de
Columbia, excluyendo Puerto Rico y las Islas Vírgenes.
Esta garantía es válida sólo si el producto es comprado y operado en los EE.UU., el uso del
producto que se encuentra en violación de las instrucciones escritas proporcionadas con la
unidad anulará esta garantía.
Para la garantía internacional, por favor póngase en contacto con el distribuidor local.
** Cualquier instrucción o política incluida en este manual puede estar sujeta a cambios en
cualquier momento.
MAXI-MATIC, EE.UU.
18401 E. Ave Arenth. City of Industry, CA 91748
Departamento de Atención al Cliente: (626) 912-9877 Ext: 120/107/105
Lunes a viernes 8:30am-5pm PST
Sitio web: www.maxi-matic.com
Questions? We're here to help! Visit: www.maxi-matic.com for support on this product.
35

INSTRUCCIONES DE DEVOLUCIÓN
DEVOLUCIONES:
A. Cualquier devolución de mercancía defectuosa al fabricante deben ser procesados
apropiadamente contactando primero al servicio al cliente (información de contacto se
muestra a continuación) para obtener un # RA (Número de autorización de devolución). No se
aceptará ninguna devolución de mercancía sin un # RA aplicable.
B. INSTRUCCIONES IMPORTANTES DE RETORNO. Su garantía depende que usted siga estas
instrucciones si va a devolver la unidad a Maxi-Matic EE.UU.:
1. Empaque cuidadosamente el producto en su caja original o en otra caja adecuada
para evitar daños durante el envío.
2. Antes del envío de la devolución unidad, asegúrese de adjuntar:
a) Su nombre, dirección completa con código postal, número de teléfono
durante el día, y #RA
b) Un recibo de compra fechado o COMPROBANTE DE COMPRA,
c) El número de modelo de la unidad y el problema que tiene (Encierre en
un sobre y pegue directamente a la unidad antes de sellar la caja) y
d) Todas las piezas o accesorios relacionados con el problema.
3. Maxi-Matic EE.UU. recomienda enviar el paquete de servicio terrestre de UPS para
fines de seguimiento. No podemos asumir la responsabilidad por productos
perdidos o dañados devueltos a nosotros durante el transporte entrante. Para su
protección, siempre cuidadosamente empaquetar el producto para su envío y
asegurarlo con la compañía. Envíos C.O.D no puede ser aceptado.
4. Todos los gastos de envío de devolución debe ser pagado por usted.
5. Una vez que su devolución ha sido recibida por nuestro almacén, Maxi-Matic
EE.UU. se compromete a reparar o sustituir el producto si presenta defectos de
materiales o mano de obra, sujeto a las condiciones del apartado B.
6. Maxi-Matic pagará los gastos de envío para enviar el producto reparado o
reemplazado de nuevo a usted.
Questions? We're here to help! Visit: www.maxi-matic.com for support on this product.
36