INSTALLATION INSTRUCTIONS
Prepare Air Conditioner for Installation
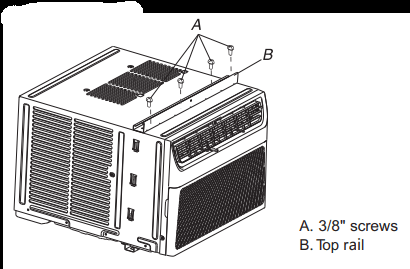
Attach Top Rail
- Locate the bag of screws provided.
- Place the top rail on top of the air conditioner cabinet, lining up the 4 holes in the top rail with the 4 holes on top of the air conditioner cabinet.
- Using four (10mm) screws, attach the top rail to the air conditioner cabinet.
NOTE: The top rail had attached by manufacturer. (Models: 10K\12K cooling only)
Install Side Curtains
NOTE: Attach curtains to the air conditioner before placing the air conditioner in window.
1. Slide the Side curtain directly into the cabinet. Slide the Side curtain down.
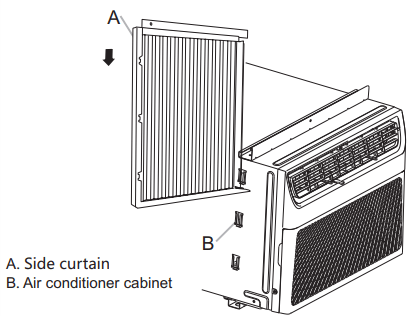
2. Insert top and then bottom of right-hand curtain housing in top and bottom curtain rails on air conditioner.
Back View
Bottom View
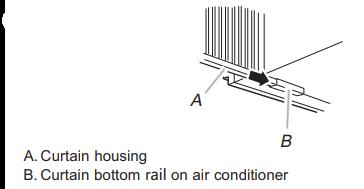
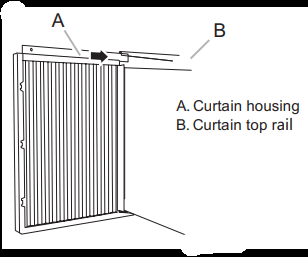
3. Slide the curtain housing into the channels as far as it will go.
4. Repeat above steps for the left-hand curtain.
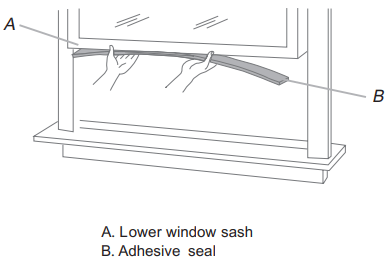
Attach Adhesive Sea
- Cut the adhesive seal to the width of the lower window sash.
- Remove the backing from the seal and attach the seal to the bottom of the lower window sash.
Window Air Conditioner Installation
WARNING: Excessive Weight Hazard, Use two or more people to move and install air conditioner. Failure to do so can result in back or other injury.
NOTES:
- Handle air conditioner gently.
- Be sure your air conditioner does not fall out of the opening during installation or removal.
- Do not block the louvers in the front panel.
- Do not block the louvers on the outside of the air conditioner.
1. Center air conditioner in window. Lower the window sash behind the top rail to hold cabinet in place. Keep a firm grip on the air conditioner, carefully place the unit into the window opening so the bottom of the air conditioner frame is against the window sill and make sure the unit is staying center of the window. Carefully close the window behind the top rail of the unit.
NOTE: Your model may differ from the one shown.
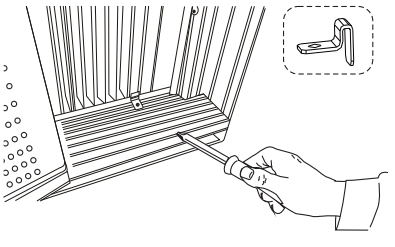
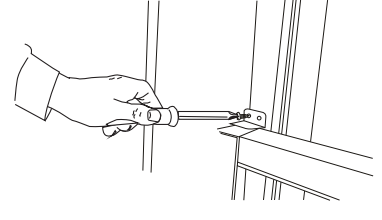
2. Place the frame lock between the frame extensions and the window sill with 3/4" (19mm) screw as shown.
3. To secure lower sash in place, attach right angle sash lock with 3/4" (19mm) screw as shown.
Attach Side Curtains to Window
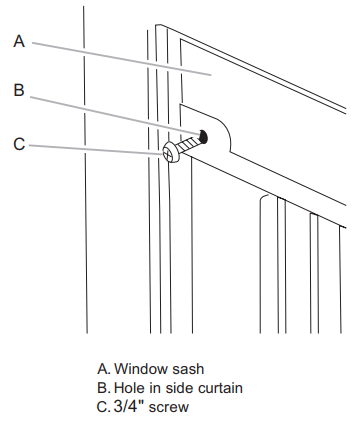
1. Pull the left-hand curtain out until it fits into the window channel.
2. Use a 1/8" (3mm) drill bit to drill a starter hole through the hole in the top rail.
3. Insert one of the 3/4" (19mm) screws through the left-hand curtain and into the window sash.
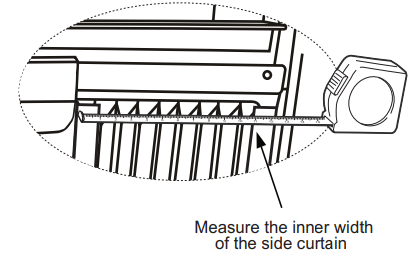
4. Put one EVA Foam on the Curtain housing. In order to minimize air leaks and ensure optimal insulation, it is necessary to install the EVA Foam on the Curtain housing.
After the unit is installed to the window, measure the inner width of the side curtain as shown.
Remark a line on the EVA Foam according to less 1/8 (3mm) than the measured width in, then cut the EVA Foam along the line.
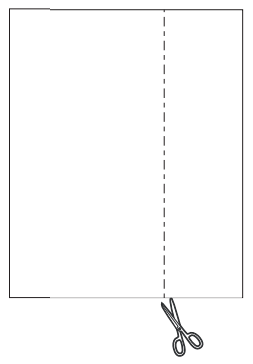
Remove the backing from the EVA Foam. Attach one EVA Foam on the Curtain housing, the side with adhesive should facing the Curtain housing
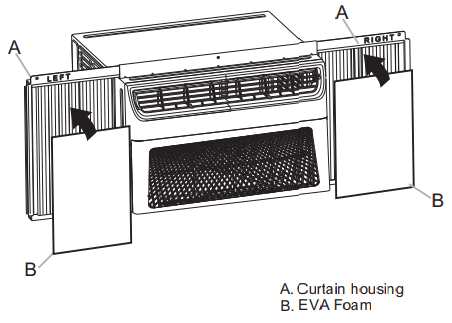
NOTE: The EVA Foam is not need to attach for Models: 6K regular cooling only.
5. Repeat for the right-hand curtain.
Complete Installation
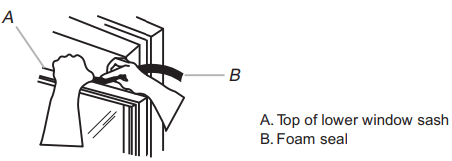
1. Insert foam seal behind the top of the lower window sash and against the glass of the upper window.
2. Use a 1/8" (3mm) drill bit to drill a starter hole through the hole in the top rail.
3. Attach top channel to window sash with on e 3/4" (19mm) screw to secure window in place.
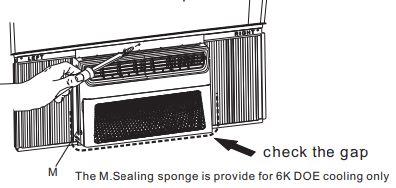
4. Check the gap around the unit and seal it with the adhesive seal attached
WARNING: Electrical Shock Hazard
- Plug into a grounded 3 prong outlet.
- Do not remove ground prong.
- Do not use an adapter.
- Do not use an extension cord.
- Failure to follow these instructions can result in death, fire, or electrical shock.
5. Plug into a grounded 3 prong outlet.
6. Press RESET on the power supply cord. See "Electrical Requirements".
AIR CONDITIONER USE
Operating your air conditioner properly helps you to obtain the best possible results. This section explains proper air conditioner operation.
IMPORTANT:
- If you turn off the air conditioner, wait at least 3 minutes before turning it back on. This prevents the air conditioner from blowing a fuse or tripping a circuit breaker.
- Air conditioner in the Cool mode operation the better limits: Outdoor side 64.4~109.4°F (18~43 °C), ≤80%RH; indoor side 62.6~89.6°F (17~32°C), ≤80%RH.
NOTE: In the event of a power failure, your air conditioner will operate at the previous settings when the power is restored.
Starting Your Air Conditioner

ON/OFF
1. Press the power button to turn on the air conditioner

NOTE: When the air conditioner is turned on for the first time after it is plugged in, the display will show the current set temperature and will run in the ECO control .
After cleaning and replace the filter, press the POWER button for resetting and the FILTER light will go off.
2. Select mode. See "Mode".
3. Select fan speed. See "Fan Speed".
4. Set temperature. See "Temperature".
Mode
1. Press MODE repeatedly until you see the indicator light glow for the desired setting.
2. Choose Fan, Dry, Cool, Eco.
FAN SPEED to select High, Med, Low.
Dry - Dries the room. The air conditioner automatically selects the temperature. Fan runs on Low speed only.
Cool - Cools the room.
Eco - Cools the room and save energy.
NOTE: Dry mode should not be used to cool the room.
Fan - Only the fan rund. Press FAN SPEED to select High, Med or Low
NOTE: Select ECO mode to initiate this function. The fan will continue to run after the compressor shuts off for 2 minutes(4 minutes for the first time),so the fan will shuts off for 10 minutes .The fan then cycles run for 2 minutes and 10 minutes off intervals until the room temperature is above the set temperature, at which time the compressor turns back on and Cooling resumes.

Temperature
Press the plus UP (∧) button to raise the temperature. Each time you press or hold the plus UP (∧) button, the temperature will go up 1°F (1°C) until it reaches 86°F (30°C).

Press the minus DOWN (∨) button to lower the temperature. Each time you press or hold the DOWN (∨) button, the temperature will go down 1°F (1°C) until it reaches 61°F (16°C).
To change the temperature display from °F to °C:
Press both the MODE and DOWN (∨) buttons at the same time for 5 seconds to switch the display from °F to °C.
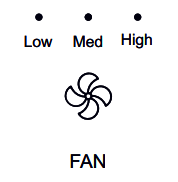
Fan Speed
NOTE: The Fan Speed button will operate only when the Cool, Fan or Power Saver mode has been selected.
1. Press FAN SPEED until you see the indicator light glow for the desired setting.
2. Choose High, Med, Low.
High - for maximum cooling
Med - for normal cooling
Low - for quieter cooling
NOTE: In ECO mode,the Fan will ran at low speed when compressor turn off.
Timer Sleep Filter
1. The LED light on control panel for Timer、Sleep、Filter.
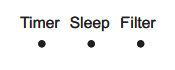
2. The function introduction See “using the remote control”.
WIFI
WIFI control is available for connected models with this logo on control panel.
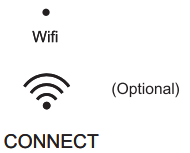
1.Press the CONNECT button for 5s,the LED start to flash.
2. After the WIFI module connecting the router,the LED keeps on.Or the LED keeps off.
NOTE: WIFI control is available for WIFI control models.
Using the Remote Control
NOTE:
- When the first use,please remove the insulated plastic patch.
- One CR2025 battery (included) powers the remote control. Replace battery after 6 months of use, or when the remote control starts to lose power.
- Please ensure the correct direction for polarity of the cell same as the indicator on the bracket.
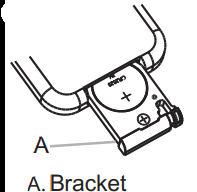
- Disposal of battery old batteries must be removed and disposed of in accordance with current legislation as they are harmful to the environment.
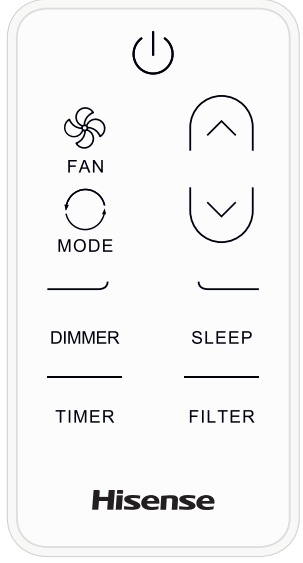
Power
Press POWER to turn on/off air conditioner.

Fan Speed
Press FAN to select High, Med, Low.
NOTE: In Dry mode, Fan speed cannot be set.

Mode
Press MODE to select Fan, Dry, Cool, ECO.

Temperature
Press the plus UP (∧) button to raise the temperature. Each time you press or hold the plus UP (∧) button, the temperature will go up 1°F (1°C) until it reaches 86°F (30°C).

Press the minus DOWN (∨) button to lower the temperature. Each time you press or hold the DOWN (∨) button, the temperature will go down 1°F (1°C) until it reaches 61°F (16°C).

DIMMER
Press the DIMMER button to turn off the control panel display.

NOTE: When in DIMMER mode, new control inputs will return display to normal.
Sleep Control
NOTES:
In the Cooling mode,Dry mode, ECO mode, the set temperature will increase by 4°F(2°C)at most, during 2hours, and continues running at that temperature until auto shut off.
In Heating mode, the set temperature will decrease by 4°F(2°C) at most, during 2hours, and continues running at that temperature until auto shut off.
1. Press MODE to select Cool, Dry or ECO
2. Press FAN to select High, Med or Low.
3. Press the up or down arrow button to set the temperature.
4. Press SLEEP. After 10 seconds, the lights on the control panel display will dim.
NOTE: The mode and temperature may be adjusted during Sleep control. Fan speed is automatically set to LOW.

5. To turn off Sleep control, press SLEEP again. or wait 8 hours for the air conditioner to turn off automatically.
NOTE: The air conditioner will return to previous settings after Sleep control is turned off.
Timer
To set timer for a 1 – 24 hour delay on – off operation:
1. Press TIMER on remote control, LED display on the air conditioner control panel will flash.

2. Press up or down arrow button to change the delay time from 1 hour to 24 hours.
3. Press TIMER on remote control again for TIMER confirmation and TIMER indicator light on the air conditioner control will be on.
4. To cancel the TIMER, press the TIMER on remote and the TIMER indicator light will be off.
Filter
1. When the Filter indicator light is lit, remove, clean and replace the air filter. See “Cleaning the Air Filter”.
2. Press Power button on the machine, or FILTER button on remote to reset the filter, after cleaning and replacing the air filter.

NOTE: When the light is on, it will remain on for 180 hours or until you press Clean Filter button.
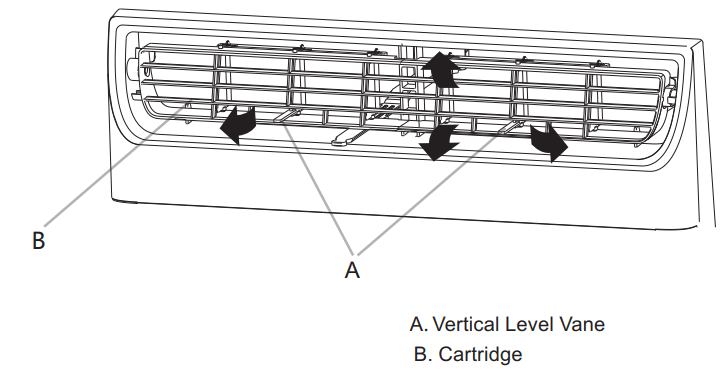
Changing Air Direction
Use the Vertical Level Vane to direct the air right or left. Use the whole cartridge to direct air up, down or straight ahead.
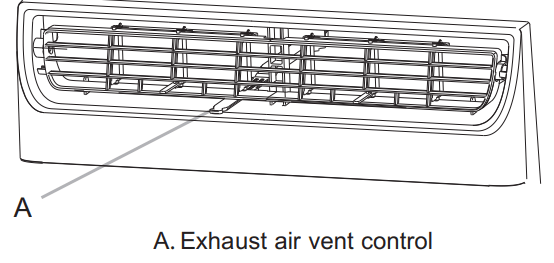
Exhaust Air Vent
- Pull out the exhaust air vent control to Open the exhaust air vent and draw stale or smoky air from the room.
- Push in the exhaust air vent control to close the exhaust air vent for maximum continuous cooling.
NOTE: The exhaust air vent control is not available for 6K\8K cooling only. The exhaust air vent control will function only when the The exhaust air vent control is not available for 6K\8K cooling only. Fan Speed control is operating.
Normal Sounds
When your air conditioner is operating normally, you may hear sounds such as:
- Droplets of water hitting the condenser, causing a pinging or clicking sound. The water droplets help cool the condenser.
- Air movement from the fan.
- Clicks from the thermostat cycle.
- Vibrations or noise due to poor wall or window construction.
- A high-pitched hum or pulsating noise caused by the modern high-efficiency compressor cycling on and off.
AIR CONDITIONER CARE
Cleaning the Air Filter
The air filter is removable for easy cleaning. A clean filter helps remove dust, lint, and other particles from the air and is important for best cooling and operating ef ficiency. Check the filter every 2 weeks to see whether it needs cleaning.
NOTE: Do not operate the air conditioner without the filter in place.
1. Turn off the air conditioner.
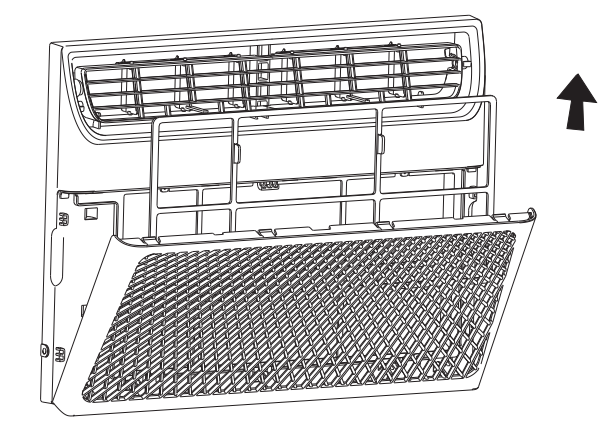
2. Open the front panel. Grasp the filter by the center and pull up and out.
3. Use a vacuum cleaner to clean the air filter. If the air filter is very dirty, wash it in warm water with a mild detergent. Do not wash the air filter in the dishwasher or use any chemical cleaners. Air dry the filter completely before replacing to ensure maximum efficiency.
4. Replace the air filter back into the air conditioner, and colse the front panel.
Cleaning the Front Panel
- Turn off the air conditioner.
- Clean the front panel with a soft, damp cloth.
- Air dry the front panel completely.
Repairing Paint Damage
Check once or twice a year for paint damage. This is very important, especially in areas near oceans or where rust is a problem. If needed, touch up with a good grade enamel paint.
Annual Maintenance
Your air conditioner needs annual maintenance to help ensure steady, top performance throughout the year. Call your local authorized dealer to schedule an annual checkup. The expense of an annual inspection is your responsibility
TROUBLESHOOTING
WARNING: Electrical Shock Hazard
- Plug into a grounded 3 prong outlet.
- Do not remove ground prong.
- Do not use an adapter.
- Do not use an extension cord.
- Failure to follow these instructions can result in death, fire, or electrical shock.
Air conditioner will not operate
- The power supply cord is unplugged. Plug into grounded 3 prong outlet. See "Electrical Requirements”.
- The power supply cord has tripped (Reset button has popped out). Press and release RESET (listen for click; Reset button will latch and on some devices, a green light will turn on) to resume operation.
- A household fuse has blown, or circuit breaker has tripped. Replace the fuse or reset the circuit breaker. If the problem continues, call an electrician. See "Electrical Requirements”.
- The Power button has not been pressed. Press the Power button.
- The local power has failed. Wait for power to be restored.
Air conditioner blows fuses or trips circuit breakers
- Too many appliances are being used on the same circuit. Unplug or relocate appliances that share the same circuit.
- Time-delay fuse or circuit breaker of the wrong capacity is being used. Replace with a time-delay fuse or circuit breaker of the correct capacity. See "Electrical Requirements”.
- An extension cord is being used.Do not use an extension cord with this or any other appliance.
- You are trying to restart the air conditioner too soon after turning off the air conditioner. Wait at least 3 minutes after turning off the air conditioner before trying to restart the air conditioner.
Air conditioner power supply cord trips (Reset button pops out)
- Disturbances in your electrical current can trip (Reset button will pop out) the power supply cord. release RESET (listen for click; Reset button will latch and on some devices, a green light will turn on) to resume operation.
- Electrical overloading, overheating, cord pinching or aging can trip (Reset button will pop out) the power supply cord. RESET (listen for click; Reset button will latch and on some devices, a green light will turn on) to resume operation.
NOTE: A damaged power supply cord must be replaced with a new power supply cord obtained from the product manufacturer and must not be repaired.
Air conditioner seems to run too much
- The current air conditioner replaced an older model. The use of more efficient components may cause the air conditioner to run longer than an older model, but the total energy consumption will be less. Newer air conditioners do not emit the "blast” of cold air you may be accustomed to from older air conditioners, but this is not an indication of lesser cooling capacity or efficiency. Refer to the efficiency rating (EER) and capacity rating (in Btu/h) marked on the air conditioner.
- The air conditioner is in a heavily occupied room, or heatproducing appliances are in use in the room. Use exhaust vent fans while cooking or bathing and try not to use heatproducing appliances during the hottest part of the day. A higher capacity air conditioner may be required, depending on the size of the room being cooled.
Air conditioner cycles on and off too much or does not cool
- The air conditioner is not properly sized for your room. Check the cooling capabilities of your room air conditioner. Room air conditioners are not designed to cool multiple rooms.
- The filter is dirty or obstructed by debris. Clean the filter.
- The inside evaporator and outside condenser coils are dirty or obstructed by debris. See Annual Maintenance.
- There is excessive heat or moisture (open container cooking, showers, etc.) in the room. Use a fan to exhaust heat or moisture from the room. Try not to use heatproducing appliances during the hottest part of the day.
- The louvers are blocked. Install the air conditioner in a location where the louvers are free from curtains, blinds, furniture, etc.
- The temperature of the room you are trying to cool is extremely hot. Allow extra time for the air conditioner to cool off a very hot room.
- Windows or doors to the outside are open. Close all windows and doors.
- The Temp control is not at a cool enough setting. Adjust the Temp control to a cooler setting by pressing the minus button to reduce the temperature. Set the Fan Speed control to the highest setting.
Water drips from cabinet into your house
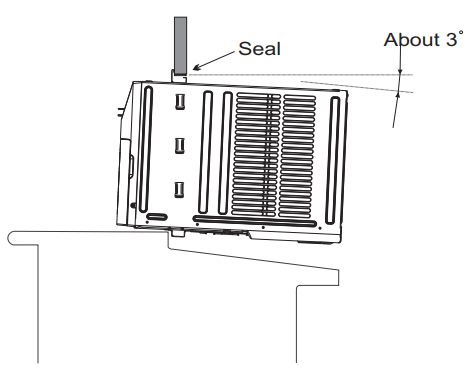
- The air conditioner is not properly leveled.The air conditioner should slope slightly downward toward the outside. Level the air conditioner to provide a downward slope toward the outside to ensure proper drainage. See the Installation Instructions.
NOTE: Do not drill a hole in the bottom of the metal base and condensate pan.