
・ RMA Contact
Visit https://support.
reolink.com
Submit a Request with
your Order No.
Reolink After Service
will contact with you
for processing
Order
RMA
・ Technical Support
Submit a Request
Technical
support
Troubleshooting
your problem
Visit https://support.
reolink.com
QSG2_A
Reolink Go
Quick Start Guide
EN/DE/FR/IT/ES
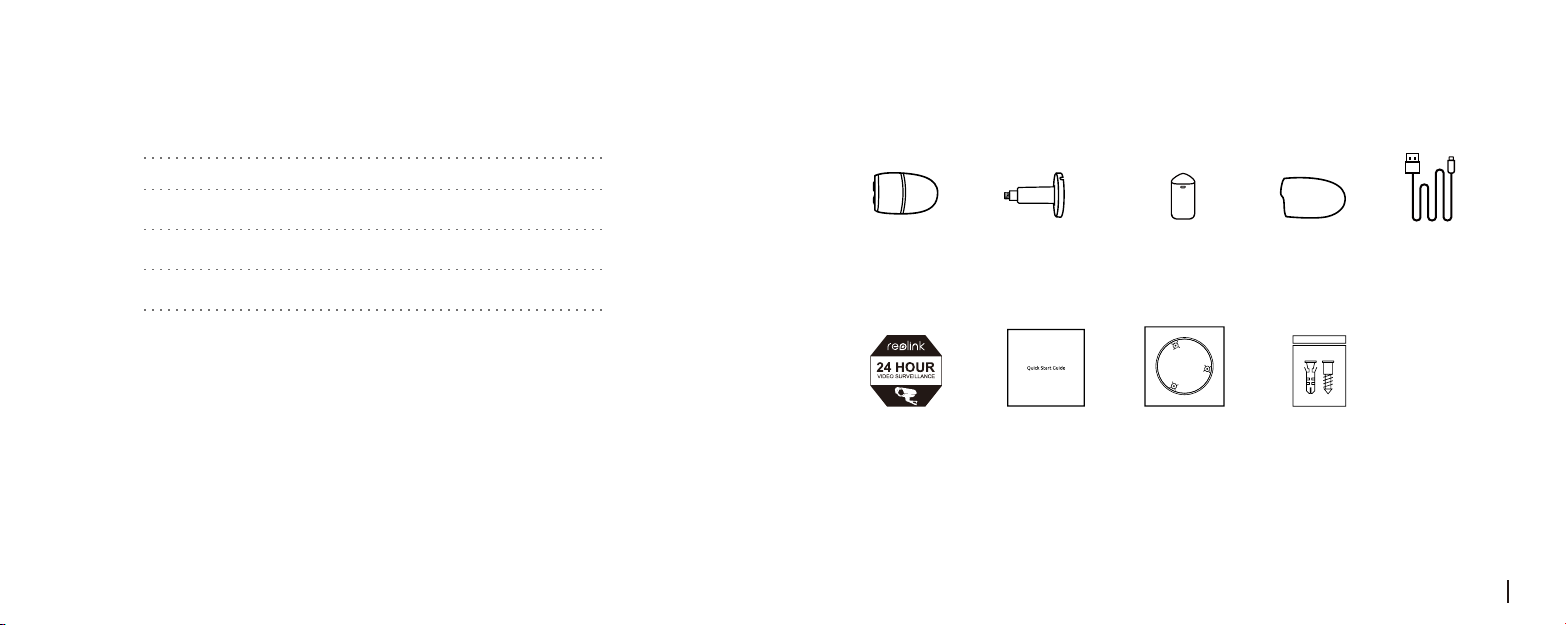
Skin
x1
Rechargeable
Battery
x1
Reset Needle
Pack of Screws
x1
Surveillance Sign
x1
Micro USB
Cable
x1
Reolink go
x1
Outdoor Security
Mount
x1
Quick Start Guide
x1
Mounting
Hole Template
x1
*
*
The camera and the rechargeable battery are packed separately in the same package.
*
Please dress the camera with the skin for better weatherproof performance when
you install the camera outdoors.
*
What’s in the Box
Contents
English
Deutsch
French
Italian
Spanish
1
14
25
36
47
1English
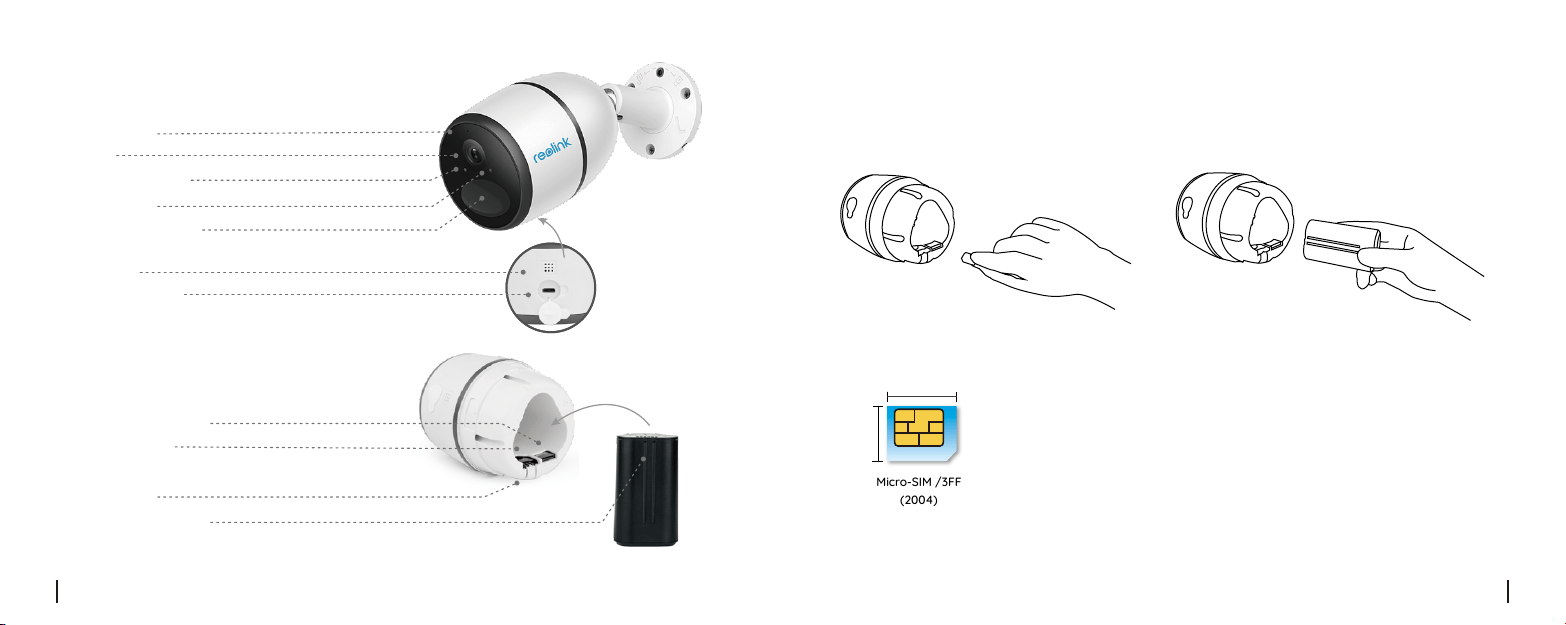
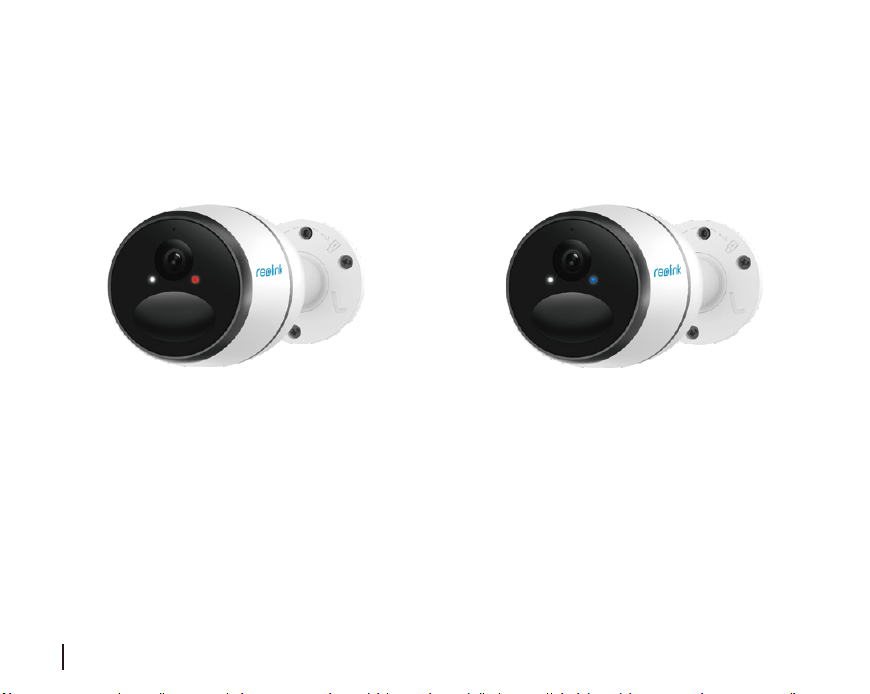
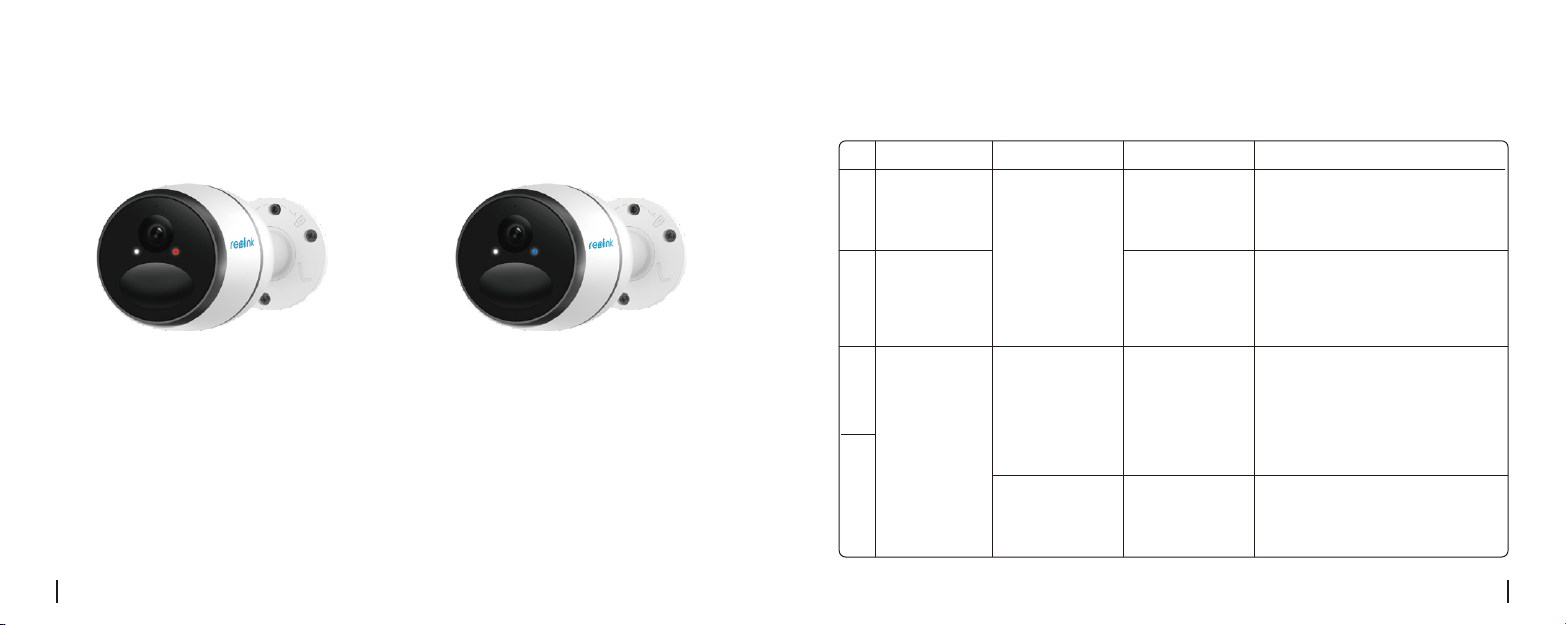
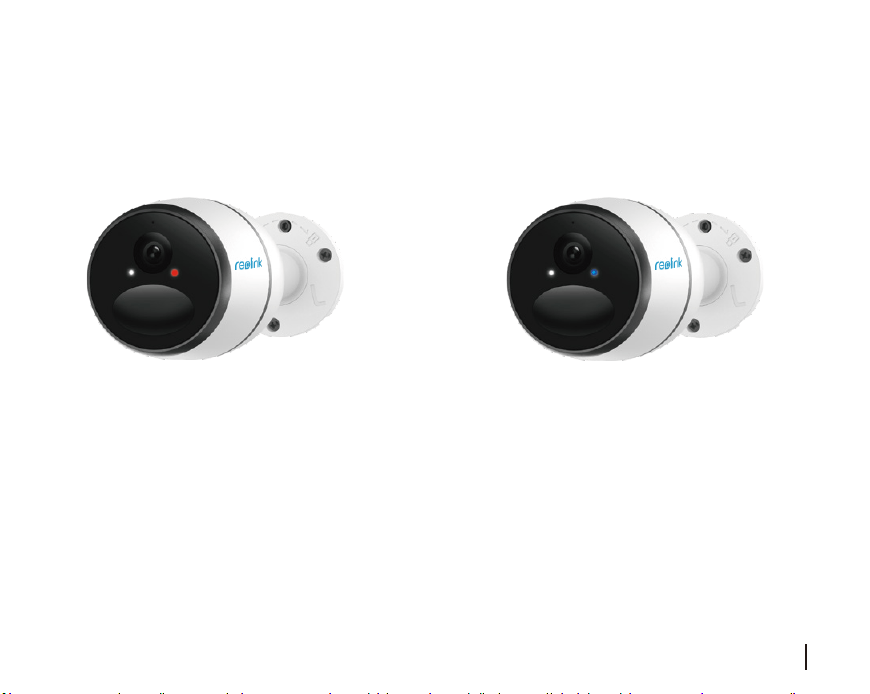
General Introduction
Built-in Mic
Lens
Status LED
Daylight Sensor
Bult-in PIR Sensor
Micro USB Port
Battery Status LED
Speaker
SIM Card Slot
Micro SD Card Slot
Reset Hole
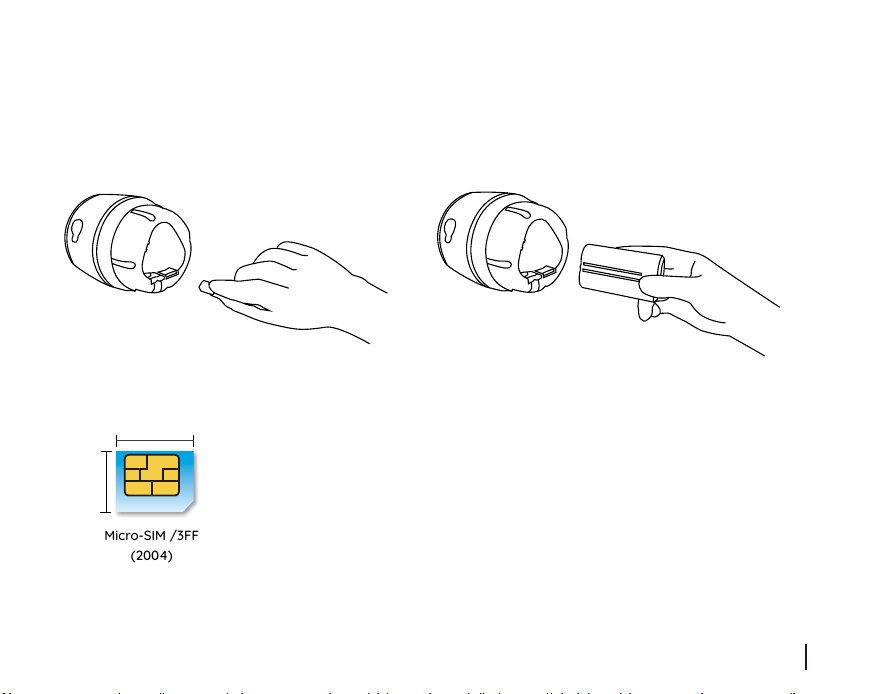
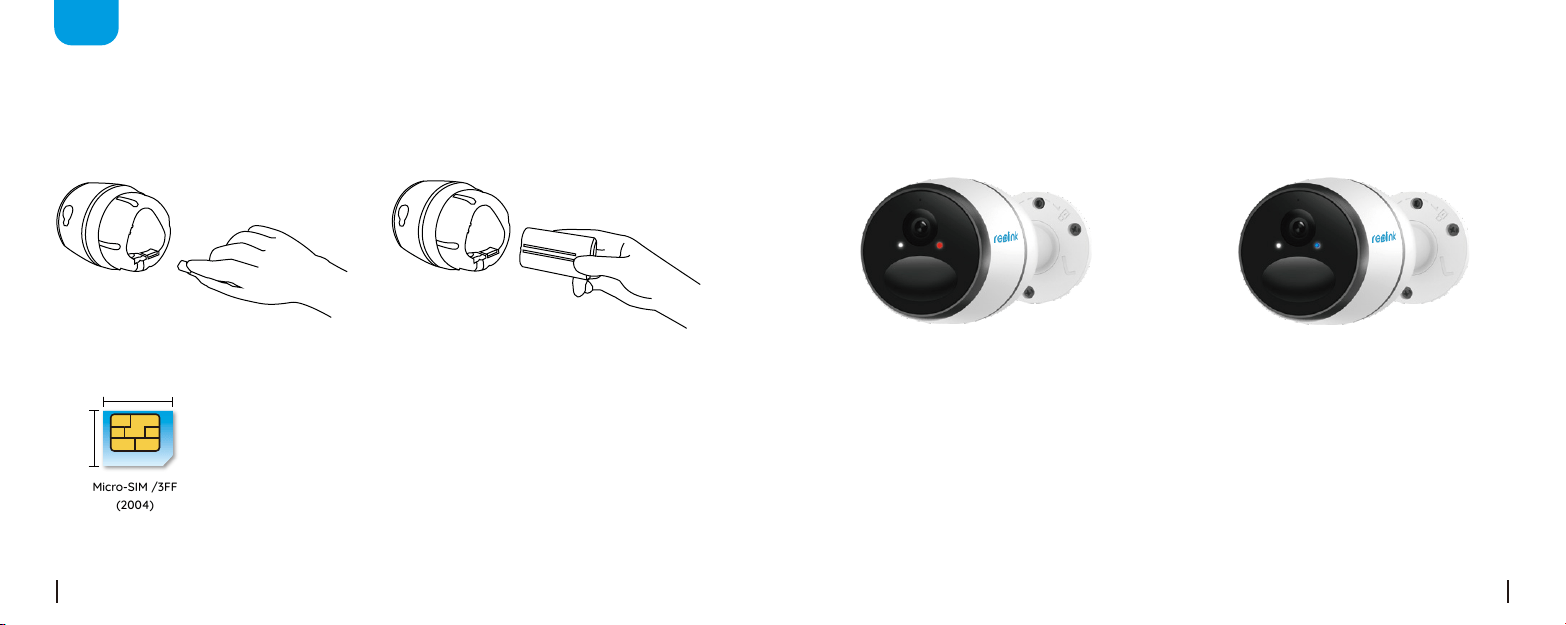
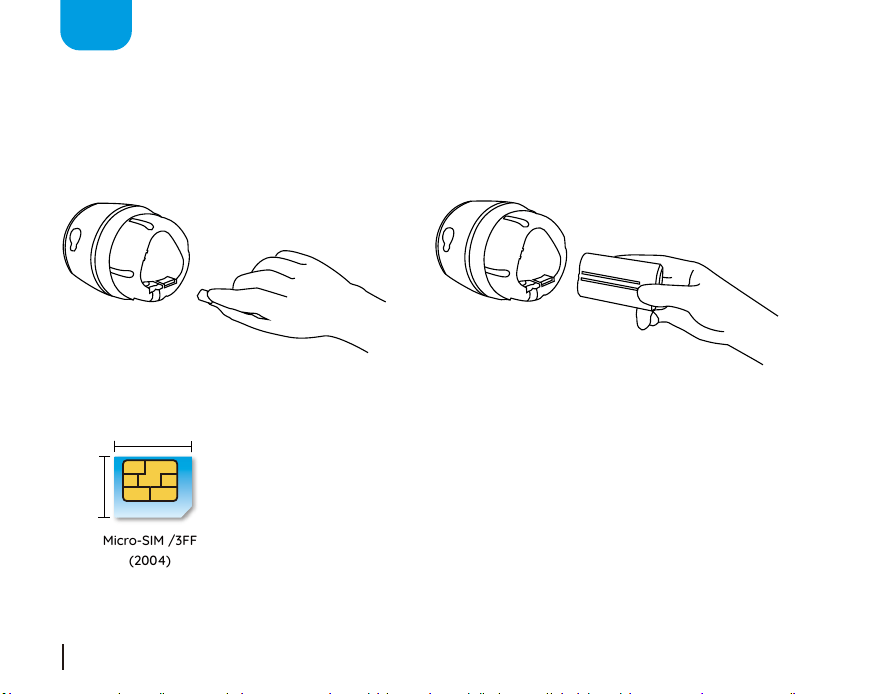
Install the SIM Card and Battery
1. Rotate the back cover counterclockwise,
insert the SIM card into the slot.
2. Insert the battery into the camera and tighten the
back cover.
• Tips for SIM Card
Micro-SIM /3FF
(2004)
0.59in/15mm
0.47in/12mm
Size of the micro SIM card required is as below
• The SIM card supports WCDMA and FDD LTE.
• Some SIM cards have a PIN code, please firstly use your smartphone to
disable the PIN.
• Activate the card through your smartphone or your operator before inserting
it into the camera.
Note:
Please make sure the SIM card can work in your smartphone.
3English
2 English
General Introduction
Built-in Mic
Lens
Status LED
Daylight Sensor
Bult-in PIR Sensor
Micro USB Port
Battery Status LED
Speaker
SIM Card Slot
Micro SD Card Slot
Reset Hole
Install the SIM Card and Battery
1. Rotate the back cover counterclockwise,
insert the SIM card into the slot.
2. Insert the battery into the camera and tighten the
back cover.
• Tips for SIM Card
Micro-SIM /3FF
(2004)
0.59in/15mm
0.47in/12mm
Size of the micro SIM card required is as below
• The SIM card supports WCDMA and FDD LTE.
• Some SIM cards have a PIN code, please firstly use your smartphone to
disable the PIN.
• Activate the card through your smartphone or your operator before inserting
it into the camera.
Note:
Please make sure the SIM card can work in your smartphone.
3English
2 English
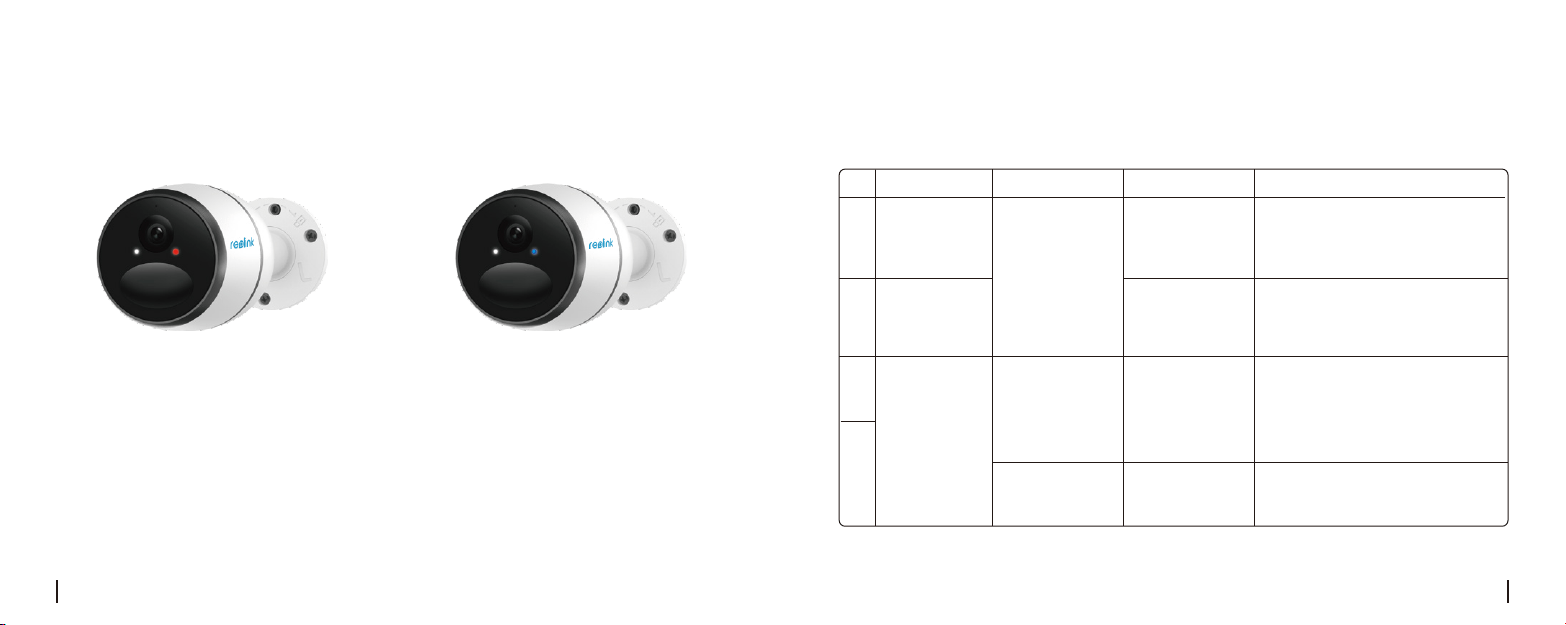
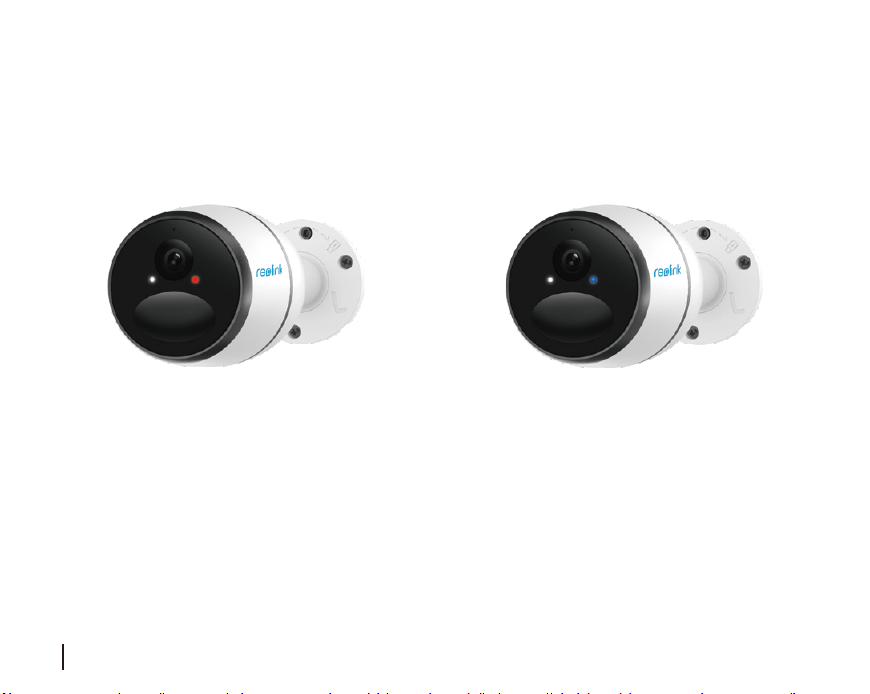
Register Online (Camera Initial Setup)
1. After the SIM card and battery are installed,
a red light will be on, and you will hear the voice
prompt"Camera is starting up, please wait". The
red LED will be solid on for some seconds and
go o.
2. A blue LED will flash for some seconds and
then go solid before going out, you would
hear"Network connection succeeded”, which
means the camera has been successfully
connected to the network.
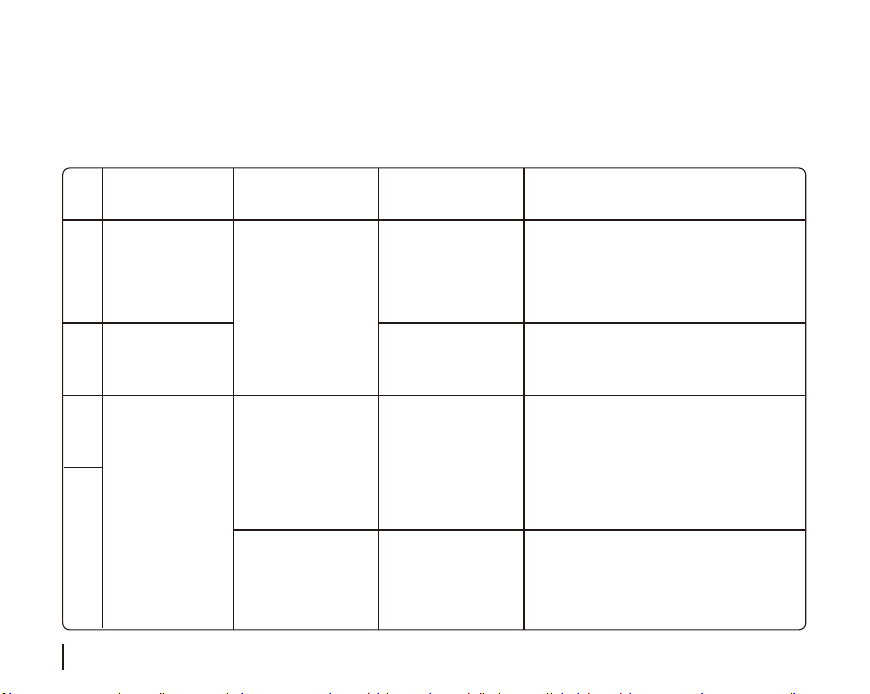
Voice Prompt LED Status Camera Status Solution
3
4
2
1
Red LED is solid on
for some seconds
and then start to
flash
Your SIM card
has a PIN
Camera fails to be
registered to the
operator network
Camera fails to
connect to the
Reolink server
Device will go into Standby mode and try to
reconnect later
Blue LED will not
go solid and just
go o
Red LED is solid on
for some time and
then go o
completely
Note: You may also run into the below situations:
1.Check whether you made a reverse
direction of SIM card
2.Check if the SIM card is not fully inserted,
please insert it again
1.Check whether your card is activated or
not, if not please call your operator to
activate it
2.Your current location may have a weak
signal, please move the camera to a
location with better signal
"SIM card
cannot be
recognized!"
" The SIM card is
locked with a
PIN. Please
disable it"
"Network
connection failed"
Camera cannot
recognize this
SIM card
Put the SIM card into your mobile phone and
disable the PIN
4 English 5English

Register Online (Camera Initial Setup)
1. After the SIM card and battery are installed,
a red light will be on, and you will hear the voice
prompt"Camera is starting up, please wait". The
red LED will be solid on for some seconds and
go o.
2. A blue LED will flash for some seconds and
then go solid before going out, you would
hear"Network connection succeeded”, which
means the camera has been successfully
connected to the network.
Voice Prompt LED Status Camera Status Solution
3
4
2
1
Red LED is solid on
for some seconds
and then start to
flash
Your SIM card
has a PIN
Camera fails to be
registered to the
operator network
Camera fails to
connect to the
Reolink server
Device will go into Standby mode and try to
reconnect later
Blue LED will not
go solid and just
go o
Red LED is solid on
for some time and
then go o
completely
Note: You may also run into the below situations:
1.Check whether you made a reverse
direction of SIM card
2.Check if the SIM card is not fully inserted,
please insert it again
1.Check whether your card is activated or
not, if not please call your operator to
activate it
2.Your current location may have a weak
signal, please move the camera to a
location with better signal
"SIM card
cannot be
recognized!"
" The SIM card is
locked with a
PIN. Please
disable it"
"Network
connection failed"
Camera cannot
recognize this
SIM card
Put the SIM card into your mobile phone and
disable the PIN
4 English 5English
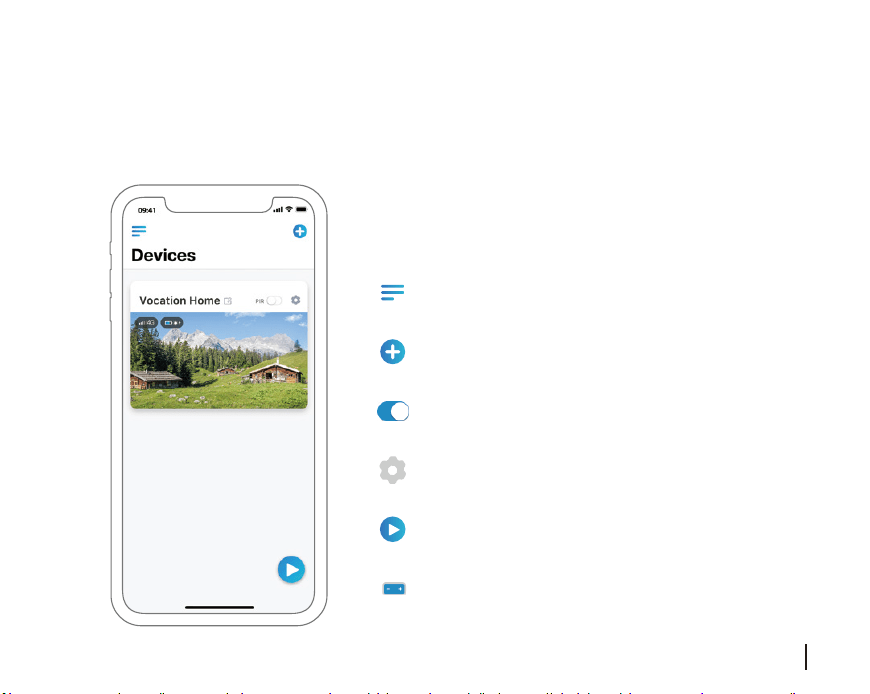
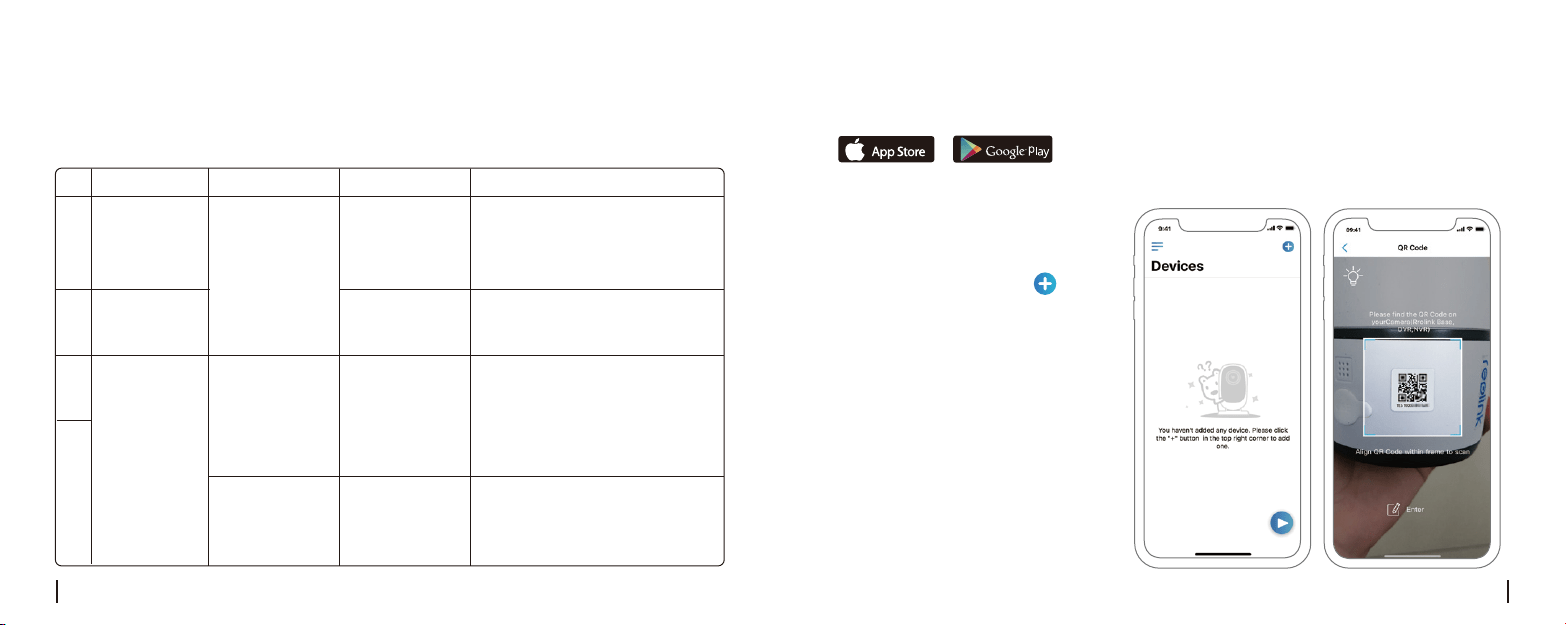
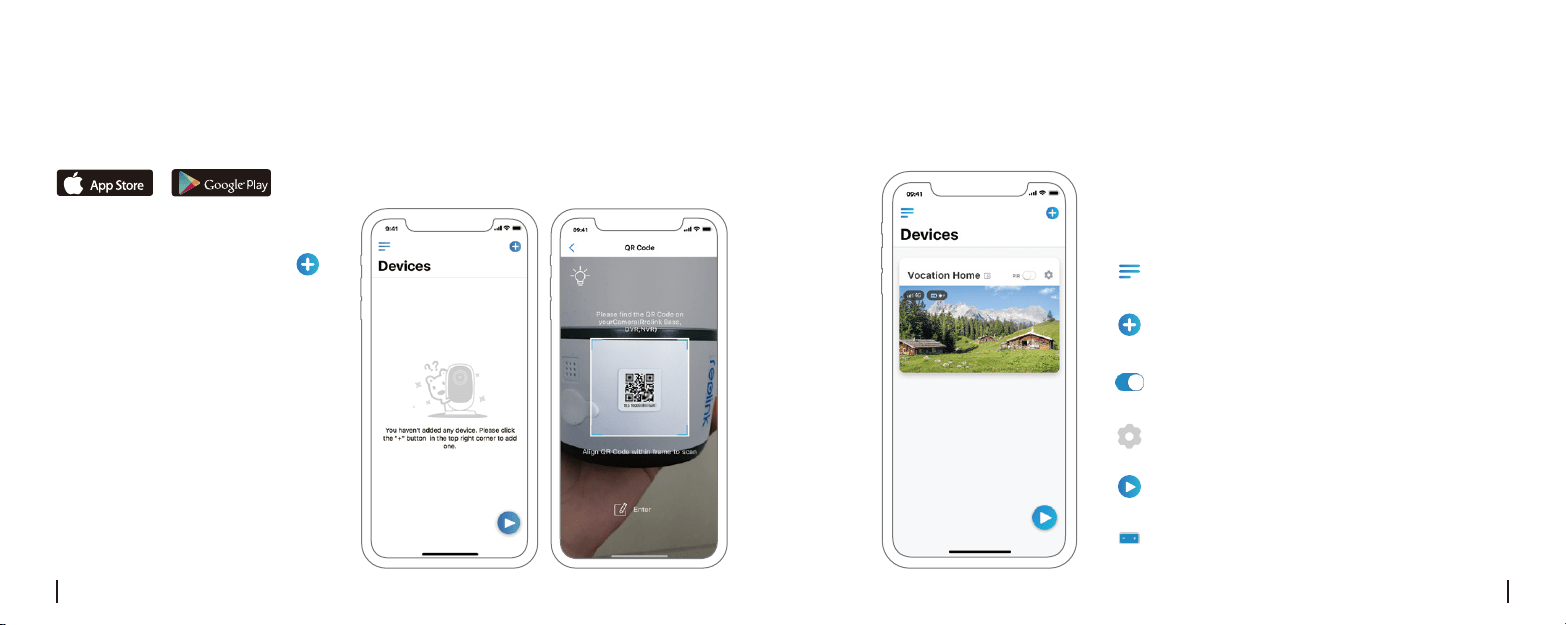
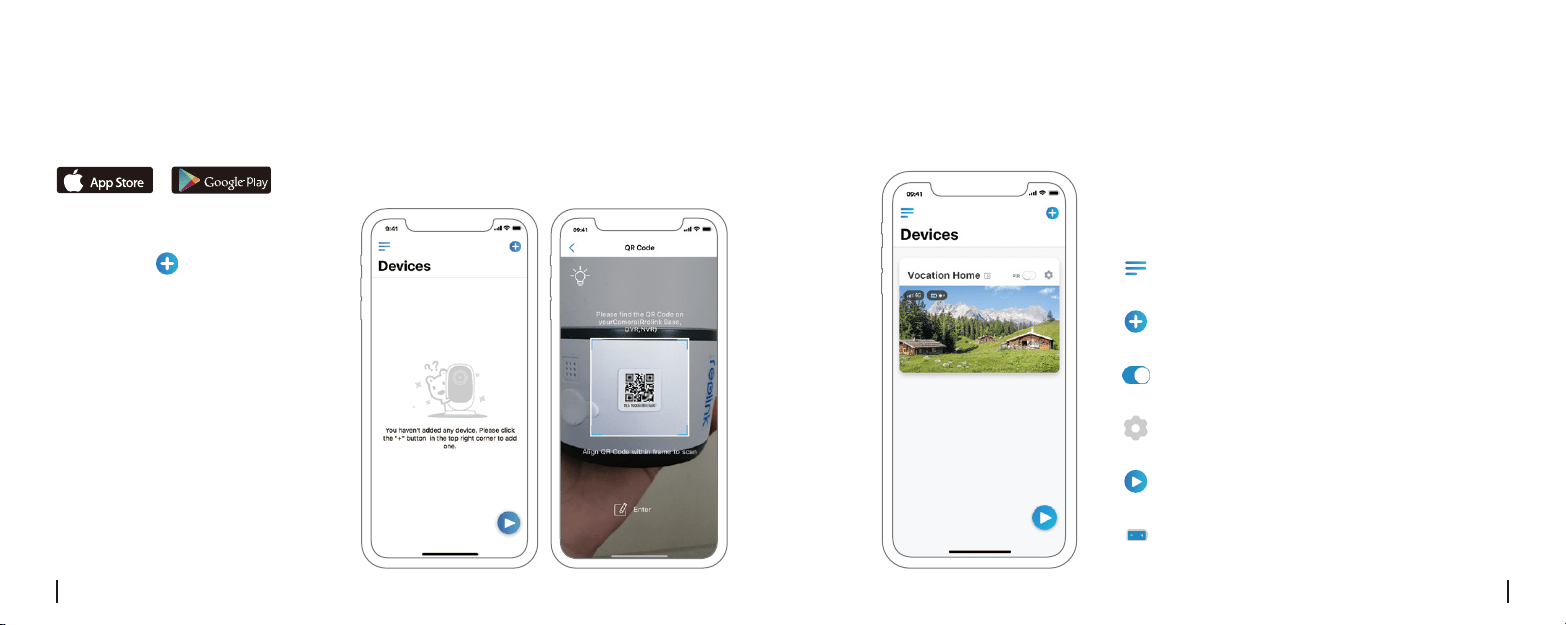
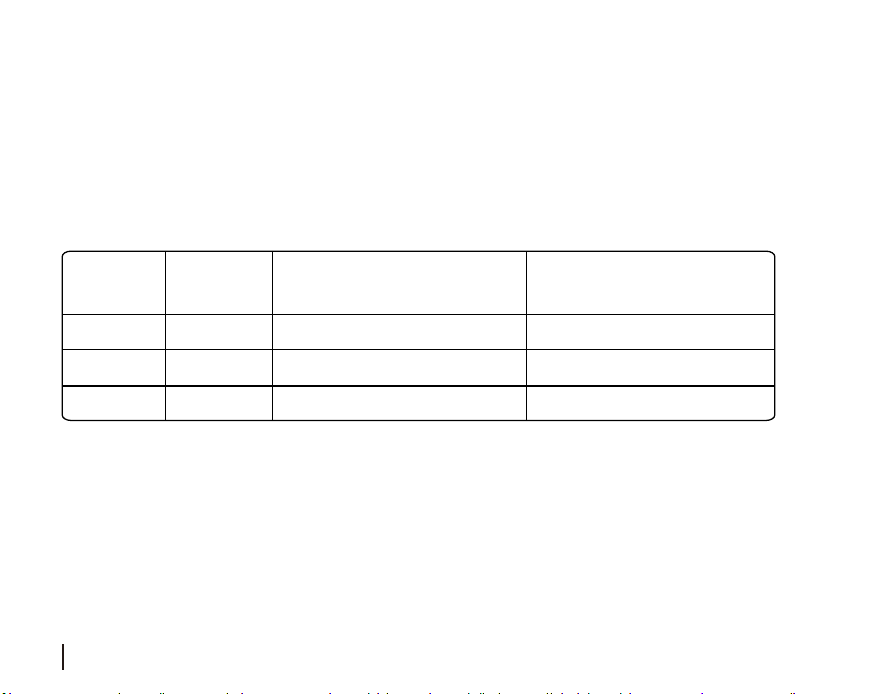
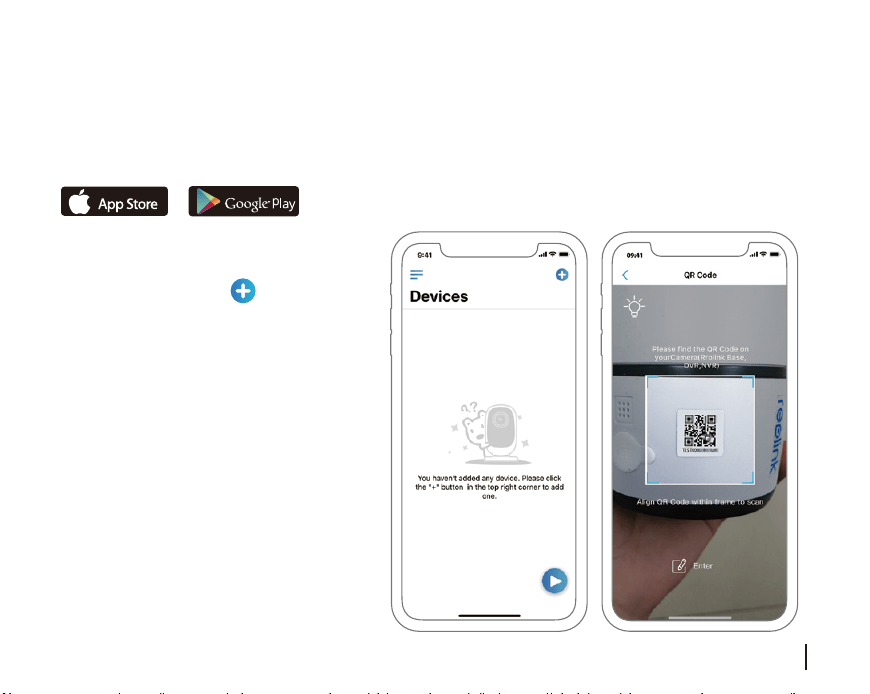
1. Please click the “ ” button in the top
right corner to add the camera.
2. Scan the QR code on the side of the
camera and follow the steps to complete
the setup.
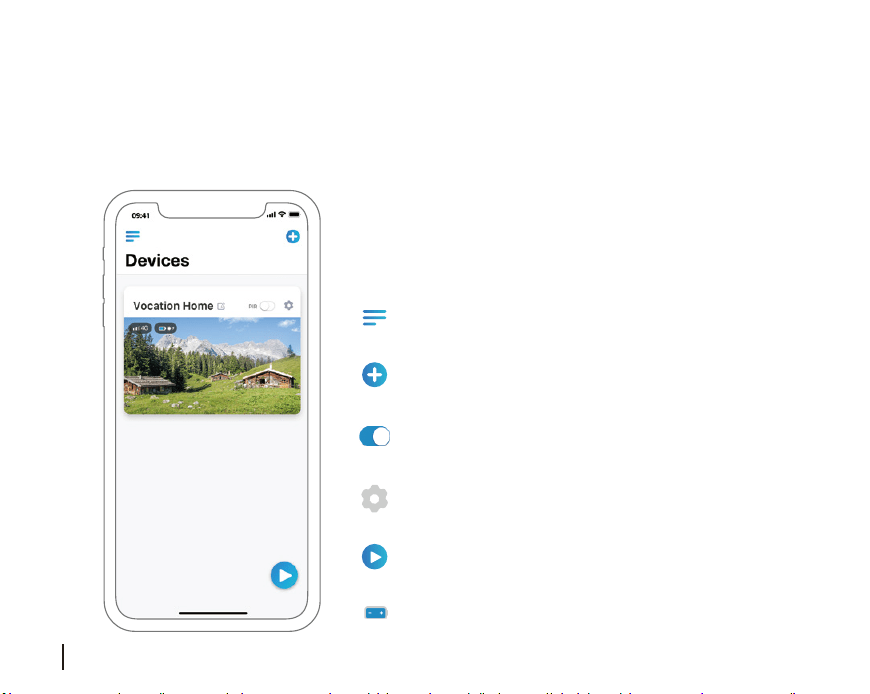
3. After you created a password for your camera, please follow the steps to sync the time, and then
start live view or go to “Device Settings”
Battery Status
Add New Device
Menu
Enable/Disable PIR Motion Sensor
(In default, the PIR sensor is enabled.)
Device Settings
Access the Live View
Download and install the Reolink App in App Store (for iOS) and Google Play (for Android).
Available on the
Get it on
Setup Camera on Reolink App (For Smartphone)
6 English 7English
1. Please click the “ ” button in the top
right corner to add the camera.
2. Scan the QR code on the side of the
camera and follow the steps to complete
the setup.
3. After you created a password for your camera, please follow the steps to sync the time, and then
start live view or go to “Device Settings”
Battery Status
Add New Device
Menu
Enable/Disable PIR Motion Sensor
(In default, the PIR sensor is enabled.)
Device Settings
Access the Live View
Download and install the Reolink App in App Store (for iOS) and Google Play (for Android).
Available on the
Get it on
Setup Camera on Reolink App (For Smartphone)
6 English 7English
Attention for Camera Installation
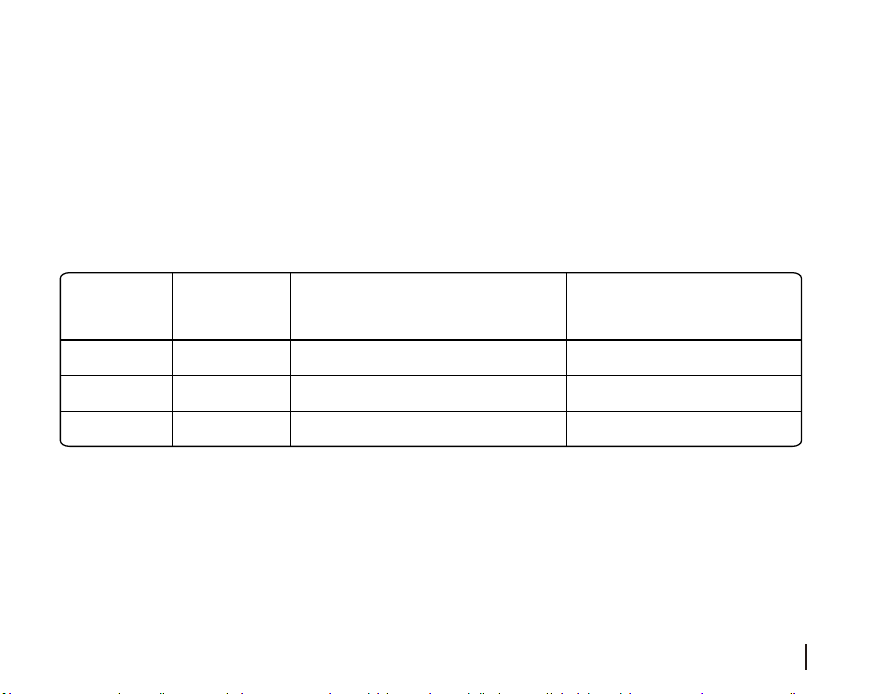
• PIR Sensor Detecting Distance
The PIR senor has 3 sensitivity levels for your adjustment: Low/Mid/High.
Higher sensitivity oers longer detecting distance. The default sensitivity of the PIR sensor is at “High”.
Path for adjusting distance in App: Device settings-PIR settings
Note:
Sensitivity
Detecting Distance
(For moving vehicles)
High
Mid
Low
Up to 10 meters (33ft)
Up to 6 meters (20ft)
Up to 4 meters (13ft)
Value
81 - 100
51 - 80
0 - 50
To reduce false alarms, please note that:
• Do not install the camera facing any objects with bright lights, including sunshine,
bright lamp lights, etc.
• Do not place the camera too close to a place where there are frequently moving
vehicles. Based on our numerous tests, the recommended distance between the
camera and the vehicle is 16 meters (52ft).
• Stay away from the outlets, including the air conditioner vents, humidifier outlets, the
heat transfer vents of projectors, etc.
• Do not install the camera where there are strong winds.
• Do not install the camera facing the mirror.
• Keep the camera at least 1 meter away from any wireless devices, including Wi-Fi
routers and phones in order to avoid wireless interference.
!
Important Notes for Reducing
False Alarms
Up to 10 meters (33ft)
Up to 12 meters (40ft)
Up to 16 meters (52ft)
Detecting Distance
(For moving and living things)
8 English 9English
Attention for Camera Installation
• PIR Sensor Detecting Distance
The PIR senor has 3 sensitivity levels for your adjustment: Low/Mid/High.
Higher sensitivity oers longer detecting distance. The default sensitivity of the PIR sensor is at “High”.
Path for adjusting distance in App: Device settings-PIR settings
Note:
Sensitivity
Detecting Distance
(For moving vehicles)
High
Mid
Low
Up to 10 meters (33ft)
Up to 6 meters (20ft)
Up to 4 meters (13ft)
Value
81 - 100
51 - 80
0 - 50
To reduce false alarms, please note that:
• Do not install the camera facing any objects with bright lights, including sunshine,
bright lamp lights, etc.
• Do not place the camera too close to a place where there are frequently moving
vehicles. Based on our numerous tests, the recommended distance between the
camera and the vehicle is 16 meters (52ft).
• Stay away from the outlets, including the air conditioner vents, humidifier outlets, the
heat transfer vents of projectors, etc.
• Do not install the camera where there are strong winds.
• Do not install the camera facing the mirror.
• Keep the camera at least 1 meter away from any wireless devices, including Wi-Fi
routers and phones in order to avoid wireless interference.
!
Important Notes for Reducing
False Alarms
Up to 10 meters (33ft)
Up to 12 meters (40ft)
Up to 16 meters (52ft)
Detecting Distance
(For moving and living things)
8 English 9English
!
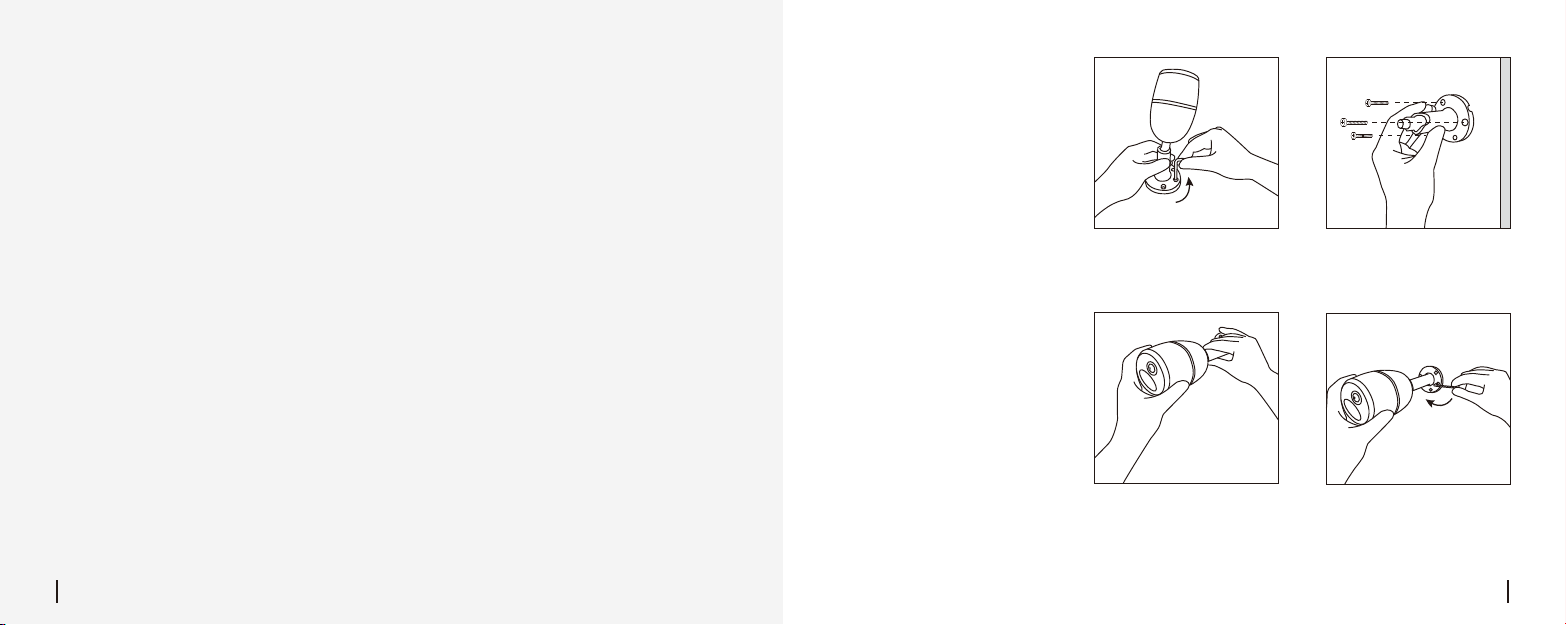
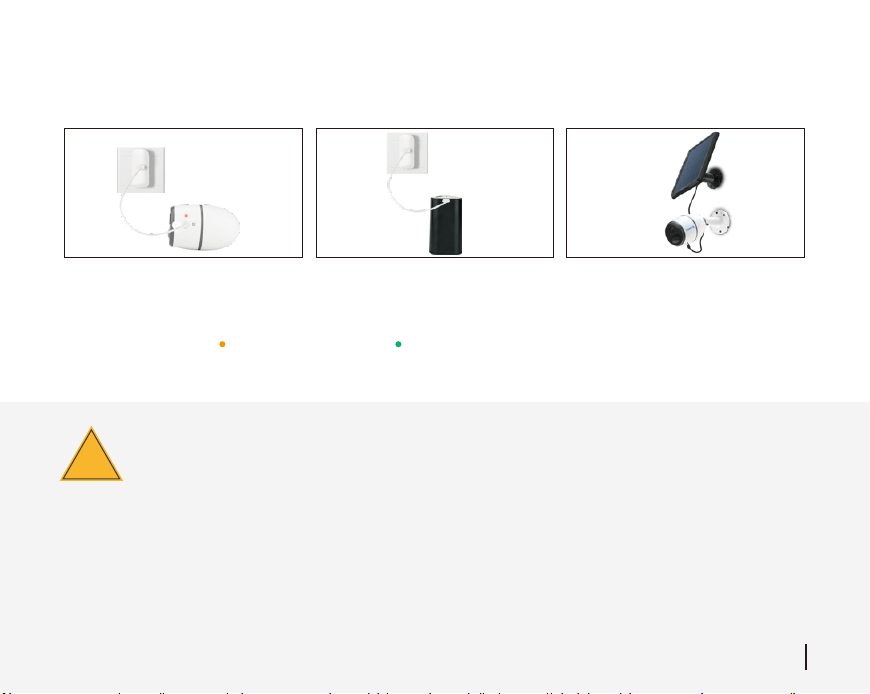
Charge the Battery
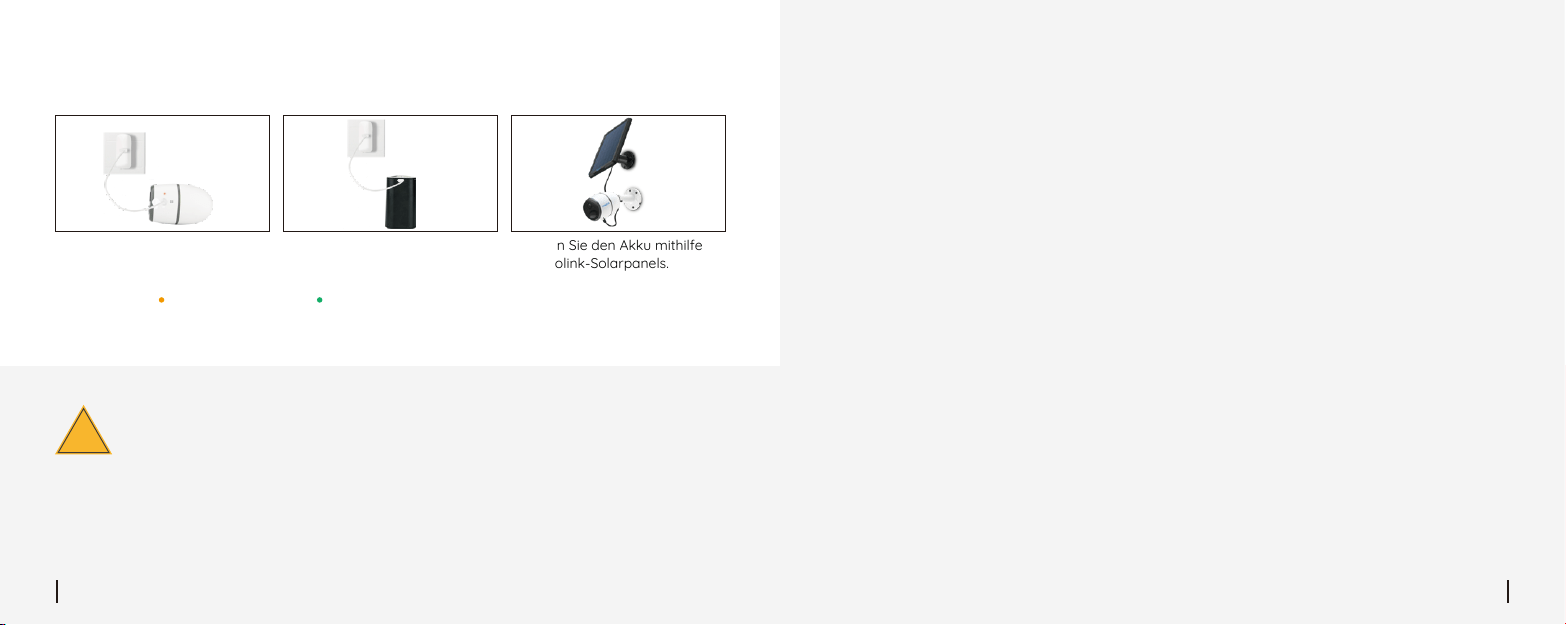
Charging indicator:
Green LED: Fully charged
Please learn some useful ways to maximize the battery life in this post:
https://support.reolink.com/hc/en-us/articles/360006991893
* Please note that the solar panel is NOT included in the package. You can buy the solar panel on Reolink ocial online
store.
Reolink Go is not designed for 24/7 full capacity running or around-the-clock live streaming. It’s
designed to record motion events and remotely view live streaming only when you need it.
Important Safeguards on Rechargeable
Battery Use
1. Charge the battery when
it's installed to the camera.
2. Charge the battery separately. 3. Charge the battery with the
Reolink solar panel.
Orange LED: Charging
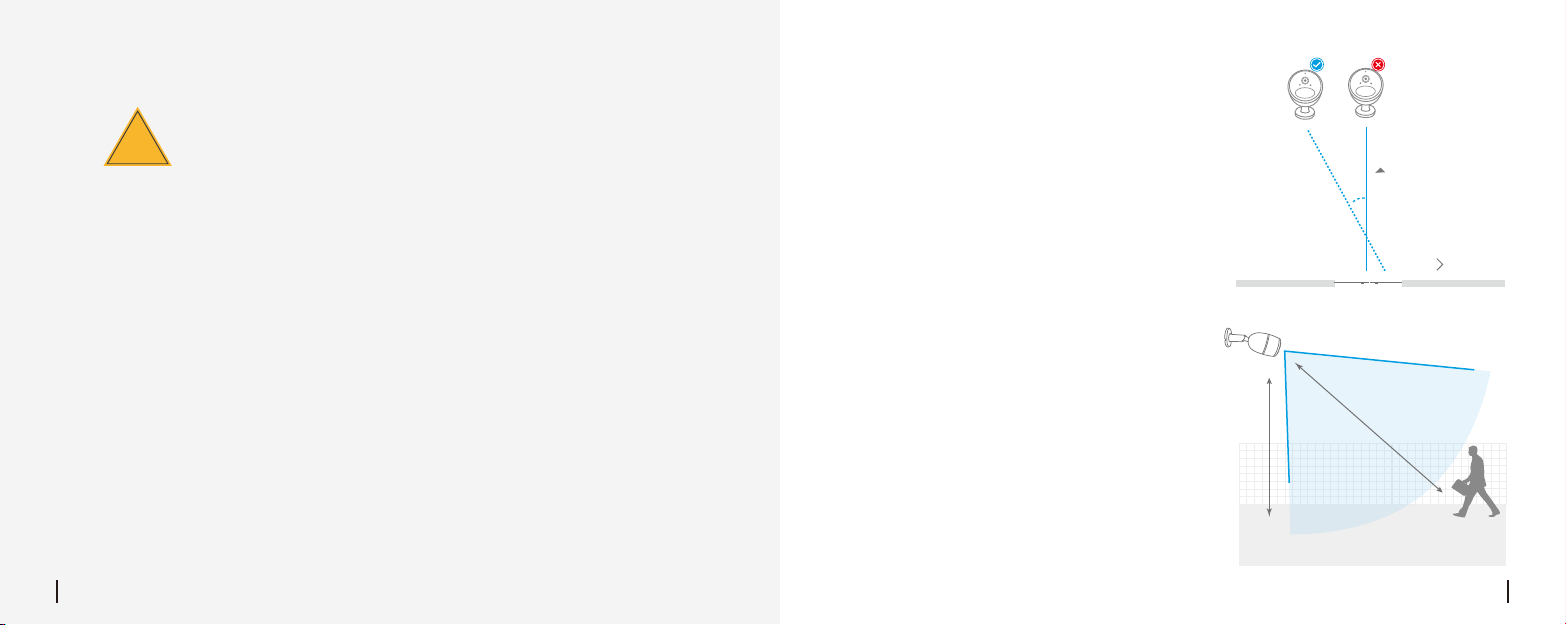
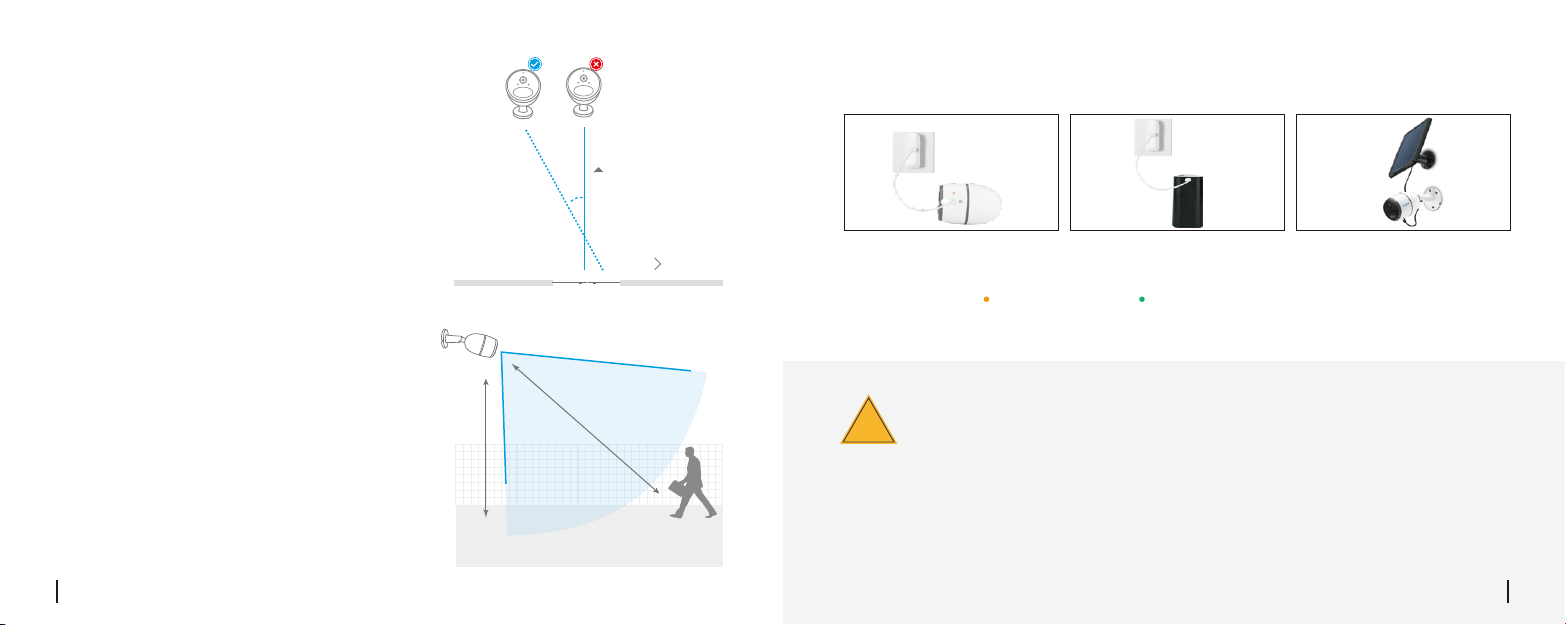
When installing the camera, please install the camera
angularly (the angle between the sensor and the detected
object is larger than 10°) for eective motion detection. If
the moving object approaches the PIR sensor vertically,
the sensor may not detect the motion events.
The ideal viewing distance is 2-10 meters (7-33ft), which
enables you to recognize a human.
Entrance
θ
The path of the
moving object
FYI:
• The PIR sensor’s detecting distance: 23ft (in default)
• The PIR sensor’s detecting angle: 120° (H)
• Camera Ideal Viewing
Distance
• PIR Sensor Installation Angle
10°
θ
2-3 meters
Ideal Viewing Distance:
2-10 meters (7-33ft)
10 English 11English
!
Charge the Battery
Charging indicator:
Green LED: Fully charged
Please learn some useful ways to maximize the battery life in this post:
https://support.reolink.com/hc/en-us/articles/360006991893
* Please note that the solar panel is NOT included in the package. You can buy the solar panel on Reolink ocial online
store.
Reolink Go is not designed for 24/7 full capacity running or around-the-clock live streaming. It’s
designed to record motion events and remotely view live streaming only when you need it.
Important Safeguards on Rechargeable
Battery Use
1. Charge the battery when
it's installed to the camera.
2. Charge the battery separately. 3. Charge the battery with the
Reolink solar panel.
Orange LED: Charging
When installing the camera, please install the camera
angularly (the angle between the sensor and the detected
object is larger than 10°) for eective motion detection. If
the moving object approaches the PIR sensor vertically,
the sensor may not detect the motion events.
The ideal viewing distance is 2-10 meters (7-33ft), which
enables you to recognize a human.
Entrance
θ
The path of the
moving object
FYI:
• The PIR sensor’s detecting distance: 23ft (in default)
• The PIR sensor’s detecting angle: 120° (H)
• Camera Ideal Viewing
Distance
• PIR Sensor Installation Angle
10°
θ
2-3 meters
Ideal Viewing Distance:
2-10 meters (7-33ft)
10 English 11English

1. Please charge the rechargeable battery with a standard and high-quality DC 5V or 9V battery charger.
2. If you want to power the battery via the solar panel, please note that the battery is ONLY compatible
with Reolink solar panel. You cannot charge the battery with other solar panel brands.
3. Please charge the battery in temperatures between 0°C and 45°C.
4. Always use the battery in temperatures between -20°C and 60°C.
5. Please make sure the battery compartment is clean.
6. Please keep the USB charging port dry, clean and free of any debris and make sure the battery
contacts are aligned.
7. Always make sure the USB charging port is clean. Please cover the USB charging port with the rubber
plug after the battery has been fully charged.
8. Never charge, use or store the battery near any ignition sources, such as fire or heaters.
9. Always store the battery in a cool, dry and ventilated environment.
10. Never store the battery with any hazardous or combustible objects.
11. Do keep the battery away from children.
12. Do not short-circuit the battery by connecting wires or other metal objects to the positive (+) and
negative (-) terminals. Do NOT transport or store the battery with necklaces, hairpins or other metal
objects.
13. Do NOT disassemble, cut, puncture, short-circuit the battery, or make it dispose of in water, fire,
microwave ovens and pressure vessels.
14. Do NOT use the battery if it gives o an odor, generates heat, becomes discolored or deformed, or
appears abnormal in any ways. If the battery is being used or charged, remove the battery from the
device or the charger immediately, and stop using it.
15. Always follow the local waste and recycle laws when throwing the used battery away.
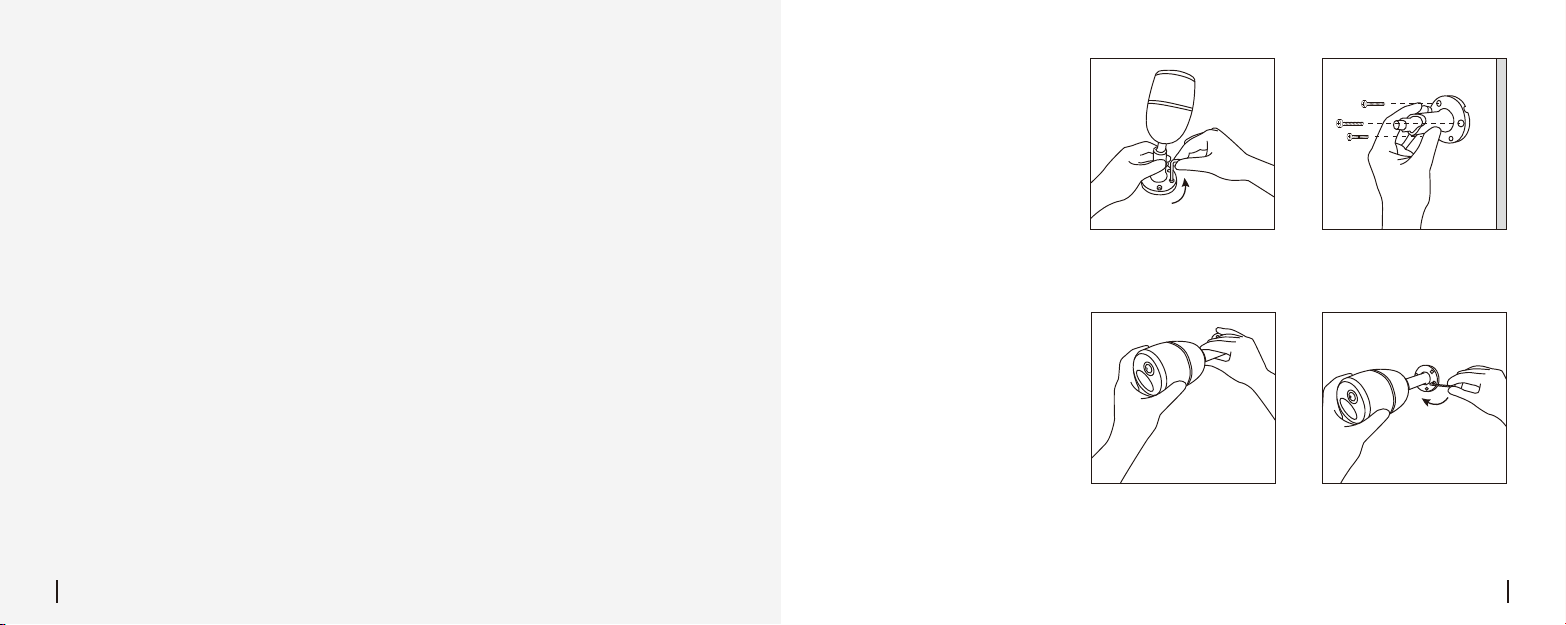
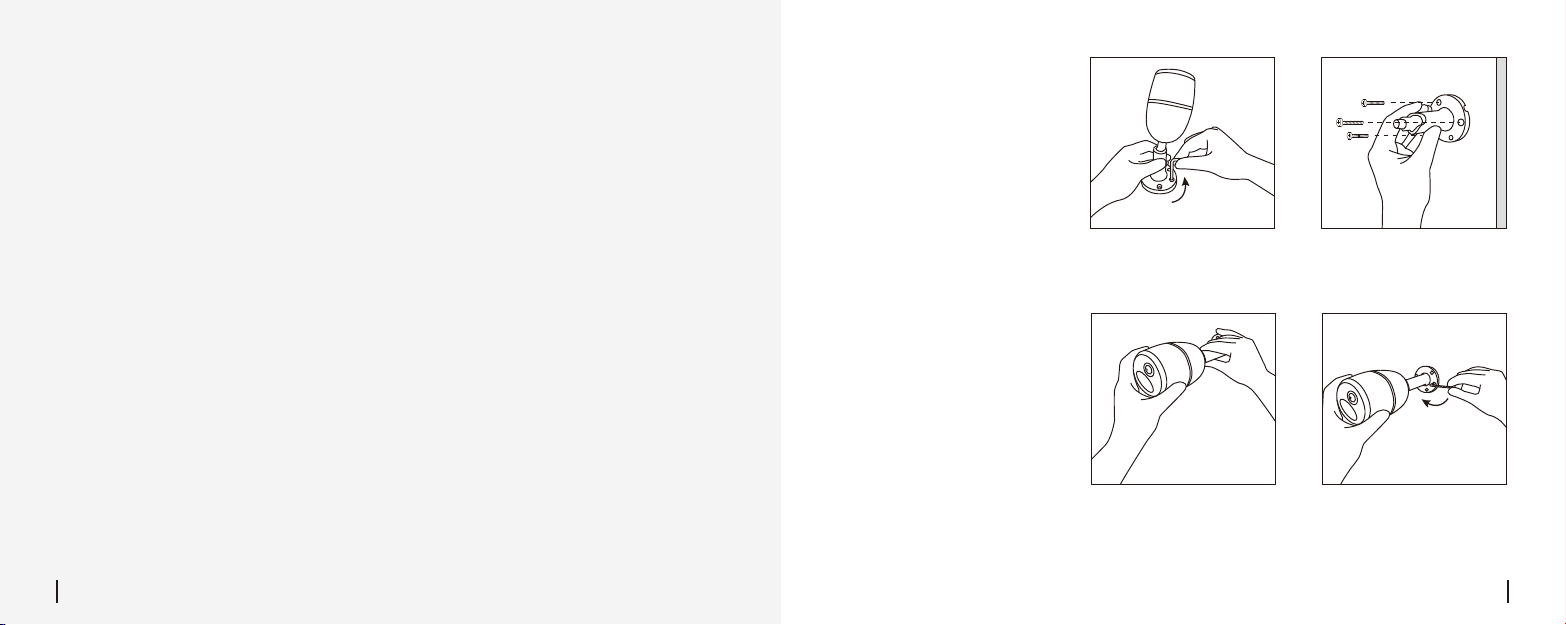
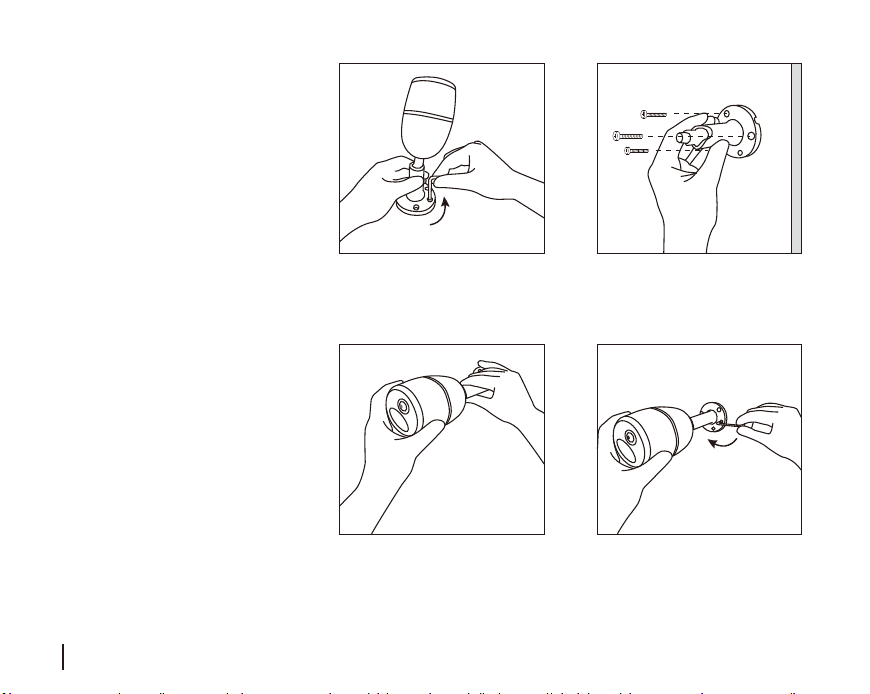
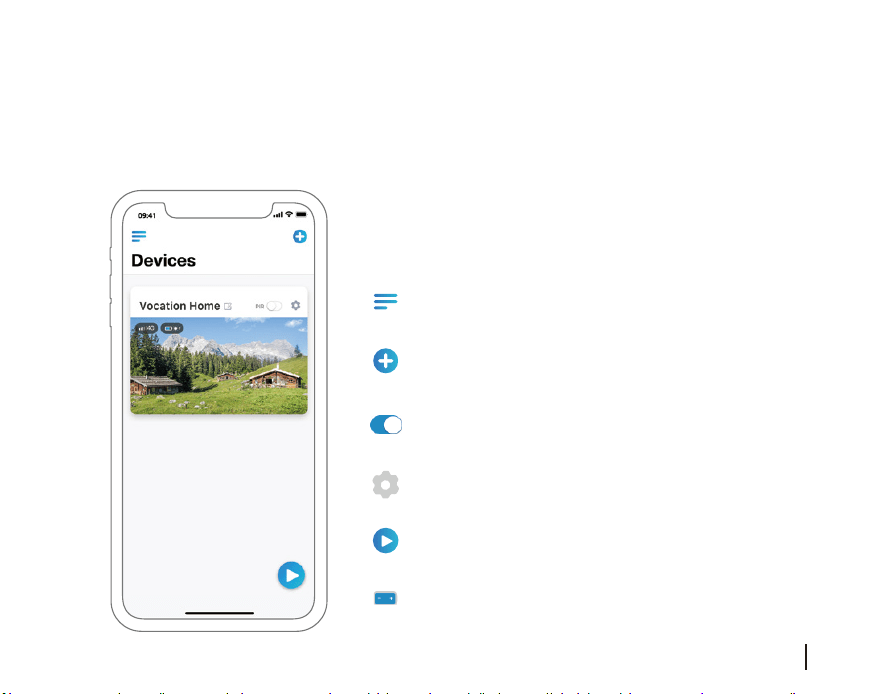
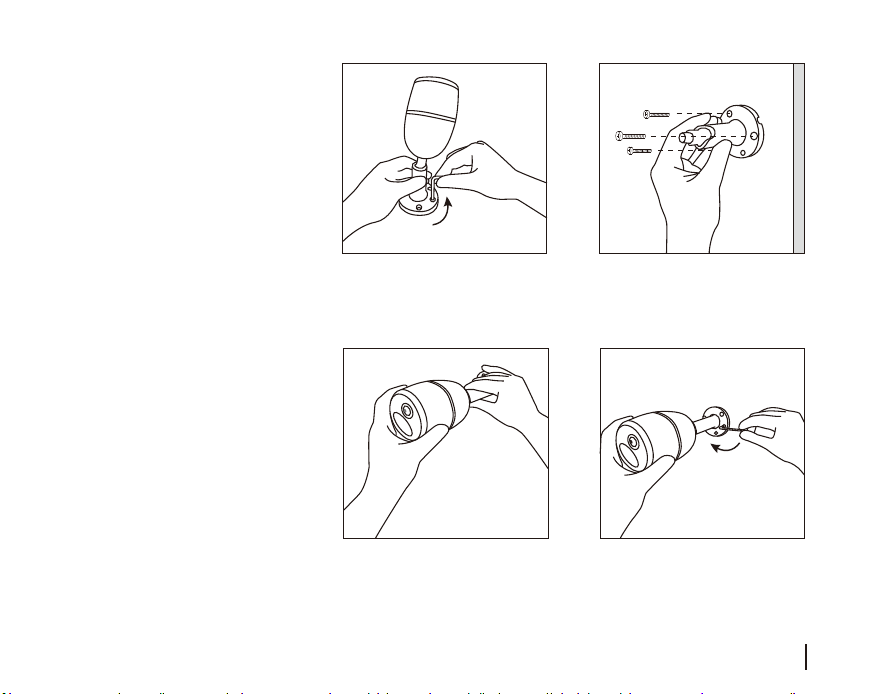
How to Install
Wall Mount
Use the allen wrench to loose the
screw.
Step 1
Screw the wall mount into the wall.
Step 2
Screw the camera to the wall mount
and adjust the camera to the proper
direction.
Step 3
Tighten the screw using the allen
wrench.
Step 4
12 English 13English
1. Please charge the rechargeable battery with a standard and high-quality DC 5V or 9V battery charger.
2. If you want to power the battery via the solar panel, please note that the battery is ONLY compatible
with Reolink solar panel. You cannot charge the battery with other solar panel brands.
3. Please charge the battery in temperatures between 0°C and 45°C.
4. Always use the battery in temperatures between -20°C and 60°C.
5. Please make sure the battery compartment is clean.
6. Please keep the USB charging port dry, clean and free of any debris and make sure the battery
contacts are aligned.
7. Always make sure the USB charging port is clean. Please cover the USB charging port with the rubber
plug after the battery has been fully charged.
8. Never charge, use or store the battery near any ignition sources, such as fire or heaters.
9. Always store the battery in a cool, dry and ventilated environment.
10. Never store the battery with any hazardous or combustible objects.
11. Do keep the battery away from children.
12. Do not short-circuit the battery by connecting wires or other metal objects to the positive (+) and
negative (-) terminals. Do NOT transport or store the battery with necklaces, hairpins or other metal
objects.
13. Do NOT disassemble, cut, puncture, short-circuit the battery, or make it dispose of in water, fire,
microwave ovens and pressure vessels.
14. Do NOT use the battery if it gives o an odor, generates heat, becomes discolored or deformed, or
appears abnormal in any ways. If the battery is being used or charged, remove the battery from the
device or the charger immediately, and stop using it.
15. Always follow the local waste and recycle laws when throwing the used battery away.
How to Install
Wall Mount
Use the allen wrench to loose the
screw.
Step 1
Screw the wall mount into the wall.
Step 2
Screw the camera to the wall mount
and adjust the camera to the proper
direction.
Step 3
Tighten the screw using the allen
wrench.
Step 4
12 English 13English
1. Drehen Sie die hintere Abdeckung gegen
den Uhrzeigersinn, stecken Sie die SIM-Karte
in den Steckplatz.
2. Setzen Sie den Akku in die Kamera ein und
befestigen Sie die hintere Abdeckung.
Einsetzen der SIM-Karte und des Akkus
• Tipps zur SIM-Karte
Micro-SIM /3FF
(2004)
0,59in/15mm
0,47in/12mm
Unterstützen diese Kamera die Größe der SIM-Karte folgendes:
• Die SIM-Karte unterstützt WCDMA und FDD LTE.
• Einige SIM-Karten besitzen einen PIN-Code, bitte nutzen Sie Ihr Smartphone
zum Deaktivieren der PIN.
• Aktivieren Sie die Karte vor dem Einsatz in der Kamera per Smartphone oder
über Ihren Anbieter.
Hinweis:
Bitte stellen Sie sicher, dass die SIM-Karte in Ihrem Smartphone funktioniert.
Online-Registrierung (Kamera-Ersteinrichtung)
1. Nach dem Einlegen von SIM-Karte und Akku
leuchtet ein rotes Licht und Sie hören die
Sprachansage „Kamera startet, bitte warten“.
Die rote LED leuchtet für einige Sekunden und
erlischt dann.
2. Eine blaue LED blinkt für einige Sekunden und
leuchtet dann dauerhaft, bevor sie erlischt. Sie
hören „Netzwerkverbindung erfolgreich“, die
Kamera hat sich also erfolgreich mit dem
Netzwerk verbunden.
DE
DE
14 Deutsch 15Deutsch

Legen Sie die SIM-Karte in Ihr
Mobiltelefon ein und deaktivieren Sie die
PIN
Sprachansage LED-Status Kamera-Status Lösung
3
4
2
1
Die rote LED
leuchtet einige
Sekunden lang und
beginnt dann zu
blinken
Die rote LED
leuchtet eine Zeit
lang und erlischt
dann komplett
Die blaue LED
leuchtet nicht und
erlischt einfach
Hinweis: Möglicherweise stoßen Sie auf eine der folgenden Situationen:
1. Prüfen Sie, ob Sie die SIM-Karte falsch
herum eingelegt haben
2. Prüfen Sie, ob die SIM-Karte
unvollständig eingelegt ist, legen Sie sie
erneut ein
1. Prüfen Sie bitte, ob Ihre Karte aktiviert ist.
Wenn nicht,rufen Sie bitte Ihren Anbieter an
und aktivieren Sie die SIM-Karte
2. Das Signal am aktuellen Standort ist
möglicherweise schwach, bitte platzieren
Sie die Kamera an einem Ort mit besserem
Empfang
Das Gerät schaltet in den Standby-Modus
und versucht, die Verbindung später
wiederherzustellen
„SIM-Karte kann
nicht erkannt
werden!“
„SIM-Karte ist
per PIN
gesperrt. Bitte
deaktivieren“
„Netzwerk-verbin
dung
fehlgeschlagen“
Die Kamera kann
diese SIM-Karte
nicht erkennen
Ihre SIM-Karte hat
eine PIN
Die Kamera kann
sich nicht im
Anbieternetz
registrieren
Die Kamera kann
keine Verbindung
zum
Reolink-Server
herstellen
1. Bitte klicken Sie zum Hinzufügen der
Kamera oben rechts auf den „ “-Knopf.
2. Scannen Sie den QR-Code an der Seite der
Kamera.Dann folgen Sie bitte die Schritte,
um die Kamera zu stellen.
Die Reolink-App im App Store (für IOS) und Google Play (für Android) herunterladen und installieren.
Available on the
Get it on
Richten Sie die Kamera auf der Reolink App ein
16 Deutsch 17Deutsch
3. Nachdem Sie ein Passwort für Ihre Kamera erstellt haben, folgen Sie bitte den Schritten, um die
Uhrzeit zu synchronisieren und die Live-Ansicht zu starten oder die „Einstellungen" zu wissen.
Akkustand
Neues Gerät hinzufügen
Menü
PIR-Bewegungsmelder ein/aus
(PIR-Sensor ist per Standard aktiviert.)
Geräteeinstellungen
Zugri auf die Live-Ansich
Achtung für die Installation der Kamera
• PIR-Sensor Erkennungsdistanz
Der Weg zu der Anpassung der Distanz in der App: Einstellungen - PIR-Einstellungen
Hoch
Mittel
Niedrig
Bis zu 10 Meter (33 Fuß)
Bis zu 6 Meter (20 Fuß)
Bis zu 4 Meter (13 Fuß) Bis zu 10 Meter (33 Fuß)
Bis zu 12 Meter (40 Fuß)
Bis zu 16 Meter (52 Fuß)
Hinweis:
Wert
81 - 100
51 - 80
0 - 50
Der PIR-Sensor hat 3 Empfindlichkeitsklassen für Ihre Einstellung: Niedrig / Mittel / Hoch.
Höhere Empfindlichkeit bietet längere Erkennungsdistanz. Die Standardempfindlichkeit des PIR-Sensors
liegt bei "Hoch".
Empfind-
lichkeit
Erkennungsabstand
(Lebewesen in Bewegung)
Erkennungsabstand
(Fahrz. in Bewegung)
18 Deutsch 19Deutsch

Bitte platzieren Sie die Kamera bei der Installation schräg
(der Winkel zwischen dem Sensor und dem erkannten
Objekt muss größer als 10° sein), um die eektive
Bewegungserkennung zu gewährleisten. Falls sich das
bewegte Objekt dem PIR-Sensor vertikal nähert, erkennt
der Sensor die Bewegungsereignisse möglicherweise nicht.
Der ideale Betrachtungsabstand beträgt 2–10 Meter
(7–33 Fuß). Hierbei sind Menschen erkennbar.
θ
Info:
• Erkennungsabstand des PIR-Sensors: 23 Fuß (Standard)
• Erfassungswinkel des PIR-Sensors: 120° (H)
• Ideale Sichtweite der
Kamera
• PIR-Sensor Installationswinkel
10°
θ
Um Fehlalarme zu verringern, beachten Sie bitte:
• Installieren Sie die Kamera nicht mit Blick auf helles Licht ausstrahlende Objekte,
einschließlich Sonnenschein, helles Lampenlicht etc.
• Platzieren Sie die Kamera nicht zu nahe an Orten, an denen sich häufig Fahrzeuge
bewegen. Aufbauend auf unseren zahlreichen Tests beträgt der empfohlene Abstand
zwischen Kamera und Fahrzeug 16 Meter (52 Fuß).
• Halten Sie Abstand zu Auslässen, einschließlich Lüftungsönungen von Klimaanla-
gen, Luftbefeuchterauslässen, Wärmeübertragungsönungen von Projektoren etc.
• Installieren Sie die Kamera nicht an Orten mit starkem Wind.
• Installieren Sie die Kamera nicht mit Ausrichtung auf einen Spiegel.
• Halten Sie die Kamera mindestens 1 Meter von allen drahtlosen Geräten fern,
einschließlich WLAN-Routern und Telefonen, um Funkstörungen zu vermeiden.
!
Wichtige Hinweise zum Reduzieren
von Fehlalarmen
2-3 Meter
Idealer Betrachtungsabstand:
2–10 Meter (7–33 Fuß)
Einfall
Weg des sich
bewegenden
Objekts
20 Deutsch 21Deutsch

!
Laden des Akkus
Ladeanzeige:
Grüne LED: Voll
* Bitte beachten Sie, dass das Solarpanel NICHT im Lieferumfang enthalten ist. Sie können das Solarpanel hier kaufen:
Ofzieller Reolink Online-Shop
Wichtige Schutzmaßnahmen bei der
Verwendung von Akkus
1. Laden Sie den Akku, nach
dem Einsetzen in die Kamera.
2. Laden Sie den Akku separat
auf.
3. Laden Sie den Akku mithilfe
des Reolink-Solarpanels.
Orange LED: Aufgeladen
1. Bitte laden Sie den Akku mit einem standardmäßigen und hochwertigen DC 5V oder 9V Ladegerät auf.
2. Wenn Sie den Akku mit dem Solarpanel laden möchten, beachten Sie bitte, dass der Akku der Kamera NUR
mit dem Reolink Solarpanel kompatibel ist. Der Akku lässt sich NICHT mit einem Solarpanel anderer Hersteller
laden.
3. Bitte laden Sie den Akku bei Temperaturen zwischen 0 ° C und 45 ° C auf.
4. Verwenden Sie bitte den Akku immer bei Temperaturen zwischen -20 ° C und 60 ° C.
5. Bitte stellen Sie sicher, dass das Batteriefach sauber ist.
6. Bitte halten Sie den USB-Ladeanschluss trocken, sauber und frei von Schmutz und stellen Sie sicher, dass die
Batteriekontakte ausgerichtet sind.
7. Vergewissern Sie sich immer, dass der USB-Ladeanschluss sauber ist. Bitte bedecken Sie den
USB-Ladeanschluss mit dem Gummistopfen, nachdem der Akku vollständig aufgeladen wurde.
8. Laden, verwenden oder lagern Sie den Akku niemals in der Nähe von Zündquellen wie Feuer oder Heizungen.
9. Bewahren Sie den Akku immer an einem kühlen, trockenen und belüfteten Ort auf.
10. Lagern Sie den Akku niemals mit gefährlichen oder brennbaren Gegenständen.
11. Halten Sie den Akku von Kindern fern.
12. Schließen Sie den Akku nicht kurz, indem Sie Drähte oder andere metallische Gegenstände an die positiven
(+) und negativen (-) Klemmen anschließen. Transportieren oder lagern Sie den Akku NICHT mit Halsketten,
Haarnadeln oder anderen Metallgegenständen.
13. Bitte den Akku NICHT zerlegen, zerschneiden, durchstechen, kurzschließen oder in Wasser, Feuer,
Mikrowellenherden und Druckbehältern entsorgen.
14. Verwenden Sie den Akku NICHT, wenn er einen Geruch abgibt, Hitze erzeugt, sich verfärbt oder deformiert
oder in irgendeiner Weise abnormal erscheint. Wenn der Akku bei der Verwendung oder Aufladung abnormal
arbeitet, entfernen Sie sofort den Akku aus dem Gerät oder dem Ladegerät und beenden Sie die Verwendung.
15. Befolgen Sie immer die örtlichen Abfall- und Recyclinggesetze, wenn Sie den gebrauchten Akku entsorgen.
Die Reolink Go wird nicht für einen 24/7 Vollbetrieb oder einen Rund-um-die-Uhr-Livestream konzipiert.
Sie wird zum Aufzeichnen von Bewegungsereignissen und für Live-Fernansicht bei Bedarf entwickelt.
In diesem Beitrag lernen Sie einige praktische Wege zur Maximierung der Akkulaufzeit kennen:
https://support.reolink.com/hc/en-us/articles/360006991893
22 Deutsch 23Deutsch
Installation
der Wand-
halterung
Verwenden Sie den Inbusschlüssel,
um die Schraube zu lösen.
Schritt 1
Schrauben Sie die Wandhalterung
in die Wand.
Schritt 2
Schrauben Sie die Kamera an die
Wandhalterung und richten Sie die
Kamera korrekt aus.
Schritt 3
Ziehen Sie die Schraube mithilfe
des Inbusschlüssels fest.
Schritt 4
Installer la carte SIM et la batterie
• Conseils pour carte SIM
Micro-SIM /3FF
(2004)
0.59in/15mm
0.47in/12mm
Taille de la carte micro SIM requise est comme ci-dessous
• La carte SIM supporte WCDMA et LTE FDD.
• Certaines cartes SIM ont un code PIN, Veuillez d'abord utiliser votre
smartphone pour désactiver le code PIN.
• Activez la carte dans votre smartphone ou votre opérateur avant de l'insérer
dans l'appareil.
Remarque:
S'il vous plaît assurez-vous que la carte SIM peut travailler dans votre
smartphone.
1. Tournez le couvercle dans le sens antihoraire,
insérez la carte SIM dans la fente.
2. Insérez la batterie dans la caméra surveillance et
serrez le couvercle arrière.
FR
24 Deutsch 25French
1. Après la carte SIM et la batterie installées, un
voyant rouge s'allume et vous entendrez le
message vocal “La caméra est en cours de
démarrage, veuillez patienter”. La LED rouge
reste allumée pendant quelques secondes et
s'éteint.
2. Une LED bleue clignote pendant quelques
secondes et ensuite solide avant de s’éteindre,
vous entendez «La connexion de réseau a réussi
», ce qui signifie que l'appareil a été connecté
avec succès au réseau.
Inscription en ligne (configuration initiale de
l'appareil photo)
Invite vocale LED d'état Etat de la caméra Solution
3
4
2
1
Remarque: Vous pouvez également exécuter dans les situations suivantes:
1.Vérifiez si vous avez fait une marche
arrière de la carte SIM
2.Vérifiez si la carte SIM est complètement
insérée, s'il vous plaît insérer à nouveau
1. Vérifiez que votre carte n'est pas activée,
s'il vous plaît appelez votre opérateur pour
l'activer
2. Votre position actuelle peut avoir un
signal faible, s'il vous plaît déplacer
l'appareil photo à un endroit meilleur signal
« Carte SIM ne
peut pas être
reconnu! »
« La carte SIM
est verrouillée
par un code PIN.
S'il vous plaît
désactiver »
LED rouge est
solide pendant
quelques secondes,
puis à clignoter
LED rouge est
solide pendant un
certain temps puis
s'éteindre
complètement
LED bleu ne va pas
et solide juste
s'éteindre
« Connexion de
réseau a échoué »
Caméra surveillance
ne peut pas
reconnaître cette
carte SIM
Votre carte SIM a un
code PIN
Mettez la carte SIM dans votre téléphone
mobile et désactiver le code PIN
Appareil passe en mode veille et essayer
de se reconnecter plus tard
Caméra surveillance
ne doit être enregistré
au réseau de
l'opérateur
Caméra surveillance
ne parvient pas à se
connecter au
serveur Reolink
26 French 27French
1. S'il vous plaît cliquer sur le Bouton« »
dans le coin supérieur droit pour ajouter la
caméra.
2. Scannez le code QR sur le côté de la
caméra et suivez les étapes pour terminer
la configuration.
3. Après avoir créé un mot de passe pour votre caméra surveillance, suivez les étapes pour synchro-
niser l'heure, puis démarrez Live View ou allez dans "Paramètres de l'appareill"
Voici deux façons pour obtenir Reolink App:
• Recherche « Reolink » dans l'App Store (pour iOS), téléchargez et installez l'application.
• Recherche « Reolink » dans Google Play (pour Android), téléchargez et installez l'application
Available on the
Get it on
Configurer la caméra sur l'application Reolink
État de la batterie
Ajouter un nouvel appareil
Menu
Activer / Désactiver PIR détecteur de mouvement
(A défaut, le détecteur PIR est activé.)
Paramètres de l'appareil
Accédez au Live View
28 French 29French
Faites attention pour l'installation de la caméra
• Capteur PIR distance de détection
Schéma de réglage de la distance dans App: paramètres de l'appareil-paramètres PIR
Sensibilité
Distance de détection
(pour les vechicles de movement)
Haute
Milieu
Faible
Jusqu'à 10 mètres (33ft)
Jusqu'à 6 mètres (20 pieds)
Jusqu'à 4 mètres (13ft)
Valeur
81 - 100
51 - 80
0 - 50
Pour réduire les fausses alarmes, s'il vous plaît notez que:
• Ne pas installer la caméra face à des objets avec des lumières vives, y compris le
soleil, lampes lumineuses, etc.
• Ne placez pas l'appareil trop près d'un endroit où il y a des véhicules qui se déplacent
fréquemment. Sur la base de nos nombreux tests, la distance recommandée entre la
caméra et le véhicule est de 16 mètres (52 pieds).
• À l'écart des prises femelles, y compris les orifices de ventilation du climatiseur, les
points d'humidificateur, les orifices de transfert de chaleur des projecteurs, etc.
• Ne pas installer l'appareil où il y a des vents forts.
• Ne pas installer la caméra face au miroir.
• Gardez l'appareil au moins 1 mètre de tout appareil sans fil, y compris les routeurs
Wi-Fi et les téléphones afin d'éviter des interférences sans fil..
!
Remarques importantes pour
réduire les fausses alarmes
Jusqu'à 10 mètres (33ft)
Jusqu'à 12 mètres (40 pieds)
Jusqu'à 16 mètres (52 pieds)
Distance de détection (pour le
mouvement et les êtres vivants)
Le PIR Senor a 3 niveaux de sensibilité pour votre réglage: Faible/Milieu/Haute.
Une sensibilité plus élevée ore une distance de détection plus longue. La sensibilité par défaut du
capteur PIR est à " Haute".
Remarque:
30 French 31French

!
Charger la batterie
Charging indicator:
LED verte: entièrement chargé
* Veuillez noter que le panneau solaire n'est pas inclus dans l'emballage. Vous pouvez acheter le panneau solaire sur le
magasin en ligne Official de Reolink.
Consignes de sécurité importantes sur
l'utilisation de la batterie rechargeable
1. Chargez la batterie
lorsqu'elle est installée sur la
caméra.
3. Chargez la batterie avec le
Reolink panneau solaire.
LED orange :chargement
lors de l'installation la caméra, s'il vous plaît installer la
caméra de manière angulaire (l'angle entre le capteur et
l'objet détecté est supérieur à 10 °) pour la détection de
mouvement ecace. Si l'objet mobile approche verticale
du capteur PIR, le capteur ne peut pas détecter les
événements de mouvement.
La distance idéale est 2-10 mètres (7-33ft), qui vous
permet de reconnaître un être humain.
entrée
θ
Le chemin de
l'objet mobile
• La distance de détection du détecteur PIR: 23ft (en défaut)
• L'angle de détection du capteur PIR: 120 ° (H)
• distance de visualisation
idéale de la caméra
• Angle d'installation du capteur
PIR
10°
θ
2-3 mètres
Idéal Distance de
visualisation: 2-10 mètres
Pour votre information:
2. Chargez la batterie
séparément.
Reolink Go n’est pas conçu pour la course des capacités 24/7 plein ou autour de l'horloge en direct. Il
est conçu pour enregistrer des événements de mouvement et de visualiser à distance en direct
seulement quand vous en avez besoin.
S'il vous plaît apprenez quelques approches utiles dans ce
Post pour étendre les limites de l'autonomie de votre pile:
https://support.reolink.com/hc/en-us/articles/360006991893
32 French 33French

1. Veuillez charger la batterie rechargeable avec un chargeur de batterie DC 5V ou 9V standard et de haute qualité.
2. Si vous voulez alimenter la batterie via le panneau solaire, veuillez noter que la batterie est UNIQUEMENT
compatible avec le panneau solaire Reolink. Vous ne pouvez pas charger la batterie avec d'autres marques de
panneaux solaires.
3. Veuillez charger la batterie à des températures comprises entre 0 ° C et 45 ° C.
4. Utilisez toujours la batterie à des températures comprises entre -20 ° C et 60 ° C.
5. Veuillez-vous assurer que le compartiment de la batterie est propre.
6. Veuillez garder le port de chargement USB sec, propre et exempt de tout débris et assurez-vous que les contacts
de la batterie sont alignés.
7. Assurez-vous toujours que le port de chargement USB est propre. Veuillez couvrir le port de chargement USB
avec la prise en caoutchouc une fois la batterie complètement chargée.
8. Ne chargez, n'utilisez ou ne stockez jamais la batterie à proximité d'une source d'allumage, telle qu'un feu ou un
radiateur.
9. Rangez toujours la batterie dans un environnement frais, sec et ventilé.
10. Ne rangez jamais la batterie avec des objets dangereux ou combustibles.
11. Gardez la batterie à l'écart des enfants.
12. Ne mettez pas la batterie en court-circuit en raccordant des fils ou d'autres objets métalliques aux bornes
positives (+) et négatives (-). Ne pas transporter ou ranger la batterie avec des colliers, épingles à cheveux ou
autres objets métalliques.
13. Ne pas démonter, couper, percer, court-circuiter la batterie ou le faire jeter dans l'eau, le feu, les fours à
micro-ondes et les récipients sous pression.
14. Ne pas utiliser la batterie si elle dégage une odeur, génère de la chaleur, devient décolorée ou déformée, ou
apparaît anormale de quelque façon que ce soit. Si la batterie est utilisée ou chargée, retirez immédiatement la
batterie de l'appareil ou du chargeur et cessez de l'utiliser.
15. Toujours suivre les lois de recyclage en jetant la batterie usée loin.
Étape 1 Étape 2
Étape 3 Étape 4
Comment
installer
Montage mural
Utilisez la clé Allen pour
desserrer la vis.
Visser le support mural dans le
mur.
Visser l'appareil sur le support
mural et d'ajuster l'appareil à la
bonne direction.
Serrer la vis à l'aide de la clé
allen wrench.
34 French 35French
1.Ruotare il coperchio posteriore in senso
antiorario, inserire la scheda SIM nello slot.
2. Inserire la batteria nella fotocamera e serrare il
coperchio posteriore.
Installare la scheda SIM e la batteria
• Suggerimenti per scheda SIM
Micro-SIM /3FF
(2004)
0,59in/15mm
0,47in/12mm
Dimensioni della scheda micro SIM richiesta:
• La scheda SIM supporta WCDMA e FDD LTE.
• Alcune schede SIM hanno un codice PIN, usa il tuo smartphone per
disattivare il PIN.
• Attiva la scheda tramite lo smartphone o il tuo operatore prima di inserirla
nella fotocamera.
Attenzione:
Assicurati che la scheda SIM possa funzionare sul tuo smartphone.
1. Dopo aver inserito la scheda SIM e la
batteria, si accenderà una luce rossa e si
udirà il messaggio vocale "La telecamera si
sta avviando, attendere prego". Il LED rosso
rimarrà acceso fisso per alcuni secondi e si
spegnerà.
2. Un LED blu lampeggerà per alcuni secondi e
poi rimarrà fisso prima di spegnersi, si udirà
"Connessione di rete riuscita", il che significa che
la telecamera si è collegata correttamente alla
rete.
IT
Registro Online (Configurazione iniziale
Telecamera )
36 Italian 37Italian
Inserisci la scheda SIM nel tuo cellulare e
disabilita il PIN
Stato LED Soluzione
3
4
2
1
Il LED rosso
rimane acceso
fisso per alcuni
secondi e quindi
inizia a
lampeggiare
Il LED rosso
rimane acceso
per un po' e poi si
spegne
completamente
Il LED blu non
rimarrà fisso e si
spegnerà
Hinweis: Möglicherweise stoßen Sie auf eine der folgenden Situationen:
1. Verifica se hai inserito la scheda SIM nel
senso corretto
2. Controlla che la scheda SIM sia
completamente inserita, inseriscila di
nuovo
1. Veriica se la tua scheda non è stata
attiva, chiama il tuo operatore per
attivarla
2. La tua posizione attuale potrebbe avere
un segnale debole, sposta la fotocamera
in una posizione con un segnale migliore
Il dispositivo entrerà in modalità Standby
e tenterà di riconnettersi più tardi
"La scheda SIM
non può essere
riconosciuta!"
"La carta SIM è
bloccata con un
PIN. Disabilitalo"
"Connessione di
rete fallita"
La telecamera
non può
riconoscere
questa scheda
SIM
La tua scheda SIM
ha un PIN
La telecamera
non viene
registrata sulla
rete dell'operatore
La telecamera
non riesce a
connettersi al
server Reolink
1. . Clicca sul pulsante " " nell'angolo in
alto a destra per aggiungere la telecamera.
2. Esegui la scansione del codice QR sul lato
della telecamera e segui i passaggi per
completare la configurazione.
Di seguito sono riportati due modi per ottenere l'app Reolink:
• Cerca "Reolink" nell’App Store (per iOS), scarica e installa l'app. “Reolink”
• Cerca "Reolink" in Google Play (per Android), scarica e installa l'app.
Available on the
Get it on
Imposta la telecamera sull'app Reolink
Messaggio
Vocale
Stato della
telecamera
38 39Italian Italian
3. Dopo aver creato una password per la telecamera, segui i passaggi per sincronizzare l'ora, quindi
avvia la visualizzazione live o vai su "Impostazioni dispositivo".
Indicazioni per l'installazione della telecamera
• Distanza di rilevamento del sensore a infrarossi
Percorso per la regolazione della distanza sull'app: Impostazioni dispositivo-impostazioni PIR
Alta
Medio
Bassa
Fino a 10 metri (33 piedi)
Fino a 6 metri (20 piedi)
Fino a 4 metri (13 piedi) Fino a 10 metri (33 piedi)
Fino a 12 metri (40 piedi)
Fino a 16 metri (52 piedi)
Attenzione:
Valore
81 - 100
51 - 80
0 - 50
Il sensore passivo a infrarossi (PIR) ha 3 livelli di sensibilità regolabili: Bassa/Medio/Alta.
La sensibilità Alta ore una distanza di rilevamento maggiore. La sensibilità predefinita del sensore PIR
è impostata su "Alta”.
Sensibilità
Distanza di Rilevamento
(per cose in movimento e viventi)
Distanza di Rilevamento
(per veicoli in movimento)
Stato della batteria
Aggiungi nuovo dispositivo
Menu
Abilita/Disabilita Sensore di movimento PIR
(Di default, il sensore PIR è abilitato.)
Impostazioni del dispositivo
Accedi alla Visualizzazione Live
40 41Italian Italian
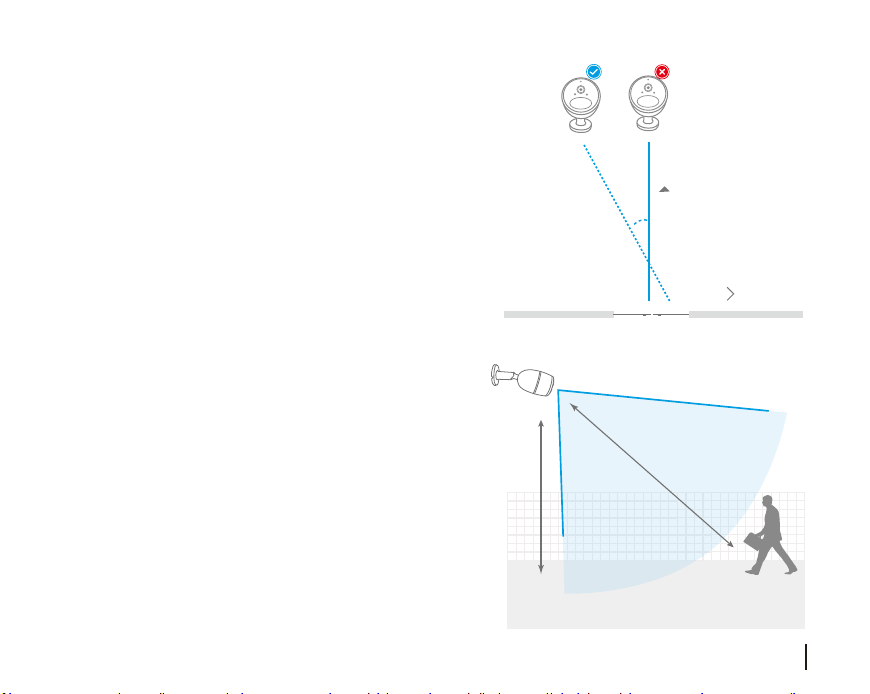
Installare la telecamera angolarmente (l'angolo tra il
sensore e l'oggetto rilevato è maggiore di 10°) per un
rilevamento ecace del movimento. Se l'oggetto in
movimento si avvicina verticalmente al sensore PIR, il
sensore potrebbe non rilevare il movimento.
La distanza di visualizzazione ideale è 2-10 metri(7-33
piedi), che consente di riconoscere un essere umano.
θ
Per conoscenza:
• Distanza di rilevamento del sensore PIR: 23piedi (di
default)
• Angolo di rilevamento del sensore PIR: 120 ° (H)
• Distanza di visione ideale
della telecamera
Angolo di installazione del
sensore PIR
10°
θ
Per ridurre i falsi allarmi, fare attenzione a:
• Non installare la telecamera davanti a oggetti con luci intense, tra cui luce del sole,
lampade molto luminose, ecc.
• Non installare la telecamera troppo vicina a un luogo in cui ci sono veicoli in
frequente movimento. Sulla base di numerosi test, la distanza consigliata tra la
telecamera e il veicolo è di 16 metri (52 piedi).
• Halten Sie Abstand zu Auslässen, einschließlich Lüftungsönungen von Klimaanla-
gen, Luftbefeuchterauslässen, Wärmeübertragungsönungen von Projektoren etc.
• Tenere lontano dagli sbocchi, incluse le bocchette del climatizzatore, le uscite d’aria
dell'umidificatore, le bocchette di dissipazione del calore dei proiettori, ecc.
• Non installare la telecamera dove ci sono forti venti.
• Non installare la fotocamera di fronte a specchi.
Tenere la telecamera ad almeno 1 metro di distanza da qualsiasi dispositivo wireless,
inclusi router e telefoni Wi-Fi per evitare interferenze wireless.
!
Note importanti per la riduzione
dei falsi allarmi
2-3 metri
IDistanza ideale:
2-10 metri (7-33piedi)
Entrata
Il percorso
dell’oggetto in
movimento
42 43Italian Italian
!
Laden des Akkus
Indicatore di carica:
LED Verde: Batteria carica
* Il pannello solare NON è incluso nella confezione. Puoi comprare il pannello solare presso lo store online uciale
Reolink
Reolink Go non è progettato per un funzionamento a piena capacità 24/7 o live streaming 24 ore su
24. È progettato per registrare eventi di movimento e visualizzare in remoto lo streaming live solo
quando ne hai bisogno.
Scopri alcuni modi utili per massimizzare la durata della batteria in questo post:
https://support.reolink.com/hc/en-us/articles/360006991893
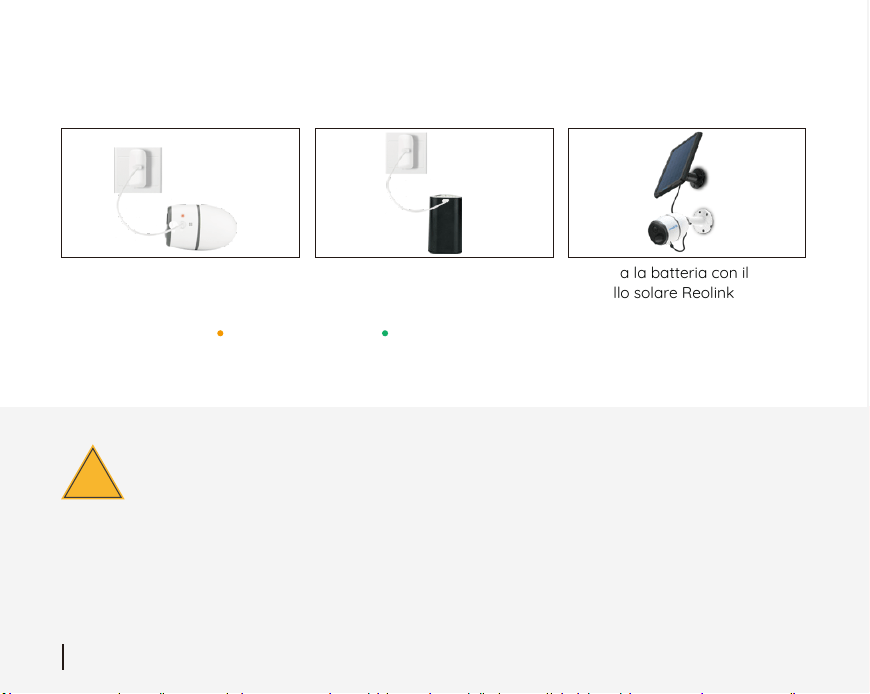
Precauzioni importanti per l'uso della batteria
ricaricabile
1. Carica la batteria quando
inserita nella telecamera
2. Carica la batteria
separatamente.
3. Carica la batteria con il
pannello solare Reolink
LED Arancione: In caric
1. Ricarica la batteria ricaricabile con un caricabatterie standard di alta qualità da 5V o 9V.
2. Se desideri alimentare la batteria tramite il pannello solare, tieni presente che la batteria è compatibile SOLO
con il pannello solare Reolink. Non è possibile caricare la batteria con pannelli solari di altre marche.
3. Ricarica la batteria a temperature comprese tra 0° C e 45° C.
4. Utilizza sempre la batteria a temperature comprese tra -20° C e 60° C.
5. Assicurati che il vano batteria sia pulito.
6. Mantieni la porta di ricarica USB asciutta, pulita e priva di detriti e assicurati che i contatti della batteria siano
allineati.
7. Assicurati sempre che la porta di ricarica USB sia pulita. Copri la porta di ricarica USB con la copertura di
gomma dopo che la batteria è stata completamente caricata.
8. Non caricare, utilizzare o conservare la batteria vicino a fonti di ignizione, come fuoco o caloriferi.
9. Conserva sempre la batteria in un ambiente fresco, asciutto e ventilato.
10. Non conservare mai la batteria con oggetti pericolosi o combustibili.
11. Conserva la batteria lontana dai bambini.
12. Non provocare il cortocircuito della batteria collegando fili o altri oggetti metallici ai terminali positivo (+) e
negativo (-). NON trasportare o conservare la batteria con collane, forcine o altri oggetti metallici.
13. NON smontare, tagliare, forare, cortocircuitare la batteria o gettarla in acqua, fuoco, forni a microonde e
recipienti a pressione.
14. NON usare la batteria se emana odori, genera calore, si scolorisce o si deforma o appare anormale in
qualsiasi modo. Se la batteria è in uso o in carica, rimuovi immediatamente la batteria dal dispositivo o dal
caricabatterie e interrompine l'utilizzo.
15. Segui sempre le normative locali sui rifiuti e il riciclaggio quando getti via la batteria usata.2. If you want to
power the battery via the
44
45
Italian Italian

!
Laden des Akkus
Indicatore di carica:
LED Verde: Batteria carica
* Il pannello solare NON è incluso nella confezione. Puoi comprare il pannello solare presso lo store online uciale
Reolink
Reolink Go non è progettato per un funzionamento a piena capacità 24/7 o live streaming 24 ore su
24. È progettato per registrare eventi di movimento e visualizzare in remoto lo streaming live solo
quando ne hai bisogno.
Scopri alcuni modi utili per massimizzare la durata della batteria in questo post:
https://support.reolink.com/hc/en-us/articles/360006991893
Precauzioni importanti per l'uso della batteria
ricaricabile
1. Carica la batteria quando
inserita nella telecamera
2. Carica la batteria
separatamente.
3. Carica la batteria con il
pannello solare Reolink
LED Arancione: In caric
1. Ricarica la batteria ricaricabile con un caricabatterie standard di alta qualità da 5V o 9V.
2. Se desideri alimentare la batteria tramite il pannello solare, tieni presente che la batteria è compatibile SOLO
con il pannello solare Reolink. Non è possibile caricare la batteria con pannelli solari di altre marche.
3. Ricarica la batteria a temperature comprese tra 0° C e 45° C.
4. Utilizza sempre la batteria a temperature comprese tra -20° C e 60° C.
5. Assicurati che il vano batteria sia pulito.
6. Mantieni la porta di ricarica USB asciutta, pulita e priva di detriti e assicurati che i contatti della batteria siano
allineati.
7. Assicurati sempre che la porta di ricarica USB sia pulita. Copri la porta di ricarica USB con la copertura di
gomma dopo che la batteria è stata completamente caricata.
8. Non caricare, utilizzare o conservare la batteria vicino a fonti di ignizione, come fuoco o caloriferi.
9. Conserva sempre la batteria in un ambiente fresco, asciutto e ventilato.
10. Non conservare mai la batteria con oggetti pericolosi o combustibili.
11. Conserva la batteria lontana dai bambini.
12. Non provocare il cortocircuito della batteria collegando fili o altri oggetti metallici ai terminali positivo (+) e
negativo (-). NON trasportare o conservare la batteria con collane, forcine o altri oggetti metallici.
13. NON smontare, tagliare, forare, cortocircuitare la batteria o gettarla in acqua, fuoco, forni a microonde e
recipienti a pressione.
14. NON usare la batteria se emana odori, genera calore, si scolorisce o si deforma o appare anormale in
qualsiasi modo. Se la batteria è in uso o in carica, rimuovi immediatamente la batteria dal dispositivo o dal
caricabatterie e interrompine l'utilizzo.
15. Segui sempre le normative locali sui rifiuti e il riciclaggio quando getti via la batteria usata.2. If you want to
power the battery via the
44
45
Italian Italian
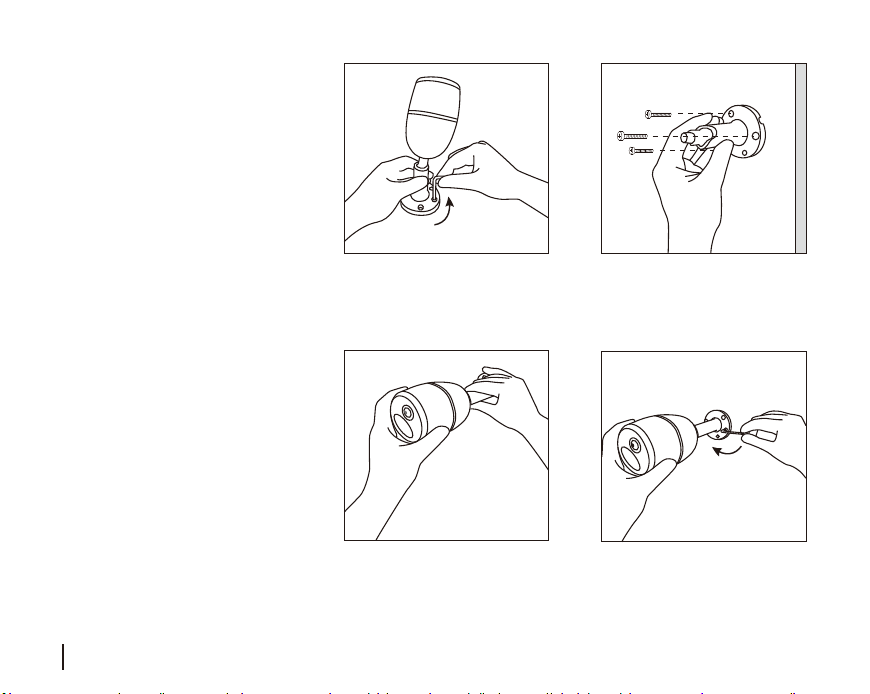
Come installare
il supporto
a parete
Utilizza la chiave a brugola per
allentare la vite.
Step 1
Avvita il supporto a parete al muro.
Step 2
Avvita la telecamera al supporto a
parete e regola la telecamera nella
direzione corretta.
Step 3
Stringi le viti con la chiave a
brugola.
Step 4
Isntale la tarjeta SIM y la bateria
• Tips para tarjera SIM
Micro-SIM /3FF
(2004)
0.59in/15mm
0.47in/12mm
El tamaño requerido de la SIM:
• LA SIM es compatible con WCDMA y FDD LTE.
• Algunas tarjetas SIM tienen código PIN, primero use su Smartphone parta
deshabilitarlo.
• Ative la tarejeta en su smartphone con su operador antes de insertala en la
camara.
Note:
Asegúrese de que la SIM pueda usarse con su Smartphone.smartphone.
1. Rote el cobertor de atrás contra el reloj.
Inserte la SIM la su ranura.
2. Inserte la bateria en l camara y asegura el
cobertor de atrás.
ES
46 47SpanishItalian
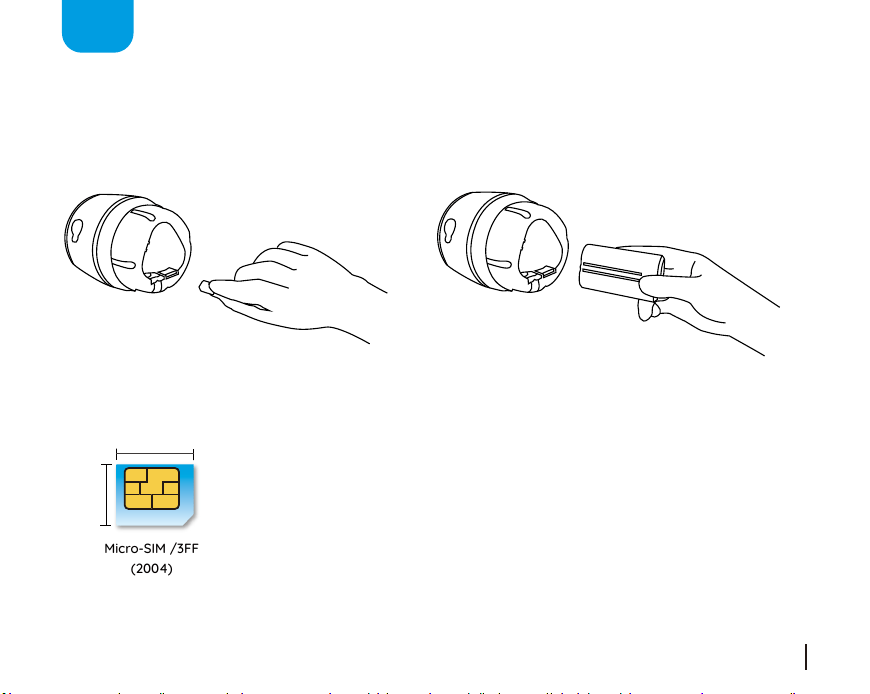

Register Online (Camera Initial Setup)
1. Después de la instalación la tarjeta SIM y
batería, vera una luz roja, y se escuchará la voz
que avisa "Cámara está iniciando, por favor
espere". El LED rojo será sólido unos segundos y
se apagara.
2. Una luz azul LED parpadeará durante unos
segundos y luego se mantiene antes de
apagarse, luego se escucha "Conexión tuvo
éxito", que significa que la cámara se ha
conectado con éxito a la red.
Activado de voz Estado de LED Estado de Camara Solucion
3
4
2
1
Note: Tambien podria ver estas situaciones.
1. Revise si hiso una dirección en reversa
de la SIM
2. Revise si la SIM no está completamente
insertada, y pruebe de nuevo
1. Revise si su tarjeta no está activa y
llame a su operador para activarla.
2. Su operador actual podría tener mala
señal,, mueva la cámara a un lugar con
mejor señal
"Tarjeta SIM no
reconocida!"
" La SIM esta
cerrada con un
PIN desactívelo."
"Conexión con red
fallida."
Cámara no
reconoce esta
tarjeta SIM
Ponga la SIM en su móvil y deshabilite el
PIN.
El aparato se pondrá en modo de espera y
se tratara de conectar más tarde
LED rojo se
mantiene firme
unos segundos y
luego parpadea
Su tarjeta SIM tiene
un PIN
La cámara falla al
registrarse con la
red del operador
Cámara falla al
conectarse al
servidor de Reolink
LED rojo se
mantiene pero se
apaga
completamente
El LED azul no se
mantiene y se
apaga.
48 49Spanish Spanish
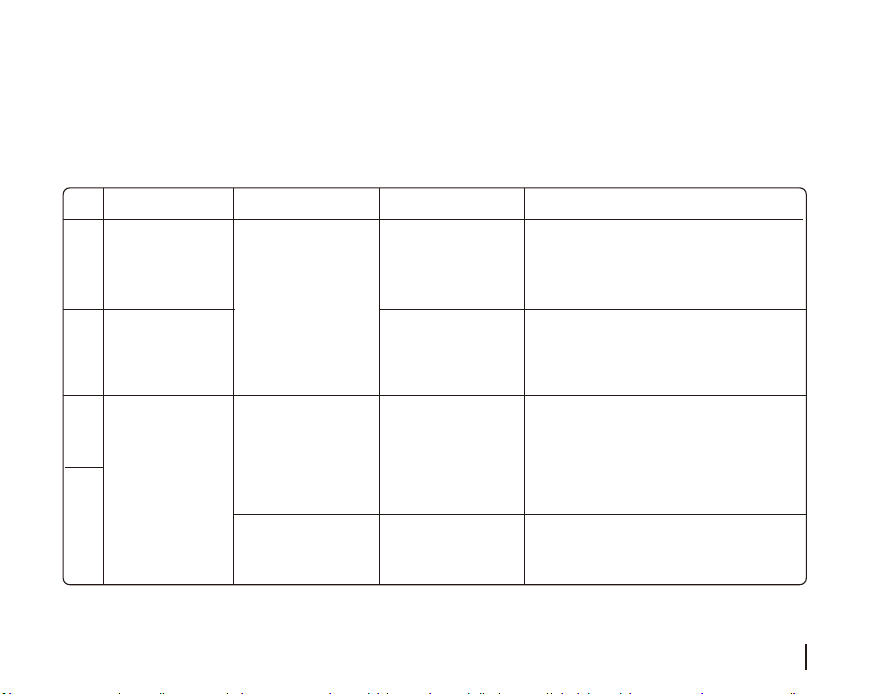
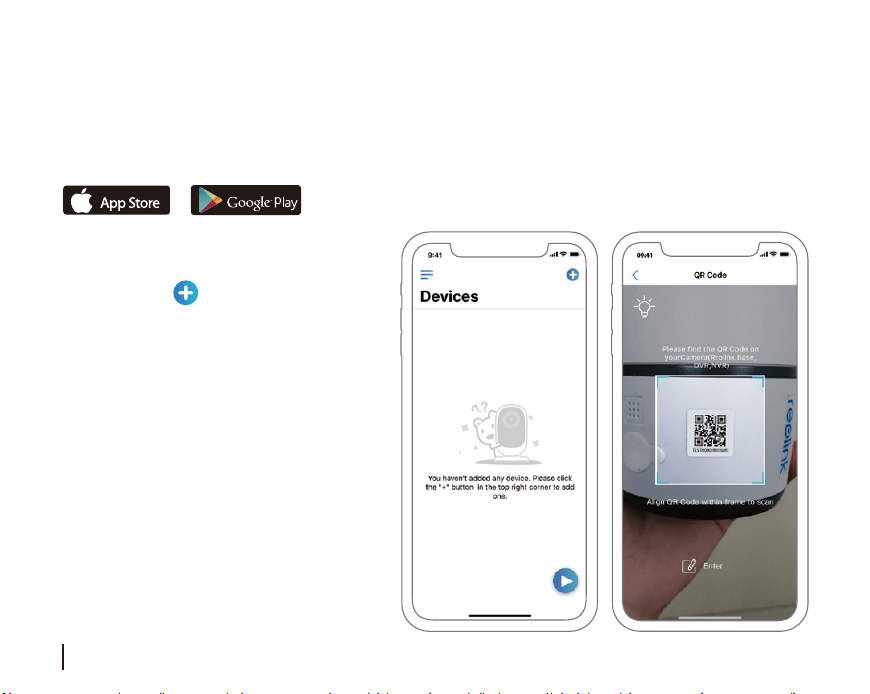
1. Dar clic en “ ” en lado derecho de
arriba para añadir camara.
2. Escanear el código QR al lado de la
cámara y seguir los pasos para completar
la instalación
3. Después de crear una contraseña para su cámara, siga los pasos para sincronizar la hora, y luego
inicie la vista en vivo o vaya a "Configuración del dispositivo".
Abajo hay dos formas de instalar el App de Reolink:
• Buscar “Reolink” en App store (para iOS), bajar e instalar la aplicación
• Buscar “Reolink” en Google Play (para Android), bajar e instalar
Available on the
Get it on
Configure la cámara en la aplicación Reolink
Estado de bateria
Añadir dispositivo
Menu
Axctivar/Desactivar Sensor PIR de movimiento
(Este esta activado por defecto.)
Configuracion de dispositivo
Acceso a vista en vivo
50 51Spanish Spanish
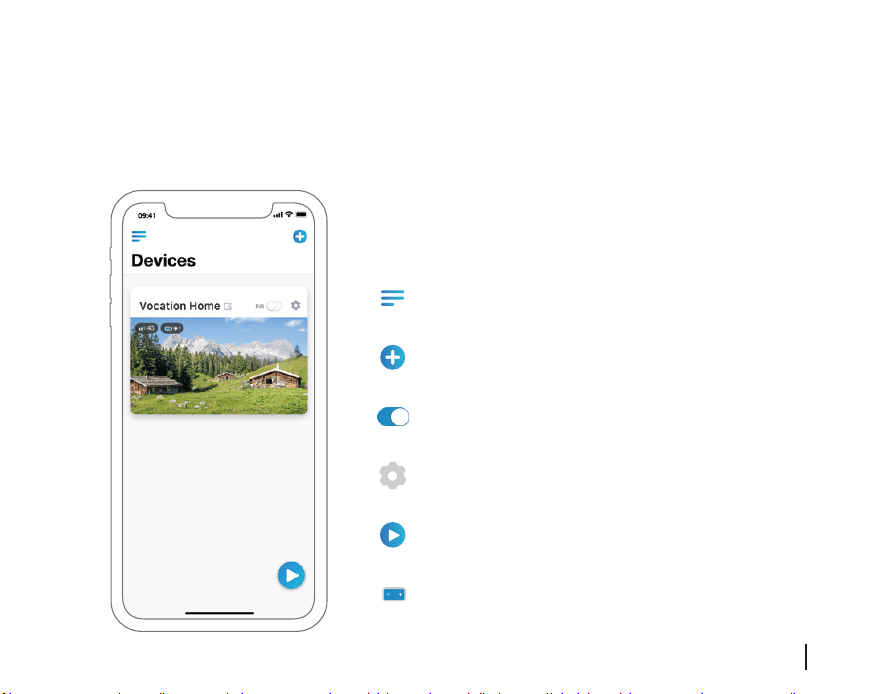

Atención para la instalación de la cámara
• Distancia de detección del sensor PIR
Pasos para ajustar la distancia en la aplicación: configuración del dispositivo-configuración PIR
Note:
Sensitividad
Alto
Medio
Bajo
Hasta 10 metros (33ft)
Hasta 6 metros (20ft)
Hasta 4 metros(13ft)
Valor
81 - 100
51 - 80
0 - 50
• No instale la cámara hacia los objetos con luces brillantes, incluyendo el sol,
enciende brillante, etcétera
• No coloque la cámara muy cerca de un lugar donde con frecuencia se mueven los
vehículos. Basado en nuestras numerosas pruebas, la distancia recomendada entre la
cámara y el vehículo es de 16 metros (52 pies).
• Manténgase alejado de las salidas, incluyendo las rejillas de ventilación del
acondicionador de aire, puntos de venta de humidificador, los orificios de
transferencia de calor de proyectores, etcétera.
• No instale la cámara donde hay fuertes vientos.
• Tampoco es buena idea que instale la cámara frente al espejo.
• Mantenga la cámara al menos 1 metro lejos de cualquier dispositivo inalámbrico,
incluyendo enrutadores Wi-Fi y los teléfonos para evitar interferencias inalámbricas.
!
Notas importantes para reducir
falsas alarmas
Hasta 10 metros (33ft)
Hasta 12 metros (40ft)
Hasta 16 metros (52ft)
Detectar distancia (Para cosas
vivas que se mueven)
Detectando distancia (Para
vehiculos en movimiento)
El sensor PIR tiene 3 niveles de sensibilidad para su ajuste: Bajo/Medio/Alto.
Una mayor sensibilidad ofrece una distancia de detección más larga. La sensibilidad predeterminada
del sensor PIR está en "Medio".
52
53
Spanish Spanish

!
Cargue la Batería
Indicador de carga:
LED verde: carga maxima
* Please note that the solar panel is NOT included in the package. You can buy the solar panel on Reolink ocial online
store.
Reolink Go no está diseñado para capacidad total 24/7 durante todo el día o ejecución live streaming.
Fue diseñado para grabar eventos de movimiento y distancia ver transmisión en vivo sólo cuando la
necesita.
Por favor aprender algunas maneras útiles para maximizar la duración de la batería en este post:
https://support.reolink.com/hc/en-us/articles/360006991893
Notas Importantes sobre el uso de la batería
recargable
1. Cargue la bacteria al
nstalarla en la camara.
2. Cargue la bateria por
separado.
3. Cargue la bateria con
panelsolar Reolink.
LED naranja: Cargando
Al instalar la cámara, por favor, instale la cámara angular
(el ángulo entre el sensor y el objeto detectado es mayor
que 10°) para la detección de movimiento efectivo. Si el
objeto en movimiento se acerca verticalmente el sensor
de PIR, el sensor no puede detectar los eventos de
movimiento.
La distancia idea es de 2-10 metros (7-33ft), lo cual
permite reconocer humanos.
EntradaEntrada
θ
La trayectoria
del objeto en
movimiento
FYI:
• El sensor PIR detecta hasta 23 pies (por defecto)
• El sensor PIR tiene alguno de detección de 120° (H)
• Distancia de visión ideal de
la cámara
• Ángulo de instalación del
sensor PIR
10°
θ
2-3 meters
Distancia ideal de vista:
2-10 metros (7-33ft)
54 55Spanish Spanish
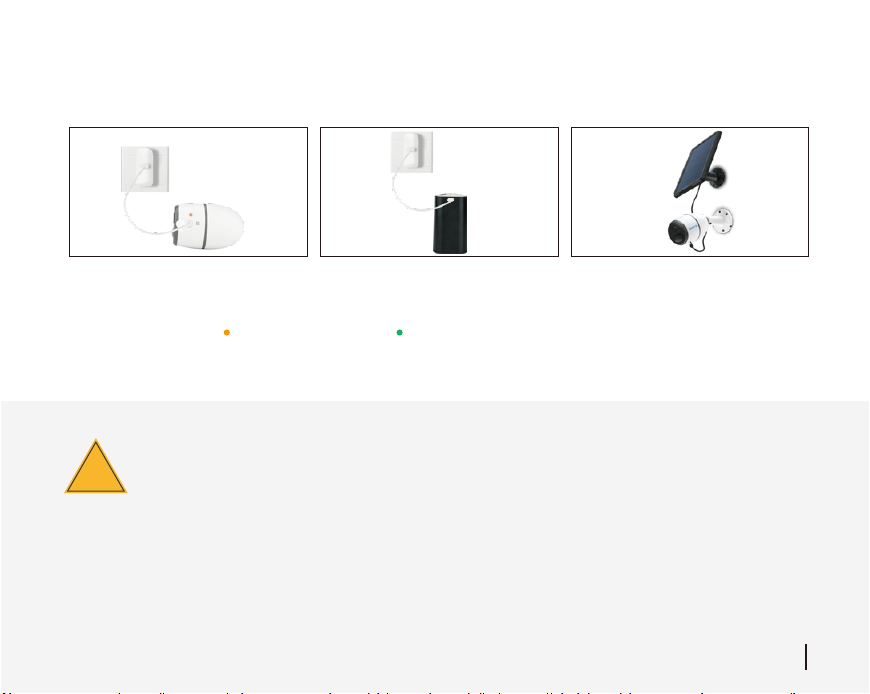

1. Cargue la batería recargable con un cargador de batería DC 5V o 9V estándar y de alta calidad.
2. Si desea alimentar la batería a través del panel solar, tenga en cuenta que la batería SÓLO es
compatible con el panel solar Reolink. No puede cargar la batería con otras marcas de paneles solares.
3. Cargue la batería a temperaturas entre 0°C y 45°C.
4. Utilice siempre la batería a temperaturas entre -20°C y 60°C.
5. Asegúrese de que el compartimento de la batería esté limpio.
6. Mantenga el puerto de carga USB seco, limpio y sin residuos y asegúrese de que los contactos de la
batería estén alineados.
7. Siempre asegúrese de que el puerto de carga USB esté limpio. Por favor, cubra el puerto de carga
USB con el tapón de goma después de que la batería se haya cargado por completo.
8. Nunca cargue, use o almacene la batería cerca de fuentes de ignición, como fuego o calentadores.
9. Guarde siempre la batería en un ambiente fresco, seco y ventilado.
10. Nunca almacene la batería con ningún objeto peligroso o combustible.
11. Mantenga la batería lejos de los niños.
12. No cortocircuite la batería conectando cables u otros objetos metálicos a los terminales positivo (+)
y negativo (-). NO transporte ni almacene la batería con collares, horquillas u otros objetos metálicos.
13. NO desarme, corte, perfore, cortocircuite la batería ni la arroje al agua, al fuego, a hornos de
microondas ni a recipientes a presión.
14. NO use la batería si emite un olor, genera calor, se decolora o deforma, o parece anormal en
cualquier forma. Si la batería está siendo utilizada o cargada, retire la batería del dispositivo o del
cargador inmediatamente y deje de usarla.
15. Siempre siga las leyes locales de desechos y reciclaje al tirar la batería usada.
Como instalar
montaje de
pared
Usar llave Allen para aflojar
tonillo
Paso 1
Atornillar el montador a la pared
Paso 2
Enroscar la camara al montador y
ajustar la camara en la direccion
correcta.
Paso 3
Ajuste el tornillo usando la llave
Allen
Paso 4
56 57Spanish Spanish
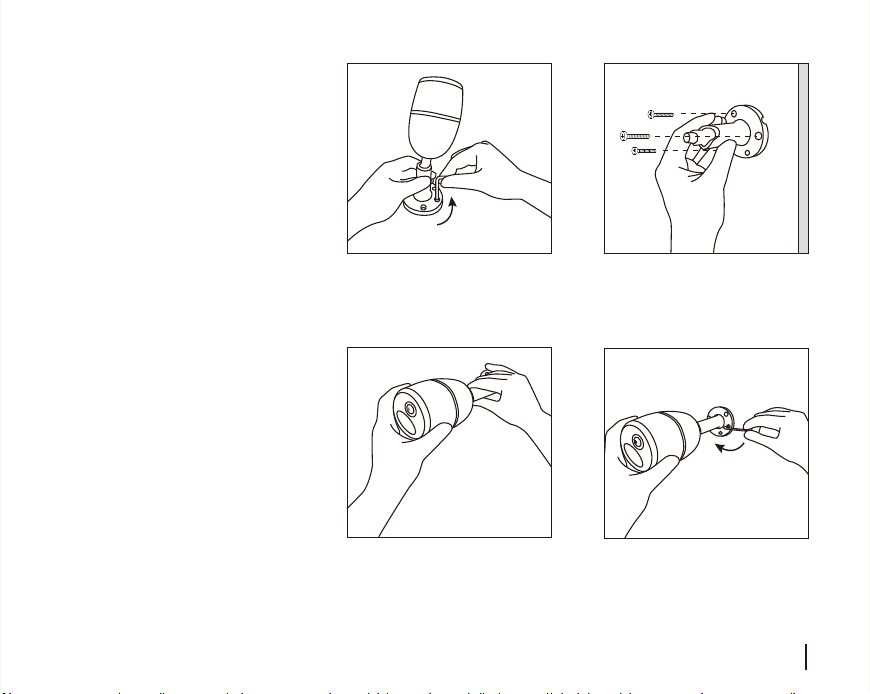
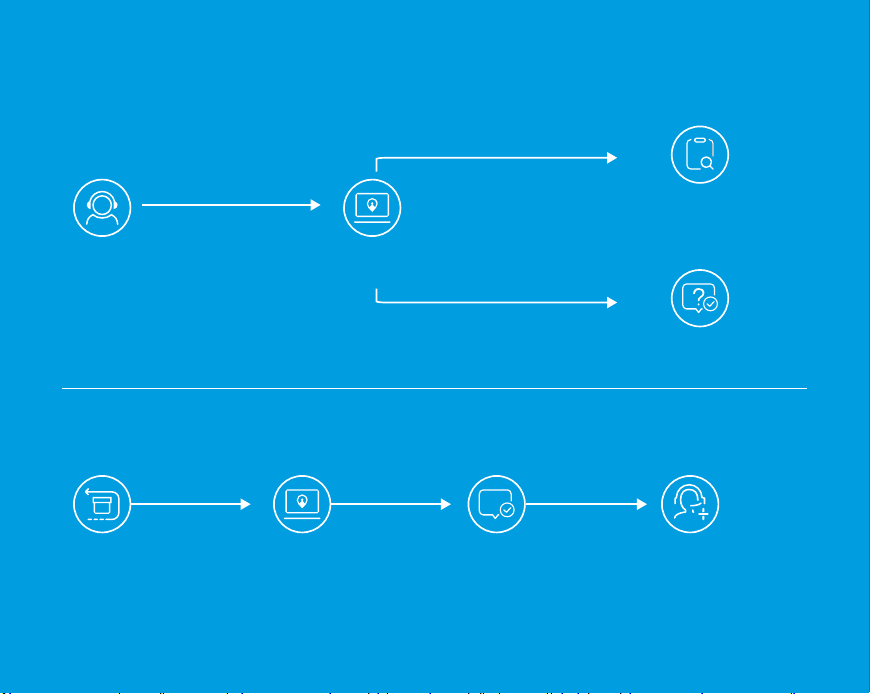
・ RMA Contact
Visit https://support.
reolink.com
Submit a Request with
your Order No.
Reolink After Service
will contact with you
for processing
Order
RMA
・ Technical Support
Submit a Request
Technical
support
Troubleshooting
your problem
Visit https://support.
reolink.com
QSG2_A
Reolink Go
Quick Start Guide
EN/DE/FR/IT/ES