

User manual
LFH4412
Pro Dictate 11.5
SpeechExec

2 User manual
Tble of contents
Importnt
About this user mnul
Your SpeechExec dicttion
softwre
Overview SpeechExec work list
window
Overview SpeechExec recorder
nd plyer window (expnded
mode)
Get strted
Instll the softwre
Strt SpeechExec dicttion
softwre
Crete SpeechExec user
prole
Add or chnge user prole
SpeechExec help
Use SpeechExec
Downlod recordings from
dicttion recorder
Crete recording
Crete recording with
SpeechMike
Crete recording with
Pocket Memo
Ply bck dicttion le
Ply bck using the
SpeechMike or Pocket Memo
Ply bck in the recorder
window
Ply bck in the worklist
window
Edit previously recorded le
Finish, suspend or cncel
recording
Record n instruction
Record spoken instruction
Record specil instruction
Delete dicttion le
Delete prt of dicttion le
Delete dicttion le entirely
Use more of SpeechExec
Settings menu
Pocket Memo Congurtion
Wizrd
Congure the downlod process
from Pocket Memo
SpeechMike Congurtion Wizrd
SpeechAir Congurtion Wizrd
Congure the downlod process
from SpeechAir
Use Philips SpeechLive
Conguring SpeechLive
Speech recognition functions
Setting up speech
recognition
Creting Drgon user
prole
Using speech recognition
Send dicttion les vi emil
Set up n emil prole
Mnully send dicttion les
vi emil
Set up utomtic emil
sending
Automticlly send dicttion
les
Trouble shooting
Technicl dt
System requirements

3User manual
Sfety
• Bck up your les. Philips is not
responsible for ny loss of dt.
Hering protection
Observe the following guidelines when
you use hedphones:
• Set the volume to moderte level to
void dmging your hering.
• Don’t turn the volume up so high tht
you cn’t her wht is going on round
you.
• In potentilly dngerous situtions,
be prticulrly creful or temporrily
discontinue use.
Legl restrictions on recording
• The use of the recording function of
dicttion devices is subject to the legl
restrictions tht my pply in your
country. You should lso respect the
privcy nd personl rights of third
prties if you record tlks or lectures.
• If you wnt to record telephone clls,
check if this is legl in your country. In
certin countries, you my be leglly
required to inform the person you re
conversing with on the telephone tht
you re recording the converstion.
1 Importnt
This mnul covers the bsic instlltion
of the SpeechExec softwre nd its
relted use with the SpeechMike, Pocket
Memo nd SpeechAir dicttion hrdwre.
Not ll devices mentioned in this mnul
re necessrily prt of the pckge
contents. Descriptions of devices nd
ccessories re for informtion only nd
do not require Philips to deliver ny of
these ccessories with this pckge.
Tip
• For more informtion bout using the
SpeechExec softwre, see the help
function (press F1 on the keybord).
Philips reserves the right to chnge
products t ny time without being
obliged to djust erlier supplies
ccordingly.
The mteril in this mnul is believed
dequte for the intended use of the
system. If the product, or its individul
modules or procedures, re used for
purposes other thn those specied
herein, conrmtion of their vlidity nd
suitbility must be obtined.

4 User manual
Disposl of your old product
Europe
A crossed-out wheeled bin
symbol ttched to product
indictes tht the product
is covered by the Europen
Directive 2011/65/EU. Plese
get informed bout the locl seprte
collection system for electricl nd
electronic products. Plese ct ccording
to your locl rules nd don’t dispose
of your old products with your norml
household wste. Correct disposl
of your old product helps to prevent
potentil negtive consequences for the
environment nd humn helth.
United Sttes
Rechrgeble Li-ion bttery:
• Your product is designed nd
mnufctured with high qulity
mterils nd components, which cn
be recycled nd reused. For recycling
informtion, plese contct your locl
wste mngement fcilities or visit
www.recycle.philips.com.
• This pplince contins rechrgeble
lithium-ion bttery which must be
disposed of properly.
• Contct your locl town or city ocils
for bttery disposl informtion.
You cn lso cll 1-800-822-8837 or
visit www.cll2recycle.org for bttery
drop-o loctions.
• For ssistnce, visit our website
www.philips.com/support or cll
1-800-243-3050 toll free.
Rechrgeble NiMH bttery:
• Your product is designed nd
mnufctured with high qulity
mterils nd components, which cn
be recycled nd reused. For recycling
informtion, plese contct your locl
wste mngement fcilities or visit
www.recycle.philips.com.
• This pplince contins rechrgeble
NiMH bttery which must be disposed
of properly.
• Contct your locl town or city ocils
for bttery disposl informtion.
You cn lso cll 1-800-822-8837 or
visit www.cll2recycle.org for bttery
drop-o loctions.
• For ssistnce, visit our website
www.philips.com/support or cll
1-800-243-3050 toll free.
Cnd
Rechrgeble Li-ion bttery:
• Your product is designed nd
mnufctured with high qulity
mterils nd components, which cn
be recycled nd reused. For recycling
informtion, plese contct your locl
wste mngement fcilities or visit
www.recycle.philips.com.
• This pplince contins rechrgeble
lithium-ion bttery which mustbe
disposed of properly.
• Contct your locl town or city ocils
for bttery disposl informtion.
You cn lso cll 888-224-9764 or visit
www.cll2recycle.c for bttery drop-
o loctions.
• For ssistnce, visit our website www.
philips.com/support or cll
1-800-243-7884 toll free.
eeeeeeee›

5User manual
About this user mnul
Find quick overview of your softwre on
the next pges. For detiled description,
see the following chpters of this user
mnul. Red the instructions crefully.
Symbols used
Note
• This symbol indictes notices which
you should observe when using the
softwre.
Tip
• This symbol identies informtion tht
helps you to use your softwre more
eciently nd simply.
Rechrgeble NiMH bttery:
• Your product is designed nd
mnufctured with high qulity
mterils nd components, which cn
be recycled nd reused. For recycling
informtion, plese contct your locl
wste mngement fcilities or visit
www.recycle.philips.com.
• This pplince contins rechrgeble
NiMH bttery which must be disposed
of properly.
• Contct your locl town or city ocils
for bttery disposl informtion.
• You cn lso cll 888-224-9764 or visit
www.cll2recycle.c for bttery drop-
o loctions.
• For ssistnce, visit our website
www.philips.com/support or cll
1-800-243-7884 toll free.

6 User manual
2 Your SpeechExec dicttion
softwre
Congrtultions on your purchse nd welcome to Philips!
To fully benet from the service tht Philips oers, visit our website for support
informtion, such s user mnuls, softwre downlods, wrrnty informtion nd
more: www.philips.com/dicttion.
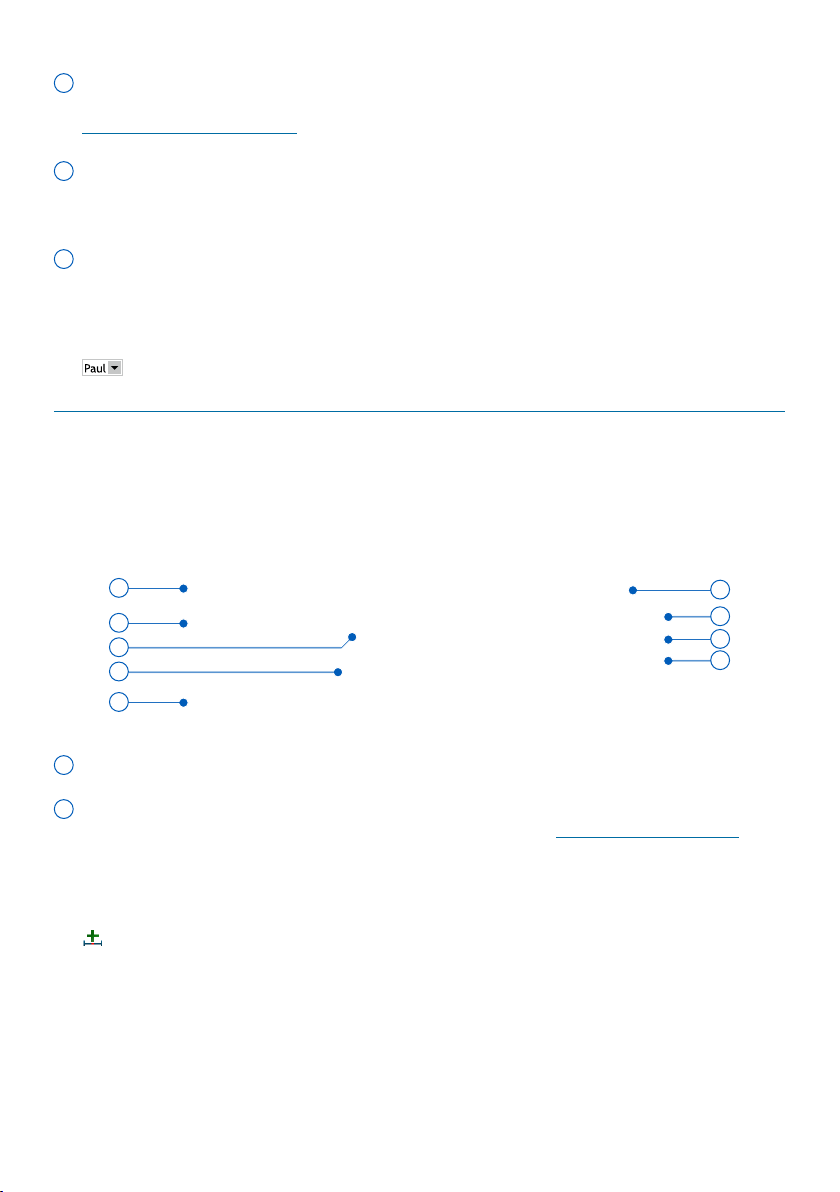
Overview SpeechExec work list window
The work list llows you to mnge the dicttion le list, dene dicttion properties
nd chnge vrious settings.
1
2
3
4
6
5
7

7User manual
1 The menu br cross the top orgnizes commnds under menus.
2 The toolbr contins tools for creting, plying nd editing dicttion les. Relted
tools re grouped together.
Create a new dictation le
Create a new dictation le for speech recognition
Add to speech recognition queue
Open the selected dictation le in the SpeechExec player window
Start/stop playback of the selected dictation le
Display the dictation properties of a le
Attach a document
Display the General settings window
Display the settings window for a connected Philips SpeechAir recorder
Display the settings window for a connected Philips Pocket Memo recorder
Display the settings window for a connected Philips SpeechMike microphone
Create a new email message with the selected dictation le attached
Refresh the information displayed in the work list
Start downloading from a connected Philips Pocket Memo recorder to a PC
Send emails with dictations via a connected email system
Search for items in your dictation list
Open the help function
Display the SpeechLive settings window
Display dictation les queued for SpeechLive upload
Send dictation to SpeechLive transcription service
Recall dictation from SpeechLive transcription service
Send dictation to SpeechLive speech recognition service
Find out more about Philips dictation products
Note
• To customize the toolbr, click
Settings > Generl settings on the
menu br nd select Worklist >
Toolbr. Select the icon you wish to
dd from the left column nd click the
Add item button.
3 The folder list displys the folder structure. The structure depends on personl or
pre-congured settings. Click the rrow t the left of folder to expnd the tree
nd disply folder’s sub-folders.
4 The dicttion le list displys informtion bout the dicttion les stored in the
selected folder. The columns disply the properties of the dicttion les. Chnge
the focus between the tree view nd the dicttion list view by clicking inside ech
pne.
8 User manual
5 The Recognition nd dpttion queue pnel displys informtion bout
dicttion les submitted for oine speech recognition. For more informtion, see
Using speech recognition.
6 Device disply: The device disply ppers when Pocket Memo or SpeechAir
is connected. It llows users to disply nd ply bck dicttion les stored on the
Pocket Memo or SpeechAir, nd to congure settings on the connected device.
7
The sttus br t the bottom of the window displys informtion on dicttion
mngement, such s the number of dicttion les in the selected folder, the
number of dicttion les with priority sttus ssigned, nd the nme of the current
user.
Active author prole: Select the author prole from the drop-down list
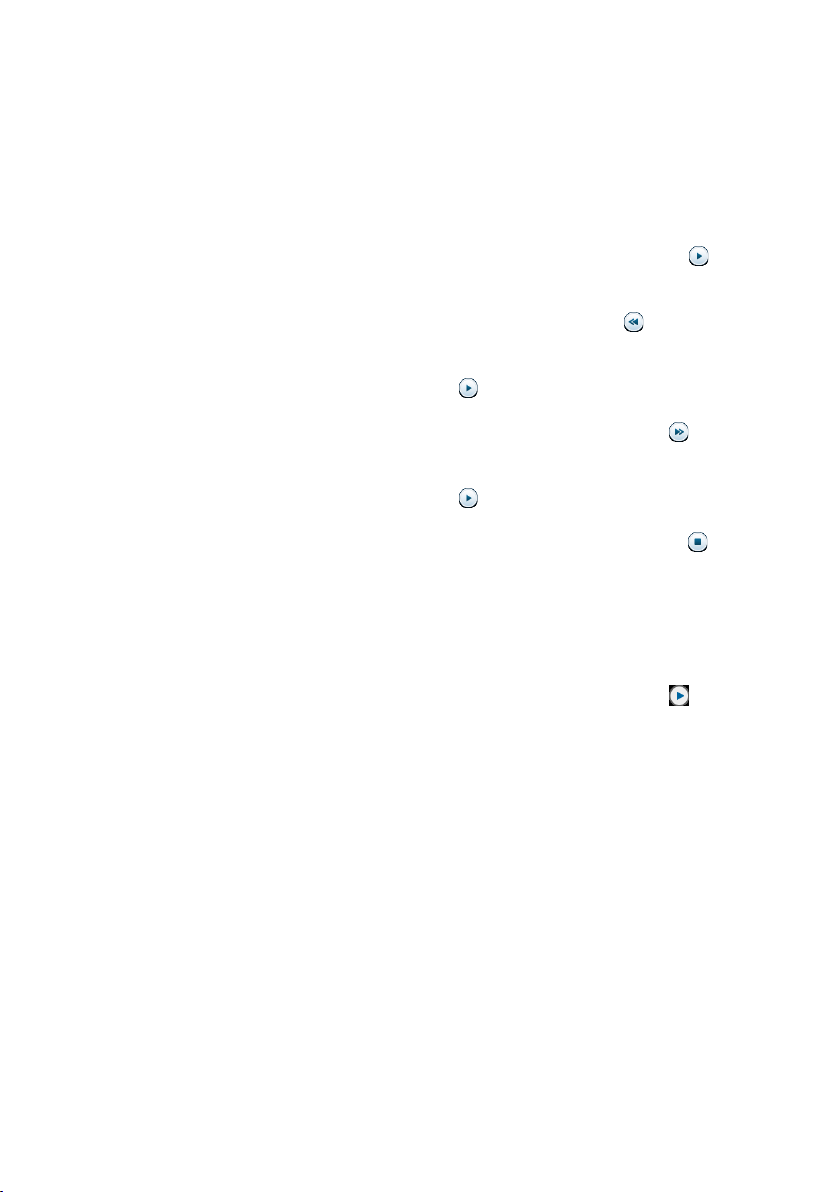
Overview SpeechExec recorder nd plyer window
(expnded mode)
The recorder/plyer module is desktop window tht llows the user to record nd
ply bck sound les.
9
11
12
8
13
15
16
14
10
8 The title br displys the le nme.
9 Instructions re recorded comments by the uthor tht re directed to the person
trnscribing the dicttion le. For more informtion, see Record n instruction.
Record a special instruction
Play back a special instruction
Delete a special instruction
Insert an index mark
Record a spoken instruction
Jump to the previous spoken instruction
Jump to the next spoken instruction

9User manual
10 Control nd positioning buttons:
Mark the beginning of a section to be deleted
Mark the end of a section to be deleted
Remove the deletion marks
Delete a marked section
Undo the last deletion
Switch between Insert, Overwrite and Append modes
11
Position slider: Disply le informtion, such s le length nd the current position
in the sound le during recording or plybck. The length of the recording is
displyed in HH:MM:SS (hours:minutes:seconds) bove the slider.
12 Audio toolbr:
Start/stop recording
Start/pause playback
Stop the current action (recording, playback)
Jump to the beginning of the dictation
Fast rewind
Fast forward
Jump to the end of the dictation
Adjust the playback volume
Adjust the playback speed
Adjust the playback tone
Adjust the record volume
Adjust the playback balance
13 Show/hide the menu bar
14 Switch player window between compact and expanded mode
Display the dictation properties window
Display the audio settings window
Open the help function
15 Finish: Close the dicttion le nd mrk it s nished. The dicttion le is moved
to the Finished dicttions folder.
16 Sve s drft: Close the dicttion le nd mrk it s suspended, mening tht
work on the dicttion le is interrupted temporrily nd will be continued t lter
time.

10 User manual
3 Get strted
Instll the softwre
Note
• For ll operting systems, we
recommend instlling the ltest
service pck vilble before
instlling SpeechExec.
• For oine work, SpeechExec requires
Internet connection t lest once in 7
dys.
• Administrtor rights re required to
instll the softwre. For more help,
contct your dministrtor.
• For instlltion of SpeechExec,
subscription product key is required
(strting with PDCO-112-...). You cn
nd the product key on the leet
inside the box or printed inside the
box.
• Keep your product key on sfe
plce to hve it vilble for support
inquiries. Lost product keys cnnot be
restored!
1
Downlod the instlltion le from
www.speechexec.com/instll.
2
Unzip the le you downloded nd
strt the setup.exe le.
3
When you re sked to llow the
ppliction to mke chnges to your
computer, click Yes.
4
Follow the on-screen instructions of
the set-up progrm.
Strt SpeechExec
dicttion softwre
If the option to strt SpeechExec
utomticlly ws selected in Settings
> Generl settings > Worklist > Strtup,
the progrm opens s soon s your
system strts.
To mnully strt the progrm, open the
Windows strt menu in Windows nd
select Philips SpeechExec Pro Dictte.
Crete SpeechExec user prole
When using SpeechExec for the rst time,
wizrd guides you through the step-
by-step congurtion process to crete
new user prole nd congure your initil
key settings.
Follow the on-screen instructions to:
• Specify n uthor nme tht will be
used to identify your dicttions
• Strt nother wizrd to congure
SpeechLive
• Dene the nme nd the (network)
pth where your nished dicttions will
be stored
• Set the defult Work type (Note, Letter,
Report, Protocol, or Abstrct) ssigned
to new dicttions
• Strt nother wizrd to congure
Pocket Memo or SpeechAir. For
more informtion, see Pocket Memo
Congurtion Wizrd or
SpeechAir Congurtion Wizrd.

11User manual
Restrt the user wizrd
If you wnt to reuse the user wizrd, you
cn restrt it nytime.
1
Go to Settings > Generl settings >
Worklist > Strtup.
2
Activte the checkbox next to Strt
New User Wizrd.
3
Click Apply nd then click OK.
X The next time you strt
SpeechExec, the user wizrd will
utomticlly be opened.
Note
• If you wish to use the speech
recognition fetures of SpeechExec
nd hve lredy creted user
prole in Drgon NturllySpeking,
use the sme nme for your
SpeechExec uthor nme. For
more informtion, see Using speech
recognition.
• It is possible to chnge the settings
lter using the Settings menu. For
more informtion, see Settings menu.
Tip
• If working in network, select folder
on mpped network drive to store
nished dicttions. Trnscriptionists
will then be ble to ccess the folder
nd mp their pending folders to your
Finished dicttions folder.
Add or chnge user prole
1
Go to Settings > Generl settings >
Rules > Author proles.
2
To dd user prole, click Add..., nd
set your desired settings.
To chnge n existing user prole,
click prole from the list nd then
click Modify....
3
Click Apply nd then click OK.
4
Select the desired uthor in the
bottom right corner of the SpeechExec
window.
SpeechExec help
For detiled informtion bout using
the SpeechExec softwre, see the help
function. To strt the help function:
• Press F1 on the keybord.
• Click the
button on the toolbar in the
worklist or in the recorder window.

12 User manual
4 Use
SpeechExec
Philips hrdwre devices re designed for
comptibility with SpeechExec nd cn
lso be used to control the SpeechExec
progrm. For detiled informtion, refer
to the documenttion delivered with the
device.
Downlod recordings
from dicttion recorder
Use Philips SpeechExec softwre for
utomtic downlod, conversion nd
routing of les recorded with Pocket
Memo or SpeechAir dicttion recorder.
1
Mke recording with the dicttion
recorder.
2
Strt SpeechExec.
3
Connect the Pocket Memo or
SpeechAir recorder to the computer
using the USB cble or the USB
docking sttion.
4
By defult, the recordings on
the recorder will be downloded
utomticlly to the computer nd
moved to the Finished dicttions
folder of the work list.
Tip
• How nd which les re downloded
fter recorder is connected, cn be
congured in the Settings menu of
SpeechExec or with the Congurtion
Wizrd. For more informtion, see
Congure the downlod process from
Pocket Memo or
Congure the downlod process from
SpeechAir.
Note
• When the recorder is connected to the
computer for the rst time, Windows
detects the new hrdwre nd
utomticlly instlls the required
drivers. When the instlltion is
complete, Windows my prompt you
to restrt the computer.
Crete recording
SpeechExec cn be controlled during
recording by using Philips SpeechMike
dicttion microphone, Philips Pocket
Memo dicttion recorder, or by clicking
the toolbr buttons.
Note
• For best results, spek clerly nd
keep the microphone bout 10 to 15
centimeters (4 to 6 inches) wy from
your mouth.
• By defult, the Speech Exec window
is not visible in the bckground
while the recorder window is open.
You cn chnge the visibility of the
SpeechExec window in Settings
> Generl settings > Worklist >
Visibility.

13User manual
Tip
• Click the
button in the recorder
window to djust the recording
volume.
Crete recording with
SpeechMike
SpeechMike with push buttons:
Tip
• Use ‘Push-To-Dictte’ recording to
strt recording immeditely when
pressing nd holding the d Record
button on the SpeechMike. When
relesing the d Record button ,
recording will stop. ‘Push-To-Dictte’
cn be enbled in the Settings menu
of the SpeechExec Recorder window
(under Audio Settings > Recording).
1
Strt SpeechExec.
2
Press the d Record button on the
SpeechMike.
X The device is in record stndby
mode.
X The recorder window is displyed.
X The record indictor light shes
red (in overwrite nd ppend
mode) or green (in insert mode).
3
Press the e button to strt recording.
X The record indictor light glows red
(in overwrite nd ppend mode)
or green (in insert mode) while
recording.
4
For short puses, press the e button.
To continue recording, press the e
button gin.
5
To stop recording, press the d Record
button.
6
To mrk the recording s nished,
press the
• EOL/• • PRIO button.
X The dicttion le is moved to the
Finished dicttions folder.
X The recorder window closes nd
the work list window is displyed.
SpeechMike with slide switch (Rec, Stop,
Ply, Rewind):
1
Strt SpeechExec.
2
To strt recording, move the slide
switch on the SpeechMike to the REC
position.
X The recorder window is displyed.
X The record indictor light glows red
(in overwrite nd ppend mode)
or green (in insert mode) while
recording.
3
For short puses, move the slide
switch to the f position. To continue
recording, move the slide switch bck
to the REC position.
4
To stop recording, move the slide
switch to the f position.
5
To mrk the recording s nished,
press the
• EOL/• • PRIO button.
X The dicttion le is moved to the
Finished dicttions folder.
X The recorder window closes nd
the work list window is displyed.

14 User manual
SpeechMike with slide switch (Forwrd,
Ply, Stop, Rewind):
1
Strt SpeechExec.
2
Press the d Record button on the
SpeechMike.
X The device is in record stndby
mode.
X The recorder window is displyed.
X The record indictor light shes
red (in overwrite nd ppend
mode) or green (in insert mode).
3
To strt recording, move the slide
switch to the
PLAY position.
4
For short puses, move the slide
switch to the f position. To continue
recording, move the slide switch bck
to the
PLAY position.
5
To stop recording, move the slide
switch to the f position nd press
the d Record button.
6
To mrk the recording s nished,
press the
• EOL/• • PRIO button.
X The dicttion le is moved to the
Finished dicttions folder.
X The recorder window closes nd
the work list window is displyed.
7
To ssign priority sttus to the
recording, press the
• EOL/• • PRIO
button gin within hlf second.
Crete recording with Pocket
Memo
Pocket Memo with slide switch (Rec,
Stop, Ply, Rewind):
1
Strt SpeechExec.
2
To strt recording, move the slide
switch on the Pocket Memo to the
recording position.
X The recorder window is displyed.
X The record indictor light glows red
(in overwrite nd ppend mode)
or green (in insert mode) while
recording.
3
For short puses, move the slide
switch to the stop position. To
continue recording, move the slide
switch bck to the recording position.
4
To stop recording, move the slide
switch to the stop position.
5
To mrk the recording s nished,
press the End of letter button.
X The dicttion le is moved to the
Finished dicttions folder.
X The recorder window closes nd
the work list window is displyed.

15User manual
Pocket Memo with slide switch
(Forwrd, Ply, Stop, Rewind):
1
Strt SpeechExec.
2
In stop mode, press the function
button on the right side of the
recorder.
X The device is in record stndby
mode.
X The recorder window is displyed.
X The record indictor light glows red
(in overwrite nd ppend mode)
or green (in insert mode) while
recording.
3
To strt recording, move the slide
switch to the ply position.
4
For short puses, move the slide
switch to the stop position. To
continue recording, move the slide
switch bck to the ply position.
5
To stop recording, press the function
button on the right side of the
recorder.
6
To mrk the recording s nished,
press the End of letter button.
X The dicttion le is moved to the
Finished dicttions folder.
X The recorder window closes nd
the work list window is displyed.
Ply bck dicttion le
Vrious plybck functions cn be
controlled by the SpeechMike, the Pocket
Memo or the toolbr buttons in the
recorder window or worklist window.
Ply bck using the SpeechMike
or Pocket Memo
SpeechMike with push buttons:
1
Open recording by double-clicking
the dicttion le in the work list.
X The dicttion le is opened in the
recorder window.
2
To rewind, press nd hold the c
button on the SpeechMike. When
rewinding reches the desired
position, relese the c button.
3
To fst forwrd, press nd hold the
b button on the SpeechMike. When
forwrding reches the desired
position, relese the b button.
4
To strt plybck, press the e button
on the SpeechMike. To stop plybck,
press the e button gin.
16 User manual
SpeechMike or Pocket Memo with slide
switch (Rec, Stop, Ply, Rewind):
1
Open recording by double-clicking
the dicttion le in the work list.
X The dicttion le is opened in the
recorder window.
2
To rewind, move the slide switch
on the recorder to the fst rewind
position.
3
To fst forwrd, press nd hold the
fst forwrd button.
4
To strt plybck, move the slide
switch to the ply position. To stop
plybck, move the slide switch to the
stop position.
SpeechMike or Pocket Memo with slide
switch (Forwrd, Ply, Stop, Rewind):
1
Open recording by double-clicking
the dicttion le in the work list.
X The dicttion le is opened in the
recorder window.
2
To rewind, move the slide switch
on the recorder to the fst rewind
position.
3
To fst forwrd, move the slide switch
on the recorder to the fst forwrd
position.
4
To strt plybck, move the slide
switch to the ply position. To stop
plybck, move the slide switch to the
stop position.
Ply bck in the recorder
window
1
Open recording by double-clicking
the dicttion le in the work list.
X The dicttion le is opened in the
recorder window.
2
To strt plybck, click the button
on the plyer toolbr.
3
To rewind, click the button on
the plyer toolbr. When rewinding
reches the desired position, click the
button on the plyer toolbr.
4
To fst forwrd, click the button on
the plyer toolbr. When forwrding
reches the desired position, click the
button on the plyer toolbr.
5
To stop plybck, click the button
on the plyer toolbr.
Ply bck in the worklist window
• To strt/stop plybck, select
dicttion le nd click the
button on
the worklist toolbr.

17User manual
Edit previously recorded
le
A previously recorded le cn be edited if
trnscription hs not begun. You cn edit
le by inserting n dditionl recording
prt, overwriting prt of the recording or
ppending recording prt t the end of
the le.
1
Before you edit recording, rst
set the desired edit mode (insert or
overwrite) on your recording device.
To switch between insert nd
overwrite mode, press the
INS/OVR
button on the SpeechMike or Pocket
Memo in stop mode. Alterntively,
click the
button on the toolbr in
the recorder window.
2
Open recording by double-clicking
the dicttion le in the work list.
X The dicttion le is opened in the
recorder window.
3
Ply, forwrd or rewind to the position
where the insertion should be mde.
4
Strt recording. For more informtion
bout recording, see Crete
recording.
Finish, suspend or cncel
recording
Mrk recording s nished
• Press the
• EOL/• • PRIO button on the
SpeechMike or the End of letter button
on the Pocket Memo.
Alterntively, click the Finish button or
the
button in the recorder window of
SpeechExec.
X The dicttion le is sved in
the Finished dicttions folder.
SpeechExec oers dditionl
options for nished dicttions,
such s conversion to pre-
dened formt, sending vi emil
or copying to the Bckup folder.
Suspend recording
Mrk recording s suspended to
temporrily interrupt recording nd nish
it lter.
To suspend recording:
• Click on the
Sve s drft button in
the recorder window.
X The dicttion le is sved in the
Finished dicttions folder.
Cncel recording
• To cncel the recording without sving
it, click the
Close button in the
recorder window.
18 User manual
Record n instruction
Instructions re recorded comments by
the uthor tht re directed to the person
trnscribing the dicttion. SpeechExec
supports two types of instructions:
• Spoken instructions re stored within
the dicttion sound le t the position
where the instruction ws ctully
recorded.
Exmples: the correct spelling of
nme or technicl term, or instructions
to insert new prgrph
• Specil instructions re usully
recorded t the strt of dicttion
with specil informtion relting to the
dicttion. Specil instructions re stored
in seprte sound le.
Exmples: document formtting
instructions, nmes of individuls to
receive copies, or delivery instructions
Record spoken instruction
1
Mke sure you re in the recording
mode.
2
In SpeechExec, click the button in
the SpeechExec recorder window.
On the SpeechMike with slide switch
opertion, press nd hold the g
button.
On the SpeechMike with push button
operation, press and hold the
INS/OVR
button.
On the Pocket Memo, press and hold
the right function button below the
screen.
3
Dictte the instruction.
X The instruction will be recorded
into the dicttion le without
overwriting your dicttion.
4
When the spoken instruction is
complete, click the
button gin or
relese the button on the SpeechMike
or the Pocket Memo.
X The spoken instruction is displyed
s white br in the position slider.
5
Continue or stop recording.
Note
• A spoken instruction cn be deleted
just like ny other prt of dicttion
le: Delete the section of the recording
tht includes one or more spoken
instructions (see Delete prt of
dicttion le). Alterntively, record
over the spoken instruction (see
Edit previously recorded le).

19User manual
Record specil instruction
1
Click the button in the recorder
window.
2
Dictte the specil instruction.
X Specil instructions re stored
in seprte sound le nd re
ttched to the dicttion.
3
When the specil instruction is
complete, click the
button gin in
the recorder window.
4
To ply bck the specil instruction,
click the
button in the recorder
window.
5
To delete the specil instruction, click
the
button in the recorder window.
Delete dicttion le
Delete prt of dicttion le
To delete only prt of dicttion le:
1
Nvigte to the beginning of the
section to be deleted by plybck or
fst forwrd/fst rewind.
2
Click the button in the recorder
window.
3
Nvigte to the end of the section to
be deleted.
4
Click the button in the recorder
window.
X The section is mrked with red
frme in the position slider.
5
To delete the section, click the
button in the recorder window.
To undo the deletion mrks (the red
frme), click the
button.
6
To undo the lst deletion, click the
button.
Delete dicttion le entirely
1
Select the dicttion les to be deleted
in the work list.
To select more thn one le, press nd
hold the Shift key on the keybord
nd click the les to be selected.
2
Click Edit > Delete on the menu br or
press the Delete key on the keybord
to delete the selected dicttion les.

20 User manual
5 Use more of
SpeechExec
Settings menu
The Generl Settings window llows
personliztion of vriety of ppliction
settings, such s dicttion options, en-
cryption, user proles, delivery rules, soft-
wre updtes nd work list options. It lso
llows the congurtion of SpeechMike,
Pocket Memo, SpeechAir, foot control
nd recorder/plyer settings.
1
Click Settings > Generl settings on
the menu br to open the Settings
menu. The left pne contins the list of
the vilble settings.
2
Select n option in the list to disply
the ssocited options on the right
pne.
3
Click Apply to sve the chnges or
click OK to sve the settings nd close
the window.
Note
• All or some of the settings cn be pre-
congured nd locked by your system
dministrtor. Locked settings re
red-only.
Pocket Memo
Congurtion Wizrd
The Pocket Memo Congurtion
Wizrd guides you through the device
congurtions nd settings of Pocket
Memo.
1
Mke sure tht the Pocket Memo is
turned on nd connect the device to
the computer using USB cble.
2
Strt Philips SpeechExec softwre.
3
Click Settings > Generl settings
on the menu br nd select DPM
Congurtion > DPM Wizrd from the
list on the left side.
4
Click the Strt Wizrd... button to
open the wizrd. Follow the on-screen
instructions to customize the Pocket
Memo.
5
Click the Finish button to close the
wizrd nd conrm the trnsfer of the
new settings to the Pocket Memo.

21User manual
Congure the downlod
process from Pocket
Memo
How nd which les re downloded
fter Pocket Memo is connected, cn
be congured in the Settings menu.
1
Mke sure tht the Pocket Memo is
turned on nd connect the device to
the computer using the USB cble.
2
Click Settings > Generl settings
on the menu br nd select DPM
Congurtion > DPM settings from
the list on the left side.
3
Click the Strt congurtion… button.
X The Recorder congurtion
window opens.
4
Select Downloding in the left pne.
5
Select which les should be
downloded from the Pocket Memo.
The downlod settings lso llow the
user to specify if les will be deleted
on the Pocket Memo fter they re
downloded.
6
Click Finish in the Summry section.
to sve the settings nd conrm the
trnsfer of the new settings to the
Pocket Memo.
SpeechMike
Congurtion Wizrd
The SpeechMike Congurtion Wizrd
guides users through the device
congurtions nd settings of
SpeechMike.
1
Connect the SpeechMike to the
computer.
2
Strt Philips SpeechExec softwre.
3
Click Settings > Generl settings on
the menu br nd select SpeechMike
Congurtion > Congurtion Wizrd
from the list on the left side.
4
Click the Strt Wizrd... button to
open the wizrd. Follow the on-
screen instructions to customize the
SpeechMike.
5
Click the Finish button to close the
wizrd nd conrm the trnsfer of the
new settings to the SpeechMike.

22 User manual
SpeechAir Congurtion
Wizrd
The SpeechAir Congurtion Wizrd
guides you through the device
congurtions nd settings of
SpeechAir.
1
Mke sure tht the SpeechAir is
turned on nd connect the device to
your computer using the USB cble.
2
Click Settings > Generl settings on
the menu br nd select SpeechAir
congurtion > Device congurtion
from the list on the left side.
3
Click the Open SpeechAir wizrd...
button to open the wizrd. Follow the
on-screen instructions to customize
the SpeechAir.
4
Click the Finish button to close the
wizrd nd conrm the trnsfer of the
new settings to the SpeechAir.
Congure the downlod
process from SpeechAir
How nd which les re downloded
fter SpeechAir is connected, cn be
congured in the Settings menu.
1
Mke sure tht the SpeechAir is
turned on nd connect the device to
your computer using the USB cble.
2
Click Settings > Generl settings on
the menu br nd select SpeechAir
congurtion > Downlod from the
list on the left side.
3
In the Downlod le type section,
select which les you wnt to be
downloded from the SpeechAir. The
downlod settings lso llow the user
to specify if les will be deleted on
SpeechAir fter they re downloded.
4
Click OK to sve the settings nd
close the window.

23User manual
Use Philips SpeechLive
Philips SpeechLive is cloud dicttion
solution tht llows you to store, ccess
nd shre dicttion les from nywhere
in the world nd round the clock while
gurnteeing mximum le security.
Before you send dicttion to
SpeechLive, you need to hve vlid
SpeechLive ccount. If you re not
using SpeechLive yet, crete new user
ccount t www.speechlive.com.
Conguring SpeechLive
1
Click Strt SpeechLive on the
toolbr.
X The SpeechLive congurtion
wizrd window opens.
2
Enter your Emil ddress nd
Pssword.
3
Click Next.
X The SpeechExec dicttion
softwre is now linked to your
SpeechLive user ccount.
Note
• For more informtion bout how
to use SpeechLive nd SpeechLive
services, e.g. the trnscription service,
see the SpeechLive Quick strt guide
for uthors. Downlod the Quick
strt guide t www.speechlive.com/
support.
Speech recognition
functions
SpeechExec Pro hndles the complete
dicttion nd trnscription workow
including the interfce to Drgon
NturllySpeking speech recognition.
This wy, you cn control the entire
process from dicttion, speech
recognition nd correction to the nl text
document in SpeechExec.
Note
• To ctivte the speech recognition
functions, n dditionl SpeechExec
license is required. For more
informtion bout upgrding, contct
your locl Philips deler.
• If you hve lredy purchsed
speech recognition license for
SpeechExec, click Help > License
informtion on the menu br to
ctivte the license.
Setting up speech recognition
SpeechExec Pro instlls only the
necessry les nd components to
ccess the recognition ppliction
functionlities. The Drgon
NturllySpeking speech recognition
ppliction must be purchsed nd
instlled seprtely.
For informtion on the instlltion,
congurtion, trining, nd dpttion
of Drgon NturllySpeking, see the
Drgon NturllySpeking user mnul.

24 User manual
Note
• For full performnce of Drgon
speech recognition, mke sure tht
not too mny progrms re running
in the bckground simultneously.
This might slow down the computer
nd negtively ect Drgon speech
recognition performnce.
To use Drgon NturllySpeking for
speech recognition, Drgon user prole
with vlid user nme nd dicttion
source is required. For more informtion,
see Creting Drgon user prole.
User proles cn either be sved on the
locl hrd drive (C:) or on server where
they cn be ccessed through network
connection (roming proles).
Before using the speech recognition
feture, mke the following settings:
Note
• If you instll Drgon speech
recognition softwre seprtely, we
recommend tht you mnge ll
Drgon-relted settings (e.g. User
proles or Vocbulry) vi the Drgon
br nd not vi SpeechExec or the
SpeechExec speech recognition
recorder.
• Enble the speech recognition
functions in the SpeechExec Settings
menu under Settings > Generl
settings > Speech recognition >
Drgon proles > Speech recognition
settings.
• Select your Drgon user prole.
• To enhnce your user prole, trin
vocbulry from typicl documents in
Generl settings > Speech Recognition
> Vocbulry > Lern from specic
documents.
Optionl settings
• Enble the use of roming user proles
under Settings > Generl settings >
Speech recognition > Drgon proles.
• Enble the use of templtes under
Settings > Generl settings > Speech
recognition > Templtes if you wnt
the text to be inserted into predened
text document.
• Enble the utomtic strt of the
recognition queue under Settings >
Generl settings > Speech recognition
> Oine recognition to process
dicttion les newly dded to the
recognition queue utomticlly.
• Enble the utomtic collection of
corrected dicttion les for dpttion
under Settings > Generl settings >
Speech recognition > Adpttion to
mke dpttions on Drgon user
proles bsed on the corrected speech
recognition documents.
• Enble the utomtic strt of the
speech recognition queue whenever
dicttion les re downloded from the
Pocket Memo or SpeechAir recorder.
Activte this option under Settings >
Generl settings > Oine recognition.
Then, in the DPM or the SpeechAir
Wizrd go to the USB Downlod
section nd ctivte Drgon speech
recognition.

25User manual
Note
• If this option is ctivted, the
conversion, encryption nd other
delivery fter downlod options re
disbled.
• When using this option, mke sure
tht the delivery option SR (speech
recognition) is lso ctivted on the
Pocket Memo nd in the dicttion
recorder pp on SpeechAir.
Creting Drgon user prole
Crete new user prole
When creting new Drgon prole nd
using Philips SpeechMike microphone,
select the SpeechMike s your udio
device in the Drgon setup window.
When creting new Drgon prole nd
using Philips Pocket Memo recorder,
select Trnscription source s your udio
device in the Drgon setup window.
Note
• We highly recommend using USB
microphone dicttion source. Only
this source cn be used for recording
dicttion les within SpeechExec.
• Use the sme uthor nme for your
Drgon user prole s you re using
for your SpeechExec prole. To select
Drgon prole, go to Settings >
Generl settings > Drgon proles
> User nme nd select the relevnt
user prole from the drop-down list.
To crete new user prole:
1
Go to Settings > Generl settings >
Speech recognition > Drgon proles.
2
In the section Speech recognition
settings, click Crete new Drgon
prole....
X The New User Prole window
opens.
3
Click New... nd then follow the on-
screen instructions.
Upgrde n existing prole
You cn upgrde existing Drgon proles
tht you hve creted in older versions
of Drgon NturllySpeking. After the
upgrde, you cn use these proles with
Drgon in SpeechExec.
Note
• This feture is not vilble if the Use
Drgon roming option is enbled.
To upgrade an existing prole:
1
Go to Settings > Generl settings >
Speech recognition > Drgon proles.
2
Click Upgrde old proles....
3
When you re sked to llow the
ppliction to mke chnges to your
device, click Yes.
4
Follow the on-screen instructions to
upgrde your old prole.
26 User manual
Using speech recognition
SpeechExec supports two types of
speech recognition. Your words re
trnscribed onto your screen s you
dictte (online speech recognition) or
les tht where previously recorded (e.g.
on Pocket Memo or SpeechAir) re
trnscribed when they re downloded
to your computer (oine speech
recognition).
Online speech recognition
Dictte directly into the speech
recognition softwre nd hve your
spoken text trnscribed by Drgon
stright wy.
1
Connect your SpeechMike or your
Pocket Memo to your computer.
2
Crete dicttion with speech
recognition in SpeechExec by
selecting
New with speech
recognition from the toolbr or the
File menu.
X The SpeechExec Speech
Recognition Recorder window
opens.
3
Strt recording. For more informtion
bout recording, see Crete
recording.
Note
• As you tlk, your words re
trnscribed onto your screen.
Corrections to the trnscribed text
cn be mde during recording or
when recording is complete.
4
To mrk the previous or the next word
for editing or correcting, press the c or
b button on the SpeechMike briey.
Press the
• EOL/• • PRIO button
repetedly to mrk one or more words
previous to the cursor.
To disply the correction or spell
dilog of Drgon NturllySpeking,
select the word recognized incorrectly
nd press the
INS/OVR button on the
SpeechMike.
If no text is selected, the word or
phrse previous to the cursor is tken
into ccount.
Tip
• Dene the dilog to be displyed
when the
INS/OVR button is pressed
under Settings > Generl settings
> Worklist > Shortcuts > Online
recorder.
5
When the recording is complete,
select one of the following options
from the toolbr or the File menu:
• Finish: The dicttion le is moved
to the Archive folder nd the sttus
is set to Trnscription nished. A
Text document (.rtf) contining the
trnscribed text is ttched to the
dicttion le.
Note
• The Archive folder is hidden by
defult. To disply the Archive
folder in the folder tree, click
Settings > General settings on
the menu bar and select Work
list > Folders from the list on
the left side. Select Archive and
change the Visible option to Yes.

27User manual
• Send for correction: The dicttion
le is moved to the Finished
dicttions folder nd the sttus
is set to Correction pending. A
text document (.rtf) contining the
trnscribed text is ttched to the
dicttion le.
• Sve s drft: Mrk recording s
suspended to temporrily interrupt
recording nd nish it lter. The
recording is sved in the Suspended
folder.
Oine speech recognition
Record dicttion on your dicttion
recorder nd hve your dicttion les
trnscribed by Drgon fter downloding
them from your dicttion recorder to
SpeechExec.
1
Downlod previously recorded le
from your Pocket Memo or SpeechAir
(see Downlod recordings from
dicttion recorder) or crete
new dicttion le in SpeechExec by
selecting
New from the toolbr
or the File menu (see Crete
recording).
2
Select one or more dicttion les from
the work list.
3
Click the Add to Drgon speech
recognition queue button on the
toolbr to queue the selected les for
speech recognition in the Recognition
nd dpttion queue pnel.
4
Click the Strt recognition queue
button in the Recognition nd
dpttion queue pnel to strt the
speech recognition process.
X When the speech recognition
process is nished, the dicttion
le is moved to the Finished
dicttions folder nd the sttus
is set to Correction pending. A
text document (.rtf) contining the
trnscribed text is ttched to the
dicttion.
Note
• The nme of the user prole in
Drgon NturllySpeking must be
identicl to the SpeechExec uthor
nme nd the uthor nme used for
recordings on hndheld dicttion
recorder. The speech recognition
softwre cnnot recognize dicttions
if the Drgon prole nme nd the
uthor nme dier. In this cse,
contct your dministrtor.
• Speech recognition is not supported
for the following dicttion les:
• .wv les with smpling rte of
less thn 11kHz.
• Encrypted dicttions

28 User manual
Plybck nd correction of
trnscribed recordings
1
Double-click speech-recognizble
dicttion le in the work list.
X The dicttion le is opened in the
SpeechExec Speech Recognition
Recorder.
2
Use the buttons on the toolbr of
the speech recognition recorder, the
SpeechMike or the Pocket Memo to
rewind, forwrd nd strt plybck.
For more informtion, see Ply bck
dicttion le.
X By defult, the trnscribed text
is simultneously highlighted
during plybck, forwrding nd
rewinding.
X You cn chnge this setting in
Settings > Generl settings >
Speech recognition > Correction
settings.
Note
• If too much editing or correction
is mde on the trnscribed text or
the entire ow of the document is
chnged, highlighting my not work
properly.
• If prts of the trnscribed text re
deleted, the relted sound prts will
remin in the sound le.
• Dicttion les with the sttus
Trnscription nished cn be
opened only for plybck. Editing or
correction is not possible.
Send dicttion les vi
emil
SpeechExec llows dicttion les to
be trnsferred vi emil directly to the
trnscriptionist or ny other recipient.
Note
• If you re not connected to the
Internet, the QuickSend option
(if ctivted) is not vilble. All
dicttion les will then be sved in
the Outbox folder. You cn send
these les lter s soon s you re
connected to the Internet.
Set up n emil prole
To trnsfer dicttion les directly by
SpeechExec without using the computer’s
defult emil ppliction, you need to set
up n emil prole.
Note
• When no emil prole hs been set
up, emils re sent vi the defult
emil ppliction of the computer
(e.g. Microsoft Outlook).
To set up n emil prole:
1
Click Settings > Generl settings on
the menu br to open the Settings
menu, nd select
Delivery > Emil
from the list on the left side.
2
Deselect the option Use your defult
emiling progrm to send dicttions
(QuickSend).
29User manual
3
Click the Add... button to dd new
prole. Select type of prole, enter
prole nme nd click OK.
X The settings window for the
selected prole is displyed.
4
Enter the settings for the selected
prole nd click OK to sve the
settings.
Mnully send dicttion les vi
emil
You cn send dicttion les mnully
with the Quick Send option nd your
defult emil progrm. Alterntively, you
cn sve your dicttions to the Outbox
folder nd send ll les bundled t
lter time.
Note
• If you wnt to use the QuickSend
option, mke sure it is ctivted
in Settings > Generl settings >
Delivery > Emil.
To trnsfer dicttion les mnully:
1
Select one or more dicttion les from
the work list.
2
Click the Submit for emil button.
X If you hve ctivted the
QuickSend option, n emil
window with the ttched
dicttion le(s) opens either with
the computer’s defult emil
ppliction or vi the congured
emil prole.
X If you hve dectivted the
QuickSend option, the dicttion
le(s) re sved in the Outbox
folder nd drft emil window
opens for ech dicttion le
seprtely.
3
Enter recipients, body text and
additional attachments.
4
If you have activated the QuickSend
option, click Send to send the
message.
If you have deactivated the QuickSend
option, click OK to close the draft
email window and send the dictation
les bundled at a later time.
5
To send the dictation les bundled
at a later time, click the
Send nd
Receive button on the toolbr.
X All dicttion les in the Outbox
folder re trnsferred. See
Automticlly send dicttion
les for more informtion bout
sending dicttion les in the
Outbox folder utomticlly.
Note
• The Outbox folder is hidden by
defult. To disply the Outbox
folder in the Folder tree, click
Settings > General settings on
the menu bar and select Work list
> Folders from the list on the left
side. Select Outbox and change
the Visible option to Yes.
• No more thn ve dicttion les
cn be ttched to n emil t
time. If more thn ve dicttion
les re selected, SpeechExec
cretes new emil for ech
group of ve les tht should be
sent by the user mnully.

30 User manual
Set up utomtic emil sending
You cn hve dicttion les utomticlly
prepred for emil sending when
recording is nished or when les re
downloded from Pocket Memo or
SpeechAir.
For SpeechExec recorder:
1
Click Settings > Generl settings on
the menu br to open the Settings
menu.
2
To set up utomtic sending when
dicttion le is nished in the
SpeechExec recorder, select Dicttion
> Dicttion nished from the list
on the left side. Activte the Emil
option.
3
Click the OK button to sve the
settings.
X Dicttion les will now be
utomticlly copied to the
Outbox folder when they re
nished.
4
Click the Send nd Receive button
on the toolbr to trnsfer ll dicttion
les sved in the Outbox folder. See
Automticlly send dicttion les
for more informtion bout sending
dicttion les in the Outbox folder
utomticlly.
For Pocket Memo:
5
Click Settings > Generl settings on
the menu br to open the Settings
menu
6
To set up utomtic sending fter
dicttion le is downloded
from Pocket Memo, select DPM
Congurtion > Delivery fter
downlod. Activte the Emil option.
Optionlly, click the Congure
button to set up defult contents for
emils (recipients, subject, body text,
ttchments).
X Dicttion les will now be
utomticlly copied to the
Outbox folder when they
downloded from Pocket Memo.
7
Click the Send nd Receive button
on the toolbr to trnsfer ll dicttion
les sved in the Outbox folder. See
Automticlly send dicttion les
for more informtion bout sending
dicttion les in the Outbox folder
utomticlly.

31User manual
For SpeechAir:
1
Connect your SpeechAir to the
computer.
2
Click Settings > Generl settings on
the menu br to open the Settings
menu.
3
To set up utomtic sending fter
dicttion le is downloded from
SpeechAir, select SpeechAir
congurtion > Device congurtion
> Open SpeechAir wizrd.
4
In the USB downlod section of the
SpeechAir Wizrd, ctivte Emil
delivery.
5
Click Finish to sve the settings.
X Dicttion les re now copied
utomticlly to the Outbox folder
when they re downloded from
SpeechAir.
6
Click the Send nd Receive button
on the toolbr to trnsfer ll dicttion
les sved in the Outbox folder. See
Automticlly send dicttion les
for more informtion bout sending
dicttion les in the Outbox folder
utomticlly.
Note
• The Outbox folder is hidden by
defult. To disply the Outbox folder
in the Folder tree, click Settings >
General settings on the menu bar
and select Work list > Folders from
the list on the left side. Select Outbox
and change the Visible option to Yes.
Automticlly send dicttion
les
By defult, dicttion les in the Outbox
folder re trnsferred only fter clicking
the
Send nd Receive button on
the toolbr. However, you cn chnge
this setting nd send dicttion les
utomticlly.
To send dicttions utomticlly:
1
Click Settings > Generl settings on
the menu br to open the Settings
menu, nd select
Delivery > Send/
receive from the list on the left side.
2
Activte the option Send nd receive
utomticlly nd set time intervl
for dicttions to be sent utomticlly.
3
Click the OK button to sve the
settings.
X Dicttion les in the Outbox folder
will now be utomticlly sent vi
emil.

32 User manual
6 Trouble-
shooting
Find the most common problems you
could encounter with your SpeechExec
softwre in the following tble. If you
re unble to solve the problem with
the informtion below, contct the
supporting Philips prtner you purchsed
the softwre from.
Problem Possible cuse Solution
The operting system stops
responding fter restrt.
• Using the Philips
SpeechMike together
with certin USB
hubs my cuse the
operting system to stop
responding when the
computer is strted.
• Unplug the SpeechMike
before strting the
computer nd reconnect
it fterwrds. We
recommend replcing the
USB hub or connecting
your SpeechMike directly
to the USB port of the
computer.
The SpeechMike is
completely without
function.
• Some computer providers
limit the output power
of USB ports to 100mA.
These ports my not
provide enough power
for the SpeechMike to
function properly.
• Use the AC chrger.
• Connect the SpeechMike
vi the self-powered hub.
The SpeechMike is
connected to the computer
but sound will ply on the
computer’s speker only.
• Windows cn support
more thn one plybck
device t time.
However, if you disble
the device for plybck,
it is lso disbled for
recording.
• Chnge the plybck
settings vi Strt >
Control Pnel > Sound >
Plybck
or
right-click the speker
icon on your toolbr nd
select Plybck devices.

33User manual
Problem Possible cuse Solution
After nishing dicttion
in the speech recognition
recorder, I don’t see my
nished dicttions.
• Dicttions nished in
the speech recognition
recorder, re sved in the
Archive folder. However,
the Archive folder is
hidden by defult.
• To disply the Archive
folder in the folder tree,
click Settings > General
settings on the menu
bar and select Work list
> Folders from the list
on the left side. Select
Archive and change the
Visible option to Yes.
I cnnot see the Outbox
folder.
• The Outbox folder is
hidden by defult.
• To disply the Outbox
folder in the Folder tree,
click Settings > General
settings on the menu
bar and select Work list
> Folders from the list
on the left side. Select
Outbox and change the
Visible option to Yes.

34 User manual
• Windows Medi Plyer must be
instlled on Windows operting
system
• A free USB port
• Internet connection for required
softwre ctivtion
Additionl system requirements
for Drgon speech recognition:
• Supported speech recognition
softwre:
Nunce Drgon Professionl 13/14/15,
Nunce Drgon Legl 13/14/15,
Nunce Drgon Medicl Prctice
Edition 2/3/4,
Nunce Drgon Professionl
Individul/Group 14
Nunce Drgon Legl Individul/Group
14
Nunce Drgon Professionl
Individul/Group 15
Nunce Drgon Legl Individul/Group
15
• Processor:
2.2 GHz Intel dul core or equivlent
AMD processor
• RAM:
8 GB for the 64-bit versions of Microsoft
Windows 10
• Free hrd disk spce:
4 GB hrd disk spce
7 Technicl dt
System requirements
SpeechExec:
• Processor:
1 GHz Intel dul core or equivlent AMD
processor
• RAM:
4 GB for the 64-bit versions of Microsoft
Windows 10
• Free hrd disk spce:
2.5 GB hrd disk spce for SpeechExec
nd Microsoft .NET Frmework
• Browser:
Internet Explorer 9 or higher, or the
current version of Chrome or Firefox for
Drgon online help nd SpeechLive
ccount ctivtion
• Supported operting systems:
Microsoft Windows 10, version 1809,
1903 nd 1909
• Grphics crd:
DirectX-complint grphics crd with
hrdwre ccelertion recommended
• Sound:
A sound crd supporting 16-bit
recording

35User manual
Open source softwre
This product my contin open source
softwre.
Speech Processing Solutions GmbH
hereby oers to deliver, upon request,
copy of the complete corresponding
source code for the copyrighted open
source softwre pckges used in this
product for which such oer is requested
by the respective licenses. This oer is
vlid up to three yers fter product
purchse.
To obtin the source code, plese write in
English to: inf[email protected].

a
Issue date 2020-02-03
Version 1.0
© 2020 Speech Processing Solutions GmbH. All rights reserved.
Specications are subject to change without notice. Philips and the Philips shield emblem
are registered trademarks of Koninklijke Philips N.V. and are used by Speech Processing
Solutions GmbH under license from Koninklijke Philips N.V. All trademarks are the property
of their respective owners.
www.philips.com/dictation
