
USER MANUAL
.PEFM)4
$)4PVOECBSXJUIXJSFMFTTTVCXPPGFS%PMCZ"UNPT
Before using the sound bar, please read this manual
thoroughly and retain it for future reference.

2
Contents
Important Safety Instructions 3
Safety ...........................................................................................................................................................................................3
Warning .......................................................................................................................................................................................4
What’s in the Box 7
Identifying the Parts 8
Main Unit ...................................................................................................................................................................................8
Wireless Subwoofer ................................................................................................................................................................8
Remote Control ........................................................................................................................................................................9
Preparations 9
Prepare the Remote Control ................................................................................................................................................9
Replace the Remote Control Battery ................................................................................................................................ 9
Placement and Mounting .................................................................................................................................................. 10
Connections 11
Dolby Atmos®......................................................................................................................................................................... 11
DTS: X ........................................................................................................................................................................................ 11
HDMI Socket ........................................................................................................................................................................... 11
Use the OPTICAL Socket .................................................................................................................................................... 12
Use the COAXIAL Socket .................................................................................................................................................... 12
Use the AUX Socket ............................................................................................................................................................. 12
Connect Power ...................................................................................................................................................................... 13
Pairing the Wireless Subwoofer with the Main Unit 13
Basic Operation 14
Standby/ON ............................................................................................................................................................................ 14
Select Modes .......................................................................................................................................................................... 14
Adjust the Bass Level ........................................................................................................................................................... 14
Turn the Surround Sound ON/OFF ................................................................................................................................. 14
Adjust the Volume ................................................................................................................................................................ 14
Adjust the Brightness .......................................................................................................................................................... 14
Select a Preset Sound Eect ............................................................................................................................................. 14
AUX / OPTICAL / COAXIAL / HDMI ARC Operation 14
Bluetooth Operation 15
Pair Bluetooth-enabled Devices ...................................................................................................................................... 15
Listen to Music from Bluetooth Device ........................................................................................................................ 16
USB Operation 16
Troubleshooting 17
Specications 18
3
third prong is provided for your safety. If the
provided plug does not fit into your outlet,
consult an electrician for replacement of the
obsolete outlet.
10 Protect the power cord from being walked on
or pinched particularly at plugs, convenience
receptacles, and the point where they exit
from the apparatus.
11 Only use attachments/accessories specied by
the manufacturer.
12 Use only with the cart, stand, tripod,
bracket or table specified by the
manufacturer, or sold with the
apparatus. When a cart or rack is
used, use caution when moving the cart/
apparatus combination to avoid injury from
tip-over.
13 Unplug the apparatus during lightning storms
or when unused for long periods of time.
14 Refer all servicing to qualified personnel.
Servicing is required when the apparatus has
been damaged in any way, such as power
supply cord or plug is damaged, liquid has
been spilled or objects have fallen into the
apparatus, the unit has been exposed to rain
or moisture, does not operate normally, or has
been dropped.
15 This equipment is a Class II or double
insulated electrical appliance. It has been
designed in such a way that it does not require
a safety connection to electrical earth.
16 The apparatus shall not be exposed to
dripping or splashing. No objects filled with
liquids, such as vases, shall be placed on the
apparatus.
17 Minimum distance around the apparatus for
sucient ventilation is 5cm.
18 The ventilation should not be impeded by
covering the ventilation openings with items,
such as newspapers,table-cloths, curtains,
etc…
19 No naked flame sources, such as lighted
candles, should be placed on the apparatus.
20 Batteries should be recycled or disposed of as
per state and local guidelines.
21 The use of apparatus in moderate or tropical
climates.
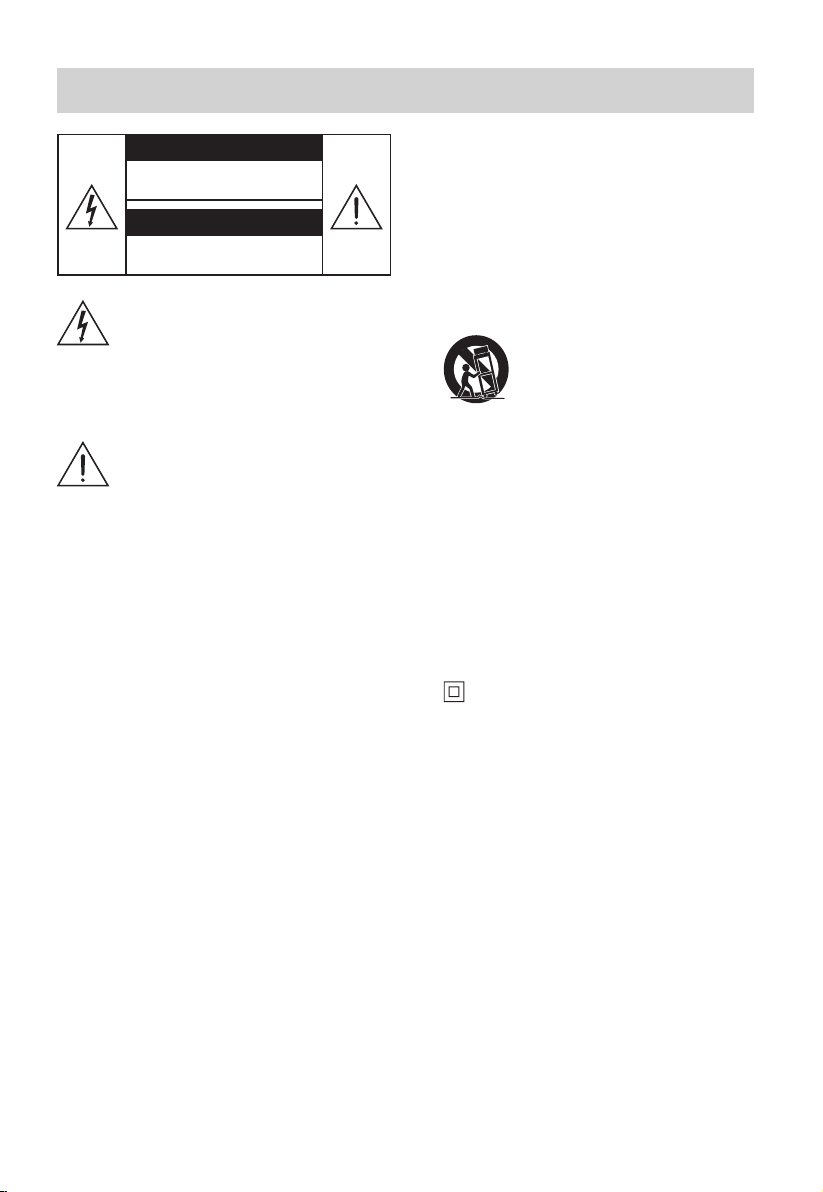
Important Safety Instructions
The lightning flash with arrowhead
symbol, within an equilateral triangle, is
intended to alert the user to the presence
of uninsulated “dangerous voltage” within
the product’s enclosure that may be of
sufficient magnitude as to constitute a
risk of electric shock to persons.
The exclamation point within an
equilateral triangle is intended to
alert the user to the presence of
important operating and maintenance
(servicing) instructions in the literature
accompanying the appliance.
Safety
1 Read these instructions – All the safety and
operating instructions should be read before
this product is operated.
2 Keep these instructions – The safety and
operating instructions should be retained for
future reference.
3 Heed all warnings – All warnings on the
appliance and in the operating instructions
should be adhered to.
4 Follow all instructions – All operating and
usage instructions should be followed.
5 Do not use this apparatus near water – The
appliance should not be used near water or
moisture – for example, in a wet basement or
near a swimming pool and the like.
6 Clean only with a dry cloth.
7 Do not block any ventilation openings.
Install in accordance with the manufacturer’s
instructions.
8 Do not install near any heat sources such as
radiators, heaters, stoves, or other apparatus
(including ampliers) that produce heat.
9 Do not defeat the safety purpose of the
polarized or grounding plug. A polarized
plug has two blades with one wider than the
other. A grounding plug has two blades and a
third grounding prong. The wide blade or the
CAUTION
RISK OF ELECTRIC SHOCK
DO NOT OPEN
AVIS
RISQUE DE CHOC
ELECTRIQUE NE PAS PUVRIR

4
Caution:
- Use of controls or adjustments or performance
of procedures other than those described
herein, may result in hazardous radiation
exposure or other unsafe operation.
- To reduce the risk of re or electric shock, do
not expose this apparatus to rain or moisture.
The apparatus must not be exposed to
dripping or splashing and objects lled with
liquids, such as vases, must not be placed on
apparatus.
- The mains plug/appliance coupler is used as
the disconnect device, the disconnect device
must remain readily operable.
- Danger of explosion if battery is incorrectly
replaced. Replace only with the same or
equivalent type.
Warning
• The battery (batteries or battery pack) shall not
be exposed to excessive heat such as sunshine,
re or the like.
• Before operating this system, check the
voltage of this system to see if it is identical to
the voltage of your local power supply.
• Do not place this unit close to strong magnetic
elds.
• Do not place this unit on the amplier or
receiver.
• Do not place this unit close to damp areas as the
moisture will aect the life of the laser head.
• If any solid object or liquid falls into the
system, unplug the system and have it checked
by qualied personnel before operating it any
further.
• Do not attempt to clean the unit with chemical
solvents as this may damage the nish. Use a
clean, dry or slightly damp cloth.
• When removing the power plug from the wall
outlet, always pull directly on the plug, never
yank on the cord.
• Changes or modications to this unit not
expressly approved by the party responsible
for compliance will void the user’s authority to
operate the equipment.
• The rating label is pasted on the bottom or
back of the equipment.
Battery usage CAUTION
To prevent battery leakage which may result in
bodily injury, property damage, or damage to the
apparatus:
- Install all batteries correctly, + and - as marked
on the apparatus.
- Do not mix old and new batteries.
- Do not mix alkaline, standard (Carbon-Zinc) or
rechargeable (Ni-Cd, Ni- MH, etc.) batteries.
- Remove batteries when the unit is not used for
a long time.
Correct Disposal of this product. This
marking indicates that this product
should not be disposed with other
household wastes throughout the EU.
To prevent possible harm to the environment or
human health from uncontrolled waste disposal,
recycle it responsibly to promote the sustainable
reuse of material resources. To return your used
device, please use the return and collection
systems or contact the retailer where the product
was purchased. They can take this product for
environmental safe recycling.
We hereby declares that this product
is in compliance with the essential
requirements and other relevant
provisions of Directive 2014/53/EU.
The Bluetooth word mark and logos are registered
trademarks owned by Bluetooth SIG,. Inc.
The terms HDMI and HDMI High-Denition
Multimedia Interface, and the HDMI Logo are
trademarks or registered trademarks of HDMI
Licensing Administrator, Inc.
Manufactured under license from
Dolby Laboratories. Dolby, Dolby
Atmos, Dolby Audio, and the
double-D symbol are trademarks of
Dolby Laboratories.
For DTS patents, see http: //patents.dts.com.
Manufactured under license from DTS Licensing
Limited. DTS, the Symbol, & DTS and the Symbol
together, DTS:X, and the DTS:X logo are registered
trademarks and/or trademarks of DTS, Inc. in the
United States and/or other countries. © DTS, Inc.
All Rights Reserved.
Only use the power supply listed in the user
instructions.
Manufacturer: Hisense International Co., Ltd
Adapter model: HAD2303

5
Supported input audio formats
The audio formats supported by this system are as follows.
Format
Function
HDMI 1
HDMI 2
TV ARC TV OPT TV COA
LPCM 2ch
√
√ √ √
LPCM 5.1ch
√
X X X
LPCM 7.1ch
√
X X X
Dolby Digital
√ √ √ √
Dolby TrueHD
√
X X X
Dolby Digital Plus
√ √
X X
Dolby Atmos - Dolby TrueHD
√
X X X
Dolby Atmos - Dolby Digital Plus
√ √
X X
DTS
√ √ √ √
DTS-ES Discrete 6.1,
DTS-ES Matrix 6.1
√ √ √ √
DTS 96/24
√ √ √ √
DTS-HD High Resolution Audio
√
X X X
DTS-HD Master Audio
√
X X X
DTS-HD LBR
√
X X X
DTS:X
√
X X X
√
: Supported formats.
X
: Unsupported format.
Note:
•
The HDMI IN 1/2 jack does not support copy-protected audio formats such as Super Audio CD or
DVD-Audio.

6
Supported HDMI video formats
The video formats supported by this system are as follows.
Resolution Frame rate 3D Color space
Color
depth
[HDMI Signal
Format] setting
4K
4096 x 2160p
3)
3840 x 2160p
50/59.94/60 Hz
-
RGB 4:4:4
YCbCr
4:4:4
8 bits
[enhanced format]
1)
-
YCbCr
4:2:2
8/10/12
bits
-
YCbCr
4:2:0
10/12
bits
23.98/24/25/
29.97/30 Hz
-
RGB 4:4:4
YCbCr
4:4:4
10/12
bits
4K
4096 x 2106p
3)
3840 x 2106p
50/59.94/60 Hz -
YCbCr
4:2:0
8 bits
[standard format]
2)
23.98/24/25/
29.97/30 Hz
-
RGB 4:4:4
YCbCr
4:4:4
8 bits
-
YCbCr
4:2:2
8/10/12
bits
1920 x 1080p
25/29.97/30/50/
59.94/60 Hz
-
RGB 4:4:4
YCbCr
4:4:4
YCbCr
4:2:2
8/10/12
bits
23.98/24 Hz
◎
1920 x 1080i 50/59.94/60 Hz
○
1280 x 720p
50/59.94/60 Hz
◎
23.98/24/29.97/
30 Hz
-
720 x 480p 59.94/60 Hz -
720 x 576p 50 Hz -
640 x 480p 59.94/60 Hz - RGB 4:4:4
○
:
Compatible with side-by-side (half width)
3)
format 3D signals
◎
:
Compatible with frame packing and 3D signals in
3)
format
1) Please use a high-quality high-speed HDMI Ethernet cable that supports 18Gbps.
2) Please use a high quality high speed HDMI Ethernet cable.

7
What’s in the Box
• Design and specications are subject to change without notice.
Adapter
(for Main Unit)
AC power Cord
x 2
3.5mm to 3.5mm
audio Cable
Main Unit Remote Control /
AAA Batteries x 2
Wireless Subwoofer
Wall Bracket Quick Start Guide
HDMI Cable
Wall mounting Screw
8
aux
4
3
6 7 8
1 2 3
9 1210 11 13 14 1615
5
3
2
112
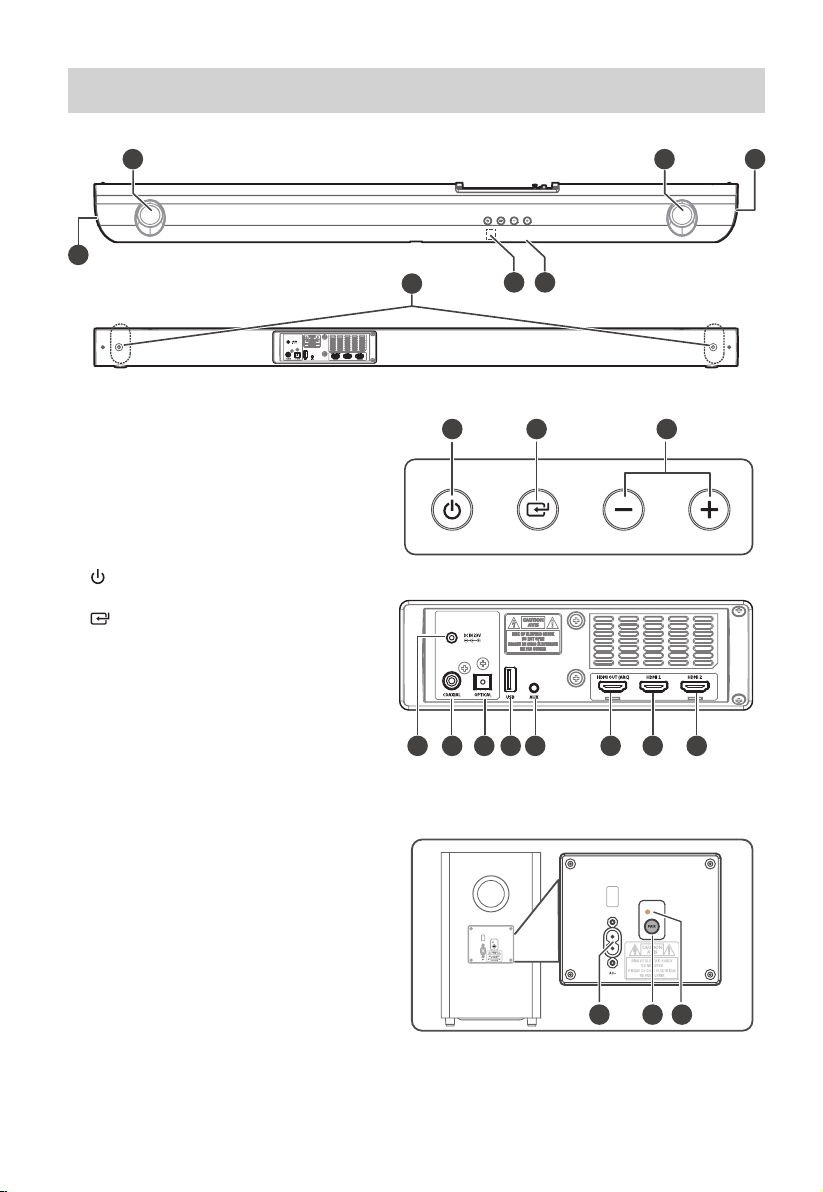
Identifying the Parts
Main Unit
1 Overhead Sound
2 Surround Speakers
3 Display Window
Show the current status.
4 Remote Control Sensor
Receive signal from the remote control.
5 Screws
Remove the screws then install the wall
mounting screws into the back of the unit.
6 (ON/OFF) button
Switch the unit between ON and Standby mode.
7 (SOURCE) button
Select the play function.
8 VOL+/VOL- buttons
Increase/decrease the volume level.
9 DC IN 23V Socket
Connect to adapter.
10 COAXIAL Socket
11 OPTICAL Socket
12 USB Socket
Insert the USB device to play music.
13 AUX Socket
Connect to an external audio device.
14 HDMI OUT (ARC) Socket
Connect to a TV via HDMI cable.
15 HDMI IN 1 Socket
16 HDMI IN 2 Socket
Wireless Subwoofer
1 AC~ Socket
Connect to power.
2 PAIR button
Press activate the pairing function between the main unit and the subwoofer.
3 PAIR Indicator
Light up solidly when the pairing succeed.

9
Remote Control
1 Switch the unit between ON and
STANDBY mode.
2 MUTE Mute or resume the sound.
3 SOURCE Select the play function.
4 BT Select the Bluetooth mode.
5 VOL+/VOL- Increase/decrease the volume level.
6 / Skip to previous/next track in
Bluetooth/USB mode.
7
BF
/PAIR Play/pause/resume playback in
Bluetooth/USB mode.
Press and hold to activate the pairing
function in Bluetooth mode or
disconnect the existing paired
Bluetooth device.
8 EQ Select a preset sound eect.
9 SURROUND Adjust the surround ON/OFF.
10 DIMMER+/- Adjust display brightness.
11 BASS+/- Adjust bass level.
Preparations
Prepare the Remote Control
The provided Remote Control allows the unit to
be operated from a distance.
•
Even if the Remote Control is operated within
the effective range 19.7 feet (6m), remote
control operation may be impossible if there
are any obstacles between the unit and the
remote control.
•
If the Remote Control is operated near other
products which generate infrared rays, or if
other remote control devices using infra-red
rays are used near the unit, it may operate
incorrectly. Conversely, the other products may
operate incorrectly.
Replace the Remote Control Battery
Precautions Concerning Batteries
• Be sure to insert the batteries with correct
positive “
” and negative “
” polarities.
• Use batteries of the same type. Never use
dierent types of batteries together.
• Either rechargeable or non-rechargeable
batteries can be used. Refer to the precautions
on their labels.
• Be aware of your fingernails when removing
the battery cover and the battery.
• Do not drop the remote control.
• Do not allow anything to impact the remote
control.
• Do not spill water or any liquid on the remote
control.
• Do not place the remote control on a wet
object.
• Do not place the remote control under direct
sunlight or near sources of excessive heat.
• Remove the battery from the remote control
when not in use for a long period of time, as
corrosion or battery leakage may occur and
result in physical injury, and/or property
damage, and/or re.
• Do not use any batteries other than those
specied.
• Do not mix new batteries with old ones.
• Never recharge a battery unless it is conrmed
to be a rechargeable type.
1 Press and slide the back
cover to open the battery
compartment of the
remote control.
2 Insert two AAA size
batteries (included). Make
sure the (+) and (–) ends of
the batteries match the (+)
and (–) ends indicated in
the battery compartment.
3 Close the battery
compartment cover.
10
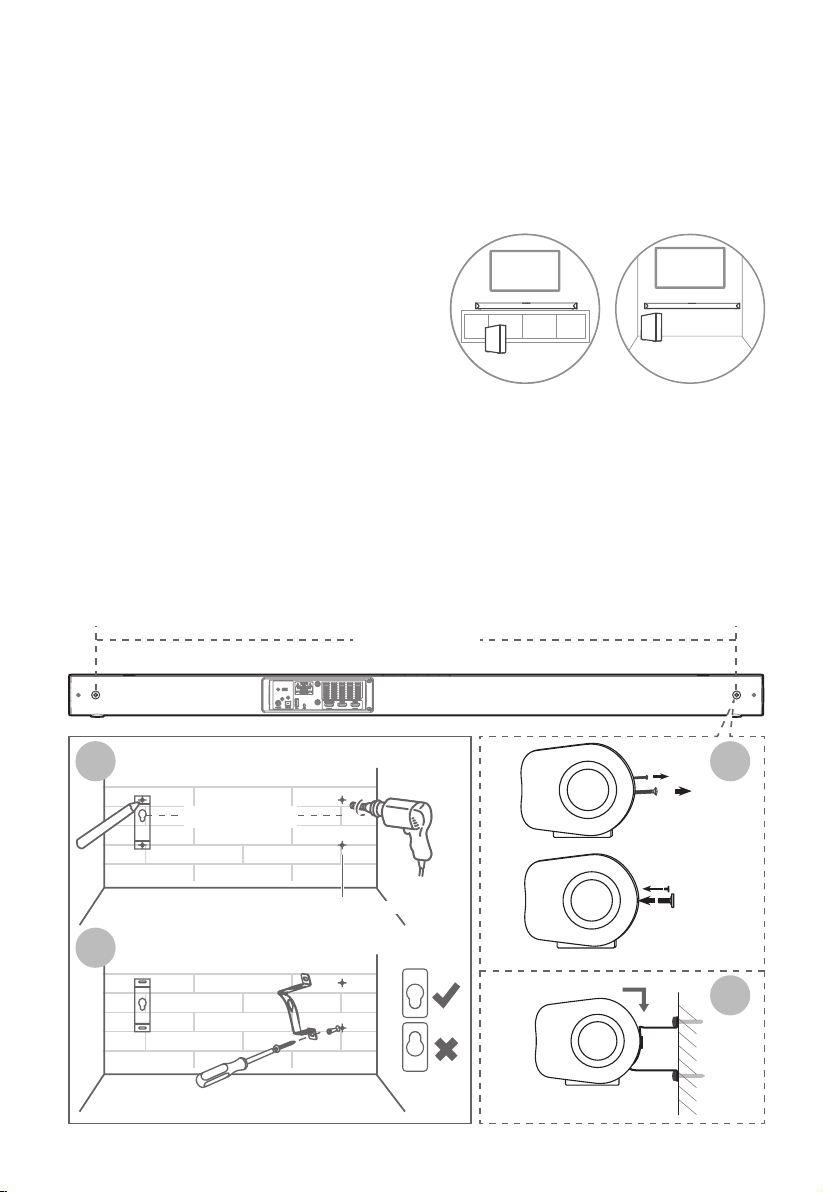
Placement and Mounting
Placement
A If your TV is placed on a table, you can place the unit on the table directly in front of the TV stand,
centered with the TV screen.
B If your TV is attached to a wall, you can mount the unit on the wall directly below the TV screen.
Wall Mounting (if using option-B)
Note:
- Installation must be carried out by qualied
personnel only. Incorrect assembly can result in
severe personal injury and property damage (if
you intend to install this product yourself, you
must check for installations such as electrical
wiring and plumbing that may be buried inside
the wall). It is the installer’s responsibility to
verify that the wall will safely support the total load of the unit and wall brackets.
- Additional tools (not included) are required for the installation.
- Do not overtighten screws.
- Keep this instruction manual for future reference.
- Use an electronic stud nder to check the wall type before drilling and mounting.
1. Drill 4 parallel holes (Ø 5.5-6 mm each according to wall type) in the wall. The distance between the
holes should be 1106 mm.
2. Firmly x 1 dowel into each hole in the wall if necessary. Tighten the wall mount brackets on the wall
with screws and screwdriver (not included). Make sure that they are securely installed.
3. Remove the screws at the back of the unit. Install the wall mounting screws into the back of the unit.
4. Lift the unit onto the wall mount brackets and slot into place.
1106 mm
Remove
the screws
Install the wall
mounting screws
1 3
4
2
1106 mm
(ø5.5~6mm / 32mm)
AB
11
Connections
Dolby Atmos®
Dolby Atmos gives you amazing experience you have never before by overhead sound, and all the
richness, clarity, and power of Dolby sound.
DTS: X
DTS: X The border sound is no longer constrained by xed-position speaker placement or specic channel
signals. It can be exibly debugged according to the playback environment to achieve the best sound
performance in this environment.
For using Dolby Atmos® / DTS: X
Dolby Atmos® / DTS: X is available only in HDMI mode. For the details of the connection, please refer to
“HDMI Connection”.
1. To use Dolby Atmos® / DTS: X in HDMI 1 and HDMI 2 mode, Your TV had to support Dolby Atmos® /
DTS: X or HDMI audio passthrough.
2. Make sure that “No Encoding“ is selected for bitstream in the audio output of the connected external
device (e.g. Blu-ray DVD player, TV etc.).
3. While entering Dolby Atmos / DTS: X / Dolby Digital / PCM format, the soundbar will show DOLBY
ATMOS / DTS: X / DOLBY AUDIO / PCM AUDIO.
4. While the soundbar is using Dolby Atmos / DTS: X audio, you can only adjust the bass level of the
subwoofer. All other EQ eects will not be available.
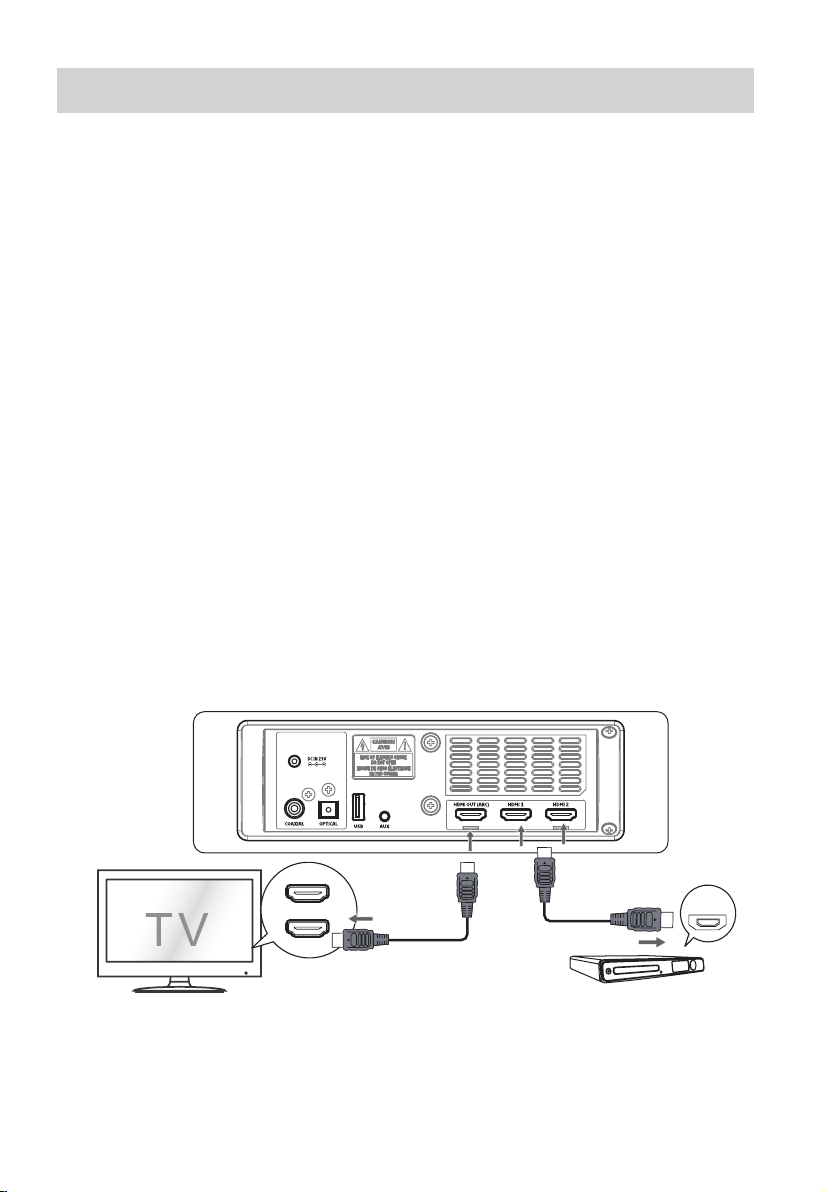
HDMI Socket
Some 4K HDR TVs require the HDMI input or picture settings to be set for HDR content reception. For
further setup details on HDR display, please refer to the instruction manual of your TV.
Using HDMI to connect the soundbar, AV equipment and TV:
AV equipment
HDMI IN
HDMI (ARC)
OR
HDMI OUT
Method 1: ARC (Audio Return Channel)
The ARC (Audio Return Channel) function allows you to send audio from your ARC- compliant TV to your
sound bar through a single HDMI connection. To enjoy the ARC function, please ensure your TV is both
HDMI-CEC and ARC compliant and set up accordingly. When correctly set up, you can use your TV remote
control to adjust the volume output (VOL +/- and MUTE) of the sound bar.

12
- Connect the HDMI cable (not included) from unit's HDMI (ARC) socket to the HDMI (ARC) socket on your
ARC compliant TV. Then press the remote control to select HDMI ARC.
Tips:
• Your TV must support the HDMI-CEC and ARC function. HDMI-CEC and ARC must be set to On.
• The setting method of HDMI-CEC and ARC may dier depending on the TV. For details about ARC
function, please refer to the owner’s manual.
Method 2: Standard HDMI
- If your TV is not HDMI ARC-compliant,
connect your soundbar to the TV
through a standard HDMI connection.
1. Use an HDMI cable (not included) to
connect the soundbar's HDMI OUT
socket to the TV’s HDMI IN socket.
2. Use an HDMI cable (not included) to
connect the soundbar's HDMI IN (1 or
2) socket to your external devices (e.g.
games consoles, DVD players and blu
ray).
Use the OPTICAL Socket
- Remove the protective cap of the
OPTICAL socket, then connect an
OPTICAL cable (not included) to the TV’s
OPTICAL OUT socket and the OPTICAL
socket on the unit.
Use the COAXIAL Socket
• You also can use the COAXIAL cable (included) to connect the TV's COAXIAL OUT socket and COAXIAL
socket on the unit.
Tip: The unit may not be able to decode all digital audio formats from the input source. In this case,
the unit will mute. This is NOT a defect. Ensure that the audio setting of the input source (e.g. TV, game
console, DVD player, etc.) is set to PCM or Dolby Digital (Refer to the user manual of the input source
device for its audio setting details) with
HDMI / OPTICAl / COAXIAL input.
Use the AUX Socket
A. Use a 3.5mm to 3.5mm audio cable
(included) to connect the TV’s or
external audio device headphone
socket to the AUX socket on the unit.
B. Use a RCA to 3.5mm audio cable
(included) to connect the TV’s audio
output sockets to the AUX socket on
the unit.
56:/)'2)5'>/'2
.KGJVNUTK
A
B
13
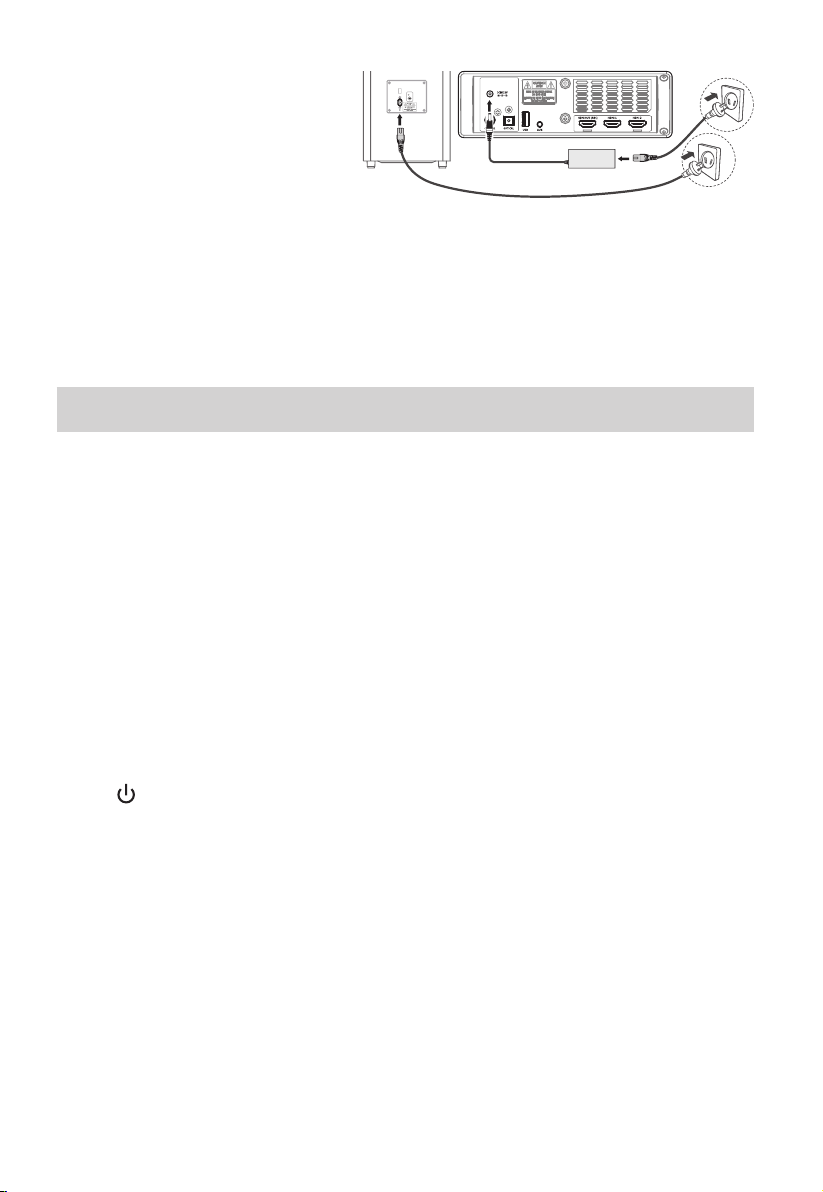
Connect Power
Risk of product damage!
- Ensure that the power supply voltage
corresponds to the voltage printed on
the back or the underside of the unit.
- Before connecting the AC power cord,
ensure you have completed all other
connections.
Soundbar
Unwind the mains adapter and mains cable to their full length. Connect the mains adapter to the DC IN
23V socket of the soundbar, then connect the mains cable to the mains adapter and into a mains socket.
Subwoofer
Connect the mains cable to the AC~ Socket of the subwoofer and then into a mains socket.
Pairing the Wireless Subwoofer with the Main Unit
Automatic pairing
The subwoofer and soundbar will automatically pair when both units are plugged into the mains sockets
and turned on. No cable is needed for connecting the two units.
• When the subwoofer is pairing with the main unit, the Pair Indicator will ash fast.
• When the subwoofer is paired with the main unit, the Pair Indicator will light up.
NOTE:
- Do not press the Pair button on the rear of the subwoofer, except for manual pairing.
- If the automatic pairing fails, pair the subwoofer with the main unit manually.
Manual pairing
1. Ensure that all the cables are well connected and the main unit is in Standby mode.
2. Press and hold the Pair button on the rear of the subwoofer for a few seconds. The subwoofer will
enter the pairing mode and the Pair Indicator will blink quickly.
3. Press the button on the main unit or on the remote control to switch the main unit on.
4. After the wireless connection succeeded, the Pair Indicator will light up.
5. If the Pair indicator blinks, the wireless connection has failed. Unplug the cable of the subwoofer and
then reconnect the main cable after 3 minutes. Repeat step 1 ~ 4.
NOTE:
• If the wireless connection fails again, check if there is conict or strong interference
(for example, interference from an electronic device) around your location. Remove these conicts or
strong interferences and repeat the above procedures.
• The subwoofer should be within 6m (18 feet) of the soundbar in an open area.
• If a TV or an external device is connected, the main unit only AUX model and the subwoofer will
switch on automatically when the TV or the external device is switched on.
• If the main unit is not connected with the subwoofer and it is in On mode, the POWER Indicator will
ash. Follow step 1 ~ 4 above to pair the subwoofer to the main unit.

14
Basic Operation
Standby/ON
When you rst connect the main unit to the mains socket, the main unit will be in Standby mode.
• Press the button on the unit or on the remote control to switch the unit ON.
• Press the button again to switch the unit back to STANDBY mode.
• Disconnect the mains plug from the mains socket if you want to switch the unit OFF completely.
- If a TV or an external device is connected, the unit will switch on automatically when the TV or the
external device is switched on.
- When there is no input signal from the unit in over 15 minutes, then it will automatically switch to
Standby mode.
Select Modes
Press the (SOURCE) button repeatedly on the unit or the SOURCE, BT buttons on the remote control
to select the AUX, OPTICAL, COAXIAL, HDMI 1, HDMI 2, HDMI ARC, USB and BT (Bluetooth) mode. The
selected mode will show on the display.
Adjust the Bass Level
• Press the BASS +/- buttons on the remote control to adjust bass level. (bass +5 ~ bass -9).
Turn the Surround Sound ON/OFF
• Press the SURROUND button on the remote control to turn on the surround sound. Press this button
again to turn o the surround sound.
Adjust the Volume
- Press the VOL+ / VOL- buttons on the unit or on the remote control to adjust the volume.
- If you wish to turn the sound o, press the MUTE button on the remote control. Press the MUTE
button again or press the VOL+ / VOL- buttons on the unit or on the remote control to resume
normal listening.
Adjust the Brightness
- Press the DIMMER +/- button on the remote control to select brightness level.
Select a Preset Sound Eect
• While playing, press the EQ button on the remote control to select desired preset equalizers:
MOVIE, MUSIC, NEWS, SPORT.
AUX / OPTICAL / COAXIAL / HDMI ARC Operation
1 Ensure that the unit is connected to the TV or audio device.
2 Press the button repeatedly on the unit or the SOURCE button on the remote control to select the
AUX, OPTICAL, COAXIAL, HDMI 1, HDMI 2, HDMI ARC mode.
3 Operate your audio device directly for playback features.
4 Press the VOL +/– button to adjust the volume to your desired level.

15
Tip:
• The unit may not be able to decode all digital audio formats from the input source. In this case, the
unit will mute. This is NOT a defect. Ensure that the audio setting of the input source (e.g. TV, game
console, DVD player, etc.) is set to PCM or Dolby Digital (Refer to the user manual of the input source
device for its audio setting details) with HDMI 1 / HDMI 2 / HDMI ARC / OPTICAl / COAXIAL input.
• When selecting a dierent audio format, the unit will display the following as follows:
Audio (abbreviation) Display
LPCM 2ch PCM
LPCM 5.1ch PCM
LPCM 7.1ch PCM
Dolby Digital DOLBY AUDIO
Dolby TrueHD DOLBY AUDIO
Dolby Digital Plus DOLBY AUDIO
Dolby Atmos -
Dolby TrueHD
DOLBY ATMOS
Dolby Atmos -
Dolby Digital Plus
DOLBY ATMOS
DTS DTS AUDIO
DTS Discrete Surround DTS AUDIO
Audio (abbreviation) Display
DTS-ES 6.1 Matrix DTS-ES MTX
DTS-ES 6.1 Discrete DTS-ES DSCRT
DTS 96/24 DTS 96
DTS 96/24 ES Matrix DTS 96 ES MTX
DTS Express DTS EXPRESS
DTS-ES 8-Channel Discrete DTS ES DSCRT
DTS-HD High Resolution DTS-HD HI RES
DTS-HD Master Audio DTS-HD MA
DTS:X DTS:X
DTS:X Master Audio DTS X MA
Bluetooth Operation
Pair Bluetooth-enabled Devices
The rst time you connect your bluetooth device to this player, you need to pair your device to this player.
Note:
- The operational range between this player and a Bluetooth device is approximately 26 feet (8m)
(without any object between the Bluetooth device and the unit).
- Before you connect a Bluetooth device to this unit, ensure you know the device’s capabilities.
- Compatibility with all Bluetooth devices is not guaranteed.
- Any obstacle between this unit and a Bluetooth device can reduce the operational range.
- If the signal strength is weak, your Bluetooth receiver may disconnect, but it will re-enter pairing
mode automatically.
1 During ON mode, press the button repeatedly on the unit or the BT button on the remote control
to select Bluetooth mode. “NO BT” will show on the display if the unit is not paired to any Bluetooth
device.
2 Activate your Bluetooth device and select the search mode. “HS512” will appear on your Bluetooth
device list.
- If you cannot nd the unit, press and hold the
BF
/ PAIR button on the remote control to be
searchable. The display will show “PAIR” and you will hear "Pairing" from the unit.
3 Select “HS512” in the pairing list. After successful pairing, you will hear "Paired" from the unit, and the
display panel shows “BT”.
4 Play music from the connected Bluetooth device.
16
To disconnect the Bluetooth function, you can :
- Switch to another function on the unit.
- Disable the function from your Bluetooth device.The Bluetooth device will be disconnected from the
unit after the “Disconnected” voice prompt.
- Press and hold the
BF
/ PAIR button on the remote control.
Tips:
• Enter "0000" for the password if necessary.
• If no other Bluetooth device pairs with this player within two minutes, the player will recover its
previous connection.
• The player will also be disconnected when your device is moved beyond the operational range.
• If you want to reconnect your device to this player, place it within the operational range.
• If the device is moved beyond the operational range, when it is brought back, please check if the
device is still connected to the player.
• If the connection is lost, follow the instructions above to pair your device to the player again.
Listen to Music from Bluetooth Device
- If the connected Bluetooth device supports Advanced Audio Distribution Prole (A2DP), you can
listen to the music stored on the device through the player.
- If the device also supports Audio Video Remote Control Prole (AVRCP), you can use the player's
remote control to play music stored on the device.
1. Pair your device with the player.
2. Play music via your device (if it supports A2DP).
3. Use supplied remote control to control play (if it supports AVRCP).
- To pause/resume play, press the
BF
/ PAIR button on the remote control.
- To skip to a track, press the /
buttons on the remote control.
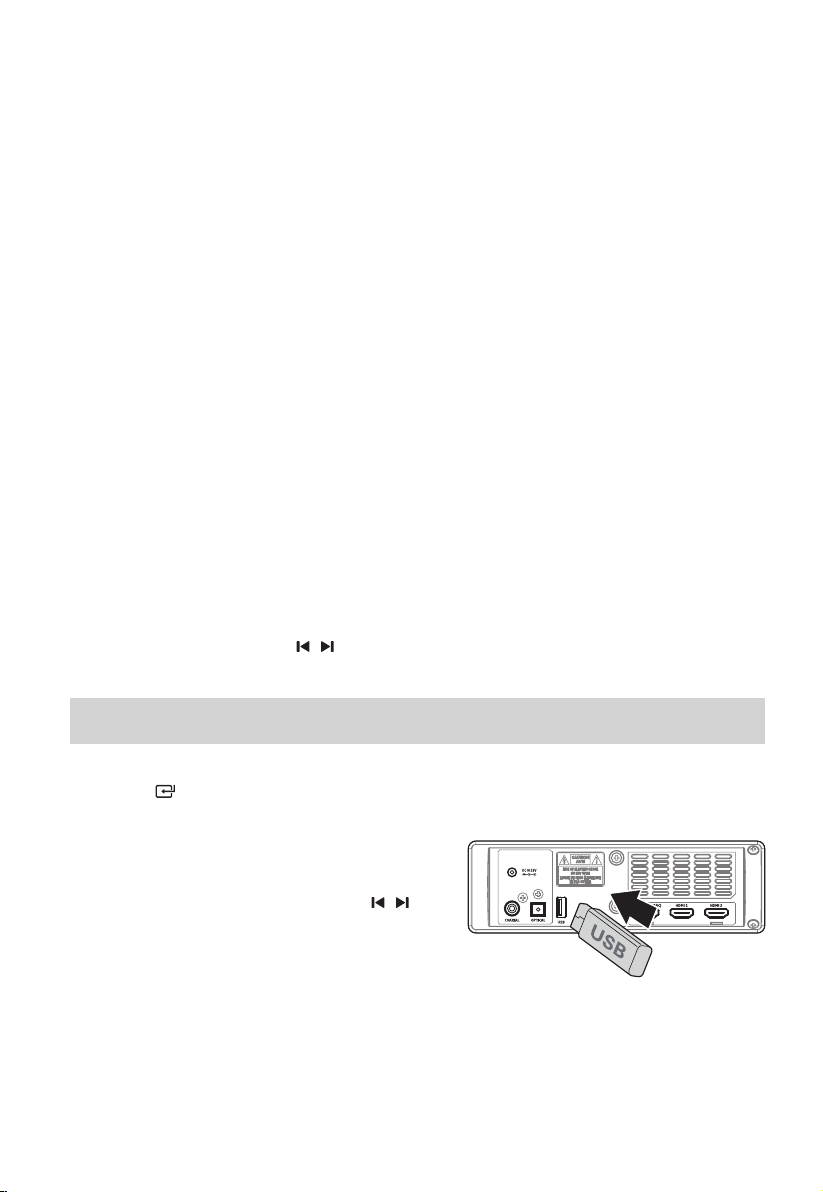
USB Operation
1 Insert the USB device.
2 Press the button repeatedly on the unit or press the SOURCE button on the remote control to
select USB mode.
3 During playback:
- To pause or resume play, press the
BF
/ PAIR button
on the remote control.
- To skip to the previous/next le, press the /
buttons on the remote control.
Tips:
• The unit can support USB devices with up to 32 GB
of memory.
• This unit can play MP3.

17
Troubleshooting
To keep the warranty valid, never try to repair the system yourself. If you encounter problems when using
this unit, check the following points before requesting service.
No power
• Ensure that the AC cord of the apparatus is properly connected .
• Ensure that there is power at the AC outlet.
• Press standby button to turn the unit on.
Remote control does not work
• Before you press any playback control button, rst select the correct source.
• Reduce the distance between the remote control and the unit.
• Insert the battery with its polarities (+/-) aligned as indicated.
• Replace the battery.
• Aim the remote control directly at the sensor on the front of the unit.
No sound
• Make sure that the unit is not muted. Press MUTE or VOL+/VOL– button to resume normal listening.
• Press button on the unit or on the remote control to switch the soundbar to standby mode. Then
press the button again to switch the soundbar on.
• Unplug both the soundbar and the subwoofer from the mains socket, then plug them again. Switch
on the soundbar.
• Ensure the audio setting of the input source (e.g. TV, game console, DVD player, etc.) is set to PCM or
Dolby Digital mode while using digital (e.g. HDMI, OPTICAL, COAXIAL) connection.
• The subwoofer is out of range, please move the subwoofer closer to the soundbar. Make sure the
subwoofer is within 5 m of the soundbar (the closer the better).
• The soundbar may have lost connection with the subwoofer. Re-pair the units by following the steps
on the section “Pairing the Wireless Subwoofer with the Soundbar”.
• The unit may not be able to decode all digital audio formats from the input source. In this case, the
unit will mute. This is NOT a defect.device is not muted.
I can’t nd the Bluetooth name of this unit on my Bluetooth device for Bluetooth
pairing
• Ensure the Bluetooth function is activated on your Bluetooth device.
• Ensure you have paired the unit with your Bluetooth device.
This is a 15 mins power o function, one of the ERPII standard requirement for
saving power
• When the unit's external input signal level is too low, the unit will be turned o automatically in
15 minutes. Please increase the volume level of your external device.
The subwoofer is idle or the indicator of subwoofer do not light up.
• Please unplug power cord from the mains sockect, and plug it in again after 4 minutes to resent the
subwoofer.

18
HS512
406/%#"3
⊤Ԏڕᮜฝ⩢㻳䴠マ
ݣ䕍喟䱿ᇈ⊤Ԏ⩢க㗎Ъᰶ䭽ڙ
ౝ౭喟䱿ᇈጯ㏼≻ឭᱜᐭࣾࡧݺ⎫⍜䌜
పݣ䕍
⩢䄊喟
Specications
Model Name HS512
Soundbar
Adapter Power Input AC120V~ /220-240V~ 50/60Hz, 1.8A
Adapter Power Output 23V 3A
Main Unit Power Supply Input DC 23V 3A
USB 5V 0.5A
Dimension (WxHxD) 1200 x 73 x 110 mm (47.2 x 2.9 x 4.3 inch)
Net weight 8.8 lbs (4 kg)
Audio input sensitivity 500mV
Frequency Response 120Hz - 20KHz
Bluetooth
Version V 4.2
Maximum power transmitted <5 dbm
Frequency bands 2402 MHz ~ 2480 MHz
Subwoofer
Power Supply AC120V~ /220-240V~
Dimension (WxHxD) 240 x 420 x 240 mm (9.5 x 16.5 x 9.5 inch)
Net weight 11.55 lbs (5.25 kg)
Frequency Response 40Hz - 120Hz
Maximum power transmitted <10 dbm
Frequency bands 2400 MHz ~ 2483 MHz
Amplier (RMS Outputpower)
Total 380 W
Main Unit 25W x 8 + 180W (8Ω x 8 + 3Ω )
Remote Control
Distance/Angle 19.7 feet (6m) / 30°
Battery type AAA (1.5V X 2)

HS512
406/%#"3
⊤Ԏڕᮜฝ⩢㻳䴠マ
ݣ䕍喟䱿ᇈ⊤Ԏ⩢க㗎Ъᰶ䭽ڙ
ౝ౭喟䱿ᇈጯ㏼≻ឭᱜᐭࣾࡧݺ⎫⍜䌜
పݣ䕍
⩢䄊喟