
Before using the soundbar, please read this manual thoroughly and retain
it for future reference.
USER MANUAL
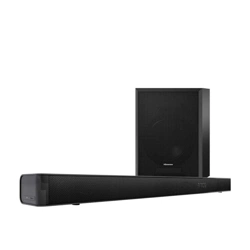
3.1CH Soundbar with Wireless Subwoofer
Model: HS3100
EN
FR
ES
PT
DE
IT
CZ
HU

EN
2
Contents
1. Important Safety Instruction .......................................................................................................... 3
1.1 Safety .........................................................................................................................................................................................................3
1.2 Caution .....................................................................................................................................................................................................4
1.3 Warning ....................................................................................................................................................................................................4
2. What’s in the Box .............................................................................................................................. 5
3. Identifying the Parts ........................................................................................................................ 6
3.1 Soundbar ................................................................................................................................................................................................6
3.2 Wireless Subwoofer ..............................................................................................................................................................................6
3.3 Remote Control .....................................................................................................................................................................................7
4. Preparations ..................................................................................................................................... 7
4.1 Prepare the Remote Control .............................................................................................................................................................7
4.2 Replace the Remote Control Battery .............................................................................................................................................7
5. Placement and Mounting ................................................................................................................ 8
5.1 Placement ................................................................................................................................................................................................8
5.2 Wall Mounting (if using option-B)...................................................................................................................................................8
6. Connections ...................................................................................................................................... 9
6.1 Use the HDMI ARC Socket ..................................................................................................................................................................9
6.2 Use the Roku TV .....................................................................................................................................................................................9
6.3 Use the Hisense EzPlay Function .....................................................................................................................................................9
6.4 Use the OPTICAL Socket .................................................................................................................................................................. 10
6.5 Use the AUX Socket ...........................................................................................................................................................................10
6.6 Connect Power ...................................................................................................................................................................................10
7. Pa
ir u
p with the Subwoofer ...................................................................................................................10
7.1 Automatic pairing .............................................................................................................................................................................. 10
7.2 Manual pairing .................................................................................................................................................................................... 11
8. Basic Operation .............................................................................................................................. 11
8.1 Standby/ON ......................................................................................................................................................................................... 11
8.2 Auto-Standby / Auto-Wake Feature ............................................................................................................................................ 11
8.3 Select Modes ....................................................................................................................................................................................... 12
8.4 Adjust the Volume ............................................................................................................................................................................. 12
8.5 Turn the Surround Sound ON/OFF .............................................................................................................................................. 12
8.6 Adjust the Bass/Treble ..................................................................................................................................................................... 12
8.7 Select Equalizer (EQ) Eect ............................................................................................................................................................. 12
8.8 Adjust the Brightness ....................................................................................................................................................................... 12
8.9 Factory reset ........................................................................................................................................................................................ 12
9. AUX / OPTICAL / HDMI ARC Operation ......................................................................................... 12
10. USB Operation ................................................................................................................................ 13
11. Bluetooth® Operation .................................................................................................................... 13
12. Setup Menu ..................................................................................................................................... 14
13. DEMO Mode .................................................................................................................................... 14
14. Troubleshooting ............................................................................................................................. 15
15. Specications.................................................................................................................................. 16
5
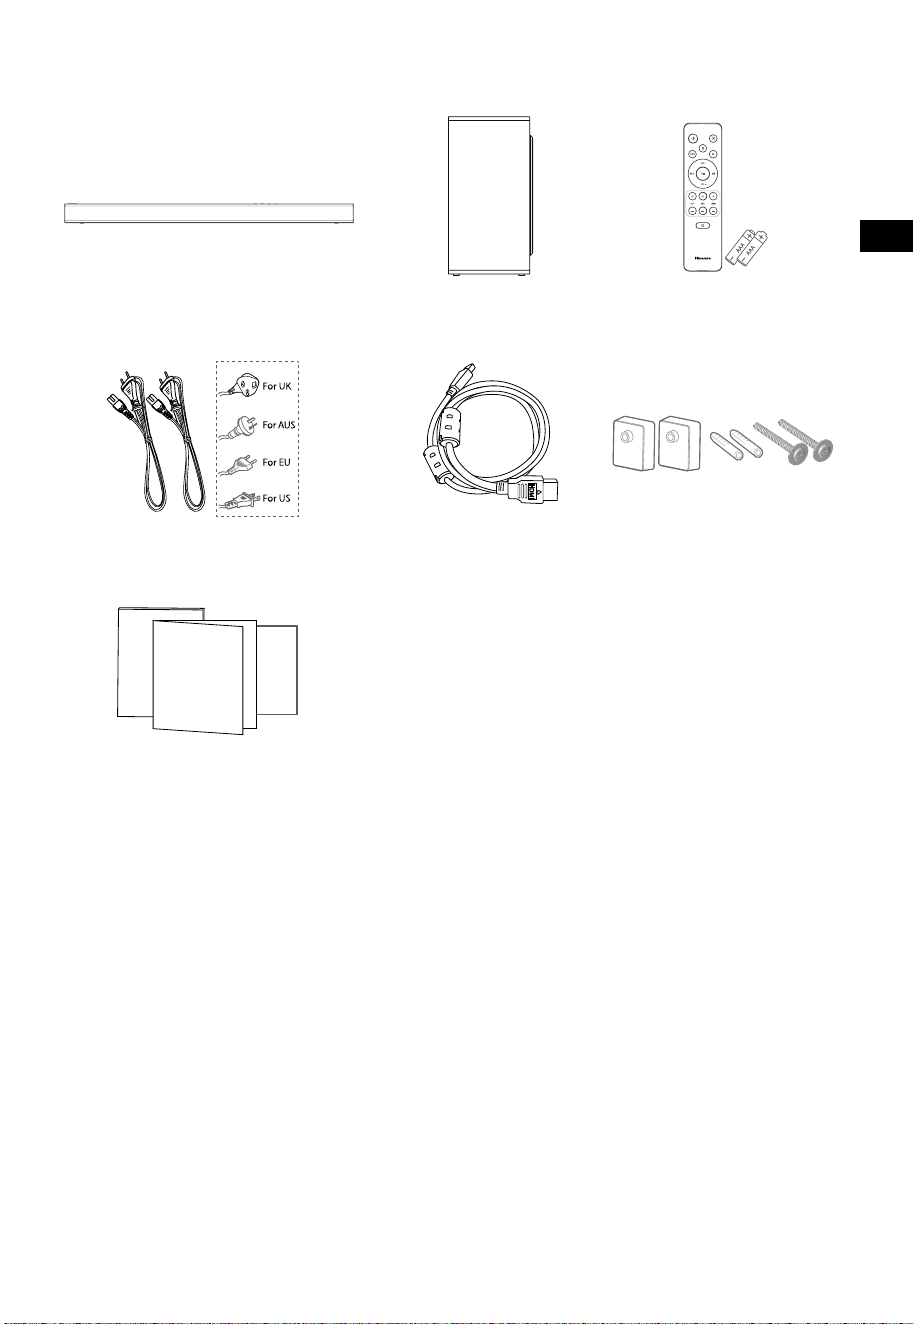
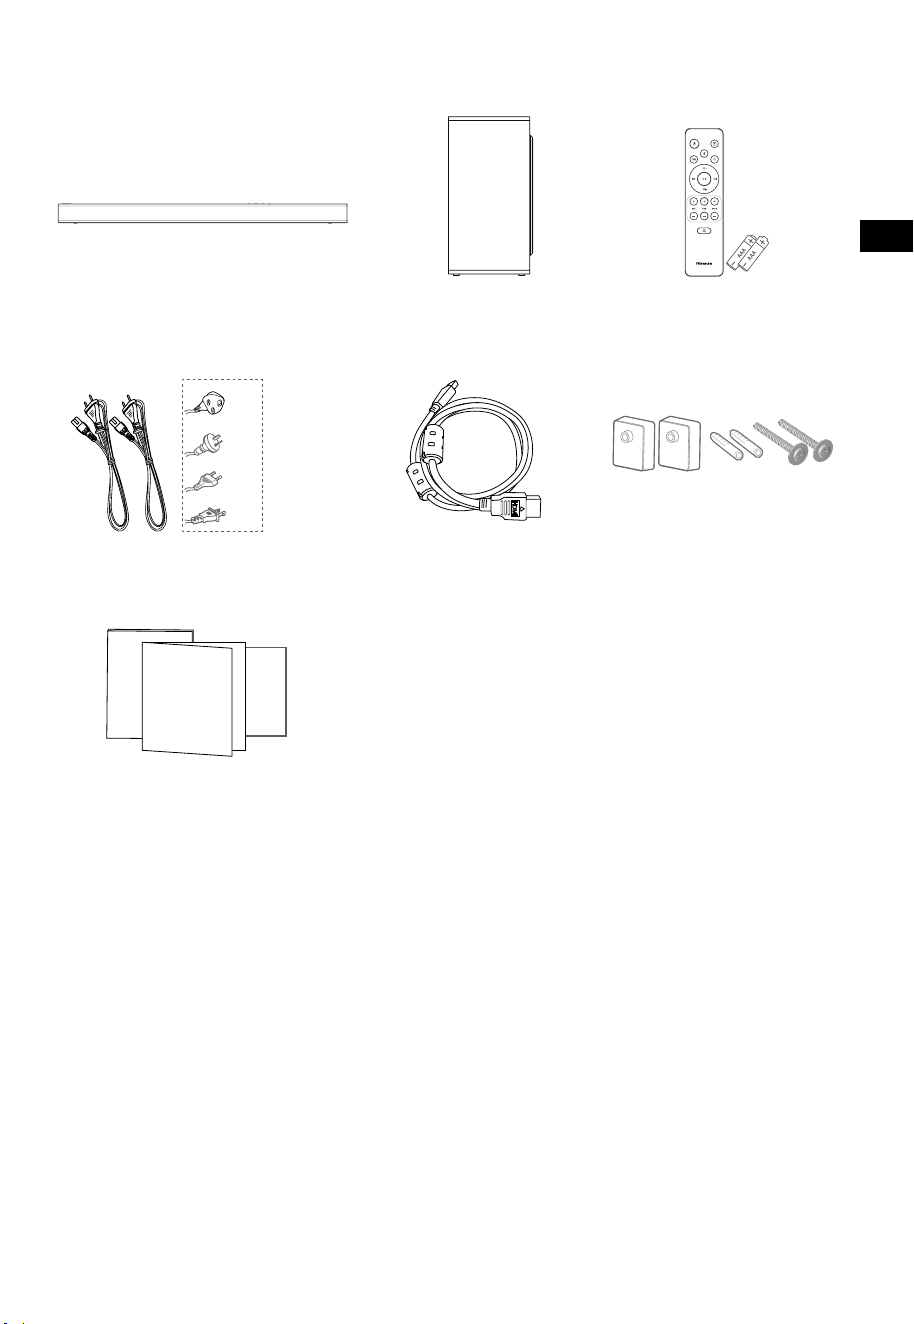
2. What’s in the Box
• Power cord quantity and plug type vary by regions.
• Images, illustrations and drawings shown on this User Manual are for reference only, actual product
may vary in appearance.
HDMI Cable
Soundbar
Wall Bracket
Remote Control /
AAA Batteries x 2
Wireless Subwoofer
AC Power Cord x 2
User Manual/Warranty card
/Quick start guide
EN
6
3 4 5
TOP
BACK
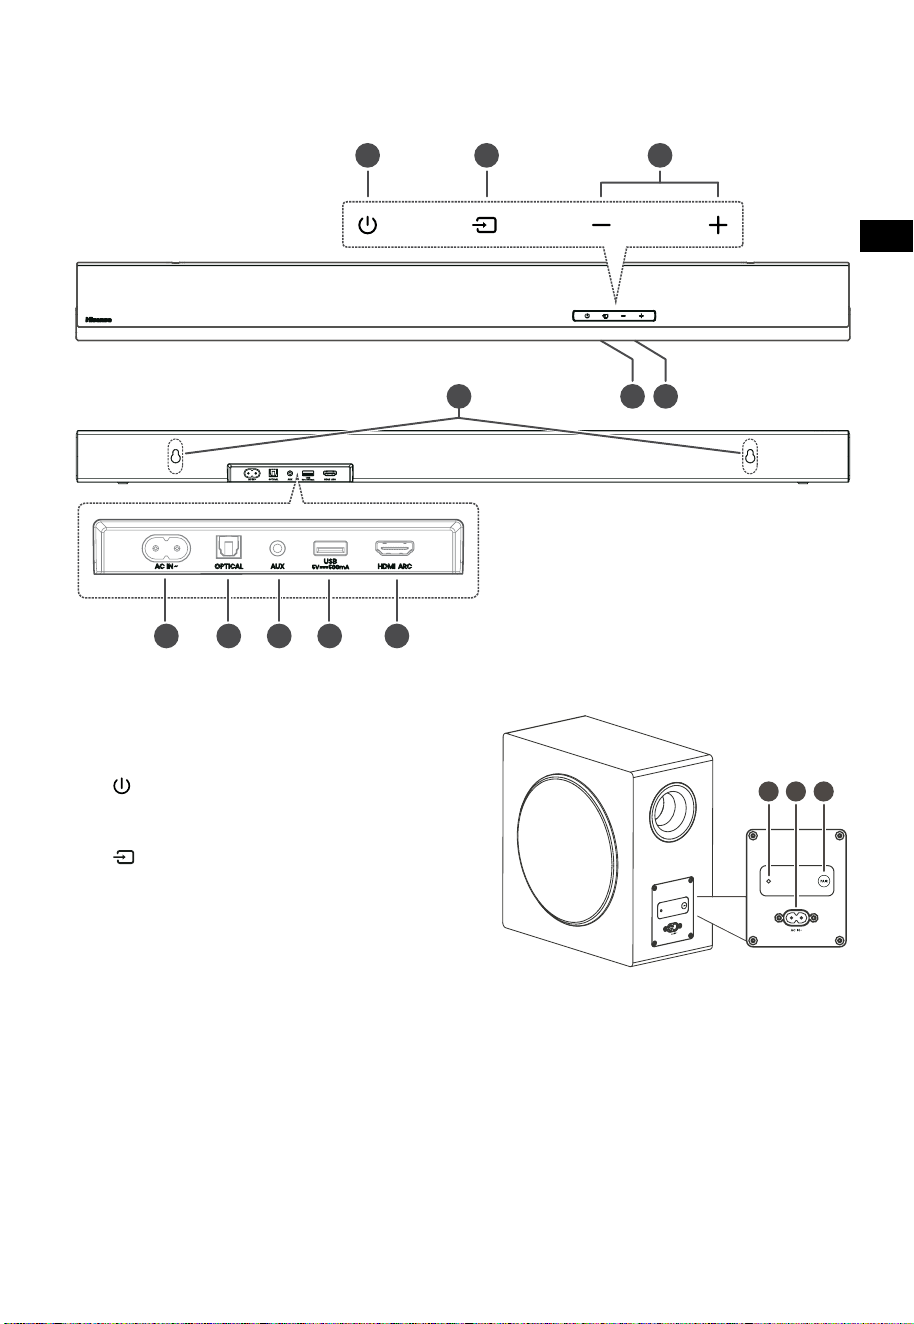
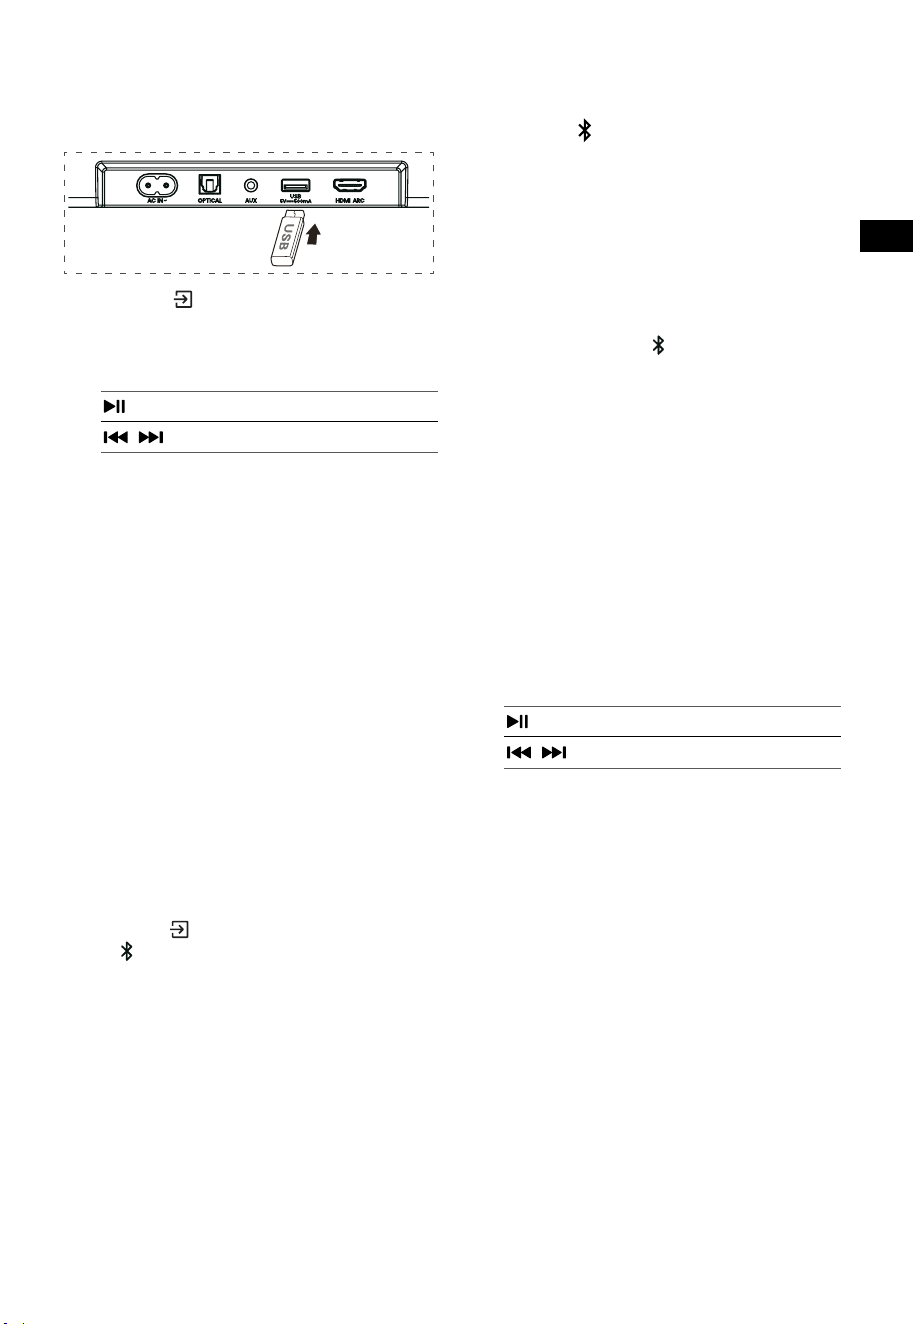
3. Identifying the Parts
3.1 Soundbar
1 Remote Control Sensor
Receive signal from the remote control.
2 Display Window
Show the current status.
3
(ON/OFF) button
Switch the soundbar between ON and
Standby mode.
4 (SOURCE) button
Select the play function.
5
+/-(
VOL) buttons
Increase/decrease the volume level.
6 Wall bracket screws
7 AC~ Socket
Use to connect the power cable.
8 OPTICAL Socket
Connect to an optical audio output on the
TV.
9 AUX Socket
Connect to an external audio device.
10 USB Socket
Insert the USB device to play music.
11 HDMI ARC Socket
Connect to a TV via HDMI cable.
3.2 Wireless Subwoofer
1 Pairing Indicator
Light stops blinking once the subwoofer is
paired with the soundbar.
2 AC IN~ Socket
Use to connect the power cable.
3 PAIR button
Press activate the pairing function between
the soundbar and subwoofer.
EN
6
3 4 5
TOP
BACK
3. Identifying the Parts
3.1 Soundbar
1 Remote Control Sensor
Receive signal from the remote control.
2 Display Window
Show the current status.
3
(ON/OFF) button
Switch the soundbar between ON and
Standby mode.
4 (SOURCE) button
Select the play function.
5
+/-(
VOL) buttons
Increase/decrease the volume level.
6 Wall bracket screws
7 AC~ Socket
Use to connect the power cable.
8 OPTICAL Socket
Connect to an optical audio output on the
TV.
9 AUX Socket
Connect to an external audio device.
10 USB Socket
Insert the USB device to play music.
11 HDMI ARC Socket
Connect to a TV via HDMI cable.
3.2 Wireless Subwoofer
1 Pairing Indicator
Light stops blinking once the subwoofer is
paired with the soundbar.
2 AC IN~ Socket
Use to connect the power cable.
3 PAIR button
Press activate the pairing function between
the soundbar and subwoofer.
7
11
10
12
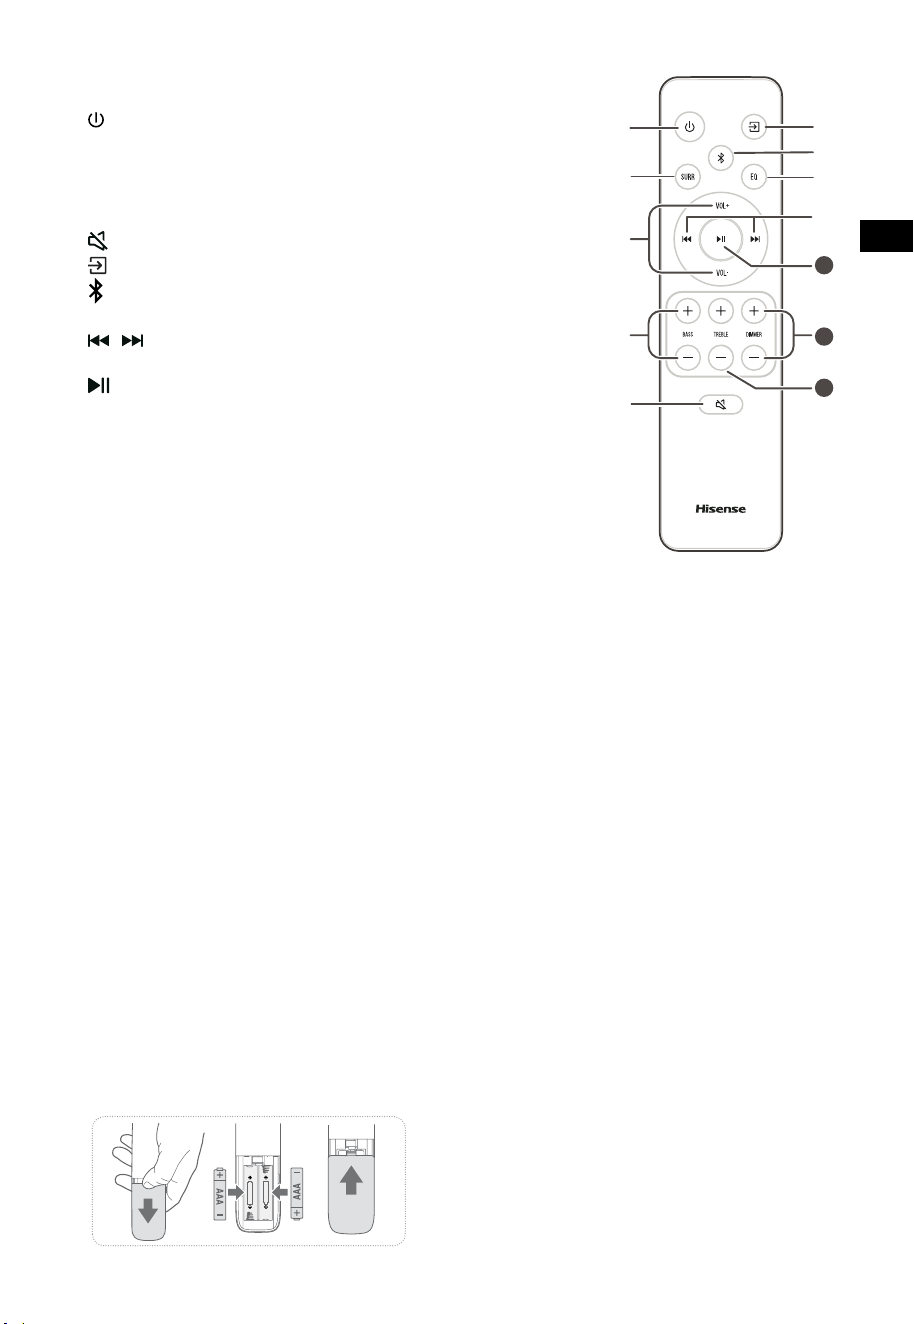
3.3 Remote Control
1 Switch the soundbar between ON and
STANDBY mode.
2 SURR Adjust the surround ON/OFF.
3 VOL
+
/VOL
-
Increase/decrease the volume level.
4 BASS
+
/
-
Adjust bass level.
5
(MUTE) Mute or resume the sound.
6
button Select the play function.
7
Select the Bluetooth mode.
8 EQ Select a preset sound eect.
9
/ Skip to previous/next track in
Bluetooth/USB mode.
10
Play/pause/resume playback in
Bluetooth/USB mode. Press and hold to
activate the pairing function in
Bluetooth mode or disconnect the
existing paired Bluetooth device.
11 DIMMER
+
/
-
Adjust LED brightness.
12 TREBLE
+
/
-
Adjust treble level.
4. Preparations
4.1 Prepare the Remote Control
The provided Remote Control allows the soundbar
to be operated from a distance.
•
Even if the Remote Control is operated within
the effective range 19.7 feet (6m), remote
control operation may be impossible if there
are any obstacles between the soundbar and
the remote control.
•
If the Remote Control is operated near other
products which generate infrared rays, or
if other remote control devices using infra-
red rays are used near the soundbar, it may
operate incorrectly. Conversely, the other
products may operate incorrectly.
4.2 Replace the Remote Control Battery
1 Press and slide the back cover to open the
battery compartment of the remote control.
2 Insert two AAA size batteries (included). Make
sure the (+) and (–) ends of the batteries match
the (+) and (–) ends indicated in the battery
compartment.
3 Close the battery compartment cover.
Precautions Concerning Batteries
• Be sure to insert the batteries with correct
positive “
” and negative “
” polarities.
• Use batteries of the same type. Never use
dierent types of batteries together.
• Either rechargeable or non-rechargeable
batteries can be used. Refer to the
precautions on their labels.
• Be aware of your ngernails when removing
the battery cover and the battery.
• Do not drop the remote control.
• Do not allow anything to impact the remote
control.
• Do not spill water or any liquid on the remote
control.
• Do not place the remote control on a wet
object.
• Do not place the remote control under direct
sunlight or near sources of excessive heat.
• Remove the battery from the remote control
when not in use for a long period of time,
as corrosion or battery leakage may occur
and result in physical injury, and/or property
damage, and/or re.
• Do not use any batteries other than those
specied.
• Do not mix new batteries with old ones.
• Never recharge a battery unless it is
conrmed to be a rechargeable type.

EN
8
1
2
3
670 mm / 26.4”
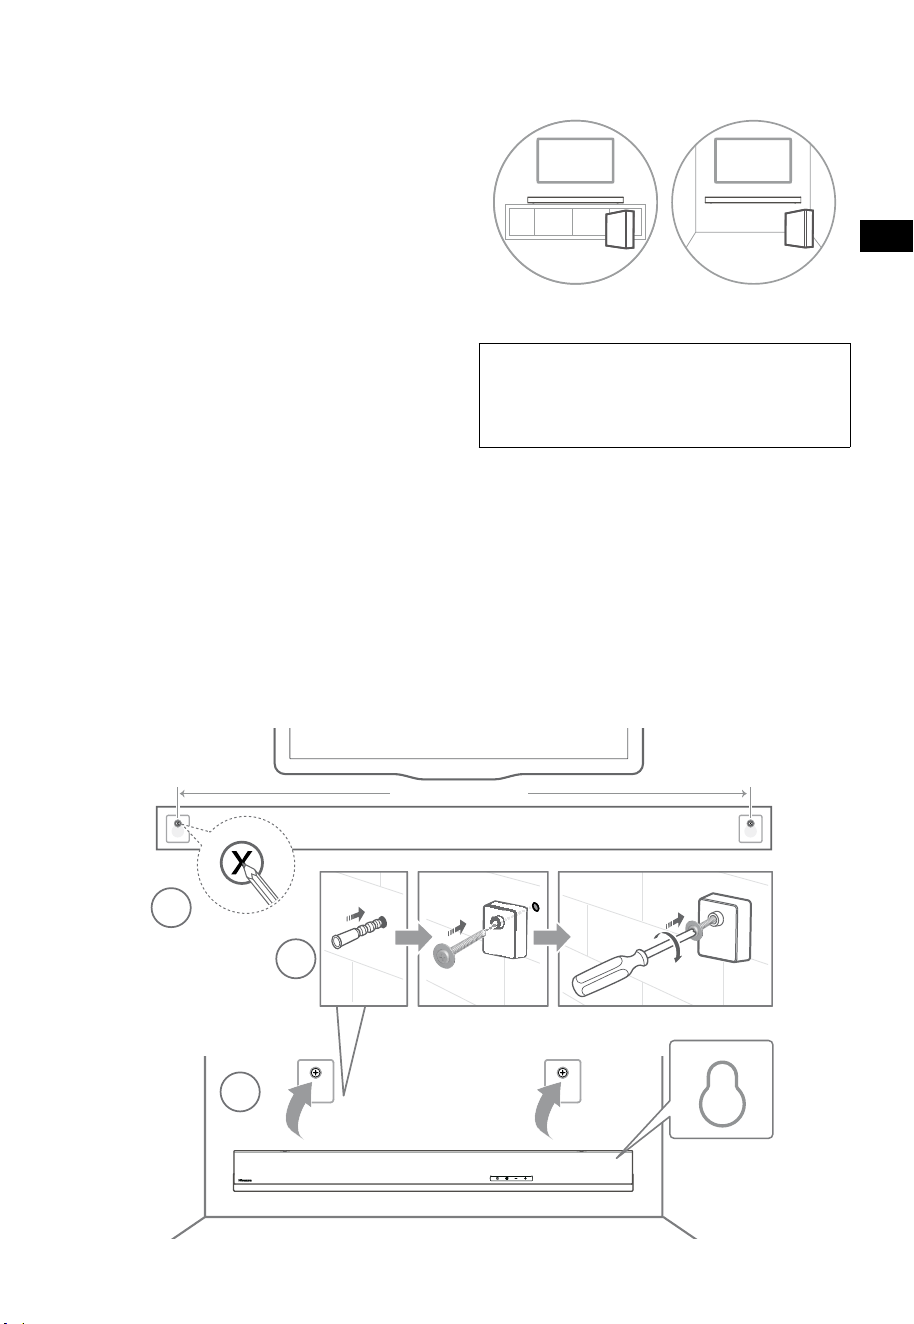
5. Placement and Mounting
5.1 Placement
A If your TV is placed on a table, you can place
the soundbar on the table directly in front of
the TV stand, centered with the TV screen.
B If your TV is attached to a wall, you can
mount the soundbar on the wall directly
below the TV screen.
5.2 Wall Mounting (if using option-B)
- Installation must be carried out by qualied
personnel only. Incorrect assembly can
result in severe personal injury and property
damage (if you intend to install this product
yourself, you must check for installations
such as electrical wiring and plumbing
that may be buried inside the wall). It is the
installer’s responsibility to verify that the
wall will safely support the total load of the
soundbar and wall brackets.
- Additional tools (not included) are required
for the installation.
- Do not overtighten screws.
- Keep this instruction manual for future
reference.
- Use an electronic stud finder to check the
wall type before drilling and mounting.
WARNING
• To prevent injury, this apparatus must be securely
attached to the oor/wall in accordance with the
installation instructions.
• Suggested wall mounting height: ≤ 1.5 meters.
1. Drill 2 parallel holes (Ø 5.5-6 mm each
according to wall type) in the wall. The
distance between the holes should be 670
mm.
2. Insert the supplied wall anchors into 2 screw
holes on the wall. Insert the supplied wall
bracket screws through the wall brackets into
the wall anchors. Fix and tighten the screws
on the wall.
3. Hang the unit on the wall mount brackets.
AB
EN
8
1
2
3
670 mm / 26.4”
5. Placement and Mounting
5.1 Placement
A If your TV is placed on a table, you can place
the soundbar on the table directly in front of
the TV stand, centered with the TV screen.
B If your TV is attached to a wall, you can
mount the soundbar on the wall directly
below the TV screen.
5.2 Wall Mounting (if using option-B)
- Installation must be carried out by qualied
personnel only. Incorrect assembly can
result in severe personal injury and property
damage (if you intend to install this product
yourself, you must check for installations
such as electrical wiring and plumbing
that may be buried inside the wall). It is the
installer’s responsibility to verify that the
wall will safely support the total load of the
soundbar and wall brackets.
- Additional tools (not included) are required
for the installation.
- Do not overtighten screws.
- Keep this instruction manual for future
reference.
- Use an electronic stud finder to check the
wall type before drilling and mounting.
WARNING
• To prevent injury, this apparatus must be securely
attached to the oor/wall in accordance with the
installation instructions.
• Suggested wall mounting height: ≤ 1.5 meters.
1. Drill 2 parallel holes (Ø 5.5-6 mm each
according to wall type) in the wall. The
distance between the holes should be 670
mm.
2. Insert the supplied wall anchors into 2 screw
holes on the wall. Insert the supplied wall
bracket screws through the wall brackets into
the wall anchors. Fix and tighten the screws
on the wall.
3. Hang the unit on the wall mount brackets.
AB
9
6. Connections
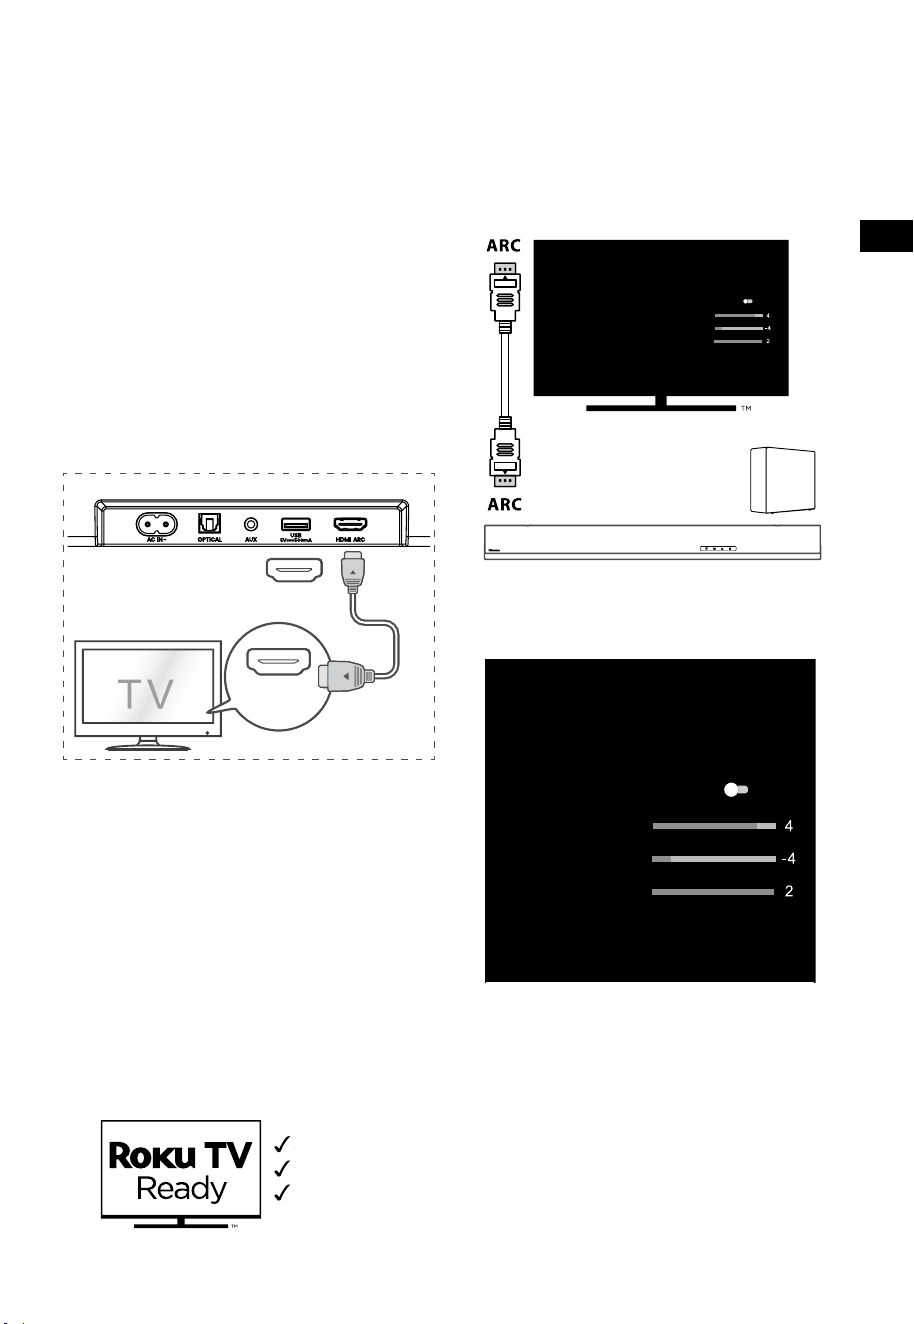
6.1 Use the HDMI ARC Socket
The ARC (Audio Return Channel) function allows
you to send audio from your ARC- compliant TV to
your soundbar through a single HDMI connection.
To enjoy the ARC function, please ensure your
TV is both HDMI-CEC and ARC compliant and set
up accordingly. When correctly set up, you can
use your TV remote control to adjust the volume
output (VOL
+
/
-
and MUTE) of the soundbar.
• Connect the HDMI cable from soundbar
HDMI ARC socket to the HDMI ARC socket
on your ARC compliant TV. Then press the
remote control to select HDMI ARC.
56:/)'2
.*3/'8)
56:/)'2
.*3/
'8)
.KGJVNUTK
BA
Tips:
• Your TV must support the HDMI-CEC and
ARC function. HDMI-CEC and ARC must be
set to On.
• The setting method of HDMI-CEC and ARC
may differ depending on the TV. For details
about ARC function, please refer to the
owner’s manual.
• Only HDMI 1.4 or higher version cable can
support the ARC function.
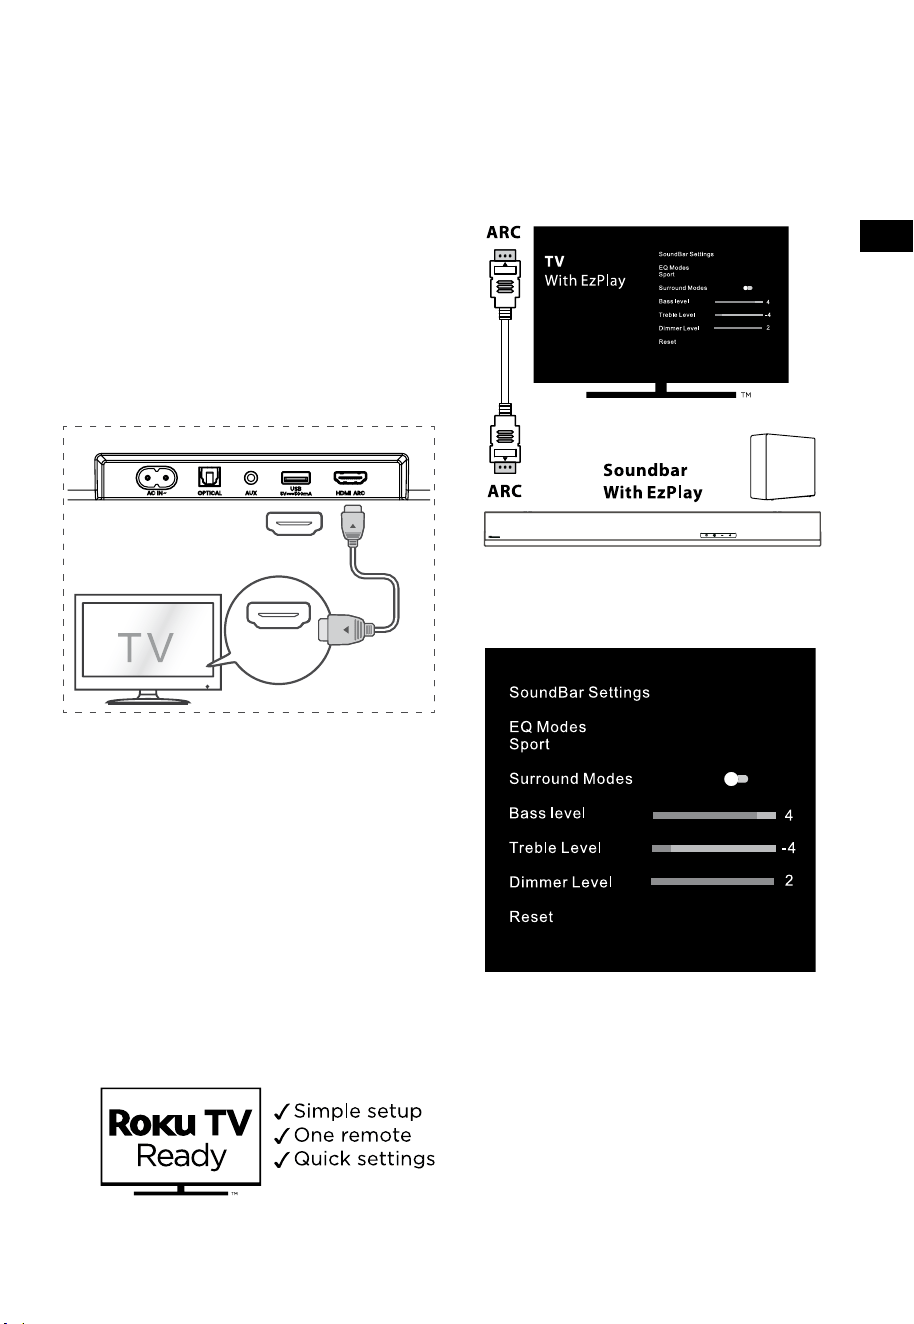
6.2 Use the Roku TV
• If you have a Roku TV™, simply plug in the
HDMI cable to the ARC ports and follow the
Roku TV Ready™ on-screen instructions.
6.3 Use the Hisense EzPlay Function
For Hisense EzPlay, when the Soundbar connects
with a Hisense TV via HDMI ARC, the will be a
Soundbar Setting menu on the TV, and you can
control this menu via you TV remote to control
most of the Soundbar features.
TV menu example (different models may have
dierent menus) :
Setting--sound--Soundbar Setting.
Note:
• This function is available only when both
Soundbar and TV support Hisense Ezplay.
• This function requires Soundbar and TV
connected via HDMI ARC, and the CEC of the
TV must be trned ON.
• If everytime setting right, for the first time
connect, there would be a tip on the TV
screen to guide you find the Soundbar
setting menu.
EN
10
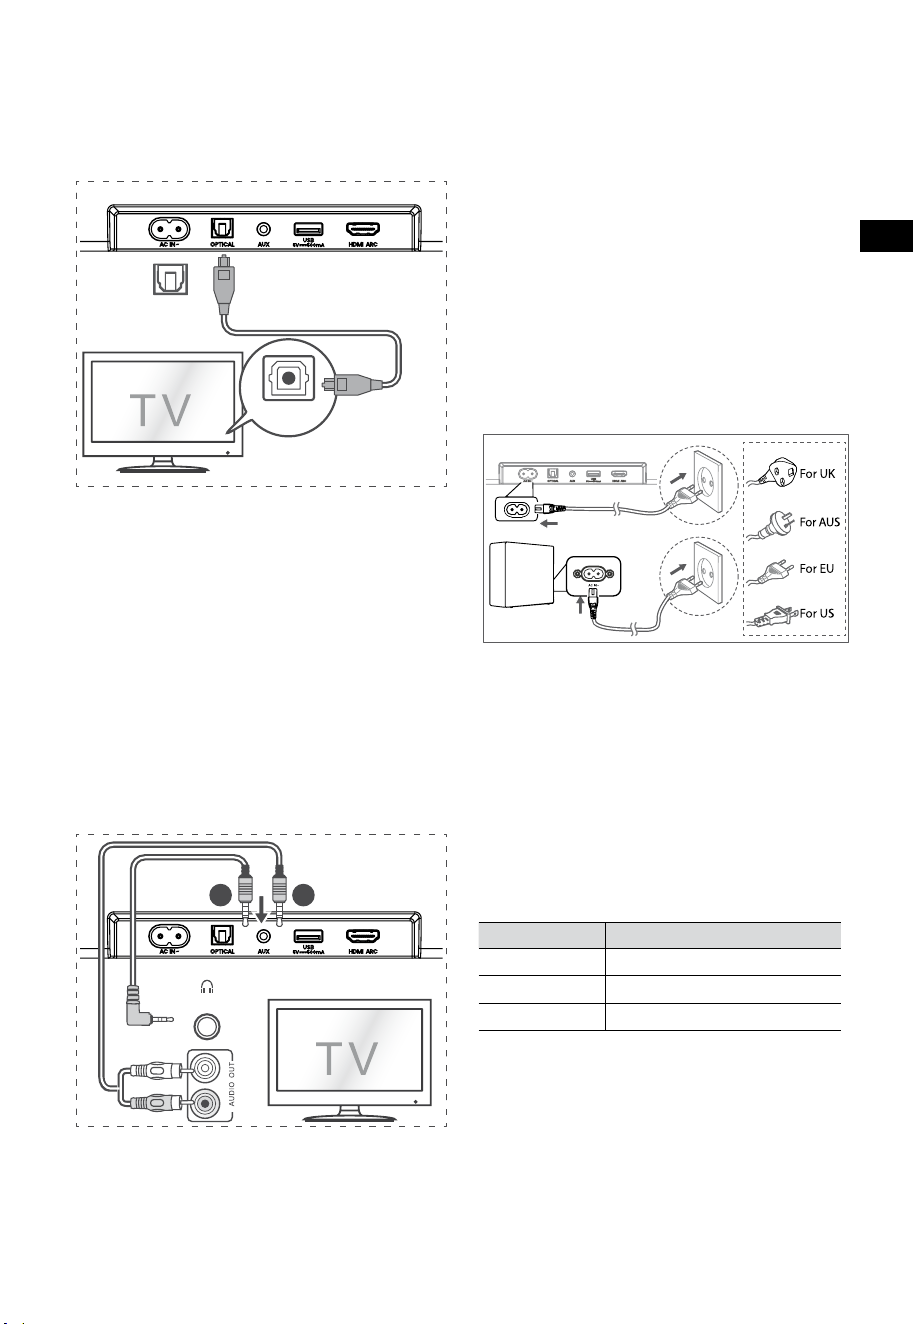
6.4 Use the OPTICAL Socket
- Use the OPTICAL cable to connect the TV’s
OPTICAL OUT socket and the OPTICAL
socket on the soundbar.
56:/)'2
.*3/'8)
56:/)'2
.*3/
'8)
.KGJVNUTK
BA
Tip:
The Soundbar may not be able to decode all
digital audio formats from the input source. In this
case, the Soundbar will mute. This is NOT a defect.
Ensure that the audio setting of the input source
(e.g. TV, game console, DVD player, etc.) is set to
PCM or Dolby Digital (Refer to the user manual
of the input source device for its audio setting
details) with HDMI ARC / OPTICAL input.
6.5 Use the AUX Socket
A. Use a 3.5mm to 3.5mm audio cable to connect
the TV’s or external audio device headphone
socket to the AUX socket on the soundbar.
56:/)'2
.*3/'8)
56:/)'2
.*3/
'8)
.KGJVNUTK
BA
B. Use a RCA to 3.5mm audio cable to connect
the TV’s audio output sockets to the AUX
socket on the soundbar.
6.6 Connect Power
Risk of product damage!
• Risk of product damage! Ensure that the power
supply voltage corresponds to the voltage printed
on the back or the underside of the soundbar.
• Before connecting the AC power cord, ensure
you have completed all other connections.
• Soundbar
Connect the mains cable to the AC~ socket of
the soundbar and then into a mains socket.
• Subwoofer
Connect the mains cable to the AC~ socket
of the subwoofer and then into a mains
socket.
* Power cord quantity and plug very by regions.
7. Pa
ir u
p with the Subwoofer
7.1 Automatic pairing
The subwoofer and soundbar will automatically
pair when both units are plugged into the mains
sockets and turned on. No cable is needed for
connecting the two units.
• Determine the status based on the wireless
subwoofer indicator.
LED State Status
Fast blink
Subwoofer in pairing mode
Constant on
Connected / Pairing successful
Slow blink
Connection / Pairing Failed
NOTE:
- Do not press the PAIR button on the rear of
the subwoofer, except for manual pairing.
- If the automatic pairing fails, pair the
subwoofer with the soundbar manually.

EN
10
6.4 Use the OPTICAL Socket
- Use the OPTICAL cable to connect the TV’s
OPTICAL OUT socket and the OPTICAL
socket on the soundbar.
56:/)'2
.*3/'8)
56:/)'2
.*3/
'8)
.KGJVNUTK
BA
Tip:
The Soundbar may not be able to decode all
digital audio formats from the input source. In this
case, the Soundbar will mute. This is NOT a defect.
Ensure that the audio setting of the input source
(e.g. TV, game console, DVD player, etc.) is set to
PCM or Dolby Digital (Refer to the user manual
of the input source device for its audio setting
details) with HDMI ARC / OPTICAL input.
6.5 Use the AUX Socket
A. Use a 3.5mm to 3.5mm audio cable to connect
the TV’s or external audio device headphone
socket to the AUX socket on the soundbar.
56:/)'2
.*3/'8)
56:/)'2
.*3/
'8)
.KGJVNUTK
BA
B. Use a RCA to 3.5mm audio cable to connect
the TV’s audio output sockets to the AUX
socket on the soundbar.
6.6 Connect Power
Risk of product damage!
• Risk of product damage! Ensure that the power
supply voltage corresponds to the voltage printed
on the back or the underside of the soundbar.
• Before connecting the AC power cord, ensure
you have completed all other connections.
• Soundbar
Connect the mains cable to the AC~ socket of
the soundbar and then into a mains socket.
• Subwoofer
Connect the mains cable to the AC~ socket
of the subwoofer and then into a mains
socket.
* Power cord quantity and plug very by regions.
7. Pa
ir u
p with the Subwoofer
7.1 Automatic pairing
The subwoofer and soundbar will automatically
pair when both units are plugged into the mains
sockets and turned on. No cable is needed for
connecting the two units.
• Determine the status based on the wireless
subwoofer indicator.
LED State Status
Fast blink
Subwoofer in pairing mode
Constant on
Connected / Pairing successful
Slow blink
Connection / Pairing Failed
NOTE:
- Do not press the PAIR button on the rear of
the subwoofer, except for manual pairing.
- If the automatic pairing fails, pair the
subwoofer with the soundbar manually.
11
7.2 Manual pairing
1. Ensure that all the cables are well connected
and the soundbar is in Standby mode.
2. Press and hold the PAIR button on the rear
of the subwoofer for a few seconds. The
subwoofer will enter the pairing mode and
the Pair Indicator will blink quickly.
3. Press the
button on the soundbar or on the
remote control to switch the soundbar on.
4. Press and hold the
button on the Soundbar
or on the remote control for a few seconds.
5. After the wireless connection succeeded, the
Pair Indicator will light up.
6. If the Pair indicator blinks, the wireless
connection has failed. Unplug the cable of
the subwoofer and then reconnect the main
cable after 4 minutes. Repeat step 1 ~ 4.
NOTE:
• If the wireless connection fails again, check
if there is conict or strong interference (for
example, interference from an electronic
device) around your location. Remove these
conflicts or strong interferences and repeat
the above procedures.
• The subwoofer should be within 6m (19.7 feet)
of the soundbar in an open area.
• If the soundbar is not connected with the
subwoofer and it is in On mode, the POWER
Indicator will flash. Follow step 1 ~ 4 above
to pair the subwoofer to the soundbar.
8. Basic Operation
8.1 Standby/ON
It will automatically turn on when the power cord
is connected.
• Press the
button to switch the soundbar
STANDBY mode.
• Disconnect the mains plug from the mains
socket if you want to switch the soundbar
OFF completely.
8.2 Auto-Standby / Auto-Wake Feature
[Auto-Standby] Your soundbar has been
programmed to enter STANDBY mode
automatically when no audio is detected for 15
minutes. For example, this would happen when
pausing playback, or should the soundbar be left
on accidentally.
[Auto-Wake] If a TV or an external device is
connected (AUX / OPTICAL / HDMI ARC mode), the
unit will switch on automatically when the TV or
the external device is switched on.
To disable this feature, please follow the steps
below:
1. During ON mode, press and hold the
button for 3 seconds to open the menu.
- The unit’s display will scroll “MENU”.
2. Press the
button 6 times in succession:
the display shows: Auto Wake [ON / OFF].
or Press the
button 7 times in succession:
the display shows: Auto Standby [ON / OFF].
3. Select the content with VOL+ /
–
buttons on
the remote control, and then press the
button to conrm your selection and exit the
settings.
• Repeating these steps will toggle the feature
"ON" and "OFF".
EN
12
8.3 Select Modes
Press the (SOURCE) button repeatedly on the
soundbar or on the remote control to select the
AUX,
, OPTICAL, HDMI ARC and USB mode. The
selected mode will show on the display.
• The selected mode will show on the display.
Display Mode
arc
HDMI ARC
Opt
OPTICAL
BT IN
NO BT
Bluetooth
Connected
Not Connected
AUX
AUX
U5B
NO U5B
USB
No USB connected
8.4 Adjust the Volume
• Press the VOL
+
/
-
buttons on the soundbar
or on the remote control to adjust the
volume.
• If you wish to turn the sound o, press the
(MUTE) button on the remote control. Press
the
(MUTE) button again or press the
VOL
+
button to resume normal listening.
8.5 Turn the Surround Sound ON/OFF
• Press the SURR button on the remote control
to turn on the surround sound. Press this
button again to turn o the surround sound.
8.6 Adjust the Bass/Treble
• Press the BASS
+
/
-
buttons on the remote
control to adjust bass level.
• Press the TREBLE
+
/
-
buttons on the
remote control to adjust treble level.
8.7 Select Equalizer (EQ) Eect
• While playing, press the EQ button on the
remote control to select desired preset
equalizers: MOVIE, MUSIC, GAME, NEWS,
SPORT, NIGHT.
8.8 Adjust the Brightness
• Press the DIMMER
+
/
-
buttons on the
remote control to select brightness level.
8.9 Factory reset
Reset device to default setting.
• Switch the soundbar on the optical mode,
press and hold the
button on the
soundbar, the soundbar will enter factory
reset mode and turn to standby state.
MODE DEFAULT
SOURCE ARC
Volume 30
Surround O
Dimmer MAX
Bass 0
Treble 0
EQ MOVIE
Auto Wake OFF
Auto Standby ON (Except the United States)
9. AUX / OPTICAL / HDMI ARC
Operation
1 Ensure that the soundbar is connected to the
TV or audio device.
2 Press the
(SOURCE) button repeatedly on
the soundbar or on the remote control to
select the AUX, OPTICAL, HDMI ARC mode.
The selected mode will show on the display.
3 Operate your audio device directly for
playback features.
4 Press the VOL
+
/
-
buttons to adjust the
volume to your desired level.
Tip: The Soundbar may not be able to decode all
digital audio formats from the input source. In this
case, the Soundbar will mute. This is NOT a defect.
Ensure that the audio setting of the input source
(e.g. TV, game console, DVD player, etc.) is set to
PCM or Dolby Digital (Refer to the user manual
of the input source device for its audio setting
details) with HDMI ARC / OPTICAL input.
13
10. USB Operation
1 Insert the USB device.
2 Press the (SOURCE) button repeatedly on
the soundbar or on the remote control to
select the USB mode.
3 During playback:
Start, pause or resume play
,
Skip to the previous or next track
Tips:
• The unit can support USB devices with up to
32 GB of memory.
• This unit can play WAV / WMA / MP3 / FLAC.
• This product may not be compatible with
certain types of USB storage devices.
• If you use a USB extension cable, USB hub,
or USB Multifunctional card reader, the USB
storage device may not be recognized.
• Do not remove the USB storage device while
reading les.
11. Bluetooth® Operation
Through Bluetooth, connect the Soundbar with
your Bluetooth device (such as an iPad, iPhone,
iPod touch, Android phone, or laptop), and then
you can listen to the audio files stored on the
device through your Soundbar speakers.
First time pairing
1 Press the (SOURCE) button on the soundbar
or
button on the remote control to select
Bluetooth® mode.
• The display will show NO BT.
2 Activate your Bluetooth device and select
the search mode.
3 Select “Hisense HS3100” in the pairing
list. After audio prompt, the system is
successfully connected and and the display
will show BT IN.
• If you want to connect your soundbar
with another Bluetooth device, press and
hold the
button on the remote control
to disconnect the currently connected
Bluetooth device. Follow step 2-3 to pair
your Bluetooth device.
To disconnect the Bluetooth function, you
can :
- Switch to another function on the unit.
- Disable the function from your Bluetooth
device.
- Press and hold the
button on the remote
control.
Listen to music from Bluetooth Device
- If the connected Bluetooth device supports
Advanced Audio Distribution Prole (A2DP),
you can listen to the music stored on the
device through the player.
- If the device also supports Audio Video
Remote Control Prole (AVRCP), you can use
the player's remote control to play music
stored on the device.
1. Pair your device with the player.
2. Play music via your device (if it supports A2DP).
3. Use supplied remote control to control play
(if it supports AVRCP).
Start, pause or resume play
,
Skip to the previous or next track
Tips:
• The operational range between the Sound
Bar and the device is approximately 8 metres.
• Before connecting a Bluetooth® device to
the Sound Bar, ensure you know the device’s
capabilities.
• Compatibility with all Bluetooth® devices is
not guaranteed.
• Any obstacle between the device and the
Sound Bar can reduce operational range.
• Keep this player away from other electronic
devices that may cause interference.
• The player will also be disconnected when your
device is moved beyond the operational range.
EN
14
12. Setup Menu
1. During ON mode, press and hold the
button for 3 seconds to open the menu.
2. Select the content with the
/ buttons.
3. Change the initial values for each of the settings
with VOL
+
/
-
buttons.
4. Press the
button to conrm your selection
and exit the settings.
• If no button is pressed within 10 seconds, the
system will automatically exit the menu.
Display
/
Description
VOL
+
/
-
MOVIE
Select Equalizer (EQ) eect
(MOVIE, MUSIC, GAME, NEWS,
SPORT, NIGHT)
5UR OFF
Switch Surround Sound
ON / OFF
BA5 O
Adjust the Bass Level
TRE O
Adjust the Treble Level
DIM 3
Adjust the Brightness
DIM 0 / DIM 1 / DIM 2 / DIM 3
AUTO WAKE OFF
Switch Auto Wake
ON / OFF
AUTO 5TANDBY ON
Switch Auto Standby
ON / OFF
BA55BOO5T ON
Switch: BassBoost
ON / OFF
13. DEMO Mode
DEMO mode is a user mode specially congured
for use in a Shop environment.
Activate / Deactivate the DEMO mode:
This Soundbar factory defaults to the ordinary
consumer mode.
• Insert the Demo Kit to activate the DEMO
mode.
• Remove the Demo Kit to deactivate the
DEMO mode.
• The soundbar will display the following as
follows:
Display Mode
DEMO ON DEMO mode
DEMO OFF Consumer mode
Use the DEMO mode
1. Enter the DEMO mode, the soundbar will switch
on automatically when the AC power on.
2. Lock source (
Unavailable). You can select
source only through the Demo Kit.
3. All keys will be locked and unavailable. You
can controlled only by Demo Kit.
All keys Locked
(Remote control & Bar)
Default
Demo
Kite
X
(SOURCE)
X
Lock Source
√
+
(Vol+)
X √
-
(Vol-)
X √
SURR
X
ON
(BT)
X
EQ
X
MOVIE
/
X
If in BT mode
√
X
If in BT mode
√
BASS
+
/
-
X
TREBLE
+
/
-
X
DIMMER
+
/
-
X
DIM 3
(MUTE)
X
AutoStandby
OFF
AutoWake
OFF
* When press the (X) unavailable keys, the
soundbar will show "
DEMO ON
".
15
14. Troubleshooting
To keep the warranty valid, never try to repair the system yourself. If you encounter problems when using
this soundbar, check the following points before requesting service.
Problem Solution
No power • Ensure that the AC cord of the apparatus is properly connected .
• Ensure that there is power at the AC outlet.
• Press
(standby) button to turn the soundbar on.
Remote control does not
work
• Before you press any playback control button, rst select the correct
source.
• Reduce the distance between the remote control and the soundbar.
• Insert the battery with its polarities (
+
/
-
) aligned as indicated.
• Replace the battery.
• Aim the remote control directly at the sensor on the front of the
soundbar.
No sound • Make sure that the soundbar is not muted. Press MUTE or
+
(VOL)
button to resume normal listening.
• Press
button on the soundbar or on the remote control to switch the
soundbar to standby mode. Then press the button again to switch the
soundbar on.
• Unplug both the soundbar and the subwoofer from the mains socket,
then plug them again. Switch on the soundbar.
• Ensure the audio setting of the input source (e.g. TV, game console, DVD
player, etc.) is set to PCM or Dolby Digital mode while using digital (e.g.
HDMI, OPTICAL) connection.
• The subwoofer is out of range, please move the subwoofer closer to the
soundbar. Make sure the subwoofer is within 5 m of the soundbar (the
closer the better).
• The soundbar may have lost connection with the subwoofer. Re-
pair the units by following the steps on the section “Pair up with the
Subwoofer”.
• The soundbar may not be able to decode all digital audio formats from
the input source.
TV has display problem
while viewing HDR
content from HDMI
source.
• Some 4K HDR TVs require the HDMI input or picture settings to be set for
HDR content reception. For further setup details on HDR display, please
refer to the instruction manual of your TV.
I can’t nd the Bluetooth
name of this soundbar on
my Bluetooth device for
Bluetooth pairing
• Ensure the Bluetooth function is activated on your Bluetooth device.
• Ensure you have paired the soundbar with your Bluetooth device.
• The soundbar has a Bluetooth® function that can receive a signal within
8 metres. Keep a distance within 8 metres between the soundbar and
your Bluetooth® device.
This is a 15 mins power
o function, one of
the ERPII standard
requirement for saving
power
• When the unit's external input signal level is too low, the soundbar will
be turned o automatically in 15 minutes. Please increase the volume
level of your external device.
EN
16
15. Specications
Brand Hisense
Model HS3100
Soundbar
Power Supply 100-240V~ 50/60Hz
Power Consumption
50 W
< 0.5 W (StandBy)
USB
5V
500mA
Hi-Speed USB (2.0) / FAT32 / FAT16
32G (max) , WAV / WMA / MP3 / FLAC.
Dimension (WxHxD) 902 x 62.3 x 91 mm / 35.5" x 2.4" x 3.6"
Net weight 1.6 kg / 3.5 lbs
Audio input sensitivity 500mV
Frequency Response 120Hz - 20KHz
Operating Temperature 0°C - 45°C
Subwoofer
Power Supply 100-240V~ 50/60Hz
Power Consumption
40 W
< 0.5 W (StandBy)
Dimension (WxHxD) 161 x 303 x 304.5 mm / 6.3" x 11.9" x 12"
Net weight 3.6 kg / 7.9 lbs
Frequency Response 40Hz - 150Hz
Wireless Specication
Bluetooth version / proles
Bluetooth frequency range
Bluetooth Max. transmitting power
V 5.3 (A2DP, AVRCP)
2400 MHz ~ 2483.5 MHz
≤ 5 dBm
2.4G Wireless frequency range
2.4G Max. transmitting power
2400 MHz ~ 2483 MHz
≤ 6 dBm
Modulation Type GFSK, π/4 DQPSK
Amplier (Max audio power)
Total 480 W
Soundbar 300 W
Subwoofer 180 W
Remote Control
Distance/Angle 19.7 feet (6m) / 30°
Battery type AAA (1.5V x 2)
• Design and specications are subject to change without notice.

Avant d'utiliser la barre de son, veuillez lire attentivement ce manuel et le
conserver pour référence ultérieure.
MANUEL D'UTILISATION
Barre de son 3.1CH avec caisson de basse sans fil
Modèle: HS3100
FR

2
FR
Table des matières
1. Consignes de sécurité ...................................................................................................................... 3
1.1 Sécurité ..................................................................................................................................................................................................... 3
1.2 Attention ..................................................................................................................................................................................................4
1.3 Avertissement ........................................................................................................................................................................................4
2. Contenu de la boîte .......................................................................................................................... 5
3. Identification des pièces .................................................................................................................. 6
3.1 Barre de son ...........................................................................................................................................................................................6
3.2 Caisson de basse sans fil .....................................................................................................................................................................6
3.3 Télécommande ......................................................................................................................................................................................7
4. Préparatifs......................................................................................................................................... 7
4.1 Préparer la télécommande ................................................................................................................................................................7
4.2 Remplacer les piles de la télécommande.....................................................................................................................................7
5. Placement et montage ..................................................................................................................... 8
5.1 Position .....................................................................................................................................................................................................8
5.2 Montage mural de la barre de son .................................................................................................................................................8
6. Connexions ....................................................................................................................................... 9
6.1 Utiliser la prise HDMI ARC .................................................................................................................................................................. 9
6.2 Télévision en direct ..............................................................................................................................................................................9
6.3 Utiliser la fonction Hisense EzPlay ..................................................................................................................................................9
6.4 Utiliser la prise OPTICAL .................................................................................................................................................................. 10
6.5 Utiliser la prise AUX ...........................................................................................................................................................................10
6.6 Branchement électrique.................................................................................................................................................................. 10
7. Appariement avec le caisson de basse ......................................................................................... 10
7.1 Association automatique ................................................................................................................................................................10
7.2 Association manuelle ....................................................................................................................................................................... 11
8. Fonctionnement de base ............................................................................................................... 11
8.1 Veille/MARCHE .................................................................................................................................................................................... 11
8.2 Fonction de mise en veille automatique/réveil automatique ........................................................................................... 11
8.3 Sélection des modes......................................................................................................................................................................... 12
8.4 Réglage du volume ........................................................................................................................................................................... 12
8.5 Activer/désactiver le son surround .............................................................................................................................................12
8.6 Régler les graves et les aigus ......................................................................................................................................................... 12
8.7 Sélectionnez l’effet égaliseur (EQ) ...............................................................................................................................................12
8.8 Réglez la luminosité .......................................................................................................................................................................... 12
8.9 Réinitialisation d’usine ..................................................................................................................................................................... 12
9. Fonctionnement AUX/OPTIQUE/HDMI ARC ................................................................................. 12
10. Fonctionnement USB ..................................................................................................................... 13
11. Fonctionnement avec source Bluetooth® ..................................................................................... 13
12. Menu Paramétrage ......................................................................................................................... 14
13. Mode DÉMO .................................................................................................................................... 14
14. Dépannage...................................................................................................................................... 15
15. Spécifications ................................................................................................................................. 16
3
FR
AVIS
RISQUE DE CHOC
ÉLECTRIQUE NE PAS OUVRIR
Le symbole éclair avec une flèche dans un
triangle équilatéral est destiné à alerter
l’utilisateur de la présence d’une tension
dangereuse non isolée dans le capot
du produit qui peut être d’une ampleur
suffisante pour constituer un risque de
décharge électrique pour les personnes.
Le point d’exclamation dans un triangle
équilatéral est destiné à alerter l’utilisateur
de la présence d’instructions importantes
d’utilisation et de maintenance dans la
documentation accompagnant l’appareil.
1.1 Sécurité
1 Lisez ces instructions – Toutes les consignes
de sécurité et de fonctionnement doivent
être lues avant d’utiliser ce produit.
2 Conservez ces instructions – Les
instructions de sécurité et de fonctionnement
doivent être conservées pour référence
ultérieure.
3 Respectez tous les avertissements - Tous
les avertissements sur cet appareil et dans
les instructions d’utilisation doivent être
respectées.
4 Suivez toutes les instructions – Toutes les
instructions et consignes d’utilisation doivent
être suivies.
5 N’utilisez pas cet appareil près de l’eau
– L’appareil ne doit jamais être utilisé près
de l’eau ou de l’humidité, tel que dans un
sous-sol humide ou près d’une piscine ou
similaires.
6 Nettoyez l’appareil uniquement à l’aide
d’un chiffon sec.
7 Ne bloquez pas les ouvertures de
ventilation. Installez l’appareil en suivant les
instructions du fabricant.
8 Ne placez pas l’appareil près d’une source de
chaleur, tels que des radiateurs, des bouches
d’air chaud, des gazinières ou tout autre
appareil (y compris des amplificateurs) qui
produisent de la chaleur.
9 N’éliminez pas la fonction de sécurité de la
fiche polarisée ni de la prise de terre. Une
prise polarisée possède deux lames avec
une plus large que l’autre. Une prise avec
terre possède deux lames et une troisième
broche pour la masse. La lame plus large
et la troisième broche sont là pour votre
sécurité. Si la prise fournie ne rentre pas dans
votre prise murale, prenez contact avec un
électricien pour le remplacement de la prise.
10 Protégez le cordon d’alimentation de tout
piétinement et empêchez qu’il soit pincé, et
plus particulièrement au niveau des prises
de courant et de l’endroit où il est branché à
l’appareil.
11 Utilisez uniquement des fixations/accessoires
recommandées par le fabricant.
12
Utilisez uniquement un chariot,
socle, trépied, support ou table
spécifiés par le fabricant ou vendu
avec l’appareil. Lorsqu’un chariot
ou rack est utilisé, soyez prudent quand vous
déplacez l’ensemble chariot/appareil de
manière à éviter les blessures en cas de
chute.
13 Débranchez l’appareil en cas d’orage ou
lorsqu’il est inutilisé pendant de longues
périodes.
14 Confiez toute réparation à un personnel
qualifié. Une réparation est nécessaire
lorsque l’appareil a été endommagé d’une
manière ou d’une autre, tels que lorsque
le cordon d’alimentation ou la fiche sont
endommagés, du liquide a été renversé, des
objets sont tombés à l’intérieur, l’appareil
a été exposé à la pluie ou à l’humidité, qu’il
ne fonctionne pas correctement ou qu’il est
tombé.
15
Cette unité est un appareil électrique
à double isolation de Classe II. Il a été
conçu de telle sorte qu'il ne nécessite pas
une connexion à la terre pour la sécurité
électrique.
16 L’appareil ne doit pas être exposé à des
égouttements ou des éclaboussures. Aucun
objet rempli de liquide, tel qu’un vase, ne
doit être placé sur l’appareil.
17 La distance minimale autour de l’appareil
1. Consignes de sécurité

4
FR
pour une ventilation suffisante est de 5 cm.
18 Ne pas entraver la ventilation en recouvrant
les ouvertures de ventilation avec des objets
tels que journaux, nappes de table, rideaux,
etc.
19 Ne pas placer de sources de flammes nues,
comme des chandelles, sur le produit.
20 Les piles doivent être recyclées ou mises
au rebut conformément aux directives
nationales et locales.
21 Utilisez l’appareil dans des climats modérés.
1.2 Attention
- L’utilisation de dispositifs de commande ou
de réglage ou l’exécution de procédures
autres que celles décrites dans le présent
document peut entraîner une exposition
dangereuse aux rayonnements ou toute
autre opération non sécuritaire.
- Afin de réduire le risque d’incendie ou
d’électrocution, ne pas exposer cet appareil
à la pluie ou à l’humidité. Cet appareil ne
doit pas être exposé à des égouttements
ou éclaboussures, ni des objets remplis de
liquides, tels que des vases, ne doivent être
placés sur l’appareil.
- Si la fiche secteur ou le coupleur de l’appareil
est utilisé comme sectionneur, ce dispositif
doit toujours rester facilement accessible.
- Le fait de remplacer la pile par une autre
pile qui ne convient pas présente un risque
d’explosion. Remplacer uniquement par une
pile de type identique ou équivalent.
1.3 Avertissement
• La pile (piles ou un ensemble de piles) ne doit
pas être exposée à une chaleur excessive, tel
que le soleil, le feu ou similaire.
• Avant de faire fonctionner ce système,
vérifier que sa tension est identique à celle
de l’alimentation électrique locale.
• Ne pas placer cet appareil à proximité de
champs magnétiques puissants.
• Ne pas placer cet appareil sur l’amplificateur
ou le récepteur.
• Si un objet solide ou du liquide tombe dans
le système, débrancher le système et le faire
vérifier par un personnel qualifié avant de le
remettre en marche.
• Ne pas tenter de nettoyer l’appareil avec
des solvants chimiques car cela pourrait en
endommager la surface. Utiliser un chiffon
propre, sec ou légèrement humide.
• Pour débrancher la fiche du cordon
d’alimentation de la prise murale, toujours
tirer directement sur la fiche, ne jamais tirer
sur le cordon.
• Tout changement ou modification de cet
appareil non expressément approuvé par la
partie responsable de la conformité annulera
le droit de l’utilisateur d’utiliser l’appareil.
• L’étiquette des caractéristiques nominales
est collée sur la face inférieure ou arrière de
l’appareil.
MISE EN GARDE relative aux piles
Pour éviter les fuites des piles qui pourraient
entraîner des blessures corporelles, des
dommages matériels ou endommager l’appareil :
- Installer toutes les piles correctement, + et -
comme indiqué sur l’appareil.
- Ne pas mélanger des piles usagées et neuves.
- Ne pas mélanger des piles alcalines, standard
(carbone-zinc) ou rechargeables (Ni-Cd, Ni-
MH, etc.).
- Retirer les piles lorsque l’appareil n’est pas
utilisé pendant une longue période.
Mise au rebut de ce produit. Ce
pictogramme indique que ce produit
ne doit pas être jeté avec les autres
déchets ménagers dans toute l’Europe.
Afin de prévenir toute nuisance
possible à l’environnement ou à la santé humaine
causée par une élimination incontrôlée des
déchets, recyclez ce produit de manière
responsable pour promouvoir la réutilisation
durable des ressources matérielles. Pour retourner
votre appareil usagé, veuillez utiliser les systèmes
de reprise et de collecte ou contactez le revendeur
où vous avez acheté le produit. Le revendeur peut
emmener ce produit pour son recyclage propre et
sûr.
Nous déclarons par la présente
que ce produit est conforme aux
exigences essentielles et aux autres
dispositions pertinentes de la
directive RED2014/53/EU et de la
réglementation britannique sur les
équipements radio2017.
5
FR
2. Contenu de la boîte
• Le nombre de cordons d’alimentation fournis et le type de prise varient selon les régions.
• Les images, illustrations et dessins présentés dans ce manuel d'utilisation sont uniquement fournis à
titre indicatif, l'apparence réelle du produit peut varier.
Câble HDMI
Barre de son
Support mural
Télécommande / Piles AAA × 2
Caisson de basse sans fil
Cordon d'alimentation CA × 2
Manuel d’utilisation/Carte de
garantie/Guide de démarrage
rapide
Pour les États-
Unis
Pour le
Royaume-Uni
Pour l’Australie
Pour l’UE

6
FR
3 4 5
TOP
BACK
3. Identification des pièces
3.1 Barre de son
1 Capteur de télécommande
Permet de recevoir le signal de la télécommande.
2 Fenêtre d’affichage
Affiche l’état actuel.
3
Bouton (MARCHE/ARRÊT)
Basculer la barre de son entre le mode ACTIVER
et le mode Veille.
4
Bouton (SOURCE)
Sélectionnez le mode de lecture.
5 Boutons +/- (VOL)
Permettent d’augmenter/diminuer le volume.
6 Vis du support mural
7 Prise AC~
Sert à connecter le câble d’alimentation.
8 Prise OPTICAL
9 Prise AUX
10 Prise USB
Insérez le périphérique USB pour lire de la
musique.
11 Prise HDMI ARC
Permet de se connecter à un téléviseur via un
câble HDMI.
3.2 Caisson de basse sans fil
1 Indicateur d’appariement
Le voyant cesse de clignoter une fois que le
caisson de basse est apparié avec la barre de
son.
2 Prise AC IN~
Sert à connecter le câble d’alimentation.
3 Bouton APPARIEMENT
Appuyez pour activer la fonction d’appariement
entre la barre de son et le caisson de basse.
PARTEA DE SUS
PARTEA DIN SPATE
7
FR
11
10
12
3.3 Télécommande
1 Basculer la barre de son entre le mode ACTIVER et le
mode VEILLE.
2 SURR Basculez le Surround sur MARCHE/ARRÊT.
3 VOL
+
/VOL
-
Permettent d’augmenter/diminuer le volume.
4 BASS
+
/
-
Permet de régler le niveau des basses.
5
(MUET)
Couper le son ou reprendre le volume.
6
bouton
Sélectionnez le mode de lecture.
7
Permet de sélectionner le mode Bluetooth.
8 EQ Permet de sélectionner un effet sonore prédéfini.
9
/ Permet de passer à la piste précédente/suivante en
mode Bluetooth/USB.
10
Lecture/pause/reprise de la lecture en mode
Bluetooth/USB. Appuyez et maintenez enfoncé pour
activer la fonction d’appariement en mode Bluetooth
ou pour déconnecter le périphérique Bluetooth
apparié existant.
11 DIMMER
+
/
-
Permet de régler la luminosité DEL.
12 TREBLE
+
/
-
Permet de régler le niveau des aigus.
4. Préparatifs
4.1 Préparer la télécommande
La télécommande fournie permet de commander
la barre de son à distance.
• Même si la télécommande est utilisée dans
la portée effective de 19,7pi (6m), il se peut
que son fonctionnement soit entravé par des
obstacles situés entre la barre de son et la
télécommande.
• Si la télécommande est utilisée à proximité
d’autres produits émettant des rayons
infrarouges, ou si d’autres dispositifs
de télécommande utilisant des rayons
infrarouges sont utilisés près de la barre de
son, cela peut entraîner un fonctionnement
incorrect. Et de même, les autres produits
peuvent fonctionner de manière incorrecte.
4.2 Remplacer les piles de la télécommande
1 Appuyez et faites glisser le couvercle arrière
pour ouvrir le compartiment des piles de la
télécommande.
2 Insérez deux piles AAA (inclus). Veiller à faire
correspondre les extrémités (+) et (–) des
piles avec les extrémités (+) et (–) indiquées
dans le compartiment à piles.
3 Fermez le couvercle du compartiment à piles.
Précautions concernant les piles
• Veillez à insérer les piles en respectant les
polarités positive «
» et négative «
».
• Utilisez des piles du même type. N’utilisez
jamais plusieurs types de piles ensemble.
• Il est possible d’utiliser des piles rechargeables
ou non rechargeables. Reportez-vous aux
précautions figurant sur leurs étiquettes.
• Faites attention à vos ongles lorsque vous
retirez le couvercle du compartiment à piles et
les piles.
• Ne laissez pas tomber la télécommande.
• Ne laissez rien heurter la télécommande.
• Ne renversez pas d’eau ou de liquide sur la
télécommande.
• Ne placez pas la télécommande sur un objet
humide.
• Ne placez pas la télécommande sous les
rayons directs du soleil ou à proximité de
sources de chaleur excessive.
• Retirez les piles de la télécommande
lorsqu’elle n’est pas utilisée pendant une
longue période, car la corrosion ou une fuite
des piles pourrait se produire et entraîner
des blessures corporelles, des dommages
matériels ou un incendie.
• N’utilisez pas d’autres piles que celles
spécifiées.
• Ne mélangez pas des piles neuves avec des
piles usagées.
• Ne rechargez jamais une pile si vous n’êtes pas
sûr qu’il s’agit d’une pile rechargeable.
8
FR
5. Placement et montage
5.1 Position
A Si votre téléviseur est placé sur une table,
vous pouvez placer la barre de son sur la
table directement devant le support de
téléviseur, au centre de l’écran du téléviseur.
B Si votre téléviseur est fixé à un mur, vous
pouvez installer la barre de son sur le mur
directement sous l’écran du téléviseur.
5.2 Montage mural de la barre de son
- L’installation doit être effectuée par un
personnel qualifié. Un montage incorrect peut
entraîner des blessures et des pertes matérielles
(si vous avez l'intention d'installer ce produit
vous-même, vous devez vérifier la présence
d’installations tels que le câblage électrique
et la plomberie qui pourraient se trouver à
l’intérieur des murs). Il incombe à l’installateur
de vérifier que le mur peut supporter en toute
sécurité la charge totale de la barre de son et
des supports muraux.
- Des outils supplémentaires (non inclus) sont
nécessaires pour l'installation.
- Ne pas trop serrer les vis.
- Gardez ce manuel pour référence ultérieure.
- Utilisez un détecteur électronique pour vérifier
le type de mur avant de percer et de réaliser le
montage.
AVERTISSEMENT
• Pour éviter les blessures, cet appareil doit être
solidement fixé au sol/mur en conformité avec les
instructions d’installation.
• Hauteur de montage mural suggérée: ≤ 1,5mètre.
1. Percez dans le mur 2 trous parallèles (de Ø
5,5-6 mm chacun, selon le type de mur). La
distance entre les trous doit être de 670mm.
2. Insérez les chevilles fournies dans les deux
trous sur le mur. Insérez les vis du support
mural fournies à travers les supports de
fixation murale dans les chevilles du mur.
Fixez et serrez les vis sur le mur.
3. Accrochez l’appareil sur les supports de
fixation murale.
1
2
3
670 mm / 26.4”
670 mm / 26,4"
AB
9
FR
6. Connexions
6.1 Utiliser la prise HDMI ARC
La fonction ARC (Audio Return Channel) vous
permet d’envoyer l’audio de votre téléviseur
compatible avec la norme ARC à votre barre de
son à travers une seule connexion HDMI. Pour
utiliser la fonction ARC, veuillez vérifier que votre
téléviseur est compatible avec la fonction ARC
et HDMI-CEC, et paramétrez-le en conséquence.
Lorsqu'il est correctement paramétré, vous pouvez
utiliser la télécommande du téléviseur pour régler
le volume (VOL
+
/
-
et Muet) de la barre de son.
• Connectez le câble HDMI de la prise HDMI
ARC de la barre de son à la prise HDMI
ARC de votre téléviseur compatible ARC.
Appuyez ensuite sur la télécommande pour
sélectionner HDMI ARC.
56:/)'2
.*3/'8)
56:/)'2
.*3/
'8)
.KGJVNUTK
BA
Conseils :
• Votre téléviseur doit être compatible avec les
fonctions HDMI-CEC et ARC. Les fonctions
HDMI-CEC et ARC doivent être activées.
• La méthode de réglage des fonctions HDMI-
CEC et ARC peut varier d’un téléviseur à
l’autre. Pour plus de détails sur la fonction
ARC, veuillez-vous reporter au manuel de
votre téléviseur.
• Seul le câble HDMI1.4 ou supérieur peut
prendre en charge la fonction ARC.
6.2 Télévision en direct
• Si vous avez un Roku TV™, branchez simplement
le câble HDMI aux ports ARC et suivez les
instructions à l’écran de Roku TV Ready™.
Configuration simple
Une télécommande
Réglages rapides
6.3 Utiliser la fonction Hisense EzPlay
Pour Hisense EzPlay, lorsque la barre de son se
connecte à un téléviseur Hisense via HDMI ARC, le
menu de réglage de la barre de son apparaît sur le
téléviseur et vous pouvez contrôler ce menu via la
télécommande de votre téléviseur pour régler la
plupart des fonctionnalités de la barre de son.
Réglages de la barre de son
Modes EQ
Sport
Mode Surround
Niveau des graves
Niveau des aigus
Niveau d’intensité du
rétroéclairage
Réinitialiser
Barre de son avec
EzPlay
Téléviseur
avec EzPlay
Exemple de menu TV (différents modèles peuvent
avoir des menus différents):
Réglage--Son--Réglage de la barre de son.
Réglages de la barre de son
Modes EQ
Sport
Mode Surround
Niveau des graves
Niveau des aigus
Niveau d’intensité du
rétroéclairage
Réinitialiser
Remarques:
• Cette fonction est uniquement disponible
lorsque la barre de son et le téléviseur
prennent en charge Hisense Ezplay.
• Cette fonction nécessite une barre de son
et un téléviseur connectés via HDMI ARC, et
l’activation du CEC sur le téléviseur.
• Si chaque réglage est correct, lors de la
première connexion, une astuce s’affiche sur
l’écran du téléviseur pour vous guider dans le
menu de réglage de la barre de son.

10
FR
6.6 Branchement électrique
Risque d'endommager le produit!
• Risque d'endommager le produit! Assurez-
vous que la tension d’alimentation
correspond à la tension imprimée sur le dos
ou sur le dessous de l’appareil.
• Avant de connecter le câble d’alimentation,
veuillez-vous assurer que vous avez effectué
toutes les autres connexions.
• Barre de son
Branchez le câble secteur à la prise AC~ de la
barre de son, puis à une prise secteur.
• Caisson de basse
Branchez le câble secteur à la prise AC~ du
caisson de basse, puis à une prise secteur.
Pour le
Royaume-Uni
Pour
l’Australie
Pour l’UE
Pour les États-
Unis
* Le nombre de cordons d’alimentation fournis et
le type de prise varient selon les régions.
7. Appariement avec le caisson
de basse
7.1 Association automatique
Le caisson de basse et la barre de son s’apparient
automatiquement lorsque les deux appareils sont
branchés sur les prises secteur et mis sous tension.
Aucun câble n’est nécessaire pour connecter les
deux appareils.
• Déterminez l’état en fonction de l’indicateur
du caisson de basse sans fil.
État du voyant
DEL
État
Clignotement
rapide
Caisson de basse en mode
appariement
Toujours allumé Connecté/Appariement réussi
Clignotement lent Connexion/Appariement échoué
REMARQUES :
- N’appuyez pas sur le bouton PAIR du caisson
de basse, sauf pour l’appariement manuel.
- Si l’association automatique échoue, associez
manuellement le caisson de basse à la barre
de son.
6.4 Utiliser la prise OPTICAL
– Utilisez le câble OPTIQUE pour connecter la
prise OPTICAL OUT du téléviseur à la prise
OPTICAL de la barre de son.
56:/)'2
.*3/'8)
56:/)'2
.*3/
'8)
.KGJVNUTK
BA
Conseils:
La barre de son peut ne pas être en mesure de
décoder tous les formats audio numériques à
partir de la source d'entrée. Dans de tels cas, la
barre de son ne produira pas de son. Ceci n’est PAS
un défaut. Veillez à ce que le réglage audio de la
source de signal (par exemple TV, console de jeux,
lecteur DVD, etc.) soit réglé sur PCM ou Dolby
Digital (reportez-vous au manuel de l’utilisateur du
périphérique source de signal pour les détails du
réglage audio) avec entrée HDMI ARC / OPTIQUE.
6.5 Utiliser la prise AUX
A. Utilisez un câble audio 3,5mm-3,5mm pour
connecter la prise Casque du téléviseur ou
d’un appareil audio externe à la prise AUX de
la barre de son.
56:/)'2
.*3/'8)
56:/)'2
.*3/
'8)
.KGJVNUTK
BA
Casque
B. Utilisez un câble audio RCA-3,5 mm pour
connecter les prises de sortie audio du
téléviseur à la prise AUX de la barre de son.

11
FR
7.2 Association manuelle
1. Assurez-vous que tous les câbles sont bien
connectés et que la barre de son est en mode
veille.
2. Appuyez et maintenez enfoncé le bouton
PAIR au dos du caisson de basse pendant
quelques secondes. Le caisson de basse
passera en mode appariement et l’indicateur
d’appariement clignotera rapidement.
3. Appuyez sur la touche
de la barre de son
ou de la télécommande pour activer la barre
de son.
4. Maintenez enfoncée la touche
de la barre
de son ou de la télécommande pendant
quelques secondes.
5. Une fois la connexion sans fil réussie,
l’indicateur d’appariement s’allume.
6. Si le voyant d’appariement clignote, la
connexion sans fil a échoué. Débranchez le
câble du caisson de basse, puis rebranchez le
câble principal après 4minutes. Répétez les
étapes1 à 4.
REMARQUES :
• Si la connexion sans fil échoue à nouveau,
vérifiez s’il y a un conflit ou une forte
interférence (par exemple, une interférence
provenant d’un appareil électronique) autour
de l’emplacement. Éliminez ces conflits ou
interférences fortes et répétez les procédures
ci-dessus.
• Le caisson de basse doit se trouver à moins
de 6m (19,7pieds) de la barre de son dans un
endroit ouvert.
• Si la barre de son n’est pas connectée au
caisson de basse et qu’elle est activée, le
voyant ALIMENTATION clignote. Suivez
l’étape1 à 4 ci-dessus pour associer le caisson
de basse à la barre de son.
8. Fonctionnement de base
8.1 Veille/MARCHE
Il s’allume automatiquement lorsque le cordon
d’alimentation est branché.
• Appuyez sur le bouton
pour mettre la
barre de son en mode VEILLE.
• Débranchez la fiche secteur de la prise secteur
si vous voulez éteindre complètement la barre
de son.
8.2 Fonction de mise en veille
automatique/réveil automatique
[Auto-Standby] Votre barre de son a été
programmée pour passer automatiquement
en mode VEILLE lorsqu’aucun son n’est détecté
pendant 15minutes. Par exemple, cela peut se
produire lors d’une pause de la lecture ou si la
barre de son est laissée allumée accidentellement.
[Auto-Wake] Si un téléviseur ou un périphérique
externe est connecté (mode AUX / OPTIQUE /
HDMI ARC), l’appareil s’allume automatiquement
lorsque le téléviseur ou le périphérique externe
est allumé.
Pour désactiver cette fonction, veuillez suivre
les étapes ci-dessous:
1. En mode MARCHE, appuyez longuement sur le
bouton
pendant 3secondes pour ouvrir le
menu.
– L’écran de l’appareil fait défiler «MENU».
2. Appuyez sur le bouton
6fois
consécutivement: l’écran affiche: Auto
Wake [ON / OFF].
Ou appuyez sur le bouton
7fois
consécutivement: l’écran affiche: Auto
Standby [ON / OFF].
3. Sélectionnez le contenu à l’aide du bouton
VOL +/- de la télécommande, puis appuyez
sur le bouton
pour confirmer votre
sélection et quitter les paramètres.
• Répétez ces étapes pour activer «MARCHE»
et désactiver «ARRÊT» la fonction.
12
FR
8.3 Sélection des modes
Appuyez plusieurs fois sur le bouton (SOURCE)
de la barre de son ou de la télécommande pour
sélectionner le mode AUX,
, OPTIQUE, HDMI
ARC et USB. Le mode sélectionné apparaîtra à
l’écran.
• Le mode sélectionné apparaîtra à l’écran.
Écran Mode
HDMI ARC
OPTIQUE
Bluetooth
Connecté
Non connecté
AUX
USB
Pas de connexion USB
8.4 Réglage du volume
• Appuyez sur les boutons VOL
+
/
-
de la barre
de son ou de la télécommande pour régler le
volume.
• Si vous souhaitez désactiver le son, appuyez
sur la touche
(MUET) de la télécommande.
Appuyez de nouveau sur la touche
(MUET)
ou appuyez sur les touches VOL
+
pour
reprendre l’écoute normale.
8.5 Activer/désactiver le son surround
• Appuyez sur le bouton SURR de la
télécommande pour activer/désactiver le son
surround.
8.6 Régler les graves et les aigus
• Appuyez sur le bouton BASS
+
/
-
de la
télécommande pour régler le niveau des
basses.
• Appuyez sur le bouton TREBLE
+
/
-
de la
télécommande pour régler le niveau des
aigus.
8.7 Sélectionnez l’effet égaliseur (EQ)
• Pendant la lecture, appuyez sur la touche
EQ sur la télécommande parmi les différents
réglages d’égalisation prédéfinis : FILM,
MUSIQUE, JEU, NOUVELLES, SPORT, NUIT.
8.8 Réglez la luminosité
• Appuyez sur les boutons DIMMER
+
/
-
de la
télécommande pour sélectionner le niveau
de luminosité.
8.9 Réinitialisation d’usine
Réinitialisez l’appareil aux paramètres par défaut.
• Basculez la barre de son en mode optique,
appuyez et maintenez la touche [
] sur
la barre de son. La barre de son entrera en
mode de réinitialisation d’usine et passera à
l’état de veille.
MODE PAR DÉFAUT
SOURCE ARC
Volume 30
Surround Arrêt
Variateur MAX
Graves 0
Aigus 0
EQ FILM
Réveil
automatique
ARRÊT
Mise en veille
automatique
MARCHE (sauf les États-Unis)
9. Fonctionnement AUX/
OPTIQUE/HDMI ARC
1 Assurez-vous que la barre de son est
connectée au téléviseur ou à l’appareil audio.
2 Appuyez plusieurs fois sur le bouton
(SOURCE) de la barre de son ou de la
télécommande pour sélectionner le mode
AUX, OPTIQUE, HDMI ARC. Le mode
sélectionné apparaîtra à l’écran.
3 Utilisez directement votre appareil audio
pour les fonctions de lecture.
4 Appuyez sur la touche VOL
+
/
-
pour régler le
volume au niveau désiré.
Conseils: La barre de son peut ne pas être
en mesure de décoder tous les formats audio
numériques à partir de la source d'entrée. Dans
de tels cas, la barre de son ne produira pas de son.
Ceci n’est PAS un défaut. Veillez à ce que le réglage
audio de la source de signal (par exemple TV,
console de jeux, lecteur DVD, etc.) soit réglé sur
PCM ou Dolby Digital (reportez-vous au manuel
de l’utilisateur du périphérique source de signal
pour les détails du réglage audio) avec entrée
HDMI ARC / OPTIQUE.
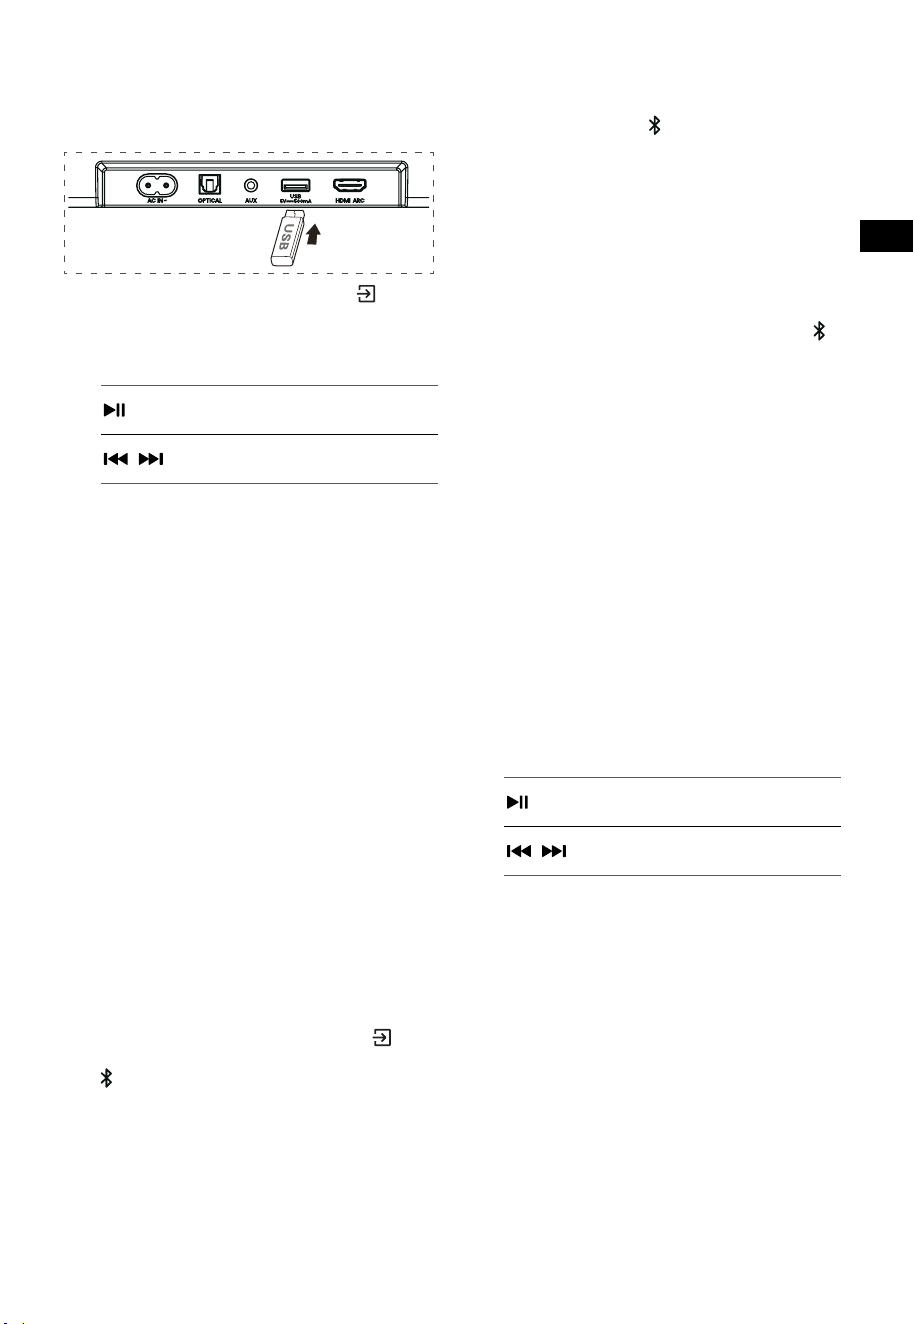
13
FR
10. Fonctionnement USB
1 Insérez le périphérique USB.
2 Appuyez plusieurs fois sur le bouton
(SOURCE) de la barre de son ou de la
télécommande pour sélectionner le mode USB.
3 Pendant la lecture :
Démarrer, mettre en pause ou
reprendre la lecture
,
Passer à la page précédente ou
suivante
Conseils :
• L’appareil peut prendre en charge des
périphériques USB avec jusqu’à 32 Go de mémoire.
• Cette unité peut lire des fichiers WAV / WMA / MP3
/ FLAC.
• Il est possible que ce produit ne soit pas
compatible avec certains types de périphériques
de stockage USB.
• Si vous utilisez un câble d’extension USB, un
concentrateur USB ou un lecteur de carte
multifonctions USB, il est possible que le
périphérique de stockage USB ne soit pas reconnu.
• Ne retirez pas le périphérique de stockage USB
pendant la lecture des fichiers.
11. Fonctionnement avec
source Bluetooth®
Connectez la barre de son à votre appareil
Bluetooth (iPad, iPhone, iPod touch, téléphone
Android ou ordinateur portable) par Bluetooth,
puis écoutez les fichiers audio stockés sur l’appareil
grâce aux haut-parleurs de la barre de son.
Première association
1 Appuyez plusieurs fois sur le bouton
(SOURCE) de la barre de son ousur le bouton
de la télécommande pour sélectionner le
mode Bluetooth®.
• L’écran affichera NO BT.
2 Activez votre appareil Bluetooth et
sélectionnez le mode de recherche.
3 Sélectionnez «Hisense HS3100» dans la
liste d’appariement. Après l’invite audio, le
système est connecté avec succès et l’écran
affichera BT IN.
• Si vous souhaitez connecter votre barre de
son à un autre appareil Bluetooth, maintenez
enfoncée la touche
sur la télécommande
pour déconnecter l’appareil Bluetooth
actuellement connecté. Suivez les étapes2-3
pour associer votre appareil Bluetooth.
Pour déconnecter la fonction Bluetooth,
vous pouvez:
- Passer à une autre fonction de l’unité.
- Désactivez la fonction de votre périphérique
Bluetooth.
- Appuyez et maintenez enfoncé le bouton
de la télécommande.
Écouter de la musique à partir d’un
périphérique Bluetooth
- Si le périphérique Bluetooth connecté prend
en charge la fonction Advanced Audio
Distribution Profile (A2DP), vous pouvez
écouter la musique stockée sur l'appareil via
le lecteur.
- Si l’appareil prend également en charge le
profil de télécommande audio-vidéo (AVRCP),
vous pouvez utiliser la télécommande du
lecteur pour écouter de la musique stockée
sur l’appareil.
1. Associez votre appareil avec le lecteur.
2. Lisez la musique stockée sur votre appareil
(s’il est compatible avec la norme A2DP).
3. Utilisez la télécommande fournie pour
contrôler la lecture (s’il est compatible avec la
norme AVRCP).
Démarrer, mettre en pause ou
reprendre la lecture
,
Passer à la page précédente ou
suivante
Conseils :
• La portée opérationnelle entre la barre de
son et l’appareil est d’environ 8mètres.
• Avant de connecter un appareil Bluetooth® à
la barre de son, assurez-vous de connaître les
capacités de l’appareil.
• La compatibilité avec tous les appareils
Bluetooth® n’est pas garantie.
• Tout obstacle entre l’appareil et la barre de
son peut réduire la portée opérationnelle.
• Éloignez ce lecteur d’autres appareils
électroniques susceptibles de provoquer des
interférences.
• Le lecteur se déconnectera également
lorsque votre appareil sort de la zone de
fonctionnement.

14
FR
12. Menu Paramétrage
1. En mode MARCHE, appuyez longuement
sur le bouton pendant 3secondes pour
ouvrir le menu.
2. Sélectionnez le contenu à l’aide des boutons
/ .
3. Modifiez les valeurs initiales de chacun des
paramètres à l’aide des boutons VOL
+
/
-
.
4. Appuyez sur le bouton
pour confirmer
votre sélection et quitter les paramètres.
• Si aucun bouton n’est enfoncé dans
les 10secondes, le système quittera
automatiquement le menu.
Écran
/
Description
VOL
+
/
-
Sélectionner l’effet de
l’égaliseur (EQ) (FILM, MUSIQUE,
JEU, NOUVELLES, SPORT, NUIT)
Régler le son Surround
MARCHE / ARRÊT
Régler le niveau des basses
Régler le niveau des aigus
Réglez la luminosité
DIM 0 / DIM 1 / DIM 2 / DIM 3
Régler le réveil automatique
MARCHE / ARRÊT
Régler la mise en veille
automatique
MARCHE / ARRÊT
Régler: Amplification des
basses
MARCHE / ARRÊT
13. Mode DÉMO
Le mode DÉMO est un mode utilisateur
spécialement configuré pour être utilisé dans un
environnement de magasin.
Activation/Désactivation du mode DÉMO:
Par défaut, la barre de son est configurée en mode
consommateur ordinaire.
• Insérez le kit de démonstration pour activer le
mode DÉMO.
• Retirez le kit de démonstration pour désactiver le
mode DÉMO.
• La barre de son affiche les informations suivantes:
Écran Mode
DEMO ON Mode DÉMO
DEMO OFF Mode consommateur
Utilisation du mode DÉMO
1. Accédez au mode DÉMO. La barre de son
s’allumera automatiquement à la mise sous
tension AC.
2. Verrouillage de source (
indisponible). Vous
pouvez sélectionner la source uniquement
par le kit de démonstration.
3. Toutes les touches seront verrouillées et
indisponibles. Vous ne pouvez contrôler que
par le kit de démonstration.
Toutes les touches
verrouillées
(Télécommande et barre de
son)
Par défaut
Kit de
démonstration
(SOURCE)
Verrouillage
de source
+
(Vol+)
-
(Vol-)
SURR ACTIVER
(BT)
EQ FILM
/ Si en mode BT
Si en mode BT
BASS
+
/
-
TREBLE
+
/
-
DIMMER
+
/
-
X DIM 3
(MUET) X
Mode veille
automatique
ARRÊT
Réveil
automatique
ARRÊT
* Lorsque vous appuyez sur les touches
indisponibles (X), la barre de son affiche
«
DEMO ON
».

15
FR
14. Dépannage
Pour garder la validité de la garantie, n’essayez jamais de réparer le système. Si vous rencontrez des
problèmes lors de l’utilisation de cette barre de son, vérifiez les points suivants avant de faire appel au
service après-vente.
Problème Solution
Pas d’alimentation • Veillez à ce que le cordon secteur de l’appareil soit correctement branché.
• Assurez-vous qu’il y a du courant sur la prise secteur.
• Appuyez sur le bouton
(veille) pour allumer la barre de son.
La télécommande ne
fonctionne pas
• Avant d’appuyer sur une touche de lecture, veuillez d’abord sélectionner
la source adéquate.
• Réduisez la distance entre la télécommande et la barre de son.
• Vérifiez que la polarité (+/-) des piles a été respectée.
• Remplacez les piles.
• Orientez la télécommande directement vers le capteur situé à l’avant de
la barre de son.
Pas de son • Assurez-vous que le son de la barre de son n’est pas désactivé. Appuyez
sur le bouton MUET ou + (VOL) pour reprendre l’écoute normale.
• Appuyez sur le bouton de la barre de son ou de la télécommande pour
mettre la barre de son en mode veille. Appuyez ensuite sur la touche
à
nouveau pour activer la barre de son.
• Débranchez la barre de son et le caisson de basse de la prise secteur, puis
rebranchez-les. Activez la barre de son.
• Assurez-vous que le réglage audio de la source d'entrée (par exemple, le
téléviseur, la console de jeux, le lecteur DVD, etc.) est réglé sur le mode
PCM ou Dolby Digital lors de l'utilisation d'une connexion numérique (par
exemple, HDMI, OPTIQUE).
• Le caisson de basse est hors de portée, veuillez rapprocher le caisson
de basse de la barre de son. Assurez-vous que le caisson de basse est à
moins de 5m de la barre de son (le plus proche sera le mieux).
• La barre de son a peut-être perdu la connexion avec le caisson de
basse. Réappairez les appareils en suivant les étapes de la section
«Appariement avec le caisson de basse».
• La barre de son peut ne pas être en mesure de décoder tous les formats
audio numériques à partir de la source d'entrée.
Le téléviseur a un problème
d’affichage lors de la
visualisation du contenu HDR
à partir d’une source HDMI.
• Certains téléviseurs 4K HDR nécessitent que l’entrée HDMI ou les
réglages d’image soient configurés pour la réception de contenu HDR.
Pour plus de détails sur le paramétrage HDR, veuillez consulter le manuel
d’instructions de votre téléviseur.
Je ne trouve pas le nom
Bluetooth de cette barre
de son sur mon appareil
Bluetooth pour l’appariement
Bluetooth
• Assurez-vous que la fonction Bluetooth est activée sur votre dispositif
Bluetooth.
• Veillez à ce que l’appareil soit appairé avec votre appareil Bluetooth.
• La barre de son dispose d’une fonction Bluetooth® capable de recevoir
un signal dans un rayon de 8mètres. Gardez une distance inférieure à
8mètres entre la barre de son et votre appareil Bluetooth®.
L'appareil se met
automatiquement hors tension
après 15 minutes d'inactivité.
Exigence de la norme ERPII
pour économiser de l'énergie
• Lorsque le niveau du signal d’entrée externe de l’appareil est trop bas, la
barre de son s’éteint automatiquement au bout de 15minutes. Veuillez
augmenter le volume de votre périphérique externe.
16
FR
15. Spécifications
Marque Hisense
Modèle HS3100
Barre de son
Alimentation électrique 100-240 V~ 50/60 Hz
Consommation d’énergie
50 W
< 0,5W (Veille)
USB
5 V
500 mA
USB haute vitesse (2.0) / FAT32 / FAT16
32 Go (max) , WAV / WMA / MP3 / FLAC.
Dimensions (L × H × P) 902 × 62,3 × 91 mm / 35,5" × 2,4" × 3,6"
Poids net 1,6kg / 3,5lb
Sensibilité d’entrée audio 500 mV
Réponse en fréquence 120 Hz - 20 kHz
Température de fonctionnement 0°C - 45°C
Caisson de basse
Alimentation électrique 100-240 V~ 50/60 Hz
Consommation d’énergie
40 W
< 0,5W (Veille)
Dimensions (L × H × P) 161 × 303 × 304,5 mm / 6,3" × 11,9" × 12"
Poids net 3,6kg / 7,9lb
Réponse en fréquence 40 Hz - 150 Hz
Spécification sans fil
Version/profils Bluetooth
Plage de fréquences Bluetooth
Puissance d’émission max. Bluetooth
V5.3 (A2DP, AVRCP)
2400 MHz - 2483,5 MHz
≤ 5 dBm
Plage de fréquences sans fil 2,4G
Puissance d’émission max. 2,4G
2400 MHz - 2483 MHz
≤ 6 dBm
Type de modulation GFSK, π/4DQPSK
Amplificateur (puissance audio maximale)
Total 480 W
Barre de son 300 W
Caisson de basse 180 W
Télécommande
Distance/Angle 19,7 pieds (6 m) / 30°
Type de batterie AAA (1,5 V × 2)
• La conception et les spécifications sont sujettes à changement sans préavis.

Antes de usar la barra de sonido, lea completamente este manual y
consérvelo para futuras referencias.
MANUAL DE USUARIO
Barra de sonido de 3.1 canales con subwoofer inalámbrico
Modelo: HS3100
ES

2
ES
Contenido
1. Instrucciones importantes de seguridad ....................................................................................... 3
1.1 Seguridad ................................................................................................................................................................................................3
1.2 Precaución ...............................................................................................................................................................................................4
1.3 Advertencia .............................................................................................................................................................................................4
2. Contenido de la caja ......................................................................................................................... 5
3. Identificación de las piezas .............................................................................................................. 6
3.1 Barra de sonido .....................................................................................................................................................................................6
3.2 Subwoofer inalámbrico ......................................................................................................................................................................6
3.3 Mando a distancia ................................................................................................................................................................................7
4. Preparaciones ................................................................................................................................... 7
4.1 Preparar el mando a distancia ..........................................................................................................................................................7
4.2 Sustituir la batería del mando a distancia ....................................................................................................................................7
5. Colocación y montaje ....................................................................................................................... 8
5.1 Colocación ...............................................................................................................................................................................................8
5.2 Montaje en pared de la barra de sonido ......................................................................................................................................8
6. Conexiones ....................................................................................................................................... 9
6.1 Utilice la toma HDMI ARC ..................................................................................................................................................................9
6.2 Uso del Roku TV .....................................................................................................................................................................................9
6.3 Use la función Hisense EzPlay ..........................................................................................................................................................9
6.4 Uso de la toma OPTICAL .................................................................................................................................................................. 10
6.5 Utilice la toma AUX............................................................................................................................................................................ 10
6.6 Conexión de alimentación .............................................................................................................................................................10
7. Emparej
ar e
l Subwoofer.........................................................................................................................10
7.1 Emparejamiento automático ......................................................................................................................................................... 10
7.2 Emparejamiento manual ................................................................................................................................................................11
8. Operación básica ............................................................................................................................ 11
8.1 Espera/ENCENDIDO .......................................................................................................................................................................... 11
8.2 Función de espera automática/reactivación automática ....................................................................................................11
8.3 Seleccionar modos ............................................................................................................................................................................ 12
8.4 Ajustar el volumen ............................................................................................................................................................................12
8.5 Encienda/apague el sonido envolvente .................................................................................................................................... 12
8.6 Ajustar los graves/agudos ..............................................................................................................................................................12
8.7 Seleccionar el efecto de ecualizador (EQ) .................................................................................................................................12
8.8 Ajustar el brillo .................................................................................................................................................................................... 12
8.9 Restauración de fábrica ................................................................................................................................................................... 12
9. Funcionamiento de AUX/ ÓPTICO/HDMI ARC .............................................................................. 12
10. Operación de USB ........................................................................................................................... 13
11. Funcionamiento Bluetooth® .......................................................................................................... 13
12. Menú de configuración .................................................................................................................. 14
13. Modo DEMO .................................................................................................................................... 14
14. Solución de problemas .................................................................................................................. 15
15. Especificaciones ............................................................................................................................. 16
3
ES
PRECAUCIÓN
RIESGO DE DESCARGAS
ELÉCTRICAS NO ABRIR
El símbolo de relámpago con cabeza de
flecha, dentro de un triángulo equilátero
tiene como propósito alertar al usuario
sobre la presencia de "tensión peligrosa"
no aislada dentro del recinto del producto
que podría ser de la magnitud suficiente
para constituir un riesgo de descarga
eléctrica.
El signo de exclamación dentro de un
triángulo equilátero tiene como propósito
alertar al usuario sobre la presencia de
instrucciones importantes de operación
y de mantenimiento (servicio) en la
documentación que acompaña al
aparato.
1.1 Seguridad
1 Lea estas instrucciones – Todas las
instrucciones de seguridad y operación
deben leerse antes de operar este producto.
2 Mantenga estas instrucciones – Las
instrucciones de seguridad y operación
deben conservarse para futuras referencias.
3 Preste atención a todas las advertencias
– Deben tomarse en cuenta todas las
advertencias colocadas en el aparato y en las
instrucciones de operación.
4 Siga todas las instrucciones – Deben
seguirse todas las instrucciones de operación
y uso.
5 No use este aparato cerca del agua – El
aparato no debe ser usado cerca de agua
o humedad, por ejemplo, en un sótano
húmedo o cerca de una piscina o lugar
similar.
6 Limpie solamente con un paño seco.
7 No bloquee las aberturas de ventilación.
Instale en conformidad con las instrucciones
del fabricante.
8 No instale cerca de fuentes que generen
calor tales como radiadores, registradores de
calor, estufas así como productos similares
(incluidos amplificadores) que generen calor.
9 No modifique la medida de seguridad de
la clavija polarizada o de puesta a tierra.
Una clavija polarizada tiene dos contactos,
uno más ancho que otro. Una clavija de
puesta a tierra tiene dos contactos y un
tercero de puesta a tierra. El contacto más
ancho o el tercero de puesta a tierra se
proporciona para brindarle seguridad. Si la
clavija proporcionada no encaja en su toma
de corriente, consulte a un electricista para
cambiar la toma de corriente obsoleta.
10 Proteja el cable de alimentación de tal
manera que no lo pisen o que no sea
pinchado, particularmente las clavijas,
receptáculos de conveniencia y el punto
donde salen del aparato.
11 Solamente use accesorios/aditamentos
especificados por el fabricante.
12
Solamente use el aparato con un
carrito, base, trípode o mesa
especificados por el fabricante, o
vendido con el aparato. Cuando
use un carrito, tenga precaución cuando
mueva el carrito/aparato en combinación
para evitar lesiones en caso de volcarse.
13 Desconecte este aparato durante tormentas
eléctricas o cuando no se use por periodos
de tiempo prolongados.
14 Consulte a un técnico de servicio cualificado.
Se requiere servicio cuando el aparato esté
dañado en cualquier sentido, por ejemplo
si el cable de alimentación o la clavija están
dañados, cuando se haya derramado líquido
o si han caído objetos extraños en el aparato,
cuando esté expuesta la unidad a la lluvia o
humedad, no funciona normalmente o si se
ha dejado caer.
15
Este equipo es un dispositivo de Clase II
o aislado doblemente. Ha sido diseñado de
tal modo que no requiere de una conexión
de seguridad para la puesta a tierra.
16 El equipo no debe estar expuesto a caídas
o salpicaduras. Ningún objeto lleno con
líquidos, como vasijas, debe colocarse sobre
el aparato.
1. Instrucciones importantes de seguridad
4
ES
17 La distancia mínima alrededor del aparato
para tener la suficiente ventilación es de 5 cm.
18 La ventilación no debe estar bloqueada
cubriendo las aberturas de ventilación con
objetos tales como periódicos, manteles,
cortinas, etc.
19 No deben colocarse fuentes de flamas
abiertas, tales como velas, sobre el aparato.
20 Las baterías deben reciclarse o desecharse
de acuerdo a los lineamientos estatales y
locales.
21 El uso de aparatos en climas moderados.
1.2 Precaución
- El uso de controles o ajustes o la realización
de procedimientos distintos a los descritos
en este documento, pueden provocar una
exposición peligrosa a la radiación u otra
operación insegura.
- Para reducir el riesgo de incendio o descargas
eléctricas, no exponga este producto a
lluvia o humedad. El aparato no debe estar
expuesto a goteo o derrames de agua ni
ningún objeto que contenga líquido, como
por ejemplo vasijas, debe colocarse encima
del aparato.
- En sitios donde se use una clavija de corriente
o un acoplador de aparato como circuito que
desconecte el dispositivo, el dispositivo de
desconexión debe permanecer listo para su
funcionamiento.
- Peligro de explosión si se cambia la batería
incorrectamente. Sustituya solamente por
una batería del mismo tipo.
1.3 Advertencia
• La batería (baterías o paquete de baterías)
no debe exponerse a calor excesivo como
por ejemplo, la luz solar, fuego o fuentes
similares.
• Antes de operar este sistema, compruebe el
voltaje de este sistema para ver si es idéntico
al voltaje de su suministro de alimentación
local.
• No coloque esta unidad cerca de campos
magnéticos potentes.
• No coloque esta unidad sobre el amplificador
o receptor.
• Si cualquier objeto sólido o líquido cae en
el sistema, desconecte el sistema y hágalo
que lo revise personal cualificado antes de
operarlo.
• No intente limpiar la unidad con solventes
químicos ya que esto podría dañar el
acabado. Use un paño limpio, seco o
ligeramente humedecido.
• Cuando desconecte la clavija de alimentación
de la toma de corriente, siempre jálelo
directamente de la clavija, nunca jale el cable.
• Los cambios o modificaciones en esta unidad
no expresamente aprobados por la parte
responsable de la conformidad, podrían
invalidar la autoridad del usuario a operar el
equipo.
• La etiqueta de la marca está adherida en la
parte inferior o posterior del equipo.
Uso de la batería PRECAUCIÓN
Para evitar fugas de la batería que pueden
provocar lesiones corporales, daños a la propiedad
o daños al aparato:
- Instale todas las baterías correctamente, + y -
como está marcado en el aparato.
- No mezcle baterías viejas y nuevas.
- No mezcle baterías alcalinas, estándar
(carbono-zinc) o recargables (Ni-Cd, Ni-MH,
etc.).
- Retire las baterías cuando la unidad no se
utilice durante mucho tiempo.
Desecho correcto de este producto.
Esta marca indica que este producto
no debe desecharse con la basura
residual en toda la UE. Para evitar
efectos adversos en el ambiente o en
la salud humana a causa de desechos residuales
no controlados, recicle el producto de forma
responsable para promover la reutilización
sustentable de recursos materiales. Para devolver
su dispositivo usado, use los sistemas de recogida
y devolución o póngase en contacto con el
distribuidor donde adquirió el producto para
obtener más información. El distribuidor podría
gestionar el reciclado seguro ambiental.
Por este medio declaramos que
este producto se encuentra en
conformidad con los requerimientos
esenciales y otras disposiciones
relevantes de la Directiva RED
2014/53/EU y las Regulaciones de
equipos de radio del Reino Unido
de 2017.
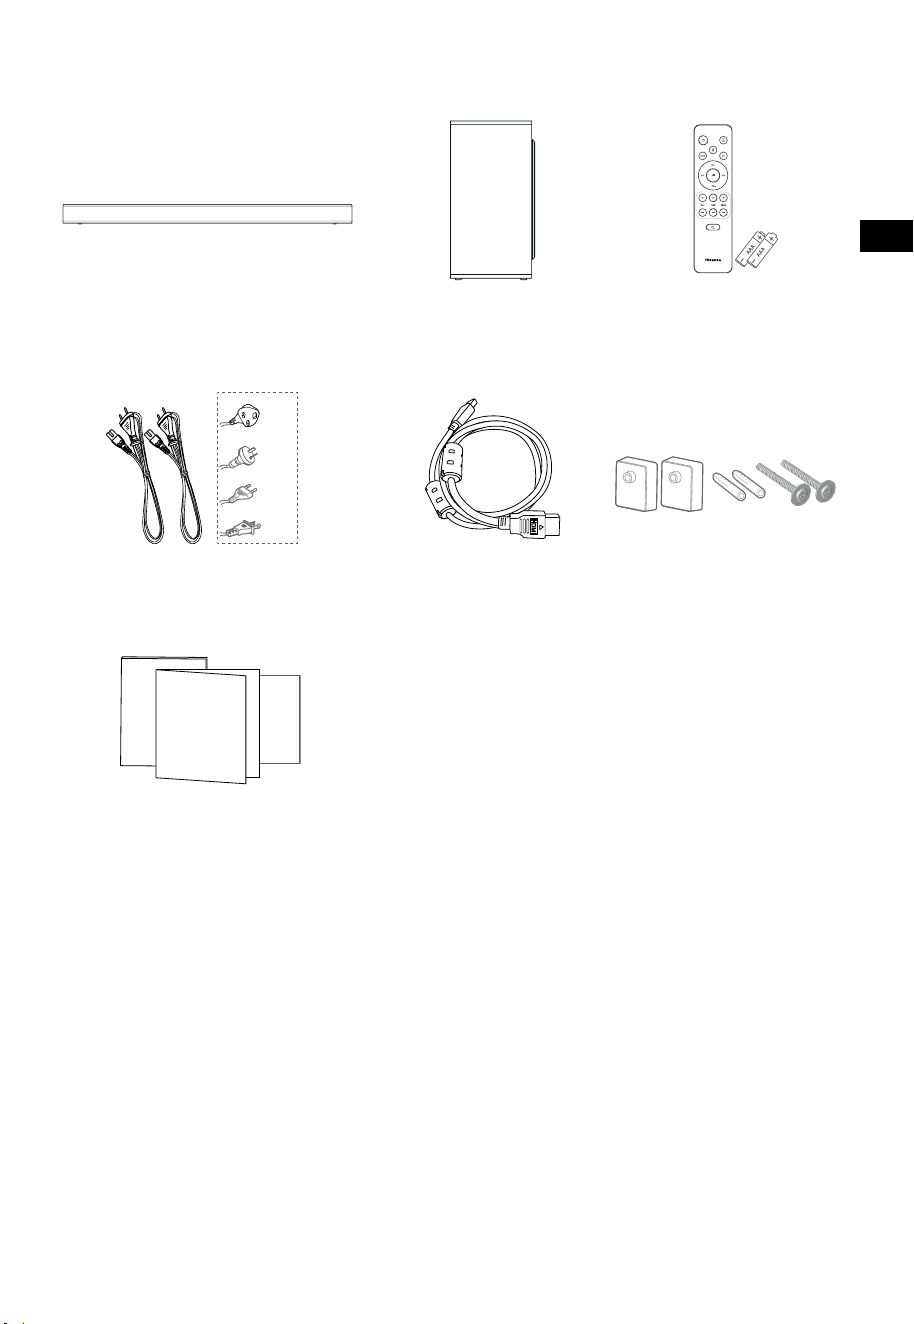
5
ES
2. Contenido de la caja
• La cantidad de cable de alimentación y el tipo de enchufe varían según la región.
• Las imágenes, ilustraciones y dibujos que se muestran en este manual del usuario son solo para
referencia, el producto real puede variar en apariencia.
Cable HDMI
Barra de sonido
Soporte para pared
Mando a distancia /
baterías AAA × 2
Subwoofer inalámbrico
Cable de alimentación de CA × 2
Manual de usuario/Tarjeta de
garantía/Guía de inicio rápido
Para EE. UU.
Para el Reino
Unido
Para AUS
Para la UE

6
ES
3 4 5
TOP
BACK
3. Identificación de las piezas
3.1 Barra de sonido
1 Sensor del mando a distancia
Recibir la señal del mando a distancia.
2 Ventana de visualización
Mostrar estado actual.
3 Botón
(ENCENDIDO/APAGADO)
Cambie la barra de sonido entre el modo
Encendido y En espera.
4 Botón (FUENTE)
Seleccione la función de reproducción.
5 Botones
+/- (
VOL)
Aumentar/disminuir el nivel de volumen.
6 Tornillos para soporte de pared
7 Toma CA~
Usar para conectar el cable de alimentación.
8 Toma OPTICAL
9 Toma AUX
10 Toma USB
Inserte el dispositivo USB para reproducir
música.
11 Toma HDMI ARC
Conectar a un TV a través de un cable HDMI.
3.2 Subwoofer inalámbrico
1 Indicador de emparejamiento
La luz deja de parpadear una vez que el subwoofer
se ha emparejado con la barra de sonido.
2 Toma AC IN~
Usar para conectar el cable de alimentación.
3 Botón PAIR
Presione para activar la función de
emparejamiento entre la barra de sonido y el
subwoofer.
PARTE SUPERIOR
PARTE POSTERIOR

7
ES
11
10
12
3.3 Mando a distancia
1 Cambie la barra de sonido entre el modo Encendido
y EN ESPERA.
2 SURR Alternar el modo envolvente entre ACTIVAR /
DESACTIVAR.
3 VOL
+
/VOL
-
Aumentar/disminuir el nivel de volumen.
4 BASS
+
/
-
Ajustar el nivel de graves.
5
(SILENCIAR)
Silenciar o reactivar el sonido.
6
botón
Seleccione la función de reproducción.
7
Seleccione el modo Bluetooth.
8 EQ Seleccione el efecto de sonido predefinido.
9
/ Saltar a la pista anterior/siguiente en el modo
Bluetooth/USB.
10
Reproducir/pausar/reanudar la reproducción en
modo Bluetooth/USB. Mantenga presionado para
activar la función de emparejamiento en modo
Bluetooth o desconectar el dispositivo Bluetooth
emparejado existente.
11 DIMMER
+
/
-
Ajuste el brillo del LED.
12 TREBLE
+
/
-
Ajuste el nivel de agudos.
4. Preparaciones
4.1 Preparar el mando a distancia
El mando a distancia proporcionado permite operar la
barra de sonido a distancia.
•
Incluso si el mando a distancia se opera dentro del
alcance efectivo de 19,7 pies (6 m), la operación
del mando a distancia puede ser imposible si hay
obstáculos entre la barra de sonido y el mando a
distancia.
•
Si el mando a distancia se utiliza cerca de otros
productos que generan rayos infrarrojos, o si se
utilizan otros dispositivos de mando a distancia
que utilizan rayos infrarrojos cerca de la barra de
sonido, es posible que funcione incorrectamente.
Por el contrario, los otros productos pueden
funcionar incorrectamente.
4.2 Sustituir la batería del mando a distancia
1 Presione y deslice la tapa posterior para abrir el
compartimiento de baterías del mando a distancia.
2 Inserte dos baterías AAA (incluidas). Asegúrese de
que los polos (+) y (-) en los polos de las baterías
coincidan con los polos (+) y (-) del compartimiento
de las baterías.
3 Cierre la tapa del compartimiento de baterías.
Precauciones relacionadas con las baterías
• Asegúrese de insertar las baterías con las
polaridades positiva “
” y negativa “
” correctas.
• Use baterías del mismo tipo. Nunca use diferentes
tipos de baterías juntas.
• Se pueden usar baterías recargables o no
recargables. Consulte las precauciones en sus
etiquetas.
• Tenga cuidado con las uñas cuando retire la tapa
de las baterías y las baterías.
• No deje caer el mando a distancia.
• No permita que nada afecte el mando a distancia.
• No derrame agua ni ningún líquido sobre el
mando a distancia.
• No coloque el mando a distancia sobre un objeto
mojado.
• No coloque el mando a distancia bajo la luz solar
directa ni cerca de fuentes de calor excesivo.
• Retire las baterías del mando a distancia cuando
no esté en uso por un período prolongado, ya
que la corrosión o las fugas de la batería pueden
ocasionar lesiones físicas y/o daños a la propiedad
y/o incendios.
• No use baterías distintas a las especificadas.
• No mezcle baterías nuevas con viejas.
• Nunca recargue una batería a menos que se
confirme que es del tipo recargable.

8
ES
5. Colocación y montaje
5.1 Colocación
A Si su TV está colocado sobre una mesa,
puede colocar la barra de sonido en la
mesa directamente frente al soporte del TV,
centrada con la pantalla del TV.
B Si su TV está fijado a una pared, puede
montar la barra de sonido en la pared
directamente debajo de la pantalla del TV.
5.2 Montaje en pared de la barra de sonido
- La instalación debe ser realizada por personal
cualificado solamente. El montaje incorrecto
pueden resultar en lesiones personales severas
y en daños a la propiedad (si pretende instalar
este producto usted mismo, debe comprobar
las instalaciones como el cableado eléctrico y la
tubería que pudiera existir dentro de la pared).
Es responsabilidad del instalador verificar que la
pared soporte de manera segura la carga total de
la barra de sonido y los soportes para la pared.
- Para la instalación se requieren herramientas
adicionales (no incluidas).
- No apriete excesivamente los tornillos.
- Conserve este manual de instrucciones para
futuras referencias.
- Use un detector de vigas eléctrico para
comprobar el tipo de pared antes de perforar y
montar.
ADVERTENCIA
• Para evitar lesiones, este aparato debe asegurarse al
suelo o pared de conformidad con las instrucciones
de instalación.
• Altura de montaje en pared recomendada: ≤ 1,5
metros.
1. Taladre 2 orificios paralelos (Ø 5,5-6 mm cada
uno según el tipo de pared) en la pared.
La distancia entre los orificios debe ser de
670mm.
2. Inserte los anclajes de pared suministrados en
2 orificios para tornillos en la pared. Inserte los
tornillos del soporte de pared provistos a través
de los soportes de pared en los anclajes de
pared. Fije y apriete los tornillos en la pared.
3. Cuelgue la unidad en los soportes de montaje
en pared.
1
2
3
670 mm / 26.4”
670 mm / 26,4"
AB
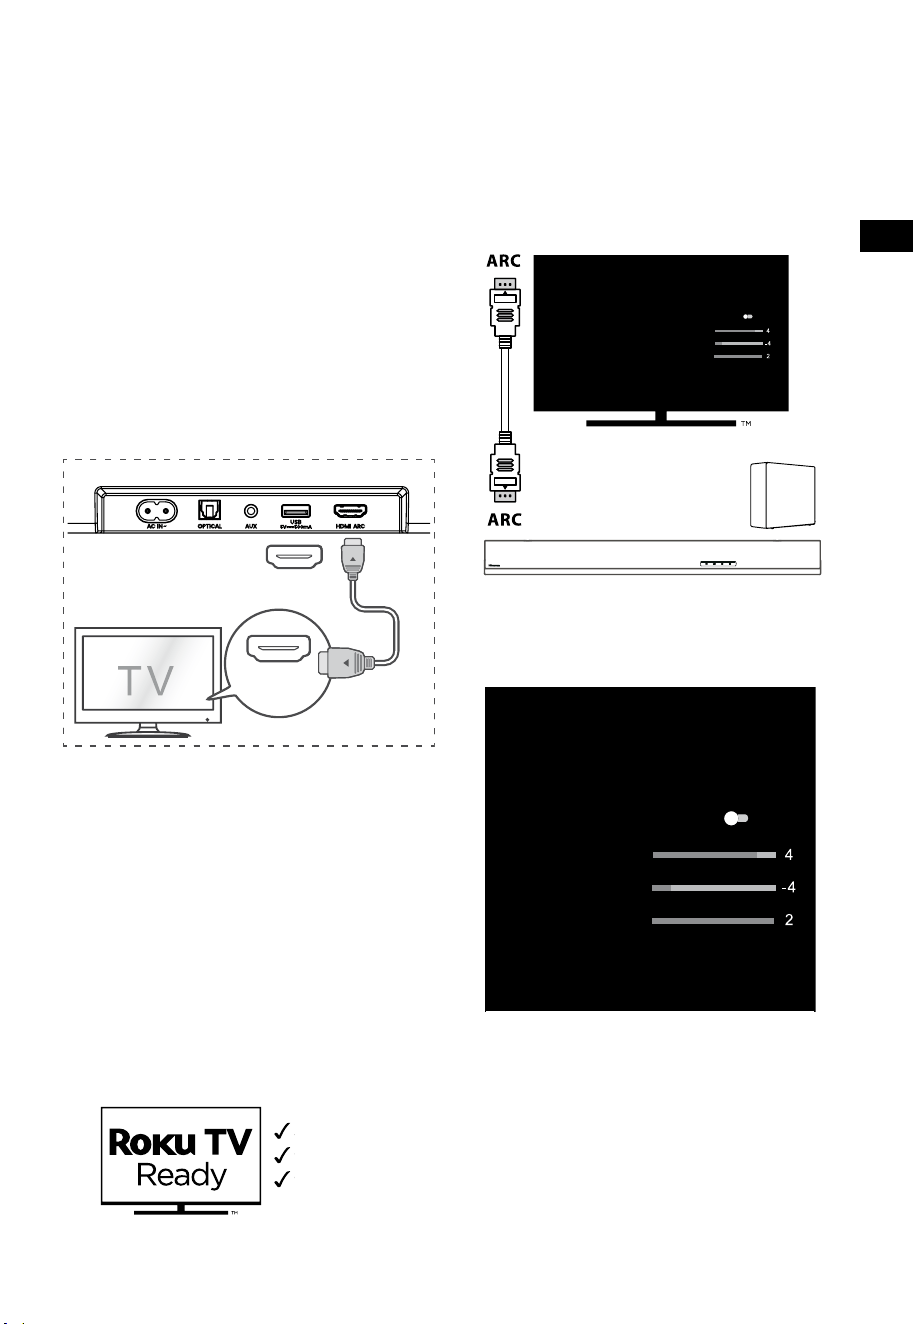
9
ES
6. Conexiones
6.1 Utilice la toma HDMI ARC
La función ARC (Canal de retorno de audio) le
permite enviar audio desde su TV compatible
con ARC a su barra de sonido a través de una
sola conexión HDMI. Para disfrutar de la función
ARC, asegúrese de que su TV es compatible tanto
con HDMI-CEC y ARC y realice la configuración
en conformidad. Cuando realice la configuración
correctamente, puede usar el mando a distancia
del TV para ajustar el nivel de volumen (VOL +/- y
SILENCIAR) de la barra de sonido.
• Conecte el cable HDMI de la toma HDMI ARC
de la barra de sonido a la toma HDMI ARC de
su TV compatible con ARC. Luego presione el
mando a distancia para seleccionar HDMI ARC.
56:/)'2
.*3/'8)
56:/)'2
.*3/
'8)
.KGJVNUTK
BA
Consejos:
• Su TV debe ser compatible con la función
HDMI-CEC y ARC. HDMI-CEC y ARC deben
ajustar en Activar.
• El método de ajuste de HDMI-CEC y ARC
pueden diferir dependiendo del TV. Para
obtener detalles sobre la función ARC,
consulte el manual del propietario del TV.
• Solo el cable HDMI 1.4 o una versión superior
puede admitir la función ARC.
6.2 Uso del Roku TV
• Si tiene un Roku TV™, simplemente conecte
el cable HDMI a los puertos ARC y siga las
instrucciones en pantalla de Roku TV Ready™.
Configuración sencilla
Un mando a distancia
Ajustes rápidos
6.3 Use la función Hisense EzPlay
Para Hisense EzPlay, cuando la barra de sonido
se conecta con un TV Hisense a través de HDMI
ARC, habrá un menú de configuración de la barra
de sonido en el TV, y puede controlar este menú
a través del mando a distancia de su TV para
controlar la mayoría de las funciones de la barra
de sonido.
Configuración de la barra
de sonido
Modos de EQ
Deportes
Modos envolventes
Nivel de graves
Nivel de agudos
Nivel de atenuación
Restablecer
Barra de sonido con
EzPlay
TV con
EzPlay
Ejemplo de menú de TV (los diferentes modelos
pueden tener diferentes menús):
Configuración--Sonido--Configuración de la
barra de sonido.
Configuración de la
barra de sonido
Modos de EQ
Deportes
Modos envolventes
Nivel de graves
Nivel de agudos
Nivel de atenuación
Restablecer
Nota:
• Esta función está disponible solo cuando la
barra de sonido y el TV son compatibles con
Hisense Ezplay.
• Esta función requiere que la barra de sonido
y el TV estén conectados a través de HDMI
ARC, y el CEC del TV debe estar encendido.
• Si cada vez que se configura correctamente,
la primera vez que se conecta, habrá un
consejo en la pantalla del TV para guiarlo a
encontrar el menú de configuración de la
barra de sonido.
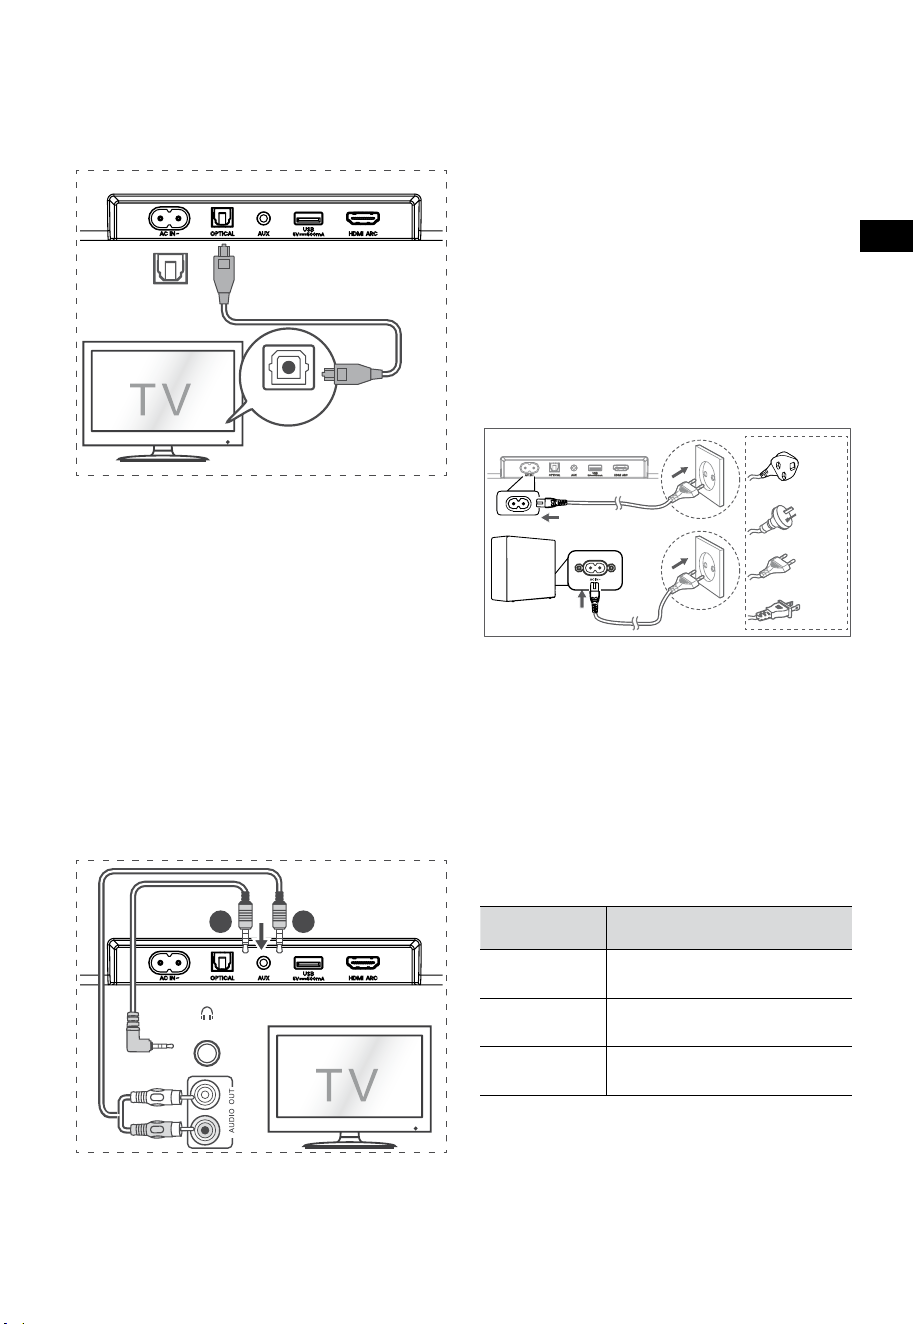
10
ES
6.6 Conexión de alimentación
¡Riesgo de daños al producto!
• ¡Riesgo de daños al producto! Asegúrese de
que el voltaje de la fuente de alimentación
corresponda al voltaje impreso en la parte
posterior o inferior de la barra de sonido.
• Antes de conectar el cable de alimentación
de CA, asegúrese de completar las otras
conexiones.
• Barra de sonido
Conecte el cable de alimentación a la toma CA~
de la barra de sonido y luego a una toma de
corriente.
• Subwoofer
Conecte el cable de corriente a CA~ Toma de
corriente subwoofer y enseguida a una toma de
corriente.
Para el Reino Unido
Para AUS
Para la UE
Para EE. UU.
* La cantidad de cable de alimentación y el tipo de
enchufe varían según la región.
7. Emparej
ar e
l Subwoofer
7.1 Emparejamiento automático
El subwoofer y la barra de sonido se emparejarán
automáticamente cuando ambas unidades estén
enchufadas a las tomas de corriente y activadas. No se
necesita ningún cable para conectar las dos unidades.
• Determine el estado basándose en el indicador
del subwoofer inalámbrico.
Estado del
LED
Estado
Parpadeo
rápido
Subwoofer en modo de
emparejamiento
Encendido fijo
Conectado/emparejamiento
correcto
Parpadeo lento Error de conexión/
emparejamiento
NOTA:
- No pulse el botón PAIR situado en la parte
posterior del subwoofer, excepto para el
emparejamiento manual.
- Si falla el emparejamiento automático,
empareje el subwoofer con la barra de sonido
manualmente.
6.4 Uso de la toma OPTICAL
- Utilice el cable ÓPTICO para conectar la toma
OPTICAL OUT del TV y la toma OPTICAL de la
barra de sonido.
56:/)'2
.*3/'8)
56:/)'2
.*3/
'8)
.KGJVNUTK
BA
Consejo:
Es posible que la barra de sonido no pueda
decodificar todos los formatos de audio digital de la
fuente de entrada. En este caso, la barra de sonido se
silenciará. Esto no es un defecto. Asegúrese de que
la configuración de audio de la fuente de entrada
(por ejemplo, TV, consola de juegos, reproductor de
DVD, etc.) esté configurada en PCM o Dolby Digital
(consulte el manual del usuario del dispositivo de
fuente de entrada para conocer los detalles de la
configuración de audio) con entrada HDMI ARC /
ÓPTICO.
6.5 Utilice la toma AUX
A. Utilice un cable de audio de 3,5 mm a 3,5 mm
para conectar la toma de auriculares del TV o
del dispositivo de audio externo a la toma AUX
de la barra de sonido.
56:/)'2
.*3/'8)
56:/)'2
.*3/
'8)
.KGJVNUTK
BA
Audífonos
B. Utilice un cable de audio RCA a 3,5 mm para
conectar las tomas de salida de audio del TV a la
toma AUX de la barra de sonido.

11
ES
7.2 Emparejamiento manual
1. Asegúrese de que todos los cables estén bien
conectados y que la barra de sonido esté en
el modo de espera.
2. Mantenga pulsado el botón PAIR situado
en la parte posterior del subwoofer durante
unos segundos. El subwoofer entrará en el
modo de emparejamiento y el indicador de
emparejamiento parpadeará rápidamente.
3. Pulse el botón
de la barra de sonido o del
mando a distancia para encender la barra de
sonido.
4. Mantenga pulsado el botón
de la barra
de sonido o del mando a distancia por unos
segundos.
5. Una vez que la conexión inalámbrica se haya
realizado correctamente, el indicador de
emparejamiento se iluminará.
6. Si el indicador de emparejamiento parpadea,
la conexión inalámbrica ha fallado.
Desenchufe el cable del subwoofer y vuelva
a conectar el cable principal después de 4
minutos. Repita los pasos 1 ~ 4.
NOTA:
• Si la conexión inalámbrica vuelve a fallar,
compruebe si hay conflicto o interferencias
fuertes (por ejemplo, interferencias de
un dispositivo electrónico) alrededor de
su ubicación. Elimine estos conflictos
o interferencias fuertes y repita los
procedimientos anteriores.
• El subwoofer debe estar a menos de 6 m (19,7
pies) de la barra de sonido en un área abierta.
• Si la barra de sonido no está conectada al
subwoofer y está en modo de encendido, el
indicador ENCENDIDO parpadeará. Siga los
pasos
1 ~ 4 anteriores para emparejar el subwoofer
con la barra de sonido.
8. Operación básica
8.1 Espera/ENCENDIDO
Se encenderá automáticamente cuando el cable
de alimentación esté conectado.
• Presione el botón
para cambiar el modo
ESPERA de la barra de sonido.
• Desconecte el enchufe de la toma de
corriente si desea apagar la barra de sonido
por completo.
8.2 Función de espera automática/
reactivación automática
[Auto-Standby] La barra de sonido se ha
programado para entrar automáticamente en
modo de espera cuando no se detecta audio
durante 15 minutos. Por ejemplo, esto ocurrirá
cuando se pausa la reproducción, o si la barra de
sonido se deja encendida accidentalmente.
[Auto-Wake] Si se conecta un TV o un dispositivo
externo (modo AUX / ÓPTICO / HDMI ARC), la
unidad se encenderá automáticamente cuando se
encienda el TV o el dispositivo externo.
Para desactivar esta función, siga estos pasos:
1. Durante el modo de ENCENDIDO, mantenga
pulsado el botón
durante 3 segundos
para abrir el menú.
- La pantalla de la unidad se desplazará por
“MENU”.
2. Pulse el botón
6 ces seguidas, la pantalla
muestra: Auto Wake [ON / OFF].
o presione el botón
7 veces sucesivamente:
la pantalla muestra: Auto Standby [ON /
OFF].
3. Seleccione el contenido con los botones
VOL+ /
–
del mando a distancia y enseguida
presione el botón
para confirmar su
selección y salir de los ajustes.
• Al repetir estos pasos, la función se "ACTIVA"
y "DESACTIVA".

12
ES
8.3 Seleccionar modos
Presione el botón (FUENTE) repetidamente
en la barra de sonido o el mando a distancia para
seleccionar el modo AUX,
, ÓPTICO, HDMI ARC y
USB. El modo seleccionado se mostrará en la pantalla.
• El modo seleccionado se mostrará en la
pantalla.
Pantalla Modo
HDMI ARC
ÓPTICO
Bluetooth
Conectado
No conectado
AUX
USB
No hay ningún USB
conectado
8.4 Ajustar el volumen
• Presione los botones VOL
+
/
-
en la barra de
sonido o en el mando a distancia para ajustar
el volumen.
• Si desea apagar el sonido, presione el botón
(SILENCIAR) del mando a distancia. Pulse
nuevamente el botón
(SILENCIAR) o pulse
los botones VOL
+
de la unidad o del mando
a distancia para reanudar la audición normal.
8.5 Encienda/apague el sonido
envolvente
• Presione el botón SURR en el control remoto
para encender/apagar el sonido envolvente.
8.6 Ajustar los graves/agudos
• Pulse los botones BASS
+
/
-
del mando a
distancia para ajustar el nivel de graves.
• Pulse los botones TREBLE +/
-
del mando a
distancia para ajustar el nivel de agudos.
8.7 Seleccionar el efecto de ecualizador
(EQ)
• Durante la reproducción, pulse el botón EQ
del mando a distancia para seleccionar los
ecualizadores predefinidos deseados: FILM,
MÚSICA, JUEGO, NOTICIAS, DEPORTE,
NOCHE.
8.8 Ajustar el brillo
• Presione los botones DIMMER
+
/
-
del
mando a distancia para seleccionar el nivel de
brillo.
8.9 Restauración de fábrica
Restablecer el dispositivo a la configuración
predeterminada.
• Cambie la barra de sonido al modo óptico,
mantenga pulsado el botón [
] en la barra de
sonido, la barra de sonido ingresará al modo de
restablecimiento de fábrica y pasará al estado
de espera.
MODO PREDETERMINADO
FUENTE ARC
Volumen 30
Surround Desactivar
Atenuador MAX
Graves 0
Agudos 0
EQ FILM
Auto Wake DESACTIVAR
Modo de espera
automático
ACTIVADO (Excepto en los
Estados Unidos)
9. Funcionamiento de AUX/
ÓPTICO/HDMI ARC
1 Asegúrese de que la barra de sonido esté
conectada al TV o dispositivo de audio.
2 Presione el botón
(FUENTE) repetidamente
en la barra de sonido o en el mando a
distancia para seleccionar el modo AUX,
ÓPTICO, HDMI ARC. El modo seleccionado
se mostrará en la pantalla.
3 Opere su dispositivo de audio directamente
para las funciones de reproducción.
4 Presione los botones VOL
+
/
-
para ajustar el
volumen al nivel deseado.
Consejo: Es posible que la barra de sonido no
pueda decodificar todos los formatos de audio
digital de la fuente de entrada. En este caso,
la barra de sonido se silenciará. Esto no es un
defecto. Asegúrese de que la configuración de
audio de la fuente de entrada (por ejemplo,
TV, consola de juegos, reproductor de DVD,
etc.) esté configurada en PCM o Dolby Digital
(consulte el manual del usuario del dispositivo de
fuente de entrada para conocer los detalles de la
configuración de audio) con HDMI ARC / OPTICAL
entrada coaxial.
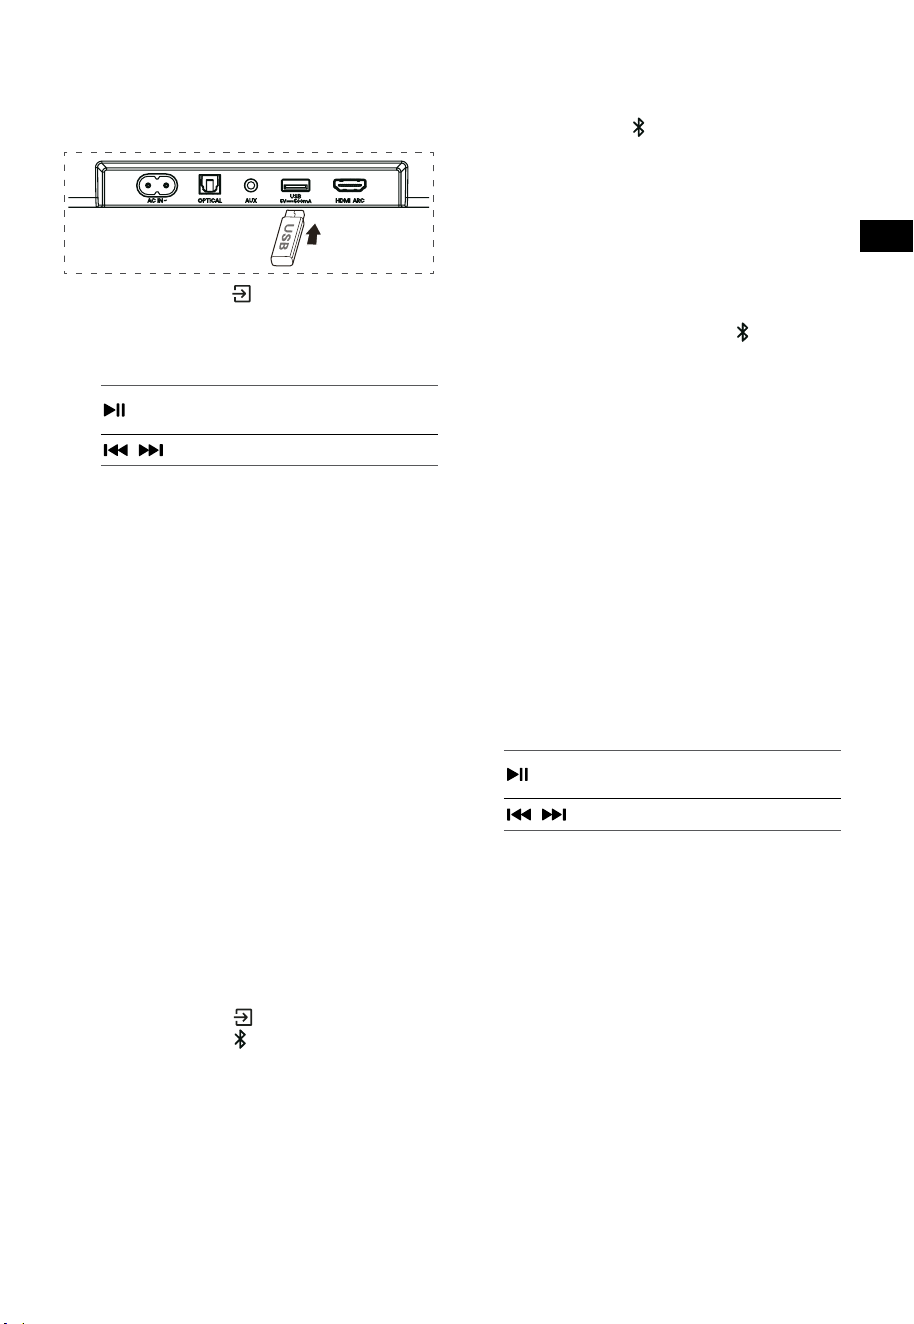
13
ES
10. Operación de USB
1 Inserte el dispositivo USB.
2 Presione el botón (FUENTE) repetidamente
en la barra de sonido o en el mando a
distancia para seleccionar el modo USB.
3 Durante la reproducción:
Inicie, pause o reanude la
reproducción
,
Salta a la pista anterior o siguiente
Consejos:
• La unidad puede admitir dispositivos USB de
hasta 32 GB de memoria.
• Esta unidad puede reproducir WAV / WMA /
MP3 / FLAC.
• Este producto puede no ser compatible
con ciertos tipos de dispositivos de
almacenamiento USB.
• Si utiliza un cable de extensión USB, un
concentrador USB o un lector de tarjetas
multifunción USB, es posible que no se reconozca
el dispositivo de almacenamiento USB.
• No extraiga el dispositivo de almacenamiento
USB mientras lee los archivos.
11. Funcionamiento Bluetooth®
A través de Bluetooth, conecte la barra de
sonido con su dispositivo Bluetooth (como un
iPad, iPhone, iPod touch, teléfono Android o
computadora portátil), y luego podrá escuchar los
archivos de audio almacenados en el dispositivo a
través de los altavoces de la barra de sonido.
Emparejamiento por primera vez
1 Presione el botón (FUENTE) en la barra de
sonido o el botón
del mando a distancia
para seleccionar el modo Bluetooth®.
• La pantalla mostrará NO BT.
2 Active su dispositivo Bluetooth y seleccione
el modo de búsqueda.
3 Seleccione “Hisense HS3100” en la lista de
emparejamiento. Después del mensaje de
audio, el sistema se conecta correctamente y
la pantalla mostrará BT IN.
• Si desea conectar su barra de sonido con
otro dispositivo Bluetooth, mantenga
pulsado el botón
en el mando a distancia
para desconectar el dispositivo Bluetooth
actualmente conectado. Siga los pasos 2 y 3
para emparejar su dispositivo Bluetooth.
Para desconectar la función Bluetooth,
puede hacer lo siguiente:
- Cambie a otra función de la unidad.
- Desactive la función de su dispositivo
Bluetooth.
- Mantenga presionado el botón
del mando
a distancia.
Escuchar música de un dispositivo
Bluetooth
- Si el dispositivo Bluetooth conectado admite
el Perfil de Distribución de Audio Avanzado
(A2DP), puede escuchar la música almacenada
en el dispositivo a través del reproductor.
- Si el dispositivo también es compatible con
el perfil de control remoto de audio y video
(AVRCP), puede utilizar el mando a distancia
del reproductor para reproducir música
almacenada en el dispositivo.
1. Empareje su dispositivo con el reproductor.
2. Reproduzca la música a través de su
dispositivo (si admite A2DP).
3. Use el mando a distancia para controlar la
reproducción (si admite AVRCP).
Inicie, pause o reanude la
reproducción
,
Salta a la pista anterior o siguiente
Consejos:
• El rango operativo entre la barra de sonido
y el dispositivo es de aproximadamente 8
metros.
• Antes de conectar un dispositivo Bluetooth®
a la barra de sonido, asegúrese de conocer
las capacidades del dispositivo.
• No está garantizada la compatibilidad con
todos los dispositivos Bluetooth®.
• Cualquier obstáculo entre el dispositivo y
la barra de sonido puede reducir el rango
operativo.
• Mantenga este reproductor alejado de otros
dispositivos electrónicos que puedan causar
interferencias.
• El reproductor también se desconectará
cuando se mueva el dispositivo fuera del
rango operacional.
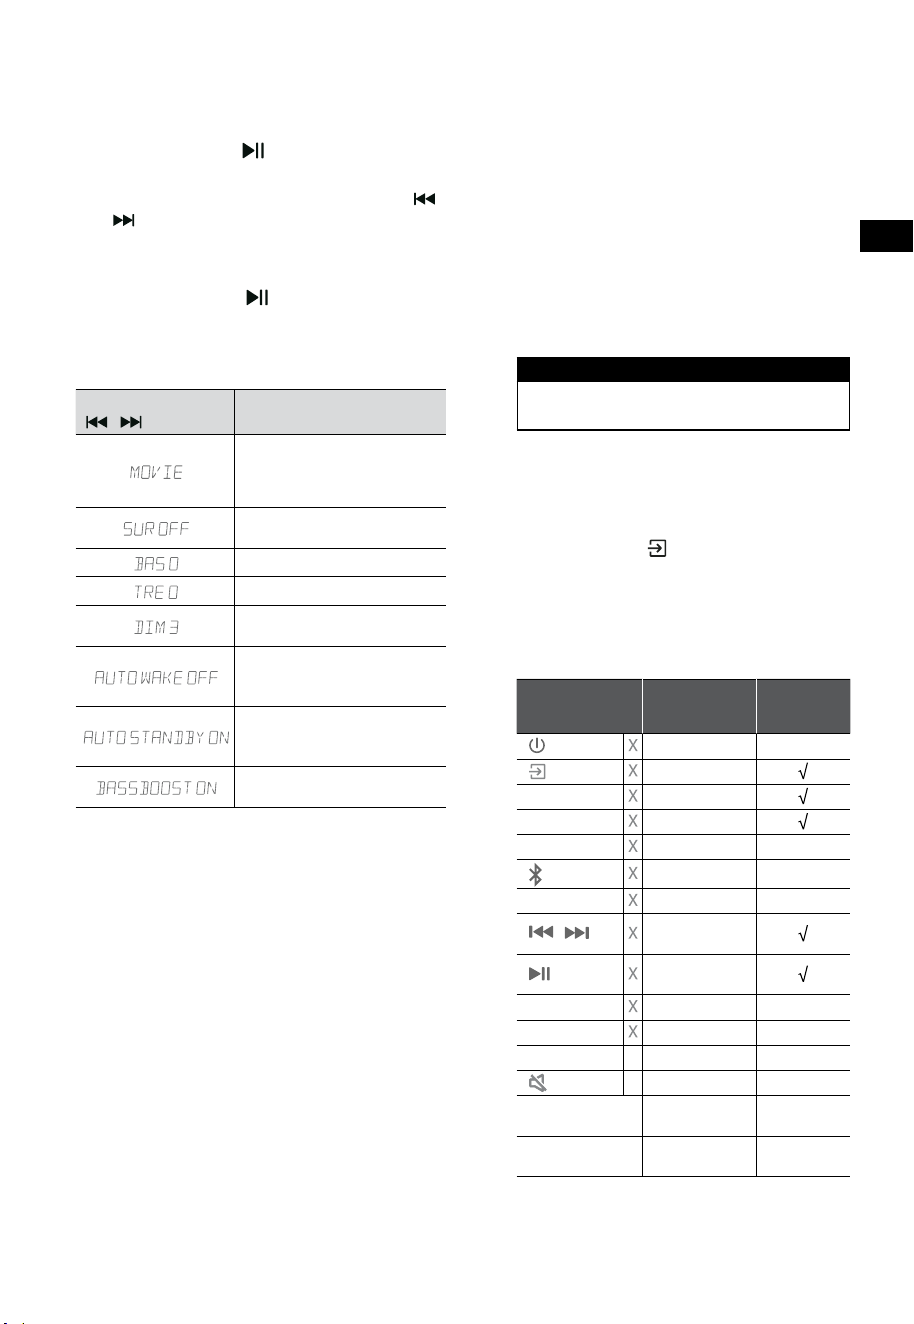
14
ES
12. Menú de configuración
1. Durante el modo de ENCENDIDO, mantenga
pulsado el botón durante 3 segundos
para abrir el menú.
2. Seleccione el contenido con los botones
/
.
3. Cambie los valores iniciales de cada uno de
los ajustes con los botones VOL
+
/
-
.
4. Presione el botón
para confirmar su
selección y salga de los ajustes.
• Si no se pulsa ningún botón en 10 segundos,
el sistema saldrá automáticamente del menú.
Pantalla
/
Descripción
VOL
+
/
-
Seleccione los efectos del
Ecualizador (EQ) (FILM, MÚSICA,
JUEGO, NOTICIAS, DEPORTE,
NOCHE)
Alternar el sonido envolvente
ACTIVAR / DESACTIVAR
Ajuste el nivel de graves
Ajuste el nivel de agudos
Ajustar el brillo
DIM 0 / DIM 1 / DIM 2 / DIM 3
Cambiar reactivación
automática
ACTIVAR / DESACTIVAR
Cambiar modo de espera
automático
ACTIVAR / DESACTIVAR
Interruptor: BassBoost
ACTIVAR / DESACTIVAR
13. Modo DEMO
El modo DEMO es un modo de usuario especialmente
configurado para su uso en un entorno de Tienda.
Activar/Desactivar el modo DEMO:
Esta barra de sonido está predeterminada de
fábrica en el modo de cliente normal.
• Inserte el kit de demostración para activar el
modo DEMO.
• Retire el kit de demostración para desactivar
el modo DEMO.
• La barra de sonido mostrará lo siguiente:
Pantalla Modo
DEMO ON Modo DEMO
DEMO OFF Modo cliente
Usar el modo DEMO
1. Ingrese al modo DEMO, la barra de sonido
se encenderá automáticamente cuando se
encienda la corriente alterna.
2. Bloquear fuente (
no disponible). Puede
seleccionar la fuente solo a través del kit de
demostración.
3. Todas las claves estarán bloqueadas y no
estarán disponibles. Solo puede controlarlo
mediante el kit de demostración.
Todos los botones
bloqueados
(Mando a distancia y barra)
Predeterminado
Kit de
demostración
(FUENTE) Bloquear fuente
+
(Vol+)
-
(Vol-)
SURR ACTIVAR
(BT)
EQ FILM
/
Si está en el
modo BT
Si está en el
modo BT
BASS
+
/
-
TREBLE
+
/
-
DIMMER
+
/
-
X DIM 3
(SILENCIAR)
X
Modo de espera
automático
DESACTIVAR
Reactivación
automática
DESACTIVAR
* Cuando presione los botones (X) no disponibles,
la barra de sonido mostrará "DEMO ON".
15
ES
14. Solución de problemas
Para mantener la garantía válida, nunca intente reparar el sistema usted mismo. Si tiene problemas al
utilizar esta barra de sonido, verifique los siguientes puntos antes de solicitar servicio.
Problema Solución
No hay alimentación • Asegúrese de que el cable de CA esté conectado correctamente.
• Asegúrese de que hay alimentación en la toma de CA.
• Presione el botón
(en espera) para encender la barra de sonido.
No funciona el mando a
distancia
• Antes de pulsar cualquier botón de control de reproducción, primero seleccione la
fuente correcta.
• Reduzca la distancia entre el mando a distancia y la barra de sonido.
• Inserte la batería con sus polaridades (+/-) alineadas como se indica.
• Cambie la batería.
• Apunte el mando a distancia directamente al sensor en la parte frontal de la barra
de sonido.
No hay sonido • Asegúrese de que la barra de sonido no esté silenciada. Presione el botón
SILENCIAR o + (VOL) para reanudar la escucha normal.
• Presione el botón
en la barra de sonido o en el mando a distancia para cambiar
la barra de sonido al modo de espera. Luego presione el botón
nuevamente
para encender la barra de sonido.
• Desenchufe la barra de sonido y el subwoofer de la toma de corriente, luego
vuelva a enchufarlos. Enciende la barra de sonido.
• Asegúrese de que la configuración de audio de la fuente de entrada (por ejemplo,
TV, consola de juegos, reproductor de DVD, etc.) esté configurada en modo PCM o
Dolby Digital mientras usa la conexión digital (por ejemplo, HDMI, ÓPTICO).
• El subwoofer está fuera de rango, acerque el subwoofer a la barra de sonido.
Asegúrese de que el subwoofer esté a menos de 5 m de la barra de sonido (cuanto
más cerca, mejor).
• La barra de sonido puede haber perdido la conexión con el subwoofer. Vuelva
a emparejar las unidades siguiendo los pasos de la sección “Emparejar el
Subwoofer”.
• Es posible que la barra de sonido no pueda decodificar todos los formatos de
audio digital de la fuente de entrada.
El TV tiene un problema
de visualización al ver
contenido HDR desde una
fuente HDMI.
• Algunos televisores 4K HDR requieren que la entrada HDMI o la configuración
de imagen se establezcan para la recepción de contenido HDR. Para obtener
más detalles sobre la configuración de la pantalla HDR, consulte el manual de
instrucciones de su televisor.
No puedo encontrar el
nombre de Bluetooth de
esta barra de sonido en
mi dispositivo Bluetooth
para el emparejamiento de
Bluetooth
• Asegúrese de que la función Bluetooth esté activada en su dispositivo Bluetooth.
• Asegúrese de haber emparejado la barra de sonido con su dispositivo Bluetooth.
• La barra de sonido tiene una función Bluetooth® que puede recibir una señal en un
radio de 8 metros. Mantenga una distancia de 8 metros entre la barra de sonido y
su dispositivo Bluetooth®.
Esta es una función de
apagado de 15 minutos,
uno de los requerimientos
estándar de ERPII para
ahorrar energía
• Cuando el nivel de la señal de entrada externa de la unidad es demasiado bajo, la
barra de sonido se apagará automáticamente en 15 minutos. Aumente el nivel de
volumen de su dispositivo externo.
16
ES
15. Especificaciones
Marca Hisense
Modelo HS3100
Barra de sonido
Suministro de energía 100-240 V~ 50/60 Hz
Consumo de energía
50 W
< 0,5 W (En espera)
USB
5 V
500 mA
USB de alta velocidad (2.0) / FAT32 / FAT16
32 GB (máx), WAV / WMA / MP3 / FLAC.
Dimensión (An × Al × P) 902 × 62,3 × 91 mm / 35,5" × 2,4" × 3,6"
Peso neto 1,6 kg / 3,5 lbs
Sensibilidad de entrada de sonido 500 mV
Respuesta de frecuencia 120 Hz - 20 kHz
Temperatura de funcionamiento 0°C - 45°C
Subwoofer
Suministro de energía 100-240 V~ 50/60 Hz
Consumo de energía
40 W
< 0,5 W (En espera)
Dimensión (An × Al × P) 161 × 303 × 304,5 mm / 6,3" × 11,9" × 12"
Peso neto 3,6 kg / 7,9 lbs
Respuesta de frecuencia 40 Hz - 150 Hz
Especificación inalámbrica
Versión/perfiles de Bluetooth
Rango de frecuencia Bluetooth
Potencia de transmisión máxima de Bluetooth
V 5.3 (A2DP, AVRCP)
2400 MHz ~ 2483,5 MHz
≤ 5 dBm
Rango de frecuencia inalámbrica 2,4G
Potencia máxima de transmisión 2,4G
2400 MHz ~ 2483 MHz
≤ 6 dBm
Tipo de modulación GFSK, π/4 DQPSK
Amplificador (potencia de audio máxima)
Total 480 W
Barra de sonido 300 W
Subwoofer 180 W
Mando a distancia
Distancia/ángulo 19,7 pies (6 m) / 30°
Tipo de batería AAA (1,5 V × 2)
• El diseño y las especificaciones se encuentran sujetos a cambios sin previo aviso.

Antes de utilizar a barra de som, leia cuidadosamente este manual e
guarde para futuras consultas.
MANUAL DO UTILIZADOR
Barra de som 3.1 Canais com subwoofer sem fios
Modelo: HS3100
PT

2
PT
Conteúdo
1. Instruções de segurança importantes ............................................................................................ 3
1.1 Segurança ................................................................................................................................................................................................ 3
1.2 Cuidado ....................................................................................................................................................................................................4
1.3 Aviso ..........................................................................................................................................................................................................4
2. Conteúdos da embalagem ............................................................................................................... 5
3. Identicar as peças ........................................................................................................................... 6
3.1 Barra de som ..........................................................................................................................................................................................6
3.2 Subwoofer sem os ..............................................................................................................................................................................6
3.3 Controlo remoto .................................................................................................................................................................................... 7
4. Preparações ...................................................................................................................................... 7
4.1 Prepare o Controlo remoto ...............................................................................................................................................................7
4.2 Substituir as pilhas do controlo remoto .......................................................................................................................................7
5. Colocação e montagem ................................................................................................................... 8
5.1 Colocação ................................................................................................................................................................................................8
5.2 Montagem da barra de som na parede ........................................................................................................................................8
6. Ligações ............................................................................................................................................ 9
6.1 Utilizar a tomada HDMI ARC .............................................................................................................................................................9
6.2 Utilizar Roku TV ......................................................................................................................................................................................9
6.3 Utilizar a função Hisense EzPlay ......................................................................................................................................................9
6.4 Utilizar a tomada OPTICAL ............................................................................................................................................................. 10
6.5 Utilizar a tomada AUX ...................................................................................................................................................................... 10
6.6 Ligar à alimentação ........................................................................................................................................................................... 10
7. Emparelhar
com o Subwoofer................................................................................................................10
7.1 Emparelhamento automático ....................................................................................................................................................... 10
7.2 Emparelhar manual ........................................................................................................................................................................... 11
8. Funcionamento básico ................................................................................................................... 11
8.1 Standby/LIGADO ................................................................................................................................................................................ 11
8.2 Funcionalidade Auto-Standby / Auto-Wake ............................................................................................................................ 11
8.3 Selecionar modos .............................................................................................................................................................................. 12
8.4 Ajustar o volume ................................................................................................................................................................................12
8.5 Ligue/desligue o som surround ................................................................................................................................................... 12
8.6 Ajustar os Baixos/Agudos ............................................................................................................................................................... 12
8.7 Selecionar o Efeito Equalizador (EQ) ...........................................................................................................................................12
8.8 Ajustar a luminosidade .................................................................................................................................................................... 12
8.9 Reposição de fábrica......................................................................................................................................................................... 12
9. Funcionamento AUX/ÓTICO/HDMI ARC ....................................................................................... 12
10. Funcionamento USB ....................................................................................................................... 13
11. Funcionamento Bluetooth® ........................................................................................................... 13
12. Menu Conguração ........................................................................................................................ 14
13. Modo DEMO .................................................................................................................................... 14
14. Resolução de problemas ................................................................................................................ 15
15. Especicações ................................................................................................................................. 16
3
PT
CUIDADO
RISCO DE CHOQUE ELÉTRICO
NÃO ABRIR
O relâmpago com uma seta, dentro de um
triângulo, destina-se a alertar o utilizador
da presença de “tensão perigosa” não
isolada dentro da estrutura do produto
e pode ser de magnitude suficiente para
constituir um risco de choque elétrico
para as pessoas.
O ponto de exclamação dentro de
um triângulo destina-se a alertar o
utilizador da presença de instruções
de funcionamento e manutenção
importantes (reparação) na literatura que
acompanha o equipamento.
1.1 Segurança
1 Leia estas instruções – Todas as instruções
de segurança e de funcionamento devem ser
lidas antes de utilizar este produto.
2 Guarde essas instruções – As instruções de
segurança e de funcionamento devem ser
guardadas para futuras consultas.
3 Siga todos os avisos – Todos os avisos
no equipamento e nas instruções de
funcionamento devem ser seguidos.
4 Siga todas as instruções – Todas as
instruções de funcionamento e de utilização
devem ser seguidas.
5 Não utilize este aparelho perto de água
– O aparelho não deve ser utilizado perto
de água ou humidade – por exemplo, numa
cave molhada ou perto de uma piscina ou
local similar.
6 Limpe apenas com um pano seco.
7 Não bloqueie quaisquer aberturas de
ventilação. Instale de acordo com as
instruções do fabricante.
8 Não instale perto de fontes de calor, como
radiadores, aquecedores, fornos ou outros
equipamentos (incluindo amplificadores)
que produzem calor.
9 Não anule a finalidade de segurança da
ficha polarizada ou com ligação terra. Uma
ficha polarizada tem duas lâminas, uma mais
larga que a outra. Uma ficha terra tem duas
lâminas e um terceiro pino terra. A lâmina
larga ou o terceiro pino é facultado para sua
segurança. Se a ficha fornecida não encaixar
na sua tomada, consulte um eletricista para
trocar a tomada obsoleta.
10 Proteja o cabo elétrico de ser pisado ou
dobrado, especialmente perto das fichas,
recetáculos de conveniência e no ponto
ondo sai do aparelho.
11 Utilize apenas acessórios especificados pelo
fabricante.
12
Utilize apenas com o carrinho,
suporte, tripé, suporte ou mesa
especificados pelo fabricante ou
que seja sólido com o
equipamento. Quando utiliza um carrinho ou
prateleira, tenha cuidado ao mover a
combinação carrinho/equipamento para
evitar ferimentos derivados de tropeçar.
13 Desligue o equipamento durante trovoadas
ou quando não for utilizado durante longos
períodos de tempo.
14 Para reparação, envie para pessoas
qualificadas. A reparação é necessária
quando o equipamento foi danificado de
alguma forma, como o cabo da fonte de
alimentação ou a ficha estão danificados,
foram derramados líquidos ou objetos
caíram em cima do equipamento ou este foi
exposto a chuva ou humidade, não funciona
normalmente ou caiu.
15
Este equipamento é um aparelho
elétrico de Classe II ou duplo isolamento. Foi
desenhado de forma a não necessitar de uma
ligação de segurança a terra.
16 O aparelho não deve ser exposto a gotas
ou salpico de líquidos. Não deve colocar
quaisquer objetos com líquidos, como jarras,
em cima do aparelho.
17 A distância mínima em redor do
equipamento para ventilação suficiente é de
5 cm.
18 A ventilação não deve ser impedida ao cobrir
1. Instruções de segurança importantes

4
PT
as aberturas de ventilação com itens como
jornais, toalhas, cortinados, etc.
19 Não deve colocar fontes de chama viva,
como velas acesas em cima do equipamento.
20 As pilhas devem ser recicladas ou eliminadas
de acordo com as orientações estatais e
locais.
21 Utilização do aparelho em climas moderados.
1.2 Cuidado
- A utilização de controlos ou ajustes ou o
desempenho de procedimentos diferentes
daqueles descritos neste manual podem
provocar exposição perigosa a radiação ou
outras situações de perigo.
- Para reduzir o risco de incêndio ou choque
elétrico, não exponha o equipamento a
chuva ou humidade. O equipamento não
deve ser exposto a gotas ou salpicos de água
e quaisquer objetos com líquidos, como
jarras, não devem ser colocados em cima do
equipamento.
- A ficha elétrica/acoplador do equipamento é
utilizado como dispositivo de desconexão e
deve estar sempre operável.
- Perigo de explosão se as pilhas forem
trocadas incorretamente. Substitua apenas
com pilhas do mesmo tipo ou equivalente.
1.3 Aviso
• A bateria (baterias ou pacote de bateria) não
deve ser exposta a calor excessivo, como luz
solar, fogo ou semelhantes.
• Antes de utilizar este sistema, verifique a
tensão para confirmar se é idêntica à tensão
da corrente elétrica local.
• Não coloque este equipamento perto de
fortes campos magnéticos.
• Não coloque este equipamento no
amplificador ou recetor.
• Se qualquer objeto sólido ou liquido cair no
sistema, desligue o sistema e leve para ser
verificado por um técnico qualificado antes
de continuar a utilizar.
• Não tente limpar o equipamento com
solventes químicos, pois pode danificar o
acabamento. Utilize um pano limpo, seco ou
ligeiramente humedecido.
• Quando remove a ficha elétrica da tomada,
puxe diretamente pela ficha, nunca arranque
pelo cabo.
• As alterações ou modificações a este
equipamento que não sejam expressamente
aprovadas pela parte responsável pela
conformidade irá anular a autoridade do
utilizador em utilizar o equipamento.
• A etiqueta informativa está colada na parte
inferior ou traseira do equipamento.
CUIDADO com a bateria
Para evitar derrame das pilhas, que pode resultar
em ferimentos corporais, danos a propriedade ou
danos ao aparelho:
- Instale todas as pilhas corretamente, + e -
conforme marcado no aparelho.
- Não misture pilhas novas com pilhas usadas.
- Não misture pilhas alcalinas, normais
(carbono-zinco) ou recarregáveis (Ni-Cd,
Ni-MH, etc.).
- Remova as pilhas quando não for utilizar
o aparelho durante um longo período de
tempo.
Eliminação correta deste produto. Este
símbolo indica que este produto não
deve ser eliminado junto com o lixo
doméstico no espaço da União
Europeia. Para evitar possíveis danos
ao ambiente e à saúde humana, devido a
eliminação de resíduos descontrolada, recicle de
forma responsável, para promover a reutilização
sustentável dos recursos dos materiais. Para
devolver o seu equipamento usado, utilize os
sistemas de devolução e recolha ou contacte o
distribuidor onde adquiriu o produto. Ele pode
realizar a reciclagem ambientalmente segura do
equipamento.
Declaramos que este produto
está em conformidade com os
requisitos essenciais e outras
provisões relevantes da Diretiva RED
2014/53/UE e os Regulamentos de
Equipamento de Rádio do RU 2017.
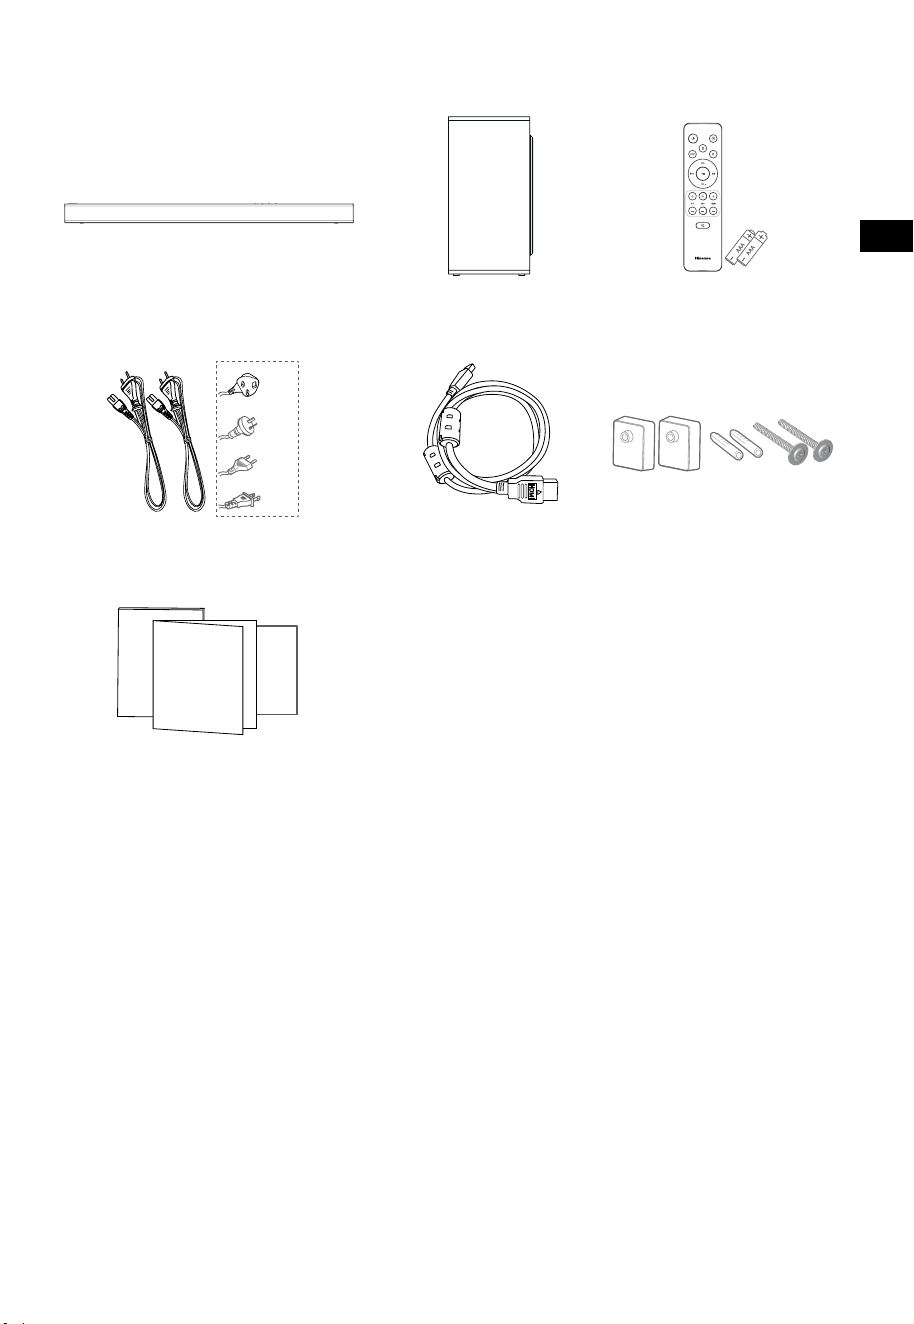
5
PT
2. Conteúdos da embalagem
• A quantidade de cabo de alimentação e o tipo de ficha variam de acordo com a região.
• As imagens, ilustrações e esquemas apresentados neste Manual do Utilizador servem apenas como
referência. O aspeto do produto real pode ser diferente.
Barra de som Subwoofer sem fios
Cabo HDMI
Suporte para a parede
Controlo remoto
/ 2 pilhas AAA
Cabo elétrico CA × 2
Manual do utilizador/Cartão de
garantia/Guia de início rápido
Para EUA
Para RU
Para AUS
Para UE
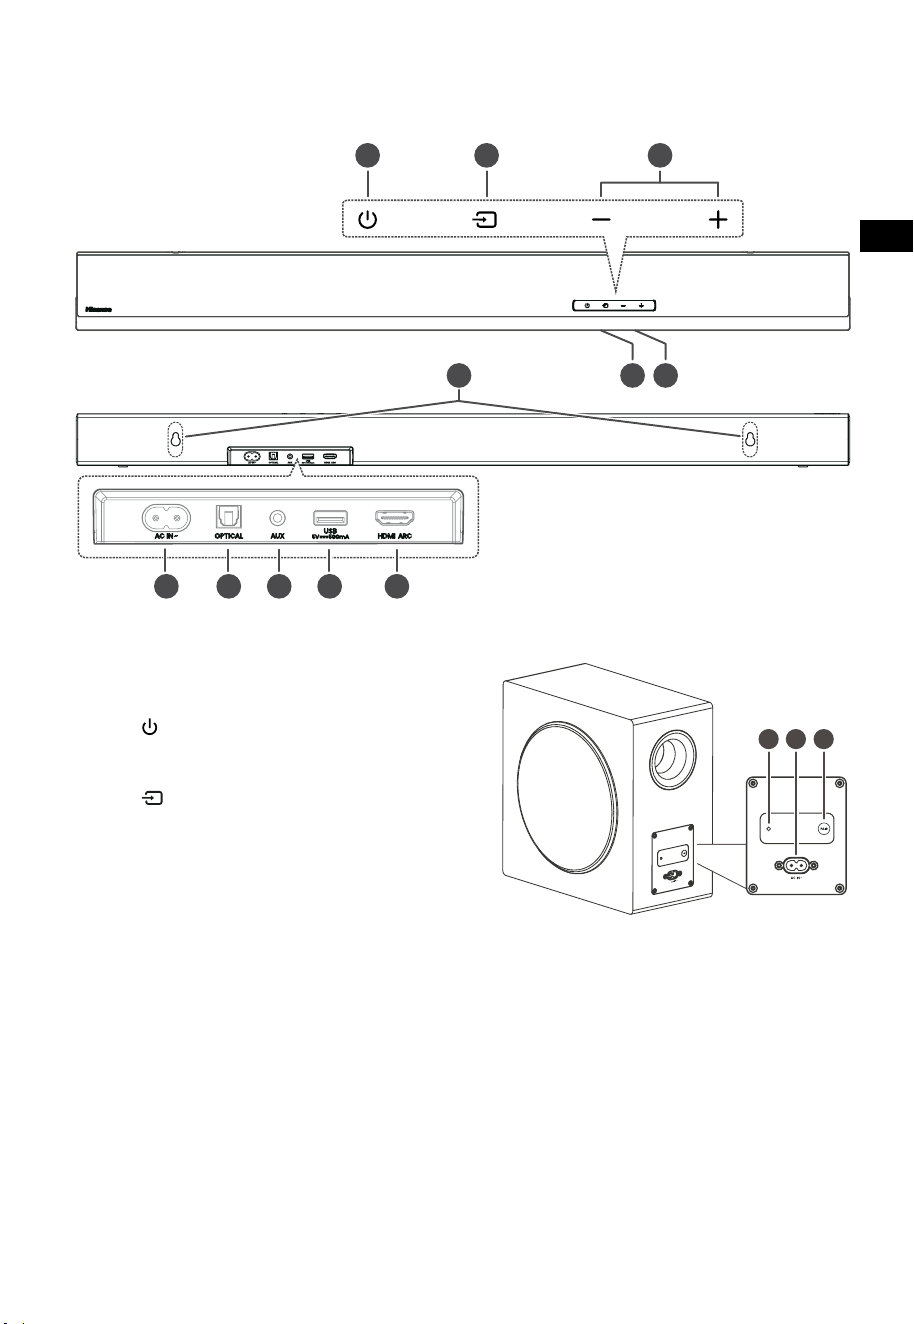
6
PT
3 4 5
TOP
BACK
3. Identificar as peças
3.1 Barra de som
1 Sensor do controlo remoto
Sinal de receção do controlo remoto.
2 Janela de visualização
Mostra o estado atual.
3 Tecla
(LIGAR/DESLIGAR)
Colocar a barra de som no modo LIGADO e
modo Standby.
4 Tecla
(ENTRADA)
Seleciona o modo de reprodução.
5 Teclas
+/-(
VOL)
Aumentar/reduzir o nível do volume.
6 Parafusos para o suporte de parede
7 Tomada AC~
Utilizar para ligar o cabo elétrico.
8 Tomada OPTICAL
9 Tomada AUX
10 Tomada USB
Ligar o dispositivo USB para reproduzir música.
11 Tomada HDMI ARC
Ligar uma TV através do cabo HDMI.
3.2 Subwoofer sem fios
1 Indicador de emparelhamento
A luz para de piscar assim que o Subwoofer
estiver emparelhado com a Barra de som.
2 Tomada AC IN~
Utilizar para ligar o cabo elétrico.
3 Tecla PAIR
Premir para ativar a função de emparelhar
entre a barra de som e o subwoofer.
TOPO
TRASEIRA

7
PT
11
10
12
3.3 Controlo remoto
1 Colocar a barra de som no modo LIGADO e modo
STANDBY.
2 SURR Colocar o Surround em LIGAR / DESLIGAR.
3 VOL
+
/VOL
-
Aumentar/reduzir o nível do volume.
4 BASS
+
/
-
Ajustar o nível de baixos.
5
(MUDO)
Ligar e desligar o som.
6
tecla
Seleciona o modo de reprodução.
7
Selecionar modo Bluetooth.
8 EQ Selecione um efeito de som predefinido.
9
/ Saltar para a faixa anterior/seguinte no modo
Bluetooth/USB.
10
Reproduzir/pausar/retomar a reprodução no modo
Bluetooth/USB. Manter premido para ativar a função
emparelhar no modo Bluetooth ou desligar o
dispositivo Bluetooth existente emparelhado.
11 DIMMER
+
/
-
Ajustar a luminosidade LED.
12 TREBLE
+
/
-
Ajustar o nível de agudos.
4. Preparações
4.1 Prepare o Controlo remoto
O Controlo remoto facultado permite que a barra de
som seja operada à distância.
• Mesmo se o Controlo remoto for operado
dentro do alcance efetivo de 6 metros (19,7
pés), o funcionamento do controlo remoto
pode não ser possível se houver obstáculos
entre a barra de som e o controlo remoto.
• Se o Controlo remoto for operado perto
de outros produtos que originem raios
infravermelhos, ou se outros dispositivos
de controlo remoto que utilizem raios
infravermelhos forem utilizados perto da barra
de som, esta pode não funcionar corretamente.
Da mesma forma, os outros equipamentos
também podem funcionar indevidamente.
4.2 Substituir as pilhas do controlo remoto
1 Prima e deslize a tampa traseira para abrir o
compartimento das pilhas do controlo remoto.
2 Insira duas pilhas de tamanho AAA (incluídas).
Certifique-se de que os terminais (+) e (–)
das pilhas coincide com os terminais (+) e (–)
indicados no compartimento das pilhas.
3 Feche a tampa do compartimento das pilhas.
Precauções referentes a pilhas
• Certifique-se de que insere as pilhas com as
polaridades positiva “
” e negativa “
” nas
posições corretas.
• Utilize pilhas do mesmo tipo. Nunca misture
tipos de pilhas.
• Pode utilizar pilhas recarregáveis ou não
recarregáveis. Consulte as precauções nas
respetivas etiquetas.
• Tenha atenção às suas unhas quando remove
a tampa das pilhas e as pilhas.
• Não deixe cair o controlo remoto.
• Não permita que nada bata no controlo
remoto.
• Não derrame água ou qualquer líquido no
controlo remoto.
• Não coloque o controlo remoto em cima de
um objeto molhado.
• Não exponha o controlo remoto à luz solar
direta, nem perto de fontes de calor excessivo.
• Retire as pilhas do controlo remoto quando
não utiliza durante um longo período, pode
ocorrer corrosão ou vazamento das pilhas e
resultar em ferimentos físicos, e/ou danos a
propriedade, e/ou incêndio.
• Não utilize pilhas diferentes daquelas
especificadas.
• Não misture pilhas novas com pilhas usadas.
• Nunca recarregue uma pilha, exceto se for
confirmado que é do tipo recarregável.

8
PT
5. Colocação e montagem
5.1 Colocação
A Se a sua TV estiver colocada numa mesa,
pode colocar a barra de som diretamente na
mesa, em frente do suporte da TV, centrada
com o ecrã da TV.
B Se a sua TV estiver presa na parede,
pode montar a barra de som na parede,
diretamente por baixo do ecrã da TV.
5.2 Montagem da barra de som na parede
- A instalação só deve ser realizada por pessoas
qualificado. A montagem incorreta pode
resultar em graves ferimentos pessoais e
danos a propriedade (se pretender instalar
você mesmo este produto, deve verificar as
instalações como parte elétrica e tubagem
que podem estar no interior da parede). É da
responsabilidade do instalador verificar que a
parede suporta em segurança a carga total da
barra de som e dos suportes para a parede.
- São necessárias ferramentas adicionais (não
incluídas) para a instalação.
- Não aperte os parafusos em demasia.
- Guarde este manual de instruções para futuras
consultas.
- Utilize um equipamento eletrónico para
verificar o tipo de parede antes de perfurar e
montar.
AVISO
• Para evitar ferimentos, este aparelho deve ser fixo em
segurança à parede/chão, de acordo com as instruções
de instalação.
• Altura de montagem na parede sugerida: ≤ 1,5 metros.
1. Perfure 2 orifícios paralelos (Ø 5,5-6 mm cada,
de acordo com o tipo de parede) na parede. A
distância entre os orifícios deve ser de 670 mm.
2. Insira as âncoras de parede facultadas nos
dois parafusos nos orifícios na parede. Insira
os parafusos de suporte de parede fornecidos
através dos suportes de parede nas âncoras
de parede. Encaixe e aperte os parafusos na
parede.
3. Pendure o aparelho nos suportes de
montagem na parede.
1
2
3
670 mm / 26.4”
670 mm / 26,4"
AB
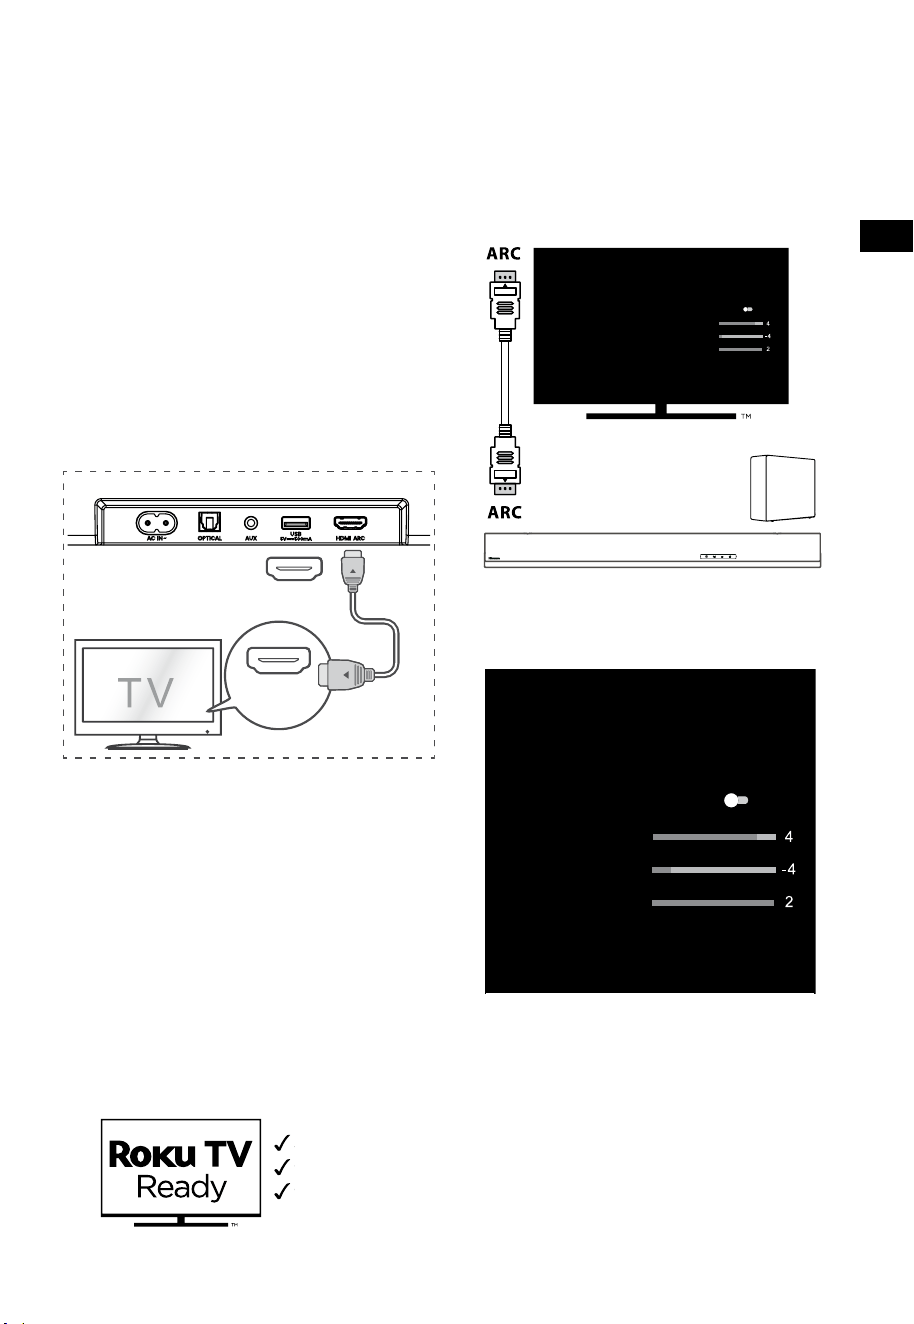
9
PT
6. Ligações
6.1 Utilizar a tomada HDMI ARC
A função ARC (Canal de retorno de áudio)
permite-lhe enviar o áudio da sua TV compatível
com ARC para a barra de som através de apenas
uma ligação HDMI. Para desfrutar da função ARC,
certifique-se de que a sua TV é conforme HDMI-
CEC e ARC e que está devidamente configurada.
Quando configurado corretamente, pode utilizar
o controlo remoto da sua TV para ajustar a saída
de volume (VOL +/- e MUDO) da barra de som.
• Ligue o cabo HDMI da barra de som indicado
como tomada HDMI ARC à tomada HDMI
ARC da sua TV compatível com ARC. Prima
então no controlo remoto para selecionar
HDMI ARC.
56:/)'2
.*3/'8)
56:/)'2
.*3/
'8)
.KGJVNUTK
BA
Dicas:
• A sua TV deve suportar a função HDMI-CEC e
ARC. HDMI-CEC e ARC devem estar definidos
para Ligado.
• O método de configuração de HDMI-CEC e
ARC pode diferir, dependendo da TV. Para
detalhes sobre a função ARC, consulte o
manual do proprietário.
• Apenas o cabo HDMI 1.4 ou de versão
superior pode suportar a função ARC.
6.2 Utilizar Roku TV
• Se tiver uma Roku TV™, basta ligar o cabo
HDMI às portas ARC e seguir as instruções no
ecrã Roku TV Ready™.
Configuração simples
Um controlo remoto
Conteúdos da
embalagem
6.3 Utilizar a função Hisense EzPlay
Para Hisense EzPlay, quando a Barra de som liga
a uma TV Hisense através de HDMI ARC, irá surgir
um menu de configuração da Barra de som na
TV. Pode controlar este menu através do controlo
remoto da TV para a maioria das funcionalidades
da Barra de som.
Definições da Barra de som
Modos EQ
Desporto
Modos Surround
Nível de baixos
Nível de Agudos
Nível de Regulação
Reposição
Barra de som com
EzPlay
TV com
EzPlay
Exemplo de menu da TV (diferentes modelos
podem ter diferentes menus):
Definição-som-Definição da Barra de Som.
Definições da Barra de som
Modos EQ
Desporto
Modos Surround
Nível de baixos
Nível de Agudos
Nível de Regulação
Reposição
Nota:
• Esta função só está disponível quanto a Barra
de som e a TV suportam Hisense Ezplay.
• Esta função requer que a Barra de som e a TV
estejam ligadas através de HDMI ARC, e CEC
da TV deve ser LIGADO.
• Se cada vez que for preciso configurar, da
primeira vez que liga irá surgir uma sugestão
no ecrã da TV para o orientar pelo menu de
definição da Barra de som.
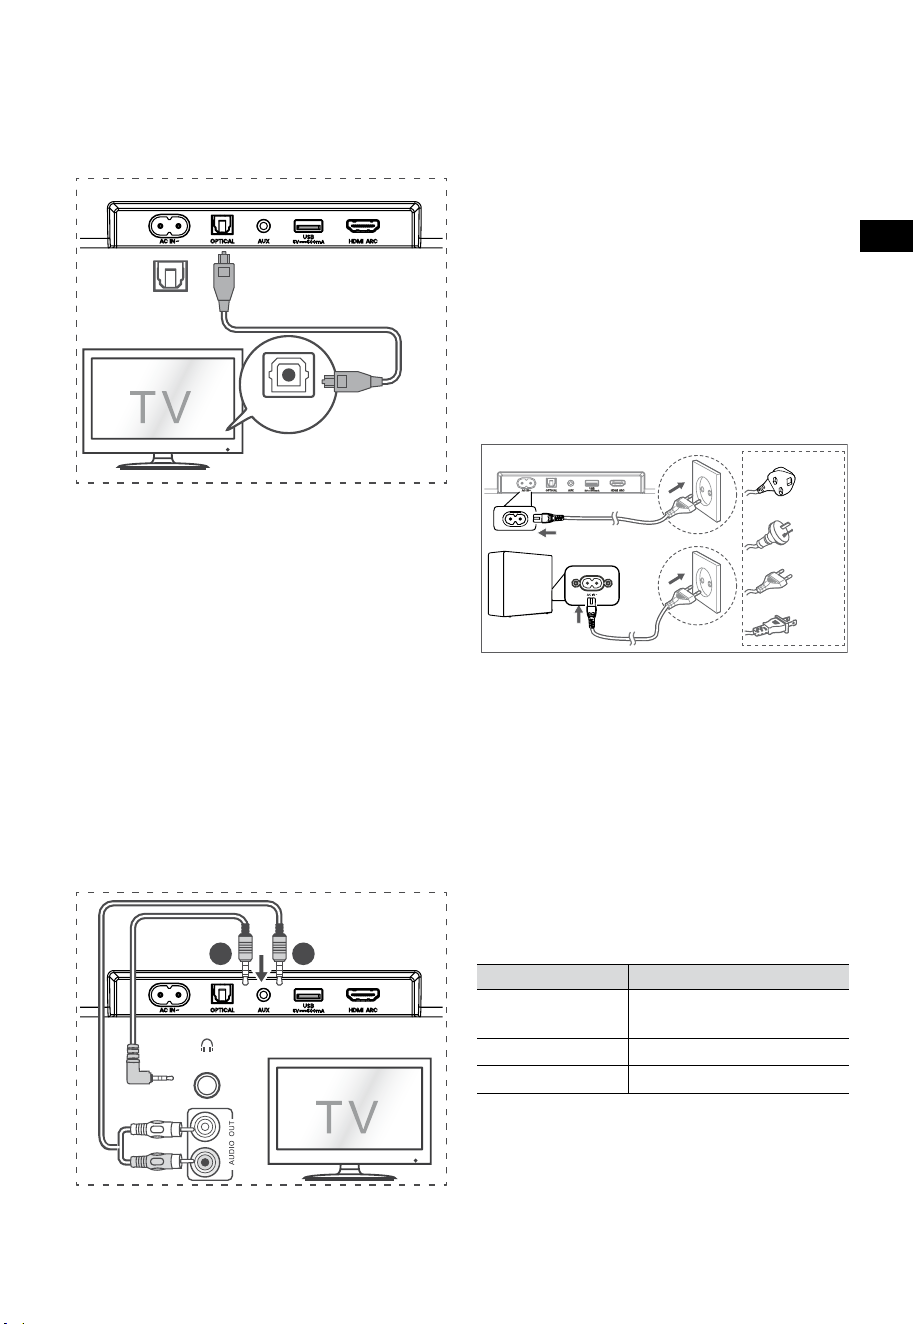
10
PT
6.6 Ligar à alimentação
Risco de danos ao produto!
• Risco de danos ao produto! Certifique-se
de que a tensão da fonte de alimentação
corresponde à tensão impressa na traseira ou
na parte inferior da barra de som.
• Antes de ligar o cabo elétrico, certifique-se
de que concluiu todas as outras ligações.
• Barra de som
Ligue o cabo elétrico à tomada AC~ da barra
de som e depois a uma tomada elétrica.
• Subwoofer
Ligue o cabo elétrico da tomada AC~, do
subwoofer e depois ligue a uma tomada
elétrica na parede.
* A quantidade de cabo elétrico e de ficha variam
de acordo com a região.
7. Emparelhar
com o Subwoofer
7.1 Emparelhamento automático
O subwoofer e a barra de som irão
automaticamente emparelhar quando ambos os
aparelhos estiverem ligados à tomada elétrica e
ligados no interruptor. Não é necessário nenhum
cabo para ligar os dois aparelhos.
• Determine o estado com base no indicador
do Subwoofer sem fios.
Estado LED Estado
Intermitente
rápido
Subwoofer em modo
emparelhar
Constante ligado
Ligado / Emparelhar com êxito
Intermitente lento
Ligação / Emparelhar falhou
NOTAS:
- Não prima a tecla PAIR na traseira do
subwoofer, exceto para emparelhar manual.
- Se emparelhar automático falhar,
emparelhe o subwoofer com a Barra de som
manualmente.
6.4 Utilizar a tomada OPTICAL
- Utilize o cabo ÓTICO para ligar a tomada
OPTICAL OUT da TV e a tomada OPTICAL na
barra de som.
56:/)'2
.*3/'8)
56:/)'2
.*3/
'8)
.KGJVNUTK
BA
Dica:
A barra de som pode não conseguir descodificar
todos os formato de áudio digital da fonte de
entrada. Neste caso, a barra de som irá ficar
silenciado. NÃO se trata de um defeito. Certifique-
se de que a definição de áudio da fonte de entrada
(por ex. televisão, consola de jogos, leitor de DVD,
etc.) está definida para PCM ou Dolby Digital
(Consulte o manual do utilizador do aparelho da
fonte de entrada para ver os detalhes de definição
de áudio) com entrada HDMI ARC / ÓTICO.
6.5 Utilizar a tomada AUX
A. Utilize um cabo de áudio de 3,5 mm para
3,5 mm para ligar a tomada da TV ou dos
auscultadores áudio externos à tomada AUX
na barra de som.
56:/)'2
.*3/'8)
56:/)'2
.*3/
'8)
.KGJVNUTK
BA
Auscultadores
B. Utilize um cabo de áudio de RCA para
3,5 mm para ligar as tomadas de saída de
áudio da TV à tomada AUX na barra de som.
Para RU
Para AUS
Para UE
Para EUA

11
PT
7.2 Emparelhar manual
1. Certifique-se de que todos os cabos estão
bem ligados e que a Barra de som está em
modo Standby.
2. Mantenha premida a tecla PAIR na traseira
do subwoofer durante alguns segundos. O
subwoofer entra em modo emparelhar e o
indicador Emparelhar pisca rapidamente.
3. Prima a tecla
na Barra de som ou no
controlo remoto para ligar a Barra de som.
4. Mantenha premida a tecla
na Barra de
som ou no controlo remoto durante alguns
segundos.
5. Depois da ligação sem fios bem sucedida, os
indicadores de emparelhado acendem-se.
6. Se o indicador de emparelhado piscar, a
ligação sem fios falhou. Desligue o cabo do
subwoofer e volte a ligar o cabo principal
após 4 minutos. Repita os passos 1 ~ 4.
NOTAS:
• Se a ligação sem fio falhar, verifique se
existe um objeto ou interferência forte (por
ex., interferência de um aparelho elétrico)
próximo da localização. Remova esses
objetos ou interferências fortes e repita os
procedimentos acima.
• O subwoofer deve estar a 6 metros (19,7 pés)
da barra de som, numa área aberta.
• Se a Barra de som não estiver ligada ao
subwoofer e estiver no modo Ligado, o
indicador INTERRUPTOR pisca. Siga os passos
1 - 4 acima para emparelhar o subwoofer
com a Barra de som.
8. Funcionamento básico
8.1 Standby/LIGADO
Irá ligar automaticamente quando o cabo elétrico
é ligado.
• Prima o botão
para colocar a barra de som
em modo STANDBY.
• Desligue o cabo elétrico da tomada elétrica
se pretender DESLIGAR a barra de som por
completo.
8.2 Funcionalidade Auto-Standby / Auto-
Wake
[Auto-Standby] A sua barra de som foi
programada para entrar automaticamente em
modo standby quando não é detetado áudio
durante 15 minutos. Por exemplo, isto deve
ocorrer quando pausa a reprodução ou se a barra
de som for deixada ligada acidentalmente.
[Auto-Wake] Se uma TV ou um dispositivo
externo estiver ligado (modo AUX/ÓTICO/HDMI
ARC), o aparelho liga-se automaticamente quando
a TV ou o dispositivo externo é ligado.
Para desativar esta funcionalidade, siga os
passos abaixo:
1. Durante o modo Ligado, mantenha premida
a tecla
durante 3 segundos para abrir o
menu.
- O visor do aparelho irá mostrar “MENU”.
2. Prima
6 vezes seguidas, o visor mostra:
Auto Wake [ON / OFF].
ou prima o botão
7 vezes seguidas:
o visor mostra: Auto Standby [ON / OFF].
3. Selecione o conteúdo com os botões
VOL+ / – no controlo remoto, prima o
botão
para confirmar a seleção e sair das
definições.
• Repetir esses passos irá alternar a
funcionalidade para "LIGADO" e "DESLIGAR".

12
PT
8.3 Selecionar modos
Prima o botão (ENTRADA) repetidamente
na barra de som ou no controlo remoto para
selecionar o modo AUX,
, ÓTICO, HDMI ARC e
USB. O modo selecionado será exibido no ecrã.
• O modo selecionado será exibido no ecrã.
Visor Modo
HDMI ARC
ÓTICO
Bluetooth
Ligado
Não ligado
AUX
USB
Nenhum USB ligado
8.4 Ajustar o volume
• Prima os botões VOL
+
/
-
na barra de som ou
no controlo remoto para ajustar o volume.
• Se pretender desligar o som, prima a tecla
(MUDO) no controlo remoto. Prima
novamente a tecla (MUDO) ou prima
VOL
+
para retomar o som.
8.5 Ligue/desligue o som surround
• Pressione o botão SURR no controle remoto
para ligar/desligar o som surround.
8.6 Ajustar os Baixos/Agudos
• Prima os botões BASS
+
/
-
no controlo
remoto para ajustar o nível de baixos.
• Prima os botões TREBLE
+
/
-
no controlo
remoto para ajustar o nível de agudos.
8.7 Selecionar o Efeito Equalizador (EQ)
• Durante a reprodução, prima a tecla EQ
no controlo remoto para selecionar os
equalizadores predefinidos: FILME, MÚSICA,
JOGO, NOTÍCIAS, DESPORTO, NOITE.
8.8 Ajustar a luminosidade
• Prima os botões DIMMER
+
/
-
no controlo
remoto para selecionar o nível de luminosidade.
8.9 Reposição de fábrica
Repor o aparelho para as definições de fábrica.
• Ligue a barra de som no modo ótico,
mantenha premida a tecla [
] na barra de
som, a barra de som irá entrar em modo de
reposição de fábrica e alterar para o estado
standby.
MODO PREDEFINIDO
ENTRADA ARC
Volume 30
Surround Desligar
Regulador MÁX
Baixos 0
Agudos 0
EQ FILME
Auto-Ativar DESLIGAR
Auto Standby LIGADO (Exceto Estados
Unidos da América)
9. Funcionamento AUX/
ÓTICO/HDMI ARC
1 Certifique-se de que a barra de som está
ligada à TV ou ao dispositivo de áudio.
2 Prima repetidamente o botão
(ENTRADA)
na barra de som ou no controlo remoto para
selecionar o modo AUX, ÓTICO, HDMI ARC.
O modo selecionado será exibido no ecrã.
3 Opere o seu equipamento áudio diretamente
para as funcionalidades de reprodução.
4 Prima os botões VOL
+
/
-
para ajustar o
volume para o seu nível pretendido.
Dica: A barra de som pode não conseguir
descodificar todos os formato de áudio digital da
fonte de entrada. Neste caso, a barra de som irá ficar
silenciado. NÃO se trata de um defeito. Certifique-
se de que a definição de áudio da fonte de entrada
(por ex. televisão, consola de jogos, leitor de DVD,
etc.) está definida para PCM ou Dolby Digital
(Consulte o manual do utilizador do aparelho da
fonte de entrada para ver os detalhes de definição
de áudio) com entrada HDMI ARC / ÓTICO.

13
PT
10. Funcionamento USB
1 Insira um dispositivo USB.
2 Prima repetidamente o botão (ENTRADA)
na barra de som ou no controlo remoto para
selecionar o modo USB.
3 Durante a reprodução:
Iniciar, pausar ou retomar a
reprodução
,
Saltar para a faixa anterior ou
seguinte
Dicas:
• O equipamento suporta dispositivos USB
com até 32GB de memória.
• Este equipamento pode reproduzir WAV /
WMA / MP3 / FLAC.
• Este produto pode não ser compatível
com determinados tipos de dispositivos de
armazenamento USB.
• Se utilizar um cabo de extensão USB, um hub
USB ou um leitor de cartões multifunções
USB, o dispositivo de armazenamento USB
pode não ser reconhecido.
• Não remova o dispositivo de armazenamento
USB enquanto está a ler ficheiros.
11. Funcionamento Bluetooth®
Através de Bluetooth, ligue a Barra de som com o
seu dispositivo Bluetooth (como iPad, iPhone, iPod
touch, telemóvel Android ou portátil) e pode ouvir
os ficheiros de áudio guardados no dispositivo
através das colunas da sua Barra de som.
Emparelhar pela primeira vez
1 Prima o botão (ENTRADA) na barra de
som ou o botão
no controlo remoto para
selecionar o modo Bluetooth®.
• O visor irá exibir NO BT.
2 Ative o seu dispositivo Bluetooth e selecione
o modo de pesquisa.
3 Selecione “Hisense HS3100” na lista para
emparelhar. Depois da indicação áudio, o
sistema irá ligar com êxito e o visor irá exibir
BT IN.
• Se quiser ligar a sua barra de som com outro
dispositivo Bluetooth, mantenha premida
a tecla
no controlo remoto para desligar
o dispositivo Bluetooth atualmente ligado.
Siga os passos 2-3 para emparelhar o seu
dispositivo Bluetooth.
Para desligar a função Bluetooth, pode:
- Alterar para outra função no dispositivo.
- Desativar a função do seu dispositivo
Bluetooth.
- Mantenha premido o botão
no controlo
remoto.
Ouvir música a partir do dispositivo
Bluetooth
- Se o dispositivo Bluetooth ligado suportar
o Perfil de distribuição de áudio avançado
(A2DP), pode ouvir a música guardada no
dispositivo através da barra de som.
- Se o dispositivo também suportar o Perfil de
controlo remoto de vídeo e áudio (AVRCP),
pode utilizar o controlo remoto da barra de
som para reproduzir a música guardada no
dispositivo.
1. Emparelhar o seu equipamento com o leitor.
2. Reproduzir música através do seu
equipamento (se suportar A2DP).
3. Utilizar o controlo remoto fornecido para
controlar a reprodução (se suportar AVRCP).
Iniciar, pausar ou retomar a
reprodução
,
Saltar para a faixa anterior ou
seguinte
Dicas:
• O alcance operacional entre a Barra de som
e o dispositivo é de aproximadamente 8
metros.
• Antes de ligar um dispositivo Bluetooth® à
Barra de som, certifique-se de que conhece
as capacidades do dispositivo.
• Não garantimos a compatibilidade com
todos os dispositivos Bluetooth®.
• Qualquer obstáculo entre o dispositivo
e a Barra de som pode reduzir o alcance
operacional.
• Mantenha o leitor afastado de outros
dispositivos eletrónicos que possam provocar
interferência.
• O leitor também será desligado quando
o seu dispositivo for movido para fora do
alcance operacional.
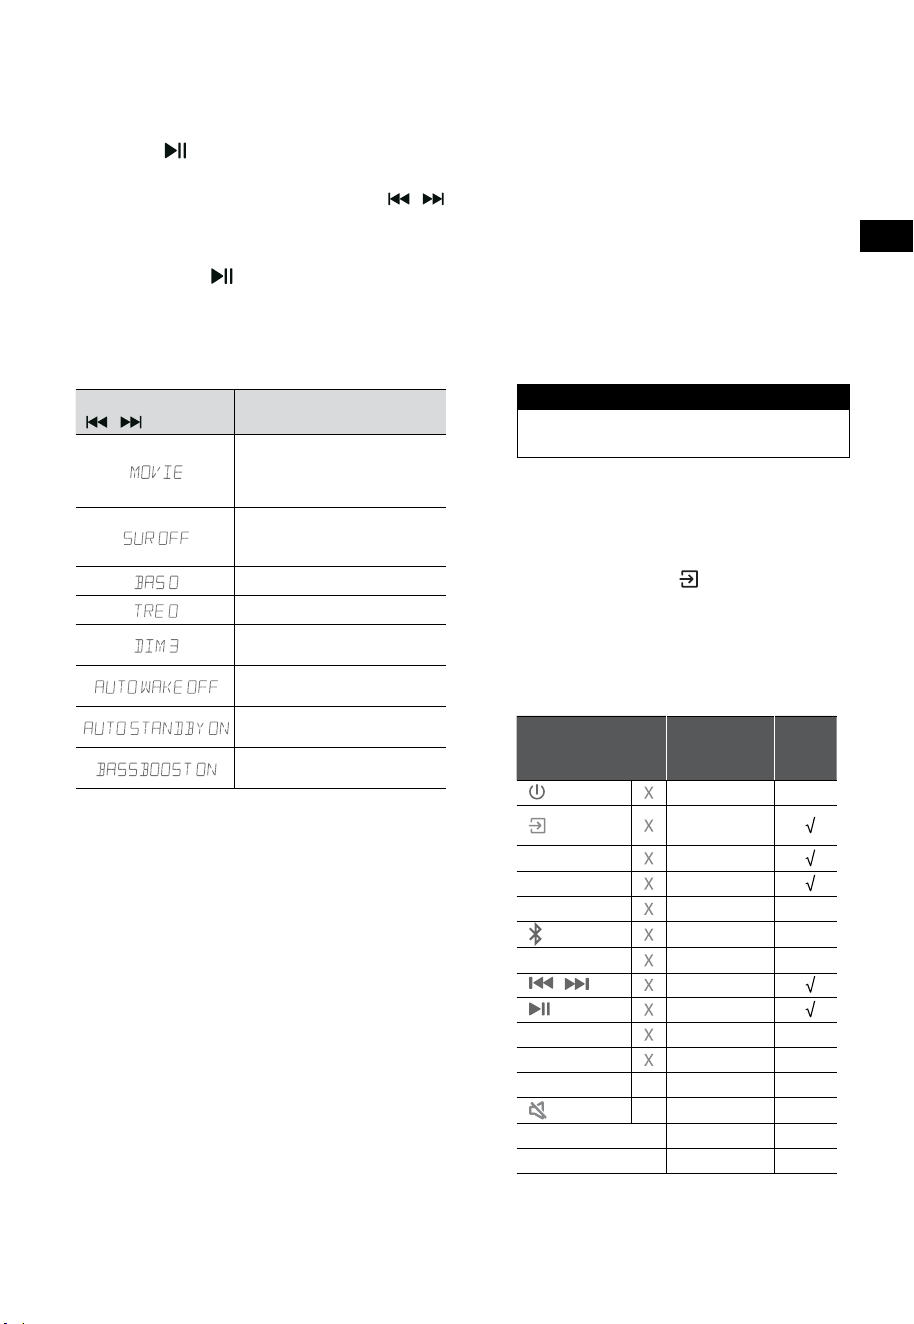
14
PT
12. Menu Configuração
1. Durante o modo LIGADO, mantenha premida
a tecla durante 3 segundos para abrir o
menu.
2. Selecione o conteúdo com os botões
/ .
3. Altere os valores iniciais para cada definição
com as teclas VOL
+
/
-
.
4. Prima a tecla
para confirmar a sua seleção
e sair das definições.
• Se não for premido qualquer tecla dentro de
10 segundos, o sistema sai automaticamente
do menu.
Visor
/
Descrição
VOL
+
/
-
Selecione o efeito do
Equalizador (EQ) (FILME,
MÚSICA, JOGO, NOTÍCIAS,
DESPORTO, NOITE)
Altere o modo do som
Surround para
LIGAR / DESLIGAR
Ajustar o nível de Baixos
Ajustar o nível de Agudos
Ajustar a luminosidade
DIM 0 / DIM 1 / DIM 2 / DIM 3
Altere Auto Wake para
LIGAR / DESLIGAR
Altere Auto Standby para
LIGAR / DESLIGAR
Altere: BassBoost
LIGAR / DESLIGAR
13. Modo DEMO
O modo DEMO é um modo do utilizador
especialmente configurado para utilizar num
ambiente de Loja.
Ativar/Desativar o modo DEMO:
Esta barra de som possui as predefinições de
acordo com o modo de consumidor normal.
• Insira o Kit de Demo para ativar o modo
DEMO.
• Remova o Kit de Demo para desativar o
modo DEMO.
• A barra de som irá exibir o seguinte:
Visor Modo
DEMO ON Modo DEMO
DEMO OFF Modo consumidor
Utilizar o modo DEMO
1. Aceda ao modo DEMO, a barra de som liga-
se automaticamente quando está ligada à
corrente elétrica.
2. Entrada de bloqueio (
Indisponível). Só
pode selecionar a entrada através do Kit
Demo.
3. Todas as teclas serão bloqueadas e ficam
indisponíveis. Só pode controlar através do
Kit Demo.
Todas as teclas
bloqueadas
(Controlo remoto e barra)
Predefinido
Kit
Demo
(ENTRADA)
Entrada de
bloqueio
+
(Vol+)
-
(Vol-)
SURR LIGAR
(BT)
EQ FILME
/ Se no modo BT
Se no modo BT
BASS
+
/
-
TREBLE
+
/
-
DIMMER
+
/
-
X
DIM 3
(MUDO)
X
AutoStandby
DESLIGAR
AutoWake
DESLIGAR
* Quando prime nas teclas (X) indisponíveis, a
barra de som irá mostrar "
DEMO ON
".
15
PT
14. Resolução de problemas
Para manter a garantia válida, nunca tente reparar você mesmo o sistema. Se encontrar problemas
durante a utilização desta barra de som, verifique os seguintes pontos antes de solicitar a reparação.
Problema Solução
Sem corrente • Certifique-se de que o cabo CA do equipamento está devidamente ligado.
• Certifique-se de que há corrente na tomada elétrica.
• Prima o botão
(standby) para ligar a barra de som.
O controlo remoto não
funciona
• Antes de premir qualquer tecla de controlo da reprodução, primeiro selecione a
entrada correta.
• Reduza a distância entre o controlo remoto e a barra de som.
• Insira a pilha com as polaridades (+/-) alinhadas, conforme indicado.
• Troque as pilhas.
• Oriente o controlo remoto diretamente par ao sensor na frente da barra de som.
Sem som • Certifique-se de que a barra de som não está sem som. Prima o botão MUDO ou +
(VOL) para retomar a audição normal.
• Prima o botão
na barra de som ou no controlo remoto para alterar a barra de
som para o modo standby. Prima então novamente a tecla
para ligar a barra de
som.
• Desligue a barra de som e o subwoofer da tomada elétrica e volte a ligar. Ligar a
barra de som.
• Certifique-se de que a definição de áudio na fonte de entrada (por ex. TV, consola
de jogos, leitor DVD, etc.) está definido para o modo PCM ou Dolby Digital
enquanto utiliza a ligação digital (por ex. HDMI, ÓTICO).
• O subwoofer está fora do alcance, aproxime o subwoofer da barra de som.
Certifique-se de que o subwoofer está a 5 m da barra de som (quanto mais perto
melhor).
• A barra de som pode ter perdido a ligação com o subwoofer. Repare os aparelhos
ao seguir os passos na secção “Emparelhar com o Subwoofer”.
• A barra de som pode não conseguir descodificar todos os formato de áudio digital
da fonte de entrada.
A TV tem um problema
de visualização ao exibir
conteúdo HDR a partir da
entrada HDMI.
• Algumas TV 4K HDR precisa que a entrada HDMI ou as definições de imagem sejam
configuradas para receção de conteúdo HDR. Para detalhes de configuração sobre
a visualização HDR, consulte o manual de instruções da sua TV.
Não encontro o nome
Bluetooth desta
barra de som no meu
dispositivo Bluetooth para
emparelhamento Bluetooth.
• Certifique-se de que a função Bluetooth está ativa no seu dispositivo Bluetooth.
• Certifique-se de que emparelhou a barra de som com o seu dispositivo Bluetooth.
• A barra de som tem uma função Bluetooth® que pode receber um sinal dentro de
8 metros. Mantenha uma distância de até 8 metros entre a barra de som e o seu
dispositivo Bluetooth®.
Tem uma função de desligar
de 15 minutos, um dos
requisitos da norma ERPII
para economizar energia
• Quando o nível do sinal de entrada externa do aparelho é insuficiente, a barra de
som irá desligar-se automaticamente em 15 minutos. Aumente o nível de volume
do seu dispositivo externo.

16
PT
15. Especificações
Marca Hisense
Modelo HS3100
Barra de som
Fonte de alimentação 100 - 240 V~ 50/60 Hz
Consumo elétrico
50 W
< 0,5 W (StandBy)
USB
5 V
500 mA
Hi-Speed USB (2.0) / FAT32 / FAT16
32 G (máx.), WAV / WMA / MP3 / FLAC.
Dimensões (L × A × P) 902 × 62,3 × 91 mm / 35,5" × 2,4" × 3,6"
Peso líquido 1,6 kg / 3,5 lbs
Sensibilidade da entrada de áudio 500 mV
Resposta de frequência 120 Hz ~ 20 kHz
Temperatura de funcionamento 0°C - 45°C
Subwoofer
Fonte de alimentação 100 - 240 V~ 50/60 Hz
Consumo elétrico
40 W
< 0,5 W (StandBy)
Dimensões (L × A × P) 161 × 303 × 304,5 mm / 6,3" × 11,9" × 12"
Peso líquido 3,6 kg / 7,9 lbs
Resposta de frequência 40 Hz - 150 Hz
Especificação sem fios
Versão Bluetooth / perfis
Alcance de frequência Bluetooth
Potência máx. de transmissão Bluetooth
V 5.3 (A2DP, AVRCP)
2400 MHz ~ 2483,5 MHz
≤ 5 dBm
Intervalo de frequência sem fios de 2,4 G
Potência máx. de transmissão 2,4 G
2400 MHz ~ 2483 MHz
≤ 6 dBm
Tipo de modulação GFSK, π/4 DQPSK
Amplificador (Potência Áudio Máx.)
Total 480 W
Barra de som 300 W
Subwoofer 180 W
Controlo remoto
Distância/Ângulo 19,7 pés (6 m)/30°
Tipo de pilhas AAA (1,5 V × 2)
• Design e especificações sujeitas a alterações sem aviso.

Bevor Sie die Soundbar verwenden, lesen Sie bitte dieses Handbuch
gründlich durch und bewahren Sie es zum späteren Nachschlagen auf.
BENUTZERHANDBUCH
3.1-Kanal Soundbar mit Drahtlos-Subwoofer
Modell: HS3100
DE

2
DE
Inhalt
1. Lieferumfang .................................................................................................................................... 3
2. Bedienelemente und Funktionen ................................................................................................... 4
2.1 Soundbar ................................................................................................................................................................................................4
2.2 Drahtlos-Subwoofer ............................................................................................................................................................................. 4
2.3 Fernbedienung ......................................................................................................................................................................................5
3. Vorbereitungen ................................................................................................................................ 5
3.1 Fernbedienung vorbereiten..............................................................................................................................................................5
3.2 Batterien der Fernbedienung austauschen.................................................................................................................................5
4. Aufstellung und Montage ................................................................................................................ 6
4.1 Aufstellung ..............................................................................................................................................................................................6
4.2 Wandmontage der Soundbar ..........................................................................................................................................................6
5. Anschlüsse ........................................................................................................................................ 7
5.1 HDMI ARC-Eingang verwenden ......................................................................................................................................................7
5.2 Roku-TV verwenden ............................................................................................................................................................................7
5.3 Hisense EzPlay-Funktion verwenden.............................................................................................................................................7
5.4 OPTICAL-Eingang verwenden .......................................................................................................................................................... 8
5.5 AUX-Eingang verwenden...................................................................................................................................................................8
5.6 Stromanschluss......................................................................................................................................................................................8
6. Subwoofer koppeln .......................................................................................................................... 8
6.1 Automatische Kopplung ....................................................................................................................................................................8
6.2 Manuelle Kopplung .............................................................................................................................................................................9
7. Allgemeine Bedienungshinweise ................................................................................................... 9
7.1 EIN- und Ausschalten (Standby) ......................................................................................................................................................9
7.2 Auto-Standby / Auto-Wake-Funktion ............................................................................................................................................9
7.3 Betriebsmodus wählen .................................................................................................................................................................... 10
7.4 Lautstärke einstellen......................................................................................................................................................................... 10
7.5 Surround-Sound ein- und ausschalten ...................................................................................................................................... 10
7.6 Bässe/Höhen einstellen ................................................................................................................................................................... 10
7.7 Equalizereekt (EQ) wählen ........................................................................................................................................................... 10
7.8 Helligkeit einstellen .......................................................................................................................................................................... 10
7.9 Rücksetzung zu den Werkseinstellungen ................................................................................................................................. 10
8. AUX-/OPTISCHER/HDMI-ARC-Betrieb ........................................................................................... 10
9. USB-Wiedergabe ............................................................................................................................ 11
10. Bluetooth®-Betrieb ......................................................................................................................... 11
11. Einstellungsmenü ........................................................................................................................... 12
12. DEMO-Modus .................................................................................................................................. 12
13. Fehlerbehebung ............................................................................................................................. 13
14. Technische Daten ........................................................................................................................... 14

3
DE
1. Lieferumfang
• Netzkabel und Steckertyp variieren je nach Region.
• Die in diesem Benutzerhandbuch verwendeten Bilder, Illustrationen und Zeichnungen dienen nur
zu Referenzzwecken, das tatsächliche Produkt kann vom Aussehen abweichen.
Soundbar Drahtlos-Subwoofer
HDMI-Kabel
Wandhalterung
Fernbedienung /
2 × AAA Batterien
2 × AC-Kabel
Benutzerhandbuch/
Garantiekarte/Kurzanleitung
Für GB
Für AUS
Für EU
Für USA
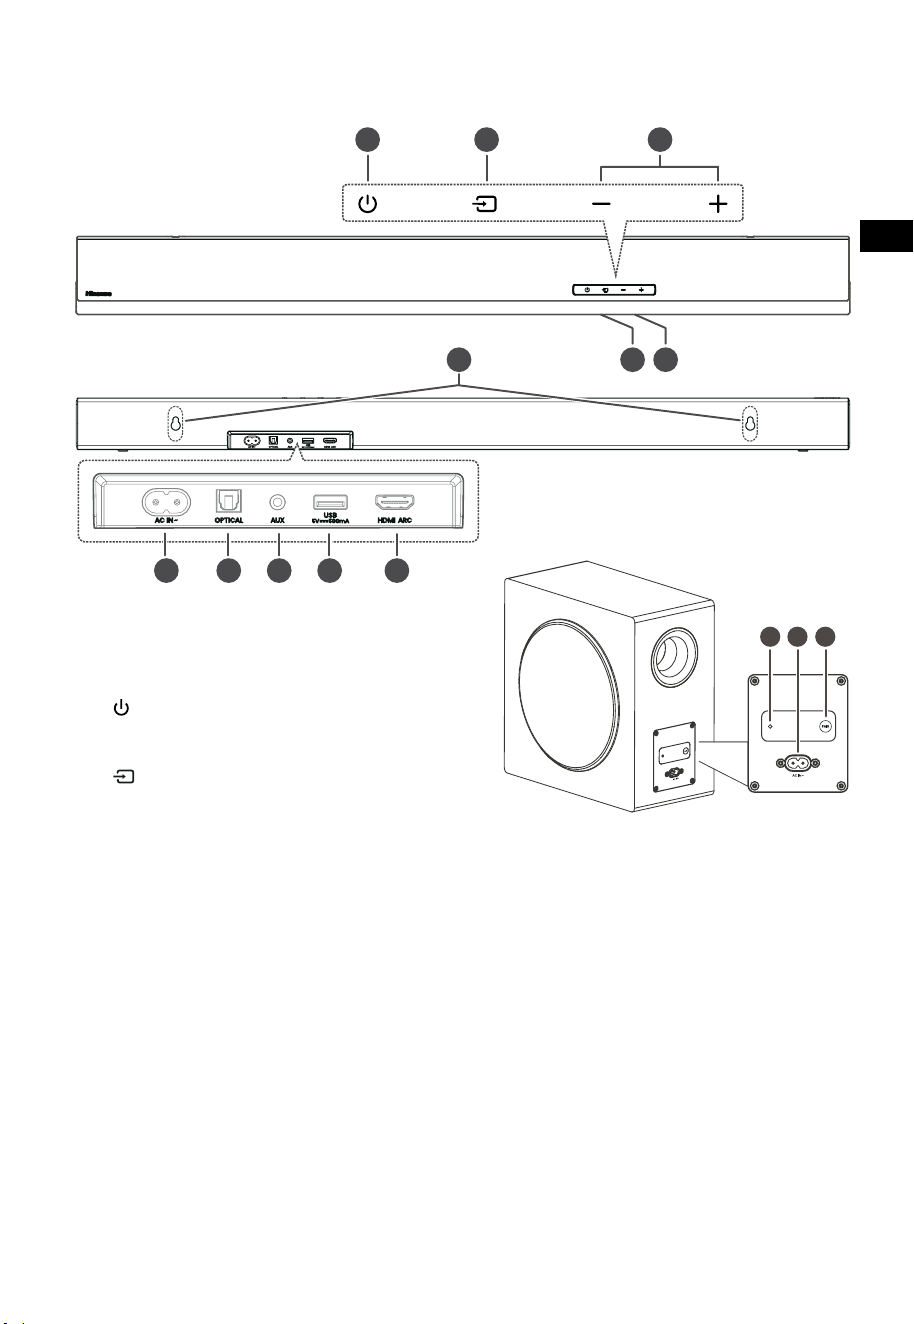
4
DE
3 4 5
TOP
BACK
2. Bedienelemente und Funktionen
2.1 Soundbar
1 Sensor für die Fernbedienung
Empfängt Signale von der Fernbedienung.
2 Display
Hier wird der aktuelle Status angezeigt.
3
(EIN/AUS)
Schaltet die Soundbar ein und in den
Standby-Modus aus.
4
(QUELLE)
Wählt die Wiedergabefunktion.
5
+/-(
VOL)
Hier erhöhen/verringern Sie den
Lautstärkepegel.
6 Wandhalterung
7 AC~ Stromeingang
Hier schließen Sie das Netzkabel an.
8 OPTICAL-Eingang
9 AUX Eingang
10 USB-Eingang
Hier schließen Sie ein USB-Gerät zur
Musikwiedergabe an.
11 HDMI ARC Anschluss
Hier schließen Sie einen Fernseher über
HDMI-Kabel an.
2.2 Drahtlos-Subwoofer
1 Kopplungsanzeige
Die Anzeige erlischt, sobald der Subwoofer
mit der Soundbar gekoppelt ist.
2 AC IN~ Stromeingang
Hier schließen Sie das Netzkabel an.
3 PAIR-Taste
Hier aktivieren Sie die Kopplungsfunktion
zwischen soundbar und subwoofer.
DRAUFSICHT
RÜCKSEITE
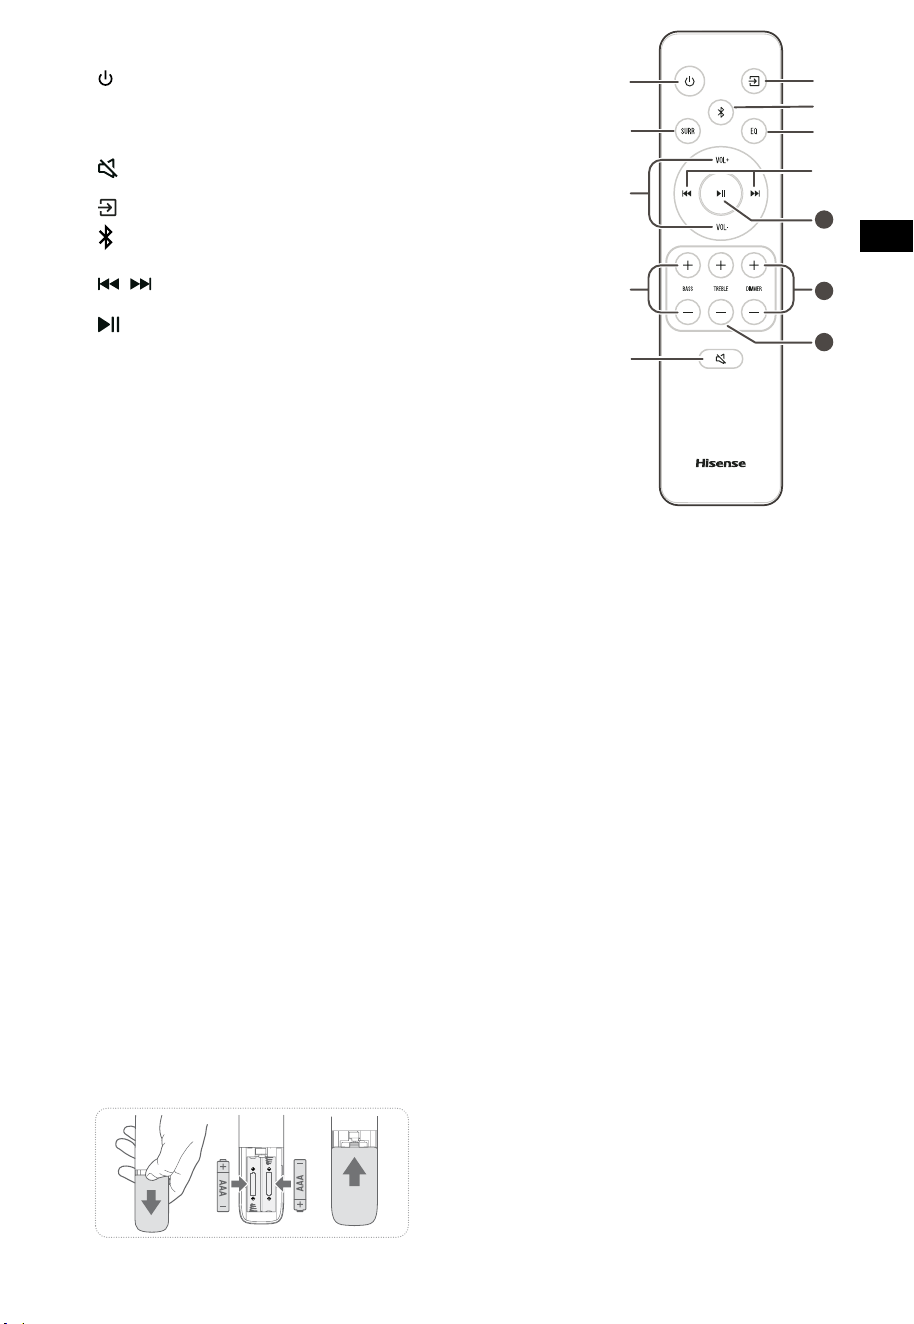
5
DE
11
10
12
2.3 Fernbedienung
1 Schaltet die Soundbar ein und in den Standby-Modus aus.
2 SURR Surround EIN/AUS umschalten.
3 VOL
+
/VOL
-
Hier erhöhen/verringern Sie den Lautstärkepegel.
4 BASS
+
/
-
Hier stellen Sie die Bässe ein.
5
(STUMM)
Hier schalten Sie den Ton stumm oder heben Sie die
Stummschaltung wieder auf.
6
Wählt die Wiedergabefunktion.
7
Hier wählen Sie den Bluetooth-Modus.
8 EQ Hier wählen Sie einen Klangeffekt.
9
/ Hier springen Sie im Bluetooth /USB-Modus zum
vorherigen bzw. nächsten Titel.
10
Wiedergabe/Pause/Fortsetzen der Wiedergabe im
Bluetooth/USB-Modus. Halten Sie die Taste gedrückt, um
die Kopplungsfunktion im Bluetooth-Modus zu aktivieren
oder die Verbindung mit dem bereits gekoppelten
Bluetooth-Gerät zu trennen.
11 DIMMER
+
/
-
Hier stellen Sie die LED-Helligkeit ein.
12 TREBLE
+
/
-
Hier stellen Sie die Höhen ein.
3. Vorbereitungen
3.1 Fernbedienung vorbereiten
Mit der mitgelieferten Fernbedienung kann die
Soundbar fernbedient werden.
•
Auch wenn sich die Fernbedienung innerhalb
der effektiven Reichweite von 6 m befindet,
kann die Bedienung unmöglich sein, wenn
sich Hindernisse zwischen der Soundbar und
der Fernbedienung befinden.
• Wenn die Fernbedienung in der Nähe
anderer Produkte betrieben wird, die
Infrarotstrahlung erzeugen, oder wenn andere
Fernbedienungen, die Infrarotstrahlung
verwenden, in der Nähe der Soundbar
verwendet werden, kann es zu Fehlfunktionen
kommen. Umgekehrt können auch die
anderen Produkte Fehlfunktionen aufweisen.
3.2 Batterien der Fernbedienung austauschen
1 Drücken und schieben Sie die rückseitige
Abdeckung, um das Batteriefach der
Fernbedienung zu öffnen.
2 Setzen Sie zwei Akkus oder Batterien der Größe
AAA ein (Batterien im Lieferumfang enthalten).
Achten Sie darauf, dass die Pole (+) und (-) der
Akkus/Batterien mit den Markierungen (+) und
(-) im Batteriefach übereinstimmen.
3 Schließen Sie das Batteriefach wieder.
Sicherheitshinweise zu Akkus/Batterien
• Achten Sie darauf, die Akkus/Batterien mit
der korrekten positiven „
“ und negativen
„
“ Polarität einzusetzen.
• Verwenden Sie Akkus/Batterien
desselben Typs. Verwenden Sie keinesfalls
unterschiedliche Batterietypen zusammen.
• Es können sowohl Akkus als auch
gewöhnliche Batterien verwendet werden.
Beachten Sie die Sicherheitshinweise auf den
Etiketten der Akkus/Batterien.
• Achten Sie auf Ihre Fingernägel, wenn Sie das
Batteriefach öffnen und die Akkus/Batterien
entfernen.
• Lassen Sie die Fernbedienung nicht fallen.
• Achten Sie darauf, dass keine Gegenstände
auf die Fernbedienung einwirken.
• Verschütten Sie kein Wasser oder andere
Flüssigkeiten auf der Fernbedienung.
• Legen Sie die Fernbedienung nicht auf nasse
Gegenstände.
• Setzen Sie die Fernbedienung nicht
direkter Sonneneinstrahlung oder starken
Wärmequellen aus.
• Entfernen Sie die Akkus/Batterien aus der
Fernbedienung, wenn sie längere Zeit nicht
benutzt wird, da es sonst zu Korrosion oder
zum Auslaufen der Akkus/Batterien kommen
kann, was wiederum zu Verletzungen,
Sachschäden und/oder Feuer führen kann.
• Verwenden Sie keine anderen Akkus/
Batterien als die angegebenen.
• Verwenden Sie keine neuen und alten
Batterien gleichzeitig.
• Laden Sie Batterien keinesfalls auf, es sei
denn, es handelt sich um Akkus.
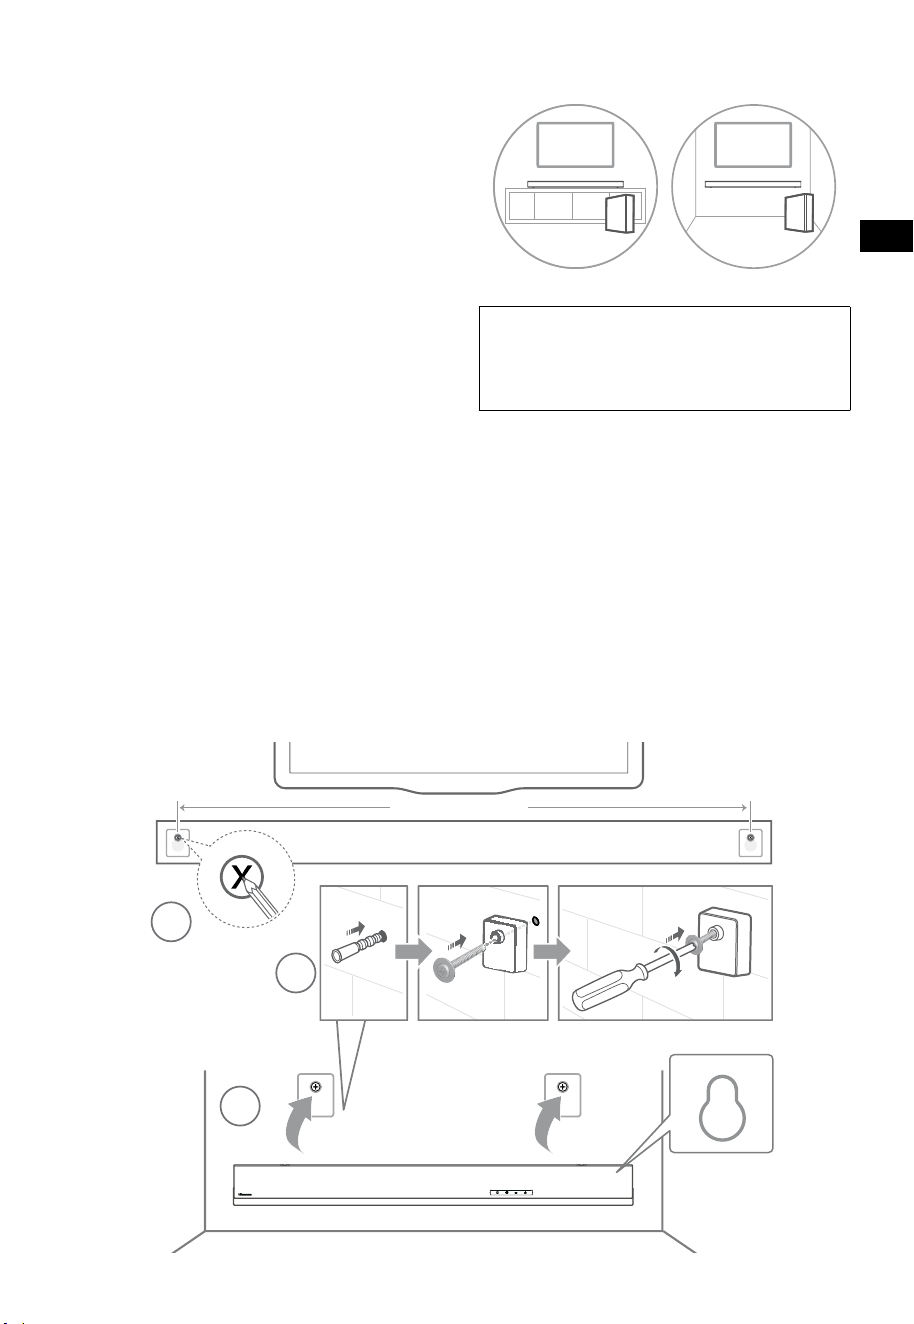
6
DE
4. Aufstellung und Montage
4.1 Aufstellung
A Wenn Ihr Fernseher auf einem Tisch steht,
können Sie die Soundbar direkt mittig vor
dem Fernseher auf den Tisch stellen.
B Wenn Ihr Fernseher an der Wand befestigt ist,
können Sie die Soundbar direkt unter dem
Fernseher an der Wand montieren.
4.2 Wandmontage der Soundbar
- Die Installation darf nur von qualifiziertem
Personal durchgeführt werden. Eine
unsachgemäße Montage kann zu schweren
Verletzungen und Sachschäden führen (wenn
Sie beabsichtigen, dieses Produkt selbst
zu installieren, müssen Sie auf elektrische
Leitungen und Rohrleitungen achten, die
möglicherweise in der Wand verlegt sind).
Die Überprüfung der Tragfähigkeit der Wand
für die Gesamtlast der Soundbar und der
Wandhalterungen liegt in der Verantwortung
des Installateurs.
- Für die Installation sind zusätzliche Werkzeuge
erforderlich (nicht im Lieferumfang enthalten).
- Ziehen Sie die Schrauben nicht zu fest an.
- Bewahren Sie diese Anleitung zum späteren
Nachschlagen auf.
- Verwenden Sie einen elektronischen
Balkensucher, um eine Leichtbauwand vor
dem Bohren und Montieren zu überprüfen.
WARNUNG
• Um Verletzungen zu vermeiden, muss dieses Gerät
gemäß den Installationsanleitungen sicher am Boden/
an der Wand befestigt werden.
• Empfohlene Höhe für die Wandmontage: ≤ 1,5 m.
1. Bohren Sie 2 Löcher (Ø 5,5 - 6 mm je nach
Wandtyp) in die Wand. Der Abstand zwischen
den Löchern muss 670 mm betragen.
2. Setzen Sie die mitgelieferten Dübel in der
Wand ein. Setzen Sie die mitgelieferten
Schrauben der Wandhalterung durch die
Wandhalterung in die Dübel ein. Ziehen Sie
die Schrauben fest.
3. Hängen Sie das Gerät an den
Wandhalterungen auf.
1
2
3
670 mm / 26.4”
670 mm / 26,4”
AB
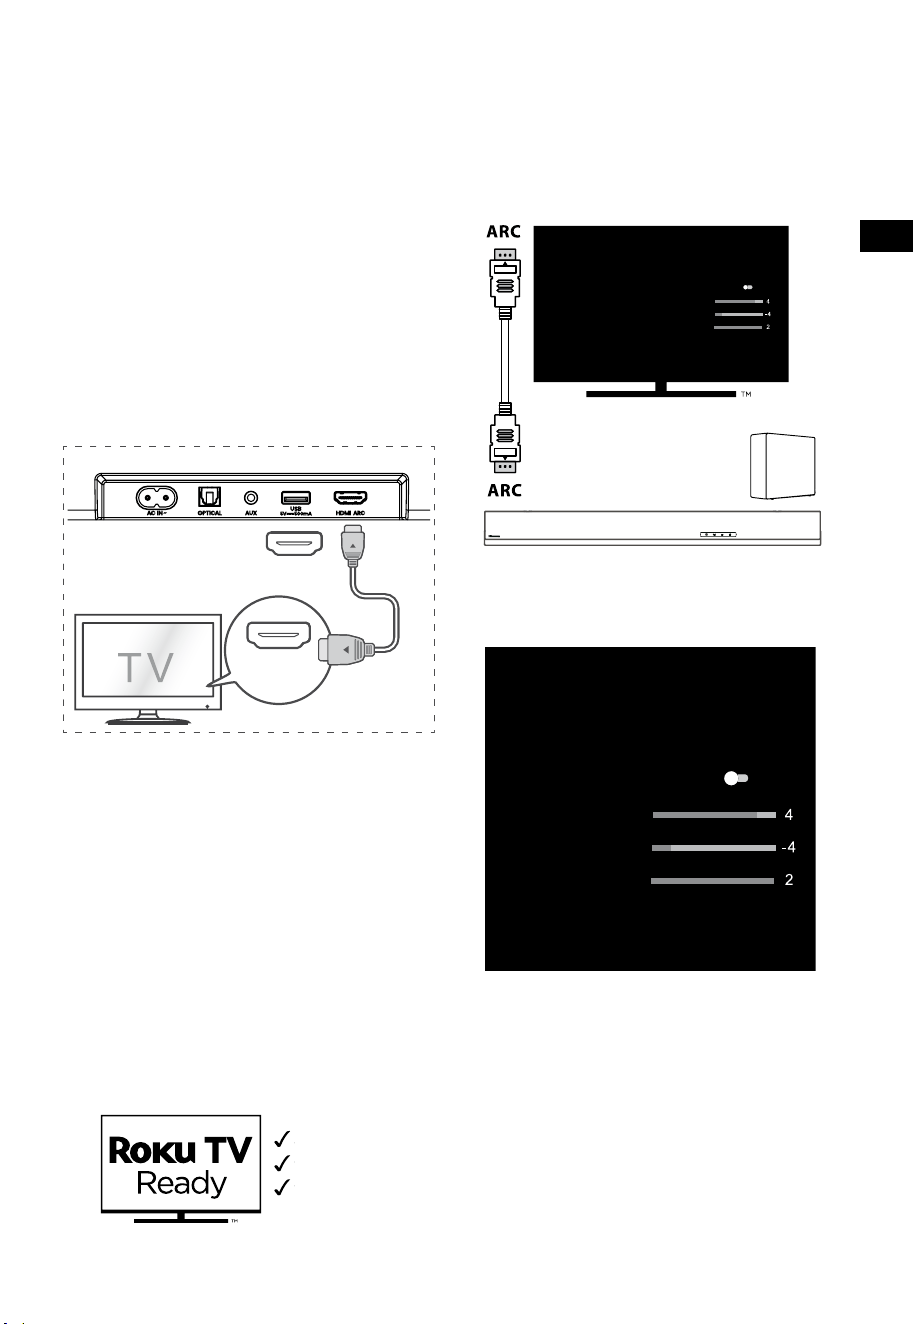
7
DE
5. Anschlüsse
5.1 HDMI ARC-Eingang verwenden
Die ARC-Funktion (Audio Return Channel)
ermöglicht es Ihnen, Audiosignale von Ihrem
ARC-kompatiblen Fernseher über einen einzigen
HDMI-Anschluss an Ihre Soundbar zu senden.
Um die ARC-Funktion nutzen zu können, muss
Ihr Fernseher sowohl HDMI-CEC- als auch ARC-
kompatibel sein; richten Sie ihn entsprechend
ein. Bei korrekter Einrichtung können Sie die
Lautstärke (VOL +/- und STUMM) der Soundbar
mit der Fernbedienung Ihres Fernsehers einstellen.
• Schließen Sie das HDMI-Kabel von der
Soundbar am Anschluss HDMI ARC Ihres
ARC-kompatiblen Fernsehers an. Wählen Sie
dann mit der Fernbedienung HDMI ARC.
56:/)'2
.*3/'8)
56:/)'2
.*3/
'8)
.KGJVNUTK
BA
Tipps:
• Ihr Fernseher muss die Funktion HDMI-CEC
und ARC unterstützen. HDMI-CEC und ARC
müssen aktiviert sein.
• Die Einstellungsmethode von HDMI-CEC und
ARC kann sich je nach Fernseher unterscheiden.
Einzelheiten zur ARC-Funktion finden Sie im
Benutzerhandbuch Ihres Fernsehers.
• Nur Kabel der Version HDMI 1.4 oder höher
unterstützen die ARC-Funktion.
5.2 Roku-TV verwenden
• Wenn Sie einen Roku TV™ besitzen, schließen
Sie einfach das HDMI-Kabel an den ARC-
Anschlüssen an und folgen Sie den Anleitungen
auf dem Bildschirm von Roku TV Ready™.
Einfache Einrichtung
Fernbedienung
Schnelleinstellungen
5.3 Hisense EzPlay-Funktion verwenden
Wenn die Hisense EzPlay-Funktion genutzt wird und
die Soundbar über HDMI ARC mit einem Hisense-
Fernseher verbunden ist, wird auf dem Fernseher das
Einstellungsmenü der Soundbar angezeigt, über das
Sie die meisten Funktionen der Soundbar mit der
Fernbedienung Ihres Fernsehers steuern können.
EQ-Modi
Sport
Surround-Modi
Basspegel
Höhenpegel
Dimmerpegel
Zurücksetzen
Soundbar mit EzPlay
Fernseher
mit EzPlay
Beispiel für ein TV-Menü (verschiedene Modelle
können unterschiedliche Menüs haben):
Einstellungen - Ton - Soundbar-Einstellungen.
EQ-Modi
Sport
Surround-Modi
Basspegel
Höhenpegel
Dimmerpegel
Zurücksetzen
Hinweis:
• Diese Funktion ist nur verfügbar, wenn
sowohl die Soundbar als auch der Fernseher
Hisense EzPlay unterstützen.
• Für diese Funktion müssen die Soundbar und
der Fernseher über HDMI ARC verbunden
sein, und die CEC-Funktion des Fernsehers
muss eingeschaltet sein.
• Wenn Sie die Soundbar zum ersten Mal verbinden
und die Einstellungen korrekt vornehmen,
erscheint auf dem Bildschirm ein Hinweis, der Sie
zum Einstellungsmenü der Soundbar führt.
Soundbar-Einstellungen
Soundbar-Einstellungen
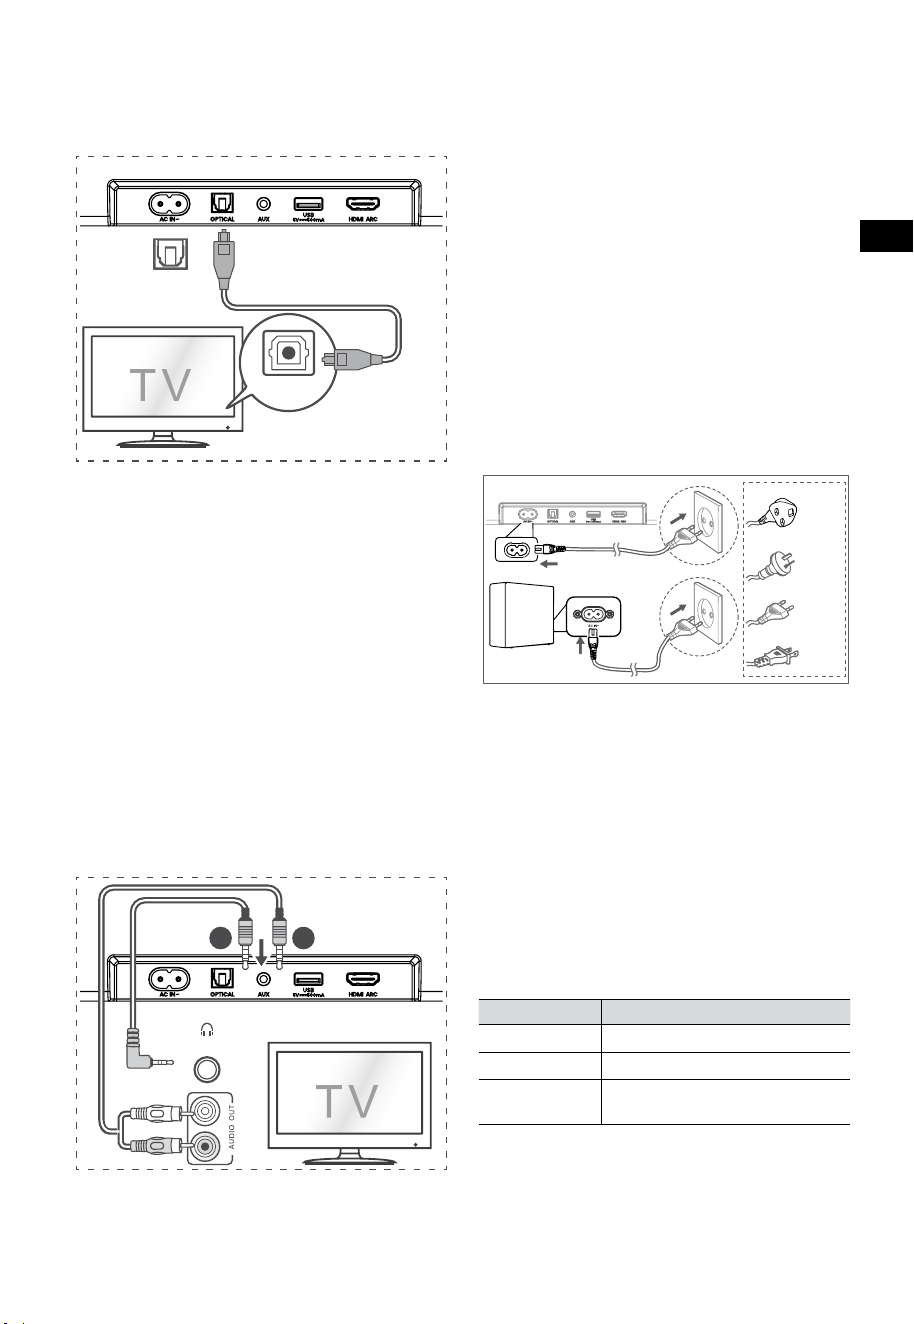
8
DE
5.6 Stromanschluss
Gefahr von Produktschäden!
• Gefahr von Produktschäden! Achten Sie
darauf, dass die Netzspannung mit der
Spannung übereinstimmt, die auf dem
Typenschild auf der Unter- oder Rückseite
des Geräts angegeben ist.
• Bevor Sie das Netzkabel anschließen,
vergewissern Sie sich, dass Sie alle anderen
Anschlüsse vorgenommen haben.
• Soundbar
Schließen Sie das Netzkabel am
Stromeingang AC~ der Soundbar und dann
an einer geeigneten Steckdose an.
• Subwoofer
Schließen Sie das Netzkabel am AC~-Eingang des
Subwoofers und dann an einer Steckdose an.
* Netzkabel und Stecker variieren je nach Region.
6. Subwoofer koppeln
6.1 Automatische Kopplung
Subwoofer und Soundbar werden automatisch
gekoppelt, wenn beide Geräte am Stromnetz
angeschlossen sind und eingeschaltet werden.
Zur Verbindung der beiden Geräte ist kein Kabel
erforderlich.
• Ermitteln Sie den Status anhand der Anzeige
des Drahtlos-Subwoofers.
LED-Status Status
Blinkt schnell
Subwoofer im Kopplungsmodus
Leuchtet
Verbunden / erfolgreich gekoppelt
Blinkt langsam
Kopplung / Verbindung
Fehlgeschlagen
HINWEIS:
- Drücken Sie die Kopplungstaste PAIR auf der
Rückseite des Subwoofers nur zur manuellen
Kopplung.
- Wenn die automatische Kopplung fehlschlägt,
5.4 OPTICAL-Eingang verwenden
- Verwenden Sie das OPTISCHE Kabel, um den
Anschluss OPTICAL OUT des Fernsehers an
OPTICAL der Soundbar anzuschließen.
56:/)'2
.*3/'8)
56:/)'2
.*3/
'8)
.KGJVNUTK
BA
Tipp:
Die Soundbar ist möglicherweise nicht in der Lage,
alle digitalen Audioformate der Eingangsquelle
zu dekodieren. In diesem Fall wird die Soundbar
stummgeschaltet. Dies ist KEINE Fehlfunktion.
Vergewissern Sie sich, dass die Audioeinstellung der
Eingangsquelle (z. B. Fernseher, Spielkonsole, DVD-
Player usw.) auf PCM oder Dolby Digital (Einzelheiten
zu den Audioeinstellungen finden Sie in der
Bedienungsanleitung des Eingangsquellengeräts)
mit HDMI ARC / Optisch-Eingang.
5.5 AUX-Eingang verwenden
A. Verwenden Sie ein 3,5-mm-zu-3,5-mm-
Audiokabel, um die Kopfhörerbuchse des
Fernsehers oder eines externen Audiogeräts am
AUX-Eingang der Soundbar anzuschließen.
56:/)'2
.*3/'8)
56:/)'2
.*3/
'8)
.KGJVNUTK
BA
Kopfhörer
B. Verwenden Sie ein Cinch (RCA)-zu-3,5-mm-
Audiokabel, um den Audioausgang des
Fernsehers am AUX-Eingang der Soundbar
anzuschließen.
Für GB
Für AUS
Für EU
Für USA

9
DE
koppeln Sie den Subwoofer manuell mit der
Soundbar.
6.2 Manuelle Kopplung
1. Vergewissern Sie sich, dass alle Kabel
ordnungsgemäß angeschlossen sind und dass
sich die Soundbar im Standby-Modus befindet.
2. Halten Sie die Kopplungstaste PAIR auf
der Rückseite des Subwoofers für einige
Sekunden gedrückt. Der Subwoofer
wechselt in den Kopplungsmodus und die
Kopplungsanzeige blinkt schnell.
3. Drücken Sie
an der Soundbar oder auf der
Fernbedienung, um die Soundbar einzuschalten.
4. Halten Sie
an der Soundbar oder auf der
Fernbedienung für einige Sekunden gedrückt.
5. Nachdem die Drahtlosverbindung
erfolgreich hergestellt wurde, leuchtet die
Kopplungsanzeige.
6. Wenn die Kopplungsanzeige blinkt, ist die
Drahtlosverbindung fehlgeschlagen. Ziehen
Sie das Netzkabel des Subwoofers und
schließen Sie es nach 4 Minuten wieder an.
Wiederholen Sie die Schritte 1 - 4.
HINWEIS:
• Wenn die Drahtlosverbindung erneut fehlschlägt,
überprüfen Sie, ob es in der Nähe Ihres Standorts
Störungen gibt (z. B. durch ein elektronisches
Gerät) oder ob starke Interferenzen vorliegen.
Beseitigen Sie diese Störungen und wiederholen
Sie die obigen Schritte.
• Der Subwoofer muss sich innerhalb von 6 m
von der Soundbar in einem offenen Bereich
befinden.
• Wenn die Soundbar nicht mit dem
Subwoofer verbunden und eingeschaltet ist,
blinkt die Betriebsanzeige. Führen Sie die
Schritte 1 bis 4 aus, um den Subwoofer mit
der Soundbar zu verbinden.
7. Allgemeine
Bedienungshinweise
7.1 EIN- und Ausschalten (Standby)
Das Gerät schaltet sich automatisch ein, wenn das
Netzkabel angeschlossen wird.
• Drücken Sie
, um die Soundbar in den
STANDBY-Modus zu schalten.
• Ziehen Sie den Netzstecker, wenn Sie die
Soundbar vollständig ausschalten möchten.
7.2 Auto-Standby / Auto-Wake-Funktion
[Auto-Standby] Ihre Soundbar wurde so
programmiert, dass sie automatisch in den
Standby-Modus wechselt, wenn 15 Minuten lang
kein Ton erkannt wird. Dies ist z. B. der Fall, wenn
die Wiedergabe unterbrochen wird oder wenn die
Soundbar versehentlich eingeschaltet bleibt.
[Auto-Wake] Wenn ein Fernseher oder ein
externes Gerät angeschlossen ist (AUX- / OPTICAL-
/ HDMI ARC-Modus), schaltet sich das Gerät
automatisch ein, wenn der Fernseher oder das
externe Gerät eingeschaltet wird.
Um diese Funktion zu deaktivieren, führen Sie
bitte die nachstehenden Schritte aus:
1. Halten Sie bei eingeschaltetem Gerät für
3 Sekunden gedrückt, um das Menü
aufzurufen.
- Im Display des Geräts wird „MENU“ angezeigt.
2. Oder drücken Sie 6 Mal
, Im Display wird:
Auto Wake [ON / OFF].
oder drücken Sie 7 Mal
das Display zeigt:
Auto Standby [ON / OFF].
3. Wählen Sie den Inhalt mit VOL+ /
–
auf der
Fernbedienung aus, und drücken Sie dann
, um Ihre Auswahl zu bestätigen und die
Einstellungen zu verlassen.
• Wenn Sie diese Schritte wiederholen,
schalten Sie die Funktion „EIN“ und „AUS“.
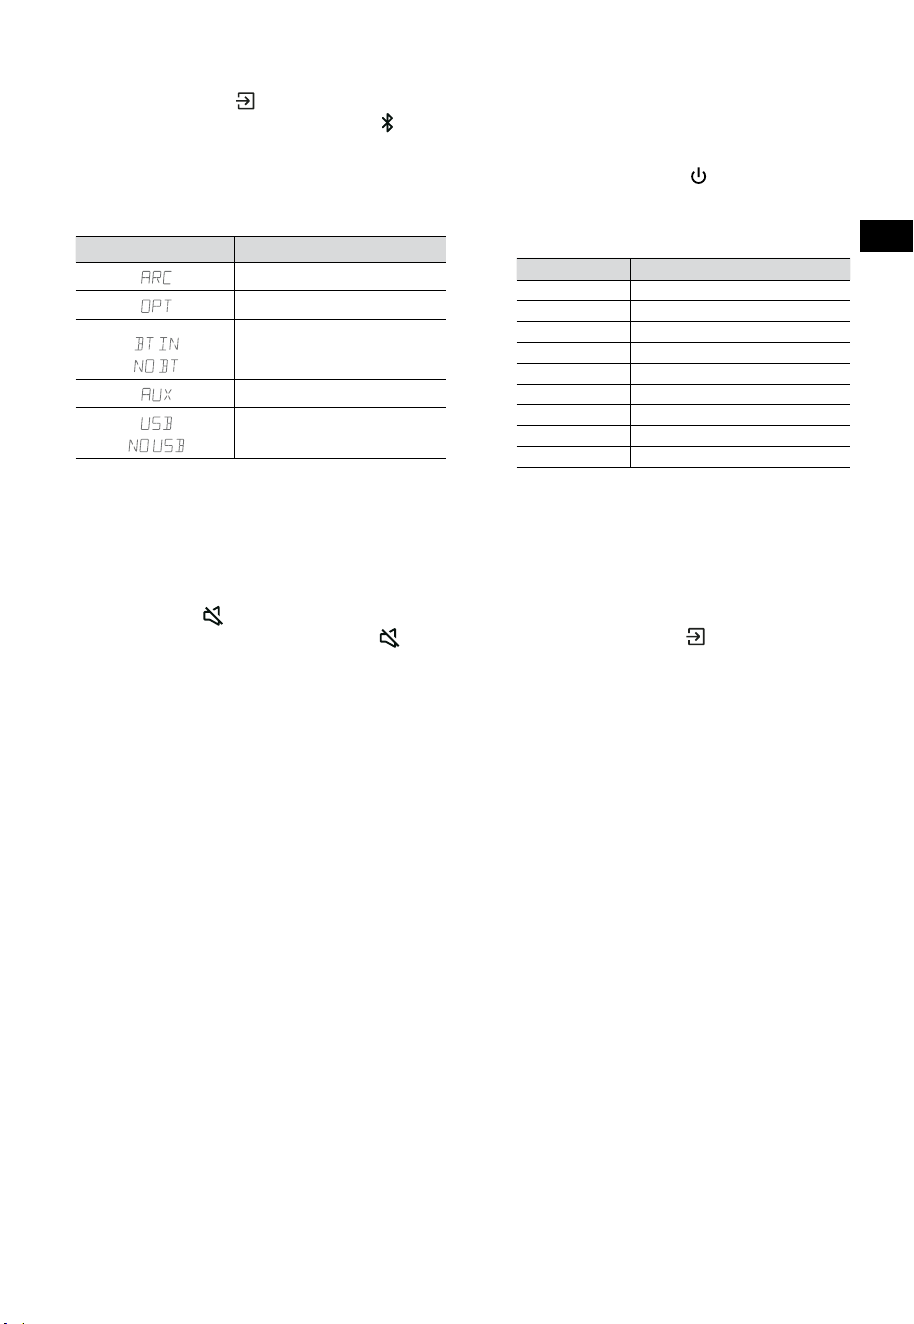
10
DE
7.3 Betriebsmodus wählen
Drücken Sie mehrmals (QUELLE) auf der Soundbar
oder auf der Fernbedienung, um den AUX-,
,
OPTICAL-, HDMI ARC- oder USB- Modus zu wählen.
Der gewählte Modus wird im Display angezeigt.
• Der gewählte Modus wird im Display
angezeigt.
Anzeige Modus
HDMI ARC
OPTISCH
Bluetooth
Verbunden
Nicht verbunden
AUX
USB
USB nicht verbunden
7.4 Lautstärke einstellen
• Drücken Sie VOL
+
/
-
auf der Soundbar oder
auf der Fernbedienung, um die Lautstärke
einzustellen.
• Wenn Sie den Ton ausschalten möchten,
drücken Sie
(STUMM) auf der
Fernbedienung. Drücken Sie erneut
(STUMM) oder VOL
+
, um den normalen
Hörbetrieb wiederaufzunehmen.
7.5 Surround-Sound ein- und ausschalten
• Drücken Sie SURR auf der Fernbedienung, um
den Surround-Sound ein- und auszuschalten.
7.6 Bässe/Höhen einstellen
• Drücken Sie BASS
+
/
-
auf der
Fernbedienung, um den Basspegel
einzustellen.
• Drücken Sie TREBLE
+
/
-
auf der
Fernbedienung, um den Höhenpegel
einzustellen.
7.7 Equalizereffekt (EQ) wählen
• Drücken Sie während der Wiedergabe EQ auf
der Fernbedienung, um die gewünschten
Equalizer-Voreinstellungen auszuwählen:
FILM, MUSIK, SPIEL, NACHRICHTEN,
SPORT, NACHT.
7.8 Helligkeit einstellen
• Drücken Sie DIMMER
+
/
-
auf der
Fernbedienung, um die Helligkeit einzustellen.
7.9 Rücksetzung zu den
Werkseinstellungen
Gerät auf die Standardeinstellungen zurücksetzen.
• Schalten Sie die Soundbar in den optischen
Modus und halten Sie [
] auf der Soundbar
gedrückt, damit setzt sich die Soundbar zu
den Werkseinstellungen zurück und wechselt
in den Standby-Modus.
MODUS STANDARD
QUELLE ARC
Lautstärke 30
Surround Aus
Dunkler MAX.
Bässe 0
Höhen 0
EQ FILM
Auto-Wake AUS
Auto-Standby AN (außer USA)
8. AUX-/OPTISCHER/HDMI-
ARC-Betrieb
1 Vergewissern Sie sich, dass die Soundbar mit
dem Fernseher oder Audiogerät verbunden ist.
2 Drücken Sie mehrmals
(QUELLE) auf der
Soundbar oder auf der Fernbedienung, um
den AUX-, OPTICAL-, HDMI ARC-Modus zu
wählen. Der gewählte Modus wird im Display
angezeigt.
3 Bedienen Sie Ihr Audiogerät direkt für die
Wiedergabefunktionen.
4 Drücken Sie VOL
+
/
-
, um die Lautstärke
einzustellen.
Tipp: Die Soundbar ist möglicherweise nicht
in der Lage, alle digitalen Audioformate der
Eingangsquelle zu dekodieren. In diesem Fall
wird die Soundbar stummgeschaltet. Dies ist
KEINE Fehlfunktion. Vergewissern Sie sich, dass
die Audioeinstellung der Eingangsquelle (z.
B. Fernseher, Spielkonsole, DVD-Player usw.)
auf PCM oder Dolby Digital (Einzelheiten
zu den Audioeinstellungen finden Sie in der
Bedienungsanleitung des Eingangsquellengeräts)
mit HDMI ARC / Optisch-Eingang.
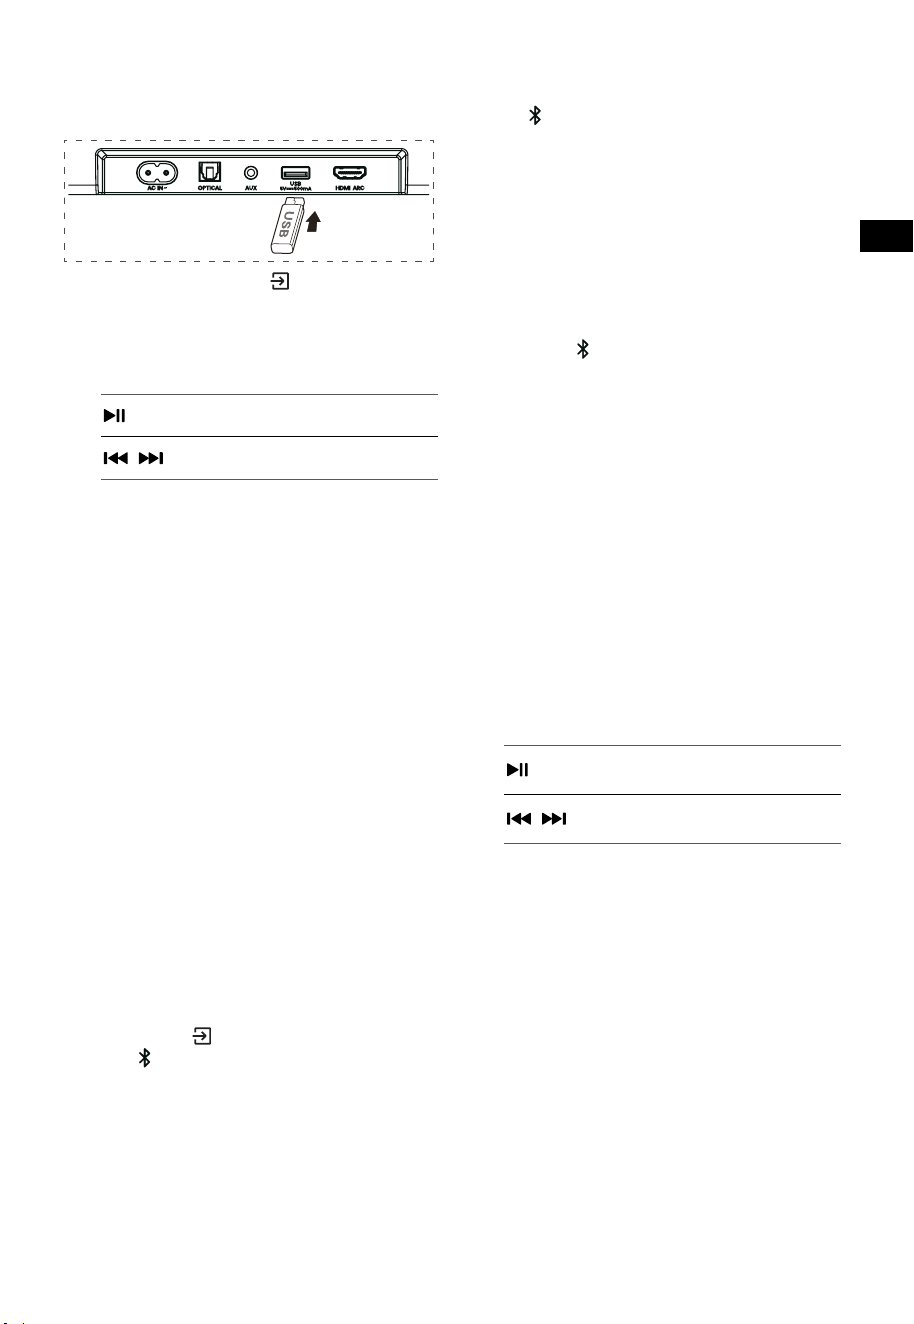
11
DE
9. USB-Wiedergabe
1 Schließen Sie ein USB-Speichermedium an.
2 Drücken Sie mehrmals (QUELLE) auf der
Soundbar oder auf der Fernbedienung, um
den USB-Modus zu wählen.
3 Während der Wiedergabe gehen Sie wie folgt
vor:
Wiedergabe starten, unterbrechen
oder fortsetzen.
,
Zum vorherigen oder nächsten
Titel springen.
Tipps:
• Das Gerät unterstützt USB-Speichermedien
mit bis zu 32 GB Speicher.
• Dieses Gerät kann WAV / WMA / MP3 / FLAC-
Dateien wiedergeben.
• Dieses Produkt ist möglicherweise nicht
mit bestimmten USB-Speichergeräten
kompatibel.
• Wenn Sie ein USB-Verlängerungskabel,
einen USB-Hub oder einen USB-
Multifunktionskartenleser verwenden, wird
das USB-Speichergerät möglicherweise nicht
erkannt.
• Entfernen Sie das USB-Speichergerät nicht,
während Dateien gelesen werden.
10. Bluetooth®-Betrieb
Verbinden Sie die Soundbar über Bluetooth mit
Ihrem Bluetooth-Gerät (iPad, iPhone, iPod touch,
Android-Handy oder Laptop). Dann können Sie
die auf dem Gerät gespeicherten Audiodateien
über die Soundbar-Lautsprecher anhören.
Erste Kopplung
1 Drücken Sie (QUELLE) auf der Soundbar
oder
auf der Fernbedienung, um den
Bluetooth®-Modus zu wählen.
• Im Display wird NO BT angezeigt.
2 Aktivieren Sie Ihr Bluetooth-Gerät und
wählen Sie den Suchmodus.
3 Wählen Sie „Hisense HS3100“ in der
Kopplungsliste. Nach einer akustischen
Meldung ist das System erfolgreich verbunden,
und im Display wird BT IN angezeigt.
• Wenn Sie Ihre Soundbar mit einem anderen
Bluetooth-Gerät verbinden möchten, halten
Sie
auf der Fernbedienung gedrückt, um
das aktuell verbundene Bluetooth-Gerät zu
trennen. Folgen Sie den Schritten 2 - 3, um
Ihr Bluetooth-Gerät zu koppeln.
Um die Bluetooth-Funktion zu deaktivieren,
gehen Sie wie folgt vor:
- Schalten Sie zu einer anderen Quelle auf dem
Gerät um.
- Deaktivieren Sie die Funktion auf Ihrem
Bluetooth-Gerät.
- Halten Sie
auf der Fernbedienung gedrückt.
Bluetooth-Wiedergabe
- Wenn das verbundene Bluetooth-Gerät
das Advanced Audio Distribution Profile
(A2DP) unterstützt, können Sie die auf dem
Gerät gespeicherte Musik über dieses Gerät
wiedergeben.
- Wenn das Gerät auch das Audio Video Remote
Control Profile (AVRCP) unterstützt, können Sie
die auf dem Gerät gespeicherte Musik über
die Fernbedienung des Geräts wiedergeben.
1. Koppeln Sie Ihr Gerät mit diesem Gerät.
2. Geben Sie Musik über Ihr Gerät wieder (wenn
es A2DP unterstützt).
3. Verwenden Sie die mitgelieferte
Fernbedienung zur Steuerung der
Wiedergabe (wenn es AVRCP unterstützt).
Wiedergabe starten, unterbrechen
oder fortsetzen.
,
Zum vorherigen oder nächsten
Titel springen.
Tipps:
• Die Reichweite zwischen Soundbar und
Gerät beträgt etwa 8 m.
• Bevor Sie ein Bluetooth®-Gerät mit der
Soundbar verbinden, informieren Sie sich
über die Fähigkeiten des Geräts.
• Die Kompatibilität mit allen Bluetooth®-
Geräten ist nicht garantiert.
• Jedes Hindernis zwischen dem Gerät
und der Soundbar kann die Reichweite
beeinträchtigen.
• Halten Sie diesen Player von anderen
elektronischen Geräten fern, die Störungen
verursachen können.
• Das Gerät wird auch getrennt, wenn Sie Ihr
Gerät außerhalb der Reichweite bewegen.
12
DE
11. Einstellungsmenü
1. Halten Sie bei eingeschaltetem Gerät für
3 Sekunden gedrückt, um das Menü
aufzurufen.
2. Wählen Sie den Inhalt mit
/ .
3. Ändern Sie die ursprünglichen Werte für die
einzelnen Einstellungen mit VOL
+
/
-
.
4. Drücken Sie
, um Ihre Auswahl zu
bestätigen und die Einstellungen zu
verlassen.
• Wenn innerhalb von 10 Sekunden keine Taste
gedrückt wird, verlässt das System das Menü
automatisch.
Anzeige
/
Beschreibung
VOL
+
/
-
Equalizer-Effekt (EQ)
wählen (FILM, MUSIK, SPIEL,
NACHRICHTEN, SPORT, NACHT)
Surround Sound umschalten
EIN/AUS
Bässe einstellen
Höhen einstellen
Helligkeit einstellen
DIM 0 / DIM 1 / DIM 2 / DIM 3
Auto Wake umschalten
EIN/AUS
Auto Standby umschalten
EIN/AUS
Umschalten zwischen: Bassve
rstärkung EIN/
AUS
12. DEMO-Modus
Der DEMO-Modus ist ein Benutzermodus,
der speziell zur Verwendung in einer
Verkaufsumgebung konfiguriert ist.
DEMO-Modus aktivieren/deaktivieren:
Diese Soundbar ist werkseitig auf den
gewöhnlichen Verbrauchermodus voreingestellt.
• Setzen Sie das Demo-Kit ein, um den DEMO-
Modus zu aktivieren.
• Entfernen Sie das Demo-Kit, um den DEMO-
Modus zu deaktivieren.
• Im Display der Soundbar wird Folgendes
angezeigt:
Anzeige Modus
DEMO ON DEMO-Modus
DEMO OFF Verbrauchermodus
DEMO-Modus verwenden
1. Rufen Sie den DEMO-Modus auf. Die
Soundbar schaltet sich automatisch ein,
wenn das Gerät eingeschaltet wird.
2. Quelle sperren (
nicht verfügbar). Sie
können die Quelle nur über das Demo Kit
wählen.
3. Alle Tasten werden gesperrt und sind nicht
verfügbar. Sie können nur über das Demo-Kit
gesteuert werden.
Alle Tasten
gesperrt
(Fernbedienung & Leiste)
Standard
Demo-
Kit
(QUELLE) Quelle sperren
+
(Vol+)
-
(Vol-)
SURR EIN
(BT)
EQ FILM
/ Im BT-Modus
Im BT-Modus
BASS
+
/
-
TREBLE
+
/
-
DIMMER
+
/
-
X
DIM 3
(STUMM)
X
Auto Standby
AUS
Auto Wake
AUS
* Wenn Sie (X) nicht verfügbar drücken, zeigt
die Soundbar „
DEMO ON
“ an.
13
DE
13. Fehlerbehebung
Versuchen Sie niemals, das Gerät selbst zu reparieren, damit verlieren Sie Ihre Garantieansprüche. Wenn
bei der Verwendung dieser Soundbar Probleme auftreten, überprüfen Sie die folgenden Punkte, bevor
Sie den Kundendienst anfordern.
Problem Lösung
Kein Strom • Vergewissern Sie sich, dass das Netzkabel des Geräts ordnungsgemäß
angeschlossen ist.
• Vergewissern Sie sich, dass an der Steckdose Strom anliegt.
• Drücken Sie
(Standby), um die Soundbar einzuschalten.
Fernbedienung funktioniert
nicht
• Bevor Sie eine Taste der Wiedergabesteuerung drücken, wählen Sie zunächst die
korrekte Quelle.
• Verringern Sie den Abstand zwischen Fernbedienung und Soundbar.
• Setzen Sie die Batterien so ein, dass die Polaritäten (+/-) wie angegeben
ausgerichtet sind.
• Tauschen Sie die Batterien aus.
• Richten Sie die Fernbedienung direkt auf den Sensor an der Vorderseite der
Soundbar.
Kein Ton • Vergewissern Sie sich, dass die Soundbar nicht stummgeschaltet ist. Drücken Sie
STUMM oder
+
(VOL), um die normale Wiedergabe fortzusetzen.
• Drücken Sie
auf der Soundbar oder auf der Fernbedienung, um die Soundbar
in den Standby-Modus zu schalten. Drücken Sie dann
erneut, um die Soundbar
einzuschalten.
• Ziehen Sie den Netzstecker der Soundbar und des Subwoofers und schließen Sie
sie dann wieder an. Schalten Sie die Soundbar ein.
• Vergewissern Sie sich, dass die Audioeinstellung der Eingangsquelle (z. B.
Fernseher, Spielkonsole, DVD-Player usw.) auf PCM oder Dolby Digital ist, wenn Sie
eine digitale Verbindung (z. B. HDMI, OPTISCH) verwenden.
• Der Subwoofer befindet sich außerhalb der Reichweite, bitte stellen Sie den
Subwoofer näher an die Soundbar. Der Subwoofer darf nicht weiter als 5 m von der
Soundbar entfernt stehen (je näher, desto besse).
• Die Soundbar hat möglicherweise die Verbindung mit dem Subwoofer verloren.
Koppeln Sie die Geräte erneut, indem Sie die Schritte im Abschnitt „Subwoofer
koppeln“ ausführen.
• Die Soundbar ist möglicherweise nicht in der Lage, alle digitalen Audioformate der
Eingangsquelle zu dekodieren.
Der Fernseher hat ein
Problem mit der Anzeige,
wenn HDR-Inhalte von einer
HDMI-Quelle angezeigt
werden.
• Bei einigen 4K HDR-Fernsehern müssen der HDMI-Eingang oder die
Bildeinstellungen für den Empfang von HDR-Inhalten eingestellt werden. Weitere
Einrichtungsdetails zur HDR-Anzeige finden Sie in der Bedienungsanleitung Ihres
Fernsehers.
Ich kann den Bluetooth®-
Namen dieser Soundbar
nicht auf meinem
Bluetooth®-Gerät zur
Bluetooth®-Kopplung
finden.
• Vergewissern Sie sich, dass die Bluetooth-Funktion auf Ihrem Bluetooth-Gerät
aktiviert ist.
• Vergewissern Sie sich, dass Sie die Soundbar mit Ihrem Bluetooth®-Gerät gekoppelt
haben.
• Die Soundbar verfügt über eine Bluetooth®-Funktion, die innerhalb von 8 m ein
Signal empfangen kann. Halten Sie einen Abstand von weniger 8 m zwischen der
Soundbar und Ihrem Bluetooth®-Gerät ein.
Dies ist eine
Abschaltfunktion nach
15 Minuten, eine der
Anforderungen des ERPII-
Standards zum Stromsparen
• Wenn der externe Signalpegel des Geräts zu niedrig ist, schaltet sich die Soundbar
nach 15 Minuten automatisch aus. Bitte erhöhen Sie die Lautstärke Ihres externen
Geräts.

14
DE
14. Technische Daten
Marke Hisense
Modell HS3100
Soundbar
Stromversorgung 100-240 V~ 50/60 Hz
Leistungsaufnahme
50 W
< 0,5 W (StandBy)
USB
5 V
500 mA
Hi-Speed USB (2.0) / FAT32 / FAT16
32 GB (maximale), WAV / WMA / MP3 / FLAC.
Abmessungen (B × H × T) 902 × 62,3 × 91 mm / 35,5'' × 2,4'' × 3,6''
Gewicht (Netto) 1,6 kg / 3,5 lbs
Audio-Eingangsempfindlichkeit 500 mV
Frequenzgang 120 Hz - 20 kHz
Betriebstemperatur 0°C - 45°C
Subwoofer
Stromversorgung 100-240 V~ 50/60 Hz
Leistungsaufnahme
40 W
< 0,5 W (StandBy)
Abmessungen (B × H × T) 161 × 303 × 304,5 mm / 6,3'' × 11,9'' × 12''
Gewicht (Netto) 3,6 kg / 7,9 lbs
Frequenzgang 40 Hz - 150 Hz
Drahtlos-Spezifikationen
Bluetooth-Version / Profile
Bluetooth-Frequenzbereich
Max. Bluetooth-Sendeleistung
V 5.3 (A2DP, AVRCP)
2400 MHz ~ 2483,5 MHz
≤ 5 dBm
2,4 GHz Funkfrequenzbereich
2,4 GHz max. Sendeleistung
2400 MHz ~ 2483 MHz
≤ 6 dBm
Modulationstyp GFSK, π/4 DQPSK
Verstärker (max. Audioleistung)
Gesamt 480 W
Soundbar 300 W
Subwoofer 180 W
Fernbedienung
Reichweite/Winkel 6 m / 30°
Batterien AAA (1,5 V × 2)
• Design und technische Daten können ohne vorherige Ankündigung geändert werden.

Prima di utilizzare la soundbar, leggere attentamente questo manuale e
conservarlo per future consultazioni.
MANUALE DELL'UTENTE
Soundbar con Subwoofer wireless da 3.1 canali
Modello: HS3100
IT

2
IT
Contenuti
1. Cosa c’è nella confezione ................................................................................................................. 3
2. Identificare le parti ........................................................................................................................... 4
2.1 Soundbar ................................................................................................................................................................................................4
2.2 Subwoofer wireless ..............................................................................................................................................................................4
2.3 Telecomando .......................................................................................................................................................................................... 5
3. Preparazioni...................................................................................................................................... 5
3.1 Preparare il telecomando ...................................................................................................................................................................5
3.2 Sostituire la batteria del telecomando ..........................................................................................................................................5
4. Posizionamento e montaggio ......................................................................................................... 6
4.1 Posizionamento ..................................................................................................................................................................................... 6
4.2 Montaggio a muro della soundbar ................................................................................................................................................6
5. Collegamenti .................................................................................................................................... 7
5.1 Utilizzare la presa HDMI ARC ............................................................................................................................................................7
5.2 Utilizzare Roku TV .................................................................................................................................................................................7
5.3 Utilizzare la funzione Hisense EzPlay .............................................................................................................................................7
5.4 Utilizzare la presa OPTICAL................................................................................................................................................................8
5.5 Utilizzare la presa AUX ........................................................................................................................................................................8
5.6 Collegare l'alimentazione ..................................................................................................................................................................8
6. Appa
iare
con il Subwoofer ....................................................................................................................... 8
6.1 Accoppiamento automatico .............................................................................................................................................................8
6.2 Accoppiamento manuale ..................................................................................................................................................................9
7. Operazioni di base ........................................................................................................................... 9
7.1 Standby/ACCENSIONE ........................................................................................................................................................................9
7.2 Funzione standby automatico / accensione automatica .......................................................................................................9
7.3 Selezionare Modalità ........................................................................................................................................................................ 10
7.4 Regolare il volume .............................................................................................................................................................................10
7.5 Attiva/disattiva l'audio surround.................................................................................................................................................. 10
7.6 Regolare i livelli di bassi/alti ...........................................................................................................................................................10
7.7 Selezionare l'effetto dell’Equalizzatore (EQ).............................................................................................................................10
7.8 Regolare la luminosità ..................................................................................................................................................................... 10
7.9 Ripristino delle impostazioni di fabbrica................................................................................................................................... 10
8. Utilizzo AUX/ OTTICO/HDMI ARC .................................................................................................. 10
9. Utilizzo USB ..................................................................................................................................... 11
10. Utilizzo Bluetooth® ......................................................................................................................... 11
11. Menù configurazione ..................................................................................................................... 12
12. Modalità DEMO .............................................................................................................................. 12
13. Risoluzione dei problemi ............................................................................................................... 13
14. Specifiche ........................................................................................................................................ 14

3
IT
1. Cosa c’è nella confezione
• La lunghezza del cavo di alimentazione ed il tipo di spina variano in base alla regione.
• Le immagini, le illustrazioni, e i disegni mostrati su questo Manuale dell'utente sono solo per
riferimento, il prodotto effettivo potrebbe variare nell'aspetto.
Cavo HDMI
Soundbar
Braccetto a muro
Telecomando /
Batterie AAA × 2
Subwoofer wireless
Cavi di alimentazione AC × 2
Manuale dell'utente/Certificato
di garanzia/Guida rapida di avvio
Per US
Per UK
Per AUS
Per EU

4
IT
3 4 5
TOP
BACK
2. Identificare le parti
2.1 Soundbar
1 Sensore del telecomando
Riceve i segnali in remoto del telecomando.
2 Finestra Display
Mostra lo stato corrente.
3 Tasto
(ON/OFF)
Passa la soundbar tra le modalità ON e Standby.
4 Tasto
(SORGENTE)
Selezionare la modalità riproduzione.
5 Tasti +/- (VOL)
Aumenta/diminuisce il livello del volume.
6 Viti per il montaggio a muro
7 Presa AC~
Utilizzare per connettere il cavo di
alimentazione.
8 Presa OPTICAL
9 Presa AUX
10 Presa USB
Inserire un dispositivo USB per riprodurre la
musica.
11 Presa HDMI ARC
Collega ad un televisore via cavo HDMI.
2.2 Subwoofer wireless
1 Spia di appaiamento
La luce smette di lampeggiare una volta che il
subwoofer è appaiato con la soundbar.
2 Presa AC IN~
Utilizzare per connettere il cavo di
alimentazione.
3 Tasto PAIR
Premere per attivare la funzione di
appaiamento tra la soundbar e il subwoofer.
SOPRA
RETRO
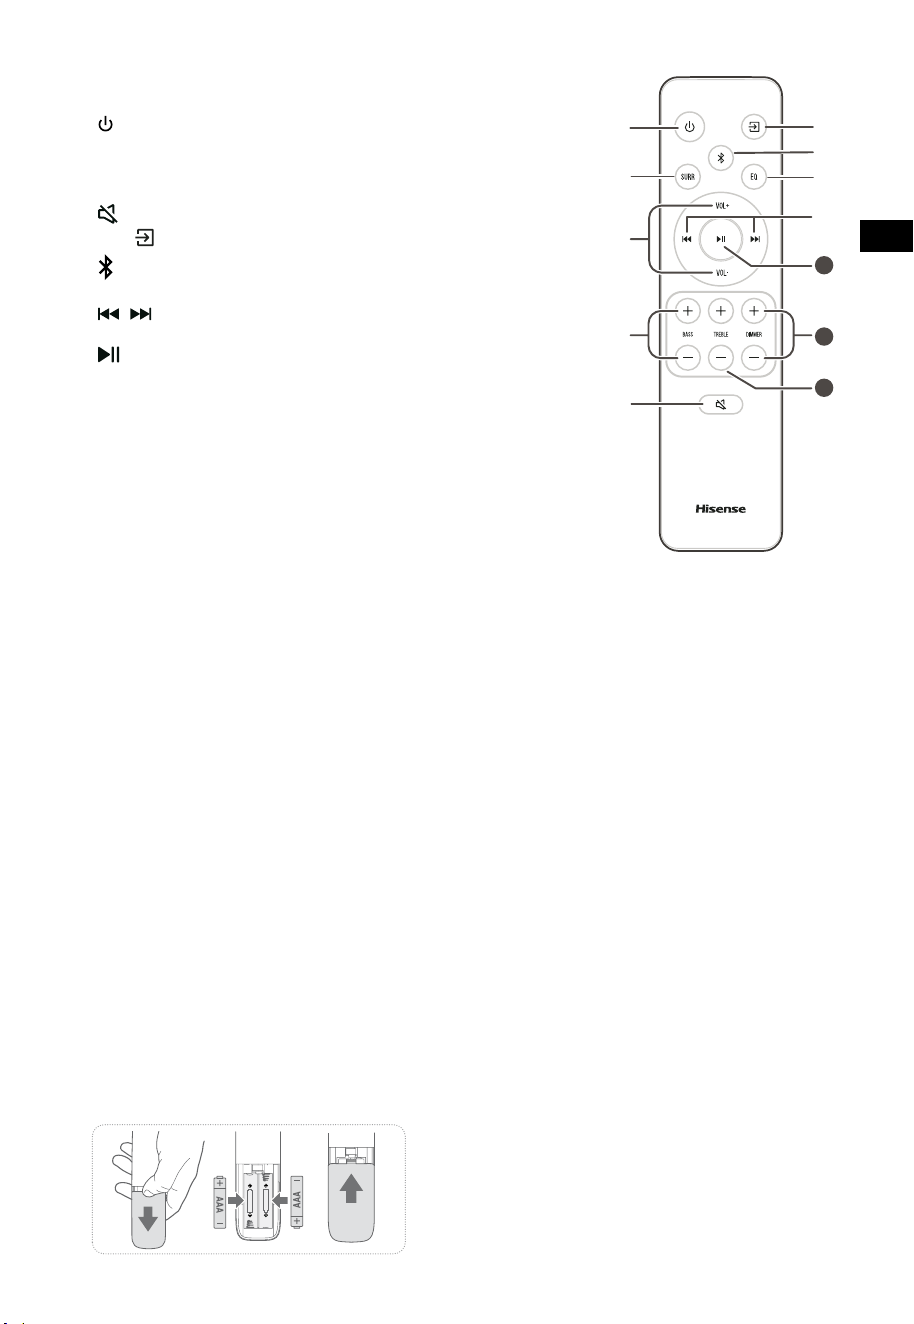
5
IT
11
10
12
2.3 Telecomando
1 Passa la soundbar tra le modalità ON e STANDBY.
2 SURR Passa il surround tra ON/OFF.
3 VOL+/VOL- Aumenta/diminuisce il livello del volume.
4 BASSI +/- Controllo del livello di bassi.
5
(MUTO)
Mette in muto o riattiva l’audio.
6
Tasto
Selezionare la modalità riproduzione.
7
Seleziona la modalità Bluetooth.
8 EQ Selezionare un effetto audio preimpostato.
9
/ Salta alla traccia precedente/successiva in modalità
Bluetooth/USB.
10
Play/pausa/riprendi riproduzione in modalità
Bluetooth/USB. Tenere premuto per attivare la
funzione di appaiamento in modalità Bluetooth, o
scollegare il dispositivo Bluetooth appaiato esistente.
11 DIMMER +/- Regola la luminosità LED.
12 TREBLE +/- Controllo del livello di alti.
3. Preparazioni
3.1 Preparare il telecomando
Il telecomando fornito permette di controllare la
soundbar a distanza.
• Anche se il telecomando è utilizzato entro il
raggio effettivo di 6 metri (19,7 piedi), il suo
funzionamento può essere impossibile se ci
sono ostacoli tra esso e la soundbar.
• Se il telecomando è utilizzato vicino ad altri
prodotti che generano raggi infrarossi, o
se i telecomandi di altri dispositivi a raggi
infrarossi sono utilizzati vicino alla soundbar,
esso potrebbe funzionare in modo errato.
Viceversa, anche gli altri prodotti potrebbero
funzionare in modo errato.
3.2 Sostituire la batteria del telecomando
1 Premere e sollevare il coperchio posteriore per
aprire lo scomparto batterie del telecomando.
2 Inserire due batterie AAA (incluse). Assicurarsi
di allineare le estremità (+) e (–) delle batterie
con i segni (+) e (-) indicati nello scomparto
batterie.
3 Chiudere lo sportello dello scomparto batterie.
Precauzioni riguardo le batterie
• Assicurarsi di inserire le batterie con le polarità
positiva “
” e negativa “
” corrette.
• Utilizzare batterie dello stesso tipo. Non usare
mai tipi di batterie diversi assieme.
• Possono essere usate pile ricaricabili o non
ricaricabili. Fare riferimento alle precauzioni
sulle loro etichette.
• Stare attenti alle unghie quando si estrae il
coperchio batteria e le batterie.
• Non far cadere il telecomando.
• Non lasciare che oggetti colpiscano i l
telecomando.
• Non fare cadere acqua o altri liquidi sul
telecomando.
• Non posizionare il telecomando su un oggetto
umido.
• Non posizionare il telecomando alla luce diretta
del sole o vicino a sorgenti di calore eccessivo.
• Rimuovere le batterie dal telecomando quando
non viene usato per un lungo periodo di
tempo, perché potrebbero causare corrosione
o perdita di liquido e quindi causare infortuni
e/o danni alla proprietà, e/o incendi.
• Non utilizzare batterie diverse da quelle specificate.
• Non mescolare batterie vecchie con batterie
nouve.
• Non ricaricare mai una batteria a meno che non
si confermi che sia del tipo ricaricabile.

6
IT
4. Posizionamento e montaggio
4.1 Posizionamento
A Se il televisore è posizionato su un tavolo,
si può mettere la soundbar sul tavolo
direttamente di fronte al supporto del
televisore, centrata con lo schermo.
B Se il televisore è attaccato al muro, si può
montare l’unità su di esso direttamente sotto
lo schermo del televisore.
4.2 Montaggio a muro della soundbar
- L’installazione deve essere effettuata solo
da personale qualificato. Il montaggio
errato può avere come conseguenza gravi
infortuni personali e danni alle proprietà (se
avete intenzione di montare il prodotto in
autonomia, dovrete controllare che dietro il
muro non passino cavi della corrente o tubi
idraulici). È responsabilità dell’installatore
verificate che il muro supporti in sicurezza il
carico totale dell’unità e dei braccetti.
- Sono necessari strumenti aggiuntivi (non
inclusi) per l’installazione.
- Non stringere troppo le viti.
- Conservare il libretto delle istruzioni per
future consultazioni.
- Utilizzare un rilevatore per cavi elettrici per
controllare il tipo di muro prima di trapanare
e montare.
AVVISO
• Per prevenire infortuni, questo apparecchio deve
essere ancorato saldamente al pavimento/muro come
da istruzioni di installazione.
• Altezza suggerita per il montaggio a muro: ≤ 1,5 metri.
1. Creare 2 fori paralleli (Ø 5,5-6 mm ognuno
a seconda del tipo di muro) nel muro. La
distanza tra i fori deve essere 670 mm.
2. Inserire le ancore a muro fornite nei due fori
a parete per le viti. Inserire le viti dei braccetti
a muro attraverso i braccetti nelle ancore a
muro. Fissare e stringere le viti a muro.
3. Appendere l’unità ai braccetti per il
montaggio a muro.
1
2
3
670 mm / 26.4”
670 mm / 26,4"
AB

7
IT
5. Collegamenti
5.1 Utilizzare la presa HDMI ARC
La funzione ARC (canale di ritorno audio) permette
di inviare l’audio dal televisore conforme ARC alla
soundbar attraverso una singola connessione
HDMI. Per godere della funzione ARC, assicurarsi
che il televisore sia conforme sia a HDMI-CEC
sia a ARC e impostato adeguatamente. Quando
impostato correttamente, è possibile usare il
telecomando del televisore per regolare il volume
(VOL+/- e MUTO) della soundbar.
• Collegare il cavo HDMI dalla presa HDMI
ARC dell’unità alla presa HDMI ARC del
televisore conforme ad ARC. Quindi premere
il telecomando per selezionare HDMI ARC.
56:/)'2
.*3/'8)
56:/)'2
.*3/
'8)
.KGJVNUTK
BA
Consigli:
• Il televisore deve supportare le funzioni HDMI-
CEC e ARC. HDMI-CEC e ARC devono essere
impostati su Acceso.
• Il metodo per impostare HDMI-CEC e ARC
potrebbe differire a seconda del televisore. Per
maggiori dettagli riguardo la funzione ARC, fare
riferimento al manuale dell’utente.
• Solo i cavi compatibili con HDMI 1.4 o superiore
possono supportare la funzione ARC.
5.2 Utilizzare Roku TV
• Se si ha la Roku TV™, collegare semplicemente
il cavo HDMI alle porte ARC e seguire le
istruzioni a schermo Roku TV Ready™.
Configurazione semplice
Un telecomando
Configurazione rapida
5.3 Utilizzare la funzione Hisense EzPlay
Per Hisense EzPlay, quando la Soundbar si collega
con un televisore Hisense attraverso la presa HDMI
ARC, apparirà un menù Impostazioni Soundbar
sul televisore, e sarà possibile controllare tale
menù attraverso il telecomando del televisore per
controllare la maggior parte delle funzioni della
Soundbar.
Impostazioni Soundbar
Modalità EQ
Sport
Modalità surround
Livello dei bassi
Livello degli alti
Livello attenuazione
Reset
Soundbar con EzPlay
TV con
EzPlay
Esempio menù televisore (modelli diversi
potrebbero avere menù diversi):
Impostazioni – audio – Impostazioni Soundbar.
Impostazioni Soundbar
Modalità EQ
Sport
Modalità surround
Livello dei bassi
Livello degli alti
Livello attenuazione
Reset
Nota:
• Questa funzione è disponibile solo quando
sia la Soundbar sia il televisore supportano
Hisense Ezplay.
• Questa funzione, richiede che la Soundbar e
il televisore TV siano connesse tramite HDMI
ARC, e il CEC sul televisore deve essere attivo.
• Se viene impostata correttamente, per la
prima volta, ci sarà un suggerimento sullo
schermo del televisore per guidarvi a trovare
il menù di impostazioni della Soundbar.
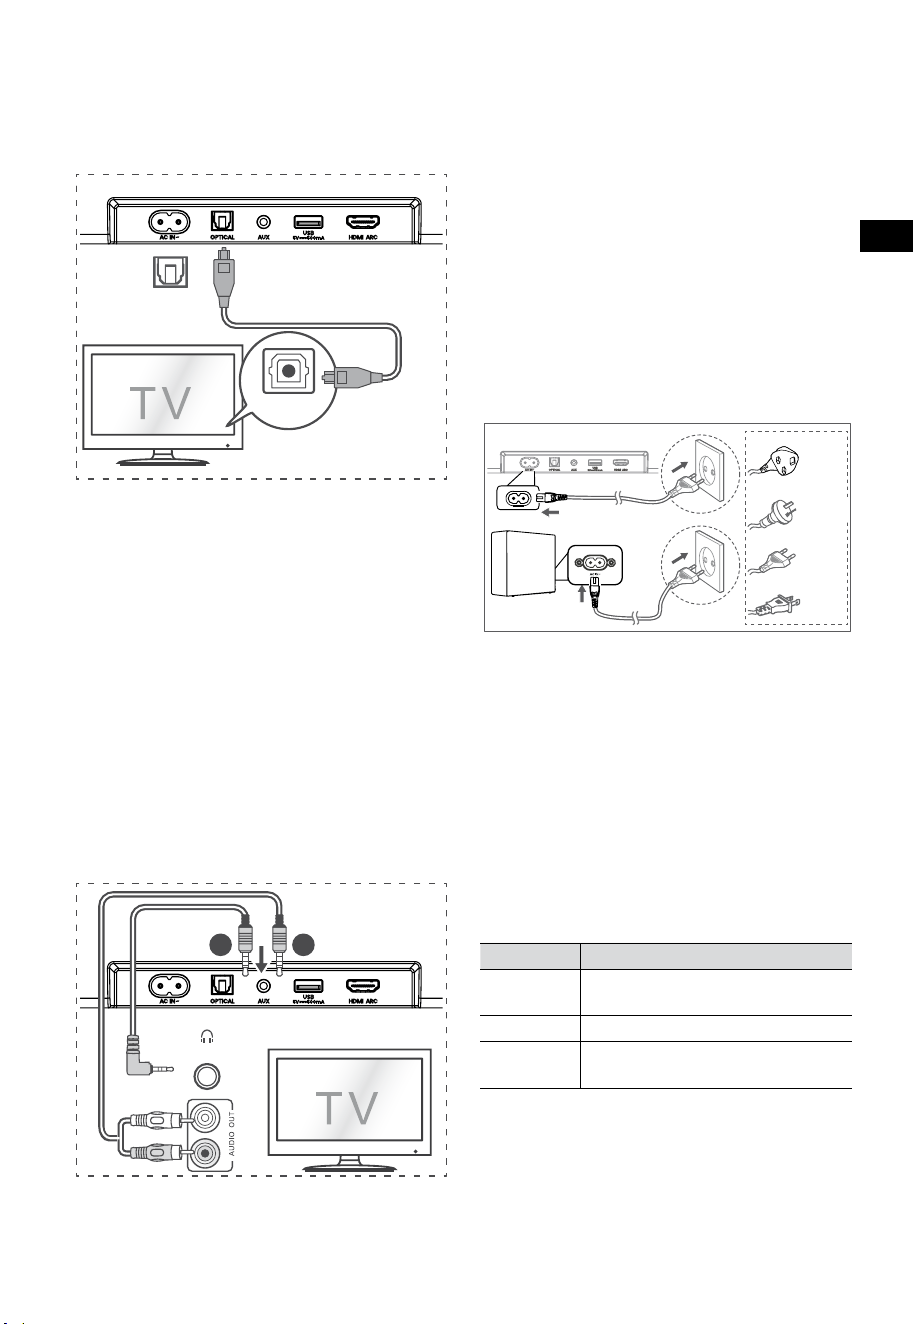
8
IT
5.6 Collegare l'alimentazione
Rischio di danno al prodotto!
• Rischio di danno al prodotto! Assicurarsi che
il voltaggio di alimentazione corrisponda
al voltaggio stampato sul retro o sotto alla
soundbar.
• Prima di collegare il cavo AC, assicurarsi di aver
completato tutte le altre connessioni.
• Soundbar
Collegare il cavo di alimentazione alla presa in
AC~ del Soundbar e quindi alla presa a muro.
• Subwoofer
Collegare il cavo di alimentazione alla presa in
AC~ del Subwoofer e quindi alla presa a muro.
* La lunghezza del cavo di alimentazione e il tipo di
spina variano in base alla regione.
6. Appa
iare
con il Subwoofer
6.1 Accoppiamento automatico
Il subwoofer e la soundbar si appaieranno
automaticamente quando sono collegati alla presa
di corrente e accesi. Non è necessario alcun cavo per
collegare le 2 unità.
• Determinare lo stato in base alla spia del
subwoofer wireless.
Stato LED Stato
Lampeggia
rapidamente
Il subwoofer è in modalità
accoppiamento
Acceso fisso Connesso/accoppiato con successo
Lampeggia
lentamente
Connessione/accoppiamento Fallito
NOTE:
- Non premere il tasto PAIR sul subwoofer, a meno
che non si stia effettuando un accoppiamento
manuale.
- Se l’accoppiamento automatico fallisce,
accoppiare manualmente il subwoofer con la
Soundbar.
5.4 Utilizzare la presa OPTICAL
- Usare un cavo OTTICO per collegare OPTICAL
OUT del televisore e la presa OPTICAL sulla
soundbar.
56:/)'2
.*3/'8)
56:/)'2
.*3/
'8)
.KGJVNUTK
BA
Consiglio:
La Soundbar potrebbe non riuscire a decodificare
tutti i formati audio digitali dalla sorgente
in ingresso. In questo caso, la Soundbar sarà
muta. Ciò NON è un difetto. Assicurarsi che le
impostazioni audio della sorgente in ingresso
(per esempio TV, console di gioco, lettore DVD,
etc.) sia impostato su PCM o Dolby Digital (Fare
riferimento al manuale dell’utente del dispositivo
della sorgente in ingresso per i dettagli sulle
impostazioni audio) con l’ingresso HDMI ARC /
OTTICO.
5.5 Utilizzare la presa AUX
A. Utilizzare un cavo audio da 3,5 mm a 3,5 mm
per collegare la presa esterna audio cuffia del
televisore o del dispositivo audio esterno e la
presa AUX sulla soundbar.
56:/)'2
.*3/'8)
56:/)'2
.*3/
'8)
.KGJVNUTK
BA
Cuffie
B. Utilizzare un cavo audio RCA da 3,5 mm per
collegare la presa di uscita del televisore alla
presa AUX sulla soundbar.
Per UK
Per AUS
Per EU
Per US

9
IT
6.2 Accoppiamento manuale
1. Assicurarsi che tutti i cavi siano ben connessi e
che la Soundbar sia in modalità Standby.
2. Tenere premuto il tasto PAIR sul retro del
subwoofer per alcuni secondi. Il subwoofer
entrerà in modalità accoppiamento e la spia
di accoppiamento sul subwoofer lampeggerà
rapidamente.
3. Premere il tasto
sulla Soundbar o sul
telecomando per accenderla.
4. Tenere premuto il tasto
sul retro della
Soundbar o sul telecomando per alcuni secondi.
5. Dopo che la connessione wireless è stata
stabilita con successo, la spia di accoppiamento
si accenderà.
6. Se la spia di accoppiamento lampeggia, la
connessione wireless è fallita. Scollegare il
cavo del subwoofer, riconnettere il cavo di
alimentazione principale dopo 4 minuti. Ripetere
i passi da 1 a 4.
NOTE:
• Se la connessione wireless fallisce ancora,
controllare se c’è un conflitto o una forte
interferenza (per esempio, da un dispositivo
elettronico) nel luogo. Rimuovere tali conflitti o
forti interferenze e ripetere le procedure sopra
indicate.
• Il subwoofer deve essere entro i 6 metri dalla
soundbar in un’area aperta.
• Se la Soundbar non è connessa con il subwoofer
ed è in modalità ON, la spia POWER lampeggerà.
Seguire i passi da 1 a 4 sopra riportati per
appaiare il subwoofer alla Soundbar.
7. Operazioni di base
7.1 Standby/ACCENSIONE
Si accenderà automaticamente quando il cavo di
alimentazione è connesso.
• Premere di nuovo il tasto
per passare la
soundbar in modalità STANDBY.
• Scollegare la presa di alimentazione dalla
presa se si vuole spegnere completamente la
soundbar.
7.2 Funzione standby automatico /
accensione automatica
[Auto-Standby] La soundbar è programmata per
entrare automaticamente in modalità STANDBY
quando non viene rilevato alcun audio per 15 minuti.
Per esempio, ciò accade quando si mette in pausa la
riproduzione, o se la soundbar viene accidentalmente
lasciata accesa.
[Auto-Wake] Se un televisore o un dispositivo esterno
sono collegati (Modalità AUX / OTTICO / HDMI ARC),
l’unità si accenderà automaticamente quando il
televisore o il dispositivo esterno vengono accesi.
Per disabilitare questa funzione, seguire i passi
sotto elencati:
1. In modalità di accensione, puntare il
telecomando alla soundbar, tenere premuto
il tasto per 3 secondi per aprire il menù.
- Il display dell’unità avrà la scritta a
scorrimento "MENU".
2. Premere il tasto
per 6 volte di seguito, il
display mostra: Auto Wake [ON / OFF].
o premere 7 volte di fila il tasto
:
il display mostra: Auto Standby [ON / OFF].
3. Selezionare il contenuto con i tasti VOL+ /
–
sul telecomando, e quindi premere il tasto
per confermare la selezione ed uscire dalle
impostazioni.
• Ripetere questi passaggi farà alternare tra le
opzioni "ON" e "OFF” della funzione.
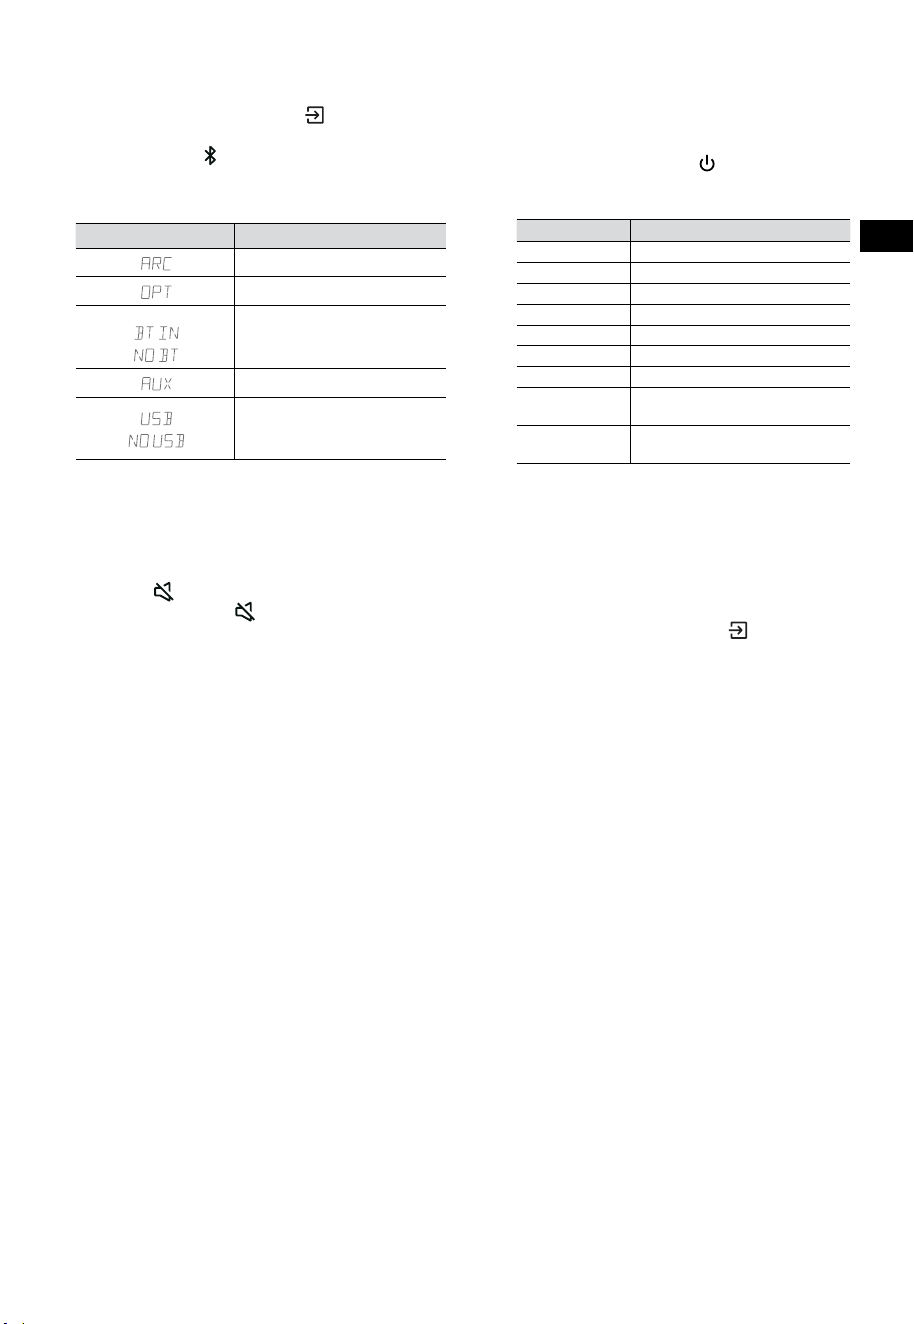
10
IT
7.3 Selezionare Modalità
Premere ripetutamente il tasto (SORGENTE)
sulla soundbar o sul telecomando per selezionare
le modalità AUX,
, OTTICA, HDMI ARC e USB. La
modalità selezionata apparirà sul display.
• La modalità selezionata apparirà sul display.
Display Modalità
HDMI ARC
OTTICA
Bluetooth
Connesso
Non connesso
AUX
USB
Nessun dispositivo USB
connesso
7.4 Regolare il volume
• Premere i tasti VOL
+
/
-
sulla soundbar o sul
telecomando per regolare il volume.
• Se si vuole disattivare l’audio, premere il
tasto
(MUTO) sul telecomando. Premere
di nuovo il tasto (MUTO) o premere i tasti
VOL
+
per riprendere l’ascolto normale.
7.5 Attiva/disattiva l'audio surround
• Premere il pulsante SURR sul telecomando
per attivare/disattivare l'audio surround.
7.6 Regolare i livelli di bassi/alti
• Premere i tasti BASS
+
/
-
sul telecomando
per selezionare il livello dei bassi.
• Premere i tasti TREBLE
+
/
-
sul telecomando
per selezionare il livello degli alti.
7.7 Selezionare l'effetto
dell’Equalizzatore (EQ)
• Durante la riproduzione, premere il tasto
EQ sul telecomando per selezionare gli
equalizzatori pre-impostati desiderati: FILM,
MUSICA, GIOCHI, NEWS, SPORT, NOTTE.
7.8 Regolare la luminosità
• Premere i tasti DIMMER
+
/
-
sul telecomando
per selezionare il livello di luminosità.
7.9 Ripristino delle impostazioni di fabbrica
Ripristina il dispositivo alle impostazioni predefinite.
• Attivare la modalità ottica sulla soundbar,
tenere premuto il tasto [
] sulla Soundbar,
la Soundbar entrerà in modalità ripristino di
fabbrica e passare allo stato di standby.
MODALITÀ PREDEFINITA
SORGENTE ARC
Volume 30
Surround Off
Attenuatore MASSIMA
Bassi 0
Alti 0
EQ FILM
Accensione
automatica
OFF
Standby
automatico
ON (eccetto per gli Stati
Uniti)
8. Utilizzo AUX/ OTTICO/HDMI
ARC
1 Assicurarsi che la soundbar sia collegata al
televisore o al dispositivo audio.
2 Premere ripetutamente il tasto (SORGENTE)
sulla soundbar o sul telecomando per
selezionare la modalità AUX, OTTICA, HDMI
ARC. La modalità selezionata apparirà sul display.
3 Utilizzare direttamente il dispositivo audio
per le funzioni di riproduzione.
4 Premere i tasti VOL
+
/
-
per regolare il
volume al livello desiderato.
Consiglio: La Soundbar potrebbe non riuscire
a decodificare tutti i formati audio digitali dalla
sorgente in ingresso. In questo caso, la Soundbar
sarà muta. Ciò NON è un difetto. Assicurarsi che le
impostazioni audio della sorgente in ingresso (per
esempio TV, console di gioco, lettore DVD, etc.) sia
impostato su PCM o Dolby Digital (Fare riferimento
al manuale dell’utente del dispositivo della sorgente
in ingresso per i dettagli sulle impostazioni audio)
con l’ingresso HDMI ARC / OTTICO.
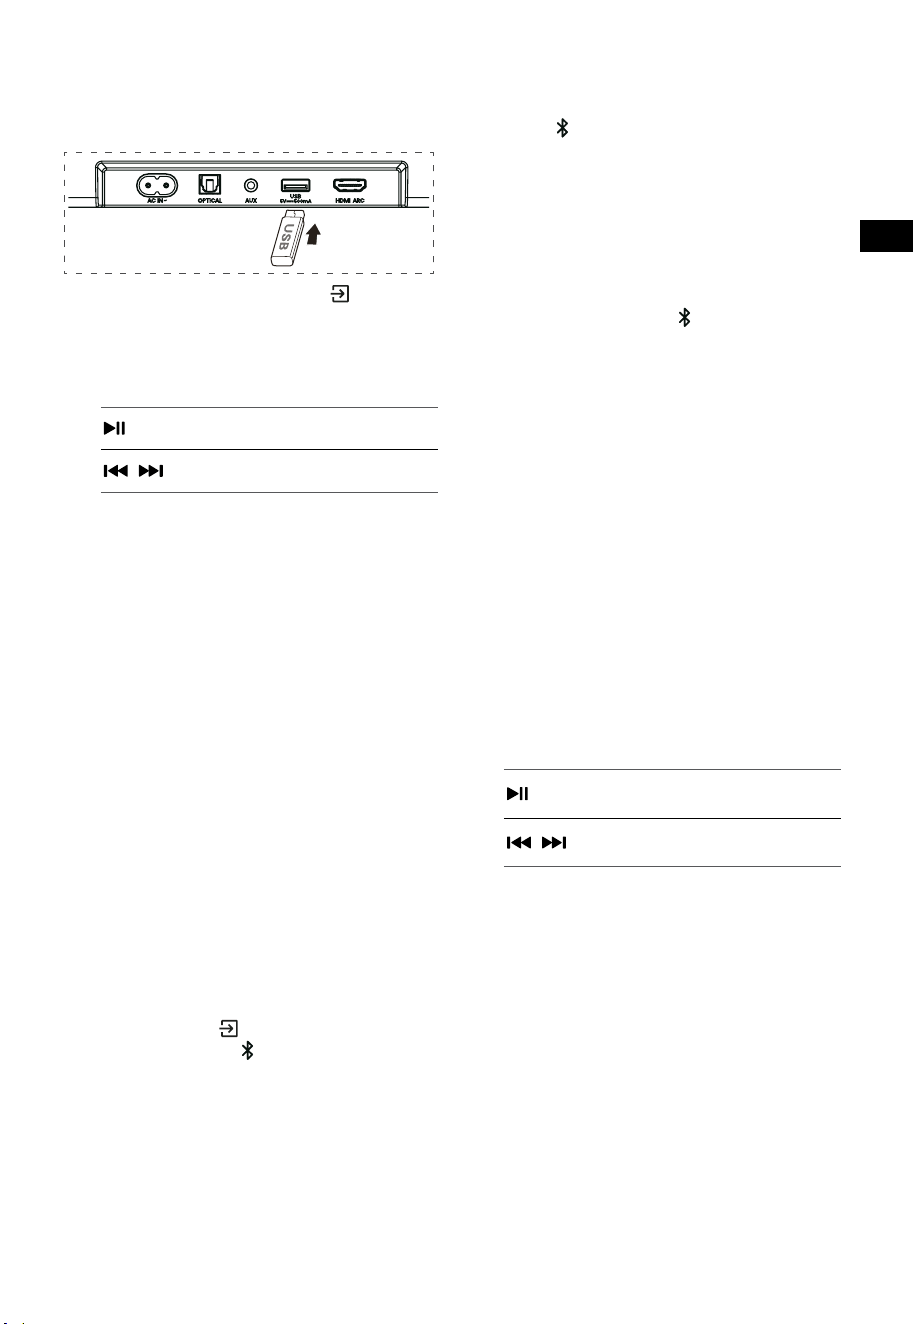
11
IT
9. Utilizzo USB
1 Inserire un dispositivo USB.
2 Premere ripetutamente il tasto
(SORGENTE) sulla soundbar o sul
telecomando per selezionare la modalità
USB .
3 Durante la riproduzione:
Avvio, pausa o riprendere la
riproduzione
,
Salta alla traccia precedente/
successiva
Consigli:
• L’unità supporta i dispositivi USB fino a 32 GB
di memoria.
• Questa unità supporta WAV / WMA / MP3 /
FLAC.
• Questo prodotto potrebbe non essere
compatibile con certi tipi di dispositivi di
archiviazione USB.
• Se si usa una prolunga USB, un hub USB o
un lettore multifunzione per schede USB, il
dispositivo di archiviazione USB potrebbe
non essere riconosciuto.
• Non rimuovere il dispositivo di archiviazione
USB durante la lettura del file.
10. Utilizzo Bluetooth®
Attraverso il Bluetooth, connettere la Soundbar
con il dispositivo Bluetooth (come un iPad, iPhone,
iPod touch, telefono Android, o portatile), e quindi
si possono ascoltare i file audio memorizzati sul
dispositivo attraverso gli altoparlanti della Soundbar.
Primo appaiamento
1 Premere il tasto (SORGENTE) sulla
soundbar o il tasto
sul telecomando per
selezionare la modalità Bluetooth®.
• Lo schermo mostrerà NO BT.
2 Attivare il dispositivo Bluetooth e selezionare
la modalità ricerca.
3 Selezionare "Hisense HS3100 " nella lista
accoppiamento. Dopo il suono di avviso,
il sistema sarà connesso con successo e lo
schermo mostrerà BT IN.
• Se si vuole connettere la Soundbar con un
altro dispositivo Bluetooth, tenere premuto
il tasto
sul telecomando per scollegare il
dispositivo Bluetooth attualmente connesso.
Seguire i passi 2-3 per appaiare il dispositivo
Bluetooth.
Per scollegare la funzione Bluetooth, si può:
- Passare ad un’altra sorgente sull’unità.
- Disabilitare la funzione sul dispositivo
Bluetooth.
- Tenere premuto il tasto
sul telecomando.
Ascoltare la musica da dispositivi
Bluetooth
- Se il dispositivo Bluetooth connesso supporta
il Advanced Audio Distribution Profile (A2DP
- Profilo di distribuzione avanzata dell’audio),
è possibile ascoltare la musica memorizzata
sul dispositivo tramite l’unità.
- Se il dispositivo supporta anche il Audio
Video Remote Control Profile (AVRCP - Profilo
telecomando video e audio), si può usare
il telecomando dell’unità per riprodurre la
musica memorizzata sul dispositivo.
1. Accoppiare il dispositivo con l’unità.
2. Riproduzione musica attraverso il dispositivo
(se supporta A2DP).
3. Utilizzare il telecomando in dotazione per
controllare la riproduzione (se supporta
AVRCP).
Avvio, pausa o riprendere la
riproduzione
,
Salta alla traccia precedente/
successiva
Consigli:
• La distanza di funzionamento: tra la
Soundbar e il dispositivo è circa di 8 metri.
• Prima di collegare un dispositivo Bluetooth®
alla Soundbar, assicurarsi di conoscere le
capacità del dispositivo.
• Non è garantita la compatibilità con tutti i
dispositivi Bluetooth®.
• Qualsiasi ostacolo tra il dispositivo e
la Soundbar può ridurre il raggio di
funzionamento.
• Tenere il lettore lontano da altri dispositivi
elettronici che possano causare interferenza.
• L’unità sarà scollegata anche quando il
dispositivo viene spostato oltre il raggio di
utilizzo.
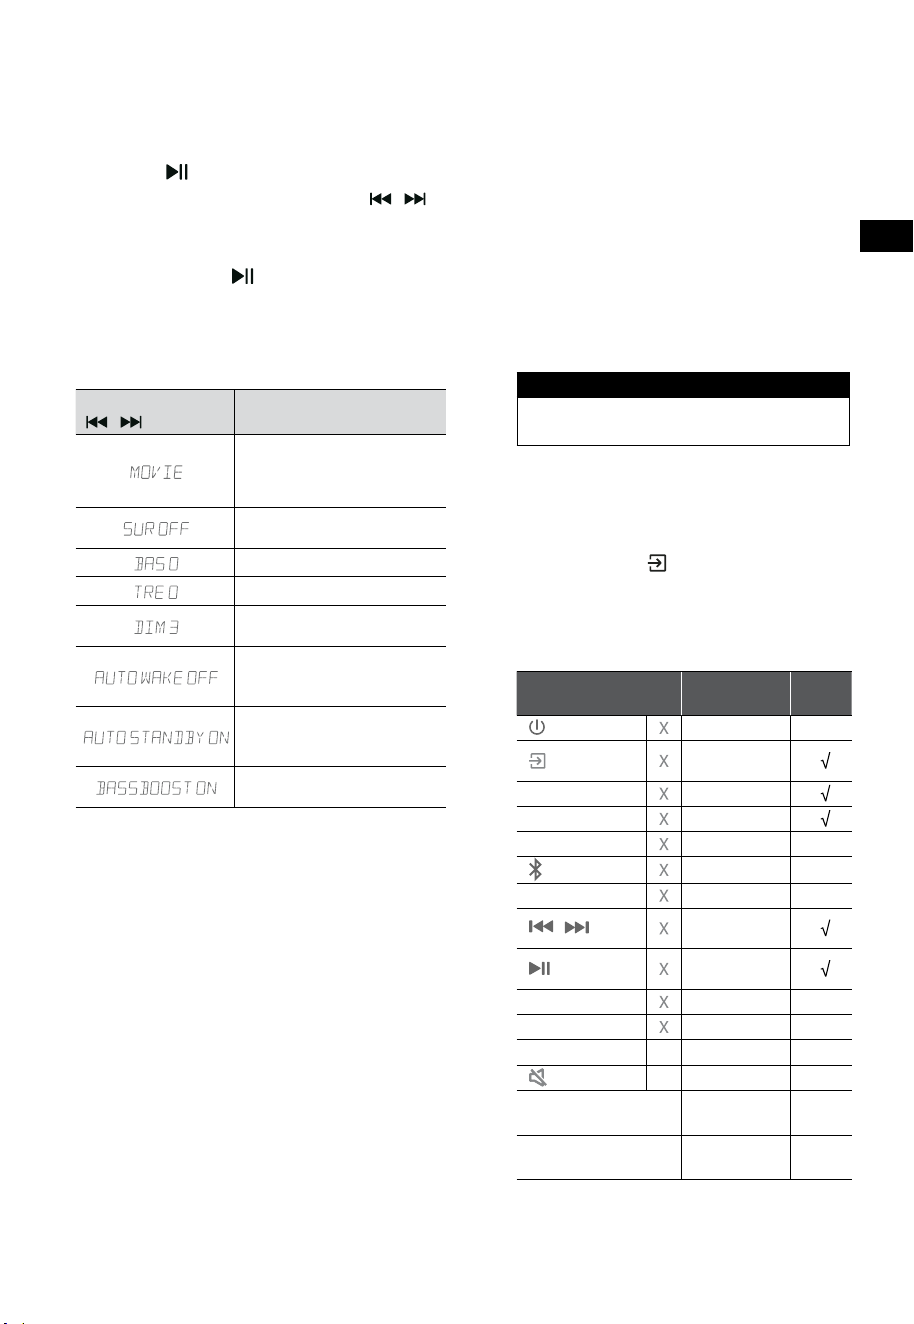
12
IT
11. Menù configurazione
1. In modalità di accensione, puntare il
telecomando alla soundbar, tenere premuto
il tasto per 3 secondi per aprire il menù.
2. Selezionare il contenuto con i tasti
/ .
3. Cambiare i valori iniziali per ogni
impostazione con i tasti VOL
+
/
-
.
4. Premere il tasto
per confermare la
selezione e uscire dalla configurazione.
• Se non viene premuto alcun tasto entro 10
secondi, il sistema uscirà automaticamente
dal menù.
Display
/
Descrizione
VOL
+
/
-
Selezionare l'effetto
dell’equalizzatore (EQ) (FILM,
MUSICA, GIOCHI, NEWS, SPORT,
NOTTE)
Interruttore audio surround
ON / OFF
Regolare i livelli dei bassi
Regolare i livelli degli alti
Regolare la luminosità
DIM 0 / DIM 1 / DIM 2 / DIM 3
Interruttore Accensione
automatica
ON / OFF
Interruttore Standby
automatico
ON / OFF
Interruttore: BassBoost
ON / OFF
12. Modalità DEMO
La modalità DEMO è una modalità utente speciale
configurata per l’uso nei negozi.
Attivare/Disattivare la modalità DEMO:
Questa soundbar ha come modalità di default la
normale modalità consumatore.
• Inserire il Kit Demo per attivare la modalità
DEMO.
• Rimuovere il Kit Demo per disattivare la
modalità DEMO.
• La soundbar mostrerà quanto segue come
sotto:
Display Modalità
DEMO ON Modalità DEMO
DEMO OFF Modalità Consumatore
Utilizzare la modalità DEMO
1. Accedere alla modalità DEMO, la soundbar si
accenderà automaticamente quando viene
acceso il tasto di accensione.
2. Blocco sorgente (
Non disponibile). Si può
selezionare la sorgente solo attraverso il Kit
Demo.
3. Tutti i tasti saranno bloccati e non disponibili.
Si può controllare solo col Kit Demo.
Tutti i tasti bloccati
(Telecomando e soundbar)
Default
Kit
Demo
(SORGENTE)
Blocco
sorgente
+
(Vol+)
-
(Vol-)
SURR ACCESO
(BT)
EQ FILM
/
Se in modalità
BT
Se in modalità
BT
BASSI
+
/
-
ALTI
+
/
-
DIMMER
+
/
-
X
DIM 3
(MUTO)
X
Standby
automatico
OFF
Attivazione
automatico
OFF
* Quando si premono i tasti (X) non disponibili,
la soundbar mostrerà "
DEMO ON
".

13
IT
13. Risoluzione dei problemi
Per mantenere la validità della garanzia, non provare mai a riparare il sistema da soli. Se si hanno
problemi durante l’utilizzo di questa soundbar, controllare i seguenti punti prima di richiedere l’intervento
del servizio.
Problema Soluzione
Unità spenta • Assicurarsi che il cavo AC dell’apparato sia collegato correttamente.
• Assicurare che la presa AC sia alimentata.
• Premere il tasto di (standby) per accendere la soundbar.
Il telecomando non
funziona
• Prima di premere qualsiasi tasto di controllo riproduzione, selezionare la
sorgente corretta.
• Ridurre la distanza tra il telecomando e l’unità.
• Inserire le batterie con le polarità (+/-) allineate come indicato.
• Sostituire le batterie.
• Puntare il telecomando direttamente al sensore davanti alla soundbar.
Nessun audio • Assicurarsi che la soundbar non sia in modalità muto. Premere MUTO o il
tasto + (VOL) per riprendere l’ascolto normale.
• Premere il tasto
sulla soundbar o sul telecomando per passare la
soundbar in modalità standby. Quindi premere di nuovo il tasto per
accendere la soundbar.
• Scollegare sia la soundbar sia il subwoofer dalla presa di corrente, poi
ricollegarli. Accendere la soundbar.
• Assicurarsi che le impostazioni Audio della sorgente in ingresso (per
esempio: TV, console di gioco, lettore DVD, etc.) sia impostato sulla
modalità PCM o Dolby Digital mentre si usano connessioni digitali (per
esempio HDMI, OTTICA).
• Il subwoofer è fuori portata, spostarlo più vicino alla soundbar.
Assicurarsi che il subwoofer sia entro 5 metri dalla soundbar (più vicino è,
meglio è).
• La soundbar potrebbe aver perso la connessione col subwoofer.
Riappaiare le unità seguendo le istruzioni nella sezione “Appaiare con il
Subwoofer”.
• La Soundbar potrebbe non riuscire a decodificare tutti i formati audio
digitali dalla sorgente in ingresso.
Il televisore ha mostrato
problemi mentre si vede
il contenuto HDR dalla
sorgente HDMI.
• Alcuni televisori HDR 4K richiedono che l’ingresso HDMI o le
impostazioni immagini siano impostate per la ricezione di contenuto
HDR. Per maggiori dettagli sulla configurazione del display HDR, fare
riferimento al manuale di istruzioni del televisore.
Non riesco a trovare
il nome Bluetooth di
questa soundbar sul
mio dispositivo per fare
l’appaiamento.
• Assicurarsi che la funzione Bluetooth sia attivata sul dispositivo.
• Assicurarsi di aver appaiato la soundbar col dispositivo Bluetooth.
• La soundbar ha una funzione Bluetooth® che può ricevere un segnale
entro 8 metri. Mantenere una distanza di massimo 8 metri tra la
soundbar e il dispositivo Bluetooth® .
Questa è una funzione
di spegnimento dopo 15
minuti, uno dei requisiti
dello standard ERPII per
il risparmio energetico
• Quando il livello del segnale esterno dell’unità è troppo basso, la
soundbar si spegnerà automaticamente dopo 15 minuti. Aumentare il
volume del dispositivo esterno.
14
IT
14. Specifiche
Marca Hisense
Modello HS3100
Soundbar
Alimentazione 100-240 V~ 50/60 Hz
Consumo
50 W
< 0,5 W (Standby)
USB
5 V
500 mA
USB ad alta velocità (2,0) / FAT32 / FAT16
32 GB (massima), WAV / WMA / MP3 / FLAC.
Dimensioni (L× A × P) 902 × 62,3 × 91 mm / 35,5 × 2,4 × 3,6 pollici
Peso netto 1,6 kg / 3,5 libbre
Sensibilità dell’ingresso Audio 500 mV
Frequenza di risposta 120 Hz - 20 kHz
Temperatura di utilizzo 0°C - 45°C
Subwoofer
Alimentazione 100-240 V~ 50/60 Hz
Consumo
40 W
< 0,5 W (Standby)
Dimensioni (L× A × P) 161 × 303 × 304,5 mm / 6,3 × 11,9 × 12 pollici
Peso netto 3,6 kg / 7,9 libbre
Frequenza di risposta 40 Hz-150 Hz
Specifiche Wireless
Versione / profili Bluetooth
Intervallo di frequenza Bluetooth
Potenza massima di trasmissione Bluetooth
V 5.3 (A2DP, AVRCP)
2400 MHz ~ 2483,5 MHz
≤ 5 dBm
Banda di frequenza wireless 2.4G
Potenza massima di trasmissione 2.4G
2400 MHz ~ 2483 MHz
≤ 6 dBm
Tipo di modulazione GFSK, π/4 DQPSK
Amplificatore (Potenza audio massima)
Totale 480 W
Soundbar 300 W
Subwoofer 180 W
Telecomando
Distanza/angolo 6 m / 30°
Tipo di batteria AAA (1,5 V × 2)
• Il progetto e le specifiche sono soggetti a cambiamenti senza notifica.

Před tím, než začnete soundbar používat, si pozorně přečtěte tuto
příručku a ponechte si ji, abyste do ní mohli znovu nahlédnout.
UŽIVATELSKÁ PŘÍRUČKA
3.1 kanálový soundbar s bezdrátovým subwooferem
Model: HS3100
CZ

2
CZ
Obsah
1. Co je v krabici .................................................................................................................................... 3
2. Identifikace součástí ........................................................................................................................ 4
2.1 Soundbar ................................................................................................................................................................................................4
2.2 Bezdrátový subwoofer ........................................................................................................................................................................4
2.3 Dálkový ovladač ....................................................................................................................................................................................5
3. Příprava ............................................................................................................................................. 5
3.1 Příprava dálkového ovladače ...........................................................................................................................................................5
3.2 Výměna baterií v dálkovém ovladači .............................................................................................................................................5
4. Umístění a montáž ........................................................................................................................... 6
4.1 Umístění ...................................................................................................................................................................................................6
4.2 Montáž soundbaru na stěnu .............................................................................................................................................................6
5. Připojení ............................................................................................................................................ 7
5.1 Použití zdířky HDMI ARC ....................................................................................................................................................................7
5.2 Používání Roku TV ................................................................................................................................................................................7
5.3 Používání funkce Hisense EzPlay ..................................................................................................................................................... 7
5.4 Použití zdířky OPTICAL ........................................................................................................................................................................8
5.5 Použití zdířky AUX.................................................................................................................................................................................8
5.6 Připojení napájení.................................................................................................................................................................................8
6. Sp
árování s
e subwooferem ..................................................................................................................... 8
6.1 Automatické párování .........................................................................................................................................................................8
6.2 Ruční párování .......................................................................................................................................................................................9
7. Základní ovládání ............................................................................................................................. 9
7.1 Pohotovostní režim / ZAPNUTO ......................................................................................................................................................9
7.2 Funkce automatického pohotovostního režimu / automatického probouzení ............................................................9
7.3 Výběr režimů........................................................................................................................................................................................10
7.4 Úprava hlasitosti .................................................................................................................................................................................10
7.5 ZAPNUTÍ/VYPNUTÍ prostorového zvuku. .................................................................................................................................. 10
7.6 Úprava basů/výšek ............................................................................................................................................................................ 10
7.7 Výběr efektu ekvalizéru (EQ) ..........................................................................................................................................................10
7.8 Úprava jasu ...........................................................................................................................................................................................10
7.9 Obnovení továrního nastavení ..................................................................................................................................................... 10
8. Ovládání režimů AUX/ OPTICKÝ/HDMI ARC ................................................................................. 10
9. Ovládání USB .................................................................................................................................. 11
10. Používání Bluetooth® ..................................................................................................................... 11
11. Nabídka Nastavení ......................................................................................................................... 12
12. PŘEDVÁDĚCÍ režim ......................................................................................................................... 12
13. Řešení problémů ............................................................................................................................ 13
14. Specifikace ...................................................................................................................................... 14
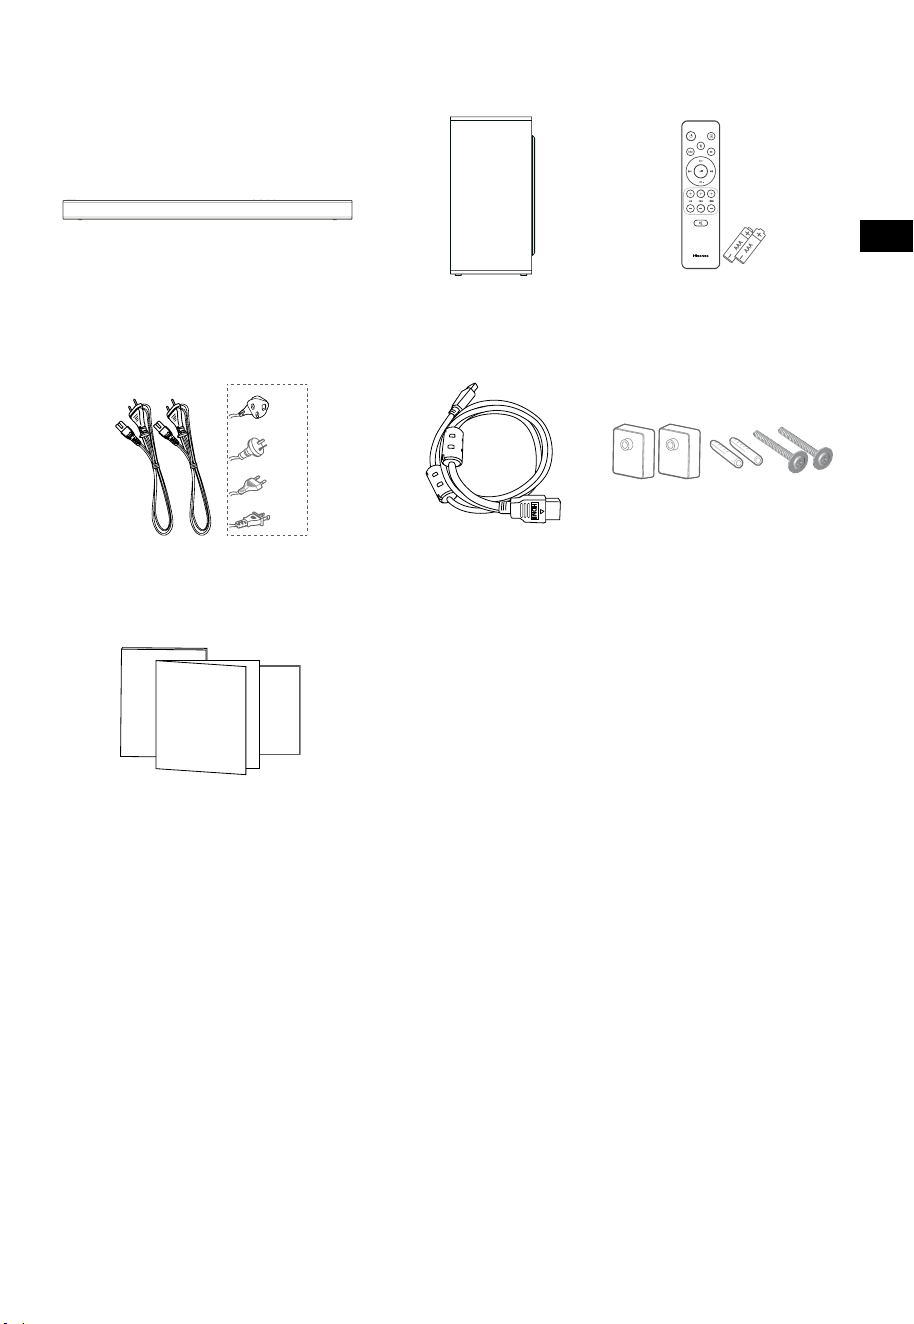
3
CZ
1. Co je v krabici
• Počet napájecích kabelů a typ zástrčky se liší podle regionu.
• Obrázky a nákresy v této uživatelské příručce jsou jen pro ilustraci. Skutečný produkt může vypadat
jinak.
Kabel HDMI
Soundbar
Stěnový držák
Dálkový ovladač /
baterie AAA × 2
Bezdrátový subwoofer
Kabel střídavého napájení × 2
Uživatelská příručka / záruční list /
průvodce pro rychlý start
Pro USA
Pro UK
Pro AUS
Pro EU

4
CZ
3 4 5
TOP
BACK
2. Identifikace součástí
2.1 Soundbar
1 Snímač pro dálkový ovladač
Přijímá signály z dálkového ovladače.
2 Okénko displeje
Zobrazuje aktuální stav.
3
Tlačítko (ZAP./VYP.)
Přepínání soundbaru mezi ZAPNUTÝM a
pohotovostním režimem.
4 Tlačítko (ZDROJ)
Výběr funkce přehrávání.
5 +/- Tlačítka (VOL)
Zvýšení nebo snížení úrovně hlasitosti.
6 Šrouby nástěnného držáku
7 Zdířka AC~
Sem připojte napájecí kabel.
8 OPTICAL zdířka
9 Zdířka AUX
10 Zdířka USB
Vložení USB zařízení za účelem přehrávání
hudby.
11 Zdířka HDMI ARC
Připojení k televizoru pomocí HDMI kabelu.
2.2 Bezdrátový subwoofer
1 Indikátor PAIR
Světlo přestane blikat, jakmile se subwoofer
spáruje se soundbarem.
2 Zdířka AC IN~
Sem připojte napájecí kabel.
3 Tlačítko PAIR
Stisknutím aktivujete funkci párování mezi
soundbarem a subwooferem.
HORNÍ ČÁST
ZADNÍ ČÁST

5
CZ
11
10
12
2.3 Dálkový ovladač
1 Přepínání soundbaru mezi ZAPNUTÝM a
POHOTOVOSTNÍM režimem.
2 SURR Přepínání prostorového zvuku na ZAP./VYP..
3 VOL
+
/VOL
-
Zvýšení nebo snížení úrovně hlasitosti.
4 BASS
+
/
-
Úprava úrovně basů.
5
(ZTLUMIT)
Ztlumení nebo opětovné zapnutí zvuku.
6
tlačítko
Výběr funkce přehrávání.
7
Výběr režimu Bluetooth.
8 EQ Výběr přednastaveného zvukového efektu.
9
/ Přeskočení na předcházející nebo následující skladbu
v režimu Bluetooth nebo USB.
10
Přehrávání/pauza/pokračování v přehrávání v režimu
Bluetooth/USB. Stisknutím a podržením se aktivuje
funkce párování v režimu Bluetooth nebo odpojí
stávající spárované zařízení Bluetooth.
11 DIMMER
+
/
-
Úprava jasu LED.
12 TREBLE
+
/
-
Úprava úrovně výšek.
3. Příprava
3.1 Příprava dálkového ovladače
Dodávaný dálkový ovladač umožňuje ovládat
soundbar na dálku.
• I když budete přístroj ovládat dálkovým
ovladačem v jeho pracovním dosahu 6 m
(19,7 stop), ale mezi ovladačem a přístrojem
se budou nacházet nějaké překážky, nemusí
dálkové ovládání fungovat.
• Funkčnost může být narušena i v případě, že
budete dálkový ovladač používat v blízkosti
jiných produktů, které vysílají infračervené
paprsky, nebo pokud se budou v blízkosti
soundbaru používat jiná zařízení pro dálkové
ovládání využívající infračervené paprsky.
Obdobně může být narušena i funkčnost
těchto jiných produktů.
3.2 Výměna baterií v dálkovém ovladači
1 Stiskněte a odsuňte zadní kryt dálkového
ovladače, abyste otevřeli bateriový prostor.
2 Vložte dvě baterie velikosti AAA (jsou
součástí balení). Ujistěte se, že póly (+) a (−)
na bateriích odpovídají označení (+) a (−) v
bateriovém prostoru.
3 Zavřete kryt bateriového prostoru.
Opatření týkající se baterií
• Ujistěte se, že jste vložili baterie se správnými
kladnými „
“ a zápornými „
“ polaritami.
• Používejte baterie stejného typu. Nikdy
nepoužívejte baterie různých typů společně.
• Lze používat buď nabíjecí, nebo nenabíjecí
baterie. Věnujte pozornost upozorněním na
jejich štítcích.
• Při vyjímání krytu baterií a samotných baterií
si dejte pozor na nehty.
• Dálkový ovladač neupusťte.
• Nevystavujte dálkový ovladač žádným
nárazům.
• Dálkový ovladač nepolijte vodou ani jinou
kapalinou.
• Nepokládejte dálkový ovladač na mokré
objekty.
• Neumisťujte dálkový ovladač na přímé slunce
nebo do blízkosti silných zdrojů tepla.
• Když nebudete dálkový ovladač dlouho
používat, vyjměte z něj baterie, aby nedošlo
k rozleptání nebo vytečení baterií, které by
mohlo způsobit zranění osob, poškození
majetku nebo požár.
• Nepoužívejte jiné než určené baterie.
• Nepoužívejte zároveň nové a staré baterie.
• Nikdy nedobíjejte baterie, pokud si nejste
jistí, že se jedná o dobíjecí akumulátory.

6
CZ
4. Umístění a montáž
4.1 Umístění
A Pokud máte televizor položený na stole,
můžete soundbar umístit na stůl přímo před
stojan televizoru tak, aby byl vzhledem k
obrazovce uprostřed.
B Pokud máte televizor upevněný na stěně,
můžete soundbar uchytit na stěnu přímo
pod obrazovku televizoru.
4.2 Montáž soundbaru na stěnu
- Montáž smějí provádět pouze kvalifikovaní
pracovníci. Nesprávná instalace může
vést k vážnému zranění osob a poškození
majetku (pokud si chcete tento výrobek
nainstalovat sami, musíte zkontrolovat, zda
se ve stěně nenacházejí například instalace
rozvodů elektřiny nebo vody). Odpovědností
pracovníka provádějícího instalaci je ověřit si,
zda stěna dokáže unést celkovou hmotnost
soundbaru a nástěnných držáků.
- Pro montáž jsou potřeba další nástroje, které
nejsou součástí dodávky.
- Neutahujte šrouby příliš velkou silou.
- Tuto uživatelskou příručku si uschovejte,
abyste do ní mohli později znovu nahlédnout.
- Před zahájením vrtání a montáže zkontrolujte
typ stěny pomocí elektronického detektoru
kovů.
UPOZORNĚNÍ
• Tento přístroj musí být bezpečně připevněn k podlaze
nebo stěně v souladu s montážními pokyny, aby
nedošlo ke zranění.
• Doporučená výška montáže na stěnu: ≤ 1,5 metrů.
1. Vyvrtejte ve stěně 2 paralelní otvory (každý
o ø 5,5–6 mm podle typu stěny). Vzdálenost
mezi otvory by měla být 670 mm.
2. Do dvou otvorů pro šrouby ve stěně vložte
dodané hmoždinky. Přes stěnové nosníky
vložte dodané šrouby do nosníků a do
hmoždinek ve stěně. Zašroubujte šrouby do
stěny a utáhněte je.
3. Zavěste přístroj na stěnové nosníky.
1
2
3
670 mm / 26.4”
670 mm / 26,4"
AB

7
CZ
5. Připojení
5.1 Použití zdířky HDMI ARC
Funkce ARC (Audio Return Channel, zpětný
zvukový kanál) umožňuje posílat zvuk z televizoru
podporujícího ARC do soundbaru pomocí
jediného propojení HDMI. Abyste mohli používat
funkci ARC, ujistěte se, že váš televizor podporuje
funkce HDMI-CEC i ARC a obě jsou správně
nastavené. Při správném nastavení můžete ovládat
hlasitost soundbaru (VOL +/− a ZTLUMIT) pomocí
dálkového ovladače televizoru.
• Pomocí kabelu HDMI propojte zdířku HDMI
ARC na soundbaru se zdířkou HDMI ARC na
televizoru kompatibilním s funkcí ARC. Pak
pomocí dálkového ovladače vyberte HDMI
ARC.
56:/)'2
.*3/'8)
56:/)'2
.*3/
'8)
.KGJVNUTK
BA
Tipy:
• Váš televizor musí podporovat funkce HDMI-
CEC a ARC. Funkce HDMI-CEC a ARC musejí
být nastavené na Zapnuto.
• Způsob nastavení funkcí HDMI-CEC a ARC se
může lišit podle konkrétního televizoru. Více
informací o funkci ARC najdete v příslušné
uživatelské příručce.
• Funkci ARC podporují pouze kabely pro
HDMI 1.4 a vyšší.
5.2 Používání Roku TV
• Pokud máte Roku TV™, stačí zapojit HDMI
kabel do portů ARC a postupovat podle
pokynů Roku TV Ready™ na obrazovce.
Jednoduché nastavení
Jeden dálkový ovladač
Rychlé nastavení
5.3 Používání funkce Hisense EzPlay
Když se u funkce Hisense EzPlay soundbar spojí
s televizorem Hisense přes HDMI ARC, bude
na televizoru dostupná nabídka Nastavení
soundbaru, kterou můžete ovládat dálkovým
ovladačem televizoru a nastavit v ní většinu funkcí
soundbaru.
Nastavení soundbaru
Režimy EQ
Sport
Režimy prostorového zvuku
Úroveň basů
Úroveň výšek
Úroveň ztlumení jasu
Reset
Soundbar s EzPlay
Televizor s
EzPlay
Příklad nabídky na televizoru (různé modely
mohou mít různé nabídky):
Nastavení--Zvuk--Nastavení soundbaru.
Nastavení soundbaru
Režimy EQ
Sport
Režimy prostorového zvuku
Úroveň basů
Úroveň výšek
Úroveň ztlumení jasu
Reset
Poznámka:
• Tato funkce je dostupná pouze tehdy, když
soundbar i televizor podporují funkci Hisense
Ezplay.
• Tato funkce vyžaduje, aby byl soundbar s
televizorem propojený pomocí HDMI ARC a
aby byla na televizoru ZAPNUTÁ funkce CEC.
• Pokud je všechno nastaveno správně, při
prvním připojení se na obrazovce televizoru
objeví tip, který vám poradí, jak najít nabídku
Nastavení soundbaru.
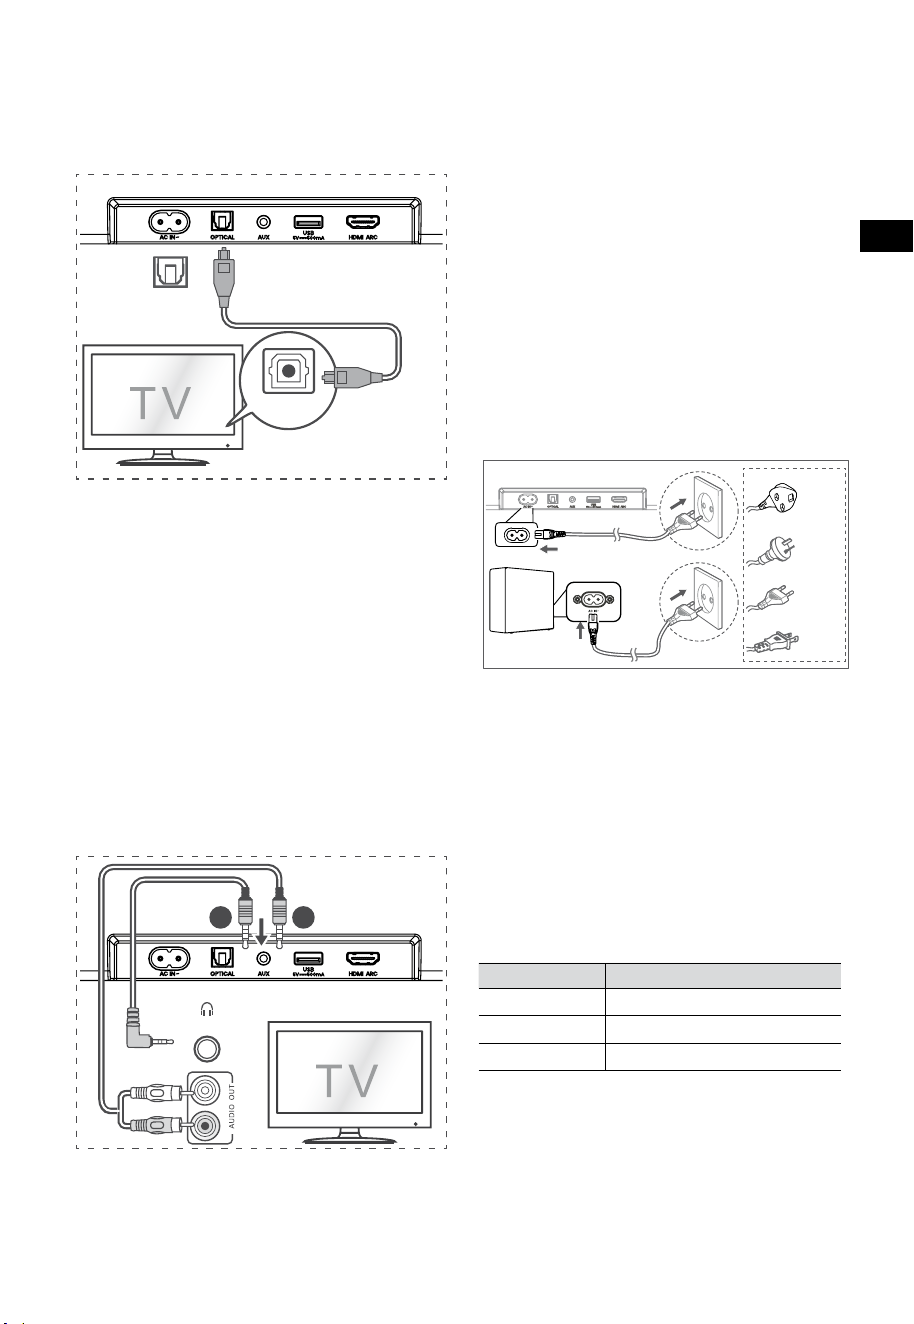
8
CZ
5.6 Připojení napájení
Nebezpečí poškození výrobku!
• Nebezpečí poškození výrobku! Přesvědčte
se, že napájecí napětí odpovídá napětí
uvedenému na zadní nebo spodní straně
soundbaru.
• Před připojením napájecího kabelu se
přesvědčte, že jste dokončili všechna ostatní
propojení.
• Soundbar
Zapojte napájecí kabel do zdířky střídavého
napájení na soundbaru a pak do napájecí
zásuvky.
• Subwoofer
Zapojte napájecí kabel do AC~ zdířky na
subwooferu a pak do napájecí zásuvky.
Pro UK
Pro AUS
Pro EU
Pro USA
* Počet napájecích kabelů a jejich zástrčky se liší
podle regionu.
6. Sp
árování s
e subwooferem
6.1 Automatické párování
Subwoofer a soundbar se při zapojení obou
přístrojů do napájecí zásuvky po zapnutí
automaticky spárují. K propojení těchto dvou
přístrojů není třeba žádný kabel.
• Stav můžete určit podle indikátoru na
bezdrátovém subwooferu.
Stav LED Stav
Rychle bliká
Subwoofer je v režimu párování
Trvale svítí
Připojeno / úspěšně spárováno
Pomalu bliká
Připojení / spárování se nezdařilo
POZNÁMKA:
- Nemačkejte tlačítko PAIR na zadní části
subwooferu, používá se jen při ručním
párování.
- Pokud se automatické spárování nepodaří,
spárujte subwoofer se soundbarem ručně.
5.4 Použití zdířky OPTICAL
- K propojení zdířky OPTICAL OUT na
televizoru a zdířky OPTICAL na soundbaru
použijte OPTICKÝ kabel.
56:/)'2
.*3/'8)
56:/)'2
.*3/
'8)
.KGJVNUTK
BA
Tip:
Soundbar nemusí být schopný dekódovat všechny
formáty digitálního zvuku z vstupního zdroje. V
takovém případě se zvuk soundbaru vypne. Toto
NENÍ závada. Ujistěte se, že je nastavení zvuku na
vstupním zdroji (např. na televizoru, herní konzoli,
DVD přehrávači apod.) nastaveno na PCM nebo
Dolby Digital (podrobnosti o nastavení zvuku
najdete v uživatelské příručce ke vstupnímu zařízení),
když používáte HDMI ARC / OPTICKÝ vstup.
5.5 Použití zdířky AUX
A. K propojení sluchátkové zdířky na televizoru
nebo externím zvukovém zařízení se zdířkou
AUX na soundbaru použijte zvukový kabel se
3,5 mm konektory na obou stranách.
56:/)'2
.*3/'8)
56:/)'2
.*3/
'8)
.KGJVNUTK
BA
Sluchátka
B. K propojení zdířky zvukového výstupu
televizoru se zdířkou AUX na soundbaru
použijte zvukový kabel s konektory RCA na
jedné straně a 3,5 mm na druhé straně.

9
CZ
6.2 Ruční párování
1. Přesvědčte se, že jsou všechny kabely dobře
připojené a že je soundbar v pohotovostním
režimu.
2. Stiskněte a několik sekund podržte stisknuté
tlačítko PAIR na zadní části subwooferu.
Vstoupí do režimu párování a indikátor
spárování začne rychle blikat.
3. Stisknutím tlačítka
na soundbaru nebo
dálkovém ovladači soundbar zapnete.
4. Stiskněte a několik sekund podržte stisknuté
tlačítko
na soundbaru nebo dálkovém
ovladači.
5. Po úspěšném bezdrátovém spojení se
indikátor spárování trvale rozsvítí.
6. Pokud indikátor spárování bliká, bezdrátové
spojení se nezdařilo. Odpojte kabel
subwooferu a poté po 4 minutách hlavní
kabel znovu připojte. Opakujte kroky 1 ~ 4.
POZNÁMKA:
• Pokud bezdrátové spojení znovu selže,
zkontrolujte, zda v daném místě nedochází
k nějakému konfliktu nebo silnému rušení
(například rušení jiným elektronickým
zařízením). Odstraňte tyto konflikty nebo
silná rušení a zopakujte výše uvedený
postup.
• Subwoofer by se měl nacházet v otevřeném
prostoru do 6 m (19,7 stop) od soundbaru.
• Pokud není soundbar spojený se
subwooferem a je v zapnutém režimu,
indikátor NAPÁJENÍ bude blikat. Ke spárování
subwooferu se soundbarem použijte výše
uvedené kroky 1–4.
7. Základní ovládání
7.1 Pohotovostní režim / ZAPNUTO
Přístroj se po připojení napájecího kabelu
automaticky zapne.
• Stisknutím tlačítka
přepnete soundbar do
POHOTOVOSTNÍHO režimu.
• Pokud chcete soundbar zcela VYPNOUT,
vytáhněte napájecí zástrčku ze zásuvky.
7.2 Funkce automatického
pohotovostního režimu /
automatického probouzení
[Auto-Standby] Váš soundbar je naprogramovaný
tak, aby automaticky přešel do pohotovostního
režimu, když není 15 minut detekován žádný
zvuk. To se může stát například při pozastavení
přehrávání nebo když necháte soundbar omylem
zapnutý.
[Auto-Wake] Pokud je připojený televizor nebo
externí zařízení (v režimu AUX / OPTICAL / HDMI
ARC), přístroj se automaticky zapne, jakmile
televizor nebo externí zařízení zapnete.
Pokud chcete tuto funkci deaktivovat,
postupujte podle níže uvedených kroků:
1. V ZAPNUTÉM režimu stiskněte a podržte tlačítko
po dobu 3 sekund, aby se otevřela nabídka.
- Na displeji přístroje se bude pohybovat nápis
„MENU“.
2. Stiskněte postupně 6× tlačítko
, na displeji se
objeví: Auto Wake [ON / OFF].
nebo stiskněte postupně 7× tlačítko
, na
displeji se objeví: Auto Standby [ON / OFF].
3. Vyberte obsah pomocí tlačítek VOL+ /
–
na
dálkovém ovladači a pak stiskněte tlačítko
pro potvrzení výběru a opuštění nastavení.
• Opakováním těchto kroků se přepíná stav
funkce na „Z AP. “ a „V YP. “.
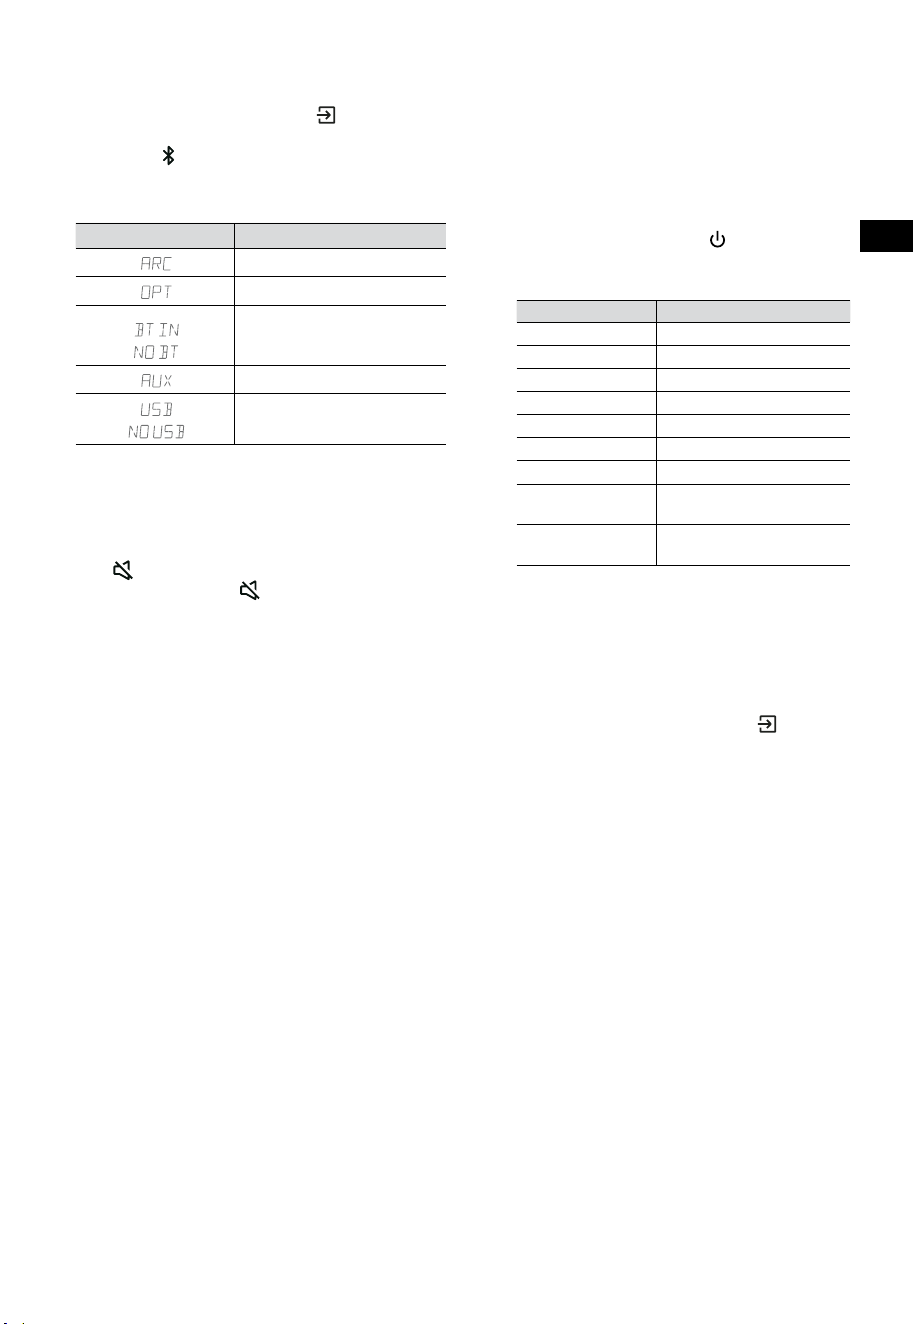
10
CZ
7.3 Výběr režimů
Opakovaným stisknutím tlačítka (ZDROJ) na
soundbaru nebo na dálkovém ovladači vyberte
režim AUX,
, OPTICKÝ, HDMI ARC a USB.
Vybraný režim se zobrazí na displeji.
• Vybraný režim se zobrazí na displeji.
Displej Režim
HDMI ARC
OPTICKÝ
Bluetooth
Připojeno
Nepřipojeno
AUX
USB
Žádné připojené USB
7.4 Úprava hlasitosti
• Stisknutím tlačítek VOL
+
/
-
na soundbaru
nebo na dálkovém ovladači upravíte hlasitost.
• Pokud chcete zvuk vypnout, stiskněte tlačítko
(ZTLUMIT) na dálkovém ovladači. Dalším
stisknutím tlačítka (ZTLUMIT) nebo stisknutím
tlačítka VOL
+
se vrátíte k normálnímu poslechu.
7.5 ZAPNUTÍ/VYPNUTÍ prostorového
zvuku
• Stiskněte tlačítko SURR na dálkovém ovladači,
abyste ZAPNULI/VYPNULI prostorový zvuk.
7.6 Úprava basů/výšek
• Stisknutím tlačítek BASS
+
/
-
na dálkovém
ovladači upravíte úroveň basů.
• Stisknutím tlačítek TREBLE
+
/
-
na dálkovém
ovladači upravíte úroveň výšek.
7.7 Výběr efektu ekvalizéru (EQ)
• Při přehrávání můžete stisknout tlačítko
EQ na dálkovém ovladači, abyste vybrali
požadovaný přednastavený ekvalizér: FILM,
HUDBA, HRA, ZPRÁVY, SPORT, NOC.
7.8 Úprava jasu
• Stisknutím tlačítek DIMMER
+
/
-
na
dálkovém ovladači vyberte úroveň jasu.
7.9 Obnovení továrního nastavení
Obnoví výchozí nastavení zařízení.
• Přepněte soundbar do optického režimu,
stiskněte a podržte tlačítko [
] na soundbaru.
Soundbar přejde do režimu obnovení továrního
nastavení a přepne se do pohotovostního režimu.
REŽIM VÝCHOZÍ
ZDROJ ARC
Hlasitost 30
Prostorový zvuk Vypnutý
Ztlumení jasu MAX.
Basy 0
Výšky 0
EQ FILM
Automatické
probouzení
VYPNUTÝ
Automatický
pohotovostní režim
ZAP. (kromě Spojených států)
8. Ovládání režimů AUX/
OPTICKÝ/HDMI ARC
1 Ujistěte se, že je soundbar připojený k
televizoru nebo zvukovému zařízení.
2 Opakovaným stisknutím tlačítka
(ZDROJ)
na soundbaru nebo na dálkovém ovladači
vyberte režim AUX, OPTICKÝ, HDMI ARC.
Vybraný režim se zobrazí na displeji.
3 Funkce pro přehrávání ovládejte přímo na
zvukovém zařízení.
4 Stisknutím tlačítek VOL
+
/
-
upravte hlasitost
na požadovanou úroveň.
Tip: Soundbar nemusí být schopný dekódovat
všechny formáty digitálního zvuku z vstupního
zdroje. V takovém případě se zvuk soundbaru
vypne. Toto NENÍ závada. Ujistěte se, že je
nastavení zvuku na vstupním zdroji (např.
na televizoru, herní konzoli, DVD přehrávači
apod.) nastaveno na PCM nebo Dolby Digital
(podrobnosti o nastavení zvuku najdete v
uživatelské příručce ke vstupnímu zařízení), když
používáte HDMI ARC / OPTICKÝ vstup.
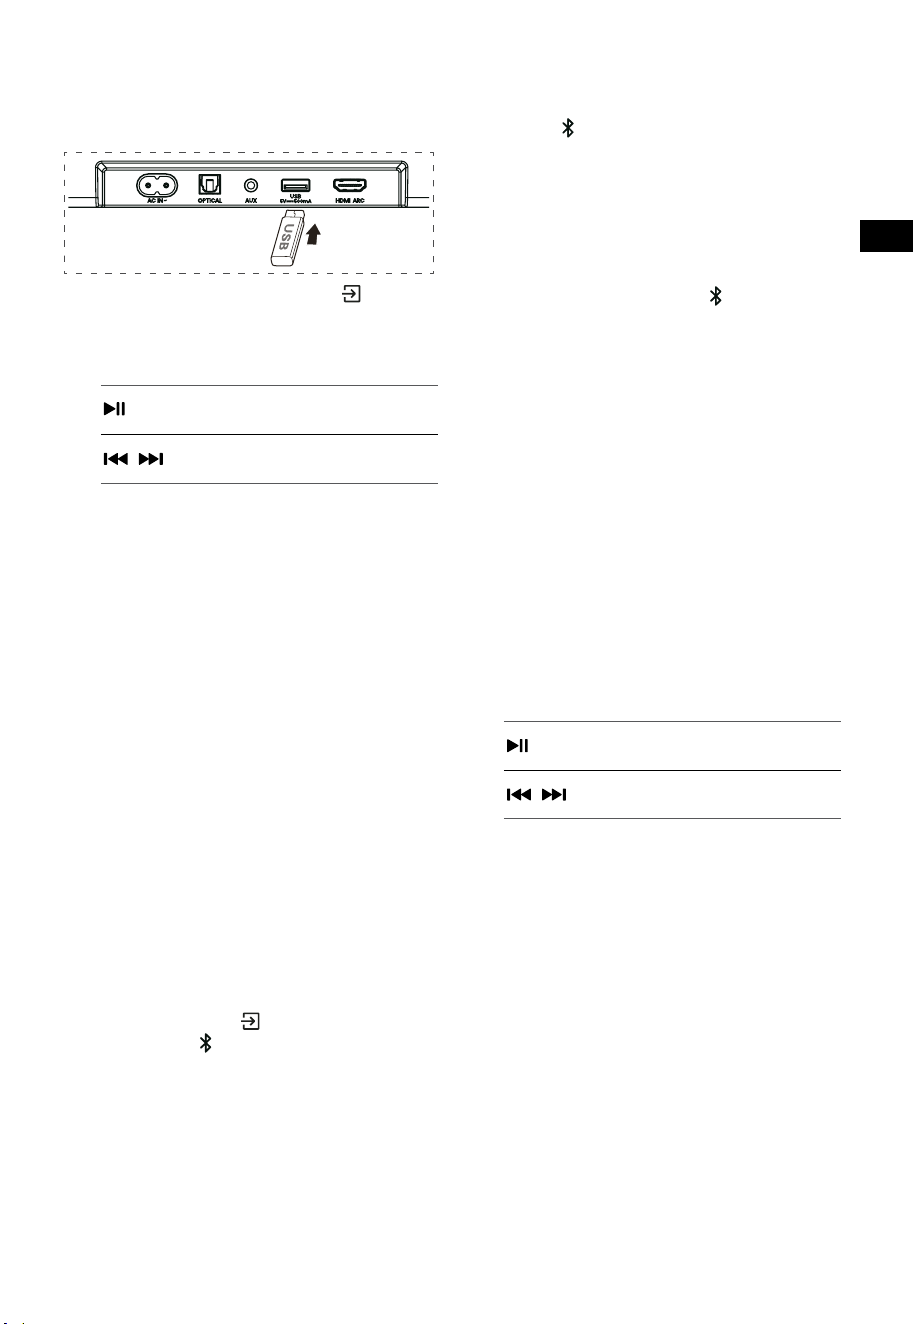
11
CZ
9. Ovládání USB
1 Připojte USB zařízení.
2 Opakovaným stisknutím tlačítka (ZDROJ)
na soundbaru nebo na dálkovém ovladači
vyberte režim USB.
3 Během přehrávání:
Spuštění, pozastavení nebo
pokračování v přehrávání
,
Přeskočení na předcházející nebo
následující skladbu
Tipy:
• Přístroj podporuje USB zařízení s pamětí až
32 GB.
• Tento přístroj dokáže přehrávat soubory WAV
/ WMA / MP3 / FLAC.
• Tento produkt nemusí být kompatibilní s
určitými typy úložných USB zařízení.
• Pokud použijte prodlužovací USB kabel,
rozbočovač USB nebo multifunkční USB
čtečku karet, úložné USB zařízení nemusí být
rozpoznáno.
• Nevysouvejte úložné USB zařízení, když se z
něj čtou soubory.
10. Používání Bluetooth®
Přes Bluetooth můžete propojit soundbar se
svým zařízením Bluetooth (například s iPadem,
iPhonem, iPodem Touch, telefonem se systémem
Android nebo s notebookem) a pak poslouchat
zvukové soubory uložené na tomto zařízení přes
reproduktory v soundbaru.
První spárování
1 Stisknutím tlačítka (ZDROJ) na soundbaru
nebo tlačítka
na dálkovém ovladači vyberte
režim Bluetooth®.
• Na displeji se zobrazí NO BT.
2 Aktivujte své zařízení s Bluetooth a vyberte
režim vyhledávání.
3 V seznamu ke spárování vyberte položku
„Hisense HS3100“. Po zvukové výzvě je
systém úspěšně připojený a na displeji se
zobrazí BT IN.
• Pokud chcete připojit k soundbaru jiné
zařízení Bluetooth, stiskněte a podržte
tlačítko
na dálkovém ovladači, abyste
odpojili momentálně připojené zařízení
Bluetooth. Připojte zařízení Bluetooth podle
kroků 2–3.
Pro odpojení funkce Bluetooth můžete:
- Přepnout přístroj na jiný zdroj.
- Zakázat funkci BT na zařízení s Bluetooth.
- Stisknout a podržet tlačítko
na dálkovém
ovladači.
Poslech hudby ze zařízení s Bluetooth
- Pokud připojené zařízení s Bluetooth
podporuje profil A2DP (Advanced Audio
Distribution Profile), můžete na přístroji
poslouchat hudbu, která je na zařízení
uložená.
- Pokud zařízení podporuje také profil AVRCP
(Audio Video Remote Control Profile), můžete
k ovládání poslechu hudby uložené na
zařízení používat dálkový ovladač přístroje.
1. Spárujte zařízení s přístrojem.
2. Přehrávejte hudbu ze svého zařízení (pokud
podporuje A2DP).
3. Pomocí dodaného dálkového ovladače
přístroje ovládejte přehrávání ze zařízení
(pokud podporuje AVRCP).
Spuštění, pozastavení nebo
pokračování v přehrávání
,
Přeskočení na předcházející nebo
následující skladbu
Tipy:
• Pracovní dosah mezi soundbarem a
zařízením je přibližně 8 metrů.
• Před tím, než k soundbaru připojíte zařízení
s Bluetooth®, se přesvědčte, jaké má
schopnosti.
• Nelze zaručit kompatibilitu se všemi
zařízeními podporujícími Bluetooth®.
• Jakákoli překážka mezi zařízením a
soundbarem může snížit pracovní dosah.
• Umístěte tento přehrávač dále od jiných
elektronických zařízení, která by mohla
způsobovat rušení.
• Přístroj se také odpojí, když se zařízení
dostane mimo pracovní dosah.
12
CZ
11. Nabídka Nastavení
1. V ZAPNUTÉM režimu stiskněte a podržte
tlačítko po dobu 3 sekund, aby se otevřela
nabídka.
2. Vyberte obsah pomocí tlačítek
/ .
3. Změňte výchozí hodnoty jednotlivých
nastavení pomocí tlačítek VOL
+
/
-
.
4. Stiskněte tlačítko
, abyste potvrdili svůj
výběr a opustili nastavení.
• Pokud do 10 sekund nestisknete žádné
tlačítko, systém automaticky nabídku opustí.
Displej
/
Popis
VOL
+
/
-
Výběr efektu ekvalizéru (EQ)
(FILM, HUDBA, HRA, ZPRÁVY,
SPORT, NOC)
Přepínání prostorového zvuku
ZAP. / VYP.
Úprava úrovně basů
Úprava úrovně výšek
Úprava jasu
DIM 0 / DIM 1 / DIM 2 / DIM 3
Přepínání automatického
probouzení
ZAP. / VYP.
Přepínání automatického
pohotovostního režimu
ZAP. / VYP.
Přepínání: Zvýraznění basů
ZAP. / VYP.
12. PŘEDVÁDĚCÍ režim
PŘEDVÁDĚCÍ režim je speciálně nastavený k
použití v prostředí prodejny.
Zapnutí/vypnutí PŘEDVÁDĚCÍHO režimu:
Tento soundbar má jako výchozí nastavení běžný
spotřebitelský režim.
• Vložením předváděcí sady aktivujete
PŘEDVÁDĚCÍ režim.
• Vyjmutím předváděcí sady deaktivujete
PŘEDVÁDĚCÍ režim.
• Soundbar zobrazuje následující informace:
Displej Režim
DEMO ON Předváděcí režim
DEMO OFF Spotřebitelský režim
Používání PŘEDVÁDĚCÍHO režimu
1. Vstupte do PŘEDVÁDĚCÍHO režimu, soundbar
se automaticky zapne, pokud je připojené
střídavé napájení.
2. Uzamkněte zdroj (
Nedostupné). Zdroj
můžete vybrat pouze přes předváděcí sadu.
3. Všechna tlačítka budou zamčená a
nedostupná. Ovládat můžete jen přes
předváděcí sadu.
Všechna tlačítka
zamčena
(dálkový ovladač i
soundbar)
Výchozí
Předváděcí
sada
(ZDROJ)
Uzamčení
zdroje
+
(Vol+)
-
(Vol-)
SURR ZAPNUTO
(BT)
EQ FILM
/
Pokud je v
režimu BT
Pokud je v
režimu BT
BASS
+
/
-
TREBLE
+
/
-
DIMMER
+
/
-
X
DIM 3
(ZTLUMIT)
X
Autom. pohot. režim
VYPNUTÝ
Autom. probouzení
VYPNUTÝ
* Když stisknete (X) nedostupná tlačítka,
soundbar zobrazí nápis „
DEMO ON
“.
13
CZ
13. Řešení problémů
Abyste nepřišli o záruku, nikdy se nepokoušejte přístroj opravit sami. Pokud při používání tohoto
soundbaru nastane nějaký problém, podívejte se na následující body, než požádáte o servisní zásah.
Problém Řešení
Není napájení • Přesvědčte se, že je správně zapojen napájecí kabel přístroje.
• Přesvědčte se, že je napájecí zásuvka skutečně napájená.
• Zapněte soundbar stisknutím tlačítka
(pohotovostní režim).
Nefunguje dálkový
ovladač
• Dříve, než stisknete jakékoli tlačítko pro ovládání přehrávání, vyberte
správný zdroj.
• Snižte vzdálenost mezi dálkovým ovladačem a soundbarem.
• Vložte baterie se správnou polaritou (+/−) podle nákresu.
• Vyměňte baterie.
• Namiřte dálkový ovladač přímo na snímač v přední části soundbaru.
Žádný zvuk • Přesvědčte se, že na soundbaru není ztlumen zvuk. Stisknutím tlačítka
ZTLUMIT nebo + (VOL) se vrátíte k normálnímu poslechu.
• Stisknutím tlačítka
na soundbaru nebo na dálkovém ovladači
přepněte soundbar do pohotovostního režimu. Pak stiskněte znovu
tlačítko , abyste soundbar zapnuli.
• Odpojte soundbar i subwoofer z napájecí zásuvky a pak je znovu
připojte. Zapněte soundbar.
• Přesvědčte se, že když používáte digitální připojení (např. HDMI,
OPTICKÉ), je nastavení zvuku na zdroji vstupu (např. televizoru, herní
konzoli, přehrávači DVD apod.) nastaveno na režim PCM nebo Dolby
Digital.
• Subwoofer je mimo dosah, přesuňte ho blíže k soundbaru. Ujistěte se, že
se subwoofer nachází do 5 m od soundbaru (čím blíže, tím lépe).
• Soundbar mohl ztratit spojení se subwooferem. Proveďte znovu
spárování přístrojů pomocí postupu uvedeného v části „Spárování se
subwooferem“.
• Soundbar nemusí být schopný dekódovat všechny formáty digitálního
zvuku z vstupního zdroje.
Televizor má problém s
obrazem při sledování
HDR obsahu ze zdroje
HDMI.
• Některé 4K televizory s HDR vyžadují nastavit vstup HDMI nebo obraz
pro příjem HDR. Podrobné pokyny k nastavení zobrazení HDR najdete v
uživatelské příručce svého televizoru.
Při párování nemohu na
zařízení s Bluetooth najít
Bluetooth název tohoto
soundbaru
• Ujistěte se, že je na vašem zařízení s Bluetooth aktivována funkce
Bluetooth.
• Ujistěte se, že jste soundbar se svým Bluetooth zařízením spárovali.
• Soundbar má funkci Bluetooth®, která dokáže přijímat signál až z 8
metrů. Udržujte mezi soundbarem a zařízením s Bluetooth® vzdálenost
menší než 8 metrů.
Přístroj má funkci
vypnutí po 15 minutách
podle požadavků normy
ERPII pro úsporu energie
• Když je úroveň vstupního signálu z externího zařízení příliš nízká,
soundbar se po 15 minutách automaticky vypne. Zvyšte prosím hlasitost
na svém externím zařízení.
14
CZ
14. Specifikace
Značka Hisense
Model HS3100
Soundbar
Napájení 100 - 240 V~ 50/60 Hz
Příkon
50 W
< 0,5 W (pohotovostní režim)
USB
5 V
500 mA
Vysokorychlostní USB (2.0) / FAT32 / FAT16
32 GB (max.), WAV / WMA / MP3 / FLAC.
Rozměry (Š × V × H) 902 × 62,3 × 91 mm / 35,5" × 2,4" × 3,6"
Čistá hmotnost 1,6 kg / 3,5 libry
Citlivost vstupu zvuku 500 mV
Frekvenční odezva 120 Hz - 20 kHz
Provozní teplota 0°C - 45°C
Subwoofer
Napájení 100 - 240 V~ 50/60 Hz
Příkon
40 W
< 0,5 W (pohotovostní režim)
Rozměry (Š × V × H) 161 × 303 × 304,5 mm / 6,3" × 11,9" × 12"
Čistá hmotnost 3,6 kg / 7,9 libry
Frekvenční odezva 40 Hz - 150 Hz
Specifikace bezdrátových funkcí
Verze/profily Bluetooth
Frekvenční rozsah Bluetooth
Max. vysílaný výkon Bluetooth
V 5.3 (A2DP, AVRCP)
2400 MHz ~ 2483,5 MHz
≤ 5 dBm
Bezdrátový frekvenční rozsah 2,4G
Max. vysílaný výkon 2,4G
2400 MHz ~ 2483 MHz
≤ 6 dBm
Typ modulace GFSK, π/4 DQPSK
Zesilovač (max. zvukový výkon)
Celkem 480 W
Soundbar 300 W
Subwoofer 180 W
Dálkový ovladač
Vzdálenost/úhel 6 m / 30°
Typ baterie AAA (1,5 V × 2)
• Konstrukce a specifikace se mohou změnit i bez předchozího upozornění.

A hangprojektor használata előtt figyelmesen olvassa el ezt a kézikönyvet,
és őrizze meg későbbi felhasználás céljából.
KEZELÉSI UTASÍTÁS
3.1 csatornás hangprojektor vezeték nélküli mélysugárzóval
Modell: HS3100
HU

2
HU
Tartalomjegyzék
1. Ami a dobozban van ........................................................................................................................ 3
2. Részek azonosítása .......................................................................................................................... 4
2.1 Hangprojektor .......................................................................................................................................................................................4
2.2 Vezeték nélküli mélysugárzó ............................................................................................................................................................4
2.3 Távirányító ...............................................................................................................................................................................................5
3. Előkészületek .................................................................................................................................... 5
3.1 A távirányító előkészítése ..................................................................................................................................................................5
3.2 A távirányítóban lévő elemek cseréje ............................................................................................................................................5
4. Elhelyezés és felszerelés .................................................................................................................. 6
4.1 Elhelyezés ................................................................................................................................................................................................6
4.2 A hangprojektor falra szerelése .......................................................................................................................................................6
5. Csatlakoztatások .............................................................................................................................. 7
5.1 A HDMI ARC aljzat használata ..........................................................................................................................................................7
5.2 Roku TV használata ..............................................................................................................................................................................7
5.3 A Hisense EzPlay funkció használata .............................................................................................................................................7
5.4 Használja az OPTICAL aljzatot ..........................................................................................................................................................8
5.5 Használja az AUX aljzatot ...................................................................................................................................................................8
5.6 Áram csatlakoztatása ...........................................................................................................................................................................8
6. Pá
rosítá
s a mélysugárzóval ..................................................................................................................... 8
6.1 Automatikus párosítás ........................................................................................................................................................................8
6.2 Kézi párosítás ..........................................................................................................................................................................................9
7. Alapműveletek ................................................................................................................................. 9
7.1 Készenlét/BE ...........................................................................................................................................................................................9
7.2 Automatikus készenlét / Automatikus ébredési funkció ........................................................................................................9
7.3 Üzemmódok kiválasztása ............................................................................................................................................................... 10
7.4 Hangerő beállítása.............................................................................................................................................................................10
7.5 A térhatású hangout kapcsolja BE/KI ......................................................................................................................................... 10
7.6 A mély/magas hangok állítása ...................................................................................................................................................... 10
7.7 Az Equalizer (EQ) eektus kiválasztása ...................................................................................................................................... 10
7.8 Állítsa be a fényerőt...........................................................................................................................................................................10
7.9 Visszaállítás gyári értékekre ........................................................................................................................................................... 10
8. AUX/OPTIKAI/HDMI ARC kezelés .................................................................................................. 10
9. USB kezelés ..................................................................................................................................... 11
10. Bluetooth® működtetés ................................................................................................................. 11
11. Beállítás menü ................................................................................................................................ 12
12. DEMÓ mód ...................................................................................................................................... 12
13. Hibaelhárítás .................................................................................................................................. 13
14. Műszaki adatok .............................................................................................................................. 14

3
HU
1. Ami a dobozban van
• Az áramkábel mennyisége és a dugvilla régiónként eltérő.
• A felhasználói kézikönyvben látható képek, illusztrációk és rajzok csak tájékoztató jellegűek, a
tényleges termék megjelenése eltérhet.
HDMI kábel
Hangprojektor
Fali konzol
Távirányító / 2 db AAA elem
Vezeték nélküli mélysugárzó
AC hálózati áramkábel, 2 db
Kezelési utasítás / Garanciakártya /
Gyors indítási útmutató
Az USA
számára
Az UK
számára
Az AUS
számára
Az EU
számára
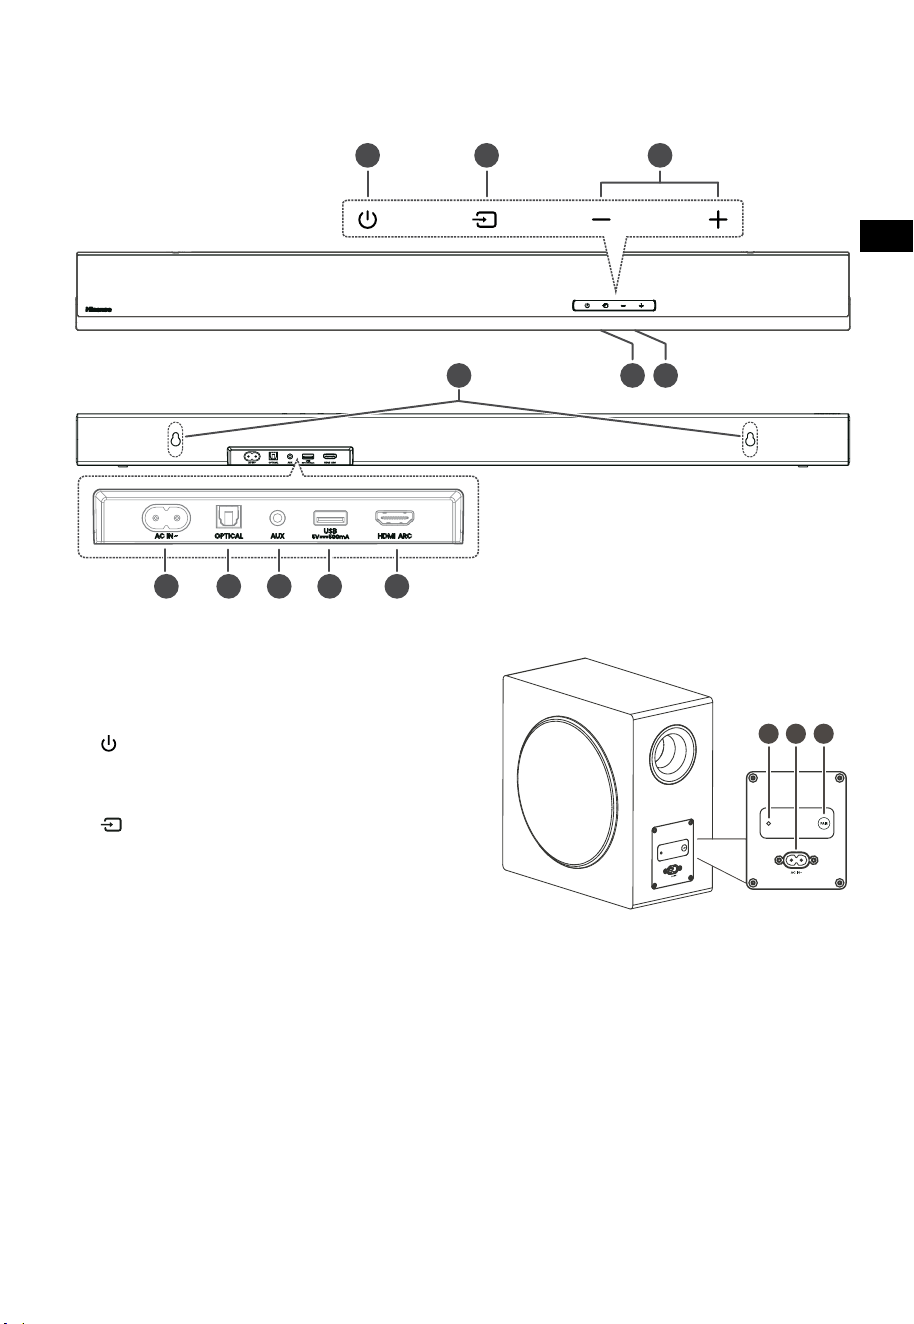
4
HU
3 4 5
TOP
BACK
2. Részek azonosítása
2.1 Hangprojektor
1 Távirányító érzékelő
A távirányítótól érkező jeleket fogadja.
2 Kijelző ablak
Az aktuális státuszt mutatja.
3
(BE/KI) gomb
A hangprojektort a BE és a Készenléti mód
között kapcsolja át.
4
(FORRÁS) gomb
A lejátszási funkció kiválasztása.
5 +/- (VOL) gombok
A hangerő szintjét növeli/csökkenti.
6 Falikonzol-csavarok
7 AC~ aljzat
A tápkábel csatlakoztatására szolgál.
8 OPTICAL aljzat
9 AUX aljzat
10 USB aljzat
Zene lejátszásához ide dughat be USB eszközt.
11 HDMI ARC aljzat
A TV-hez HDMI kábellel történő
csatlakozáshoz.
2.2 Vezeték nélküli mélysugárzó
1 Párosítási jelzőfény
Ha a mélysugárzó és a hangprojektor párosítása
sikeres, a jelzőfény abbahagyja a villogást.
2 AC IN~ aljzat
A tápkábel csatlakoztatására használatos.
3 PAIR gomb
Megnyomása aktiválja a párosítási funkciót a
hangprojektor és a mélysugárzó között.
FELÜLNÉZET
HÁTULNÉZET
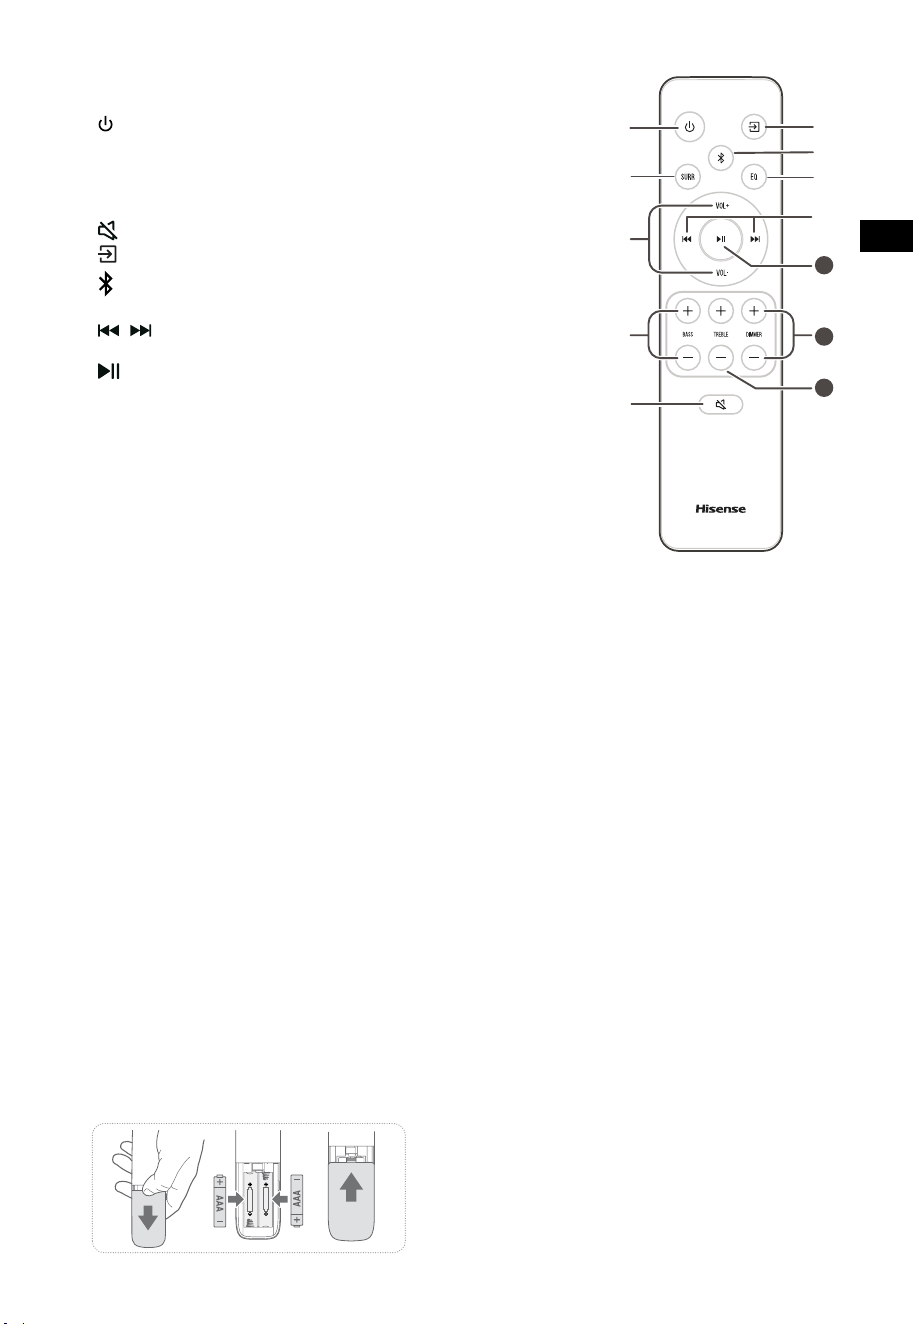
5
HU
11
10
12
2.3 Távirányító
1 A hangprojektort a BEKAPCSOLT és a KÉSZENLÉTI
módok között kapcsolja át.
2 SURR A térhatású hangot a BE/KI között kapcsolja át.
3 VOL
+
/VOL
-
A hangerő szintjét növeli/csökkenti.
4 BASS
+
/
-
A mély hangok szintjének beállítása.
5
(NÉMÍTÁS)
A hang némítása vagy a némítás feloldása.
6
gomb
A lejátszási funkció kiválasztása.
7
A Bluetooth üzemmód kiválasztása.
8 EQ Előre beállított hangeffektus kiválasztása.
9
/ Ugrás az előző/következő számra Bluetooth/USB
módban.
10
Lejátszás/szünet/lejátszás folytatása Bluetooth/USB
módban. Nyomja meg és tartsa lenyomva a párosítási
funkció aktiválásához Bluetooth módban, vagy a már
párosított Bluetooth eszköz leválasztásához.
11 DIMMER
+
/
-
A LED fényerejének állítása.
12 TREBLE
+
/
-
A magas hangok szintjének beállítása.
3. Előkészületek
3.1 A távirányító előkészítése
A mellékelt távirányító teszi lehetővé a hangprojektor
távolról történő kezelését.
• Még akkor is, ha a távirányítót a tényleges 19,7
láb (6 m) hatótávolságon belül működteti, a
távirányító műveletei lehetetlenné válhatnak,
ha a hangprojektor és a távirányító között
akadályok vannak.
• Ha a távirányítót más olyan termékek
közelében üzemeltetik, amelyek infravörös
sugarakat generálnak, vagy ha a hangprojektor
közelében más, infravörös sugarakat alkalmazó
távirányítót használnak, akkor az helytelenül
működhet. Kölcsönösen a többi termék is
helytelenül működhet.
3.2 A távirányítóban lévő elemek cseréje
1 A távirányító elemrekeszének kinyitásához nyomja
meg és csúsztassa le a hátsó fedelet.
2 Helyezzen be kettő AAA méretű elemet
(mellékelve). Ellenőrizze, hogy az elemek (+) és (–)
végei megfelelő helyen vannak-e az elemrekeszben
jelzett (+) és (–) érintkezőkhöz képest.
3 Zárja vissza az elemrekesz fedelét.
Az elemekkel kapcsolatos óvintézkedések
• Ügyeljen arra, hogy az elemeket megfelelő
pozitív „
” és negatív „
” polaritással
helyezze be.
• Azonos típusú elemeket használjon. Soha
ne használjon együtt különböző típusú
elemeket.
• Akár újratölthető, akár nem újratölthető
elemek is használhatók. Olvassa el a
címkéjükön szereplő óvintézkedéseket.
• Ügyeljen a körmére, amikor eltávolítja az
elemrekesz fedelét és az elemet.
• Ne ejtse le a távirányítót.
• Ne engedje, hogy bármi ütést mérjen a
távirányítóra.
• Ne öntsön vizet vagy folyadékot a
távirányítóra.
• Ne helyezze a távirányítót nedves tárgyra.
• Ne helyezze a távirányítót közvetlen
napfényre vagy túl erős hőforrások közelébe.
• Vegye ki az elemet a távirányítóból, ha
hosszabb ideig nem használja, mert korrózió
vagy szivárgás következhet be, és fizikai
sérüléseket és/vagy anyagi károkat és/vagy
tüzet okozhat.
• Ne használjon a megadottól eltérő elemeket.
• Ne használjon vegyesen új és régi elemeket.
• Soha ne töltsön újra egy elemet, ha nem
győződött meg arról, hogy újratölthető típus.

6
HU
4. Elhelyezés és felszerelés
4.1 Elhelyezés
A Ha a TV-t egy asztalra helyezte, az egységet
közvetlenül a TV állványa elé teheti, a TV
képernyőjével központosítva.
B Ha a TV falra van szerelve, a hangprojektort is
falra szerelheti közvetlenül a TV képernyője alá.
4.2 A hangprojektor falra szerelése
- A felszerelést csak szakember hajthatja
végre. A helytelen felszerelés súlyos személyi
sérüléseket és anyagi károkat okozhat
(ha ezt a terméket saját maga kívánja
felszerelni, ellenőriznie kell, hogy vannak-e
a falban szerelvények, mint pl. elektromos
vezetékek vagy vízvezetékek). A felszerelést
végző felelősségi körébe tartozik annak
az ellenőrzése is, hogy a fal biztonságosan
elviseli-e a hangprojektor és a fali konzolok
teljes terhelését.
- A felszereléshez további szerszámokra van
szükség (nem tartozék).
- Ne húzza meg túlzottan a csavarokat.
- Őrizze meg ezt a használati utasítást későbbi
felhasználás céljából.
- Fúrás és felszerelés előtt ellenőrizze a
faltípust egy elektronikus fugakeresővel.
FIGYELMEZTETÉS
• A sérülések megelőzése érdekében ezt a készüléket a
padlóhoz vagy a falhoz biztonságosan kell rögzíteni, a
telepítési utasításokkal összhangban.
• Javasolt falraszerelési magasság: ≤ 1,5 méter.
1. Fúrjon a falba 2 párhuzamos furatot
(Ø5,5 -6mm, a faltípustól függően). A furatok
közötti távolságnak 670 mm-nek kell lennie.
2. Dugja a mellékelt fali dübeleket a falon
lévő 2 csavarfuratba. A mellékelt fali konzol
csavarjait a fali konzolokon keresztül tegye
a dübelekbe. Rögzítse és húzza meg a
csavarokat a falon.
3. Akassza fel az egységet a fali konzolokra.
1
2
3
670 mm / 26.4”
670 mm / 26,4"
AB
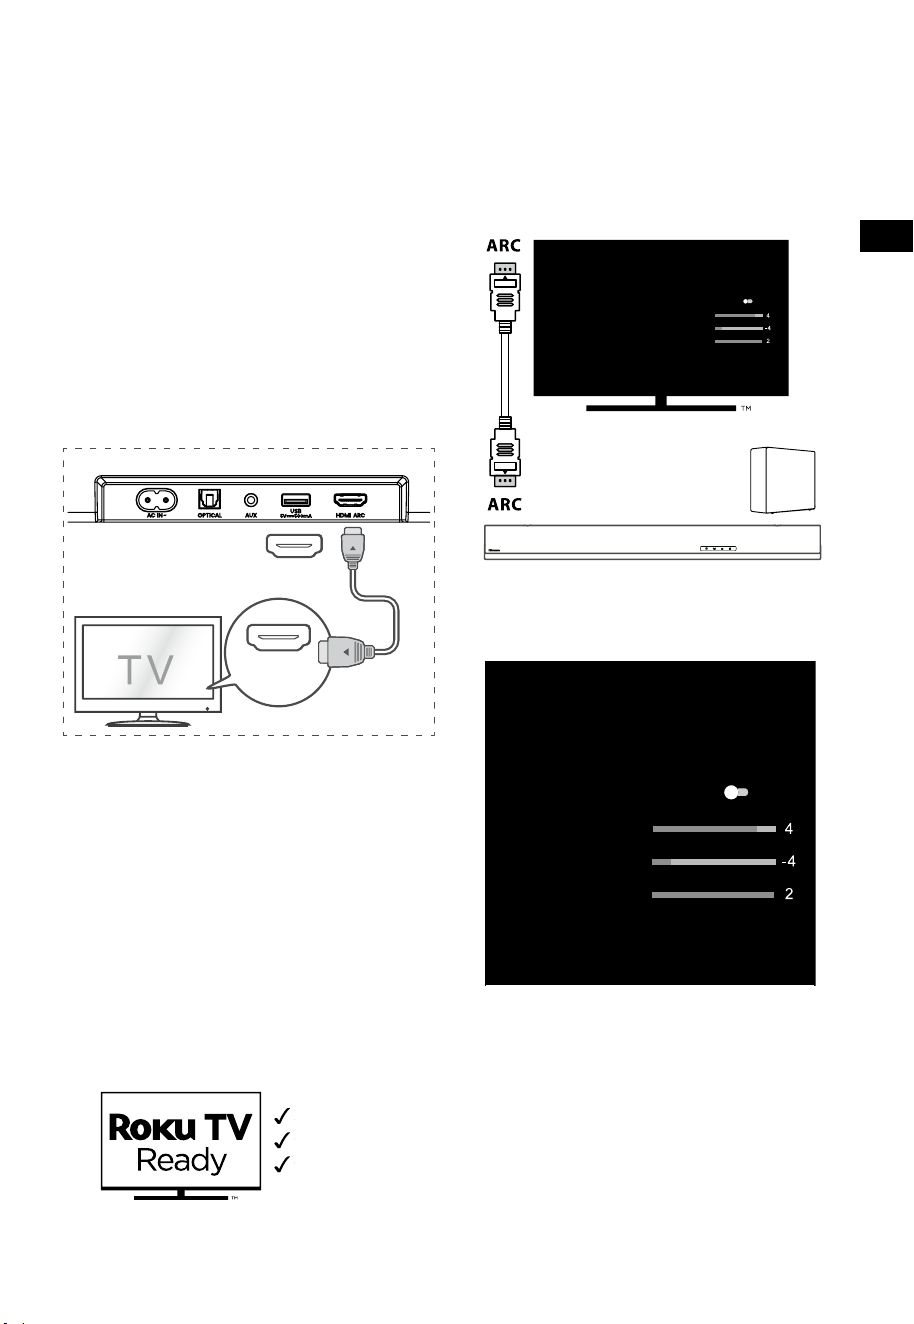
7
HU
5. Csatlakoztatások
5.1 A HDMI ARC aljzat használata
Az ARC (Audio Return Channel - hang visszaadási
csatorna) funkció azt teszi lehetővé, hogy ARC
kompatibilis TV-jéről hangot egyetlen HDMI
csatlakozással küldjön a hangprojektorra. Az ARC
funkció kihasználásához gondoskodjon arról,
hogy a TV kompatibilis legyen a HDMI-CEC és
ARC lehetőségekkel is, és ennek megfelelően
állítsa be. Ha a beállítás helyes, a TV távirányítóját
használhatja a hangprojektor hangkimenetének
beállítására (VOL+/- és a NÉMÍTÁS).
• A HDMI kábelt csatlakoztassa a hangprojektor
HDMI ARC aljzatától az ARC kompatibilis TV
HDMI ARC aljzatához. Ezután nyomja meg
távirányítót, hogy kiválassza a HDMI ARC-t.
56:/)'2
.*3/'8)
56:/)'2
.*3/
'8)
.KGJVNUTK
BA
Tippek:
• A TV-nek támogatnia kell a HDMI-CEC és
az ARC funkciókat. A HDMI-CEC és az ARC
funkciókat be kell kapcsolni.
• A HDMI-CEC és az ARC beállításának
módszere a TV-től függően eltérő lehet.
Az ARC-vel kapcsolatos részleteket lásd a
használati utasításában.
• Csak a HDMI 1.4 vagy magasabb verziószámú
kábel képes az ARC funkciót támogatni.
5.2 Roku TV használata
• Ha Roku TV™-vel rendelkezik, egyszerűen
dugja be a HDMI kábelt az ARC portokba
és kövesse a Roku TV Ready™ képernyőn
megjelenő utasításait.
Egyszerű telepítés
Egyetlen távirányító
Gyors beállítások
5.3 A Hisense EzPlay funkció használata
A Hisense EzPlay esetében, ha a hangprojektor
csatlakozik egy Hisense TV-hez HDMI ARC-n
keresztül, a hangprojektor beállítás menü lesz a
TV-n, és ezt a menüt a TV távirányítóján keresztül
vezérelheti a hangprojektor legtöbb funkciójának
vezérléséhez.
Hangprojektor beállítások
EQ módok
Sport
Surround módok
Mély hangok szintje
Magas hangok szintje
Halványító szint
Visszaállítás
Hangprojektor EzPlay
funkcióval
TV EzPlay
lehetőséggel
Példa a TV-menühöz (a különböző modelleknek
eltérő menüje lehet):
Beállítás -- hang -- Hangprojektor beállítás.
Hangprojektor beállítások
EQ módok
Sport
Surround módok
Mély hangok szintje
Magas hangok szintje
Halványító szint
Visszaállítás
Megjegyzés:
• Ez a funkció csak akkor érhető el, ha a
hangprojektor és a TV is támogatja a Hisense
EzPlay-t.
• Ehhez a funkcióhoz HDMI ARC-n keresztül
csatlakoztatott hangprojektor és TV szükséges,
és a TV-készülék CEC-jét BE kell kapcsolni.
• Ha mindent helyesen állít be, az első
csatlakozáskor a TV képernyőjén megjelenik
egy tipp, amely segít megtalálni a
hangprojektor beállítási menüjét.
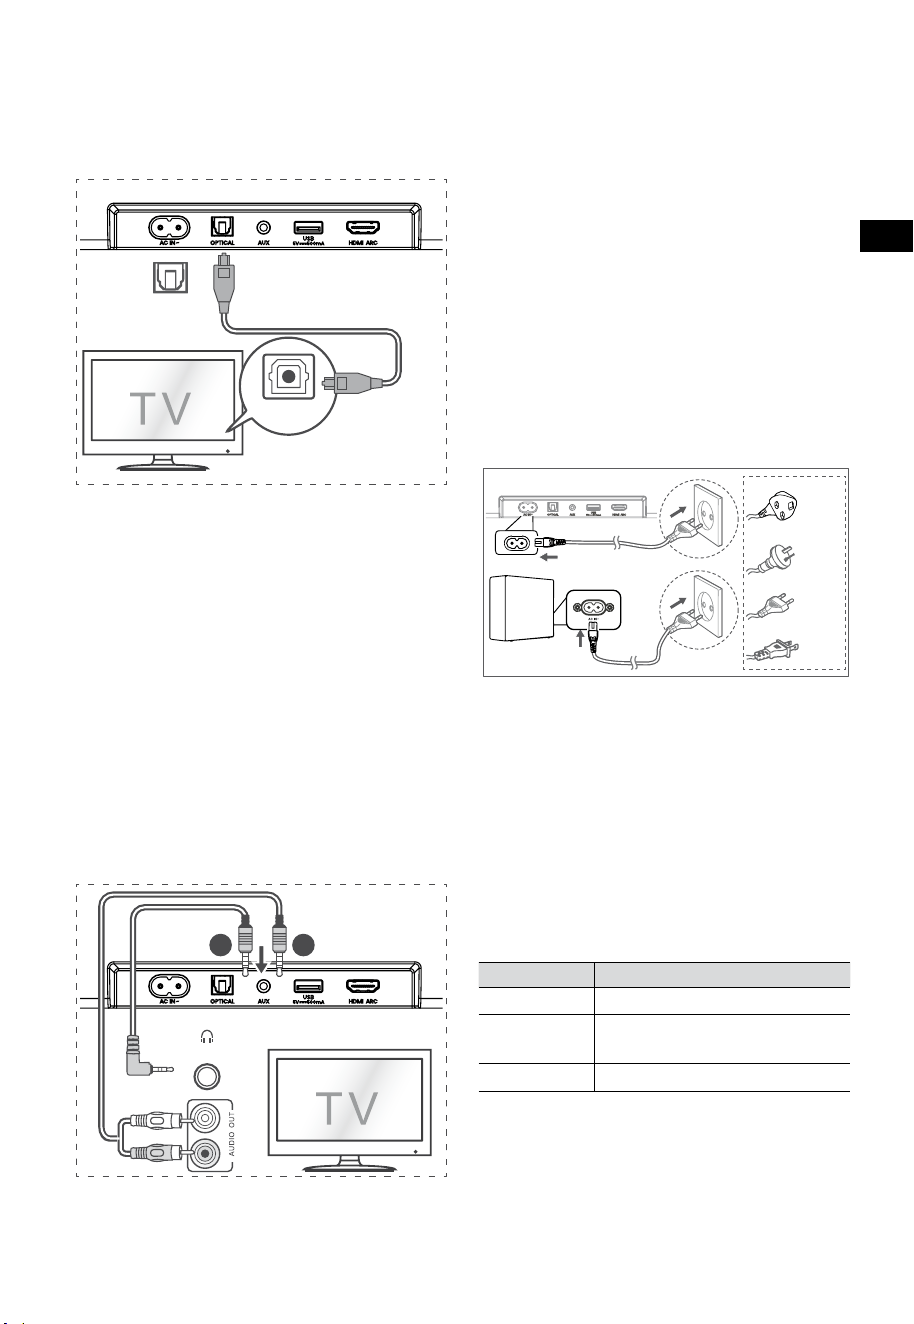
8
HU
5.6 Áram csatlakoztatása
A termék károsodásának a kockázata!
• A termék károsodásának a kockázata!
Győződjön meg arról, hogy a tápfeszültség
megegyezik a hangprojektor hátulján vagy
alján feltüntetett feszültséggel.
• A hálózati áramkábel csatlakoztatása előtt
győződjön meg arról, hogy az összes többi
csatlakoztatást elvégezte.
• Hangprojektor
Az áramkábelt először a mélysugárzó AC~
aljzatába dugja, és ezt követően dugja a
konnektorba.
• Mélynyomó
Az áramkábelt először a mélysugárzó AC~
aljzatába dugja, és ezt követően dugja a
konnektorba.
Az UK számára
Az AUS számára
Az EU számára
Az USA számára
* Az áramkábel hossza és a dugvilla régiónként
eltérő.
6. Pá
rosítá
s a mélysugárzóval
6.1 Automatikus párosítás
A mélysugárzó és a hangprojektor automatikusan
párosul, ha mindkét egységet bedugják a
hálózati aljzatba és bekapcsolják. A két egység
csatlakoztatásához nincs szükség kábelre.
• Határozza meg az állapotot a vezeték nélküli
mélysugárzó jelzőfénye alapján.
LED állapot Állapot
Gyors villogás
A mélysugárzó párosítási módban van
Folyamatosan
világít
Csatlakoztatva / Párosítás sikeres
Lassú villogás
Csatlakoztatás / Párosítás sikertelen
MEGJEGYZÉSEK:
- A PAIR gombot ne nyomja meg a mélysugárzó
hátulján, kivéve a kézi párosítás esetét.
- Ha az automatikus párosítás sikertelen,
párosítsa manuálisan a mélysugárzót a
hangprojektorral.
5.4 Használja az OPTICAL aljzatot
- Csatlakoztasson egy OPTIKAI kábelt a TV
OPTICAL OUT aljzatához és a hangprojektor
OPTICAL aljzatához.
56:/)'2
.*3/'8)
56:/)'2
.*3/
'8)
.KGJVNUTK
BA
Tipp:
Előfordulhat, hogy a hangprojektor nem képes
minden digitális audioformátumot dekódolni a
bemeneti forrásból. Ilyen esetben a hangprojektor
elnémul. Ez NEM hiba. Győződjön meg arról, hogy
a bemeneti forrás (pl. TV, játékkonzol, DVD-lejátszó
stb.) hangbeállítása PCM vagy Dolby Digital
értékre van állítva (a hangbeállítás részleteit
lásd a bemeneti forrás eszköz felhasználói
kézikönyvében) HDMI ARC / OPTIKAI bemenet
használatakor.
5.5 Használja az AUX aljzatot
A. Használjon 3,5 mm-től 3,5 mm-hez
hangkábelt a TV vagy egy külső hangeszköz
fejhallgató aljzatának és a hangprojektor
AUX aljzatának csatlakoztatásához.
56:/)'2
.*3/'8)
56:/)'2
.*3/
'8)
.KGJVNUTK
BA
Fejhallgató
B. Használjon RCA–3,5 mm-es hangkábelt a TV
hangkimeneti aljzatainak a hangprojektor
AUX aljzatához való csatlakoztatásához.

9
HU
6.2 Kézi párosítás
1. Győződjön meg arról, hogy az összes
kábel megfelelően van csatlakoztatva, és a
hangprojektor készenléti módban van.
2. Nyomja meg és tartsa lenyomva néhány
másodpercig a PAIR gombot a mélysugárzó
hátulján. A mélysugárzó párosítási módba
lép, és a párosítás jelzőfénye gyorsan villog.
3. A hangprojektor bekapcsolásához nyomja
meg a
gombot a hangprojektoron vagy a
távirányítón.
4. Nyomja meg és tartsa néhány másodpercig
lenyomva a
gombot a hangprojektoron
vagy a távirányítón.
5. Miután a vezeték nélküli kapcsolat sikeres
volt, a párosítás jelzőfénye kigyullad.
6. Ha a Párosítás jelzőfény villog, a vezeték
nélküli kapcsolat meghiúsult. Húzza ki a
mélysugárzó kábelét, majd 4 perc múlva
csatlakoztassa újra a fő kábelt. Ismételje meg
az 1.–4. lépéseket.
MEGJEGYZÉSEK:
• Ha a vezeték nélküli kapcsolódás ismételten
sikertelen, ellenőrizze, hogy konfliktus vagy
erős interferencia áll-e fenn (pl. elektronikus
eszköz interferenciája) a helyszín körül.
Szüntesse meg ezeket a konfliktusokat vagy
erős interferenciákat, és ismételje meg a fenti
eljárásokat.
• A mélysugárzónak 6 méteren (19,7 lábon)
belül kell lennie a hangprjektortól nyílt
területen.
• Ha a hangprojektor nincs a mélysugárzóhoz
csatlakoztatva, és be van kapcsolva, az ÁRAM
jelzőfény villogni kezd. Kövesse a fenti 1.–4.
lépéseket a mélysugárzó és a hangprojektor
párosításához.
7. Alapműveletek
7.1 Készenlét/BE
Ha az áramkábel csatlakoztatva van,
automatikusan bekapcsol.
• Nyomja meg a
gombot, hogy a
hangprojektort KÉSZENLÉTI üzemmódba
kapcsolja.
• Ha a hangprojektort teljesen KI szeretné
kapcsolni, akkor húzza ki az áramkábelt a
konnektorból.
7.2 Automatikus készenlét / Automatikus
ébredési funkció
[Auto-Standby] A hangprojektor úgy van
beprogramozva, hogy automatikusan KÉSZENLÉTI
módba lépjen, ha 15 percig nem érzékel hangot.
Ez történhet például a lejátszás szüneteltetésekor,
vagy ha véletlenül bekapcsolva marad a
hangprojektor.
[Auto-Wake] Ha TV vagy külső eszköz van
csatlakoztatva (AUX / OPTIKAI / HDMI ARC
módon), az egység automatikusan bekapcsol,
amikor a TV-t vagy a külső eszközt bekapcsolják.
A funkció letiltásához kövesse az alábbi
lépéseket:
1. BE üzemmódban nyomja meg és tartsa
lenyomva a
gombot 3 másodpercig a
menü megnyitásához.
- A készülék kijelzőjén a „MENU” felirat jelenik
meg.
2. Nyomja meg a
gombot egymás után
6-szer, a kijelzőn ez látható: Auto Wake [ON /
OFF].
vagy nyomja meg a
gombot egymás után
7-szer, a kijelzőn ez látható: Auto Standby
[ON / OFF].
3. Válassza ki a tartalmat a távirányító VOL+
/
–
gombjaival, majd nyomja meg a
gombot a választás megerősítéséhez és a
beállításokból való kilépéshez.
• A lépések megismétlésével a funkció „BE” és
„KI” kapcsol.
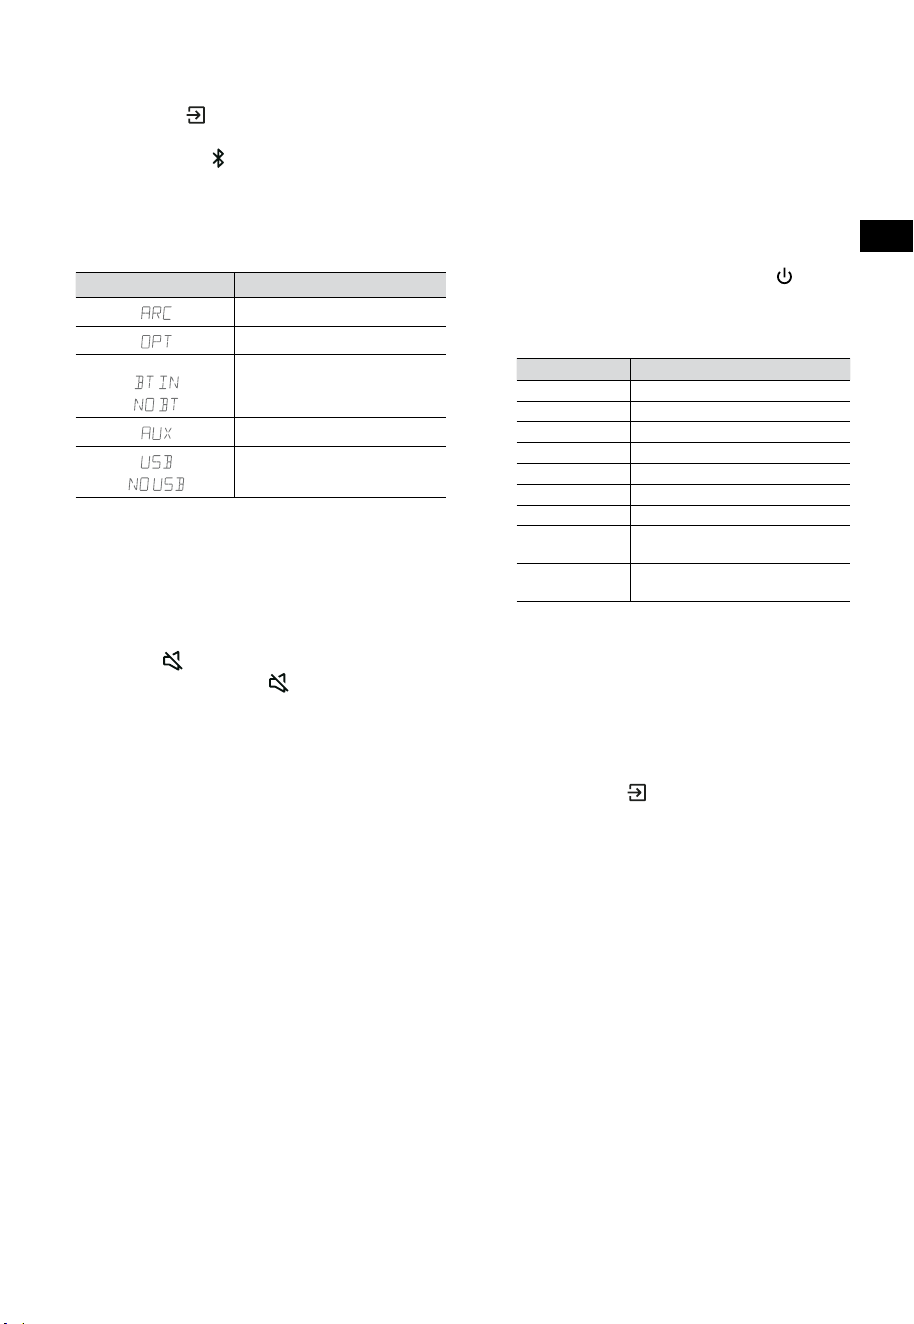
10
HU
7.3 Üzemmódok kiválasztása
Nyomja meg a (FORRÁS) gombot ismétlődően
a hangprojektoron vagy a távirányítón, hogy
válasszon az AUX,
, OPTIKAI, HDMI ARC és USB
üzemmódok közül. A kiválasztott üzemmód a
kijelzőn megjelenik.
• A kiválasztott üzemmód a kijelzőn
megjelenik.
Kijelzés Mód
HDMI ARC
OPTIKAI
Bluetooth
Csatlakoztatva
Nincs csatlakoztatva
AUX
USB
Nincs USB csatlakoztatva
7.4 Hangerő beállítása
• Nyomja meg VOL
+
/
-
gombokat a
hangprojektoron vagy a távirányítón, hogy
beállítsa a hangerőt.
• Ha a hangot ki akarja kapcsolni, nyomja
meg a
(NÉMÍTÁS) gombot a távirányítón.
Nyomja meg ismét a
(NÉMÍTÁS) gombot,
vagy nyomja meg a VOL + gombokat a
normál hallgatás folytatásához.
7.5 A térhatású hangout kapcsolja BE/KI
• A térhatású hang BE/KI kapcsolásához
nyomja meg a távirányító SURR gombját.
7.6 A mély/magas hangok állítása
• A mély hangszint beállításához nyomja meg
a távirányító BASS
+
/
-
gombjait.
• A magas hangszint beállításához nyomja
meg a távirányító TREBLE
+
/
-
gombjait.
7.7 Az Equalizer (EQ) effektus
kiválasztása
• Lejátszás közben nyomja meg a távirányító
EQ gombját a kívánt előre beállított
hangszínszabályzó kiválasztásához: FILM,
ZENE, JÁTÉK, HÍREK, SPORT, ÉJSZAKAI.
7.8 Állítsa be a fényerőt
• A fényerő beállításához nyomja meg a
távirányító DIMMER
+
/
-
gombjait.
7.9 Visszaállítás gyári értékekre
Az eszköz visszaállítása az alapértelmezett
beállításokra.
• Kapcsolja a hangprojektort optikai módba,
nyomja meg és tartsa lenyomva a [
]
gombot a hangprojektoron, a hangprojektor
visszaáll a gyárilag beállított értékekre és
készenléti állapotba kapcsol.
MÓD ALAPÉRTELMEZETT
FORRÁS ARC
Hangerő 30
Térhangzás Ki
Halványító MAX
Mély hang 0
Magas hang 0
EQ FILM
Automatikus
ébresztés
KI
Automatikus
készenlét
BE (Az Egyesült Államok
kivételével)
8. AUX/OPTIKAI/HDMI ARC
kezelés
1 Győződjön meg arról, hogy a hangprojektor
a TV-hez vagy hangeszközhöz csatlakoztatva
van.
2 Nyomja meg a
(FORRÁS) gombot
ismétlődően a hangprojektoron vagy
a távirányítón, hogy válasszon az AUX,
OPTIKAI és HDMI ARC üzemmódok közül. A
kiválasztott üzemmód a kijelzőn megjelenik.
3 A lejátszási funkciókért közvetlenül
működtesse a hangeszközt.
4 A VOL
+
/
-
gombok nyomásával állítsa be a
kívánt hangerőt.
Tipp: Előfordulhat, hogy a hangprojektor
nem képes minden digitális audioformátumot
dekódolni a bemeneti forrásból. Ilyen esetben a
hangprojektor elnémul. Ez NEM hiba. Győződjön
meg arról, hogy a bemeneti forrás (pl. TV,
játékkonzol, DVD-lejátszó stb.) hangbeállítása
PCM vagy Dolby Digital értékre van állítva (a
hangbeállítás részleteit lásd a bemeneti forrás
eszköz felhasználói kézikönyvében) HDMI ARC /
OPTIKAI bemenet használatakor.

11
HU
9. USB kezelés
1 Dugjon be egy USB eszközt.
2 Nyomja meg a (FORRÁS) gombot
ismétlődően a hangprojektoron vagy a
távirányítón, hogy kiválassza az USB módot.
3 Lejátszás közben:
A lejátszás elindítása,
szüneteltetése vagy újrakezdése
,
Az előző vagy a következő sávra
lépés
Tippek:
• Az egység legfeljebb 32 GB memóriával
rendelkező USB eszközöket képes támogatni.
• Ez az egység WAV / WMA / MP3 / FLAC
fájlokat képes lejátszani.
• Előfordulhat, hogy ez a termék nem
kompatibilis bizonyos típusú USB-
tárolóeszközökkel.
• Ha USB-hosszabbító kábelt, USB-elosztót
vagy többfunkciós USB-kártyaolvasót
használ, előfordulhat, hogy a rendszer nem
ismeri fel az USB-tárolóeszközt.
• Fájlok olvasása közben ne távolítsa el az USB-
tárolóeszközt.
10. Bluetooth® működtetés
Bluetooth-on keresztül csatlakoztassa a
hangprojektort Bluetooth-eszközéhez (például
iPad, iPhone, iPod touch, Android telefon vagy
laptop), majd a hangprojektor hangszóróin keresztül
hallgathatja az eszközön tárolt hangfájlokat.
Első párosítás
1 Nyomja meg a (FORRÁS) gombot a
hangprojektoron vagy a
gombot a távirányítón,
hogy kiválassza az Bluetooth® módot.
• A kijelzőn megjelenik a NO BT felirat.
2 Aktiválja a Bluetooth eszközt, és válassza ki a
keresési módot.
3 Válassza ki a „Hisense HS3100” elemet
a párosítási listában. A hangjelzés után a
rendszer sikeresen csatlakozik, és a kijelzőn a
BT IN felirat látható.
• Ha a hangprojektort egy másik Bluetooth-
eszközhöz szeretné csatlakoztatni, nyomja
meg és tartsa lenyomva a távirányító
gombját, hogy leválassza az éppen
csatlakoztatott Bluetooth eszközt. Kövesse
a 2.-3. lépéseket a Bluetooth eszköz
párosításához.
A Bluetooth funkció leválasztásához a
következőket teheti:
- Váltson másik forrásra az egységen.
- A Bluetooth eszközről való működés
kikapcsolása.
- Nyomja meg és tartsa nyomva a
gombot a
távirányítón.
Zenehallgatás Bluetooth készülékről
- Ha a csatlakoztatott Bluetooth eszköz
támogatja az speciális hangelosztó profil
(Advanced Audio Distribution Profile (A2DP))
funkciót, akkor az egységen keresztül
hallgathatja a készüléken tárolt zenét.
- Ha a készülék támogatja a hang és kép
távvezérlési profil (Audio Video Remote
Control Profile (AVRCP)) funkciót is, akkor
a készülék távirányítójával lejátszhatja az
készüléken tárolt zenét.
1. Párosítsa készülékét az egységgel.
2. Zene lejátszása a készüléken keresztül (ha
támogatja az A2DP-t).
3. A lejátszás vezérléséhez használja a
távirányítót (ha támogatja az AVRCP-t).
A lejátszás elindítása,
szüneteltetése vagy újrakezdése
,
Az előző vagy a következő sávra
lépés
Tippek:
• A hangprojektor és az eszköz közötti
működési tartomány körülbelül 8 méter.
• Mielőtt Bluetooth®-eszközt csatlakoztatna
a hangprojektorhoz, győződjön meg arról,
hogy ismeri az eszköz képességeit.
• Az összes Bluetooth® eszközzel való
kompatibilitás nem garantált.
• Bármilyen akadály az eszköz és a
hangprojektor között csökkentheti a
működési hatótávolságot.
• Tartsa távol a lejátszót más elektronikus
eszközöktől, amelyek interferenciát
okozhatnak.
• Az egység akkor is lekapcsolódik, ha a
készüléket hatótávolságon kívülre viszi.
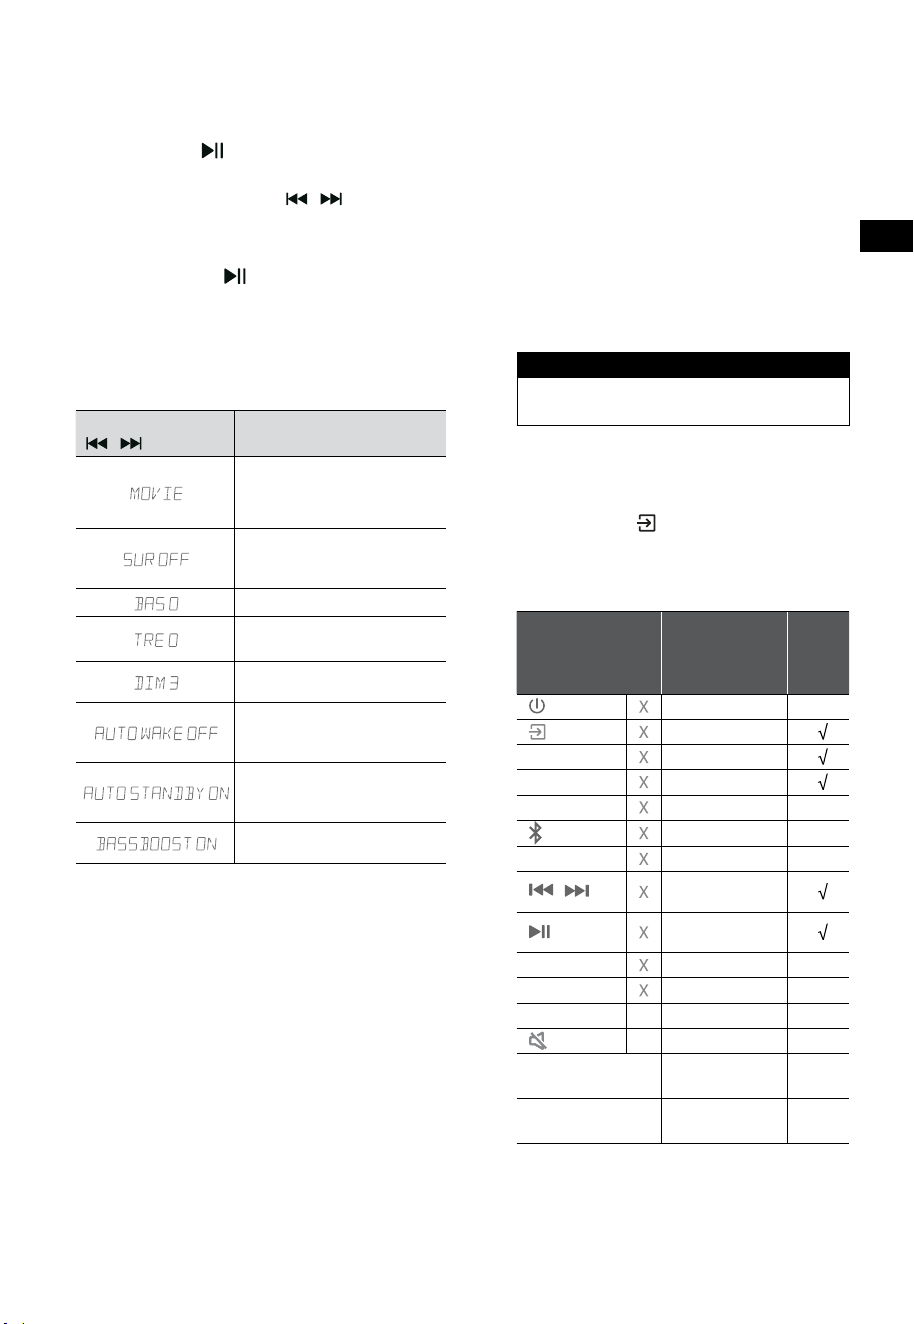
12
HU
11. Beállítás menü
1. BE üzemmódban nyomja meg és tartsa
lenyomva a gombot 3 másodpercig a
menü megnyitásához.
2. Tartalom kiválasztása a
/ gombokkal.
3. Módosítsa az egyes beállítások kezdeti
értékeit a VOL +/- gombokkal.
4. Nyomja meg a
gombot a választás
megerősítéséhez és a beállításokból való
kilépéshez.
• Ha 10 másodpercen belül nem nyomnak
meg gombot, a rendszer automatikusan kilép
a menüből.
Kijelzés
/
Leírás
VOL
+
/
-
Hangszínszabályzó (EQ)
effektus kiválasztása (FILM,
ZENE, JÁTÉK, HÍREK, SPORT,
ÉJSZAKAI)
Térhatású hangzás
átkapcsolása
BE / KI
A basszusszint beállítása
A magas hangok szintjének
beállítása
Állítsa be a fényerőt
DIM 0 / DIM 1 / DIM 2 / DIM 3
Automatikus ébredés
kapcsolása
BE / KI
Automatikus készenlét
kapcsolása
BE / KI
Kapcsoló: BassBoost
BE / KI
12. DEMÓ mód
A DEMÓ mód egy kifejezetten áruházi környezetben
való használatra konfigurált felhasználói mód.
A DEMÓ mód be- / kikapcsolása:
Ez a hangprojektor gyári alapértelmezés szerint a
normál fogyasztói módot használja.
• Helyezze be a Demo Kitet a DEMÓ mód
aktiválásához.
• Távolítsa el a Demo Kitet a DEMÓ mód
kikapcsolásához.
• A hangprojektor a következőket jeleníti meg:
Kijelzés Mód
DEMO ON DEMÓ mód
DEMO OFF Fogyasztói mód
A DEMÓ mód használata
1. Lépjen be a DEMÓ módba, a hangprojektor
azonnal bekapcsol, amikor áram alá helyezi.
2. Forrás lezárása (
nem elérhető). Forrást
csak a Demo Kiten keresztül választhat.
3. Minden gomb zárolva lesz és nem elérhető.
Csak a Demo Kit segítségével vezérelhet.
Az összes gomb
zárolva
(Távirányító és
hangprojektor)
Alapértelmezés
Demo
Kit
(FORRÁS) Forrás zárolása
+
(Vol+)
-
(Vol-)
SURR BE
(BT)
EQ FILM
/
Ha BT
üzemmódban van
Ha BT
üzemmódban van
BASS
+
/
-
TREBLE
+
/
-
DIMMER
+
/
-
X
DIM 3
(NÉMÍTÁS)
X
Automatikus
készenlét
KI
Automatikus
ébresztés
KI
* Ha megnyomja az (X) nem elérhető gombot,
a hangprojektor ezt jelzi ki: „DEMO ON”.
13
HU
13. Hibaelhárítás
A garancia érvényességének megőrzése érdekében soha ne próbálja meg saját maga megjavítani az
egységet. Ha probléma merül fel a hangprojektor használata közben, ellenőrizze a következő pontokat,
mielőtt szervizt kérne.
Probléma Megoldás
Nincs áram • Győződjön meg arról, hogy az egység hálózati kábele megfelelően van
csatlakoztatva.
• Ellenőrizze, hogy van-e áram a hálózati csatlakozón.
• Az egység bekapcsolásához nyomja meg a
(készenlét) gombot.
A távirányító nem működik • Mielőtt megnyomja a lejátszás vezérlő gombját, először válassza ki a
megfelelő forrást.
• Csökkentse a távirányító és a hangprojektor közötti távolságot.
• Úgy helyezze be az elemeket, hogy a polaritásuk (+/-) a jelzésnek megfelelően
álljon.
• Cserélje ki az elemeket.
• A távirányítót egyenesen a hangprojektor elején lévő szenzorra irányítsa.
Nincs hang • Győződjön meg arról, hogy a hangprojektor nincs némítva. Nyomja meg a
NÉMÍTÁS vagy a + (VOL) gombot a normális hallgatás újrakezdéséhez.
• Nyomja meg a gombot a hangprojektoron vagy a távirányítón a
hangprojektor készenléti üzemmódba kapcsolásához. Ezután nyomja meg a
gombot ismét, hogy bekapcsolja a hangprojektort.
• Húzza ki úgy a hangprojektor, mint a mélysugárzó áramkábelét a
konnektorból, majd dugja azokat vissza. Kapcsolja be a hangprojektort.
• Ellenőrizze, hogy a bemeneti forrás hangbeállítása (pl. TV, játékkonzol, DVD
lejátszó stb.) PCM vagy Dolby Digital módra van-e állítva digitális (pl. HDMI,
OPTIKAI) csatlakozás esetén.
• A mélysugárzó tartományon kívül van, helyezze közelebb a mélysugárzót a
hangprojektorhoz. Gondoskodjon arról, hogy a mélysugárzó a hangprojektor
5 m-es körzetén belül legyen (minél közelebb, annál jobb).
• A hangprojektor esetleg elveszítette a kapcsolatát a mélysugárzóval.
Párosítsa ismét az egységeket a „Párosítás a mélysugárzóval” című
szakaszban írt lépések szerint.
• Előfordulhat, hogy a hangprojektor nem képes minden digitális
audioformátumot dekódolni a bemeneti forrásból.
A TV-nek megjelenítési
problémája van, miközben
HDR-tartalmat néz HDMI-
forrásról.
• Egyes 4K HDR TV-knél be kell állítani a HDMI bemenetet vagy a
képbeállításokat a HDR tartalom vételéhez. A HDR-kijelző beállításának
további részleteit a TV-készülék használati utasításában találja.
Nem találom ennek a
hangprojektornak a nevét
Bluetooth párosításhoz a
Bluetooth eszközömön
• Ellenőrizze, hogy aktiválva van-e a Bluetooth funkció a Bluetooth készüléken.
• Ellenőrizze, hogy már párosította-e a hangprojektort a Bluetooth készülékkel.
• A Hangprojektor Bluetooth® funkciója 8 méter távolságból képes jelet
fogadni. Tartsa a hangprojektor és a Bluetooth® készülék távolságát 8
méteren belül.
Ez egy 15 perces
kikapcsolási funkció, amely
az energiatakarékosság
egyik standard ERPII
követelménye
• Ha az egység külső bemeneti jelszintje túl alacsony, az hangprojektor 15 perc
múlva automatikusan kikapcsol. Kérjük, növelje a külső eszköz hangerejét.
14
HU
14. Műszaki adatok
Márka Hisense
Modell HS3100
Hangprojektor
Áramellátás 100-240 V~ 50/60 Hz
Energiafogyasztás
50 W
< 0,5 W (Készenlét)
USB
5 V
500 mA
Nagysebességű USB (2.0) / FAT32 / FAT16
32 GB (max), WAV / WMA / MP3 / FLAC.
Méretek (szélesség × magasság × mélység) 902 × 62,3 × 91 mm / 35,5" × 2,4" × 3,6"
Nettó tömeg 1,6 kg / 3,5 font
Hangbemeneti érzékenység 500 mV
Frekvenciaválasz 120 Hz ~ 20 kHz
Üzemi hőmérséklet 0°C - 45°C
Mélynyomó
Áramellátás 100-240 V~ 50/60 Hz
Energiafogyasztás
40 W
< 0,5 W (Készenlét)
Méretek (szélesség × magasság × mélység) 161 × 303 × 304,5 mm / 6,3" × 11,9" × 12"
Nettó tömeg 3,6 kg / 7,9 font
Frekvenciaválasz 40 Hz - 150 Hz
Vezetéknélküli adatok
Bluetooth verzió / profilok
Bluetooth frekvencia tartomány
Bluetooth max. átviteli teljesítmény
V 5.3 (A2DP, AVRCP)
2400 MHz ~ 2483,5 MHz
≤ 5 dBm
2,4G vezeték nélküli frekvenciatartomány
2,4G max. átviteli teljesítmény
2400 MHz ~ 2483 MHz
≤ 6 dBm
Modulációtípus GFSK, π/4 DQPSK
Erősítő (max. hangteljesítmény)
Összesen 480 W
Hangprojektor 300 W
Mélynyomó 180 W
Távirányító
Távolság/szög 19,7 láb (6 m) / 30°
Elemtípus AAA (1,5 V × 2)
• A kialakítás és a műszaki adatok előzetes értesítés nélkül változhatnak.