Loading ...
Loading ...
Loading ...
Blender (Q-U) ®
Important:
• The appliance can be used with or
without the blender attached to the
motor unit. If you use the appliance
without the blender, the appliance will
not function if the screw cap (P) has
not been screwed onto the attaching
hole for the blender.
• Before use: do not put the mains plug
in the socket until you have attached
the blender jar (S), the lid (R) and the
knife unit (U) to the motor unit in the
correct way.
• After use: unplug the appliance before
you remove the blender jar from the
motor unit.
• The blender can be used for pureeing
very finely and for blending. It can be
used for e.g. soups, sauces,
milkshakes, baby food, vegetables,
fruit, thin batter, puree, etc. If
necessary, cut solid ingredients into
smaller pieces before you put them in
the blender.
• Do not fill the blender jar with
ingredients that are hotter than 80 °C.
• To prevent spilling, do not put more
than 1.2 litres of liquid in the blender
jar.
• Never remove the lid while the blender
is running.
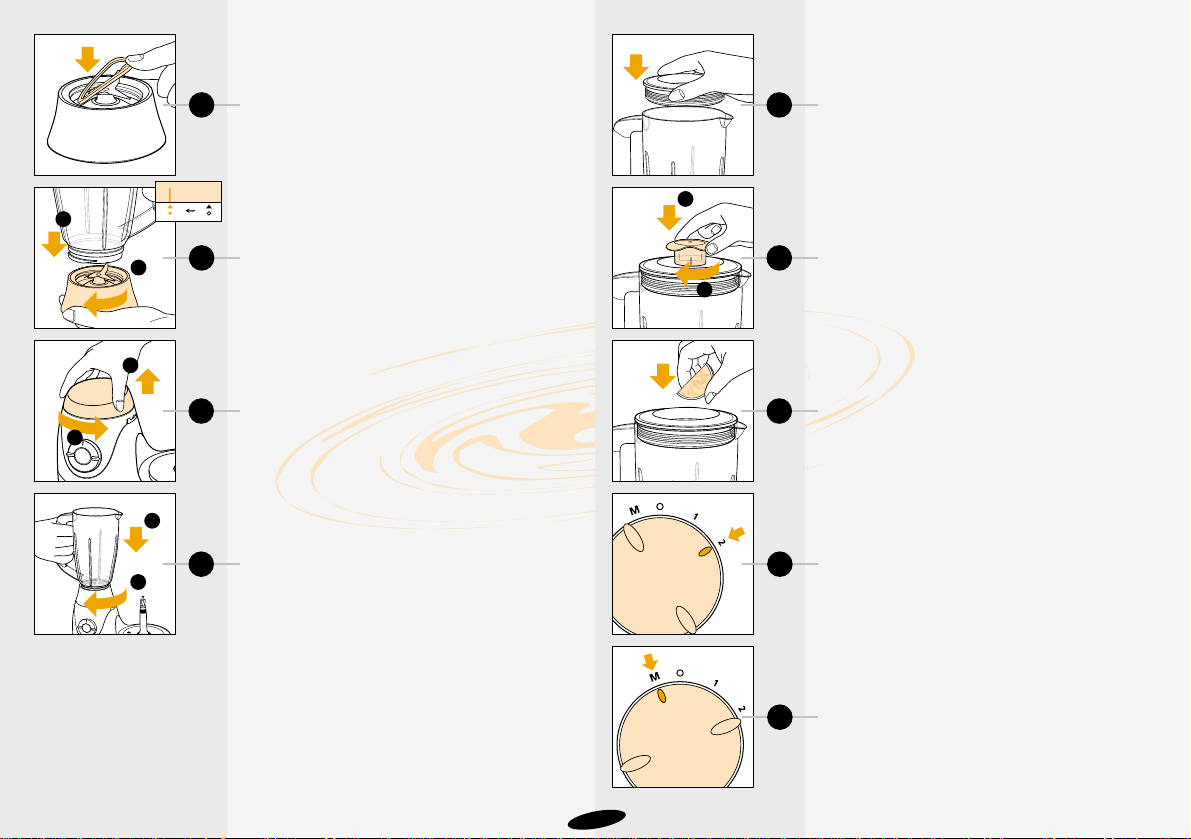
Assembly and disassembly
- Put the rubber sealing ring (T) around the
edge of the knife unit (U) (fig. 27).
- Turn the knife unit to the left to attach it to
the blender jar (fig. 28). Make sure it is
firmly fixed!
- Remove the screw cap (P) (fig. 29).
- Mount the blender jar onto the attaching
hole and turn it in the direction of the arrow
until it is firmly fixed (fig. 30).
Warning: do not exert too much pressure on
the handle of the blender jar.
- Press the lid into place (fig. 31).
- Attach the stopper by pressing it down and
turning it in the direction of the arrows until
it is firmly attached (fig. 32).
• To detach the blender, follow these steps
in reverse order and opposite direction.
• Applications/recipes, mentioned in the
table, will be ready after 10 seconds - 2
minutes.
How to use the blender
- Put the ingredients in the blender jar
(fig. 33).
- Switch on the appliance by setting the
speed control to the recommended speed
(fig. 34) or by pressing the pulse button (M)
(fig. 35). If you have any doubt about the
correct speed, always select the highest
speed (position 2). Check the table for the
appropriate speed and setting.
8
27
1
2
28
2
1
29
1
2
30
31
1
2
32
33
34
35
Loading ...
Loading ...
Loading ...