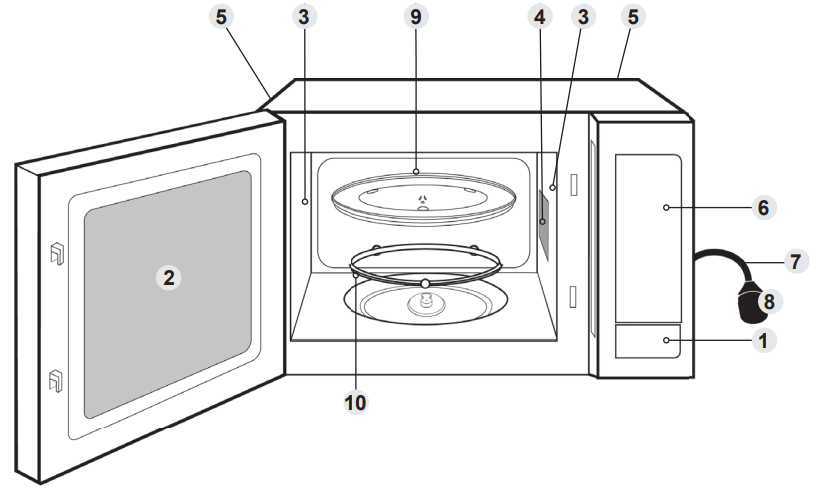
1. Door Release ButtonPress to open the door. Opening the door during cooking will stop the cooking process without cancelling the programme. Cooking resumes after the door is closed and Start is pressed. It is quite safe to open the door at any time during a cooking programme and there is no risk of microwave exposure.
2. Oven window
3. Air vents
4. Microwave feed guide
(Do not remove.)
5. External air vents
6. Control panel
7. Power supply cord
8. Plug
9. Glass tray
10. Roller ring
Identification label is attached on the oven.
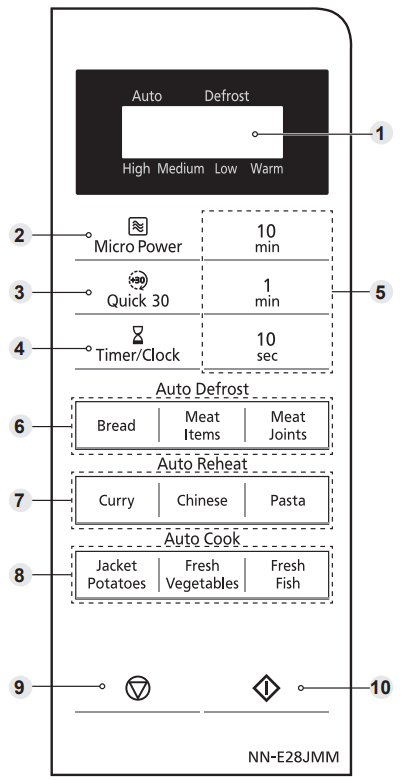
Control panel
Your control panel may have differences in appearance, but the words on the pads and functionality will be the same.
1. Display window 2. Micro Power pad 3. Quick 30 pad 4. Timer / Clock pad 5. Time pads 6. Auto Defrost pads 7. Auto Reheat pads 8. Auto Cook pads 9. Stop / Reset pad: Before Cooking: One press clears your instructions.
During Cooking: One press temporarily stops the cooking process. Another press cancels all your instructions and a dot or the time of day will appear in the display.
10. Start pad
One press allows oven to begin functioning. If door is opened or Stop/Reset is pressed once during oven operation, Start must be pressed again to restart oven.
Beep sound When a pad is pressed correctly a beep will be heard. If a pad is pressed and no beep is heard, the unit has not or cannot accept the instruction. The oven will beep twice between programmed stages. At the end of any complete programme, the oven will beep 5 times and “End” will be displayed.
Note
If Start is not pressed for 6 minutes after cooking programme setting, the oven will automatically cancel the cooking programme. The display will revert back to clock or colon.
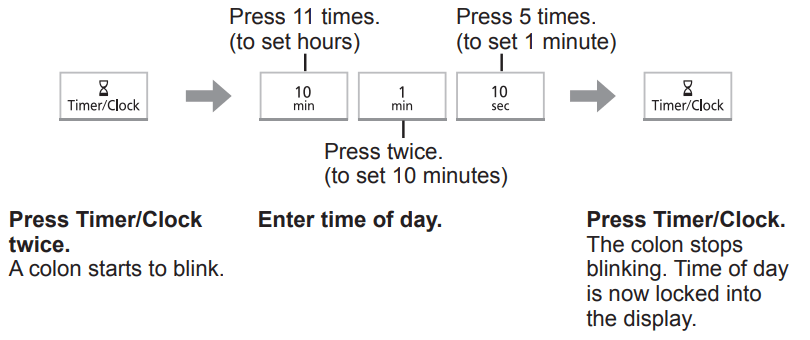
Setting the clock
When the oven is first plugged in, “88.88” appears in display.
Example: To set 11:25am
Notes
To reset time of day, repeat step 1 through to step 3, as above.
The clock will keep the time of day as long as the oven is plugged in and electricity is supplied.
This is a 24 hour clock, ie 2 pm = 14:00 not 2:00.
Child safety lock
This feature will make the oven controls inoperable; however, the door can be opened. Child Lock can be set when the display shows a dot or the time.
To Set:
Press Start 3 times in 10 seconds. The time of day will disappear. Actual time will not be lost. ‘L ---’ is indicated in the display.
To Cancel:
Press Stop/Reset 3 times in 10 seconds. The time of day will reappear in the display
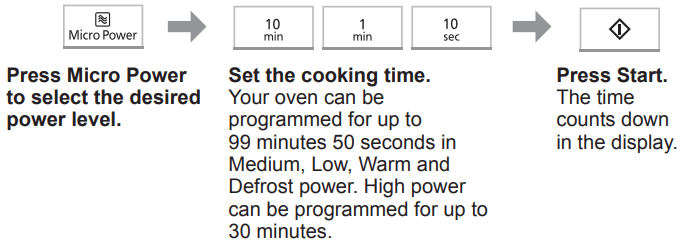
Microwave cooking and defrosting
The glass tray must always be in position when using the oven.
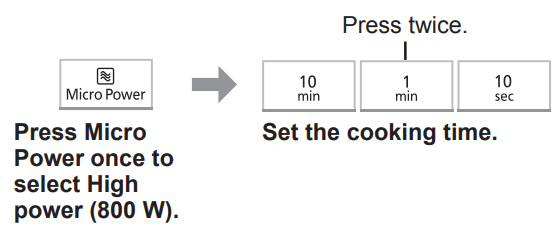
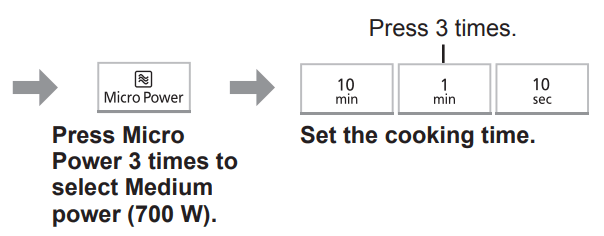
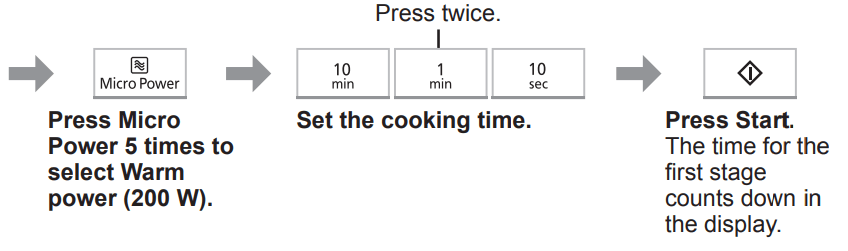
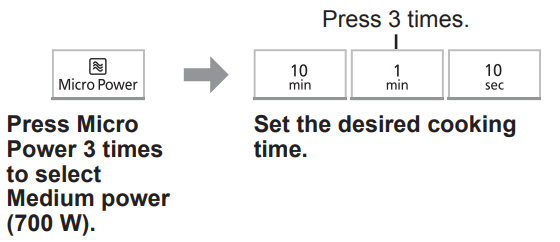
Press
Power Level
once
High
800 W
twice
Defrost
270 W
3 times
Medium
700 W
4 times
Low
520 W
5 times
Warm
200 W
Note:
The oven will automatically work on High microwave power if a cooking time is entered without the power level previously being selected.
While cooking, the glass tray may vibrate. This will not affect cooking performance.
For MULTI-STAGE COOKING
STANDING TIME can be programmed after microwave power and time setting.
DO NOT use microwave only with any metal accessory in the oven.
Always check the food during defrosting by opening the door then restarting. It is not necessary to cover food during defrosting. To ensure an even result, stir, turn or separate several times during defrosting. For large joints and poultry, turn halfway through defrosting and protect ends and tips with foil.
Multi-stage cooking
This feature allows you to programme up to 3 stages of cooking continuously.
Example: To continually set High power (800 W) for 2 minutes, Medium power (700 W) for 3 minutes and Warm power (200 W) for 2 minutes.
Notes
AUTO PROGRAMMES cannot be used with MULTI-STAGE COOKING.
When operating, 2 beeps will sound between each stage, and 5 beeps will sound after all stages have finished.
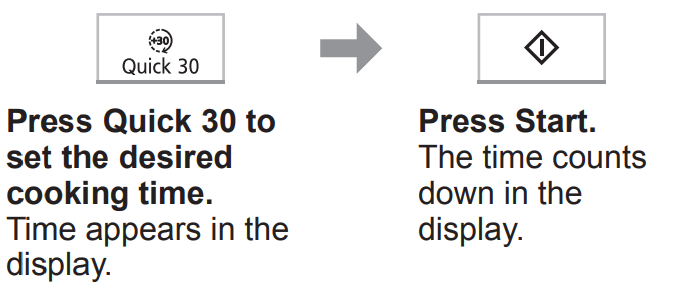
Quick 30 feature
This feature allows you to set cooking time in 30 seconds increments up to 5 minutes at High MICROWAVE power (800 W). It is only available for MICROWAVE.
Notes
If desired, you can use other power levels. Select the desired power level before pressing Quick 30.
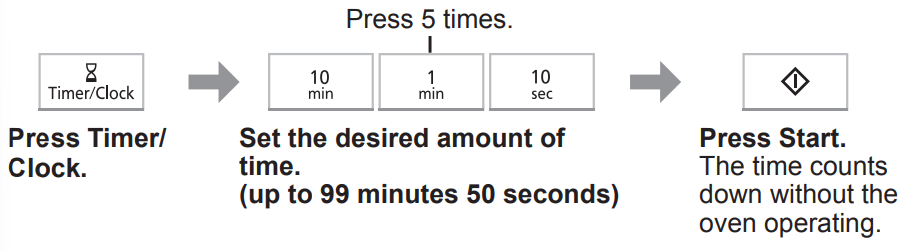
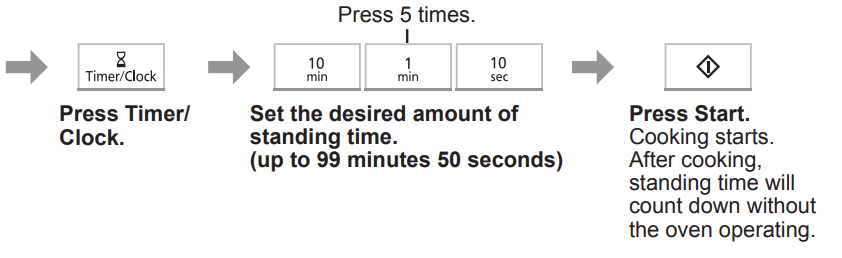
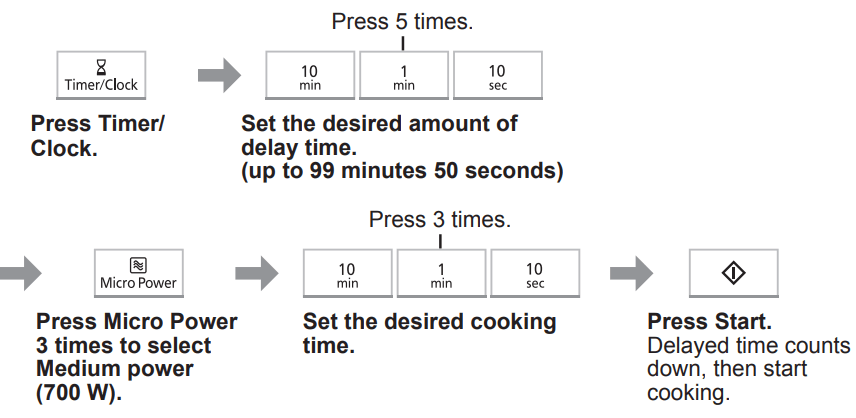
Using the timer
This feature operates as a KITCHEN TIMER or allows you to programme the STANDING TIME/DELAY START.
Kitchen timer
Example: To count 5 minutes.
Standing time
Example: To stand for 5 minutes after cooking at Medium MICROWAVE power (700 W) for 3 minutes.
Delay start
Example: To start cooking at Medium MICROWAVE power (700 W) for 3 minutes after 5 minutes of standing time.
Notes
MULTI-STAGE COOKING can be programmed including STANDING TIME and DELAY START.
Even if the oven door is opened during KITCHEN TIMER, STANDING TIME or DELAY START, the time in the display window will continue to count down.
STANDING TIME/DELAY START cannot be programmed before/after any AUTO PROGRAMME.
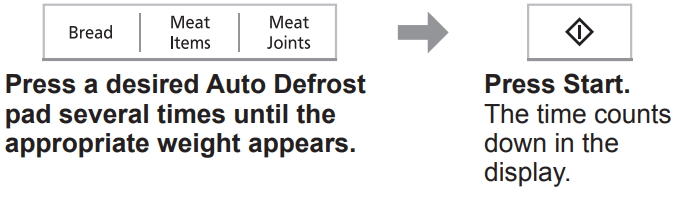
Auto programmes
With this feature you can defrost/cook food according to the weight. Select the category and set the weight of the food. The weight is programmed in grams. The oven determines MICROWAVE power level, and then cooking time automatically. Do not include the weight of any added water or the container weight.
Notes
The AUTO PROGRAMMES must ONLY be used for foods described.
Only defrost/cook foods within the weight ranges described.
Always weigh the food rather than relying on the package information.
Most foods benefit from STANDING TIME. After cooking with an AUTO PROGRAMME, allow heat to continue conducting to the centre.
Auto defrost
Note
The shape and size of the food will determine the maximum weight the oven can accommodate.
Programme
Instructions
Weight: 100-600 g Accessories:
For small items which are required for immediate use, they may feel warm straight after defrosting. Loaves can also be defrosted on this programme but these will require standing time to allow the centre to thaw out. Standing time can be shortened if slices are separated and buns and loaves cut in half. Items should be turned halfway during defrosting. THIS
PROGRAMME IS NOT SUITABLE FOR CREAM CAKES OR DESSERTS e.g. cheesecake.
See “Defrosting charts” on page 25 for standing time.
(mince/chops/ chicken portions)
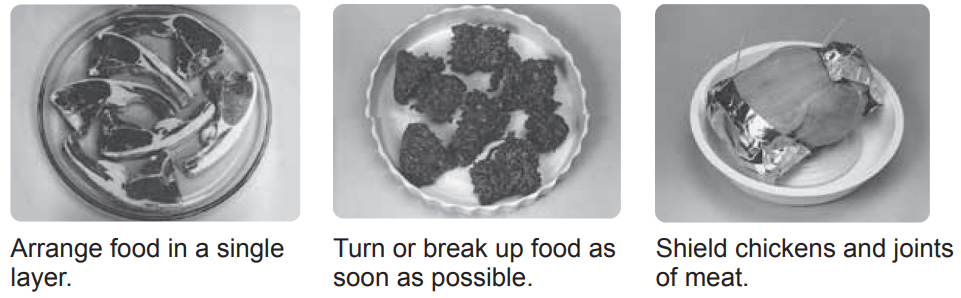
Weight: 200-1000 g Accessories:
NOT SUITABLE FOR SAUSAGES, which can be defrosted manually using defrost power and time. Chops and chicken portions should be arranged in a single layer and turned frequently during defrosting. It is necessary for mince to be broken up frequently during defrosting and this is best carried out in a large shallow dish.
See “Defrosting charts” on page 25 for standing time.
(Whole Chickens, etc.)
Weight: 600-1600 g Accessories:
Whole chickens and meat joints will require shielding during defrosting especially if it is a particularly fatty piece. This is to prevent food starting to cook on the outside edges. Protect wings, breast and fat with smooth pieces of aluminium foil secured with cocktail sticks. DO NOT ALLOW THE FOIL TO TOUCH THE WALLS OF THE OVEN.
Standing time of at least 1 hour should be allowed for joints after defrosting.
Defrosting guidelines
For Best Results:
Place foods in a suitable container. Meat joints and chickens should be placed on an upturned saucer or on a plastic rack if you have one.
Check food during defrosting, as foods vary in their defrosting speed.
It is not necessary to cover the whole food (see point 6).
Always turn or stir the food halfway. Shield if necessary (see point 6).
Minced meat, chops and other small items should be broken up or separated and placed in a single layer.
Shielding prevents food from cooking. It is essential when defrosting chickens and joints of meat. The outside thaws out first, so protect wings/breast/fat/bones with smooth pieces of aluminium foil secured with cocktail sticks.
Allow standing time so that the centre of the food thaws out (minimum of 1 hour for joints of meat and whole chickens).
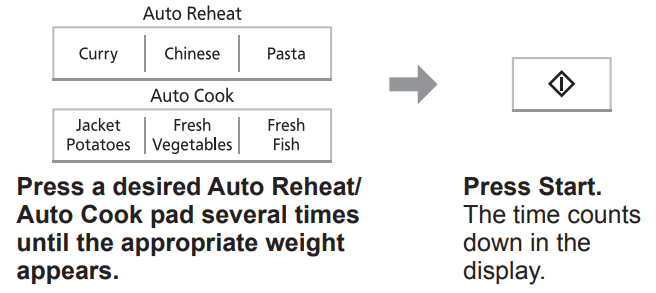
Auto reheat/auto cook
Notes
Only use the accessories as indicated below.
Large pieces of fish/meat in a thin sauce, may require longer cooking.
These programs are not suitable for foods that cannot be stirred.
Meals in bowl shaped containers will need extra cooking time.
As some variations may occur in food, check that food is thoroughly cooked and piping hot before serving.
Auto Reheat
Programme
Instructions
Weight: 200-800 g Accessories:
For reheating a curry convenience meal that can be stirred. Foods must be in a suitable single section microwaveable container and have the film pierced. Place it on the glass tray. Press Curry several times until the appropriate weight appears, and press Start. Stir at beeps. Allow to stand for 1 minute. Ensure the food is piping hot. Stir the food before serving.
Weight: 200-500 g Accessories:
For reheating a Chinese style convenience meal that can be stirred. Foods must be in a suitable single section microwaveable container and have the film pierced. Place it on the glass tray. Press Chinese several times until the appropriate weight appears, and press Start. Stir at beeps. Allow to stand for 1 minute. Ensure the food is piping hot. Stir the food before serving.
Weight: 200-800 g Accessories:
For reheating a pasta style convenience meal that can be stirred. Foods must be in a suitable single section microwaveable container and have the film pierced. Place it on the glass tray. Press Pasta several times until the appropriate weight appears, and press Start. Stir at beeps. Allow to stand for 1 minute. Ensure that the food is piping hot. Stir the food before serving.
Auto programmes
Auto Cook
Programme
Instructions
Weight: 200-1000 g Accessories:
For cooking jacket potatoes. Choose medium sized potatoes 200-250 g (7-9 oz). Wash and dry and prick with a fork several times. Arrange around the edge of glass tray. Press Jacket Potatoes several times until the appropriate weight appears, and press Start. DO NOT COVER.
Weight: 100-1000 g Accessories:
For cooking FRESH vegetables. Place prepared vegetables into a shallow container on the glass tray. Add 15 ml (1 tbsp) of water per 100 g of vegetables. Cover with pierced cling film or lid. Press Fresh Vegetables several times until the appropriate weight appears, and press Start. Stir/rearrange if necessary when the oven beeps.
Weight: 200-800 g Accessories:
For cooking FRESH fish. Shield the thinner portions. Place in a shallow container on the glass tray. Add 15-45 ml (1-3 tbsp) of liquid. Cover with pierced cling film or lid. Press Fresh Fish several times until the appropriate weight appears, and press Start.
Defrosting charts
The time given below is a guideline only. Always check the progress of the food by opening the oven door and then re-starting. For larger quantities adjust the time accordingly. Food should not be covered during defrosting.
[Microwave power level: Defrost (270 W)]
Meat
Weight
Defrosting
Time
Instructions
Standing Time
Beef/Lamb/ Pork Joint
450 g (1 lb)
5-7 mins.
Place in a suitable dish or on an upturned saucer or use a rack.
Turn 3-4 times. Shield.
60 mins.
Minced Beef
450 g (1 lb)
8 mins. 30 sec. -11 mins.
Place in a suitable dish. Break up and turn 3-4 times.
15 mins.
Chops
450 g (1 lb)
6-7 mins.
Place in a suitable dish in a single layer. Turn twice. Shield if necessary.
15 mins.
Sausages
450 g (1 lb)
4 mins.
Place in a suitable dish in a single layer. Turn twice. Shield if necessary.
15 mins.
Bacon Rashers
450 g (1 lb)
5-6 mins.
Place in a suitable dish. Turn and separate twice. Shield if necessary.
10 mins.
Stewing Steak
450 g (1 lb)
7-9 mins.
Place in a suitable dish. Break up frequently.
15 mins.
Whole Chicken
450 g (1 lb)
6-7 mins.
Place in a suitable dish on an upturned saucer or use a rack.
Turn 3-4 times. Shield.
60 mins.
Chicken Portions
450 g (1 lb)
5 mins. 30 sec. -7 mins.
Place in a suitable dish in a single layer. Turn twice. Shield if necessary.
15-30 mins.
Fish
Weight
Defrosting
Time
Instructions
Standing Time
Whole
450 g (1 lb)
6-7 mins.
Place in a suitable dish. Turn twice. Shield.
15 mins.
Fillets/
Steak
450 g (1 lb)
6-7 mins.
Place in a suitable dish. Turn twice, separate and shield if necessary.
15 mins.
Prawns
450 g (1 lb)
6-7 mins.
Place in a suitable dish. Stir twice during defrosting.
10 mins.
General
Weight
Defrosting
Time
Instructions
Standing Time
Bread Sliced
400 g
(14 oz)
1 min. 30 sec. -2 mins.
Place on the glass tray. Separate and rearrange during defrosting.
10 mins.
Slice of bread
30 g
(1 oz)
10-15 sec.
Place on the glass tray on a piece of kitchen paper.
1-2 mins.
Pastry
450 g (1 lb)
1 min. 30 sec.
+ rest 1 min.
1 min. 30 sec.
Place on a plate. Turn over after 1 min. resting time.
10-15 mins.
Soft Fruit
450 g (1 lb)
7-8 mins.
Place in a suitable dish. Stir twice during defrosting.
10 mins.
Reheating charts
The time given in the charts below is a guideline only, and will vary depending on STARTING temperature, dish size etc.
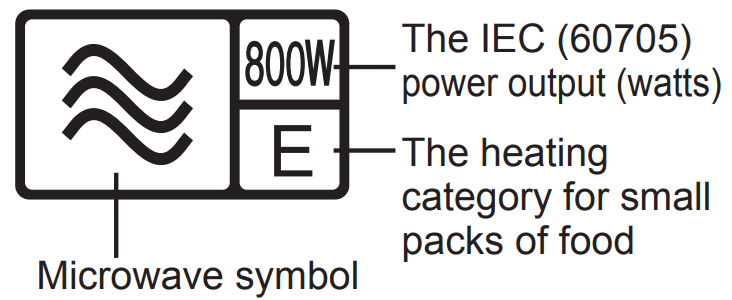
HEATING CATEGORY
Your oven is Heating Category E and this is displayed on your oven. The information on this label will assist you in using new instructions on food packs to enable you to programme the best heating time in your oven.
Food
Weight/ Power Quantity Level
Cooking Time (approx.)
Instructions
BREAD – Precooked – Fresh – N.B. Breads reheated by Microwave will have a soft base.
Croissants
2
High
25-30 secs.
Place on microwave safe plate on glass tray. Do not cover.
4
High
45-50 secs.
Rolls
1
High
10 secs.
4
High
20 secs.
CANNED BEANS, PASTA
Baked Beans, Ravioli in sauce
200 g
High
2-3 mins.
Place in a microwave safe bowl. Cover and place on glass tray. Stir halfway.
420 g
High
4-5 mins.
Spaghetti in Tomato Sauce
200 g
High
21⁄2-3 mins.
CANNED SOUPS
Cream of Tomato
400 g
High
3-4 mins.
Place in a microwave safe bowl. Cover and place on glass tray.
Minestrone
400 g
High
21⁄2-3 mins.
CANNED PUDDINGS
Creamed Rice
425 g
High
3-31⁄2 mins.
Place in a microwave safe bowl. Cover and place on glass tray.
624 g
High
4-5 mins.
Sponge Pudding
300 g
High
21⁄2 mins.
CHRISTMAS PUDDINGS – Overheating may cause pudding to ignite
Slice
150 g
High
20-30 secs.
Place in a microwave safe dish. Cover and place on glass tray.
Small
450 g
High
11⁄2-2 mins.
Medium
900 g
High
21⁄2-3 mins.
DRINKS – COFFEE
1 mug
235 ml
High
2 mins.
Place in a microwave safe mug on glass tray. Stir,
2 mugs
470 ml
High
31⁄2 mins.
before, during and after reheating.
Note: Always check that food is piping hot after reheating in the microwave. If unsure, return to oven. Foods will still require STANDING TIME, especially if they cannot be stirred. The denser the food, the longer the standing time.
Food
Weight/ Power Quantity Level
Cooking Time (approx.)
Instructions
DRINKS – MILK
1 mug
235 ml
High
1-11⁄2 min.
Place in a microwave safe mug on glass tray. Stir, before,
1 jug
600 ml
High
5 mins.
during and after reheating.
PASTRY PRODUCTS – PRECOOKED – N.B. Pastries reheated by microwave will have a soft base.
Chicken Pie
600 g
High
4-41⁄2 mins.
Place on microwave safe plate on glass tray. Do not cover.
Cornish Pasty
227 g (1)
High
2-21⁄2 mins.
Quiche
400 g (1)
High
41⁄2-5 mins.
Steak & Kidney Pie
325 g (1)
High
2-21⁄2 mins.
Sausage Rolls
260 g (4)
High
11⁄2-2 mins.
Samosas
200 g (4)
High
11⁄2-2 mins.
Place on microwave safe plate on glass tray. Do not
Spring Rolls
230 g (4)
High
2-21⁄2 mins.
cover. Turn halfway.
Christmas Mince Pies
90 g (2)
High
5-10 secs.
Place on a microwave safe plate on glass tray.
PLATED MEALS – HOMEMADE – CHILLED
Child Size
1
High
3-4 mins.
Place on a microwave safe plate on glass tray. Cover and place on glass tray.
Adult Size
1
High
51⁄2-6 mins.
PUDDINGS & DESSERTS N.B. Transfer food from foil containers to a similar sized microwave safe dish
Bread & Butter Pudding
395 g
High
3-31⁄2 mins.
Place in a microwave safe dish on glass tray. Do not cover.
Fruit Crumble
600 g
High
31⁄2-4 mins.
Fruit Pie, individual
1
High
20-25 secs.
4
High
50-60 mins.
Rice Pudding
1
High
2-21⁄2 mins.
Place in a microwave safe dish. Cover and place on glass tray.
PURCHASED CONVENIENCE FOODS – CHILLED N.B. Transfer food from foil container to a similar sized microwave safe dish. Plastic dishes designed for microwave and conventional ovens may be used with care.
Cauliflower
Cheese
450 g
High
51⁄2-6 mins.
Place in microwave safe dish on glass tray. Do not cover.
Cottage Pie
450 g
High
6 mins.
Lasagne
400 g
High
41⁄2-5 mins.
Vegetable Bake
400 g
High
51⁄2-6 mins.
Note: Always check that food is piping hot after reheating in the microwave. If unsure, return to oven. Foods will still require STANDING TIME, especially if they cannot be stirred. The denser the food, the longer the standing time.
Food
Weight/ Power Quantity Level
Cooking Time (approx.)
Instructions
PURCHASED CONVENIENCE FOODS – FROZEN N.B. Transfer food from foil container to a similar sized microwave safe dish. Plastic dishes designed for microwave and conventional ovens may be used with care.
Lasagne
400 g
High
41⁄2-5 mins.
Place in a microwave safe dish on glass tray. Do not cover.
+ Rest.
1 min.
+ High
5-51⁄2 mins.
Salmon Crumble
340 g
High
51⁄2 mins.
+ Rest.
1 min.
+ Medium
51⁄2-6 mins.
Shepherdʼs Pie
460 g
High
51⁄2 mins.
+ Rest.
1 min.
+ Medium
6-7 mins.
Note: Always check that food is piping hot after reheating in the microwave. If unsure, return to oven. Foods will still require STANDING TIME, especially if they cannot be stirred. The denser the food, the longer the standing time.
Cooking charts
Food
Weight/ Quantity
Power Cooking Time Level (approx.)
Instructions
BACON – from raw
Rashers
130 g (4)
High
2-3 mins.
(or 30-40 secs per rasher)
Place on microwave safe rack or plate on glass tray.
BEANS & PULSES – should be pre-soaked (except lentils)
Chick Peas
225 g
High
81⁄2 mins.
Use 600 ml (1 pt) boiling water in a large bowl. Cover and place on glass tray.
+ Low
35-40 mins.
Lentils
225 g
Low
101⁄2-13 mins.
Red Kidney Beans
225 g
High
13 mins.
Use 600 ml (1 pt) boiling water in a large bowl. Cover.
Must boil for at least 12 minutes to destroy toxic enzymes.
+ Low
30-35 mins.
Note:Always check that food is piping hot after reheating in the microwave. If unsure, return to oven. Foods will still require STANDING TIME, especially if they cannot be stirred. The denser the food, the longer the standing time.
Food
Weight/ Quantity
Power Level
Cooking Time (approx.)
Instructions
BEEF – Joints from raw – Caution: Hot fat! Remove dish with care.
Medium
per 450 g (1 lb)
Medium
7-12 mins.
Place on upturned saucer in microwave safe dish or rack on glass tray. Cover and turn halfway. Drain off fat during cooking.
CHICKEN from raw – Caution: Hot fat! Remove dish with care.
Breasts, boneless
500 g
Low
101⁄2-12 mins.
Place on microwave safe rack or plate. Cover and place on glass tray.
Drumsticks
450 g (4)
Low
101⁄2 mins.
Quarters
700 g (2)
Low
16-17 mins.
Whole
per 450 g (1 lb)
High
81⁄2-9 mins.
Place on upturned saucer breast side down in microwave safe dish. Cover and place on glass tray.
EGGS – Poached.
Water
45 ml
High
45 secs.
Place water in a small bowl and heat for 1st cooking time.
Add egg (medium sized).
Pierce yolk and white.
Cover.
Cook for 2nd cooking time.
Then leave to stand for 1 min.
Egg
1
High
25-35 secs.
Water
90 ml
High
50 secs.
Eggs
2
High
45 secs.
EGGS – Scrambled.
Egg
1
High
25 secs.
Add 1 tbsp of milk for each egg used.
Beat eggs, milk and knob of butter together.
Cook for 2nd cooking time then stand for 1 min.
+ Stir.
+ High
20 secs.
Eggs
2
High
45 secs.
+ Stir.
+ High
35 secs.
FISH – FRESH from raw
Haddock Fillets
380 g (4)
High
41⁄2 mins.
Place in microwave safe dish. Add 30 ml of liquid. Cover and place on glass tray.
+ Medium
41⁄2-51⁄2 mins.
Whole
450 g (2)
High
81⁄2-101⁄2 mins.
Boil in the Bag
170 g (1)
Defrost
41⁄2 mins.
Place bag sauce side down on a microwave safe plate. Slash top of bag with a knife.
+ rest
2 mins.
+ Low
51⁄2 mins.
Note: Always check that food is piping hot after reheating in the microwave. If unsure, return to oven. Foods will still require STANDING TIME, especially if they cannot be stirred. The denser the food, the longer the standing time.
Food
Weight/ Quantity
Power Level
Cooking Time (approx.)
Instructions
FRUIT – Peel, slice, chop into even sized pieces. Place in shallow microwave safe dish.
Apples, Rhubarb, stewed
450 g
High
41⁄2-8 mins.
Only half fill dish. Cover. Stir halfway.
Plums – stewed
450 g
High
7-8 mins.
Add 30 ml (2 tbsp) of water. Only half fill dish. Cover and place on glass tray.
LAMB – from raw – CAUTION: Hot Fat! Remove dish with care.
Chops, loin
per 450 g (1 lb)
High
11⁄2-21⁄2 mins.
Place on microwaveable safe dish or rack. Cover and place on glass tray.
+ Low
2-3 mins.
Joints
per 450 g (1 lb)
High
3-4 mins.
Place on upturned saucer in microwave safe dish or rack on glass tray. Cover and turn joint over halfway. Drain off fat during cooking.
+ Low
6-7 mins.
PASTA – Place in a large 3 litre (6 pint) microwave safe bowl.
Macaroni
225 g
High
12 mins.
Use 1 litre (13⁄4 pint) boiling water. Cover and place on glass tray.
Spaghetti,
Tagliatelli
225 g
High
7-81⁄2 mins.
PIZZA – FRESH CHILLED – N.B. Remove all packaging. Pizzas will have a soft base.
Thin & Crispy
400 g
High
41⁄2-5 mins.
Place on heatproof plate on glass tray. Do not cover.
Deep Pan
475 g
High
31⁄2-41⁄2 mins.
PORK – from raw – CAUTION: Hot Fat! Remove dish with care.
Chops
360 g (2)
High
2-3 mins.
Place in microwave safe dish or rack on glass tray. Cover
+ Low
6-7 mins.
and place on glass tray.
Joints
per 450 g (1 lb)
High
51⁄2-6 mins.
Place on upturned saucer in microwave safe dish or rack. Cover and place on glass tray. Turn joint over halfway.
Drain off fat during cooking.
+ Low
8-9 mins.
PORRIDGE – N.B. Use a large bowl.
1 serving
1⁄2 cup oats
High
21⁄2-3 mins.
Add 1 cup of water or milk. Stir halfway.
2 servings
1 cup oats
High
4-5 mins.
Add 2 cups of water or milk. Stir halfway.
Note: Always check that food is piping hot after reheating in the microwave. If unsure, return to oven. Foods will still require STANDING TIME, especially if they cannot be stirred. The denser the food, the longer the standing time.
Food
Weight/ Quantity
Power Level
Cooking Time (approx.)
Instructions
RICE – Place in a large microwave safe bowl. 3 litre (6 pint)
Basmati
250 g
Low
101⁄2-111⁄2 mins.
Use 600 ml (1 pt) to 800 ml (11⁄2 pt) boiling water. Cover and place on glass tray.
Easycook White
250 g
High
101⁄2-111⁄2 mins.
SAUSAGES from raw – CAUTION: HOT FAT! Remove dish with care.
Thick
240 g (4)
High
21⁄2-3 mins.
Place on microwave safe plate or microwave rack.
Cover and place on glass tray.
Thin
110 g (4)
High
11⁄2-2 mins.
FRESH VEGETABLES – Place in shallow microwave safe dish.
Green Beans
450 g
High
6-7 mins.
Add 90 ml (6 tbsp) water. Cover and place on glass tray.
Beetroot
450 g
High
81⁄2-101⁄2 mins.
Broccoli +
Cauliflower
– florets
450 g
High
7-81⁄2 mins.
Brussel Sprouts
450 g
High
7-8 mins.
Cabbage
– sliced
450 g
High
6-8 mins.
Carrots, Leeks
450 g
High
6-7 mins.
Corn on the Cob
450 g
High
6-8 mins.
Courgettes, Mange Tout
450 g
High
31⁄2-41⁄2 mins.
Peas
450 g
High
31⁄2-51⁄2 mins.
Potatoes – boiled
450 g
High
51⁄2-6 mins.
Potatoes
– jacket (225 g /
8 oz each)
1
High
41⁄2 mins.
Wash and prick skins. Place directly on glass tray on outer edge. After cooking stand for 5 mins wrapped in foil.
2
High
7 mins.
FROZEN VEGETABLES – Place in shallow microwave safe dish.
Beans – green, Carrots
450 g
High
81⁄2-10 mins.
Add 30 ml (2 tbsp) water. Cover and place on glass tray.
Cauliflower
450 g
High
101⁄2 mins.
Peas
450 g
High
7-8 mins.
Note: Always check that food is piping hot after reheating in the microwave. If unsure, return to oven. Foods will still require STANDING TIME, especially if they cannot be stirred. The denser the food, the longer the standing time.
Questions and answers
Q: Why won’t my oven turn on?
A: When the oven does not turn on, check the following:
Is the oven plugged in securely? Remove the plug from the outlet, wait 10 seconds and reinsert.
Check the circuit breaker and the fuse. Reset the circuit breaker or replace the fuse if it is tripped or blown.
If the circuit breaker or fuse is all right, plug another appliance into the outlet. If the other appliance works, there probably is a problem with the oven. If the other appliance does not work, there probably is a problem with the outlet. If it seems that there is a problem with the oven, contact an authorised Service Centre.
Q: My oven causes interference with my TV. Is this normal?
A: Some radio and TV interference might occur when you cook with the oven. This interference is similar to the interference caused by small appliances such as mixers, vacuums, blow dryers, etc. It does not indicate a problem with your oven.
Q: The oven won’t accept my programme. Why?
A: The oven is designed not to accept an incorrect programme. For example, the oven will not accept a 4th stage.
Q: Sometimes warm air comes from the oven vents. Why?
A: The heat given off from the cooking food warms the air in the oven cavity. This warmed air is carried out of the oven by the air flow pattern in the oven. There are no microwaves in the air. The oven vents should never be blocked during cooking.
Care of your oven
The oven should be unplugged before cleaning.
Clean the inside of the oven, door seals and door seal areas regularly. When food splatters or spilled liquids adhere to the oven walls, door seals and door seal areas wipe off with a damp cloth. Mild detergent may be used if they get very dirty. The use of harsh detergent or abrasive is not recommended. Avoid cleaning the microwave feed guide area situated on the right hand side of the cavity wall. DO NOT USE COMMERCIAL OVEN CLEANERS.
Do not use harsh, abrasive cleaners or sharp metal scrapers to clean the oven door glass since they can scratch the surface, which may result in shattering the glass.
The outside oven surface should be cleaned with a damp cloth. To prevent damage to the operating parts inside the oven, water should not be allowed to seep into the ventilation openings.
If the Control Panel becomes dirty, clean it with a soft cloth. Do not use harsh detergents or abrasives on the Control Panel. When cleaning the Control Panel leave the oven door open to prevent the oven from accidentally turning on. After cleaning press Stop/Reset to clear display window.
If steam accumulates inside or around the outside of the oven door, wipe with a soft cloth. This may occur when the oven is operated under high humidity conditions and in no way indicates a malfunction of the unit.
It is occasionally necessary to remove the glass tray for cleaning. Wash the tray in warm soapy water or in a dishwasher.
The roller ring and oven cavity floor should be cleaned regularly to avoid excessive noise. Simply wipe the bottom surface of the oven with mild detergent and hot water then dry with a clean cloth. The roller ring may be washed in mild soapy water. Cooking vapours collect during repeated use but in no way affect the bottom surface or roller ring wheels. After removing the roller ring from the cavity floor for cleaning, be sure to replace it in the proper position.
A steam cleaner is not to be used for cleaning.
This oven should only be serviced by qualified personnel. For maintenance and repair of the oven contact the nearest authorised dealer.
Failure to maintain the oven in a clean condition could lead to deterioration of surfaces that could affect the life of the appliance and possibly result in a hazardous situation.
Keep air vents clean at all times. Check that no dust or other material is blocking any of the air vents on the top, bottom or rear of the oven. If air vents become blocked this could cause overheating which would affect the operation of the oven and possibly result in a hazardous situation.
#1 What are the dimensions of the microwave cooker?
The internal dimensions are measured in litres and it has 20 Litre capacity
#2 Can anyone tell me what is the depth of the microwaves for sale, amazon states length, width and height, so which is the depth?
The exterior depth of this product is 330 mm while the interior depth is 308 mm. Outside Dimensions: 443 mm (W) x 330 mm (D) x 258 mm (H) Oven Cavity Dimensions: 306 mm (W) x 308 mm (D) x 214 mm (H)
#3 Are the buttons easy to use like the old Panasonic microwaves? I have weak hands.
The button controls on the side have been made out of lightweight high quality plastics which makes them easy to use.