Connect all components before you plug any power cords into the wall outlet or power strip.
NEVER plug your TV into an outlet that is controlled by a wall switch.
Turn off the TV before you connect or disconnect any cables.
Make sure all antennas and cables are properly grounded. Refer to the Important Safety Instructions.
Safety information
Prevent TV from overheating by placing in an area with good ventilation.
Do not block ventilation holes on the TV. Position the TV so air can circulate freely on all sides.
Do not stack objects on the TV.
If you place the TV on a stand, make sure you allow adequate ventilation.
If you connect an audio receiver or amplifier to the TV, place it on the top shelf so the heated air will not overheat the TV.
Avoid audio interference
Position cables properly; insert each cable firmly into the designated jack.
Route all cables down one side of the back of the TV instead of straight down the middle.
If your antenna uses 300-ohm twin lead cables, do not coil the cables.
Keep twin lead cables away from audio/video cables.
Avoid direct light
Do not place the TV where sunlight or room lighting is directed toward the screen. Use soft or indirect lighting.
Set up your new TV
Open the box and remove the TV and other items. Be careful, the TV may be heavy! We strongly recommend that at least two people unbox the TV.
Be sure to check all the foam packaging as the stands from some TV’s are stored in the foam for protection.
Refer to your TV’s Quick Start Guide or other provided documentation for model-specific information about attaching the stands or a wall mount and making connections to AC power and to your other audio/video devices.
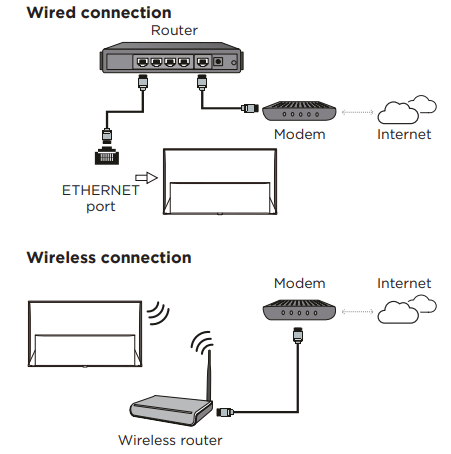
Connect to the Internet
The following instructions are just the usual ways to connect your TV to the wired or wireless network. The connection method may be different depending on your actual network configuration. If you have any questions about your home network, please refer to your Internet service provider.
Network settings
1. Press on the remote control to display the Android TV homepage.
2. Press ▲/▼/◄/► to move the cursor to on the right top of the screen and press OK to enter the settings menu.
3. Press ▲/▼ to select Network & Internet, press OK to enter the submenu and follow the onscreen guidance to set up your network.
Switch the TV on and off
1. When the power cord is connected, the TV will be turned on directly or be in standby mode. If the TV is in standby mode, press the button on the set or the button on the remote control to turn it on.
2. To put the TV into standby mode, press the button on the remote control. The TV set remains powered on, but with low energy consumption.
3. To completely turn the TV off, unplug the power cord from the wall outlet.
Initial setup
The first time you switch the TV on, the Welcome screen appears, which guides you through the initial setup process. Follow the on-screen instructions to finish the initial setup process including selecting the language, connecting to the network, and more. During each step, either make a choice or skip the step. If you skip a step, you can perform the setup later from the settings menu.
Basic TV operations
Accessing channels
Using the CH+/- buttons: in TV mode, press the CH+/- buttons on the remote control to scroll through the channels.
Using the OK button: in TV mode, press the OK button on the remote control to display the channel list and press ▲/▼/◄/► and OK to select channels.
Watching connected devices
Press on the remote control to display the source list. Press ▲/▼ to select TV or other input sources and press OK to confirm.
Adjusting volume
Press the buttons on the remote control to increase or decrease the volume. Press and hold the button for about 3 seconds to mute the sound.
Using the power button on your TV
In addition to using the remote control to control your TV, you can also use the button on your TV.
You can turn on the TV from standby mode by pressing the button on your TV.
While the TV is on, the multi-function menu appears by pressing and holding the button on your TV about 3 seconds. For more information on how to use the multi-function menu, please refer to the figure below.
• Press the button to move the highlight to the next function selection.
• Press and hold the button for more than 2 seconds to confirm your selection.
Note: Please refer to the Quick Start Guide to find the button on your TV set.
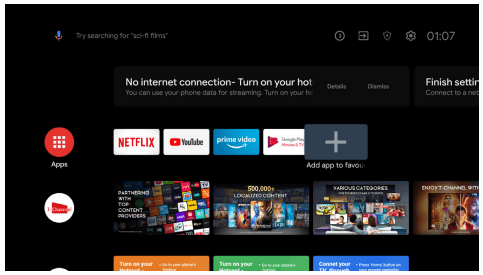
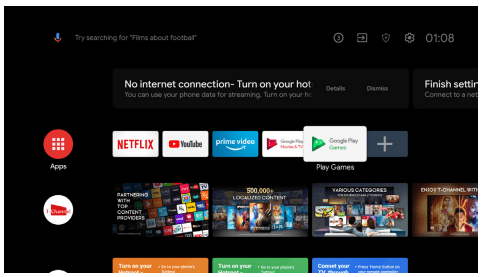
Accessing Android TV homepage
The Android TV homepage allows you to enjoy Internet Applications (Apps), specially adapted Internet websites, and change your TV settings.
WARNING:
• Configure the network settings before using Smart TV applications. • Slow responses and/or interruptions may occur, depending on your network conditions.
• If you experience a problem using an application, please contact the content provider.
• According to circumstances of the content provider, an application’s updates or the application itself may be discontinued.
• Depending on your country's regulations, some applications may have limited service or not be supported.
• Changes in application content may be made without prior notice by the service provider.
1. Press on the remote control to display the Android TV homepage.
2. Press ▲/▼/◄/► and OK to enter the desired Apps, functions or settings.
3. Press ← to return to the homepage.
Note: Since the connection to the Internet takes time, it’s recommended that you wait a few minutes to use the Smart TV feature after you activate the TV from standby mode.
If you want to add more apps to the TV homepage:
• Select “+” at the end of the row of apps, and press the “OK” button on your remote to pop out “Select app” menu.
• Pressing ▲/▼ button to select the app you want to add.
• Press the “OK” button on your remote to confirm. The app you selected will appear at the end of the Apps row.
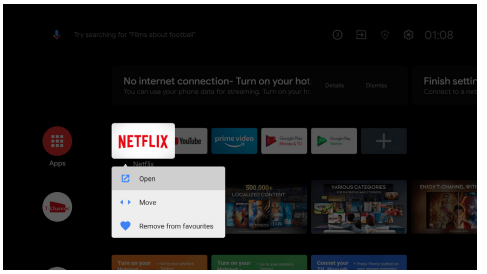
You can move apps or remove them from the favorites listed on the homepage:
• Select the app icon, and then long press (at least 3 seconds) the “OK” button on your remote until a drop-down menu appears.
• Select “Move”, and then press "OK" button to confirm. You can adjust the order of the selected app by pressing ◄/► and the "OK" button on the remote control.
• Select "Remove from favorites" to remove the app from the favorites
Using TV settings menu
Allows you to adjust TV settings, such as picture and sound.
1. Press on the remote control to display the TV settings menu.
2. Press ▲/▼ to select the desired item, then press OK/► to enter the corresponding submenu.
3. In submenus, press ▲/▼ to select menu options, then press OK/► to enter the option list, the adjustment interface, or the corresponding submenu.
4. Press ← to return to the previous menu.
5. Press to close the menu.
Note: You can also press on the remote control, select TV settings (if available) and press OK to enter the TV settings menu. Some options may not be available for certain signal sources.
Adjusting your TV
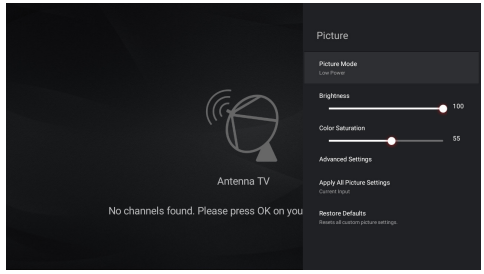
Picture settings
The picture menus are used to obtain the best picture settings according to your preference and the type of program you are watching. The picture menus can be set up at every broadcasting type and every input source.
1. Press on the remote control, select Picture and then press OK.
2. Press ▲/▼ to select the picture item you want to set, and then press OK.
3. Set the picture items to your preferences one by one.
Note: The options available may vary depending on the picture mode you set.
Picture mode: Select a picture mode optimized for different viewing conditions. Press ▲/▼ to select an option and then press OK.
Brightness: Adjust the luminance level of the screen. Press ◄/► to set the preferred brightness.
Color saturation: Adjust the color saturation level of the picture. Press ◄/► to set the preferred color saturation.
Advanced settings: Adjust more picture options.
Brightness settings: Adjust Brightness settings such as Contrast, Brightness and Black level.
Color: Adjust Color settings such as Color saturation, Temperature and Tint.
Clarity: Adjust the Clarity settings such as Sharpness and Digital noise reduction.
Screen settings: Adjust Screen settings such as Aspect ratio.
Apply all picture settings: Select whether to apply the picture settings to the current input or to all input. Press ▲/▼ to select an option and then press OK.
Restore defaults: Resets all custom picture settings. Press ▲/▼ to select OK and then press OK.
Audio settings
The audio menus are used to obtain the best audio settings to optimize audio output. The audio menus can be set up at every broadcasting type and every input source.
1. Press on the remote control, select Audio and then press OK.
2. Press ▲/▼ to select the sound item you want to set, and then press OK.
3. Set the sound items to your preferences one by one.
Sound mode: Select a sound mode optimized for different viewing conditions. Enter the Sound mode menu and press ▲/▼ to select an option and then press OK. Select Reset to restore all sound preset to factory defaults.
Audio only mode: Select to switch off the TV display and only listen to the sound from the TV. The TV screen will turn off in about 10 seconds. In audio only mode, press any key to turn on the TV screen again.
Advanced settings: Adjust more sound options.
Balance: Adjust the level of sound sent to the left and right speakers.
Auto volume control: Equalize audio for a more relaxed experience.
Digital audio out: Select the digital audio output format.
Digital audio out delay: Correct timing mismatches between the audio and video tracks. This option is only available when Digital audio out is set to PCM.
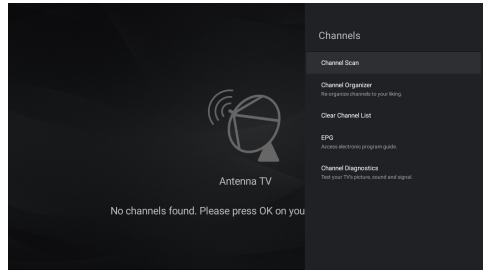
Channels settings
The channel menus are used to scan and maintain your channels, and access the Electronic Program Guide. The channel menus are only available in TV mode.
1. In TV mode, press on the remote control, select Channels and then press OK.
2. Press ▲/▼ to select the channel item you want to set, and then press OK.
3. Set the channel items to your preferences one by one.
Channel scan: Search channels automatically or manually.
Country/Region: The TV installs and arranges channels according to your country or region. Press ▲/▼ to select Country/Region, and press OK/► to enter. Enter the default password 1234 or your own password in case you have changed the password in the System > Lock menu. Press ▲/▼ to select your country or region and press OK to confirm.
Scan automatically: Press ▲/▼ to select Scan automatically and press OK/► to enter. Press ▲/▼/◄/► to select Tuner mode and other options, then press ▼ to select Search and press OK to start scanning channels.
Manually scan: Scan channels manually by entering parameters such as channel number or frequency.
Channel organizer: After the automatic search, channels are arranged in a preset order. If you want to edit the channel list, select Channel organizer and press OK/► to enter.
Clean channel list: Reset all channel lists.
EPG: Access electronic program guide.
Channel diagnostics: Test your TV's picture, sound and signal.
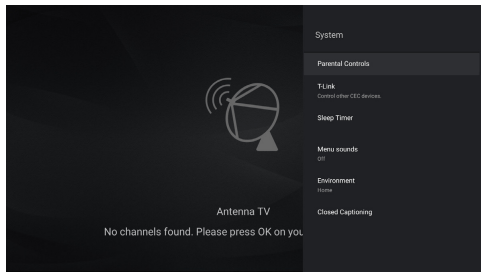
System settings
The system menus are used to adjust the system settings for your TV.
1. Press on the remote control, select System and then press OK.
2. Press ▲/▼ to select the system item you want to set, and then press OK.
3. Set the system items to your preferences one by one.
Parental controls: You can set the parental control feature to restrict the viewing of programs by children under the specified age limit. You must set a four-digit password before using the parental control feature. Password will be required to watch a program subject to watching restriction. Enter the default password 1234 to access the submenu.
Channel lock: Use this function to lock the channels which you don't want children to watch.
Parental ratings: You can set the parental rating to US, Canada or unrated.
Inputs lock: You can choose an input source of the TV and lock it. There are Antenna TV, HDMI1, HDMI2, HDMI3 and AV inputs for you to choose.
TV buttons lock: You can lock the buttons of the TV panel. Press OK to turn it on.
Channel scan lock: Set the restriction of channels scan. Press OK to turn it on.
Change password: You can change the password of parental controls.
Max volume: Set the max volume of the TV.
Reset parental controls: Reset all custom parental control settings.
T-Link: Use this function to search for CEC devices connected to the HDMI inputs in your TV and enable auto power on and auto standby between the TV and CEC devices.
Auto power on: Enables the TV to automatically power on when you power on a CEC device (e.g. DVD) with the device’s remote.
Auto Standby: Enables all CEC devices to automatically go to the standby mode when you turn off the TV with the TV remote.
Sleep timer: Set the standby time of the TV.
Menu sounds: Select whether to play a sound when pressing a button from the remote control to select menu options. Press ▲/▼ to select an option and then press OK.
Environment: You can choose the environment in which your TV is used. Press ▲/▼ to set your environment, and then press OK.
Advanced settings: Adjust more system options.
LED indicator: You can set the LED indicator to be flashing, off, or on when the TV is in standby mode. Press ▲/▼ to select your option, and then press OK.
Closed captioning: Many programs are encoded with closed captioning information, which allows you to display the audio portion of a program as text on the TV screen.
Android TV settings
Allow you to configure settings of Android TV features, such as network, accounts, apps, device preferences, remotes and accessories, etc.
1. Press on the remote control to display the Android TV homepage.
2. Press ▲/▼/◄/► to move the cursor to on the right top of the screen and press OK to enter the settings menu.
3. In submenus, press ▲/▼ to select menu options, then press OK to enter the option list or the corresponding submenu.
4. Press ← to return to the previous menu.
5. Press to close the settings menu and return to the homepage.
Suggestions
Finish setting up your TV: Add a Google account or sync the registered Google account to make the most of your TV.
General settings
Network & Internet: Configure the Wi-Fi and internet settings. The network status is also displayed.
Accounts & Sign In: Sign in your Google account to make the most of your TV. And there are two methods you can choose to sign in. The first one means that you should visit androidtv.com/setup with your phone or computer and then login the Google Account. We recommend to select the second one that use your remote to sign in on the TV directly.
Apps: View the TV guard and the list of recently opened apps, all installed apps and the system apps. You can also add permissions for different apps, and configure special app access to optimized energy and set usage access, notification access, picture-in-picture mode, and more.
Device Preferences: Set the preferences of the Android TV.
Remotes & Accessories: Search for Bluetooth accessories and pair them with your TV. You can set up your TV to make it visible to all nearby Bluetooth devices.
Setting Android TV preferences
Follow these instructions to configure various Android TV settings.
1. Press on the remote control to display the Android TV homepage.
2. Press ▲/▼/◄/► to move the cursor to on the right top of the screen and press OK to enter the settings menu.
3. Press ▲/▼ to select Device Preferences and then press OK.
4. Press ▲/▼ to select the items you want to set, and then press OK.
About: Check the detail information of the TV, such as, product information, system update, device name, status, model and version, ect. And you can also view legal information, user aggrementsterms and restart the TV.
Quick start: Configure quick start on function. When enabled, the TV will power up faster.
Inputs: You can see the connected input and standby inputs. And set the name these inputs and select whether to display them in the input list.
Date & time: Set the date and time. You can choose whether to auto synchronize or to manually set the date and time. You can also set the time zone and choose to use 24-hour format.
Language: Select a menu language. The selected menu language will also be set as the voice recognition language.
Keyboard: Configure the settings of the on-screen keyboard. You can set language and check the version and user agreements of the current keyboard. You can also add new virtual keyboards or active virtual remote keyboard.
Storage: View the memory usage status, clear data, cache and defaults, and to open, force stop or disable an app. Besides, you can add or remove an app's permissions to access your contacts, location, and microphone, etc.
Home screen: Customize channels, enable video and audio previews, reorder apps and games, and view the open source licenses for Android TV home and Android TV core services.
Google Assistant: Configure the Google search settings, including selecting which apps to include in search results, enabling the SafeSearch filter, blocking offensive words and open source licenses.
Chromecast Android Shell: View the version number and open source licenses of Chromecast.
Screensaver: Configure the screen saver settings, including the way of screen saver, the inactivity time after which to start screen saver, the inactivity time after which to put the TV to sleep, the sleep timer, or to start screen saver right now.
Location: Set whether to use Wi-Fi to estimate location and view the list of apps that requested the location recently.
Usage & diagnostics: Set whether to automatically send diagnostic information to Google or not.
Security & restrictions: Configure settings of unknown sources, app verification, and restricted profile.
Accessibility: Configure captions, high contrast text, text to speech. Set the talkback and switch access.
Reset: Restore your TV to its original factory settings.
Other information
Password in Parental Control
- The default password is 1234. You can change it to a new one.
- The super password is 0423. If you forget your code, enter the super password to override any existing codes.
Troubleshooting
Please check the following list before requesting service.
There is no picture or sound.
Make sure the power cord is properly inserted in the power outlet.
Make sure the source type is set correctly.
Make sure the antenna is properly connected.
Make sure the volume is not set to minimum or the sound is not set to mute.
Make sure the headphones are not connected.
The TV may be receiving a signal other than from TV broadcasting stations.
Picture is not clear.
Make sure the antenna cable is properly connected.
Consider whether your TV signal is being properly received.
Poor picture quality can occur due to a VHS camera, camcorder, or other peripheral being connected at the same time. Switch off one of the other peripherals.
The ‘ghost’ or double image may be caused by obstruction to the antenna due to high-rise buildings or hills. Using a highly directional antenna may improve the picture quality.
The horizontal dotted lines shown on the pictures may be caused by electrical interference, e.g., hair dryer, nearby neon lights, etc. Turn off or remove these.
Picture is too dark, too light or tinted.
Check the color adjustment.
Check the brightness setting.
Check the sharpness function.
Remote control does not work.
Check the batteries of the remote control.
Make sure the remote sensor window on the front of the TV is not in strong fluorescent lighting.
Try to clean the remote sensor window on the front of the TV with a soft cloth.
If the above suggestions do not solve your technical issue, please refer to the warranty card for service information.
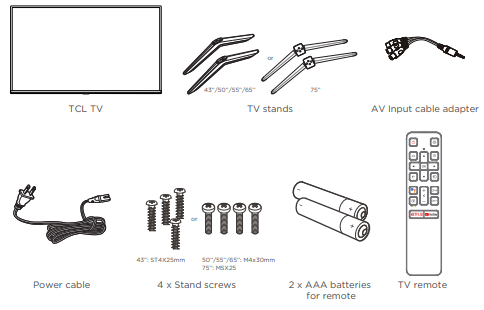
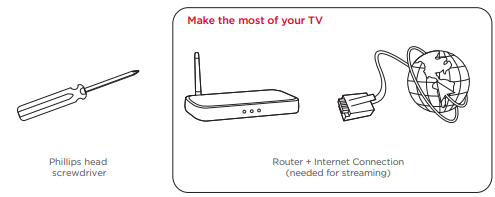
What’s in the box
What you need
Key things to know:
A paid subscription or other payments may be required for some streaming channels and apps. Streaming channels and apps availability are subject to change and vary by country.
Step 1 Set up your TV
Ready for the step-by-step? You’re only minutes away from TV bliss!
Remove your TV from the box
Be careful, it’s heavy!
To use the stand
To prevent damage to the screen, carefully place your TV on a soft, cushioned surface.
Put the column of the stands into the TV, align the stands with the screw holes located on the TV. Secure the stands to the TV with four (4) screws.
Note: Make sure the installation direction of the stand is the same as illustrated
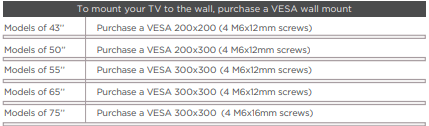
To mount on a wall
If you are mounting your TV to the wall, don’t attach the stands.
The VESA number is the horizontal and vertical measurement of the mounting holes. For example, 200X200 refers to the fact that the mounting measurements are 200mm horizontally and 200mm vertically.
Follow the instructions that come with the wall mount.
Your wall mount must be able to bear a minimum of five times the TV’s net weight to avoid causing damage.
Warning:
Never place a television set in an unstable location. A television set may fall, causing serious personal injury or death. Many injuries, particularly to children, can be avoided by taking simple precautions such as:
Using cabinets or stands recommended by the manufacturer of the television set.
Only using furniture that can safely support the television set.
Ensuring the television set is not overhanging the edge of the supporting furniture.
Not placing the television set on tall furniture (for example, cupboards or bookcases) without anchoring both the furniture and the television set to a suitable support.
Not placing the television set on cloth or other materials that may be located between the television set and supporting furniture.
Educating children about the dangers of climbing on furniture to reach the television set or its controls.
If your existing television set is being retained and relocated, the same considerations as above should be applied.
Step 2 Power up
In this step, we’ll make sure all systems are GO!
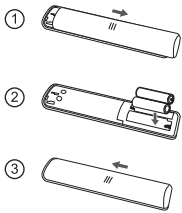
Power your TV remote by inserting the included batteries.
Connect your power cable to the TV, then plug it in to the wall outlet.
Connect other devices by referencing port label and descriptions on the next page.
Power Tip! Always replace depleted batteries with two same brand-new batteries from the same manufacturer. Never use damaged batteries.
Insert batteries in the correct polarity as indicated in the battery compartment.
Step 3 Grab your remote
The TV remote should feel right at home in your hand. We designed it to be incredibly intuitive for watching TV and navigating on-screen menus.
POWER Turn TV on and off
SETTINGS Display the TV settings menu
HOME Return to home screen
OPTIONS Open the Option menu
BACK Return to previous screen
SOURCE Open input source shortcut
GOOGLE ASSISTANT Awake Google Assistant (Only available when the network is connected)
CHANNEL Change channels
VOLUME Raise and lower volume Press and hold the button for about 3 seconds to mute the sound.
VIRTUAL KEYBOARD Open virtual keyboard on screen
NETFLIX Open Netflix
YouTube Open YouTube
Tip! Follow the on-screen guide to pair the remote control with the TV when pressing the button for the first time.
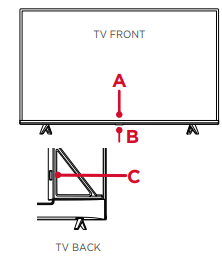
Step 4 Get to know your TV
STATUS LIGHT Glows when the TV is in standby.
IR RECEIVER Receives signal from the TV remote.
POWER and OPTIONS BUTTON Press once to open the menu. Press and hold to turn o the TV.
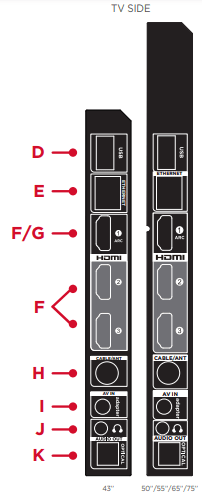
POWER PORT Connect your TV to the power source with the included power cable.
USB PORT Connect a USB device to access photos, music and movies.
ETHERNET Connect an Ethernet cable to your home Internet router or switch.
3 HDMI PORTS Highest quality audio/video connection. Connect cable box, Blu-ray player, gaming console, or other devices to your TV using HDMI cables.
HDMI ARC PORT Connect HDMI ARC (audio return channel) capable audio devices like sound bars or AV receivers
ANTENNA/CABLE IN Connect an outdoor VHF/UHF antenna or Cable TV feed.
AV IN adapter AV Input (analog audio/video). Use the supplied adapter to connect to older devices that use analog audio/video outputs. The supplied adapter connects to the RCA cable (video - yellow and audio - white and red) that you normally use to connect to that device.
HEADPHONE OUT Connect headphones or other external speakers.
OPTICAL (DIGITAL AUDIO OUT) Connect an optical cable to an external digital audio system.
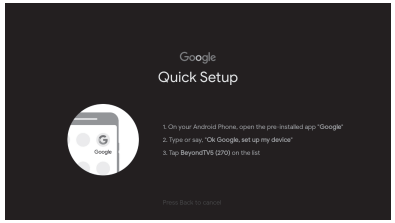
Step 5 Complete guided setup
It’s the final stretch-hurray!
Let’s Connect
Once your language has been selected, you can quickly set up the TV using an Android phone with the pre-installed Google app.
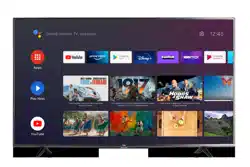
TV interface may vary and subject to change.
Or you can follow the easy on-screen instructions to setup your TV. If you aren’t ready to connect your TV to a wireless network, you can still use it as a regular TV.
Troubleshooting
Having trouble completing the guided setup? Don’t worry, it’s usually an easy fix.
Cannot connect to wireless network (Wi-Fi)
Select the correct wireless network name and verify the password entered (case sensitive).
Relocate the router from objects that interfere with performance (cordless phones, baby monitors, etc.).
Reboot the router by disconnecting the power for more than 2 minutes and reconnect.
Problems connecting my cable box or antenna through a coax cable
For best performance, use the HDMI connection. If not available, then:
Make sure the cable connections to the TV and your device are securely fastened.
Select cable or antenna input.
Select the channel scan menu and follow the on-screen instructions to perform a full channel scan.
Access parental control
The initial personal password for your TV is 1234.
You can change the personal password anytime.
If you forget your personal password, you can use 0423 to reset.
 on the remote control to display the Android TV homepage.
  on the right top of the screen and press OK to enter the settings menu.
  button on the set or the
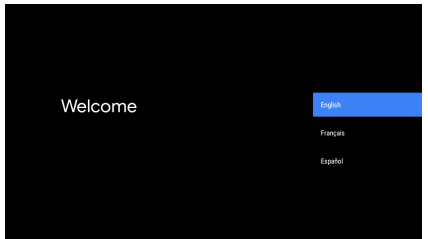
 on the remote control to display the source list. Press ▲/▼ to select TV or other input sources and press OK to confirm.
 buttons on the remote control to increase or decrease the volume. Press and hold the
  button for about 3 seconds to mute the sound.
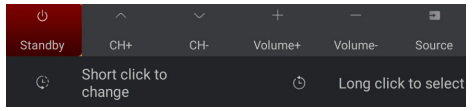

 on the remote control, select TV settings (if available) and press OK to enter the TV settings menu. Some options may not be available for certain signal sources.
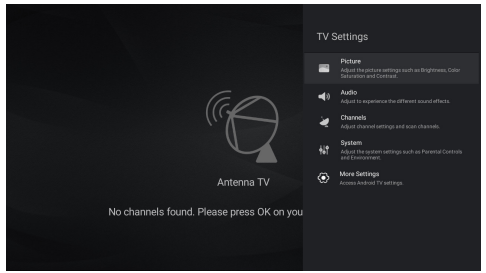

 on the remote control to display the Android TV homepage.
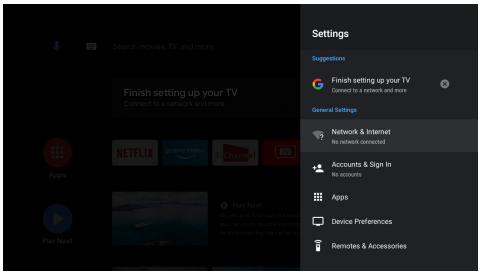
 To prevent damage to the screen, carefully place your TV on a soft, cushioned surface.
 Put the column of the stands into the TV, align the stands with the screw holes located on the TV. Secure the stands to the TV with four (4) screws.
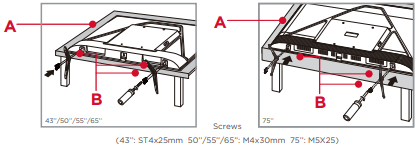
 HOME Return to home screen
 OPTIONS Open the Option menu
 BACK Return to previous screen
 SOURCE Open input source shortcut
 GOOGLE ASSISTANT Awake Google Assistant (Only available when the network is connected)
 CHANNEL Change channels
 VOLUME Raise and lower volume Press and hold the button for about 3 seconds to mute the sound.
 VIRTUAL KEYBOARD Open virtual keyboard on screen
 NETFLIX Open Netflix
 YouTube Open YouTube
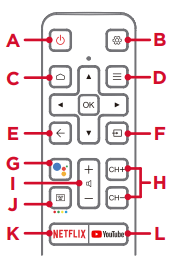
 button for the first time.