Documents: Go to download!
User Manual
- User Manual - (English)
- Quick Start Guide - (English)
- User Guide - (English)
- Energy Guide - (English)

- Connections
- AC power
- Roku remote batteries
- Panel buttons
- Guided Setup
- The Home screen
- Using your TV
- Care and Cleaning
Table of contents
Owner's Guide Television
Connections
Connecting an antenna, cable, or satellite box
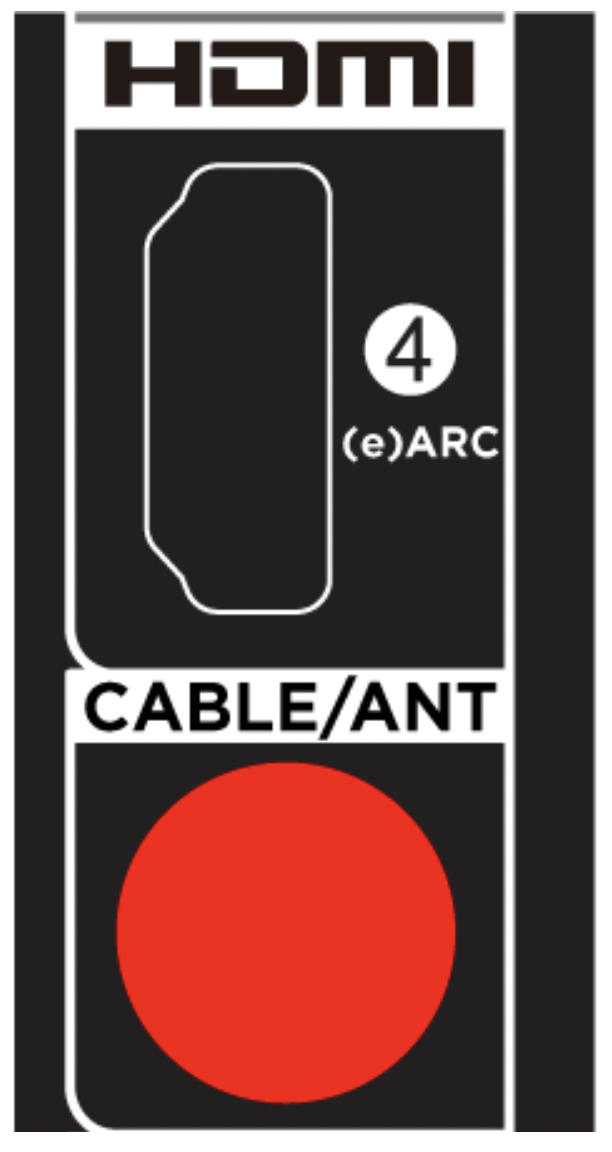
If you are using an antenna, CATV cable without a set-top box, or a cable or satellite box that has only an antenna output, connect a 75-ohm coaxial cable (not provided) from the source to the ANT/CABLE input on the TV.
Tip: If you are using an antenna with a 300-ohm twin-lead cable, you need to use a 300-to-75-ohm adapter (not provided) to adapt the twin-lead cable to a connection that is compatible with the TV’s antenna input.
Tip: If you receive your TV stations through a set top box from a cable or satellite TV provider, connect it to the TV using the best connection method available. From most to least desirable:
- HDMI® input – Digital HD and SD video
- AV input – analog SD video
- Antenna input – analog SD video using NTSC
Connecting external equipment with a composite AV video cable
If the best connection available on your device is AV or composite video output, connect it to the TV using a composite AV cable (not provided). Composite AV cables typically have three RCA-type plugs on each end, color coded as follows:

- Yellow – Video
- Red – Audio, right channel
- White or black – Audio, left channel
Connect each plug to the corresponding connector on the device and on the TV.
Note: Select models have an AV Input that looks like a headphone jack. Use the breakout cable (included) to adapt this input to the three RCA-type plugs on your composite cable.
Connecting external equipment with an HDMI® cable

If possible, connect your devices using HDMI® cables (not provided). They help to provide the best video quality and also carry audio signals, so that only one cable is needed. For better picture quality, we recommend that you use cables designated as High Speed HDMI® Cables.
Tip: You might need to configure the device to send its signal through its HDMI® connector.
The connector labeled HDMI (ARC) has the additional ability to use the audio return channel to send digital audio to a receiver or soundbar, as explained in Connecting an AV receiver or digital soundbar. Only on select models: The connector labeled HDMI (eARC) provides the same functionality as the HDMI ARC connector, plus the ability to pass through full-resolution sound formats such as Dolby Atmos and DTS:X from and to devices that support these formats, without additional processing by the TV. Additional details are provided in Choosing an audio format.
Connecting headphones or analog soundbar
You can connect headphones or an analog soundbar (not provided) to the TV’s headphone jack.
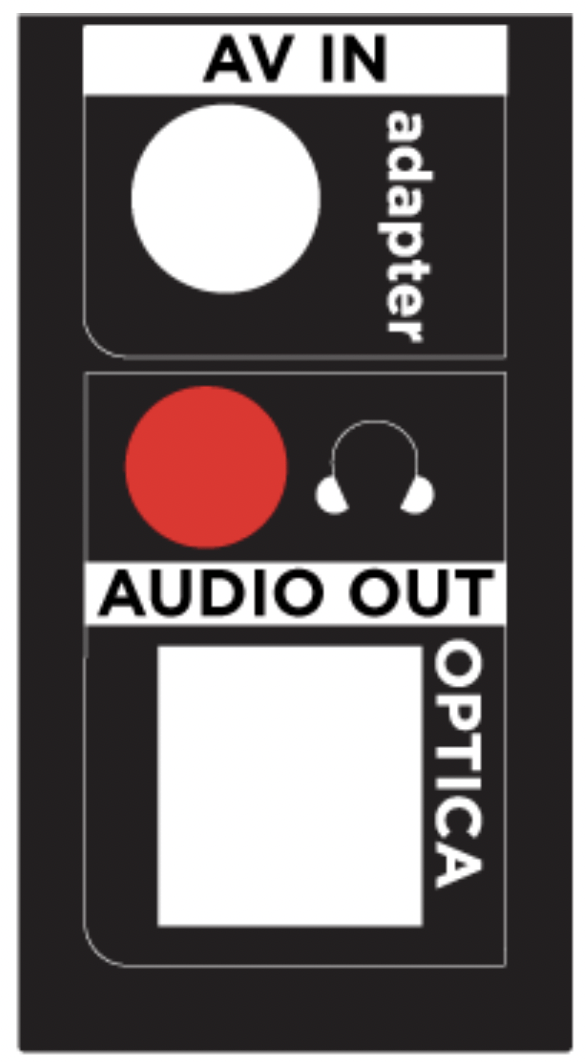
Tip: Inserting a plug in the headphone jack disables the sound from the TV’s built-in speakers.
Warning: Loud noise can damage your hearing. When using headphones, use the lowest volume setting on your headphones that still lets you hear the sound.
Select models also have an audio line out connection that is not affected by TV volume or mute settings and does not disable the TV speakers. Use this connection when you want to use your amplifier or soundbar to control the TV volume. To turn off the TV’s built-in speakers, from the Home screen menu, navigate to Settings > Audio > TV speakers and change the setting.
Connecting headphones to a Roku Voice Remote Pro
Select TCL • Roku TVs come with the Roku Enhanced Voice Remote or Roku Voice Remote Pro. On these models, you can connect headphones to the jack on the left side of the remote.
Tip: Inserting a plug in the remote’s headphone jack disables the sound from the TV’s built-in speakers or attached receiver or soundbar. The volume and mute controls on the right side of the remote adjust the volume level of the connected headphones.
Warning: Loud noise can damage your hearing. When using headphones, use the lowest volume setting on your headphones that still lets you hear the sound. You might notice that connecting headphones to your remote shortens the remote’s battery life somewhat.
Connecting an AV receiver or digital soundbar
You can enjoy Dolby Audio™ multichannel sound from your TV if you connect a digital amplifier or soundbar (not provided) in any of the following ways:
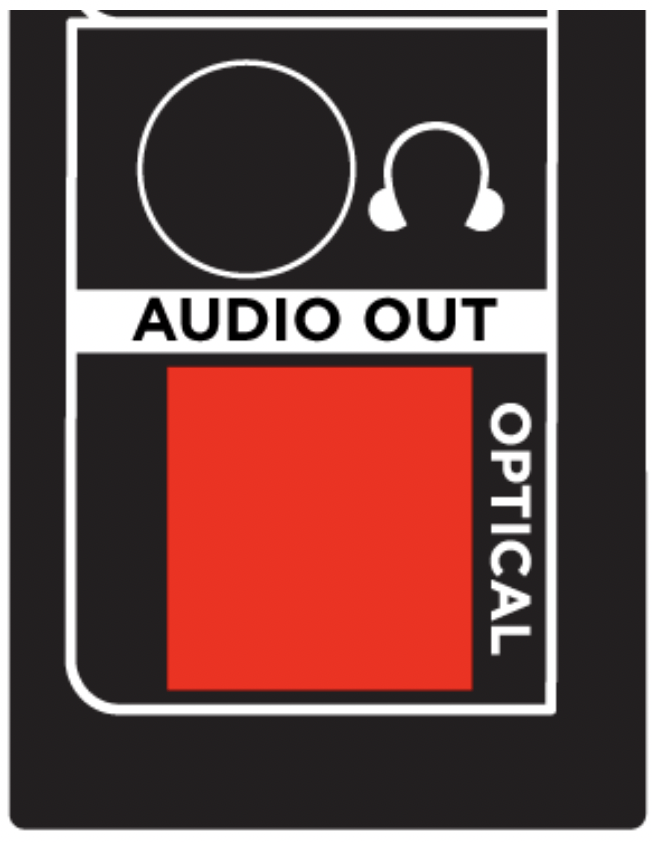
- Digital optical audio out (S/PDIF) – Connect a TOSLINK optical cable (not provided) from the TV to the Optical input on your receiver or soundbar.
- HDMI® ARC – Connect an HDMI® cable (not provided) from the HDMI (ARC) connector to the HDMI® input on your receiver or soundbar. This connection uses the Audio Return Channel (ARC) feature of HDMI® to output sound from the TV to a compatible device. To use this feature, you must configure the TV to enable HDMI® ARC, as explained in Setting up a digital audio connection.
- HDMI® eARC – Select models only: Connect an HDMI® cable (not provided) from the HDMI (eARC) connector to the HDMI (ARC) or HDMI (eARC) input on your receiver or soundbar. If your receiver or soundbar supports HDMI enhanced ARC (eARC), the TV can pass through full-resolution sound from programs containing enhanced audio. If your receiver or soundbar does not support eARC, use the TV’s eARC port to make the connection to the device’s ARC port. The eARC port is backward compatible with the ARC standard.
Preparing for Internet connectivity
If you want to watch streaming content and take advantage of most of the cool features of your TCL • Roku TV, connect it to the Internet through a wireless modem/router or a wireless access point (not provided). The TV has a built-in wireless LAN adapter.
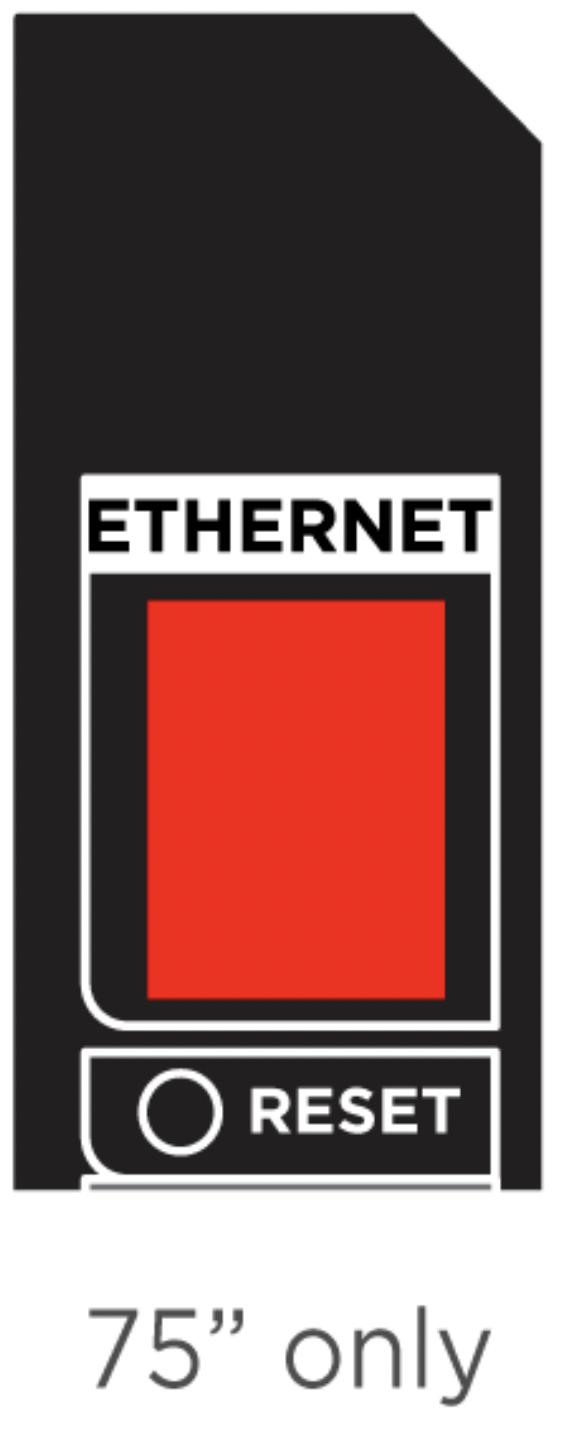
Note: The TV supports only its internal wireless network adapter—it does not support the use of a USB network adapter.
Select models have both wired and wireless network connectivity. To use the wired network connection, connect an RJ-45 Ethernet cable (not provided) from the jack on the back of your TV to your network router or switch. The wired connection automatically supports both 10 Base-T and 100 Base-T Ethernet.
AC power
Plug your TV into a power outlet. You can tell that the TV has power because the status indicator lights up when the TV is off.
The topic Status indicator explains how the status indicator shows what is happening with the TV.
Roku remote batteries
Review the Battery Caution & Disposal Information on page 167
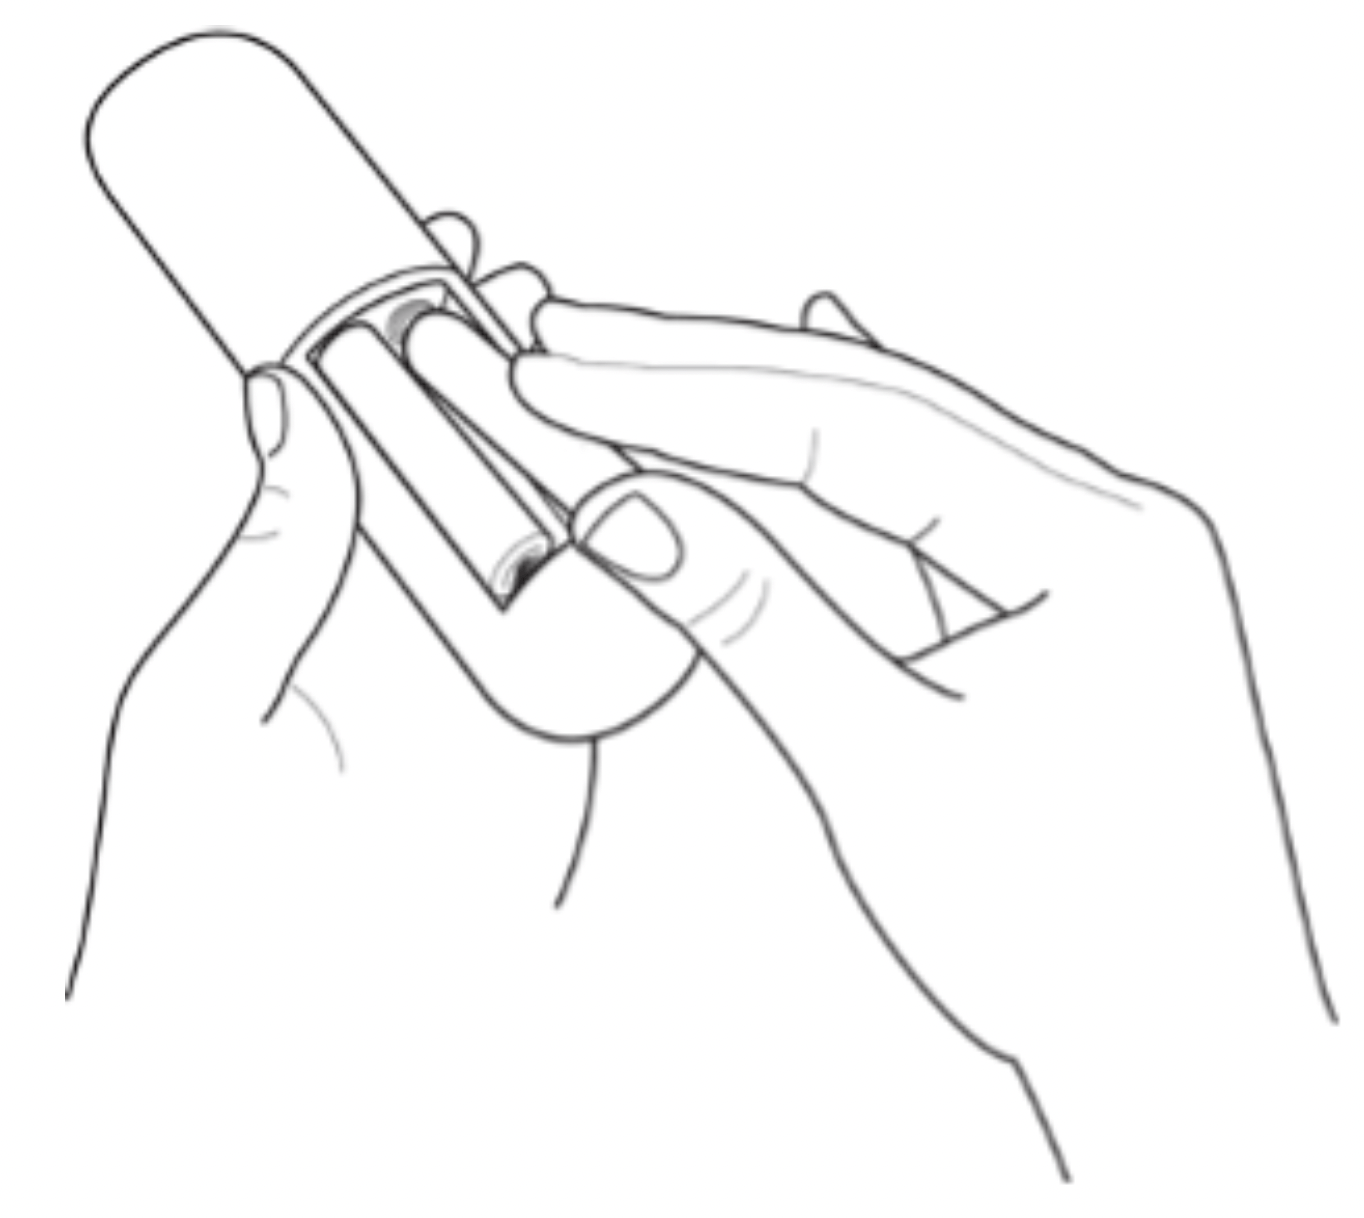
Open the back of your Roku remote and insert the included batteries, observing the proper orientation as indicated in the battery compartment. Reattach the back cover.
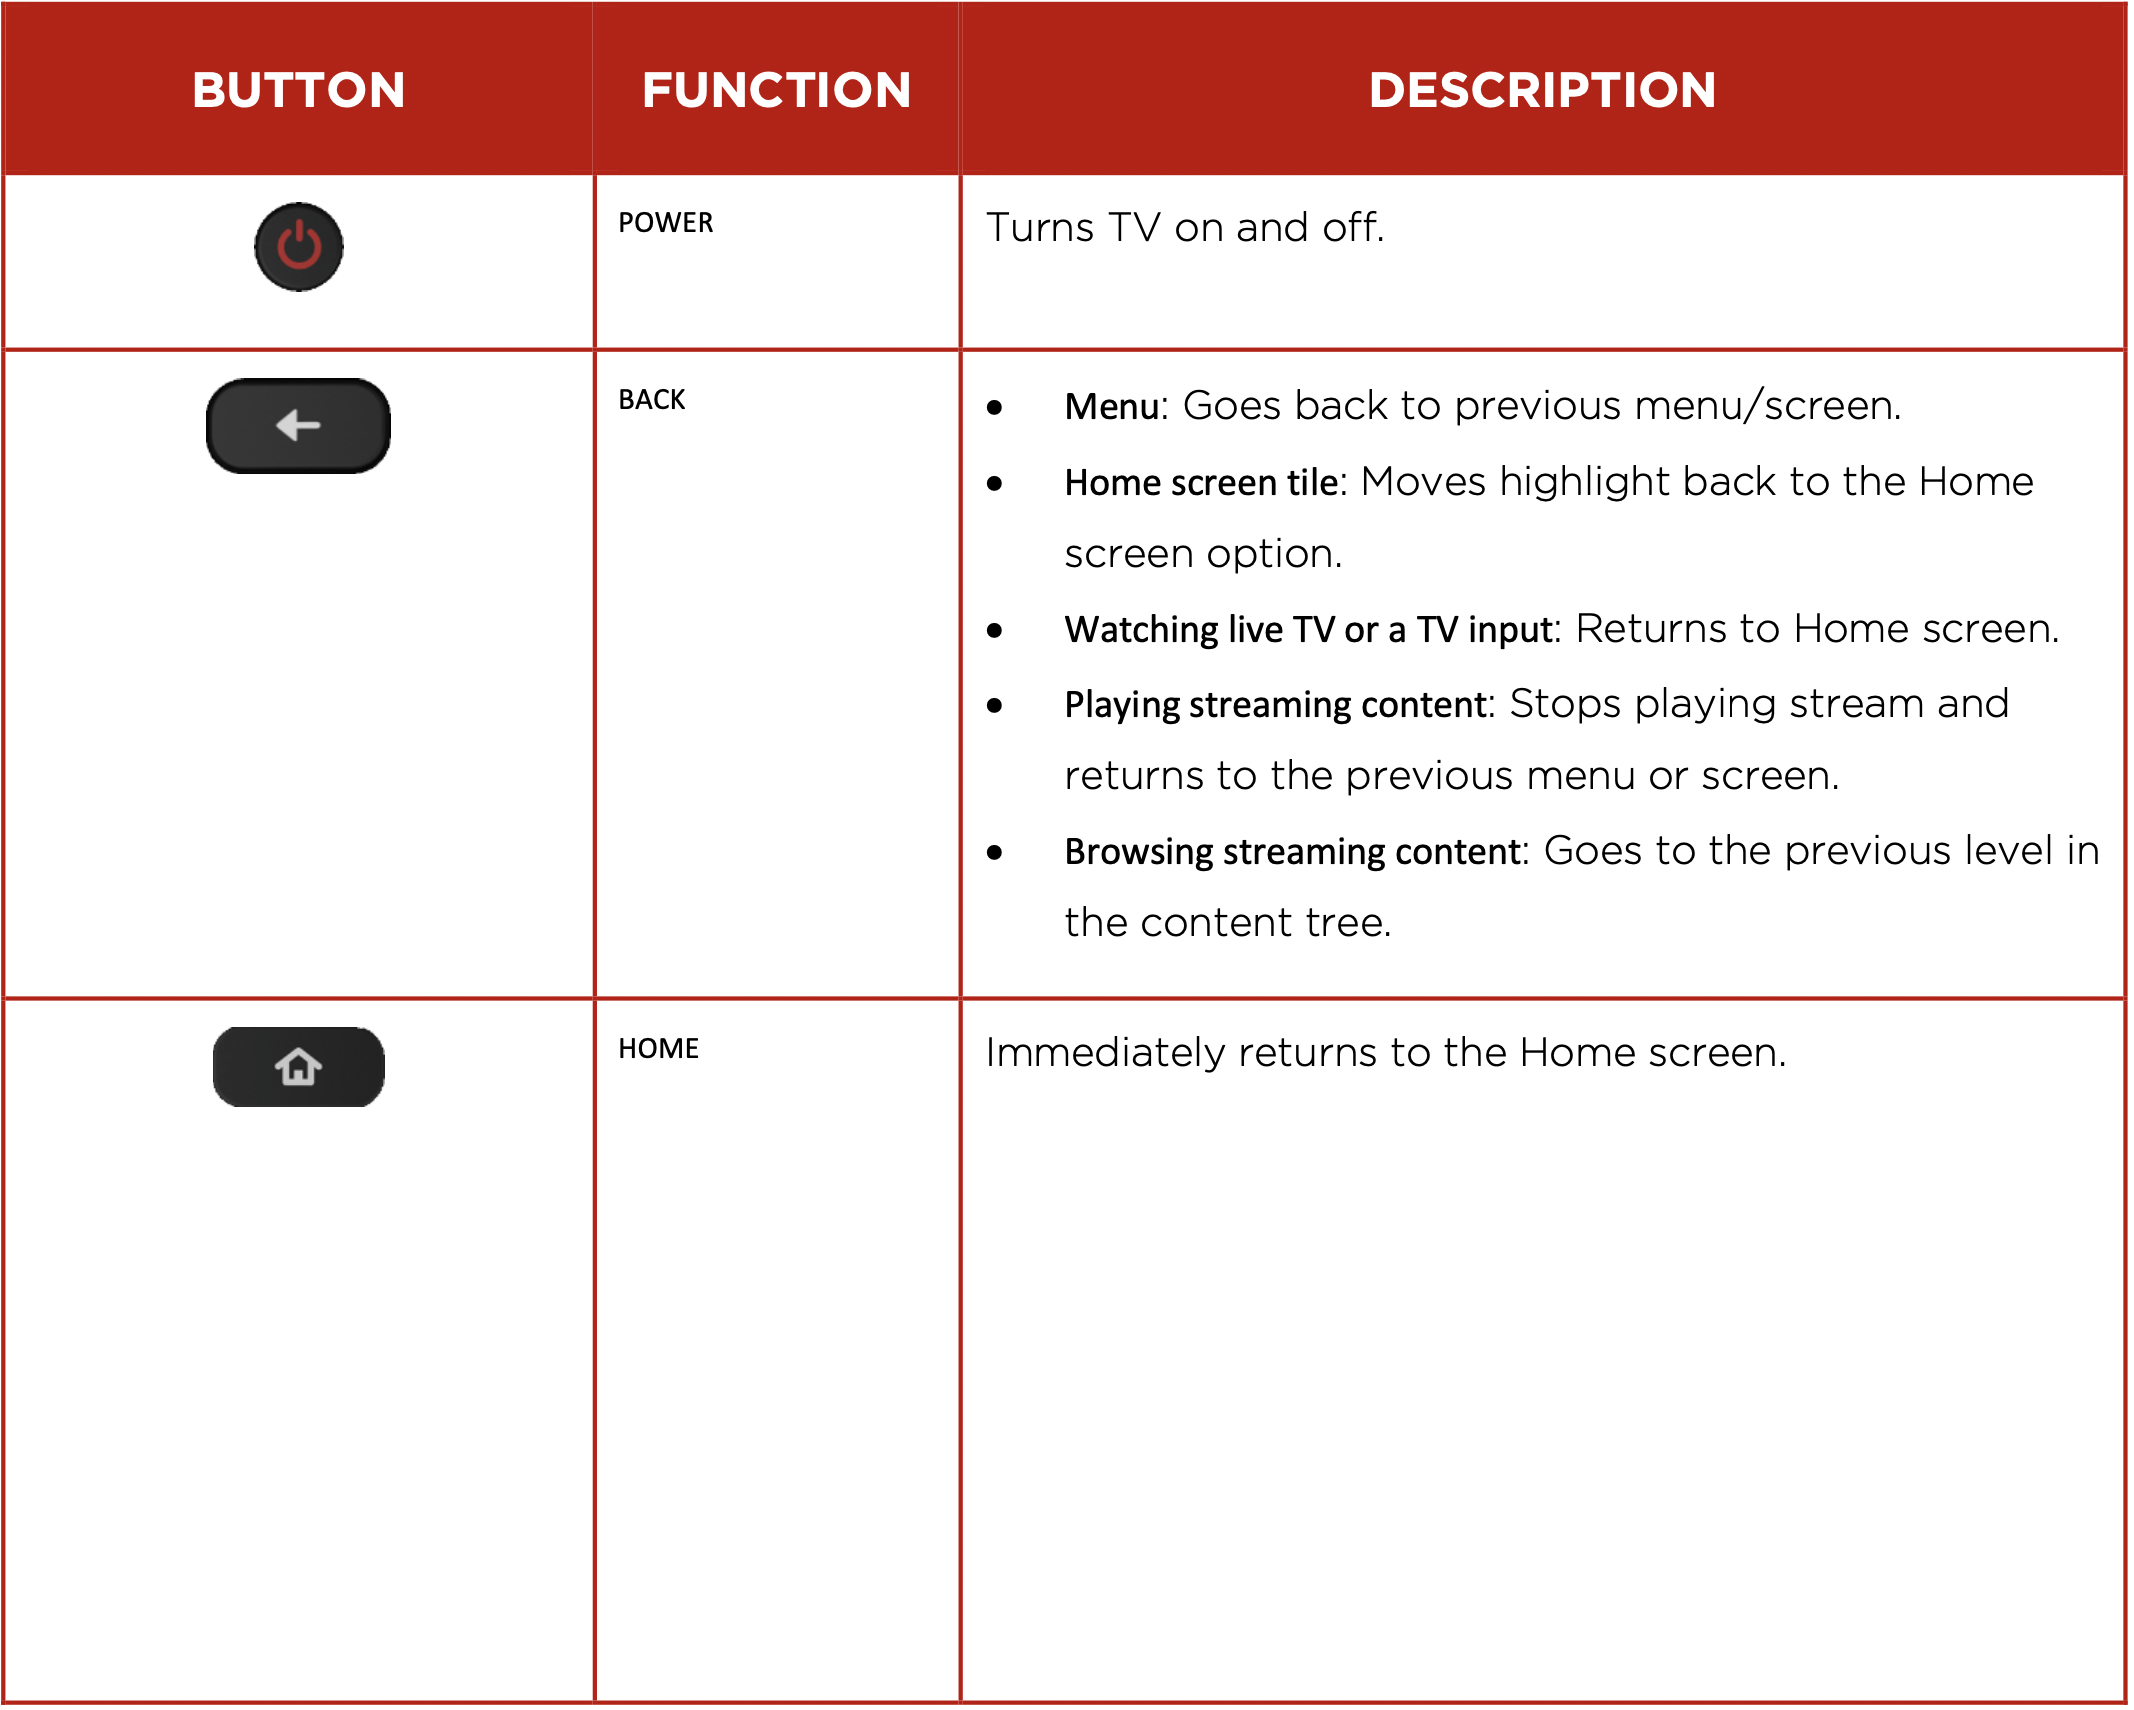
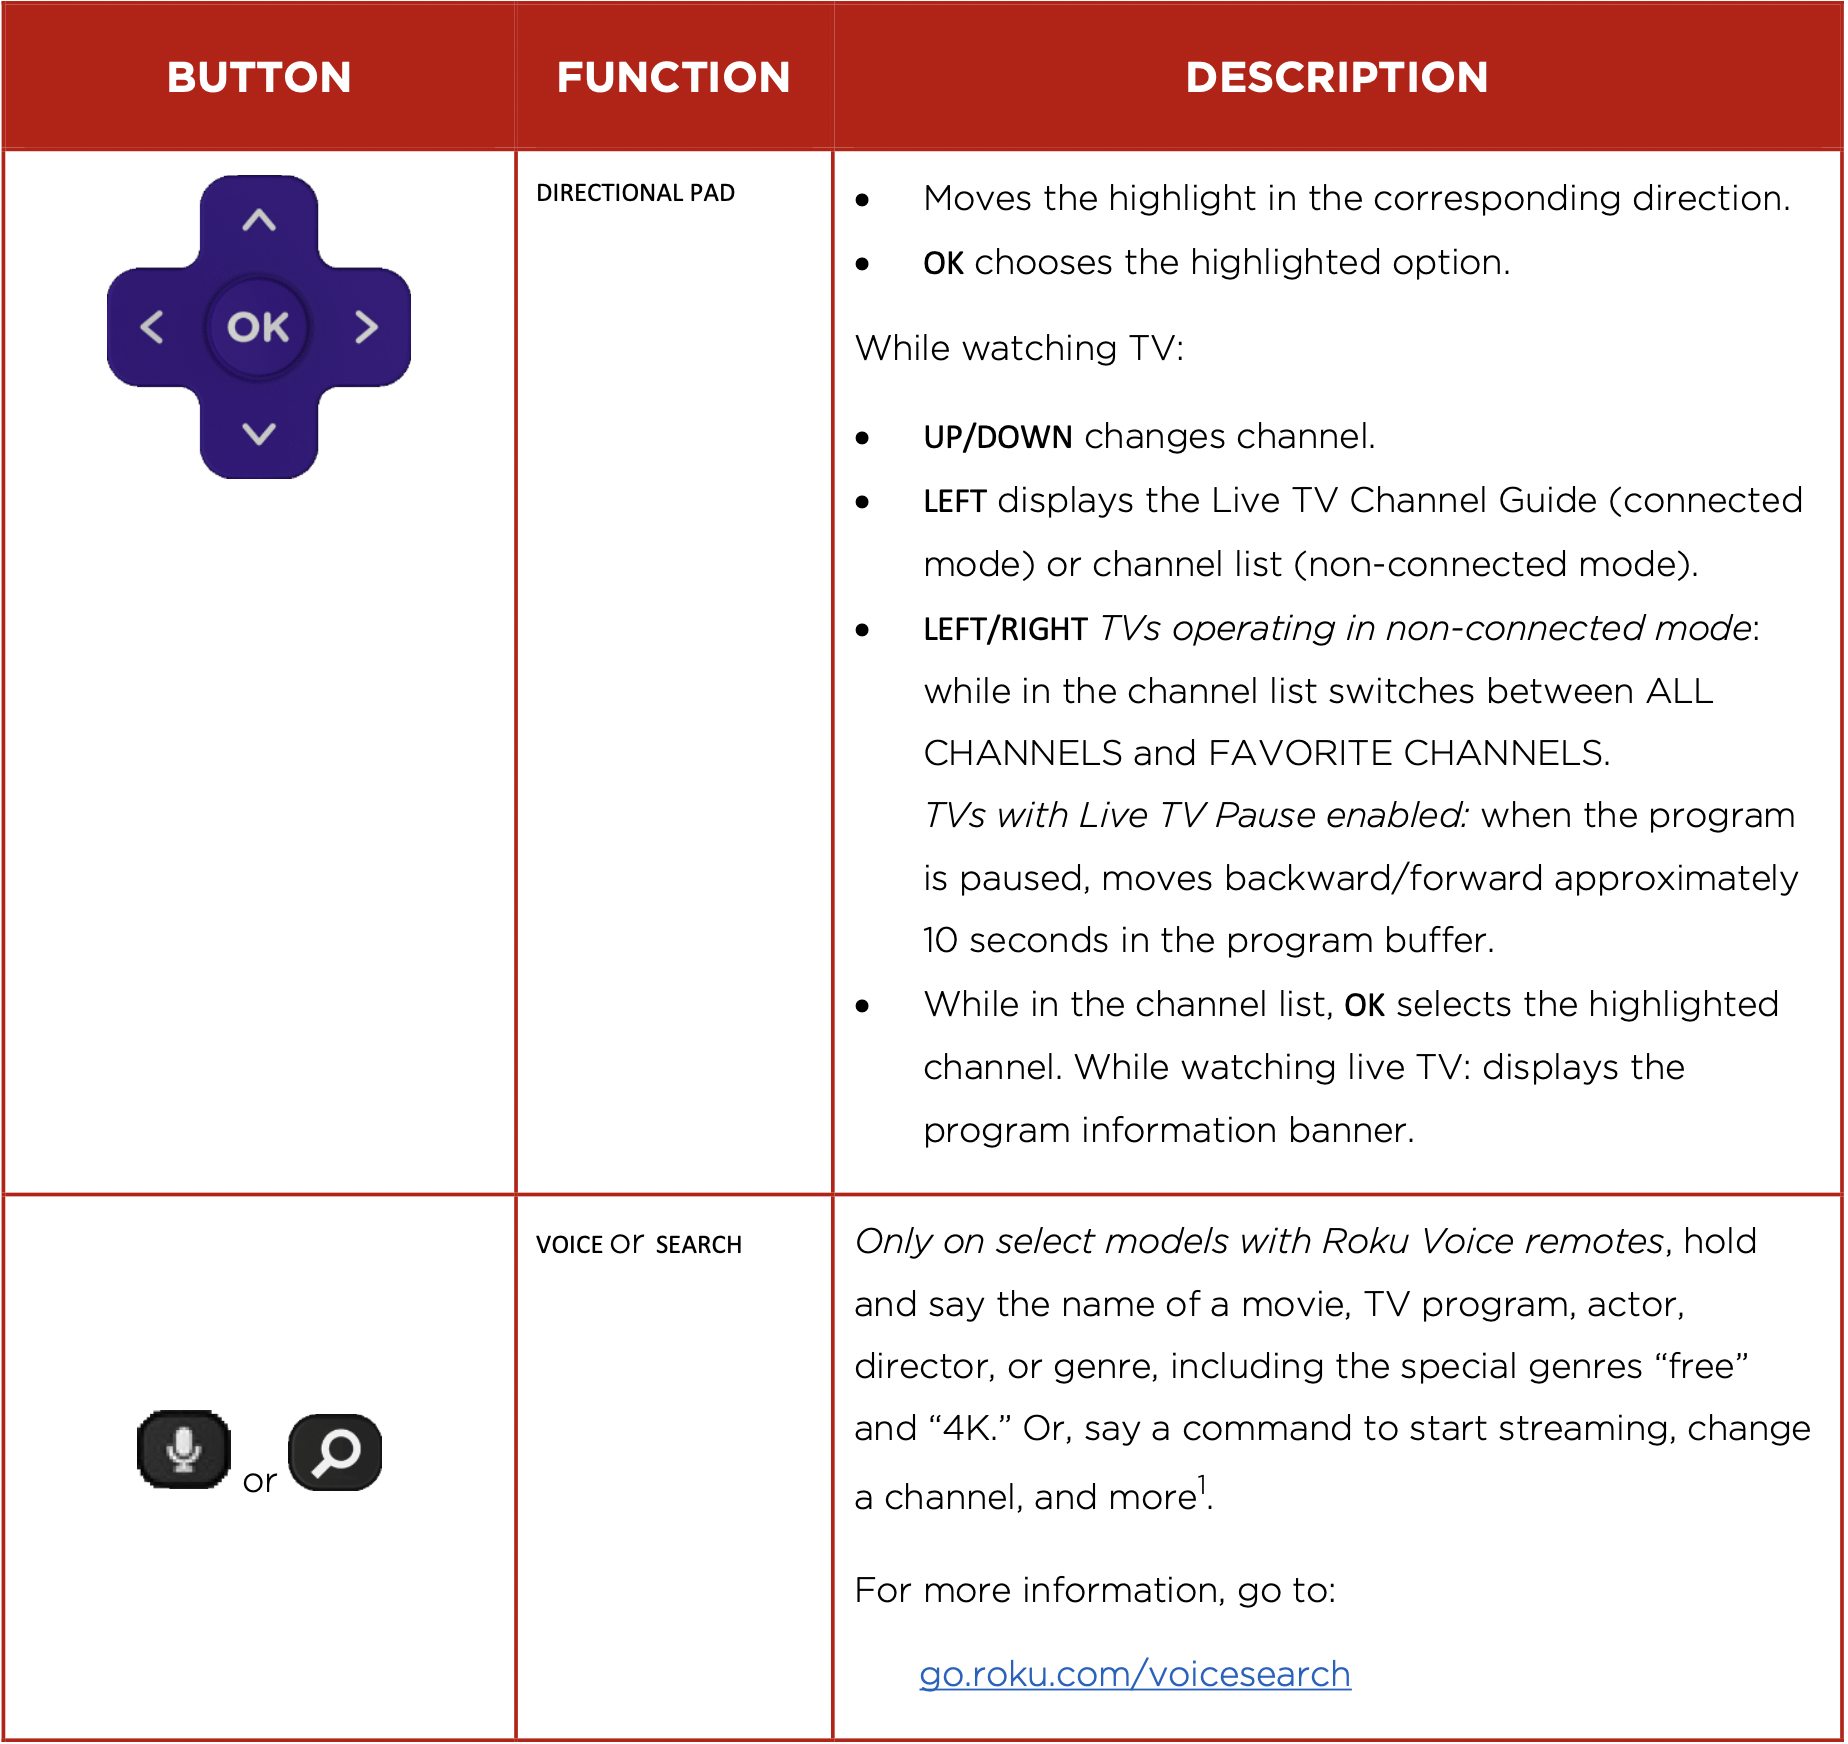
Use the following information to identify the buttons on your Roku remote.
Note: Remote buttons and features vary somewhat by model. Your remote might not have all buttons or features listed.
- If your remote has a VOICE
 just below the purple pad, you have a Roku Voice Remote.
 - If your remote has a headphone jack on its left edge, you have a Roku Enhanced Voice Remote or Roku Voice Remote Pro.
Roku Voice remotes have additional capabilities as noted in the following table.
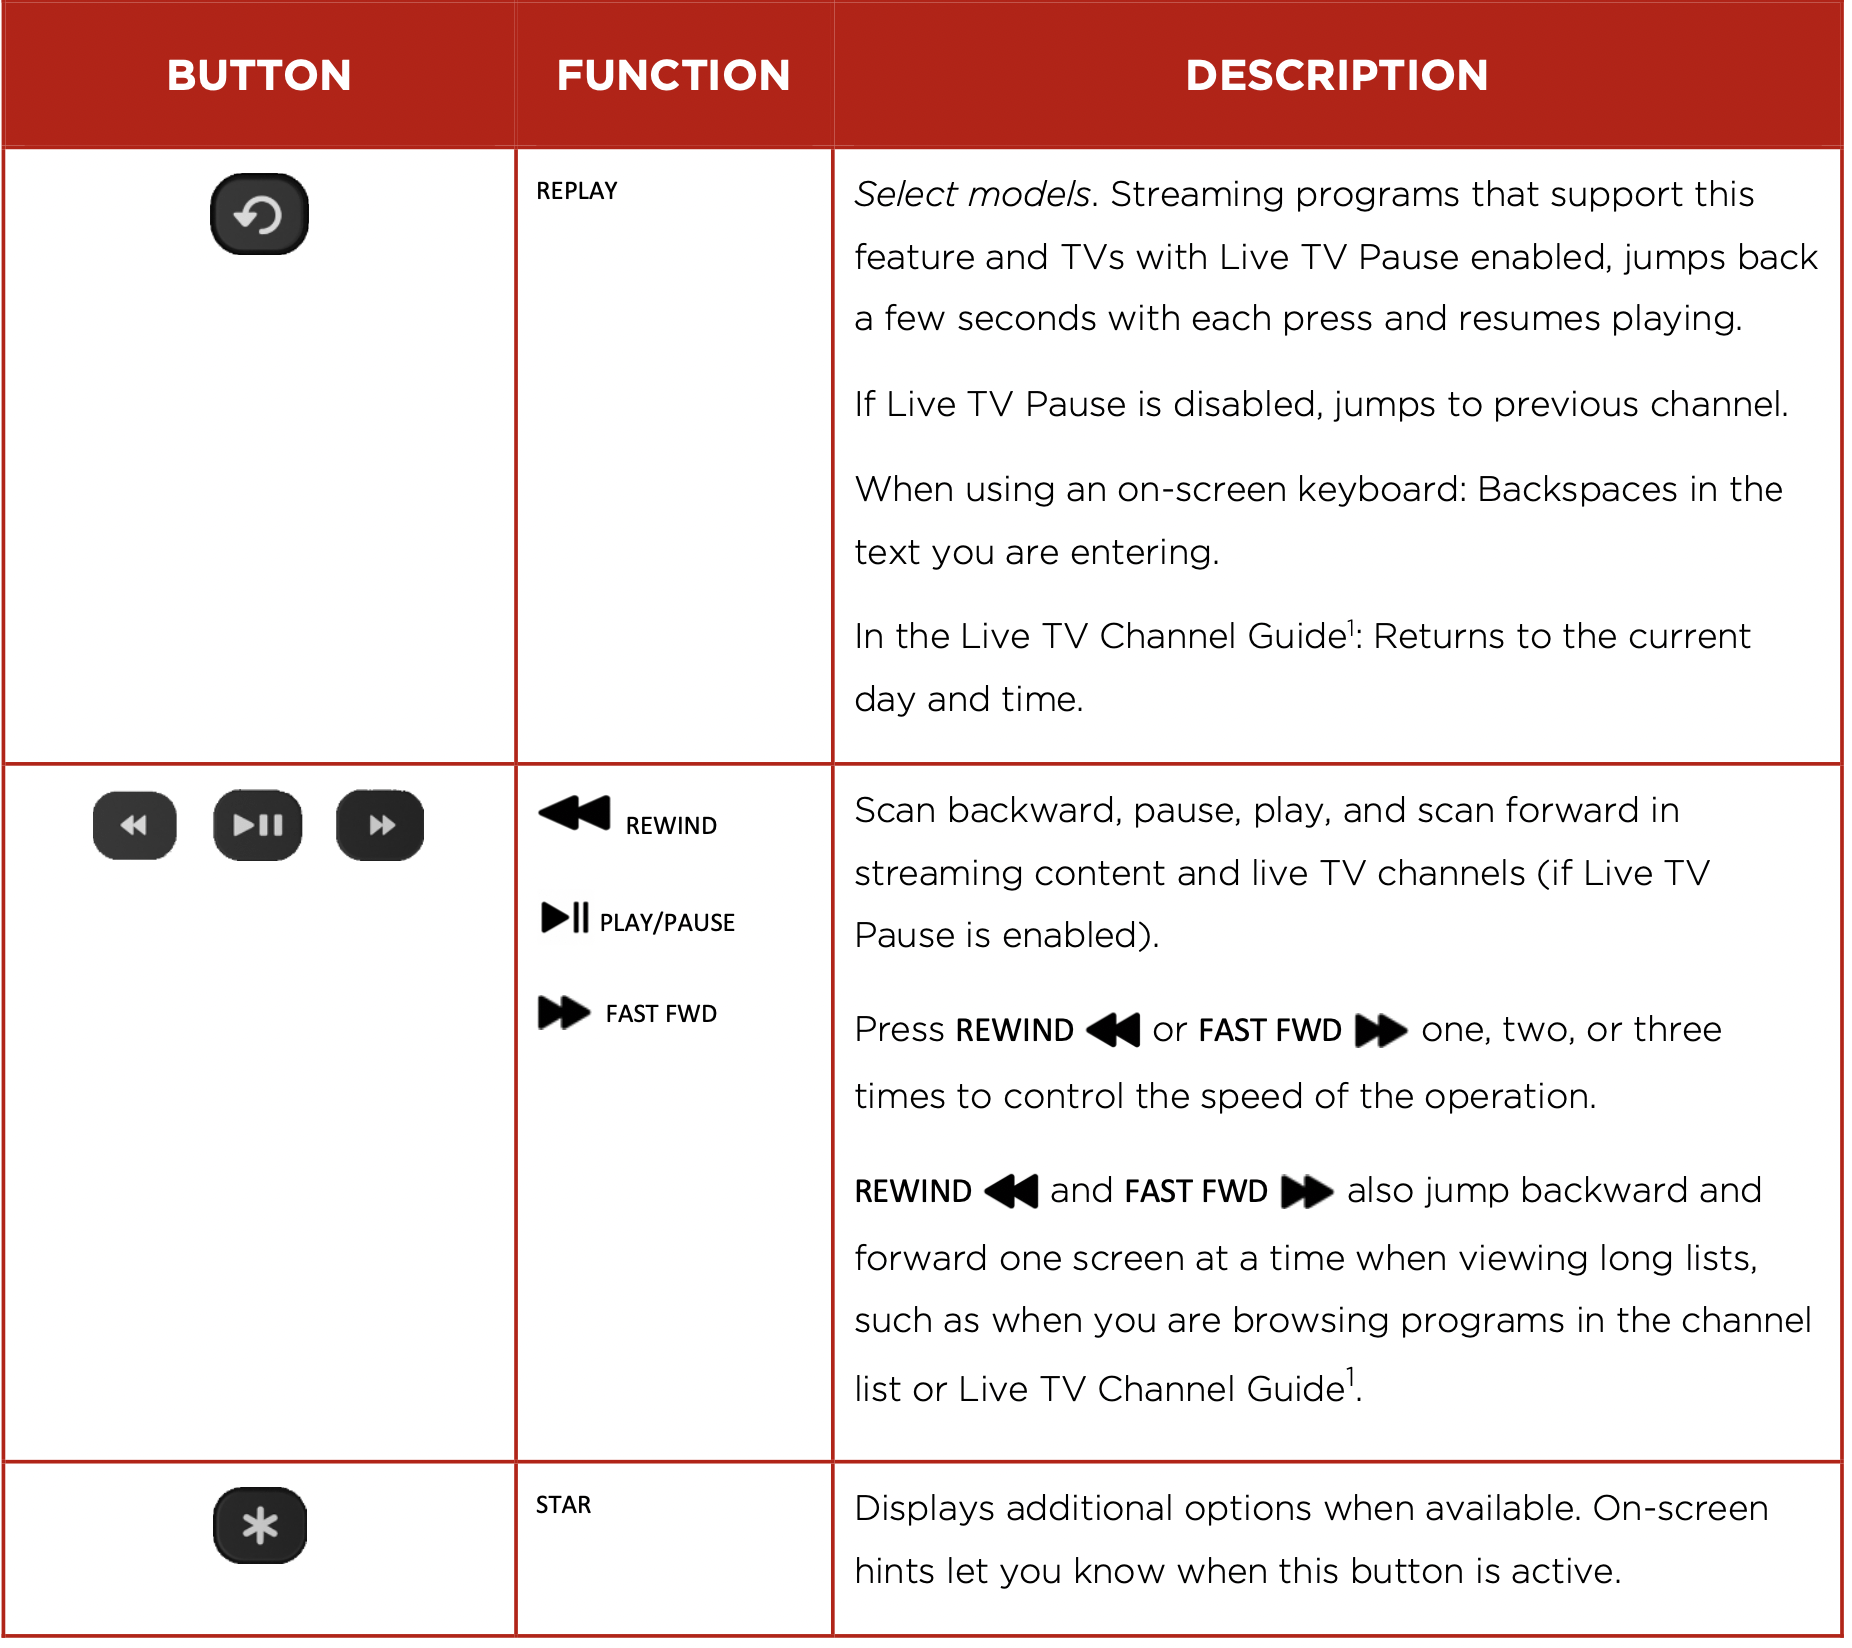
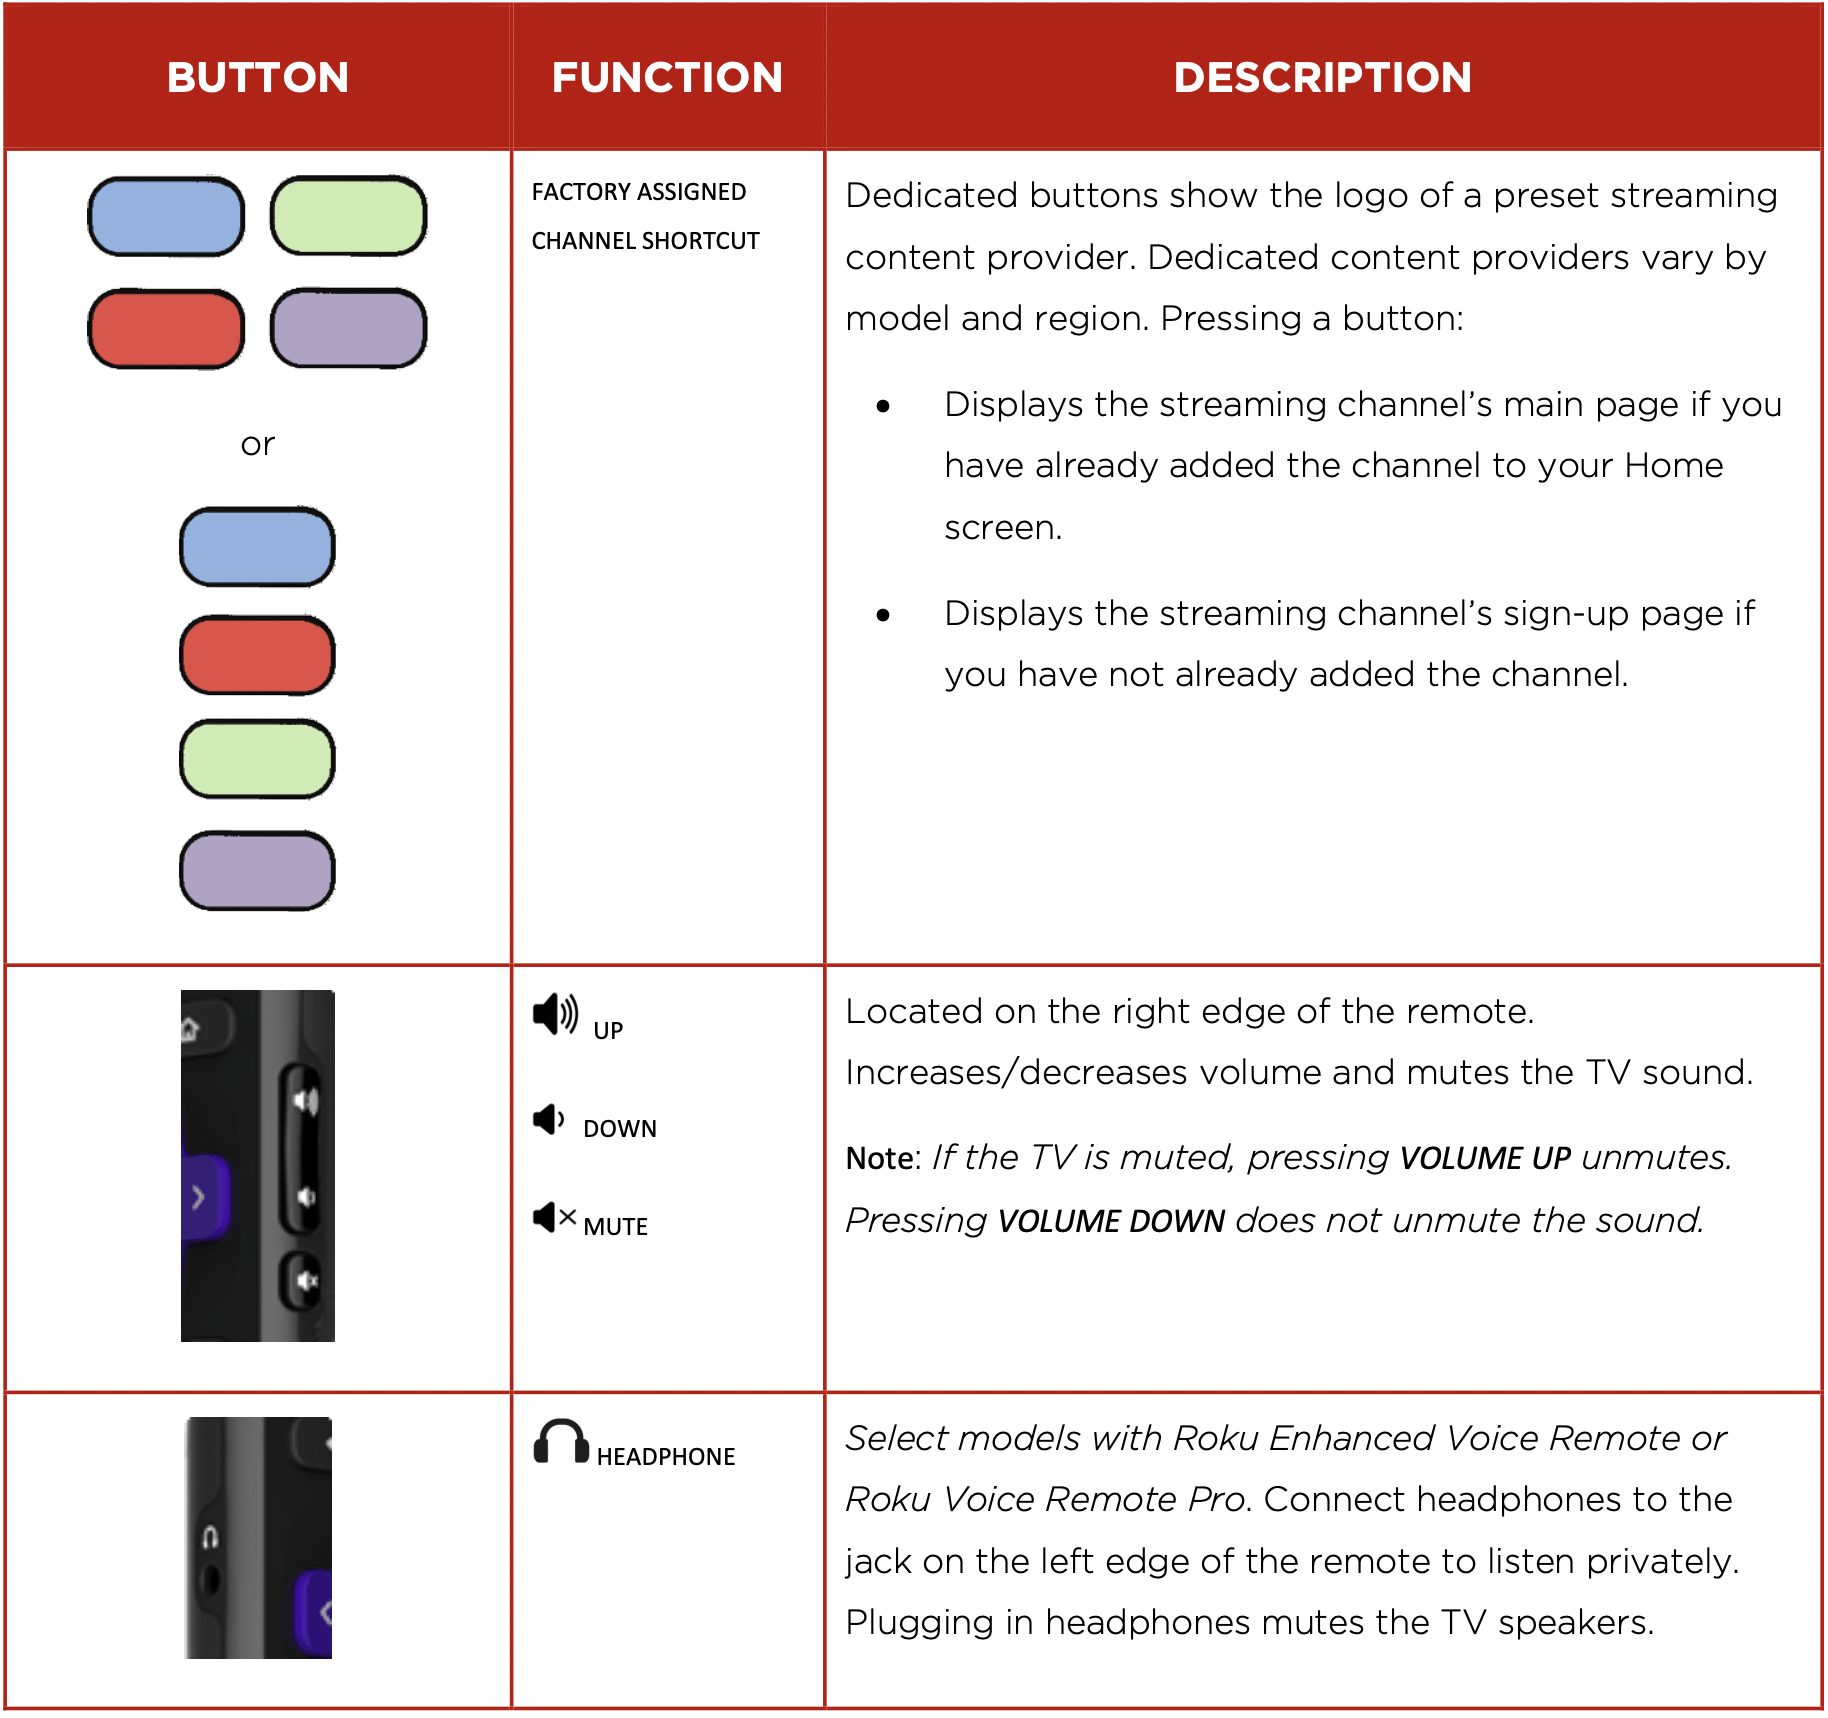
Panel buttons
Your TV has buttons on its side, bottom, or back panel that perform simple control functions. The TV panel buttons are not a substitute for the remote, as they do not give you access to all TV functions.
Depending on model, your TV model has one of several different panel button designs. Choose the one that applies to your TV from the following list:
- Single button
- Three buttons
- Game-pad style joystick
- Four buttons
- Five buttons (with mute)
- Five buttons (without mute)
Single button
If your TV has this style of panel button, you can perform the following functions:
- Turn TV on: short press.
- Display the Input List: short press when TV is on.
- Select the next input in the Input List: short press while the TV is showing the Input List.
- Dismiss the Input List without changing inputs: no press.
- Turn TV off: long press.
Short press = less than two seconds
Long press = more than two seconds
No press = no press within two seconds
Three buttons
If your TV has this style of panel buttons, you can perform the following functions:
- Turn TV on: middle button, short or long press.
- Volume up: right button when Input List is not active.
- Volume down: left button when Input List is not active.
- Display Input List: middle button, short press when TV is on.
- Highlight next input in the Input List: right button when Input List is active.
- Highlight previous input in the Input List: left button when Input List is active.
- Select highlighted item in the Input List: middle button, short press, or no press.
- Turn TV off: middle button, long press.
Short press = less than two seconds
Long press = more than two seconds
No press = no press within four seconds
Game-pad style joystick

If your TV has this style of panel button, you can perform the following functions:
- Press in: Toggle between power ON and Standby.
- Press up or down: Increase/decrease the volume.
- Press left or right: Switch inputs. Each press moves the highlight up or down one item. Pausing for a few moments selects the highlighted item.
Four buttons
If your TV has this style of panel buttons, you can perform the following functions:
- Power: Turns the power on and off.
- Input: Selects among TV inputs. Each press moves down one item. Pausing for a few moments selects the highlighted item.
- Volume +: Increases the volume.
- Volume – : Decreases the volume.
Five buttons (with mute)
If your TV has this style of panel buttons, you can perform the following functions. Note that the order of the buttons might vary from model to model. Examine the panel button labels to determine your TV model’s layout.
- Power: Turns the power on and off.
- Input: Selects among TV inputs. Each press moves down one item. Pausing for a few moments selects the highlighted item.
- Volume +: Increases the volume.
- Volume – : Decreases the volume.
- Mute: Mutes and unmutes the sound.
Five buttons (without mute)
If your TV has this style of panel buttons, you can perform the following functions. Note that the order of the buttons might vary from model to model. Examine the panel button labels to determine your TV model’s layout.
- Power: Turns the power on and off.
- Input +: Selects the next TV input. Each press moves down one item. Pausing for a few moments selects the highlighted item.
- Input – : Selects the previous TV input. Each press moves up one item. Pausing for a few moments selects the highlighted item.
- Volume +: Increases the volume.
- Volume – : Decreases the volume.
Guided Setup
With the preliminaries out of the way, it’s time to turn on your TV. As the TV starts for the first time, it leads you through Guided Setup, which configures the TV before you start to use it.
During Guided Setup, you’ll:
- Answer a few questions
- Provide network connection information
- Get a software update
- Link your TV to your Roku account.
- Connect devices such as a DVD player, game console, or cable box.
Starting Guided Setup
To start Guided Setup, press POWER  on the remote to turn on your TV.
Note: Guided Setup normally runs only once, the first time you turn on your TV. If you need to run Guided Setup again, you must perform a factory reset as explained in Factory reset everything.
When you first turn on your TV, it will take a few seconds to get itself ready. You’ll notice the following things happening:
- The status indicator blinks every time the TV is busy doing something; in this case it’s powering up and getting ready for you.
- The splash screen appears and the status indicator blinks slowly for a few more seconds. The power-on screen shows a brand logo while the TV starts up.

- After a few seconds, Guided Setup starts.
Guided Setup
At this point, you should be seeing the Language screen.
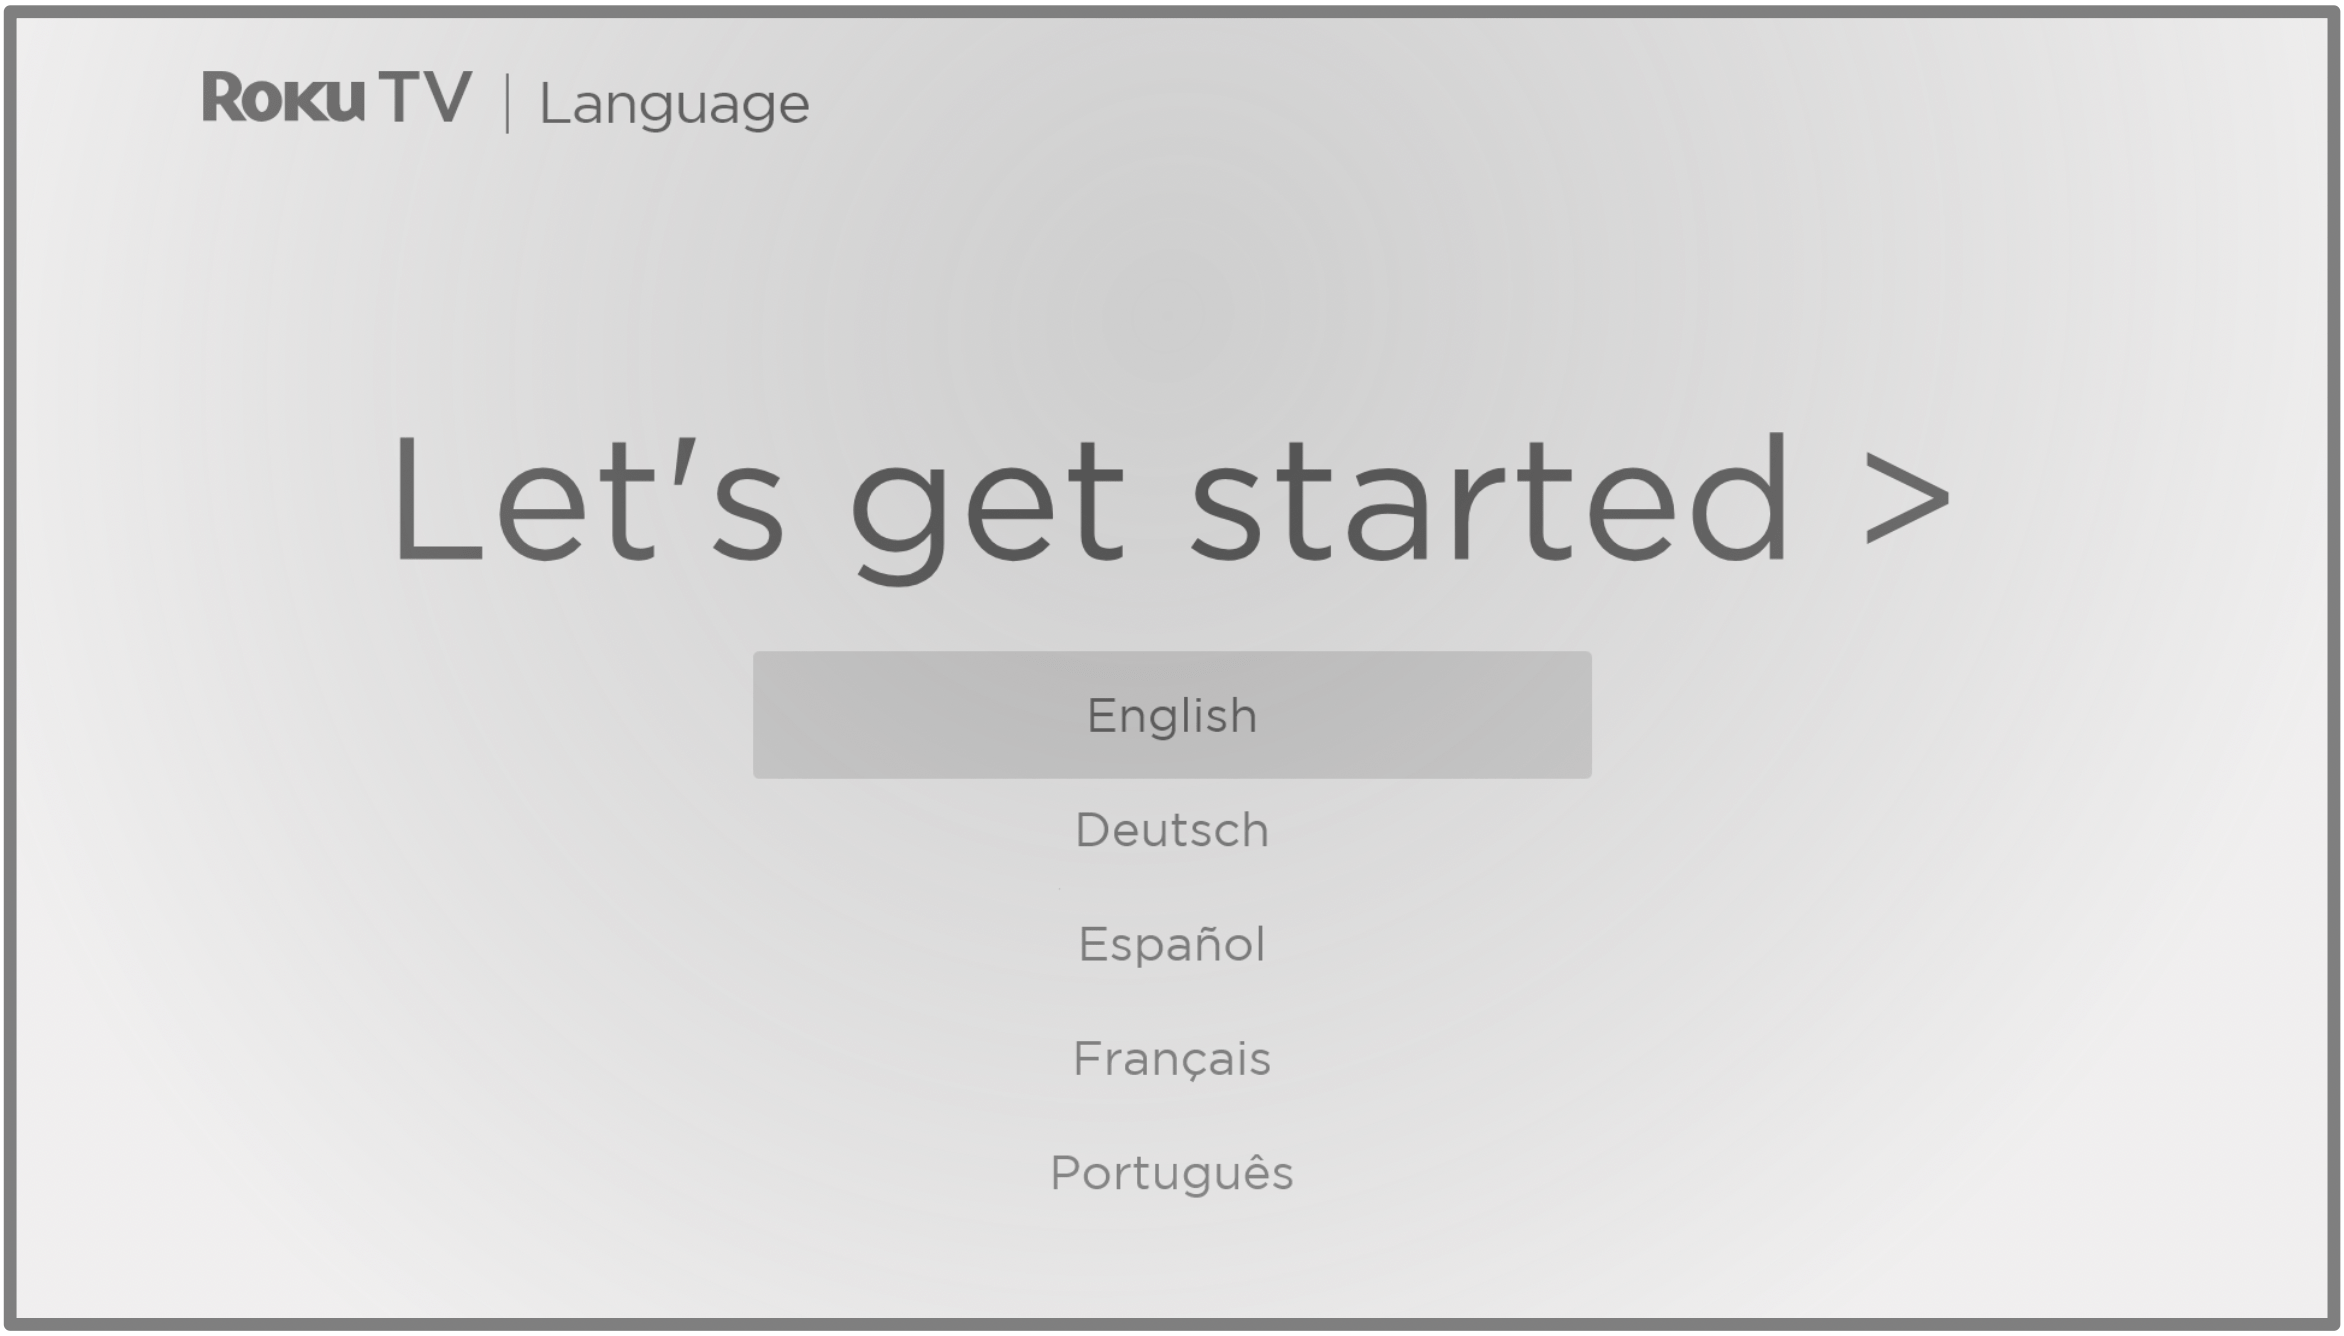
- Only on models that have a Roku Voice remote: A few moments after the Let’s get started screen appears, Guided Setup starts the pairing process for the Roku Voice remote. (You’ll know if you have this type of remote because it has a VOICE
 or SEARCH
  button just below the purple directional pad.) If the Roku Voice remote does not pair automatically, follow the instructions on the screen to complete the pairing process.
See other models: A114W A1W15W 43S334 98R754 85X925PRO
Accessibility: On TVs sold in the United States, if you are blind or visually impaired, you can activate the screen reader, a text-to-speech screen reader to help you navigate the TV’s menus and commands. To enable the screen reader, press STAR four times in rapid succession. Repeat to disable the screen reader. (STAR
  is located directly below the purple directional pad on the right side of the Roku remote.)
If you enabled the screen reader, choosing any language other than English disables it. - Press DOWN on the purple directional pad to highlight your preferred language, and then press OK.
- Some models have a country selection screen: If you don’t see this screen, skip ahead to the next step.
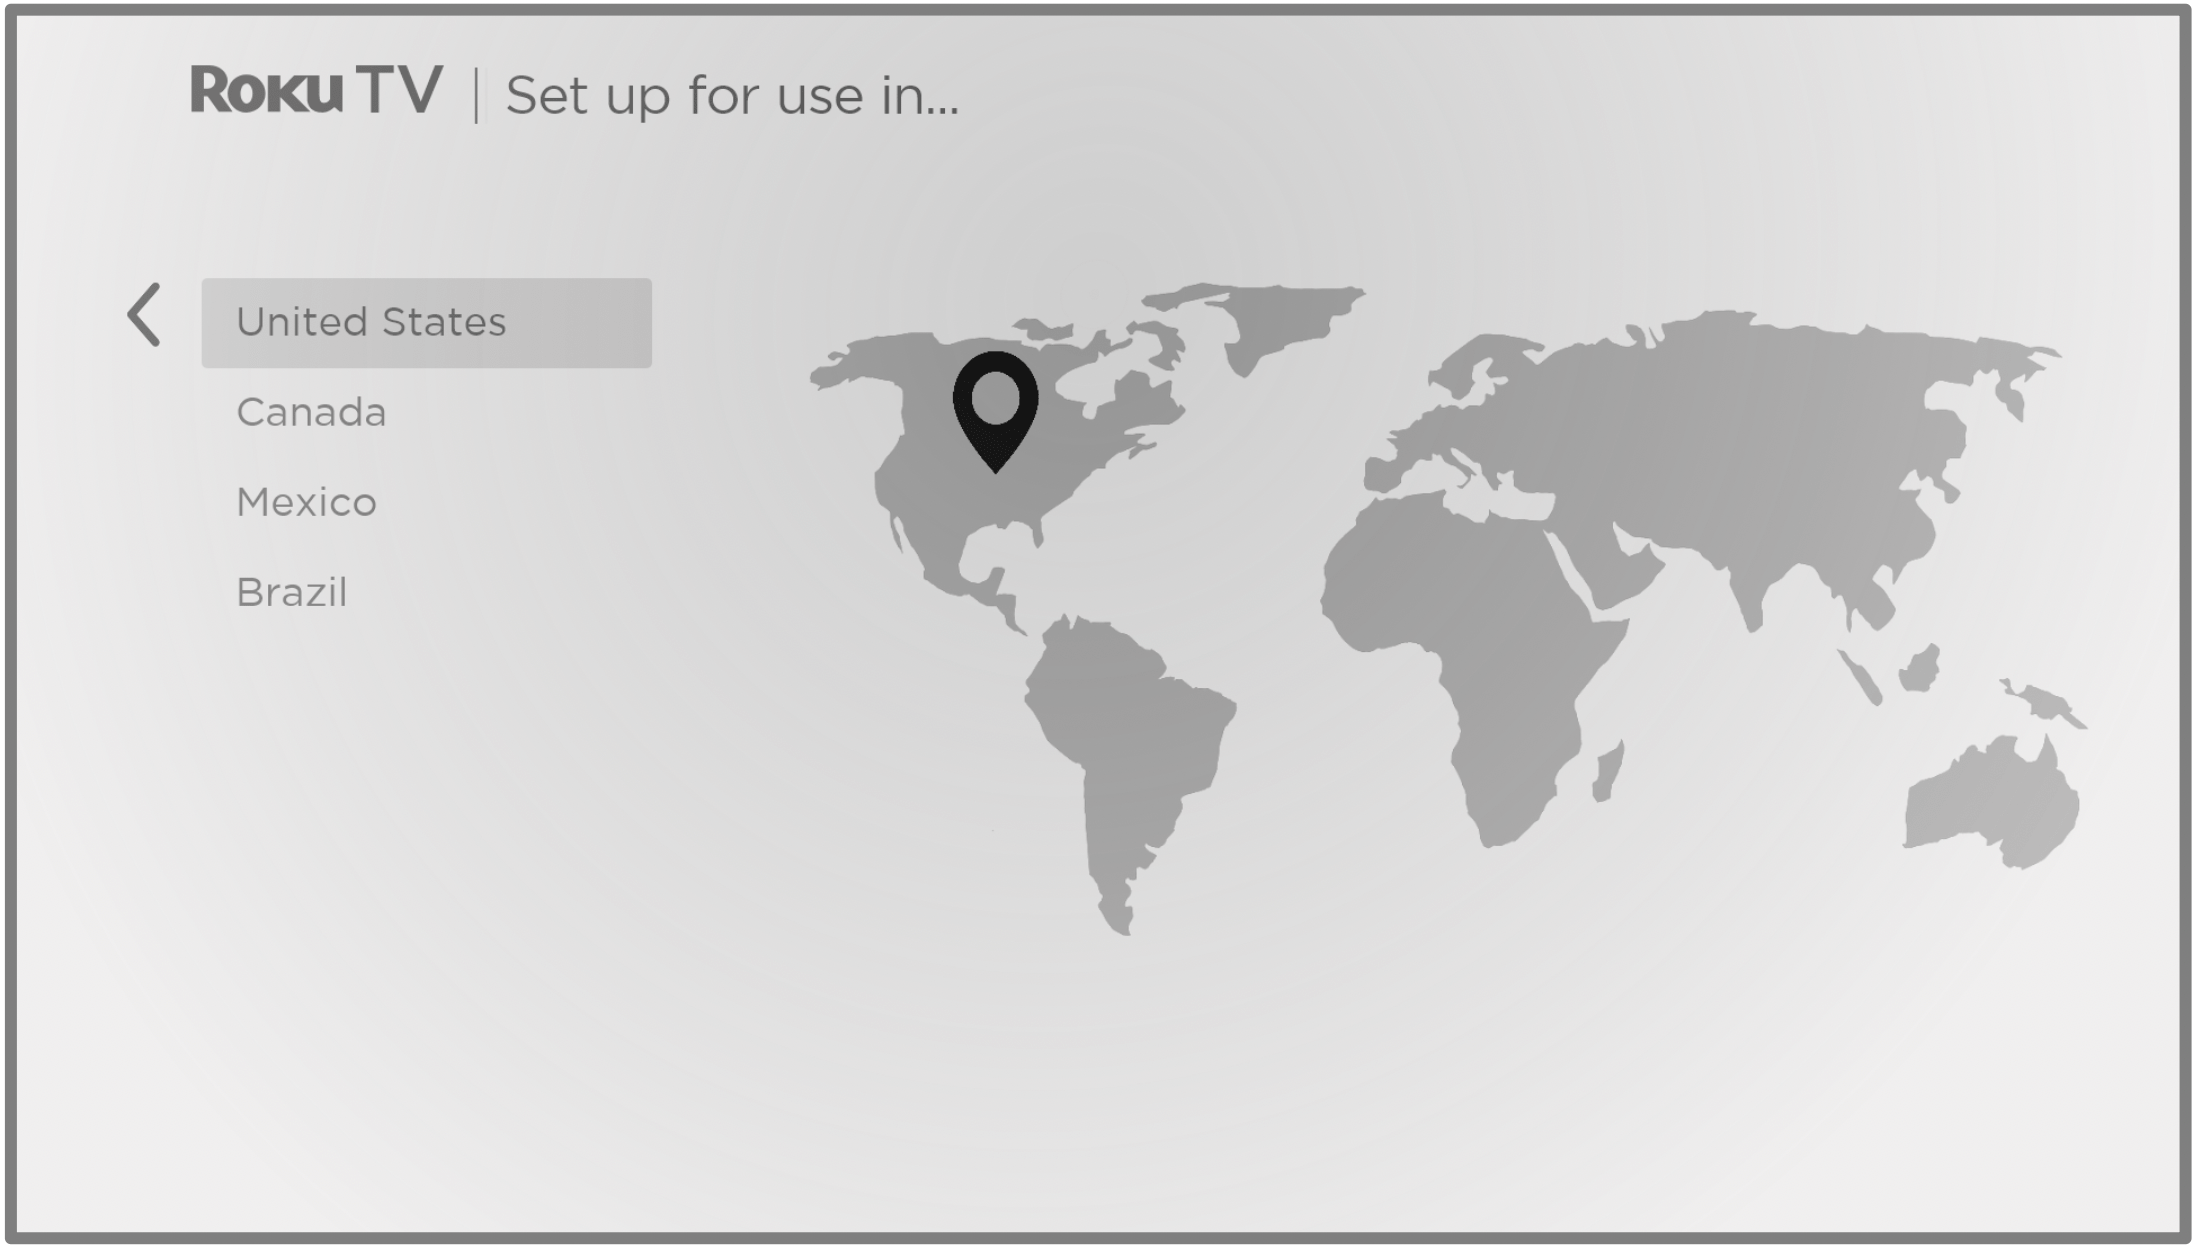
If you see this screen, select your country, and then press OK.
Accessibility: If you enabled screen reader, choosing any country other than United States disables it.
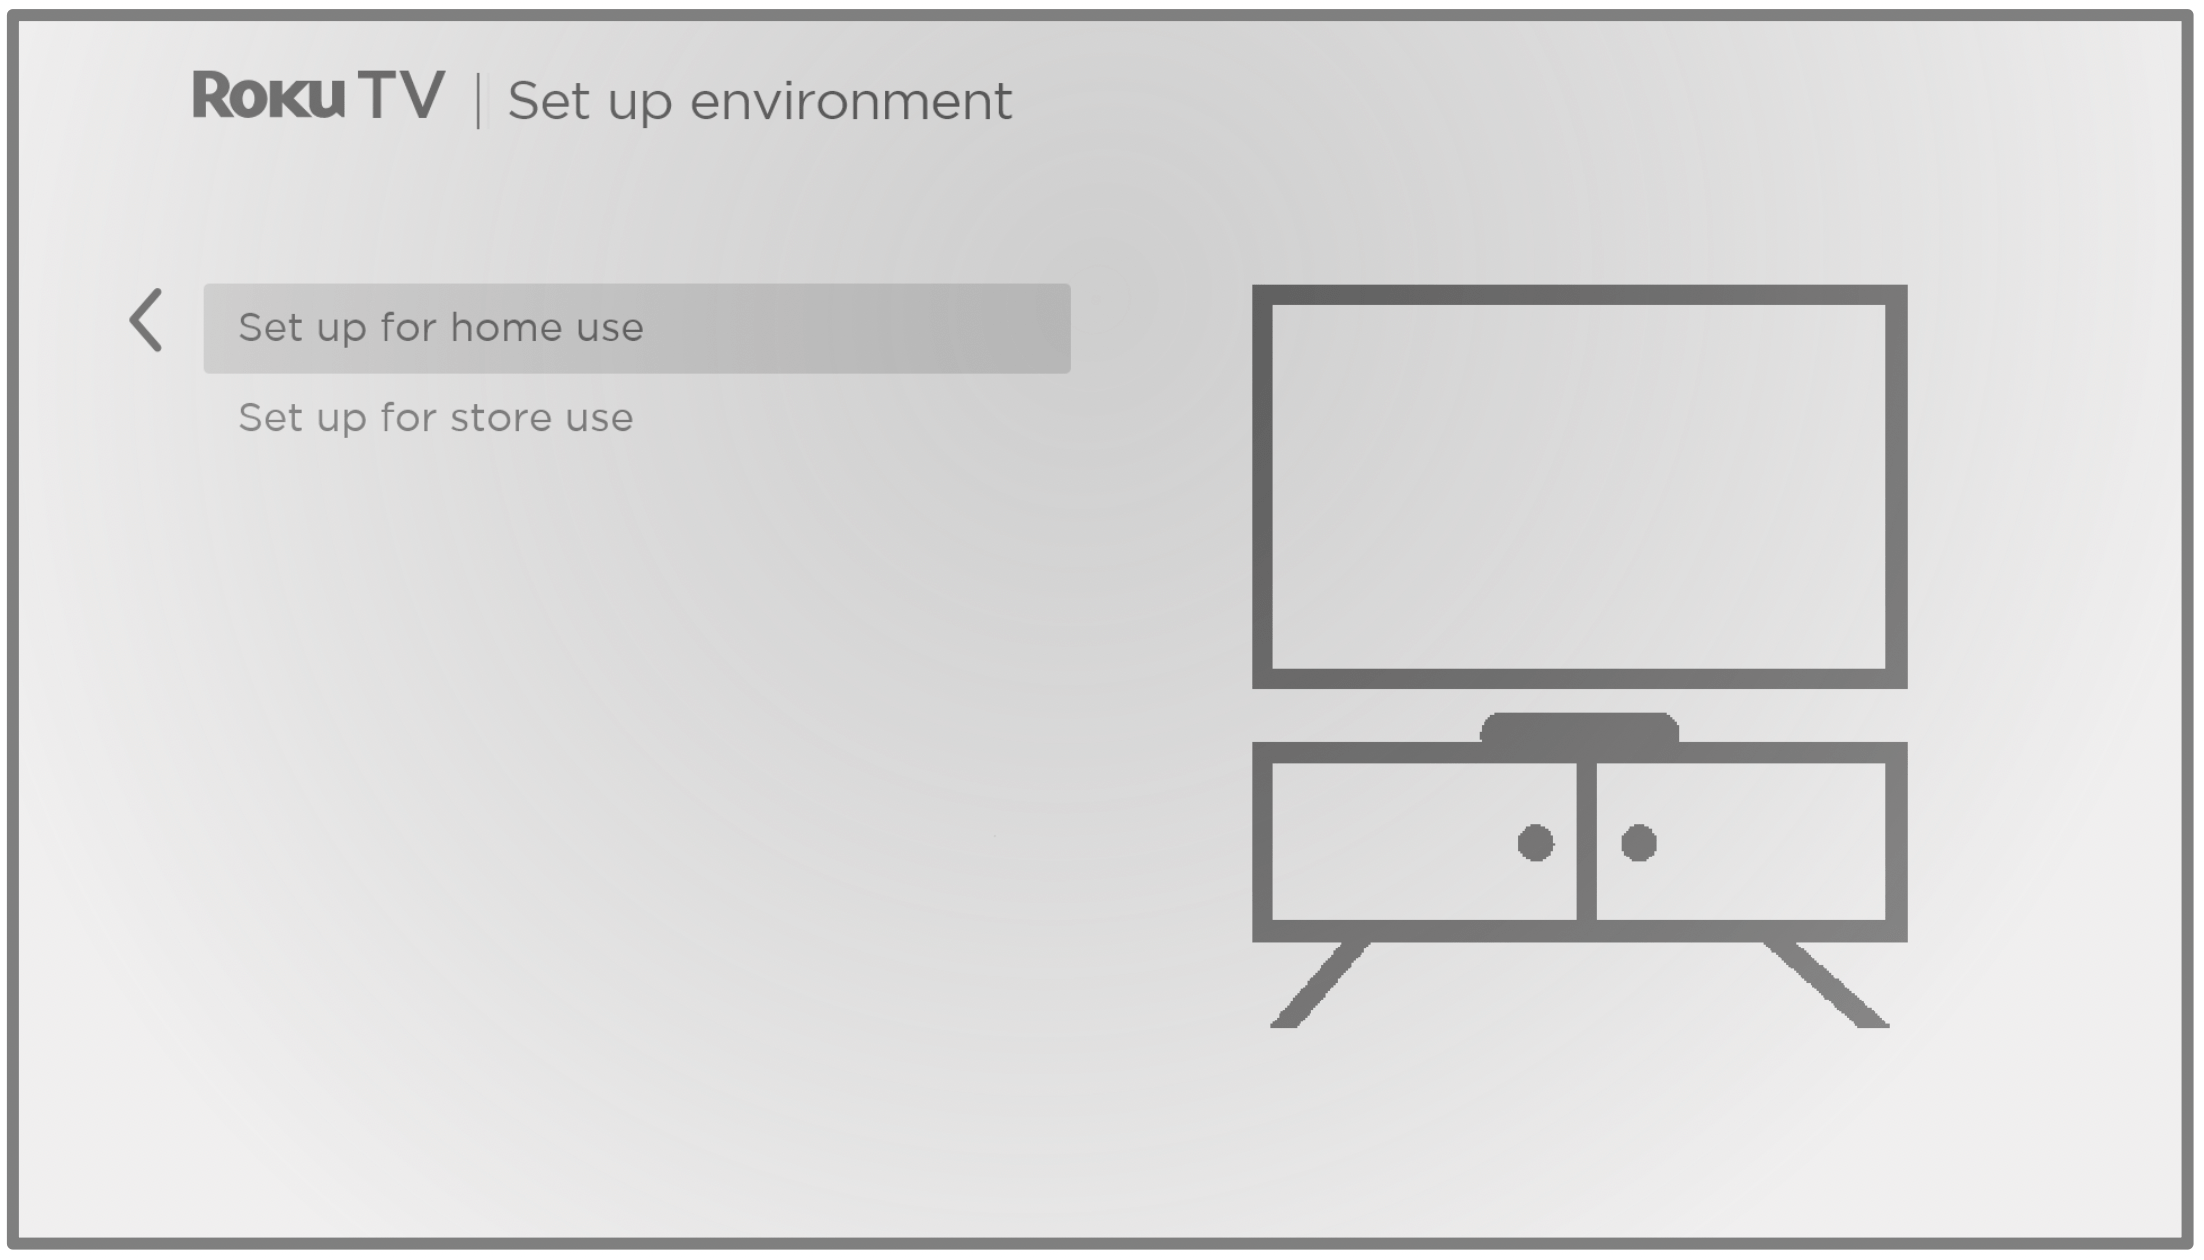
- Press OK to select Set up for home use. This is the right choice for enjoying your TV at home. It provides energy saving options as well as access to all features of the TV.
Note: Set up for store use configures the TV for retail display and is not recommended for any other use. In store mode, some features of the TV are missing or limited. To switch from one mode to the other, you have to perform a factory reset as explained in Factory reset everything, and then repeat Guided Setup.
Network connection
After you select Set up for home use, the TV prompts you to make a network connection. If your TV has both wired and wireless connections, you’ll see the following screen. If your TV has only wireless connectivity, skip the following step.
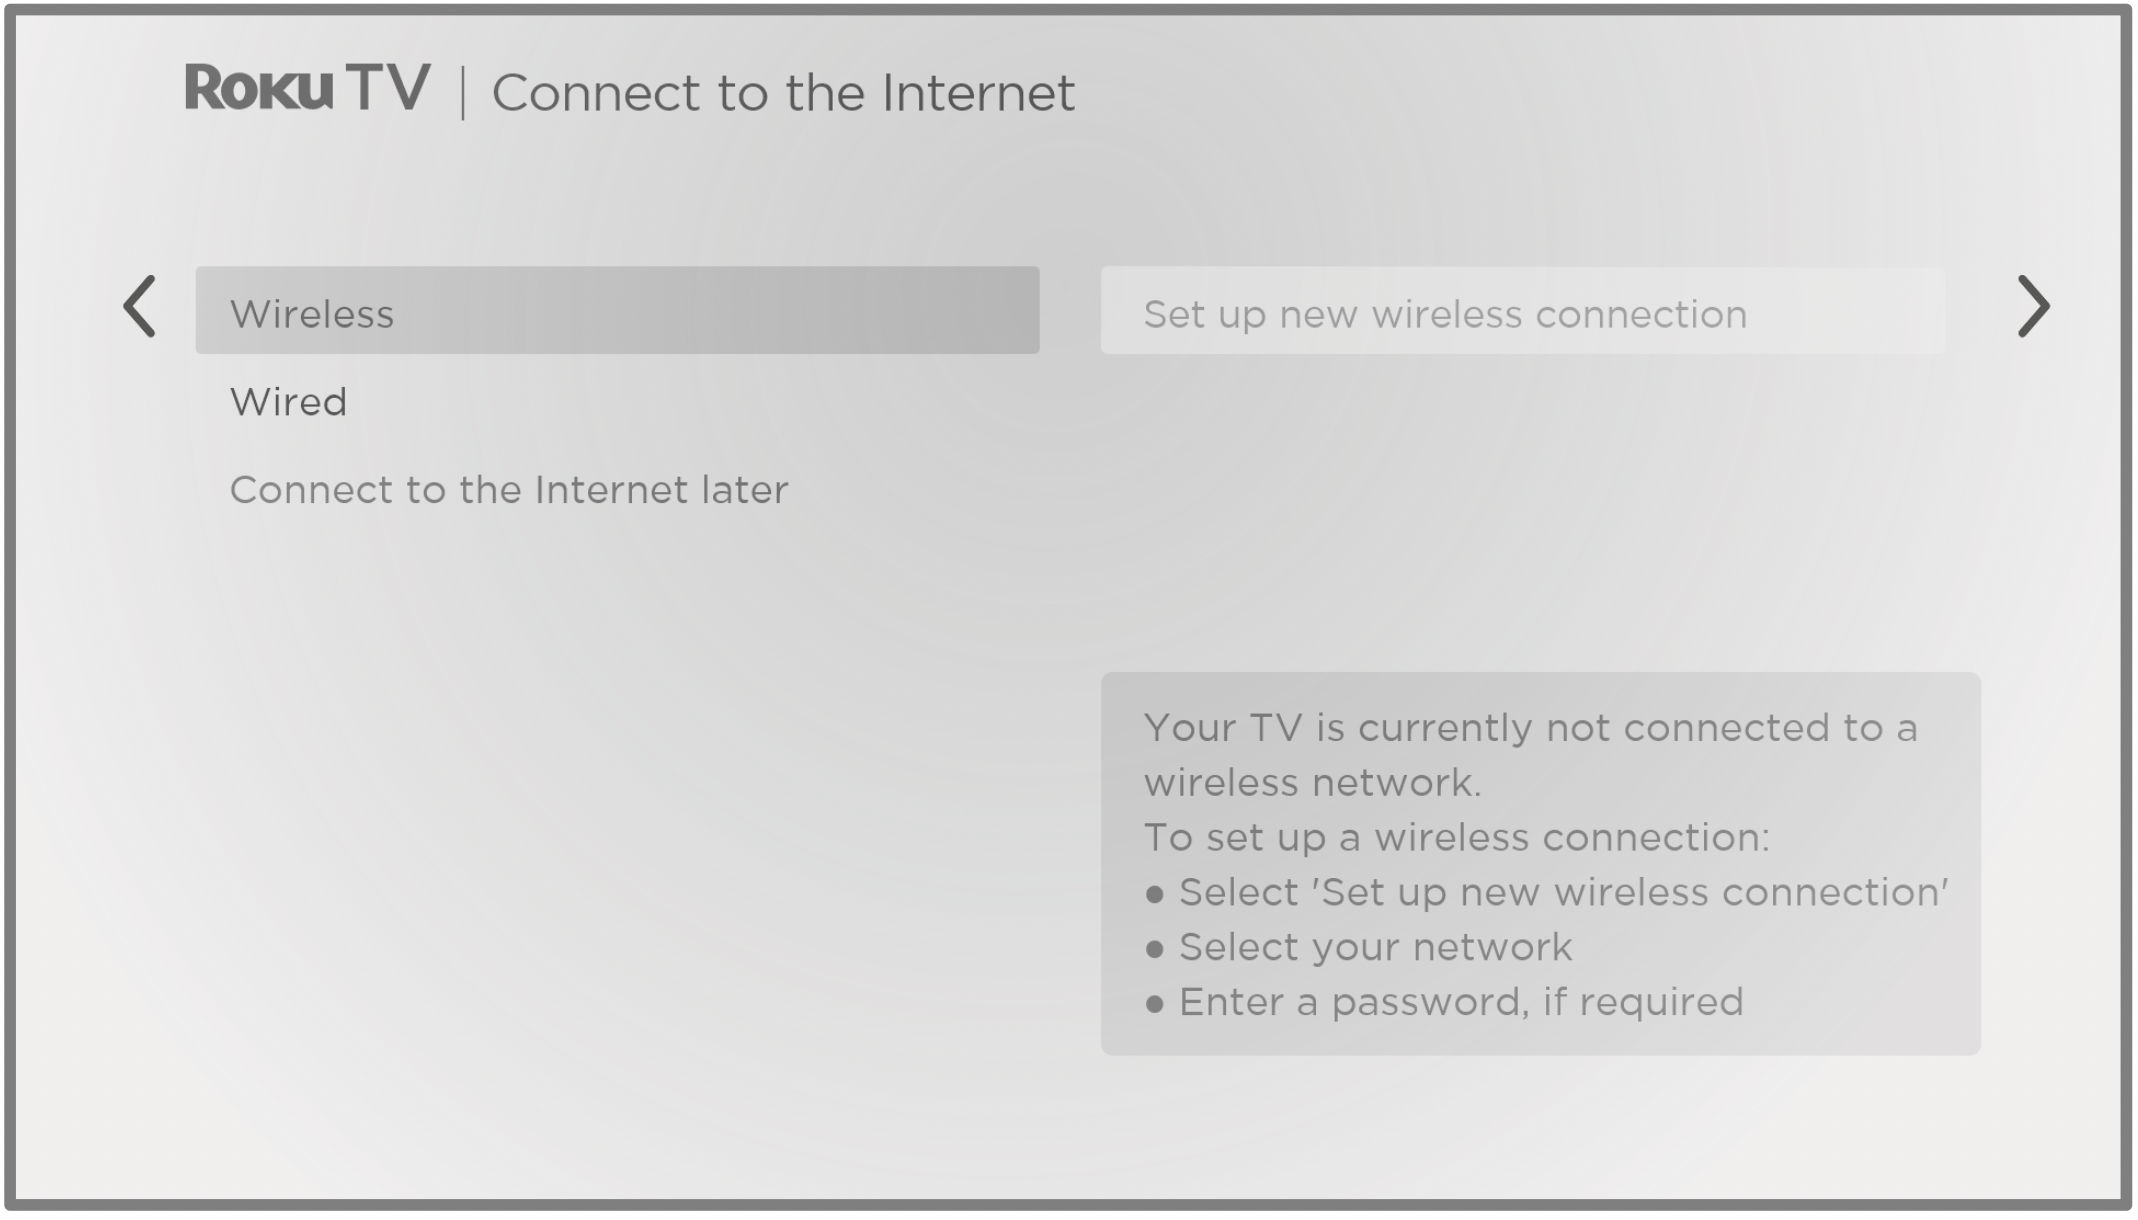
Only on models that display the Connect to the Internet screen:
Make a selection:
- Wireless connection – Highlight Set up new wireless connection and press OK. The TV prompts you through wireless setup. Skip ahead to the next step for help with the process.
- Wired connection – Highlight Connect to wired network and press OK. The TV immediately attempts to connect to your wired network, your local network, and then the Internet. Go to Step 9 to continue with Guided Setup.
- Connect to the Internet later – If you don’t want to connect to the Internet right now, you can select this option, and then press OK. You can still use the TV to watch live TV channels, and connect your devices to play games, watch DVDs, or watch channels from a cable box or another streaming device. When you’re ready to connect, it’s easy. We’ll show you how in Benefits of connecting.
Note: If you decide not to connect, Guided Setup skips ahead to setting up the devices that you’ve connected to your TV. Jump ahead to Connect your devices to complete Guided Setup.
On models that have wireless only, and models with both wired and wireless when you’ve selected Wireless: The TV scans for the wireless networks within range and displays them in order, with the strongest signals first. In addition to your own wireless signal, the TV might pick up signals from your neighbors.
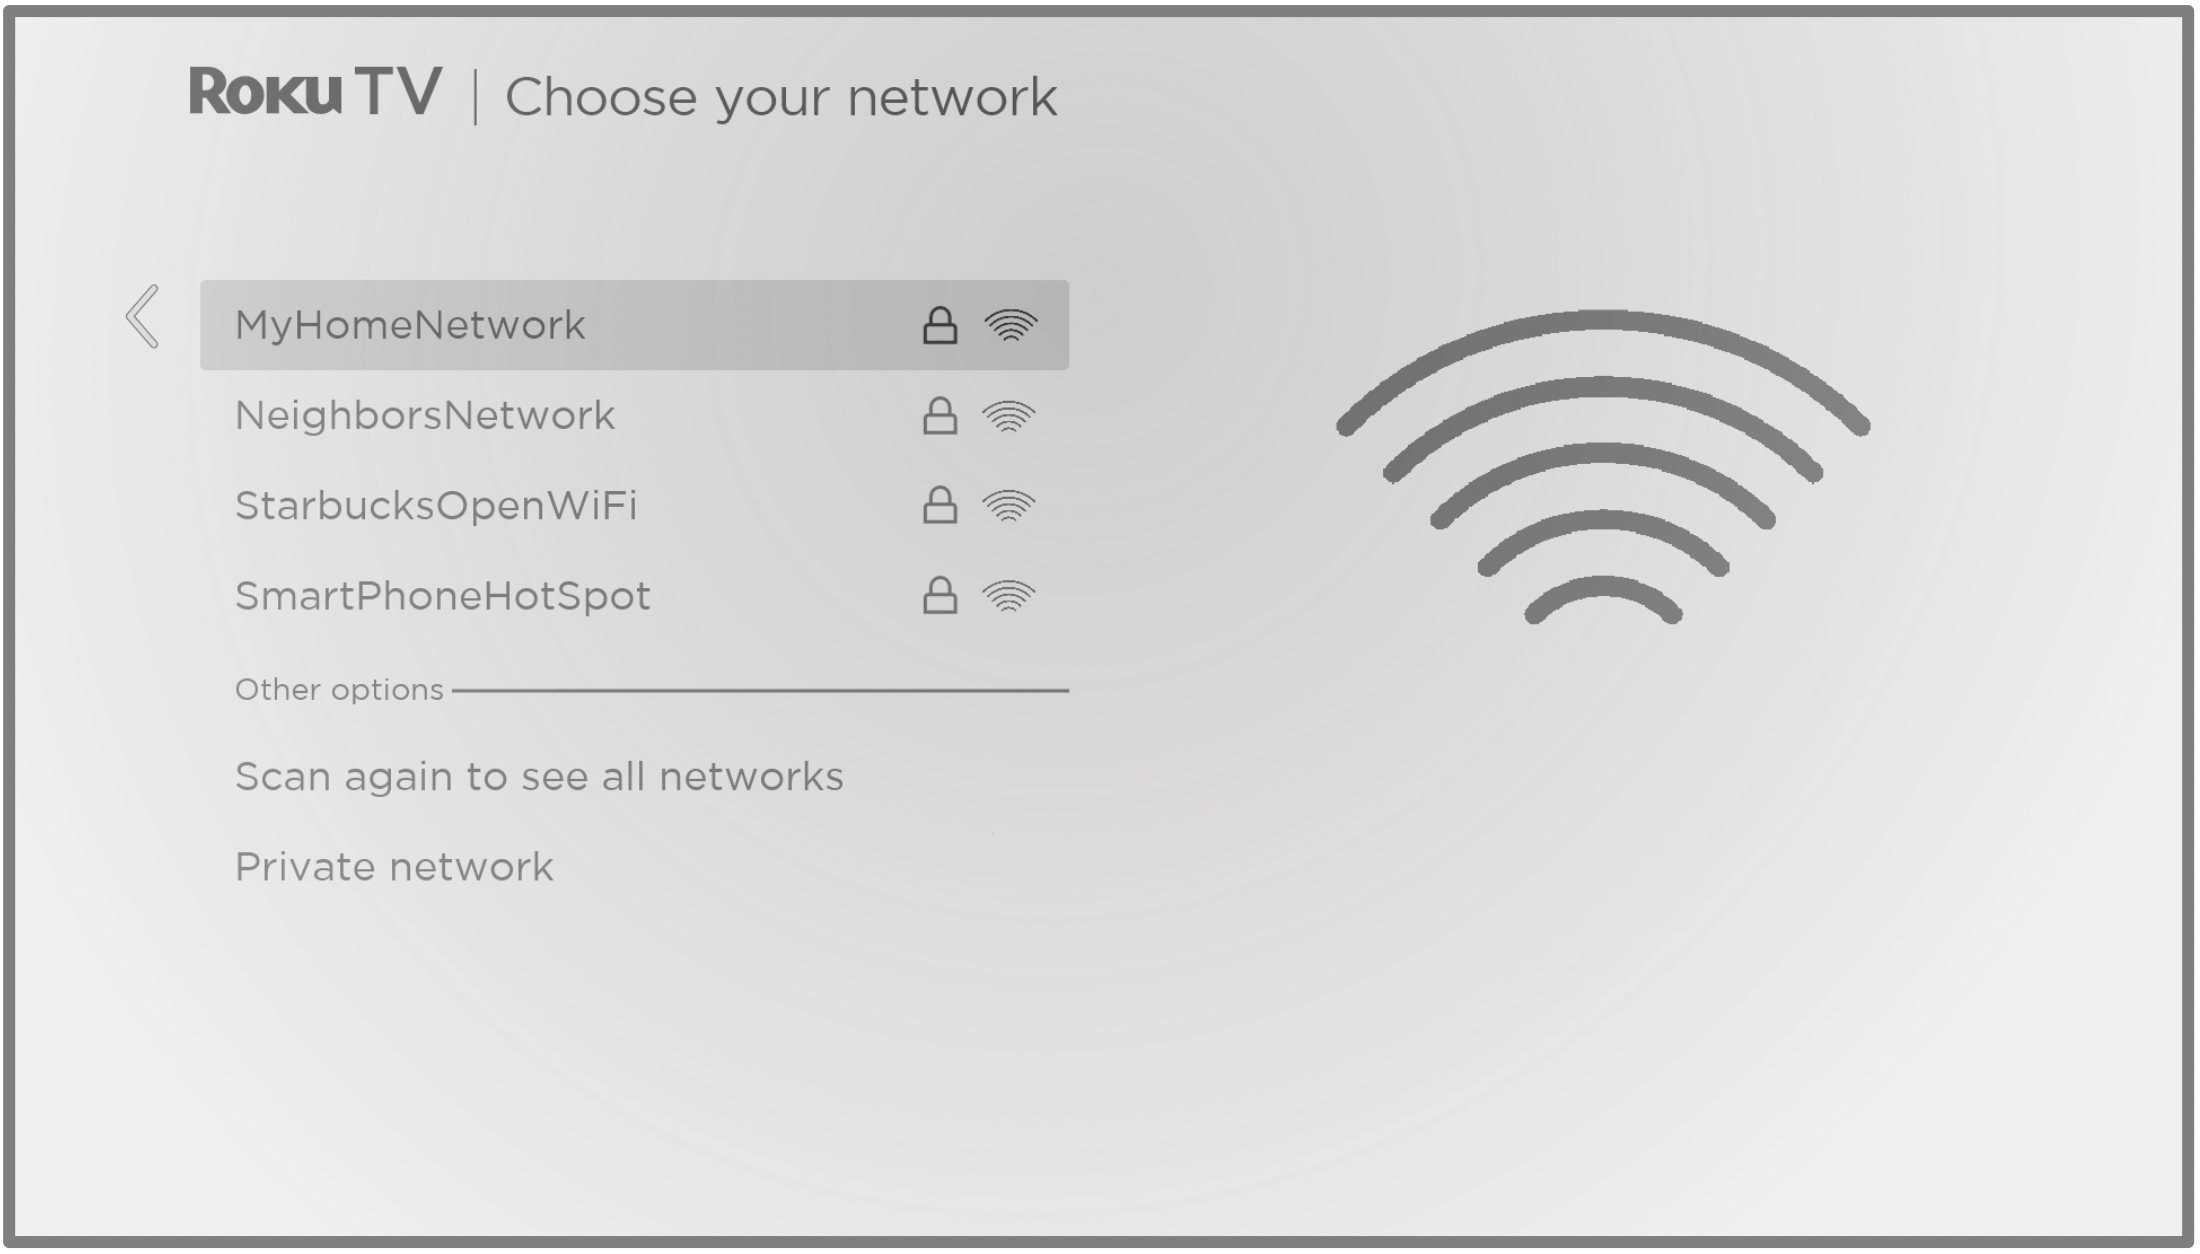
Press UP or DOWN to highlight the name of your wireless network, and then press OK to select it.
Note: Some networks, such as those often found in dorm rooms, hotels, and other public places, require you to read and agree to terms, enter a code, or provide identifying information before letting you connect to the Internet. If your TCL • Roku TV detects that you are connecting to such a network, it prompts you through the connection process using your smartphone or tablet to provide the needed information. For more information, see Using your TV in a hotel or dorm room.
Other options
- Scan again / Scan again to see all networks – The name of this option depends on the number of wireless networks within range.
- Scan again appears if the list already shows all available wireless networks within range. If you don’t see your wireless network name in the list, you might need to adjust the location of your wireless router or the TV, turn on your router, or make other changes. When everything is ready, select Scan again to see if your network name now appears in the list.
- Scan again to see all networks appears if there are more wireless networks than the strongest ones it initially listed. If you don’t see your wireless network name in the list, this option displays the complete list. If you still don’t see your network name, you might have your router configured to provide wireless service as a “private network.”
Note: Highlighting either of these options displays an informational panel with the unique media access control (MAC) address of your TCL • Roku TV. You will need the MAC address if your wireless router is configured to use MAC address filtering.
- Private network – If your wireless network name is hidden, it won’t appear in the list. Select Private network and then press OK to display an on-screen keyboard. Use the keyboard to enter your network name. Unless you changed the factory-set network name, you can find the name (also called SSID) on a label on the router.
Tip: Wireless networks that are password-protected display a “padlock” icon adjacent to the name. This icon enables you to know that you are going to be prompted to enter a password after you select that network.
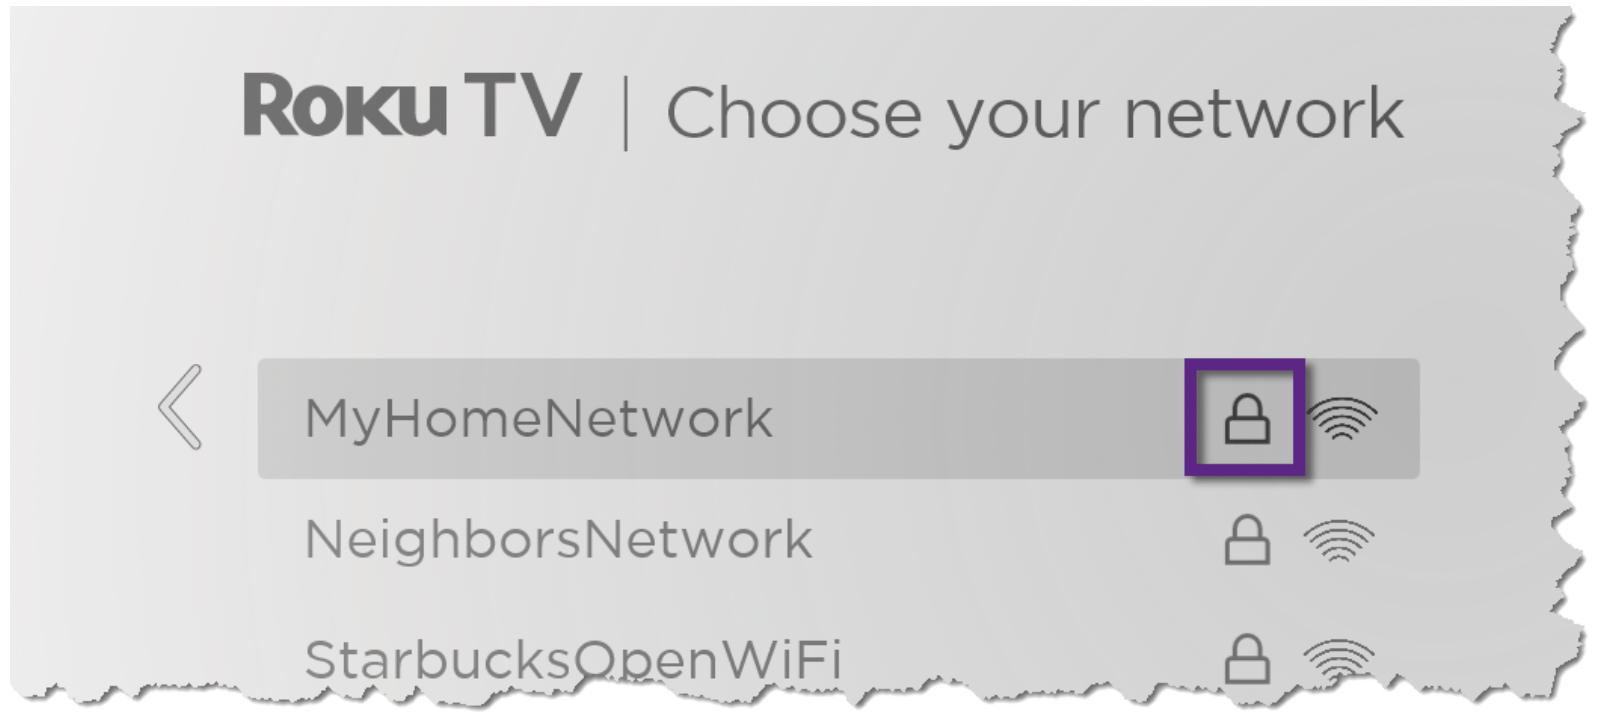
Only if you select a password protected wireless network: An on-screen keyboard appears. Enter your wireless network password by using the purple directional pad to navigate the keyboard, and pressing OK to select a highlighted letter, number, or symbol. When you finish, press DOWN to select Connect, and then press OK.
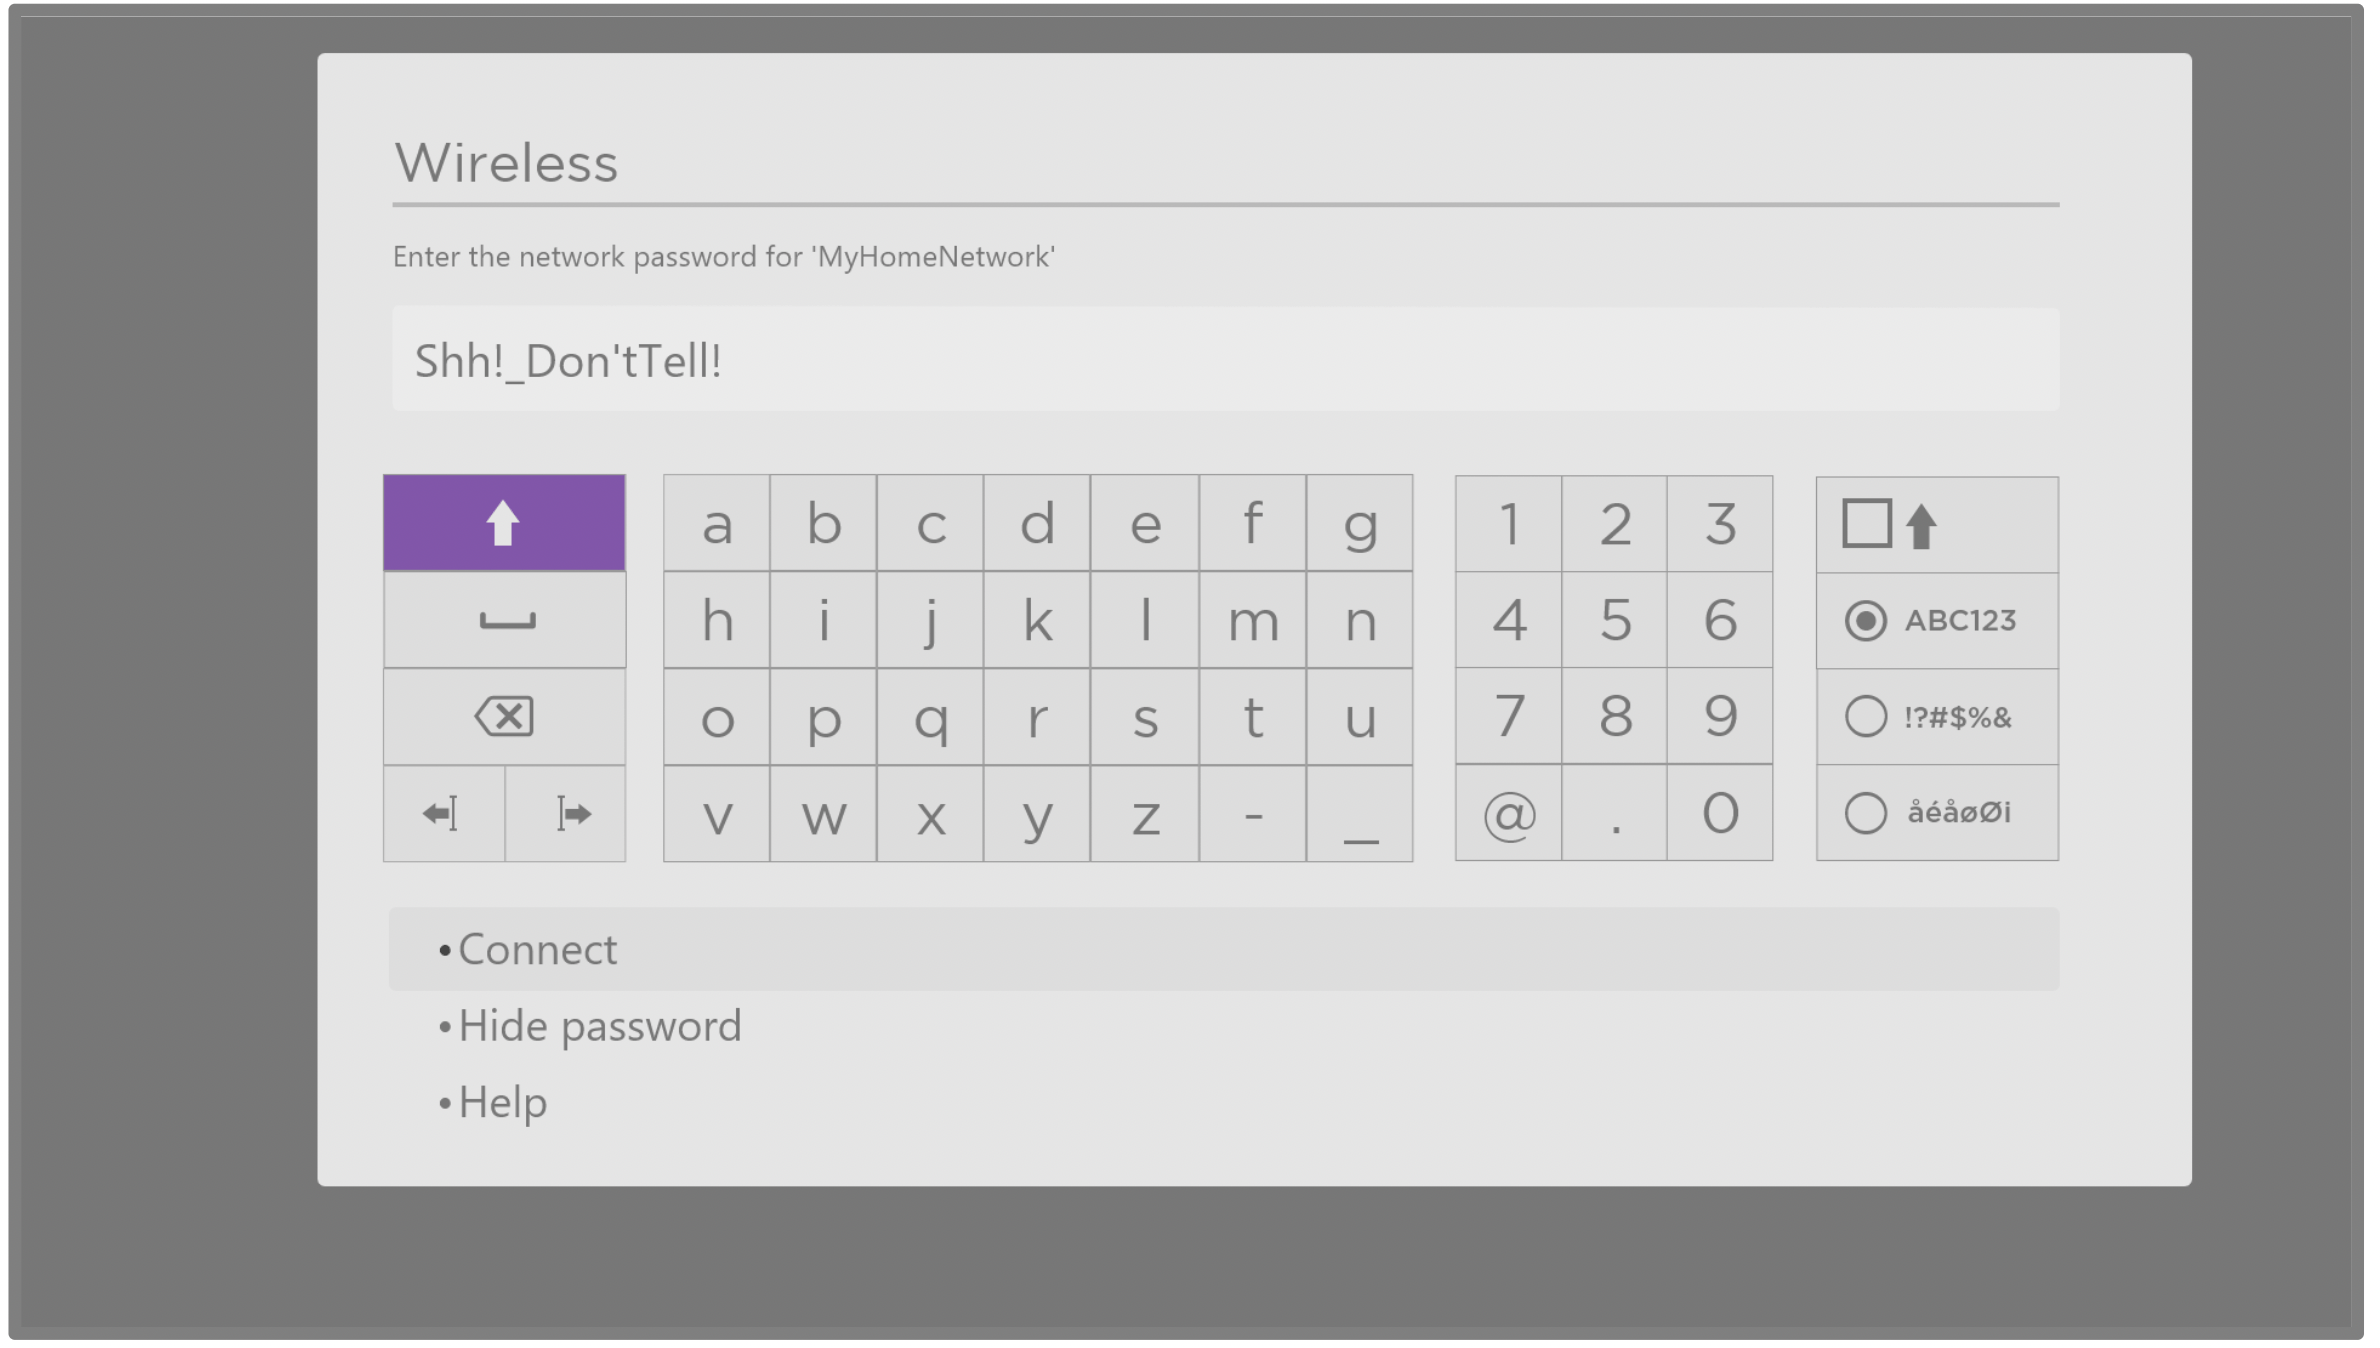
After you select Connect, the TV displays progress messages as it connects to your wireless network, your local network, and the Internet.
Only if your TV cannot get the correct time zone and current time from your network service provider: The Choose your time zone screen appears. Press UP or DOWN to highlight your time zone, and then press OK.
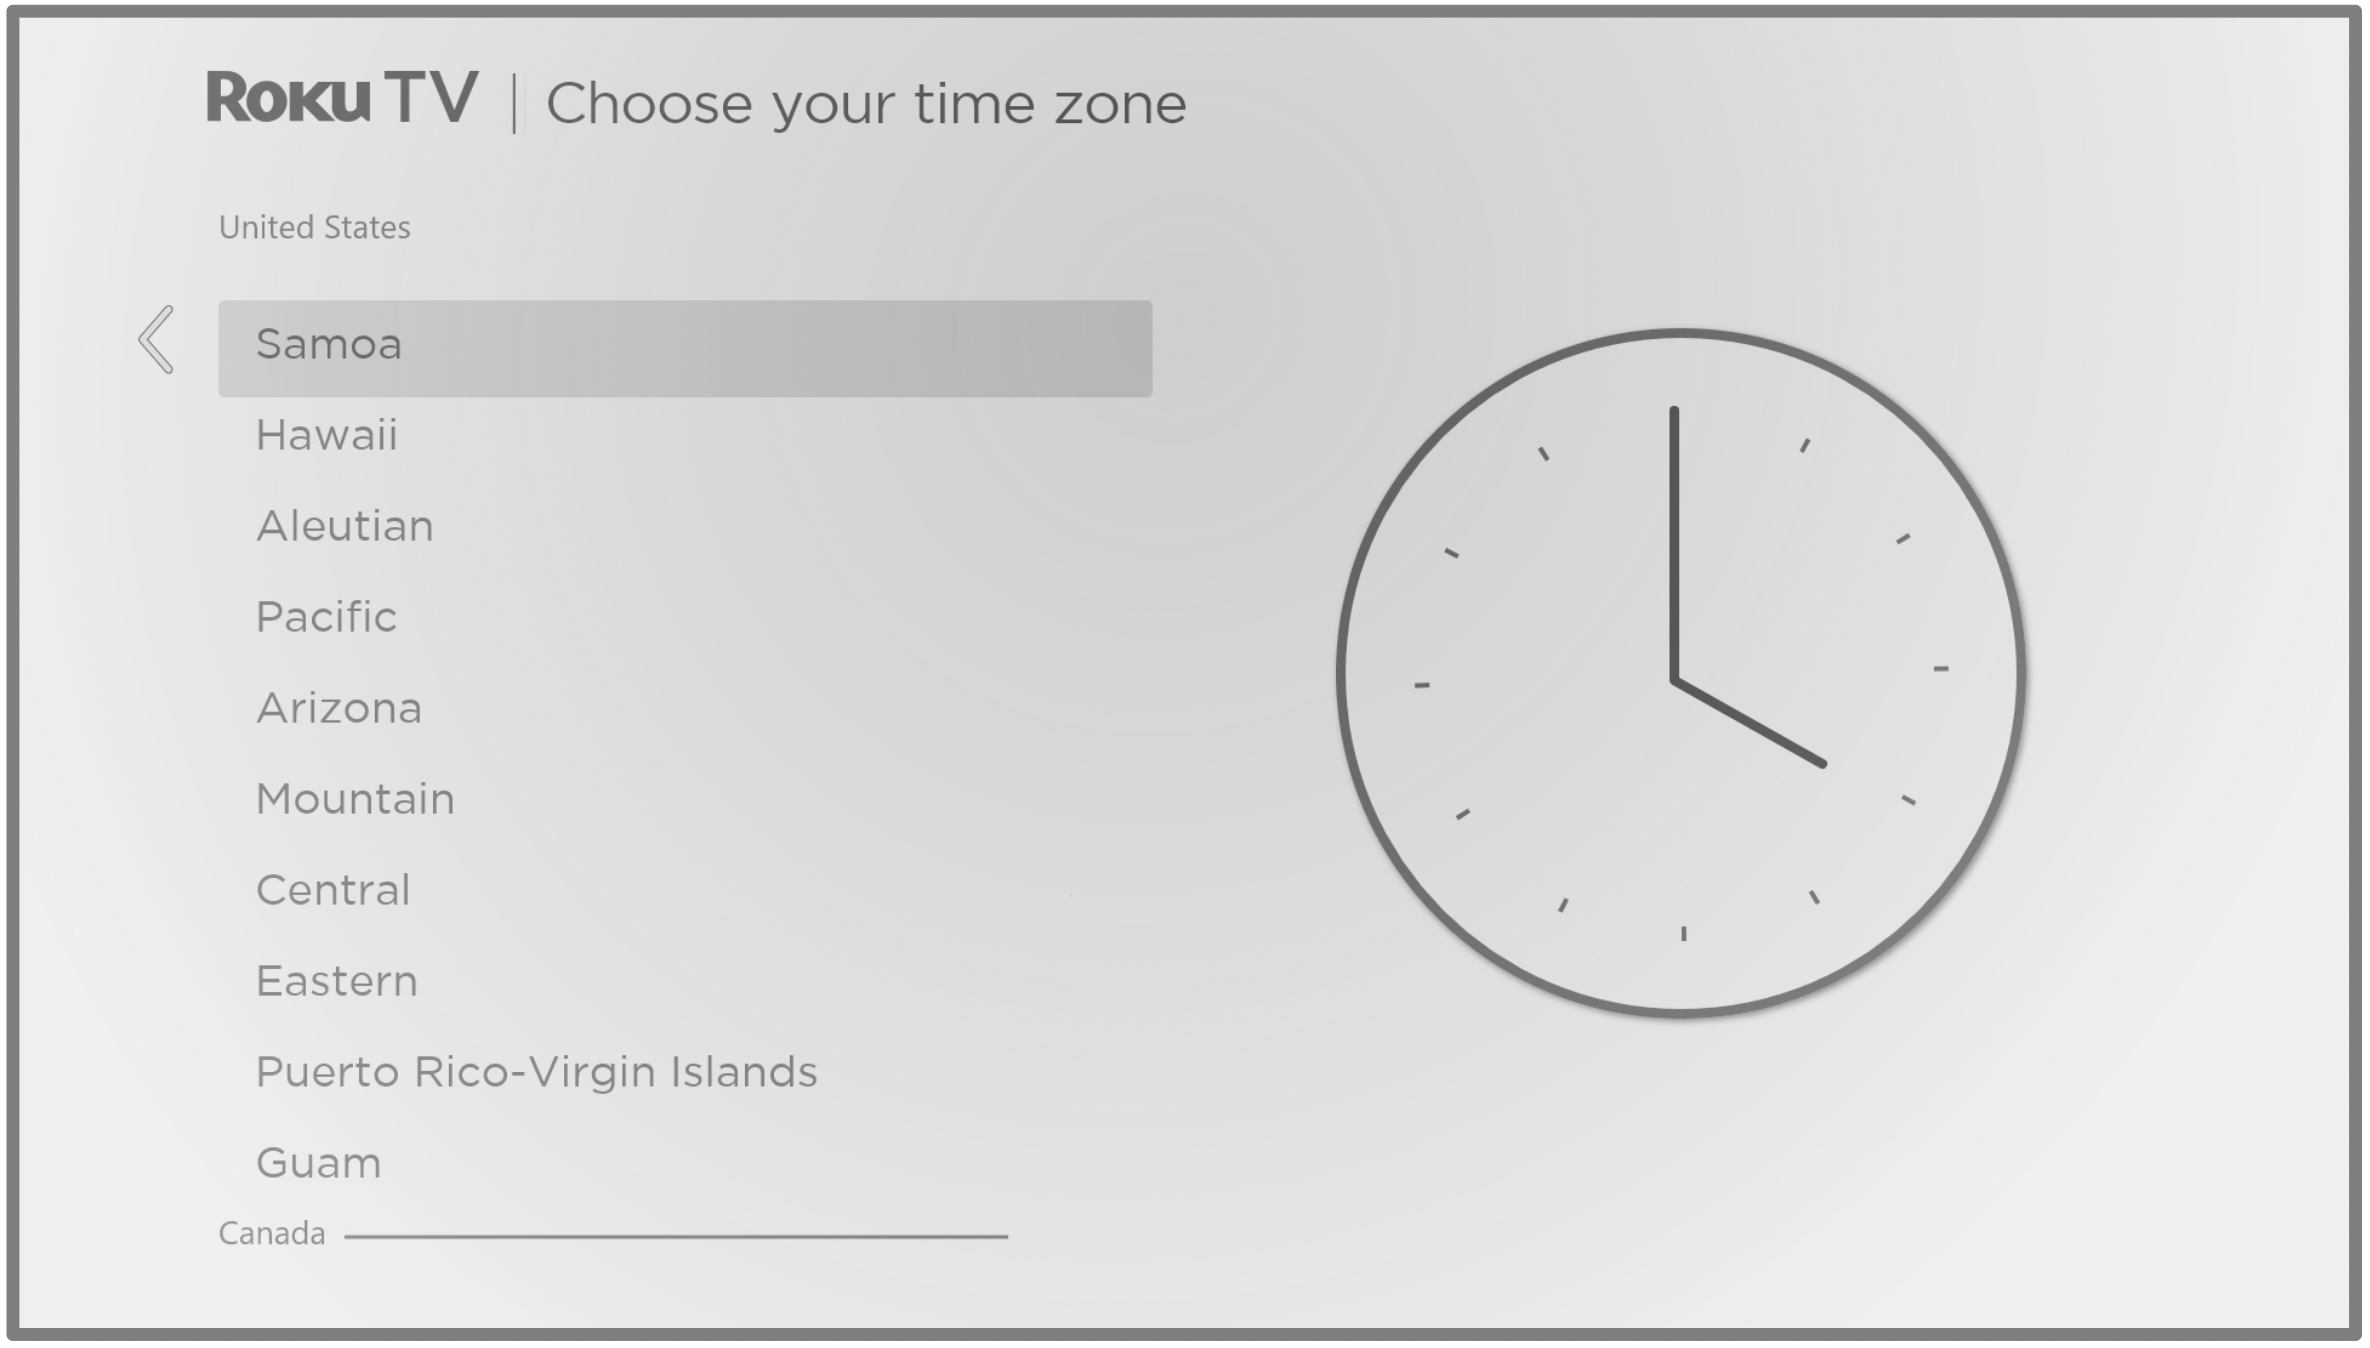
Tips: Your TV needs to know the local time zone so that it can correctly display information about the program you are currently watching.
Your TV automatically checks for updates periodically. These updates provide new features and improve your overall experience with the TV. After an update, you might notice that some options have moved, and that there are new options or features. This User Guide describes version 10.5. To determine your current TCL • Roku TV software version, go to Settings > System > About after you complete Guided Setup. You can download an updated User Guide that matches your TCL • Roku TV software version from the TCL • Roku TV web site.
Activation
After the TV restarts, it prompts you through activation.
Use a computer, tablet, or smartphone with an Internet connection to link to a new or existing Roku account.
Note: Roku does not charge for activation support – beware of scams. For detailed information, see How do I protect myself from activation and technical support scams?
After you activate your TV, the TV gets an acknowledgement, and then adds your newly-selected and pre-existing streaming channels from other Roku devices on the same account. This process is automatic and takes a few moments—a little longer if you have added a lot of streaming channels.
Tip: Streaming channels from all of the Roku streaming devices associated with your account are synchronized periodically. All of your Roku streaming devices therefore display the same set of channels (subject to compatibility with the device).
Connect your devices
Next, Guided Setup helps you set up the external devices that you want to use with it, such as a cable box, Blu-ray™ player, or game console.
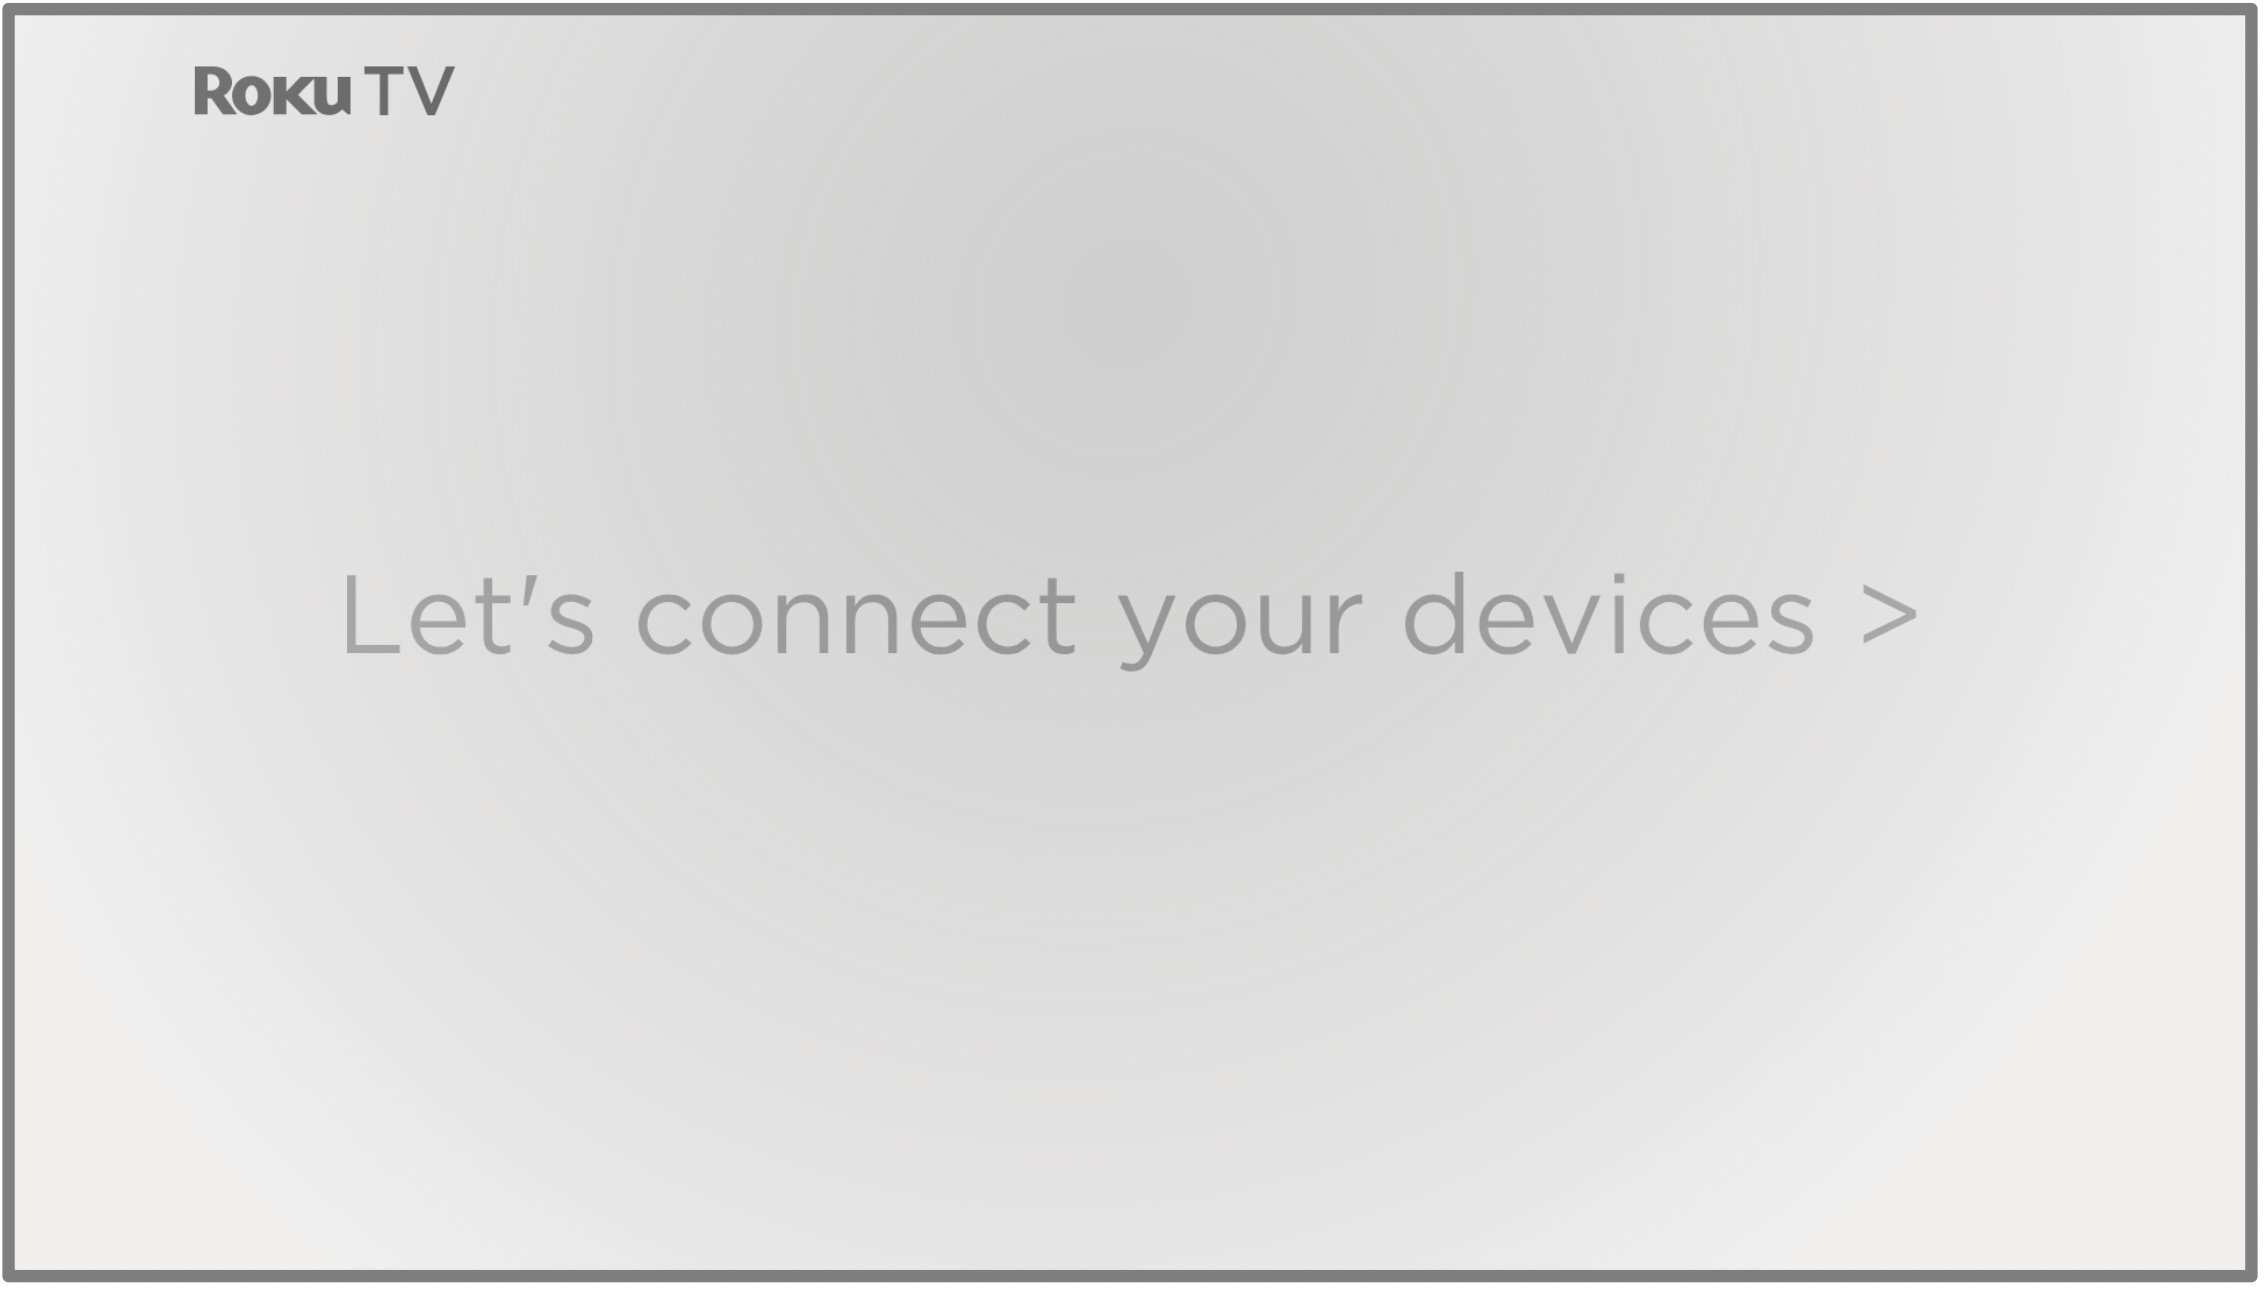
- Press OK to proceed:
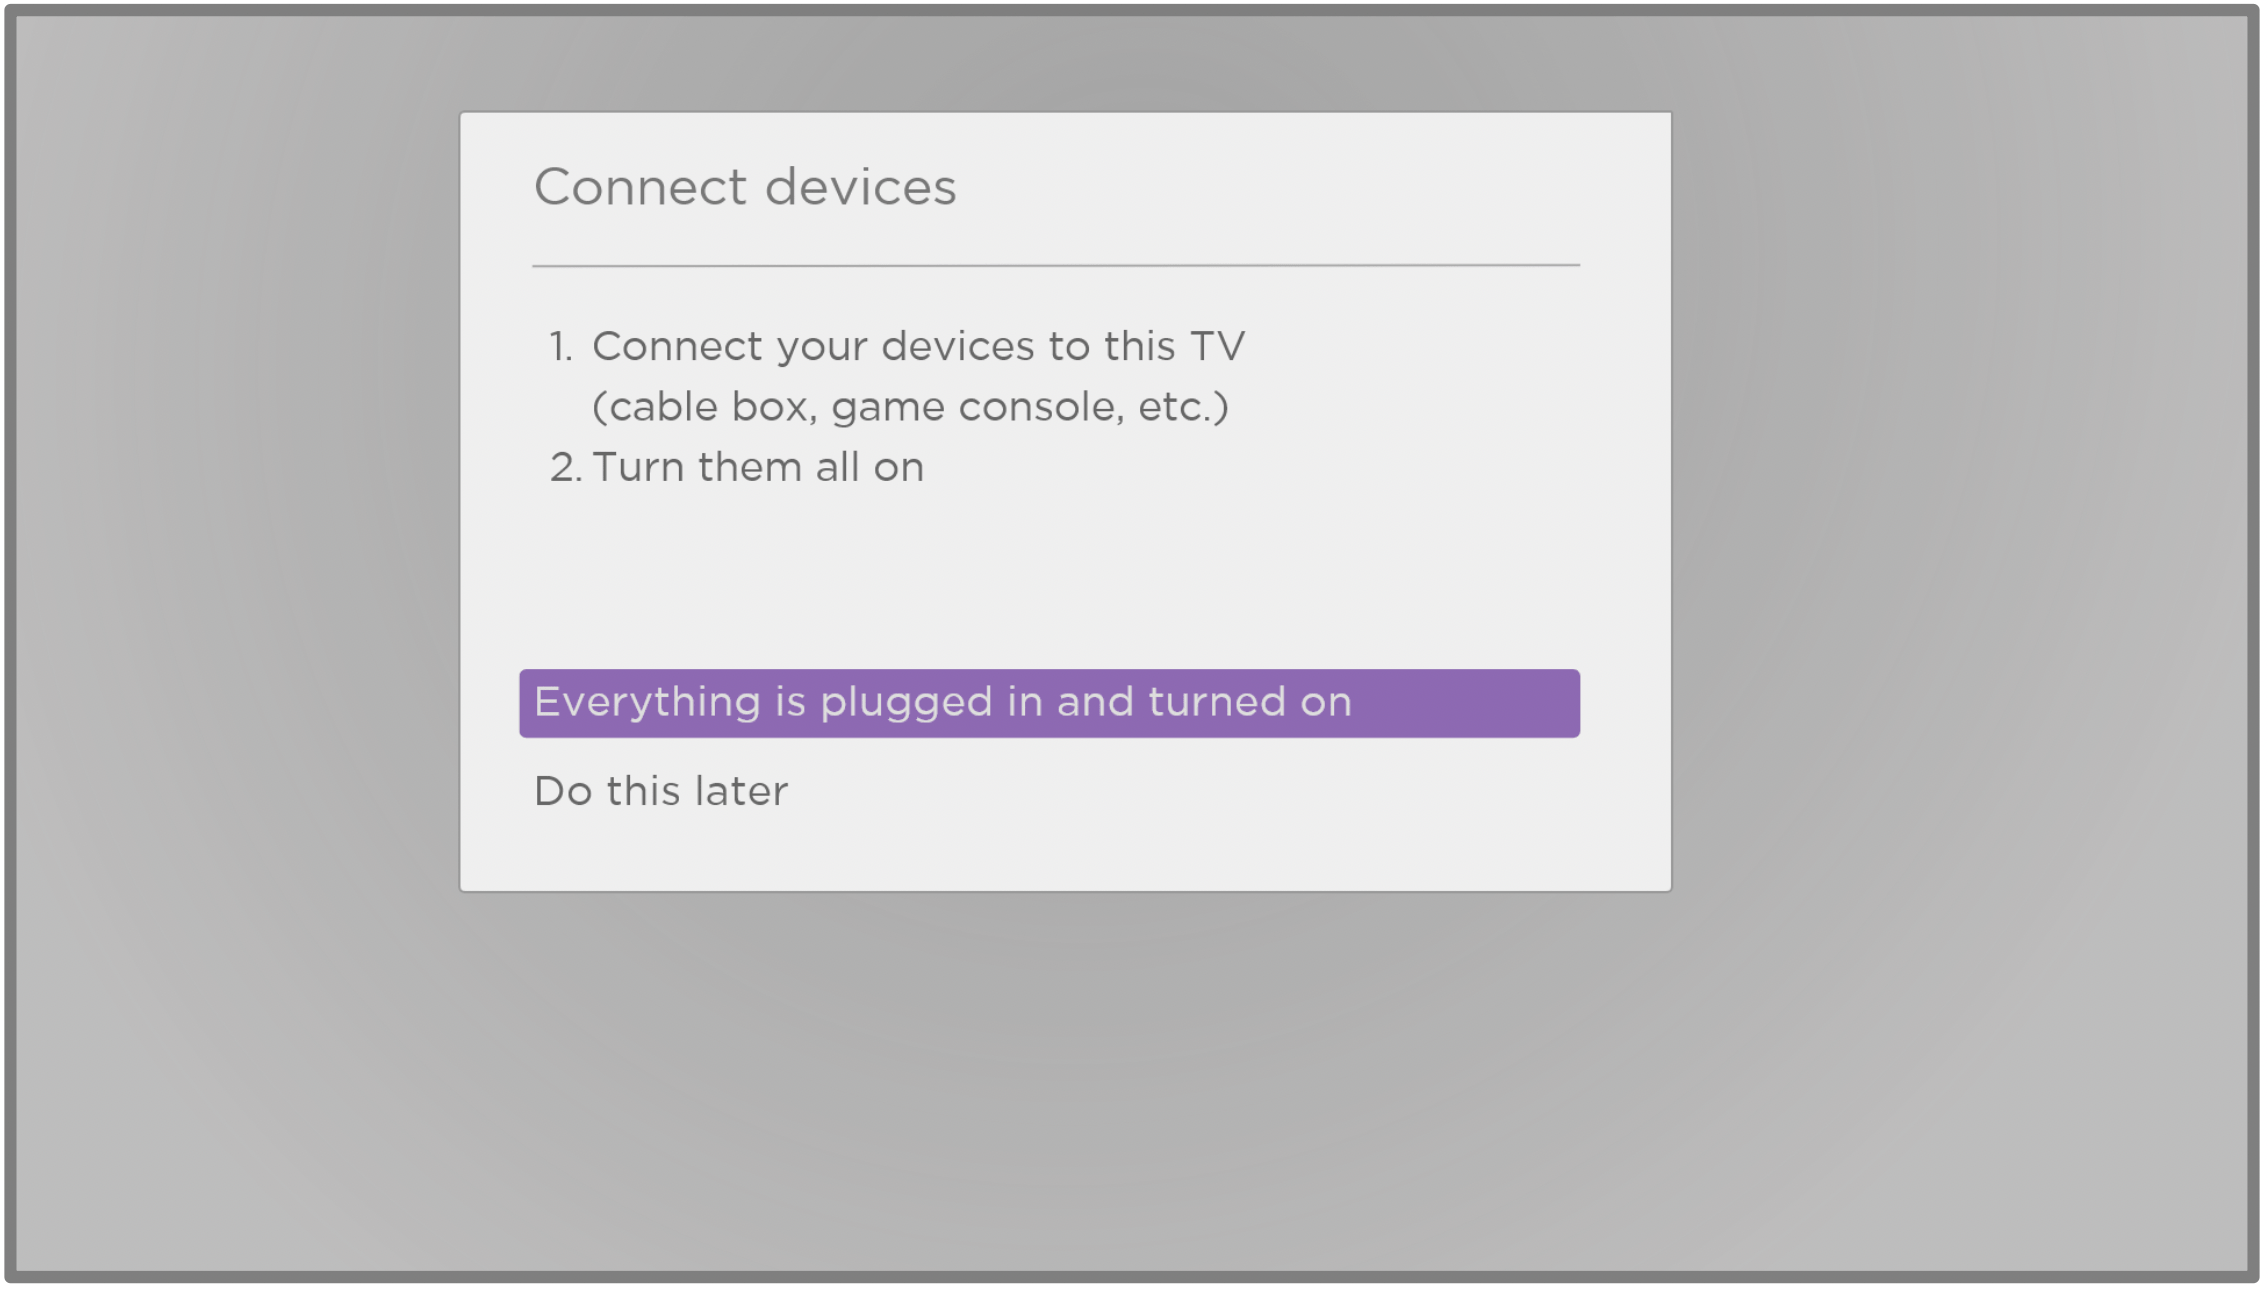
- Connect all the devices you plan to use with your TV, turn them all on, and then select Everything is plugged in and turned on. The TV now takes you step by step through each of its inputs and asks what kind of device you have connected. For each input that has a connected and active device, you can see its picture and hear its sound.
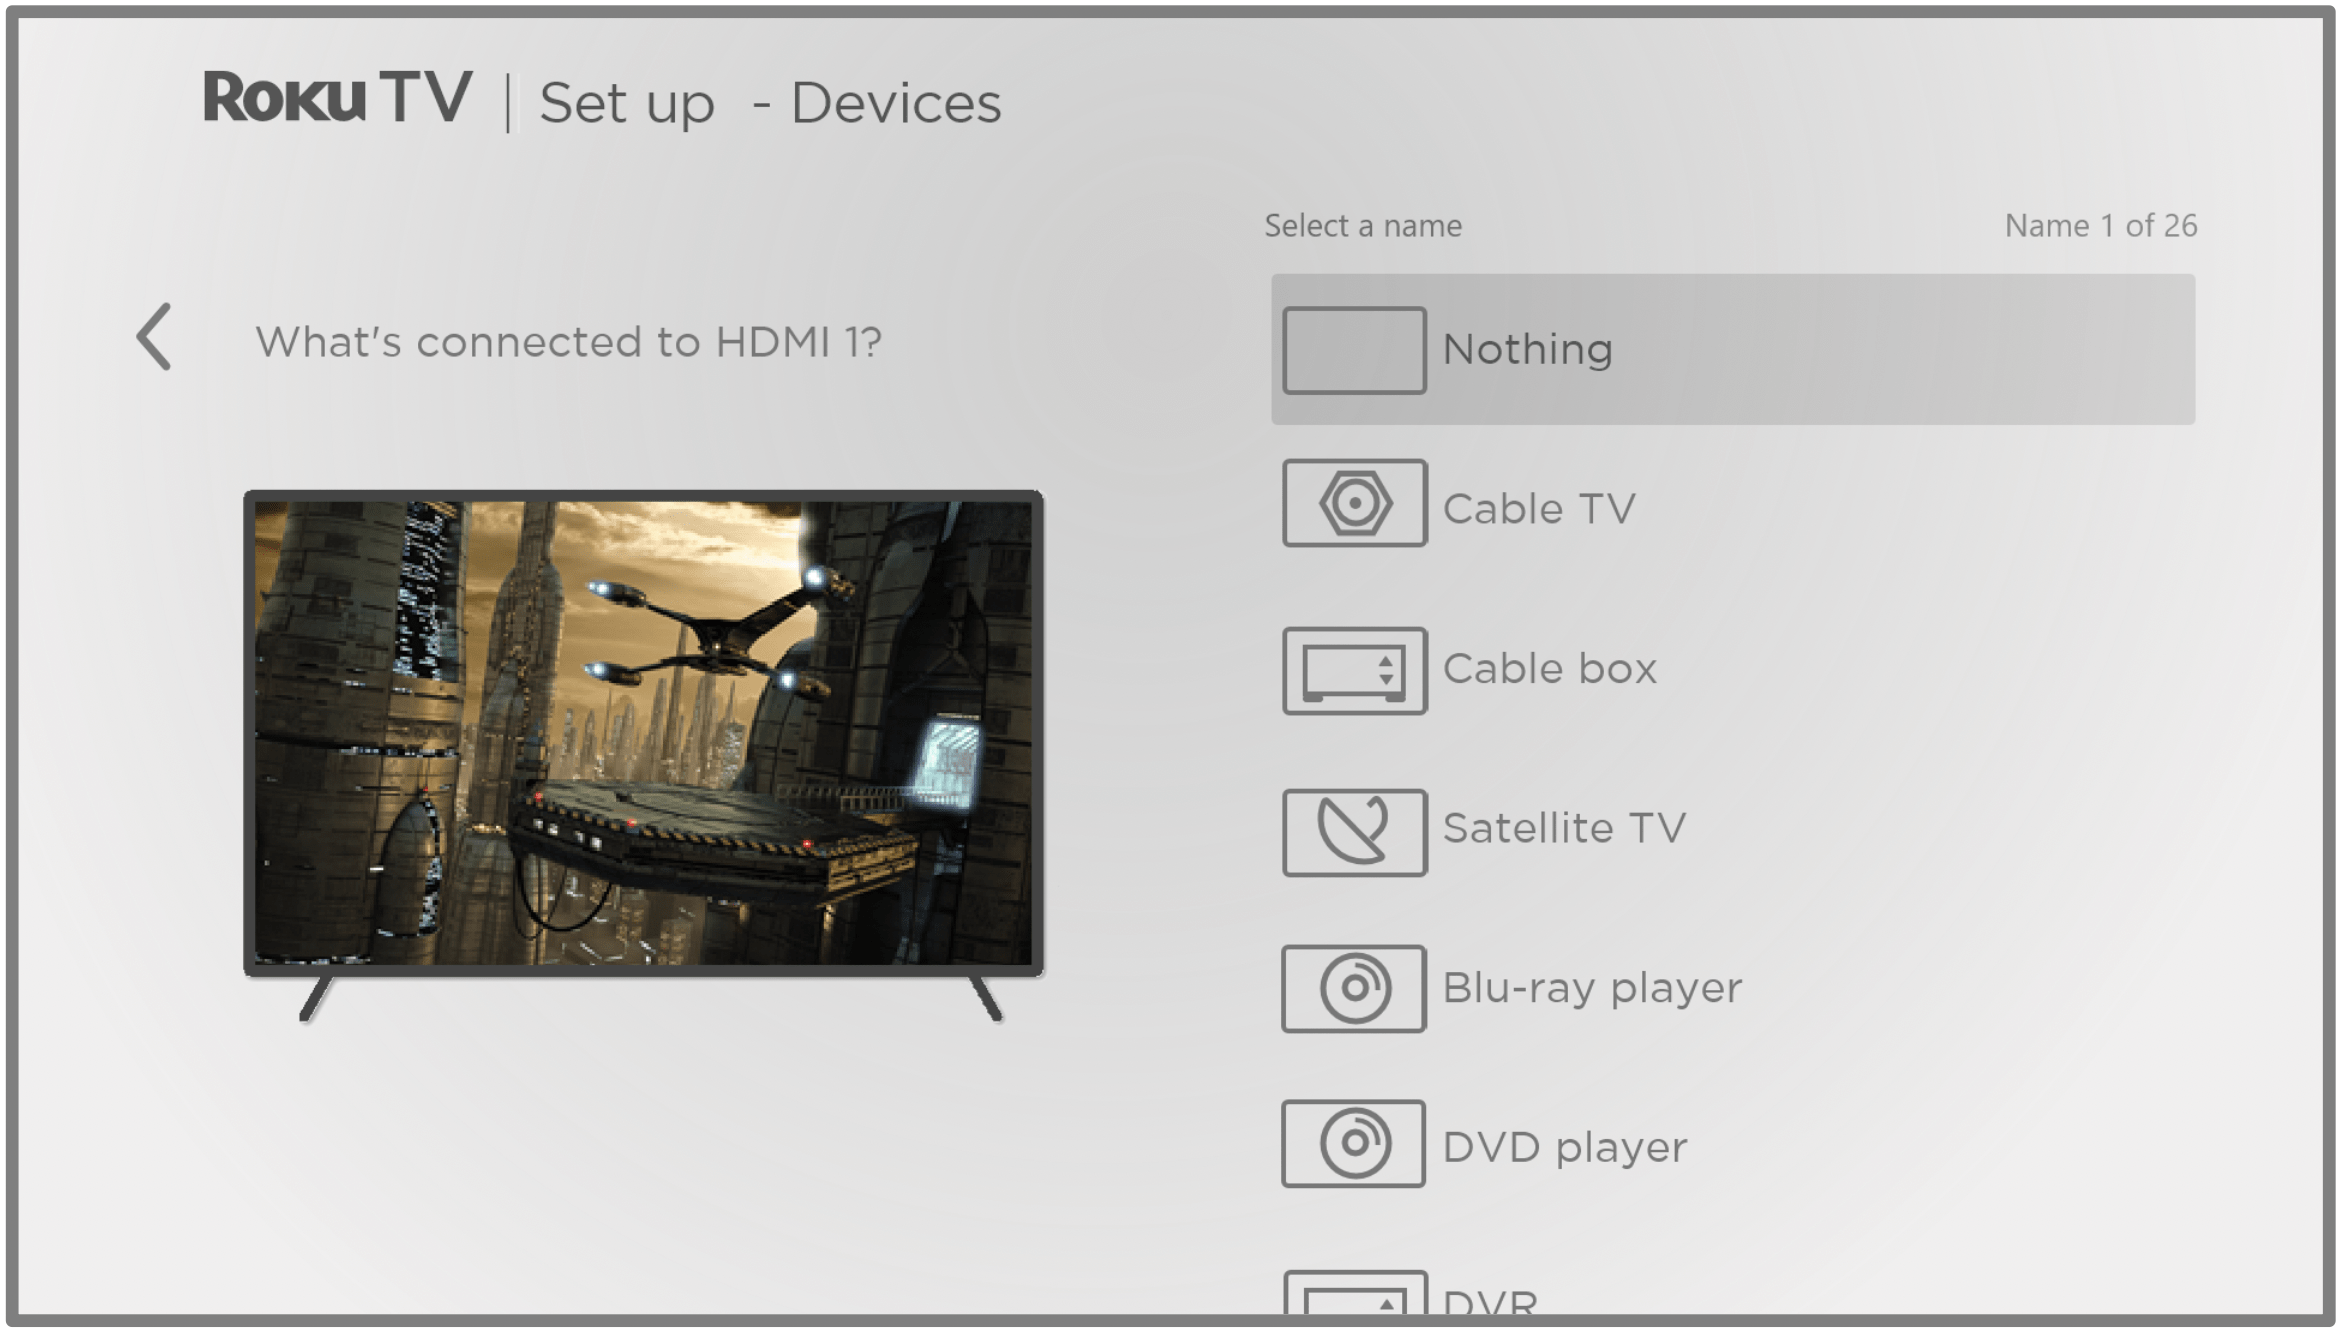
- Press UP or DOWN to highlight the label you want to associate with the input, and then press OK. If you are not using the input, select Nothing, and the input won’t appear on the Home screen.
- While setting up your devices, rather than using the predefined names and icons, you can set a custom name and icon. To do so, scroll up or down to highlight Set custom name & icon, and then press OK. Follow the instructions on the screen to enter a name and select an icon for the input. See Rename inputs for more information.
Note: If you specify a custom name for an input, voice commands will not reliably switch to that input. Voice commands typically can only switch among inputs that use built-in names, such as “AV,” and “Cable Box,” and “DVR.” - Repeat the previous step for each input.

Note: Some TCL • Roku TVs, depending on where you live and other factors, show you an introductory video filled with some great hints and tips. If you’re not interested in viewing this video, press HOME  on the remote to go to the TCL • Roku TV Home screen.
Whenever you press HOME  , the Home screen greets you.
From here, you can explore everything your TV has to offer. Use the purple directional pad to move around, and then press OK to select a highlighted item. We’ve designed the TV to encourage you to explore, and you can probably figure out most of the capabilities and settings on your own. If you have any questions or difficulties, you can find answers and solutions in this guide.
The Home screen
The following illustrations show typical Home screens, which vary depending on location, connected mode, selected theme, number of TV inputs enabled, and streaming channels and apps added.
Note: A paid subscription or other payments may be required for some channel content. Channel availability is subject to change and varies by country. Not all content is available in countries or regions where Roku ® products are sold.
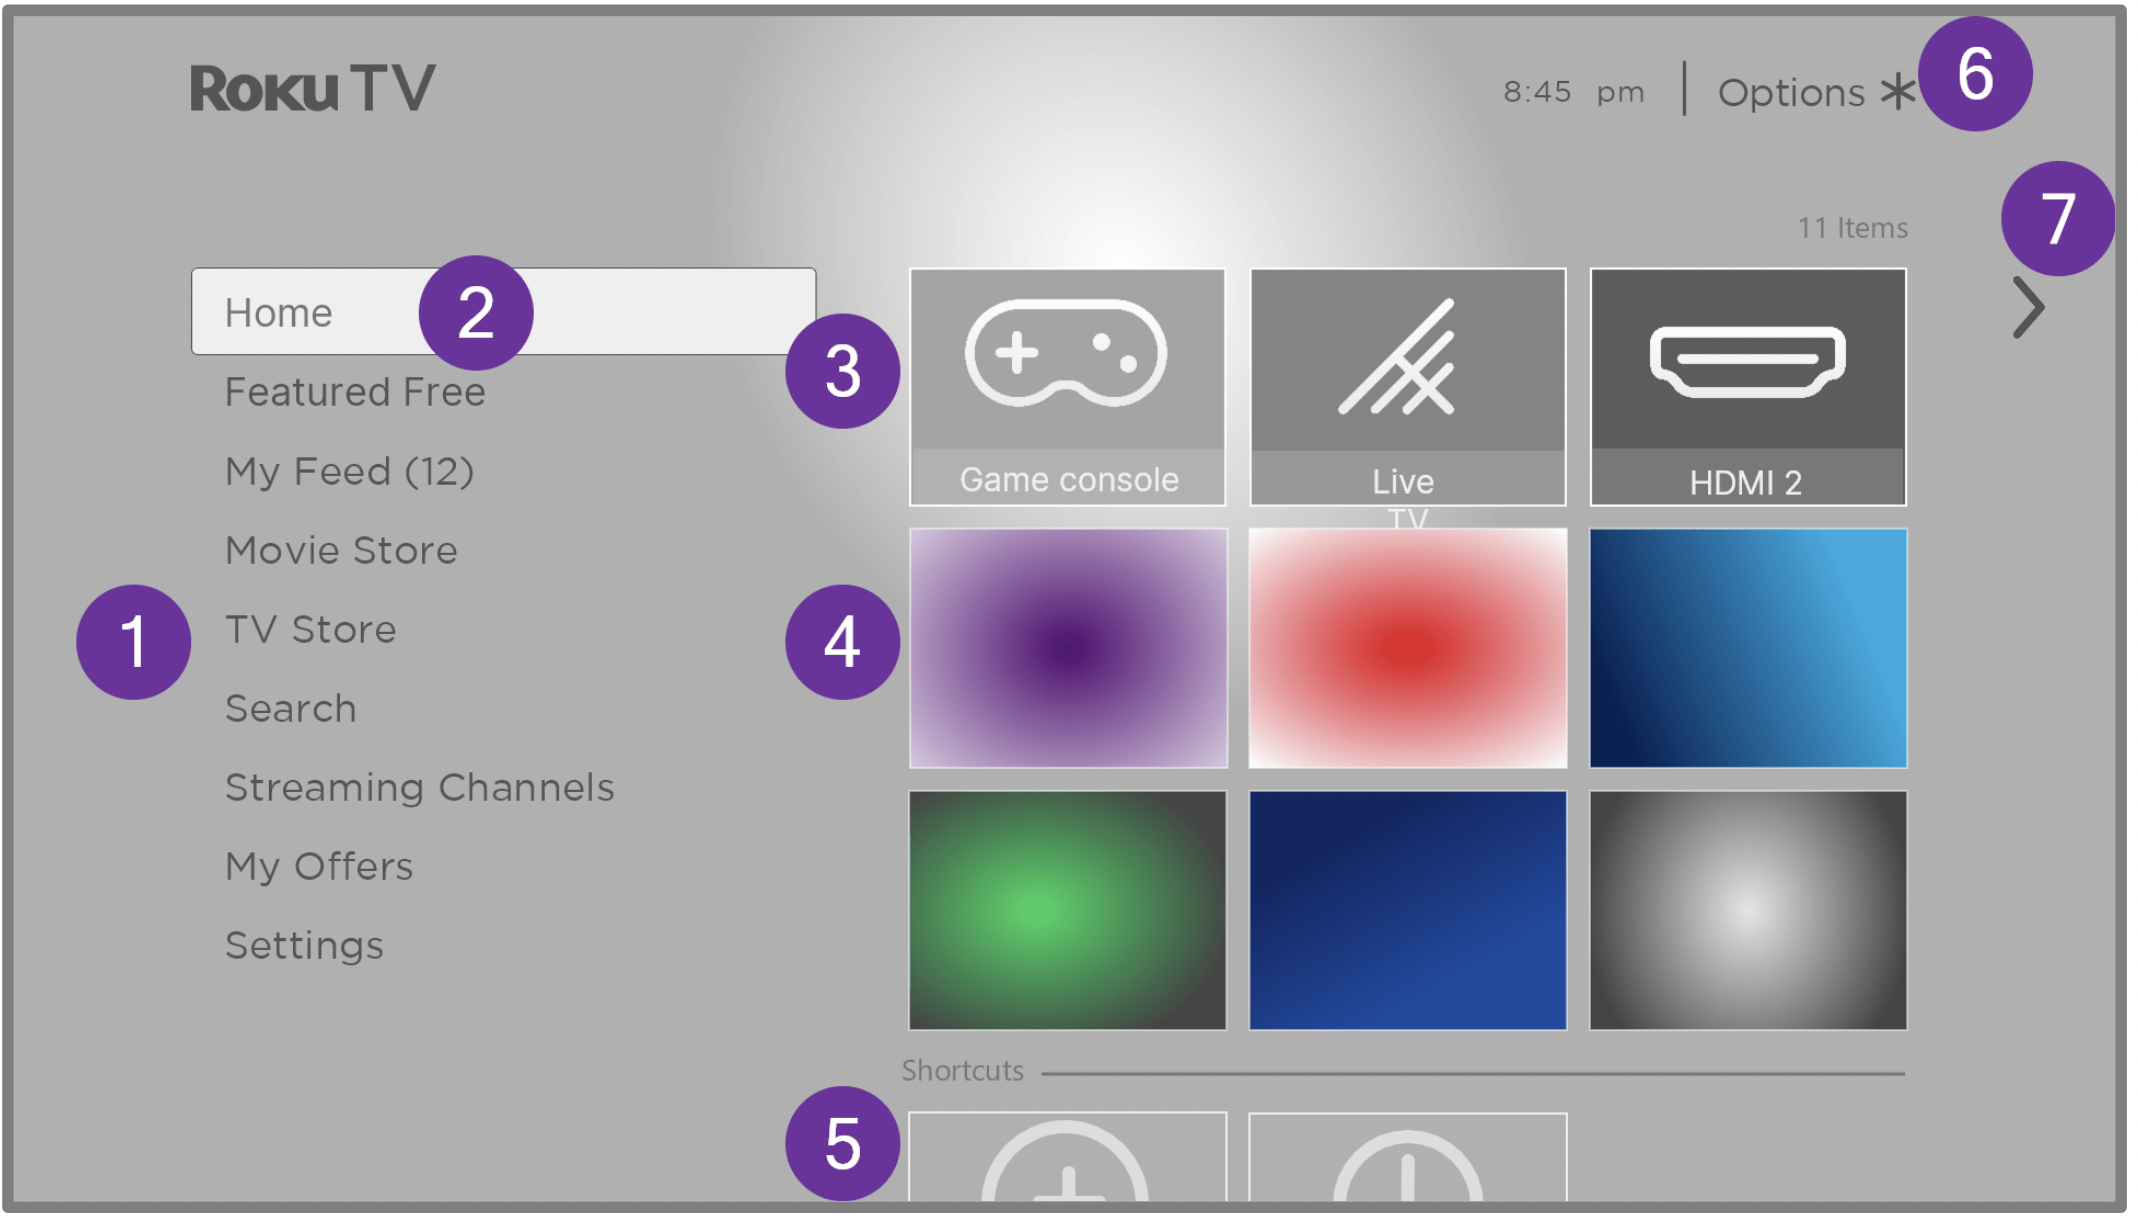
Typical connected Home screen
- Home screen menu — shows options available to you when you are on the Home screen.
- Highlighted option — press OK to select.
- TV input tiles — select an input to watch the connected device.
- Streaming channel and app tiles — select a tile and press OK to go to the indicated streaming channel or application. You can add any number of channels from the Roku Channel Store.
- Direct access tiles – shortcuts to often used features.
- Options hint — press STAR
 to see options when this symbol is present.
 - Next screen hint — press RIGHT to see the next screen.
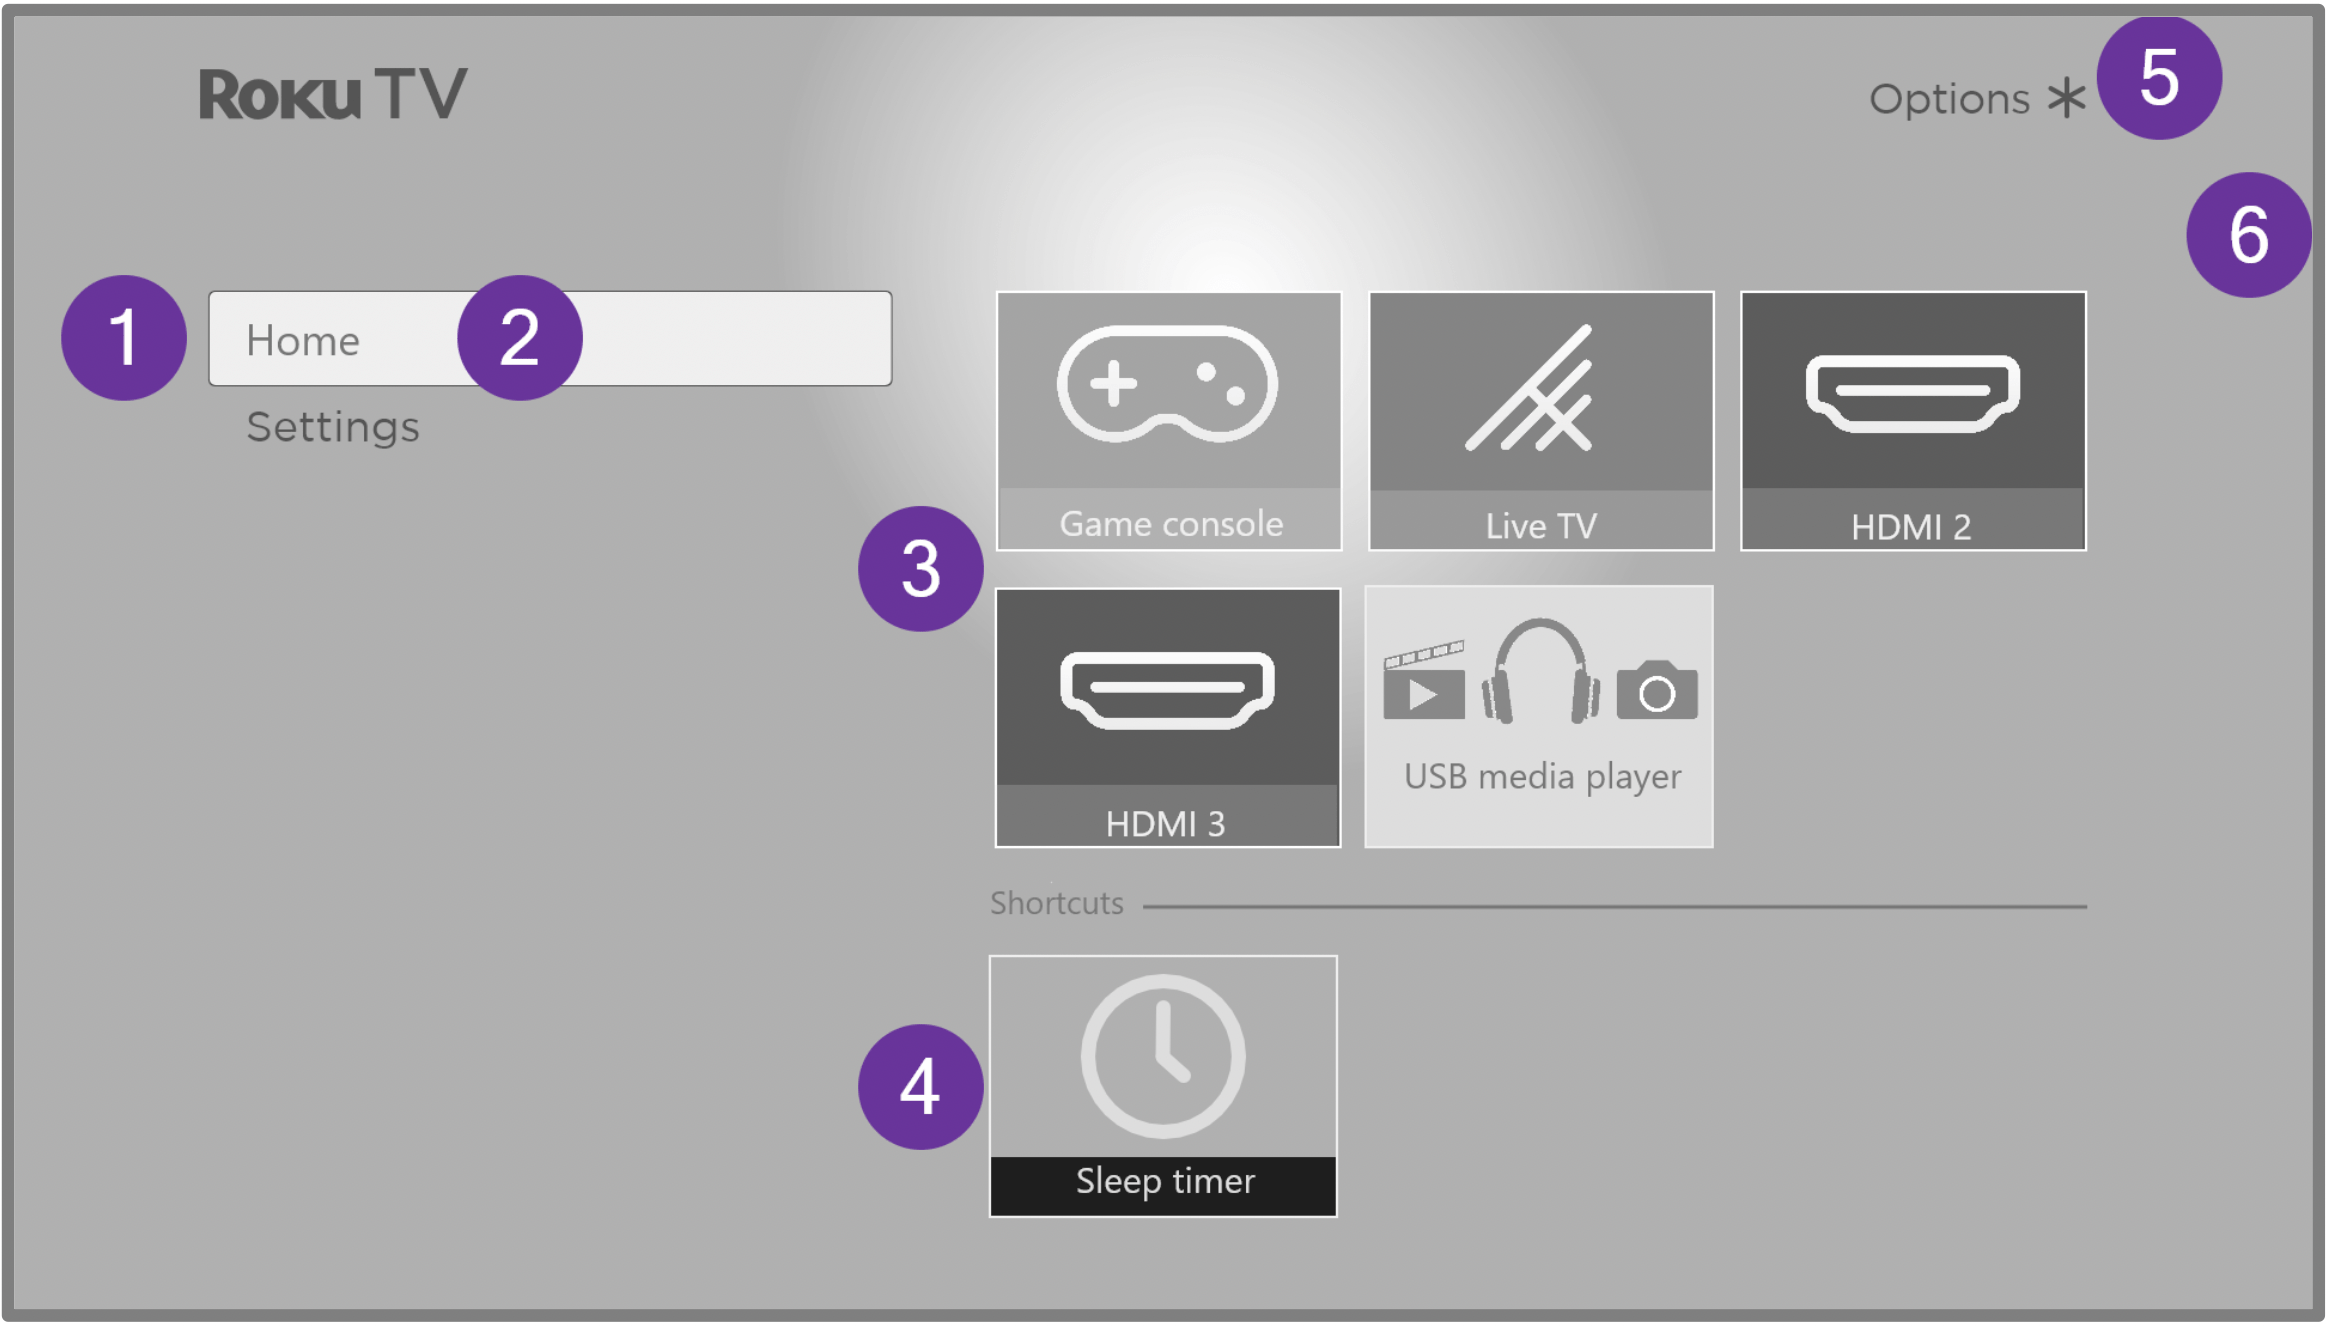
Typical non-connected Home screen
- Home screen menu — shows options available to you when you are on the Home screen.
- Highlighted option — press OK to select.
- TV input tiles — select an input and press OK to watch the connected device.
- Direct access tiles – shortcuts to often used features.
- Options hint — press STAR
 for options when this symbol is present.
 - Next screen hint — press RIGHT to see the next screen.
Using your TV
This section provides information on using the day-to-day features of your TV.
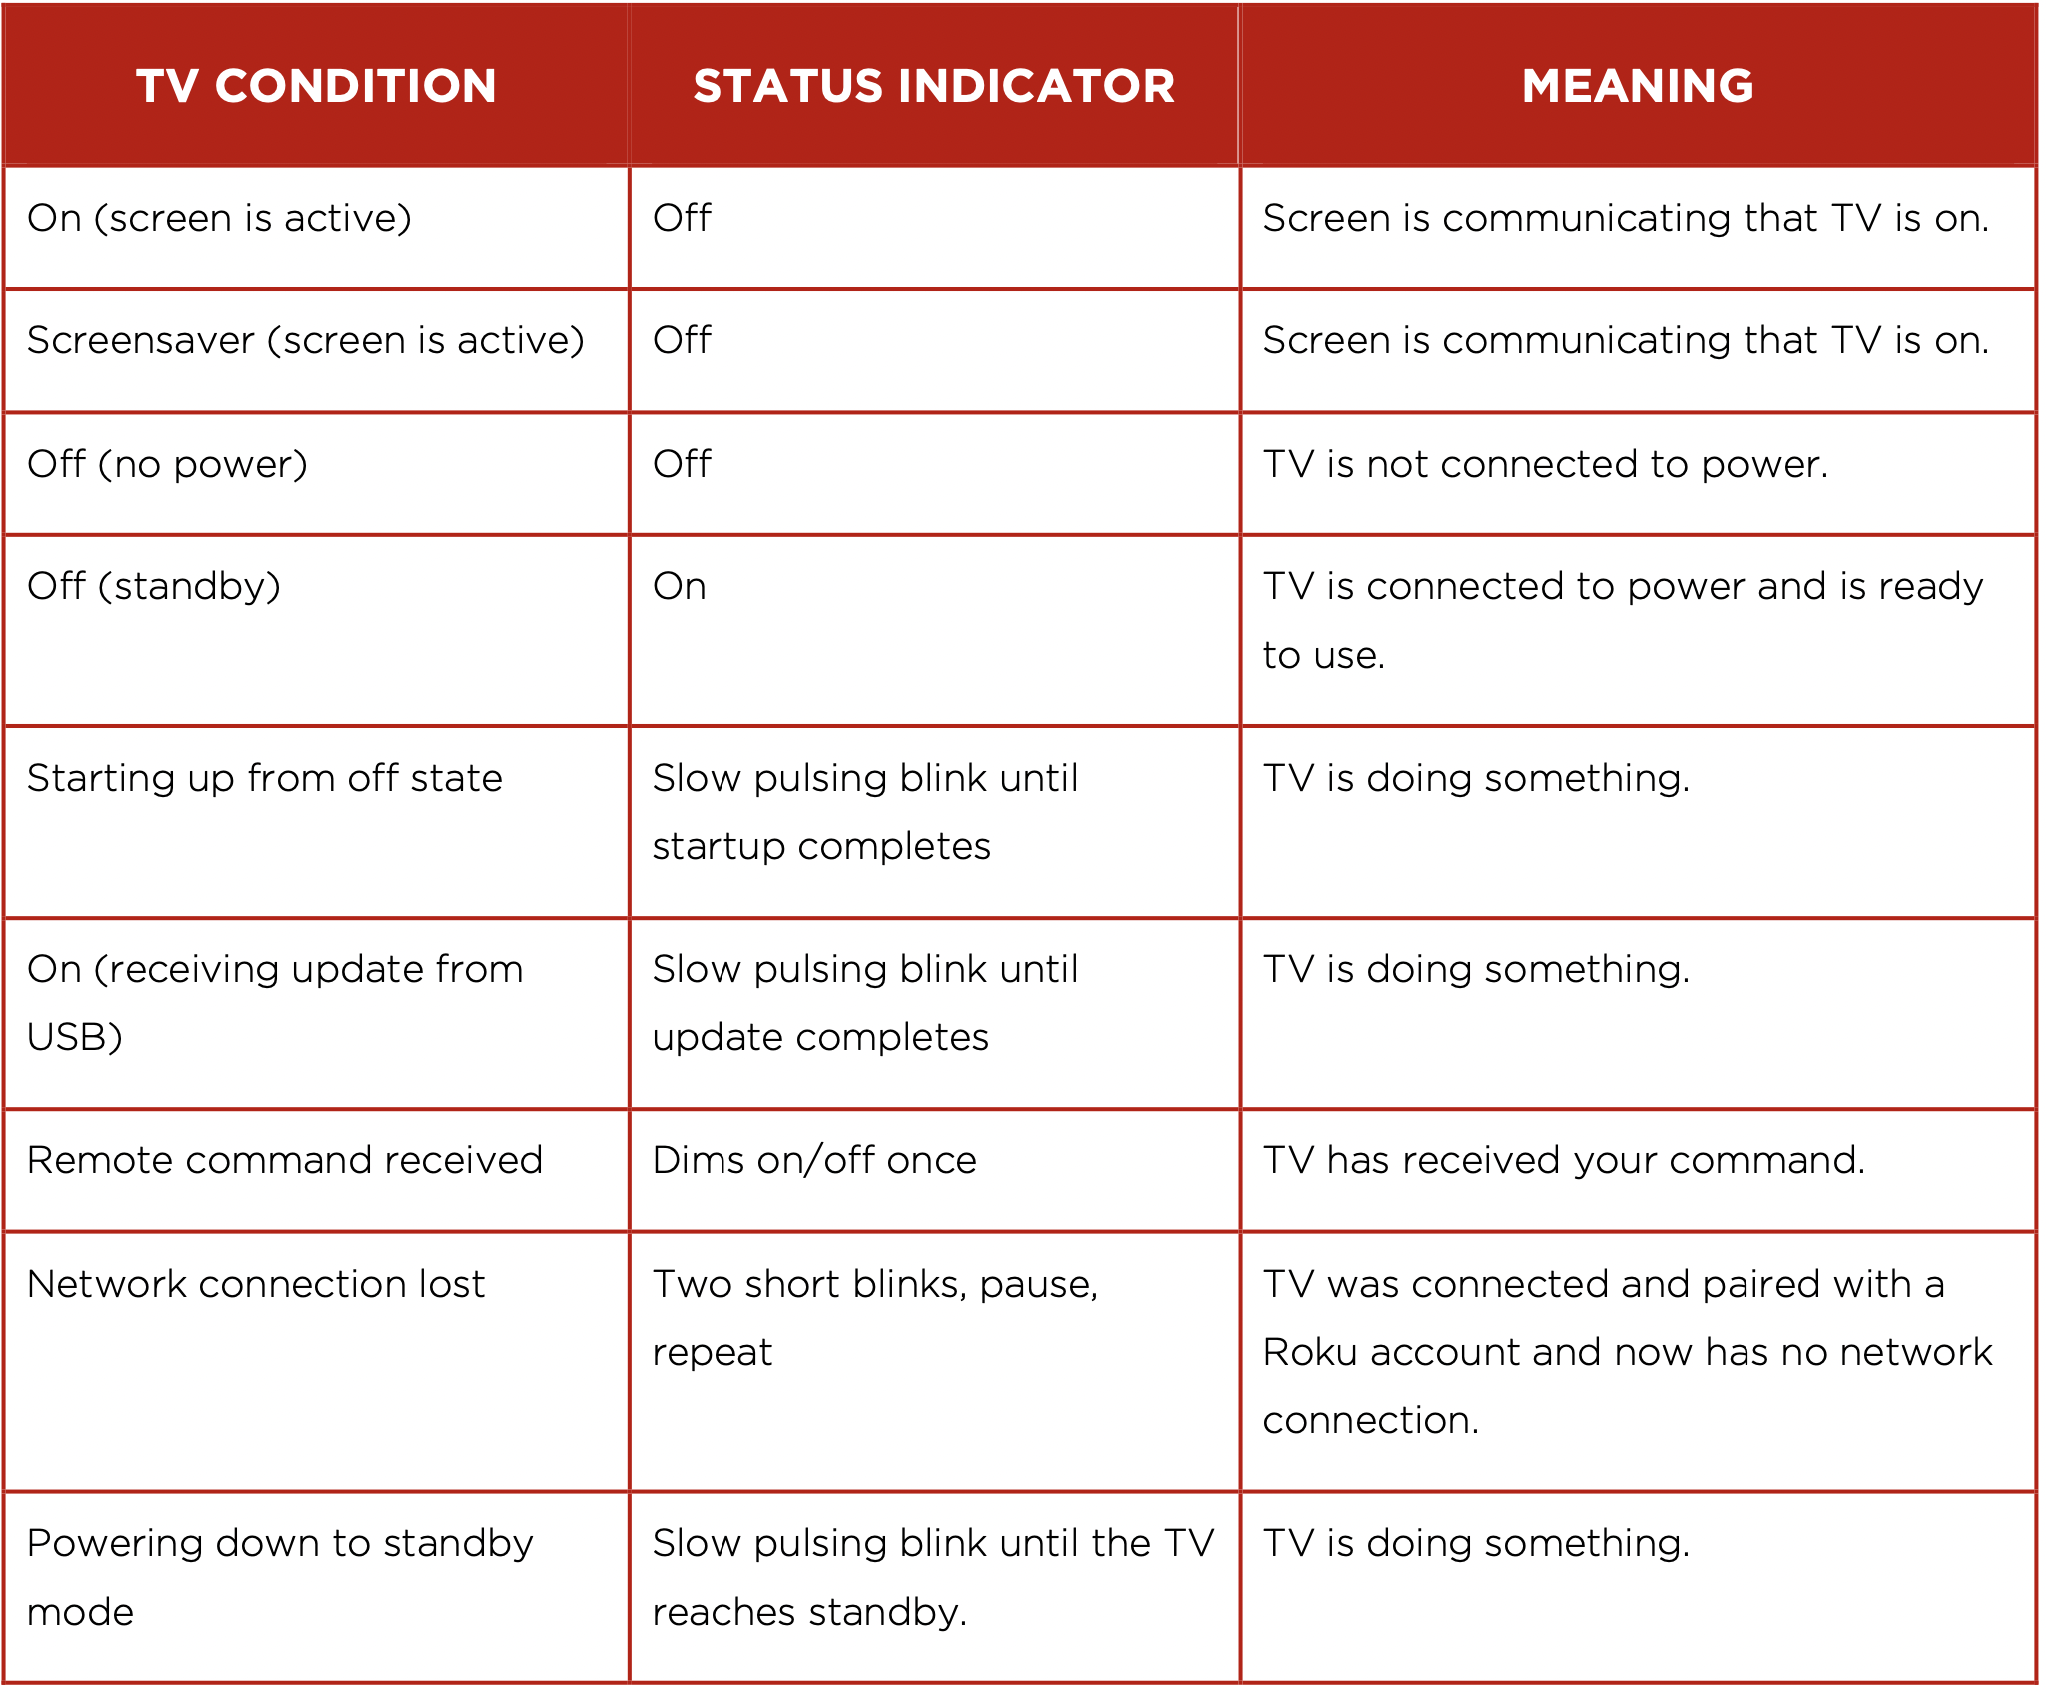
Status indicator
Your TV has a single status indicator. It goes on and off and blinks in different ways depending on the status of the TV, as shown in the following table:
Standby mode energy savings
When you turn off your TV, it remains in a higher power mode for a few minutes, after which it goes into a very low power standby mode. If you turn on the TV again before it has entered the very low power mode, it turns on immediately. After the TV goes into the lower power standby mode, it takes a few seconds longer to start up.
Only in connected mode, you can optionally enable Fast TV start. When this option is enabled, your TV starts up almost immediately regardless of how long it has been turned off, but uses somewhat more power in standby mode. Fast TV start also gives you access to some additional features, such as turning on the TV with voice commands and turning off the screen when listening to music. For more information, see Fast TV start.
Getting help
Only in connected mode, you can get two different types of help:
- Tips and tricks videos: From the Home screen menu, navigate to Settings > Help and select Roku Tips & Tricks.
- Help with Roku voice: Navigate from the Home screen menu to Settings > Help and select Voice help. Or from your Roku voice remote or the Roku mobile app, press VOICE
 and say “Help.”
Opting into Smart TV experience
Only in connected mode, the first time you select live TV, an HDMI input, or AV input, your TV offers to enable the Smart TV experience. If you decide to enable it at this time, you’re all set to enjoy its recommendations and features.
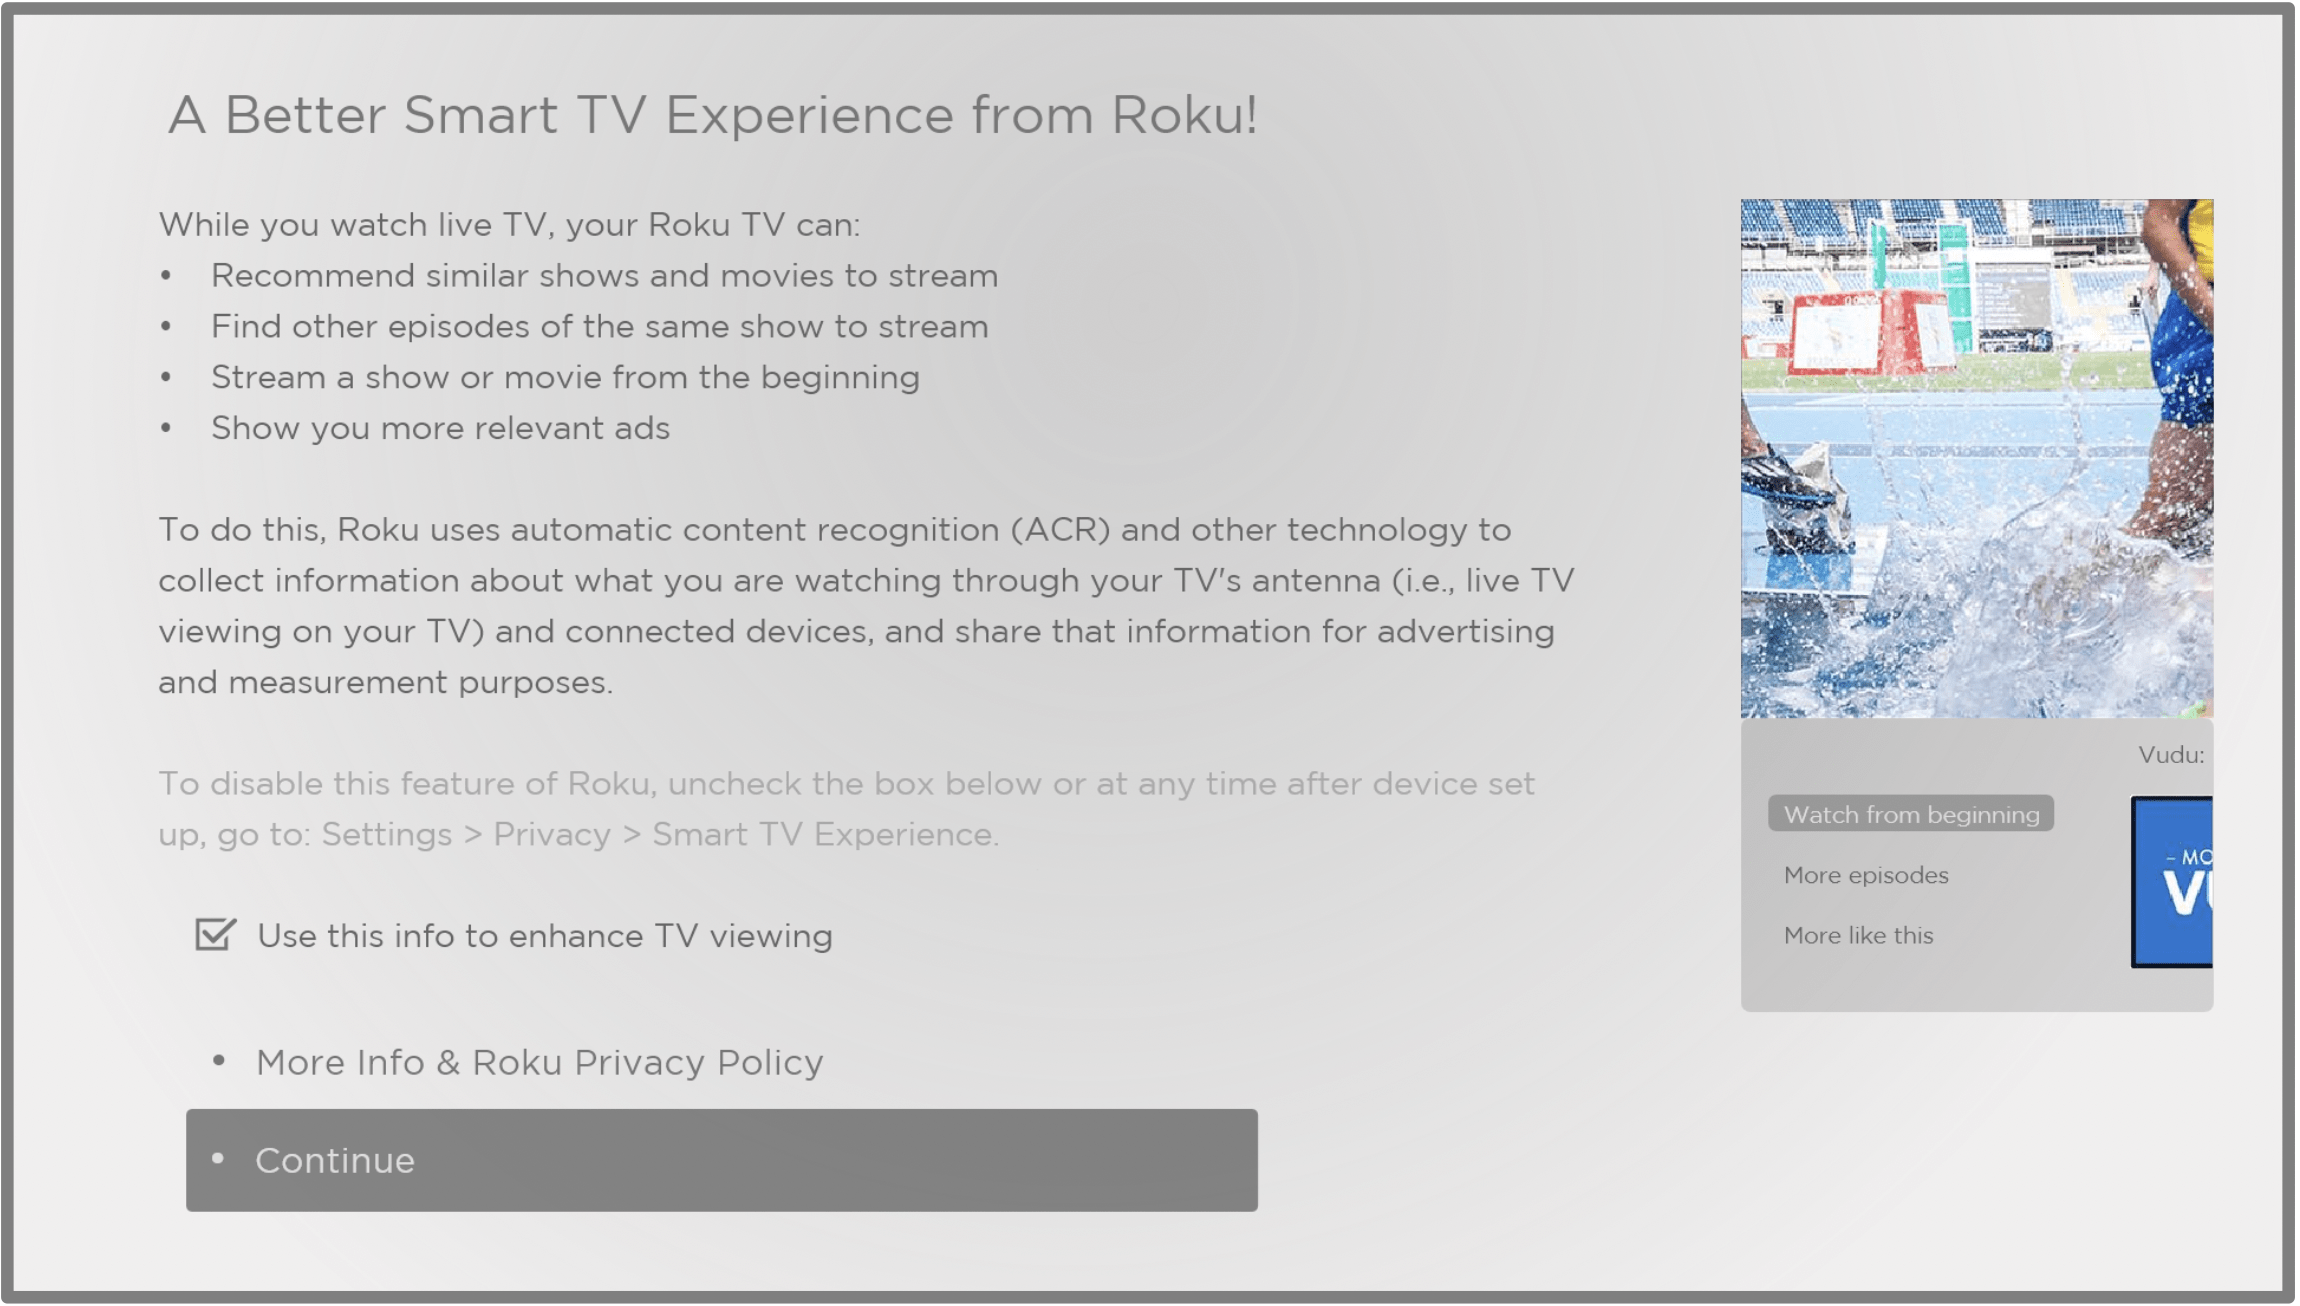
The Smart TV experience uses automatic content recognition (ACR) and other technology to collect information about what you watch on live TV, and on devices like media players and cable boxes connected to the HDMI or AV inputs. Opting in means that you give permission to analyze the programs you watch for the purpose of making recommendations, as well as showing ads that are more relevant to you.
If you decide not to enable the Smart TV experience at this first opportunity, you can enable it later. Or, if you decide you’d rather not use the feature, you can disable it, but be aware that previously collected information is retained and not deleted.
Disable Smart TV experience
If you decide you want to disable Smart TV experience, follow these steps:
- From the Home screen menu, go to Settings > Privacy > Smart TV experience.
- Navigate to the right to highlight Use info from TV inputs.
- Press OK on the remote to clear the check box.
Disable Auto Notifications
If you want to keep the Smart TV experience enabled, but you do not want to see notifications while you are watching programs, you can disable notifications. To do so, follow these steps:
- From the Home screen menu, go to Settings > Privacy > Smart TV experience.
- Navigate to the right to highlight Use info from TV inputs.
- Press DOWN to highlight Enable auto notifications.
- Press OK to clear the check box.
Note: These settings do not affect recommendations for More Ways to Watch that you see in the Live TV Channel Guide when watching live TV channels. Those recommendations show up only in the Live TV Channel Guide and do not rely on ACR technology.
Watching live TV channels
Select the Live TV tile in the Home screen. Your TV remembers the last channel you watched and starts with that channel playing.
Changing channels
To change channels, you can do any of the following:
- Press UP to change to the next higher channel.
- Press DOWN to change to the next lower channel.
- Press LEFT to display the channel list (in non-connected mode) or Live TV Channel Guide 1 (in connected mode), and then press the arrow keys to select the channel or program you want to watch. Press REWIND
 or FAST FWD
  to move through the list one page at a time. When you’ve highlighted the channel or program you want to watch, press OK. (If you decide you don’t want to change channels, press BACK
  .)
.) - Only if Live TV Pause is not enabled, press REPLAY
 to jump to the previous channel. Press again to return to the channel you were watching before you pressed REPLAY
  .
.
Note: If REPLAY  is not available on your remote, you can use this feature in the Roku mobile app. For more information, see Roku mobile app.
Using the Live TV Channel Guide
Only in connected mode, use the Live TV Channel Guide to find both over-the-air and live streaming TV programs. The Live TV Channel Guide lets you scroll through all the TV channels you receive (except those you have hidden, if any), plus a large number of live streaming programs. You can see what’s on right now and the upcoming 14 days.
For live, over-the-air TV programs, you can use More Ways to Watch to find the program you’re watching and start watching it from the beginning from one of your streaming channels. Your clue that there are More Ways to Watch a program is a purple star ( ) next to the program name in the guide.
For example, you might turn on your TV at 10 minutes past the hour and discover you are missing the current episode of Empire. But there is a purple star next to the program title, so you can press STAR  and find that there are several streaming channels where you can watch the current episode from the beginning. You also can find more episodes of Empire, and other programs that have a similar theme.
Note: A paid subscription or other payments may be required for some streaming channels.
To open the Live TV Channel Guide, press LEFT while watching live TV. It opens with the name of the current program highlighted, and a lot more information.
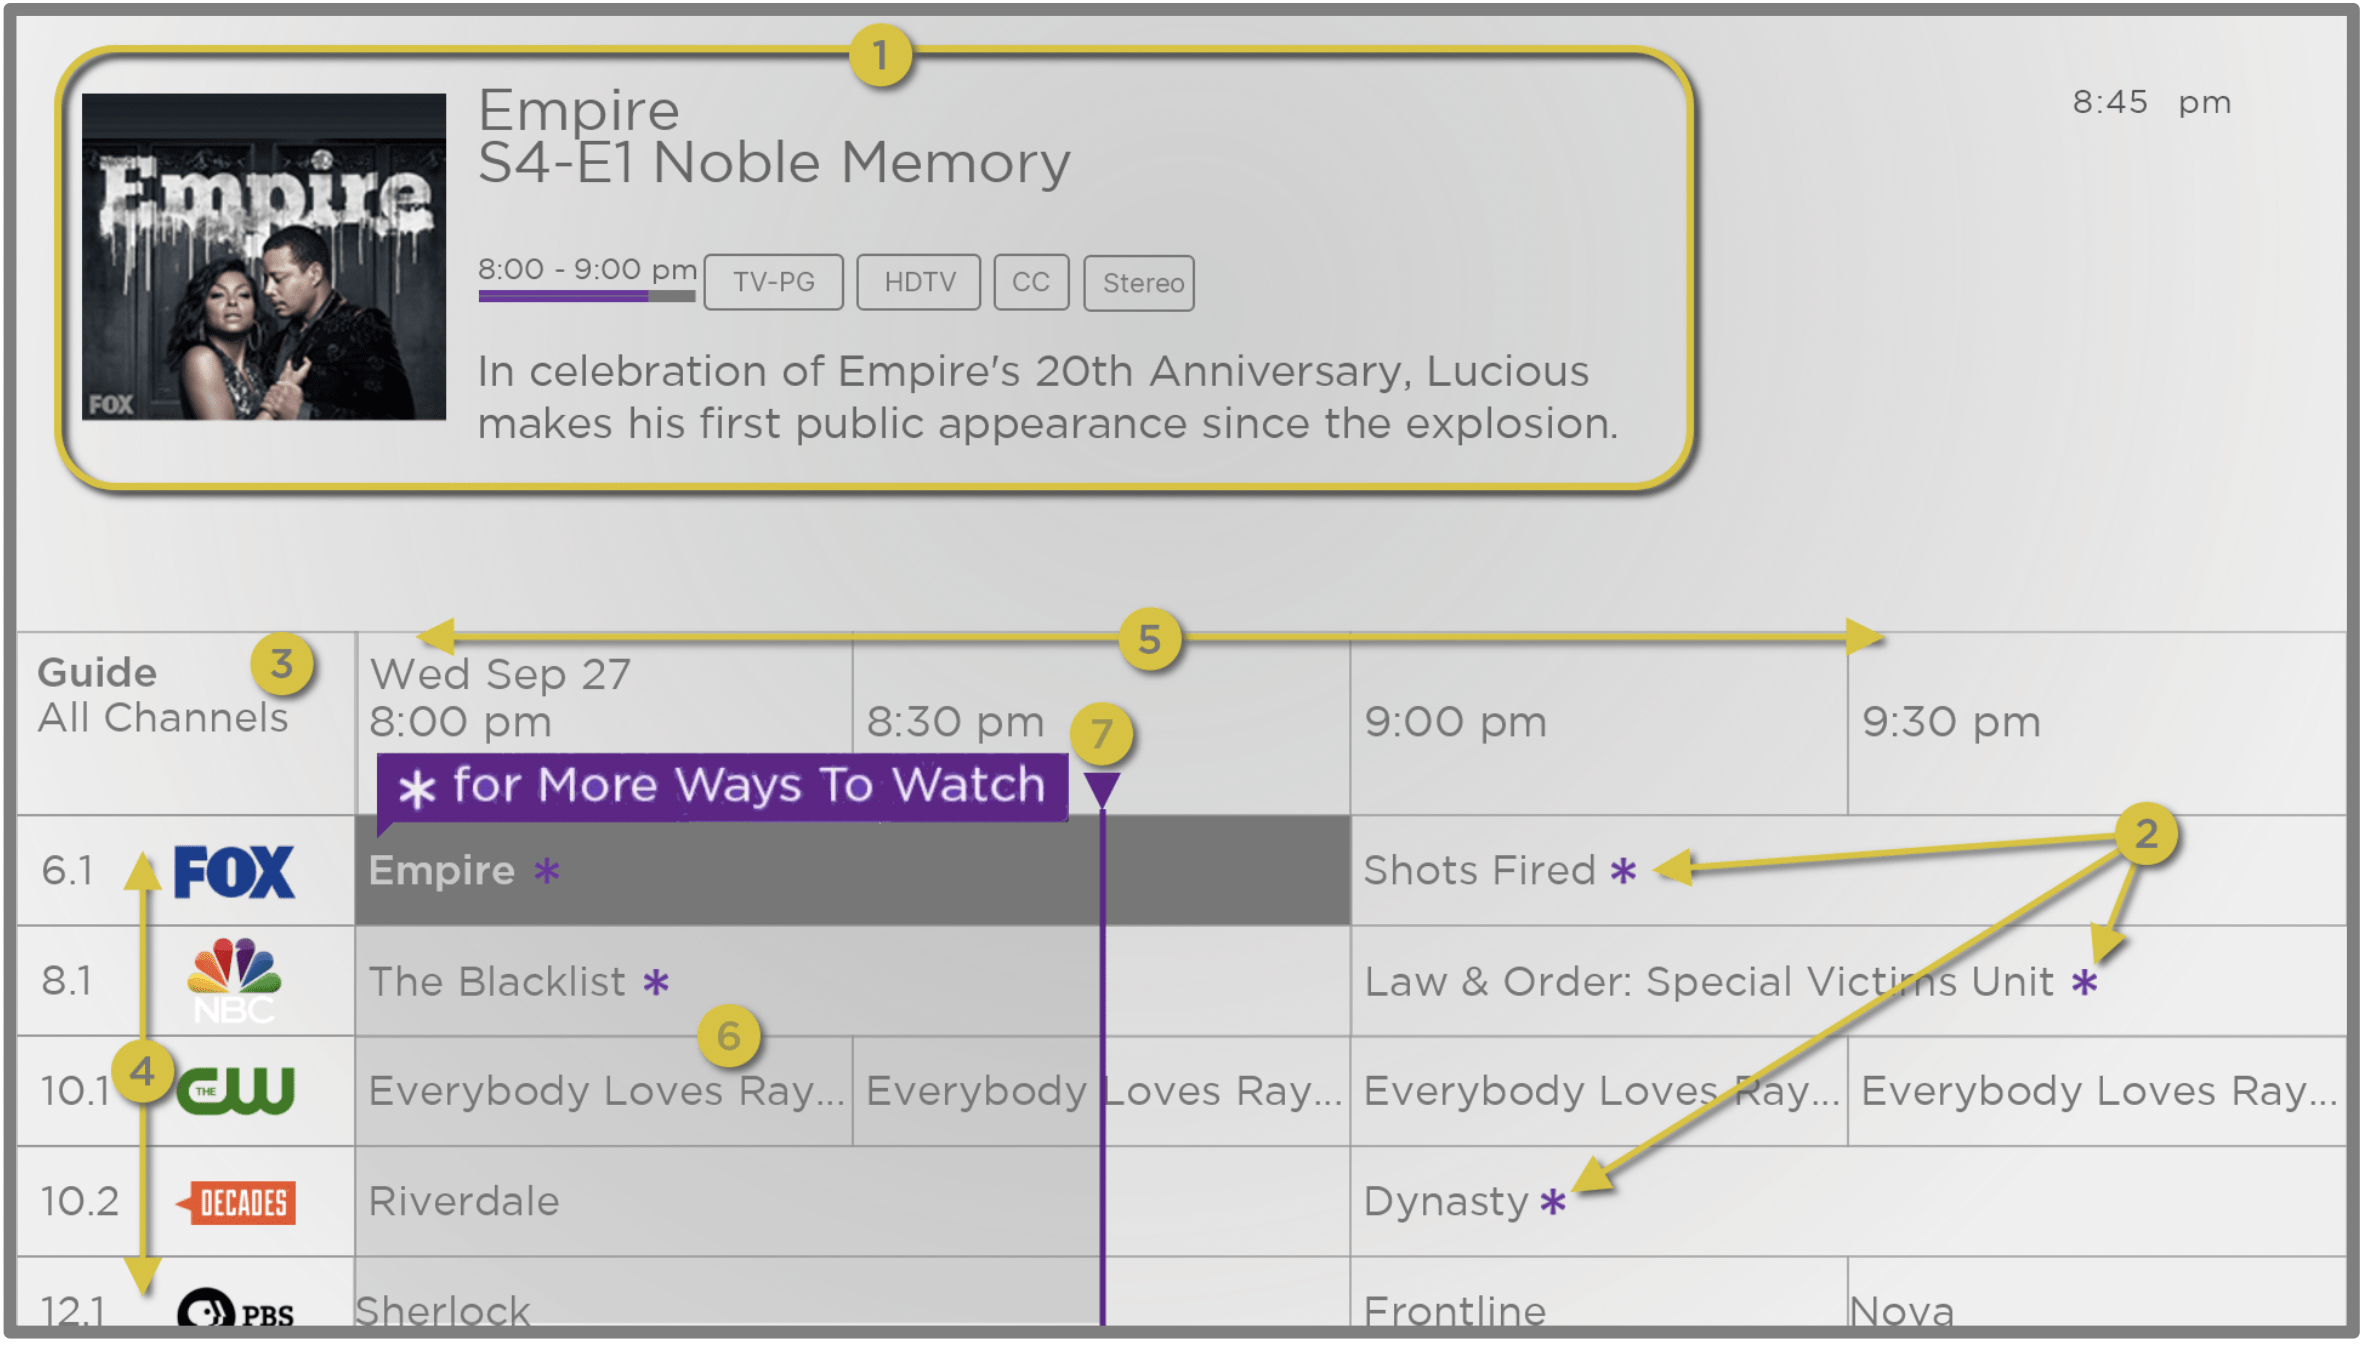
- Program information for the highlighted program. See Viewing program information for details.
- More Ways to Watch indicator. See More Ways to Watch for more information.
- Channel filter. Currently set to All Channels.
- Channel list. Navigate UP or DOWN.
- Time slots. Navigate LEFT or RIGHT. Press FAST FWD
 or REWIND
  to skip ahead or back a screen at a time.
 - Program list. Shaded area is prior to the current time.
- Progress bar. Shows the current time within the listed programs.
When you are viewing the current time slot, notice that the Live TV Channel Guide shows a light gray background for portions of programs before the current time, and a dark background for programs and portions of programs that have not yet aired. The line dividing these two zones is the progress bar.
Navigating the Live TV Channel Guide in connected mode
- Use the purple directional pad to move up, down, left, and right.
- To switch to a program that is currently in progress, highlight it, and then press OK. (Note that pressing OK on a past or future program does nothing.)
- To return to the current time after navigating to a different time slot, press REPLAY
 .
. - To return to the currently airing program without causing a channel change, press BACK
 .
. - To see More Ways to Watch, highlight any program that has a purple asterisk (
 ), and then press STAR
  .While using the Live TV Channel Guide, navigate all the way to the left so that a channel number is highlighted, and then press STAR
  to open the Channel options dialog.
Changing channel options in connected mode
Only in connected mode, while using the Live TV Channel Guide, navigate all the way to the left to the channel number column, and then press STAR  to open Channel options.
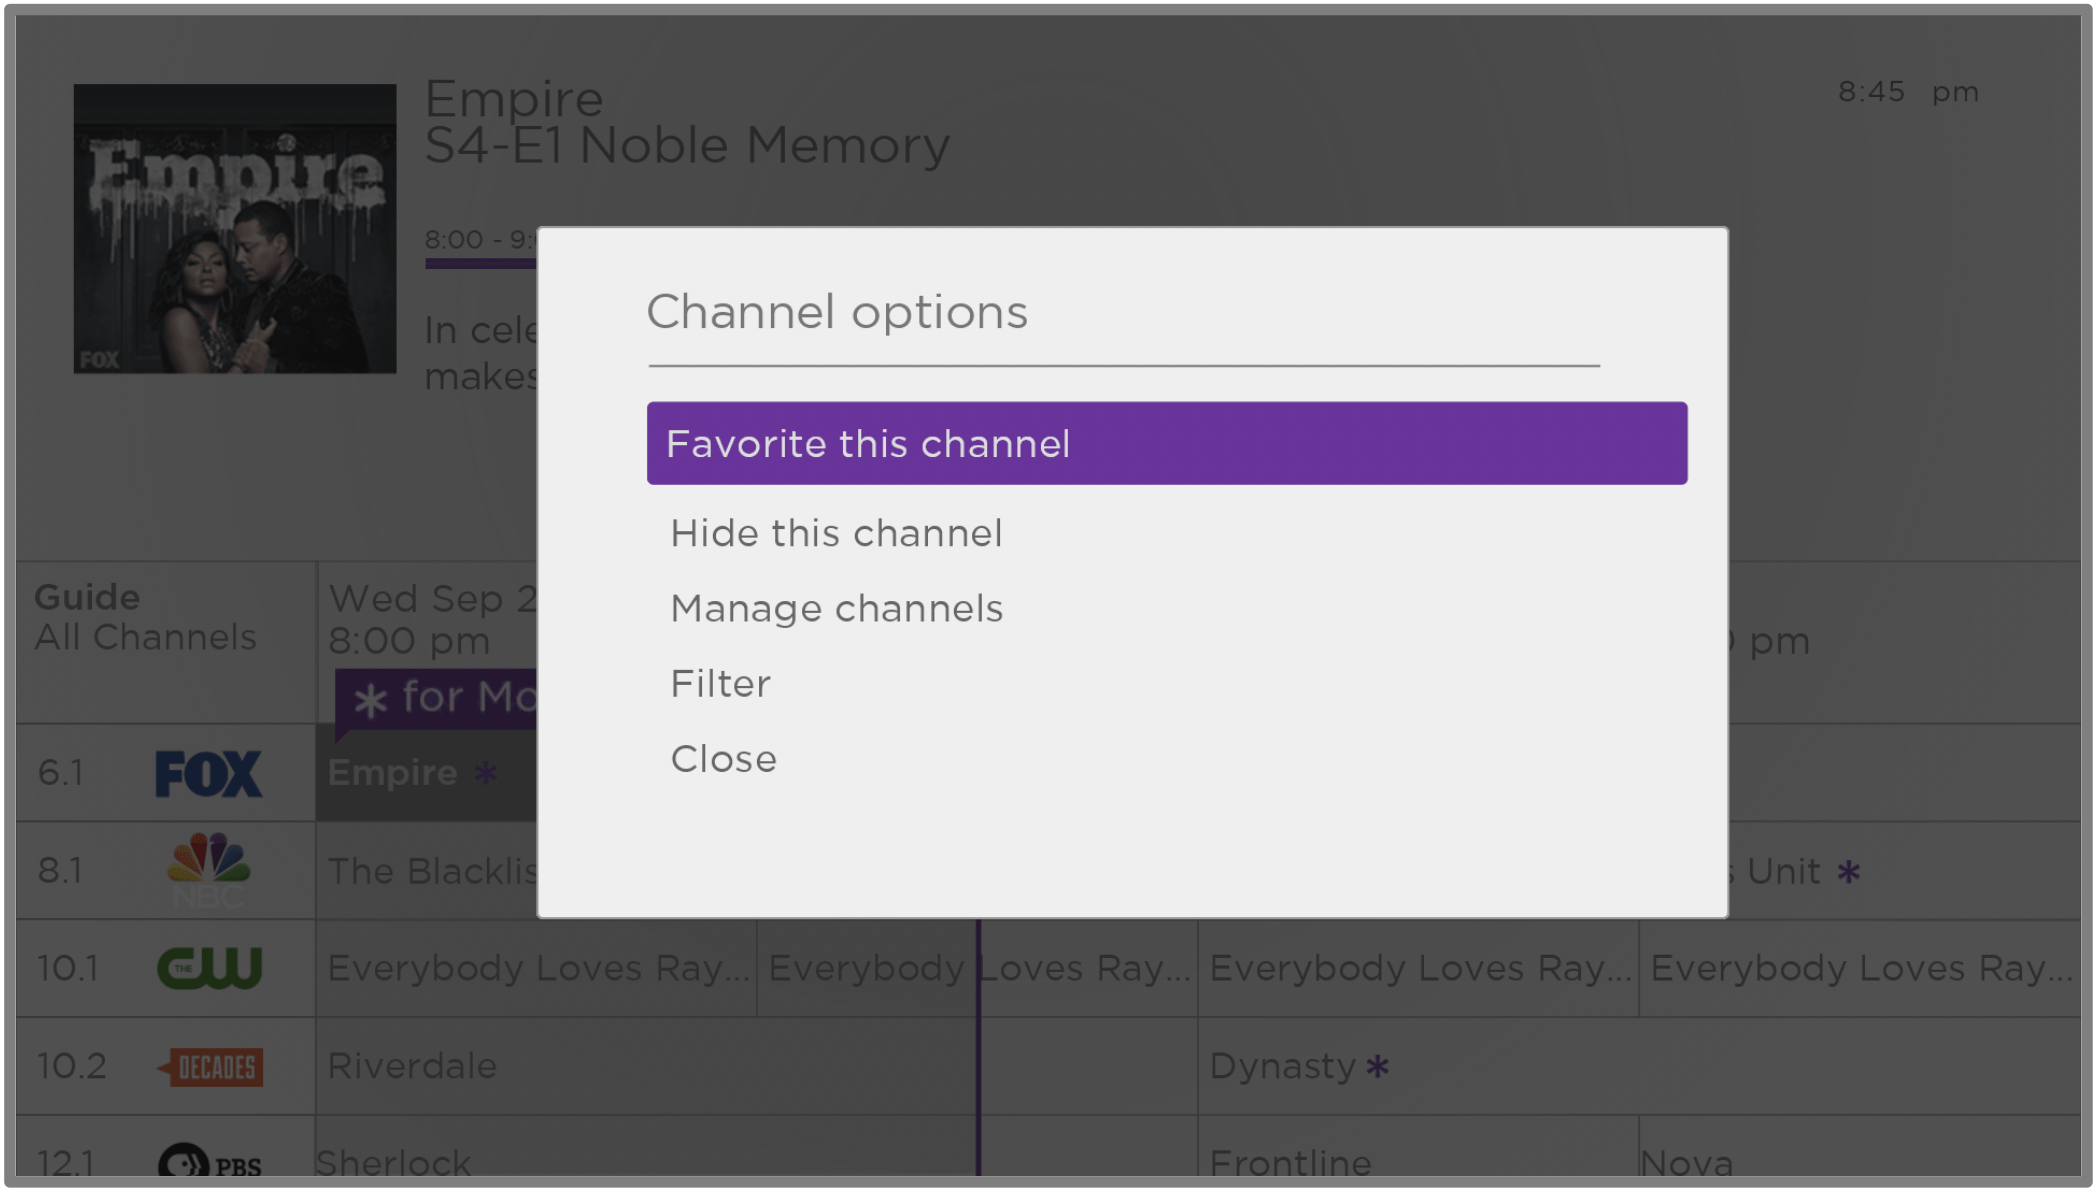
Favorite/Unfavorite this channel – Select this option to make the selected channel a favorite. Select again to remove the channel from your favorites. Use the Filter option to show only favorite channels.
Hide/Unhide this channel – Select this option to hide the current channel. Select again before moving on to unhide the channel if you hid it by mistake. But note that once you close the dialog, you cannot access the channel to unhide it. Instead, use the Manage channels option to unhide hidden channels.
Manage channels – Opens the Manage Channels menu where you can edit the channel lineup and mark certain channels as favorites. See Manage channels.
Filter – Opens the Filter dialog where you can choose to see:
- All Channels – Show all channels that you can receive.
- Recents – Show only recently tuned channels in the order in which you watched them.
- Favorites – Show only channels you have marked as favorites.
Viewing program information
You can view program information in different ways:
- When you are viewing a program and no other guides or menus are open, press OK to view program information in a banner at the bottom of the screen. This program information appears both in connected and non-connected modes. The following illustration shows the information that is available.
- Only in connected mode, view program information for any program listed in the Live TV Channel Guide. Press LEFT while watching live TV to see the Live TV Channel Guide. For more information, see Using the Live TV Channel Guide.

Program information banner
Program information might include any or all of the following, depending on availability within the broadcast information:
- Channel number
- Channel call sign
- Signal strength
- Program title and episode name/number
- Start time, end time, and graph of program length showing current position
- Content rating
- Video resolution (480i, 480p, 720p, 1080i, 1080p, 4K)
- Frame rate (24Hz, 30Hz, 60Hz for television sources, 60Hz, 70Hz, 72Hz, 75Hz for computer sources)
- Audio format (Mono, Stereo, Dolby Audio™ logo)
- Audio features (SAP/MTS)
- Only on select 4K models: HDR or Dolby Vision™ 1 logo (HDMI® and streaming sources)
- Closed captioning (CC)
- Current time
- Program description.
Tip: If you’ve set up Live TV Pause and you’re watching live TV, you’ll also see a progress bar showing the current playback position within the rolling 90-minute pause time. For more information, see Pausing live TV
Adjusting settings while watching a program
Press STAR  to display the TV settings menu. Press UP or DOWN to highlight an option, and then press LEFT or RIGHT to change the setting. The topic Adjusting TV settings explains each of the settings in detail.
Pausing live TV
Only in connected mode, Live TV Pause gives your TCL • Roku TV the ability to pause, play, fast forward, and rewind live TV received on the ANT input. You can pause live TV for up to 90 minutes.
Requirements
To use this feature, you need to:
- Connect your TV to the Internet. If you didn’t connect during Guided Setup, see What if I didn’t connect my TV?.
- Provide your own dedicated USB flash drive (thumb drive} with the following minimum specifications.
16 GB
15 Mbps read/write speed
USB 2.0 compliant
A USB flash drive (thumb drive) meeting the minimum requirements is highly recommended over an externally-powered hard disk drive. Note that you can use any larger size drive—there is no limit to the maximum size—but using a larger drive does not extend the 90-minute pause time.
Important: After warning you and giving you a chance to cancel Live TV Pause setup, all existing content on your USB drive is erased when you enable this feature. - Connect your USB drive to the TV’s USB port.
Important: Some TV models have more than one USB port. You can connect your Live TV Pause USB drive to any port, but make sure that nothing is connected to other USB ports while enabling Live TV Pause. Reconnect other USB devices after you have finished enabling Live TV Pause. - Enable Live TV Pause, as explained in the following topic.
Enabling Live TV Pause
You can start setting up Live TV Pause in any of the following ways:
- After completing a channel scan, select Set up Live TV Pause from the available options.
- Press PLAY/PAUSE
 on the Roku remote while watching a live TV channel.
 - Highlight the Live TV tile on the Home screen, press STAR
 on the remote, and then select Enable Live TV Pause.
After starting setup of Live TV Pause in any of these ways, the TV prompts you through the steps needed to enable this feature. Setup takes only a few moments.
Note: Use of a USB hub is not supported.
Using Live TV Pause
If you have used the Roku remote to watch streaming channels, using Live TV Pause should be very familiar to you.
- While watching a digital live TV channel, press PLAY/PAUSE
 to pause or play the content. After the TV program has been paused for 90 minutes, the TV resumes playing from the point in the program where you paused it.
 - After watching a channel for a while, press REWIND
 to jump back up to the point where you first started watching the channel, up to 90 minutes.
 - After pausing or rewinding, press FAST FWD
 to jump ahead up to the point where you are once again watching the live TV program.
 - Press FAST FWD
 or REWIND
  repeatedly to cycle through 1x, 2x, and 3x skip speeds. Press REPLAY
  to play back the last several seconds of the program.
 - When the program is paused, press LEFT or RIGHT to move backward or forward through the program approximately 10 seconds per press. Small frames appear across the screen to identify your location in the program.
Note: If REPLAY  is not available on your remote, you can use the Roku mobile app. For more information, see Roku mobile app.
Whenever you use any of the Live TV Pause features, the TV momentarily displays a progress bar:
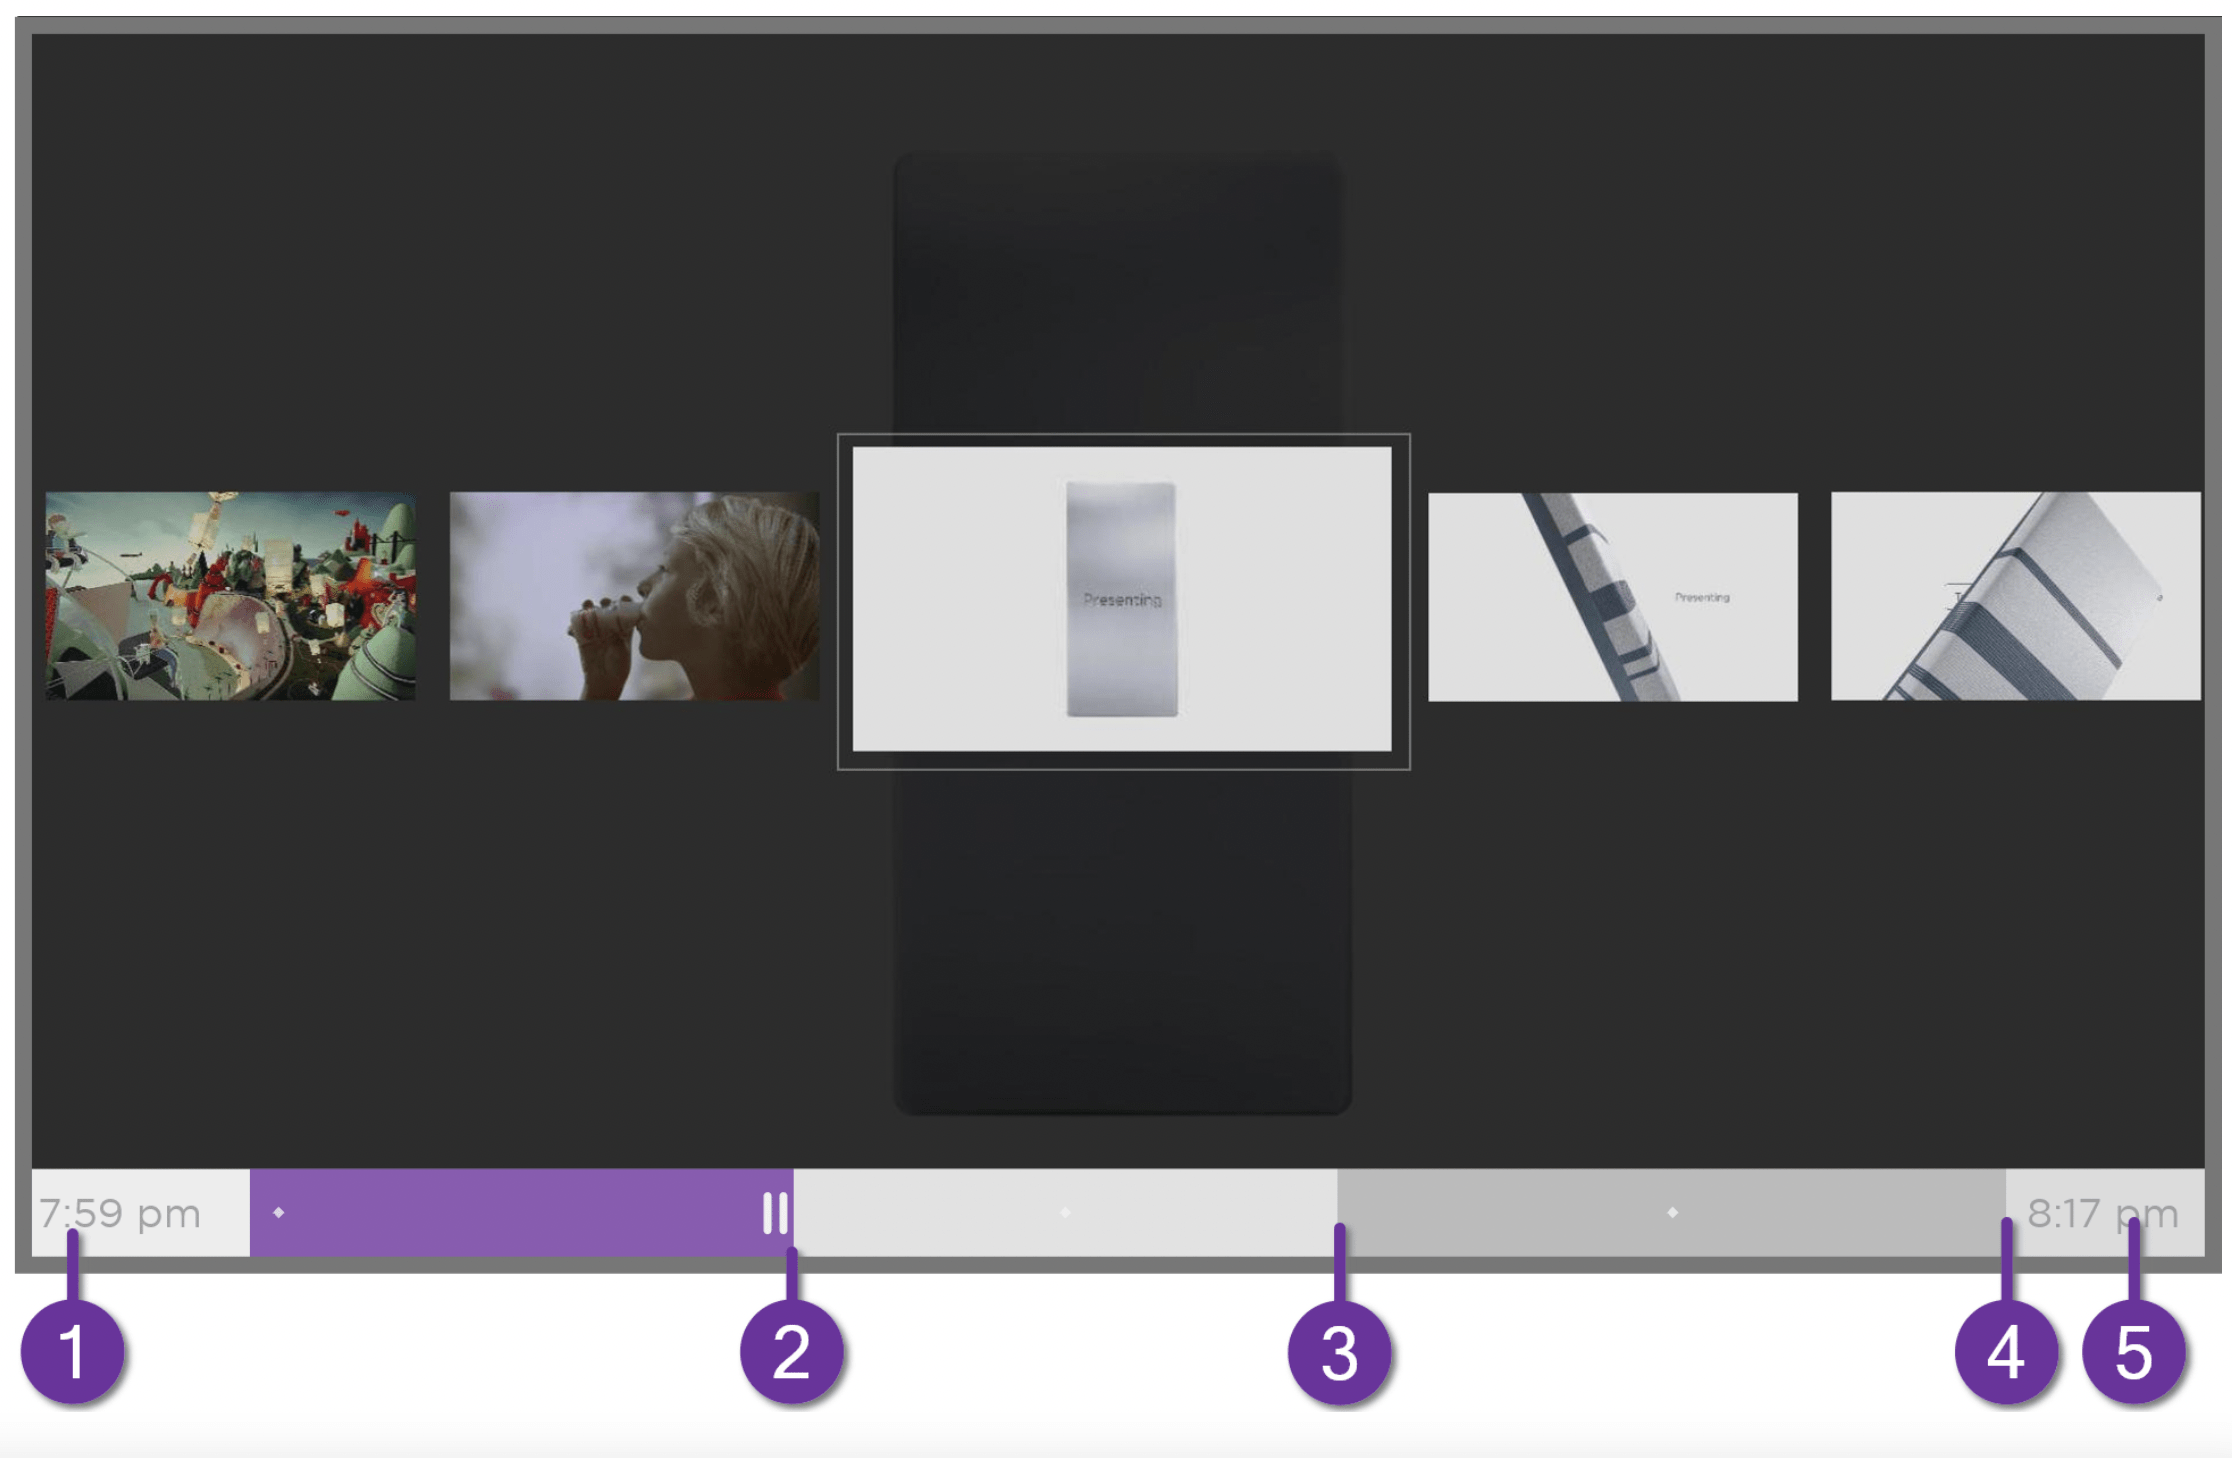
- Time at the current playback position.
- Current playback position
- Extent of pause time, representing the amount of time this channel has been buffered, up to 90 minutes.
- 90-minute mark, representing the maximum extent of pause time.
- Current time.
The progress bar also shows tick marks at each half hour point, to help you locate the boundaries where one program ends and a new one begins.
Notes about Live TV Pause
- You can use Live TV Pause only with digital broadcast and cable channels received through the TV’s ANT input (ATSC and Clear QAM channels).
- Changing channels erases and restarts the Live TV Pause buffer.
- Returning to the Home screen, selecting another input, or turning off the TV erases and resets the Live TV Pause buffer.
- Disconnecting the USB drive erases the Live TV Pause buffer.
More Ways to Watch
Only in connected mode, More Ways to Watch gives you recommendations about the programs you’re watching on the ANT, HDMI, and AV inputs. You will automatically get these recommendations in the Live TV Channel Guide for live TV programs. However, before you can get recommendations for programs you’re watching through the HDMI or AV inputs, you must opt into the Smart TV experience to acknowledge that you want to allow the TV to use automatic content recognition (ACR). See Opting into Smart TV experience for details.
Using More Ways to Watch
Not every program provides recommendations. As you use More Ways to Watch, be aware that you’ll only see suggestions on your TV when all of the following conditions are met:
- Your TV is operating in connected mode in the United States.
- You have enabled Smart TV experience if you are watching programs through an HDMI or AV input. (If you are watching live TV from the ANT input, this setting does not matter.)
- The program you’re watching contains the information needed to identify it.
Note that some programs, such as the daily news, typically do not activate More Ways to Watch. - At least one participating streaming channel offers the movie or TV program you are watching, or other episodes, or more programs like the one you are watching.
If all of these conditions are met, you can view the suggestions. More Ways to Watch recommendations appear in two different places:
- When watching the HDMI and AV inputs, you’ll see a More Ways to Watch notification in the lower right corner of the screen for a few seconds unless you have disabled Enable auto notifications. Press STAR
 to see the list of matching programs.
Note: After this banner disappears, you can restore the More Ways to Watch prompt by pressing OK.
- In the Live TV Channel Guide, all programs that meet the criteria for More Ways to Watch display a purple asterisk
 next to their titles:
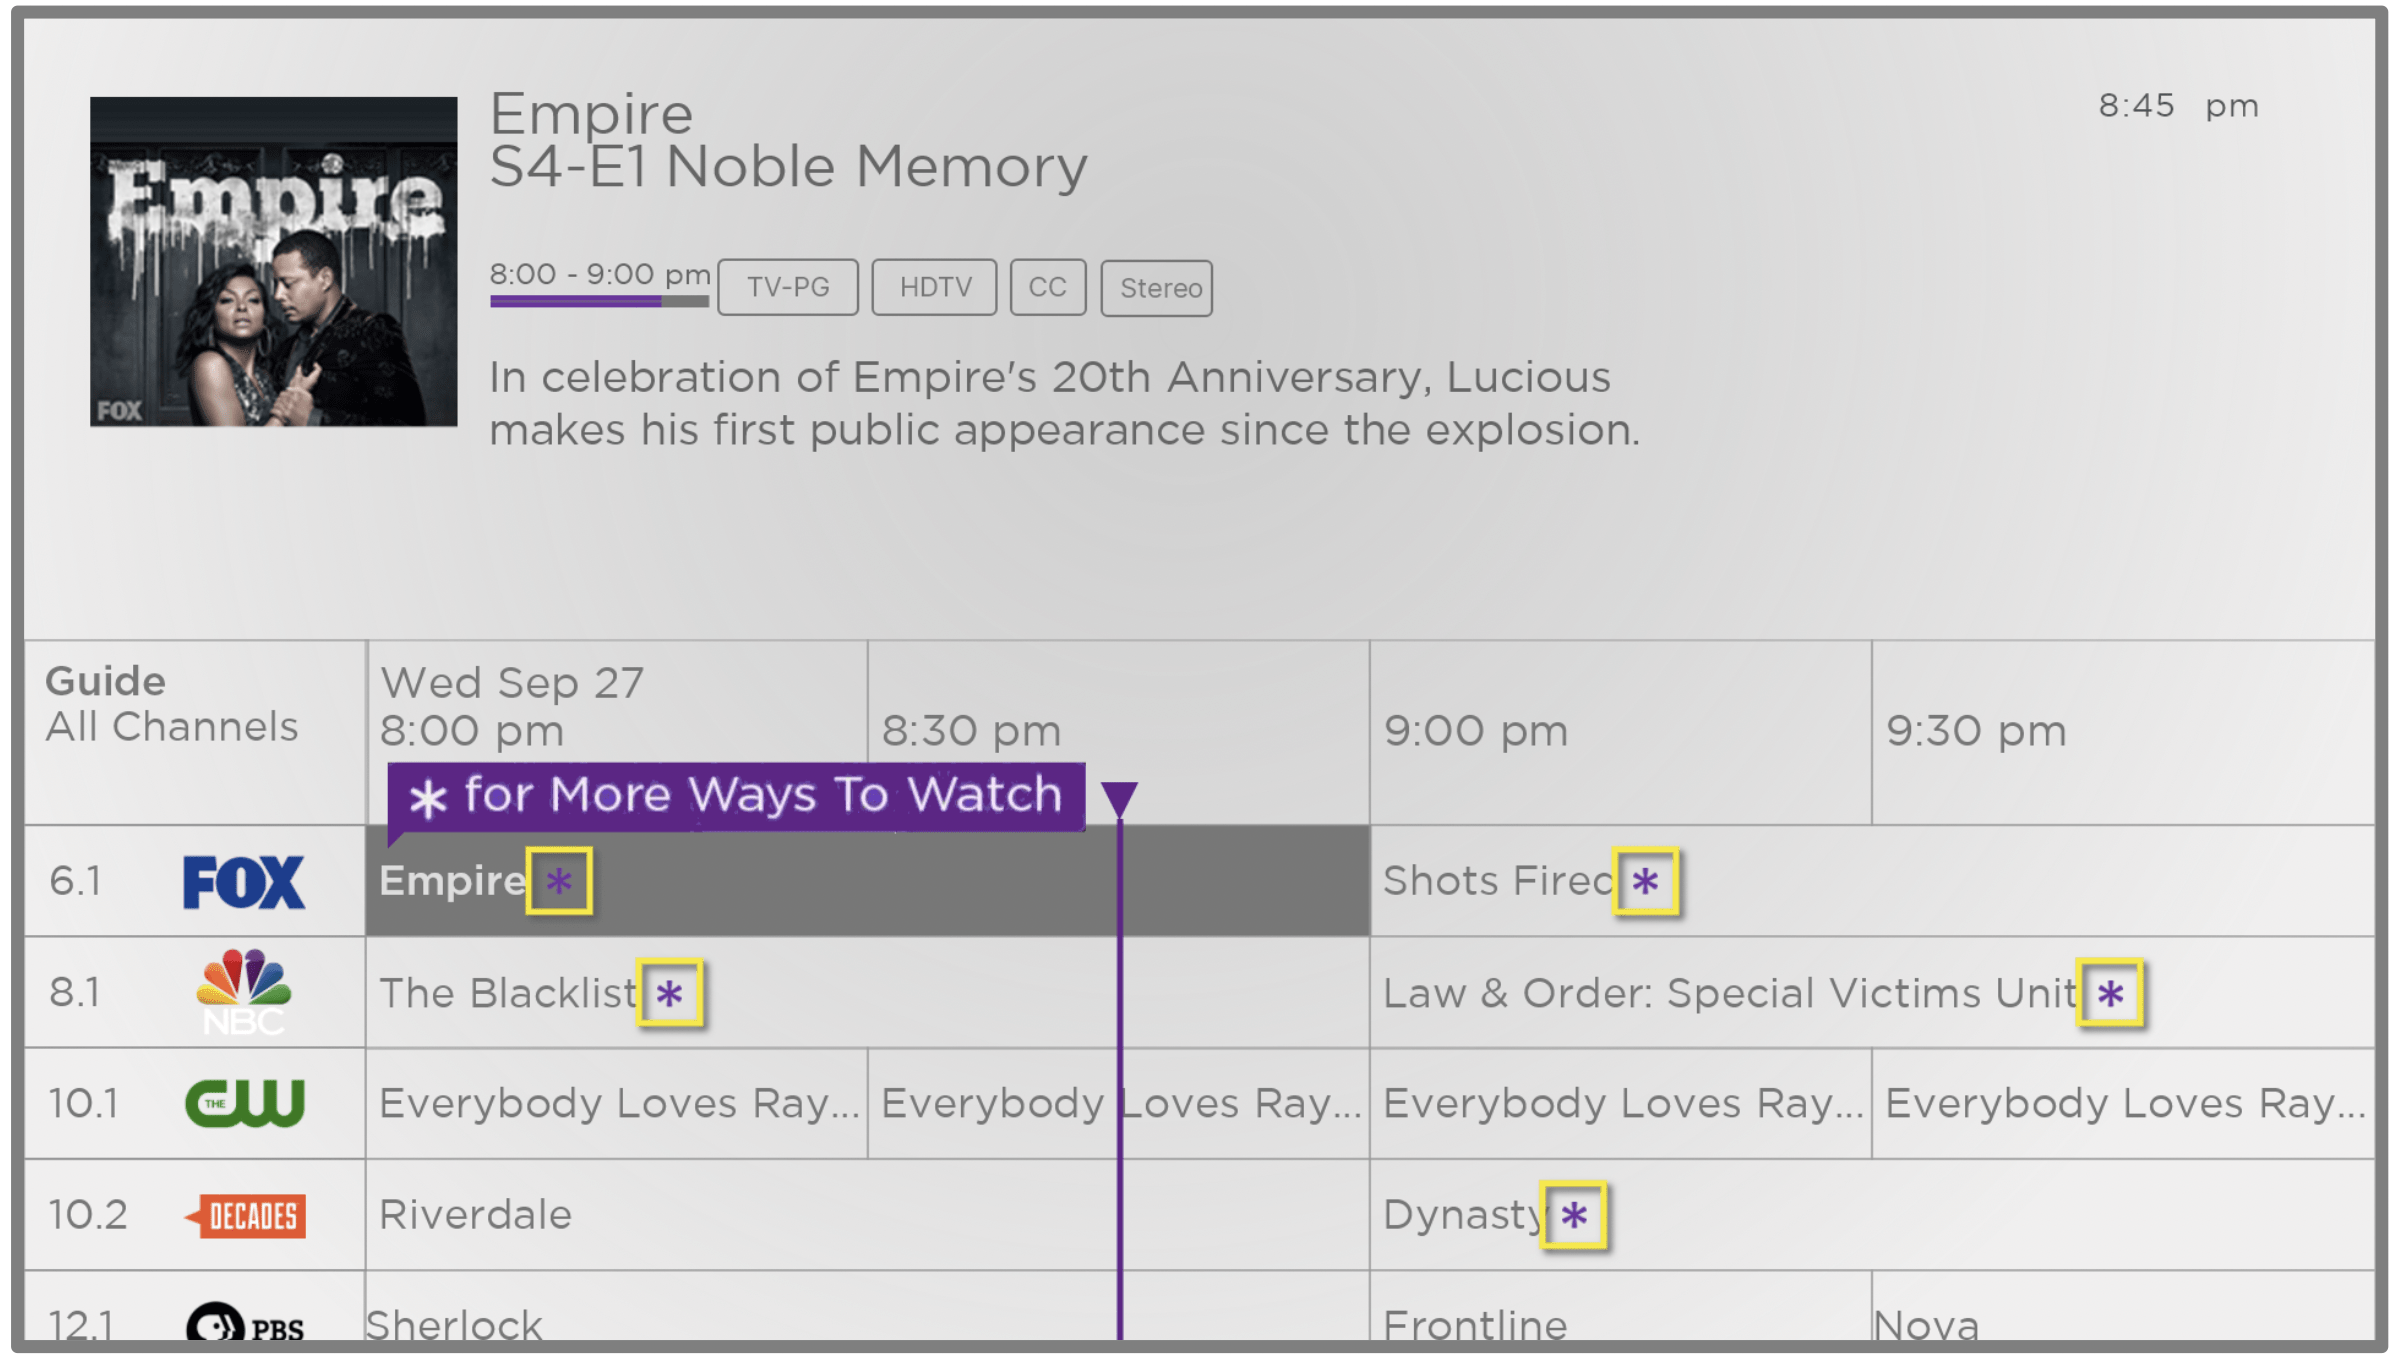
Highlight the program of interest and press STAR  to see recommendations.
Regardless of how you got to this point, the options you’ll see depend on the type of program you’re watching and the available ways there are to watch, so you might see any or all of the following:
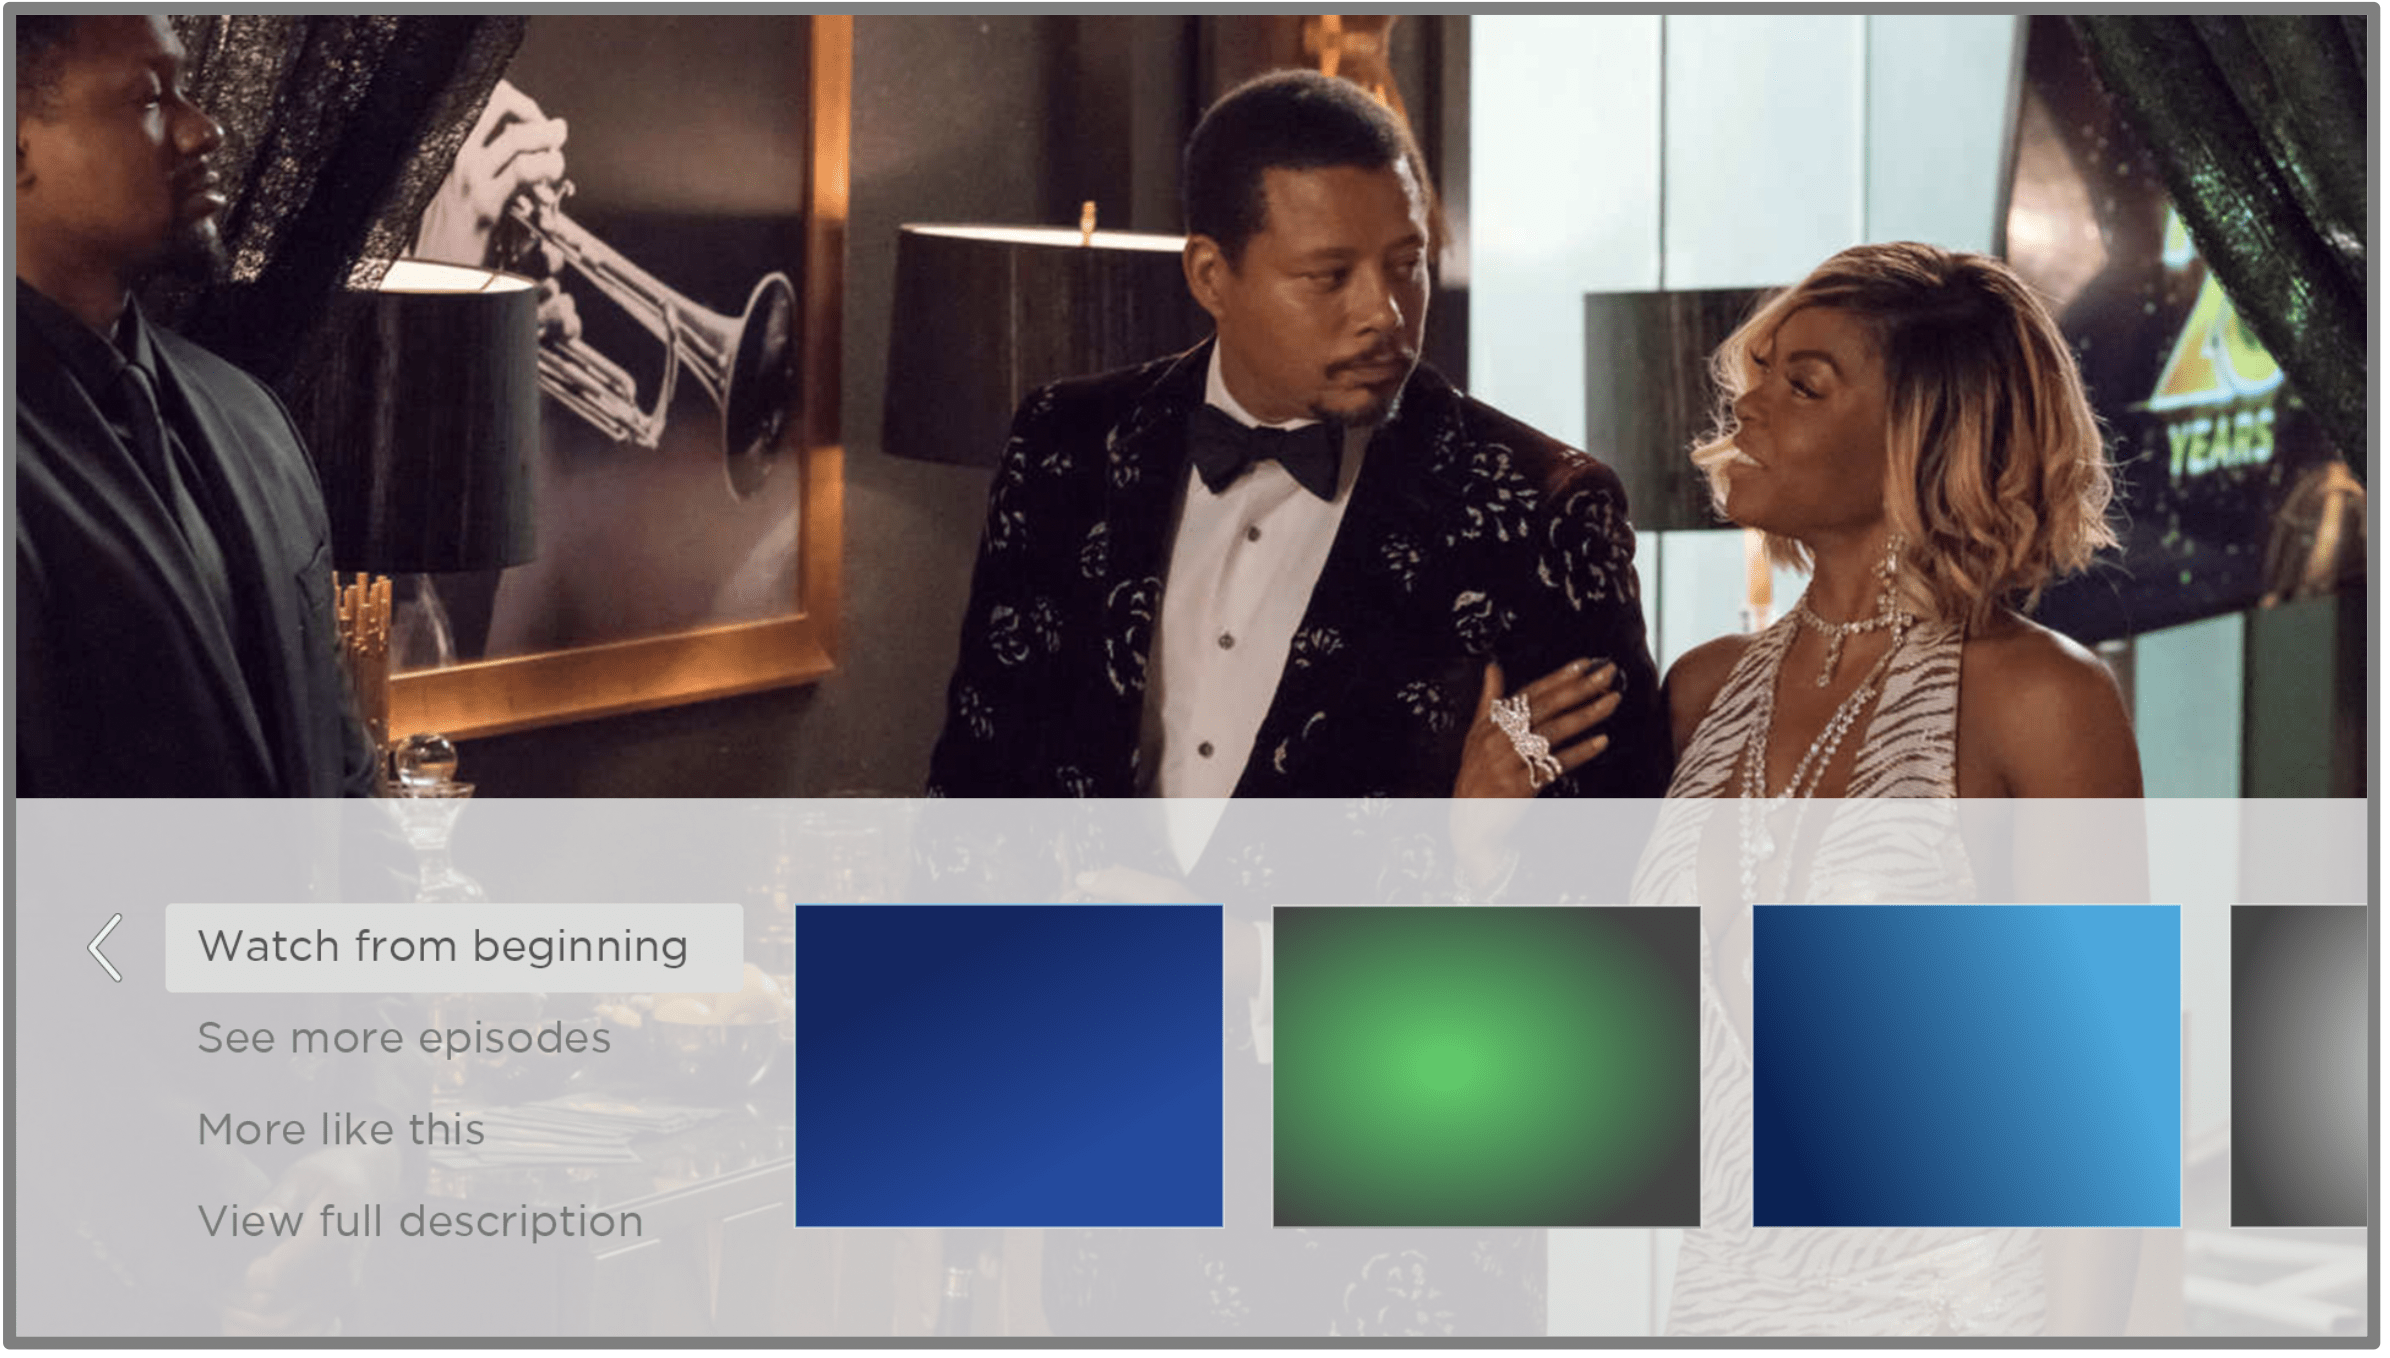
- Watch from beginning – Streaming channels on which the same TV program or movie is available. Often, this option does not appear on first run programs, because streaming content typically is not available until some time after the program is first broadcast.
- See more episodes – Streaming channels where you can find other episodes of the TV program you are watching. Does not apply to movies.
- More like this – TV programs or movies with a similar theme.
- View full description – Full description of the selected program.
Press DOWN to select an option, and then press RIGHT to select the streaming channel you want to watch.
Assuming you’ve already added the channel and completed any required sign-in, More Ways to Watch takes you directly to the program in the streaming channel where you can select and watch the program. Otherwise, it prompts you to add the channel and, if you do, then takes you to the program.
Getting the most from More Ways to Watch
- Streaming channels you’ve already installed appear first in the list of suggestions.
- When you select a streaming channel, you leave the program you are currently watching.
- If you’ve used the Live TV Pause feature to pause the program, your paused program buffer is deleted. In other words, you cannot return to a live TV channel and resume watching from where you left off.
Automatic network recommendation
Your home might have multiple wireless networks, each with its own characteristics. While you are streaming and during manual network scans, your TV checks the wireless networks nearby to make sure you are getting the optimum viewing experience.
If your TV determines that a better connection is available while you are watching streaming content, it recommends that you switch by displaying a message in the lower portion of the screen:
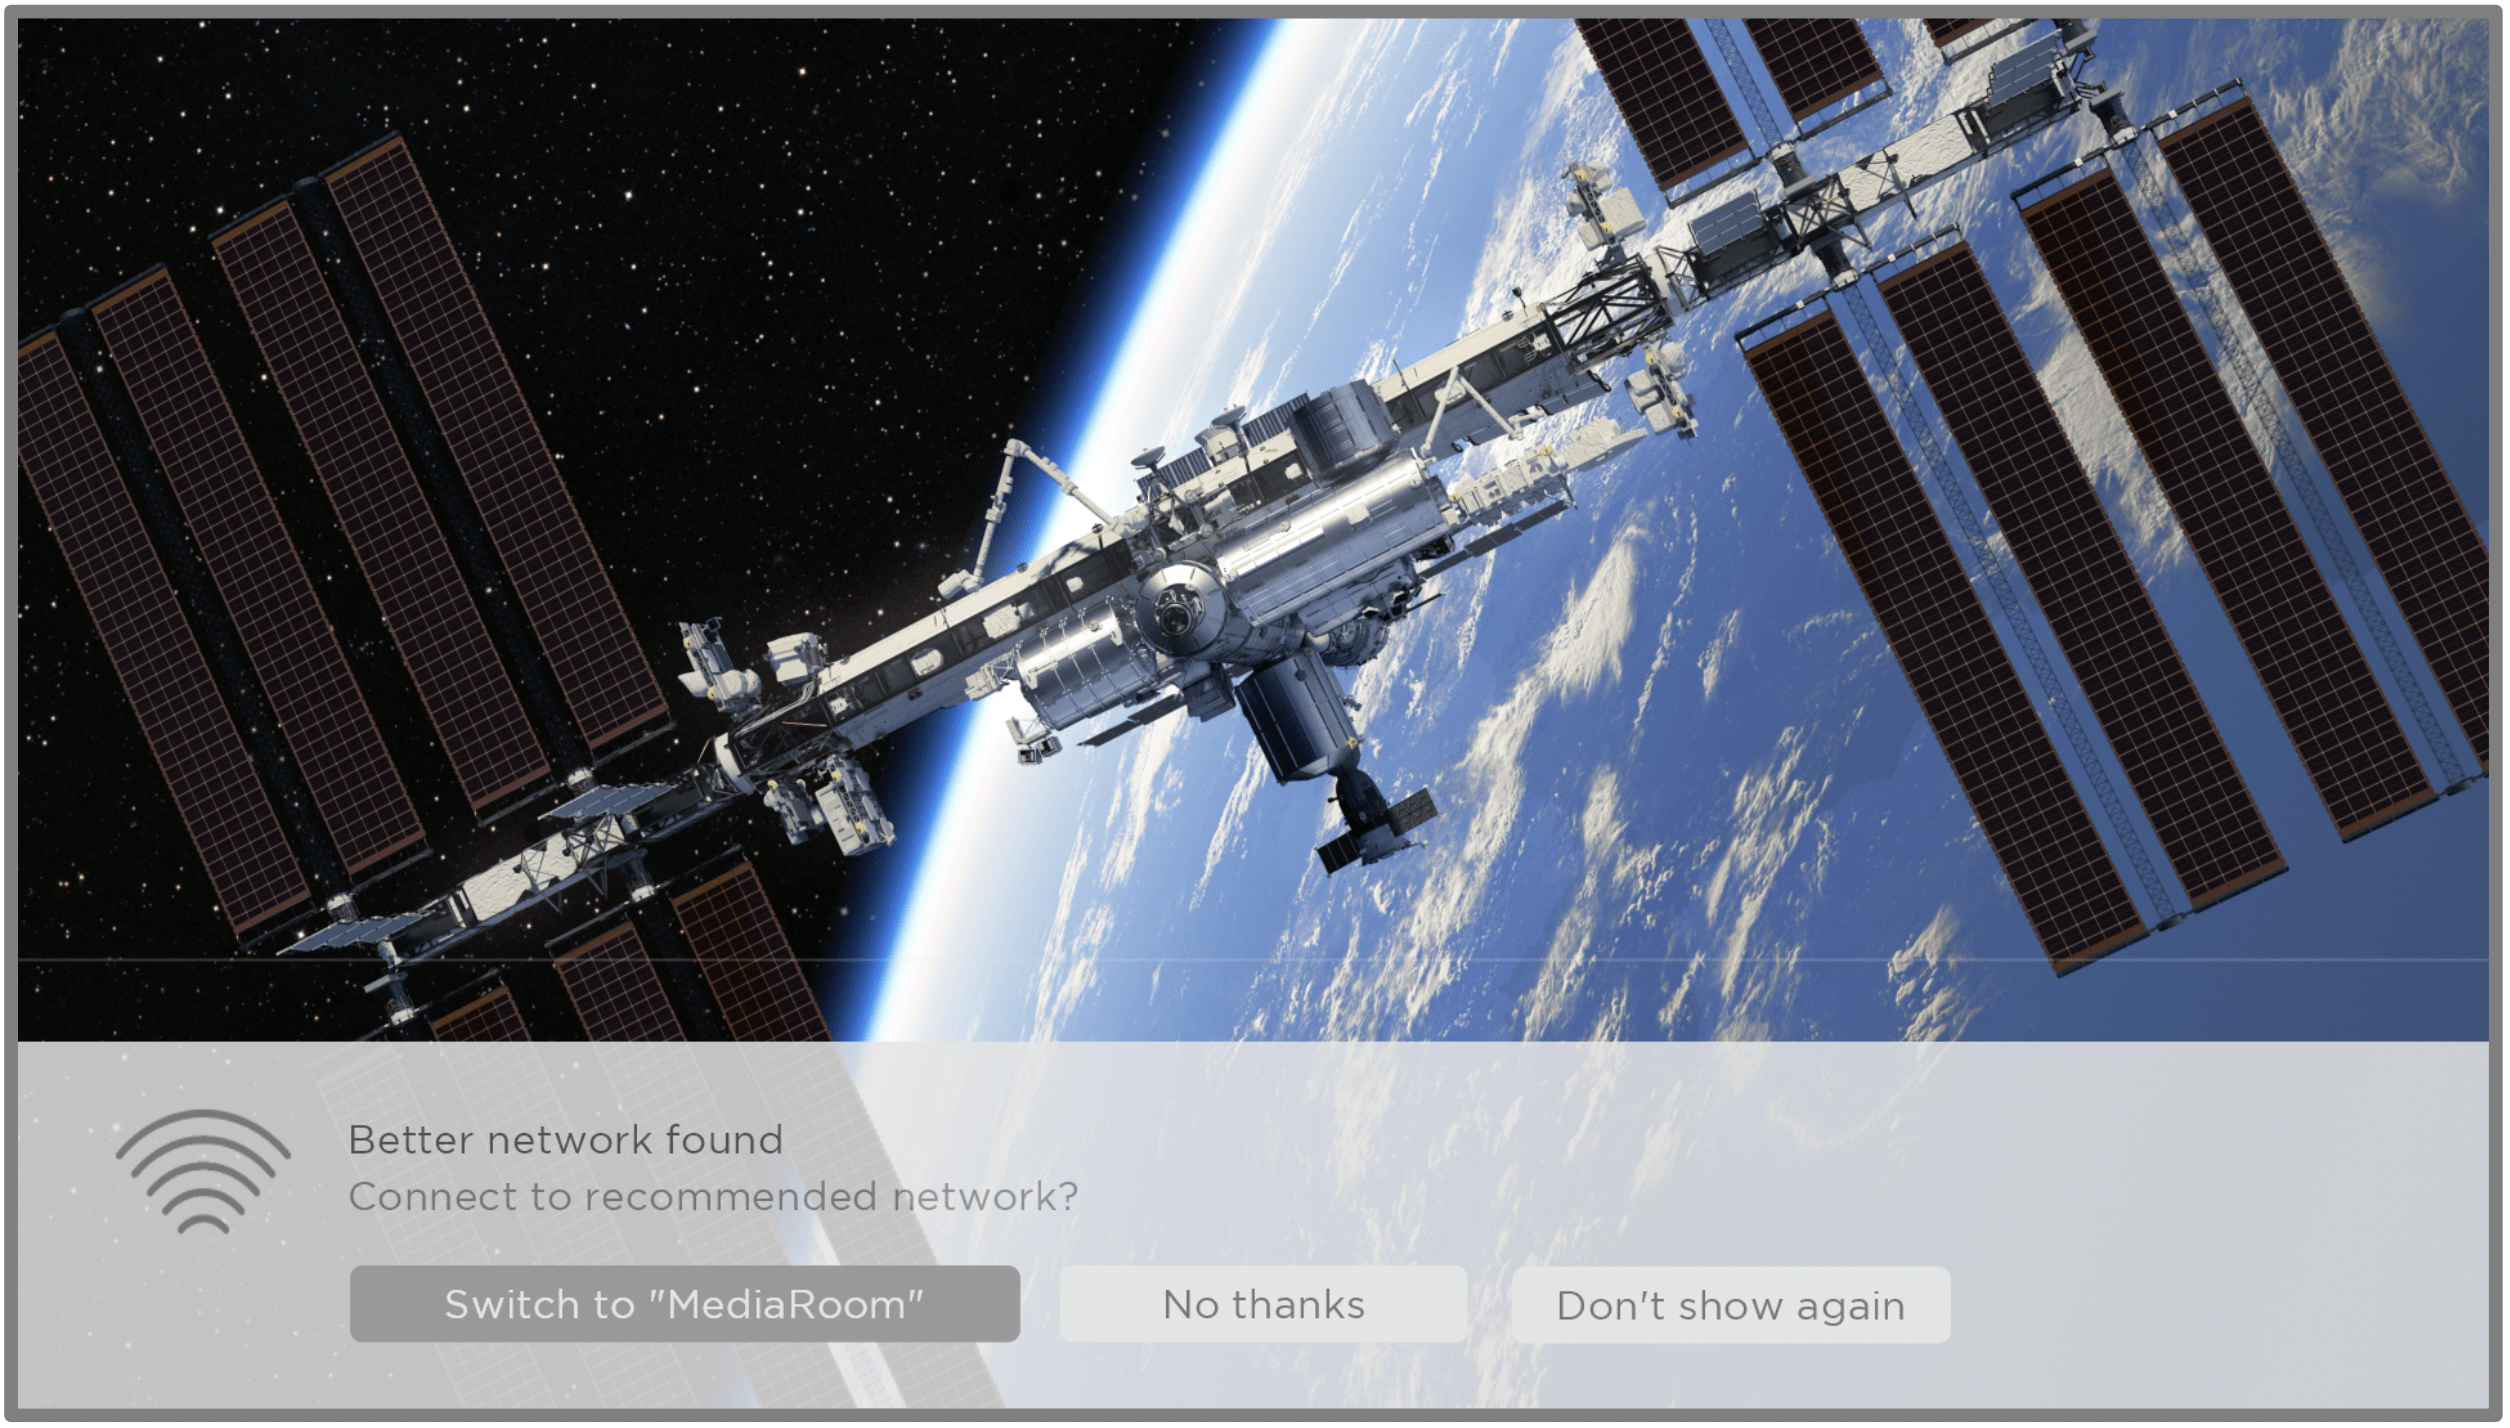
When this happens, you can select the appropriate button to accept or reject the recommendation, or you can select Don’t show again if you do not want to use this feature.
Switching TV inputs
Switch TV inputs to access the device connected to that input, for example, a Blu-ray™ player. Switching inputs is as easy as highlighting the input’s tile in the Home screen, and pressing OK. The video signal on the input, if any, plays on the screen.
Tip: To learn how to add, remove, rename, and rearrange the tiles on your Home screen, see Customizing your TV.
Auto-detecting devices
Your TV automatically detects when you connect a new device to an HDMI input and turn on its power. The input is automatically added to the Home screen if it isn’t already present.
Adjusting audio/video settings
While watching video content on any input, press STAR  to display the TV settings menu. Press UP or DOWN to highlight an option, and then press LEFT or RIGHT to change the setting. To learn about each of the audio and video settings, see Adjusting TV settings.
Setting preferred audio language for streaming channels
You can select the preferred language for the audio played by streaming channels. If the selected language is available in the streaming content, the TV plays that language.
To set the preferred audio language:
- From the Home screen menu, navigate to Settings > Audio > Audio preferred language.
- Press RIGHT to highlight one of the languages.
- Press UP or DOWN to highlight the language you want to use.
- Press OK.
Note: Many streaming channels have an option to select the language while you are watching a program. The Audio preferred language setting sets the default for that option.
Automatic game console configuration
Your TV automatically detects select game consoles and configures the key features it supports to optimize TV performance while playing video games. When you connect a supported and powered-on game console through an HDMI® input, the TV automatically changes the input tile to the game console icon1 . Only on selected models with compatible game consoles, it also enables:
- Automatic low-latency mode (ALLM)
- Variable refresh rate
- HDR gaming
- High frame rate
- Game mode
- THX Certified game mode
Various combinations of these features are available only on select TCL • Roku TV models, and if present, can be disabled by navigating to Settings > TV inputs and then selecting the appropriate HDMI input.
When you start playing a game, your TV displays a message at the bottom of the screen to make you aware of the settings that it will use.

Select Cancel before the timer runs out to keep the current TV picture settings. For example, you might want to cancel automatic configuration if you are watching a movie from your game console.
Using Roku Voice commands
Roku Voice commands make it fast and easy to control your TV and find entertainment with simple voice commands like “show me comedies.” Control your TV with commands like “switch to game console,” or “watch channel 7.1.” Use your Roku Voice remote, the Roku mobile app, or a compatible smart speaker to speak commands. When using a smart speaker, add “on my Roku” or, for example, “on my bedroom Roku” to the end of the command.
To learn what commands to use, watch out for hints that appear at appropriate times. For example, if you are in the TV settings menu with the Sleep timer command highlighted, a hint might appear explaining how to use a Roku Voice command to set the sleep timer. By using the Roku Voice command, you can use the command at any time, without a need to call up the menu.
Using Roku Voice remotes (select models only)
Only on TVs with the Roku Voice remotes: The following topics explain how to get the most out of your TV when it includes a Roku Voice Remote, Roku Enhanced Voice Remote, or Roku Voice Remote Pro.
Re-pairing your Roku Voice remote
The Roku Voice remotes operate with wireless radio-frequency signals and must be paired with your TV. You initially paired the remote when you set up your TV during Guided Setup. But if your remote loses its pairing with the TV for some reason, you can easily re-pair it using either of the following methods:
- Remove the battery cover from the back of the remote.
- Press and hold down the pairing button for 3 seconds or longer, until the adjacent LED lights up.
- Do one of the following:
- Turn on the TV using the power button on the TV side or back panel.
Pairing occurs as the TV starts up. - Use the Roku mobile app or a different remote to navigate to Settings > Remotes & devices > Pair new device > Remote.
Tip: If the remote fails to pair with the TV, try installing new batteries. Also, it’s helpful to hold the remote within two to three feet of the TV to ensure successful pairing.
Checking the Roku Voice remote battery level
You can check the condition of the batteries in your Roku Voice remote at any time by navigating to Settings > Remotes & devices, and then pressing OK to select your remote below My paired devices. With your remote selected, navigate right to About > Remote to view its Battery level. The resulting screen displays not only the battery level, but also other information that can be useful when you need technical support with your remote.
Tip: When you first turn on the TV, a battery level indicator appears in the upper right corner of the screen for a few seconds.
Finding your Roku Enhanced Voice Remote or Roku Voice Remote Pro
Only on TVs with the Roku Enhanced Voice Remote or Voice Remote Pro, when your remote has found its way down into the sofa cushions or your dog has hidden it in the corner, you can use the Find Remote feature to find out where it’s hiding. This feature has a limited range, and is designed to find your Enhanced Voice remote somewhere in the same room as the TV.
Select Find Remote on the Settings > Remotes & devices > Remote settings menu to see brief instructions on how to activate the Find Remote feature. Note, however, that selecting this option doesn’t actually activate the feature. Here are the complete instructions:
Activate Find Remote
- If your TV has a joystick-style control, press to the Left or Right to open the Inputs menu, and then press Right to scroll down to Find Remote.
- If your TV has a column of labeled panel buttons, press the INPUT button to open the Inputs menu, and then press the INPUT button again until you highlight Find Remote.
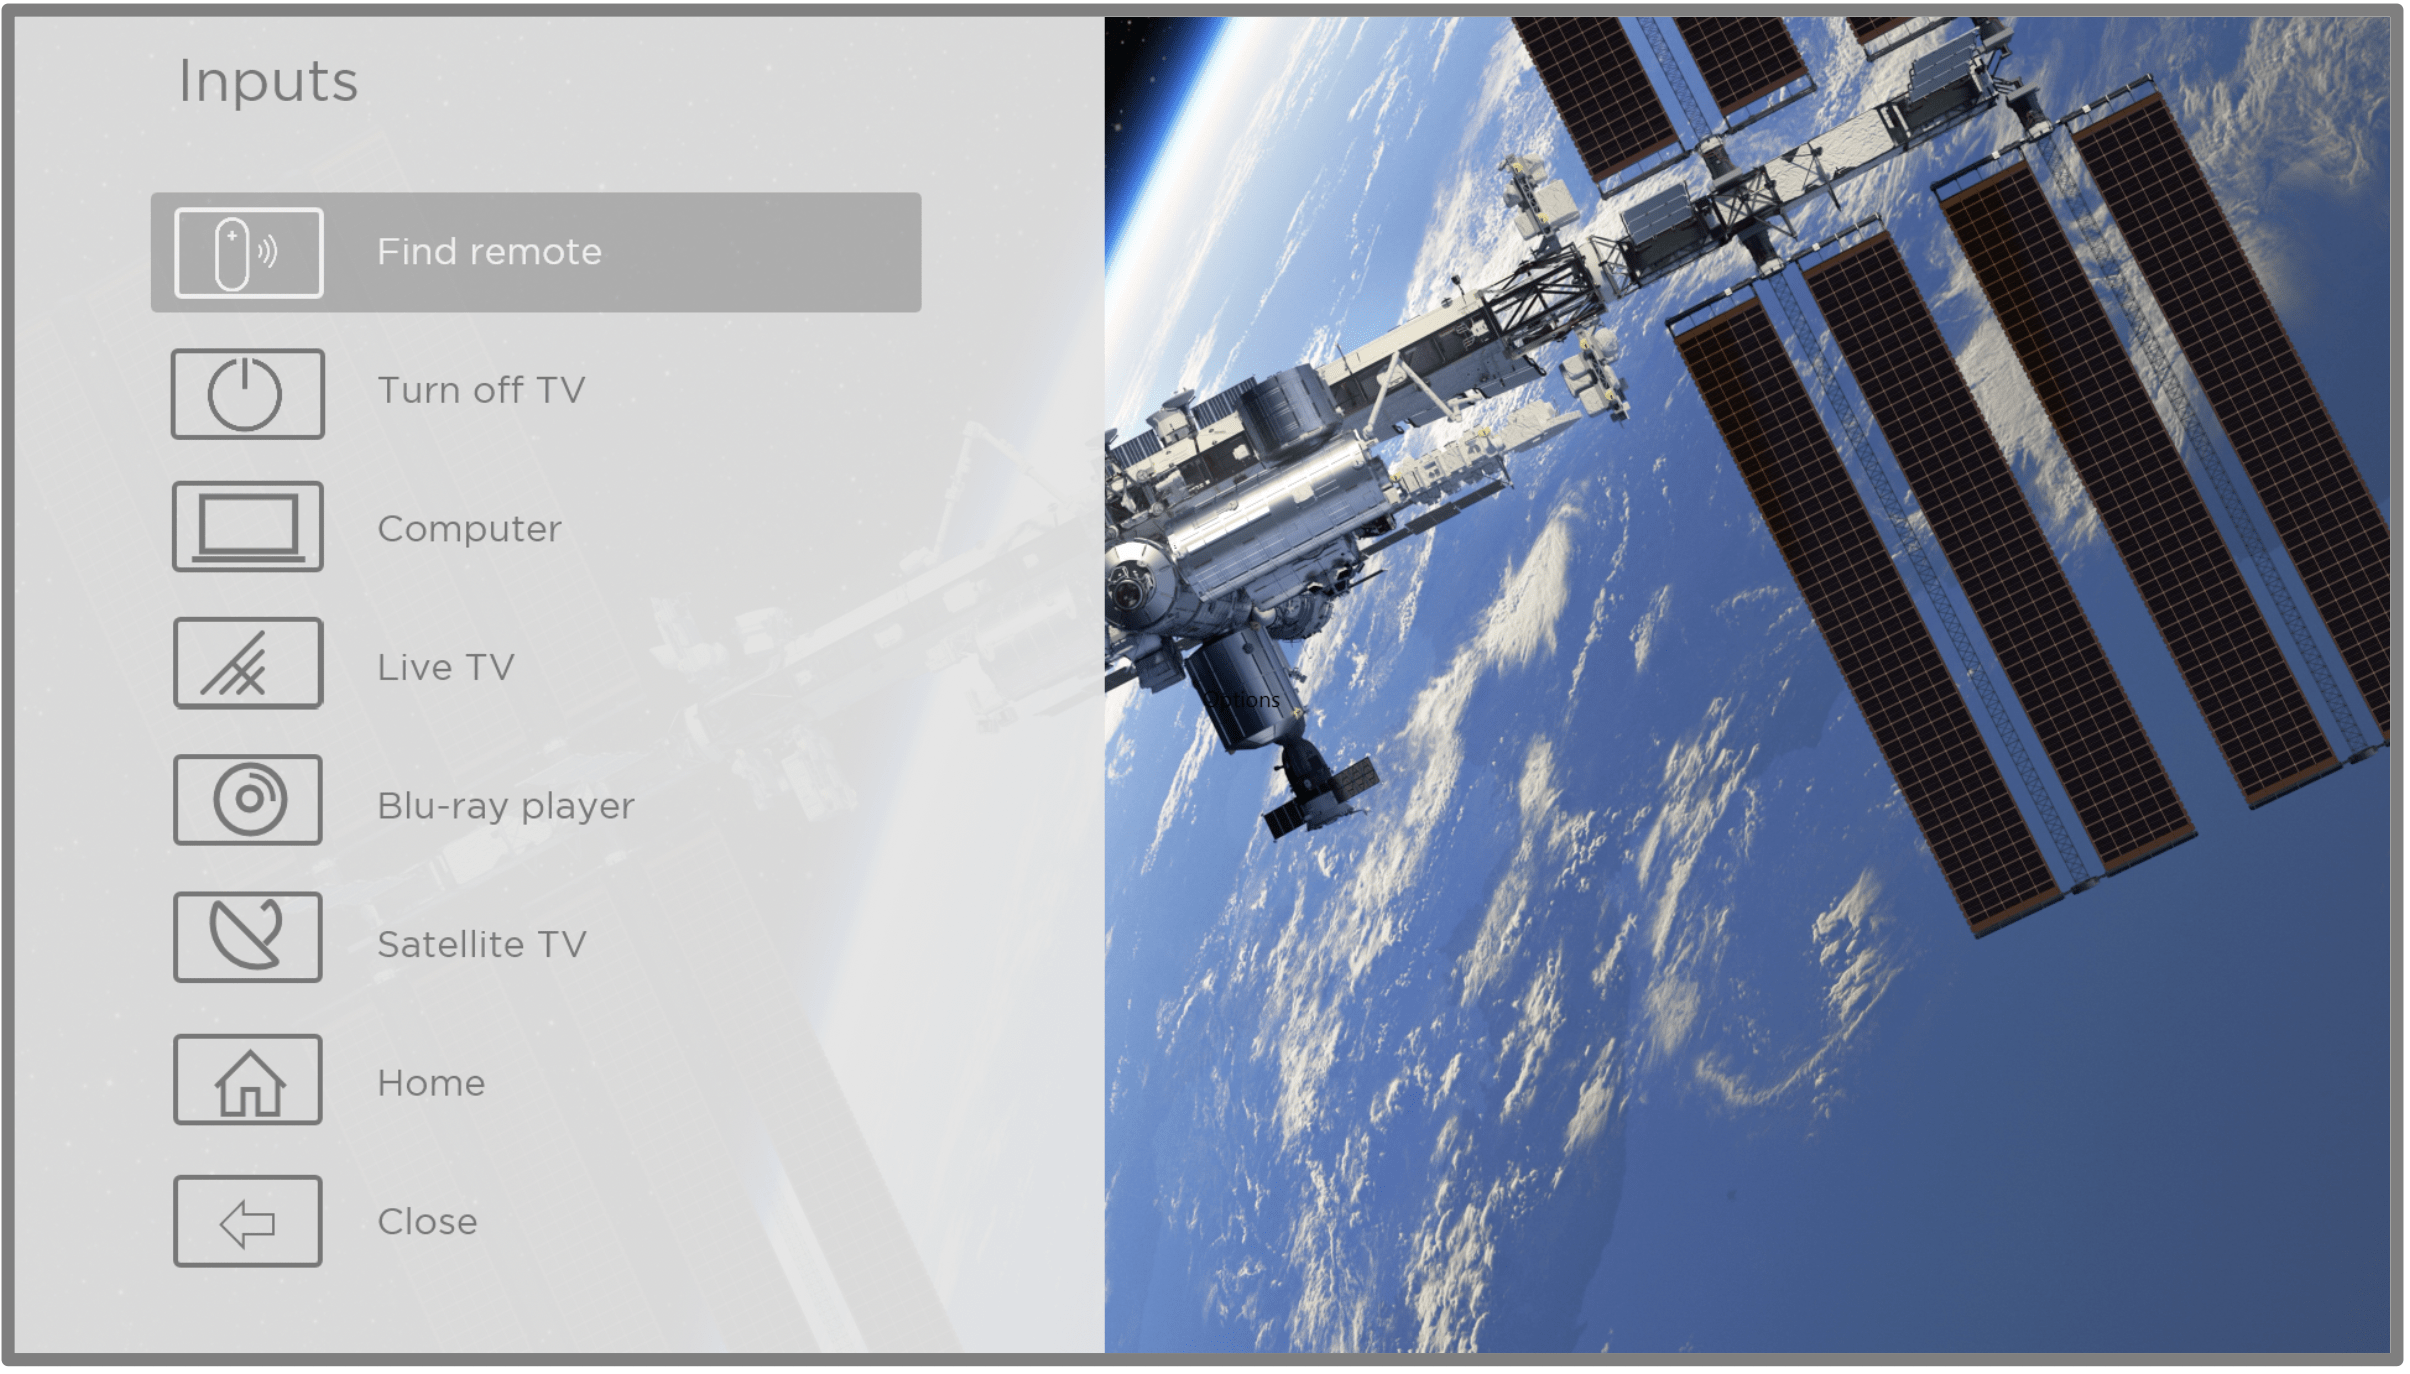
A moment or two after highlighting Find Remote, the remote starts playing your selected Find Remote sound to let you know where it is hiding. The sound automatically stops after a minute, or after you find the remote and press any button.
Changing and previewing the remote finder sound
Only on TVs with the Roku Enhanced Voice Remote or Voice Remote Pro, you can
customize the sound your remote makes when you use the Find Remote feature. To customize the sound, navigate to Settings > Remotes & devices > Remote settings > Change remote finder sound. Select the sound you want to use from the available settings.
To preview the sound you have chosen, select Preview remote finder sound, and then hold down OK on the remote to play the sound. When you release the OK button, the sound will stop.
Playing content from USB storage devices
Only in connected mode, your Home screen has the Roku Media Player tile. Otherwise, the Home screen has the USB Media Player tile. With either player, you can play personal music, video, and photo files from a personal USB flash drive or hard disk connected to the TV’s USB port.
To use this feature, make sure your media files are compatible with the Roku/USB Media Player. To see the latest list of supported formats, view Help in the Media Player1 . The Roku/USB Media Player displays supported file types only, and hides file types it knows it cannot play.
Note: If you do not see the Roku Media Player on your Home screen, it might have been uninstalled. You can reinstall it from the Roku Channel Store by using the Streaming Channels menu option or the Add Channels shortcut. The USB Media Player in non-connected mode cannot be uninstalled.
Auto player launch
Only in connected mode, you can set your TV to automatically open the Roku Media Player when you connect a USB drive with a recognizable file system (such as FAT16/32, NTFS, HFS+ or EXT2/3). To configure this setting, from the Home screen menu, navigate to Settings > System > USB media. At this point, the following options are available:
- Auto-launch – Select Prompt, On, or Off, as desired.
- Prompt – (default) Display a prompt each time a recognized USB drive is connected. The prompt provides options to launch the Roku Media Player as well as to change future auto-play behavior.
- On – Always launch the Roku Media Player whenever you connect a recognized USB drive.
- Off – Never launch the Roku Media Player automatically.
- Launch channel – Select the app you want to use to play back media files.
Playing content from local network media servers
Only in connected mode, your TV can play personal video, music, and photo files from a media server on your local network. Media servers include personal computers running media server software such as Plex or Windows Media Player, network file storage systems that have built-in media server software, and other devices that implement the specifications of the Digital Living Network Alliance. Some servers do not fully implement the DLNA specification but are UPNP (Universal Plug and Play) compatible. The Roku Media Player can connect to them as well.
Some media servers can convert files into Roku compatible formats. Digital Rights Management (DRM) protected content is not supported.
Setting up a payment method
For Movie Store, TV Store, and other channels that allow you to pay through your linked Roku account, you can enter a payment method directly on your TV. Entering a payment method on your TV means that you don’t need to go to a computer or mobile device to set up a payment method.
To add a payment method:
- From the Home screen menu, navigate to Settings > Payment method > Add payment method.
- Use the on-screen number pad to enter your credit/debit card number, expiration date, CVV number, and ZIP Code.
Note: If you have already set up a payment method on my.roku.com, that payment method is identified here in such a way as not to expose any personal data. You can use this screen to change your payment method, if desired. - Select Save card, and then press OK.
Using your TV in a hotel or dorm room
Hotels, school dorms, conference facilities, and similar locations with public wireless Internet access often require you to interact with a web page to authenticate your access. These types or networks are called restricted public networks. When you select a network of this type, the TV automatically detects that additional information is needed and prompts you through using another wireless device to supply the requested information.
About using your TV on a restricted public network
Here are some points to keep in mind when using your TV on a restricted public network:
- Using your TCL • Roku TV on a hotel or dorm room network requires wireless availability and a network-connected smartphone, tablet, or computer to authenticate access to your wireless access point.
- You will need your TCL • Roku TV remote.
- Some content might be limited or unavailable if you try to connect outside your home country due to geo-filtering.
Getting your TCL • Roku TV online on a restricted public network
- Either during Guided Setup or after using the Settings > Network menu to set up a new connection, the TV automatically detects that you are connecting to a restricted network and displays the following prompt:
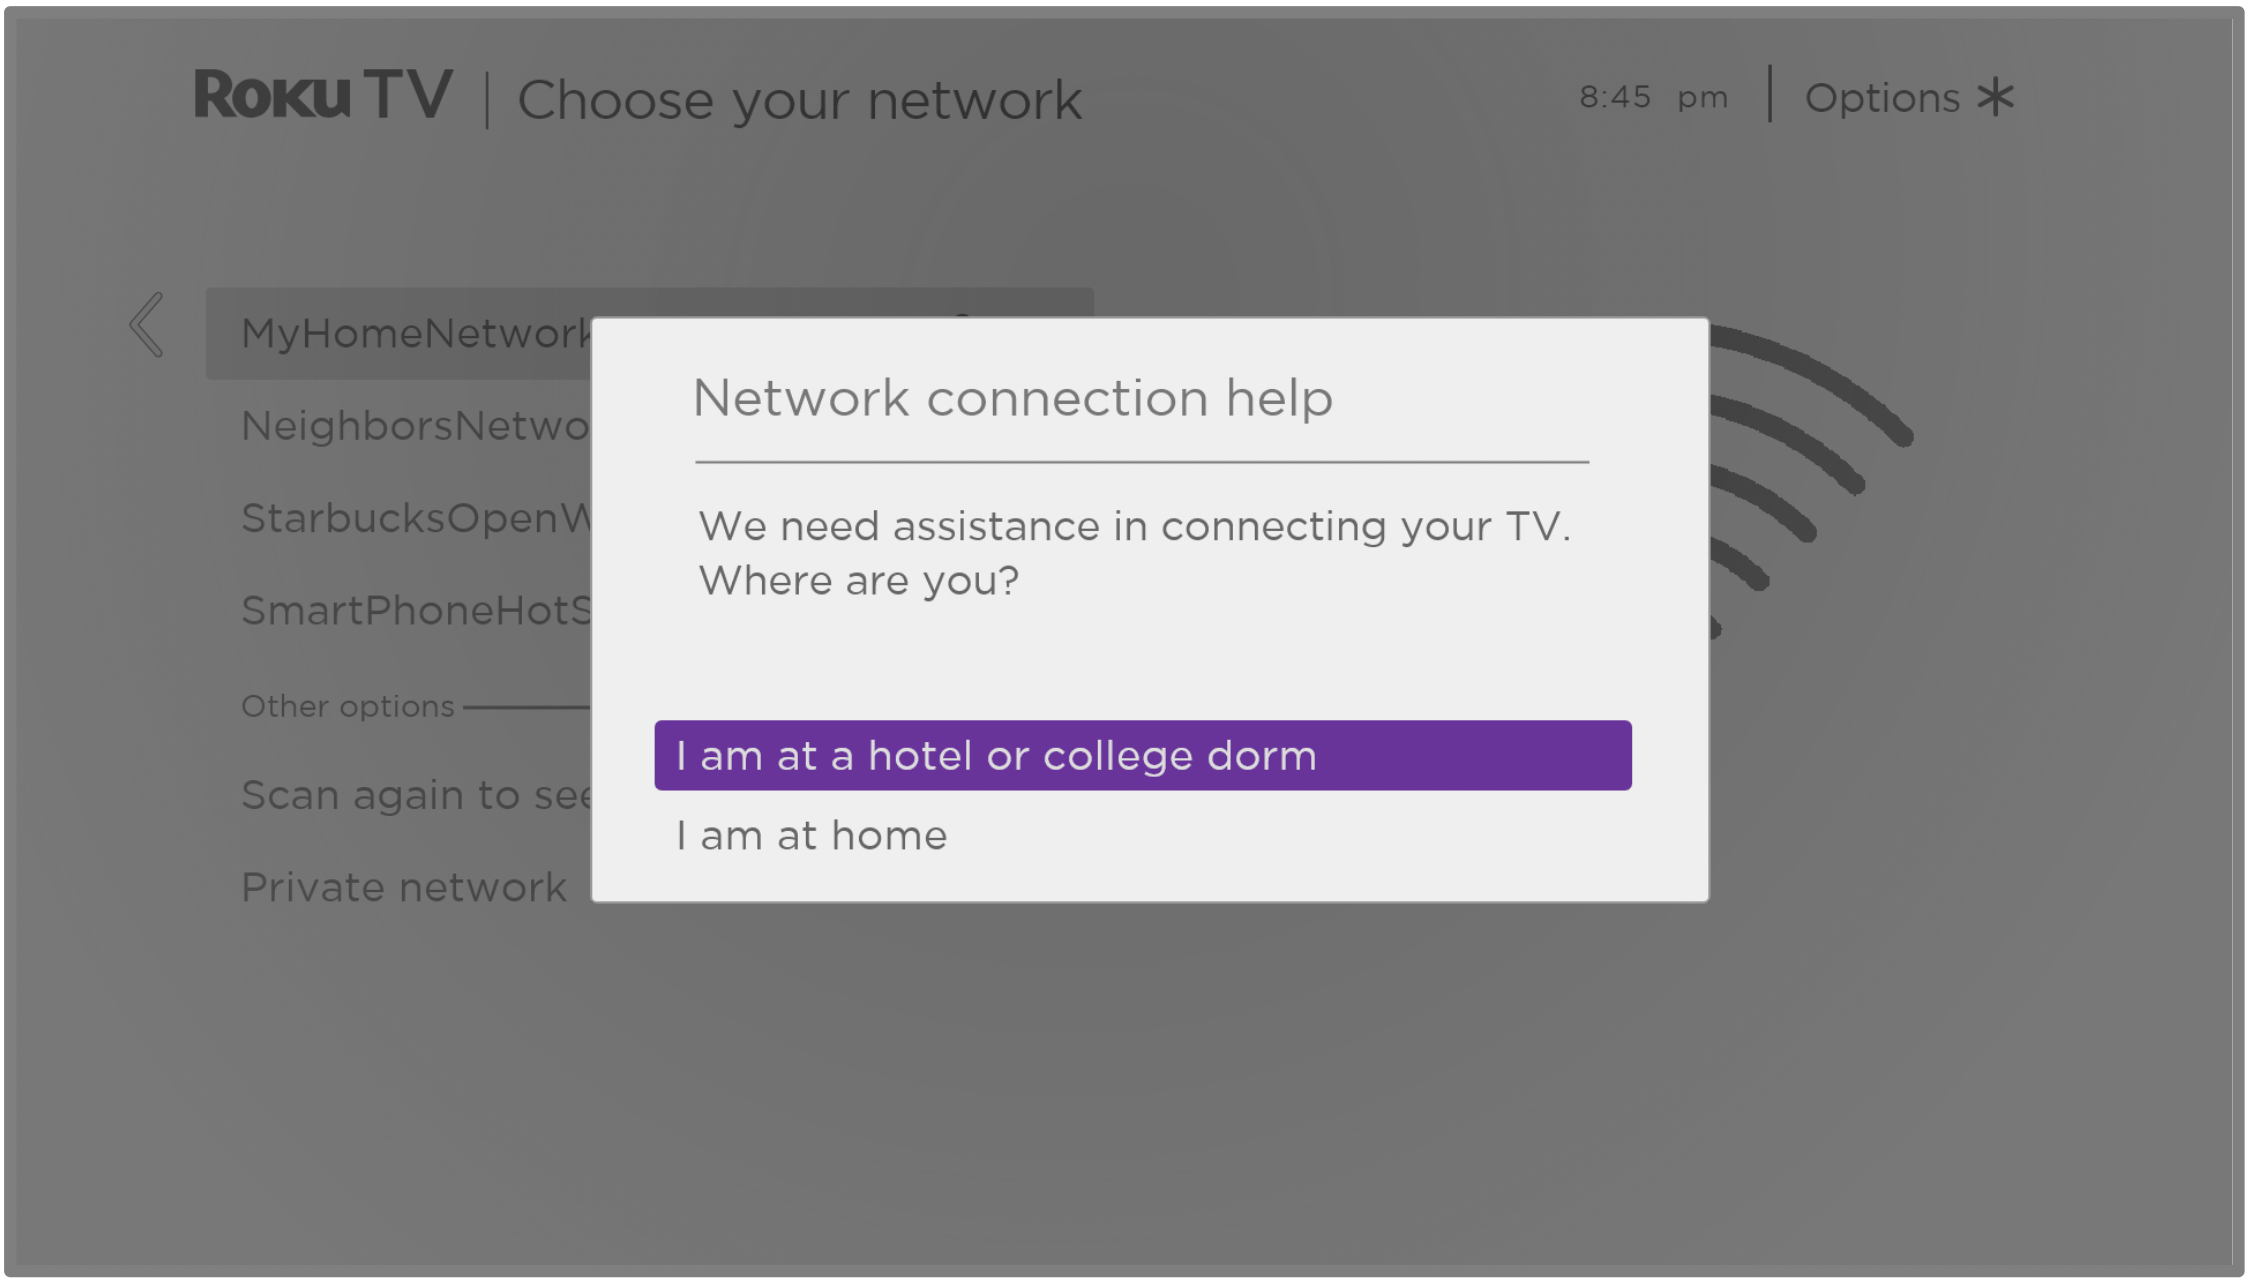
Tip: Your TV can connect to a restricted network only if Enable ‘Device connect’ is selected in Settings > System > Advanced system settings. (Device connect is enabled by default, but if you have disabled it, the TV cannot complete the connection.)
Note: Device connect is not present if the TV is in non-connected mode. - After selecting the correct network, highlight I am at a hotel or college dorm, and then press OK. The TV prompts you to use your smartphone, tablet, or laptop to complete the connection.
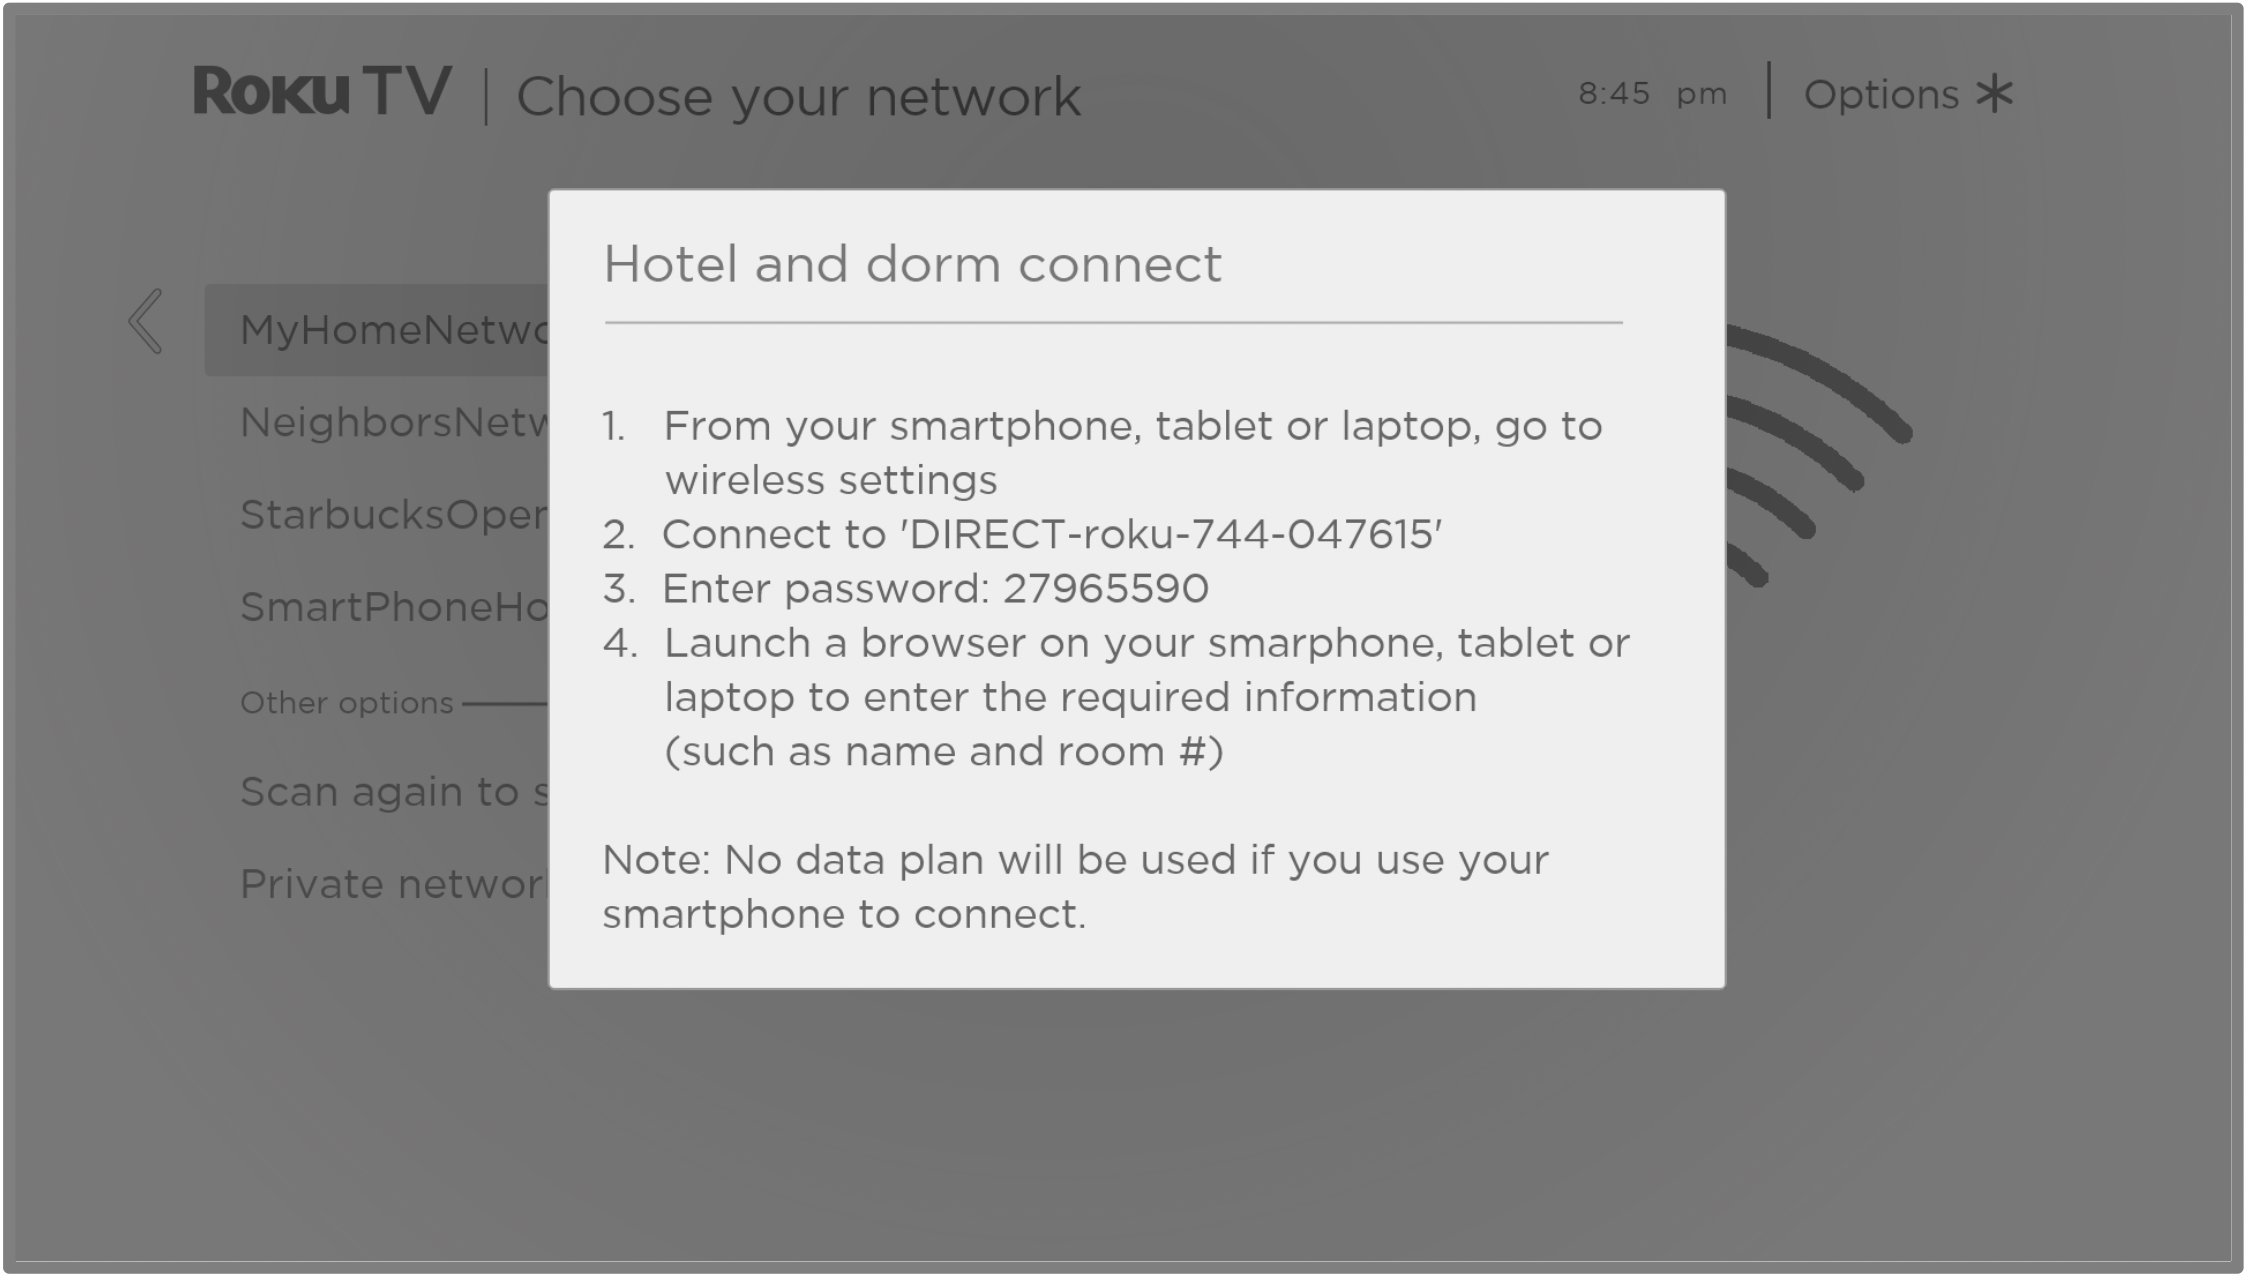
- Use a mobile phone, tablet, or wireless-enabled computer to detect wireless networks. In most cases, you can simply open the device’s Wi-Fi Settings or Network Settings screen to start scanning.
Note: The mobile phone, tablet, or computer must be on the same wireless network to which you are connecting the TV. - Connect to the network named on your TV screen. The actual network name varies.
Note: The previous step connects your smartphone, tablet, or computer directly to the TV. No connection charges apply and the connection does not impact your device’s data plan. - The wireless connection process prompts you for a password. Enter the password as shown on the TV screen. The actual password varies.
- Start the web browser on your mobile phone, tablet, or computer. When you attempt to open any web page, the restricted connection will prompt you for whatever information it needs. In most cases, you must agree to terms and conditions, provide identifying information, or enter a password, PIN, or room number to proceed. The information requested depends on the organization that controls the wireless connection.
- After you enter the requested information, the TV automatically proceeds to complete its connection and resumes normal operation.
- If the TV prompts you to link to your Roku account, use your mobile phone, tablet, or computer to activate your TCL • Roku TV.
Care and Cleaning
- Caution : Turn off your TV before cleaning.
- Clean the TV as needed using a soft lint-free cloth. Be sure to occasionally dust the ventilation slots in the cabinet to help assure adequate ventilation.
- IMPORTANT: Never use strong cleaning agents, such as ammonia-based cleaners, or abrasive powder. These types of cleaners will damage the TV. The TV’s screen may be cleaned with a soft, lint-free cloth as well. Take care not to scratch or mar the screen. If necessary, you may use a cloth dampened with warm water. While cleaning, do not spray liquid directly on the screen, or allow liquid to run down the screen and inside the TV. Also, never place drinks or vases with water on top of the TV. This could increase the risk of fire, shock hazard or damage to the TV.
