
www.klarstein.com
VESUVIO
Pizzaofen
Pizza Oven
Horno para pizza
Four à pizza
Forno per pizza
10034578 10034579


3
DE
Sehr geehrter Kunde,
wir gratulieren Ihnen zum Erwerb Ihres Gerätes. Lesen Sie
die folgenden Hinweise sorgfältig durch und befolgen Sie
diese, um möglichen Schäden vorzubeugen. Für Schäden,
die durch Missachtung der Hinweise und unsachgemäßen
Gebrauch entstehen, übernehmen wir keine Haftung. Scannen
Sie den folgenden QR-Code, um Zugriff auf die aktuellste
Bedienungsanleitung und weitere Informationen rund um das
Produkt zu erhalten.
INHALTSVERZEICHNIS
Sicherheitshinweise4
Geräteübersicht5
Inbetriebnahme und Bedienung6
Reinigung und Pege7
Hinweise zur Entsorgung8
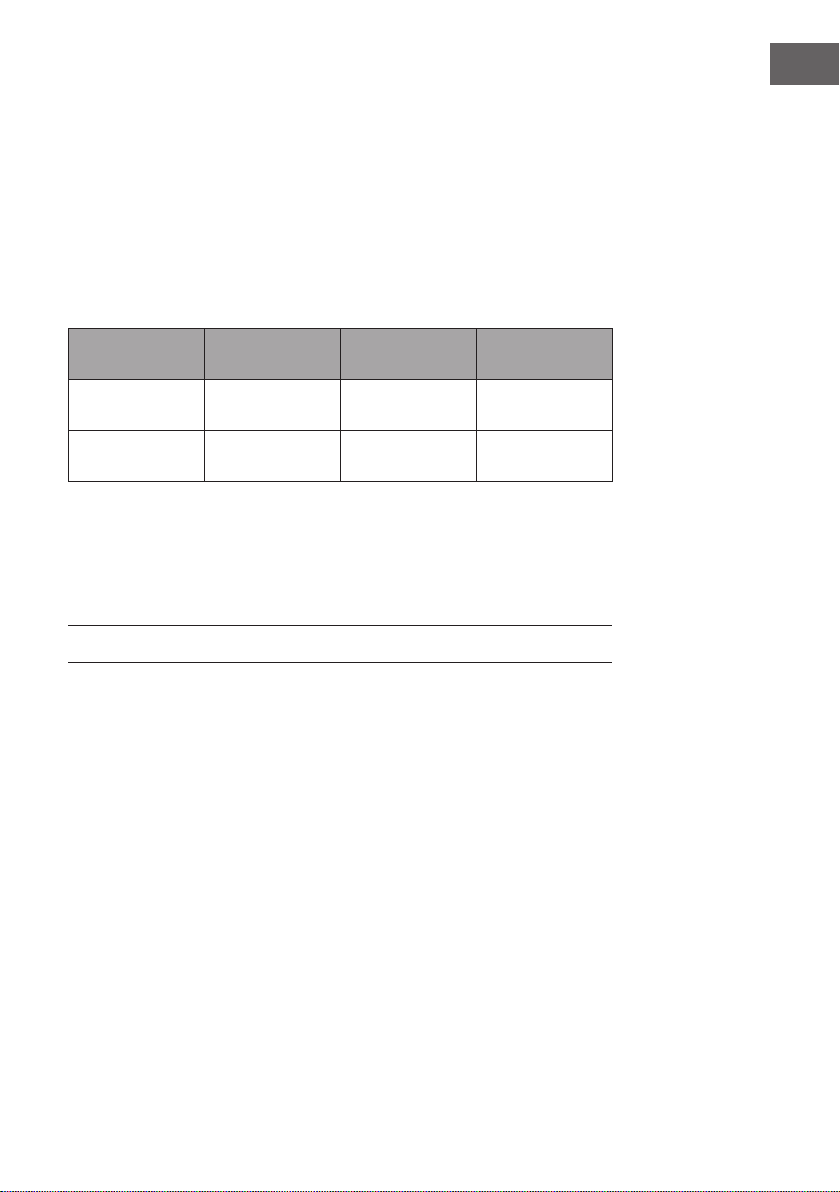
TECHNISCHE DATEN
Artikelnummer 10034578 10034579
Stromversorgung 220-240 V ~ 50/60 Hz
Einstellbare Temperatur 65-300°C
Leistung 1130 W 2260 W
HERSTELLER & IMPORTEUR (UK)
Hersteller:
Chal-Tec GmbH, Wallstraße 16, 10179 Berlin, Deutschland.
Importeur für Großbritannien:
Chal-Tec UK limited
Unit 6 Riverside Business Centre
Brighton Road
Shoreham-by-Sea
BN43 6RE
United Kingdom
English 9
Español 15
Français 21
Italiano 27
4
DE
SICHERHEITSHINWEISE
VORSICHT
Verbrennungsgefahr! Berühren Sie keine heißen Ober ächen. Die
Ober ächen können während des Gebrauchs sehr heiß werden.
• Zum Schutz vor Stromschlag tauchen Sie das Kabel, den Stecker und das Gehäuse
niemals in Wasser oder andere Flüssigkeiten.
• Benutzen Sie das Gerät in Anwesenheit von Kindern nur unter Aufsicht.
• Ziehen Sie bei Nichtgebrauch und vor der Reinigung den Netzstecker. Lassen Sie
das Gerät abkühlen, bevor Sie teile entnehmen oder anbringen.
• Lassen Sie Reparaturen nur von quali zierten Fachkräften durchführen. Lassen Sie
das Gerät überprüfen wenn es in irgendeiner Weise beschädigt oder wenn das
Netzkabel oder der Stecker beschädigt sind. Gleiches gilt falls Flüssigkeiten oder
Gegenstände auf dem Gerät gelandet sind, das Gerät Regen oder Feuchtigkeit
ausgesetzt war, nicht ordnungsgemäß funktioniert oder umgefallen ist.
• Verwenden Sie nur das mitgelieferte Zubehör.
• Verwenden Sie das Gerät nicht im Freien.
• Lassen Sie das Kabel nicht über den Rand des Tisches oder der Arbeits äche
hängen und achten Sie darauf, dass es keine heißen Ober ächen berührt.
• Stellen Sie das Gerät nicht in die Nähe eines Heißgas-/Elektrobrenners oder
neben einen Ofen.
• Verwenden Sie das Gerät nicht für einen anderen als den vorgesehenen Zweck.
• Metallgeschirr darf nicht in einen Ofen eingesetzt werden, da es sonst zu einem
Brand oder Kurzschluss kommen kann. Reinigen Sie das Gerät nicht mit einem
Metallscheuerschwamm, Teile des Schwamms könnten abbrechen und elektrische
Geräteteile beschädigen.
• Ein Brand kann entstehen, wenn der Ofen abgedeckt ist oder während des Betriebs
brennbares Material, einschließlich Vorhänge, Wände und dergleichen berührt.
Legen Sie während des Betriebs keine Gegenstände auf das Gerät.
• Bei der Verwendung von anderen Materialien als Metall oder Glas ist äußerste
Vorsicht geboten.
• Lagern Sie keine Materialien und Gegenstände im ausgeschalteten Ofen.
• Verwenden Sie im Ofen keine der folgenden Materialien: Papier, Pappe, Kunststoff
und dergleichen.
• Decken Sie die Krümelschale oder andere Teile des Ofens nicht mit Metallfolie ab.
Dies führt zu einer Überhitzung des Ofens.

5
DE
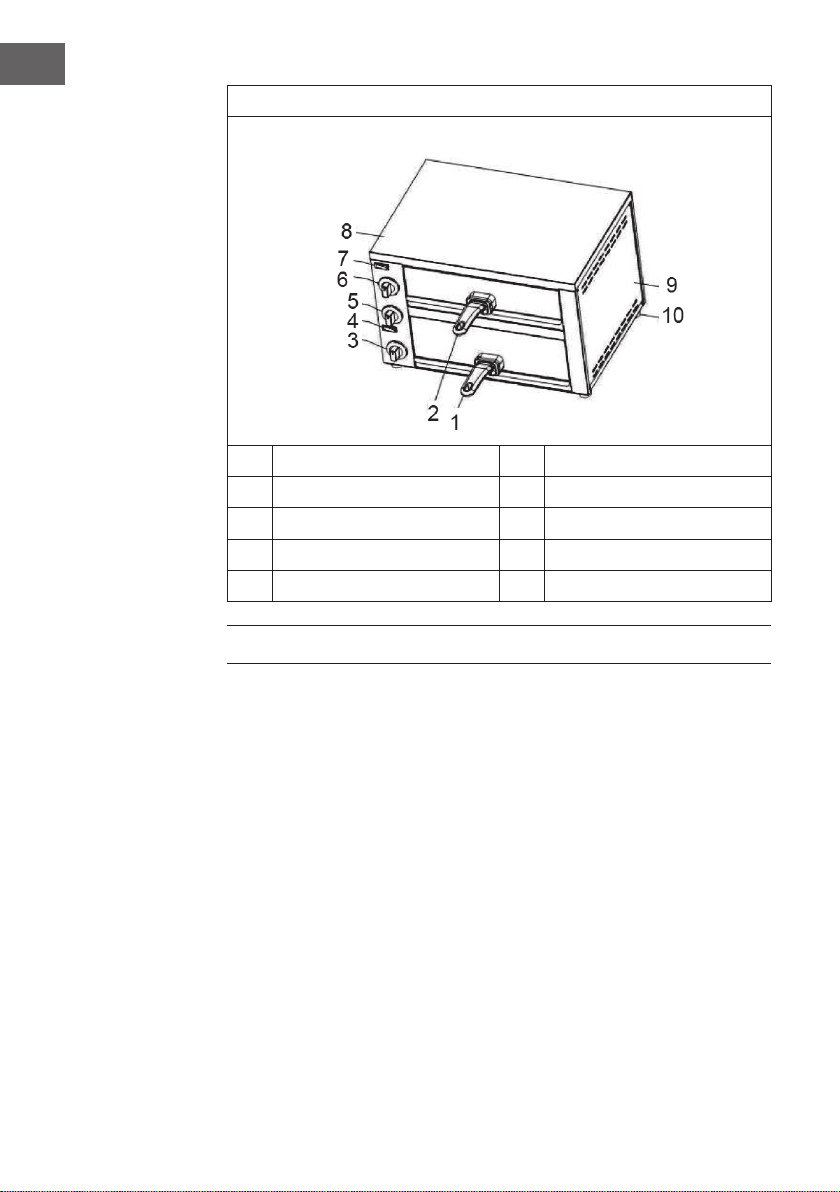
GERÄTEÜBERSICHT
Hinweis: Stecken Sie das Netzkabel immer zuerst in das Gerät, bevor Sie den
Stecker in die Steckdose stecken. Um das Gerät auszuschalten, drehen Sie den
Regler auf [0], ziehen Sie dann den Stecker aus der Steckdose. Das Gerät ist
ausgeschaltet, wenn sich beide Netzschalter in der Position [0].benden.
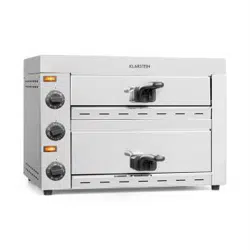
10034578
1
Obere Abdeckung
6
Timer
2
Seitenverkleidung
7
Heizelement
3
Fuß
8
Krümelfach
4
Thermostat
9
Einschub
5
Netzschalter
6
DE
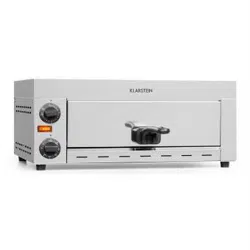
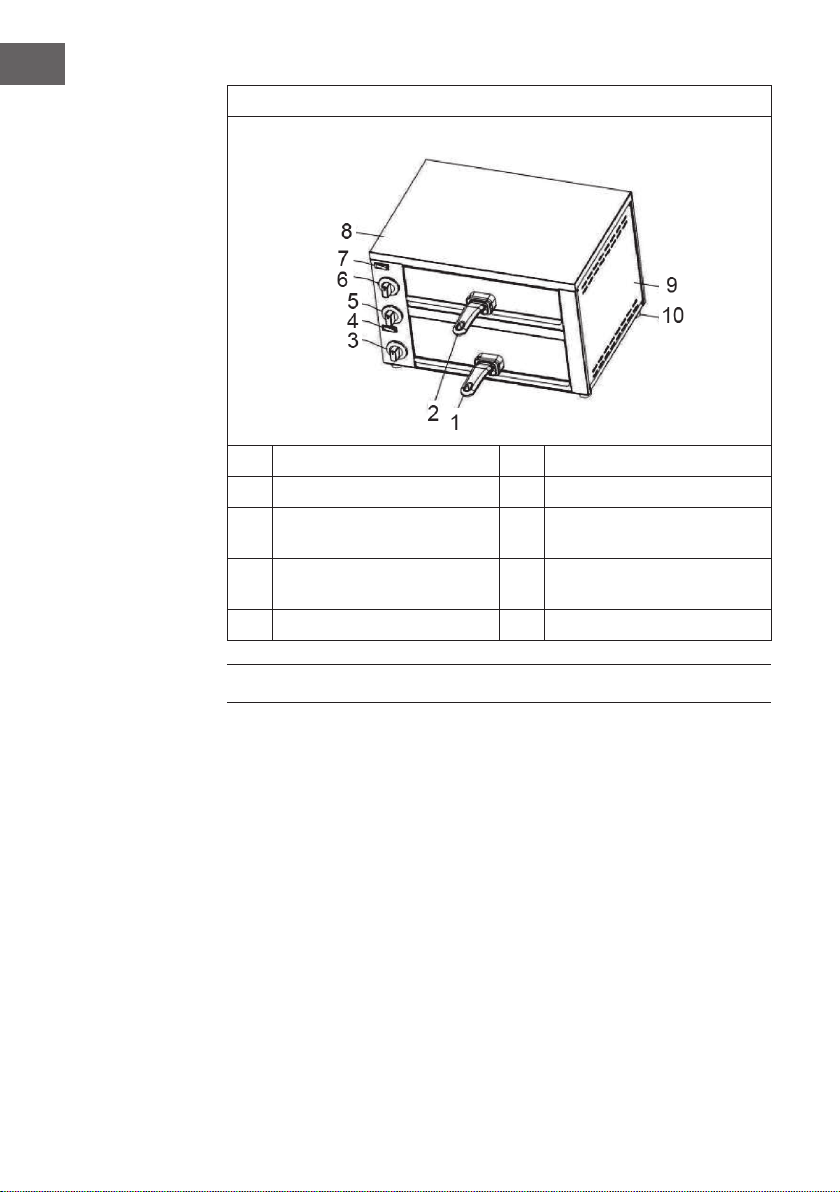
10034579
1
Untere Schublade
6
Oberer Thermostat
2
Obere Schublade
7
Oberer Netzschalter
3
Unterer Temperaturregler
8
Obere Abdeckung
4
Unterer Temperaturregler
9
Seitenverkleidung
5
Timer
10
Fuß
INBETRIEBNAHME UND BEDIENUNG
Vor dem ersten Betrieb
• Waschen Sie den Griff, den Einschub und das Backblech mit Seifenwasser.
• Wischen Sie die Innenwände des Ofens mit einem feuchten Lappen ab.
• Verwenden Sie kein Sprühreiniger oder Scheuermittel.
• Berühren Sie nicht die elektrischen Heizelemente und achten Sie darauf, dass kein
Wasser ins Innere des Ofens tropft.
Ofen starten
• Schieben Sie alle Einschübe in den Ofen.
• Lassen Sie den Ofen 5 Minuten lang auf der höchsten Temperatur vorheizen.
• Schalten Sie die Heizelemente dann aus und öffnen Sie die Einschübe, um
Rauchrückstände im Inneren des Ofens zu entfernen.
7
DE
Leistungs- und Temperaturanzeige
Stecken Sie den Stecker in die Steckdose und drehen Sie den Temperaturregler auf die
Einstellung. Drücken Sie dann den Netzschalter, die Betriebsanzeige leuchtet und der
Ofen beginnt sich aufzuheizen.
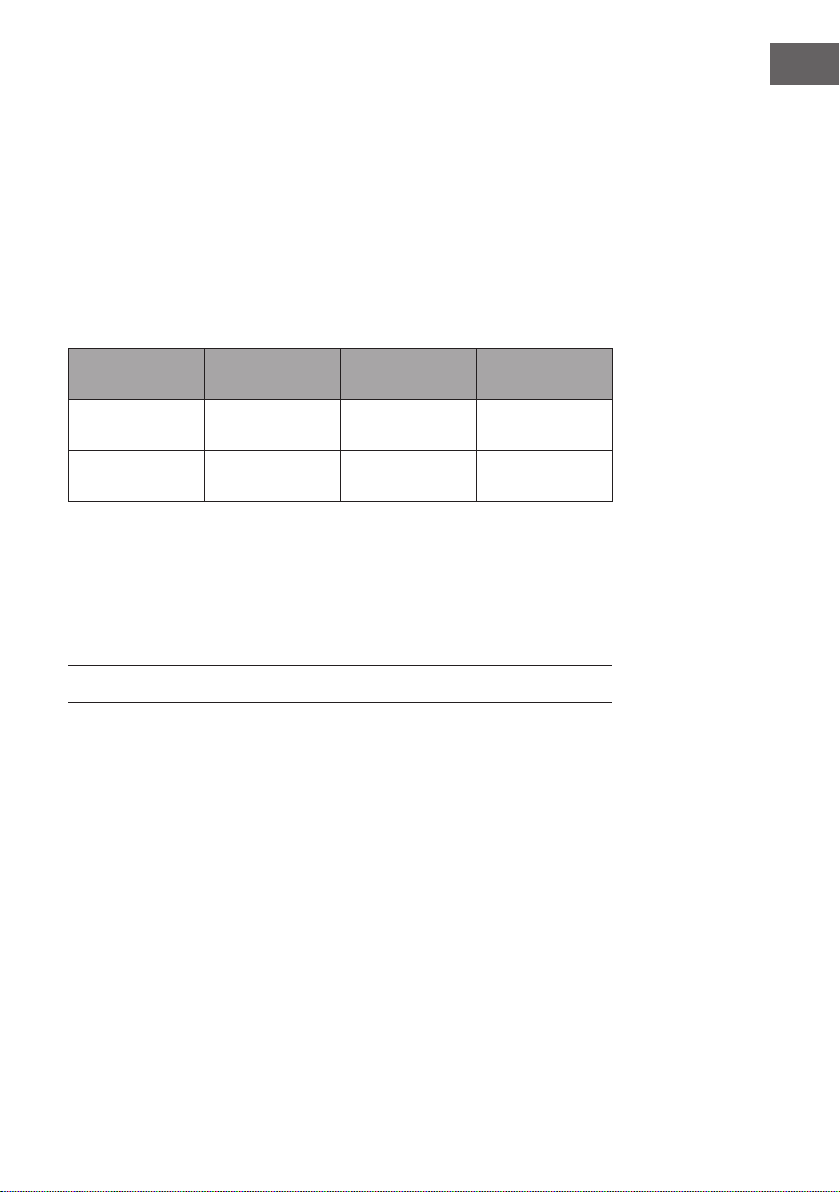
Timer
Der einstellbare Bereich des Timers beträgt 0-15 Minuten. Der Timer hat keinen Einuss
auf den Betrieb des Ofens, er dient nur als Erinnerung. Während des Backvorgangs
kann der Timer in eine neue Position gedreht werden, um die Zeit gemäß der folgenden
Tabelle anzupassen:
Lebensmittel Einschub Backzeit bei
kaltem Ofen
Backzeit bei
vorgeheiztem Ofen
Gefrorene Pizza oben oder unten 12-13 Minuten 8-9 Minuten
bei 250°C
Baguette unten 10 Minuten 8 Minuten
bei 180°C
Hinweis zum Thermostat
Der Thermostat steuert die Temperatur im Inneren des Ofens. Wenn der Ofen aufgeheizt
ist, wird die Temperatur automatisch gehalten. Immer wenn sich der Ofen erneut
aufheizt, leuchtet die Betriebsanzeige. Sollte sich der Ofen einmal überhitzen, wird er
automatisch abgeschaltet.
REINIGUNG UND PFLEGE
• Ziehen Sie zuerst den Stecker des Netzkabels aus der Steckdose.
• Nachdem der Ofen abgekühlt ist, verwenden Sie ein feuchtes Tuch oder einen
Schwamm zur Reinigung. Weichen Sie das Innere des Ofens nicht ein und waschen
Sie ihn nicht unter ießendem Wasser, da dies zu schweren Schäden am Gerät
führen kann.
• Verwenden Sie zu Reinigung keine scharfen oder harten Gegenstände, da diese
die Oberäche des Gerätes beschädigen könnten.

8
DE
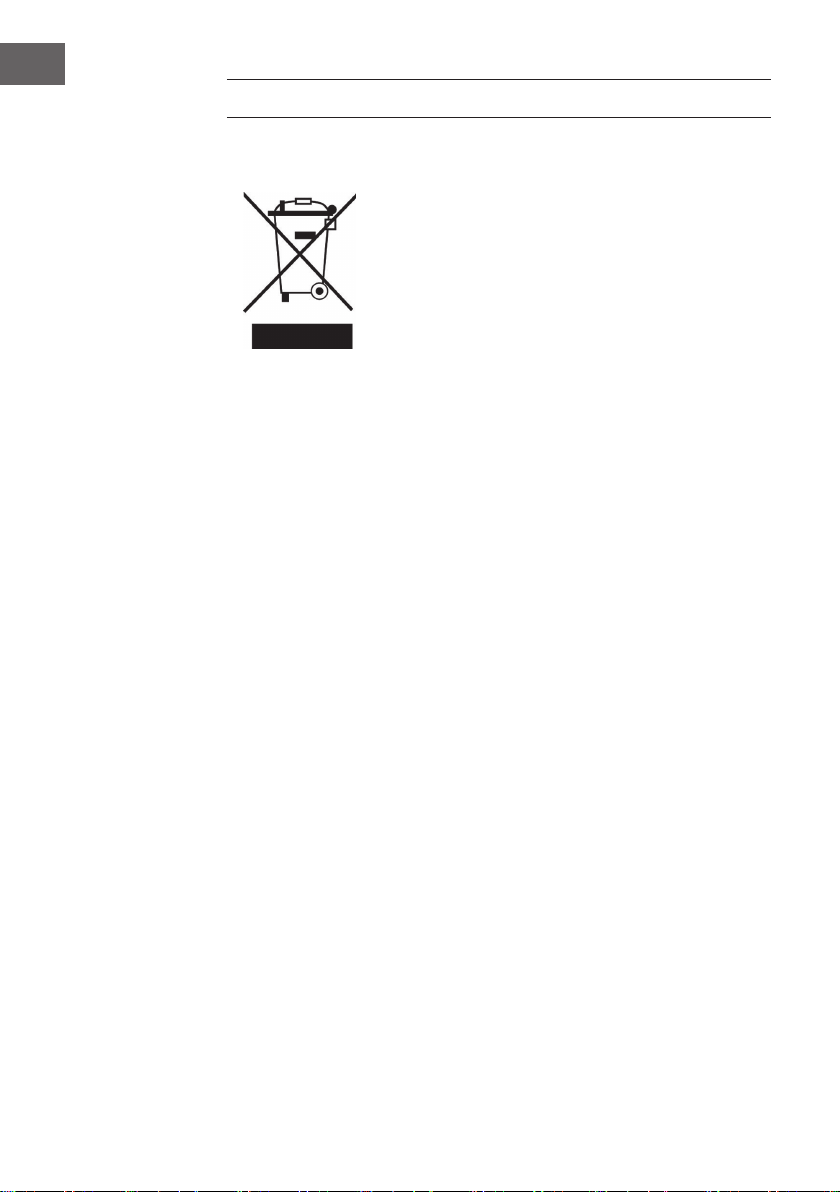
HINWEISE ZUR ENTSORGUNG
Wenn es in Ihrem Land eine gesetzliche Regelung zur
Entsorgung von elektrischen und elektronischen Geräten
gibt, weist dieses Symbol auf dem Produkt oder auf der
Verpackung darauf hin, dass dieses Produkt nicht im
Hausmüll entsorgt werden darf. Stattdessen muss es zu
einer Sammelstelle für das Recycling von elektrischen
und elektronischen Geräten gebracht werden. Durch
regelkonforme Entsorgung schützen Sie die Umwelt und die
Gesundheit Ihrer Mitmenschen vor negativen Konsequenzen.
Informationen zum Recycling und zur Entsorgung dieses
Produkts, erhalten Sie von Ihrer örtlichen Verwaltung oder
Ihrem Hausmüllentsorgungsdienst.

9
EN
Dear Customer,
Congratulations on purchasing this device. Please read the
following instructions carefully and follow them to prevent
possible damages. We assume no liability for damage caused
by disregard of the instructions and improper use. Scan the QR
code to get access to the latest user manual and more product
information.
CONTENT
Safety Instructions10
Device Overview11
Commissioning and Operation12
Cleaning and care13
Hints on Disposal14
TECHNICAL DATA
Item number 10034578 10034579
Power supply 220-240 V ~ 50/60 Hz
Adjustable temperature 65-300°C
Power 1130 W 2260 W
MANUFACTURER & IMPORTER (UK)
Manufacturer:
Chal-Tec GmbH, Wallstrasse 16, 10179 Berlin, Germany.
Importer for Great Britain:
Chal-Tec UK limited
Unit 6 Riverside Business Centre
Brighton Road
Shoreham-by-Sea
BN43 6RE
United Kingdom
10
EN
SAFETY INSTRUCTIONS
CAUTION
Risk of burns! Do not touch hot surfaces. The surfaces can become very
hot during use.
• To protect against electric shock, never immerse the cable, plug or housing in water
or other liquids.
• Only use the appliance under supervision when children are present.
• Disconnect the power plug when not in use and before cleaning. Allow the unit to
cool before removing or installing any parts.
• Have repairs carried out only by quali ed specialists. Have the unit inspected if it is
damaged in any way or if the power cord or plug is damaged. The same applies
if liquids or objects have landed on the unit, the unit has been exposed to rain or
moisture, does not operate properly or has fallen over.
• Use only the supplied accessories.
• Do not use outdoors.
• Do not let the cable hang over the edge of the table or worktop and do not allow it
to touch hot surfaces.
• Do not place the appliance near a hot gas/electric burner or an oven.
• Do not use the appliance for any purpose other than its intended use.
• Metal utensils must not be placed in an oven as this may result in a re or short
circuit. Do not clean the appliance with a metal scouring pad; parts of the pad may
break off and damage electrical parts of the appliance.
• A re may occur if the furnace is covered or touches combustible materials,
including curtains, walls, and the like, during operation. Do not place any objects
on the appliance during operation.
• When using materials other than metal or glass, extreme caution is required.
• Do not store any materials or objects in the switched-off furnace.
• Do not use any of the following materials in the furnace: paper, cardboard, plastic
and the like.
• Do not cover the crumb tray or other parts of the oven with metal foil. This will cause
the oven to overheat.

11
EN
DEVICE OVERVIEW
Note: Always plug the power cord into the unit before plugging the power cord into
the wall outlet. To turn the power off, turn the control knob to [0], then unplug the
power cord from the outlet. The unit is turned off when both power switches are in
position [0].
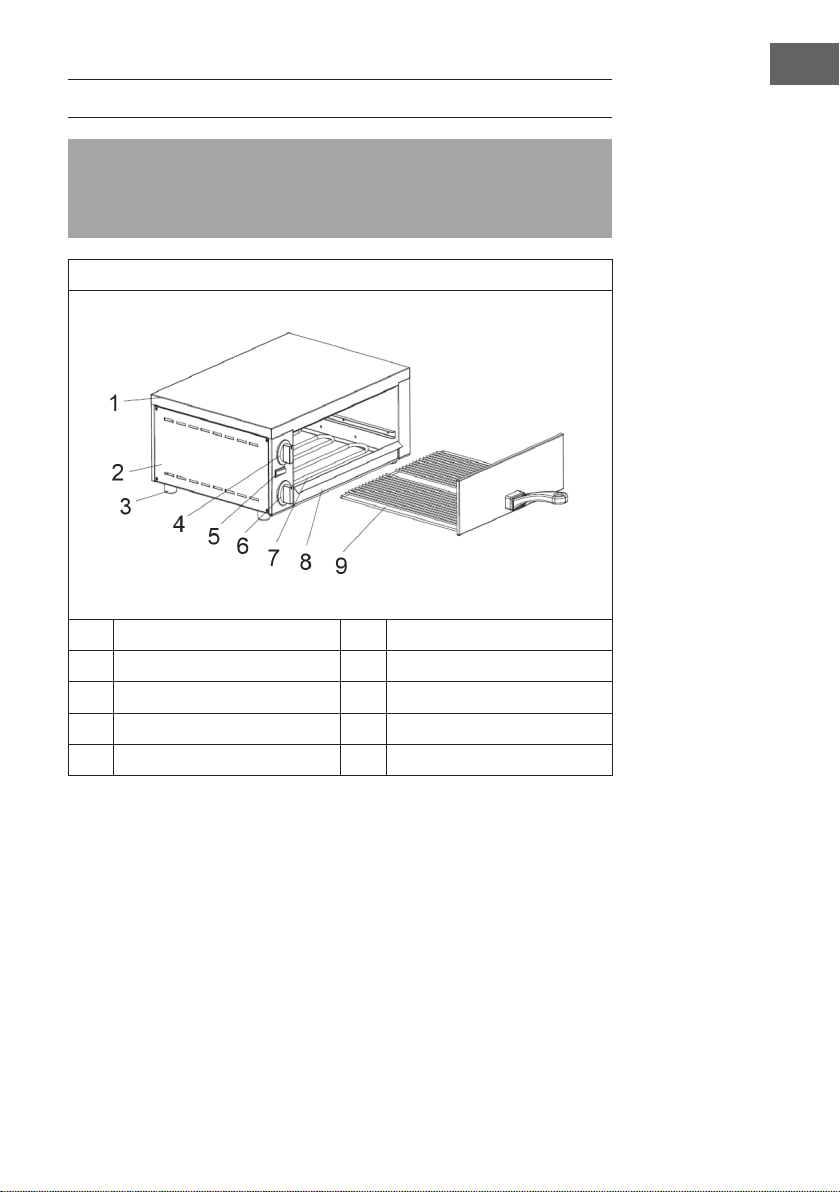
10034578
1
Upper cover
6
Timer
2
Side cladding
7
Heating element
3
Foot
8
Crumb tray
4
Temperature controllers
9
Drawer
5
Mains switch

12
EN
10034579
1
Bottom drawer
6
Upper thermostat
2
Upper drawer
7
Upper power switch
3
Lower temperature controller
8
Upper cover
4
Lower temperature controller
9
Side cladding
5
Timer
10
Foot
COMMISSIONING AND OPERATION
Before the rst operation
• Wash the handle, the tray and the baking tray with soapy water.
• Wipe the inside walls of the oven with a damp cloth.
• Do not use spray cleaner or abrasive cleaners.
• Do not touch the electrical heating elements and make sure that no water drips
inside the oven.
Starting the oven
• Slide all the trays into the oven.
• Allow the oven to preheat to the highest temperature for 5 minutes.
• Then turn off the heaters and open the drawers to remove smoke residue inside the
oven.
13
EN
Power and temperature display
Insert the plug into the socket and turn the temperature control knob to the setting
position. Then press the mains switch, the operating indicator lights up and the furnace
begins to heat up.
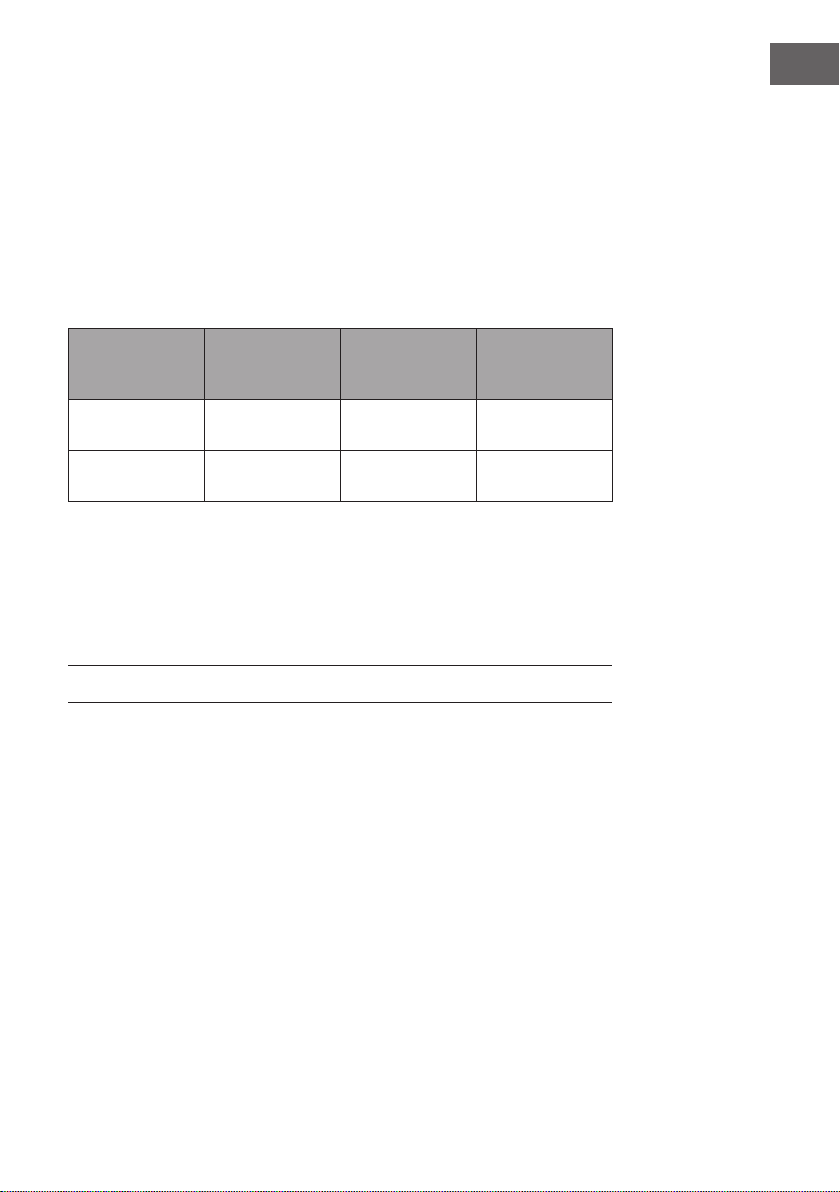
Timer
The adjustable range of the timer is 0-15 minutes. The timer has no effect on the
operation of the furnace, it is only a reminder. During baking, the timer can be rotated
to a new position to adjust the time according to the following table:
Food Drawer Baking time with
cold oven
Baking time with
pre-heated oven
Frozen pizza top or bottom 12-13 minutes 8-9 minutes
at 250°C
Baguette bottom 10 minutes 8 minutes
at 180°C
Note on the thermostat
The thermostat controls the temperature inside the oven. When the oven is heated,
the temperature is automatically maintained. Whenever the oven heats up again, the
operating indicator lights up. If the oven overheats, it is automatically switched off.
CLEANING AND CARE
• First unplug the power cord from the wall outlet.
• After the oven has cooled down, use a damp cloth or sponge for cleaning. Do not
soak the inside of the stove or wash it under running water as this may cause serious
damage to the stove.
• Do not use sharp or hard objects for cleaning, as they may damage the surface of
the appliance.
14
EN
HINTS ON DISPOSAL
If there is a legal regulation for the disposal of electrical
and electronic devices in your country, this symbol on the
product or on the packaging indicates that this product must
not be disposed of with household waste. Instead, it must be
taken to a collection point for the recycling of electrical and
electronic equipment. By disposing of it in accordance with
the rules, you are protecting the environment and the health of
your fellow human beings from negative consequences. For
information about the recycling and disposal of this product,
please contact your local authority or your household waste
disposal service.
15
ES
Estimado cliente,
Le felicitamos por la adquisición de este producto. Lea
atentamente las siguientes instrucciones y sígalas para evitar
posibles daños. No asumimos ninguna responsabilidad por los
daños causados por el incumplimiento de las instrucciones y el
uso inadecuado. Escanee el siguiente código QR para obtener
acceso a la última guía del usuario y más información sobre el
producto.
ÍNDICE
Indicaciones de seguridad16
Vista general del aparato17
Puesta en funcionamiento18
Limpieza y cuidado19
Retirada del aparato20
DATOS TÉCNICOS
Número de artículo 10034578 10034579
Alimentación 220-240 V ~ 50/60 Hz
Temperatura ajustable 65-300°C
Potencia 1130 W 2260 W
FABRICANTE E IMPORTADOR (REINO UNIDO)
Fabricante:
Chal-Tec GmbH, Wallstraße 16, 10179 Berlín, Alemania.
Importador para Gran Bretaña:
Chal-Tec UK limited
Unit 6 Riverside Business Centre
Brighton Road
Shoreham-by-Sea
BN43 6RE
United Kingdom
16
ES
INDICACIONES DE SEGURIDAD
¡ATENCIÓN!
Riesgo de quemaduras. No toque las super cies calientes. La
super cie del aparato puede alcanzar temperaturas elevadas
durante el funcionamiento.
• A n de evitar descargas eléctricas, nunca sumerja el cable, el enchufe o la base
en agua ni en ningún otro líquido.
• Si utiliza el aparato en presencia de niños, estos deberán estar bajo supervisión.
• Desenchufe el aparato cuando no lo utilice o antes de limpiarlo. Deje que el
aparato se enfríe completamente antes de montar o desmontar los accesorios.
• Solamente un personal técnico cuali cado debe llevar a cabo las reparaciones.
Si el aparato, el cable de alimentación o el enchufe está dañado, acuda al
fabricante o a una persona cuali cada. Del mismo modo, acuda al fabricante o
a una persona cuali cado si en el interior del aparato hay agua u objetos, si el
aparato se ha visto expuesto a la lluvia o líquidos, si no funciona correctamente o
si se ha caído.
• Utilice exclusivamente los accesorios incluidos en el envío.
• Utilice el aparato únicamente en el interior.
• No deje que el cable quede colgando del borde de la encimera o la mesa y que
no entre en contacto con las super cies calientes.
• No coloque el aparato cerca de fogones eléctricos o de gas ni de hornos.
• No utilice el aparato con otro n distinto al del indicado.
• No inserte vajillas metálicas en el horno, ya que podría provocar un incendio o un
cortocircuito. No limpie el horno con una esponja metálica, ya que una parte de la
misma podría desprenderse y dañar las piezas eléctricas del aparato.
• Puede producirse un incendio si el horno está cubierto o toca material in amable
durante su funcionamiento, incluyendo cortinas, paredes y similares. No coloque
ningún objeto encima del aparato mientras está en marcha.
• Extreme las precauciones si utiliza materiales que no sean de metal o vidrio.
• No guarde objetos o materiales dentro del horno cuando está apagado.
• No utilice en el horno los siguientes materiales: papel, cartón, plásticos y similares.
• No cubra la bandeja de migas u otras partes del horno con papel de aluminio.
Esta acción conduce al sobrecalentamiento del horno.

17
ES
VISTA GENERAL DEL APARATO
Atención: Conecte primero el cable de alimentación al aparato y, luego, el enchufe
a la toma de corriente. Para apagar el aparato, gire la perilla hasta [0] y desconecte
el enchufe de la toma de corriente. El aparato está apagado cuando los dos
interruptores están en posición [0].
10034578
1
Tapa superior
6
Temporizador
2
Revestimiento lateral
7
Elemento calefactor
3
Pata
8
Bandeja de migas
4
Termostato
9
Bandeja
5
Interruptor de alimentación

18
ES
10034579
1
Bandeja inferior
6
Termostato superior
2
Bandeja superior
7
Interruptor superior
3
Regulador de temperatura inferior
8
Tapa superior
4
Regulador de temperatura inferior
9
Revestimiento lateral
5
Temporizador
10
Pata
PUESTA EN FUNCIONAMIENTO
Antes del primer uso
• Limpie el mango y las bandejas con agua jabonosa.
• Limpie el interior del horno con un paño húmedo.
• No utilice productos de limpieza o sprays limpiadores.
• No toque los elementos calefactores eléctricos y asegúrese de que el agua no
entre en el interior del horno.
Encender el horno
• Inserte todas las bandejas en el horno.
• Precaliente el horno durante 5 minutos a temperatura máxima.
• A continuación, apague el elemento calefactor y extraiga las bandejas para retirar
cualquier residuo que pudo estar en el interior del horno.

19
ES
Indicadores de potencia y temperatura
Conecte el enchufe a la toma de corriente y gire el regulador de temperatura a la
posición deseada. Luego, pulse el interruptor de encendido. Se enciende el indicador y
el horno empieza a calentarse.
Temporizador
El temporizador se ajusta entre 0 y 15 minutos. El temporizador no inuye de manera
alguna en el funcionamiento del horno, solo funciona como un recordatorio. Durante la
cocción, el temporizador puede girarse a una nueva posición para ajustar el tiempo de
acuerdo con la siguiente tabla:
Alimento Bandeja Tiempo de
preparación con el
horno frío
Tiempo de
preparación
con el horno
precalentado
Pizza congelada Arriba o abajo 12-13 minutos 8-9 minutos
a 250 °C
Baguette Abajo 10 minutos 8 minutos
a 180 °C
Indicaciones sobre el termostato
El termostato controla la temperatura en el interior del horno. Cuando el horno está
caliente, la temperatura se mantiene automáticamente. Cuando el horno se vuelve a
calentar, se enciende el indicador luminoso. En caso de que el horno se sobrecaliente,
se apaga automáticamente.
LIMPIEZA Y CUIDADO
• Desconecte el enchufe de la toma de corriente.
• Después de que el horno se haya enfriado, use un paño húmedo o una esponja
para limpiarlo. No limpie el interior del horno con agua, ya que podría dañar
gravemente el aparato.
• No utilice objetos punzantes o duros para la limpieza, ya que pueden dañar la
supercie del aparato.

20
ES
RETIRADA DEL APARATO
FABRICANTE E IMPORTADOR
(REINO UNIDO)
Fabricante:
Chal-Tec GmbH, Wallstraße 16, 10179 Berlín, Alemania.
Importador para Gran Bretaña:
Chal-Tec UK limited
Unit 6 Riverside Business Centre
Brighton Road
Shoreham-by-Sea
BN43 6RE
United Kingdom

21
FR
Chère cliente, cher client,
Toutes nos félicitations pour l’acquisition de ce nouvel appareil.
Veuillez lire attentivement et respecter les instructions de ce mode
d’emploi an d’éviter d’éventuels dommages. Nous ne saurions
être tenus pour responsables des dommages dus au non-respect
des consignes et à la mauvaise utilisation de l’appareil. Scannez
le QR-Code pour obtenir la dernière version du mode d‘emploi
et des informations supplémentaires concernant le produit.
SOMMAIRE
Consignes de sécurité22
Aperçu de l‘appareil23
Mise en marche et utilisation24
Nettoyage et entretien25
Informations sur le recyclage26
FICHE TECHNIQUE
Numéro d'article 10034578 10034579
Alimentation 220-240 V ~ 50/60 Hz
Température réglable 65-300°C
Puissance 1130 W 2260 W
FABRICANT ET IMPORTATEUR (UK)
Fabricant :
Chal-Tec GmbH, Wallstraße 16, 10179 Berlin, Allemagne.
Importateur pour la Grande Bretagne :
Chal-Tec UK limited
Unit 6 Riverside Business Centre
Brighton Road
Shoreham-by-Sea
BN43 6RE
United Kingdom

22
FR
CONSIGNES DE SÉCURITÉ
ATTENTION
Risque de brûlure ! Ne touchez pas les surfaces chaudes. Les surfaces
peuvent devenir très chaudes pendant l‘utilisation.
• Pour vous protéger contre les chocs électriques, ne plongez jamais le câble, la
che ou le boîtier dans de l‘eau ou dans tout autre liquide.
• En présence d‘enfants, utilisez l‘appareil uniquement sous surveillance.
• Débranchez le cordon d‘alimentation de l‘appareil lorsque vous ne l‘utilisez pas
et avant de le nettoyer. Laissez l’appareil refroidir avant de retirer ou de xer des
pièces.
• Ne faites effectuer les réparations que par des spécialistes quali és. Faites véri er
l‘appareil s‘il elle est endommagé de quelque manière que ce soit ou si le cordon
d‘alimentation ou la che sont endommagés. Il en va de même si des liquides ont
été renversés ou si des objets sont tombés sur l‘appareil, si l‘appareil a été exposé à
la pluie ou à l‘humidité, s‘il n‘a pas fonctionné correctement ou s‘il a fait une chute.
• Utilisez uniquement les accessoires fournis.
• N‘utilisez pas l‘appareil à l‘extérieur.
• Ne laissez pas le câble pendre du bord de la table ou du plan de travail et veillez
à ce qu‘il ne touche pas de surface chaude.
• Ne placez pas l‘appareil près d‘une cuisinière électrique / à gaz chaude ou près
d‘un four.
• N‘utilisez pas l‘appareil à des ns autres que celles prévues.
• Les ustensiles en métal ne doivent pas être placés dans un four car ils pourraient
provoquer un incendie ou un court-circuit. Ne nettoyez pas l‘appareil avec un
tampon à récurer en métal, car des morceaux de l‘éponge pourraient se détacher
et endommager le matériel électrique.
• Un incendie peut se déclencher si le four est recouvert ou s‘il touche des matériaux
in ammables pendant le fonctionnement, y compris des rideaux, des murs et autres.
Ne placez aucun objet sur l‘appareil pendant son fonctionnement.
• Lors de l‘utilisation de matériaux autres que le métal ou le verre, une extrême
prudence est requise.
• Ne stockez pas de matériaux ni d‘objets dans le four éteint.
• N‘utilisez aucun des matériaux suivants dans le four : papier, carton, plastique, etc.
• Ne couvrez pas le plateau ramasse-miettes ou d‘autres parties du four avec du
papier aluminium. Cela provoque une surchauffe du four.

23
FR
APERÇU DE L‘APPAREIL
Remarque : Branchez toujours le cordon d’alimentation sur l’appareil d’abord, avant
de le brancher dans la prise. Branchez la che dans la prise. Pour éteindre l‘appareil,
tournez le bouton sur [0], puis débranchez le cordon d‘alimentation. L‘appareil est
éteint lorsque les deux interrupteurs sont en position [0].
10034578
1
Capot supérieur
6
Minuterie
2
Parois latérales
7
Elément chauffant
3
Pied
8
Plateau à miettes
4
Thermostat
9
Tiroir
5
Interrupteur d'alimentation
24
FR
10034579
1
Tiroir inférieur
6
Thermostat supérieur
2
Tiroir supérieur
7
Alimentation supérieure
3
Régulateur de température
inférieur
8
Capot supérieur
4
Régulateur de température
inférieur
9
Parois latérales
5
Minuterie
10
Pied
MISE EN MARCHE ET UTILISATION
Avant la première utilisation
• Lavez la poignée, le tiroir et la plaque à pâtisserie avec de l’eau savonneuse.
• Essuyez les parois intérieures du four avec un chiffon humide.
• N‘utilisez pas de nettoyant en aérosol ni d‘agent de récurage.
• Ne touchez pas les éléments chauffants électriques et assurez-vous que de l‘eau ne
coule pas dans le four.
Pour démarrer le four
• Glissez tous les tiroirs dans le four.
• Préchauffez le four à la température la plus élevée pendant 5 minutes.
• Puis éteignez les éléments chauffants et ouvrez les tiroirs pour éliminer toute fumée à
l‘intérieur du four.

25
FR
Indicateurs de puissance et de température
Insérez la che dans la prise et réglez le bouton de température. Appuyez ensuite sur
l‘interrupteur d‘alimentation, le voyant d‘alimentation s‘allume et le four commence à
chauffer.
Minuterie
La plage de réglage de la minuterie est comprise entre 0 et 15 minutes. La minuterie n‘a
aucune inuence sur le fonctionnement du four, elle ne sert que de rappel. Pendant la
cuisson, le minuteur peut être modié pour ajuster la durée selon le tableau suivant :
Aliment Tiroir Temps de cuisson si
le four est froid
Temps e cuisson
avec le four
préchauffé
Pizza surgelée En haut ou en bas 12-13 minutes 8-9 minutes
à 250 °C
Baguette En bas 10 minutes 8 minutes
à 180 °C
Remarques sur le thermostat
Le thermostat contrôle la température à l‘intérieur du four. Lorsque le four est chauffé, la
température est automatiquement maintenue. À chaque réchauffement du four, le témoin
de fonctionnement s‘allume. En cas de surchauffe, le four s‘éteint automatiquement.
NETTOYAGE ET ENTRETIEN
• Débranchez d‘abord le cordon d‘alimentation de la prise.
• Une fois le four refroidi, utilisez un chiffon humide ou une éponge pour le nettoyer.
Ne faites pas tremper l’intérieur du four et ne le lavez pas à l’eau courante, car
cela pourrait endommager sérieusement l’appareil.
• N‘utilisez pas d‘objets pointus ou durs pour le nettoyage, ils pourraient
endommager la surface de l‘appareil.
26
FR
INFORMATIONS SUR LE RECYCLAGE
S‘il existe une réglementation pour l‘élimination ou le
recyclage des appareils électriques et électroniques dans
votre pays, ce symbole sur le produit ou sur l‘emballage
indique que cet appareil ne doit pas être jeté avec les
ordures ménagères. Vous devez le déposer dans un point
de collecte pour le recyclage des équipements électriques
et électroniques. La mise au rebut conforme aux règles
protège l‘environnement et la santé de vos semblables des
conséquences négatives. Pour plus d‘informations sur le
recyclage et l‘élimination de ce produit, veuillez contacter
votre autorité locale ou votre service de recyclage des
déchets ménagers.

27
IT
Gentile cliente,
La ringraziamo per aver acquistato il dispositivo. La preghiamo
di leggere attentamente le seguenti istruzioni per l’uso e di
seguirle per evitare possibili danni. Non ci assumiamo alcuna
responsabilità per danni scaturiti da una mancata osservazione
delle avvertenze di sicurezza e da un uso improprio del
dispositivo. Scansionare il codice QR seguente, per accedere
al manuale d’uso più attuale e per ricevere informazioni sul
prodotto.
INDICE
Istruzioni di sicurezza28
Panoramica del dispositivo29
Accensione e funzionamento30
Pulizia e cura31
Smaltimento32
DATI TECNICI
Numero articolo 10034578 10034579
Alimentazione 220-240 V ~ 50/60 Hz
Temperatura regolabile 65-300°C
Potenza 1130 W 2260 W
PRODUTTORE E IMPORTATORE (UK)
Produttore:
Chal-Tec GmbH, Wallstraße 16, 10179 Berlino, Germania.
Importatore per la Gran Bretagna:
Chal-Tec UK limited
Unit 6 Riverside Business Centre
Brighton Road
Shoreham-by-Sea
BN43 6RE
United Kingdom

28
IT
ISTRUZIONI DI SICUREZZA
ATTENZIONE
Rischio di ustioni! Non toccare le super ci calde. Le super ci possono
diventare molto calde durante l‘uso.
• Per proteggersi da scosse elettriche, non immergere mai il cavo, la spina o
l‘alloggiamento in acqua o altri liquidi.
• Utilizzare il dispositivo in presenza di bambini solo sotto supervisione.
• Scollegare la spina di alimentazione quando non viene utilizzata e prima della
pulizia. Lasciare raffreddare l‘unità prima di rimuovere o ssare le parti.
• Far eseguire le riparazioni solo da specialisti quali cati. Far controllare l‘unità se
è danneggiata in qualche modo o se il cavo di alimentazione o la spina sono
danneggiati. Lo stesso vale se liquidi o oggetti sono atterrati sul dispositivo, il
dispositivo è stato esposto a pioggia o umidità, non ha funzionato correttamente o
è caduto.
• Utilizzare solo gli accessori in dotazione.
• Non utilizzare il dispositivo all‘aperto.
• Evitare che il cavo penda dal bordo del tavolo o del piano di lavoro, facendo
attenzione a non toccare le super ci calde.
• Non posizionare il dispositivo vicino a gas caldo/torcia elettrica o vicino a un
forno.
• Non utilizzare il dispositivo per scopi diversi da quelli previsti.
• Non mettere utensili metallici in una stufa poiché ciò potrebbe causare incendi
o cortocircuiti. Non pulire l‘apparecchio con una spugnetta di metallo, poiché
alcune parti della spugna potrebbero rompersi e danneggiare le apparecchiature
elettriche.
• Potrebbe veri carsi un incendio se la stufa è coperta o se tocca materiale
combustibile durante il funzionamento, comprese tende, pareti e simili. Non
posizionare oggetti sul dispositivo durante il funzionamento.
• Prestare la massima attenzione quando si utilizzano materiali diversi da metallo o
vetro.
• Non conservare materiali e oggetti nel forno spento.
• Non utilizzare nessuno dei seguenti materiali nel forno: carta, cartone, plastica e
simili.
• Non coprire il vassoio raccogli briciole o altre parti del forno con un foglio di
metallo. Ciò porta al surriscaldamento della fornace.
29
IT
PANORAMICA DEL DISPOSITIVO
Nota: collegare sempre il cavo di alimentazione al dispositivo prima di collegarlo
alla presa di corrente. Per spegnere l‘unità, ruotare la manopola su [0], quindi
scollegare il cavo di alimentazione. Il dispositivo è spento quando entrambi gli
interruttori di alimentazione sono in posizione [0].
10034578
1
Coperchio superiore
6
Timer
2
Pannello laterale
7
Elemento riscaldante
3
Piedi
8
Vassoio raccogli briciole
4
Termostato
9
Cassetto
5
Interruttore di alimentazione

30
IT
10034579
1
Cassetto inferiore
6
Termostato superiore
2
Cassetto superiore
7
Interruttore di alimentazione
superiore
3
Piedi
8
Copertura superiore
4
Controllo temperatura inferiore
9
Copertura laterale
5
Timer Piedi
ACCENSIONE E FUNZIONAMENTO
Prima dell´accensione
• Lavare la maniglia, il cassetto e la teglia con acqua e sapone.
• Pulire le pareti interne del forno con un panno umido.
• Non utilizzare detergenti spray o abrasivi.
• Non toccare gli elementi riscaldanti elettrici ed assicurarsi che non penetri acqua
nella stufa.
Avvia il forno
• Far scorrere tutte le fessure nel forno.
• Preriscaldare il forno per 5 minuti alla massima temperatura.
• Quindi spegnere gli elementi riscaldanti e aprire gli alloggiamenti per rimuovere
eventuali fumi all‘interno del forno.
31
IT
Display di potenza e temperatura
Inserire la spina nella presa e ruotare la manopola della temperatura su impostazione.
Quindi premere l‘interruttore di alimentazione, l‘indicatore di alimentazione si illumina e
il forno inizia a riscaldarsi.
Timer
L‘intervallo regolabile del timer è di 0-15 minuti. Il timer non inuisce sul funzionamento
della stufa, serve solo come promemoria. Durante il processo di cottura, il timer può
essere ruotato in una nuova posizione per impostare l‘ora in base alla seguente tabella:
Alimentare Inserimento Tempo di cottura
con forno freddo
Tempo di cottura
con forno
preriscaldato
Pizza surgelata superiore o
inferiore
12-13 minuti 8-9 minuti
a 250°C
Baguette inferiore 10 minuti 8 minuti
a 180°C
Nota sul termostato
Il termostato controlla la temperatura all‘interno del forno. Quando il forno viene
riscaldato, la temperatura viene automaticamente mantenuta. Ogni volta che la stufa si
riscalda di nuovo, l‘indicatore di funzionamento si illumina. Se la stufa si surriscalda, si
spegne automaticamente.
PULIZIA E CURA
• Scollegare prima il cavo di alimentazione dalla presa a muro.
• Dopo che il forno si è raffreddato, utilizzare un panno umido o una spugna per la
pulizia. Non immergere l‘interno della stufa o lavarlo sotto l‘acqua corrente, poiché
ciò potrebbe causare gravi danni all‘apparecchio.
• Non utilizzare oggetti appuntiti o duri per la pulizia, poiché potrebbero
danneggiare la supercie del dispositivo.

32
IT
SMALTIMENTO
Se nel proprio paese si applicano le regolamentazioni
inerenti lo smaltimento di dispositivi elettrici ed elettronici,
questo simbolo sul prodotto o sulla confezione segnala che
questi prodotti non possono essere smaltiti con i riuti normali
e devono essere portati a un punto di raccolta di dispositivi
elettrici ed elettronici. Grazie al corretto smaltimento dei
vecchi dispositivi si tutela il pianeta e la salute delle persone
da possibili conseguenze negative. Informazioni riguardanti il
riciclo e lo smaltimento di questi prodotti si ottengono presso
l’amministrazione locale oppure il servizio di gestione dei
riuti domestici.