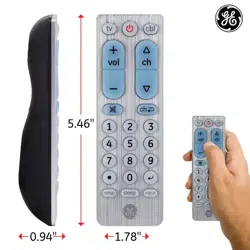
Setup
Your universal remote requires (2) AAA batteries (not included). Alkaline batteries are recommended.
Battery Installation
- On the back of the remote, pull down on the textured surface and slide battery cover downward to remove.
- Match the (+) and (-) marks on the batteries tothe (+) and (-) marks inside the battery compartment, then insert (2) AAA batteries. Be sure to use fresh batteries.
- Position battery cover slightly below opening and push upward to lock into place.
NOTE: If your remote stops operating properly, replace the batteries.
Battery Precautions
- Do not mix old and new batteries.
- Do not mix alkaline, standard (carbon-zinc), or rechargeable (Ni-Cd, Ni-MH, etc.) batteries.
- Always remove old, weak or worn-out batteries promptly and recycle or dispose of them in accordance with local and national regulations.
Battery Saver
Your remote automatically turns off if the buttons are depressed more than 8 seconds. This will save your batteries should your remote get stuck in a place where the buttons remain depressed (e.g., between the sofa cushions).
Code Saver
You have up to 10 minutes to change the batteries in your remote without losing programmed codes.
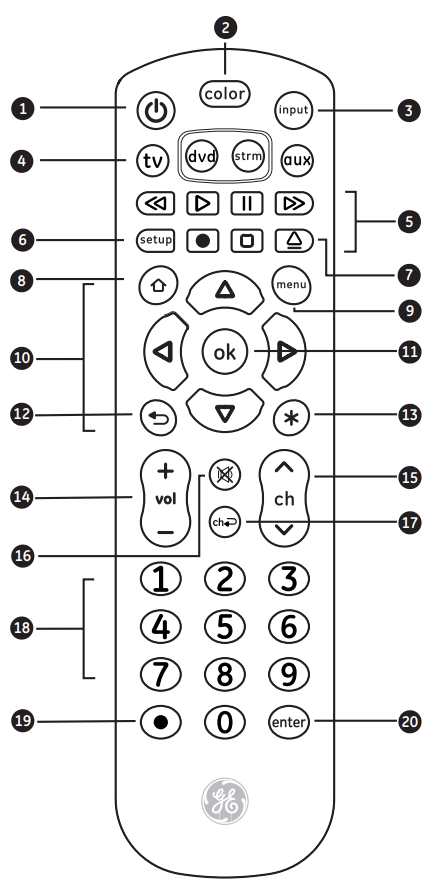
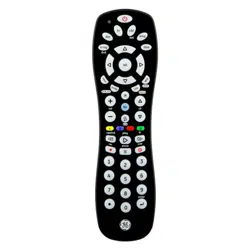
- Power - Turns devices ON/OFF
- Color-Select Backlit - Five backlight color options – blue, green, white, red and yellow
- Input - Selects video inputs
- TV, dvd, strm, aux - Selects the device to control
- Record, play, stop, rewind, fast forward, pause
- Setup - Used to program the remote
- DVD open/close - Open/close a player, or List features on cable/satellite receivers
- Home/guide - Easily access features on streaming devices, or channel guide on cable/satellite receivers
- Menu - Displays the on-screen menu
- Navigation arrows - Moves up, down left and right in menus
- Ok - Selects menu items for the controlled device
- Exit - Exit on-screen menus
- Info - Displays on-screen show/content details
- Volume up/down - Controls audio on selected device
- Channel up/down - Scrolls through channels
- Mute - Mutes sound
- Previous channel - Returns to the previously selected channel
- Numbers - Enter numbers for direct channel selection
- Dot (•) - Select, digital subchannels
- Enter- Assists in channel selection on some devices
Programming Your Remote
Your remote is designed to control multiple audio/video devices. To use, you will need to program the remote for your devices. There are two different methods you can use to program the remote, Direct Code Entry or Auto Code Search.
- The Direct Code Entry method is the recommended method as it is the simplest and quickest method in most cases.
- The Auto Code Search method searches through all the codes in the remote to find a code for your device.
Note: This remote comes preprogrammed for Roku® boxes and Samsung TVs. Press TV for Samsung TVs and strm for Roku boxes.
Direct Code Entry (Recommended)
1. Locate the Code List included with your remote. Find the section for the type of device you wish to control, (for example TV, dvd, strm, aux. Locate the brand of your device and circle all the remote codes for the brand.
2. Press and hold down the SETUP button on the remote until the red light on the remote control turns on. Release the SETUP button. The red light will remain on.

Note: The red light will either be a small light at the top of the remote or the power ON/OFF button.
3. Press and release the device button on the remote for the type of device you wish to control, (for example TV, dvd, strm, aux). The red light will blink once and remain on.

Note: Any of the device buttons on the remote can be programmed to control any of your devices. For example, you can use the Aux device button on the remote to control a Cable Box, Satellite Receiver, Digital Converter Box, Streaming Media Player or any device category in the Code List.
4. Use the number buttons on the remote to enter the first 4-digit remote code you circled in the Code List in Step 1. The red light will turn off after entering the fourth digit.
5. Point the remote at the device. Test the buttons on the remote to see if the device responds as you would expect. If the buttons do not operate the device, return to Step 2 above and use the next code that you circled for that device.

6. Repeat Steps 1 – 5 for each device you wish to control.
Programming Notes
- Some codes may operate only a few functions of your device. There may be another code in the Code List that controls more functions. Test other codes in the Code List for more functionality.
- If you do not find a remote code that works your device or there are no codes in the Code List for your device, use the Auto Code Search method in the next section to program your remote.
- For combination devices such as a TV/Dvd combo or TV/ VCR combo, you may have to enter a code for each device.
- Write down the remote codes used to program the remote for future reference.
Auto Code Search
The Auto Code Search is a process where you can search through all the codes stored in the remote to find a code for your device. It is recommended that you read through all the steps below to familiarize yourself with the Auto Code Search before starting the process.
1. Manually turn on the device you wish to control.
Note: The Auto Code Search process cannot be used for devices without power ON/OFF capability. Use the Direct Code Entry method in these cases.
2. Press and hold down the SETUP button on the remote until the red light on the remote control turns on. Release the SETUP button. The red light will remain on.

Note: The red light will either be a small light at the top of the remote or the power ON/OFF button.
3. Press and release the device button on the remote for the type of device you wish to control, (for example TV, dvd, strm, aux). The red light will blink once and remain on.

4. With the remote pointed at the device, press and release the POWER button on the remote. The remote will send 10 different codes to the device. The red light will blink once for each code and remain on after sending the 10 codes.

Did the device turn off?
- If YES, go to Step 5.
- If NO, repeat Step 4 to test the next 10 codes.
5. Manually turn the device back on.
6. With the remote pointed at the device, press and release the VOL + button. The remote will re-send the first code of the 10 codes from Step 4. The red light will blink once and remain on.

Did the device turn off?
- If YES, you have found a code for the device. Press and release the same device button you pressed in Step 3. This will store the code in the remote. Go to Step 7.
- If NO, continue to press and release the VOL + button until the device turns off to test the other 9 codes from Step 4. Be sure to wait approximately 3 seconds after each VOL + button press to allow the device time to respond to the code. When the device turns off, you have found a code for your device. Press and release the same device button pressed in Step 3. This will store the code in the remote. Go to Step 7.
Notes:
- The VOL – button can be used to go backwards through each batch of 10 codes.
- The red indicator light will flash 2 times after testing the first or last code in each batch of 10.
7. Use the remote to turn the device back on. Test the buttons on the remote to see if the device responds as you would expect. If the buttons do not operate the device, return to Step 2 and repeat this process to search for a better code to operate the device.
8. Repeat this process for each device you wish to control.
Color-Select Backlight Feature
Choose from five color options or turn off the backlight.
1. Press and release the COLOR button to cycle through five color options – blue, green, white, red and yellow.

2. When the desired backlight is selected, the remote keys illuminate in that color when any button is pressed.
Using your remote
Master Volume Feature
The Master Volume Feature allows you to select a single device that the volume buttons always control. For example, the remote can be in TV mode while the volume buttons control the volume on your audio receiver or sound bar instead of your TV.
Enabling the Master Volume Feature
1. Press and hold down the SETUP button on the remote until the red light on the remote control turns on. Release the SETUP button. The red light will remain on.

2. Press and release the device button (TV, dvd, strm, aux) on the remote for the device you wish to control the volume.

3. Press and release the MUTE button.

4. Press and release the VOL+ button. The red light will blink twice and turn off.

Disabling the Master Volume Feature
1. Press and hold down the SETUP button on the remote until the red light on the remote control turns on. Release the SETUP button. The red light will remain on.
2. Press and release the device button (TV, dvd, strm, aux) programmed to control the Master Volume Feature.
3. Press and release the MUTE button.
4. Press and release the VOL - button. The red light will blink twice and turn off.

Code Identification
1. Press and hold down the SETUP button on the remote until the red light on the remote control turns on. Release the SETUP button. The red light will remain on.
2. Press and release the desired device button (TV, dvd, strm, aux) you would like the code for.

3. Press and release the ENTER button.

4. Press and release the #1 button. Count the number of times the remote light flashes. This is the number corresponding to the first digit of the code. Repeat the process by pressing the #2, #3 and #4 buttons for the remaining digits.
5. Press and release the ENTER button to exit this mode.

Reset to Factory Settings
1. Press and hold down the SETUP button on the remote until the red light on the remote control turns on. Release the SETUP button. The red light will remain on.

2. Press and release the MUTE button.
3. Press and release the number #0 button. The red indicator light will flash twice.

Troubleshooting
Remote Does Not Operate Your Device
- Make sure the batteries are fresh and installed correctly.
- Aim the remote directly at your device, and make sure there are no obstructions between the remote and device.
- Make sure the appropriate device is selectable — tv for tv and aux for sound bar.
- Program the remote with a different code. See Direct Code Entry section.
- Remote may not be compatible with your device.
Remote Does Not Operate Some Device Features
- A particular code might operate a few features but not all. Program the remote with a different code from the code list. See Direct Code Entry section.
- Remote may not be able to operate all features of your device or button names may be different than that of your original remotes.