Loading ...
Loading ...
Loading ...
8 / 20 EN
Freezer/User Manual
Freezer/User Manual
3 Installation
Refer to the nearest Authorised Service Agent
for installation of the product. To make the
product ready for use, make sure that the
electricity installation is appropriate before
calling the Authorised Service Agent. If
not, call a qualified electrician to have any
necessary arrangements carried out.
C
Preparation of the location and
electrical installation at the place
of installation is under customer's
responsibility.
B
Product must not be plugged in during
installation. Otherwise, there is the risk
of death or serious injury!
B
WARNING:Installation and electrical
connections of the product must be
carried out by the Authorised Service
Agent. Manufacturer shall not be held
liable for damages that may arise from
procedures carried out by unauthorised
persons.
A
WARNING:Prior to installation, visually
check if the product has any defects
on it. If so, do not have it installed.
Damaged products cause risks for your
safety.
C
Make sure that the power cable is not
pinched or crushed while pushing the
product into its place after installation
or cleaning procedures.
3.1 Appropriate
installation location
• Choose a place at where you can access
the product comfortably.
• Install the product at least 30 cm away
from heat sources such as hobs, ovens,
heater cores and stoves and at least 5 cm
away from electrical ovens. Product must
not be subjected to direct sun light and
kept in humid places after installation.
• Appropriate air ventilation must be
provided around your product in order
to achieve an efficient operation. If the
product is to be placed in a recess in the
wall, pay attention to leave at least 5 cm
distance with the ceiling and side walls.
• Do not place the product on materials such
as rugs or carpets.
• Place the product on an even floor surface
to prevent jolts.
• Your product can operate in ambient
temperatures between +5°C to +43°C.
3.2 Installing the
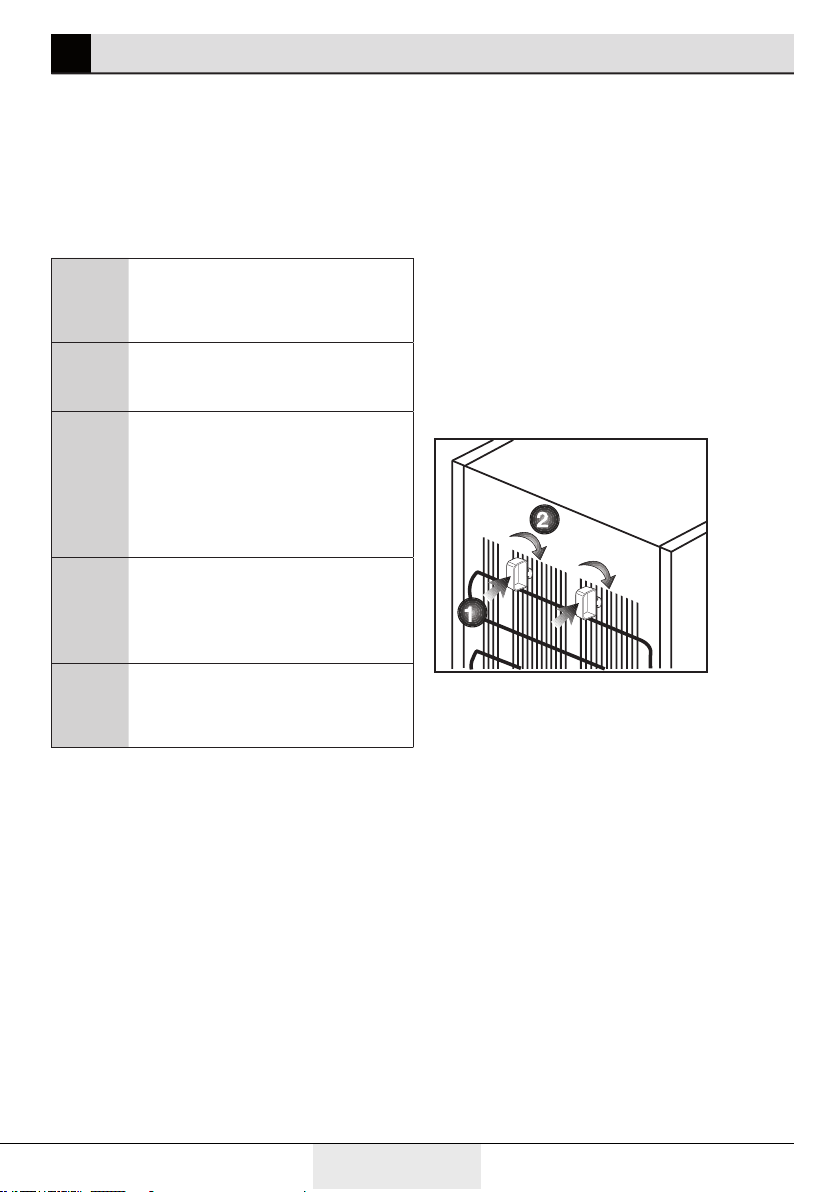
plastic wedges
Plastic wedges are used to create the distance
for the air circulation between the product and
the rear wall. Insert the 2 plastic wedges onto
the rear ventilation cover as illustrated in the
figure. To install the wedges, push and twist a
quarter of a turn.
3.3 Electrical connection
Connect the product to a grounded outlet
protected by a fuse complying with the values
in the rating plate. Our company shall not be
liable for any damages that will arise when
the product is used without grounding in
accordance with the local regulations.
Loading ...
Loading ...
Loading ...