Loading ...
Loading ...
Loading ...
30 31
PAge heAder..... PAge heAder.....
CARE & CLEANING
CLEANING / UNBLOCKING THE FILTERS, PORTAFILTER ANd GROUP HEAd
Periodically run water through the machine with the portafilter in place, but without any
ground coffee, to rinse out any residual coffee particles.
Should the fine holes in the filters become
blocked follow the following steps:
1. Place the filter into the portafilter. Run
water through the machine with the
filter and portafilter, without any ground
coffee, in place.
2. The fine pin on the cleaning tool can
be used to clear the filter basket holes.
CLEANING THE OUTER HOUSING /
CUP WARMING PLATE
The outer housing and tray warming plate
can be cleaned with a soft, damp cloth. Then
polish with a soft, dry cloth.
Do not use abrasive cleansers, pads or cloths
which can scratch the surface.
CLEANING THE dRIP TRAy
The drip tray should be removed, emptied
and cleaned at regular intervals, particularly
when the drip tray full indicator is showing
EMPTy ME!.
Remove grid, compartments and EMPTy
ME! indicator from the drip tray. Dispose of
the grounds from the dry compartment into
the bin. Wash the drip tray with warm soapy
water, using a non-abrasive washing liquid,
rinse and dry thoroughly. The EMPTy ME!
indicator can be removed from the drip
tray by pulling upwards to release the side
latches.
The drip tray base and cover are
dishwasher safe.
CLEANING THE STORAGE TRAy
The storage tray is located behind the drip
tray and is pulled forward when you slide
the drip tray out. Clean the tray with a soft,
damp cloth (do not use abrasive cleansers,
pads or cloths which can scratch the
surface).
Clean filter basket Place filter basket into
portafilter
Insert & lock portafilter
into Group Head
Flush waterKnock grinds out
1 2 3 4 5
Use cleaning tool to unblock
Repeat steps C1-C2
6
PRESS & HOLD
LOCK
INSERT
CARE & CLEANING
STORING yOUR MACHINE
Before storing, press the POWER button to
off, turn the steam dial to STANDBy switch
Off at the power outlet and unplug.
Remove unused beans from the hopper,
clean the grinder (see page 29), empty the
water tank and the drip tray.
Ensure the machine is cool, clean and dry.
Insert all accessories into position or into
the storage tray.
Store upright. Do not place anything on top.
WARNING
Do not immerse power cord, power
plug or appliance in water or any
other liquid. The water tank should
never be removed or completely
emptied during decalcifying.
CLEANING THE STEAM WANd
The steam wand should always be cleaned
after texturing milk.
• Wipe the steam wand with a damp cloth,
and then with the steam wand directed
back into the drip tray, briefly set the
steam dial to the STEAM position. This
will clear any remaining milk from
inside the steam wand.
• Ensure the steam dial is in the STANDBy
position. Press the POWER button to Off
and allow the machine to cool.
• If the steam wand remains blocked,
use the pin on the cleaning tool to clear
the opening.
• If the steam wand continues to be
blocked, the tip of the steam wand can
be removed by using the spanner in the
middle of the cleaning tool.
• Unscrew the tip with the cleaning tool.
• Soak the tip in hot water before using
the pin on the cleaning tool to unblock.
Replace the tip back onto the steam
wand and secure with the cleaning tool.
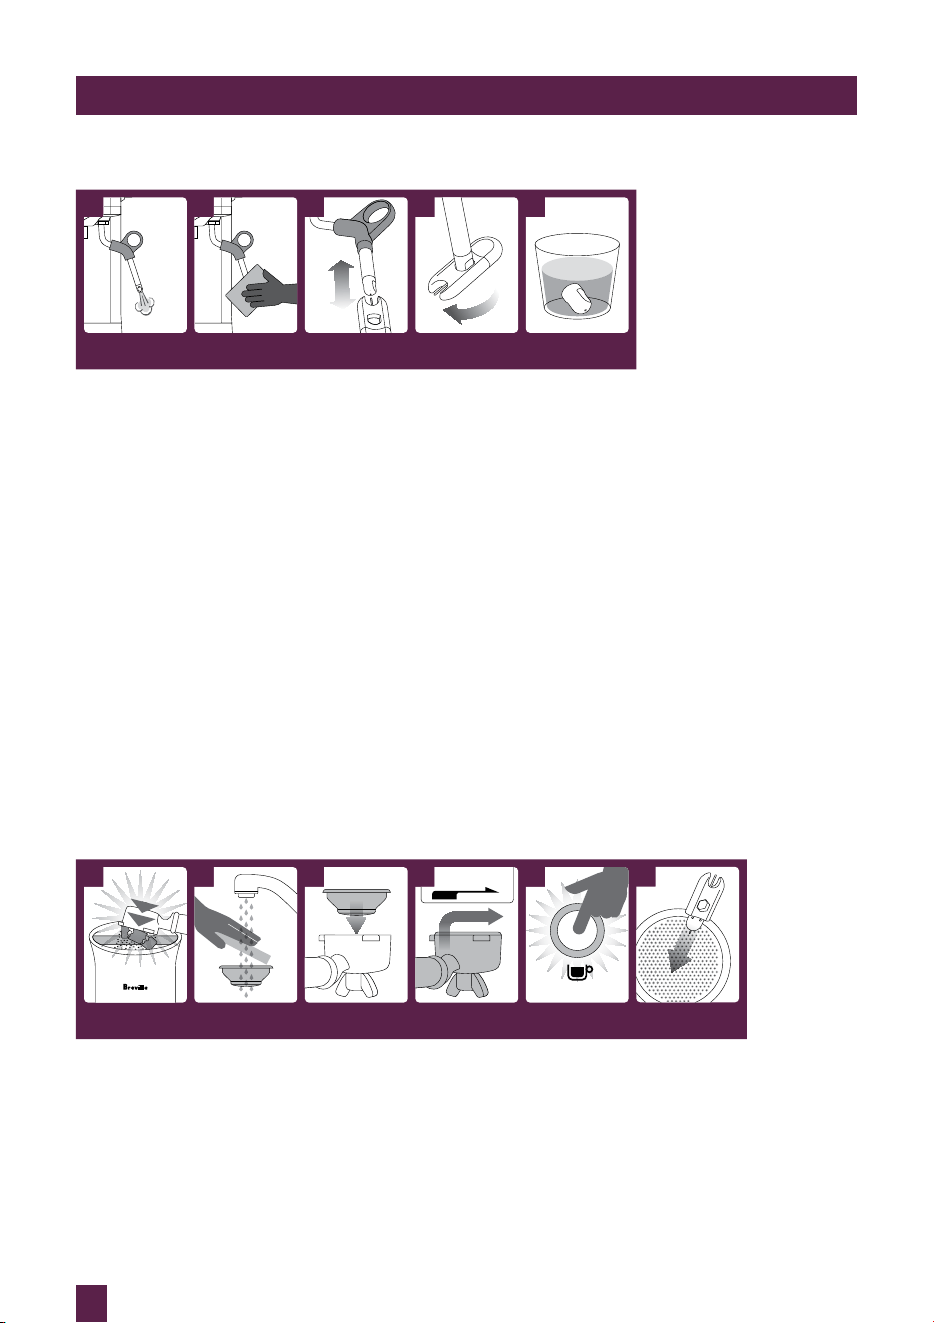
Wipe steam wand after
each use
Clean hole with pin Remove tip Soak tip overnight then
re-attach
Run steam to clear milk
from wand after texturing
1 2 3 4 5
3. To clean the Single Wall filters
simply run water through the
portafilter using the manual pour
function by holding down the 1 CUP
button.
4. For a thorough clean of the filters,
run a cleaning cycle of the machine
with the portafilter and filter in place.
Loading ...
Loading ...
Loading ...