Loading ...
Loading ...
Loading ...
28 29
PAge heAder..... PAge heAder.....
CARE & CLEANING
Concentrated Solution (for harder water)
• 1 part white vinegar
• 1 part cold tap water
WARNING
Do not immerse power cord, power
plug or appliance in water or any other
liquid. The water tank should never be
removed or completely emptied during
decalcifying.
dECALCIFyING THE MACHINE
• Remove the portafilter and frothing
attachment. Pour the mixture of white
vinegar and water into the water tank.
• Plug the machine into the power outlet
and switch On.
• Press the POWER button to the On
position.
• Place a large container under the group
head and steam wand.
• When the brewing temperature has been
reached all the button surrounds on
the control panel will illuminate. Press
and hold the 1 CUP or 2 CUP button to
commence manual pour. Release the
button once half the mixture of white
vinegar and water has run through the
group head.
• Set the steam dial to the STEAM position
and allow steam to run through the Steam
Wand for approximately 2 minutes. Return
the steam dial back to the STANDBy
position.
• After decalcifying, remove the water
tank and rinse thoroughly then refill
with fresh cold water. To rinse the
machine, repeat previous steps.
CARE & CLEANING
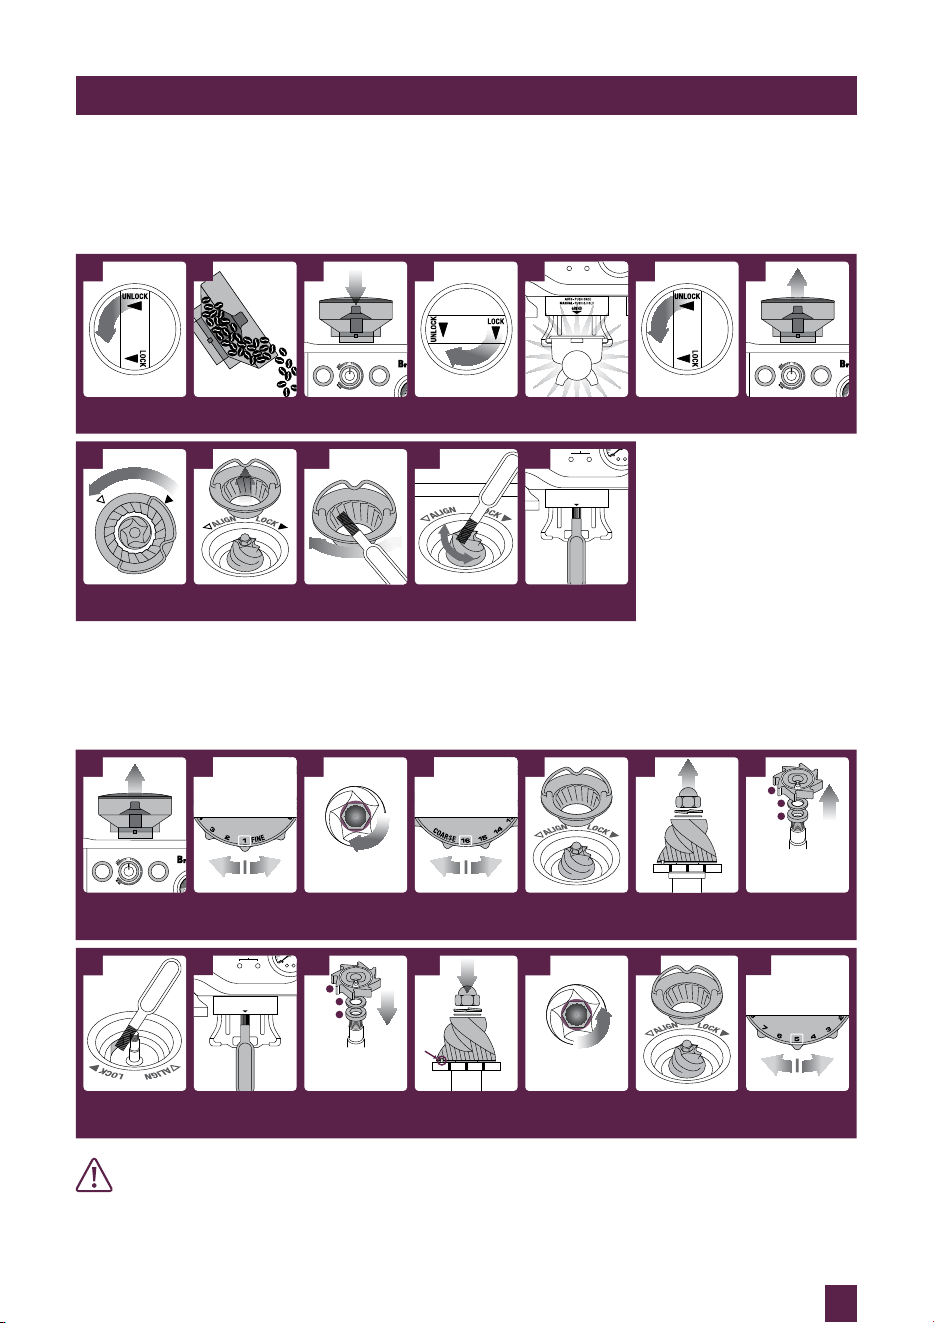
CLEANING THE CONICAL BURR GRINdER
This grinder cleaning cycle removes oil build-up on the burrs which can impede
performance.
AdvANCEd CLEANING FOR THE CONICAL BURR GRINdER
This step is only required if there’s a blockage between the grinding burrs and the grinder outlet.
Empty hopper Replace hopper Lock hopper Run grinder empty Unlock hopperUnlock hopper
1 2 3 4 5
SINGLE DOUBLE
PUSH
6
Remove top burr Clean burr with brush Clean lower burr with
cleaning brush
Clean chute with brushUnlock top burr
8 9
10 11 12
L
O
C
K
A
L
I
G
N
SINGLE DOUBLE
PUSH TO GRIND
Remove hopper
7
POWER
FILTER SIZE
GRIND AMOUNT
POWER
FILTER SIZE
GRIND AMOUNT
Set 'GRIND SIZE' to '1'
(finest)
Use 10mm socket. Rotate
'Clockwise' to remove nut
Set 'GRIND SIZE' to '16'
(coarsest)
Remove top burr Before removing the lower
burr, loosen nut & remove
spring & flat washer
Remove hopper
1 2 3 4 5 6
Clean chute with brush Insert grind fan & washers
using long nose pliers
Insert Lower Burr (drive pin
& cavity to align). Insert
flat washer & spring washer
Rotate 'Anti-clockwise' to
tighten nut
Unblock the grinds exit
chute using the cleaning
brush or a pipe cleaner
8 9
10 11 12
Insert top burr
13
Set 'GRIND SIZE' to '5'.
Insert hopper
14
SINGLE DOUBLE
PUSH TO GRIND
Remove grind fan & washers
using long nose pliers
7
POWER
FILTER SIZE
GRIND AMOUNT
GRIND SIZE
LOOSEN NUT
TIGHTEN NUT
GRIND SIZE
GRIND SIZE
1. GRIND FAN
2. METAL WASHER
3. FELT WASHER
3
2
1
1.
FELT WASHER
2. METAL WASHER
3.
GRIND FAN
1
2
3
WARNING
Care should be taken as the
grinder burrs are extremely sharp.
Loading ...
Loading ...
Loading ...