Manual Version 1.0
Tiki Sounds Quickstart Guide iSP92A
Box Contents
If an individual speaker is purchased: If purchased as a pair:
(1) Tiki Sounds
(
2
)
Tiki Sounds
(1) Pole Mount Assembly
• (3) Extension Tubes
• (1) Tube Cap
• (1) Ground Stake
(
2
)
Pole Mount Assemblies
• (6) Extension Tubes
• (2) Tube Caps
• (2) Ground Stakes
(1) Lamp Base
(
2
)
Lamp Bases
(1) Handle
(
2
)
Handles
(1) Micro-USB Cable
(
2
)
Micro-USB Cables
Quickstart Guide Quickstart Guide
Note: Some items may already be assembled.
Support
Thank you for purchasing the Tiki Sounds! At ION, your entertainment is as important
to us as it is to you. That’s why we design our products with one thing in mind—to
make your life more fun and more convenient.
For the latest information about this product (documentation, technical specifications,
system requirements, compatibility information, etc.) and product registration, visit
ionaudio.com.
For additional product support, visit ionaudio.com/support.
Outdoor Use and Care
Certified to IPX4 standards, Tiki Sounds is water-resistant and protected against
splashing water in any direction, such as light rain or water spray. Please review the
tips below to get the best performance from Tiki Sounds:
• Bring Tiki Sounds indoors during extreme weather.
• Please do not place Tiki Sounds in standing water.
• Tiki Sounds must only be used outdoors with power outlets or extension cords
that are rated for outdoor use.
• Please do not connect Tiki Sounds to charge in a wet environment. Make sure
the micro-USB port, charging adapter, and power outlet are all completely dry
before making any connections.
• WARNING: Keep any non-water-resistant devices (phones, music players, etc.)
in a dry place where they will not be affected by water and cause a risk of electric
shock.
Setup
Assembly
Tiki Sounds may be used mounted using the included post; freestanding using the
included base; or hanging using the included handle. Follow the instructions below
for how you would like to use Tiki Sounds.
Important: If using the solar panel to prolong battery life between charges, make sure
to place Tiki Sounds in an area that receives at least 3 hours of direct sunlight a day
for best results. For fastest charging, power off Tiki Sounds and connect to USB.
Pole Mounted
1. Drive the ground stake into the ground where you would like to install Tiki Sounds.
Important: If the ground where you would like to install Tiki Sounds is hard or
tough, use a shovel to loosen the soil prior to driving the ground stake.
2. Attach the three sections of the extension tube to the ground stake. The middle
section is tapered at both ends to connect to the other sections, and the top
section includes a cap used to secure Tiki Sounds and prevent water from
entering the pole.
3. Place Tiki Sounds so that the hole at the bottom of the speaker is in line with the
cap at top of the pole mount. Gently push Tiki Sounds onto the pole mount until
it is secure.
4. Before attempting to move Tiki Sounds, always remove the speaker from the
pole mount first. Hold the topmost section of the pole with one hand and gently
pull Tiki Sounds up until it is separated from the pole mount.
Freestanding
1. Place the lamp base on a flat, stable surface.
Note: If desired, a screw can be inserted into the center of the lamp base to
secure the speaker in place.
2. Place Tiki Sounds on the lamp base so that the hole at the bottom of the speaker
is in line with the post at the top of the base. Gently push Tiki Sounds onto the
base until it is secure.
3. To remove Tiki Sounds from the base, hold the base with one hand and gently
pull Tiki Sounds up until it is separated from the base.
Hanging
1. Attach the included handle to the holes located on the outer edge of each Tiki
Sounds speaker. Make sure the handle "snaps" into place to indicate it is
properly secured before attempting to hang Tiki Sounds.
2. To remove the handles, gently pull each side away from the speaker until it is
separated.
Charging
If the LEDs appear dim, or if your music cuts out or fails to play, your battery may
require recharging. Tiki Sounds can be charged using the micro-USB port or the
solar panel.
For fastest charging, power off Tiki Sounds and use the included micro-USB cable to
connect the speaker to (A) a USB power adapter (DC 5 V; sold separately) connected
to a power outlet, or (B) your computer (powered on).
Tiki Sounds' battery life can also be prolonged between charges using the solar
panel. For best results, place Tiki Sounds in an area that receives at least 3 hours of
direct sunlight a day.
Connecting with Ti
k
i Sounds
Connecting to One Speaker / Establishing the Master Speaker
Before connecting to Tiki Sounds, make sure the “master” speaker is within range of
your Bluetooth device.
1. Power on Tiki Sounds by holding down the power button. You will hear “Power
On” for confirmation. *
2. Ensure the speaker is in Bluetooth/Master mode. A blue LED will indicate the
speaker is in Bluetooth/Master mode. If a yellow LED appears, the speaker is not
in Bluetooth/Master mode, it is in Link mode. You will need to hold the
Bluetooth/Link button down for 2 seconds to exit Link mode.
Note: The speaker(s) power on in the last mode used prior to being powering
down. If powered on in Bluetooth/Master mode, the speaker will automatically
connect to a previously paired Bluetooth device.
3. When connecting to a Bluetooth device for the first time, navigate to your
device’s Bluetooth setup screen, find Tiki Sounds, and connect. The Bluetooth
LED will be solidly lit blue when it is connected and you will hear “Paired” for
confirmation. *
Note: If you experience trouble in connecting, select “Forget this Device” on
your Bluetooth device and try to connect again.
4. Start playback from your Bluetooth device.
To disconnect from a paired Bluetooth device, press the Bluetooth/Link button on
the master speaker. The Bluetooth LED will blink blue, and you will hear “Ready to
Pair” to indicate that the previous pairing was disconnected and the speaker is
"ready to pair" to another Bluetooth device. *
* Tip: If you would like to disable (or enable) the voice prompts, press and hold the
Light Mode button for 2 seconds.
Linking Additional Tiki Sounds to the Master Speaker with Multi-Link™
After establishing the “master” speaker by connecting via Bluetooth as described
above, you can link an unlimited number of speakers to the master speaker to play
the same music.
1. Power on the additional speaker(s) you would like to link to the master speaker.
2. Ensure the speaker(s) is in Link mode, which will be indicated by the yellow LED. If
a blue LED is seen, press and hold the Bluetooth/Link button to enter Link Mode.
3. Once in Link Mode, the speaker will automatically link to the master speaker and
play the same audio.
When a speaker is in Link Mode, its Light Mode Button will not function. The master
speaker's Light Mode Button will control the brightness of any linked speakers while
audio is being transmitted.
Tip: If all speakers are not at the same brightness level when linked, cycle through the
brightness settings once on the master speaker by pressing the Light Mode Button
5 times while audio is being transmitted. This will sync the brightness levels on all
speakers.
Linked speakers may be powered off at any time without interrupting playback from
the Master speaker. Powering off the Master speaker will disrupt audio on any linked
speaker(s).
Note: If you have multiple speakers, it is possible to use each speaker independently
if each is in Bluetooth/Master Mode.
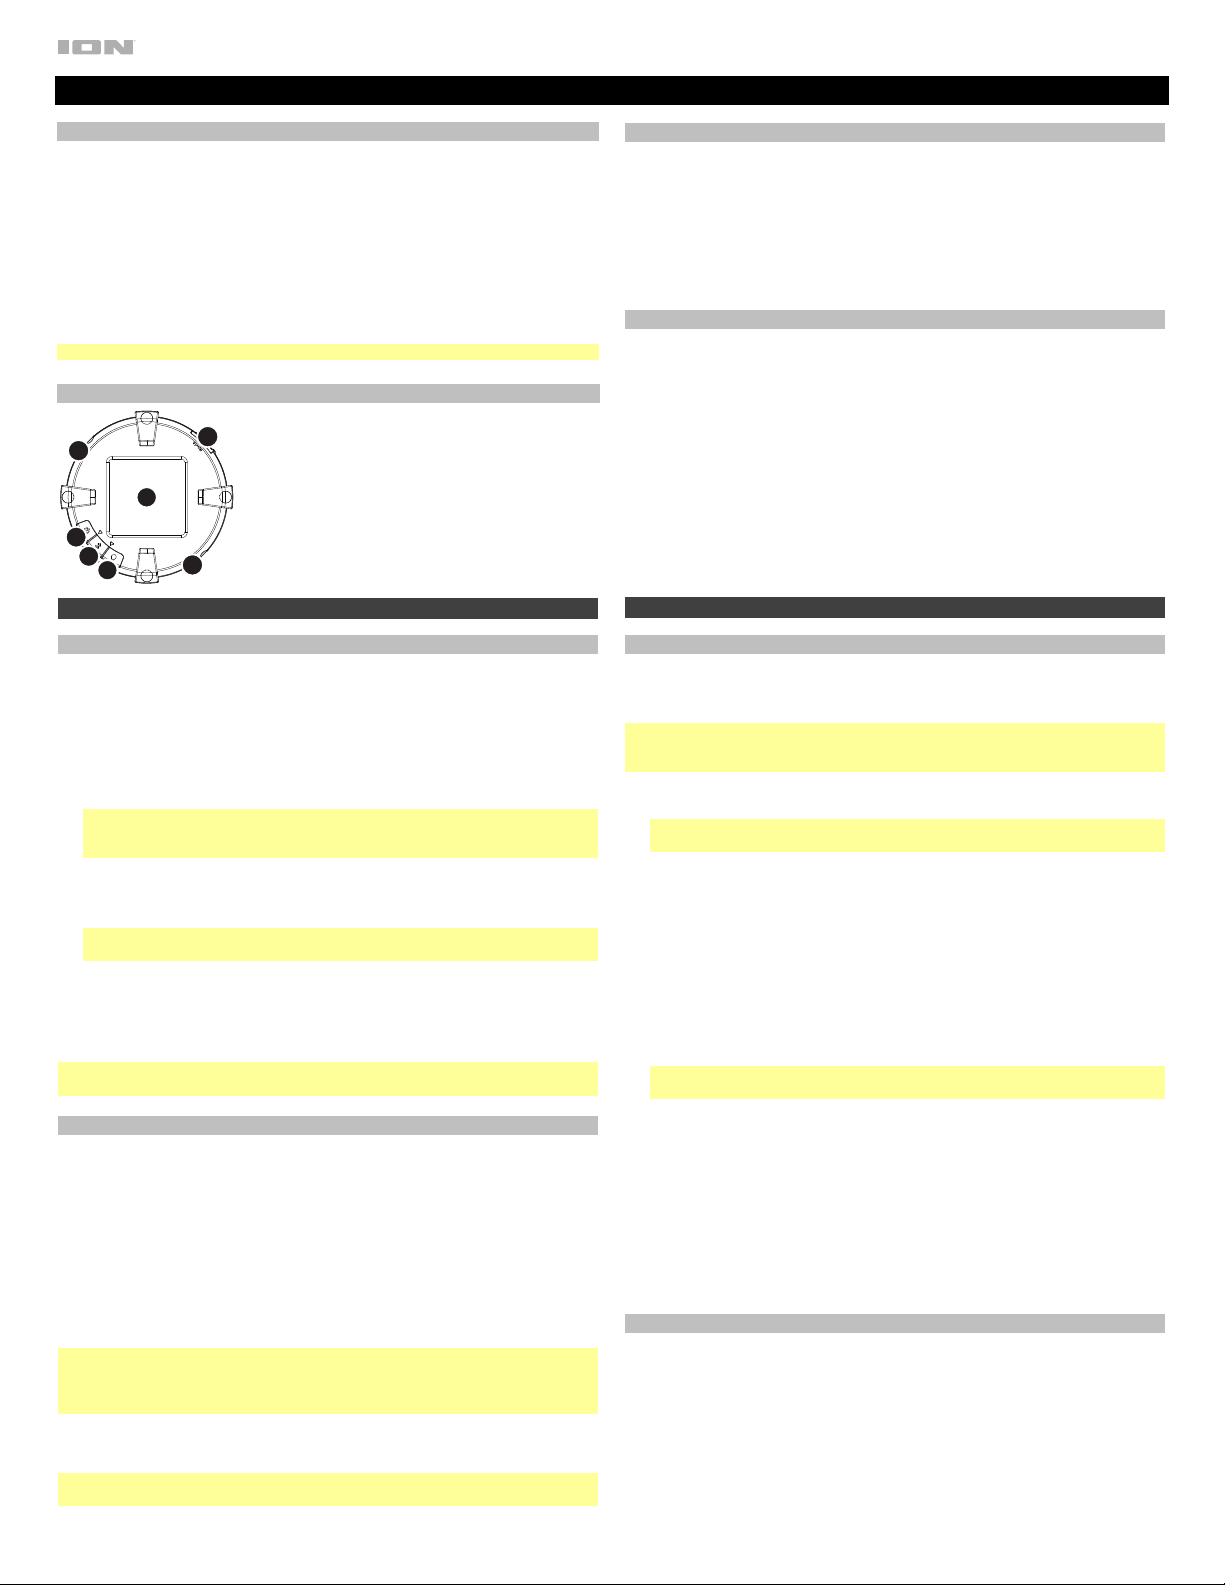
Features
1. Power Button
2. Bluetooth/Link Button
3. Light Mode Button
4. Solar Panel
5. Micro-USB Port
6. Handle Attachments
1
2
5
3
4
6
6
Manual Version 1.0
Technical Specifications Trademarks & Licenses
Output Power: 10 W (peak)
Drivers: 3" (76.2 mm) driver with sound dispersion
Bluetooth:
Profile: A2DP, AVRCP
Range: Up to 32.8 ft. (10 m) (Bluetooth range is affected by
walls, obstructions, and movement. For optimal performance,
place the product in the center of the room so it is unobstructed
by walls, furniture, etc.)
Water Resistance Class: IPX4
Battery:
Battery Life: Up to 6 hours (at 50% volume, lights on) (Battery
life may vary based on temperature, age, and volume use.)
Recharge Time: 4 Hours
Dimensions
(DxWxH): 3.94” x 4.13” x 7.36” (100 x 105 x 187 mm)
(per speaker)
Weight: 1.2 lbs. (0.55 kg) (per speaker)
ION Audio is a trademark of inMusic Brands, Inc., registered in the
U.S. and other countries. The Bluetooth word mark and logos are
owned by the Bluetooth SIG, Inc. and any use of such marks by
ION Audio is under license. All other product names, company
names, trademarks, or trade names are those of their respective
owners.
Guía de inicio rápido de Tiki Sounds (Español) iSP92A
Contenido de la caja
Si adquirió un altavoz individual: Si adquirió un par de altavoces:
(1) Tiki Sounds (2) Tiki Sounds
(1) Conjunto de montaje en soporte
• (3) Tubos de prolongación
• (1) Tapa del tubo
• (1) Estaca para jardín
(2) Conjuntos de montaje en soporte
• (6) Tubos de prolongación
• (2) Tapas del tubo
• (2) Estacas para jardín
(1) Base de la lámpara (2) Bases de la lámpara
(1) Manija (2) Manijas
(1) Cable Micro USB (2) Cables Micro USB
Guía de inicio rápido Guía de inicio rápido
Nota: Es posible que algunos elementos ya vengan ensamblados.
Soporte
Gracias por comprar el Tiki Sounds. En ION, su entretenimiento es tan importante para nosotros
como para usted. Por eso es que diseñamos nuestros productos con una sola cosa en mente—
hacer que su vida sea más divertida y cómoda.
Para obtener la información más reciente acerca de este producto (documentación, especificaciones
técnicas, requisitos de sistema, información de compatibilidad, etc.) y registrarlo, visite ionaudio.com.
Para obtener soporte adicional del producto, visite ionaudio.com/support.
Uso y cuidado a la intemperie
El Tiki Sounds cumple con la norma IPX4, es resistente al agua y está protegido contra salpicaduras
de agua desde cualquier dirección, como por ejemplo lluvia leve o agua rociada. Lea las
sugerencias que se incluyen a continuación para obtener el mejor rendimiento del Tiki Sounds:
• Traiga a los Tiki Sounds bajo techo durante condiciones meteorológicas extremas.
• No coloque el Tiki Sounds sobre agua estancada.
• El Tiki Sounds sólo puede usarse en exteriores con tomas de corriente o cables de prolongación
aptos para el uso en exteriores.
• No cargue el Tiki Sounds en ambientes húmedos. Asegúrese de que el puerto micro USB, el
adaptador de carga y la toma de corriente estén completamente secos antes de realizar
cualquier conexión.
• ADVERTENCIA: Coloque los dispositivos no resistentes al agua (teléfonos, reproductores de música,
etc.) en un lugar seco donde no sean afectados por el agua y causen un riesgo de electrocución.
Instalación
Ensamblaje
El Tiki Sounds puede utilizarse montado en el soporte incluido; de pie utilizando la base incluida o
colgado desde la manija incluida. Siga las instrucciones a continuación según como quiera utilizar
el Tiki Sounds.
Importante: Si utiliza el panel solar para prolongar la vida útil de la batería entre cargas, asegúrese de
colocar los Tiki Sounds en un área que reciba al menos 3 horas de luz solar directa para un mejor
resultado. Para lograr una carga más rápida, apague el Tiki Sounds y conéctelo mediante USB.
Instalación en soporte de montaje
1. Clave la estaca para jardín en la tierra en donde desea instalar el Tiki Sounds.
Importante: Si la tierra en donde desea instalar el Tiki Sounds es dura, utilice una pala para
aflojarla antes de clavar la estaca para jardín.
2. Conecte las tres secciones del tubo de prolongación a la estaca para jardín. La sección del medio
tiene forma de cono en ambos extremos para poder conectarse a las otras secciones, y la sección
superior incluye una tapa para sujetar el Tiki Sounds y evitar el ingreso de agua en el tubo.
3. Coloque el Tiki Sounds de manera que el orificio en la parte inferior del altavoz esté alineado
con la tapa en la parte superior del soporte de montaje. Empuje delicadamente el Tiki Sounds
sobre el soporte de montaje hasta que quede firme.
4. Antes de intentar mover el Tiki Sounds, siempre desmonte primero el altavoz del soporte.
Sostenga la sección superior del soporte con una mano y tire con delicadeza del Tiki Sounds
hacia arriba hasta que se desprenda del soporte.
Instalación de pie
1. Coloque la base de la lámpara sobre una superficie plana y estable.
Nota: Si se desea puede introducirse un tornillo en el centro de la base de la lámpara para
sujetar el altavoz en el lugar.
2. Coloque el Tiki Sounds sobre la base de la lámpara de manera que el orificio en la parte
inferior del altavoz esté alineado con el soporte en la parte superior de la base. Empuje
delicadamente el Tiki Sounds sobre la base hasta que quede firme.
3. Para retirar el Tiki Sounds de la base, sosténgala con una mano y tire con delicadeza del Tiki
Sounds hacia arriba hasta que se desprenda de la base.
Instalación colgante
1. Sujete la manija incluida en los orificios localizados en el borde externo de cada altavoz Tiki
Sounds. Asegúrese de que la manija se encaje "a presión" en su lugar para indicar que está
firmemente asegurada antes de intentar colgar el Tiki Sounds.
2. Para retirar las manijas, tire con delicadeza de cada lado hacia fuera del altavoz hasta que
quede separado.
Carga
Si los LED se atenúan, o si la música se corta o no se reproduce, significa que es posible que deba
recargarse la batería. El Tiki Sounds se puede cargar utilizando el puerto micro USB o el panel solar.
Para lograr una carga más rápida, apague el Tiki Sounds y utilice el cable micro USB incluido para
conectar el altavoz a (A) un adaptador de corriente USB (5 V de CC; se vende por separado)
conectado a una toma de corriente, o a (B) su ordenador (encendido).
La duración de la batería del Tiki Sounds también se puede prolongar entre cargas utilizando el
panel solar. Para obtener mejores resultados, coloque el Tiki Sounds en un lugar que reciba al
menos 3 horas de luz solar directa por día.
Cómo conectarse con el Tiki Sounds
Conexión con un altavoz / Selección del altavoz maestro
Antes de conectarse con el Tiki Sounds, asegúrese de que el altavoz "maestro" se encuentra dentro
del alcance de su dispositivo Bluetooth.
1. Encienda el Tiki Sounds manteniendo pulsado el botón de encendido. Escuchará “Power On”
(Unidad encendida) como confirmación. *
2. Asegúrese de que el altavoz esté en modo Bluetooth/maestro. Un LED azul indicará que el
altavoz se encuentra en modo Bluetooth/maestro. Si se enciende un LED verde, el altavoz no
se encuentra en modo Bluetooth/maestro, sino en modo de enlace. Deberá mantener pulsado
el botón de Bluetooth/Link durante 2 segundos para salir del modo de enlace.
Nota: El/Los altavoz(es) se encienden en el último estado en el que se encontraba(n) la última
vez que se apagó(aron). Si se enciende en modo Bluetooth/Maestro, el altavoz se conectará
automáticamente a un dispositivo Bluetooth previamente apareado.
3. Al conectar un dispositivo Bluetooth por primera vez, navegue hasta la pantalla de
configuración de Bluetooth de su dispositivo, busque Tiki Sounds y realice la conexión. El
LED Bluetooth quedará permanentemente encendido una vez conectado y escuchará
“Paired” (Apareado) como confirmación. *
Nota: Si tiene problemas para conectarse, seleccione "Forget this Device" (Olvidar este
dispositivo) en su dispositivo Bluetooth e intente conectarse nuevamente.
4. Comience la reproducción desde su dispositivo Bluetooth.
Para desconectarlo de un dispositivo Bluetooth, pulse el botón Bluetooth/Link del altavoz
maestro. El LED Bluetooth parpadeará de color azul y escuchará “Ready to Pair” (Listo para
aparearse) lo cual indicará que el apareamiento anterior ha quedado desconectado y que el altavoz
está "listo para aparearse" con otro dispositivo Bluetooth. *
* Consejo: Si desea desactivar (o activar) los avisos de voz, mantenga pulsado el botón Light
Mode durante 2 segundos.
Enlace de Tiki Sounds adicionales al altavoz maestro con Multi-Link™
Una vez establecido el altavoz "maestro" conectándose vía Bluetooth como se describió anteriormente,
puede enlazar una cantidad ilimitada de altavoces al altavoz maestro y reproducir la misma música.
1. Encienda el/los altavoz(es) adicional(es) que desearía enlazar con el altavoz maestro.
2. Asegúrese de que el/los altavoz(es) esté(n) en modo de enlace, lo cual será indicado por el
LED verde. Si se enciende un LED azul, mantenga pulsado el botón Bluetooth/Link para
entrar al modo de enlace.
3. Una vez en modo de enlace, el altavoz se enlazará de forma automática al altavoz maestro y
reproducirá el mismo audio.
Cuando un altavoz está en modo de enlace, su botón Light Mode (modo de luz) no funcionará. El botón
Light Mode controlará el brillo de cualquier altavoz enlazado mientras se esté transmitiendo audio.
Consejo: Si no todos los altavoces tienen el mismo nivel de brillo cuando están enlazados, reinicie
los ajustes de brillo una vez en el altavoz maestro pulsando el botón Light Mode 5 veces mientras
se esté transmitiendo audio. Esto sincronizará los niveles de brillo en todos los altavoces.
Los altavoces enlazados pueden apagarse en cualquier momento sin interrumpir la reproducción desde
el altavoz maestro. Al apagar el altavoz maestro se interrumpirá el audio en todos los altavoces enlazados.
Nota: Si tiene múltiples altavoces, es posible usar cada altavoz de forma independiente si se
encuentran en modo Bluetooth/Maestro.
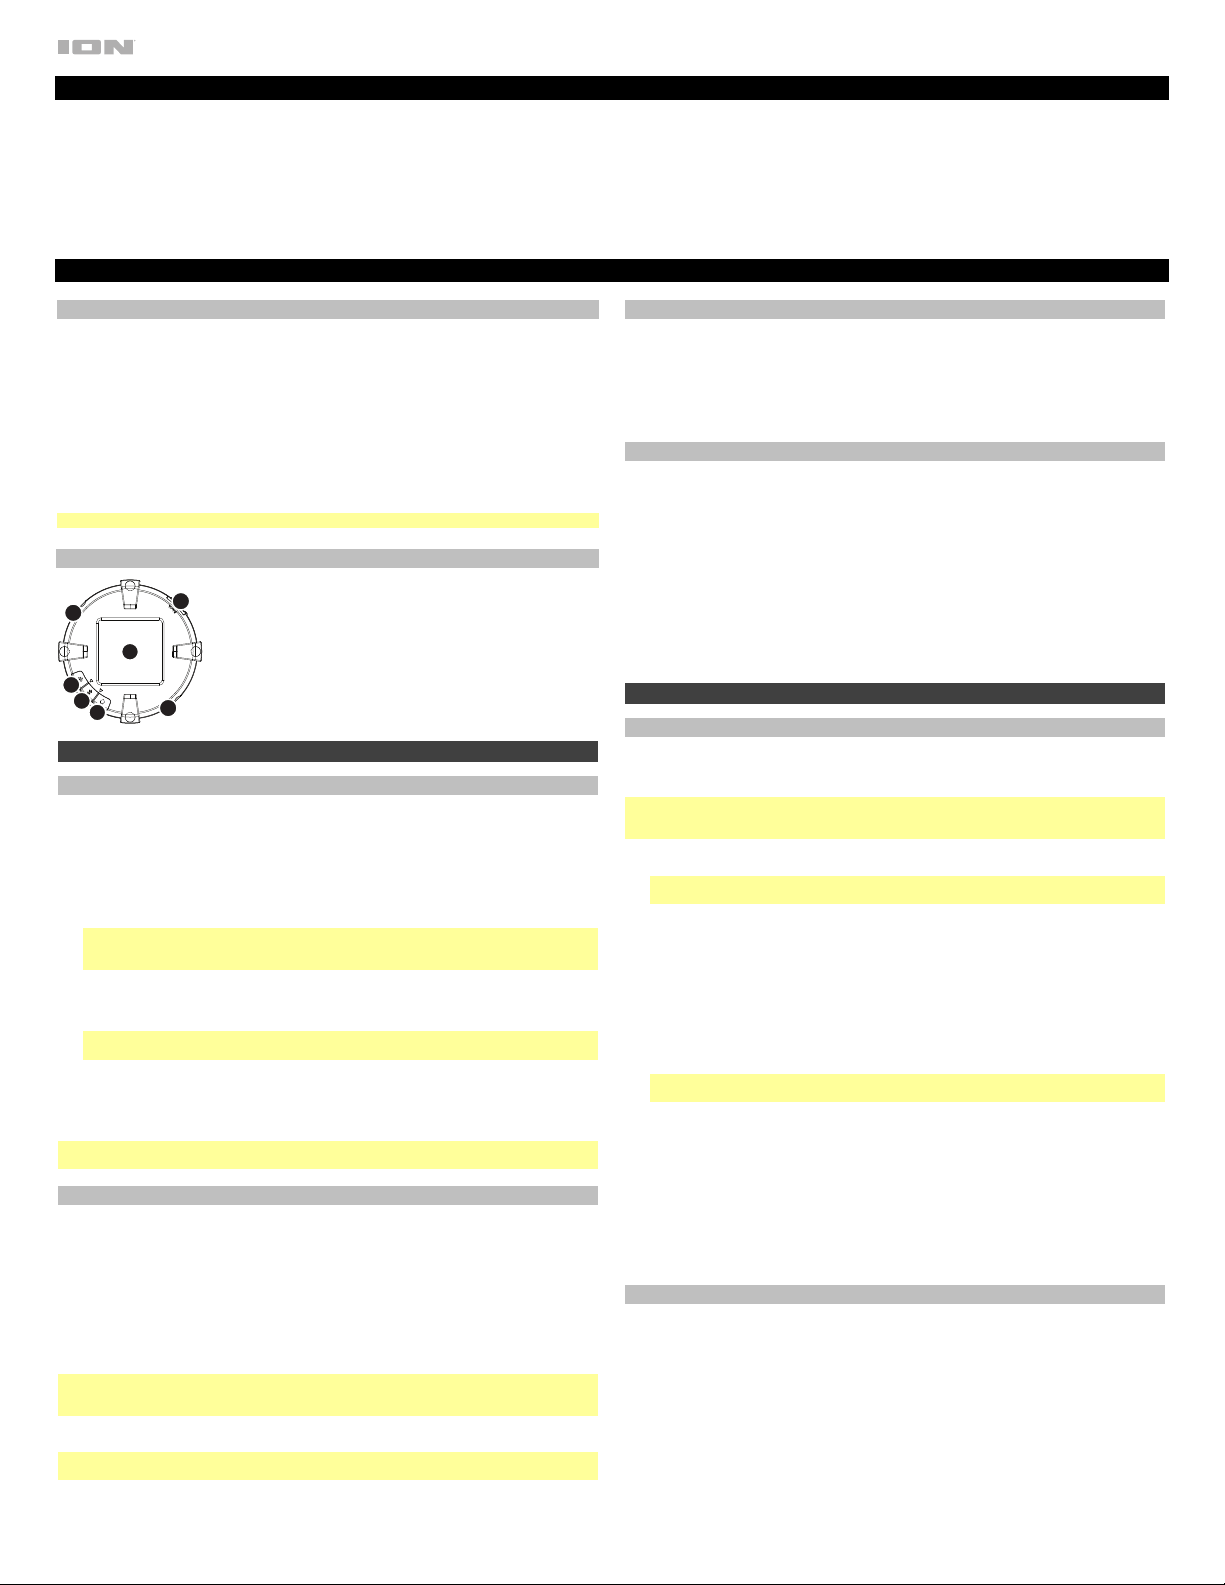
Características
1. Botón de encendido
2. Botón Bluetooth/Enlace
3. Botón de modo de luz
4. Panel solar
5. Puerto micro USB
6. Colocación de la manija
1
2
5
3
4
6
6
