Brew Strength Control — Classic or Rich, Brew strength control allows you to choose your favorite coffee flavor. 24-Hour Programmable Delay Brew - Set it to automati- cally brew ata desired time. The brewer will remain pre-heated and ready to brew at the time you programmed.
Mid-Brew Pause - Automatically stops the flow of coffee from the brew basket when the carafe is removed, allowing you to pour a cup mid-brew.
Clean Function - The clean function allows you to clean your unit whenever you would like. After 60 times of the coffee brewing cycle, The CLEAN indicator on the LED display will flash. It will remind you that you need to clean the coffee machine.
Adjustable Warming Plate - (low, medium, high) ensures that your coffee stays at the temperature you like best.Keep your brew at the ideal temperature for up to 4 hours. The Adjustable Warming Plate will activate during the brew and will automatically shut off after 0.5 hours by default. You can also program the warming plate to stay on for more or less time by pressing and holding “AUTO OFF"button.
Mute function - You can turn off all the sounds of the coffee machine, no longer be disturbed by annoying sounds.
BEFORE FIRST USE
Remove all packaging material and stickers from the coffee maker.
Wash the water reservoir, carafe, removable filter holder, and black-tone permanent filter in warm, soapy water with a soft cloth. Rinse parts and dry thoroughly.
Prime the system by running 2 full carafes on brew with water only. After each cycle is complete, discard the water.
SETTING THE CLOCK
Plug the power cord into an electrical outlet, the LCD display "AM 12:00" and flashes 5 times, then the machine sound “Beep”, the clock starts to run, and enter the stand- by state.
Press either the “HOUR” button or “MINUTE” button and the display will flash. Enter the clock setting. Use the “HOUR” and “MINUTE” button to set the clock to the current time. The AM or PM indicator will illuminate on the right side of the display as you are setting the time.
When the desired time is reached, Press the“BREW/OFF" button or wait 5 seconds to complete the setting.
REMARK:
If you unplug the brewer or experience a power loss, you will need to reset the clock the next time the brewer is powered on.
If there is any operation within 15 seconds, the LCD backlight will be automatically turned off, press any key to let the backlight lit.
In the standby mode, press “HOUR"+ “MINUTE” button 2S at the same time, the buzzer sounds three times, then the factory settings will be restored.
When "PROGRAM" is displayed on the display, the time cannot be adjusted.
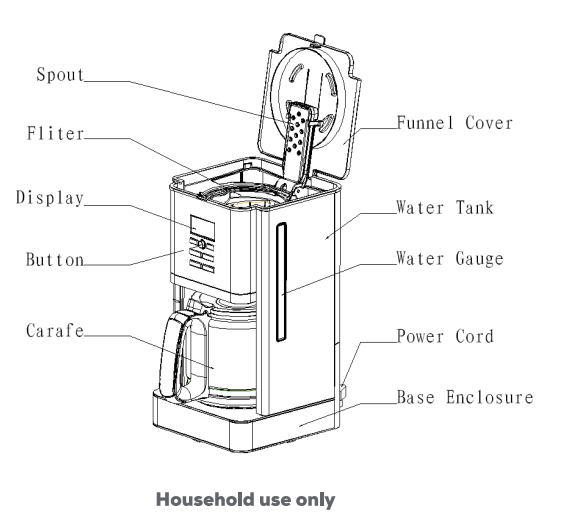
HOW TO BREW
Place the brewer on a dry, clean, and level surface. Plug your brewer in and power it on.
Fill the water reservoir to the desired level.
Place the filter holder in the brew basket. Then place the permanent filter or a #103fan-shaped paper filter in the filter holder.
Add your desired amount of coffee grounds to the brew basket.
Then place carafe under the brew basket.
Press the “CARAFE TEMP” button to select the desired coffee temperature, and press the “"BOLD/CLEAN” button to enter the strong coffee mode.
Press “BREW/OFF" to start brewing. When the brewing is complete, the unit will “Beep”.
COFFEE MEASUREMENT CHART
Integrated AIRMSEN Scoop is equivalent to | tosp. of coffee
HOW TO PROGRAMMING DELAY BREW
NOTE: The unit must remain on for the Delay Brew function to work. DO NOT power off after setting DelayBrew.
Place the brewer on a dry, clean, and level surface. Plug your brewer in and power it on.
Add water to the water reservoir and adding ground coffee to the brew basket, be sure brew basket are securely in place. Place the empty carafe under the brew basket.
Press “PROGRAM” button, the clock will flash. Use the “HOUR” and “MINUTE” button to set the time you would like the Delay Brew to begin. The AM or PM indicator will illuminate on the right side of the display as you are setting the time.
Press “BREW/OFF” to activate, or wait 5 seconds forDelay Brew to lock in. When activated, the unit will beep, and "PROGRAM" on the LED display will remain lit.
Press the “CARAFE TEMP” button to select the desired coffee temperature, and press the “BOLD/CLEAN” button to enter the strong coffee mode.
When the machine clock runs to the set time, the coffee maker will automatically initiate the brew cycle. The“BREW/OFF" button will illuminate, indicating that your coffee maker has begun the brewing. To cancel, press“BREW/OFF" button.
ADJUSTABLE WARMING PLATE
The warming plate will turn on once the brew has started.The initial automatic keep warm time of the coffee machine is 0.5 hours, At the end of the keep warm cycle, the warming plate will automatically shut off. You can change the time of your automatic keep warm cycle by following steps.
Press the “AUTO OFF" button, the display shows “AUTOOFF" and the clock “O:30" flash, displaying the time at which the warming plate is currently set to turn off.
Use the “HOUR” and “MINUTE” button to set the time you want the warming plate to automatically close. The maximum time is 4 hours, It can also be set to O hours, the heating plate will be turned off directly after brewing.
Directly press the "BREW/OFF” button to activate, or wait S seconds for it to lock in automatically. To lock in the new duration, press “AUTO OFF” button again. 8
TEMPERATURE SETTING IN COFFEE KEEPING WARM MODE
Press "CARAFE TEMP" button, select the temperature of the coffee in the keep warm mode. the "Low-Medium-High" selection will appear on the display.
REMARK: “Low” keep warm temperature: 172.4+37.4( F ), “Medium” keep warm temperature: 177.8+37.4( F ), “High” keep warm temperature: 183.2437.4( F ).
MUTE FUNCTION
NOTE: Make sure the “PROGRAM” button is not select- ed/illuminated.
Press and hold the “CARAFE TEMP" button 3S, The mute indicator on the LED display lights up. When the mute logo is displayed, the machine will be muted. To cancel, press and hold the “CARAFE TEMP" button 3S again, the mute indicator is off.
BREW STRENGTH CONTROL
If you want a strong coffee, press the “BLOD/CLEAN" button, the BOLD indicator on the LED display lights up, the machine enter to strong coffee mode.
When the water in the water tank is used up, the machine will enter the heat preservation mode, and the BLOD indicator on the LED display will go out.
To cancel, press“BOLD/CLEAN" button again.
CLEANING AFTER A BREW
After the unit has cooled, remove the filter holder from the brew basket. If using a paper filter, discard it. If using the permanent filter, wash it thoroughly with soap and warm water or place on the top rack of the dishwasher.
Empty the water reservoir and hand-wash or place on the top rack of the dishwasher.
We recommend cleaning your carafe with warm, soapy water, or placing it on the top rack of your dishwasher. If you want to clean the carafe more thoroughly, we recom- mend using a soft foam.
After the coffee maker has cooled, wipe down the main unit, showerhead, and water reservoir shelf with a cloth and warm water. DO NOT immerse the coffee maker in water.
DESCALING YOUR A(RMSEN® COFFEE BREWER
NOTE: Make sure the “PROGRAM” button is not selected/illuminated.
1.Set the empty carafe beneath the brew basket.
2. Use a descaling solution specifically formulated for coffeemaker cleaning and follow the directions on the package. Fill the water reservoir up to, but not exceeding, the 12-Cup Line (60 fl. oz.).
OR
Add 16 oz. of white vinegar to the water reservoir, then fill the rest of the reservoir with water up to, but not exceed- ing, the 12-Cup Line (60 fl. oz.).
3. Once the water reservoir is filled with your cleaning solution or vinegar mixture, press and hold the “BOLD/- CLEAN” button for 3 seconds, CLEAN on the LED display lights up, then press the “BREW/OFF" button to enter the clean mode. The clean cycle takes approximately 25-35 minutes. To cancel the clean cycle, press and hold the “BOLD/CLEAN" button for 3 seconds again.
4. The unit will beep when the clean cycle successfully completes, CLEAN on the LED display will disappear. Refill the reservoir with fresh water up to, but not exceeding, the 12-Cup Line, and set the empty carafe beneath the brew basket. Run a full Brew cycle with water only to remove any cleaning solution that could affect the flavor of your coffee.
TROUBLESHOOTING GUIDE
There is sediment in my coffee .
If using a permanent filter , the sediment at the bottom of the brewed coffee may be due to using finely ground coffee .
To reduce the amount of sediment in the brewed coffee , use a slightly coarser grind or use a paper filter .
There are grounds in my coffee
Either the permanent filter or a paper filter must be inserted into filter holder when brewing .
Using too many grounds can cause the filter holder to overflow . Once cooled , clean out the filter holder and refill using the appropriate amount of coffee ( 1 scoop per cup ) .
Finely ground coffee can clog the filter holder . For best brewing results , use a medium - grind coffee .
Brew basket drips even after the brew cycle is completed.
The removable filter holder valve may be clogged. Rinse the filter holder with water and press the valve repeatedly until the clog is cleared.
Paper filter is folding over.
The unit is designed to take a #103 cone filter. Be sure you are using this size and shape, as larger sizes may fold over. Allow the filter holder to cool before handling. Be sure the paper filter is folded along its two seams and is pressed firmly into the filter holder. Alternatively, you can wet the sides of the paper filter to temporarily adhere it to the filter holder.
If the problem persists, try using the permanent filter instead of a paper filter.
NOTE: When using a paper filter, DO NOT use the perma- nent filter.
Coffee is too weak.
For a stronger coffee, use the Rich Brew setting, try darker-roast grounds, or use the permanent filter rather than a paper filter. If you want an even bolder flavor, you can add more coffee grounds. Additional grounds do absorb water, so you may get more concentrated coffee but overall less liquid volume.
Coffee is too strong.
For milder coffee, try the brew setting using light-roast grounds and a paper filter rather than the permanent filter. If you want an even milder flavor, you can use fewer grounds.
Brew will not start.
NOTE: The brew will begin, pause, and then continue. This process is used to evenly saturate the coffee grounds.
Ensure the unit is powered on and the display is illumi- nated. If there are no lights, the machine is not getting power. Try a different outlet and press the Power button.
Check to make sure there is water in the water reservoir.
Make sure the carafe is in place. The brewer will not dispense coffee if the carafe is not under the brew basket.
If it is not in place, the brew will remain in the brew basket, which could lead to overflow.
If the brew still does not start, it may be time to runa clean cycle. Please refer to the Descaling Your AIRMSEN® Coffee Brewer section.
Brew cycle is too slow.
A full carafe brew will take approximately 12-15 minutes.
If a full carafe brew takes longer than expected, you may need to descale your unit.
Carafe overflowed.
The carafe may not have been empty prior to brewing, or the water level exceeded the Max Fill line on the water reservoir prior to brewing. Reminder, DO NOT add additional water to the reservoir after a brew or cleaning cycle has already started.
For Classic brew, the carafe holds 60 fl. oz. To avoid overflows, make sure carafe is empty prior to brewing and the water reservoir is not filled past the 12-Cup Line.
Brew basket overflowed.
Check that the carafe is in place with the lid secured. If the carafe is in place, the bottom of the filter holder may be clogged. This can happen with finely ground coffee or too many coffee grounds in the filter holder. Rinse the filter holder with water and press the valve repeatedly until the clog is cleared.
We would like to inform you that the power cord of the AIRMSEN stainless steel programming coffee machine is 3.28 feet long.
#2 Does it have any sort of water filter built in?
The coffee machine does not have a built-in water filter, but it has a self-cleaning function, so you can clean the scale regularly.
#3 Can you operate the machine without filling the coffee reservoir in order to get hot water without damaging the machine?
If you do not add coffee ground, then you will get a pot of hot water, which will not damage the machine. But I think it would be better to use an electric kettle.
Hold the clean button for 3 second. The word clean will appear (not blinking) in the upper right hand corner. Clean cycle starts and takes 25-35 minutes
#5 What kind of filter does it have, flat or cone?
It has own filter, but if you don't want it gets dirty , you can use the flat one.
#6 What is the size of the coffee maker? I only see package size in description
The 8-cup coffee machine is the same size as the 12-cup coffee machine, 7.8(L)x8.0(W)x13.4(H) inches.