Loading ...
Loading ...
Loading ...
42 43
ninjakitchen.eu
ninjakitchen.eu
GRILL
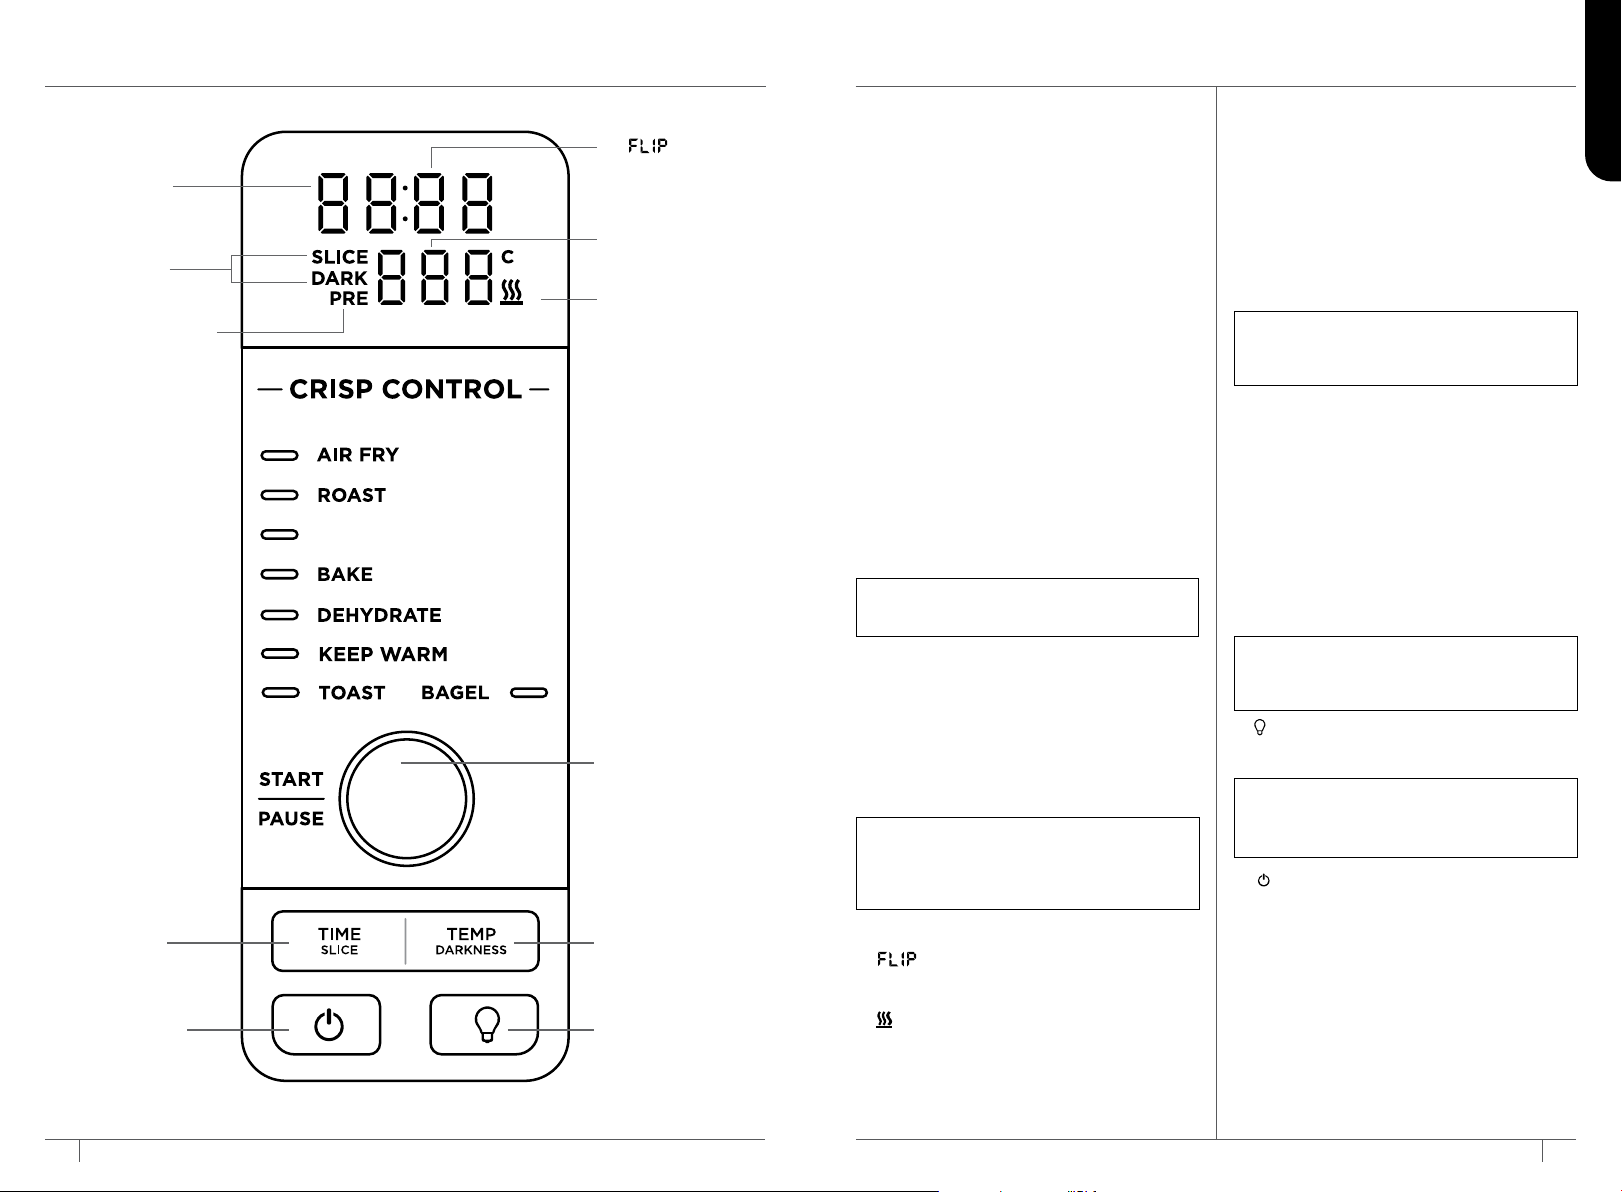
CONTROL PANEL DISPLAY
& OPERATING BUTTONS
1
Time display: Shows the cook time. The
time will count down when cooking is
in progress.
2 Temperature display: Shows the cook
temperature.
3 PRE flashes when the unit is preheating.
4 will appear on the time display
when the unit is cool enough to flip up
for storage or cleaning.
5 illuminates when the unit is hot and will
turn o when the oven is cool enough to
be flipped up for storage or cleaning.
USING THE CONTROL PANEL
FUNCTIONS
AIR FRY: Make foods that would
traditionally be fried—such as chicken
wings, French fries and chicken nuggets—
with little to no added oil.
ROAST: Achieve a crispy outside and perfectly
cooked inside for full-sized oven tray meals,
thicker proteins and roasted veggies.
GRILL: Grills meat and fish and evenly
browns the tops of casseroles.
BAKE: Evenly bakes everything from your
favourite cookies to homemade pizzas.
TOAST: Evenly toasts up to 6 slices of
bread to your perfect level of darkness.
BAGEL: Perfectly toast up to 6 slices
of bagels halves when they’re placed
cut-side up on the wire rack.
DEHYDRATE: Dehydrates meats, fruits
and vegetables for healthy snacks.
KEEP WARM: Keeps food warm up
to 2 hours.
6 SLICE and DARK will illuminate when
using the Toast or Bagel function.
7 START/PAUSE button: Press to start
or pause cooking.
8 Function/Time/Temperature dial:
Turn to select a cooking function or
adjust time and temperature (or number
of slices and darkness level when using
the Toast and Bagel functions).
9 TIME/SLICE button: To select a cook
time, press the TIME button, then use
the dial to adjust the time. When using
the Toast or Bagel function, this button
will adjust the number of slices instead
of the time.
10 TEMP/DARKNESS button: To adjust
temperature, press the TEMP button and
use the dial to adjust the temperature.
When using the Toast or Bagel function,
this button will adjust the darkness level
instead of the temperature.
11 (Light) button: Press to turn the
oven’s interior light on and o.
12 (Power) button: Press to turn the unit
on and o.
NOTE: The DEHYDRATE and KEEP WARM
functions are not included on all models.
NOTE: The cook time and temperature
may be adjusted at any time during the
cooking cycle.
NOTE: The light will automatically turn
on when there are 30 seconds of cook
time remaining.
2 Temperature display
1 Time display
5 HOT unit indicator
6 Toast/Bagel
Function indicator
3 Preheat indicator
9 TIME/SLICE
button
7 START/PAUSE
button AND
8 Function/Time/
Temperature dial
10 TEMP/DARKNESS
button
11 Light button
12 Power button
4 shows
in Time display
NOTE: Time and temperature will always
return to the cook time and temperature
that was set the last time the oven was
in use.
NOTE: Press and hold the START/PAUSE
button for 3 seconds to return to the
function selection.
ENGLISH
Loading ...
Loading ...
Loading ...