Loading ...
Loading ...
Loading ...

EN 30
Accessories
(See fold-out page at the back for illustrations)
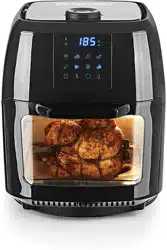
Fat Collecting Tray / Baking Tray
The fat collecting tray (8) should always be inserted so that any dripping fat, crumbs or
other food residues can be collected in it. It is slid right into the bottom of the cooking
space (16).
The fat collecting tray can also be used as a baking tray. It has food placed on it and is
pushed onto the middle rails (14).
Baking Racks
The baking racks (9) are intended for drying. However, they can also be used for crisp-
ing, warming up etc.
The baking racks are slid onto the rails (14) in the cooking space (16) (see Illustration A).
The heating element (18) is located at the top of the cooking space, i.e. the higher up a
baking rack is placed, the more intense the heat is from above.
In the top section, the food is cooked faster and crispier. The middle position should be
chosen to achieve even heating from all sides. The bottom rails are suitable for gentle
cooking.
Skewers with Rack
Pieces of meat, fi sh, vegetables etc. are placed on the skewers (7) as you wish and
grilled in the device. The skewers can either be placed on the baking racks (9) or inserted
into the associated rack. In the rack, they are turned during grilling.
Assemble the rack for skewers and insert into the device:
PLEASE NOTE!
■ The shaft (4) contains two small round notches.
They mark the outermost position of
the locking screws. These must not be attached any further than the outer ends of the
shaft to ensure that smooth operation is possible.
■ Be careful when handling the skewers in order to prevent any injuries!
1.
Slide the rack wheel (6) with the L marking onto the left-hand end of the shaft with
just one notch (see Illustration B1). The locking screw of the rack wheel is directed
outwards.
2. Fix the rack wheel gently with the locking screw. The shaft contains a small round
notch for the tip of the locking screw. Do not tighten it too much so that the rack wheel
can be moved if necessary after attaching the skewers.
3. Mount the second rack wheel on the shaft in the same way (see Illustration B1).
4. Place the tip of a skewer with food on it through the round hole in the left-hand rack
wheel (see Illustration B2).
5. Press together the other end (the clip) of the skewer slightly, slide it into the opposite
notch in the right-hand rack wheel and allow it to engage (see Illustration B2).
6. Fit the rest of the skewers in the same way (see Illustration B2). IMPORTANT: If not
all 10 skewers are used, they must be distributed evenly (always two opposite)
so that the rack can rotate.
Loading ...
Loading ...
Loading ...