IMPORTANT INSTRUCTIONS
WARRANTY
TECHNICAL SPECIFICATIONS
CONTROL
INSTALLATION
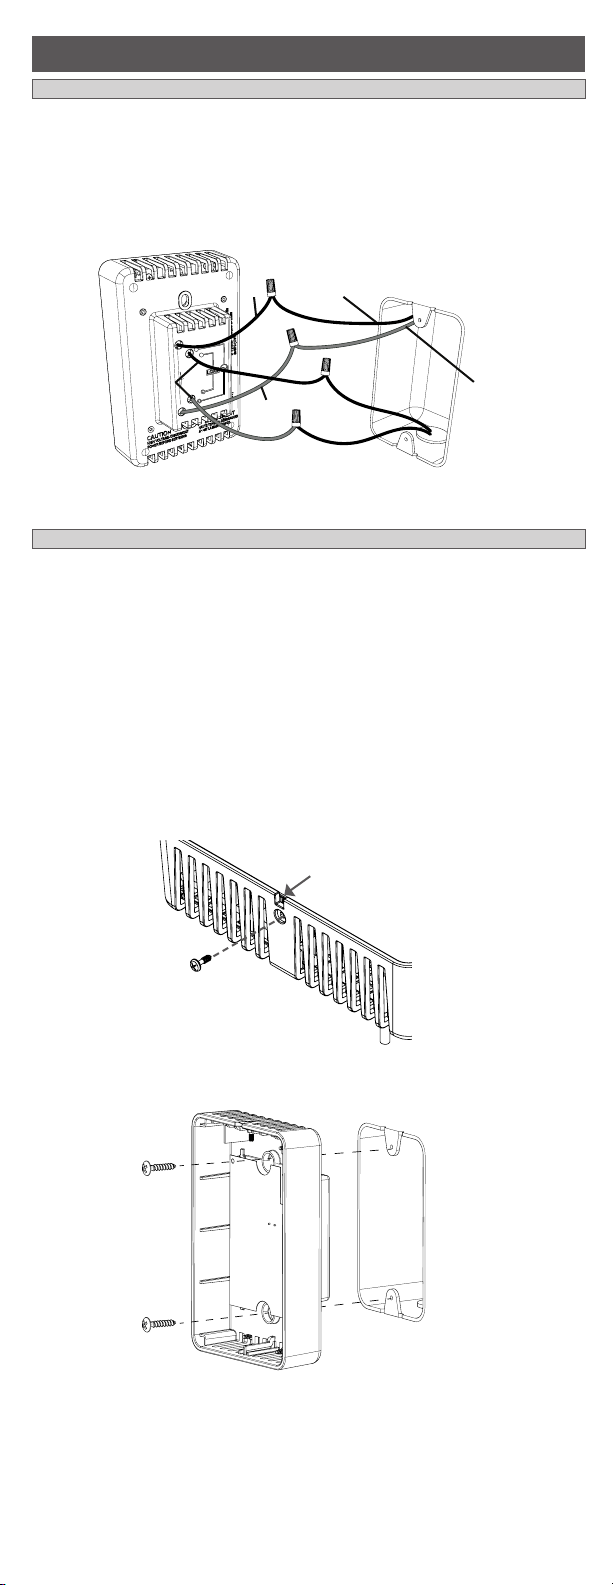
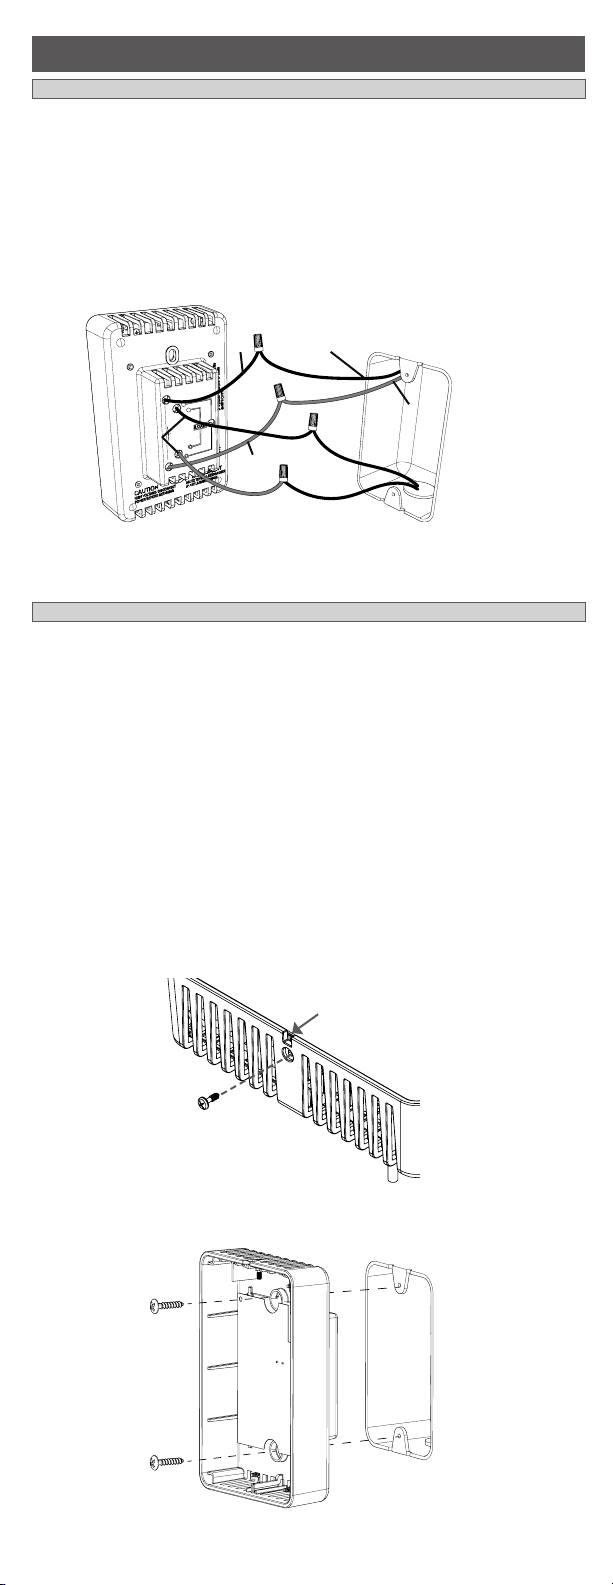
1. Connect the black ‘L1’ thermostat wire to the live supply wire.
2. 240V: Connect the red ‘L2’ thermostat wire to the other live supply wire.
120V: Connect the red ‘L2’ thermostat wire to the neutral supply wire.
3. Connect the black ‘Load’ wire to the live heater wire.
4. 240V: Connect the red ‘Load’ thermostat wire to the other heater wire.
120V: Connect the red ‘Load’ thermostat wire to the neutral heater wire.
The thermostat should be mounted after the wiring connections have been
connected.
1. Remove the small screw at the bottom of the thermostat using a Philips
#1 screwdriver.
2. Carefully insert a small at head screwdriver in the slot between the
faceplate and the gray bezel, and gently pry apart.
3. Position the thermostat over the junction box, and secure it using the two
supplied screws.
Note: The protruding box on the back of the thermostat should be
recessed in the junction box.
4. Reinstall the faceplate and insert the previously removed screw.
5. Remove the protective lm before use.
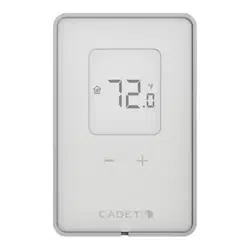
Setting the Temperature
The display will show the ambient temperature, except during temperature
adjustment, in which case it will show the set temperature. To adjust the set
temperature:
1. Use + or - to select the desired temperature.
2. The display will blink for 3 seconds before returning to the main screen.
In case of loss of power, the thermostat will retain the temperature setting.
Lock Function
Use the lock function to prevent the settings from being changed
inadvertently.
To enable:
1. Press + and - at the same time.
2. Press - 4 times. The icon will appear.
3. Press + to enable the lock function. The display will blink for 3 seconds
before returning to the main screen.
The icon will remain visible to indicate that the lock function is enabled.
To disable, press and hold + and -.
Standby (OFF)
Use the standby function to turn the heater o indenitely.
1. Press + and - at the same time.
2. Press
- 3 times. The icon will blink.
3. Press
+ to enable the standby function. The will remain solid to indicate
that it is enabled.
4. The display will blink for 3 seconds before returning to the main screen.
The
will remain visible, indicating that the standby function is enabled.
To disable, press and hold + and -.
WIRING INSTRUCTIONS
MOUNTING THE THERMOSTAT
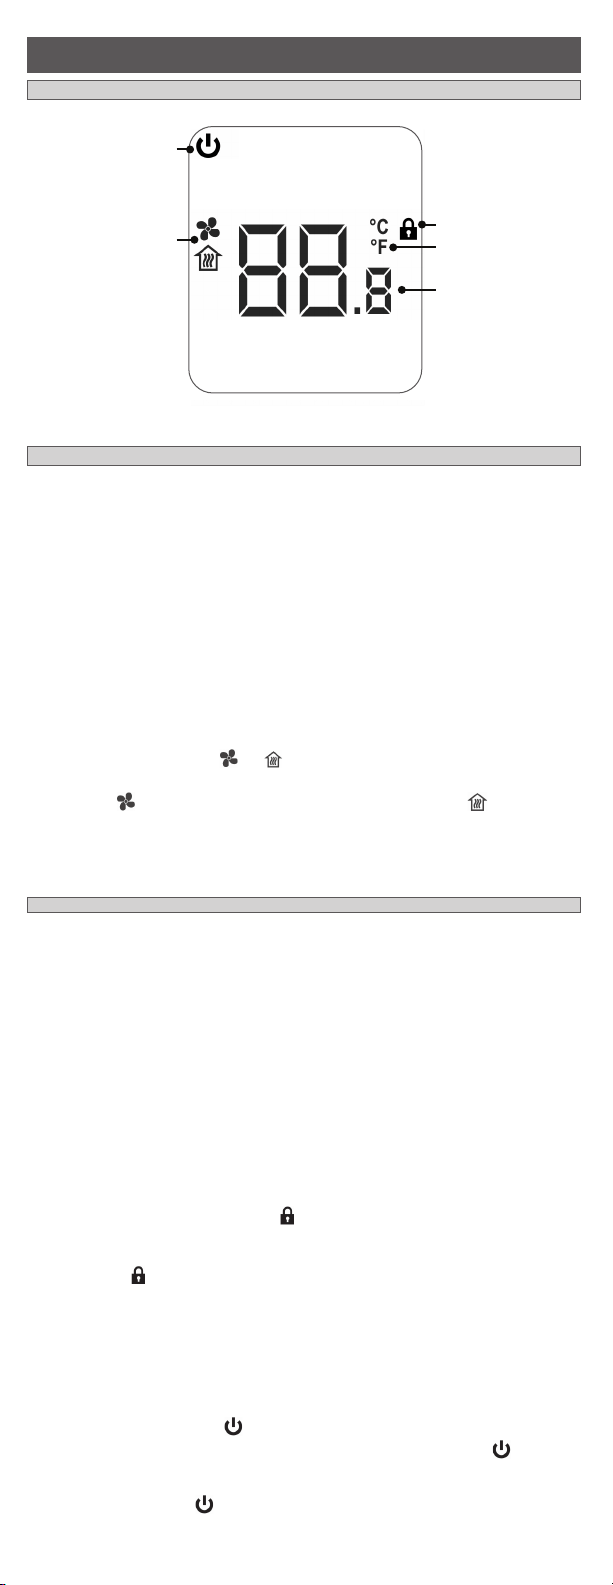
Standby (OFF)
Heat Mode
(Fan, Convection/
Baseboard)
Lock
Temperature
Display
Temperature
TEN252DW TEN362DW
Max. load (at 120/240V) 1500 W / 3000 W 1800 W / 3600 W
Max. Amps 10.4 A 15 A
Electrical Rating 120/208/240 V 50-60Hz
Heater Compatibility
Compatible with electric fan-forced or convection
heaters and baseboards
Temperature range
Programmable 5 °C - 30 °C (41 °F - 86 °F)
Storage -40 °C - 70 °C (-40 °F - 158 °F)
LCD may degrade at 0 °C (32 °F)
Wiring 4 Wire, Double pole
Software Class A
Certification cULus
Impulse Voltage 2500
Pollution Degree PD2
FCC/IC Class B
If the thermostat is deemed defective within 3 years of the
original date of purchase, Cadet will repair or replace the
product at its discretion.
Warranty is void in case of damage incurred from improper use
or installation.
See http://cadetheat.com/product-warranty for details.
This product must be installed by a qualied electrician.
In order to avoid re, shock or death, shut o power supply at the circuit
breaker or fuse before wiring.
Before you begin:
• Verify that the heating appliance that is being connected is within the
specied load range.
• Conrm voltage is within the device rating.
• For wiring, use copper conductors only.
• Mount on a certied electrical box only.
Keep this user’s guide in a safe place for future reference.
7216290200R00
To heaterTo heater
L2 or L2 or
NeutralNeutral
L1L1
To power supplyTo power supply
Temperature Display
To convert the temperature display:
1. Press + and - at the same time.
2. Press - once. °C or °F will ash.
3. Press + to change the temperature display.
4. The display will blink for 3 seconds before returning to the main screen.
Heat Mode
Select the mode that applies to your heater: If the incorrect setting is chosen,
your heater may short cycle or hold an inconsistent temperature.
1. Press + and - at the same time.
2. Press - twice. or will ash.
3. Press + to change the heat mode.
Select for fan-forced heaters or for convection heaters (including
baseboard heaters.)
4. The display will blink for 3 seconds before returning to the main screen.
DISPLAY
SETUP
FUNCTIONS
In keeping with our policy of continuous product
improvement, we reserve the right to make
changes without notice.
© 2020 Glen Dimplex Americas
Insert small at head
screwdriver here
TECHNICAL SUPPORT
Thank you for your purchase! Question or problem? Let us solve it
with a single phone call, email or online chat! We’ll save you a trip
back to the store!
Phone: 855.223.3887 (from the US)
800.668.6663 (from Canada)
email: [email protected]
Live chat: cadetheat.com (contact us)
Cadet Customer Service
TEN SERIESTEN SERIES
ELECTRONIC LINE VOLTAGE ELECTRONIC LINE VOLTAGE
THERMOSTATTHERMOSTAT
USER’S GUIDEUSER’S GUIDE
LoadLoad
L1L1
L2L2
IMPORTANT INSTRUCTIONS
WARRANTY
TECHNICAL SPECIFICATIONS
CONTROL
INSTALLATION
1. Connect the black ‘L1’ thermostat wire to the live supply wire.
2. 240V: Connect the red ‘L2’ thermostat wire to the other live supply wire.
120V: Connect the red ‘L2’ thermostat wire to the neutral supply wire.
3. Connect the black ‘Load’ wire to the live heater wire.
4. 240V: Connect the red ‘Load’ thermostat wire to the other heater wire.
120V: Connect the red ‘Load’ thermostat wire to the neutral heater wire.
The thermostat should be mounted after the wiring connections have been
connected.
1. Remove the small screw at the bottom of the thermostat using a Philips
#1 screwdriver.
2. Carefully insert a small at head screwdriver in the slot between the
faceplate and the gray bezel, and gently pry apart.
3. Position the thermostat over the junction box, and secure it using the two
supplied screws.
Note: The protruding box on the back of the thermostat should be
recessed in the junction box.
4. Reinstall the faceplate and insert the previously removed screw.
5. Remove the protective lm before use.
Setting the Temperature
The display will show the ambient temperature, except during temperature
adjustment, in which case it will show the set temperature. To adjust the set
temperature:
1. Use + or - to select the desired temperature.
2. The display will blink for 3 seconds before returning to the main screen.
In case of loss of power, the thermostat will retain the temperature setting.
Lock Function
Use the lock function to prevent the settings from being changed
inadvertently.
To enable:
1. Press + and - at the same time.
2. Press - 4 times. The icon will appear.
3. Press + to enable the lock function. The display will blink for 3 seconds
before returning to the main screen.
The icon will remain visible to indicate that the lock function is enabled.
To disable, press and hold + and -.
Standby (OFF)
Use the standby function to turn the heater o indenitely.
1. Press + and - at the same time.
2. Press
- 3 times. The icon will blink.
3. Press
+ to enable the standby function. The will remain solid to indicate
that it is enabled.
4. The display will blink for 3 seconds before returning to the main screen.
The
will remain visible, indicating that the standby function is enabled.
To disable, press and hold + and -.
WIRING INSTRUCTIONS
MOUNTING THE THERMOSTAT
Standby (OFF)
Heat Mode
(Fan, Convection/
Baseboard)
Lock
Temperature
Display
Temperature
TEN252DW TEN362DW
Max. load (at 120/240V) 1500 W / 3000 W 1800 W / 3600 W
Max. Amps 10.4 A 15 A
Electrical Rating 120/208/240 V 50-60Hz
Heater Compatibility
Compatible with electric fan-forced or convection
heaters and baseboards
Temperature range
Programmable 5 °C - 30 °C (41 °F - 86 °F)
Storage -40 °C - 70 °C (-40 °F - 158 °F)
LCD may degrade at 0 °C (32 °F)
Wiring 4 Wire, Double pole
Software Class A
Certification cULus
Impulse Voltage 2500
Pollution Degree PD2
FCC/IC Class B
If the thermostat is deemed defective within 3 years of the
original date of purchase, Cadet will repair or replace the
product at its discretion.
Warranty is void in case of damage incurred from improper use
or installation.
See http://cadetheat.com/product-warranty for details.
This product must be installed by a qualied electrician.
In order to avoid re, shock or death, shut o power supply at the circuit
breaker or fuse before wiring.
Before you begin:
• Verify that the heating appliance that is being connected is within the
specied load range.
• Conrm voltage is within the device rating.
• For wiring, use copper conductors only.
• Mount on a certied electrical box only.
Keep this user’s guide in a safe place for future reference.
7216290200R00
To heaterTo heater
L2 or L2 or
NeutralNeutral
L1L1
To power supplyTo power supply
Temperature Display
To convert the temperature display:
1. Press + and - at the same time.
2. Press - once. °C or °F will ash.
3. Press + to change the temperature display.
4. The display will blink for 3 seconds before returning to the main screen.
Heat Mode
Select the mode that applies to your heater: If the incorrect setting is chosen,
your heater may short cycle or hold an inconsistent temperature.
1. Press + and - at the same time.
2. Press - twice. or will ash.
3. Press + to change the heat mode.
Select for fan-forced heaters or for convection heaters (including
baseboard heaters.)
4. The display will blink for 3 seconds before returning to the main screen.
DISPLAY
SETUP
FUNCTIONS
In keeping with our policy of continuous product
improvement, we reserve the right to make
changes without notice.
© 2020 Glen Dimplex Americas
Insert small at head
screwdriver here
TECHNICAL SUPPORT
Thank you for your purchase! Question or problem? Let us solve it
with a single phone call, email or online chat! We’ll save you a trip
back to the store!
Phone: 855.223.3887 (from the US)
800.668.6663 (from Canada)
email: [email protected]
Live chat: cadetheat.com (contact us)
Cadet Customer Service
TEN SERIESTEN SERIES
ELECTRONIC LINE VOLTAGE ELECTRONIC LINE VOLTAGE
THERMOSTATTHERMOSTAT
USER’S GUIDEUSER’S GUIDE
LoadLoad
L1L1
L2L2
INSTRUCTIONS IMPORTANTES
GARANTIE
NOTICE TECHNIQUE
CONTRÔLE
INSTALLATION
1. Raccorder le l noir ‘L1’ du thermostat au l d’alimentation sous tension.
2. 240 V : Raccorder le l rouge ‘L2’ du thermostat au deuxième l
d’alimentation sous tension
120 V : Raccorder le l rouge ‘L2’ du thermostat au l d’alimentation
neutre
3. Raccorder le l de charge noir (Load) du thermostat au l sous tension
de l’appareil de chauage.
4. 240 V : Raccorder le l de charge rouge (Load) du thermostat au l sous
tension de l’appareil de chauage.
120 V : Raccorder le l de charge rouge (Load) du thermostat au l
neutre de l’appareil de chauage.
Le thermostat doit être xé au mur après avoir fait les raccordements
électriques.
1. Enlever la petite vis en dessous du thermostat à l’aide d’un tournevis
cruciforme n
o
1.
2. Insérer soigneusement la pointe d’un petit tournevis à tête plate dans la
fente entre la façade et le boitier gris, et écarter doucement pour enlever
la façade.
3. Placer le thermostat sur la boite de jonction et le xer à l’aide des deux
vis fournies.
Note: La partie saillante du boitier sera encastrée dans la boite de
jonction.
4. Replacer la façade et insérer la vis enlevée ultérieurement.
5. Enlever la pellicule protectrice avant l’utilisation.
Réglage de la température
La température ambiante est achée à l’écran, sauf lors du réglage de la
température. Pour régler la température :
1. Utiliser les touches + et - pour régler la température désirée.
2. L’achage clignotera pendant 3 secondes avant de retourner à l’achage
principal.
Le réglage de la température sera conservé même suite à une panne de
courant.
Verrouillage
Utiliser la fonction verrouillage pour empêcher que les réglages soient
changés par inadvertance.
To enable:
1. Appuyer sur + et - en même temps.
2. Appuyer sur - 4 fois. Le symbole apparaitra.
3. Appuyer sur + pour activer la fonction verrouillage. L’achage clignotera
pendant 3 secondes avant de retourner à l’achage principal.
Le symbole demeurera visible pour indiquer que la fonction verrouillage
est activée.
Pour désactiver, appuyer et maintenir les touches + et -.
Standby (OFF)
Utiliser le mode veille pour éteindre le chauage indéniment.
1. Appuyer sur + et - en même temps.
2. Appuyer sur - 4 fois. The
icon will blink.
3. Appuyer sur + pour activer la fonction verrouillage. Le symbole
cesse de
clignoter pour indiquer que la fonction verrouillage est activée.
4. L’achage clignotera pendant 3 secondes avant de retourner à l’achage
principal.Le symbole
demeurera visible pour indiquer que la fonction de
mise en veille est activée.
Pour désactiver, appuyer et maintenir les touches + et -.
INSTRUCTIONS DE RACCORDEMENT
INSTALLATION DU THERMOSTAT
Mode veille (éteint)
Mode de chauffage
(air pulsé,
convection/plinthes
chauffantes)
Verrouillage
Affichage de la
température
Température
TEN252DW TEN362DW
Charge maximale (120/240 V) 1500 W / 3000 W 1800 W / 3600 W
Intensité maximale 10.4 A 15 A
Catégorie 120/208/240 V 50-60Hz
Compatibilité avec
systèmes de chauffage
Compatible avec les radiateurs électriques à air pulsé,
ainsi que les convecteurs et les plinthes chauffantes
Plage de température
Réglable de 5 °C à 30 °C (41 °F à 86 °F)
Lisible -40 °C à 70 °C (-40 °F à 158 °F)
Affichage LCD peut se dégrader à 0 °C (32 °F)
Raccordement Bipolaire, 4 fils
Logiciel Classe A
Homologation cULus
Tension de choc 2500
Degré de pollution PD2
FCC/IC Classe B
Si votre thermostat est considéré comme étant défectueux
dans les trois ans qui suivent la date d’achat, cadet réparera ou
remplacera le produit à sa discrétion.
La garantie sera annulée si des dommages sont subis par raison
de mauvais usage ou d’installation fautive.
Voir http://cadetheat.com/product-warranty pour de plus
amples détails.
Ce produit doit être installé par un électricien qualié.
An d’éviter un incendie, une décharge électrique ou un décès accidentel,
couper l’alimentation électrique à partir du disjoncteur ou du fusible avant
l’installation.
Avant de procéder à l’installation:
• Vérier que l’appareil de chauage qui sera raccordé à ce thermostat est
dans l’étendue de la charge spéciée.
• Vérier que la tension correspond à celle de l’appareil de chauage.
• Utiliser uniquement des conducteurs en cuivre pour le raccordement.
• Il est nécessaire que ce thermostat soit xé à un coret électrique approuvé
aux normes de sécurité.
Conserver ce manuel dans un endroit sûr à des ns de
consultation ultérieure.
7216290200R00
À l’appareil de À l’appareil de
chauagechauage
L2 ou L2 ou
neutreneutre
L1L1
À l’alimentation À l’alimentation
electriqueelectrique
Achage de la température
Pour régler la préférence de l’achage de la température :
1. Appuyer sur + et - en même temps.
2. Appuyer sur - une fois. °C ou °F clignotera.
3. Appuyer sur + pour changer l’achage de la température.
4. L’achage clignotera pendant 3 secondes avant de retourner à l’achage
principal.
Mode de chauage
Choisir le mode de chauage qui convient à votre appareil de chauage. Si
le mode incorrect est choisi, votre appareil de chauage risque de faire des
cycles courts ou maintenir une température inconsistante.
1. Appuyer sur + et - en même temps
2. Appuyer sur - deux fois. ou clignotera.
3. Appuyer sur + pour changer le mode de chauage.
Choisir pour les appareils de chauage à air pulsé ou pour les
convecteurs (y compris les plinthes chauantes)
4. L’achage clignotera pendant 3 secondes avant de retourner à l’achage
principal.
AFFICHAGE
CONFIGURATION
FONCTIONS
Dans le cadre de notre politique d’amélioration
continue de nos produits, nous nous réservons le
droit de modifier les spécifications sans préavis.
© 2020 Glen Dimplex Americas
Insérer un tournevis
à pointe plate ici
TECHNICAL SUPPORT
Merci pour votre achat! Question ou problème? On vous répond
par un seul coup de l, un courriel ou une conversation en ligne! Ça
vous fera gagner du temps au lieu de vous déplacer au magasin!
Telephone : 855.223.3887 (des États-Unis)
800.668.6663 (du Canada)
Courriel : [email protected]
Clavardage en direct: cadetheat.com (nous joindre)
Service après-vente
SÉRIE TENSÉRIE TEN
THERMOSTAT ÉLECTRONIQUE THERMOSTAT ÉLECTRONIQUE
À TENSION DE SECTEURÀ TENSION DE SECTEUR
GUIDE D'UTILISATIONGUIDE D'UTILISATION
LoadLoad
L1L1
L2L2
INSTRUCTIONS IMPORTANTES
GARANTIE
NOTICE TECHNIQUE
CONTRÔLE
INSTALLATION
1. Raccorder le l noir ‘L1’ du thermostat au l d’alimentation sous tension.
2. 240 V : Raccorder le l rouge ‘L2’ du thermostat au deuxième l
d’alimentation sous tension
120 V : Raccorder le l rouge ‘L2’ du thermostat au l d’alimentation
neutre
3. Raccorder le l de charge noir (Load) du thermostat au l sous tension
de l’appareil de chauage.
4. 240 V : Raccorder le l de charge rouge (Load) du thermostat au l sous
tension de l’appareil de chauage.
120 V : Raccorder le l de charge rouge (Load) du thermostat au l
neutre de l’appareil de chauage.
Le thermostat doit être xé au mur après avoir fait les raccordements
électriques.
1. Enlever la petite vis en dessous du thermostat à l’aide d’un tournevis
cruciforme n
o
1.
2. Insérer soigneusement la pointe d’un petit tournevis à tête plate dans la
fente entre la façade et le boitier gris, et écarter doucement pour enlever
la façade.
3. Placer le thermostat sur la boite de jonction et le xer à l’aide des deux
vis fournies.
Note: La partie saillante du boitier sera encastrée dans la boite de
jonction.
4. Replacer la façade et insérer la vis enlevée ultérieurement.
5. Enlever la pellicule protectrice avant l’utilisation.
Réglage de la température
La température ambiante est achée à l’écran, sauf lors du réglage de la
température. Pour régler la température :
1. Utiliser les touches + et - pour régler la température désirée.
2. L’achage clignotera pendant 3 secondes avant de retourner à l’achage
principal.
Le réglage de la température sera conservé même suite à une panne de
courant.
Verrouillage
Utiliser la fonction verrouillage pour empêcher que les réglages soient
changés par inadvertance.
To enable:
1. Appuyer sur + et - en même temps.
2. Appuyer sur - 4 fois. Le symbole apparaitra.
3. Appuyer sur + pour activer la fonction verrouillage. L’achage clignotera
pendant 3 secondes avant de retourner à l’achage principal.
Le symbole demeurera visible pour indiquer que la fonction verrouillage
est activée.
Pour désactiver, appuyer et maintenir les touches + et -.
Standby (OFF)
Utiliser le mode veille pour éteindre le chauage indéniment.
1. Appuyer sur + et - en même temps.
2. Appuyer sur - 4 fois. The
icon will blink.
3. Appuyer sur + pour activer la fonction verrouillage. Le symbole
cesse de
clignoter pour indiquer que la fonction verrouillage est activée.
4. L’achage clignotera pendant 3 secondes avant de retourner à l’achage
principal.Le symbole
demeurera visible pour indiquer que la fonction de
mise en veille est activée.
Pour désactiver, appuyer et maintenir les touches + et -.
INSTRUCTIONS DE RACCORDEMENT
INSTALLATION DU THERMOSTAT
Mode veille (éteint)
Mode de chauffage
(air pulsé,
convection/plinthes
chauffantes)
Verrouillage
Affichage de la
température
Température
TEN252DW TEN362DW
Charge maximale (120/240 V) 1500 W / 3000 W 1800 W / 3600 W
Intensité maximale 10.4 A 15 A
Catégorie 120/208/240 V 50-60Hz
Compatibilité avec
systèmes de chauffage
Compatible avec les radiateurs électriques à air pulsé,
ainsi que les convecteurs et les plinthes chauffantes
Plage de température
Réglable de 5 °C à 30 °C (41 °F à 86 °F)
Lisible -40 °C à 70 °C (-40 °F à 158 °F)
Affichage LCD peut se dégrader à 0 °C (32 °F)
Raccordement Bipolaire, 4 fils
Logiciel Classe A
Homologation cULus
Tension de choc 2500
Degré de pollution PD2
FCC/IC Classe B
Si votre thermostat est considéré comme étant défectueux
dans les trois ans qui suivent la date d’achat, cadet réparera ou
remplacera le produit à sa discrétion.
La garantie sera annulée si des dommages sont subis par raison
de mauvais usage ou d’installation fautive.
Voir http://cadetheat.com/product-warranty pour de plus
amples détails.
Ce produit doit être installé par un électricien qualié.
An d’éviter un incendie, une décharge électrique ou un décès accidentel,
couper l’alimentation électrique à partir du disjoncteur ou du fusible avant
l’installation.
Avant de procéder à l’installation:
• Vérier que l’appareil de chauage qui sera raccordé à ce thermostat est
dans l’étendue de la charge spéciée.
• Vérier que la tension correspond à celle de l’appareil de chauage.
• Utiliser uniquement des conducteurs en cuivre pour le raccordement.
• Il est nécessaire que ce thermostat soit xé à un coret électrique approuvé
aux normes de sécurité.
Conserver ce manuel dans un endroit sûr à des ns de
consultation ultérieure.
7216290200R00
À l’appareil de À l’appareil de
chauagechauage
L2 ou L2 ou
neutreneutre
L1L1
À l’alimentation À l’alimentation
electriqueelectrique
Achage de la température
Pour régler la préférence de l’achage de la température :
1. Appuyer sur + et - en même temps.
2. Appuyer sur - une fois. °C ou °F clignotera.
3. Appuyer sur + pour changer l’achage de la température.
4. L’achage clignotera pendant 3 secondes avant de retourner à l’achage
principal.
Mode de chauage
Choisir le mode de chauage qui convient à votre appareil de chauage. Si
le mode incorrect est choisi, votre appareil de chauage risque de faire des
cycles courts ou maintenir une température inconsistante.
1. Appuyer sur + et - en même temps
2. Appuyer sur - deux fois. ou clignotera.
3. Appuyer sur + pour changer le mode de chauage.
Choisir pour les appareils de chauage à air pulsé ou pour les
convecteurs (y compris les plinthes chauantes)
4. L’achage clignotera pendant 3 secondes avant de retourner à l’achage
principal.
AFFICHAGE
CONFIGURATION
FONCTIONS
Dans le cadre de notre politique d’amélioration
continue de nos produits, nous nous réservons le
droit de modifier les spécifications sans préavis.
© 2020 Glen Dimplex Americas
Insérer un tournevis
à pointe plate ici
TECHNICAL SUPPORT
Merci pour votre achat! Question ou problème? On vous répond
par un seul coup de l, un courriel ou une conversation en ligne! Ça
vous fera gagner du temps au lieu de vous déplacer au magasin!
Telephone : 855.223.3887 (des États-Unis)
800.668.6663 (du Canada)
Clavardage en direct: cadetheat.com (nous joindre)
Service après-vente
SÉRIE TENSÉRIE TEN
THERMOSTAT ÉLECTRONIQUE THERMOSTAT ÉLECTRONIQUE
À TENSION DE SECTEURÀ TENSION DE SECTEUR
GUIDE D'UTILISATIONGUIDE D'UTILISATION
LoadLoad
L1L1
L2L2