English
Box Contents: Smart Badge, USB
Charging Cable, Metal Plate,
Quickstart Guide.
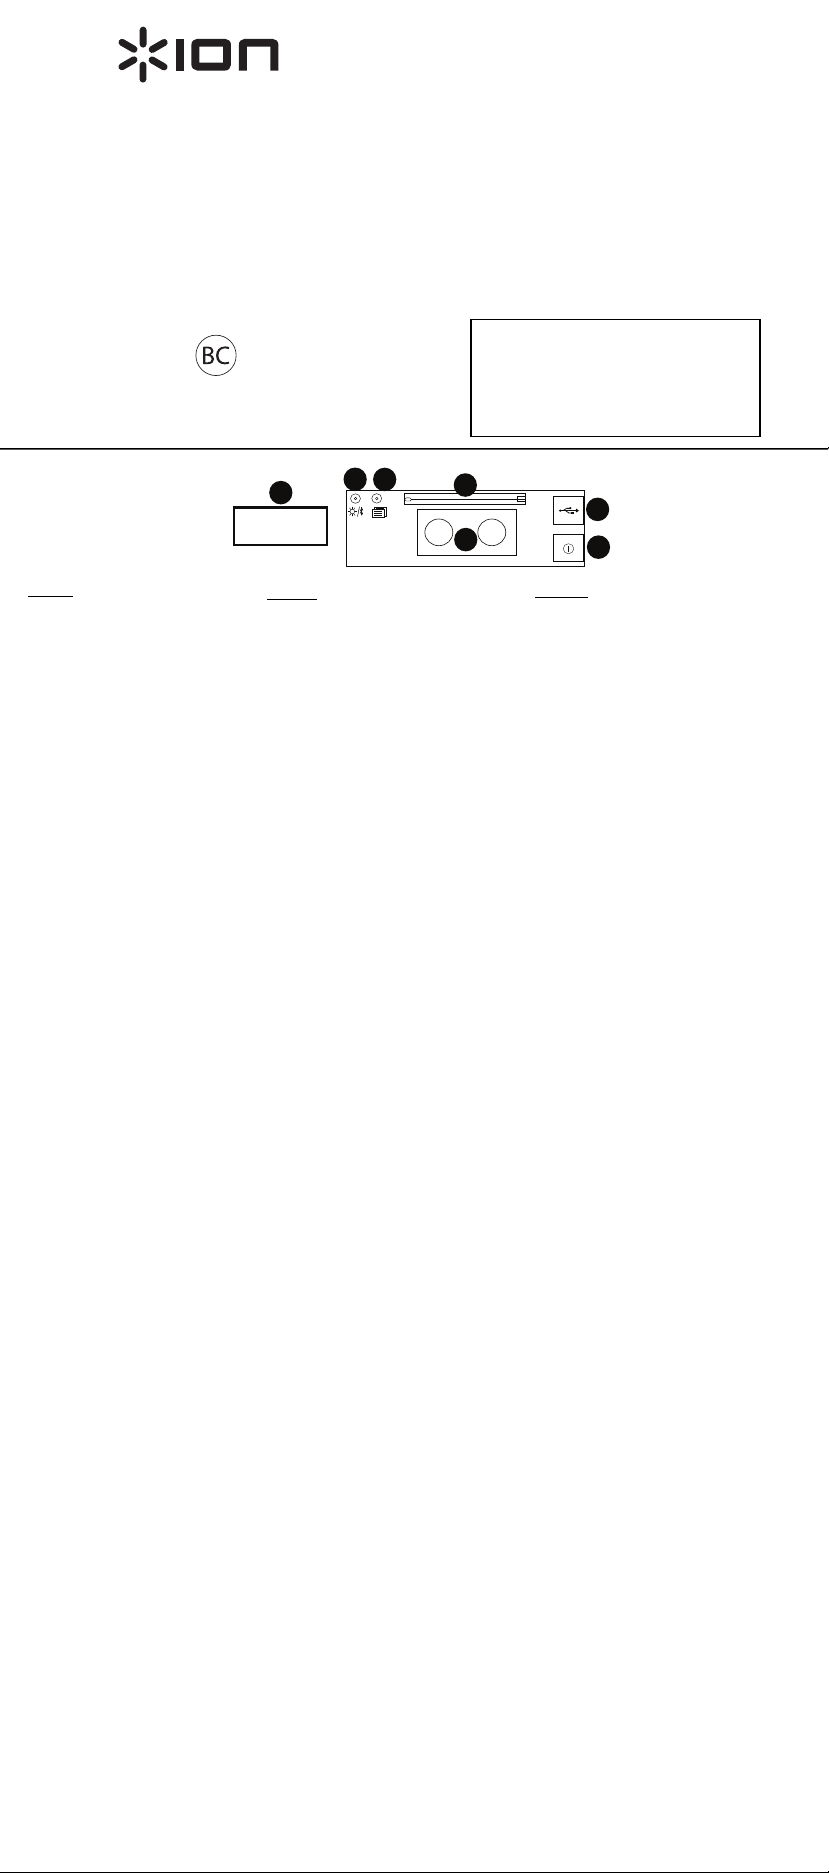
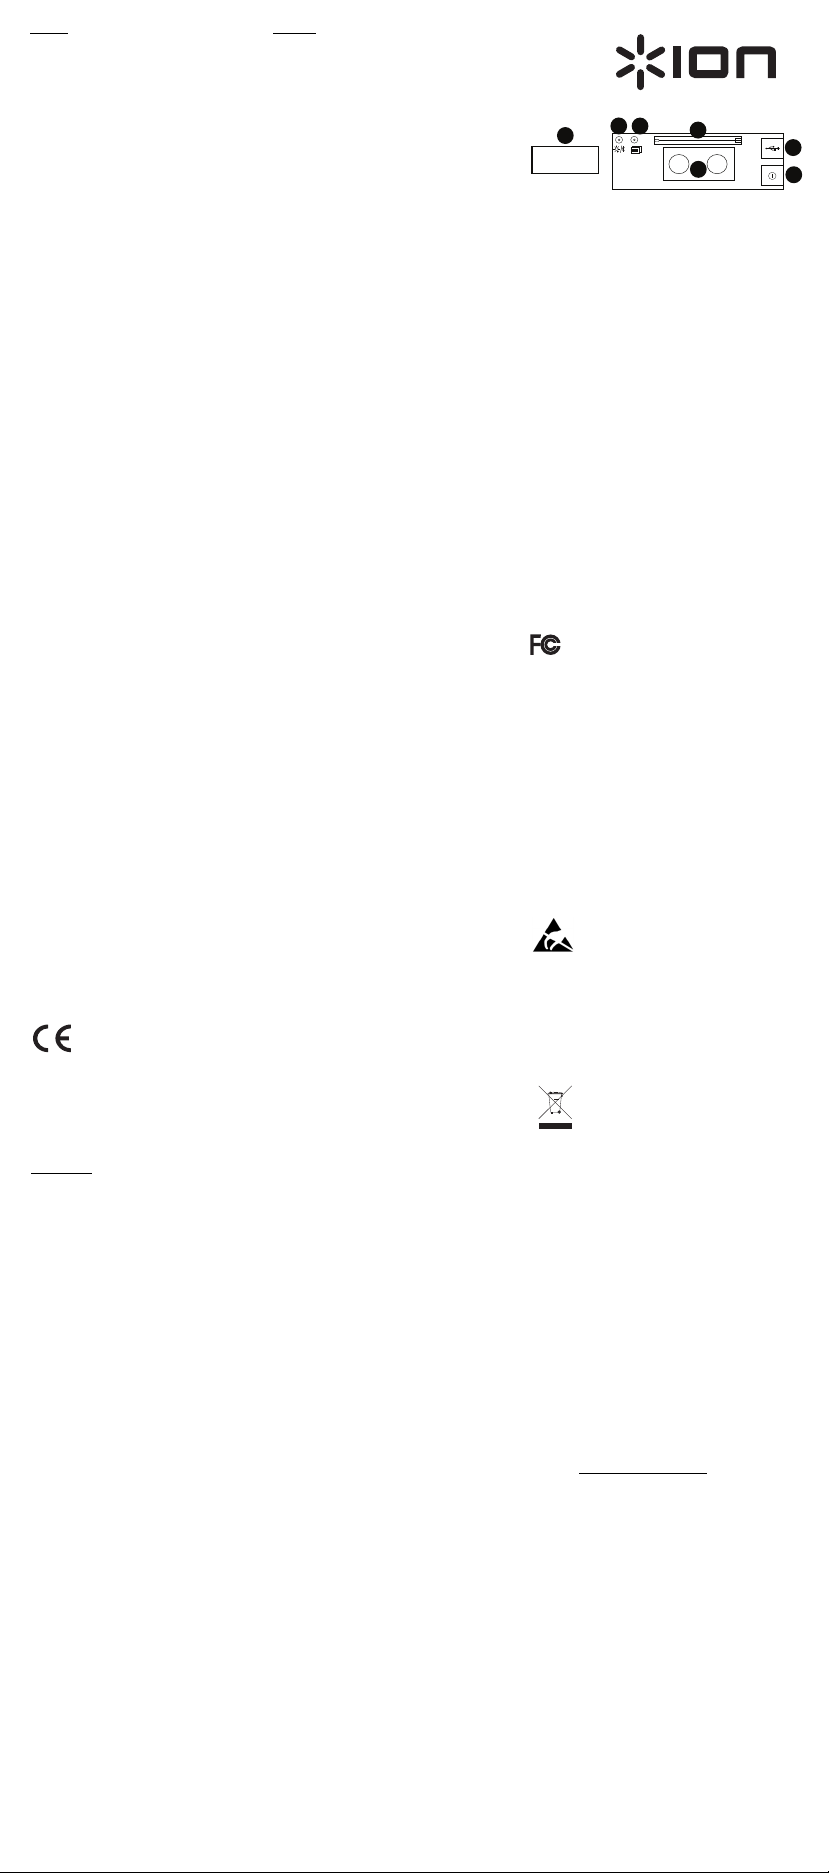
Controls:
1. Micro USB: Connect the micro-
USB cable here to charge Smart
Badge.
2. Power On/Off: Move this switch
to the up position to power on
Smart Badge. Move the switch in
the down position to power off
Smart Badge.
3. Metal Plate: Place the metal
plate under clothing to secure to
the magnetic panel.
4. Magnetic Panel: Place the panel
near the metal plate to
magnetically connect.
5. Pin: Use this to secure Smart
Badge to your clothing.
6. Brightness/Bluetooth Pairing:
Press and release this button to
cycle through the 3 brightness
levels: 50%, 75%, and 100%. To
enter Bluetooth pairing mode,
press and hold this button for 2
seconds. To disconnect from a
paired Bluetooth device, press
and hold this button for 3
seconds.
7. Message Locations: Select from
one of 8 messages. Create and
save custom messages to these
locations using the Smart Badge
app.
Charging Smart Badge: Use the
included micro-USB cable to
connect Smart Badge to a USB
power adapter connected to a power
outlet or your computer (powered
on).
Using Smart Badge:
1. Download the Smart Badge app
from the App Store or Google
Play store.
2. Power on Smart Badge.
Note: Remove the protective film
from the display screen for clear
viewing.
3. Press and hold the Bluetooth
Pairing button for 2 seconds to
enter Bluetooth pairing mode.
4. Open the Smart Badge app on
your device (smartphone, tablet,
etc.) to pair Smart Badge with
your device and to create custom
messages.
Note: There is no need to connect
using your device’s Bluetooth
settings menu. As long as your
device’s Bluetooth is turned On, the
Smart Badge app will handle
connecting.
Clock Mode: Hold the Message
Select button for 3 seconds to show
the time. Press and release the
Message Select button again to
toggle between 12 and 24 hour
formats. Press and hold the
Message Select button for 3
seconds to leave Clock mode.
Español
Contenido de la caja: Smart Badge,
cable USB de carga, placa metálica, guía
de inicio rápido.
Controles:
1. Micro USB: Conecte aquí el cable
micro USB para cargar el Smart
Badge.
2. Power On/Off (Encendido/apagado):
Mueva este interruptor hacia arriba
para encender el Smart Badge. Mueva
el interruptor hacia abajo para apagar
el Smart Badge.
3. Placa metálica: Coloque la placa
metálica bajo su ropa para sujetar el
panel magnético.
4. Panel magnético: Coloque el panel
cerca de la placa metálica para
conectarlo magnéticamente.
5. Alfiler: Utilícelo para sujetar el Smart
Badge a su ropa.
6. Brightness/Bluetooth Pairing
(Brillo/Apareamiento de Bluetooth)
Pulse y suelte este botón para alternar
por los 3 niveles de brillo. 50, 75, y
100%. Para entrar al modo de
apareamiento Bluetooth, mantenga
pulsado este botón durante 2
segundos. Para desconectarlo de un
dispositivo Bluetooth apareado,
mantenga pulsado este botón durante
3 segundos.
7. Ubicaciones del mensaje: Seleccione
uno de 8 mensajes. Cree y guarde
mensajes personalizados en estas
ubicaciones mediante la aplicación de
Smart Badge.
Carga del Smart Badge: Utilice el cable
micro USB incluido para conectar el
Smart Badge a un adaptador de
alimentación USB conectado a una toma
de corriente o a su ordenador
(encendido).
Uso del Smart Badge:
1. Descargue la aplicación de Smart
Badge desde App Store o Google
Play.
2. Encienda el Smart Badge.
Nota: Quite la película protectora de la
pantalla para una mejor visualización.
3. Mantenga pulsado el botón Bluetooth
Pairing durante 2 segundos para
entrar al modo de apareamiento de
Bluetooth.
4. Abra la aplicación Smart Badge en su
dispositivo (teléfono inteligente
[smartphone], tableta, etc.) para
aparear el Smart Badge con su
dispositivo y crear mensajes
personalizados.
Nota: No es necesario conectarse
utilizando el menú de ajustes Bluetooth
de su dispositivo. Siempre que su
dispositivo Bluetooth se encienda, la
aplicación Smart Badge se encargará de
realizar la conexión.
Modo reloj: Mantenga pulsado Message
Select (Seleccionar mensaje) durante 3
segundos para mostrar la hora. Pulse y
suelte el botón Message Select
nuevamente para alternar entre los
formatos de 12 y 24 horas. Mantenga
pulsado el botón Message Select
durante 3 segundos para salir del modo
de reloj.
Français
Contenu de la boîte : Smart Badge, câble
de rechargement USB, plaque métallique,
guide de démarrage.
Commandes :
1. Micro-USB : Branchez le câble de
rechargement USB à ce port afin de
recharger l’insigne Smart Badge.
2. Interrupteur d’alimentation : Pour
mettre le Smart Badge sous tension,
relevez l’interrupteur. Pour mettre le
Smart Badge hors tension, abaissez
l’interrupteur.
3. Plaque métallique : Placez la plaque
métallique sous les vêtements pour fixer
la plaque de fixation magnétique.
4. Plaque de fixation magnétique : Placez
la plaque de fixation magnétique près de
la plaque métallique afin qu’elles se lient
magnétiquement.
5. Épingle : Utilisez cette épingle pour fixer
l'insigne Smart Badge à vos vêtements.
6. Luminosité/Jumelage Bluetooth :
Appuyez et relâchez cette touche afin de
parcourir les 3 niveaux de luminosité :
50 %, 75 %, et 100 %. Pour jumeler un
appareil Bluetooth, maintenez cette
touche enfoncée pendant 2 secondes.
Pour déjumeler un appareil Bluetooth,
maintenir cette touche enfoncée pendant
3 secondes.
7. Emplacements de sauvegarde des
messages : Sélectionnez l’un des 8
messages.
V
ous pouvez créer et
sauvegarder des messages personnalisés
dans ces emplacements en utilisant
l'application Smart Badge.
Rechargement du Smart Badge : Utilisez le
câble micro-USB inclus afin de brancher le
Smart Badge à un adaptateur d’alimentation
USB branché à une prise secteur ou à un
ordinateur sous tension.
Utilisation du Smart Badge :
1. Téléchargez l'application Smart Badge
sur l'App Store ou Google Play.
2. Mettez le Smart Badge sous tension.
Remarque : Retirez le film protecteur de
l'écran.
3. Maintenez la touche de jumelage
pendant 2 secondes pour lancer le
jumelage Bluetooth.
4. Lancez l'application Smart Badge sur
votre appareil (smartphone, tablette, etc.)
afin de jumeler le Smart Badge avec votre
appareil et pour créer des messages
personnalisés.
Remarque : Pour établir la connexion, vous
n’avez pas à accéder au menu de
configuration Bluetooth de votre appareil.
Tant que le mode Bluetooth de votre
appareil est activé, l’application Smart
Badge se chargera de la connexion.
Mode horloge : Maintenez la touche de
sélection des messages enfoncée pendant
3 secondes afin d’afficher l’heure. Appuyez
et relâchez la touche de sélection des
messages afin de sélectionner l’affichage 12
ou 24 heures. Maintenez la touche de
sélection des messages enfoncée pendant
3 secondes afin de quitter le mode horloge.
Manual Version 1.2
Smart Badge
Quickstart Guide English
Guía de inicio rápido Español
Guide d'utilisation rapide Français
Guida rapida Italiano
Schnellstart-Anleitung Deutsch
Snelstartgids Nederlands
Stop! Don’t return this product!
If you're having problems using Smart
Badge, our support team can help.
Visit ionaudio.com/support to e-mail our
technical support team, or call us at 401-
658-3743 (U.S.) or 01252 896 080 (U.K).
ionaudio.com/support
For technical support.
Para soporte técnico.
Pour obtenir de l’assistance technique.
Per assistenza tecnica.
Für technischen Support.
Voor technische ondersteuning.
ionaudio.com/warrant
y
For complete warranty information.
Para información completa sobre la garantía.
Pour obtenir toutes les informations relatives à la garantie.
Per informazioni complete in merito alla garanzia.
Für komplette Garantieinformationen.
Voor volledige informatie over de garantie.
ON OFF
1
2
4
5
6
7
3
Italiano
Contenuti della confezione: Smart Badge,
cavo di ricarica USB, piastra in metallo,
Guida rapida.
Comandi:
1. Micro USB: collegare a questo livello il
cavo micro-USB per caricare lo Smart
Badge.
2.
A
ccensione/spegnimento (on/off):
spostare l'interruttore verso l'alto per
accendere lo Smart Badge. Spostare
l'interruttore verso il basso per spegnere
lo Smart Badge.
3. Piastra in metallo: collocare la piastra in
metallo sotto gli abiti per fissarla al
pannello magnetico.
4. Pannello magnetico: collocare il
pannello accanto alla piastra in metallo
per effettuare il collegamento magnetico.
5. Pin: servirsi dei pin per fissare lo Smart
Badge agli abiti.
6. Luminosità/collegamento Bluetooth:
premere e rilasciare questo tasto per
scorrere tra i 3 livelli di luminosità: 50%,
75%, e 100%. Per entrare in modalità di
collegamento Bluetooth, tenere premuto
questo tasto per 2 secondi. Per
interrompere il collegamento da un
dispositivo Bluetooth, tenere premuto
questo tasto per 3 secondi.
7. Posizionamento dei messaggi: scegliere
uno degli 8 messaggi disponibili. Creare e
salvare messaggi personalizzati in queste
posizioni servendosi dell'app Smart
Badge.
Ricarica dello Smart Badge: servirsi del
cavo micro-USB in dotazione per collegare lo
Smart Badge a un adattatore di alimentazione
USB collegato a una presa elettrica o al
computer (acceso).
Uso dello Smart Badge:
1. Scaricare l'app Smart Badge dall'App
Store o dal Google Play store.
2. Accendere lo Smart Badge.
Nota bene: rimuovere la pellicola
protettiva dallo schermo per una
visualizzazione chiara.
3. Tenere premuto il tasto Bluetooth
Pairing per 2 secondi per entrare in
modalità di collegamento Bluetooth.
4. Aprire l'app Smart Badge sul proprio
dispositivo (smartphone, tablet, ecc.) per
collegare lo Smart Badge al dispositivo
stesso e creare messaggi personalizzati.
Nota bene: non occorre effettuare alcun
collegamento tramite il menu impostazioni del
dispositivo Bluetooth. Se il dispositivo
Bluetooth è acceso, Smart Badge si
occuperà del collegamento.
Modalità orologio: tenere premuto il tasto
Message Select per 3 secondi per mostrare
l'ora. Premere nuovamente e rilasciare il tasto
Message Selectper commutare tra i formati
a 12 e 24 ore. Tenere premuto il tasto
Message Select per 3 secondi per lasciare la
modalità orologio.
Deutsch
Lieferumfang: Smart Badge, USB-Ladekabel,
Metallplatte, Schnellstart-Anleitung.
Bedienelemente:
1. Mikro-USB: Schließen Sie das Mikro-USB-
Kabel hier an, um Smart Badge aufzuladen.
2. Einschalten/Ausschalten: Bringen Sie
diesen Schalter in die obere Position, um
Smart Badge einzuschalten. Bringen Sie den
Schalter in die untere Position, um Smart
Badge auszuschalten.
3. Metallplatte: Bringen Sie die Metallplatte
unter Ihre Kleidung, um sie an der
Magnetplatte zu befestigen.
4. Magnetplatte: Bringen Sie die Magnetplatte
in die Nähe der Metallplatte, um den
Magnetverschluss zu schließen.
5. Pin:
V
erwenden Sie diese Option, um Smart
Badge an Ihrer Kleidung zu befestigen.
6. Helligkeit/Bluetooth-Verbindung: Drücken
Sie kurz auf diese Taste, um zwischen den 3
Helligkeitsstufen zu wählen: 50%, 75%, oder
100%. Um in den Bluetooth-Koppelmodus
zu gelangen, halten Sie diese Taste 2
Sekunden lang gedrückt. Um ein
gekoppeltes Bluetooth-Gerät zu trennen,
halten Sie diese Taste 3 Sekunden lang
gedrückt.
7. Nachrichtenspeicherorte: Wählen Sie eine
aus 8 Nachrichten aus. Erstellen und
speichern Sie benutzerdefinierte Nachrichten
mit der Smart Badge App an diesen Orten.
Smart Badge aufladen:
V
erwenden Sie das
mitgelieferte Mikro-USB-Kabel, um Smart Badge
mit Ihrem (eingeschalteten) Computer oder mit
einem USB-Netzteil zu verbinden, das in einer
Steckdose eingesteckt ist.
Smart Badge verwenden:
1. Laden Sie die Smart Badge App aus dem
App Store oder Google Play Store herunter.
2. Schalten Sie Smart Badge ein.
Hinweis: Entfernen Sie die Schutzfolie vom
Display-Bildschirm.
3. Halten Sie die Taste Bluetooth-Verbindung
2 Sekunden lang gedrückt, um in den
Bluetooth-Koppelmodus zu gelangen.
4. Öffnen Sie die Smart Badge App auf Ihrem
Gerät (Smartphone, Tablet, etc.), um Smart-
Badge mit Ihrem Gerät zu koppeln und
benutzerdefinierte Nachrichten zu erstellen.
Hinweis: Es ist nicht notwendig, eine
Verbindung über das Bluetooth-Einstellungen-
Menü Ihres Geräts herzustellen. Solange
Bluetooth auf Ihrem Gerät aktiviert ist, wird die
Smart Badge App die Verbindung verwalten.
Uhrenmodus: Halten Sie die Taste Nachricht
auswählen 3 Sekunden lang gedrückt, um die
Zeit anzuzeigen. Drücken Sie erneut kurz auf die
Taste Nachricht auswählen, um zwischen dem
12- und 24-Stunden-Format umzuschalten.
Halten Sie die Taste Nachricht auswählen 3
Sekunden lang gedrückt, um den Uhrenmodus
zu verlassen.
Nederlands
Inhoud van de doos: Smart Badge, USB-oplaadkabel, metalen
plaatje, snelstartgids.
Bedieningsknoppen:
1. Micro-USB: Sluit hier de micro-USB-kabel aan om de Smart
Badge op te laden.
2. Voeding Aan/Uit: Zet deze schakelaar in de hoogste stand om
de Smart Badge in te schakelen. Zet de schakelaar in de
onderste stand om de Smart Badge uit te schakelen.
3. Metalen plaatje: Plaats het metalen plaatje onder de kleding om
het magnetische paneel te bevestigen.
4. Magnetisch paneel: Plaats het paneel nabij het metalen plaatje
om magnetische verbinding te maken.
5. Pin: Gebruik dit om de Smart Badge aan uw kleding te
bevestigen.
6. Helderheid/Bluetooth-koppeling: Deze knop indrukken en
loslaten om de 3 helderheidsniveaus te doorlopen: 50%, 75%,
and 100%. Deze knop 2 seconden lang indrukken om Bluetooth-
koppelingsmodus te activeren. Druk deze knop 3 seconden lang
in om de koppeling met een Bluetooth-apparaat te verbreken.
7. Opslaglocaties berichten: Selecteer een van de 8 berichten.
Maak aangepaste berichten en sla deze op in de opslaglocaties
met behulp van de Smart Badge-app.
De Smart Badge opladen: Gebruik de meegeleverde micro-USB-
kabel om de Smart Badge aan te sluiten op een USB-adapter met
aansluiting op het net of uw pc (ingeschakeld).
De Smart Badge gebruiken:
1. De Smart Badge-app downloaden van de App Store of Google
Play.
2. De Smart Badge inschakelen.
Opmerking: Het beschermfolie verwijderen van het scherm voor
een helder beeld.
3. De knop Bluetooth koppelen 2 seconden lang ingedrukt houden
om de Bluetooth koppelingsmodus te activeren.
4. De Smart Badge-app op uw apparaat (smartphone, tablet, enz.)
openen om de Smart Badge te koppelen met uw apparaat en
aangepaste berichten te maken.
Opmerking: Er hoeft geen verbinding te worden gemaakt vanuit het
menu Bluetooth-instellingen van uw apparaat. Als Bluetooth op uw
apparaat is ingeschakeld, dan regelt de Smart Badge-app de
verbinding.
Klokmodus: De knop Bericht selecteren 3 seconden lang ingedrukt
houden om de tijd weer te geven. De knop Bericht selecteren
opnieuw indrukken en loslaten om te wisselen tussen 12- en 24-
uursnotatie. De knop Bericht selecteren 3 seconden lang ingedrukt
houden om klokmodus te verlaten.
Technical Specifications
Dimensions (width x depth x height):
3.7” x .50” x 1.2”; 9.4 cm x 1.2 cm x 3 cm
Weight: .20 lbs.; .09 kg
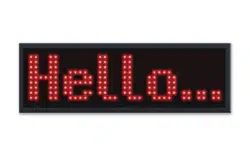
Display Resolution: 11 x 44 LEDs
Battery: Rechargeable Lithium-ion battery
Battery Life (when fully charged): Up to 24
hours
Charging Time: 2 hours
Bluetooth Specification: Bluetooth 4.0
A
llgemeinhinweis zur Konformitätserklärung: Hiermit erklären wir, daß sich das
Gerät Smart Badge in Übereinstimmung mit den grundlegenden Anforderungen der
europäischen Richtlinie 1999/5/EG befindet. Die vollständige EG Konformitätserklärung
kann unter folgender Adresse angefordert werden:
inMusic GmbH
Harkortstrasse 12–32
40880 Ratingen
GERMANY
WARNING: To reduce the risk of fire or electrical shock, do
not expose this appliance to rain or moisture. Electrical
equipment should NEVER be kept or stored in damp
environments.
NOTICE CONCERNING FCC REGULATIONS: You are
cautioned that changes or modifications not expressly
approved by the part responsible for compliance could void
the user's authority to operate the equipment.
This equipment has been tested and found to comply with
the limits for a Class B digital device, pursuant to part 15 of
the FCC rules. These limits are designed to provide
reasonable protection against harmful interference in a
residential installation. This equipment generates uses and
can radiate radio frequency energy and, if not installed and
used in accordance with the instructions, may cause
harmful interference to radio communications. However,
there is no guarantee that interference will not occur in a
particular installation. If this equipment does cause harmful
interference to radio or television reception, which can be
determined by turning the equipment off and on, the user is
encouraged to try to correct the interference by one or
more of the following measures:
a. Reorient or relocate the receiving antenna.
b. Move this unit.
c. Increase the separation between the equipment
and receiver.
d. Connect the equipment into an outlet on a circuit
different from that to which the receiver is
connected.
e. Be sure that all cables are properly shielded, using
a choke or ferrite where appropriate.
f. Consult the dealer or an experienced
radio/television technician for help.
ESD / EFT Warning: This unit may contain a
microcomputer for signal processing and control
functions. In very rare situations, severe
interference, noise from an external source, or
static electricity may cause it to lock up. In the
unlikely event that this should happen, turn off the
unit, wait at least five seconds, and then turn it
back on again.
THIS DEVICE COMPLIES WITH PART 15 OF THE
FCC RULES. OPERATION IS SUBJECT TO THE
FOLLOWING TWO CONDITIONS: (1) THIS DEVICE
MAY NOT CAUSE HARMFUL INTERFERENCE, AND
(2) THIS DEVICE MUST ACCEPT ANY
INTERFERENCE RECEIVED, INCLUDING
INTERFERENCE THAT MAY CAUSE UNDESIRED
OPERATION.
FCC RF Radiation Exposure Statement: This equipment
complies with FCC radiation exposure limits set forth for
an uncontrolled environment. End users must follow the
specific operating instructions for satisfying RF exposure
compliance. This transmitter must not be co-located or
operating in conjunction with any other antenna or
transmitter.
RSS Statement for Canadian models: This device
complies with Industry Canada licence-exempt RSS
standard(s). Operation is subject to the following two
conditions: (1) this device may not cause interference, and
(2) this device must accept any interference, including
interference that may cause undesired operation of the
device.
In an environment with radio frequency
interference, the unit may malfunction and resume
normal operation after removal of the interference.
For best audio quality, avoid using this device in a
high RF-radiated environment.
Correct Disposal of This Product: This marking
indicates that this product should not be disposed
with other household wastes throughout the EU.
To prevent possible harm to the environment or
human health from uncontrolled waste disposal,
recycle it responsibly to promote the sustainable
reuse of material resources. To return your used
device, please use the return and collection
systems or contact the retailer where the product
was purchased. They can take this product for
environmentally safe recycling.
Smart Badge contains magnets, which may affect
the operation of pacemakers, defibrillators and
other internal or external medical devices.
Individuals who wear these types of electronics
should consult their physician and the
manufacturer of their medical device to determine
its susceptibility to magnets prior to using Smart
Badge. Smart Badge users should also exercise
caution and maintain a safe distance from other
individuals with such medical devices.
ION Audio is a trademark of ION Audio, LLC,
registered in the U.S. and other countries.
The Bluetooth word mark and logos are registered
trademarks owned by Bluetooth SIG, Inc. and any
use of such marks by ION Audio is under license.
All other product names, company names,
trademarks, or trade names are those of their
respective owners.
ON OFF
1
2
4
5
6
7
3
