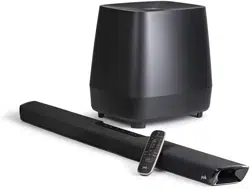
User ManualSetup
Connecting to Your TV
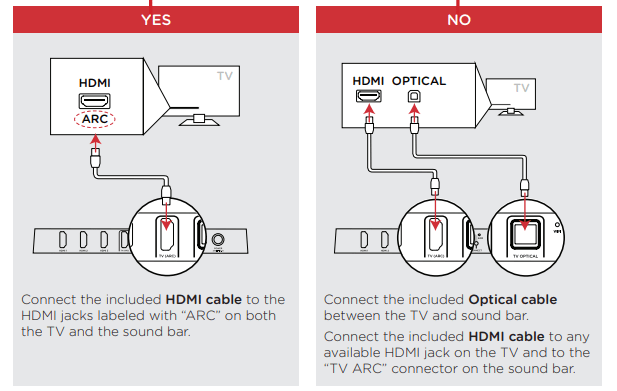
1. Is an HDMI input jack on your TV labeled “ARC” or “eARC”?
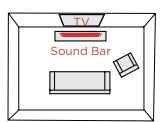
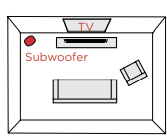
2. Placing the Sound Bar
For best listening experience, center the sound bar under your TV. If you are setting the sound bar on an entertainment center or TV stand, place it on the front-most edge.
A mounting template is provided for wall mounting the sound bar. For proper installation, please refer to the instructions printed on the template.
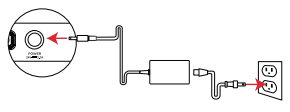
3. Connecting the Sound Bar to an AC Outlet
Initial startup will take up to a minute.
4. Placing the Subwoofer
For best performance, place on the same wall as the TV, no more than 30ft (10m) from the bar.
5. Connect the Subwoofer to an AC Outlet
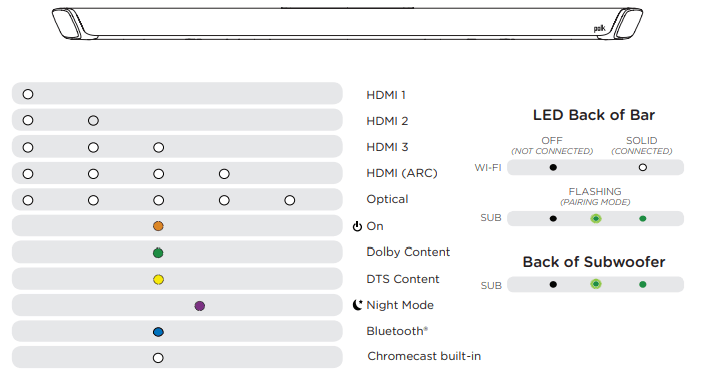
A green light will be visible on the back of the subwoofer to indicate that it is paired to the sound bar

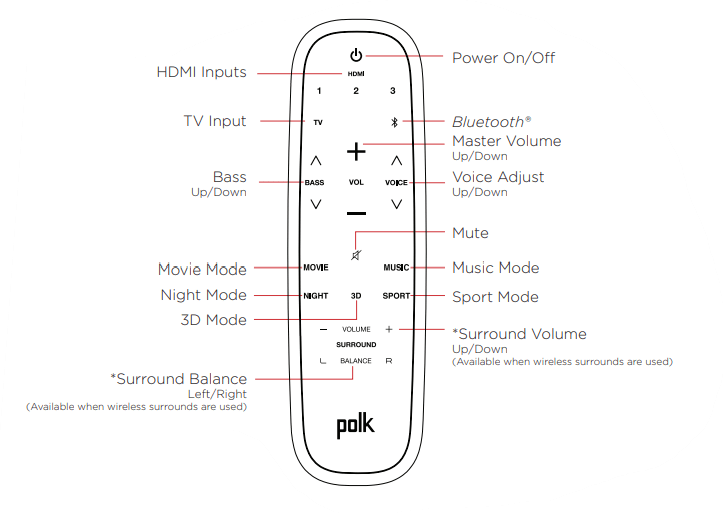
6. Installing Remote Batteries
Insert the provided AAA batteries.
7. Verifying your Connections
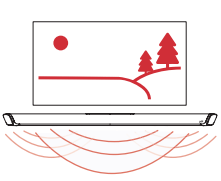
Turn on your TV and start playing content. Adjust the volume of the sound bar using the provided Polk remote or your existing TV remote. You should now hear sound from your sound bar.
If you are playing content on your TV and hear an echo or do not hear any sound at all, see page 19 for troubleshooting.
Listening to Music via Bluetooth®
Connecting a Bluetooth Device
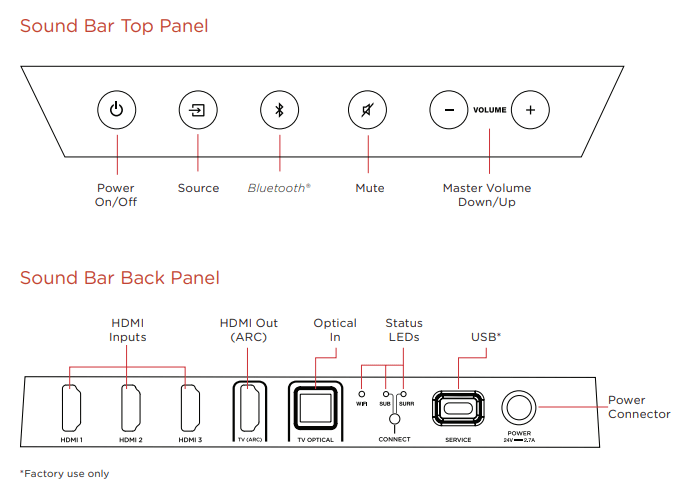
- Press the Bluetooth
 button on the sound bar or remote control. You should now see a blinking blue light on the front of the sound bar.
 - Navigate to the Bluetooth settings in your phone or tablet and select “Polk MagniFi 2”. Within a few seconds, your device should connect and the blue light on the sound bar should go solid.
- You’re all set – play music from an app of your choice.
Note: If the light on the sound bar is solid blue, this means that a Bluetooth device is already connected. You will not be able to pair a new device until you disconnect that device first.
Automatic Reconnect
When you press the Bluetooth button  , the sound bar will attempt to automatically reconnect to the Bluetooth device that was most recently connected.
Disconnecting a Bluetooth Device
You can disconnect from the Bluetooth settings in your phone or tablet. Alternatively, you can disconnect by pressing and holding the Bluetooth button  for 3 seconds. Upon disconnecting, the sound bar will enter pairing mode, and you will see a blinking blue light which will allow you to pair another device.
Visual Indicators
The front of the sound bar contains a horizontal row of lights that provides status indications such as source, volume, and listening modes. Note: These LEDs will fade out after two seconds.
Optimizing Your Listening Experience
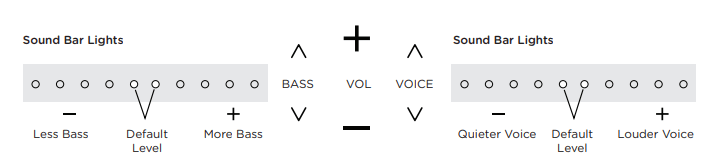
Bass Control Easily adjust low-frequency volume for more or less impact
Remote Control
Using Your TV, Cable, or Satellite Remote to Control the MagniFi 2
There are several ways to use your TV, cable, or satellite remote to control the MagniFi 2.
HDMI CEC Control
If the MagniFi 2 is connected to your TV via HDMI and your TV supports CEC: Volume, Mute, and Power for the MagniFi 2 can be controlled by TV remote without any further setup.
Preloaded Remote Control
If your TV does not support CEC or you have chosen to connect your MagniFi 2 to your TV with the Optical cable, you will likely be able to control volume and mute with your TV’s existing remote control. The MagniFi 2 is pre-configured to respond to volume and mute commands from most popular TV remotes including: Samsung, LG, Sony, VIZIO, and other major brands.*
Remote Control Learning Function
If your TV is connected to the MagniFi 2 using the Optical cable and it is not one of the more popular brands, you can teach your remote to control volume, mute and other functions (such as source selection or bass volume) on your sound bar.
Troubleshooting
I Do Not Hear Sounds from My Sound Bar
- Check that the sound bar is powered on and that a light is visible on the front.
- Check that all wires are connected correctly.
- Press Volume “+” button on top of sound bar until at least 2 white lights appear.
- Using the provided Polk remote, select the desired input. White lights should display corresponding to the input button you pressed.
I Hear an Echo From My TV or Sound Bar.
- If your TV ix connected to the sound bar via HDMI ARC, check that HDMI CED/ARC is enabled in your TV’s Settings menu.
- Check that the TV speakers are disabled. Consult your TV’s user manual for details.
I Do Not See Lights on the Front of My Sound Bar.
- Press the power button on the top of the sound bar.
- Check that the connections are secure between sound bar, power supply, and power outlet.
- Unplug power from the sound bar for 30 seconds and plug back in.
- Try another wall outlet.
My Remote Isn’t Working
- Get closer to the sound bar and aim the remote at the front of the sound bar.
- Install fresh batteries in the remote
I Do Not Hear Sounds from My Subwoofer
- Check that the sound bar is powered on and playing audio.
- Turn up the bass using the provided Polk remote.
- Check that the power cable is secure in the back of the subwoofer and wall outlet.
- Check that a solid green light is visible on the back of the subwoofer.
- Unplug power from the subwoofer for 30 seconds and then plug back in.
- If the light on the back of the subwoofer is flashing green, you will need to reconnect the sub�woofer to the sound bar using the instructions below.
Pairing the Subwoofer to the Sound Bar
- Check that the sound bar is powered on. A light should be visible on the front of the sound bar.
- On the back of the sound bar, press and hold the CONNECT button for 3-5 seconds. The SUB and SURR lights on the back of the sound bar should now be blinking green.
- On the back of the subwoofer, press and hold the CONNECT button for 3-5 seconds. The light on the back of the subwoofer should now be solid green.
- On the back of the sound bar, press the CONNECT button to exit pairing mode.
Factory Reset
Performing a factory reset will erase all settings in the sound bar including Bluetooth pairings and Wi-Fi connection. To perform a factory reset, press and hold the Power button  on top of the sound bar for 15 seconds. You can release the button when you hear the factory reset sound e!ect. The bar will reboot and be ready to use again in about a minute