User Manual Television
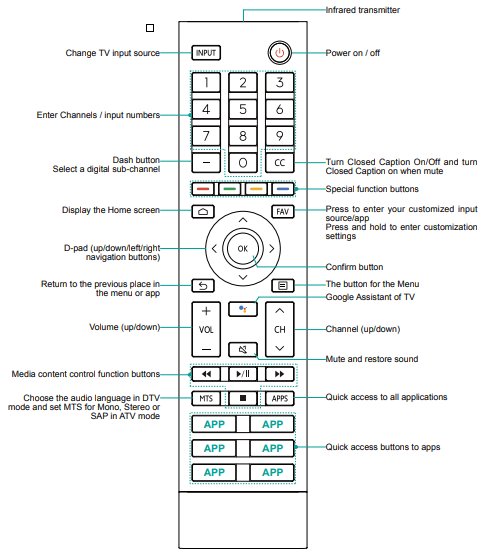
Using Your TV Remote Control
NOTE:
- The included remote may vary depending on models/countries/regions.
- The buttons are only for reference, and actual remote may vary in appearance.
- The remote supports both infrared and Bluetooth connection mode.
Remote control range information
- The remote control can work at a distance of up to 26 feet in front of the TV set.
- It can work at a 30 degree horizontal or vertical angle.
Begin using your remote
- Slide the back cover to open the battery compartment of the remote control.
- Insert two AAA size batteries. Make sure to match the (+) and (-) ends of the batteries with the (+) and (-) ends indicated in the battery compartment.
- Replace the battery compartment cover.
NOTES
• Discard batteries in a designated disposal area. Do not throw them into a fire.
• Remove old batteries immediately to prevent them from leaking into the battery compartment.
• If you do not intend to use the remote control for a long time, remove the batteries.
• Battery chemicals can cause a rash. If the batteries leak, clean the battery compartment with a cloth. If chemicals touch your skin then wash it immediately.
• Do not mix old and new batteries.
• Do not mix alkaline, standard (carbon-zinc) or rechargeable (NiCd, NiMH, etc.) batteries.
• Do not continue using the remote if it gets warm or hot.
• Call our Support Center immediately on the support website.
Pairing the Remote Control
- Pair the remote to the TV after you power it on. Keep the remote control within 10 feet from the TV. Press and hold the
 button at least 3 seconds to start pairing.
- If the remote paired successfully then a confirmation will display on the screen. If it did not pair successfully then an unsuccessful message will display. Repeat step 1.
NOTES
- If an unknown error occurred with the remote then it could have been caused by interference. Try to remove what's causing the interference and pair it again.
- If an unknown error occurred in the remote control while the battery power is normal, you can take out the batteries and press any key for 1~2 seconds, then the remote control can work normally.
- The remote cannot be paired to the TV while the TV is in standby mode.
Other
Program your universal cable or satellite remote control to operate your new television (only for
USA)
If you would like to program your other household remote controls to your new television,please refer to the User’s Manual supplied by your Cable or Satellite provider. The Cable or Satellite providers’ User’s Manuals should include instructions on how to program their remote to your television.
A list of codes for the most common Cable and Satellite providers are listed below. Use the code that is associated with your Cable or Satellite provider (if applicable).
DIRECTV
0178, 10178, 10019, 10748, 11314, 11660, 11710, 11780, 12049, 10171, 11204, 11326, 11517, 11564, 11641, 11963, 12002, 12183
Time Warner Cable
386, 0178, 10178, 400, 450, 461, 456, 0748, 1463, 0463, 10463
Comcast
0178, 10178, 10463, 11463, 10748, 11314, 11660, 10171, 11204, 11326, 11517, 11641, 11780, 11785, 11892, 11963,12002
Cox Communications
0178, 10178, 1326, 1463
Dish Network
505, 627, 538, 720, 659
If the code associated with your Cable or Satellite provider is not listed, does not work or you cannot locate the instructions to program your remote, call your local Cable or Satellite provider’s customer service center.
If your Cable or Satellite provider does not have a code available, please contact us.
Using your cable set-top box or satellite receiver remote as a ‘universal’ remote
If you prefer to use your Cable Set-top Box or Satellite Receiver Remote as a ‘universal’ remote, visit the Support page to view a list of the codes.
Plug the power cord into an AC outlet, the TV will turn on.
After the splash screen that displays the logo appears, begin the Setup Wizard menu.
The guide setting is completed according to the boot navigation prompt. The navigation information is specific to the actual condition.
The Home screen will be your starting point for navigating the TV.
Shortcuts Instructions
You can use shortcuts on the remote control for fast operation.
Turning your TV on or off
- Connect the power cord to the back of the TV, then plug the power cord into an AC outlet.
- When the TV is powered on, press the
 button on the remote to turn on TV.
- To turn your TV off, press the button on the remote.
- Only for models with far-field Google Assistant
Google Assistant Enabled:
Power ON / Screenless Mode (quick press) / Power Off (long press)
Google Assistant Disabled:
Power ON / Standby (quick press) / Power Off (long press)
Please refer to Screenless Mode (only for models with far-field Google Assistant) on page 28
NOTES
- When your TV is in standby mode, it is still consuming power. To completely disconnect power, please remove the plug from the AC outlet.
- If your TV does not receive an input signal for several minutes, it automatically goes into standby mode.
Using the Live TV
To view broadcast programs, press the  button on your remote, select the
  icon in Home screen and select Channels as the input source.
Channel search guide
When you select Channels as input, if no TV channels were saved before, you will be prompted to do a channel search.
You can also go to Menu > Channels to change the channel settings.
Launch Live TV
After channel scaning is done for the first time, the screen will display LiveTV operating tutorial, including: how to Load info Bar, how to load the channel list and so on.
Press the UP button to view channel and program information.
Press the OK button to view Channel List
Press the MENU button to configure settings of broadcast TV.
Press the BACK button to return to the channel last viewed.
Viewing channel information
As you use the  button on your remote to scroll through channels, an information banner appears on the top of the screen.

The information banner displays the following information:
- Channel number
- Lock status
- Input
- Program name
- Show identification
- Channel name
- Current date and time
- Beginning and end time of the next program
- Start/Stop time progress bar of the current program
- Prompt
- Favorite channel
If you are watching a particular channel, you can also press the [ Up ] button of your remote to view channel information.
Viewing a channel list
After you have done an automatic channel scan (if you’re using an antenna) or receiving your channels through a cable provider, you can view your list of channels by pressing [OK] on your remote.
You will see the channel list display on the right side of the screen.
Creating a Favorite List
To quickly access your most-watched channels, you can create a Favorite List in one of two ways.
• The first way is to create your Favorite List in Menu:
- Press the button to access the Menu in Channels source.
- Select Channels > Favorite List.
- Using the [Up / Down] buttons of your remote, select a channel and press [OK] button.
• The second way is to create your Favorite List in channel list:
Press the [OK] button to call out the channel list in Channels source.
- Select a channel and add it by using the Special function buttons on your remote.
- A heart-shaped indicator will appear beside the channel as confirmation that it has been successfully added.
Viewing your Favorite list
To view channels that you’ve added to your Favorite List simply press [OK] on your remote to call out the channel list.
The channel list appears on the right side of the screen and heart-shaped icons are shown next to the channels that make up your Favorite List. You can press the [ Left / Right ] buttons to switch the channel list (ANTENNA or CABLE) ,FAVORITE and HISTORY list.
Using shortcuts
Google Assistant
You can press the  button to turn on your Google Assistant, use your voice to ask it questions, tell it to do things.
Closed Caption (CC)
You can switch among Off, On and On when mute.
Audio Language (MTS)
You can choose the audio language in DTV mode and you can set MTS for Mono, Stereo or SAP in ATV mode.
Home
Getting familiar with the Home screen
The simple design of the Home screen menu makes it easy to navigate. And you can easily add or delete applications in the Home interface according to your needs.
To access the Home screen, press the button on your remote control and use the D-pad to make your selection.
Indicators and Icons on the top of the Home screen
- Google Assistant: You can search movies, TV, and more by speaking.
- Google Search: You can search movies, TV, and more by typing.
- Notifications: Notifications can come from the system, an external device, an application, the media player etc.
- Inputs: Select the Input source depending on the device you have connected to your TV.
- Network & Internet: You can set up the Network & Internet.
- Settings: Settings lets you configure the TV, set app options, add accounts, and change other preferences.
- Time: You can always view the current time at the top right corner of the Home screen.
Names of sections that appear on the Home screen
The Home screen displays the following section names:
• Apps
• Feature Apps
• Recommended content
You can press the button to access the Menu in TV mode.
The Menu consists of the following settings:
• Picture
• Sound
• Channels
• Parental Control
• Live TV Closed Captioning
• Audio Language(MTS)
• Audio Only
• Sleep Timer
• Settings
• Help
In each menu, you can:
Press the [Up / Down] buttons to select an item.
Press the [OK] buttons to enter the sub-menu or to set on or off.
Press the [Left / Right] buttons to adjust the value.
Press the  button to return to the previous menu.
Apps
Numerous factory-installed apps are available for you to choose in personal preference.
Installing an App
To install an app:
1. From the Home screen, click on the Apps and select the Get more apps.
2. Use the navigation buttons on your remote to select the app that you want to install.
3. Select the Install.
Removing an App
You can only delete apps that you’ve installed to the TV. Factory-installed apps can not be deleted.
To delete an app:
- From the Apps screen, use the navigation buttons on your remote to select the app that you want to remove. Long press the [OK] button on your remote.
- Click on Uninstall.
- A dialog message displays that asks do you want to uninstall this app. Confirm and the icon is removed from the Apps screen.
NOTE
• If an app is deleted, the information related to that app is also removed.
Moving App Icons around
To move an app:
- From the Apps screen, use the navigation buttons on your remote to select the app that you want to move. Long press the [OK] button on your remote.
- Click Move.
- Use the navigation buttons on your remote to move the location of app. Press the [OK] button to confirm.
Quick Problem-Solving Tips
When you experience an issue with your TV, turn it off and on again. If this does not resolve the problem, then refer to the tips below. If the problem is still not resolved, then contact us.
| ISSUES |
POSSIBLE SOLUTIONS |
| No sound or picture |
- Check if the power cord is plugged into a powered AC outlet.
- Press the button on the remote control to activate the unit from ‘Standby’ mode.
- Check to see if the LED light is on or not. If it is, then the TV is receiving power.
|
| I have connected an external source to my TV and I get no picture and/or sound |
- Check for the correct output connection on the external source and for the correct input connection on the TV.
- Make sure you have made the correct selection for the input mode for the incoming signal.
|
| When I turn on my TV, there is a delay for a few seconds before the picture appears. Is this normal? |
- Yes, this is normal. The TV is initializing and searching for previous setting information.
|
| The picture is normal but there is no sound |
- Check the volume settings.
- Check if ‘Mute’ mode is set to On.
|
| Sound but no picture or black and white picture |
- If the picture is black and white, unplug the TV from the AC outlet and replug it after 60 seconds.
- Check that the Color is set to 50 or higher.
- Try different TV channels.
|
| The sound and/or picture is distorted or appears wavy |
- An electric appliance may be affecting the TV. Turn off any appliances that are nearby and move it farther away from the TV.
- Insert the power plug of the TV set into another power outlet.
|
| The sound and picture is blurry or cuts out |
- If using an external antenna, check the direction, position and connection of the antenna.
- Adjust the direction of your antenna or reset or fine tune the channel.
|
| A horizontal or vertical stripe appears on the picture and/or the picture is shaking |
- Check if there is an appliance or electric tool nearby that is causing interference.
|
| The plastic cabinet makes a “clicking” type of sound |
- The ‘click’ sound can occur when the temperature of the television changes. This change causes the television cabinet to expand or contract, which makes the sound. This is normal and the TV is OK.
|
| The remote control does not work |
- Confirm that TV still has power and is operational.
- Change the batteries in the remote control.
- Check if the batteries are correctly installed.
|
NOTE:
For usage in Mexico , operation of this equipment is subject to the following two conditions : 1 ) it is possible that this device doesn’t cause any detrimental interference and 2 ) this device must take any kind of interference, including that which may cause its malfunctioning.