USER INSTRUCTIONS
OVENS
EN
02
Candy Hoover Group S.R.L. • Via Comolli 16 • 20861 Brugherio (MB) Italy
使用说明书
烤箱
CN
17

Safety Indications
• During cooking, moisture may condense inside the oven cavity or
on the glass of the door. This is a normal condition. To reduce this
effect, wait 10-15 minutes after turning on the power before putting
food inside the oven. ln any case, the condensation disappears when
the oven reaches the cooking temperature.
• Cook the vegetables in a container with a lid instead of an open tray.
• Avoid leaving food inside the oven after cooking for more than
15/20 minutes.
• WARNING: the appliance and accessible parts become hot during
use. Be careful not to touch any hot parts.
• WARNING: the accessible parts can become hot when the grill is in
use. Children should be kept at a safe distance.
• WARNING: ensure that the appliance is switched off before
replacing the bulb, to avoid the possibility of electric shocks.
• WARNING: in order to avoid any danger caused by the accidental
resetting of the thermal interruption device, the appliance should
not be powered by an external switching device, such as a timer, or
be connected to a circuit that is regularly switched on and off.
• Children under 8 should be kept at a safe distance from the
appliance if not continuously supervised.
• Children should not play with the appliance.
• The appliance can be used by those aged 8 or over and by those
with limited physical, sensorial or mental capacities, without
experience or knowledge of the product, only if supervised or
provided with instruction as to the operation of the appliance, in a
safe way with awareness of the possible risks.
• Cleaning and maintenance should not be carried out by
unsupervised children.
• Do not use rough or abrasive materials or sharp metal scrapers to
clean the oven door glasses, as they can scratch the surface and
cause the glass to shatter.
• The oven must be switched off before removing the removable
parts. After cleaning, reassemble them according the instructions.
• Only use the meat probe recommended for this oven.
• Do not use a steam cleaner for cleaning operations.
EN 02

• Connect a plug to the supply cable that is able to bear the voltage,
current and load indicated on the tag and having the earth contact.
The socket must be suitable for the load indicated on the tag and
must have ground contact connected and in operation. The earth
conductor is yellow-green in colour. This operation should be carried
out by a suitably qualified professional. ln case of incompatibility
between the socket and the appliance plug, ask a qualified electrician
to substitute the socket with another suitable type. The plug and the
socket must be conformed to the current norms of the installation
country. Connection to the power source can also be made by placing
an omnipolar breaker between the appliance and the power source
that can bear the maximum connected load and that is in line with
current legislation. The yellow-green earth cable should not be
interrupted by the breaker. The socket or omnipolar breaker used for
the connection should be easily accessible when the appliance is
installed.
• The disconnection may be achieved by having the plug accessible or
by incorporating a switch in the fixed wiring in accordance with the
wiring rules.
• lf the power cable is damaged, it should be substituted with a cable
or special bundle available from the manufacturer or by contacting
the customer service department. The type of power cable must be
H05V2V2-F. This operation should be carried out by a suitably
qualified professional. The earth conductor (yellow-green) must be
approximately 10 mm longer than the other conductors. For any
repairs, refer only to the Customer Care Department and request the
use of original spare parts.
• Failure to comply with the above can compromise the safety of the
appliance and invalidate the guarantee.
• Any excess of spilled material should be removed before cleaning.
• A long power supply failure during an occurring cooking phase may
cause a malfunction of the monitor. ln this case contact customer
service.
• The appliance must not be installed behind a decorative door in
order to avoid overheating.
• When you place the shelf inside, make sure that the stop is directed
EN 03

upwards and in the back of the cavity. The shelf must be inserted
completely into the cavity.
• WARNING: Do not line the oven walls with aluminium foil or single-
use protection available from stores. Aluminium foil or any other
protection, in direct contact with the hot enamel, risk melting and
deteriorating the enamel of the insides.
• WARNING: Never remove the oven door seal.
• CAUTION: Do not refill the cavity bottom with water during cooking
or when the oven is hot.
• No additional operation/setting is required in order to operate the
appliance at the rated frequencies.
• .WARNING: before initiating the automatic cleaning cycle:
- Clean the oven door;
- Remove large or coarse food residues from the inside of the oven
using a damp sponge. Do not use detergents;
- Remove all accessories and the sliding rack kit (where present); -Do
not place tea towels.
• ln ovens with meat probe it is necessary, before making the cleaning
cycle, close the hole with the nut provided. Always close the hole with
the nut when the meat probe is not used.
• During the pyrolytic cleaning process, surfaces can heat up more
than usual, children must therefore be kept at a safe distance.
EN 04

EN 05
Summary
General Instructions
6
1.1 Safety indications
1.2 Electrical safety
1.3 Recommendations
1.4 Installation
1.5 Waste management
1.6 Conformity declaration
2.1 Overview
2.2 Accessories
2.3 First use
Product Description
8
3.1 Display description
3.2 Cooking modes
Use of the Oven
9
4.1 General notes on cleaning
4.2 Pyrolysis
4.3 Aquactiva Function
4.4 Maintenance
• Instruction for removal
and cleaning of the side racks
• Removal of the oven window
• Removal and cleaning of the glass
door
• Changing the bulb
Oven Cleaning and Maintenance
12
5.1 F.A.Q.
Troubleshooting
16

1. General Instructions
We thank you for choosing one of our products. For the
best results with your oven, you should read this
manual carefully and retain it for future reference.
Before installing the oven, take note of the serial
number so that you can give it to customer service staff
if any repairs are required. Having removed the oven
from its packaging, check that it has not been damaged
during transportation. If you have doubts, do not use
the oven and refer to a qualified technician for advice.
Keep all of the packaging material (plastic bags,
polystyrene, nails) out of the reach of children. When
the oven is switched on for the first time, strong
smelling smoke can develop, which is caused by the glue on the insulation panels surrounding the oven
heating for the first time. This is absolutely normal and, if it occurs, you should wait for the smoke to
dissipate before putting food in the oven. The manufacturer accepts no responsibility in cases where
the instructions contained in this document are not observed.
NOTE: the oven functions, properties and accessories cited in this manual will vary, depending on the
model you have purchased.
1.1 Safety Indications
Only use the oven for its intended purpose, that is only for the cooking of foods; any other use, for
example as a heat source, is considered improper and therefore dangerous. The manufacturer cannot
be held responsible for any damage resulting from improper, incorrect or unreasonable usage.
The use of any electrical appliance implies the observance of some fundamental rules:
- do not pull on the power cable to disconnect the plug from the socket;
- do not touch the appliance with wet or damp hands or feet;
- in general the use of adaptors, multiple sockets and extension cables is not recommended;
- in case of malfunction and/or poor operation, switch off the appliance and do not tamper with it.
1.2 Electrical Safety
ENSURE THAT AN ELECTRICIAN OR QUALIFIED TECHNICIAN MAKES THE ELECTRICAL CONNECTIONS.
The power supply to which the oven is connected must conform with the laws in force in the country of
installation. The manufacturer accepts no responsibility for any damage caused by the failure to observe
these instructions. The oven must be connected to an electrical supply with an earthed wall outlet or a
disconnector with multiple poles, depending on the laws in force in the country of installation. The
electrical supply should be protected with suitable fuses and the cables used must have a transverse
section that can ensure correct supply to the oven.
CONNECTION
The oven is supplied with a power cable that should only be connected to an electrical supply with 220-
240 Vac power between the phases or between the phase and neutral. Before the oven is connected to
the electrical supply, it is important to check:
- power voltage indicated on the gauge;
- the setting of the disconnector.
The grounding wire connected to the oven's earth terminal must be connected to the earth terminal of
the power supply.
WARNING
Before connecting the oven to the power supply, ask a qualified electrician to check the continuity of the
power supply's earth terminal. The manufacturer accepts no responsibility for any accidents or other
problems caused by failure to connect the oven to the earth terminal or by an earth connection that has
defective continuity.
EN 06
1.3 Recommendations
After each use of the oven, a minimum of cleaning will help keep the oven perfectly clean.
Do not line the oven walls with aluminium foil or single-use protection available from stores. Aluminium
foil or any other protection, in direct contact with the hot enamel, risks melting and deteriorating the
enamel of the insides. In order to prevent excessive dirtying of your oven and the resulting strong
smokey smells, we recommend not using the oven at very high temperature. It is better to extend the
cooking time and lower the temperature a little. In addition to the accessories supplied with the oven,
we advise you only use dishes and baking moulds resistant to very high temperatures.
1.4 Installation
The manufacturers have no obligation to carry this out. If the assistance of the manufacturer is required
to rectify faults arising from incorrect installation, this assistance is not covered by the guarantee. The
installation instructions for professionally qualified personnel must be followed. Incorrect installation
may cause harm or injury to people, animals or belongings. The manufacturer cannot be held
responsible for such harm or injury.
The oven can be located high in a column or under a worktop. Before fixing, you must ensure good
ventilation in the oven space to allow proper circulation of the fresh air required for cooling and
protecting the internal parts. Make the openings specified on last page according to the type of fitting.
NOTE: as the oven could require maintenance work, it is advisable to keep another wall socket available
so that the oven can be connected to this if it is removed from the space in which it is installed. The
power cable must only be substituted by technical service staff or by technicians with equivalent
qualifications.
1.5 Waste management and environmental protection
This appliance is labelled in accordance with European Directive 2012/19/EU regarding
electric and electronic appliances (WEEE). The WEEE contain both polluting substances
(that can have a negative effect on the environment) and base elements (that can be
reused). It is important that the WEEE undergo specific treatments to correctly remove and
dispose of the pollutants and recover all the materials. Individuals can play an important
role in ensuring that the WEEE do not become an environmental problem; it is essential to
follow a few basic rules:
- the WEEE should not be treated as domestic waste;
- the WEEE should be taken to dedicated collection areas managed by the town council or a registered
company.
In many countries, domestic collections may be available for large WEEEs. When you buy a new
appliance, the old one can be returned to the vendor who must accept it free of charge as a one-off, as
long as the appliance is of an equivalent type and has the same functions as the purchased appliance.
SAVING AND RESPECTING THE ENVIRONMENT
Where possible, avoid pre-heating the oven and always try to fill it. Open the oven door as infrequently
as possible, because heat from the cavity disperses every time it is opened. For a significant energy
saving, switch off the oven between 5 and 10 minutes before the planned end of the cooking time, and
use the residual heat that the oven continues to generate. Keep the seals clean and in order, to avoid any
heat dispersal outside of the cavity. If you have an electric contract with an hourly tariff, the "delayed
cooking" programme makes energy saving more simple, moving the cooking process to start at the
reduced tariff time slot.
1.6 Declaration of compliance
By placing the mark on the appliance, we are confirming compliance to all relevant European
safety, health and environmental requirements which are applicable in legislation for this product.
EN 07

2. Product Description
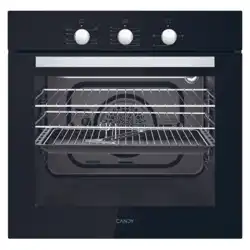
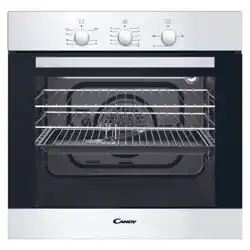
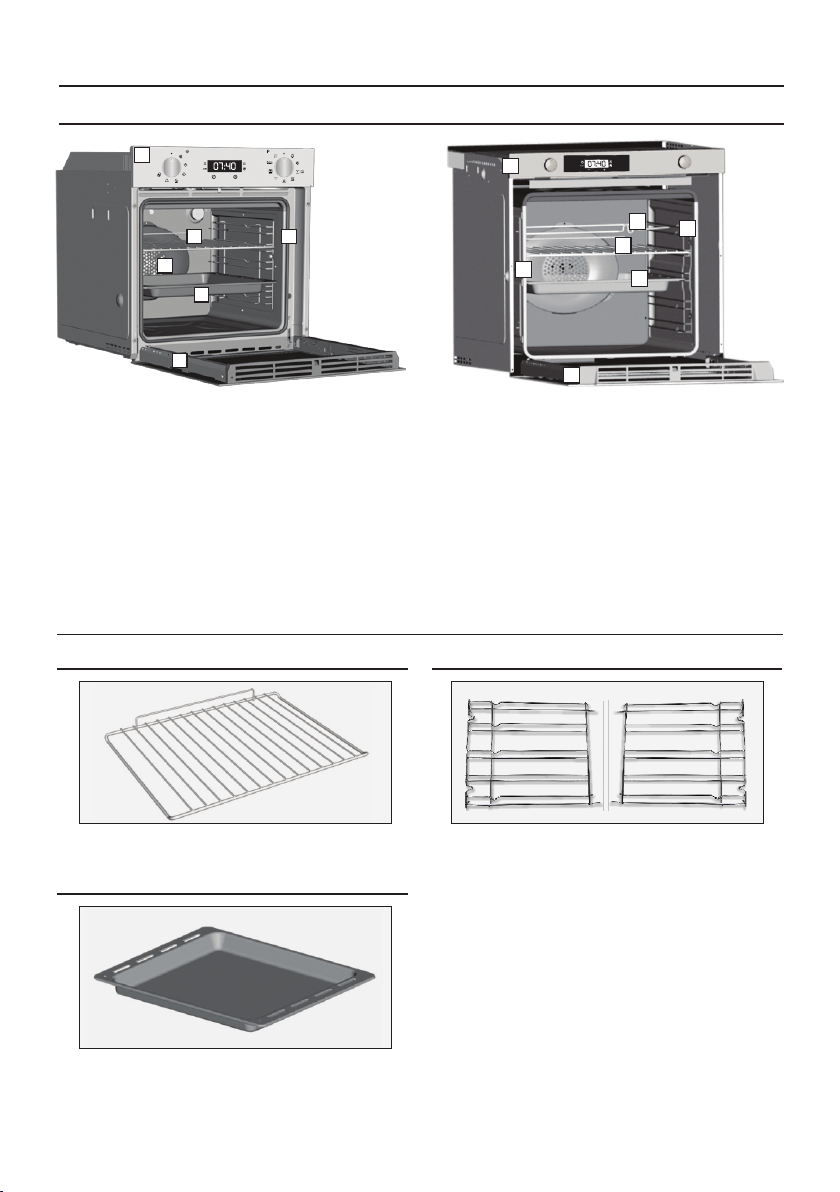
2.1 Overview
1. Control panel
2. Shelf positions
(lateral wire grid if included)
3. Metal grill
4. Drip pan
5. Fan (behind the steel plate)
6. Oven door
2.2 Accessories
Metal grill
1
Drip pan
2
Holds baking trays and plates.
Collects the residues that drip during the cooking
of foods on the grills.
EN 08
Lateral wire grids
3
It located at both sides of the oven cavity.
It holds metal grills and drip pans..
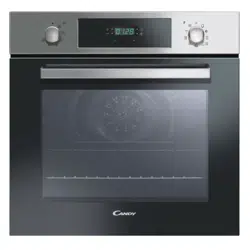
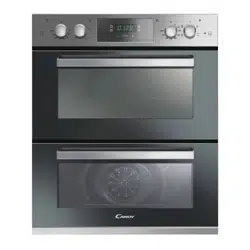
1. Control panel
2. Shelf positions (lateral wire grid if included)
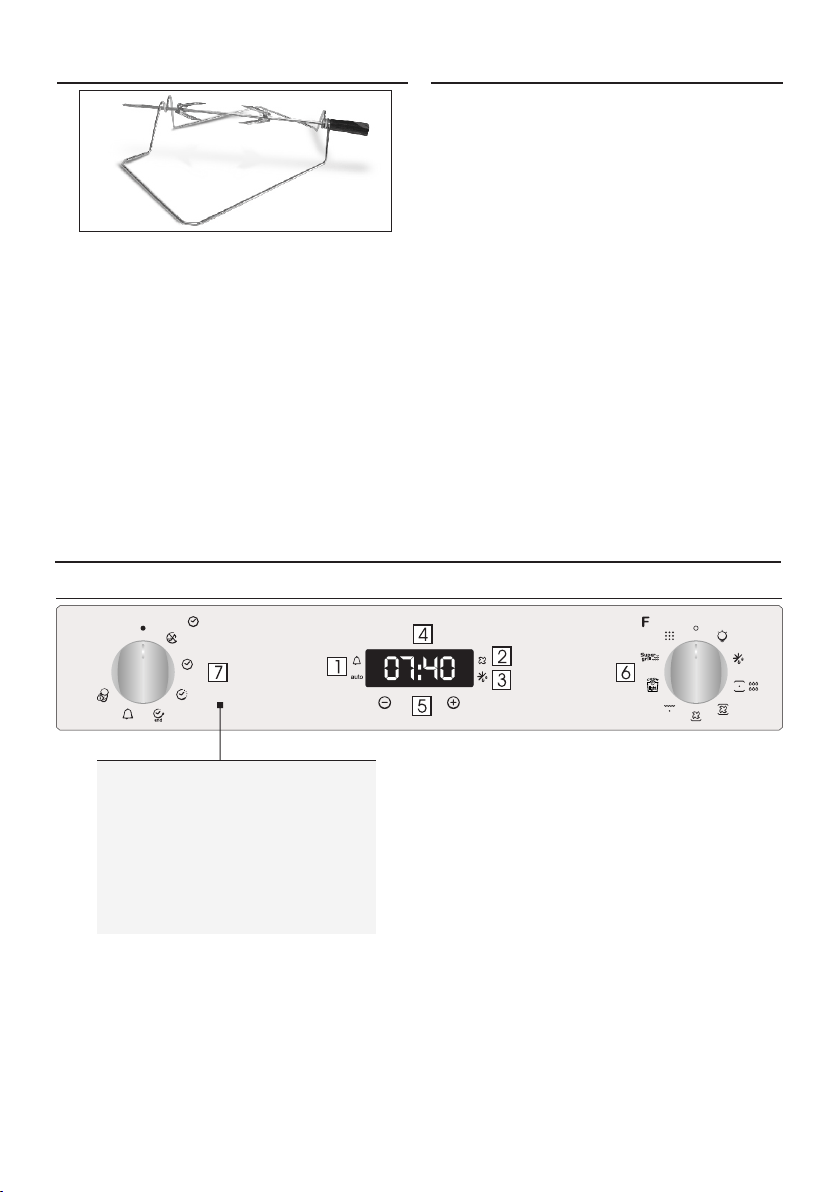
3. Turnspit
4. Metal grill
5. Drip pan
6. Fan (behind the steel plate)
7. Oven door
1
2
3
4
5
6
7
1
23
5
4
6
2.3 First Use
PRELIMINARY CLEANING
Clean the oven before using for the first time.
Wipe over external surfaces with a damp soft
cloth. Wash all accessories and wipe inside the
oven with a solution of hot water and washing up
liquid. Set the empty oven to the maximum
temperature and leave on for about 1 hour, this
will remove any lingering smells of newness.
3. Use of the Oven
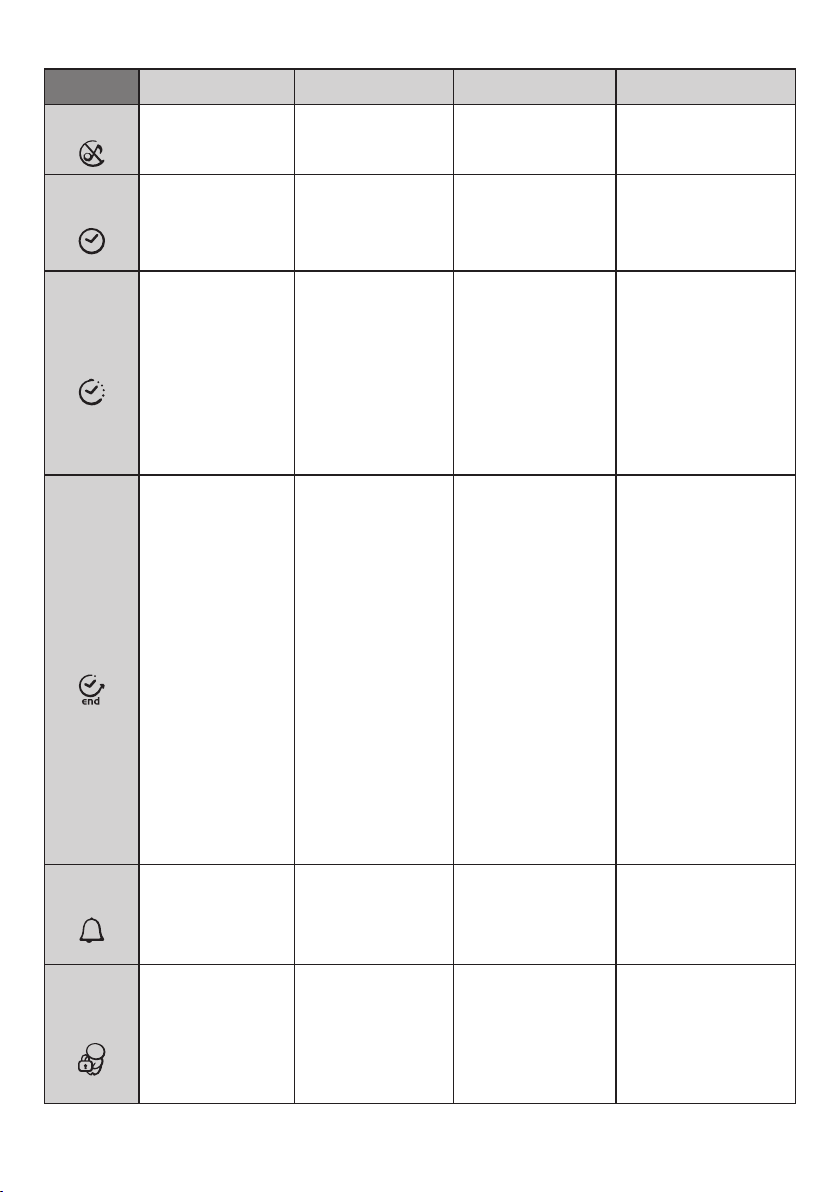
3.1 Display description
1. Timer/automatic mode
2. Fan function
3. Defrost mode
4. Temperature or clock display
5. LCD display adjustment controls
6. Function selector knob
7. Programme selector knob
WARNING!
The first operation to carry out after installation,
or after a power cut, is to set the time of day (a
power cut has occured if the display is flashing
12:00).
200°-> The temperature LED “°” flashes until the
displayed temperature is reached.
HOT -> When a programme finishes, if the oven is
still hot, the display shows "HOT", alternating with
the time, even if the knobs are positioned to OFF.
EN 09
4
Turnspit
No pre-heating is required for rotisserie cooking.
Cooking with the door closed. The energy
consumption is 90-95% less than traditional
system. When the oven is in use, any unused
accessories should be removed from the oven.
•Unscrew the hooks
•Put the spit into the meat
•Fix the meat with the hooks
•Tighten the screws
•Insert the spit into the motor hole
•Demount the handle before to start cooking.
FUNCTION HOW TO ACTIVATE
HOW TO
DEACTIVATE
WHAT IT DOES WHY IT IS NEEDED
• Enables you to turn off
the sound of the minute
minder.
• Rotate the function
selector to the position
OFF.
• To turn off the sound of the
minute minder
• Enables you to set the
time which appears on
the display
• Rotate the function
selector to the position
OFF.
• Turn the right function
selector to a cooking
function
• Rotate the left function
selector to the position
"End of cooking"
• Set the end time of
cooking by using buttons
" + " and " - "
• Lighting Auto appears
• It allows to preset the end
of cooking time you want.
• When the cooking time is
set, turn the function
selector to OFF to go back
to actual time.
• To view the cooking time
selected, turn the left
function selector to End of
cooking Time
• When the cooking time
has elapsed, the oven
switch off automatically.
• To stop the cooking
functions early, turn the
function control to OFF
• Turn the left function
selector to the position
Minute Minder.
• Set the time of cooking
by using buttons
“+”and “-”
• Allow to use the oven as
alarm even if the oven is
switch off
• The oven cannot be used.
SILENCE
MODE
COOKING
DURATION
END OF
COOKING
MINUTE
MINDER
CHILD
SAFETY
LOCK
• Rotate the left function
selector to the position
" Silence mode “
• To set the time
NB : Set the time when you
first install your oven or just
after a black out (the clock is
showing a pulsating 12.00)
• Turn the right function
selector to a cooking
function
• Rotate the left function
selector to the position
"Cooking Time Duration”
• Set the time of cooking
by using buttons " + " and
" - "
• Lighting Auto appears
•When the cooking time
has elapsed, the oven
switch off automatically
and the alarm rings for
few seconds To stop the
cooking functions early,
turn the function control
to OFF or set the time on
00.00; by rotating the
function selector to
Cooking Time Duration
and by using the buttons "
+ " and " - “
• It allows to preset the
cooking time required for
the recipe chosen.
• When the cooking time is
set, turn the function
selector to OFF to go back
to actual time.
• To view the cooking time
selected, turn the left
function selector to
Cooking Time duration.
•This function is normally
used with the COOKING
DURATION function
•For example, the desired
food needs to cook for 45
minutes and I want it to be
ready for 12.30; in this case: at
the end of the set time, the
oven automatically switches
off and an alarm sounds.
Select the desired cooking
function. Set the cooking
duration to 45 minutes (“-”
“+”). Set the end of cooking to
12:30 (“-” “+”). Cooking will
automatically begin at 11:45
(12:30 minus 45 minutes), at
the end of the set cooking
time, the oven will
automatically switch off.
WARNING: by setting only the
end of cooking time, and not
the cooking duration, the oven
will immediately switch on
and switch off at the end of
the set cooking time.
• Set the time on 00.00 by
turning the left function
selector to the position
Minute Minder, and using
the button " - “
• Turn the left function
selector to the position
Child lock.
• Press the button " + "
during 5 seconds
• Child lock is available
when " STOP " appears
on display
• Turn back the left
function selector to Child
lock and press button " +
" during 5 seconds.
• Indication STOP
disappears.
• Rotate the left function
selector to the position
“Set the time”.
• Use the buttons " + " or
" - " to set the time
• For cooking the desired
recipes.
•Emits an audible signal at
the end of a set time.
•During operation, the
display shows the
remaining time.
• This function is useful
when there are children in
the house.
SET
THE TIME
EN 10
*Tested in accordance with the CENELEC EN 60350-1 used for definition of energy class.
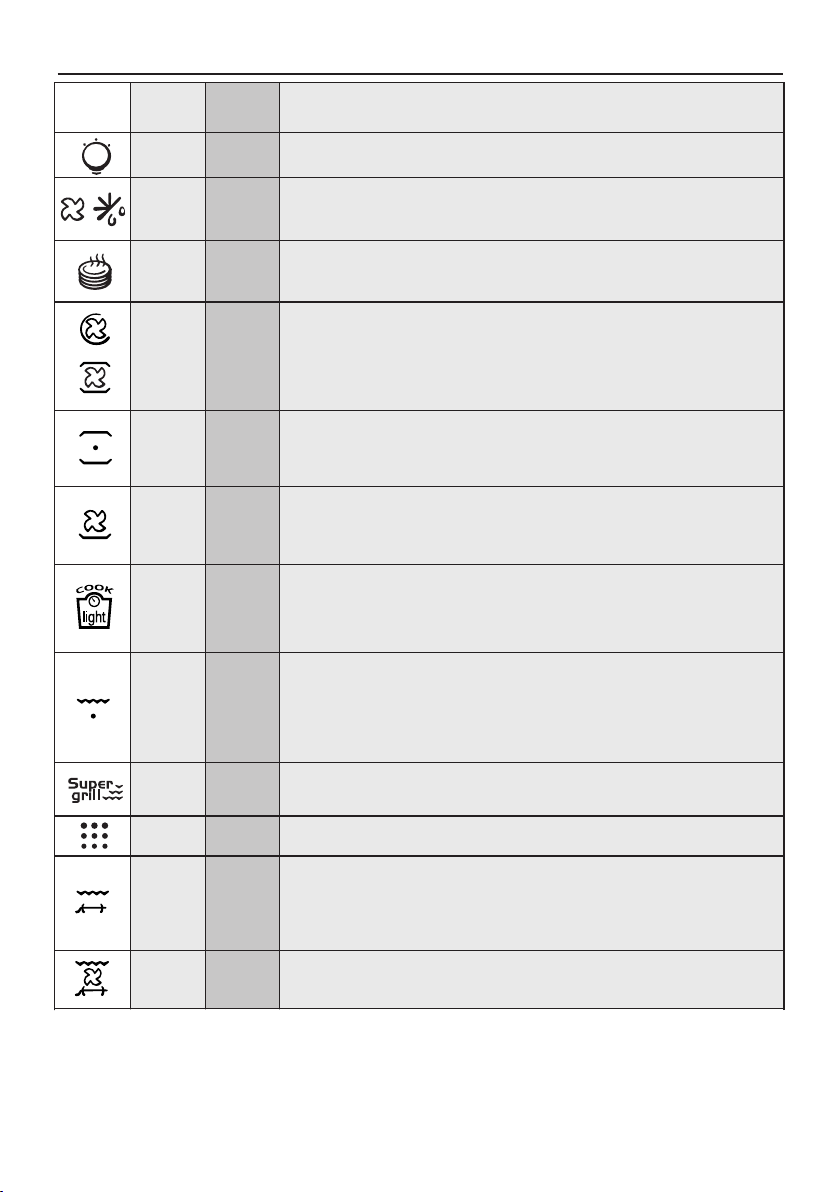
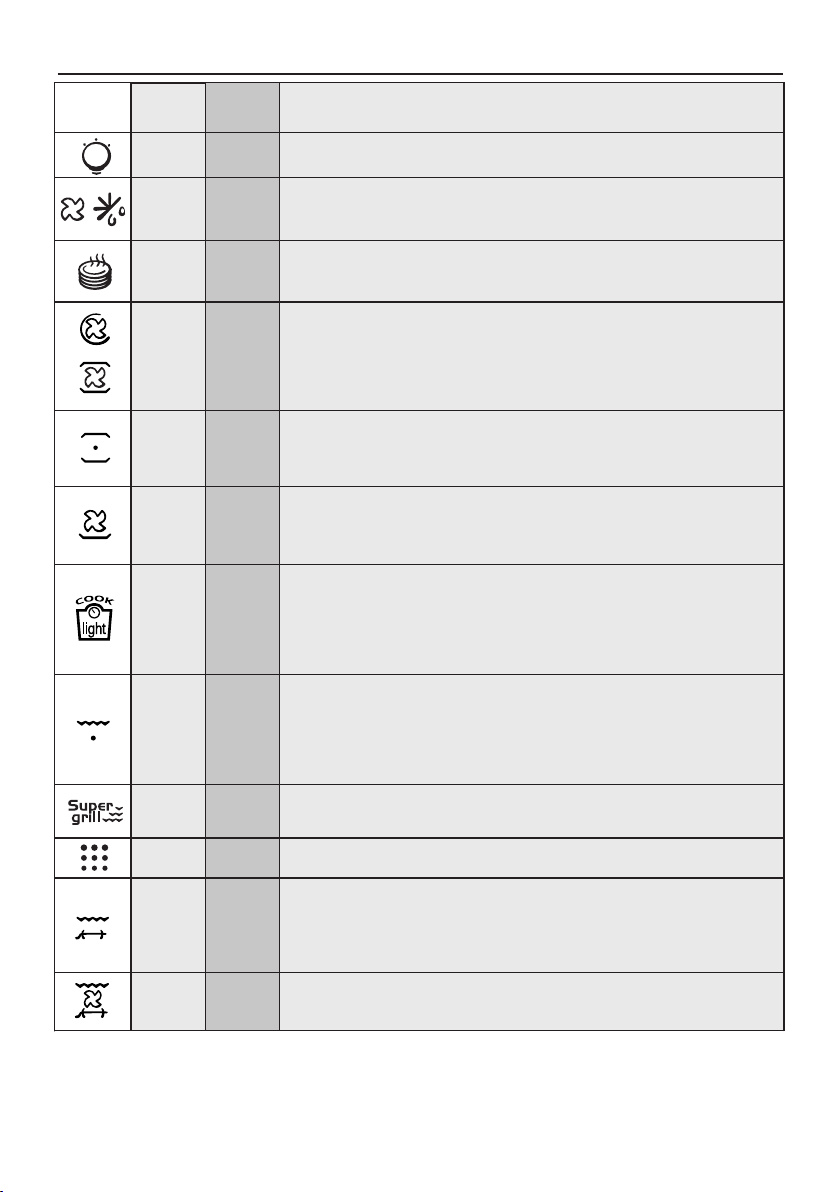
3.2 Cooking Modes
EN 11
Function
Dial
T °C
default
Function (Depends on the oven model)
LAMP: Turns on the oven light.
PYROLYSIS
GRILL : use the grill with the door closed.
The top heating element is used alone and you can adjust the temperature. Five minutes
preheating is required to get the elements red-hot. Success is guaranteed for grills, kebabs
and gratin dishes. White meats should be put at a distance from the grill; the cooking time
is longer, but the meat will be tastier. You can put red meats and fish fillets on the shelf with
the drip tray underneath. The oven has two grill positions: Grill: 1800 W
COOK LIGHT:This function allows to cook in a healthier way, by reducing the amount of fat
or oil required. The combination of heating elements with a pulsating cycle of air ensures a
perfect baking result.
MULTI-LEVEL: We recommend you use this method for poultry, pastries, fish and
vegetables. Heat penetrates into the food better and both the cooking and preheating
times are reduced. You can cook different foods at the same time with or without the same
preparation in one or more positions. This cooking method gives even heat distribution
and the smells are not mixed.
Allow about ten minutes extra when cooking foods at the same time.
CONVENTIONAL : Both top and bottom heating elements are used. Preheat the oven for
about ten minutes. This method is ideal for all traditional roasting and baking. For seizing
red meats, roast beef, leg of lamb, game, bread, foil wrapped food (papillotes), flaky pastry.
Place the food and its dish on a shelf in mid position.
DEFROST: When the dial is set to this position. The fan circulates air at room temperature
around the frozen food so that it defrosts in a few minutes without the protein content of
the food being changed or altered.
BOTTOM HEATING + FAN: The bottom heating element is used with the fan circulating the
air inside the oven. This method is ideal for juicy fruit flans, tarts, quiches and pâté.
It prevents food from drying and encourages rising in cakes, bread dough and other
bottom-cooked food. Place the shelf in the bottom position.
180
220
210
200
*
SUPER GRILL: the oven has two grill positions
Grill: 1800 W Super Grill : 3000 W
KEEP WARM: This is recommended to reheat precooked foodstuff, positioning the shelf
on the second level from top, or to defrost bread pizza or pastry by positioning the shelf on
the lower level. The temperature is preset in 60°C constant, no regulation is possible.
210
ECO
L3
60
L3
T °C
range
50 ÷ 240
50 ÷ 280
50 ÷ 230
150 ÷ 220
50 ÷ 240
ECO÷SUPER
L1 ÷ L5
60 ÷ 60
L1 ÷ L5
GRILL + TURNSPIT: use the turnspit with the door closed.
The top heating element is used with the turnspit rotating the food to be cooked. The
heating temperature can be adjusted as required. The turnspit is best used for medium-
sized items. Ideal for rediscovering the taste of traditional roast. No preheating is
required for turnspit cooking.
GRILL+FAN+TURNSPIT: It is indicated for cooking the meat, particularly
voluminous, on the spit and it allows you to cook the food faster.
L5
L1 ÷ L5
210 150 ÷ 230
*

EN 12
4. Oven cleaning and maintenance
4.1 General notes on cleaning
The lifecycle of the appliance can be extended through regular cleaning. Wait for the oven to cool before
carrying out manual cleaning operations. Never use abrasive detergents, steel wool or sharp objects for
cleaning, so as to not irreparably damage the enamelled parts. Use only water, soap or bleach-based
detergents (ammonia).
GLASS PARTS
It is advisable to clean the glass window with absorbent kitchen towel after every use of the oven. To
remove more obstinate stains, you can use a detergent-soaked sponge, well wrung out, and then rinse
with water.
OVEN WINDOW SEAL
If dirty, the seal can be cleaned with a slightly damp sponge.
ACCESSORIES
Clean accessories with a wet, soapy sponge before rinsing and drying them: avoid using abrasive
detergents.
DRIP PAN
After using the grill, remove the pan from the oven. Pour the hot fat into a container and wash the pan in
hot water, using a sponge and washing-up liquid.
If greasy residues remain, immerse the pan in water and detergent. Alternatively, you can wash the pan
in the dishwasher or use a commercial oven detergent. Never put a dirty pan back into the oven.
4.2 Pyrolysis
The oven is equipped with a pyrolyser cleaning system, which destroys food residues at high
temperature. The operation is carried out automatically by means of the programmer. The resulting
fumes are rendered “clean” by passing over a Pyrolyser wich starts as soon as cooking begins. As very
high temperatures are required by the Pyrolyser, the oven door is fitted with a safety lock. The pyrolyser
can be stopped at any time. The door cannot be opened until the safety lock is displayed.
NOTE : If a hob has been fitted above the oven, never use the gas burners or the electric hot-plates while
the Pyrolyser is working, this will prevent the hob from overheating.
TWO PYROLYTIC CYCLE are pre-set:
ECO PYROCLEAN : Cleans a moderately stained oven. Operates for a period of 90 minutes.
SUPER PYROCLEAN : Cleans a heavily stained oven. Operates for a period of 120 minutes.
Never use commercially available cleaning products on a Pyrolytic oven!
Tip : Carrying out Pyrolytic cleaning immediately after cooking allows you to take advantage of residual
heat, thus saving energy.
Before executing a pyrolytic cycle:
•Remove all the accessories from the oven because they are not able to tolerate the high
temperatures used during the pyrolytic cleaning cycle ; in particular removing grids, side racks and
the telescopic guides (refer to the chapter REMOVING GRIDS AND SIDE RACKS) . In ovens with meat
probe it is necessary, before making the cleaning cycle , close the hole with the nut provided.
•Remove any large spillages or stains as it would take too long to destroy them. Also excessively
large amounts of grease could ignite when subject to the very high temperatures of the Pyrolytic
cycle.
•Close the oven door.
•Excess spillage must be removed before cleaning.
• Clean the oven door;
• Remove large or coarse food residues from the inside of the oven using a damp sponge. Do not use
detergents;
• Remove all accessories and the sliding rack kit (where present);
• Do not place tea towels.
Using the pyrolitic cycle:
1- Rotate the function selector to the position " ". On the display, appears the indication " ECO " or
" SUP ". The preset time is 90 min, this can be varied from 90 min (Eco mode) to 120 min (Sup mode) via
the programmer (setting button " + " or " - "). If the oven is very dirty, it is recommend o increase the time
to 120 min, if the oven is moderately dirty reduce the cleaning cycle time to 90 min.
2- It is possible to defer the start time of the pyroclean cycle by changing the END time via the
programmer.
3- After few minutes, when the oven reaches a high temperature, the door locks automatically. The
pyroclean cycle can be stopped at any time by turning the function selector back to '0' (the word OFF will
be displayed for 3 seconds).
4 - Once the pyroclean cycle is finished, the pyrolysis will switch off automatically. On the display
appears the indication "END" until the door is locked then "0--n".
5- You can turn the function selector back to " 0 " but if the temperaure is still high, the "0--n " indication
appears to inform that the door is locked.
Use of the pyrolytic cycle in Touch Control ovens:
1- Rotate the function selector into position pyrolisys. The display will show either "ECO" or "SUP“
2- The pre-set time is 90 minutes but it can be varied from 90 min. (Eco mode) to 120 min. (Sup mode)
using the programmer (" +" or "-" key). If the oven is very dirty, the time should be increased to 120 min.,
while if the oven is only a slightly dirty, reduce the cleaning cycle to 90 min.
EN 13
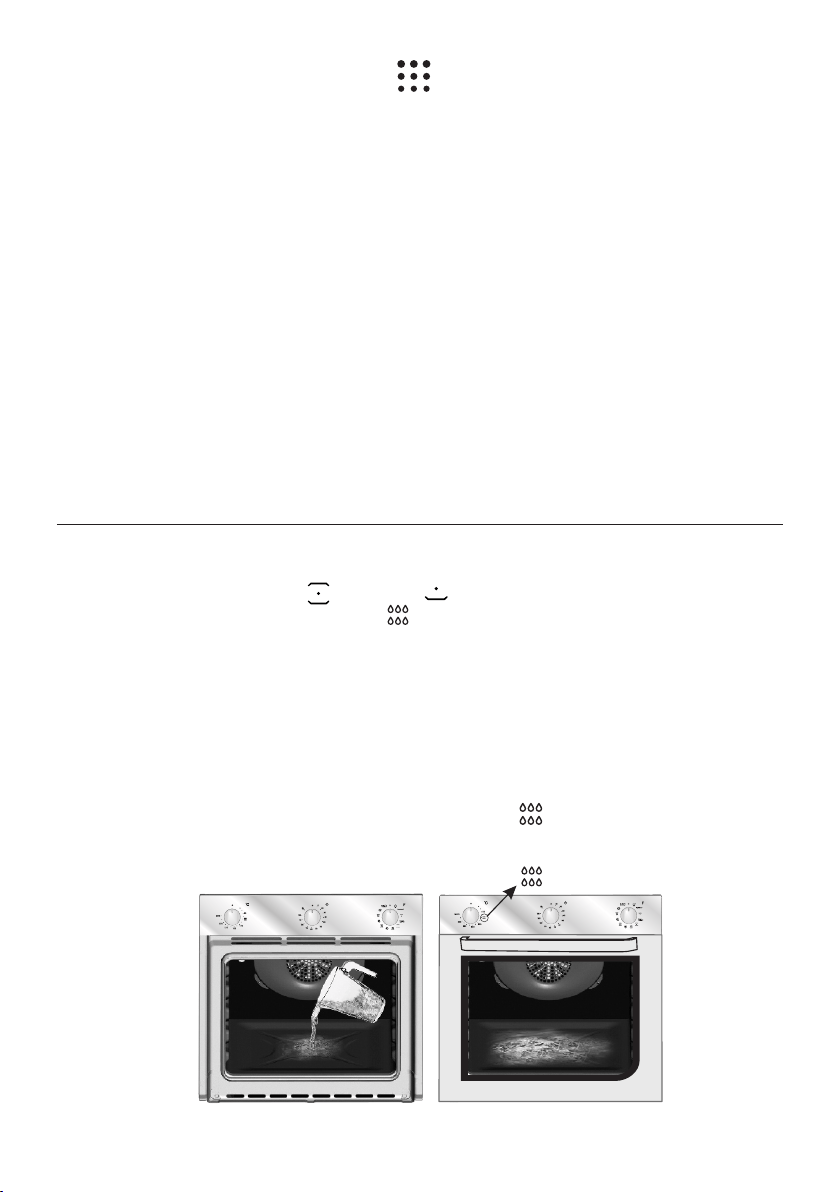
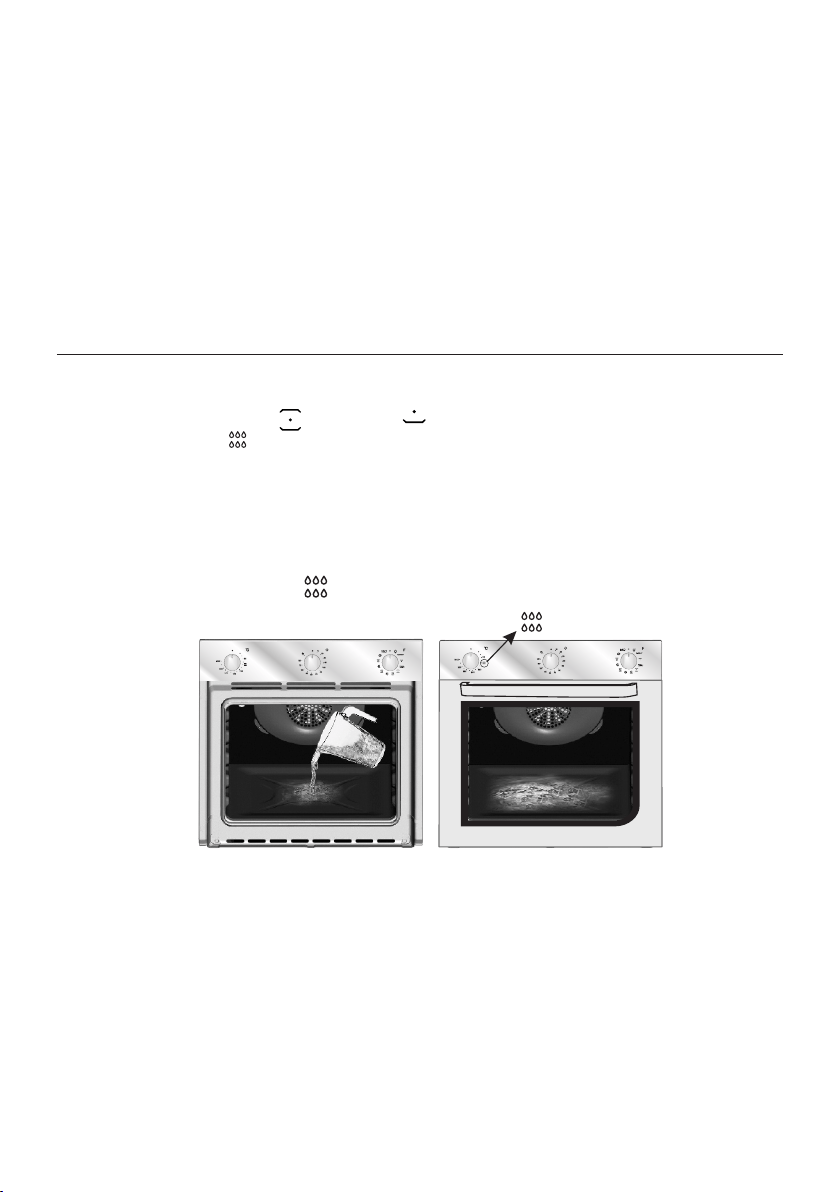
4.3 Aquactiva Function
The Aquactiva procedure uses steam to help remove remaining fat and food particles from the oven.
1. Pour 300 ml of water into the Aquactiva container at the bottom of the oven.
2. Set the oven function to Static ( )or Bottom ( )heater
3. Set the temperature to the Aquactiva icon
4. Allow the program to operate for 30 minutes.
5. After 30 minutes switch off the program and allow the oven to cool down.
6. When the appliance is cool, clean the inner surfaces of the oven with a cloth.
Warning:
Make sure that the appliance is cool before you touch it.
Care must be taken with all hot surfaces as there is a risk of burns. Use distilled or drinkable water.
N.B.: Certain pyrolytic ovens with the Precò Touch User Interface offer the Aquactiva function. To
activate it, set the function selector to the AQUACTIVA symbol ( ) and set the oven temperature
to 90°, using the “-” and “+” keys.
300 ml
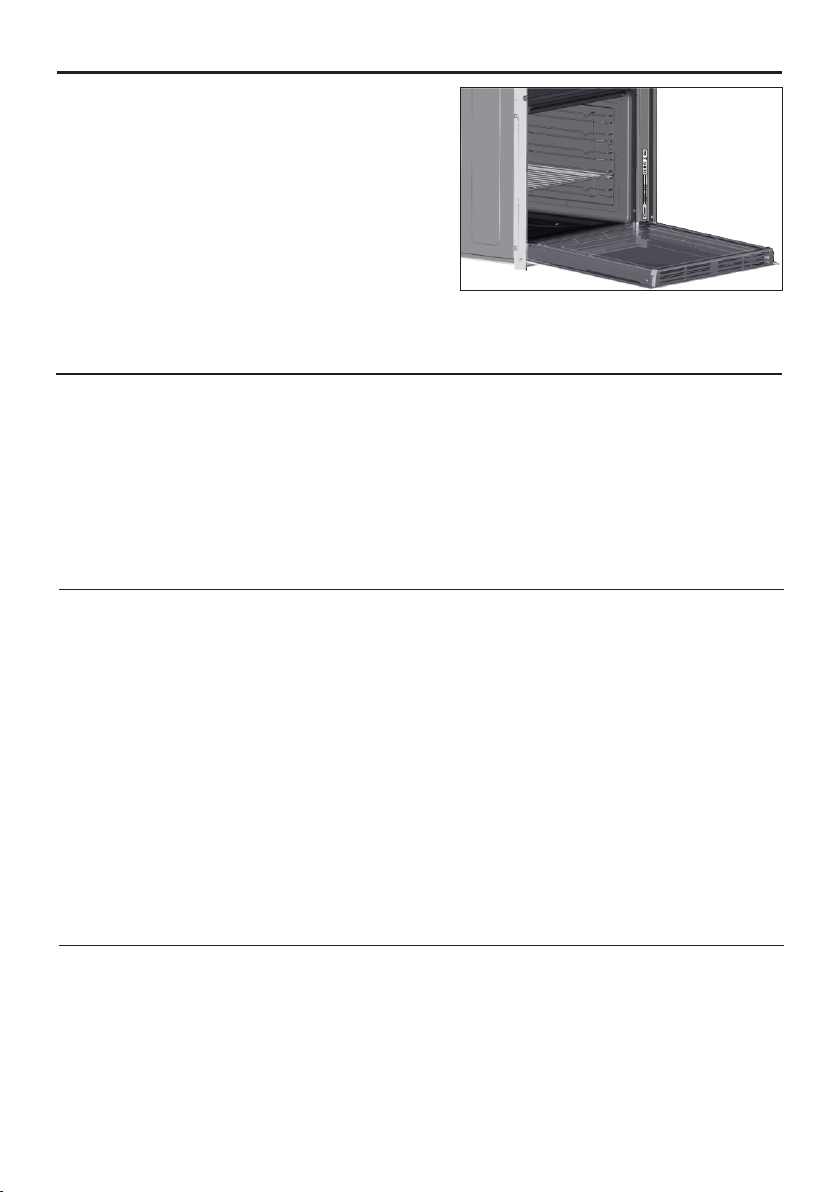
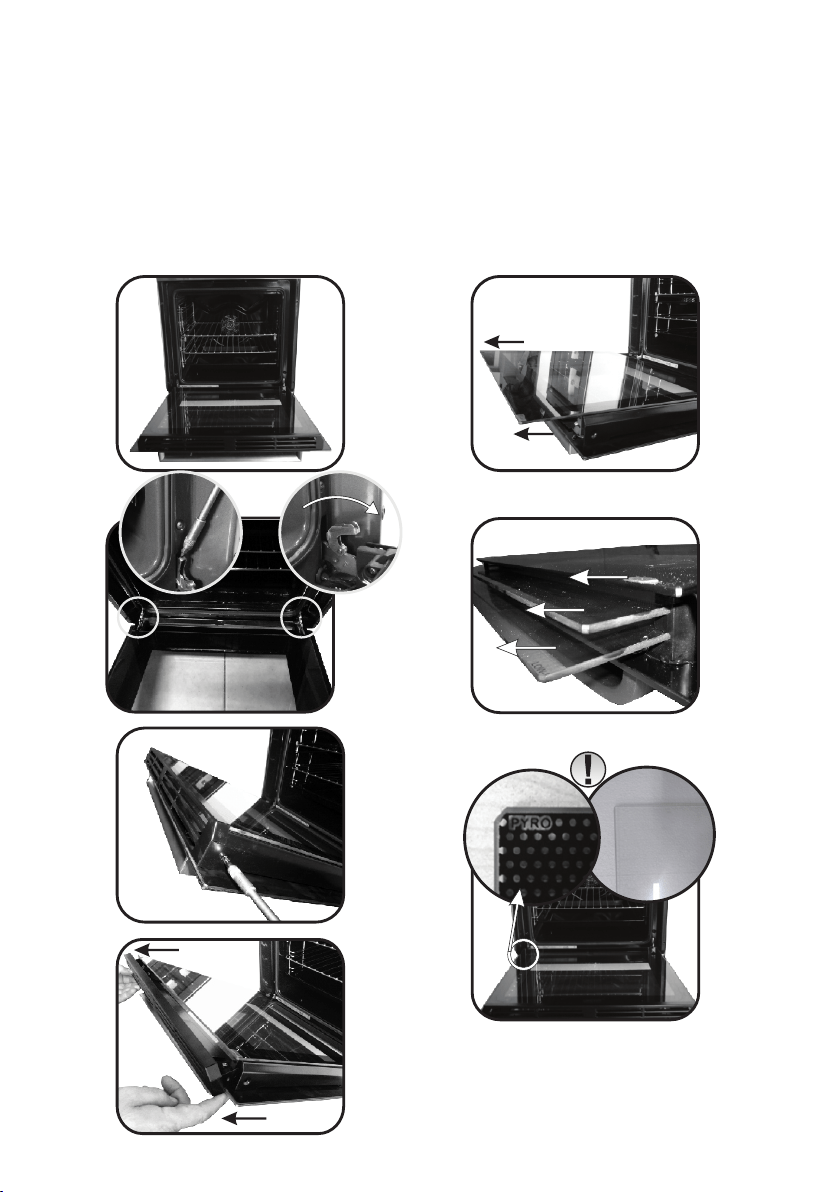
INSTRUCTION FOR REMOVAL AND CLEANING OF THE SIDE RACKS
1. Unscrew the bolt in an anti-clockwise direction.
2. Remove the side racks by pulling them towards you
3. Clean the side racks in a dishwasher or with a wet sponge and then dry them immediately.
4. Having cleaned the side racks, put them back in and reinsert the bolts, ensuring they are fully
tightened
4.4 Maintenance
A
REMOVAL OF THE OVEN WINDOW
1. Open the front window.
2. Open the clamps of the hinge housing on the right and left side of the front window by pushing them
downwards.
3. Replace the window by carrying out the procedure in reverse.
EN 14
1
2
3
1.
2.
3.
4.
5.
6.
7.
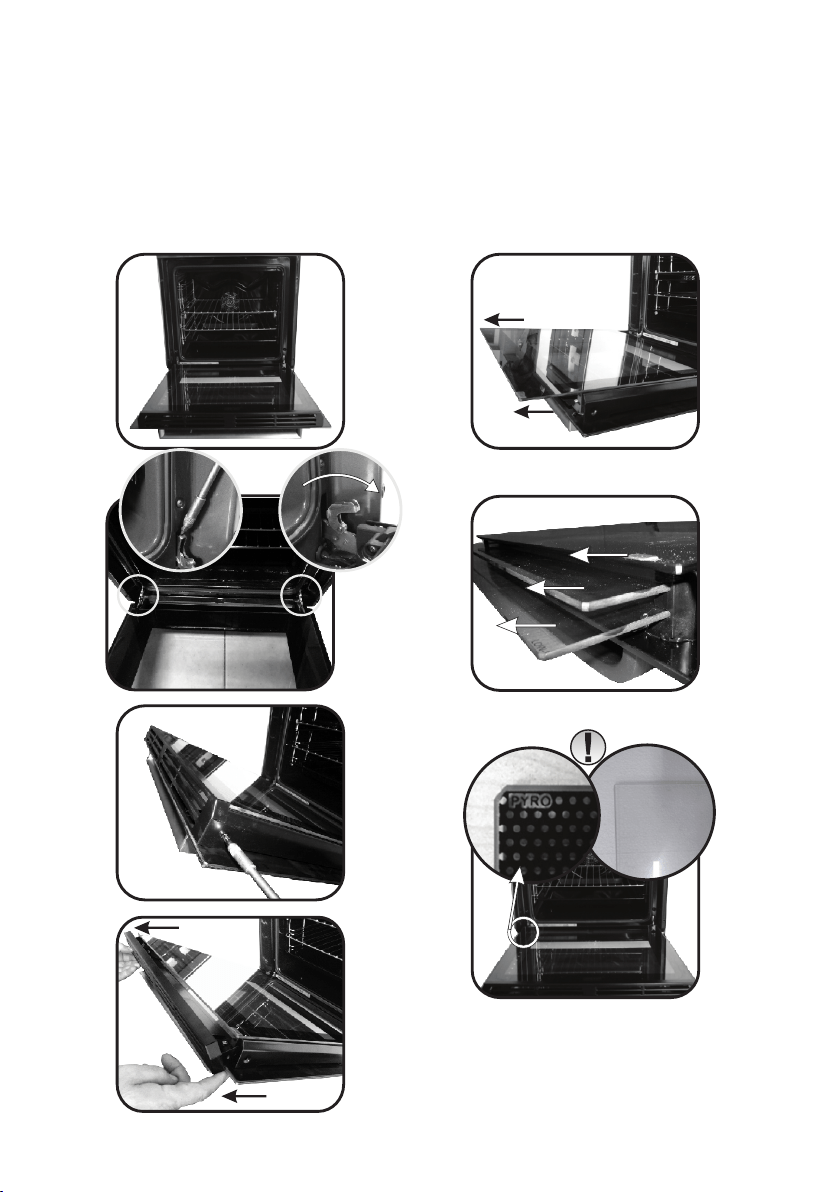
REMOVAL AND CLEANING OF THE GLASS DOOR
1. Open the oven door.
2.3.4. Lock the hinges, remove the screws and remove the upper metal cover by pulling it upwards.
5.6. Remove the glass, carefully extracting it from the oven door (NB: in pyrolytic ovens, also remove
the second and third glass (if present)).
7. At the end of cleaning or substitution, reassemble the parts in reverse order.
On all glass, the indication "Pyro" must be legible and positioned on the left side of the door, close to the
left-hand lateral hinge. In this way, the printed label of the first glass will be inside the door.
EN 15
LOW-E
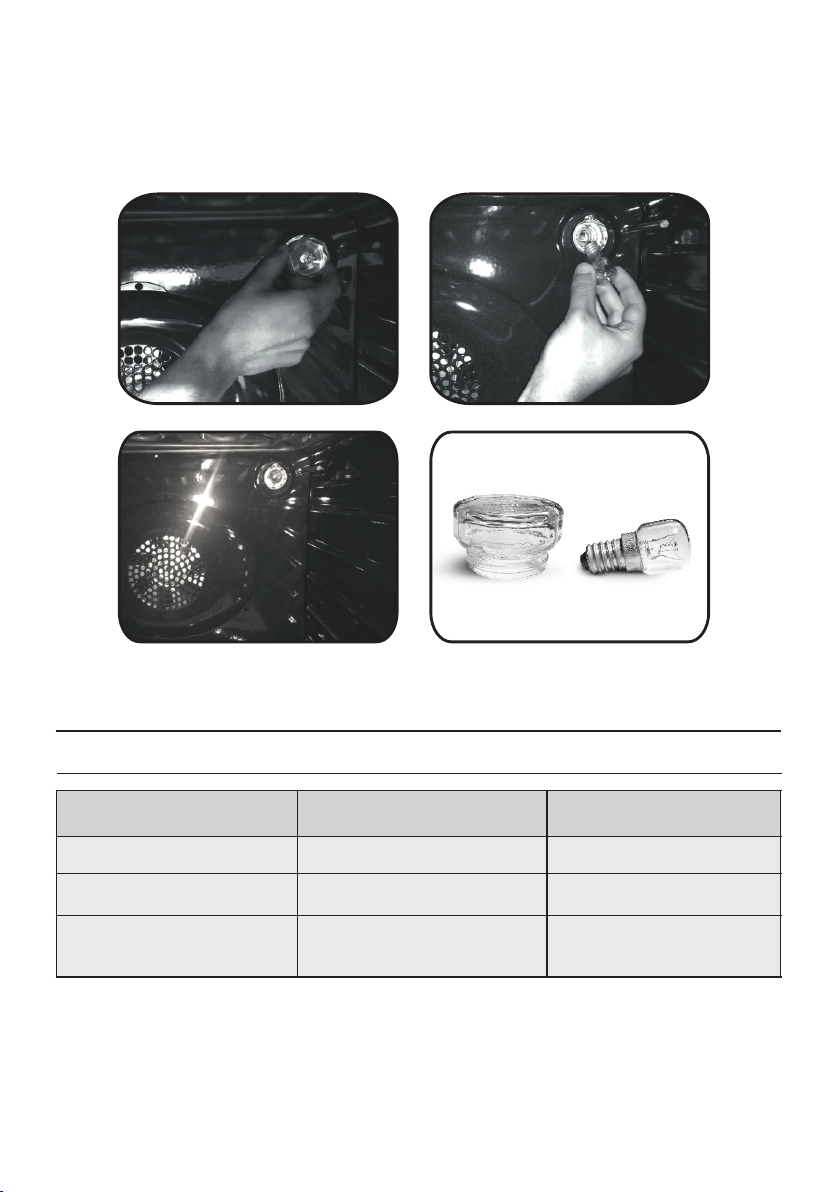
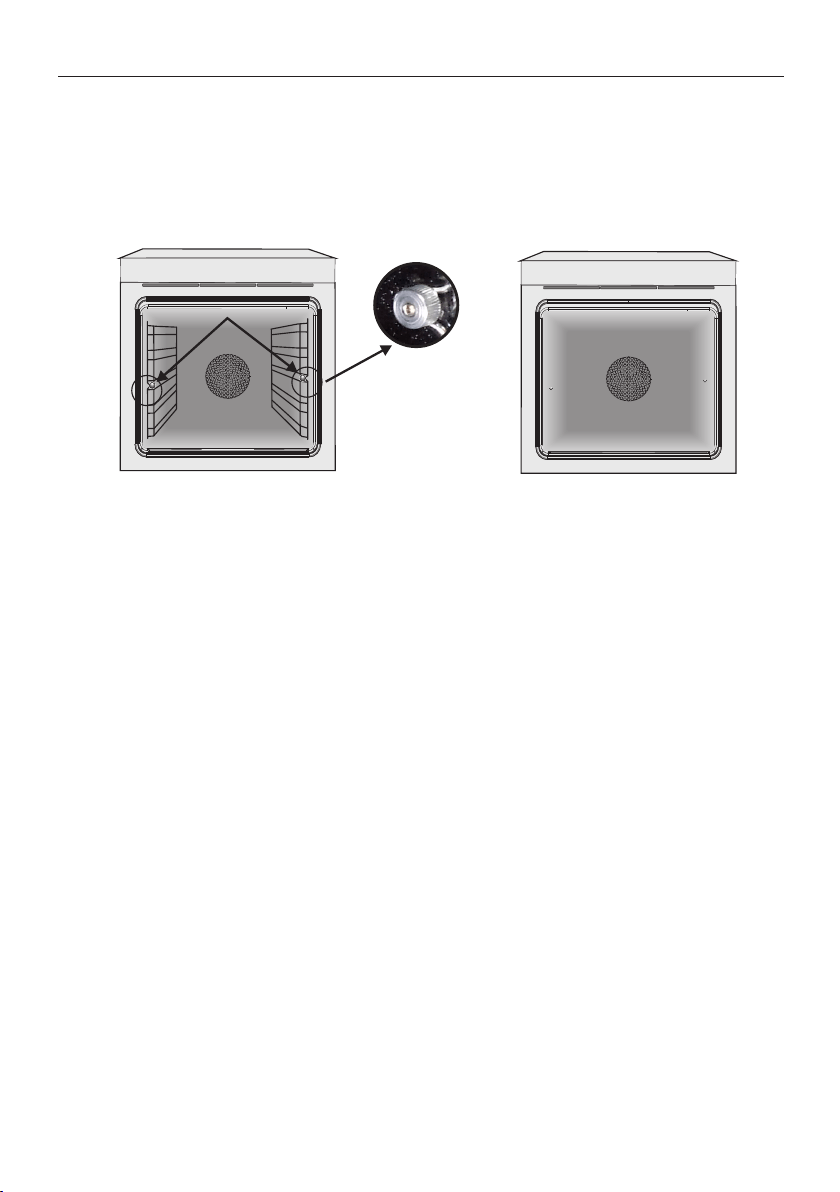
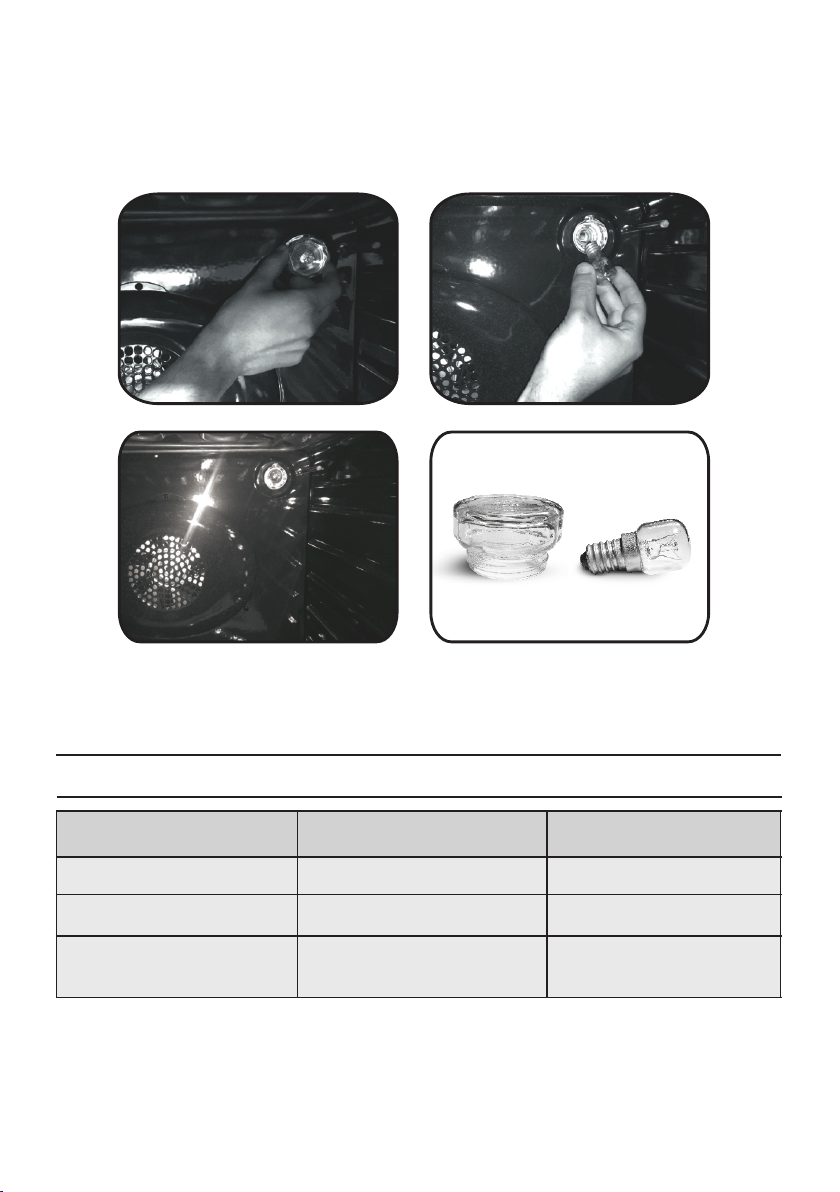
CHANGING THE BULB
1. Disconnect the oven from the mains supply.
2. Undo the glass cover, unscrew the bulb and replace it with a new bulb of the same type.
3. Once the defective bulb is replaced, replace the glass cover.
5. Troubleshooting
5.1 FAQ
PROBLEM POSSIBLE CAUSE SOLUTION
The oven does not heat up
The clock is not set Set the clock
The child lock is on
A cooking function and
temperature has not been set
Deactivate the child lock
Ensure that the necessary
settings are correct
The oven does not heat up
The oven does not heat up
EN 16

安全说明
• 烹饪期间,水分可能会凝结在烤箱腔体内部或箱门玻璃上。
这属于正常现象。为了减小这种效应,请在打开电源后先等
待 10-15 分钟,然后再将食物放入烤箱中。无论如何,当烤
箱达到烹饪温度之后,冷凝水便会消失。
• 烹饪蔬菜时,请将其盛放在带有盖子的容器中,而不是敞开
的托盘上。
• 烹饪完毕之后,请避免将食物滞留在烤箱中超过 15/20 分
钟。
• 警告:本设备和易触及部件会在使用过程中变热。注意不要
触摸任何灼热部件。
• 警告:使用烤架时,易触及的部件可能会变热。应使儿童与
其保持一段安全距离。
• 警告:在更换灯泡之前,请确保本设备已关闭,以避免潜在
的触电风险。
• 警告:为避免因热断路设备意外重置而造成的任何危险,本
设备不可由外部开关设备(如计时器)供电,也不可连接到
定期断开和闭合的电路上。
• 在没有持续监督的情况下,应使 8 岁以下的儿童与本设备保
持一段安全距离。
• 儿童请勿玩耍本设备。
• 本设备可由 8 岁及以上人员、身体、感官或心智能力有限的
人员和对本产品无相关经验或知识的人员使用,但前提是他
们接受了监督,或获得了以意识到潜在风险的方法所提供的
本设备相关操作说明。
• 清洁和维护请勿由无人监督的儿童来执行。
• 请勿使用粗糙或磨蚀性材料或锋利金属刮刀清洁烤箱门玻
璃,否则它们可能划伤表面并导致玻璃破碎。
• 在拆卸可移动部件之前,必须关闭烤箱。清洁完成之后,请
根据说明重配它们。
• 请仅使用推荐用于本烤箱的肉品探针。
• 请勿将蒸汽清洁器用于清洁操作。
• 请将插头连接到能够承受标签上所示电压、电流和负载并具
有接地触点的电源电缆。插座必须适合标签上所示的负载,
且必须使其接地触点接地并处于运行状态。接地导体呈黄绿
色。该操作应由合格的专业人员执行。如果插座与本设备插
头不兼容,请委托合格的电工使用另一个合适的替换该插
座。插头和插座必须符合设备安装所在国家/地区的现行规
CN 17

CN 18
范。用户也可以通过在设备和电源之间放置一个全极断路器
来连接电源,该断路器应能够承受最大的连接负载,并且符
合当前法规。黄绿色接地电缆请勿由断路器中断。安装本设
备时,接近用于连接的插座或全极断路器应易于接取。
• 用户可以根据接线规则,通过拔下插头或在固定接线中加入
开关来实现断开连接。
• 如果电源电缆损坏,则应使用制造商提供的电缆或专用线束
或 联 系 客 户 服 务 部 门 替 换 之 。 电 源 电 缆 的 型 号 必 须 为
H05V2V2-F。此操作应由合适的合格专业人员来执行。接地导
体(黄绿色)必须比其他导体长大约 10 mm。对于任何维修,
请仅咨询客户服务部门并请求使用原始备件。
• 不遵守上述规定可能会危害本设备的安全并使担保无效。
• 在进行清洁之前,应清除任何多余的溢出材料。
• 在进行中的烹饪阶段,如果电源长时间中断,则可能会导致
监视器故障。请在此情况下联系客户服务部门。
• 为了避免过热,请勿将本设备安装在装饰门之后。
• 当您将搁架放在烤箱内部时,请确保将挡块指向上方并位于
腔体的背面。必须将搁架完全插入腔体。
• 警告:请勿在烤箱壁上摊铺铝箔或可从商店获得的一次性保
护用品。在与高温搪瓷直接接触后,铝箔或其他保护用品可
能会熔化,并使内部搪瓷劣化。
• 警告:请勿移除烤箱门密封件。
• 小心:在烹饪期间或烤箱处于高温状态时,请勿向腔体底部
注水。
• 为了以额定频率运行本设备,不需要进行额外操作/设置。
备
• 警告:在启动自动清洁循环之前:
- 请清洁烤箱门;
- 请使用湿海绵从烤箱内部清除大块或粗糙的食物残留物。
请勿使用洗涤剂;
- 请拆下所有附件和滑架套件(如有);- 请勿放置茶巾。
• 在带有肉品探针的烤箱中,必须在进行清洁循环之前使用随
附的螺母封闭开孔。不使用肉类探针时,请务必使用螺母封
闭开孔。
• 在热解清洁过程中,表面会达到高于平时的温度,因此必须
使儿童与本设备保持一段安全距离。

CN 19
目录
一般说明
20
1.1 安全说明
1.2 电气安全
1.3 建议
1.4 安装
1.5 废弃处理和环境保护
1.6 符合性声明
2.1 概述
2.2 配件
2.3首次使用
产品说明
22
3.1 显示屏说明
3.2 烹饪模式
烤箱的使用
23
4.1 一般清洁说明
4.2 热解
4.3 Aquactiva功能
4.4 维护
• 烤架的拆卸和清洁
• 烤箱窗拆卸
• 玻璃门的拆卸和清洁
• 更换灯泡
烤箱的清洁及维护
26
5.1常见问题
故障排除
30
1.⼀般说明
感谢选购我司产品。为确保本品发挥最大功能,
请仔细阅读本说明书,并妥善保管,以便日后参
考。安装烤箱之前,请记录序列号,需要维修时
向客服提供此序列号。开箱后,查看物品在运输
过程中有无损 坏。如有任何疑问,请勿使用 烤
箱,并征求合格技术人员的意见。请将所有包装
材料(塑料袋、聚苯乙烯、钉子)放置在儿童接
触不到的地方。首次使用烤箱时,烤箱周围绝缘
板胶会因加热产生浓烈气味的烟雾。这属于正常
现象,此时,烟雾消散之前切勿将食物放入烤箱
内。如未能遵守本文件的说明,制造商将不承担
任何责任。
说明:当您选用不同型号时,本文所述的烤箱功
能、属性和配件也会不同。
1.1 安全说明
仅以预期目的使用本烤箱,即用于烹煮食物;将本品用于其他用途,比如加热,是不当、而
且危险的。对于因不当、不正确或不合理使用该电器导致的任何损害,制造商不承担任何责
任。
使用本电器则意味着将遵守一些基本规则:
- 切勿为了拔下插头而拉扯电源线;
- 切勿用湿手或脚触摸电器;
- 通常情况下不建议使用适配器、复式插座和延长电缆;
- 当出现故障和/或运行不良时,关掉电器,不要随意篡改设备。
1.2 电气安全
确保由电工或专业技术人员进行电气连接操作。
烤箱电源必须符合安装国家现行法律规定。对于因未能遵守说明而导致的任何损害,制造商
不承担任何责任。烤箱必须使用接地壁式插座或多极隔离开关(依据 安装国家现行法律规定
确定)接通电源。电源应配置适当的熔断器保护,而且电源线应具有相应的横截面以便确保
正确的电源连接。
连接
烤箱配备电源线,相间或相位和零线之间适用电源为220-240Vac。接通电源之前,检查以下
各项十分重要:
- 量表上显示的电源电压;
- 隔离开关的设置;
连接至烤箱接地端的接地线必须连接至电源的接地端子。
警告
接通烤箱电源之前,可请求专业电工检查电源接地端子的连续性。对于未能连接烤箱至接地
端或接地连接存在连续性故障而导致的任何事故或问题,制造商不承担任何责任。
注意:鉴于需要对烤箱进行维护作业,建议设置其他可用的壁式插座,当将烤箱从安装位置
卸下时可以连接该插座。电源线必须仅能由技术服务人员或具有同等资质的工作人员进行更
换。
CN 20
1.3 建议
每次使用烤箱后,简单清洁即可保证烤箱完全干净。切勿将从商店购买的铝箔纸或一次性保
护膜用于烤箱壁。与热搪瓷层直接接触的铝箔或其他任何保护膜可能导致搪瓷内胆熔化,品
质下降。为防止烤箱过于脏污产生烟味,建议您使用烤箱时温度不要太高。最好是延长烹煮
时间并稍微调低温度。除烤箱配件外,建议您仅使用耐高温的餐具和烘焙烤模。

1.4 安装
制造商无安装义务。因不正确安装导致的故障不在制造商的保修范围内。必须遵守专业合格
人员的安装说明。不正确安装可能导致人员、动物伤害或财产损坏。制造商对此类损坏或伤
害不承担任何责任。
烤箱可以放置于高的圆柱台上或放于操作台下。固定烤箱之前,必须确保烤箱周围通风良
好,促进适当的新鲜空气流通,用于冷却和保护内部部件。依据配件类型制作最后一页所述
的开孔。
1.5废弃处理和环境保护
本产品标识符合欧盟指令:报废的电子电气设备(2012/19/EU)。报废的电子电气设
备包括污染物质(会对环境产生负面影响)和基础元件(可以重新利用)。对于
报废的电子电气设备进行特殊处理十分重要,以便正确清除和处理所有污染物,
并回收和再利用所有材料。
在确保报废的电子电气设备不会造成环境问题时,个人扮演着至关重要的角色;
必须遵循这些基本规定:
- 不得将报废的电子电气设备当做生活垃圾处理。
- 需要将报废的电子电气设备移交至市政或注册公司管理的相关收集点。
在很多国家,对于大型报废的电子电气设备,均有本地收集点。当您购买新的电器时,旧的
电器可以返回至零售商,只要设备是同等类型,而且与购买的设备功能相同,零售商须免费
一次性回收。
节能和爱护环境
如可能,避免预热烤箱,而且始终避免烤箱空转。尽可能不要频繁打开烤箱门,每次开门会
散掉烤箱内热量。为实现节能,在规定的烹煮时间结束之前 5到10分钟提前关闭烤箱,使用烤
箱继续产生的剩余热量。保持密封清洁可以避免炉内热量外散。如果您采用的按小时电价的
电力合约,则"延迟烹煮"程序更容易实现节能、可以在电价优惠空档启动烹煮程序。
1.6符合性声明
通过在本设备上粘贴 标志,我们确认其符合适用于本产品相应法规的所有相关欧洲安
全、健康和环境要求。
CN 21
2.产品说明
2.1 概述
1、控制面板
2、层架位置
(横向网格烤盘,若有)
3、金属烤架
4、接油盘
5、风扇(钢板后)
6、烤箱门
2.2 配件
金属烤架
1
接油盘
2
用于放置烤盘和碟
用于收集烘烤中滴落至烤架上的食物残渣。
CN 22
横向网格烤盘
3
横向网格烤盘(如有)
1、控制面板
2、层架位置
(横向网格烤盘,若有)
3、旋转烤肉叉
4、金属烤架
5、接油盘
6、风扇(钢板后)
7、烤箱门
1
2
3
4
5
6
7
1
23
5
4
6

2.3首次使用
初步清洁
首次使用之前,需要清洁烤箱。用柔软湿润的布擦拭烤箱外表面。清洗所有配件,并用温水
和洗涤液溶液擦拭烤箱内部。将空烤箱设置到最高温度,并保持空转运行约1小时,如此可
以去除新产品的异味。
3.烤箱的使用
3.1显示屏说明
警告
安装后或断电后首次操作时需要设 置时间
(如果显示器闪烁显示12:00,表示发生断
电)。
200°->温度LED"°"闪烁直至达到显示温度。
热(HOT)->当一个程序完成后,如果烤箱
仍然发热,显示屏显示"热(HOT)",与时间
交替显示,即使旋钮被定位至OFF。
CN 23
4
旋转烤肉叉
烤叉烹 调时无需预热。烹饪时烤箱门要关
闭。相比传统烤箱,节约能耗90%~95%。使
用烤箱时,要从烤箱移除一切不用的配件。
•旋下挂钩
•烤叉串肉
•紧固螺钉
•将烤叉插入电机孔内
•卸下把手再开始烹饪
1、定时器/自动模式
2、风扇功能
3、解冻模式
4、温度或时钟显示
5、LCD显示器调整控制
6、功能选择旋钮
7、程序选择旋钮

设置
启用方法
停用方法 功能 用途
•用于关掉分钟提示音
静音模式
•旋转左侧的功能选择钮至
"静音模式"位置
CN 24
设置时间
烹饪时长
烹饪结束
分钟提醒器
儿童安全锁
•旋转功能选择钮至"关
闭"位置。
• 关掉分钟提示音
• 用于设置显示屏的时
间
•旋转左侧的功能选择
钮至"设置时间"位置
• 利用按钮"+"和"-"设置
时间
•旋转功能选择钮至"关
闭(OFF)"位置。
•设置时间
注意:烤炉首次安装后或在
突然 断电后 需 要设置 时 间
(时钟闪烁显示12:00)
• 允许预设所选菜谱所
需的烹饪时间。
• 设定烹饪时间后,旋
转功能选择钮至关闭
(OFF),进而返回至
实际的时间。
• 转动左侧功能选择钮
至烹饪时长可以查看选
定的烹饪时间。
•旋转右侧的功能选择
钮至某个烹饪功能
旋转左侧的功能选择
钮至"烹饪时长"
• 利用按钮"+"和"-"设置
烹饪时长
•照明自动显示
•当烹饪时长结束时,
烤箱自动关闭,发出几
秒钟的 报警声。如想要
提前关闭烹饪功能,旋
转 功 能 控 制 至 "关 闭
(OFF)"或设置时间为
00:00;通过转动功能选
择钮至烹饪时长,并使
用 "+"和 "-"按 钮 调 整 。
•用于烹煮想要的菜谱。
• 可以预设想要的烹饪
结束时间。
• 设定烹饪时间后,旋
转功能选择钮至关闭
(OFF),进而返回至
实际的时间。
• 转动左侧功能选择钮
至烹饪结束时间可以查
看选定的烹饪结束时
间。
•转动右侧功能选择钮
至某一烹饪功能。
• 旋转左侧功能选择钮
至"烹饪结束"位置。
• 利用按钮"+"和"-"设定
结束时间。
• 照明自动显示。
• 当烹饪时间结束时,
烤箱自动关闭。
• 转动功 能 控制至关闭
(OFF) 位 置 ,可以提
前停止烹饪功能。
• 该功能通常与烹饪时长功
能同时使用。
• 例如,食物所需的烹饪时
间为45分钟,我希望在
12:30时可以食用;此时,
烤箱自动关闭并发出警告
声。选择期望的烹饪功能,
设置烹饪时长为45分钟("-
"、"+")。设定烹饪的结束
时间12:30("-"、"+")。则
烤箱于11:45分自动启动烹
饪(12:30减去45分钟),
在设定的烹饪时间结束后,
烤箱自动关闭。
警告:在仅设定烹饪结束时
间而不设定烹饪时长时,烤
箱会立即启动并在设定烹饪
时间结束后关 闭。
• 设定时间结束时,发
出声响信号。
• 运行时,显示屏显示
剩余时间。
• 转动左侧的功能选择
钮 至 分 钟 提 醒 器 的 位
置。
• 利用按钮"+"和"-"设置
烹饪时间。
• 转动左侧的功能选择
钮 至 分 钟 提 醒 器 的 位
置,并且利用按钮"-"设
置 烹 饪 时 间 为 00:00。
• 烤箱可用作报警器使用,
即使烤箱关闭时。
• 烤箱无法使用。
• 转动左侧功能选择钮
至"儿童锁"位置。
• 5秒钟内按动按钮"+"。
• 当显示屏上出现"停止
(STOP)"时,儿童锁可
用 。
• 往回转动左侧功能选
择钮至儿童锁,并在5秒
钟内按下按钮"+"。
• "停止(STOP)"显示消
失。
• 当家中有儿童时,此功能
有用。
* 依据CENELEC EN60350-1进行测试
3.2 烹饪模式
CN 25
功能旋钮
温度 T℃
默认
功能(取决于烤箱型号)
灯:打开烤箱灯
热解
烤架:使用烤架时,关闭烤箱门
顶部的加热元件单独使用,但温度可以调整。需要进行五分钟预热,如此可以令
部件达到红热,做出美味的烤肉、烤羊肉串和奶油烤菜。白色的肉类应与烤架有
一定的距离;烹饪时间更长,但是烤肉更美味。您可以将红色肉类和鱼排放到层
架上,接油盘放于下方。烤箱具有两个烤架位置:
烤架:1800 W
(大师烘培):这个功能通过减少油脂用量以更健康的方式烹饪。加热元件与空
气脉动循环的结合确保了完美的烘焙效果。
风扇烹煮:建议在烹饪家禽肉、糕点、鱼和蔬菜时使用此程序。在这种模式下,
热量可以更好地渗透至食物中,而且烹饪和预热次数减少。您可以同时烹调不同
的食物,无论是否在一个或多个位置。此方式可以实现散热均匀,香味不会混
合。
常规烹饪:同时使用顶部和底部加热元件。对于烤箱预热约十分钟。对于传统烘
焙,该方法是理想的选择。对于红肉类、烤牛肉、羊腿、野味、面包、铝箔包装
的食品(用油纸包后烹调的方便食品)、酥饼,将食物和餐盘放在中间的层架
上。
解冻:当旋钮转动至此功能位置时,风扇以室温在冷冻食品周围实现空气流通,
因此可在不改变食物蛋白质成分的前提下在几分钟内解冻食品。
风扇+底部元件:底部加热元件与风扇配合使用,用于烤箱内空气流通。对于多
汁的水果馅饼、果馅饼、乳蛋饼和馅饼,该方式是理想选择。
可以防止食物干燥,并促使蛋糕、面包团和其它底部烹煮的食物蓬松。
将层架放于底部。
180
220
210
200
*
超级烤架:烤箱具有两个烤架
烤架:1800W 超级烤架:3000W
保温:该项功能推荐用于对预煮食物进行再加热,将层架放于第二层(从上往
下),或将层架放于低层,用于解冻面包披萨或糕点。温度预设为60℃不变,并
无规定限制。
210
ECO
L3
60
L3
T℃
范围
50 ÷ 240
50 ÷ 280
50 ÷ 230
150 ÷ 220
50 ÷ 240
ECO÷SUPER
L1 ÷ L5
60 ÷ 60
L1 ÷ L5
烤叉:使用旋转烤肉叉时,关闭烤箱门。
顶部加热元件配合旋转烹煮食物的旋转烤叉使用。加热温度可根据需要调整。旋
转烧烤架最适用于中等大小的食物。
传统烧烤体验的理想之品。旋转烤叉烹煮时无需预热。
烤架+风扇+旋转烤肉叉:烤叉非常适合烹煮肉类,尤其是卷肉;同时,烹
煮食物更快。
L5 L1 ÷ L5
210 150 ÷ 230
*

CN 26
4. 烤箱的清洁和维护
4.1一般清洁说明
定期清洁可以延长电器的使用寿命。进行人工清洁之前,等待烤箱冷却。切勿使用研磨性洗
涤剂、钢丝棉或尖锐物体进行清洁,否则会损坏搪瓷部件,而且不可修复。仅用水、肥皂或
漂白清洁剂(氨水)。
玻璃部件
每次使用烤箱后,建议用厨房吸水毛巾清洗玻璃窗。为去除顽固污渍,您可以用浸泡清洁剂
的海绵、拧出水分,然后用清水冲洗。
烤箱窗户密封件
如果较脏时,可以用微湿海绵清理密封件。
配件
用蘸有肥皂的湿海绵清洗配件,然后冲洗并晾干:避免使用研磨性清洁剂。
接油盘
使用烤架后,从烤箱中取出接油盘。将热油倒入容器内,在热水中清洗接油盘,可以使用海
绵和洗洁精。
如果仍有油脂残留物,将接油盘浸入水和清洁剂中。或者,可以将接油盘放入洗碗机清洗或
使用商用烤箱清洁剂。切勿将脏污的接油盘放回烤箱内。
4.2 热解
烤箱配备热解清洗系统,可以在高温下消除食物残留。通过设定程序可以自动启动热解操
作。热解器在烹饪开始时启动,产生的烟雾经过热解器处理干净。由于热解需要超高温度,
烤箱门装配有安全锁。热解可以随时停止。安全锁显示之前不得打开烤箱门。
注意:如果烤箱上方安装有炉盘,则进行热解操作时,切勿使用煤气灶或电热板,否则会导
致炉盘过热。
预设两个热解清洗循环:
ECO热解清洗:用于中度脏污烤箱的清洗,运行90分钟。
超级热解清洗:用于重度脏污烤箱的清洗,运行120分钟
对于热解烤箱,切勿使用市售的清洁产品!
注意:在烹饪后立即进行热解清洗可以利用余热,实现节能。
执行热解循环之前:
• 鉴于烤箱配件无法承受热解清洗循环所用的高温,因此应拆掉所有配件;尤其是要拆掉烤
架、侧架和可伸缩导轨(参见章节"烤架和侧架的拆除")。具有肉类探针的烤箱,启动清洗
循环之前,用配备的螺母堵上探针孔。
• 清除大块的溢出物或污渍,否则可能会需要较长的时间清除。而且,在进行热解循环时,
高温可能导致大量油脂点燃。
• 关闭烤箱门。
• 清洁前,必须清除过量的溢出物。
• 清洁烤箱门。
• 使用湿海绵清除烤箱内部的大块或粗糙的食物残留。切勿使用清洁剂。
• 去除所有配件和滑动架配套(如有)。
• 切勿放置茶巾 。
运用热解循环:
1-转动功能选择钮至" ""。在显示屏上,显示"ECO"或"SUP"符号。预设时间是90min,可
以通过 程序设 定 (设 定 按钮"+"或 "-"),时 间范围 为90min(ECO模式) -120min(Sup模
式)。如果烤箱是重度脏污,则可以增加循环时间至120min。如果烤箱是中度脏污,则可以
降低循环时间至90min。
2-通过程序改变结束时间可以推迟热解清洗循环。
3-几分钟后,当烤箱达到高温时,烤箱门自动锁定。可以随时转动功能选择钮至0停止热解
清洗循环("关(OFF)"将显示3秒钟)。
4-当热解清洗循环结束后,热解自动结束。显示屏将显示"结束(END)",直至门被锁定,
会显示"0-n"。
5-您可以回转功能选择钮至"0",但是如果温度仍然很高,则显示"0-n",告知已经锁上烤箱
门。
触屏控制烤箱中使用热解清洗循环:
1-转动功能选择钮至热解位置。显示屏显示"ECO"或"SUP"。
2-预设时间是90分钟,可调90min(ECO模式)-120min(Sup模式),通过程序("+"或"-"按
键)。如果烤箱属于重度脏污,时间增加到120min;如果烤箱属于轻度脏污,可以减少清洗
循环至90min。
CN 27
4.3 Aquactiva功能
Aquactiva程序使用蒸汽帮助从烤箱中去除剩余的脂肪和食物颗粒。
1.将300毫升水倒入烤箱底部的Aquactiva容器中。
2.将烤箱功能设置为静态( )或底部( )加热器 将温度设置为Aquactiva图标
4.让程序运行30分钟。
5. 30分钟后关闭程序,让烤箱冷却下来。
6.当设备冷却时,用布清洁烤箱内表面。
警告:
在触摸之前,请确保设备很凉爽。
所有热表面都必须小心,因为有灼伤的危险。 使用蒸馏水或饮用水。
N.B。:具有PrecòTouch用户界面的某些热解炉提供Aquactiva功能。 要激活它,请将功能
选择器设置为AQUACTIVA符号( ),并使用“ - ”和“+”键将柱箱温度设置为90°。
300 ml

侧架的拆除和清洁
1.沿逆时针方向拧下螺栓。
2.将侧面挂架朝您自己所在方向拉动,以将其拆下
3.用洗碗机或湿海绵清洁挂架,然后立即将它们擦干。
4.清洁侧面挂架之后,将它们放回原处,然后重新插入螺栓,并确保螺栓已完全拧紧
4.4 维护
A
CN 28
烤箱窗拆卸
1、打开前窗。
2、打开前窗左右两侧铰链机壳的夹子,可以向下推夹子打开。
3、按相反的方向执行程序更换窗户。
1
2
3
1.
2.
3.
4.
5.
6.
7.
CN 29
LOW-E
玻璃门的拆卸和清洁
1、打开烤箱门。
2、3、4、锁定铰链,卸下螺丝并向上拉上金属盖将其拆掉。
5、6、拆下玻璃,小心地从烤箱门上取出(注意:在热解烤箱中,还需要拆卸第二和第三块
玻璃(如有))。
7、清洗或替换后,以相反的方向重装部件。
所有玻璃上显示的"Pyro"必须清晰,而且位于门左侧,靠近左侧铰链。在这种方式下,第一
块玻璃的印刷标签位于门内侧。
更换灯泡
1、将烤箱与电源断开。
2、取掉玻璃盖、旋松灯泡并用同类型的新灯泡更换。
3、将故障灯泡更换后,更换玻璃盖。
5. 故障排除
5.1 常见问题
故障 可能原因 解决⽅法
烤箱不加热 未
未设置时钟 设置时钟
儿童锁启动
未设置烹饪功能和温度
停用儿童锁
确保必要的设置正确
烤箱不加热 未
烤箱不加热 未
CN 30
42833691 • 70 gr - A5 • 02.2020 • Rev_0
对于因打印或记录错误导致本手册不准确时,制造商概不承担任何责任。我们有权在必要时进行修订,包括对于不影
响与安全或功能相关的特性。
CN
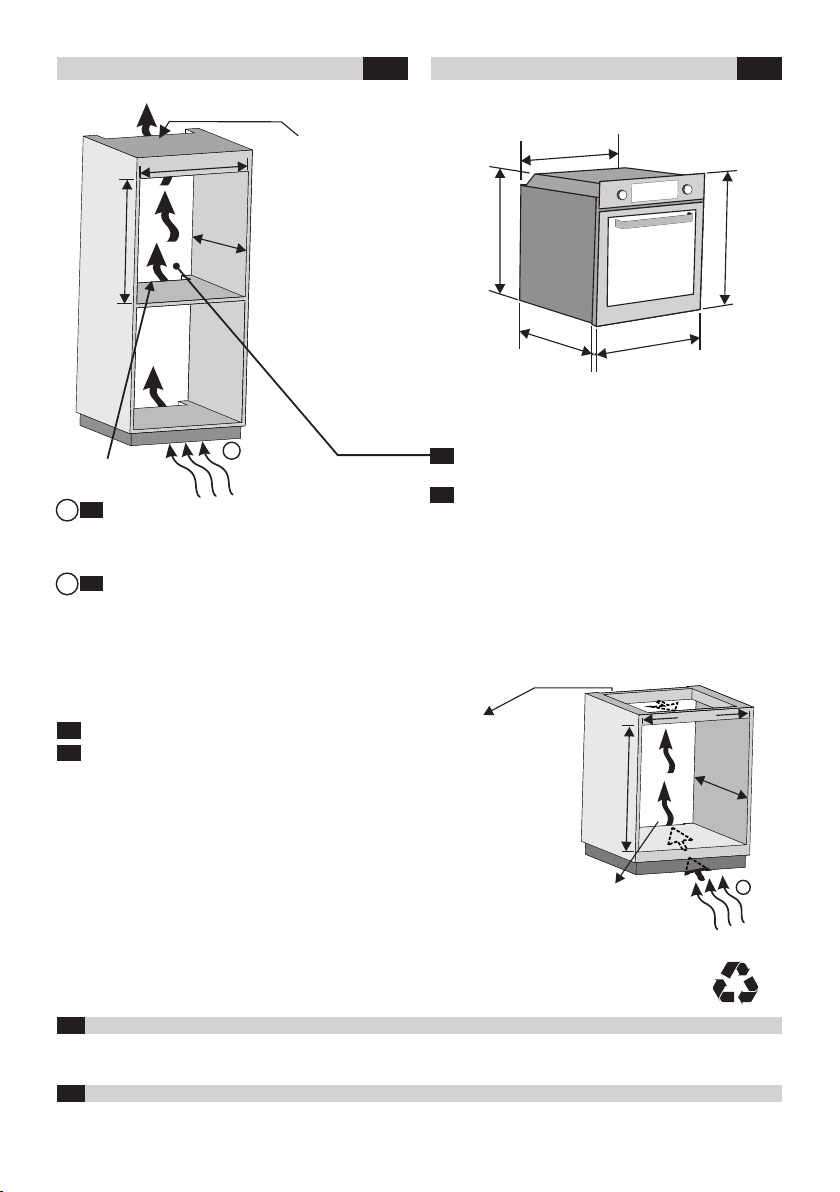
INSTALLATION EN
If the furniture is coverage with a bottom at the back part,
provide an opening for the power supply cable.
If the oven does not have a cooling fan, create an opening 460 mm x 15 mm
If the mounting of the plinth does not allow air
circulation, to obtain the maximum performance of the
oven it is necessary to create an opening of 500x10mm or
2
the same surface in 5.000 mm
EN
A
Opening / 开孔
560mm x 45 mm
Opening / 开孔
460 mm x 15 mm
安装 CN
EN
如果家具背面是底部部分,电源线应设置开孔。
CN
EN
如果烤箱无冷却风扇,设置一个 460 mm×15 mm 的开孔
CN
如果底座的安装不允许空气流通,为了获得炉子
的 最 大 性 能 , 必 须 在 5平 方 米 内 创 建 一 个 开 口 为
500×10mm或相同的表面。
CN
A
The manufacturer will not be responsible for any inaccuracy resulting from printing or transcript errors contained in this brochure. We
reserve the right to carry out modifications to products as required, including the interests of consumption, without prejudice to the
characteristics relating to safety or function.
EN
595 mm
595 mm
546 mm
22 mm
580 mm
560 mm
A
600 mm
560 mm
560
mm
560 mm
560 mm x 45 mm
A
560 mm
590 mm