V1
Quick Start Guide
V1 クイックスタートガイド
Guide de démarrage rapide de la V1
Guida Rapida V1
Guía de inicio rápido V1
V1 Schnellstartanleitung
FR
IT
DE
SP
JP

32
Español
Visión General
Qué hay en la Caja
Resumen de la Cámara
Instalación
Operación Básica
Deutsch
Übersicht
Verpackungsinhalt
Kamera übersicht
Installation
Grundbedienung
Table of Contents
English
Overview
What’s in the Box
Camera Overview
Installation
Basic Operation
日本語
概説
本製
品の同梱物
カメラの概 説
画 面 のアイコン
基本操作
Français
Aperçu
Que contient la Boîte
Aperçu de la Caméra
Installation
Opération de Base
Italiano
Descrizione
Nella Confezione
Descrizione Telecamera
Installazione
Funzionamento Base
page
4
5
6
7
12
18
19
20
21
26
32
33
34
35
40
46
47
48
49
54
60
61
62
63
68
74
75
76
77
84
page
54
1. Overview
Thank you for choosing REXING! We hope you
love your
new product as much as we do.
If you need assistance, or have any suggestions to improve it,
please contact us. You can reach us via [email protected] or
call us at (203) 800-4466. Our support team will respond you as
soon as possible.
Always a surprise in Rexing. Check us out here.
https://www.facebook.com/rexingusa/
https://www.instagram.com/rexingdashcam/
https://www.rexingusa.com/support/registration/
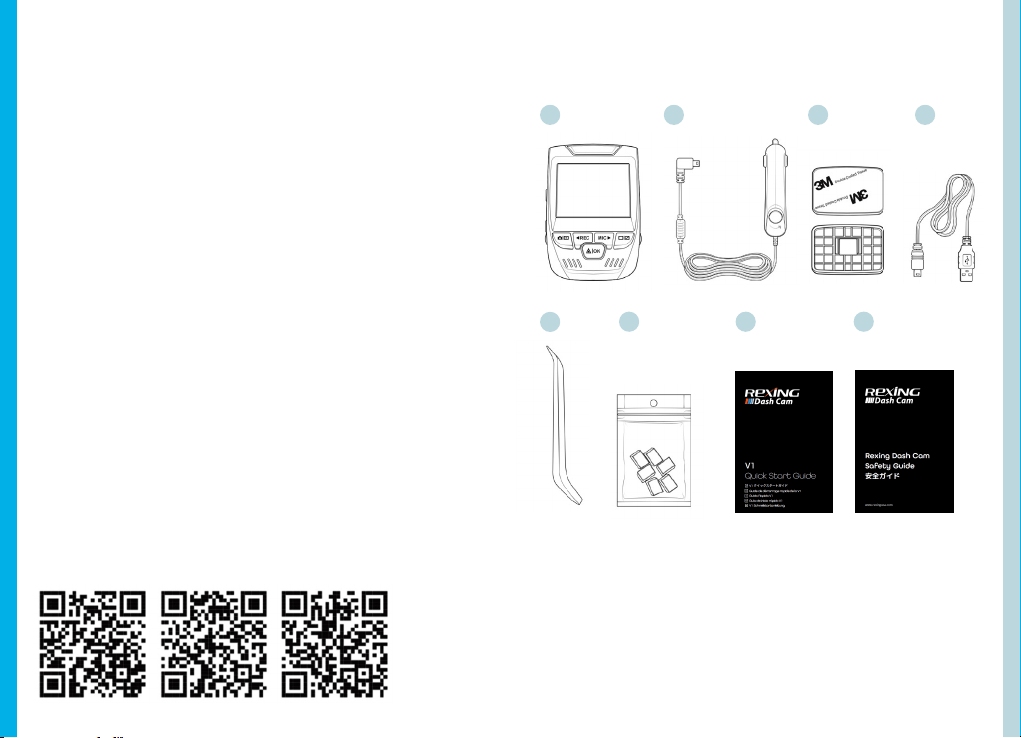
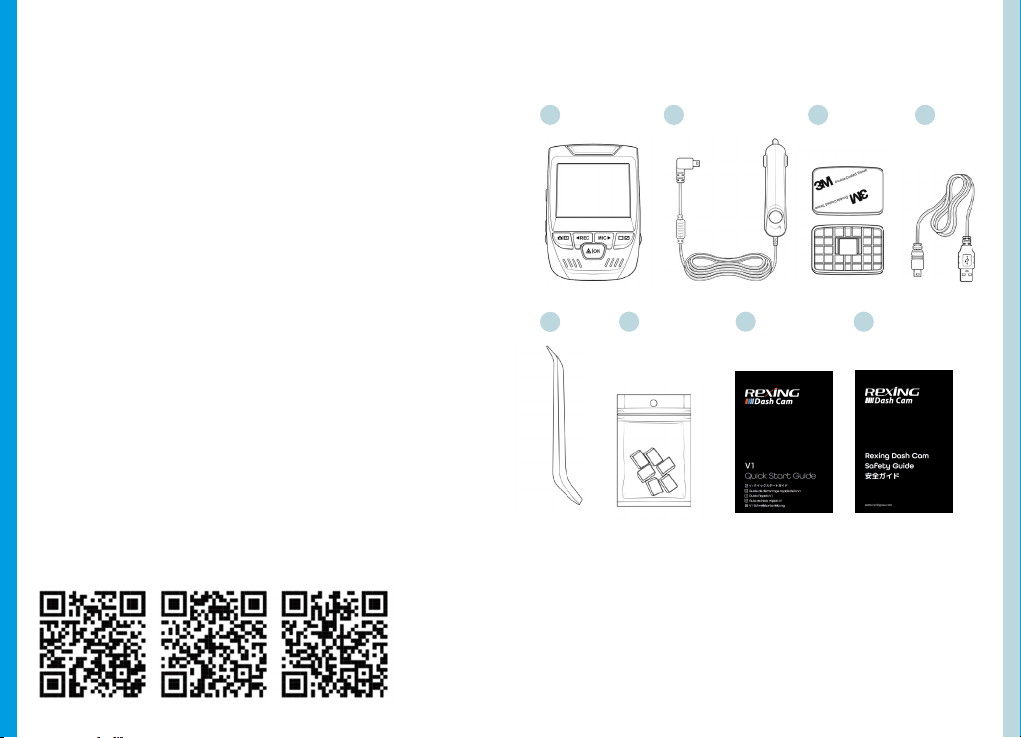
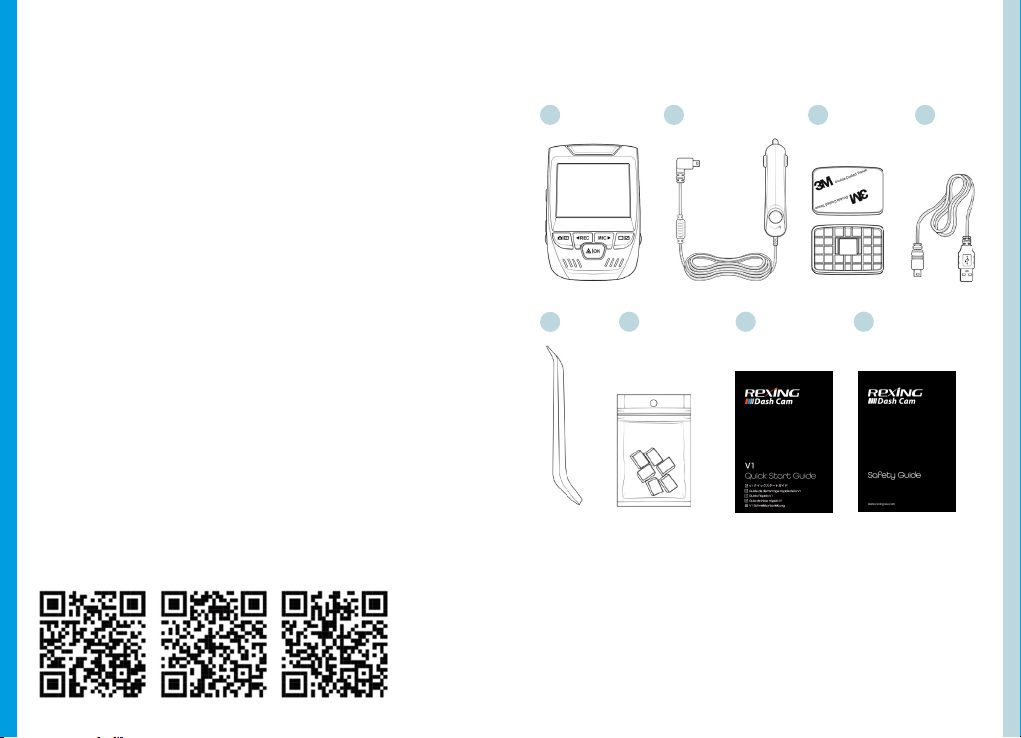
1. Rexing V1 Dash Cam
2. Car Charger
3. Dash Cam Mount Plate & 3M Adhesive
4. Mini-USB Cable
5. Cable Management Tool
6. Cable Clips©
7. V1 Quick Start Guide
8. V1 Safety Guide
1.
5.
6. 7. 8.
2. 3. 4.
Facebook Instagram Site
2. What’s in the box

76
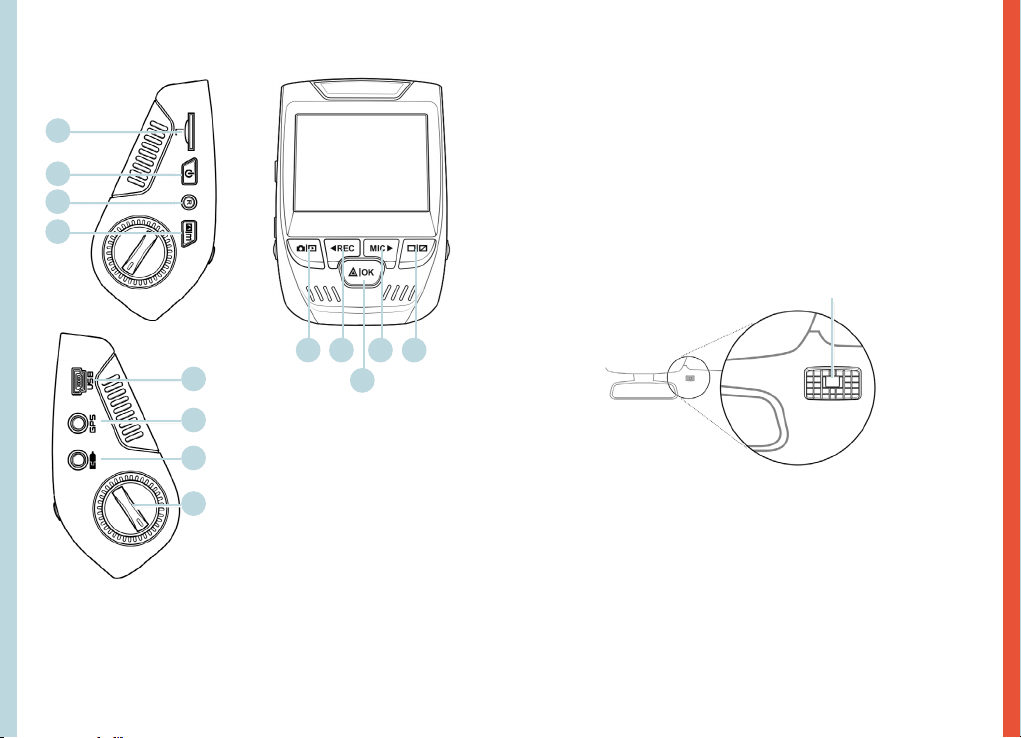
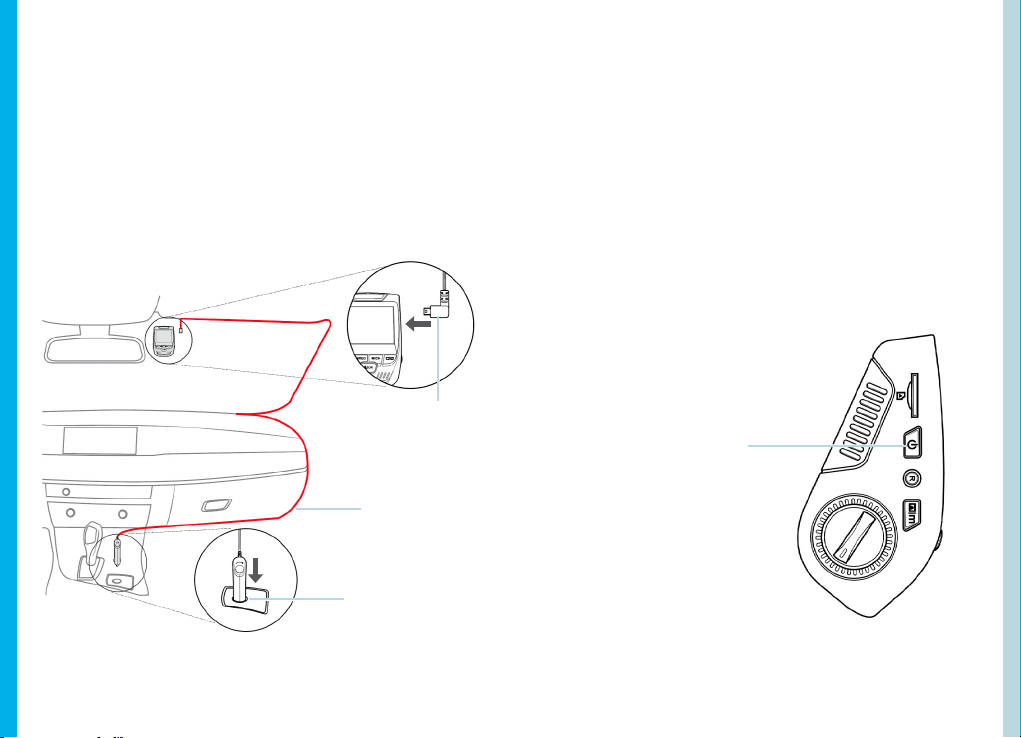
3. Camera Overview
1. Micro SD Card Slot
2. Power Button
3. Reset Button
4. Menu Button
5. Mode Button
6. REC (Record) Button *
7. OK (Conrm) Button **
8. MIC (Microphone) Button ***
9. Screen Button
10. Mini-USB Port
11. GPS Logger Port
12. Rear Camera Port (Not Support)
13. Lens Angle Adjustment
* The Camera is recording when the LED is ashing red.
** The Camera is recording when the LED is ashing red. The device charging
or powered on when the LED is solid blue.
*** The device is charging or powered on when the LED is solid blue.
1.
10.
11.
5. 6. 8.
7.
9.
2.
3.
4.
12.
13.
4. Installation
Step 1: Install the Dash Cam
Place the 3M adhesive on the mount and properly orient
the mount square to the roof and hood line of the
vehicle. Important! Ensure the T-interlock on the Mount
is oriented in the correct direction (as shown below).
Firmly press the mount onto the windshield. Wait at least
20 minutes before mounting the camera.
Orientation mount as shown
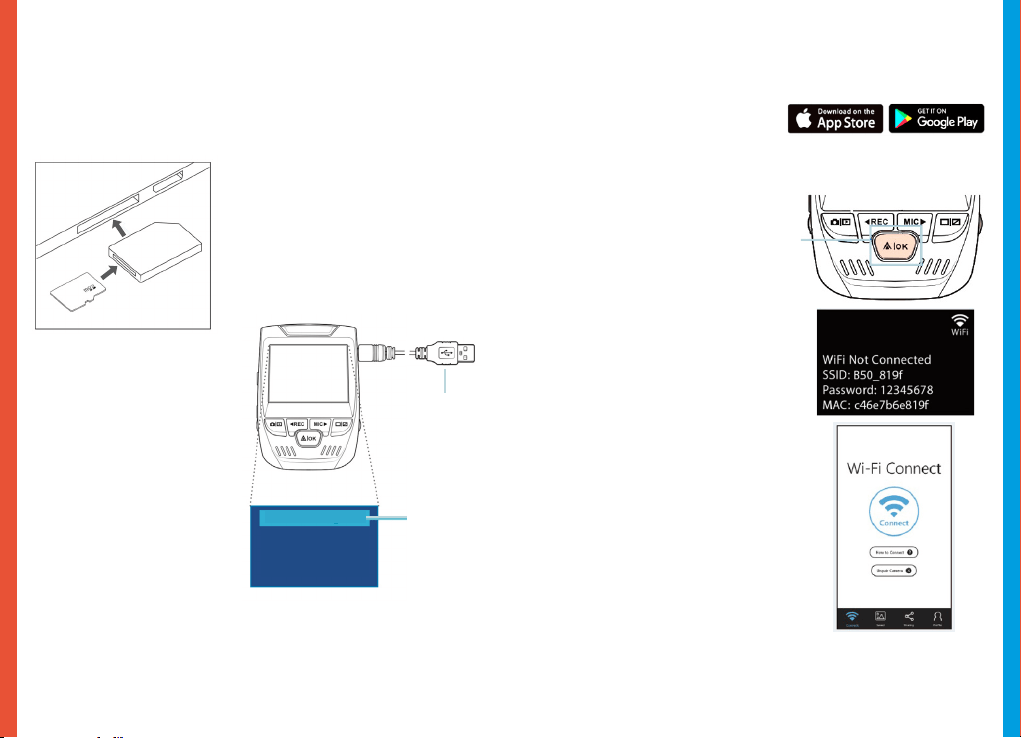
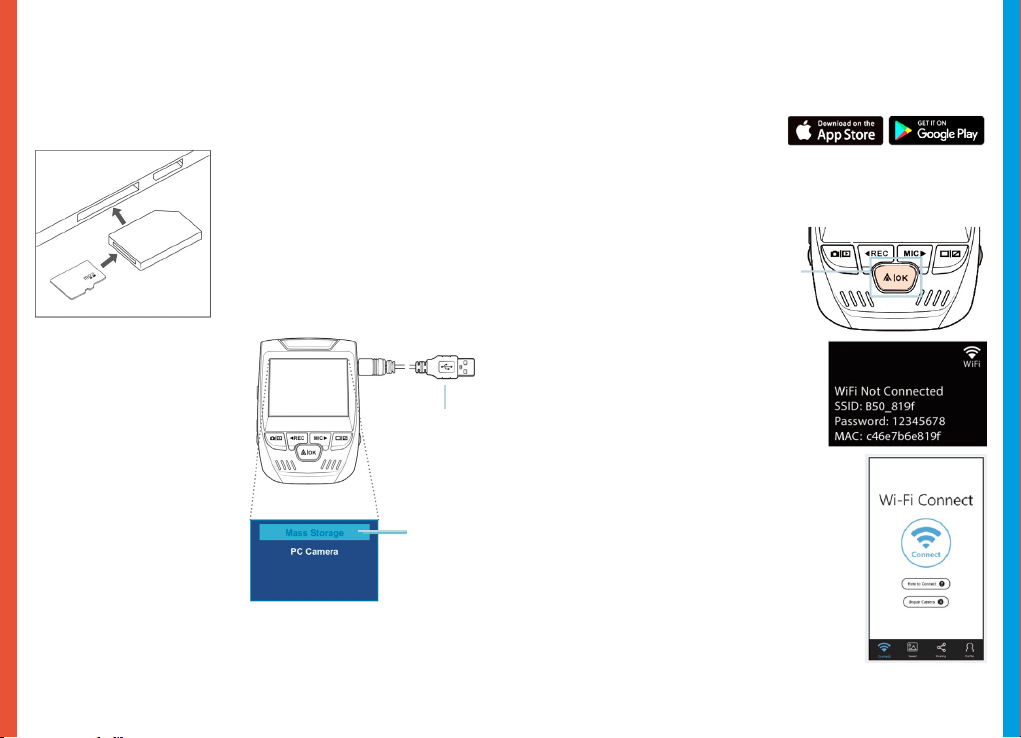
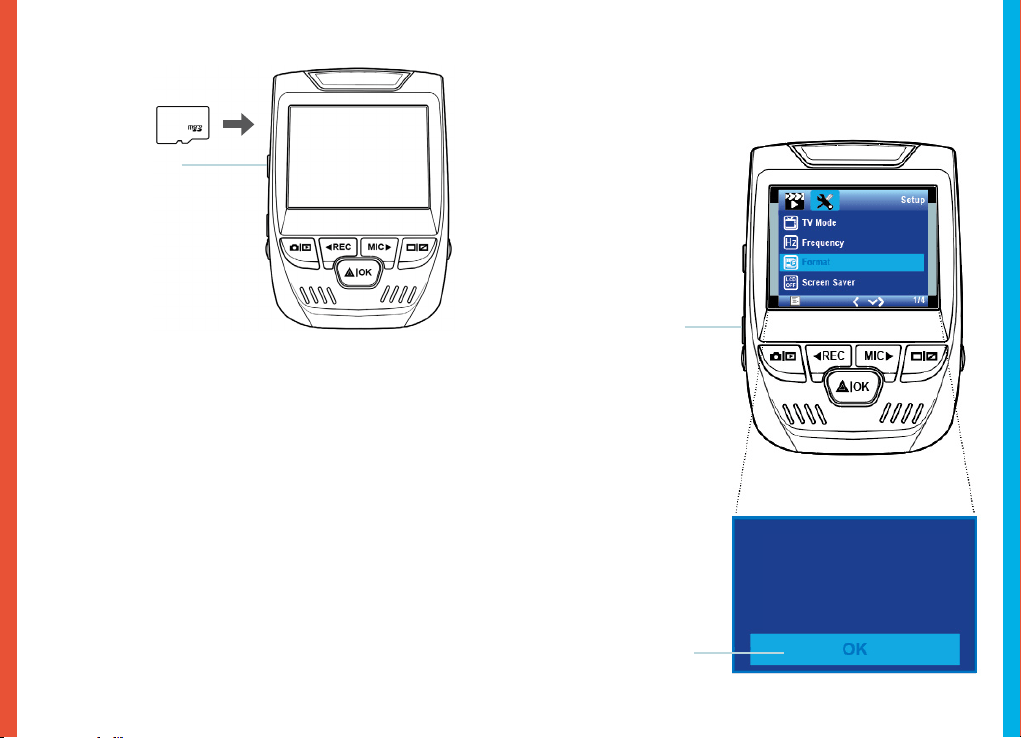
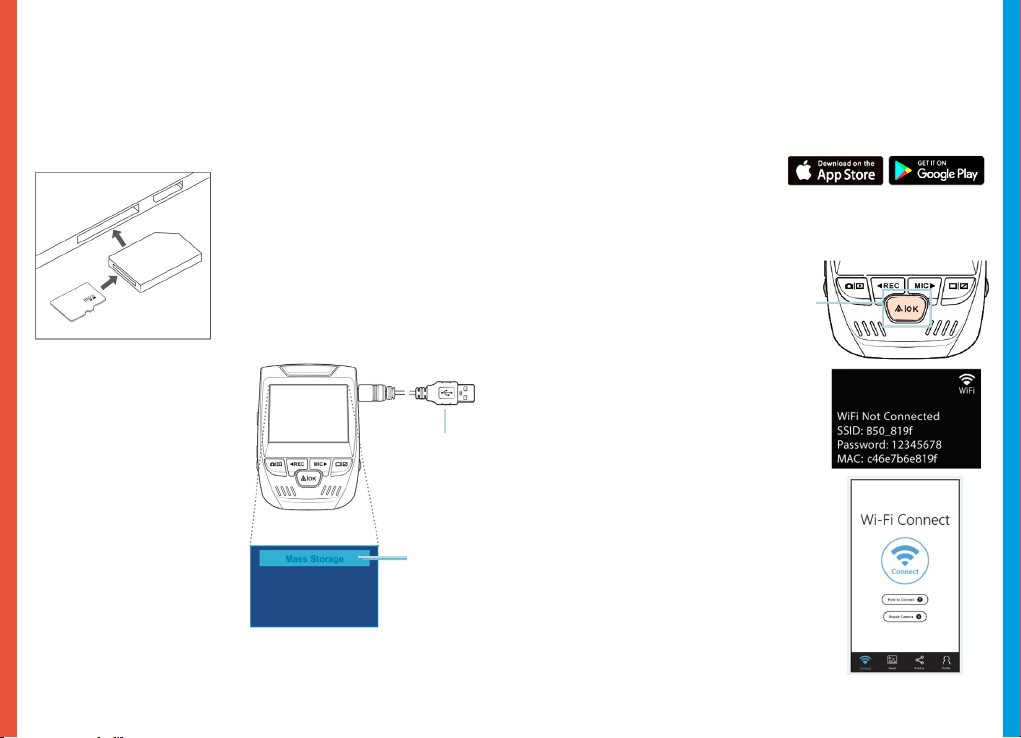
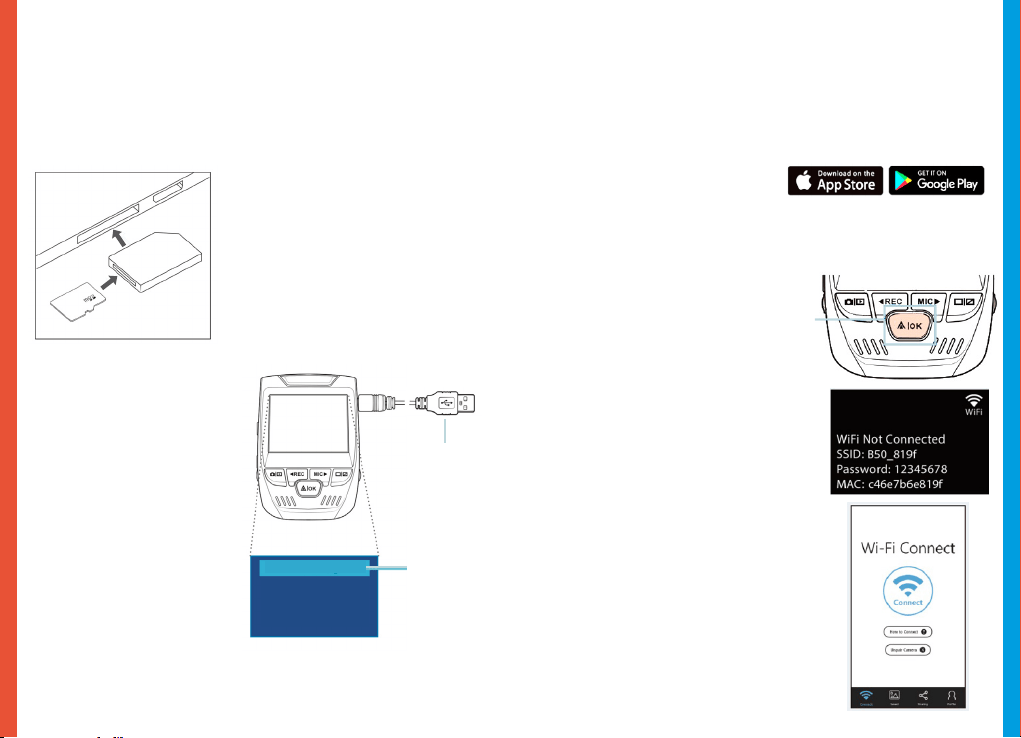
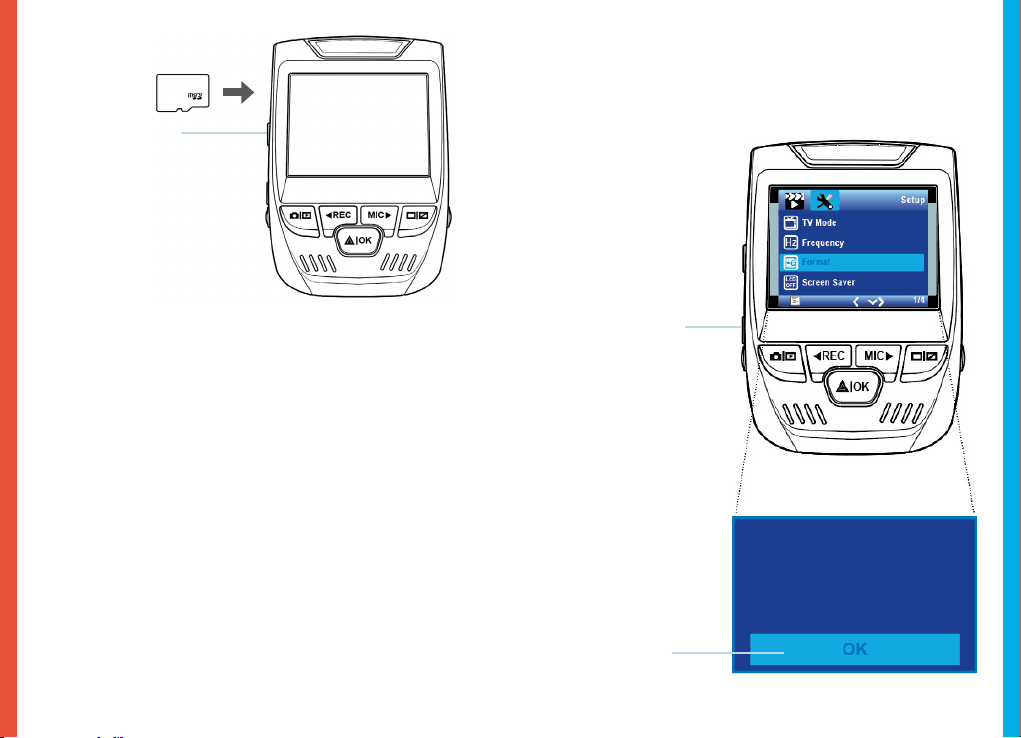
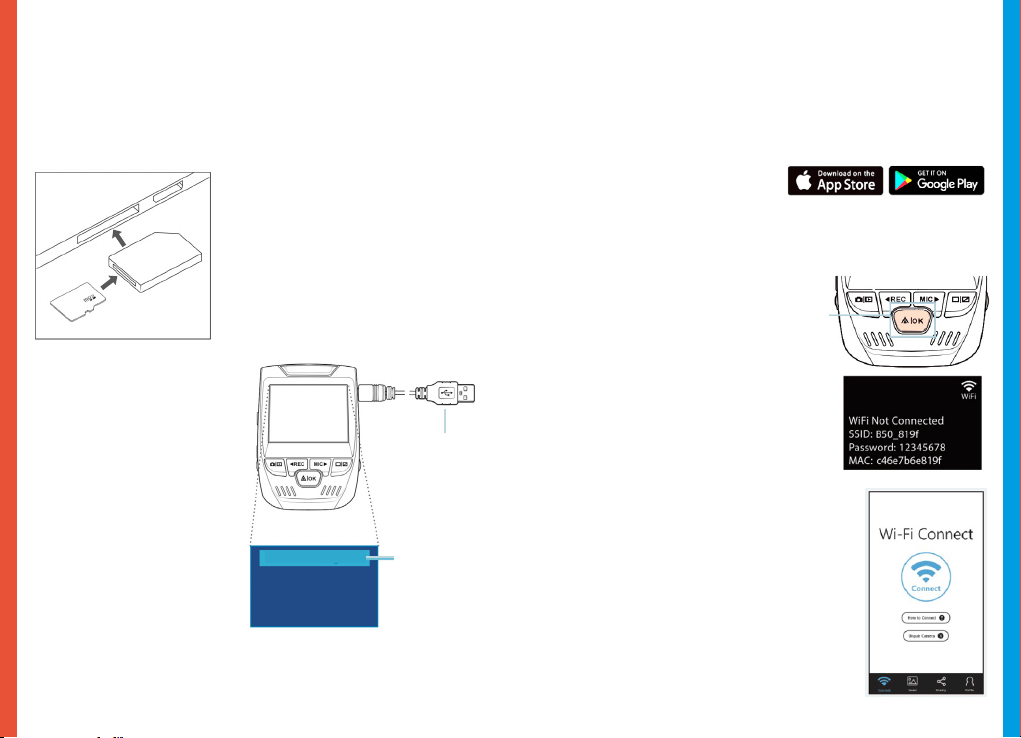
Step 2: Insert the Memory Card
The Rexing V1 accepts [Class 10/ UHS-1 or higher] Micro SD
memory cards up to 256 GB. You will need to insert a memory
card before you can begin recording. Before inserting or
removing a memory card, rst ensure you’ve powered
down the device.
Gently push the memory card in until you hear a click, and allow
the spring release to push the card out.

98
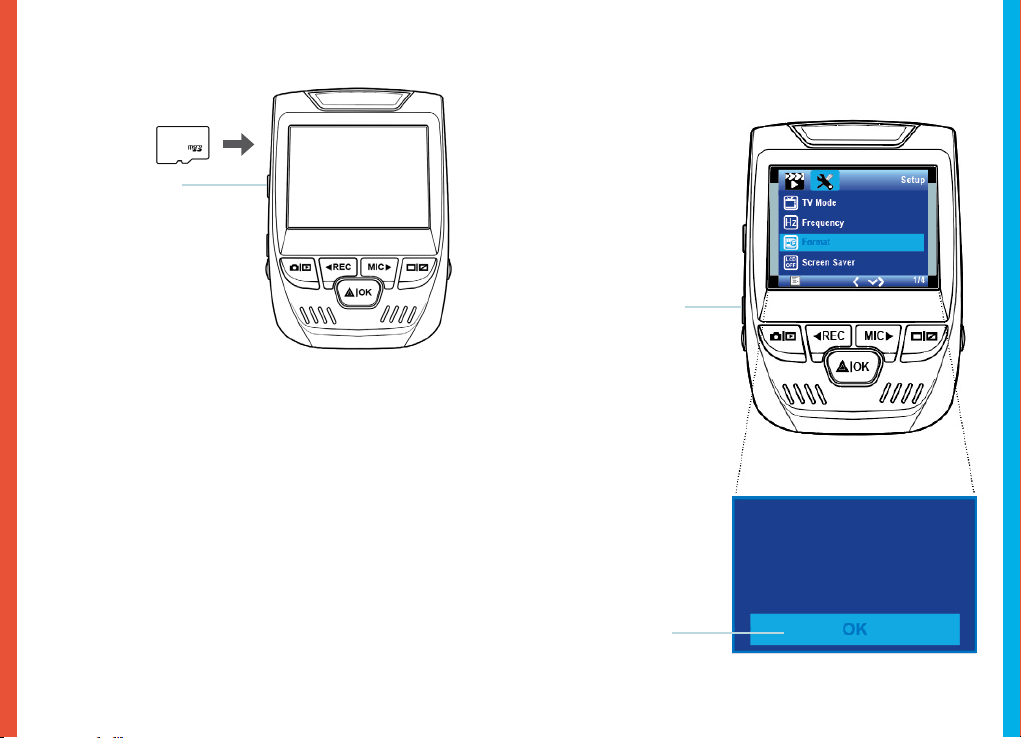
Step 3: Power the Camera and Format the
Memory Card
Power the camera by connecting the charger to the car cigarette
lighter and camera.
To ensure the V1 records to your memory card properly and
without error. Before you start using a new memory card,
you must format the card within the camera using the
format function. Always backup important data stored on the
memory card before formatting.
To format the memory card, make sure you have inserted
your memory card, then turn on the device by connecting to
a power source. Press REC to stop recording. Then press the
MENU button twice to enter the System Setup Menu. Use the
REC and MIC buttons and go to the Format setting. Press the OK
Button to conrm the selection.
Press the Power
button to turn
the power o
You may now disconnect from power. The camera will shut
down after 3 seconds. The camera should begin recording
automaticially the next time it is powered on.
Press the Menu
button twice
Press the OK
button to conrm
formatting
the card

1110
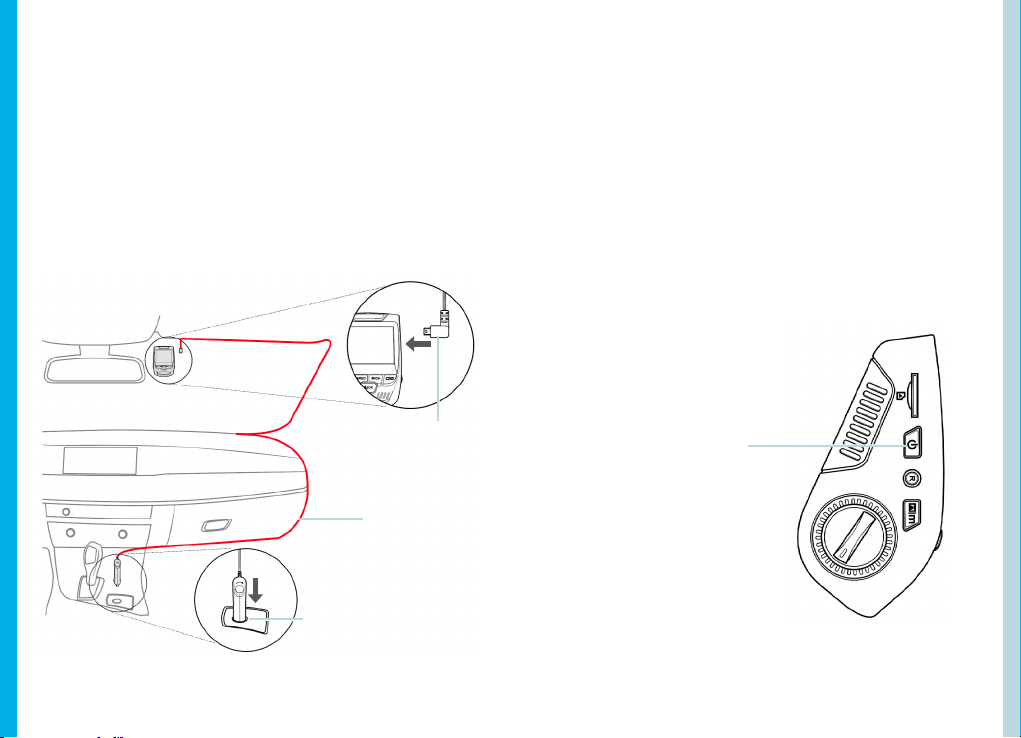
Step 4: Installing the Camera onto the Windshield
Place the camera on the mount and carefully route the power
cable around the windscreen and tuck in under the trim.
Plug the Car Charger Cable into a 12V DC power outlet or the
car cigarette lighter.
Connect car charger to the camera. The camera will auto-start
recording once powered on.
Plug Mini 5 pin
Connector to
the Dash Cam
Route power
cable to the
Dash Cam
Plug charger into
power outlet or
cigarette lighter
5. Basic Operation
Device Power
The device is automatically powered on when plugged into a
12V accessory socket or cigarette lighter and receives a charge
(i.e.: the vehicle is started.)
To turn the device on manually, press and hold the POWER
button until the welcome screen appears.
The camera will autoatically start recording when powered on.
Press an hold the POWER button
to turn the device on manually

1312
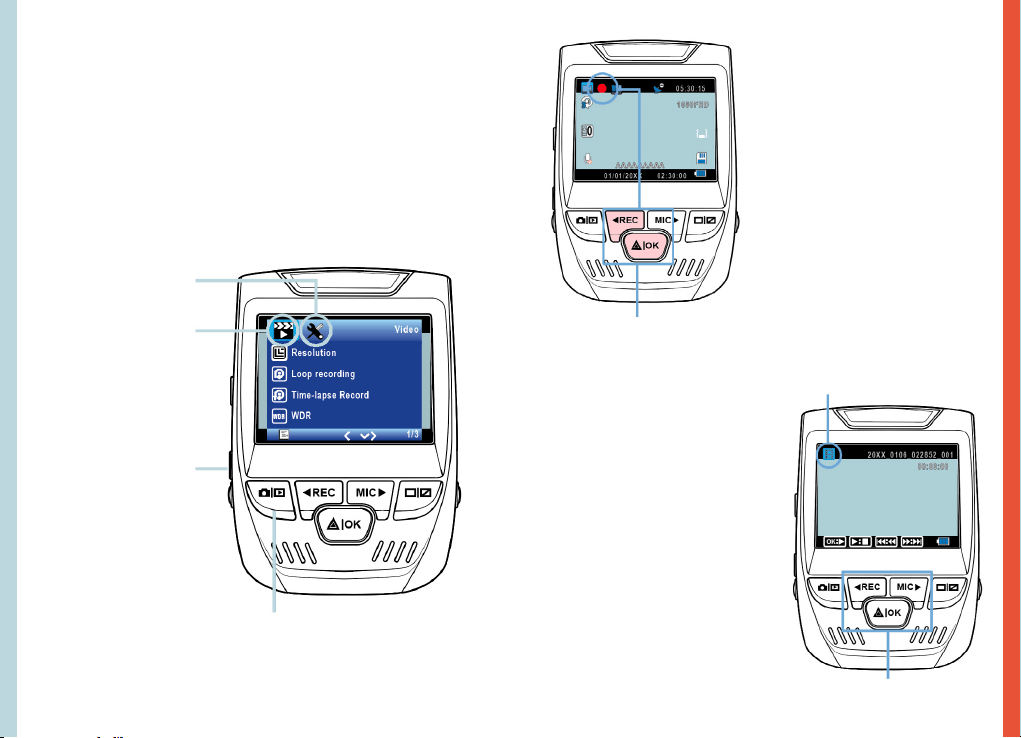
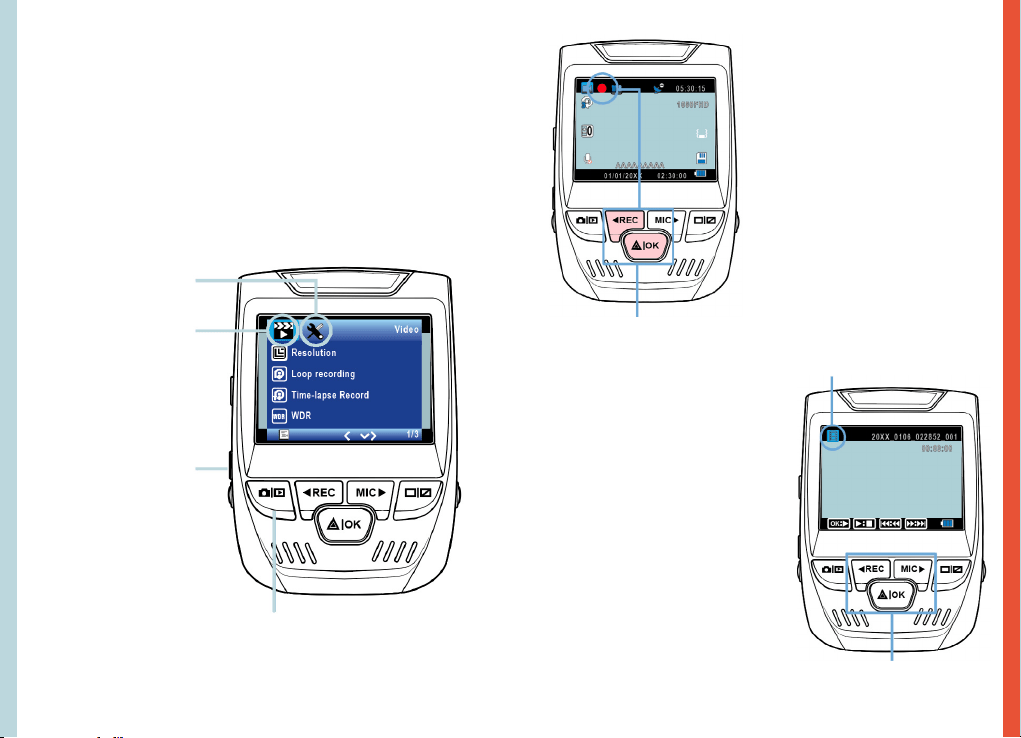
Menu Settings
Power the camera on. If the camear is recording, pres the REC
button to stop recording. Press the MODE button and toggle to
the desired mode.
Press the MENU button once to enter the settings
menu for a Mode. Press the MENU button twice to enter the
System Settings.
System icon
Video Mode icon
Press the Menu button to
select the desired setting
Press the Mode button and toggle
to the desired Mode
Video Recording
The camera will automatically
start recording when the
device receives a charge. The
LED lights and the red dot
will blink when the device
is recording. Press the REC
button to stop recording.
The camera automatically start
recording when powered on
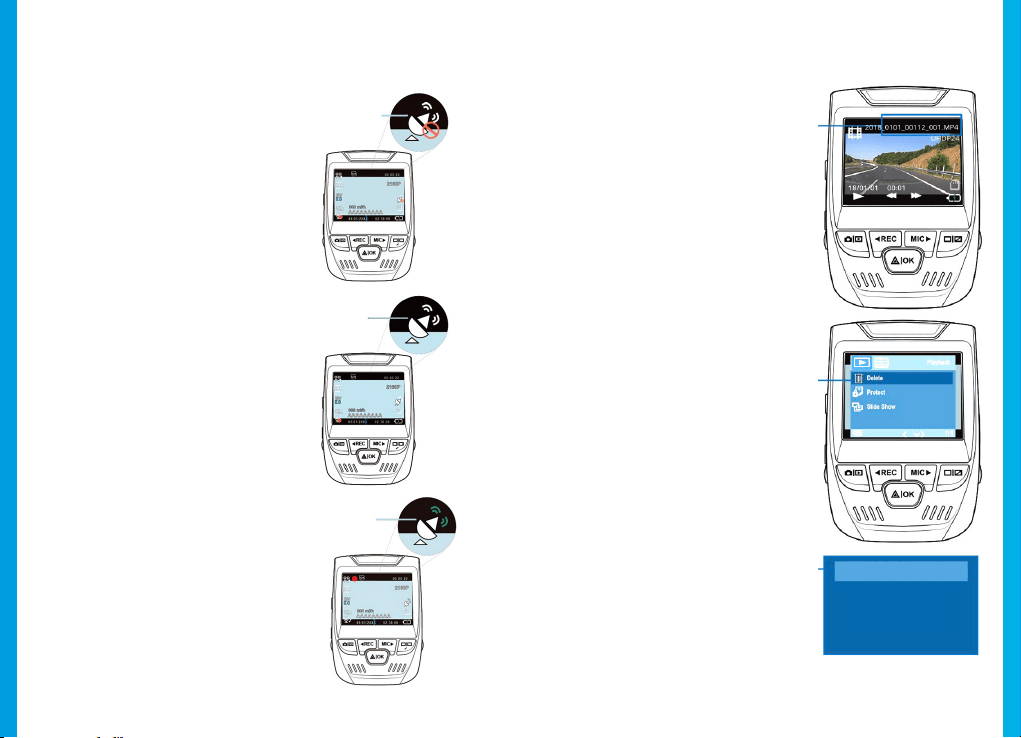
Playback mode
Control playback with these buttons
Video Playback
Playback of videos can
be done on the device or
a computer. Also, if you
have purchased a Rexing
GPS Logger you may play
back the recordings in
a specialized application.
To playback a video on
the device, toggle to the
Playback mode. Use the REC
and MIC buttons to toggle to
the desired video. Press the
OK button to play.

1514
During playback use the OK (pause), MIC (fast forward) and REC
(rewind) buttons to control the video playback.
To playback a video on the computer either use an SD card
adapter or connect the device to the computer directly using
the USB to Mini B 5pin male cable.
To playback a video using
an SD card adapter,
remove the memory card and
insert it into an SD card
adapter. Place the adapter in
the computer.
To playback a video
using USB to Mini B
5pin male cable, connect
the USB to Mini B 5pin Male
Cable to the device and
the USB connector to the
computer.
After the device powers
up, press the OK Button to
select Mass Storage.
On the computer, navigate
to device drive. The videos
are stored at: \CARDV\
MOVIE.
Select the video to playback.
Connect USB
connector to
computer
Select Mass
Storage
Parking Monitor
Connect the dash cam to the smart hardwire kit to activate
the parking monitor function (Need to purchase the Smart
Hardware Kit separately. ASIN: B07RN24B7V)
Please visit support.rexingusa.com to watch a video tutorial.
Wi-Fi Connect
Download “Rexing Connect” app from the App Store/Google
Play Store.
1. To access or exit the Wi-Fi
feature, hold down OK.
2. Open Wi-Fi settings on your
phone, nd “SSID:B50 _ XXXX”
from the list, tap to connect.
(Default password: 12345678)
3. Open the Rexing Connect app,
tap “Connect to enter realtime
video streaming page.
4. Once connected, the dash
cam screen will switch to the
camera view and will display
“Wi-Fi Connect” message.
Using the Rexing Connect app, you
can view a live preview of the dash
cam screen, start/stop recording, as
well as view and save your captures
with your mobile device.
For further instruction regarding the
Wi-Fi Connect feature, please visit
www.rexingusa.com/wi-connect/.
1716
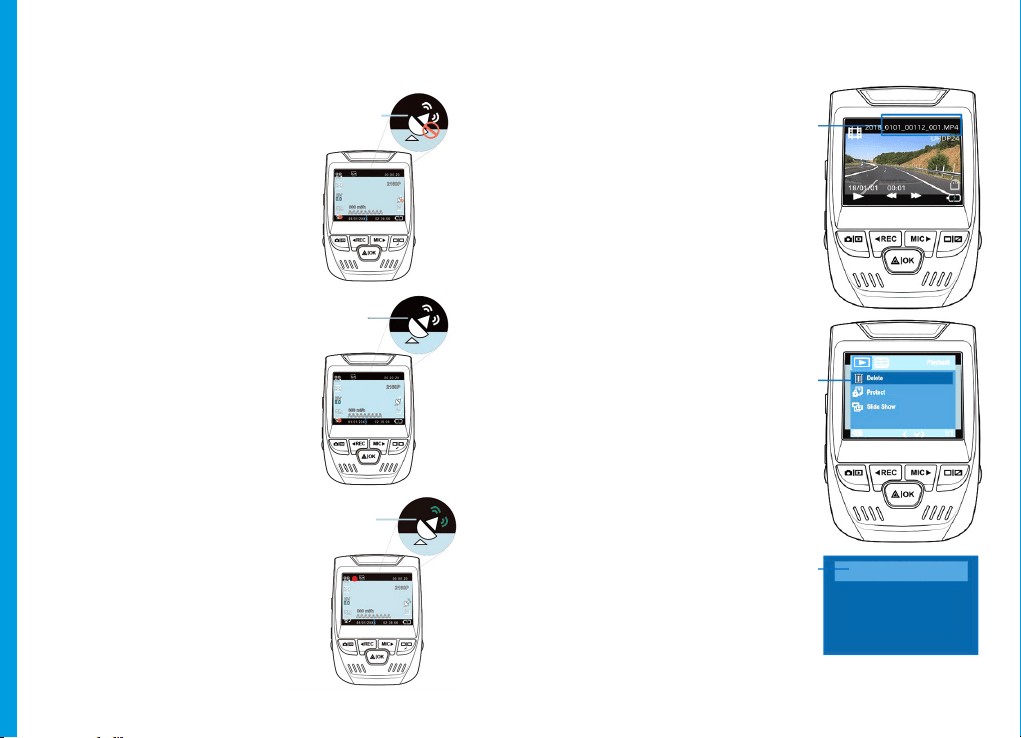
GPS Logger
(Need to purchase separately. ASIN: B07BL4NCMD)
When connected to the camera,
it will record the speed and
location of your vehicle as you
drive.
You can then access this
information while playing back
your recordings using the GPS
Video player (For Windows and
Mac, available at rexingusa.com).
Press the MENU button twice
and enter the System Settings.
Toggle to the GPS Speed Unit
setting and select your preferred
speed unit.
After a GPS signal is found, the
screen icon will turn from blue
to green.
Please visit gpsa.rexingusa.com
to watch a video tutorial.
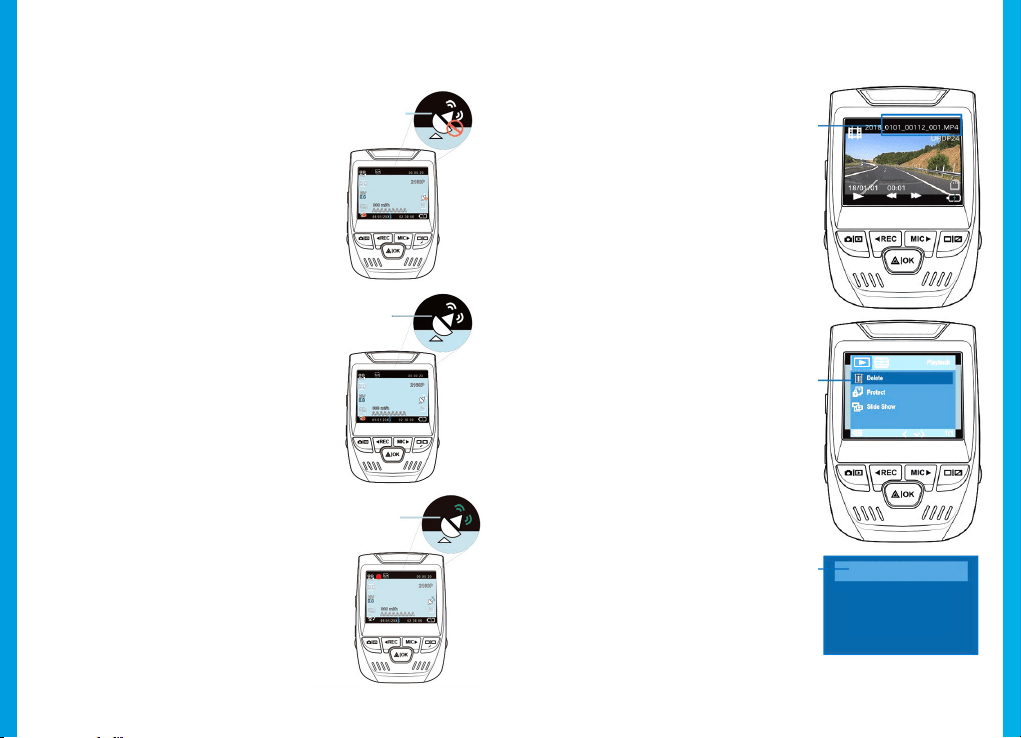
GPS Signal
(not connected)
GPS Signal
(searching)
GPS Signal
(active)
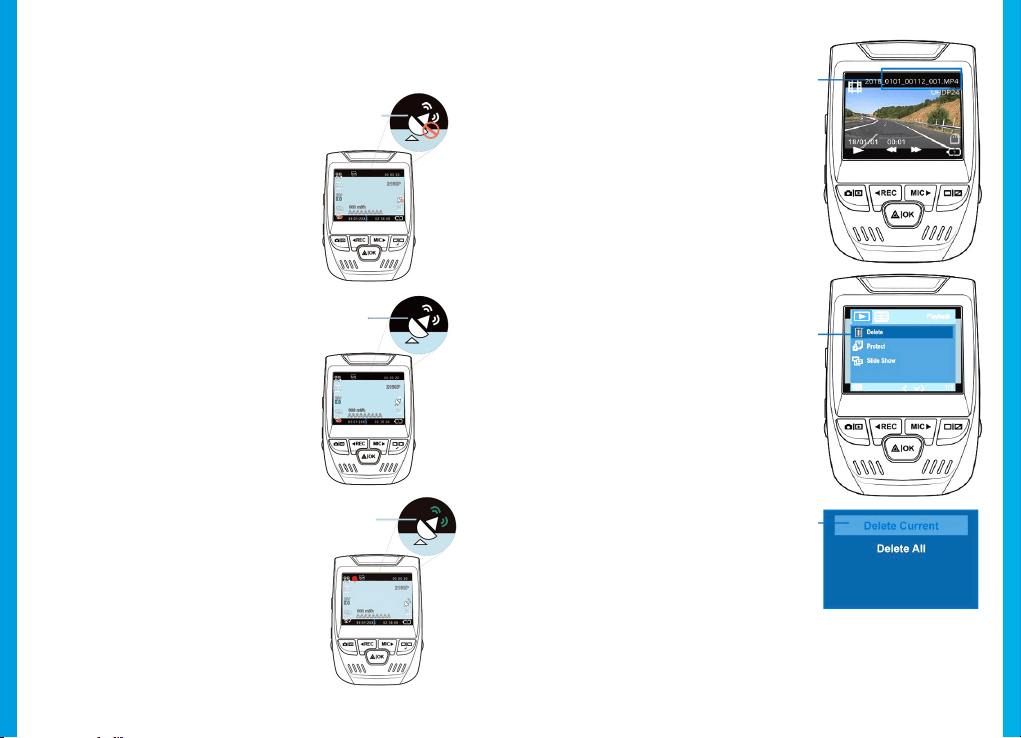
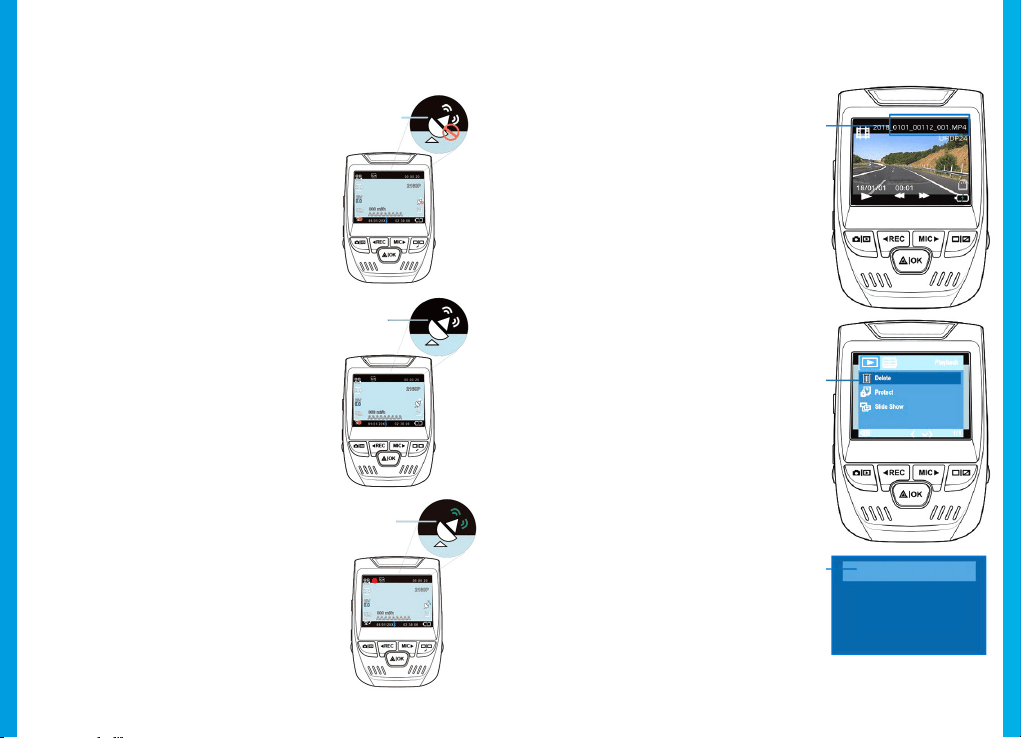
Taking Photos
To take a photo, stop
video recording and toggle
to the Photo Mode.
Press the OK Button to
take a photo.
To view a photo, stop
video recording and toggle
to the Playback Mode.
Press the REC and MIC
Buttons to toggle through
your photos.
To delete a photo,
stop video recording and
toggle to the Playback
Mode and toggle through
the videos and photos to
the one you want to
delete.
Press the MENU button
once and toggle to the
Delete option.
Press the OK Button and
select Delete Current or
Delete All.
Toggle
to the
Playback
mode and
select a
photo to
view
Toggle to
the Delete
option
Choose
the desired
option
1918
1. 概説
REXINGを選んでいただきありがとうございます!お客様が、私
たちと同様、新しい商品を気に入っていただけることを願ってい
ます。サポートが必要な場合、または改善のための提案がありま
したら、是非、ご連絡ください。[email protected]に電子
メールを送ることができます。当社のサポートチームができるだけ
早くお返事いたします。
常にREXINGでサプライズを。こちらから最新情報をチェックくだ
さい。
https://www.facebook.com/rexingusa/
https://www.instagram.com/rexingdashcam/
https://www.rexingusa.com/support/registration/
Facebook Instagram
ホームページ
1. Rexing V1 ドライブレコーダー
2. 車載充電器
3. ドライブレコーダーマウントプレートと3M接着シール
4. ミニUSBケーブル
5. ケーブル管理ツール
6. ケーブルクリップ
7. V1クイックスタートガイド
8. V1安全ガイド
2. 本製品の同梱物
1.
5.
6.
7. 8.
2. 3. 4.
2120
3. カメラの概 説
1. マイクロ SDカ ードスロット
2. 電 源 ボタン
3. リセットボタン
4. メニュー ボ タン
5. モードボタン
6. 録画ボタン*
7. OKボタン**
8. マイクボタン***
9. 画 面 ボタン
10. ミニUSBポート
11. GPSロガーポート
12. 背面カメラポート(サポートなし)
13. レンズ角度調整
* LEDが赤く点滅している時、カメラは録画中です。
** LEDが赤く点滅している時、カメラは録画中です。LEDが青く点灯している時、機器は
充電中または電源が入っている状態です。
*** LEDが青く点灯している時、機器は充電中または電源が入っている状態です。
1.
10.
11.
5. 6. 8.
7.
9.
2.
3.
4.
12.
13.
4. 設定
ステ
ップ1:ドライブレコーダーの設定
3Mテープをマウントに置き、マウントスクエアを適切に車の屋根とフー
ドラインの方向に合わせます。重要! マウントのT-インターロックが正
しい方向に置かれていることを確認してください。
マウントをフロントガラスにしっかりと押し付けます。カメラを取り付け
るまで、少なくとも20分は待ってください。
マウントを図 のように向 けて置きます
ス
テップ2:メモリーカードを挿入します
Rexing V1は、最大256GBのマイクロSDメモリカード(Class 10/
UHS-1以上)に対応しています。録画を開始する前にメモリーカー
ドを挿入する必要があります。
メモリーカードを挿入または取り外す前に、まず機器の電源が切
れていることを確認してください。
カチッという音がするまでメモリーカードを静かに押し込み、そして、押
すとスプリングが解除されてカードを取り外すことができます。
2322
ス テップ 3:カメラの電源を入れて、メモリーカードを初期
化します
充電器を車のシガーライターとカメラに接続して、カメラの電源を入れ
ます。
V1メモリーカードに適切に間違いなく記録することを確実にします。
新しいメモリーカードを使用し始める前に、初期化機能を使用してカ
メラ内でカードを初期化しなければなりません。初期化する前に、メモ
リーカードに保 存されている重要なデータを常にバックアップしてくだ
さい。
メモリーカードを初期化するためには、メモリーカードが挿入されてい
ることを確認した後、電源に接続して、機器の電源を入れます。録画ボ
タンを押して録画を停止します。その後、メニューボタンを2回押して、
システム設 定メニューに入ります。録画 ボタンとマイクボタンを使 用し
て、初期化設定に移動します。OKボタンを押して選択を確認します。
電 源 ボタンを押して
電源をオフにします
ここで電源を切ります。3秒後にカメラの電源が切れます。カメラは次
回電源を入れた時、自動的に録画が開始されるはずです。
メニュー ボタンを 2回
押します
OKボタンを押して、
カードの初期化を
確認します
全ての日付が 削 除
されます
キャンセ ル
2524
ス テップ 4:フロントガラスへのカメラの 取り付け
カメラをマウントに置 き、電 源ケーブルをフロントガラスの周りに注 意し
て配線し、トリムの下にしまい込みます。
車載充電器のケーブルを12V DC電 源コンセントまたは車のシガ ーライ
ターに差し込みます。
車載充電器をカメラに接続します。電源を入れるとカメラは自動的に
録画を開始します。
ミニ5ピンコネク
タ
をドライブレコ
コ
ーダーに差し込
みます
電源ケーブルを
ドライブレコ
ー
ダーに配線
します
充電器を電源コン
セントまたはシガ
ー ラ イタ ー に 差 し
込みます
5. 基本操作
機器の電力
機器が12Vアクセサリソケットまたはシガーライターに差し込まれて、
充電されたら(すなわち、車のエンジンがかかった時)、機器に自動的に
電 源が 入ります。
機器の電源を手動で入れるためには、「ようこそ」の画面が表示される
まで電 源 ボタンを押し続けます。
電源が入ると、カメラは自動的に録画を開始します。
電源ボタンを長押しして、機器の電
源を手 動 で入 れます。

2726
メニューの設定
カメラの電源を入れます。カメラが録画中の場合は、録画ボタンを押
して録画を停止します。モードボタンを押して、希望のモードに切り替
えます。
メニュー ボタンを 1回 押して、モ ードの 設 定メニュー に 入ります。メニュ
ーボタンを2回押して、システム設 定に入ります。
システムのアイコン
ビデオモ ードのアイコン
メ ニ ュ ー ボ タ ン を 押 し て 、希 望
の設定を選択します
モードボタンを押して、希望のモード
に切り替えます。
録画
機器が充電されたら、カメラは自
動的に録画を開始します。機器
が録画中の時、LEDが点灯し、
赤い点が点滅します。録画ボタ
ンを押して、録画を停止します。
電源が入ると、カメラは自動的に録
画を開 始します
再生モード
これらのボタンで再 生を制御します
ビデオの再生
ビデオの再生は、機器またはコ
ン ピ ュ ー タ ー で 実 行 で き ま す 。ま
た、Rexing GPS ロガーを購入
した場合、特殊アプリケーショ
ンで録画を再生できます。
機器でビデオを再生する
た め に は 、再 生 モ ー ド に 切
り替えます。録 画 ボタンとマイ
ク ボ タ ン を 使 用 し て 、希 望 の ビ
デオに切り替えます。OKボタン
を押して再生します。
2928
再生中は、OK(一時停止)、マイク(早送り)、録画(巻き戻し)ボタンを使
用して、ビデオの再生を制御します。
コンピューターでビデオを再生するには、SDカードアダプターを使用
す る か 、ま た は USBケーブルを使用して機器をコンピューターに直接接
続します。
SDカードアダプターを使用し
てビデオを再 生するためには、
メ モ リ ー カ ー ド を 取 り 外 し て 、そ れ を
SDカードアダプターに挿入します。
アダプターをコンピューターに設置
します。
USBケーブルを使用して
ビデオを再生するために
は 、 USBケーブルを機 器とコ
ン ピ ュ ー タ ー に 接 続 し ま す 。機
器に電源が入った後、OKボタ
ンを押してマスストレージを選
択します。
コンピューター上で、機器ド
ライブをに移 動します。ビデオ
は\ICARDV\MOVIEに保存
さ れ ま す 。再 生 す る ビ デ オ を 選
択します。
USBコネクタを
コンピューター
に接続します
マスストレー
ジを選択
駐車モニター
ドライブレコーダーをスマートハードワイヤーキット(別途購入する
必要があります。ASIN: B07RN24B7V)に接続して、パーキングモ
ニター機能をアクティブにします。
Wi-Fi接続
App Store/Google Play ス ト ア か ら「 Rexing Connect」ア プ リ を ダ
ウンロードします。
1. Wi-
Fi機能にアクセスまたは
Wi-Fi機能を終了するために
は、OKボタンを長押しします。
2. スマートフォンでWi-Fi設定を開
き、リストから「SSID: B50_
XXXX」を見つけ、タップして接続
します。(デフォルトのパスワー
ド:12345678)
3. Rexing Connectアプリを開き、
「接続」をタップしてリアルタイ
ムビ デ オストリーミングペ ージ
に入ります。
4. 接続され
たら、ドライブレコーダ
ー画面がカメラ表示に切り替
わり、「Wi-Fi接続」メッセー
ジが表示されます。
Rexing Connectアプリを使用する
と、
ドライブレコーダー画面のライブ
プレビュ ーを表示したり、録画を開
始/停止したり、モバイル機器を使っ
て、録画を見たり、保存したりすること
ができます。
Wi-Fi接続機能の詳しい使い方に
ついては、www.rexingusa.com/
wifi-connect/をご覧ください。***
PCカメラ
マスストレージ
support.rexingusa.com にアクセスして、チュートリアルビデオをご
覧く
ださい。
3130
GPSロガー
(別途購入する必要があります。ASIN:B07BL 4NCMD)
カメラに
接続すると、運転中の車の
速度と位置が記録されます。
GPSビデオプレーヤーを使用して
記録を再生しながら、これらの情報
にアクセスすることができます
(WindowsおよびMacの場
合、rexingusa.comで入手可能)。
メニューボタンを2回押して、システ
ム設定に入ります。
GPS速度単位の設定に切り替え
て、 希望の速度単位を選択しま
す。
GPS信号が検出されると、画面のア
イコンが青から緑に変わります。
チュートリアルビデオを見るために
は、gpsa.rexingusa.comにアクセス
してください。
GPS信号(接続
されていない)
GPS信号(検
索中)
GPS機能(アクテ
ィブ )
写真を撮る
写真を撮るためには、ビデオ
録
画を停止し、写真モードに
切り替えます。
OKボタンを押して写真を撮
ります。
写真を表示するためには、ビ
デオ録画を停止し、再生モー
ドに切り替えます。
録画ボタンとマイクボタンを
押して、写真に切り替えます。
写真を削除するためには、ビ
デオ録画を停止して再生モー
ドに切り替え、が削除したいビ
デオと写真に切り替えます。
メニューボタンを1回押し
て、削除オプションに切り替
えます。
OKボタンを押して、「現在選
択しているものを削除」または
「全て削除」を選択します。
再生モード
に切り替え
て 、表 示 す
るための写
真を選択し
ます
削除オプシ
ョンに切り
替えます
希望のオプ
ションを選
択します
全て削除
現在選択しているものを削除
3332
1. Aperçu
Merci
d’avoir choisi REXING! Nous espérons que vous aimez
votre nouveau produit autant que nous.
Si vous avez besoin d’assistance ou avez des suggestions
pour l’améliorer, veuillez nous contacter. Vous pouvez
nous joindre via [email protected]. Notre équipe
d’assistance vous répondra dans les plus brefs délais.
Rexing a toujours une surprise pour vous. Visitez-nous ici.
https://www.facebook.com/rexingusa/
https://www.instagram.com/rexingdashcam/
https://www.rexingusa.com/support/registration/
Facebook Instagram Site
1. Rexing V1 Dash Cam
2. Chargeur de voiture
3. Support de montage de la Dash Cam et
ruban adhésif de 3 m
4. Câble mini-USB
5. Outil de gestion des câbles
6. Câble Clipso
7. Guide de démarrage rapide de la V1
8. Guide de sécurité de la V1
2. Que contient la boîte
1.
5.
6.
7. 8.
2. 3. 4.

3534
3. Aperçu de la Caméra
1. Fente pour carte Micro SD
2. Bouton POWER
3. Bouton RESET
4. Bouton MENU
5. Bouton MODE
6. Bouton REC*
7. Bouton OK**
8. Bouton MIC***
9. Bouton SCREEN
10. Port mini-USB
11. Port de l’enregistreur GPS
12. Port de la caméra arrière (non
pris en charge)
13. Réglage de l’angle de l’objectif
* La caméra enregistre lorsque la LED clignote en rouge.
** La caméra enregistre lorsque la LED clignote en rouge. La caméra est en
charge ou allumée lorsque le voyant est d’un bleu xe.
*** La caméra est en cours de chargement ou sous tension lorsque le voyant
est d’un bleu xe.
1.
10.
11.
5. 6. 8.
7.
9.
2.
3.
4.
12.
13.
4. Installation
Étape 1: Installez la Dash Cam
Placez le ruban de 3 m sur le support et orientez correctement
le carré du support sur la ligne de toit et de capot du véhicule.
Important! Assurez-vous que le verrouillage en T sur le support
est orienté dans la bonne direction.
Appuyez fermement le support sur le pare-brise. Attendez au
moins 20 minutes avant de monter la caméra.
Orientez le support comme indiqué
Étape 2: Insérez la carte mémoire
La Rexing V1 accepte les cartes mémoire Micro SD [Classe 10 /
UHS-1 ou supérieure] jusqu’à 256 Go. Vous devrez insérer une
carte mémoire avant de commencer l’enregistrement. Avant
d’insérer ou de retirer une carte mémoire, assurez-vous
d’abord d’avoir éteint l’appareil.
Poussez doucement la carte mémoire jusqu’à ce que vous
entendiez un clic et laissez le ressort de dégagement pousser la
carte vers l’extérieur.

3736
3: Alimentez la caméra et formatez
la carte mémoire
Alimentez la caméra en connectant le chargeur à l’allume-cigare
de la voiture et à la caméra.
Pour vous assurer que la V1 enregistre sur votre carte mémoire
correctement et sans erreur, avant de commencer à utiliser
une nouvelle carte mémoire, vous devez la formater dans
la caméra à l’aide de la fonction de formatage. Sauvegardez
toujours les données importantes stockées sur la carte mémoire
avant de la formater.
Pour formater la carte mémoire, assurez-vous d’avoir
inséré votre carte mémoire, puis allumez l’appareil en vous
connectant à une source d’alimentation. Appuyez sur le
bouton REC pour arrêter l’enregistrement. Appuyez ensuite
deux fois sur le bouton MENU pour accéder au menu de
conguration du système. Utilisez les boutons REC et MIC et
accédez au paramètre de formatage. Appuyez sur le bouton OK
pour conrmer la sélection.
Appuyez sur le
bouton POWER
pour éteindre
l’appareil
Vous pouvez maintenant vous déconnecter de
l’alimentation. La caméra s’éteindra après 3 secondes. La
caméra devrait commencer à enregistrer automatiquement
la prochaine fois qu’elle sera allumée.
Appuyez deux
fois sur le
bouton MENU
Appuyez sur le
bouton OK pour
conrmer le
formatage de la
carte mémoire
Toutes les dates seront
supprimées
Annuler

3938
Étape 4: Installation de la caméra sur le pare-brise
Placez la caméra sur le support et passez soigneusement le
câble d’alimentation autour du pare-brise et glissez-le sous
la garniture.
Branchez le câble du chargeur de voiture dans une prise de
courant 12 V CC ou dans l’allume-cigare de la voiture.
Connectez le chargeur de voiture à la caméra. La caméra
démarre automatiquement l’enregistrement lorsqu’elle
est allumée.
Branchez le
connecteur Mini
5pin à la Dash Cam
Acheminez le
câble jusqu’à la
Dash Cam
Branchez le
chargeur dans
une prise de
courant ou un
allume-cigare
5. Opération de Base
Mise sous tension de l’appareil
L’appareil est automatiquement mis sous tension lorsqu’il est
branché sur une prise accessoire de 12 V ou un allume-cigare
et reçoit une charge (c’est-à-dire que le véhicule est démarré).
Pour allumer l’appareil manuellement, appuyez sur le bouton
POWER et maintenez-le enfoncé jusqu’à ce que l’écran d’accueil
s’ache.
La caméra démarre automatiquement l’enregistrement
lorsqu’elle est allumée.
Appuyez et maintenez le
bouton POWER pour allumer
l’appareil manuellement

4140
Paramètres du menu
llumez la caméra. Si la caméra enregistre, appuyez sur le bouton
REC pour arrêter l’enregistrement. Appuyez sur le bouton MODE
et basculez vers le mode souhaité.
Appuyez une fois sur le bouton MENU pour accéder au menu
des paramètres d’un mode. Appuyez deux fois sur le bouton
MENU pour accéder aux paramètres système.
Icône du Système
Icône du mode vidéo
Appuyez sur le bouton
« Menu » pour sélectionner
le paramètre souhaité
Appuyez sur le bouton « Mode »
et basculez vers le mode souhaité.
Enregistrement video
La caméra démarre
automatiquement
l’enregistrement lorsqu’elle
reçoit une charge. L’écran
LED s’allume et le point
rouge clignote lorsque
l’appareil enregistre.
Appuyez sur le bouton
REC pour arrêter
l’enregistrement.
La caméra démarre automatiquement
l’enregistrement lorsqu’elle est allumée.
Mode Lecture
Contrôlez la lecture avec ces boutons
Lecture vidéo
La lecture des vidéos peut être
eectuée sur la caméra ou un
ordinateur. De plus, si vous
avez acheté un enregistreur
GPS Rexing, vous pouvez lire
les enregistrements dans une
application spécialisée.
Pour lire une vidéo sur
l’appareil, basculez en mode
Lecture. Utilisez les boutons
REC et MIC pour basculer sur la
vidéo souhaitée. Appuyez sur le
bouton OK pour lire.
4342
Pendant la lecture, utilisez les boutons OK (pause), MIC (avance
rapide) et REC (rembobinage) pour contrôler la lecture vidéo.
Pour lire une vidéo sur l’ordinateur utilisez un adaptateur de
carte SD ou connectez l’appareil à l’ordinateur directement à
l’aide du câble USB.
Pour lire une vidéo à l’aide
d’un adaptateur de carte
mémoire SD,
retirez la carte
mémoire et insérez-la dans un
adaptateur de carte SD. Insérez
l’adaptateur dans l’ordinateur.
Pour lire une vidéo à
l’aide d’un câble USB,
connectez le câble USB à
l’appareil et à l’ordinateur.
Une fois l’appareil allumé,
appuyez sur le bouton
OK pour sélectionner le
stockage de masse.
Sur l’ordinateur, accédez au
lecteur de périphérique. Les
vidéos sont stockées sur: \
ICARDV\MOVIE.
Sélectionnez la vidéo à lire.
Connectez le
connecteur
USB à
l’ordinateur
Sélectionnez
« Mass
Storage »
Moniteur de stationnement
Connectez la Dash Cam au kit de câblage intelligent pour activer
la fonction de moniteur de stationnement (le kit de câblage
Connexion Wi-Fi
Téléchargez l’application « Rexing Connect » depuis App Store
/ Google Play Store.
1. Pour accéder ou quitter la
fonction Wi-Fi, maintenez
enfoncée le bouton OK.
2. Ouvrez les paramètres Wi-Fi sur
votre téléphone, recherchez «
SSID: B50_ XXXX » dans la liste,
validez pour vous connecter.
(Mot de passe par défaut:
12345678)
3. Ouvrez l’application Rexing
Connect, appuyez sur « Connect
» pour accéder à la page de
diusion vidéo en temps réel.
4. Une fois connecté, l’écran de la
Dash Cam passera à la vue de la
caméra et achera le message
« Wi-Fi Connect ».
À l’aide de l’application Rexing Connect,
vous pouvez acher un aperçu en direct de
l’écran de la Dash Cam, démarrer / arrêter
l’enregistrement, ainsi que visualiser et
enregistrer vos captures, vous êtes votre
appareil mobile.
Pour plus d’informations sur la fonction Wi-
Fi Connect, veuillez visiter www.rexingusa.
com/wi-connect/.
intelligent se vend séparément. ASIN:B07RN24B7V)
Veuillez visiter support.rexingusa.com pour regarder un
tutoriel vidéo.
4544
Enregistreur GPS
(Se vend séparément. ASIN: B07BL4NCMD)
Une fois connecté à la caméra,
le GPS enregistrera la vitesse et
l’emplacement de votre véhicule
pendant que vous conduisez.
Vous pouvez ensuite accéder à ces
informations pendant la lecture
de vos enregistrements à l’aide du
lecteur vidéo GPS (pour Windows et
Mac, disponible sur rexingusa.com).
Appuyez deux fois sur le bouton
MENU et accédez aux paramètres
système.
Basculez vers le paramètre Unité
de vitesse GPS et sélectionnez votre
unité de vitesse préférée.
Une fois le signal GPS trouvé, l’icône
de l’écran passera du bleu au vert.
Veuillez visiter gpsa.rexingusa.com
pour regarder un tutoriel vidéo.
Signal GPS
(non connecté)
Signal GPS
(recherche)
Fonction GPS
(active)
Prises de vue
Pour prendre une photo,
arrêtez l’enregistrement
vidéo et passez en mode
photo.
Appuyez sur le bouton OK
pour prendre une photo.
Pour acher une photo,
arrêtez l’enregistrement
vidéo et passez en mode
lecture.
Appuyez sur les boutons
REC et MIC pour parcourir
vos photos.
Pour supprimer une photo,
arrêtez l’enregistrement
vidéo et basculez en mode
lecture et naviguez entre
les vidéos et les photos
jusqu’à celle que vous
souhaitez supprimer.
Appuyez une fois sur le
bouton MENU et basculez
vers l’option Supprimer.
Appuyez sur le bouton OK
et sélectionnez « Delete
Current » ou « Delete All ».
Basculez
en Mode
lecture et
sélectionnez
une photo à
acher
Basculez
vers l’option
« Delete »
Choisissez
l’option
souhaitée

4746
1.
Descrizione
Grazie per aver scelto REXING! Speriamo ami il nuovo prodotto
quanto noi.
Se serve aiuto, o si hanno suggerimenti per migliorarlo,
contattaci. Puoi raggiungerci tramite [email protected].
Il nostro team risponde non appena possibile.
Sempre una sorpresa in Rexing. Ci trovi qui.
https://www.facebook.com/rexingusa/
https://www.instagram.com/rexingdashcam/
https://www.rexingusa.com/support/registration/
Facebook Instagram Site
1. Dash Cam V1 Rexing
2. Caricabatterie per Auto
3. Piastra di Supporto Dash Cam e Adesivo 3M
4. Cavo Mini-USB
5. Cable Management Tool
6. Cavo Clipso
7. Guida Rapida V1
8. Guida alla Sicurezza V1
2. Nella Confezione
1.
5.
6.
7. 8.
2. 3. 4.

4948
3. Descrizione Telecamera
1. Alloggiamento Scheda Micro
SD
2. Pulsante POWER
3. Pulsante RESET
4. Pulsante MENU
5. Pulsante MODE
6. Pulsante REC*
7. Pulsante OK**
8. Pulsante MIC***
9. Pulsante SCREEN
10. Porta Mini-USB
11. Porta GPS Logger
12. Porta Telecamera Posteriore
(Non Supportata)
13. Regolazione Angolo Obiettivo
*La telecamera registra quando il LED lampeggia rosso.
**La telecamera registra quando il LED lampeggia rosso. Il dispositivo è in
carica o acceso quando il LED è blu sso.
***Il dispositivo è in carica o acceso quando il LED è blu sso.
1.
10.
11.
5. 6. 8.
7.
9.
2.
3.
4.
12.
13.
4. Installazione
Passo 1: Installare la Dash Cam
Porre il nastro 3M sul Supporto e orientare correttamente il
quadrato al tettuccio del veicolo. Importante! Assicurarsi che
l’interlock a T sul Supporto sia orientato nella direzione corretta.
Premere bene il Supporto sul parabrezza. Attendere almeno
20 minuti prima di montare la telecamera.
Orientare il supporto come mostrato
Passo 2: Inserire la Scheda di Memoria
V1 Rexing accetta schede di memoria Micro SD [Classe 10/
UHS-1 o superiore] no a 256GB. Si deve inserire una scheda
di memoria prima di poter cominciare a registrare. Prima di
inserire o rimuovere una scheda di memoria, assicurarsi di aver
spento il dispositivo.
Gentilmente spingere la scheda di memoria nché si sente un
clic, e far rilasciare la molla per espellerla.
5150
Passo 3: Alimentare la Telecamera e Formattare la
Scheda di Memoria
Alimentare la telecamera collegando il caricabatterie
all’accendisigari dell’auto e alla telecamera.
Per assicurarsi che V1 registri correttamente nella scheda
di memoria e senza errore. Prima di iniziare a utilizzare
una nuova scheda di memoria, si deve formattarla nella
telecamera usando la funzione format. Sempre fare il backup
dei dati importanti immagazzinati nella scheda di memoria
prima di formattare.
Per formattare la scheda di memoria, assicurarsi di averla
inserita, poi accendere il dispositivo collegandolo alla
corrente. Premere REC per fermare la registrazione. Poi
premere il pulsante MENU due volte per entrare al Menu
Impostazioni di Sistema. Utilizzare i pulsanti REC e MIC e andare
all’impostazione Format. Premere il pulsante OK per confermare
la selezione.
Premere il
pulsante Power
per spegnere
Ora si può scollegare dalla corrente. La telecamera si
spegne dopo 3 secondi. Dovrebbe cominciare a registrare
automaticamente la volta successiva che si accende.
Premere il pulsante
Menu due volte
Premere il pulsante
OK per confermare
la formattazione
della scheda
Tutti i dati vengono
eliminati
Annulla

5352
Passo 4: Installare la Telecamera sul Parabrezza
Posizionare la telecamera sul supporto e indirizzare con cura
il cavo di alimentazione attorno al parabrezza e inlarlo sotto
il bordo.
Inserire il Cavo del Caricabatterie per Auto nella presa 12V DC o
nell’accendisigari.
Collegare il caricabatterie per auto alla telecamera. La telecamera
inizia automaticamente a registrare una volta accesa.
Inserire il
Miniconnettore a 5
punte alla Dash Cam
Indirizzare
il cavo di
alimentazione
alla Dash Cam
Inserire il
caricabatterie
nella presa o
accendisigari
5. Funzionamento Base
Accensione Dispositivo
Il dispositivo si accende automaticamente quando collegato a
una presa per gli accessori o all’accendisigari e riceve una carica
(il veicolo è in moto).
Per accendere il dispositivo manualmente, tenere premuto il
pulsante POWER nché appare la schermata di benvenuto.
La telecamera automaticamente inizia a registrare
quando accesa.
Enere premuto il pulsante Power
per accendere il dispositivo
manualmente
5554
Impostazioni Menu
Accendere la telecamera. Se la telecamera registra, premere il
pulsante REC per fermare la registrazione. Premere il pulsante
MODE e passare alla modalità desiderata.
Premere il pulsante MENU una volta per entrare al menu
impostazioni per una Modalità. Premere il pulsante MENU due
volte per entrare alle Impostazioni di Sistema.
Icona Sistema
Icona Modalità Video
Premere il pulsante
Menu per selezionare
l’impostazione desiderata
Premere il pulsante Mode e
passare alla modalità desiderata.
Registrazione Video
La telecamera automaticamente
inizia a registrare quando il
dispositivo riceve una carica. I
LED e il punto rosso lampeggiano
quando il dispositivo registra.
Premere il pulsante REC per
fermare la registrazione.
La telecamera automaticamente
inizia a registrare quando accesa.
Modalità Riproduzione
Controllare la riproduzione con i pulsanti
Riproduzione Video
La riproduzione di video può
essere fatta sul dispositivo
o un computer. Anche,
se si è acquistato un GPS
Logger Rexing si possono
riprodurre le registrazioni in
un’applicazione specica.
Per riprodurre un video
sul dispositivo, passare
alla modalità Riproduzione.
Utilizzare i pulsanti REC e
MIC per passare al video
desiderato. Premere il
pulsante OK per riprodurlo.
5756
Durante la riproduzione utilizzare i pulsanti OK (pausa),
MIC (avanzamento veloce) e REC (rewind) per controllare la
riproduzione video.
Per riprodurre un video sul computer utilizzare un adattatore
per schede SD o collegare direttamente il dispositivo al
computer usando il cavo USB.
Per riprodurre un video
utilizzando un adattatore
per schede SD,
rimuovere la
scheda di memoria e inserirla
in un adattatore. Posizionare
l’adattatore nel computer.
Per riprodurre un
video utilizzando un
cavo USB, collegare il
cavo USB al dispositivo
e al computer. Dopo che
il dispositivo si accende,
premere il pulsante OK
per selezionare Mass
Storage.
Sul computer, spostarsi al
drive dispositivo. I video
sono immagazzinati in:
\ICARDV\MOVIE.
Selezionare il video per
riprodurlo.
Collegare il
connettore USB
al computer
Selezionare
Mass Storage
Monitor Parcheggio
Collegare la dash cam al smart hardwire kit per attivare la
funzione monitor parcheggio (Si deve acquistare lo smart
hardwire kit separatamente. ASIN:B07RN24B7V)
Visitare support.rexingusa.com per guardare un video tutorial.
Wi-Fi Connect
Scaricare l’app “Rexing Connect” dall’App Store/Google
Play Store.
1. Per accedere a o uscire dalla
funzione Wi-Fi, tenere premuto
OK.
2. Aprire le impostazioni Wi-Fi sul
telefono, trovare “SSID: B50_ XXXX”
dalla lista, premere per connettersi.
(Password predenita: 12345678)
3. Aprire l’app Rexing Connect,
premere “Connect” per entrare
alla pagina streaming realtime
video.
4. Una volta connesso, lo schermo
della dash cam passa alla visuale
della telecamera e mostra il
messaggio “Wi-Fi Connect”.
Utilizzando l’app Rexing Connect, si
può visualizzare un’anteprima live
dello schermo della dash cam, avviare
/ fermare la registrazione, oltre a
visualizzare e salvare le acquisizioni del
dispositivo mobile.
Per ulteriori istruzioni riguardo la
funzione Wi-Fi Connect, visitare
www.rexingusa.com/wif-connect/.
Telecamera PC
5958
GPS Logger
(Si deve acquistare separatamente. ASIN:B07BL 4NCMD)
Quando connesso alla
telecamera, registra la velocità
e posizione del veicolo mentre
si guida.
Si può poi accedere alle
informazioni mentre si
riproducono le registrazioni
usando il GPS Video player (Per
Windows e Mac, disponibile su
rexingusa.com).
Premere il pulsante MENU
due volte ed entrare alle
Impostazioni di Sistema.
Passare all’impostazione Unità
Velocità GPS e selezionare la
preferita.
Dopo aver trovato un segnale
GPS, l’icona schermo passa da
blu a verde.
Visitare gpsa.rexingusa.com
per guardare un video tutorial.
Segnale GPS
(non connesso)
Segnale GPS
(Ricerca)
Funzione GPS
(attiva)
Scattare Foto
Per scattare una foto,
fermare la registrazione
video e passare alla
Modalità Foto.
Premere il pulsante OK per
scattare una foto.
Per visualizzare una foto,
fermare la registrazione
video e passare alla
Modalità Riproduzione.
Premere i pulsanti REC e
MIC per passare tra le foto.
Per eliminare una foto,
fermare la registrazione
video e passare alla
Modalità Riproduzione e
tra i video e foto a ciò che
si vuole eliminare.
Premere il pulsante
MENU una volta e passare
all’opzione Elimina.
Premere il pulsante OK
e selezionare Elimina
Corrente o Elimina Tutto.
Passare alla
modalità
Riproduzione
e selezionare
una foto per
visualizzarla
Passare
all’opzione
Elimina
Scegliere
l’opzione
desiderata
Elimina Tutto
Elimina Corrente

6160
1.
Visión General
¡Gracias por elegir REXING! Esperamos que ame su nuevo
producto tanto como a nosotros.
Si necesita ayuda o tiene alguna sugerencia para mejorarla,
contáctenos. Puede comunicarse con nosotros a través de
soporte le responderá lo antes posible.
Siempre una sorpresa en Rexing. Visítenos aquí.
https://www.facebook.com/rexingusa/
https://www.instagram.com/rexingdashcam/
https://www.rexingusa.com/support/registration/
Facebook Instagram Site
1. Dash Cam Rexing V1
2. Cargador de coche
3. Placa de Montaje de la Dash Cam y Adhesivo 3M
4. Cable mini-USB
5. Herramienta de gestión de cables
6. Cable Clipso
7. Guía de inicio rápido V1
8. Guía de seguridad V1
2. Qué hay en la caja
1.
5.
6.
7. 8.
2. 3. 4.

6362
3. Resumen de la Cámara
1. Ranura para tarjeta micro SD
2. Botón de encendido
3. Botón de reinicio
4. Botón de menú
5. Botón de modo
6. Botón REC *
7. Botón OK **
8. Botón MIC ***
9. Botón PANTALLA
10. Puerto mini-USB
11. Puerto de registrador de GPS
12. Puerto de cámara trasera (no
compatible)
13. Ajuste de ángulo del lente
*La cámara está grabando cuando el LED parpadea en rojo.
**La cámara está grabando cuando el LED parpadea en rojo. El dispositivo se
carga o se enciende cuando el LED es de color azul jo.
***El dispositivo se está cargando o encendiendo cuando el LED es azul jo.
1.
10.
11.
5. 6. 8.
7.
9.
2.
3.
4.
12.
13.
4. Instalación
Paso 1: Instale la Dash Cam
Coloque la cinta de 3M en el soporte y oriente adecuadamente
el cuadrado del soporte al techo y la línea del capó del vehículo.
¡Importante! Asegúrese de que el enclavamiento en T del
soporte esté orientado en la dirección correcta.
Presione rmemente el soporte sobre el parabrisas. Espere al
menos 20 minutos antes de montar la cámara.
Oriente la montura como se muestra
Paso 2: Inserte la Tarjeta de Memoria
La Rexing V1 acepta tarjetas de memoria Micro SD [Clase
10 / UHS-1 o superior] de hasta 256 GB. Deberá insertar una
tarjeta de memoria antes de poder comenzar a grabar. Antes
de insertar o extraer una tarjeta de memoria, primero
asegúrese de haber apagado el dispositivo.
Empuje suavemente la tarjeta de memoria hacia adentro hasta
que escuche un clic y permita que la liberación del resorte
empuje la tarjeta hacia afuera.

6564
Paso 3: Encienda la Cámara y Formatee la Tarjeta
de Memoria
Encienda la cámara conectando el cargador de la cámara al
encendedor de cigarrillos del automóvil.
Para garantizar que el V1 registre en su tarjeta de memoria
correctamente y sin error. Antes de comenzar a usar una nueva
tarjeta de memoria, debe formatear la tarjeta dentro de la
cámara utilizando la función de formateo. Siempre haga una
copia de seguridad de los datos importantes almacenados en la
tarjeta de memoria antes de formatear.
Para formatear la tarjeta de memoria, asegúrese de haber
insertado su tarjeta de memoria, luego encienda el dispositivo
conectándose a una fuente de alimentación. Presione REC
para detener la grabación. Luego presione el botón MENÚ dos
veces para ingresar al Menú de conguración del sistema. Use
los botones REC y MIC y vaya a la conguración de Formato.
Presione el botón OK para conrmar la selección.
Presione el botón
de Encendido
para apagarlo
Ahora puede desconectarse de la fuente de energía. La
cámara se apagará después de 3 segundos. La cámara
debería comenzar a grabar automáticamente la próxima
vez que se encienda.
Presione el botón
Menú dos veces
Presione el botón
OK para conrmar
formatear
la tarjeta
Toda la fechas será
eliminada
Cancelar

6766
Paso 4: Instalación de la Cámara en el Parabrisas
Coloque la cámara en el soporte y pase con cuidado el cable
de alimentación alrededor del parabrisas y colóquelo debajo de
la moldura.
Conecte el cable del cargador del automóvil a una toma de
corriente de 12 V CC o al encendedor del automóvil.
Conecte el cargador del automóvil a la cámara. La cámara
iniciará automáticamente la grabación una vez encendida.
Conecte el conector
Mini de 5 pines a la
Dash Cam
Dirija el
cable de
alimentación a
la Dash Cam
Enchufe el
cargador a la
toma de corriente
o al encendedor
5. Operación Básica
Energía del dispositivo
El dispositivo se enciende automáticamente cuando se conecta
a una toma de accesorios de 12V o encendedor de cigarrillos y
recibe una carga (es decir, el vehículo ha arrancado).
Para encender el dispositivo manualmente, mantenga
presionado el botón de ENCENDIDO hasta que aparezca la
pantalla de bienvenida.
La cámara comenzará a grabar automáticamente cuando
se encienda.
Mantenga presionado el botón
de Encendido para encender el
dispositivo manualmente

6968
Configuraciones de Menú
Encienda la cámara. Si la cámara está grabando, presione el
botón REC para detener la grabación. Presione el botón MODE y
cambie al modo deseado.
Presione el botón MENÚ una vez para ingresar al menú de
conguración de un Modo. Presione el botón MENÚ dos veces
para ingresar a la Conguración del sistema.
Ícono del Sistema
Ícono de Modo de Vídeo
Presione el botón Menú
para seleccionar la
conguración deseada
Presione el botón Modo y
cambie al modo deseado.
Grabación de vídeo
La cámara comenzará a grabar
automáticamente cuando el
dispositivo reciba una carga.
El LED se ilumina y el punto
rojo parpadeará cuando el
dispositivo esté grabando.
Presione el botón REC para
detener la grabación.
La cámara comenzará a grabar
automáticamente cuando se encienda.
Modo de reproducción
Controla la reproducción con
estos botones
Reproducción de vídeo
La reproducción de vídeos se
puede hacer en el dispositivo
o en el ordenador. Además, si
ha comprado un registrador
de GPS de Rexing, puede
reproducir las grabaciones en
una aplicación especializada.
Para reproducir un vídeo
en el dispositivo, cambie al
modo Reproducción. Use los
botones REC y MIC para alternar
al vídeo deseado. Presione el
botón OK para jugar.
7170
Durante la reproducción, use los botones OK (pausa),
MIC (avance rápido) y REC (rebobinado) para controlar la
reproducción de vídeo.
Para reproducir un vídeo en el ordenador use un adaptador de
tarjeta SD o conecte el dispositivo al ordenador directamente
usando el cable USB.
Para reproducir un vídeo
usando un adaptador de
tarjeta SD, retire la tarjeta
de memoria e insértela en un
adaptador de tarjeta SD. Coloque
el adaptador en el ordenador.
Para reproducir un
vídeo con un cable
USB, conecte el cable
USB al dispositivo y al
ordenador. Después
de que se encienda el
dispositivo, presione el
Botón OK para seleccionar
Almacenamiento Masivo.
En el ordenador, navegue
a la unidad del dispositivo.
Los vídeos se almacenan
en: \ ICARDV \ MOVIE.
Seleccione el vídeo para
reproducir.
Conecte el
conector USB
al ordenador
Seleccionar
Almacenamie
Monitor de Estacionamiento
Conecte la dash cam al kit de cableado inteligente para activar
la función de monitor de estacionamiento (necesita comprar el
kit de cableado inteligente por separado. ASIN: B07RN24B7V)
Visite support.rexingusa.com para ver un vídeo tutorial.
Conexión Wi-Fi
Descargue la aplicación “Rexing Connect” de App Store /
Google Play Store.
1. Para acceder o salir de la función de
Wi-Fi, mantenga presionado OK.
2. Abra la conguración de Wi-Fi en su
teléfono, busque “SSID: B50_XXXX”
en la lista, toque para conectarse.
(Contraseña predeterminada:
12345678)
3. Abra la aplicación Rexing Connect,
toque “Conectar” para ingresar a la
página de transmisión de vídeo en
tiempo real.
4. Una vez conectada, la pantalla de
la dash cam cambiará a la vista de
la cámara y mostrará el mensaje
“Conexión Wi-Fi”.
Con la aplicación Rexing Connect, puede
ver una vista previa en vivo de la pantalla
de la dash cam, iniciar / detener la
grabación, así como ver y guardar sus
capturas en su dispositivo móvil.
Para obtener más instrucciones sobre
la función de Wi-Fi Connect, visite
www.rexingusa.com/wif-connect/.
Cámara PC
Almacenamiento Masivo
7372
Registrador de GPS
(Necesita comprar por separado. ASIN: B07BL 4NCMD)
Cuando se conecta a la cámara,
registrará la velocidad y la ubicación
de su vehículo mientras conduce.
Luego puede acceder a esta
información mientras reproduce
sus grabaciones utilizando el
reproductor de vídeo GPS (para
Windows y Mac, disponible en
rexingusa.com).
Presione el botón MENÚ dos veces e
ingrese la Conguración del Sistema.
Cambie a la conguración de Unidad
de Velocidad GPS y seleccione su
unidad de velocidad preferida.
Después de encontrar una señal
GPS, el icono de la pantalla cambiará
de azul a verde.
Visite gpsa.rexingusa.com para ver
un vídeo tutorial.
Señal GPS
(no conectada)
Señal GPS
(Buscando)
Función GPS
(activa)
Tomando fotos
Para tomar una foto,
detenga la grabación de
vídeo y cambie al Modo de
Foto.
Presione el botón OK para
tomar una foto.
Para ver una foto, detenga
la grabación de vídeo
y cambie al Modo de
reproducción.
Presione los botones REC
y MIC para alternar entre
sus fotos.
Para eliminar una foto,
detenga la grabación de
vídeo y cambie al Modo
de reproducción y cambie
entre los vídeos y las fotos
a la que desea eliminar.
Presione el botón MENÚ
una vez y cambie a la
opción Eliminar.
Presione el botón OK y
seleccione Eliminar actual
o Eliminar todo.
Cambie
al modo
Reproducción
y seleccione
una foto
para ver
Cambia a
la opción
Eliminar
Elige la
opción
deseada
Eliminar Todo
Eliminar Actual

7574
1.
Übersicht
Danke, dass Sie sich für REXING entschieden haben! Wir hoen,
dass Sie unser neues Produkt genauso lieben wie wir.
Wenn Sie Unterstützung brauchen oder irgendwelche
Empfehlungen haben wie wir unser Produkt verbessern
können, wenden Sie sich bitte an uns. Sie können uns
wird Ihnen so schnel wie möglich eine Antwort geben.
Rexing überrascht immer. Erfahren hier Sie mehr über uns.
https://www.facebook.com/rexingusa/
https://www.instagram.com/rexingdashcam/
https://www.rexingusa.com/support/registration/
Facebook Instagram Site
1. Rexing V1 Dash Cam
2. Autoladegerät
3. Dash Cam Halterungplatte & 3M Klebeband
4. Mini-USB Kabel
5. Kabel Management Tool
6. Kabelclips
7. V1 Schnellstartanleitung
8. V1 Sicherheitsanleitung
2. Verpackungsinhalt
1.
5.
6.
7. 8.
2. 3. 4.

7776
3. Kamera übersicht
1. Micro SD Kartenschlitz
2. POWER-Taste
3. RESERT-Taste
4. MENU-Taste
5. MODE-Taste
6. REC-Taste*
7. OK-Taste**
8. MIC-Taste***
9. SCREEN-Taste
10. Mini USB-Anschluss
11. GPS Logger-Anschluss
12. Rückfahrtkameraanschluss
(Nicht unterstützt)
13. Objektivwinkeleinstellung
*Die Kamera nimmt auf wenn die LED rot aufblinkt
**Die Kamera nimmt auf wenn die LED rot aufblinkt. Das Gerät wird
aufgeladen oder ist Betriebsmodus wenn die LED in solidem Blau leuchtet.
*** Das Gerät wird aufgeladen oder ist Betriebsmodus wenn die LED in
solidem Blau leuchtet.
1.
10.
11.
5. 6. 8.
7.
9.
2.
3.
4.
12.
13.
4. Installation
Schritt 1: Die Dash Cam installieren
Legen Sie das 3M-Klebeand auf die Halterung und richten Sie
die Halterung sachgemäß zur Dach- und Motorhaubenlinie des
Fahrzeugs. Wichtig! Stellen Sie sicher, dass die T-Verriegelung
auf der Halterung in die richtige Richtung ausgerichtet ist.
Drücken Sie die Halterung fest auf die Windschutzscheibe.
Warten Sie mindestens 20 Minuten, bevor Sie die
Kamera montieren.
Richten Sie die Camera wie in der Abbildung gezeigt.
Schritt 2: Schieben Sie die Speicherkarte ein.
Der Rexing V1 unterstützt Micro-SD-Speicherkarten [Klasse
10/ UHS-1 oder höher] bis zu 256 GB. Sie müssen zuerst eine
Speicherkarte einschieben, bevor Sie mit der Aufnahme
beginnen. Vergewissern Sie sich, dass das Gerät
ausgeschaltet ist, bevor Sie eine Speicherkarte einschieben
oder entfernen.
Schieben Sie die Speicherkarte vorsichtig ein, bis Sie
ein Klicken hören, und lassen Sie die Federentriegelung die
Karte herausschieben.
7978
Schritt 3: Kamera einschalten und Speicherkarte
formatieren.
Schließen Sie das Ladegerät an den Zigarettenanzünder im Auto
und die Kamera an, um die Kamera mit Strom zu versorgen.
Um sicherzustellen, dass die V1 korrekt und fehlerfrei
Aufnahemen auf Ihre Speicherkarte speichert. Bevor Sie
eine neue Speicherkarte verwenden können, müssen Sie
die Karte in der Kamera mit der Formatierungsfunktion
formatieren. Machen Sie vor dem Formatieren immer
ein Backup von wichtigen Daten, die auf der Speicherkarte
gespeichert sind.
Um die Speicherkarte zu formatieren, stellen Sie sicher, dass
die Speicherkarte eingeschoben wurde. Shalten Sie dann das
Gerät ein, indem Sie es an eine Stromquelle anschließen.
Drücken Sie REC, um die Aufnahme zu beenden. Drücken Sie
dann zweimal die MENU-Taste, um in das System-Setup-Menü
zu gelangen. Verwenden Sie die REC- und MIC-Tasten und
gehen Sie zur Formateinstellung. Drücken Sie die OK-Taste, um
die Auswahl zu bestätigen.
Drücken Sie die
Power-Taste, um das
Gerät auszuschalten
Sie können nun die Verbindung zum Stromnetz
unterbrechen. Die Kamera schaltet sich nach 3 Sekunden
aus. Die Kamera sollte beim nächsten Einschalten
automatisch mit der Aufnahme beginnen.
Drücken Sie die
MENU-Taste
zweimal.
Drücken SIe die
OK-Taste um die
Formatierung
der Karte zu
bestätigen.
Alle Datumsangaben
werden gelöscht
Abbrechen
8180
Schritt 4: Kamera an der Windschutzscheibe
montieren
Legen Sie die Kamera auf die Halterung und drehen Sie das
Stromkabel vorsichtig um die Windschutzscheibe und stecken
Sie es unter den Trimm.
Schließen Sie das Autoladekabel an eine 12V DC-Steckdose oder
an den Zigarettenanzünder des Autos.
Verbinden Sie das Autoladegerät mit der Kamera. Sobald die
Kamera angeschaltet wird, wird sie automatisch anfangen
Aufnahmen zu machen.
Schließen Sie den
Mini 5pin-Verbinder
an die Dash Cam an.
Leiten Sie das
Netzkabel bis
zur Dash Cam
Schließen Sie das
Ladegerät an eine
Steckdose oder den
Zigarettenanzünder an.
5. Grundbedienung
Geräteleistung
Das Gerät wird automatisch eingeschaltet, wenn es an
eine 12V-Zubehörsteckdose oder den Zigarettenanzünder
angeschlossen wird, und wird aufgeladen (d.h. das Fahrzeug ist
gestartet).
Um das Gerät manuell einzuschalten, drücken und halten Sie
die POWER-Taste, bis die Wilkommennachricht erscheint.
Die Kamera beginnt automatisch mit der Aufnahme, wenn sie
eingeschaltet wird.
Press an hold the POWER button
to turn the device on manually
8382
Menüeinstellungen
Schalten Sie die Kamera ein. Wenn die Kamera gerade
aufnimmt, drücken Sie die REC-Taste, um die Aufnahme zu
beenden. Drücken Sie die MODE-Taste und wechseln Sie in den
gewünschten Modus.
Drücken Sie die MENU-Taste einmal, um in das Einstellungsmenü
zu gelangen und ein Modus zu nden. Drücken Sie die MENU-
Taste zweimal, um die zu den Systemeinstellungen zu gelangen.
Systemsymbol
Video-Modussymbol
Drücken Sie die MENU-
Taste um die gewünschte
EInstellung zu wählen.
Drücken Sie die Modus-Taste und
wechseln Sie in den gewünschten Modus
Videoaufnahme
Die Kamera beginnt
automatisch mit der Aufnahme,
wenn das Gerät aufgeladen
wird. Die LED leuchtet rot auf,
wenn das Gerät aufnimmt.
Drücken Sie die REC-Taste, um
die Aufnahme zu beenden.
Die Kamera beginnt automatisch mit der
Aufnahme, wenn sie eingeschaltet wird.
Playback-Modus
Steuern Sie das Playback mit
diesen Tasten
Video-Playback
Die Wiedergabe von Videos
kann auf dem Gerät oder einem
Computer durchgeführt werden.
Auch wenn Sie einen Rexing GPS-
Logger gekauft haben, können
Sie die Aunahmen mit einer
speziellen Anwendung abspielen.
Um ein Video auf dem
Gerät abzuspielen, wechseln
Sie in den Playback-Modus.
Verwenden Sie die REC-, und MIC-
Tasten, um in den gewünschten
Video umzuschalten. Drücken
Sie die OK-Taste um das Video
abzuspielen.
8584
Verwenden Sie während der Wiedergabe die Tasten OK
(Anhalten), MIC (Vorspulen) und REC (Zurückspulen), um die
Videowiedergabe zu steuern.
Um ein Video auf dem Computer abzuspielen verwenden Sie
entweder einen SD-Kartenadapter oder schließen Sie das Gerät
mit dem USB-Kabel direkt an den Computer an.
Um ein Video mit einem SD-
Kartenadapter abzuspielen,
entfernen Sie die Speicherkarte
und schieben Sie sie in einen SD-
Kartenadapter ein. Schieben Sie
den Adapter in den Computer ein.
Um ein Video mit
einem USB-Kabel
abzuspielen, schließen
Sie das USB-Kabel an das
Gerät und den Computer
an. Nachdem das Gerät
eingeschaltet wurde,
drücken Sie die OK-Taste,
um Massenspeicher zu
wählen.
Gehen Sie auf dem
Computer zum Laufwerk
des Geräts. Die Videos
werden unter gespeichert:
\ICARDV\MOVIE.
Wählen Sie das Video um es
abzuspielen.
Verbinden
Sie den USB-
Verbinder an
den Komputer
Parkmonitor
Schließen Sie die Dash Cam an das Smart Hardwire Kit an,
um die Funktion des Parkmonitors zu aktivieren (Das Smart
Hardwire Kit muss separat gekauft werden. ASIN:B07RN24B7V)
Besuchen Sie bitte die Website support.rexingusa.com um ein
Tutorial-Video anzuschauen.
Wi-Fi-Verbindung
Laden Sie die “Rexing Connect-”App auf App Store/Google
Play Store herunter.
1. Um die WiFi-Funktion aufzurufen
oder diese zu verlassen, drücken und
halten Sie die OK-Taste.
2. Önen Sie die Wi-Fi-Einstellungen auf
Ihrem Telefon, nden Sie “SSID:B50_
XXXX” auf der Liste,und tippen Sie
auf verbinden. (Standardpasswort:
12345678)
3. Önen SIe die Rexing Connect App
und tippen auf “Verbinden” um zur
Echtzeit-Video-Streaming Seite zu
gelangen.
4. Sobald die Verbindung abgeschlossen
ist, wird der Dash Cam-Bildshirm in
den Kamerablick umschalten und die
Message “Wi-Fi Connect” anzeigen.
Wählen Sie
Massenspeicher
PC-Kamera
Massenspeicher
Mit der Rexing Connect App können Sie
sich eine Live-Vorschau des Dash-Cam-
Bildschirms anschauen, die Aufnahme
starten / stoppen sowie Ihre Aufnahmen
anschauen und speichern - Sie sind Ihr
mobiles Gerät.
Für weitere Anweisungen über die Wi-Fi-
Verbindungsfunktion gehen Sie bitte auf:
www.rexingusa.com/wi-connect/.
8786
GPS-Logger
(Separat erhältlich. ASIN: B07BL4NCMD)
Wenn mit der Kamera verbunden,
zeichnet sie während der Fahrt die
Geschwindigkeit und den Ort Ihres
Fahrzeugs auf.
Sie können dann während des
Abspielens Ihrer Aufnahmen mit
dem GPS-Video-Player (für Windows
und Mac, erhältlich bei rexingusa.
com) auf diese Informationen
zugreifen.
Drücken Sie zweimal die MENU-
Taste undgehen Sie in die
Systemeinstellungen.
Wechseln Sie zur Einstellung der
GPS-Geschwindigkeitseinheit
und wählen Sie Ihre gewünschte
Geschwindigkeitseinheit.
Nachdem ein GPS-Signal
gefunden wurde, schaltet das
Bildschirmsymbol von blau zu grün.
BEsuchen Sie bitte die Website
gpsa.rexingusa.com um ein Video-
Tutorial anzuschauen.
GPS-Signal
(Nicht verbunden)
GPS-Signal
(Wird gesucht)
GPS-Funktion
(Aktiviert)
Fotos werden
aufgenommen
Stoppen Sie die
Videoaufnahme und
wechseln Sie in den
Fotomodus, um ein Foto
zu machen.
Stoppen Sie die
Videoaufnahme und
wechseln Sie in den
Playback-Modus, um ein
Foto anzuschauen.
Drücken Sie die REC- und
MIC-Tasten, um durch Ihre
Fotos zu navigieren.
Um ein Foto zu löschen,
stoppen Sie die
Videoaufnahme und
wechseln Sie in den
Playback-Modus und
navigieren bis zu dem
Foto oder Video, das Sie
löschen möchten.
Drücken Sie die MENU-
Taste einmal und gehen
zur Löschoption.
Drücken Sie die OK-Taste
und wählen Aktuelles
Löschen oder Alle Löschen.
Wechseln
Sie in den
Playback-
Modus und
wählen
Sie ein
Foto zum
Ansehen
aus.
Gehen
Sie zur
Löschoption
Wählen
Sie die
gewünschte
Option.
Alle Löschen
Aktuelles Löschen

88