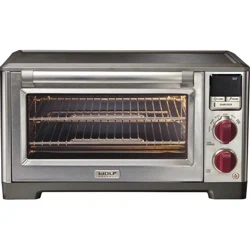
1 Control Panel Display 2 Probe Button 3 Convection Button 4 Start/Stop Button 5 Selector Bezel 6 Temperature/Darkness Knob 7 Time/Slice Knob 8 Baking Pan With Broil Rack 9 Oven Racks (2) 10 Slide-Out Crumb/Drip Tray 11 Probe 11a Plug End – Insert Into Probe Jack 11b Temperature Probe – Insert Into Food 12 Probe Jack 13 Removable Side Rack Guides (2) 14 Oven Light Button 15 Rating Plate (on back) 16 Oven Light With Removable Glass Cover 17 CAUTION: HOT SURFACE. The temperature of accessible surfaces may be high when the appliance is operating.
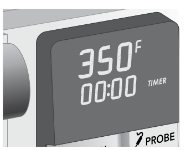
Control Panel Display: The display will show oven temperature and timer settings, probe temperature settings, error messages, toast slices and shade selections, icons for probe and convection cooking, and the Wolf Gourmet logo when in sleep mode.
Probe Button: Press the PROBE button to cook by temperature. A probe takes the guesswork out of knowing when food is properly cooked in ROAST or BAKE mode.
Convection Button: Press CONV if convection heating is desired. Convection uses forced hot air to speed the baking/ roasting process for faster, more even cooking.
START/STOP Button: Press the START/STOP button to start and to turn OFF the oven mode selected. The light will be illuminated in red and a chime will sound when the cycle is started. START/STOP also is used to engage or turn off the timer.
Selector Bezel: Rotate selector bezel to desired cooking mode: PROOF, WARM, ROAST, BAKE, BROIL, or TOAST/BAGEL.
Temperature/Darkness Knob: Use this knob to set the temperature in WARM, ROAST, BAKE, and BROIL cooking modes and shade of toast when using TOAST/BAGEL mode. Turn the knob to the right to increase or to the left to decrease.
Time/Slice Knob: The TIME/SLICE knob can be used as a timer or to select the number of slices to toast. Turn the knob to the right to increase time and number of slices or to the left to decrease. Turn all the way to the left to choose STAY ON mode.
Baking Pan With Broil Rack: The baking pan with broil rack can be used separately as a baking pan and cooling rack or together as a broiler pan.
Oven Racks: The removable oven racks have an opening towards the front for easy removal. Insert the rack or racks in any of the three positions inside the oven.
Slide-Out Crumb/Drip Tray: The full-size crumb/drip tray slides out of the oven for easy cleanup.
Probe: Insert the plug end (11a) into the probe jack located on the wall of the oven. The long, thin pointed end of the probe (11b) is the temperature probe which is inserted into the thickest area of the food away from any bones or fat to measure internal temperature and ensure perfectly cooked food.
Probe Jack: The probe jack located on the right side wall of the oven is equipped with a cover to keep the connection clean between uses. Simply use the plug end of the probe to slide the cover aside while inserting the end into the jack.
Side Rack Guides: Located on the left and right side inside the oven. The guides are removable for easy cleaning
Oven Light Button: Press the oven light button to turn the oven light on and off. The light makes viewing the food easy.
Rating Plate: Model number and rating information can be found on the back of the oven directly behind the display panel.
Oven Light with Removable Glass Cover: The oven light has a removable glass cover to protect the G9 (25-watt) halogen bulb and make it easy to replace the bulb.
Getting Started
BEFORE FIRST USE To ensure residual oil from the manufacturing process has been removed, we recommend heating the oven in CONV mode at 450°F (230°C) for 5 minutes before first use. Wash baking pan, broil racks, side rack guides, and oven rack before using following “Cleaning” instructions
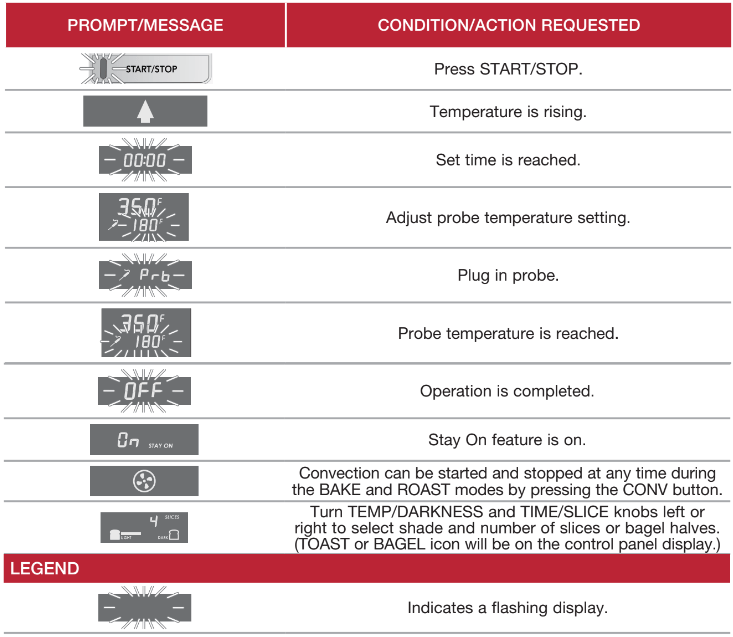
DISPLAY PROMPTS AND MESSAGES
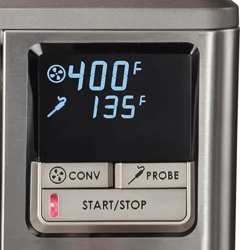
SETTING THE TEMPERATURE
To change from Fahrenheit to Celsius: Press and hold the PROBE button for 6 seconds. If unplugged, the oven will default to the chosen temperature setting.
Oven temperature can be adjusted before or during the cycle by turning the Temp/Darkness knob to the right to increase the temperature setting or to the left to decrease the temperature.
The temperature adjusts in 5-degree increments.
While preheating, the display temperature will toggle between the set temperature of the oven and the actual temperature in the oven cavity, with an up arrow indicating rising temperature.
Once heated to the set temperature, a chime will sound and the temperature will hold steady.
SETTING THE TIMER
Default time for all modes is “00:00.”
Time can be set anytime and can be adjusted during cooking time by turning the Time/Slice knob to the right to increase cooking time or to the left to decrease cooking time.
Press START/STOP to begin timer countdown or wait5 seconds and it will begin automatically to count down (except if timer is set before preheat cycle begins).
While setting the time, the timer adjusts in 1-minute increments, then in 5-minute increments, and increasing to 15-minute increments as the knob is held. The maximum setting of the timer is 4 hours.
When the timer is set for less than 1 hour, the display will show minutes and seconds.If set for more than 1 hour, the display shows hours and minutes.
Care Recommendations
BEFORE CLEANING
1. Unplug oven and let cool.
Control Panel Display
Wipe with a slightly damp sponge. Protect display when cleaning any other surfaces.
Stainless Steel Exterior
Use a nonabrasive stainless steel cleaner and apply with a soft lint-free cloth. To bring out the natural luster, lightly wipe surface with a water-dampened microfiber cloth followed by a dry polishing cloth. Always follow the grain of stainless steel. Clean using a soft, nonabrasive stainless steel cleaner like Signature Polish. Apply with a soft, 100% lint-free cloth. Signature Polish can be ordered via their website at www.signaturepolishonline.com.
Non-Stainless Steel Exterior
Wipe outside of oven with a damp cloth. Do not use abrasive cleansers or metal scouring pads. Or, spray with all-purpose cleaner. Wipe clean with a lint-free cloth.Interior of Oven Allow to cool completely before cleaning. To clean inside of oven, wipe oven walls and bottom of oven with a damp, soapy cloth. Repeat with a damp, clean cloth. For stubborn stains, use a plastic scouring pad.
Glass Oven Window
When window is cool, use a razor blade to gently lift baked-on foods. Spray glass cleaner on cloth to clean. Wipe with a damp sponge to rinse. Dry thoroughly with a clean cloth.
Oven Racks and Side Rack Guides
Clean with a mild abrasive cleaner. Wipe with a damp sponge to rinse. Dry thoroughly with clean cloth.
Crumb/Drip Tray
Dishwasher-safe. Or, hand wash in soapy water, rinse, and dry thoroughly.
Baking Pan and Broil Rack
Dishwasher-safe. Or, hand wash in soapy water, rinse, and dry thoroughly
Control Knobs
Wipe with a damp, soapy cloth. Repeat with a damp, clean cloth. Dry thoroughly with a clean cloth.
Probe
Clean the plug end of probe with soapy water. Rinse and dry thoroughly with a clean cloth.
REMOVING THE HALOGEN LIGHT BULB
NOTE: Halogen bulbs must be replaced without touching the bulbs with the fingers. When replacing the halogen bulb it is necessary to use a soft clean cloth while handling the bulb.
CAUTION: Burn Hazard. Allow the bulb to cool before removing.
Do not touch the bulb.
1. Unplug the oven and allow to cool completely.
2. Locate the oven light in the back right side of the oven.
3. To remove the glass cover, unscrew the cover by turning counter clockwise and remove.
4. To remove the halogen light bulb, gently pull the bulb straight out. Do Not attempt to unscrew the bulb.
REPLACING THE HALOGEN LIGHT BULB
1. To replace the standard 25 W G9 halogen bulb, carefully align and push the prong end of the bulb into the socket in the back right side of the oven.
2. Place the glass cover over the bulb and turn the cover clockwise until tight.
Troubleshooting
and “Err 1” displayed.
Probe is broken. Contact our customer care center.
and “Err 2” displayed.
Probe is dirty or greasy. Clean the plug end of probe with soapy water. Rinse and dry. Insert and remove the plug end into the wall jack several times. If still not working, contact our customer care center.
and “Err 3” displayed.
Probe plugged in during PROOF, WARM, BROIL, or TOAST/BAGEL modes. Remove probe.
How large a bake pan will the oven hold?
The oven will hold most 9" x 13" (23 cm x 33 cm) bake pans, except those with wide handles, including a Le Creuset pan.
How big a chicken will the oven handle?
The oven will hold a 5.5-pound (2.5-kg) chicken.
When should I choose BAKE or ROAST?
Choose BAKE for foods that rise such as cookies, breads, rolls, and cakes.
Choose ROAST for large, more dense foods that require browning such as a roast.
Do the heaters cycle in BROIL mode?
Yes.
My heaters are not glowing.
Bottom heaters may not glow very red. This is normal for this long-life incoloy heater. Adequate heat is still being provided.
If I want to toast bread, what setting is best?
The TOAST mode is best for toasting both sides of sliced breads and bagels, or use the BROIL mode for open-faced sandwiches, baguettes, and crostini. The BROIL mode activates the top heating element and is great when toasting is required on one side only, or the breads can be "flipped" when the desired level of browning is reached. Be sure the baking rack is in the topmost position for optimal browning.
What is the companion broil pan made of?
The broil pan is made of stainless steel.
My oven appears to be ‘‘sleeping’’; the screen is dark. What can I do?
Your oven defaults to sleep mode if the oven is either not performing a task or has not been activated for 30 seconds. To ‘‘wake’’ it up, simply turn any knob or press any button and the screen will reactivate.


 and “Err 1” displayed.