
9301101
0
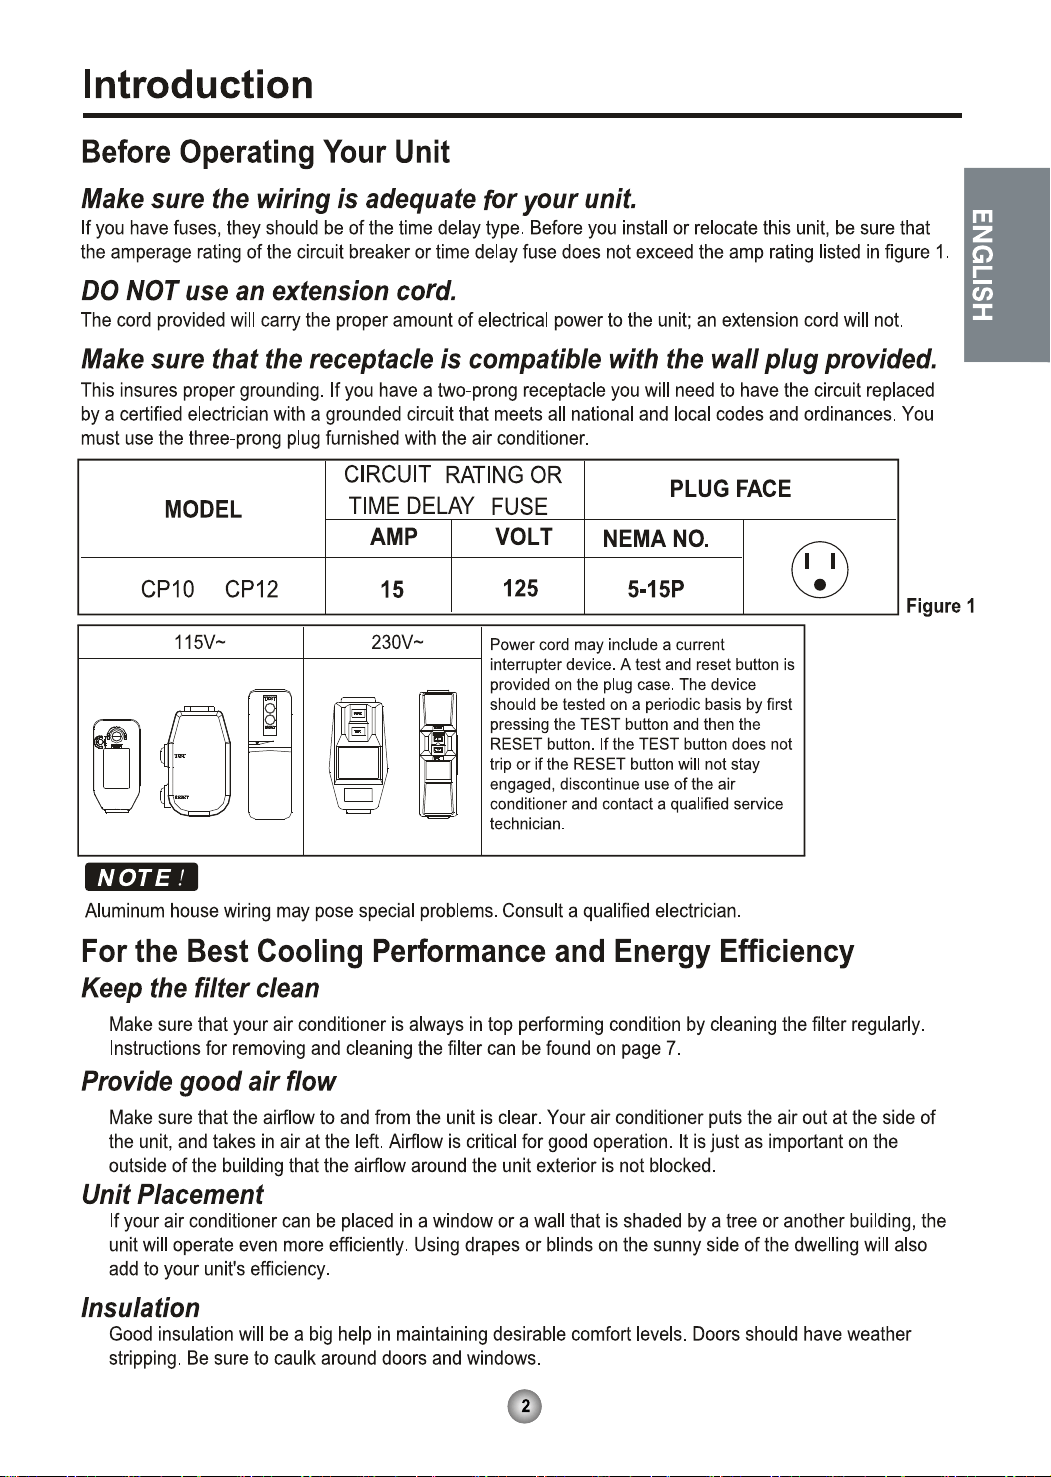
F
Power
Mode
Timer
0
n
/0ff
Fan
Speed
Temp
CoolMoney
Saver
®
Fan
Only
Dry
hr
Auto
Swing
0
F
Power
Mode
Timer
0
n
/0ff
Fan
Speed
Temp
CoolMoney
Saver
®
Fan
Only
Dry
hr
Auto
Swing
91............................................................................................ ytefaS
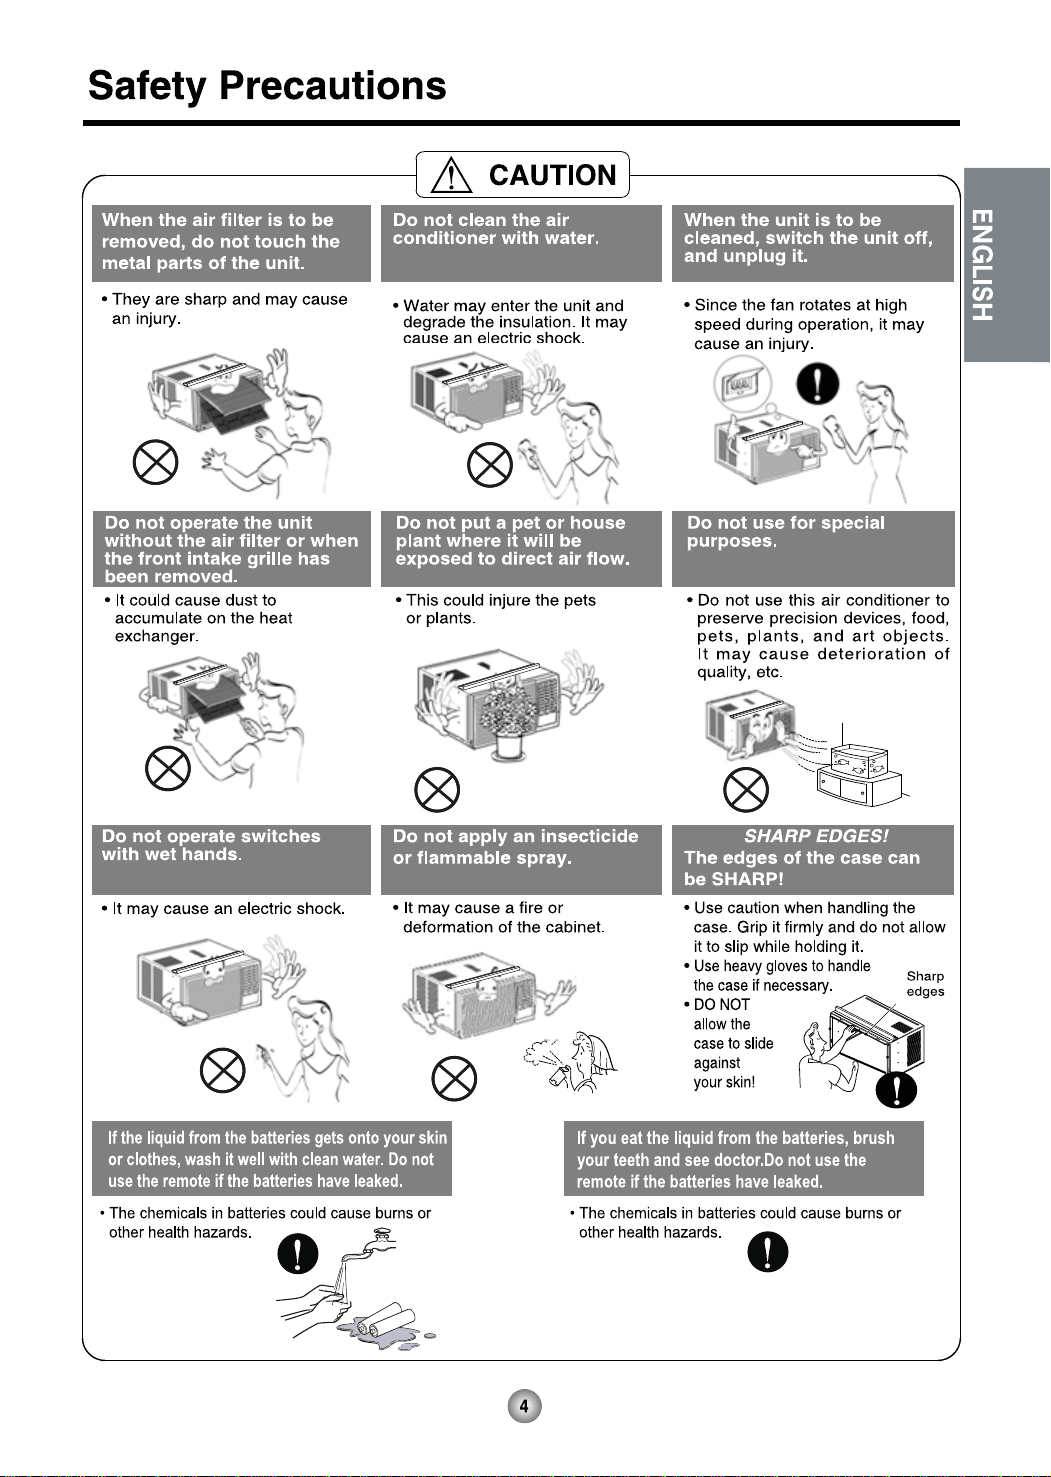
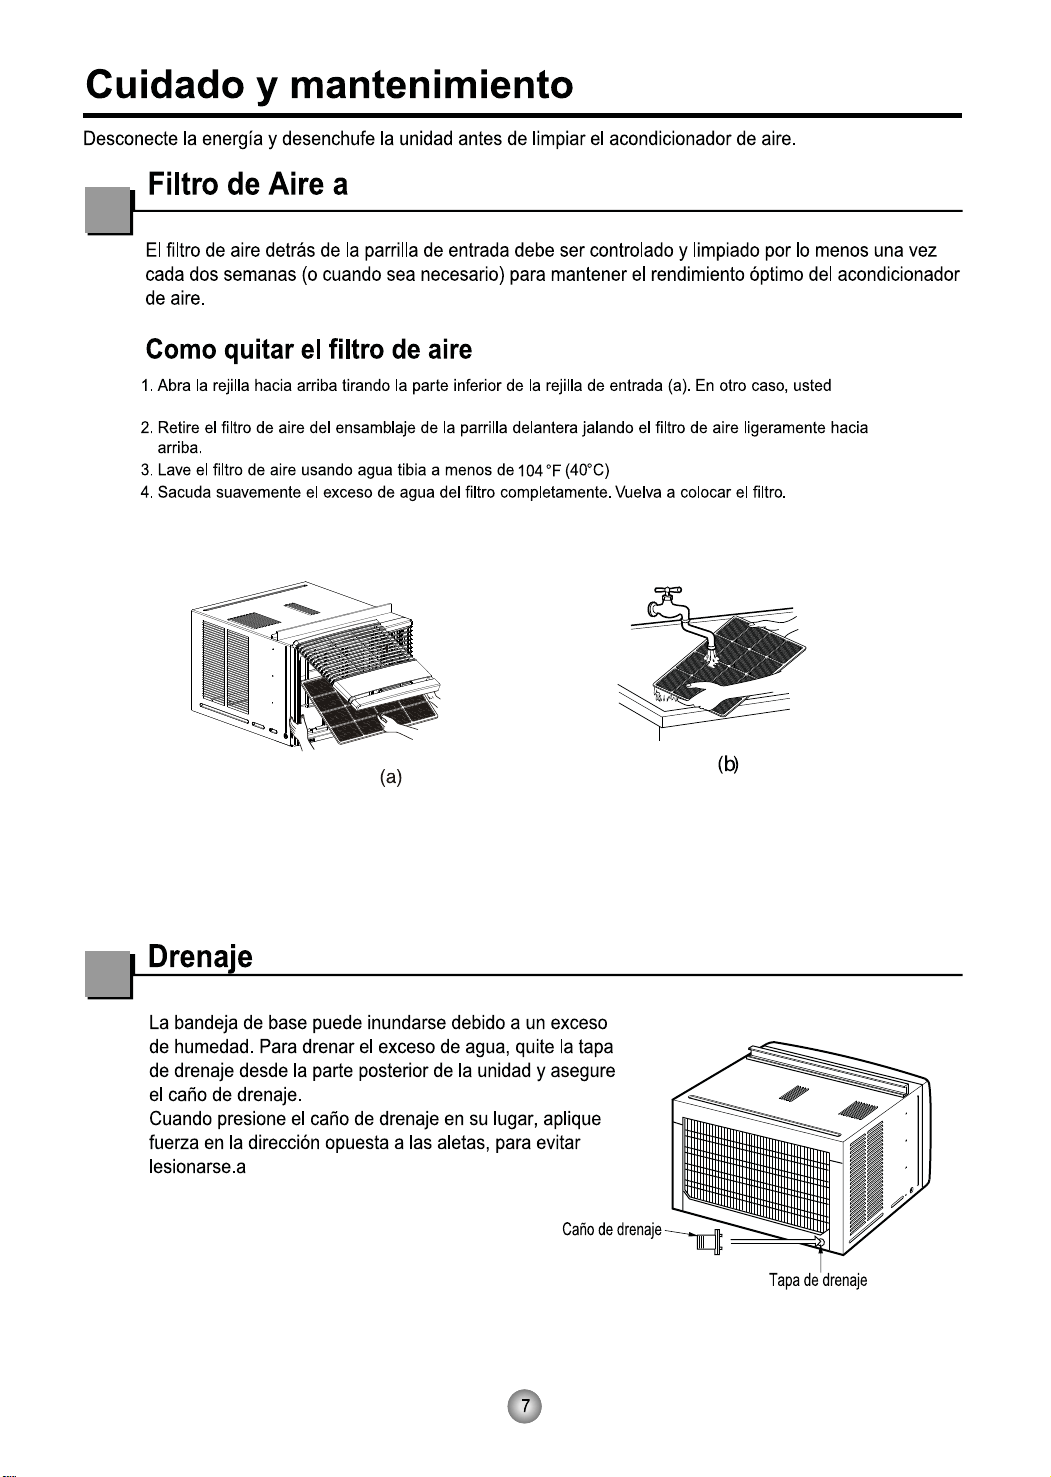
For inner cleaning, contact an Authorized Service Center or a dealer.
Do not use harsh detergent that causes corrosion or damage on the unit.
Harsh detergent may also cause failure of product, fire, or electronic shock.
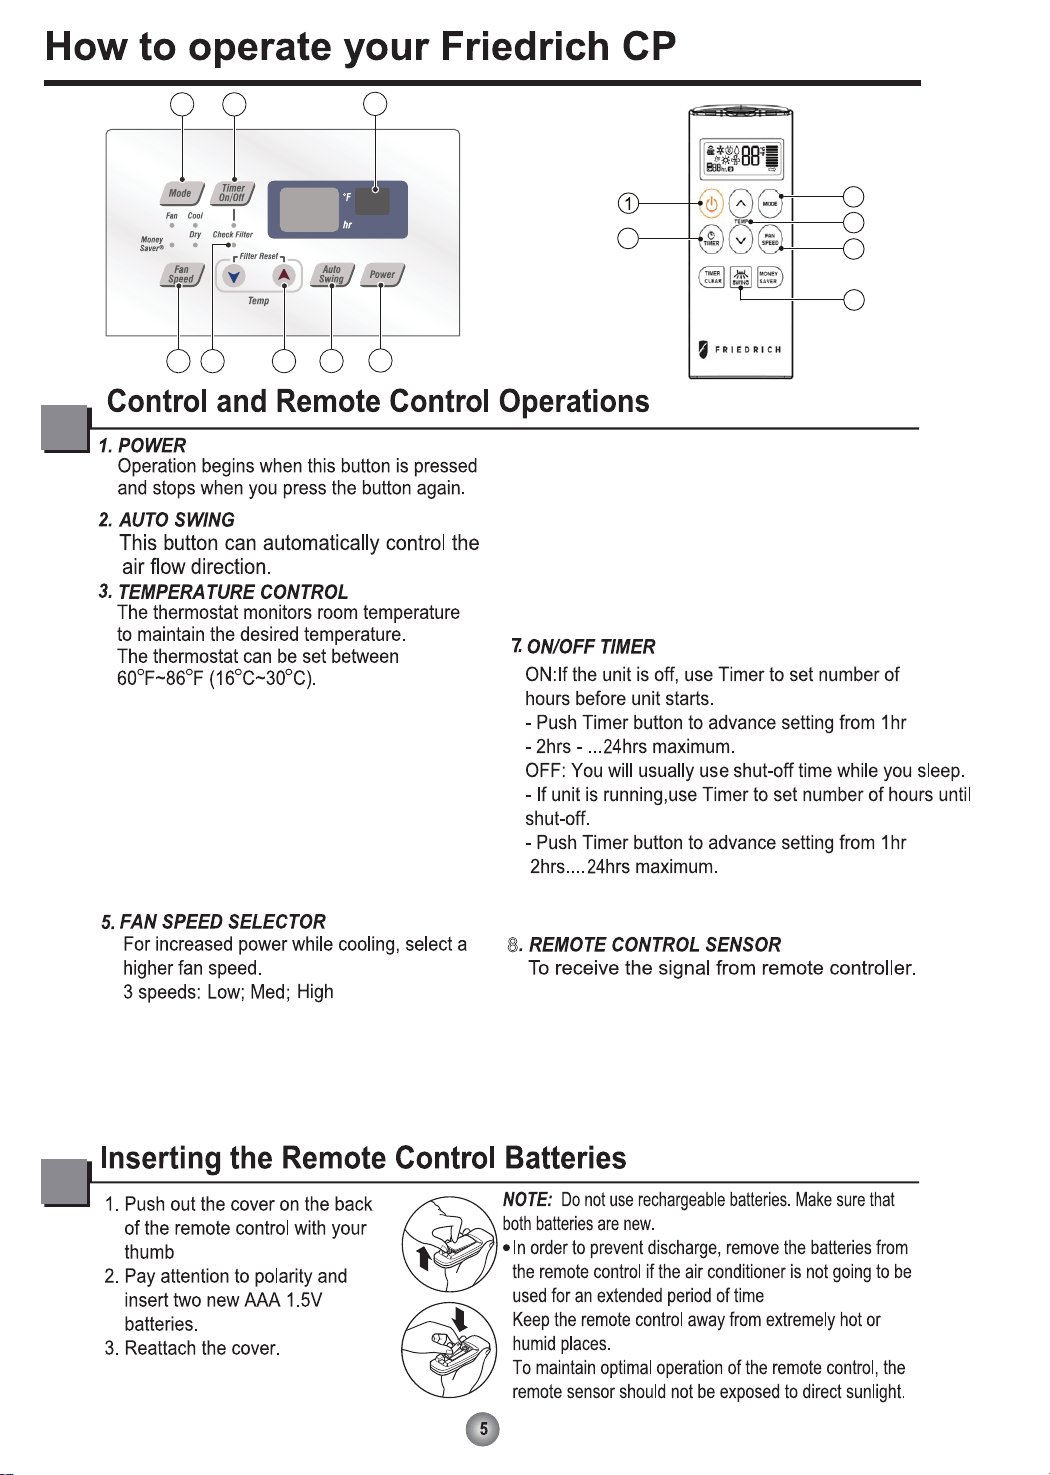
Check Filter: Your ‘Check Filter’ LED will
light up after approximately 250 hours of
operation, notifying you that your filter needs
to be cleaned.
*Timer Clear: On remote control, ‘Timer Clear’ button
will cancel the timer setting
8
2
1
3
4
5
6
7
8
3
2
5
6
7
Filter Reset: press ‘Temp ∨∧’ together to
turn off ‘Check Filter’ light.
*Filter Reset must be done from unit control
panel, not remote control
Push the ‘Mode’ button to rotate between
MoneySaver → Cool → Fan → Dry modes.
(select Dry mode for dry/dehumidifier
operation)
MoneySaver: The fan will stop when the compressor
stops cooling. The fan will turn on approximately
every 3 minutes to sample to room air and determine
if more cooling is needed.
Cool: fan runs continually for normal cooling operation
Fan Only: Fan-only operation
*MoneySaver has it’s own button on your remote
control
4. CHECK FILTER & FILTER RESET
6. OPERATION MODE SELECTOR
(BOTTOM-GUIDE)
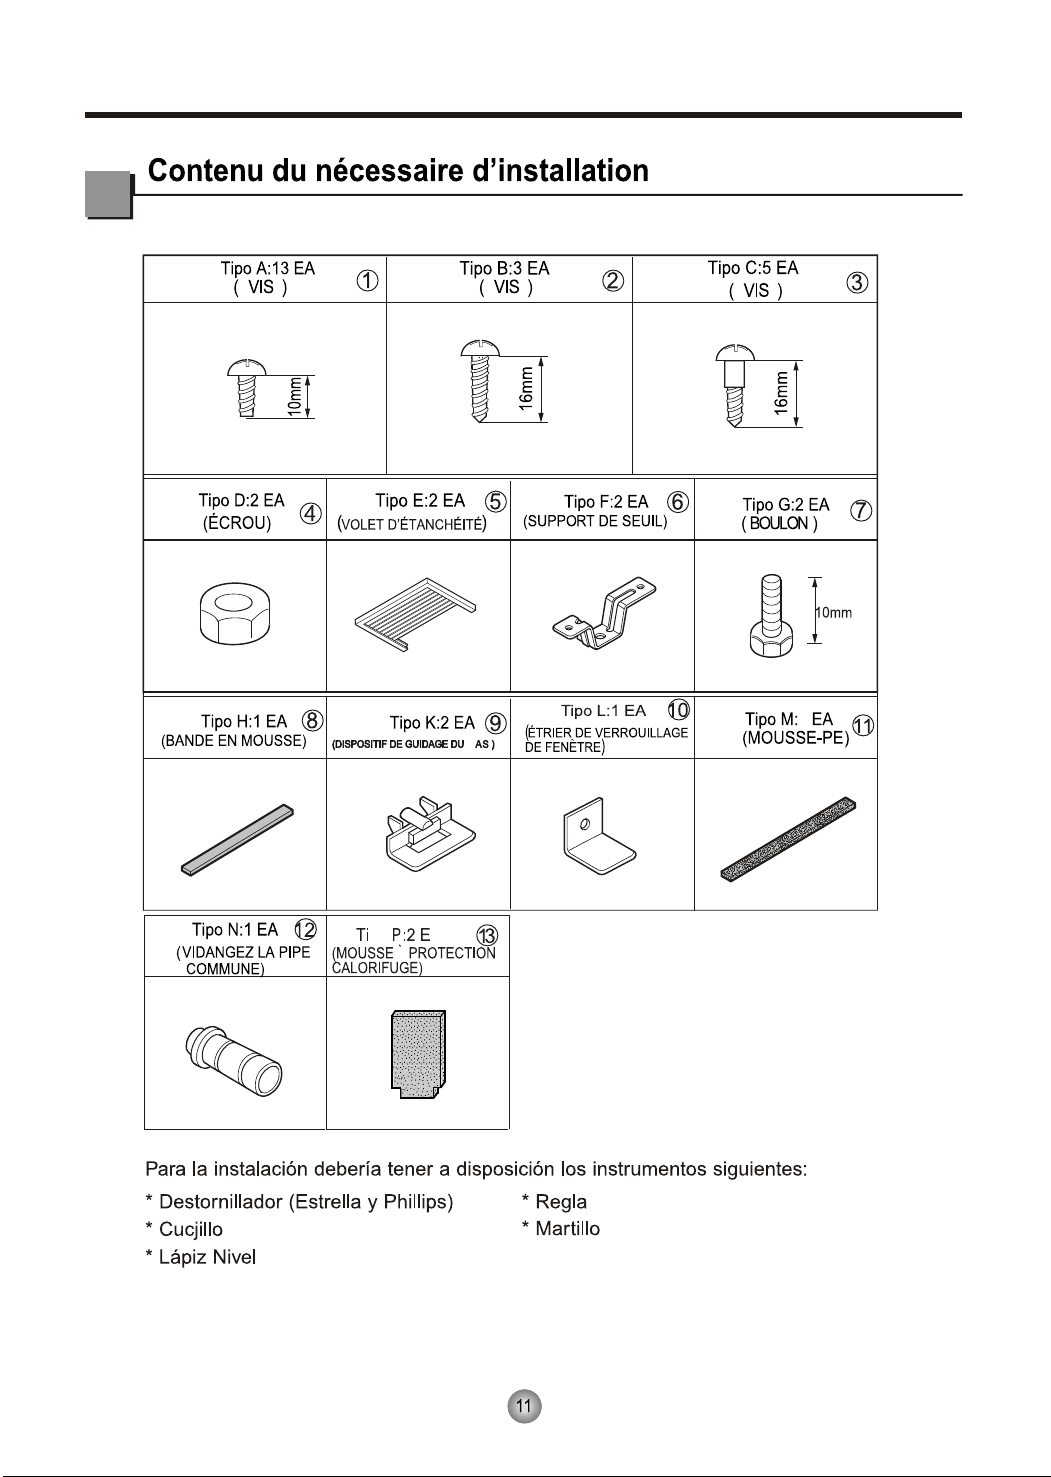
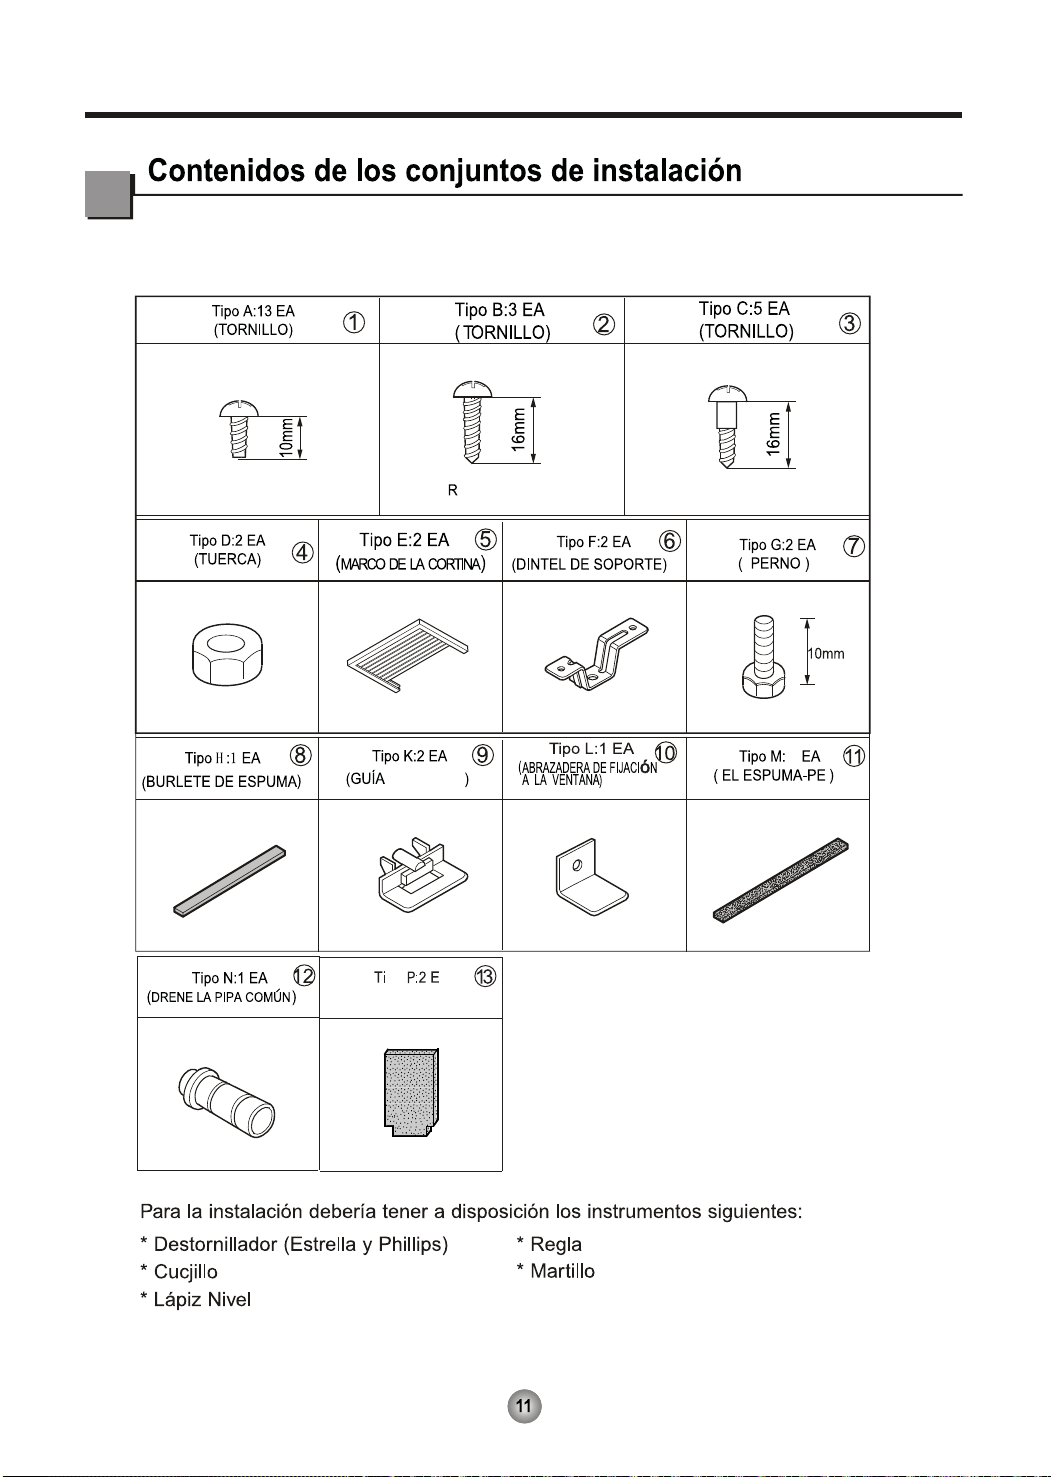
Type N:2EA
(FOAM-HEATPROOF)
13
Fig.5-2Fig.5-1 Fig.5-3
Close-up View
Front
Fig.5-4
Front Front
Cut the window sash seal to the proper length.
Peel off the backing and attach the Foam-PE
to the underside of the window sash and
bottom of window frame
4a. Make sure the pins on the bottom frame
guide are facing the back of the unit.(Fig.5-1)
4b. Align both pins to the slotted areas under
the cabinet.(Fig.5-2,Fig.5-3)
4c. Push upward fully to insert pins into slotted
areas and secure frame guide.(Fig.5-4)

Fig.12
Fig.12
Fig.11
Fig.11
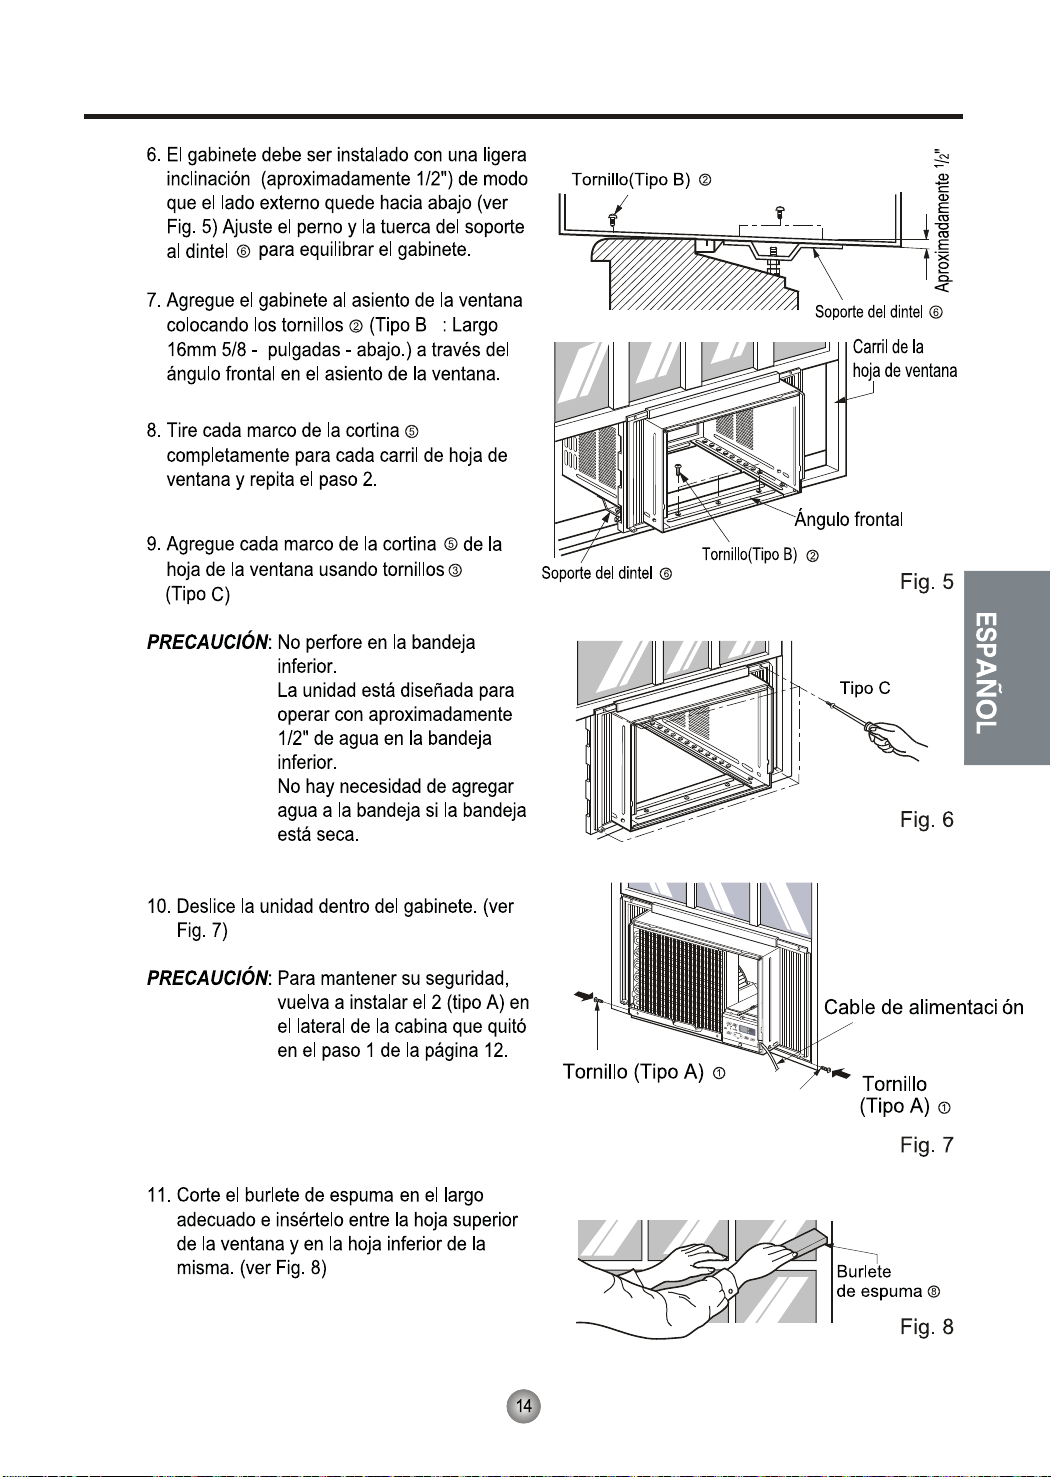
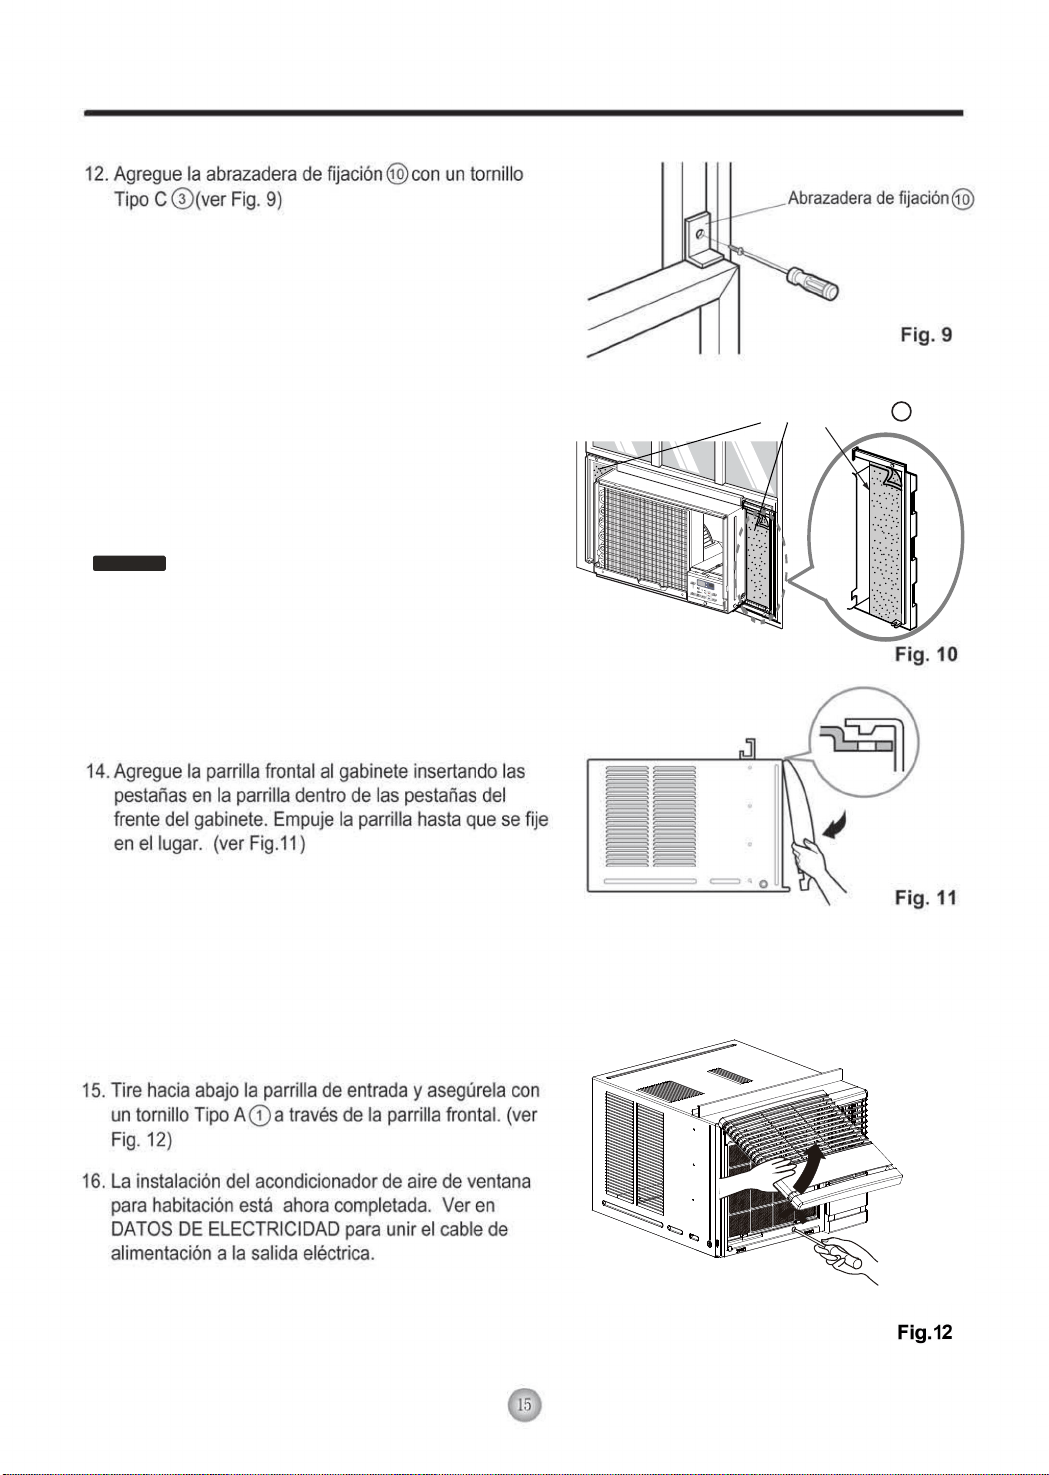
13.
14.
15.
16.
(Fig.10)
Fig.10
13
Foam-Heatproof improves
the cooling capability of the unit.


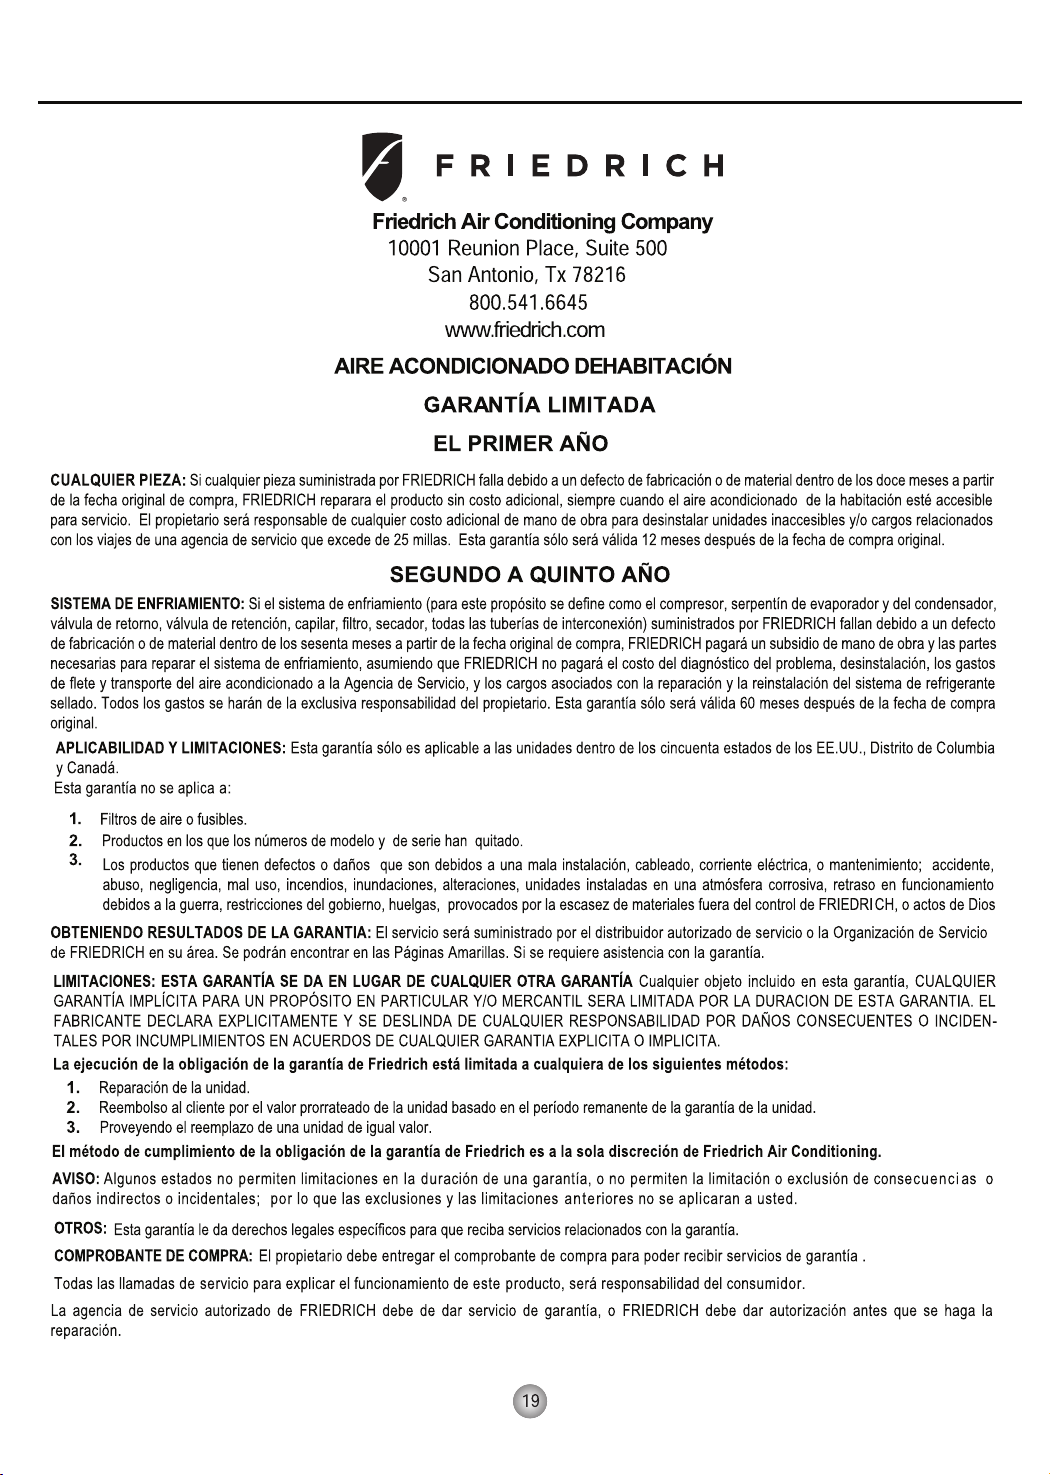
Friedrich Air Conditioning Company
10001 Reunion Place, Suite 500
San Antonio, TX 78216
800.541.6645
www.friedrich.com
ROOM AIR CONDITIONERS
LIMITED WARRANTY
FIRST YEAR
ANY PART: If any part supplied by FRIEDRICH fails because of a defect in workmanship or material within twelve months from
date of original purchase, FRIEDRICH will repair the product at no charge, provided room air conditioner is reasonably accessible
for service. Any additional labor cost for removing inaccessible units and/or charges for mileage related to travel by a Service
Agency that exceeds 25 miles one way will be the responsibility of the owner. This remedy is expressly agreed to be the exclusive
remedy within twelve months from the date of the original purchase.
SECOND THROUGH FIFTH YEAR
SEALED REFRIGERANT SYSTEM: If the Sealed Refrigeration System (defined for this purpose as the compressor, condenser
coil, evaporator coil, reversing valve, check valve, capillary, filter drier, and all interconnecting tubing
) supplied by FRIEDRICH in
your Room Air Conditioner fails because of a defect in workmanship or material within sixty months from date of purchase,
FRIEDRICH will pay a labor allowance and parts necessary to repair the Sealed Refrigeration System; PROVIDED FRIEDRICH will
not pay the cost of diagnosis of the problem, removal, freight charges, and transportation of the air conditioner to and from the
Service Agency, and the reinstallation charges associated with repair of the Sealed Refrigeration System. All such cost will be the
sole responsibility of the owner. This remedy is expressly agreed to be the exclusive remedy within sixty months from the date of the
original purchase.
APPLICABILITY AND LIMITATIONS: This warranty is applicable only to units retained within the Fifty States of the U.S.A., District
of Columbia, and Canada. This warranty is not applicable to:
1. Air filters, fuses, batteries and the front grille removal tool.
2. Products on which the model and serial numbers have been removed.
3. Products which have defects or damage which results from improper installation, wiring, electrical current
characteristics, or maintenance; or caused by accident, misuse or abuse, fire, flood, alterations and/or misapplication
of the product and/or units installed in a corrosive atmosphere, default or delay in performance caused by war,
government restrictions or restraints, strikes, material shortages beyond the control of FRIEDRICH, or acts of God.
OBTAINING WARRANTY PERFORMANCE: Service will be provided by the FRIEDRICH Authorized Dealer or Service
Organization in your area. They are listed in the Yellow Pages. If assistance is required in obtaining warranty performance, write
LIMITATIONS: THIS WARRANTY IS GIVEN IN LIEU OF ALL OTHER WARRANTIES. Anything in the warranty
notwithstanding, ANY IMPLIED WARRANTIES OF FITNESS FOR PARTICULAR PURPOSE AND/OR MERCHANTABILITY
SHALL BE LIMITED TO THE DURATION OF THIS EXPRESS WARRANTY. MANUFACTURER EXPRESSLY DISCLA
IMS AND
EXCLUDES ANY LIABILITY FOR CONSEQUENTIAL OR INCIDENTAL DAMAGE FOR BREACH OF ANY EXPRESSED OR
IMPLIED WARRANTY.
Performance of Friedrich’s Warranty obligation is limited to one of the following methods:
1. Repair of the unit
2. A refund to the customer for the prorated value of the unit based upon the remaining warranty period of the unit.
3. Providing a replacement unit of equal value
The method of fulfillment of the warranty obligation is at the sole discretion of Friedrich Air Conditioning.
NOTE: Some states do not allow limitations on how long an implied warranty lasts, or do not allow the limitation or exclusion of
consequential or incidental damages, so the foregoing exclusions and limitations may not apply to you.
OTHER: This warranty gives you specific legal rights, and you may also have other rights which vary from state to state.
PROOF OF PURCHASE: Owner must provide proof of purchase in order to receive any warranty related services.
All service calls for explaining the operation of this product will be the sole responsibility of the consumer.
All warranty service must be provided by an Authorized FRIEDRICH Service Agency, unless authorized by FRIEDRICH prior to
repairs being made.
(11-10)
to: Friedrich Air Conditioning Co.,ATTN:Warranty Registration,10001 Reunion Place,Ste.500,San Antonio,TX 78216.
18

19
This unit contains flammable refrigerant and has special safety precautions not normally associated
WARNING
with older units. Please follow all precautions and advisories.
1. Use caution while handling and prevent damage to unit.Do not put any holes into product for any
1.Do not use means to accelerate the defrosting process or to clean, other than those recommended by the manufacturer.
2.The appliance shall be stored in a room without continuously operating ignition sources (for example: open flames, an
operating gas appliance or an operating electric heater).
3.Do not pierce or burn. Be aware that refrigerants may not contain an odor.
reason, this can cause damage to product and prevent unit from cooling.
2. Maintenance and cleaning of unit should be performedby trained personnel. Failure to properly
clean unit can result in damage to the refrigeration system and or the electrical system.
3. Make certain that all the air circulation/ventilation openings are free from obstruction.
4. Service should only be performed by technicains properly trained and certified in the use of flammable
refrigerants. Any service performed by unauthorized servicers/individuals will void all warranties.
5. When storing the appliance, do not put in a room with any open flame appliances, such as gas water
heaters or furnaces. Also keep away from electric heaters. Damaged units should be repaired before storage.
0
F
Power
Mode
Timer
0
n
/0ff
Fan
Speed
Temp
CoolMoney
Saver
®
Fan
Only
Dry
hr
Auto
Swing
0
F
Power
Mode
Timer
0
n
/0ff
Fan
Speed
Temp
CoolMoney
Saver
®
Fan
Only
Dry
hr
Auto
Swing
930110
Sécurité . ......................................................................................19
3
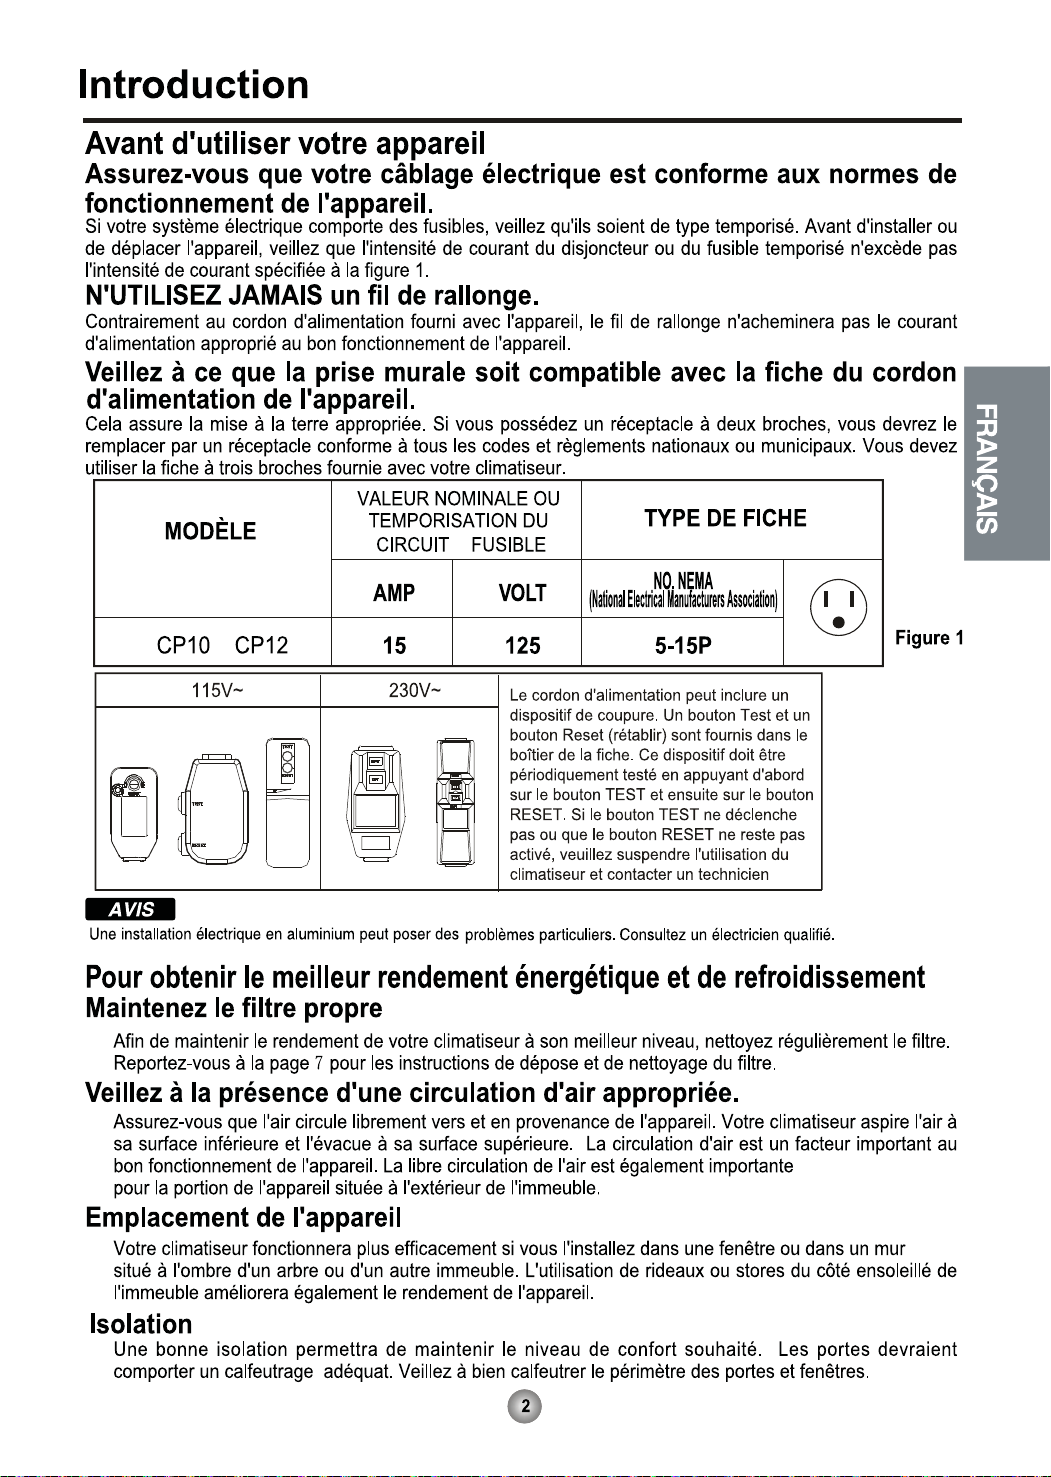
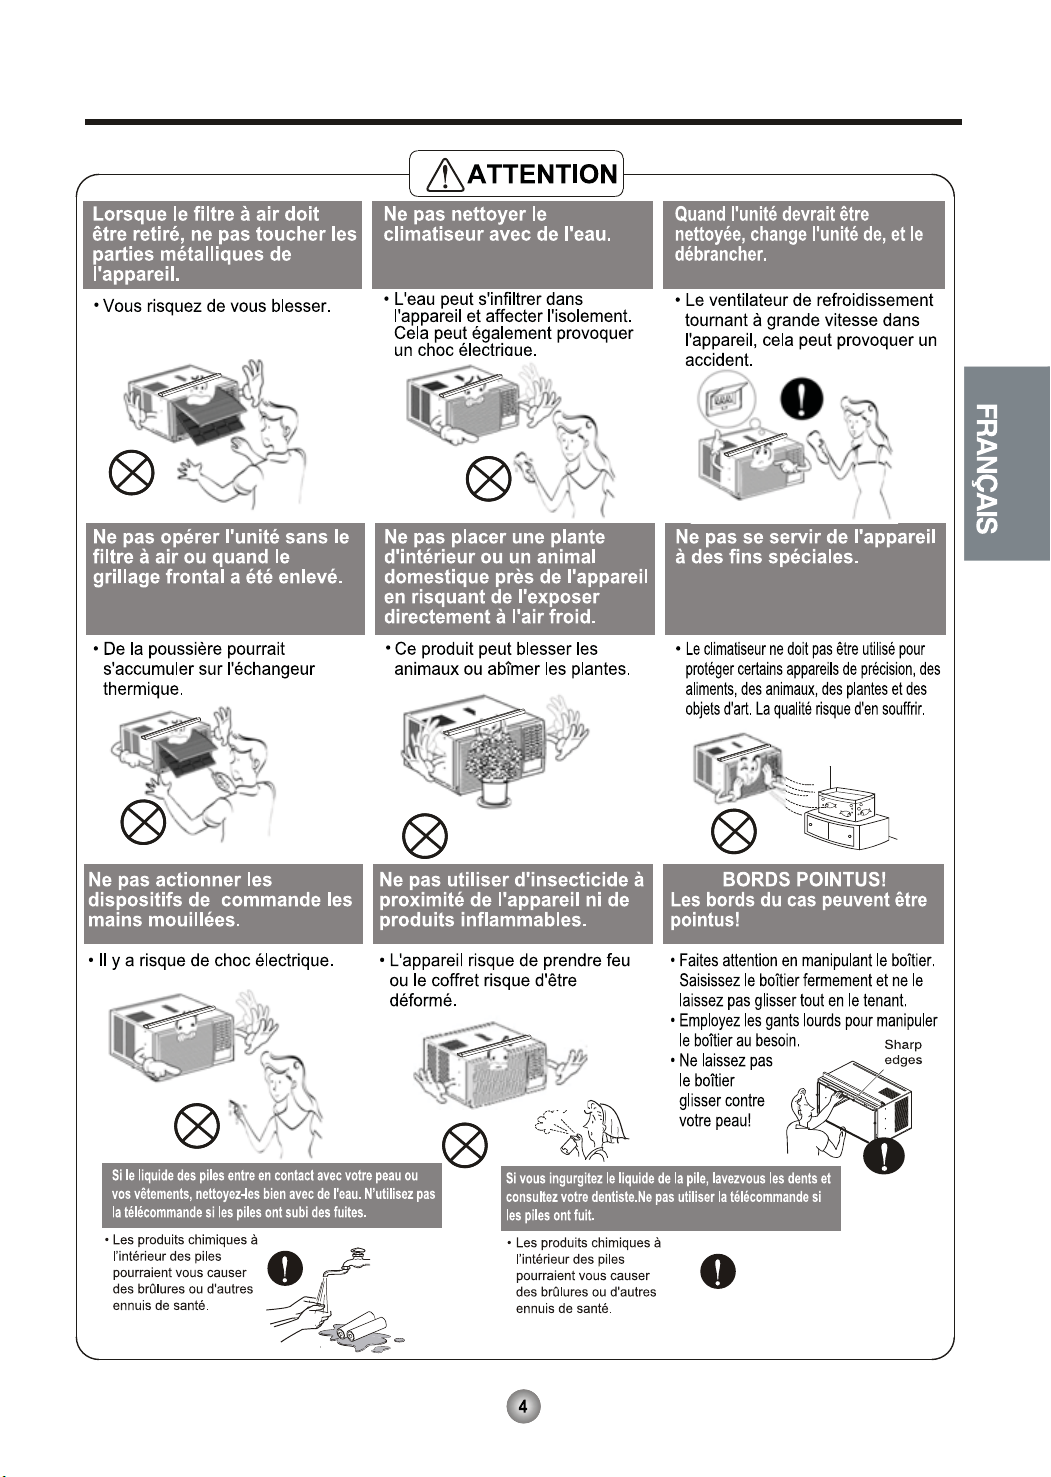
Mesures de Sécurité
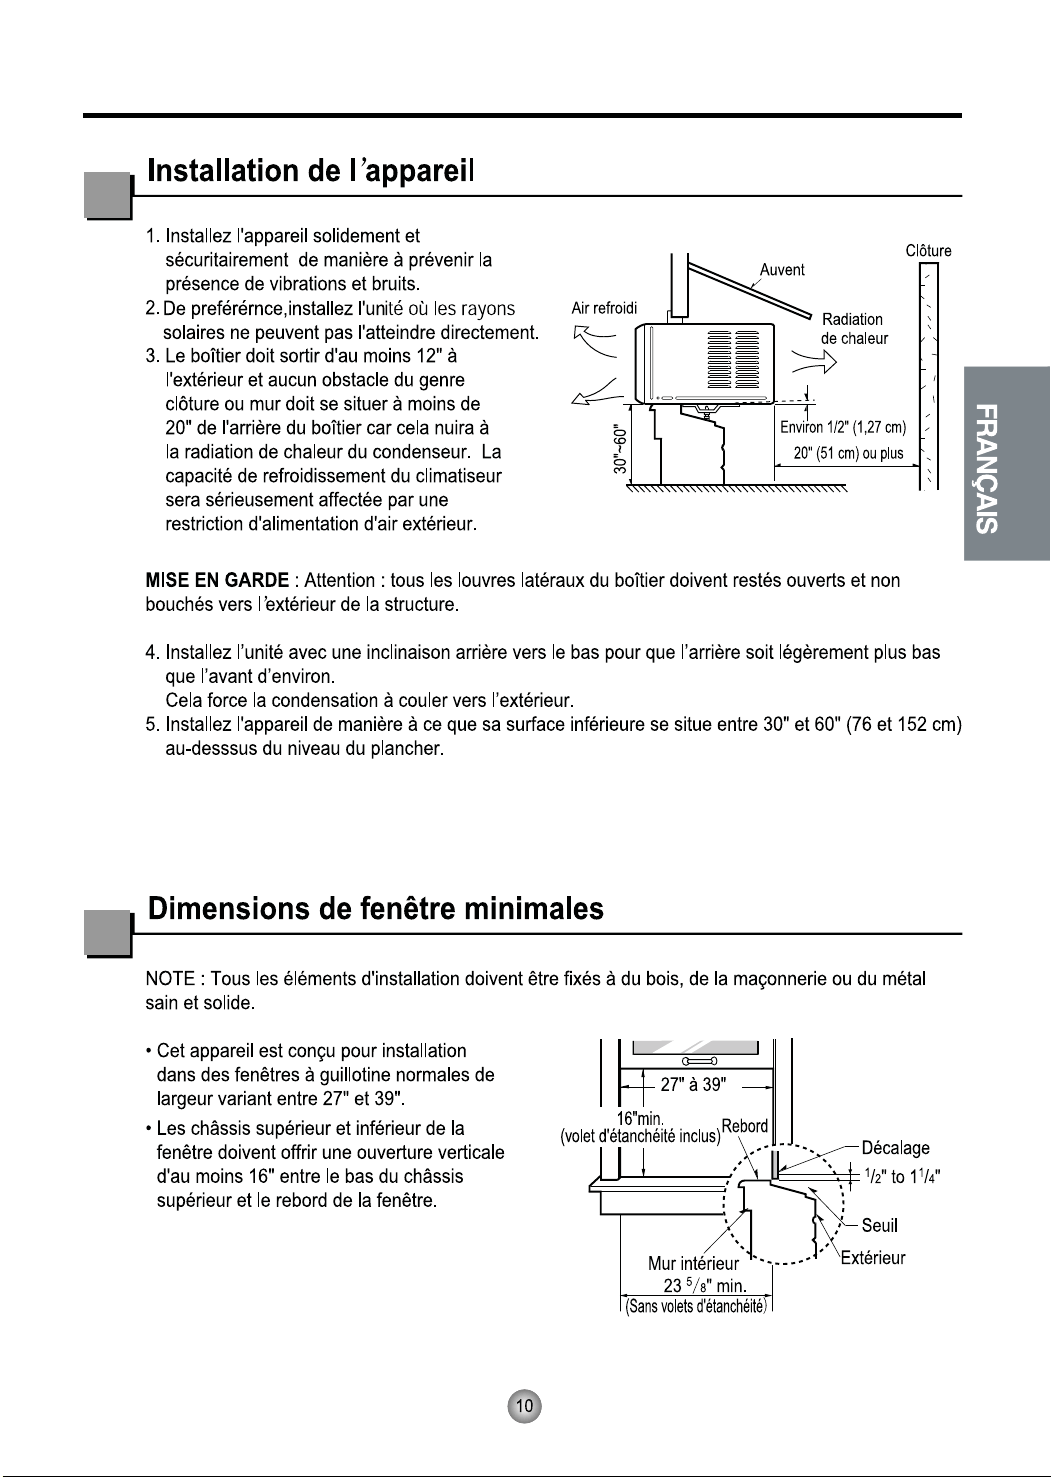
Pour éviter des accidents corporels ou des dommages matériels, suivez ces instructions.
■
Un mauvais fonctionnement dû à l’ignorance de ces instructions peut provoquer des préjudices corporels
ou des dommages.
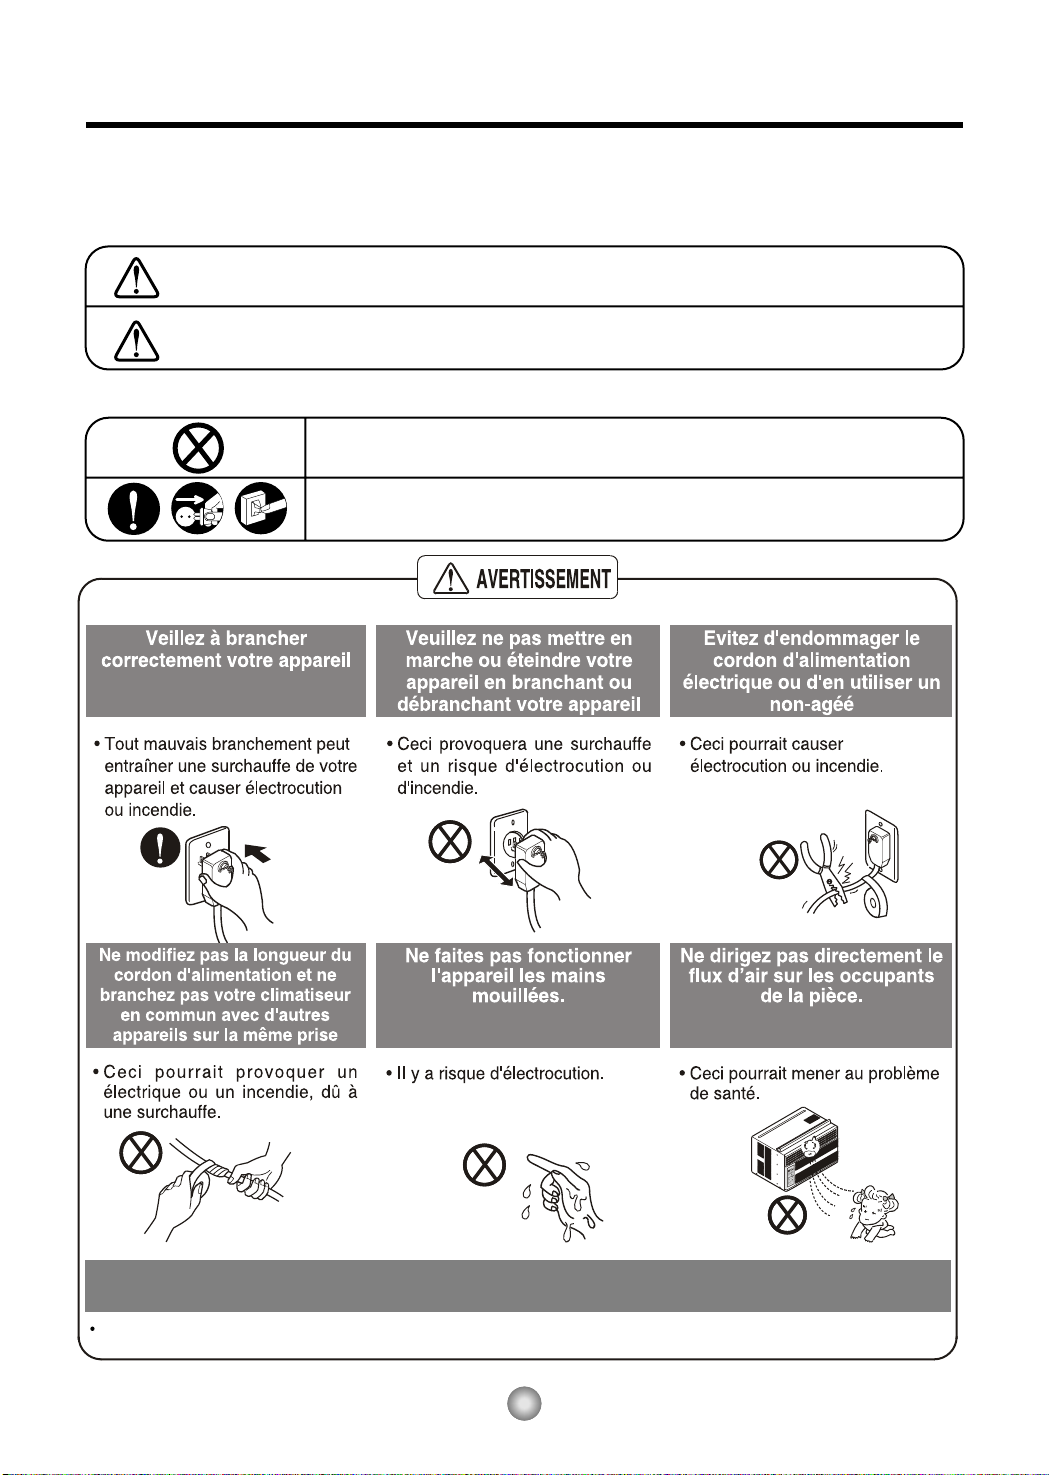
AVERTISSEMENT
Ce symbole signale un risque de blessure grave, voire mortelle.
ATTENTION
Ce symbole signale un risque limité aux dommages matériels.
■Les significations respectives des symboles utilisés dans ce manuel sont indiquées ci-dessous.
Ne faites jamais cela
Faites toujours cela
Pour le nettoyage de l’intérieur, veuillez contacter un Centre de Service Agrée ou un concessionnaire.
N’utilisez pas de détergent puissants qui provoquent la corrosion ou endommagent l’unité.
Les détergents puissants peuvent aussi provoquer des pannes, des incendies ou des chocs électriques.

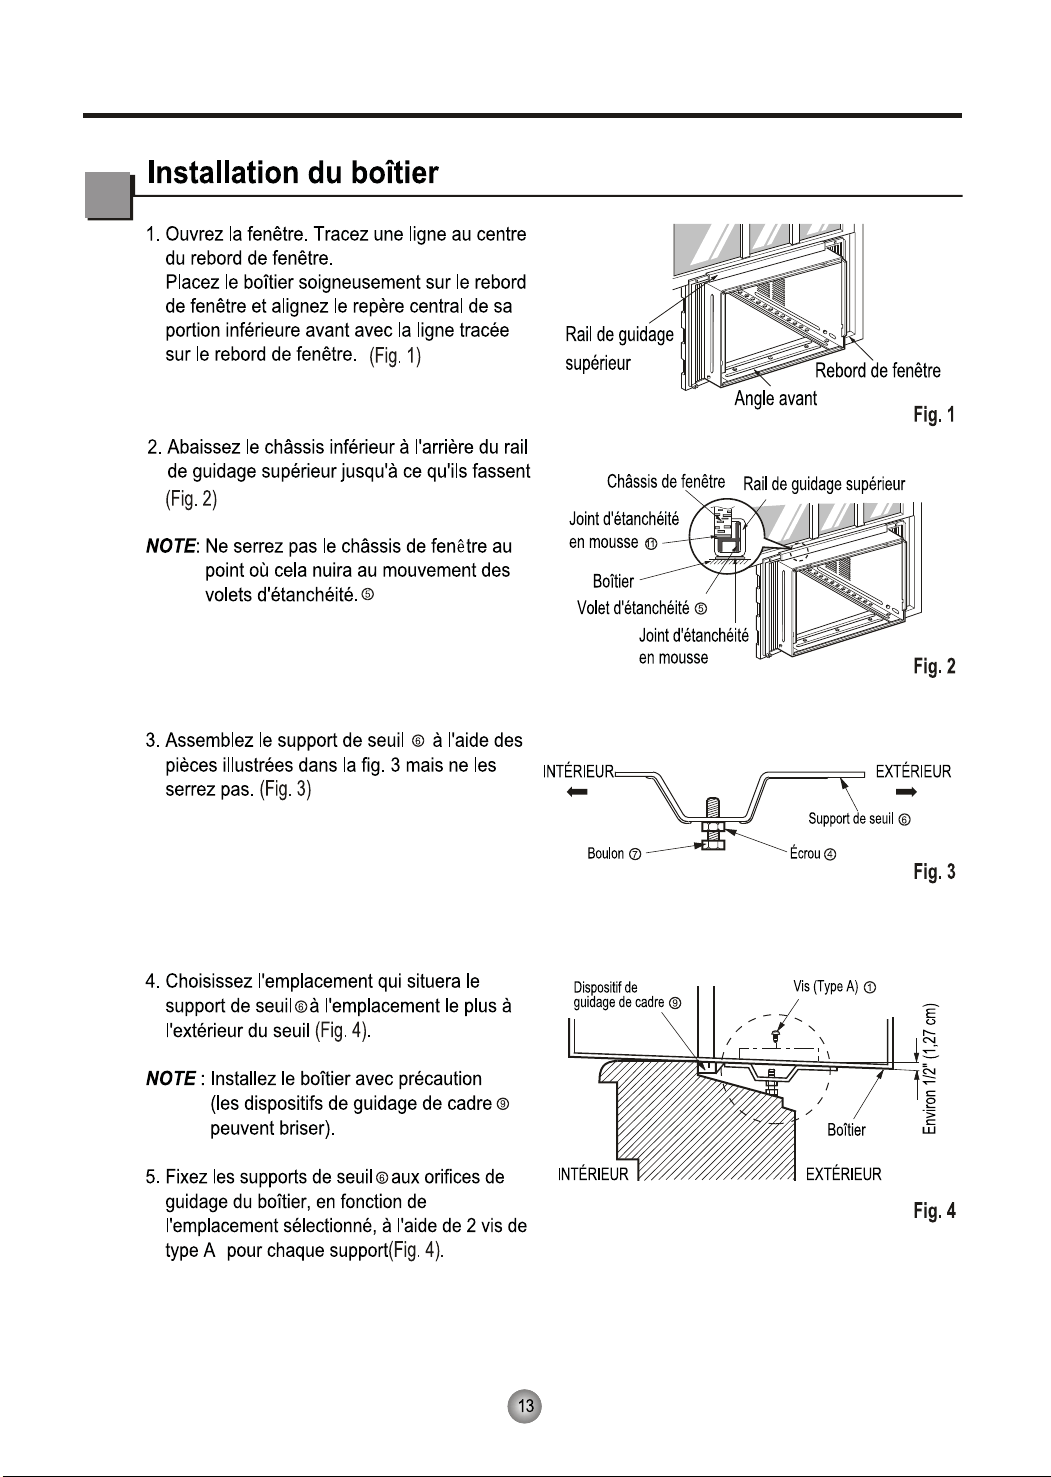
4. CONTRÔLER LE FILTRE & RÉINITIALISATION
DU FILTRE
Check Filter: Votre ‘Check Filter' du filtre s'allume
après environ 250 heures de fonctionnement, vous
notifiant que votre filtre doit être nettoyé.
Filter Reset: appuyez sur la touche ‘Filter Reset'
pour désactiver 'Vérifier le filtre de lumière.
* Réinitialisation du filtre doit être effectuée à partir du
panneau de commande, et non pas de la télécommande
6. MODE DE FONCTIONNEMENT SELECTEUR
Appuyez sur ce bouton pour faire pivoter entre
MoneySaver → Cool → Fan → Dry modes.
(Sélectionnez mode Dry sec/déshumidificateur
opération)
MoneySaver: Le ventilateur s'arrête lorsque le
compresseur s'arrête le refroidissement. Le
ventilateur s'allume environ toutes les 3 minutes
pour l'échantillonnage de l'air de la pièce et
déterminez si plus le refroidissement est nécessaire.
Cool : le ventilateur fonctionne en permanence pour
un refroidissement normal fonctionnement
Fan Only: seulement le ventilateur fonctionnement
* MoneySaver dispose de son propre bouton de votre
télécommande
8.
2
1
3
4
5
6
7
8
3
2
5
6
7
*Timer Clear: * Sur la télécommande, ‘Timer Clear' bouton
annuler le réglage de la minuterie
B
2
po
A
A
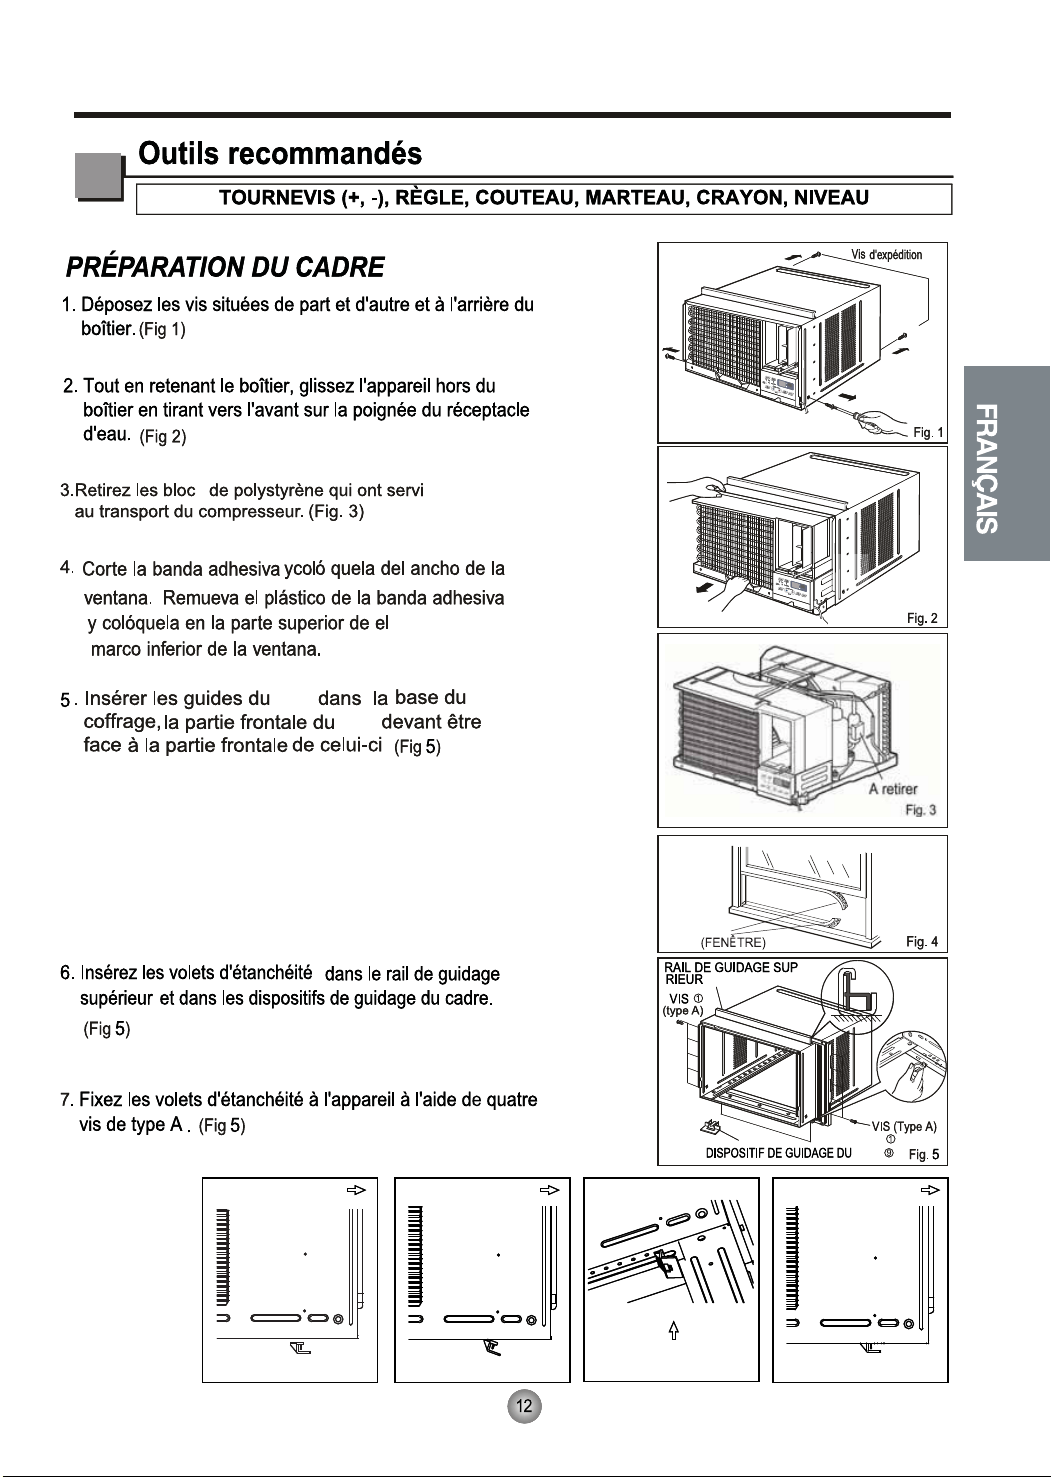
Fig.5-2Fig.5-1 Fig.5-3
Vue rapprochée
Front
Fig.5-4
Front Front
BAS
bas
bas
5a. Assurez-vous que les broches sur le guide du cadre du
5b. Alignez les deux broches dans les zones à fentes sous
l'armoire.(Fig.5-2,Fig.5-3)
5c. Poussez complètement vers le haut pour insérer les broches
dans les zones à fentes et fixez en place le guide du cadre.
(Fig.5-4)
bas font face à l'arrière de l'appareil.(Fig.5-1)
13.
13
Mousse à protection calorifuge
Couper la mousse à protection calorifuge et à endos
collant selon les dimensions du panneau de guide.
Retirer l'endos de la mousse à protection calorifuge
et fixer la mousse à protection calorifuge aux panneau
de guide.
(Fig.10)
La mousse à protection calorifuge améliore
les capacités de refroidissement de l'appareil.
Conseil
Cet appareil contient un réfrigérant inflammable et vient avec des précautions de sécurité spéciales qui ne sont
pas normalement associées avec les appareils plus anciens. Veuillez suivre toutes les précautions et les
recommandations
AVERTISSEMENT
1. Soyez prudent lors de la manipulation et éviter d'endommager l'appareil. Ne pas percer le produit pour quelque raison
que ce soit, cela peut endommager l'appareil et l'empêcher de refroidir.
2. L'entretien et le nettoyage de l'appareil doivent être effectués par du personnel formé. Omettre de nettoyer correctement
l'appareil peut aboutir en des dommages au système de réfrigération ou au système électrique.
3. Assurez-vous que toutes les ouvertures de circulation/ventilation sont exemptes d'obstacles.
4. L'entretien doit seulement être effectué par des techniciens adéquation formés et certifiés dans l'utilisation de
réfrigérants inflammables. Tout entretien effectué par des réparateurs/individus non autorisés annulera les garanties.
5. Lors de l'entreposage de l'appareil, ne pas le mettre dans une pièce avec tout autre appareil avec une flamme nue,
comme des chauffe-eaux à gaz ou des fournaises. Conserver loin de fournaises électriques. Les appareils endommagés
doivent être réparés avant leur entreposage.
Sécurité
1.Ne pas utiliser de moyens pour accélérer le processus de dégivrage
ou pour nettoyer, autres que ceux recommandés par le fabricant
2. L'appareil électroménager doit être entreposé dans une pièce sans sources d'allumage fonctionnant continuellement
(par example, des flammes nues, un appareil ménager au gaz en fonctionnement ou une fournaise électrique en fonctionnement)
3. Ne pas percer ou brûler. Soyez conscient que les réfrigérants peuvent ne pas avoir d'odeur
ATTENTION
19
0
F
Power
Mode
Timer
0
n
/0 ff
Fan
Speed
Temp
CoolMoney
Saver
®
Fan
Only
Dry
hr
Auto
Swing
0
F
Power
Mode
Timer
0
n
/0ff
Fan
Speed
Temp
CoolMoney
Saver
®
Fan
Only
Dry
hr
Auto
Swing
930110
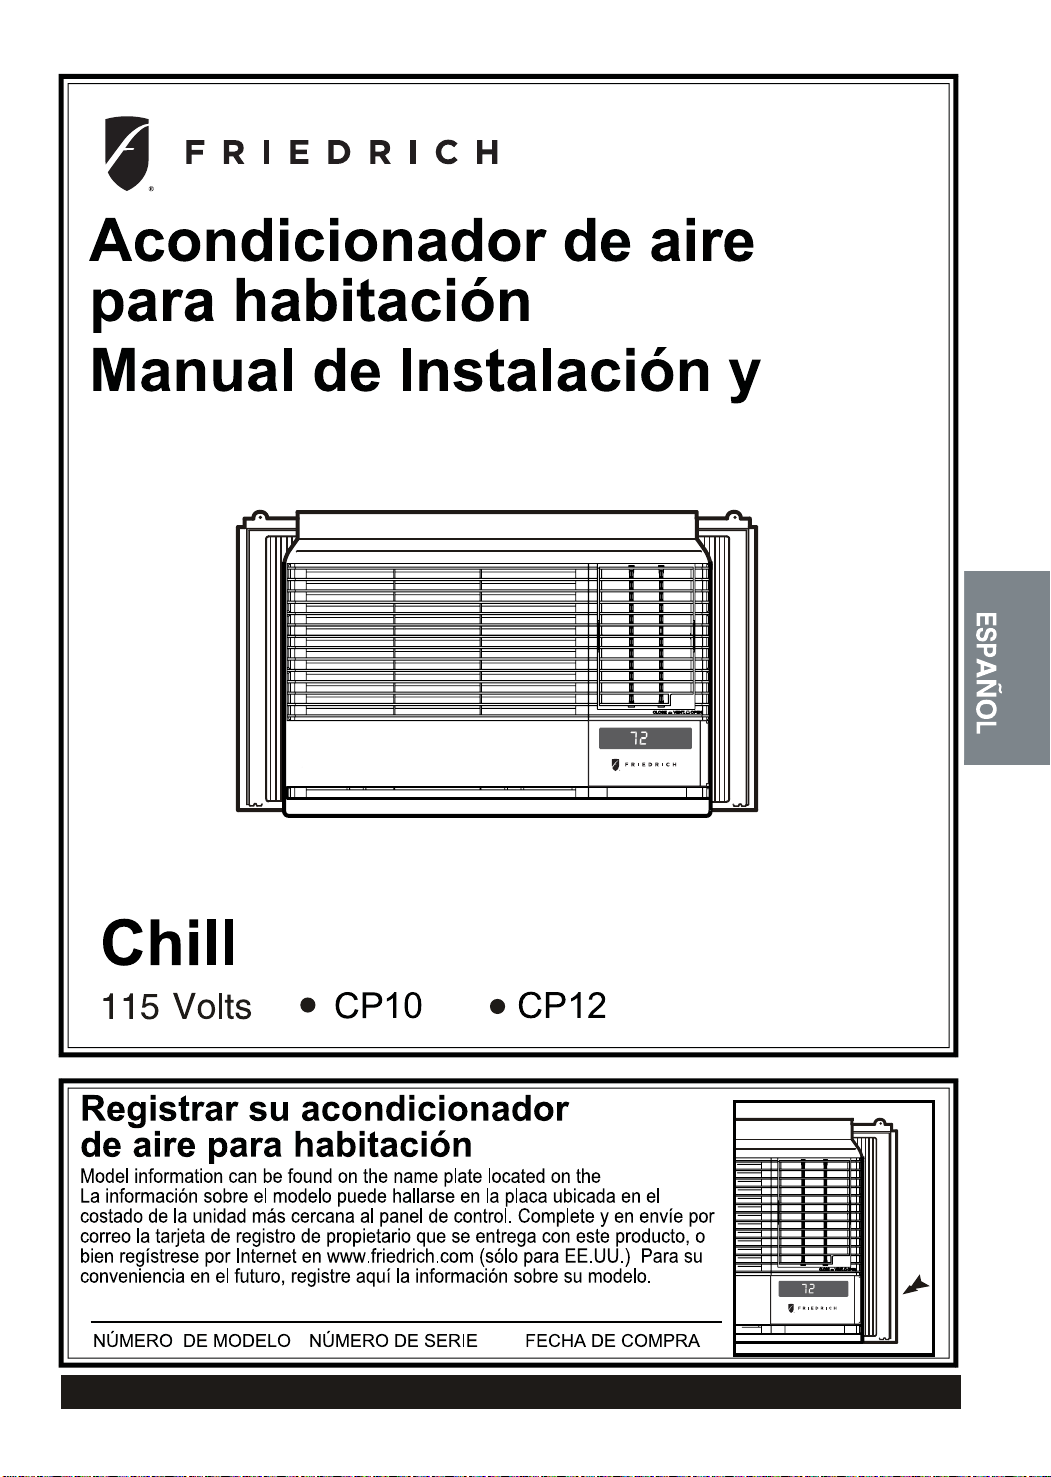
Felicitaciones!
Ha comprado un acondicionador de aire
para habitación Friedrich.
El Friedrich está diseñado para proveer el
máximo de bienestar y de tranquilidad.
Contenidos
Introducción..................................................................................2
Precauciones de seguridad ........................................................3
Seguridad.................................................................................... 20
Funcionamiento del control remoto CP....................................5
6
8
9
3
Precauciones de segoridad
Siga estas instrucciones para que no se produzcan daños en la propiedad ni daños personales.
■ Se pueden producir daños si se utiliza el aparato de forma incorrecta al desconocer las instrucciones.
ADVERTENCIA Este símbolo indica la posibilidad de lesiones mortales o graves.
PRECAUCION
Este símbolo indica la posibilidad de lesiones o daños
materiales.
■
El significado de los símbolos utilizados en este manual se indica a continuación.
No realice nunca
Lleve a cabo siempre
Para una limpieza interior, póngase en contacto con un Centro de Servicios Autorizado o un revendedor.
No utilice detergentes abrasivos que causan corrosión o dañan la unidad.
Los detergentes abrasivos pueden igualmente provocar un fallo del producto, un incendio o una
descarga electrónica.

2
1
3
4
5
6
7
8
3
2
5
6
7
4. REVISION DE FILTRO Y RESETEO DEL
INDCADOR DE REVISION
Revisión de filtro: La luz de ‘Check Filter’ LED se
iluminará después de aproximadamente 250 horas de
funcionamiento, lo cual indica que su filtro necesita ser
limpiado.
Reseteo del indicador de revisión: Presione el botón
‘Filter Reset’ para apagar la luz de ‘Check Filter’.
* El reseteo del indicador de revisión se deberá hacer desde
el panel de control de la unidad, no con el control remoto.
6. OPERATION MODE SELECTOR / SELECCIÓN DE
FUNCIONES
Presione este botón para alternar entre las funciones de
MoneySaver → Cool → Fan → Dry (para obtener la función
de deshumidificación seleccione el modo dry)
MoneySaver: El ventilador se detiene cuando el compresor
deja de enfriar. El ventilador se enciende aproximadamente
cada 3 minutos para tomar muestras de aire ambiental y
determinar si se necesita más enfriamiento.
Cool: El ventilador gira continuamente para un enfriamiento
normal.
Fan Only: Únicamente el ventilador se encuentra encendido.
* MoneySaver tiene su propio botón en el control remoto.
8.
*Timer Clear: En el control remoto, el botón 'Timer Clear',
cancelará el ajuste del cronómetro
(AISLAMIENTO DE ESPUMA)
po
A
INFERIOR
2

Fig.5-2Fig.5-1 Fig.5-3
Vista de acercamiento
Front
Fig.5-4
Front Front
INFERIOR
inferior
5a. Asegúrese de que las clavijas de la guía del bastidor inferior
miren hacia la parte posterior de la unidad.(Fig.5-1)
5b. Alinee ambas clavijas en las áreas ranuradas debajo del
gabinete.(Fig.5-2,Fig.5-3)
5b. Levante completamente para insertar las clavijas en las
ranuras y asegurar la guía del bastidor.(Fig.5-4)

13.
13
Aislamiento de espuma
Corte el aislamiento de espuma con adhesivo
en la parte trasera del tamaño del panel guía.
Retire la protección del adhesivo del aislamiento
de espuma y pegue el aislamiento en el panel guía.
(Fig.10)
El aislamiento de espuma
mejora la capacidad de
enfriamiento de la unidad
Sugerencia
20
Esta unidad contiene un refrigerante inflamable y cuenta con precauciones de seguridad especiales que normalmente
ADVERTENCIA
no se asocian con modelos anteriores. Siga todos los consejos de seguridad y precauciones.
1. Tenga cuidado al manipular la unidad para evitar daños. No perfore el producto por ningún motivo;
1.No use medios que no sean los recomendados por el fabricante para acelerar el proceso de descongelación ni para limpiar el producto.
2.El aparato debe almacenarse en una habitación en donde no esté expuesto a fuentes de combustión en funcionamiento continuo
(por ejemplo: llamas expuestas, aparatos que funcionan a gas o calentadores eléctricos)
3.No perfore ni incinere el producto. Tenga en cuenta que es posible que los refrigerantes no tengan olor.
si lo hace, puede dañar el producto e impedir que la unidad enfríe.
2. El mantenimiento y la limpieza de la unidad debe estar a cargo de personal capacitado. La falta de limpieza adecuada
de la unidad puede provocar daños en el sistema de refrigeración y/o el sistema eléctrico.
3. Asegúrese de que todas las aberturas de circulación/ventilación estén libres de obstrucciones.
4. El servicio debe estar a cargo únicamente de técnicos debidamente capacitados y certificados en el uso de refrigerantes inflamables.
Todo servicio realizado por personal no autorizado, o personas no autorizadas, anulará por completo las garantías.
5. Al almacenar el aparato, no lo coloque en una habitación donde esté expuesto a llamas abiertas,como hornos o calentadores de agua a gas.
Además,manténgalo alejado de calentadores eléctricos. Las unidades dañadas deben repararse antes de almacenarlas.
PRECAUCION
Segoridad


93011010
MFL69677106

